19
HardSID 4U user’s guide © 2008 Hard Software, Hungary 1 HardSID 4U user’s guide HardSID 4U Studio Edition HardSID 4U Standard Edition
HardSID 4U user’s guide © 2008 Hard Software, Hungary 1
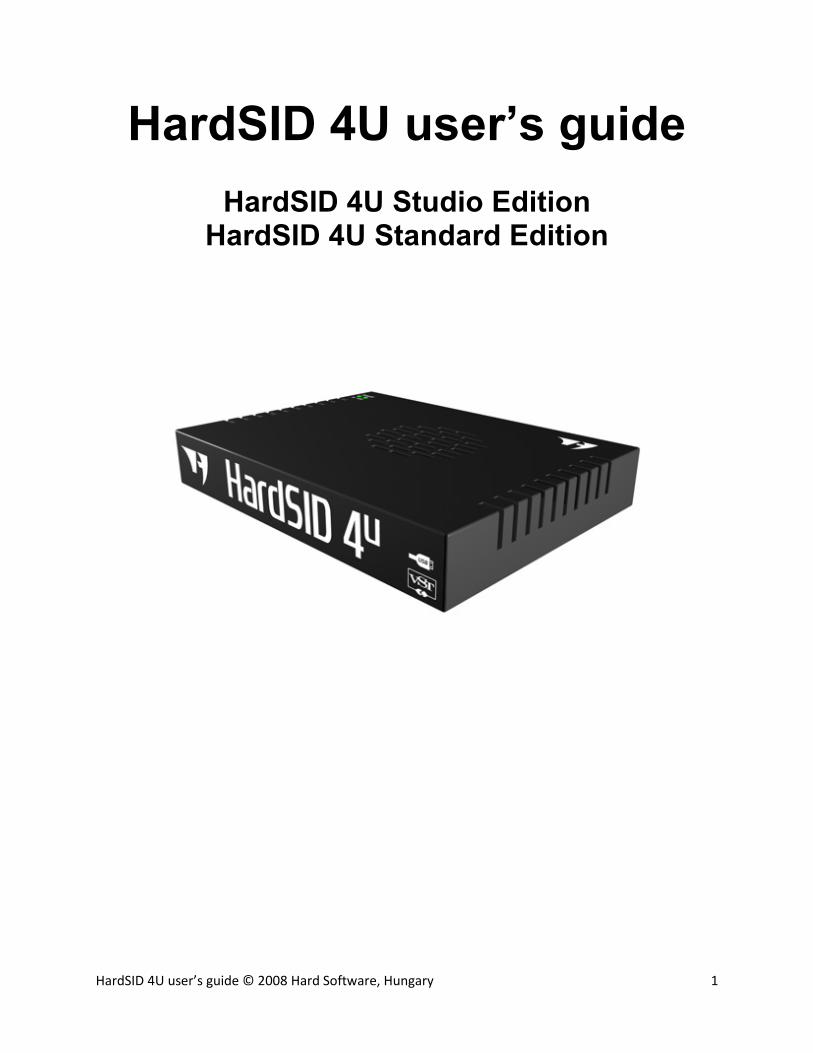
HardSID 4U user’s guide
HardSID 4U Studio Edition HardSID 4U Standard Edition
HardSID 4U user’s guide © 2008 Hard Software, Hungary 2
Safety information ........................................................................................................................................ 4
Introduction: ................................................................................................................................................. 5
Package contents ...................................................................................................................................... 5
System requirements ................................................................................................................................ 5
Key features .............................................................................................................................................. 5
Upgrading from PCI or ISA HardSID .......................................................................................................... 5
About hardware ............................................................................................................................................ 6
Conncetors ................................................................................................................................................ 6
DC-in ...................................................................................................................................................... 6
USB connector ....................................................................................................................................... 6
Mixed output (black) ............................................................................................................................. 6
Dry outputs (green) ............................................................................................................................... 6
Inputs (blue) .......................................................................................................................................... 7
Other controls ........................................................................................................................................... 7
On/Off switch ........................................................................................................................................ 7
DC LED ................................................................................................................................................... 7
MSG LED ................................................................................................................................................ 7
The Power Supply ..................................................................................................................................... 7
Installing SID chips .................................................................................................................................... 8
How to prepare the HardSID 4U for installing SID chips ....................................................................... 8
Socket numbering ................................................................................................................................. 8
Supported versions, number of SIDs .................................................................................................... 9
The right direction................................................................................................................................. 9
Setting the voltage ................................................................................................................................ 9
The filter capacitors .............................................................................................................................. 9
HardSID 4U user’s guide © 2008 Hard Software, Hungary 3
Installing the device driver .......................................................................................................................... 11
Installing the HardSID 4U 32bit or 64bit device driver on Windows XP ................................................. 11
Installing the HardSID 4U 32bit or 64bit device driver on Windows Vista ............................................. 13
Prerequisites for Windows Vista x64 Edition ...................................................................................... 13
Installing SID Chips video tutorial ............................................................................................................... 16
How to remove SIDs carefully ..................................................................................................................... 17
HardSID 4U user’s guide © 2008 Hard Software, Hungary 4
Safety information
Don’t touch the metallic parts of any cables. Possible difference in grounding potential of
different equipments may cause electric shock!
• Carefully read this manual before connecting/using the unit.
• Before using the product, make sure SIDs are installed correctly and voltage jumpers are set up
accordingly.
• Use working non-damaged SIDs only. Using damaged SIDs may cause damage to the unit.
• Before using the product, make sure all cables are correctly connected.
• To avoid short circuits, keep screws, paper clips, staples, etc… away from connectors, sockets
and circuitry.
• Avoid dust, humidity and temperature extremes. Do not place the product in any area where it
may become wet. Do not place the product in small closed places where air cannot circulate. (like
a drawer or a case for example)
• Place the product on dry, stable surface with satisfactory air circulation.
• Always switch off the unit when not using it for a long time. (for more than a few hours)
• Always unplug the power supply from the AC connector when not using the unit for a long time.
(for more than a few hours)
• If the device is broken, do not try to fix it yourself.

HardSID 4U user’s guide © 2008 Hard Software, Hungary 5
Introduction: Read this manual carefully before trying to connect/use your HardSID 4U. All the configuration/installation steps apply to both HardSID 4U versions: Studio Edition and Standard Edition.
Package contents
• HardSID 4U (Studio Edition or Standard Edition with or without SIDs installed)
• Extra filter capacitors for 6581 and 8580 SIDs (two-two extra pairs for both versions; two-two
pairs for both versions pre-installed into the unit)
• Power Supply (optional)
• USB Cable (optional)
System requirements
• IBM compatible PC (or notebook) with one free USB 1.1 (or higher) compatible high-current port
(high-current USB ports are usually on the back side of the computer)
• Microsoft Windows XP or Vista (32bit or 64bit) OS
• (Mac OS X support is under development)
Key features
• Low latency VSTi synthesizer engine with 8000Hz SID update rate for ASIO driven VST hosts
• Cycle-accurate C64 music playback (digitized sounds, high-speed tunes, etc…) with very low
CPU utilization
• Stunning C64 Emulator game play with real-time digitized sounds
• ..and more!
Upgrading from PCI or ISA HardSID
• Learn about removing SIDs at appendix “How to remove SIDs carefully” and remove the SIDs
from your ISA/PCI card
• Read this manual carefully to learn about configuring your HardSID 4U
• Learn about installing SIDs into the HardSID 4U at appendix “Installing SID chips video tutorial”
• To notify applications about the removed PCI/ISA HardSID, you need to remove this registry key:
HKEY_LOCAL_MACHINE\SOFTWARE\Hard Software\HardSID

HardSID 4U user’s guide © 2008 Hard Software, Hungary 6
About hardware
If you’ve received your HardSID 4U with no SIDs installed, you have to install the SIDs first before connecting and using the unit. Learn about installing SIDs and configuring the hardware at the “Installing SID chips” section.
Conncetors
DC-in 12V DC input connector. Connect the 12VDC power supply to this connector. The power supply must be able to provide at least 1A at 12VDC. If you’ve received the unit without a power supply, check the polarity before buying the PSU. (the inner pin is the positive) The unit is protected against wrong polarity. If the polarity is wrong, the color of the DC LED will become red after switching on the unit. Otherwise it will be green (correct polarity). Always hold the plastic/rubber part of the cable, don’t touch the metallic parts! USB connector Connect the unit to a USB 1.1 (or higher) high-current port. High-current USB ports are usually located on the back of the computer. Front-panel USB ports are usually low-current. (USB ports on notebooks are usually high-current.) If you’re planning to use the unit in a professional studio, it is recommended to use high quality full-speed USB cables with short length. Using long USB cables are not recommended for professional use. Always hold the plastic/rubber part of the cable, don’t touch the metallic parts! Mixed output (black) The mixed output is the easiest way of connecting the HardSID 4U to an amplifier, soundcard, etc... It combines the sound of all installed SIDs into one mono output (the same signal on both channels of the stereo jack). Using the mixed output is recommended for hobby usage, not for professional use. If you have serious equipment (mixer, professional soundcard/amplifier, etc…), you’d better use the dry outputs. Always hold the plastic/rubber part of the cable, don’t touch the metallic parts! Dry outputs (green) The dry outputs (green) are the best way of connecting the SID outputs to professional equipment in a studio (mixer, amplifier, etc…). There are two dry output jacks on the HardSID 4U. Both jacks are stereo. The mono outputs of SID 1&2 are on the same stereo jack (1=right, 2=left). The mono outputs of SID 3&4 are on the same stereo jack (3=right, 4=left).

HardSID 4U user’s guide © 2008 Hard Software, Hungary 7
Always hold the plastic/rubber part of the cable, don’t touch the metallic parts! Inputs (blue) The SID has the ability of routing the incoming mono audio signal through its filter. This functions can be activated in a VST host application using the HardSID 4U VSTi. There are two (blue) input jacks on the HardSID 4U. Both jacks are stereo. The mono inputs of SID 1&2 are on the same stereo jack (1=right, 2=left). The mono inputs of SID 3&4 are on the same stereo jack (3=right, 4=left). Always hold the plastic/rubber part of the cable, don’t touch the metallic parts!
Other controls On/Off switch Please read the safety information (right after the table of contents) before switching on the unit.
• Always switch off the unit when not using it for a long time. (for more than a few hours)
• Always unplug the power supply from the AC connector when not using the unit for a long time.
(for more than a few hours)
DC LED The color of the DC LED must be green after switching on the unit. The unit is protected against wrong polarity. If the polarity is wrong, the color of the DC LED will become red after switching on the unit. Otherwise it will be green (correct polarity). MSG LED The MSG LED must become lit shortly after switching on the unit. It keeps blinking in firmware update mode. (firmware update mode will be covered by the future version of this manual when/if an updated firmware will be released for the HS4U)
The Power Supply If you’ve received the unit without a power supply, check the polarity and the DC plug dimensions before buying the PSU.
- The power supply must be able to provide at least 1A at 12VDC - The inner pin is the positive - Plug dimensions: Inner diameter = 2.1mm; Outer diameter = 5.5mm; Contact length >= 10mm
The unit is protected against wrong polarity. If the polarity is wrong, the color of the DC LED will become red after switching on the unit. Otherwise it will be green (correct polarity). Always unplug the power supply from the AC connector when not using the unit for a long time. (for more than a few hours)
We ship various versions of this power supply: Sunny SYS 1308-2412 (2A at 12VDC):
http://www.sunny-euro.com/HTML/PRODUCTS/POWERSPL/SYS1308_W2E.html
HardSID 4U user’s guide © 2008 Hard Software, Hungary 8
Installing SID chips
Always install perfect / tested SID chips! Using damaged SIDs may cause damage to the HardSID 4U. If you’ve received your unit with installed SIDs from us, you don’t have to configure the unit yourself, as we always send it properly configured. Installing SIDs into the HardSID 4U is easy:
• Install the SID in the right direction (learn about it below)
• Don’t force the SID! You may brake some pins off otherwise..
• Check out the “Installing SID chips video tutorial” in the Appendix!
How to prepare the HardSID 4U for installing SID chips After you’ve checked out the “Installing SID chips video tutorial” in the Appendix, start with the following:
- Switch off the unit - Unplug all cables from it - Remove the four screws from the bottom panel - Remove the case from the board (the bottom panel will stay together with the printed circuit
board!) - Now, you’re ready to install SIDs into the HardSID 4U
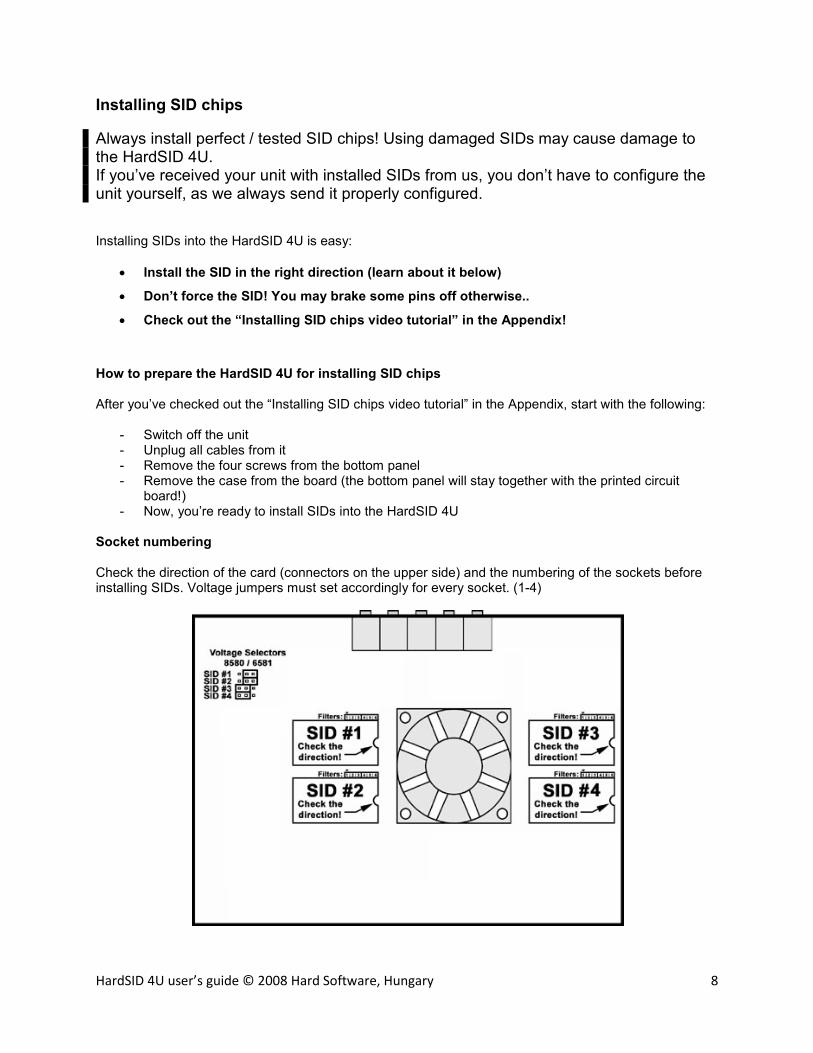
Socket numbering Check the direction of the card (connectors on the upper side) and the numbering of the sockets before installing SIDs. Voltage jumpers must set accordingly for every socket. (1-4)

HardSID 4U user’s guide © 2008 Hard Software, Hungary 9
Supported versions, number of SIDs The HardSID 4U works with any number of SIDs up to four. (1, 2, 3 or 4) All SID versions are supported in any combination. (6581, 8580, 6582) The right direction Always check the direction of the SID before installing it! Installing the SID in the wrong direction may cause damage to your HardSID 4U. See the right direction on the picture:
Setting the voltage You have to set the voltage of every SID chip you install depending on its version (8580 or 6581) by setting its voltage jumpers. Position “Left” is for the 8580, position “Right” is for the 6581. You can see the voltage jumper layout on this picture:
The filter capacitors The 6581 and 8580 versions of the SID chip are working with different filter capacitors. The 6581 needs two 470pF capacitors. (four pairs / 8 pieces are included in your package) The 8580 needs two 22nF capacitors. (four pairs / 8 pieces are included in your package) Since you can install any SID version into any SID socket, you’ll have to choose/install the proper capacitors for every SID chip/socket. You can find the filter capacitor socket at the upper-right corner of the SID socket.
HardSID 4U user’s guide © 2008 Hard Software, Hungary 10
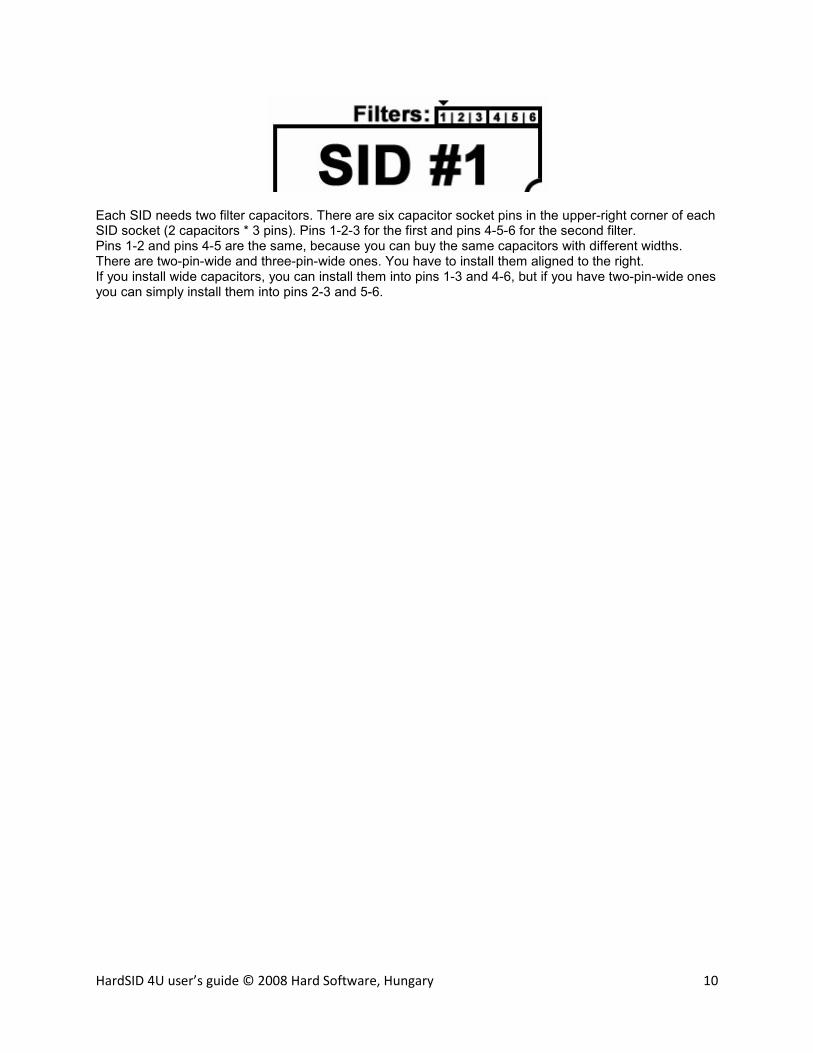
Each SID needs two filter capacitors. There are six capacitor socket pins in the upper-right corner of each SID socket (2 capacitors * 3 pins). Pins 1-2-3 for the first and pins 4-5-6 for the second filter. Pins 1-2 and pins 4-5 are the same, because you can buy the same capacitors with different widths. There are two-pin-wide and three-pin-wide ones. You have to install them aligned to the right. If you install wide capacitors, you can install them into pins 1-3 and 4-6, but if you have two-pin-wide ones you can simply install them into pins 2-3 and 5-6.

HardSID 4U user’s guide © 2008 Hard Software, Hungary 11
Installing the device driver
Download the device driver for your OS from http://www.hardsid.com/drivers_apps_docs.php and
extract to a folder before connection/turning on your HardSID 4U. Remember the folder (path) where
you extracted the driver files. Your OS will ask for the device drivers after connecting and turning on
your HardSID 4U. Please follow the following steps when installing the device drivers:
Installing the HardSID 4U 32bit or 64bit device driver on Windows XP
The very first dialog will ask you if you want to
connect to Windows Update:
Answer: No, not this time.
Click Next.
The next dialog will ask you if you want to install
the software automatically:
Answer: Install from a list or specific location
Click Next.

HardSID 4U user’s guide © 2008 Hard Software, Hungary 12
The next dialog will ask you if you want your XP to
search for the drivers.
Answer: Don’t search. I’ll choose the driver to
install.
Click Next.
The next dialog will try to display a list of
compatible drivers.
Answer: Click the Have Disk button. A new dialog
pops up. Locate the folder where you extracted the
driver files and press Ok.
Now the list contains the HardSID 4U driver.
Click on the driver’s name and click Next.
HardSID 4U user’s guide © 2008 Hard Software, Hungary 13
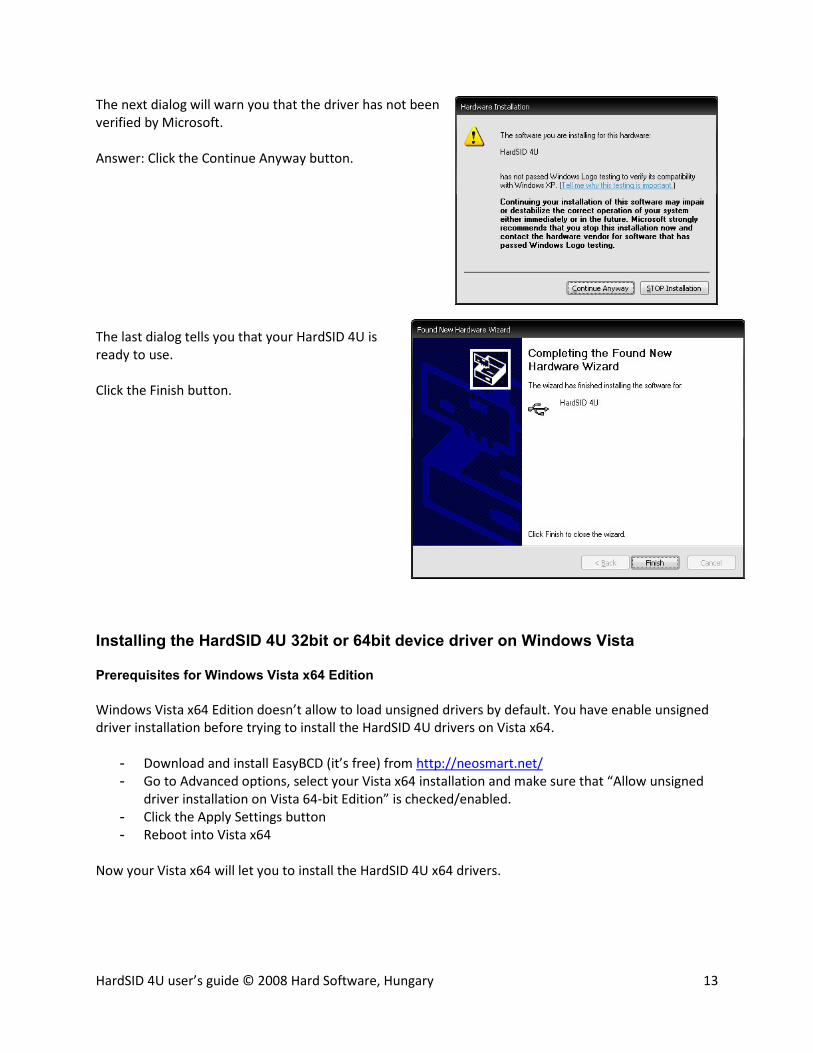
The next dialog will warn you that the driver has not been
verified by Microsoft.
Answer: Click the Continue Anyway button.
The last dialog tells you that your HardSID 4U is
ready to use.
Click the Finish button.
Installing the HardSID 4U 32bit or 64bit device driver on Windows Vista Prerequisites for Windows Vista x64 Edition
Windows Vista x64 Edition doesn’t allow to load unsigned drivers by default. You have enable unsigned
driver installation before trying to install the HardSID 4U drivers on Vista x64.
- Download and install EasyBCD (it’s free) from http://neosmart.net/
- Go to Advanced options, select your Vista x64 installation and make sure that “Allow unsigned
driver installation on Vista 64-bit Edition” is checked/enabled.
- Click the Apply Settings button
- Reboot into Vista x64
Now your Vista x64 will let you to install the HardSID 4U x64 drivers.
HardSID 4U user’s guide © 2008 Hard Software, Hungary 14
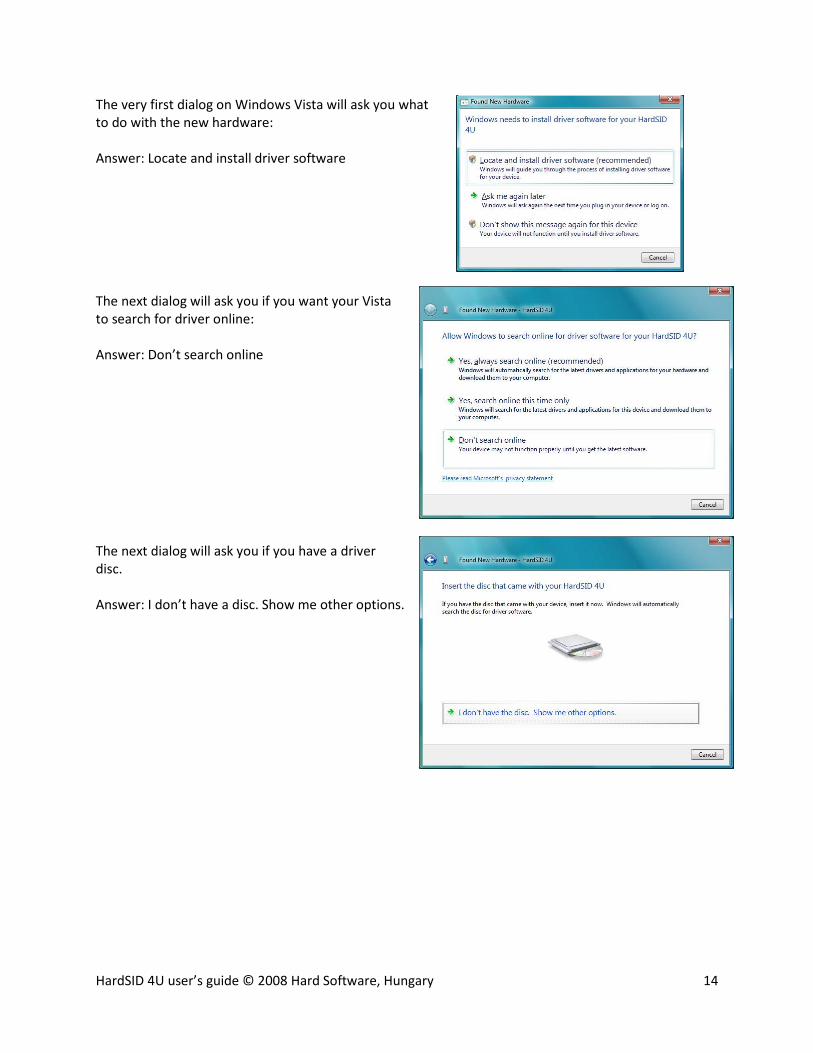
The very first dialog on Windows Vista will ask you what
to do with the new hardware:
Answer: Locate and install driver software
The next dialog will ask you if you want your Vista
to search for driver online:
Answer: Don’t search online
The next dialog will ask you if you have a driver
disc.
Answer: I don’t have a disc. Show me other options.
HardSID 4U user’s guide © 2008 Hard Software, Hungary 15
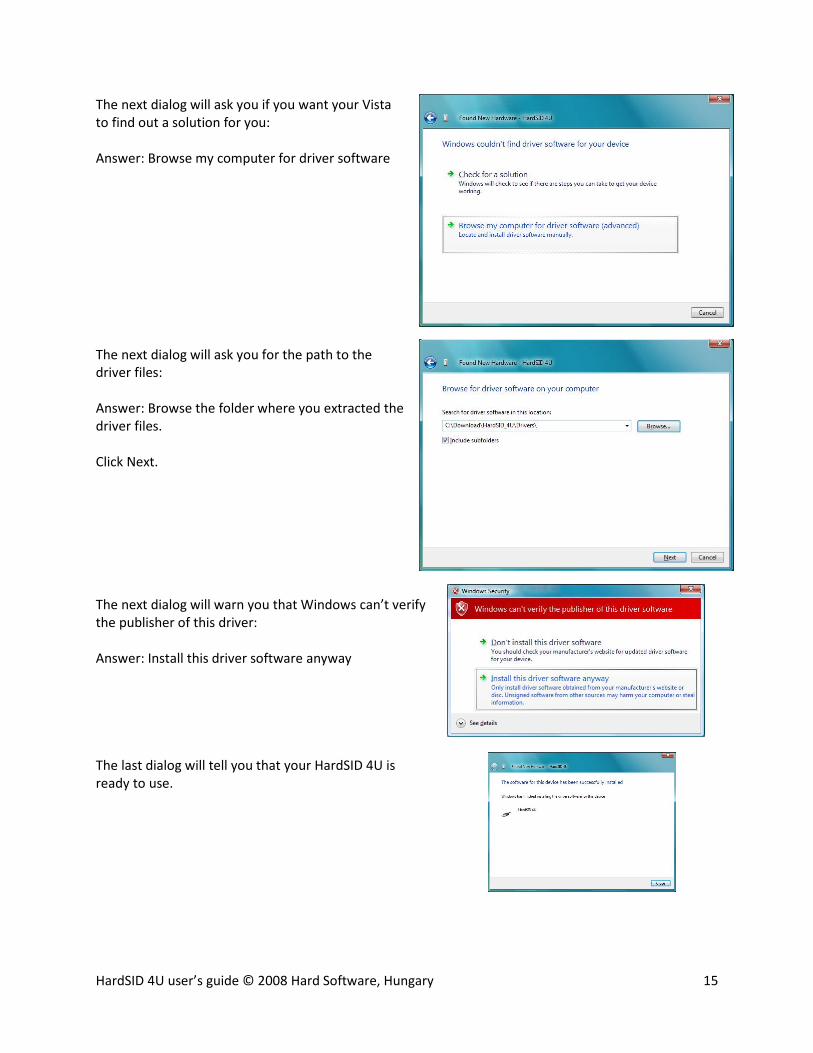
The next dialog will ask you if you want your Vista
to find out a solution for you:
Answer: Browse my computer for driver software
The next dialog will ask you for the path to the
driver files:
Answer: Browse the folder where you extracted the
driver files.
Click Next.
The next dialog will warn you that Windows can’t verify
the publisher of this driver:
Answer: Install this driver software anyway
The last dialog will tell you that your HardSID 4U is
ready to use.
HardSID 4U user’s guide © 2008 Hard Software, Hungary 16
APPENDIX
Installing SID Chips video tutorial The following video tutorial will show you how and where to:
• insert SID chips carefully
• insert / remove filter capacitors
• set the voltage for the SIDs
• handle / connect cables
The purpose of this tutorial is to help you to learn the proper way of handling SIDs, filter capacitors, voltage jumpers and cables in general. The actual configuration process will be different for you, as you’ll probably install different SID versions into the sockets. About the tutorial: The initial state of the HardSID 4U unit shown in the tutorial is the same as the initial configuration of your own unit (you’ve received it with the factory default configuration). Factory default for HardSID 4U units without SID: Sockets 1/3 are configured for 6581 and sockets 2/4 are configured to 8580. In this tutorial we want to install one 6581 into socket 1 and three 8580 chips into sockets 2/3/4. Since Socket 1 was already configured for 6581 and sockets 2/4 were already configured for 8580 chips as factory default, we don’t have to touch the filter capacitors and voltage jumpers for those sockets. Since Socket 3 was configured for 6581 as factory default, we’ll have to replace the 6581 filter capacitors with 8580 filter capacitors. We’ll also have to set the voltage jumper for Socket 3 accordingly to 8580 position. Now that you know what to watch for in the video tutorial, check it out on YouTube:
http://www.youtube.com/watch?v=A-7B9HPj1jc
HardSID 4U user’s guide © 2008 Hard Software, Hungary 17
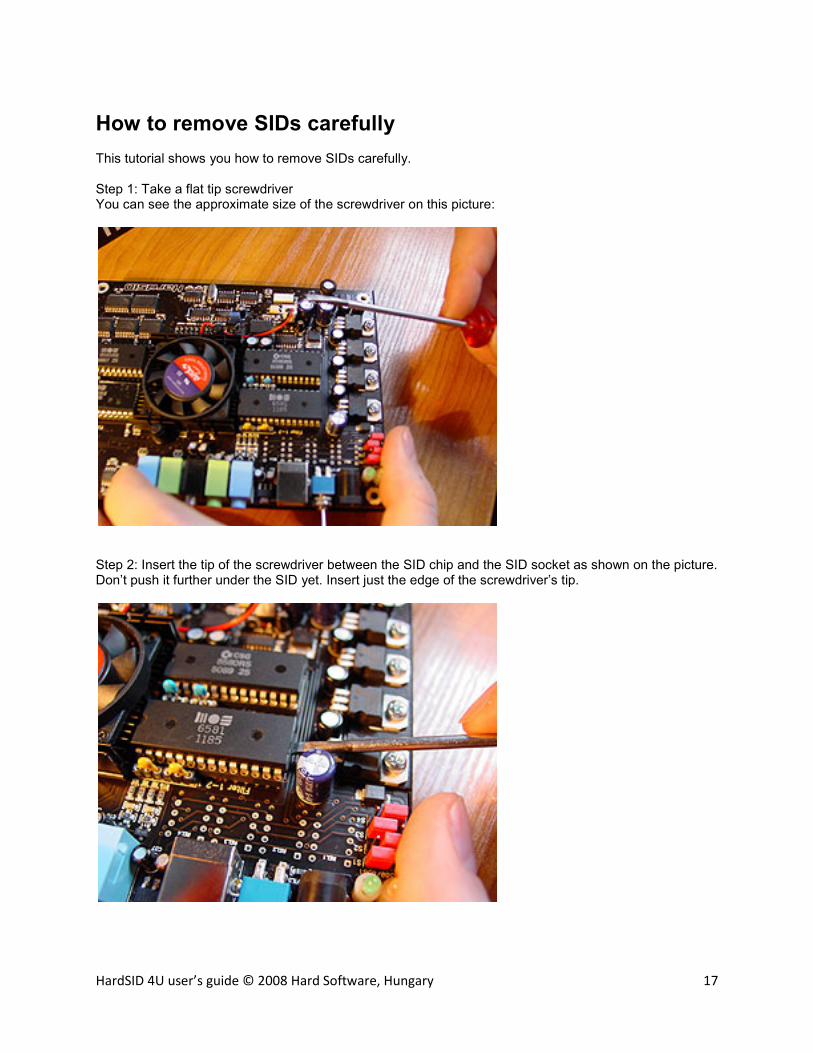
How to remove SIDs carefully This tutorial shows you how to remove SIDs carefully. Step 1: Take a flat tip screwdriver You can see the approximate size of the screwdriver on this picture:
Step 2: Insert the tip of the screwdriver between the SID chip and the SID socket as shown on the picture. Don’t push it further under the SID yet. Insert just the edge of the screwdriver’s tip.
HardSID 4U user’s guide © 2008 Hard Software, Hungary 18
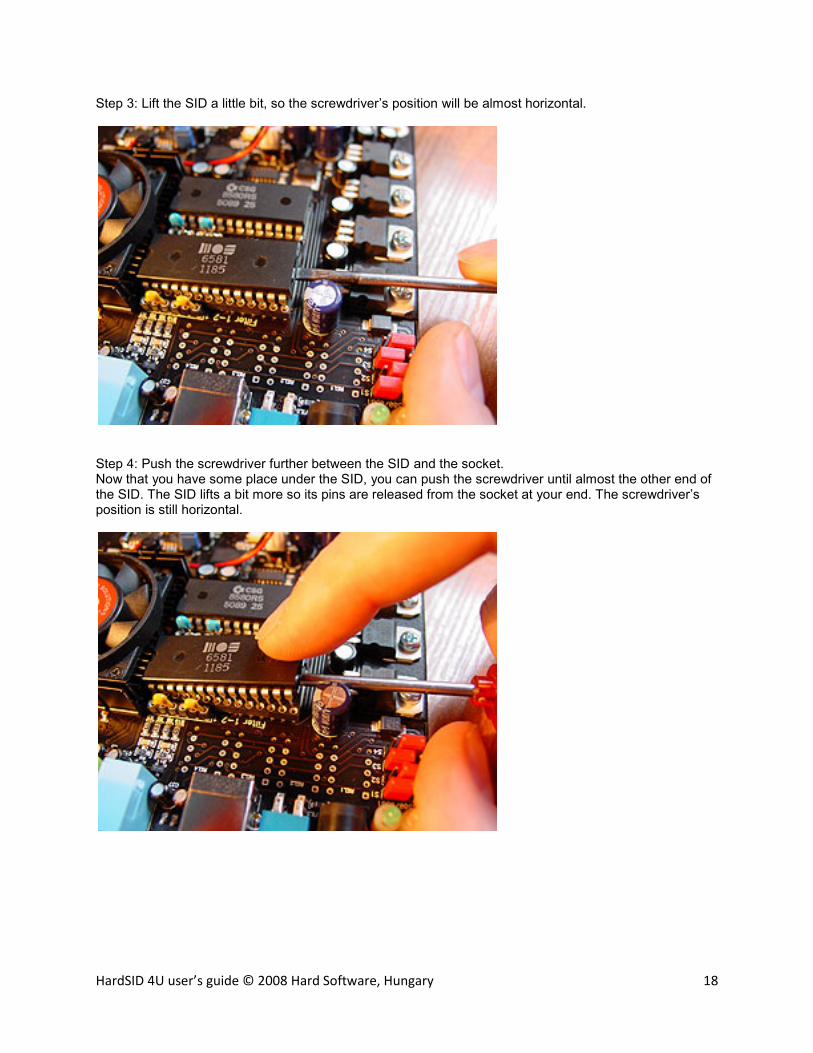
Step 3: Lift the SID a little bit, so the screwdriver’s position will be almost horizontal.
Step 4: Push the screwdriver further between the SID and the socket. Now that you have some place under the SID, you can push the screwdriver until almost the other end of the SID. The SID lifts a bit more so its pins are released from the socket at your end. The screwdriver’s position is still horizontal.
HardSID 4U user’s guide © 2008 Hard Software, Hungary 19
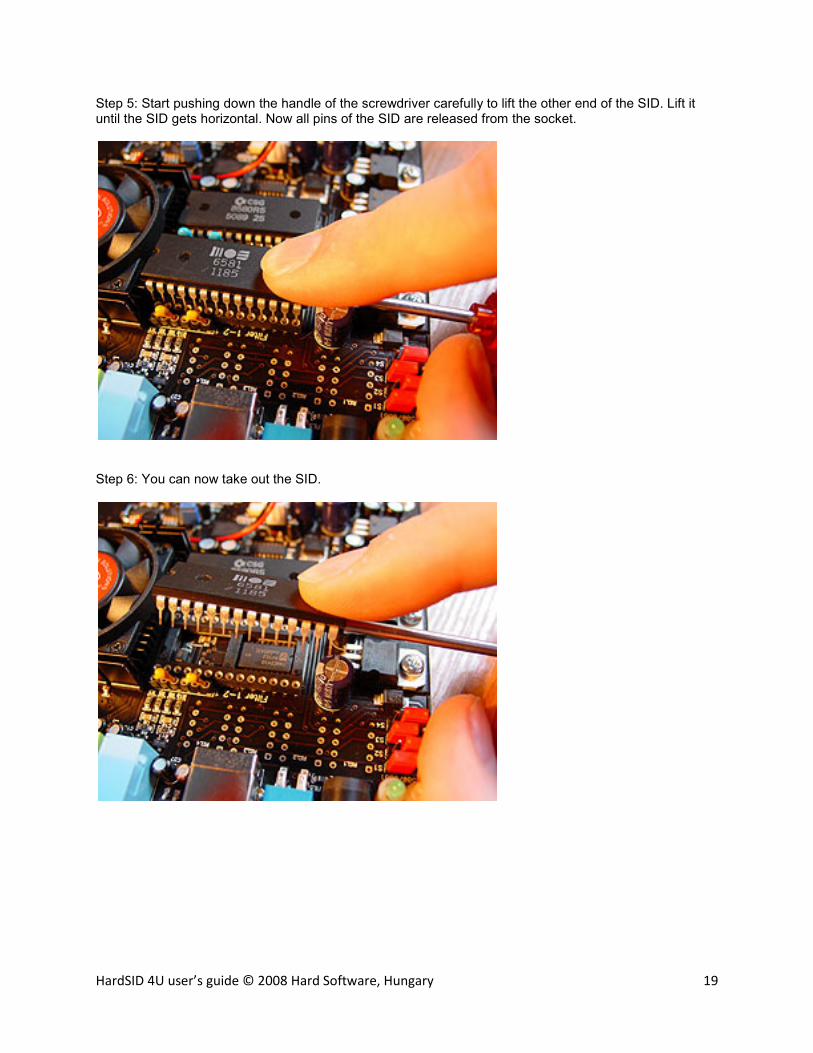
Step 5: Start pushing down the handle of the screwdriver carefully to lift the other end of the SID. Lift it until the SID gets horizontal. Now all pins of the SID are released from the socket.
Step 6: You can now take out the SID.


