1. Make sure the bike is completely cool before starting the installation and secure on a service lift. 2. Unplug O2 sensor connectors from wiring harness. Note: Pay attention to wire routing for reinstallation. 3. Loosen heat shield clamps and remove heat shields from both the front and rear head pipes. 4. Remove exhaust header nuts located at cylinder head. Keep these for use with TBR Comp-S system. 5. Remove rear head pipe clamp bolt. Reinstall bolt after clamp is removed. IMPORTANT - PLEASE READ CAREFULLY Two Brothers Racing products are intended for closed course competition purposes only. We recommend that this performance part be installed by a qualified motorcycle technician. If you have any doubts as to your ability to install this performance part, please consult with your local motorcycle dealer. Read all instructions first before starting installation. Make sure the motorcycle and exhaust system are completely cool before starting the installation. Also, make sure the bike is secure on a center stand or ideally a service lift during installation. Be sure to save all stock components for possible use later. Installation Instructions Warranty Information Two Brothers Racing products are intended for closed course competition purposes only, and therefore are sold “as is” without warranty. Two Brothers Racing specifically disclaims any warranties of merchantability or fitness for a particular purpose and disclaims all responsibility for consequential and incidental damages or any other losses arising from the use of these products or parts. Not tested for use with OEM or aftermarket accessories. Harley Davidson Sportster Part # 005-3770199 6. Remove bolts that attache mufflers to mounting bracket. Then remove bracket. 7. Remove OEM exhaust system. 8. Remove O2 sensors to install on TBR head pipes. 9. Using snapring pliers, carefully remove the circlips and flanges from the stock exhaust system. Install the stock flanges to the new TBR head pipes. Check the condition of the circlips, we recommend replacing them with new ones if they are bent or twisted.
Transcript
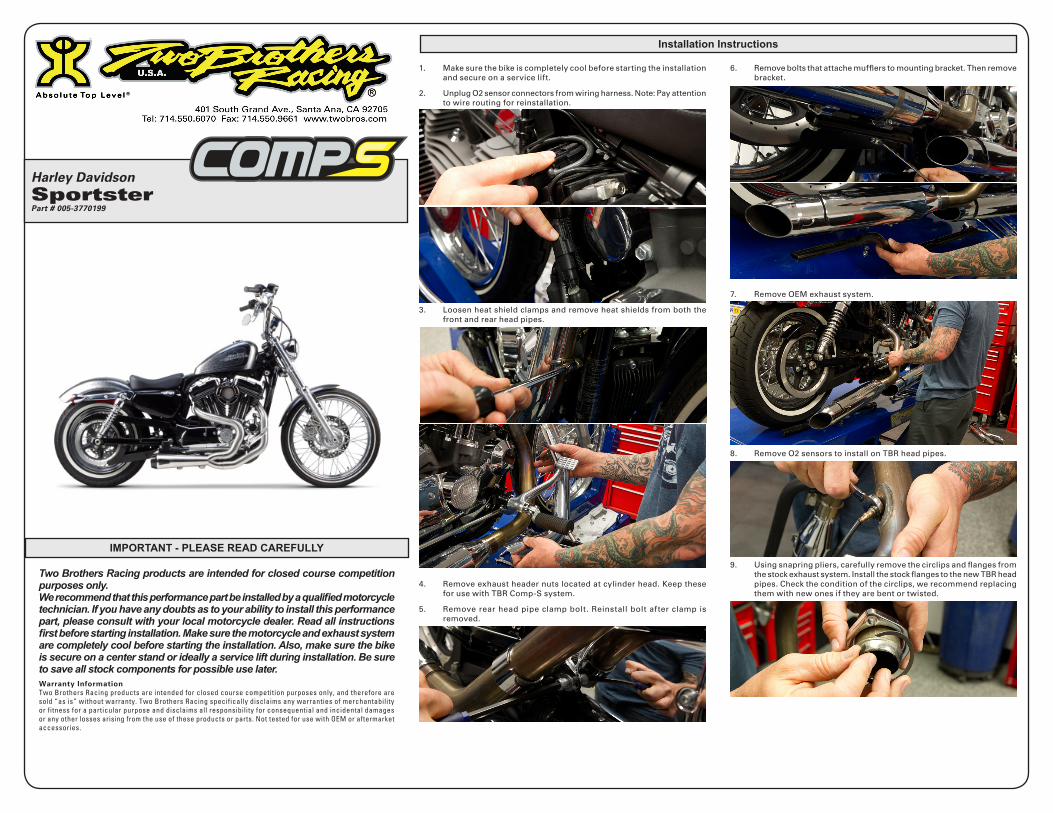
1. Make sure the bike is completely cool before starting the installation and secure on a service lift.
2. Unplug O2 sensor connectors from wiring harness. Note: Pay attention to wire routing for reinstallation.
3. Loosen heat shield clamps and remove heat shields from both the front and rear head pipes.
4. Remove exhaust header nuts located at cylinder head. Keep these for use with TBR Comp-S system.
5. Remove rear head pipe clamp bolt. Reinstall bolt after clamp is removed.
IMPORTANT - PLEASE READ CAREFULLY
Two Brothers Racing products are intended for closed course competition purposes only.We recommend that this performance part be installed by a qualified motorcycle technician. If you have any doubts as to your ability to install this performance part, please consult with your local motorcycle dealer. Read all instructions first before starting installation. Make sure the motorcycle and exhaust system are completely cool before starting the installation. Also, make sure the bike is secure on a center stand or ideally a service lift during installation. Be sure to save all stock components for possible use later.
Installation Instructions
Warranty InformationTwo Brothers Racing products are intended for closed course competition purposes only, and therefore are sold “as is” without warranty. Two Brothers Racing specifically disclaims any warranties of merchantability or fitness for a particular purpose and disclaims all responsibility for consequential and incidental damages or any other losses arising from the use of these products or parts. Not tested for use with OEM or aftermarket accessories.
Harley DavidsonSportsterPart # 005-3770199
6. Remove bolts that attache mufflers to mounting bracket. Then remove bracket.
7. Remove OEM exhaust system.
8. Remove O2 sensors to install on TBR head pipes.
9. Using snapring pliers, carefully remove the circlips and flanges from the stock exhaust system. Install the stock flanges to the new TBR head pipes. Check the condition of the circlips, we recommend replacing them with new ones if they are bent or twisted.
Care & Cleaning / Warranty Information
Care & Cleaning: Keep system free of dirt and moisture. Store in a cool, dry place. Make sure vehicle is completely cool before maintenance.
Stainless Header System: Polished stainless steel pipes will turn a light golden hue after a few heat cycles, this is a normal characteristic of high quality stainless steel. Clean using a mild water based spray cleaner. Always apply cleaner or polish with a soft, clean cloth.
Titanium Header System: Polished titanium pipes will experience color shift ranging from deep blue/purple through amber after a few heat cycles. This is a normal characteristic of high quality titanium. Clean using a mild water based spray cleaner. Always apply cleaner or polish with a soft, clean cloth.
Polished Aluminum Canisters: Use an aluminum or mag wheel polish to restore the bright finish to factory spec.
Brushed Aluminum Canisters: Clean using a mild water based spray cleaner. Always apply cleaner or polish with a soft, clean cloth.
Carbon Fiber Canisters: Clean using a mild water based spray cleaner. Always apply cleaner or polish with a soft, clean cloth. Always make sure the fiberglass packing inside is in good condition and not burned out, as exhaust heat inside an empty canister will deteriorate the carbon fiber sleeve. TBR sells repack kits (Road - #005-10038, Offroad - #005-10038MX) that include everything you need to easily do it yourself.
Titanium Mufflers: For cleaning use a mild water based spray cleaner. Always apply cleaner or polish with a soft, clean cloth. Always make sure the fiberglass packing inside is in good condition and not burned out, as exhaust heat inside an empty canister will deteriorate the carbon fiber sleeve.
TBR sells repack kits (Road - #005-10038, Offroad - #005-10038MX) that include everything you need to easily do it yourself.
Repack all road canisters every 3,000 miles. Part #005-10038
Repack all offroad canisters after every 10 hours of use. Part #005-10038MX
NEVER dyno test your bike with carbon fiber or titanium canisters installed - the intense heat and lack of cooling air can quickly burn through the canister material. Two Brothers Racing does not provide a warranty for burned canisters.
Installation Instructions
Qty. Description Part Number
1 HD Sportster Muffler 005-377-M1 HD Sportster Header 005-37701H1 HD Sportster Heat Shield 005-377-HS11 HD Sportster Heat Shield 005-377-HS22 45mm Spring 005-S452 02 Sensor Plug Kit 005-92-22KIT7 Hose Clamps 005-27-94322 Flange Bolt 5/16”x 3/4” 005-FB516342 HD Clip Nut 005-10-516CN1 Spring Puller 005-SP
Harley DavidsonSportsterPart # 005-3770199
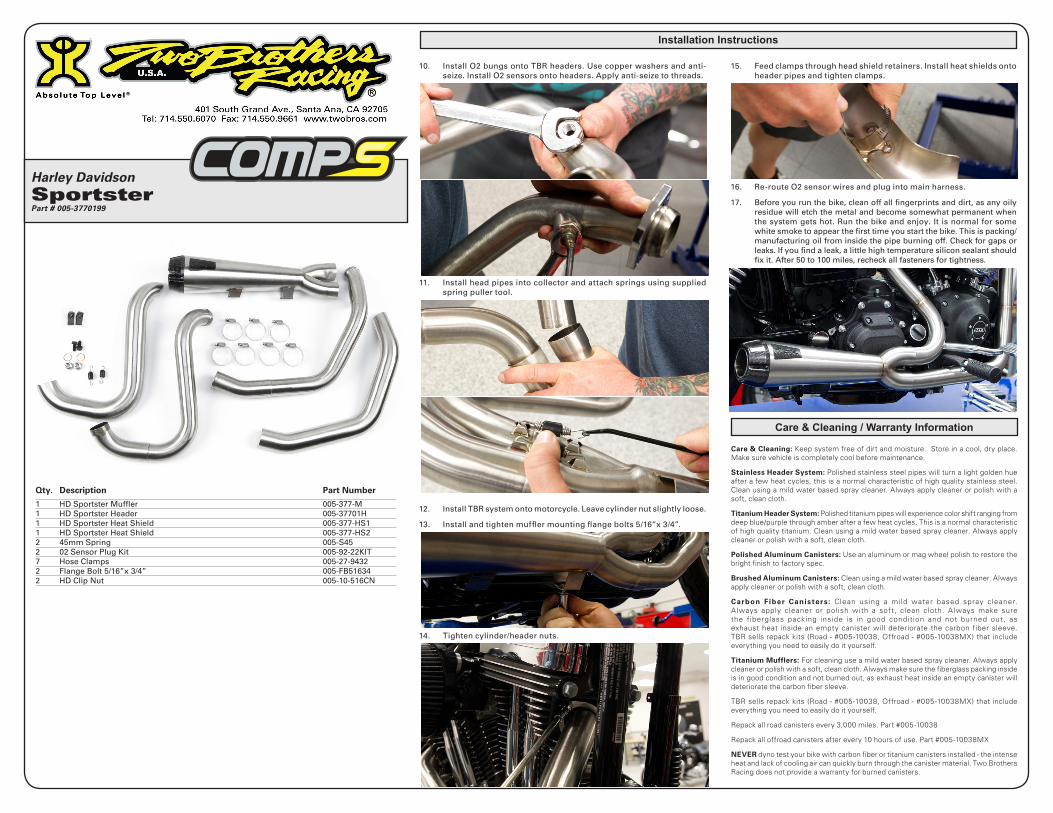
10. Install O2 bungs onto TBR headers. Use copper washers and anti-seize. Install O2 sensors onto headers. Apply anti-seize to threads.
11. Install head pipes into collector and attach springs using supplied spring puller tool.
13. Install and tighten muffler mounting flange bolts 5/16”x 3/4”.
14. Tighten cylinder/header nuts.
15. Feed clamps through head shield retainers. Install heat shields onto header pipes and tighten clamps.
16. Re-route O2 sensor wires and plug into main harness.
17. Before you run the bike, clean off all fingerprints and dirt, as any oily residue will etch the metal and become somewhat permanent when the system gets hot. Run the bike and enjoy. It is normal for some white smoke to appear the first time you start the bike. This is packing/manufacturing oil from inside the pipe burning off. Check for gaps or leaks. If you find a leak, a little high temperature silicon sealant should fix it. After 50 to 100 miles, recheck all fasteners for tightness.