24
HHC Compensation Module Training Document
HHC Compensation Module Training Document
ICP Compensation Module Training document
2
CONTENTS
1. ICP Compensation Module Installation ..............................................................................3
2. Launch the compensation ................................................................................................6
3. Setup Survey Setup/Import Data – Initial Setup .................................................................6
4. Exporting the Master list to an excel file ............................................................................9
5. Main Compensation Screen ............................................................................................ 11
6. Data Entry: .................................................................................................................... 11
a) General information: ....................................................................................................... 13 b) Cash remuneration: ......................................................................................................... 14 c) Work Hours:..................................................................................................................... 14
7. Save .............................................................................................................................. 15
8. Add New ....................................................................................................................... 15
9. Validation ...................................................................................................................... 16
10. Aggregate Indicators: ..................................................................................................... 18
11. Computed Indicator: ...................................................................................................... 18
12. Export ........................................................................................................................... 19
13. Delete: .......................................................................................................................... 20
14. Reset: ............................................................................................................................ 20
15. Exit: .............................................................................................................................. 21
16. Change the default database .......................................................................................... 21
17. Create an empty database .............................................................................................. 22

ICP Compensation Module Training document
3
Training Compensation Module
1. ICP Compensation Module Installation
Please follow the steps as mentioned below to install the compensation module of the ICP Region software:
Uninstall previous version of the software if it was installed.
To begin the installation, click on the “ICP 2011 compensation Modules.exe” which will launch the screen shown below.
Click on the “Next” button
Select the Folder/Directory where you want to install this software by clicking on the “Browse” and then click “Next”.

ICP Compensation Module Training document
4
Leave the “Create a desktop icon” checkbox check to get the shortcut of the software on your desktop and then click “Next”.

ICP Compensation Module Training document
5
Now on the next screen Click “Install”.
On successful completion of the installation, it will display the screen as shown below. Click on “Finish”.

ICP Compensation Module Training document
6
2. Launch the compensation
After the installation the compensation installation creates a Shortcut along with an icon for the compensation application on the desktop.
It also adds it under the Program Menu. User can click on the shortcut or click on the Start Menu->Programs/All Programs (in Vista)->ICP 2011 Compensation Modules->compensation.
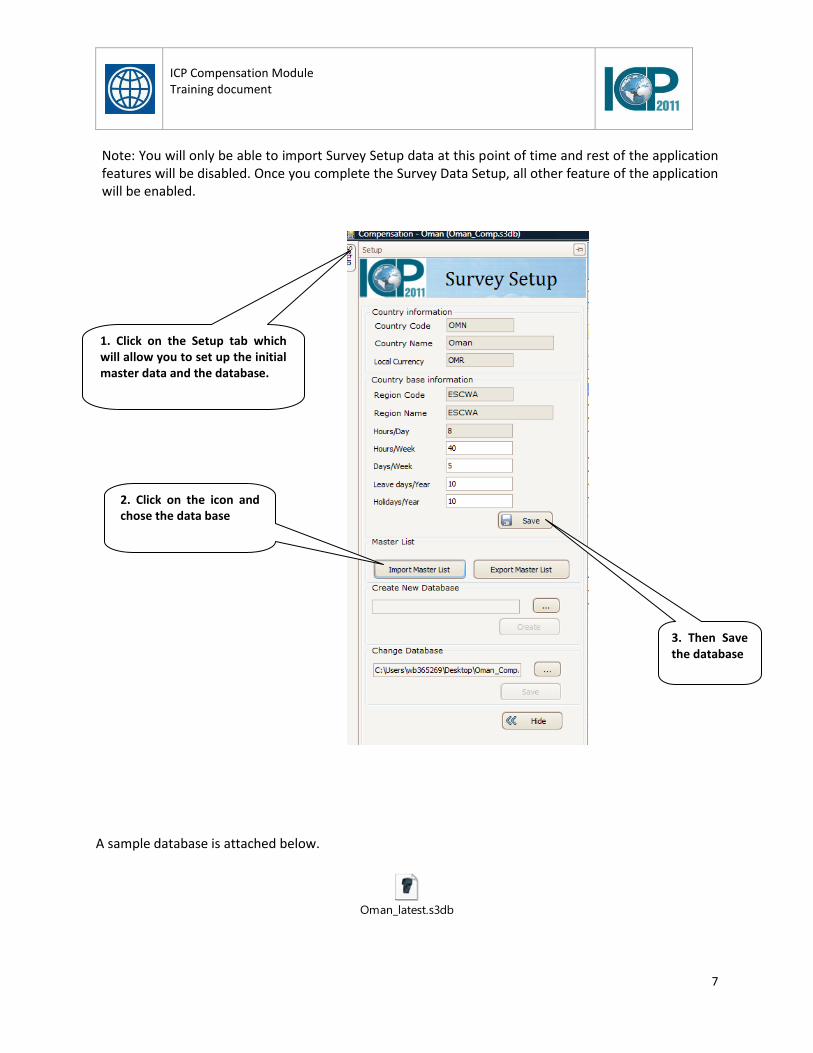
3. Setup Survey Setup/Import Data – Initial Setup
After Launching the Application, it is very important to set up the Survey data which it shows country base information like Region code Region name and some extra data that relates to that particular region.
ICP Compensation Module Training document
7
Note: You will only be able to import Survey Setup data at this point of time and rest of the application features will be disabled. Once you complete the Survey Data Setup, all other feature of the application will be enabled.
A sample database is attached below.
Oman_latest.s3db
1. Click on the Setup tab which will allow you to set up the initial master data and the database.
2. Click on the icon and chose the data base
3. Then Save the database

ICP Compensation Module Training document
8
Click on the “Import Master Data” button in the Survey Setup screen
It will display a file selection screen as shown below:
Select the Master List (Excel) file that is sent by the region and modified/Saved by you. Click “Open”. System will start the data setup process by first validating the data in all worksheets and then importing and saving it in to its own database. While import is in process a wait dialog along with a progress bar will be displayed.
Click on Import Master List

ICP Compensation Module Training document
9
And also if we need to create the new database we can browse and create a new database or change the database by clicking on browser and finding the path of database and saving the changed database.
4. Exporting the Master list to an excel file
The Survey Setup data can be exported to an Excel file. The Exported Excel file will have the same format as the Master Data file sent by the regional office. Steps for exporting the Survey Setup Data are mentioned below:
Click on the “Export Master Data” button that is available on the Survey Setup screen.

ICP Compensation Module Training document
10
Select the folder where you want to save the exported file, provide the file name and click on “Save”.
Data Export will start and system will display Wait Dialog along with a progress bar as shown below:
Once the Export is completed, system will display “Exported Successfully” message as shown below:

ICP Compensation Module Training document
11
After exporting, Add new Records at the end of the worksheet or modify the existing records. Save the Excel file and import them to the application setup.
Setting the survey is one step process and when it’s done you can click on hide bottom and go to main compensation screen.
5. Main Compensation Screen
There are 7 main functionalities on top for Add New, Save, Delete, Reset, Export, Help and Exit.
And we have 2 tabs for Data, Entry and Validation and 2 tabs for Indicators, Aggregate and Computed.
6. Data Entry:
On the left side, you have the main occupation list that is divided to Occupation code and Occupation Name. You can see below trees of occupations that provided in hierarchy. In each Occupation code you have also 4 options which is entry level, 5 years experience, 10 years experience or 20 years experience. When you click on occupation code on the light hand side you can see the observation template and you can inter the information.

ICP Compensation Module Training document
12
On the right hand side you can see the Observations form and inside the form there are 3 major categories:

ICP Compensation Module Training document
13
a) General information:
Automatically shows the Record Date and year for which data reported. Anything that highlighted at little dark is read only and for others you can inter data (e.g. location). Record Date: by default is current date (it can be change):
Year for which data are reported (its current year)
ICP occupation code: is read only you cannot change it and it’s highlighted darker
ICCP Occupation Name: it shows Job code and title.
Reported Currency can be change in any observation.
Location: you can choose the location from the list:

ICP Compensation Module Training document
14
b) Cash remuneration:
You can add Base pay and any Allowances and additional payment that you want.
If you move the mouse on any particular allowonces you can see what exactly that allowonce means
And also any employer information that you like you can add to this part.
c) Work Hours:
The system automatically picks up the actual Number of hours works from the set up form but you can
change it.
Comments:
If you have any special Observation you can add comment on it and in data Validation page it shows
your comment.
Auto Calculate:
Depending on the person that uses this can be Auto Cal or not Auto Calc (if it’s not auto calc you can
enter the total among of work.
The system starts automatically calculate the total value based on whatever extra information you add.

ICP Compensation Module Training document
15
7. Save
When you set everything you have to save this part with save button on top of the page.
8. Add New
If you want to add a new observation you can click and Add New button.

ICP Compensation Module Training document
16
In Observation it shows one of two. If we have more than one observation we can add observation 2 also.
9. Validation
Once you add all the observations you can click on Validation Screen. You can see the reports based on
each occupation and for each observation. This validation is not as extensive as the HHC one it’s just the
reporting one. In Validation screen you can start the comparing the data
As you can see they are groups based on occupation we you expand the occupation you can see the details for each observation on that occupation. It also calculates the average remuneration, local currency or number of regular household. If we add two observations for two different locations you can see side by side.

ICP Compensation Module Training document
17
The system also calculates the average local currency unit and it also shows some extra information.

ICP Compensation Module Training document
18
10. Aggregate Indicators:
Aggregate Indicators is just strait forward data entry. we should ask country to enter the details that
they have asked over here like GDP, general Government Recurrent and all the other information and
then provide the reference also .
The column that are mark Blue is the one use to be interred and other Colum are the expanded
Information to filling that data. You can also see what’s the metric being used and what’s the Reference
year and then also definition for each of them to help you fill in the data.
11. Computed Indicator:
Some of the columns use the Aggregate Indicators to Calculate the Value and fill it here and some of the
use the mix of Aggregate Indicators and the occupation to calculate the Values shows at computed
Indicator. It also shows what the formula that used is and this is something that calculated and you
cannot add data on it.

ICP Compensation Module Training document
19
12. Export
Export option ask you for the file name it also come up with the basic name instructor , which is Country
code and which type of observation and the Name that you given to the file. Since there are not lots of
observations it’s always export everything. And Export option export the countries base information
that it use for calculation.

ICP Compensation Module Training document
20
13. Delete:
Delete will be enabled only when there are observations and it will be able only for data Entry. It delet
the observation that you selected.
14. Reset:
This button resets the form and you can inter the data again.

ICP Compensation Module Training document
21
15. Exit:
When you like to close the Application you can click Exit.
16. Change the default database
If you have more than one database file available, you can use any of those file in the Data entry application by changing its default database. To Change the database follow the steps as mentioned below:
Launch the Data entry Application
Navigate to the Survey Setup screen by clicking on the “Setup” button.
Click on the button which is available next to the “Change Database” field

ICP Compensation Module Training document
22
It will display a file Selection dialog box (screen) as shown. Locate the database file which you want to use and click on “Open button”
The full path of the new database will be populated in the Change database text field.
Now click on “Save” to connect to this database.
It will display a message as shown below and Data entry application will be refreshed with the data available in the newly selected database.
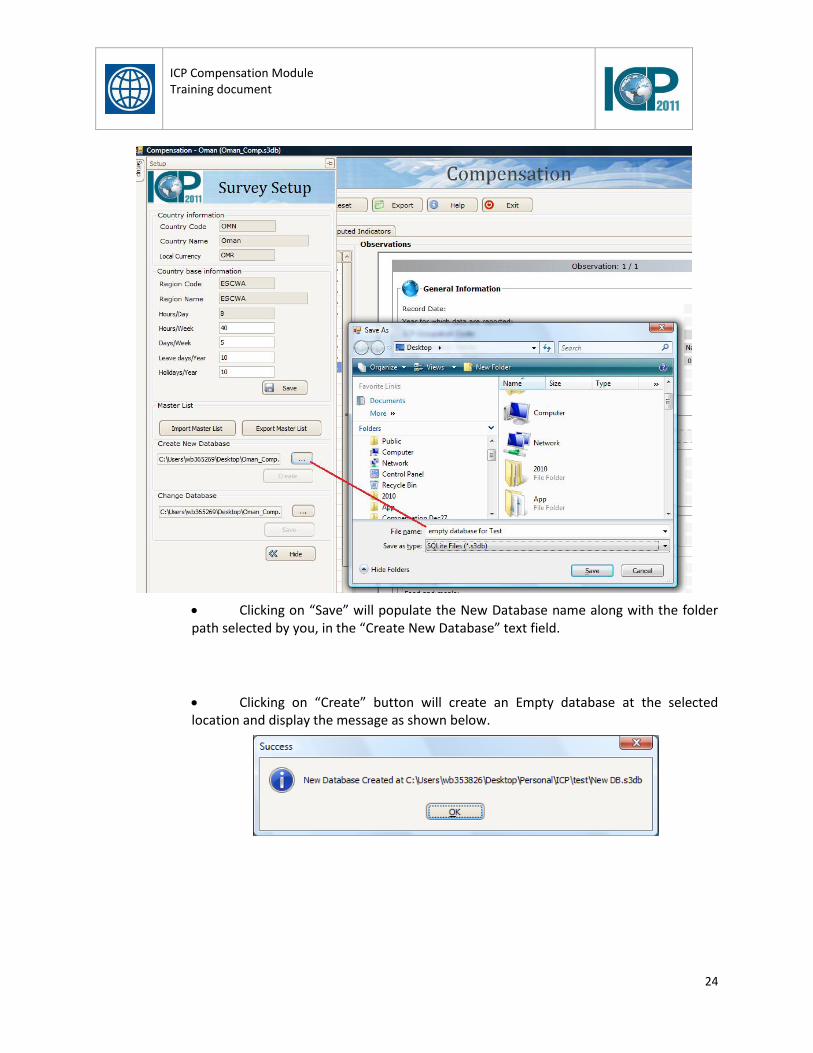
17. Create an empty database
Using this feature you can create an empty SQLite database, which will be similar to the database which comes with the installation of the software.
Launch the Data entry Application
Navigate to the Survey Setup screen by clicking on the “Setup” button.
Click on the button which is available next to the “Create New Database” field
It will display a file save dialog box (screen) as shown below. Select the Folder where you want to create the new database, provide the Database File Name and Click on “Save” button.

ICP Compensation Module Training document
23
It will display a file save dialog box (screen) as shown below. Select the Folder where you want to create the new database, provide the Database File Name and Click on “Save” button.
ICP Compensation Module Training document
24
Clicking on “Save” will populate the New Database name along with the folder path selected by you, in the “Create New Database” text field.
Clicking on “Create” button will create an Empty database at the selected location and display the message as shown below.


