28
How I Install PE Pipes BY POLY PETE

How I Install PE PipesBY POLY PETE

ContentsIntroduction .....................................................................................1How I Transport, Store & Handle Pipe ..................................2How I Prevent U.V. Damage ......................................................5The Trench ..................................................................................... 6Marking & Cutting ........................................................................7Mechanical Fittings Jointing ................................................... 8Electrofusion (EF) Jointing .......................................................11Butt Fusion Jointing ...................................................................15Curved Trenches ........................................................................21Detector Tape (Tracer Wires) ................................................ 22Thrust Blocks ...............................................................................23Backfilling & Compaction ......................................................24Testing ............................................................................................25

IntroductionHi,
All my friends call me Poly Pete, cos I have been installing PE pipes since I was a wee fella. I’ve laid enough poly pipe to go around the world twice! Maybe I could have stretched the truth a little but PE pipes stretch if y’pull em too hard!
They asked me to write a booklet on how to install PE pipes. I’ll draw some sketches as I go and I’ll use illustrations of coiled pipe and straight ones too! I’ll tell a few yarns along the way as I have a few to tell you.
I have worked in rural blocks as well as in town. When you work in town make sure you know your Local Body / Council specifications, I can’t detail them as they vary throughout the country.
In the rural blocks I take the FFP approach…that’s short for ‘Fit For Purpose’. I’ll refer to FFP often in this booklet.
Follow these steps, and you will:• Do the job faster,• Do it right first time,• Avoid those costly mistakes!
I know I can call on the guys at Iplex Pipelines – they’ll answer any problems that might stump you. Don’t you be afraid to phone Iplex. They have a call free number. Call them on 0800 800 262 and ask for the Iplex Technical Support Team.
I hope this helps you,
How I Install PE Pipes 1
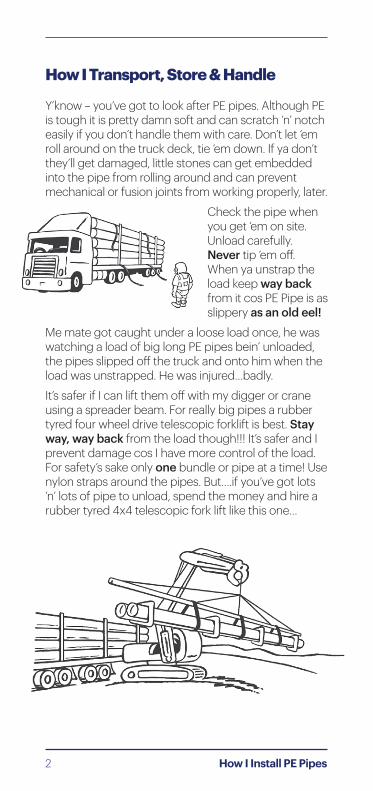
Y’know – you’ve got to look after PE pipes. Although PE is tough it is pretty damn soft and can scratch ‘n’ notch easily if you don’t handle them with care. Don’t let ‘em roll around on the truck deck, tie ‘em down. If ya don’t they’ll get damaged, little stones can get embedded into the pipe from rolling around and can prevent mechanical or fusion joints from working properly, later.
Check the pipe when you get ‘em on site. Unload carefully. Never tip ‘em off. When ya unstrap the load keep way back from it cos PE Pipe is as slippery as an old eel!
Me mate got caught under a loose load once, he was watching a load of big long PE pipes bein’ unloaded, the pipes slipped off the truck and onto him when the load was unstrapped. He was injured…badly.
It’s safer if I can lift them off with my digger or crane using a spreader beam. For really big pipes a rubber tyred four wheel drive telescopic forklift is best. Stay way, way back from the load though!!! It’s safer and I prevent damage cos I have more control of the load. For safety’s sake only one bundle or pipe at a time! Use nylon straps around the pipes. But….if you’ve got lots ‘n’ lots of pipe to unload, spend the money and hire a rubber tyred 4x4 telescopic fork lift like this one…
How I Transport, Store & Handle
2 How I Install PE Pipes

They’re quicker and safer to use…you’ll cut your unloading time down big time!!!
If I buy my pipes from Iplex they arrive in crates….they’re easier to stack ‘n’ store and much safer too! I always store on flat ground until the trench is dug or you are ready to join ’em!
For safety’s sake… stay way back from the stock pile, they could fall on ya at anytime. Remember they’re as slippery as an eel.
Now, small lengths of coiled PE pipe are fairly easy to handle, when you have real long lengths on the job they aren’t as easy cos when you cut the straps the stuff gets tangled up! I use a pipe dispensing trailer, it has a spinning turn-table on it, all ya need to do is place the coil on the trailer, cut the straps and you can walk the pipe off the trailer and into your trench…these make it real easy!
How I Install PE Pipes 3

I’ve done a bit of pipe bursting in my time too, that’s one of those in-line replacement trenchless technology methods where you have an ol’ water main that you want to rehabilitate without using ‘dig n lay’ methods. I get Iplex to make coils of 125mm PE pipe and get it made straight onto carousels like this……
Here’s another way to do it… 125mm PE pipe made into coils then placed onto a pipe dispensing trailer.
Then you park the pipe-coil over your insertion pit to begin the pull-back.
But… most coiled pipe retains memory of the coil once installed so when you try and connect two coiled pipe lengths together you get this happening…..
So… here is what I do to fix it!
You’ll need to use a re-rounding tool before you fuse it together… the re-rounder also acts as a pipe clamp too!
4 How I Install PE Pipes
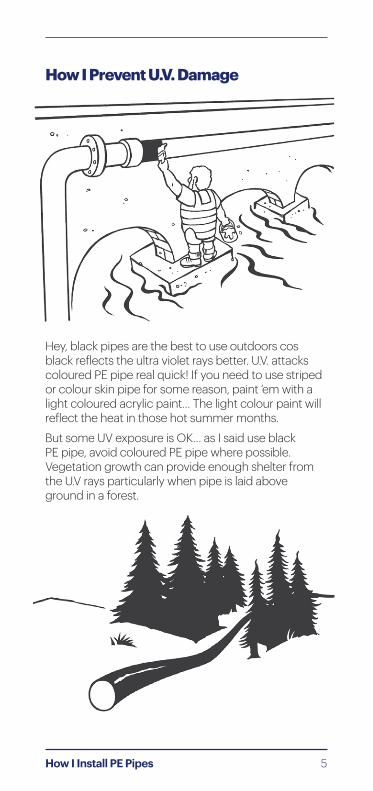
Hey, black pipes are the best to use outdoors cos black reflects the ultra violet rays better. U.V. attacks coloured PE pipe real quick! If you need to use striped or colour skin pipe for some reason, paint ‘em with a light coloured acrylic paint… The light colour paint will reflect the heat in those hot summer months.
But some UV exposure is OK… as I said use black PE pipe, avoid coloured PE pipe where possible. Vegetation growth can provide enough shelter from the U.V rays particularly when pipe is laid above ground in a forest.
How I Prevent U.V. Damage
How I Install PE Pipes 5

Me other ol’ mate Pipeline Percy wrote one of these booklets on PVC pipe, the in trench rules are exactly the same. If you’re in town the engineer’s plans always tell me how deep the trench should be. The width is important too, for both PE and PVC pipe it should not be more than 300mm wider than the pipe size at the top of the pipe, if heavy traffic is to pass over it. For example; 160mm Pipe – trench width should be 460mm. Above the crown of the pipe any width will do.
I always throw in a bed of compactable gravel, sand or fine scoria for the pipe bedding and surround.
My mate Winnie helps me to get the pipe into the trench. I NEVER drop ‘em in!
Pipe size – plus 300mm (This saves backfill material as well!)
When these PE pipes get real big ‘n’ long…y’won’t be lifting ‘em cos they are too heavy…you’ll need a real big digger for real big and long pipe-strings!
When y’in the rural blocks take the FFP approach… but use your common sense… big boulders and organic material (lumps of turf) don’t work as bedding, get ‘em out. Use loose selected as dug material in the backfill zones, remove the big boulders as they could damage any plastic pipe!
The Trench
6 How I Install PE Pipes

Marking PE pipe is not easy cos the pipes are usually black. For black ones y’may be forced to use a piece of strapping to wrap around the pipe then mark off using a piece of Kiwi ingenuity…a piece of number 8 fencing wire! A white crayon will work fine too.
I always cut small pipe using a fine-tooth hand saw. It’s much easier if blocks of wood are under each pipe. You can use a guillotine too.
A chainsaw is OK too but if you plan on any HOT fusion jointing then you should never use a chainsaw with the chain oil function operating cos the oil stuffs up y’fusion (welded) joint. You are better off replacing the saw’s blade and chain more often than have a whole heap of failed fusion joints on a job somewhere!
Marking & Cutting
How I Install PE Pipes 7

I always use Plasson mechanical fittings cos they’re reliable and have never let me down. The small diameter Plasson fitting range covers DN20-DN63, the large diameter range covers DN75-110. The installation instructions are the same. Follow these assembly instructions for a leak proof connection to last a lifetime. Before assembly ensure:• That the end of the pipe to be inserted into the
fittings is free of scratches and other imperfections.• That both the end of the pipe and the fitting itself
are clean of sand, mud, stones, etc.• Do not overtighten nut when closing. NEVER use
wrenches or spanners with handle lengths longer than 46cm – excessive torque during tightening can spread the nut cone and result in pull outs.
• If fittings are reused, ensure the split ring is sharp and bites into pipe to avoid pullouts. Alternatively replace split ring.
The manufacturer strongly recommend the use of PTFE tape in threaded connections, I always use it! But don’t put too much on – three wraps should do.
1. Cut the pipe square and remove burrs... It is good trade practice to chamfer pipe ends with a file or chamfering tool and to lubricate the pipe ends (use Medlube or an approved equivalent). Chamfering and lubrication will ease insertion, however these steps are optional.
2. Undo the nut up to the last thread. Do not remove nut from body.
Mechanical Fittings Jointing
8 How I Install PE Pipes
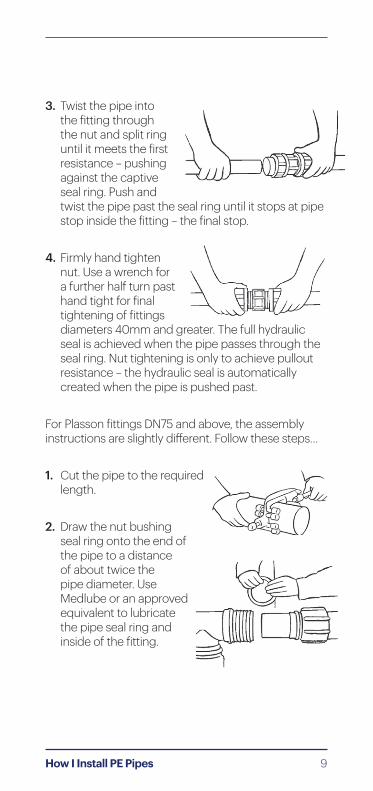
3. Twist the pipe into the fitting through the nut and split ring until it meets the first resistance – pushing against the captive seal ring. Push and twist the pipe past the seal ring until it stops at pipe stop inside the fitting – the final stop.
4. Firmly hand tighten nut. Use a wrench for a further half turn past hand tight for final tightening of fittings diameters 40mm and greater. The full hydraulic seal is achieved when the pipe passes through the seal ring. Nut tightening is only to achieve pullout resistance – the hydraulic seal is automatically created when the pipe is pushed past.
For Plasson fittings DN75 and above, the assembly instructions are slightly different. Follow these steps…
1. Cut the pipe to the required length.
2. Draw the nut bushing seal ring onto the end of the pipe to a distance of about twice the pipe diameter. Use Medlube or an approved equivalent to lubricate the pipe seal ring and inside of the fitting.
How I Install PE Pipes 9

3. Insert the pipe into the body of the fitting until it meets the interior step of the fitting body. Then draw the seal ring and the bushing close to the body of the fitting.
4. Tighten the nut with the wrench until the seal ring and the bushing enter the fitting and reach the end position.
5. Unscrew the nut from the fitting.
6. Open the split ring and mount on the pipe with larger side against the bushing. Ensure that the bushing and the split ring meet the body of the fitting.
7. Screw the nut tightly towards the body of the fitting. For final tightening use a Plasson wrench with a maximum handle length of 40-46cm. Although the nut should be closed tightly, there is no need for it to travel the full thread length.
10 How I Install PE Pipes
Once you know how to complete EF jointing its easy. But…y’need a bit of training first. I highly recommend that you sit a training course to learn how to fuse PE pipe correctly.
Go to www.waternz.org.nz to register for a class.
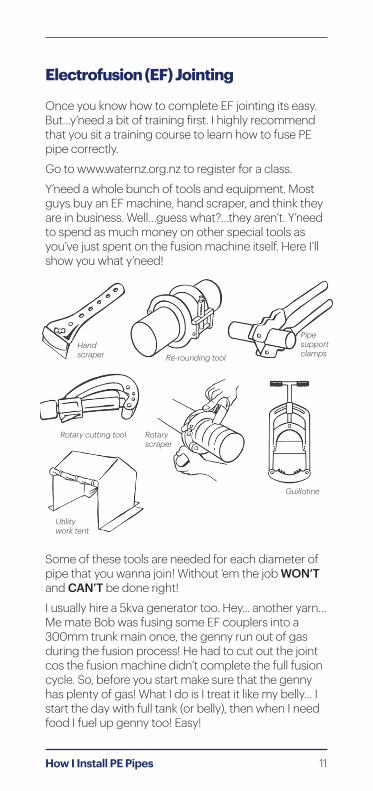
Y’need a whole bunch of tools and equipment. Most guys buy an EF machine, hand scraper, and think they are in business. Well…guess what?…they aren’t. Y’need to spend as much money on other special tools as you’ve just spent on the fusion machine itself. Here I’ll show you what y’need!
Electrofusion (EF) Jointing
Handscraper Re-rounding tool
Pipesupportclamps
Rotary cutting tool Rotaryscraper
Guillotine
Utilitywork tent
Some of these tools are needed for each diameter of pipe that you wanna join! Without ‘em the job WON’T and CAN’T be done right!
I usually hire a 5kva generator too. Hey... another yarn… Me mate Bob was fusing some EF couplers into a 300mm trunk main once, the genny run out of gas during the fusion process! He had to cut out the joint cos the fusion machine didn’t complete the full fusion cycle. So, before you start make sure that the genny has plenty of gas! What I do is I treat it like my belly… I start the day with full tank (or belly), then when I need food I fuel up genny too! Easy!
How I Install PE Pipes 11

With any fusion welding I always take this approach – “If in doubt cut it out!!” I highly recommend that you adopt this too!
STEP 1Clean your pipe…and yourself… ‘cos whatever is on you will wind up on the pipe somewhere. If it is sunny and you’ve used sun screen then remove it! Make sure the pipe is dry, free of dirt and clean, clean, clean!! You should always join our pipe under cover. A tent works best or a large umbrella can do the job sometimes. The cover keeps the wet, windy ‘n’ hot weather off your work. If you don’t use cover you’re taking a shortcut and you shouldn’t be doin’ that! Check your equipment to make sure it is workin’; and when y’ in a trench make sure you have a minimum of 150mm all around the pipe.
STEP 2Cut the pipe square – the ends must be square. Guillotines are best. Remove the burrs if you’ve used a saw. Wipe the pipe inside ‘n’ out with a big towel first, then wipe the pipe using a handful of alcohol wipes (not just one). This cleans the pipe thoroughly! Remember the pipe must be dry and clean, clean, clean!!If you have lots of joints to do I suggest y’ buy a big container of alcohol (IPA) fluid and a bag of new lint free 100% cotton ‘Terry Towels’. Avoid using those rag bags from your local supply shop cos you don’t know where they have been – they could be contaminated. I find that 400mm x 400mm ‘Terry Towels’ work best. Make sure you dispose of all dirty ‘Terry Towels’ immediately. They make good polishing rags for my trucks once used!
I’ve seen some guys use black felt pens on blue pipe and white silicone pens on black pipe to draw on the spigot to act as an indicator before peeling begins.
12 How I Install PE Pipes

Their theory is when the ink has disappeared from peeling the joint it is ready to fuse. But a few blokes in white coats (scientists) once proved that the white pens can leave traces of silicone behind causing failed fusion joints. To avoid that happening to you I suggest you don’t use them at all!
Y’ can use a hand scraper... I avoid them though. If you have a professional and responsible approach to contracting then don’t be tight. Do what all good tradesmen do – spend the money and buy the proper tools. They are designed to control even peeling of the oxidized layers on the pipe. They do the job properly by peeling off all dirt, oil and the U.V. attacked layers off. Follow the peeling tool manufacturer’s operating instructions.
STEP 3Make sure the area to be fused is moisture free. If y’have fittings that have been out of their plastic bags don’t use ‘em... I always open one end of the plastic bag. Slide the fitting on keeping it in the plastic bag. Never touch the inside windings of the EF fitting as the residue from your hands can contaminate the fusion joint.
Now, when you are installing slip couplers you need to peel right back, approximately 2.5 times the coupling’s length cos the slip coupler needs to be pushed past the end of the first pipe spigot. Once the second spigot is peeled and in position slide the coupler back onto the other spigot. Make sure you have the centre of the coupler bang on the two spigots. Inscribe a witness mark on the second pipe spigot to the correct finished position before you begin! In most cases the PE pipe will be out of round and your EF coupler won’t go on. This is when the re-rounding tool works for you.
Coiled pipe will always be out of round! Using another special tool that you bought... the pipe support clamp. Some double up as a re-rounding tool. Then fit the other pipe into the fitting and tighten the pipe support clamps. It’ll hold the joint firmly while your fusion joint is being completed.
How I Install PE Pipes 13
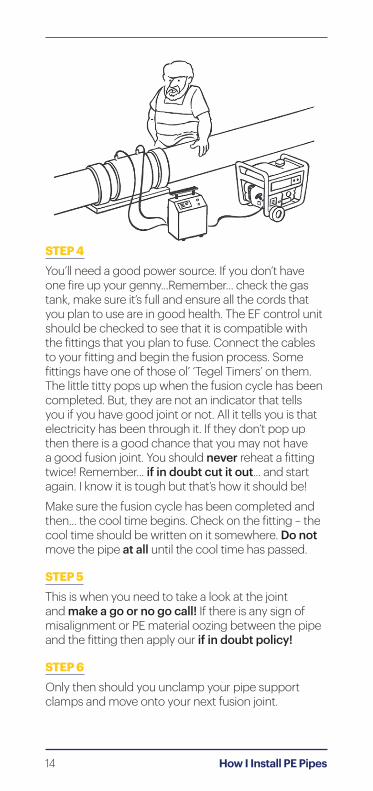
STEP 4You’ll need a good power source. If you don’t have one fire up your genny...Remember... check the gas tank, make sure it’s full and ensure all the cords that you plan to use are in good health. The EF control unit should be checked to see that it is compatible with the fittings that you plan to fuse. Connect the cables to your fitting and begin the fusion process. Some fittings have one of those ol’ ‘Tegel Timers’ on them. The little titty pops up when the fusion cycle has been completed. But, they are not an indicator that tells you if you have good joint or not. All it tells you is that electricity has been through it. If they don’t pop up then there is a good chance that you may not have a good fusion joint. You should never reheat a fitting twice! Remember... if in doubt cut it out... and start again. I know it is tough but that’s how it should be!
Make sure the fusion cycle has been completed and then... the cool time begins. Check on the fitting – the cool time should be written on it somewhere. Do not move the pipe at all until the cool time has passed.
STEP 5This is when you need to take a look at the joint and make a go or no go call! If there is any sign of misalignment or PE material oozing between the pipe and the fitting then apply our if in doubt policy!
STEP 6Only then should you unclamp your pipe support clamps and move onto your next fusion joint.
14 How I Install PE Pipes

Butt Fusion jointing requires a higher level of care and attention than compared to Electrofusion Jointing... y’need a lot more skill and training too! Although some guys try to train themselves you shouldn’t. I highly recommend that you sit a qualified training course to learn how to fuse PE pipe correctly.
Go to www.waternz.org.nz for more information.
Before you arrive on site y’need to do a bit of planning. Take a look at the site and decide where a flat staging platform can be created. I work with this policy…• Fusion Platform - pipe length x 3 x 4m wide• Pipe String Platform – proposed pipe string length x
5m or wider.
Y’need a bit of space for pipe storage too! Make sure the storage space is close to the fusion platform. Above is a picture of one of my recent 500mm pipe jobs. Do you like my bagged pipe ends? Always bag ‘em cos it keeps the breeze out and stops the dragonflies flying up the pipe. It happened to me once during a shift cycle – he got fried in the pipe joint!
Here is my typical pipe string staging area… Remember what I said earlier, those big PE pipes are heavy so I use a dedicated fork lift. Some guys use a digger but diggers are too slow for me. They can hold up other stuff on site. An off road rubber tyred 4x4 telescopic fork lift works best. I usually hire a Merlo P26.6 PLT. They are fairly stable and good for large pipe up to about 500mm. They are quick to use around the site and manoeuvrable too.
Butt Fusion Jointing
How I Install PE Pipes 15

Because they are quick, you can use it as a tow pipe vehicle as well!
Once on site, complete your first fusion joint and send away for tensile testing. Some asset owners may want you to tensile test fusion joints randomly along the pipeline as well. When you change fusion technicians it’s common to present new joints for tensile testing.
Now follow these important steps:
STEP 1Set up your pipe rollers. I try and have the pipe string being towed out, on rollers as it reduces the drag.
STEP 2Ensure your first pipe is in the rollers sitting level and level in the butt fusion machine inserts too.
STEP 3Place your next pipe onto level rollers. This reduces excessive drag on your fusion machine and joint.
16 How I Install PE Pipes

STEP 4Clamp up and align your pipe ends to ensure the two pipe spigots are evenly aligned around the entire circumference of the pipe. Most machines have adjustable jaws to correct out of round pipe.
STEP 5Clean the pipe inside, outside and remove any stones that may be embedded into the pipe barrel or spigots. If you don’t these could damage your facer blades or facer. It happened recently to some guys new to butt fusion jointing. They bought a brand new machine and on their first butt fusion joint trial little stones scratched the facer…bugger!
STEP 6Face your pipe, leaving no gaps between the two pipe faces, no notches or unfaced pipe ends.
STEP 7Now that you are ready for fusion, clean your heater plate. I don’t use any IPA. I buff up the heater with a lint free 100% cotton ‘Terry Towel,’ a 400 x 400 size towel works well.
STEP 8Remove all dust from the pipe ends with a ‘Terry Towel’ and place your heater plate between the pipe ends and follow your fusion jointing procedure completing the fusion joint.
How I Install PE Pipes 17
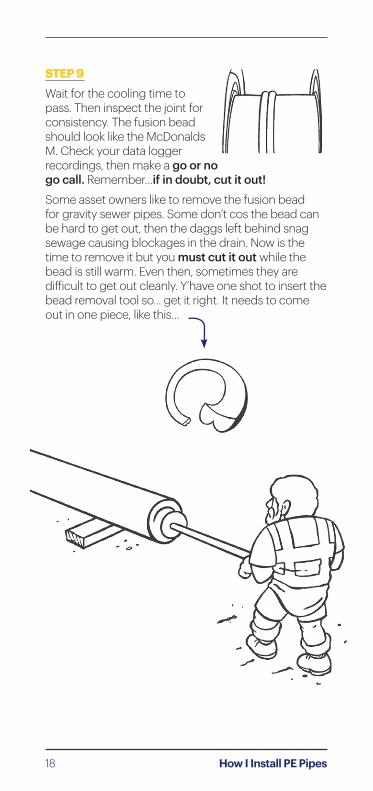
STEP 9Wait for the cooling time to pass. Then inspect the joint for consistency. The fusion bead should look like the McDonalds M. Check your data logger recordings, then make a go or no go call. Remember…if in doubt, cut it out!Some asset owners like to remove the fusion bead for gravity sewer pipes. Some don’t cos the bead can be hard to get out, then the daggs left behind snag sewage causing blockages in the drain. Now is the time to remove it but you must cut it out while the bead is still warm. Even then, sometimes they are difficult to get out cleanly. Y’have one shot to insert the bead removal tool so... get it right. It needs to come out in one piece, like this…
18 How I Install PE Pipes

STEP 10Then unclamp the pipe string and raise the rollers.
STEP 11Haul out the pipe string through the fusion machine on the rollers and move onto your next fusion joint.
Now, I always get asked, how do you join two pipe strings together when one string is already in the trench? You might be able to use an EF coupler. If you can’t, here is what y’need to do.
How I Install PE Pipes 19

The first thing is you need to buy the right fusion machine. Y’need a BF machine that has removable top jaws facing up in the bed of the frame on a 45° angle helps, like this one. Then dig a pit where the pipe will join. I work to these pit dimensions:
Width = 4 x BF machine
Length = 2 x BF machine
Depth = 1.3 x pipe diameter…
+ or – a touch!
Place a thick large steel plate in the base of your level excavated pit that you are going to be working in…
I bought a wheeled hydraulic pallet jack specifically for pit fusion; lift this into your pit next.
Lift your BF machine in and place it on the pallet jack. Adjust the BF machine to the correct height for fusion and clamp up.
Then bring your next pipe string in on rollers, clamp it up and fuse it!
Once the joint cooling has been completed, unclamp the pipe, remove the upper jaws, drop the pallet truck height down and wheel it out backwards. Don’t forget safety comes first... if you are deeper than 1.5m trench shields may be required.
20 How I Install PE Pipes

Although poly pipe can bend fairly easily there are some limits. I will list below what the allowable radii are:
Minimum Bending Radius (mm)
STAND-ARD
DIMEN-SION RATIO
BY PRESSURE CLASS (BAR)
@ 20ºC @ 0ºC PE80 PE100
SDR26 25 x DN 50 x DN PN6.3SDR21 20 x DN 50 x DN PN6.3 PN8SDR17 20 x DN 50 x DN PN8 PN10SDR13.6 20 x DN 50 x DN PN10 PN12.5SDR11 20 x DN 50 x DN PN12.5 PN16SDR9 20 x DN 50 x DN – PN20SDR7.4 20 x DN 50 x DN – PN25
Curved Trenches
How I Install PE Pipes 21

Those radio detection devices for pipes require an electrical wire to be laid in the trench so they’ll work… sometimes the engineer will want you to lay a wire with the pipe. Detector tape is also used most of the time. Just lay it 100mm above the pipe!
Detector Tape and Tracer Wires
22 How I Install PE Pipes

If thrust-blocks are to be constructed they might be needed at changes of direction for bends and tees, etc! The size of each Anchor block may vary – the engineer usually designs these so talk to him before you build it. It must be poured against freshly dug solid trench walls. I have used timber to make my boxing before, but prefer to use layered sand bags to create my shape as this allows trenching ‘n’ pipe laying to continue. Thrust-blocks must be in and cured before testing (cement takes 28 days to cure). Then I completely backfill the trench.
Thrust-Blocks
How I Install PE Pipes 23

Use a dazzle spray can to mark off your compaction layers… it takes the guessing away and really works well for deep trenches
Compacted granular bedding/aggregate surrounds the pipe and up to a minimum 100mm above the pipe. Then I use selected ordinary backfill. I compact with my machine below, beside and above the pipe in layers of 300mm until I get to the top surface.
I backfill with dense solid material like sand mixed sized pea metal or scoria which has no sharp or large stones (over 20mm) in it. I must fill all the gaps and spaces in between the pipe and trench. Once the metal is placed I haunch the bottom of the side support zone by shuffling my shovel along the pipe this shuffles metal under and beneath into the 5 o’clock to 7 o’clock zones.
If I do the compaction correctly I never need to be called back to the job to correct slumped trenches. I never get paid for doing a job twice…any call backs are on me!
I do it once and I do it right…First time…then shout myself a cold beer for doing a good job!
Backfilling & Compaction
Above in300mm layers
100mm above the crown of the pipe
Beside the pipe
And Icompact below
Dazzlespraymarking
24 How I Install PE Pipes

Pressure test procedures for testing PE pipe are complex. Procedures vary and are dependent upon the pipe diameter, pipeline length and what the pipe is being used for… gravity or as a pressure pipeline.
Check your contract documents to see what the owner wants or call Iplex 0800 800 262 and ask for them to send you their pressure test guide! All my concrete must be fully cured (up to 28 days) before testing.
Well that’s it…It’s easy when you know how! Always do it right the first time - Keep on diggin…!!
Testing

Important DisclaimerThe information, opinions, advice and recommendations contained in this publication are put forward with the main objective of providing a better understanding of technical matters associated with pipeline design using Iplex Pipelines. Whilst all reasonable care has been made in ensuring that the information contained in this publication is accurate, this publication should not be used as the only source of information by the reader. Reference should also be made to established textbooks and other published material, and readers should not rely on the information contained in this publication without taking appropriate professional advice for their particular circumstances. Pipes and fittings have been shown as typical configurations, however, in some cases product dimensions may vary or be changed without notice. In all instances, the reader should contact Iplex Pipelines for clarification that the specific product is appropriate for their circumstances.
More products from Iplex PipelinesNOVADRAINDRAIN WASTE & VENT SYSTEMS
SUPERSTORM™ & STORMFITPVC STORMWATER DUCT SYSTEM
NEXUS™ HI-WAYROAD DRAINAGE SYSTEM
NOVAKEY™ & BLUE BRUTEuPVC PRESSURE SYSTEMS
WHITE & BLUE RHINO™HIGH IMPACT mPVC PRESSURE PIPE
BLUELINEMEDIUM DENSITY POLYETHYLENE PIPE
POLIPLEXPOLYETHYLENE PRESSURE PIPE
ALKATHENE™LOW DENSITY POLYETHYLENE PIPE
NOVATUBEHORTICULTURAL LATERAL TUBE
GREENLINE, REDLINE™, RURAL BLACK & BLACKLINEMEDIUM DENSITY POLYETHYLENE PIPE
PLASSONMETRIC COMPRESSION FITTINGS
NEXUS™FLO, NEXUS™COIL, NOVAFLO™ & NOVACOILLAND DRAINAGE SYSTEMS
IPLEX EFFLUENT PIPEMEDIUM DENSITY POLYETHYLENE PIPE
FARMTUFF™ & NEXUS™ CULVERTCULVERT PIPE
RAINWATER SYSTEMSSPOUTING & DOWNPIPE
POLIGAS™POLYETHYLENE GAS SYSTEMS
iplex.co.nzIplex Pipelines NZ Limited
Call 0800 800 262 or Fax 0800 800 804
Auckland: Private Bag 92 114, 810 Great South Road, PenrosePalmerston North: Private Bag 11019, 67 Malden Street
Christchurch: PO Box 16225, 22 Braeburn Drive, Sockburn
© 2018 IPLEX PIPELINES (NZ) LIMITED. NEXUS™, IPLEX™, RESTRAIN™, APOLLO™, NOVAFLO™, FARMTUFF™, NOVAKEY™, POLIGAS™, RHINO™, REDLINE™, SUPERSTORM™
are registered trademarks of IPLEX PIPELINES (NZ) LIMITED.
VERSION 4


