240


How to Contact Us
Our main office (UK, Europe):
The Software Centre PO Box 2000, Nottingham, NG11 7GW, UK
Main (0115) 914 2000 Registration (UK only) (0800) 376 1989 Sales (UK only) (0800) 376 7070 Technical Support (UK only) (0845) 345 6770 Customer Service (UK only) (0845) 345 6770 Customer Service/ Technical Support (International) +44 115 914 9090 General Fax (0115) 914 2020 Technical Support e-mail [email protected]
American office (USA, Canada):
The Software Center 13 Columbia Drive, Suite 5, Amherst, NH 03031
Main (603) 889-8650 Registration (800) 794-6876 Sales (800) 55-SERIF or 557-3743 Technical Support (603) 886-6642 Customer Service (800) 489-6720 General Fax (603) 889-1127
Technical Support e-mail [email protected]
Online
Visit us on the Web at http://www.serif.com
Serif newsgroups news://news.serif.com
International
Please contact your local distributor/dealer. For further details please contact us at one of our phone numbers above.
Comments or other feedback
We want to hear from you! Please e-mail [email protected] with your ideas and comments, or use the Serif Web forums!

All Serif product names are trademarks of Serif (Europe) Ltd. Microsoft, Windows, and the Windows logo are registered trademarks of Microsoft Corporation. All other trademarks acknowledged.
Companies and names used in samples are fictitious.
Serif MoviePlus 5.0 © 2003-2006 Serif (Europe) Ltd. All rights reserved.
Serif PhotoPlus 10.0 ©2005 Serif (Europe) Ltd.
Serif ImpactPlus 5.0 ©2004 Serif (Europe) Ltd.
Portions graphics import/export technology © LEAD Technologies, Inc.
Portions MPEG encoding technology © 1999/2000-2003 MainConcept AG.
Portions digital audio content © 2003-2005 Robert Bailey (http://www.a1freesoundeffects.com).
Portions images © 1997-2001 Nova Development Corporation; © 1996-99 Cliptoart; © 1996-99 Focus Designs; © 1996-99 Hemera Technologies Inc.; © 1997-98 Seattle Support Group; © 1995 Expressions Computer Software.
Digital image content © 2005 JupiterImages Corporation. All rights reserved.
© Digital Vision® Ltd. All rights reserved. The motion clips are copyright Digital Vision Ltd or its licensors and are protected by the United States Copyright laws, international treaty provisions and other applicable laws. No title or intellectual property rights in the motion clips are transferred to you. Digital Vision Ltd. retains all rights not expressly granted by this license.
© 2005 TriLab Productions. All Rights Reserved.
Digital Hotcakes is a registered trademark of TriLab Productions.
© 2004 Sonic Solutions. Sonic and the Powered by Sonic logo are trademarks or registered trademarks of Sonic Solutions in the U.S. and/or other countries.
HDV and the HDV logo are trademarks of Sony Corporation and Victor Company of Japan, Ltd.
QuickTime is a trademark of Apple Computer, Inc., registered in the U.S. and other countries.

Contents
Contents
Intro and Overviews 1 Welcome to Serif MoviePlus 5.0.................................................. 3 Visual Reference: A Guide to the Interface ............................... 10 System Requirements................................................................ 14
Getting Started 17 Before You Start ........................................................................ 19 Starting a New Project ............................................................... 20 Capturing Video ......................................................................... 24 Browsing for and Adding Media Files ........................................ 30 Scene Detection......................................................................... 38
Previewing Your Project 41 Previewing your Project ............................................................. 43
Editing Your Video 47 Timeline Basics.......................................................................... 49 Adding and Arranging Tracks .................................................... 54 Selecting Sources ...................................................................... 56 Arranging Sources ..................................................................... 60 Resizing Sources ....................................................................... 65 Copying and Pasting.................................................................. 67 Zooming, Scrolling and Seeking ................................................ 68 Trimming and Splitting ............................................................... 70 Using Envelopes ........................................................................ 72 Adjusting Keyframes .................................................................. 75 Using Groups ............................................................................. 80 Using Markers and Chapter Points ............................................ 83 Looping ...................................................................................... 86 Static Extensions ....................................................................... 89 Stretching and Speeding Up ...................................................... 90 Reverse Playback ...................................................................... 90 Transparency & Opacity ............................................................ 91 Fading ........................................................................................ 92 Removing Backgrounds............................................................. 95 Masking...................................................................................... 96 Blue Screening (Chroma Key) ................................................. 102
Contents
Introducing Transforms ............................................................106 Scaling and Rotating ................................................................107 Source, Track, and Group Motion............................................112 Perspective ..............................................................................114 Picture-in-Picture Effects..........................................................116 Blend Modes ............................................................................118 Cropping...................................................................................119 Video Overlays.........................................................................122
Video Effects and Transitions 127 Applying Effects .......................................................................129 Applying Shadows, Glow, Bevel/emboss, Colour fill ...............134 Feathering ................................................................................136 Using 3D Filter Effects .............................................................137 Combining Effects ....................................................................139 Colour Correction .....................................................................140 Transitions................................................................................142
Computer-generated (CG) Sources 147 Using CG Sources ...................................................................149 Backgrounds ............................................................................152 QuickShapes............................................................................154 Text and Titles..........................................................................156
Managing Audio 161 Introducing Audio .....................................................................163 Adding and Replacing Audio....................................................166 Volume and Balance ................................................................169
Sharing Your Movie 173 Sharing Your Movies................................................................175 Write to DVD/VCD....................................................................177 Using Menu Designer...............................................................182 Export as File ...........................................................................188 Advanced Export Settings........................................................194 Export to DV Camera (Print to Tape).......................................197
Appendices 199 Codecs and their Management................................................201

Contents
Performance Notes .................................................................. 207 Changing the Layout................................................................ 211 Keyboard Shortcuts ................................................................. 213
Index 217

Contents
Intro and Overviews
1

2 | Intro and Overviews

Intro and Overviews | 3
Welcome to Serif MoviePlus 5.0 What is MoviePlus?
Serif MoviePlus is a powerful video-editing program for Windows®-based PCs, offering easy and flexible ways to capture and edit your movies, add and blend audio tracks, apply video transitions, envelopes and cool special effects along the way, and to export your creations in a number of possible video formats for sharing (to file or DVD/VCD).
In fact, there's such as diverse range of powerful features it's worthwhile taking some time to review the new and established feature lists shown below.
What's new in MoviePlus 5... • Built-in DVD/VCD Authoring! (see p. 177)
Bring your movies to the masses by wizard-driven authoring to DVD or VCD (includes auto-erase)! Your DVD/VCD will autoplay in your DVD player, or CD/DVD drives in computers with DVD-playback software. Optionally, create a disc image then author to DVD/VCD at a later date. For handy chapter navigation, the Menu Designer lets you create your very own menu designs from a diverse range of pre-built templates, by changing layout, background images/music, titling and button styles, amongst others. Easily create Chapter Points directly on your Timeline to mark the start of your DVD/VCD chapters. Requires MoviePlus 5 Resource CD!
• Create dynamic slideshows with preset Envelopes (see p. 72) Avoid creating your own keyframe envelopes (although you still can!) with preset envelopes. The Envelopes pane hosts presets for Opacity, Transform, Pan and Volume, as well as the new Crop envelope which pans, moves and zooms into your image or video sources—use it to create sensational Ken Burns effects in your "movie slideshow" montages. Transform presets let you apply animated spin, scroll, scale and perspective. You can now save any created or modified envelope for future use.
• Enhanced titling and credits (see p. 156) Gradient fills, Transparency and Filter Effects such as shadow, bevel, glow and emboss have revitalized Text sources! Apply solid and gradient colour fills or transparency with ease. Alter line styles including line fill colour and weight.. even save custom fills and transparencies at any time for future use. Benefit from better control of text placement and alignment—simply position your text anywhere in the Video Preview pane by dragging.
4 | Intro and Overviews
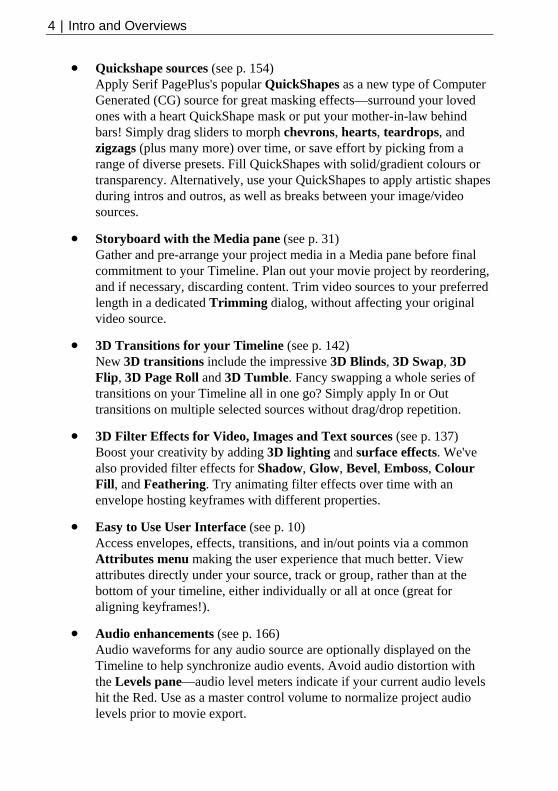
• Quickshape sources (see p. 154) Apply Serif PagePlus's popular QuickShapes as a new type of Computer Generated (CG) source for great masking effects—surround your loved ones with a heart QuickShape mask or put your mother-in-law behind bars! Simply drag sliders to morph chevrons, hearts, teardrops, and zigzags (plus many more) over time, or save effort by picking from a range of diverse presets. Fill QuickShapes with solid/gradient colours or transparency. Alternatively, use your QuickShapes to apply artistic shapes during intros and outros, as well as breaks between your image/video sources.
• Storyboard with the Media pane (see p. 31) Gather and pre-arrange your project media in a Media pane before final commitment to your Timeline. Plan out your movie project by reordering, and if necessary, discarding content. Trim video sources to your preferred length in a dedicated Trimming dialog, without affecting your original video source.
• 3D Transitions for your Timeline (see p. 142) New 3D transitions include the impressive 3D Blinds, 3D Swap, 3D Flip, 3D Page Roll and 3D Tumble. Fancy swapping a whole series of transitions on your Timeline all in one go? Simply apply In or Out transitions on multiple selected sources without drag/drop repetition.
• 3D Filter Effects for Video, Images and Text sources (see p. 137) Boost your creativity by adding 3D lighting and surface effects. We've also provided filter effects for Shadow, Glow, Bevel, Emboss, Colour Fill, and Feathering. Try animating filter effects over time with an envelope hosting keyframes with different properties.
•
e e, either individually or all at once (great for
•
ls ontrol volume to normalize project audio
levels prior to movie export.
Easy to Use User Interface (see p. 10) Access envelopes, effects, transitions, and in/out points via a commonAttributes menu making the user experience that much better. View attributes directly under your source, track or group, rather than at thbottom of your timelinaligning keyframes!).
Audio enhancements (see p. 166) Audio waveforms for any audio source are optionally displayed on the Timeline to help synchronize audio events. Avoid audio distortion with the Levels pane—audio level meters indicate if your current audio levehit the Red. Use as a master c

Intro and Overviews | 5
• TV preview (via DV) (see p. 46) For a true representation of your finished movie, preview your project on your TV directly (via your pass-through DV camera). Check for colour definition, TV-safe border alignment and correct interlacing before exporting your movie correctly!
• Broadcast-safe border display (see p. 43) Apply an adjustable TV-safe border display during TV preview to ensure that your exported movie will fit into the picture of your target TV—never lose parts of your titling or movie action again!
• QuickTime import/export (see p. 30) Importing and exporting Apple QuickTime video means MoviePlus can now handle the most popular movie formats.
• High-quality HDV support (see p. 24) The stunning new High Definition Video (HDV) files can be imported and exported. Alternatively, capture HDV directly within MoviePlus without fuss.
• nts! Here are some other things
ly d their
e
se as
great tool for uploading any exported DV movie for archiving to tape.
..and finally.... We've been listening to your commewhich we've decided to implement: Fancy turning back time? As a fun effect you can now apply Reverse playback to your video and audio source together or separately. Background sources now replace Solid colour sources, to reflect newsupported gradient colour fills, transparency and animation (anpresets). Performance-wise, Smart DV recompression when importing/exporting DV movies minimizes decompression and recompression overhead. We've expanded the range of effects and transitions available for your use—you can even save your own for futuruse. Effects added include Emboss, Channel Mixer, Curves, Solarize and Filter Effects. Use different viewing styles for your Explorer pane—duration can now be shown per video source. Scale keyframes for any object automatically—great for copy/paste of attributes between objects of differing length! Add Markers to any point on your Timeline—uhelpful guides which can be labelled as well as navigated. Use MoviePlus's new Codec Manager for CODEC control—import more movies as a result! Finally, Write file to DV camera is a

6 | Intro and Overviews
..plus these established features • Quick Sourcing of Video, Audio, Image Content
MoviePlus makes it easy to gather content for your digital desktop studio! Capture video and audio directly from sources like a DV (digital video) camera, video capture card, even audio CD. Use the convenient Explorer pane to browse and preview video, audio, and image files from your hard drive and decide which clips to use.
• Scene Detection Any movie—captured from your video camera or sourced from your hard drive—can benefit from scene detection. A simple slider allows adjustment of scene detection sensitivity, so individual clips can be used in your project in place of entire movie files—and the original file is left intact, not split into pieces by the process.
• Convenient Multi-Track Timeline Editing MoviePlus’s powerful Timeline approach lets you build your movie by arranging elements along an unlimited number of chronological tracks, using simple drag-and-drop, cut-and-paste techniques. It's easy to trim in- and out-points of your clips, adjust playback speed and direction, fade audio up or down, split a long clip into separate scenes, repeat individual clips or switch them on or off... and that's just for starters! It's easy to preview your movie-in-progress at any time—MoviePlus's amazing core processing means your movie is previewed in real-time with no pre-rendering of transitions or effects!
• Cool Transitions Automatic Transitions between two video clips makes MoviePlus a breeze. MoviePlus offers dozens of built-in, customizable transitions... enjoy standards like wipes and cross-fades through to stretches, pushes, and pixellation.
•
lur
also
ffects simultaneously and control the order in which they are
applied.
Video Effects Drag and drop from the Effects pane to enhance your movies with a widerange of customizable video-image correction filters and special effects. Choices include basic brightness, contrast, and gamma adjustments... band sharpen... Chroma key, and greyscale... colourization... and many more! Mixback allows you to blend your effected video with the original, so in addition to adjusting the strength of the effect settings you cancontrol the overall blended strength of your effect in the mix! The powerful core video processing power of MoviePlus allows you to applymultiple e
Intro and Overviews | 7
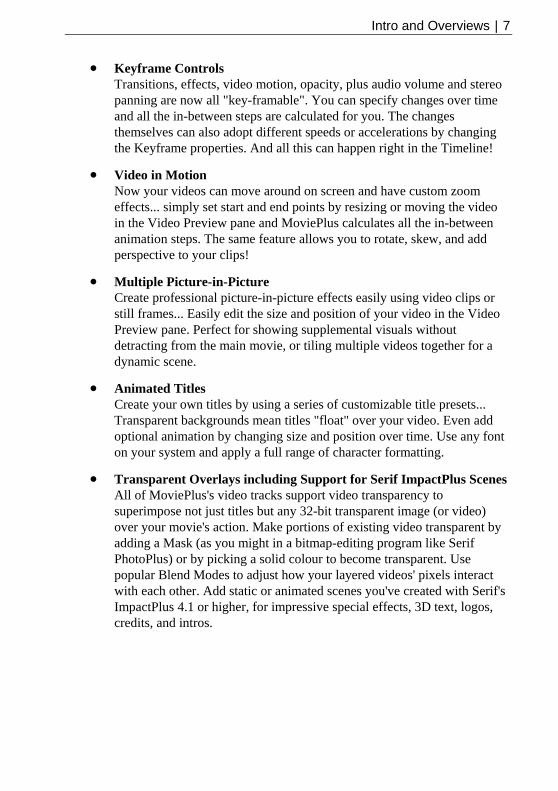
• Keyframe Controls Transitions, effects, video motion, opacity, plus audio volume and stereo panning are now all "key-framable". You can specify changes over time and all the in-between steps are calculated for you. The changes themselves can also adopt different speeds or accelerations by changing the Keyframe properties. And all this can happen right in the Timeline!
• Video in Motion Now your videos can move around on screen and have custom zoom effects... simply set start and end points by resizing or moving the video in the Video Preview pane and MoviePlus calculates all the in-between animation steps. The same feature allows you to rotate, skew, and add perspective to your clips!
• Multiple Picture-in-Picture Create professional picture-in-picture effects easily using video clips or still frames... Easily edit the size and position of your video in the Video Preview pane. Perfect for showing supplemental visuals without detracting from the main movie, or tiling multiple videos together for a dynamic scene.
• Animated Titles Create your own titles by using a series of customizable title presets... Transparent backgrounds mean titles "float" over your video. Even add optional animation by changing size and position over time. Use any font on your system and apply a full range of character formatting.
• lus Scenes
t by
s igher, for impressive special effects, 3D text, logos,
credits, and intros.
Transparent Overlays including Support for Serif ImpactPAll of MoviePlus's video tracks support video transparency to superimpose not just titles but any 32-bit transparent image (or video) over your movie's action. Make portions of existing video transparenadding a Mask (as you might in a bitmap-editing program like Serif PhotoPlus) or by picking a solid colour to become transparent. Use popular Blend Modes to adjust how your layered videos' pixels interact with each other. Add static or animated scenes you've created with Serif'ImpactPlus 4.1 or h
8 | Intro and Overviews
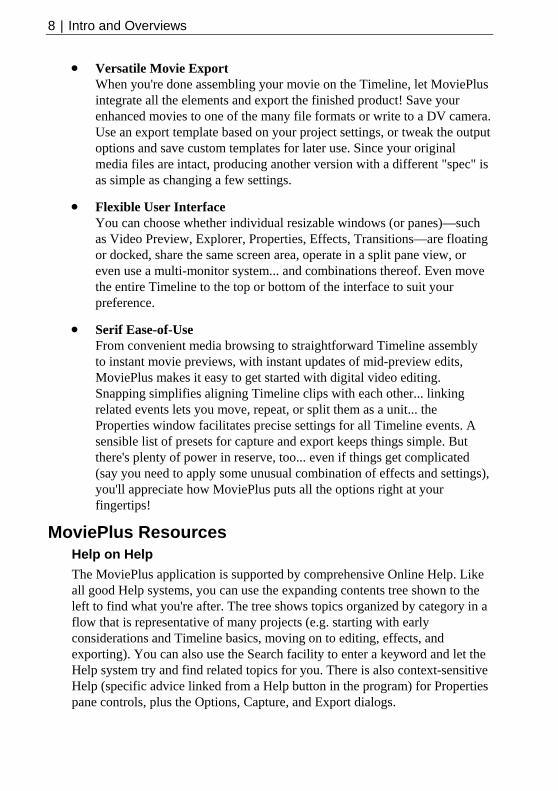
• Versatile Movie Export When you're done assembling your movie on the Timeline, let MoviePlus integrate all the elements and export the finished product! Save your enhanced movies to one of the many file formats or write to a DV camera. Use an export template based on your project settings, or tweak the output options and save custom templates for later use. Since your original media files are intact, producing another version with a different "spec" is as simple as changing a few settings.
• Flexible User Interface You can choose whether individual resizable windows (or panes)—such as Video Preview, Explorer, Properties, Effects, Transitions—are floating or docked, share the same screen area, operate in a split pane view, or even use a multi-monitor system... and combinations thereof. Even move the entire Timeline to the top or bottom of the interface to suit your preference.
• Serif Ease-of-Use From convenient media browsing to straightforward Timeline assembly to instant movie previews, with instant updates of mid-preview edits, MoviePlus makes it easy to get started with digital video editing. Snapping simplifies aligning Timeline clips with each other... linking related events lets you move, repeat, or split them as a unit... the Properties window facilitates precise settings for all Timeline events. A sensible list of presets for capture and export keeps things simple. But there's plenty of power in reserve, too... even if things get complicated (say you need to apply some unusual combination of effects and settings), you'll appreciate how MoviePlus puts all the options right at your fingertips!
MoviePlus Resources Help on Help The MoviePlus application is supported by comprehensive Online Help. Like all good Help systems, you can use the expanding contents tree shown to the left to find what you're after. The tree shows topics organized by category in a flow that is representative of many projects (e.g. starting with early considerations and Timeline basics, moving on to editing, effects, and exporting). You can also use the Search facility to enter a keyword and let the Help system try and find related topics for you. There is also context-sensitive Help (specific advice linked from a Help button in the program) for Properties pane controls, plus the Options, Capture, and Export dialogs.

Intro and Overviews | 9
MoviePlus 5 Resource CD* The MoviePlus 5 Resource CD enables DVD and VCD writing, and a powerful DVD/VCD Menu Designer. Also included are Level 1, 2 and Project Tutorials.
MoviePlus Director's Collection DVD* The Director's Collection DVD can be used to support you as you begin your first attempts at making your own movies. Think of your DVD as a digital gallery which you can call on to select source material for your MoviePlus project. Use the creative content to fuel your imagination!
* Please contact the Serif Software Centre (see How to Contact Us at the start of this User Guide) if you would like to purchase this item.
Registration, Upgrades, and Support If you see the Registration Wizard when you launch MoviePlus, please take a moment to complete the registration process. Follow the simple on-screen instructions and you'll be supplied a personalized registration number in return. If you need technical support please contact us, we aim to provide fast, friendly service and knowledgeable help. There's also a wide range of support information available 24 hours a day on our website at www.serif.com.

10 | Intro and Overviews
Visual Reference: A Guide to the Interface
If you are new to movie editing or have not encountered an interface as rich as MoviePlus's, read on for an introduction to each element of the MoviePlus interface.
Menus The Menu bar in MoviePlus offers a typical range of drop-down menu commands; some are standard to most programs, such as File>New, File>Open, File>Save, Edit>Undo and so on, and some commands are of course specific to MoviePlus or video editing functionality, such as Insert>Video Track or Tools>Capture.
Toolbars MoviePlus provides four separate toolbars (Standard, Editing, Playback, and Timeline) each hosting tools with related functions. Each of the toolbar's buttons offers a ToolTip—a popup reminder of the tool's name when you hover the mouse over the button. The toolbars can be dragged to reorder them, or to move them to new locations—they can be free floating, or docked at the top, bottom, left or right of the MoviePlus window.
Status Bar Displays helpful, context-sensitive messages about MoviePlus interface elements, as well as status information for selected operations.
Intro and Overviews | 11
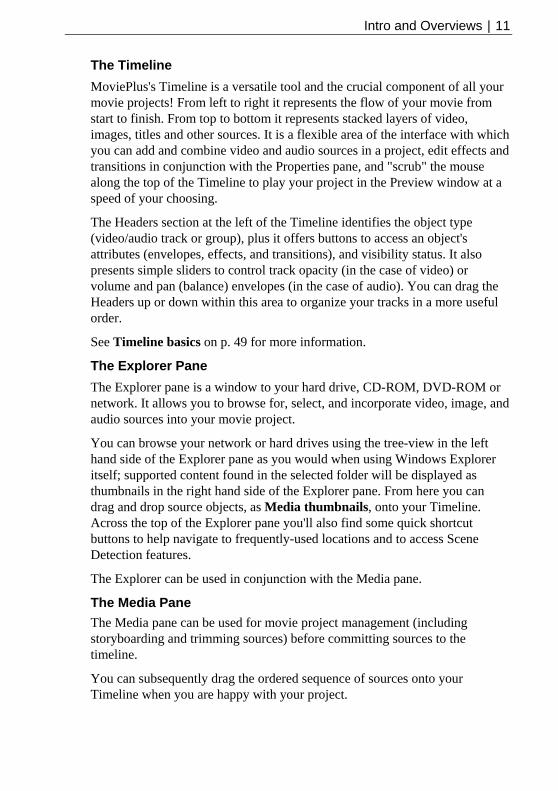
The Timeline MoviePlus's Timeline is a versatile tool and the crucial component of all your movie projects! From left to right it represents the flow of your movie from start to finish. From top to bottom it represents stacked layers of video, images, titles and other sources. It is a flexible area of the interface with which you can add and combine video and audio sources in a project, edit effects and transitions in conjunction with the Properties pane, and "scrub" the mouse along the top of the Timeline to play your project in the Preview window at a speed of your choosing.
The Headers section at the left of the Timeline identifies the object type (video/audio track or group), plus it offers buttons to access an object's attributes (envelopes, effects, and transitions), and visibility status. It also presents simple sliders to control track opacity (in the case of video) or volume and pan (balance) envelopes (in the case of audio). You can drag the Headers up or down within this area to organize your tracks in a more useful order.
See Timeline basics on p. 49 for more information.
The Explorer Pane The Explorer pane is a window to your hard drive, CD-ROM, DVD-ROM or network. It allows you to browse for, select, and incorporate video, image, and audio sources into your movie project.
You can browse your network or hard drives using the tree-view in the left hand side of the Explorer pane as you would when using Windows Explorer itself; supported content found in the selected folder will be displayed as thumbnails in the right hand side of the Explorer pane. From here you can drag and drop source objects, as Media thumbnails, onto your Timeline. Across the top of the Explorer pane you'll also find some quick shortcut buttons to help navigate to frequently-used locations and to access Scene Detection features.
The Explorer can be used in conjunction with the Media pane.
The Media Pane The Media pane can be used for movie project management (including storyboarding and trimming sources) before committing sources to the timeline.
You can subsequently drag the ordered sequence of sources onto your Timeline when you are happy with your project.
12 | Intro and Overviews
The Video Preview Pane The Video Preview pane in MoviePlus is more than just a way to preview your project! Of course its primary purpose is to be the place where you will see your project being previewed when you use the Playback controls (e.g., Play button) within the pane. You can also change the direction and speed of playback directly within the Video Preview pane, via the Playback toolbar or by "scrubbing" the Timeline caret.
The Preview pane has another important function too—it's the place for adjustments to a video track's Transform Envelope, because you get to directly see the changes to the position or size of your selected source, track, or group as you use the Transform tool.
The Properties Pane This pane is another crucial component of the MoviePlus interface, one we trust you will be using very frequently. The contents of the Properties pane will change depending on what kind of object you have selected. This versatile pane allows you to change the Selected component name of objects, to adjust their attributes (such as a source's start and end times, play speed, the repeat mode and resizing behaviour), to adjust envelope, effect and transition properties, and to control specific keyframe settings in an effect, transition, or envelope (Opacity, Crop, Transform, Volume, or Pan). From here you can also solo a strip (disables other strips of the same kind), and for video tracks you can adjust the video Blend Mode (how the track blends with the underlying track).
The Effects Pane This area of the MoviePlus interface offers categorized previews of the video effects available for use in your projects. To apply an effect, drag and drop it from the right-side of the Effects pane onto a source object, track header, or group of tracks. Once the effect is applied, you can alter its setting using the Properties pane.
The Transitions Pane Like the Effects pane, this tab shows easy-to-use previews—this time of transitions. A simple drag and drop of a preset from the Transitions pane onto an area where two sources overlap will apply the transition to that part of your project. A transition can be selected with a click on its blue bar on the Timeline, so its settings can be modified using the Properties pane.

Intro and Overviews | 13
The Sources Pane This pane offers ready-made computer-generated sources that you can drag and drop onto your Timeline. They include Background (solid colours or gradient fills), QuickShapes or Text objects. They are always generated at the highest possible quality for all your project exports. Once you've dragged and dropped your source onto a video track in the Timeline, you can use the Properties pane to edit it.
The Edit Text Pane This pane allows you to edit a selected Text source (which you can add to your Timeline from the Sources pane). The text controls are typical of a simple word processor, lines of text can be created by typing then pressing Return, plus of course you can select text using drags of your mouse in order to change the font, font size, attributes, alignment, fill/line colour (solid or gradient), and transparency using the toolbar at the top of the pane.
The Envelope Pane The pane hosts a wide variety of preset envelopes which are used to apply commonly used Cropping, Opacity, and Transform settings to video-related objects. Volume and Pan envelope presets are also available for audio-related objects.
The Levels Pane The Levels pane provides a visual indication of current audio levels used on your project. If levels peak into the red area you can make adjustments to the Gain for your master audio group.
Changing the MoviePlus Screen Layout With all the video editing possibilities MoviePlus offers, its interface needs to offer a great deal of content and control. The interface itself is customizable to suit your preferred method of working. You can grab and move the separators between panes, drag tabs out of groups of panes to make them free floating, or dock them against a side of the main window or into new groups with other panes. You can also split a pane region into two by dragging a tab to the edge of an existing pane. See Changing the Layout on p. 211 for more guidance.
14 | Intro and Overviews
System Requirements Minimum, recommended, and ideal PC specifications
MoviePlus is engineered to work on a wide variety of Microsoft Windows-based PCs, but due to the nature of digital video files and digital video editing, some weighty demands are inevitably placed on your PC hardware. MoviePlus is speed-optimized for modern PC processors—please note the system specifications listed below.
"Minimum" requirements are those necessary for MoviePlus to work. MoviePlus and its features will all function but not at optimal speed. Meeting the "recommended" requirements will mean that you will enjoy smoother performance for typical MoviePlus projects. Fulfilling the "ideal PC" specification will allow you to achieve higher levels of performance with MoviePlus, achieving more fluid editing of complex projects and speedy movie exports.
Minimum • Intel® Pentium® II or AMD Athlon™ XP processor
• 128MB RAM
• 149MB hard drive space (2-5GB of additional space may be required during the composition and export of video projects)
• Graphics card and monitor capable of 800x600 display size and 24-bit colour depth
•
rogram install)
inimum specification) 4 Hyper-Threaded processor
ents
Windows-compatible sound controller
• CD-ROM/DVD-ROM drive (for p
• Microsoft Windows® 2000 or XP
• Microsoft DirectX 9.0b device drivers (included with install)
• Microsoft Windows Media Video support files (included with install)
Recommended (beyond the items in the m• Intel® Pentium®
• 512MB RAM
• 402MB maximum hard drive space (includes all Program CD componexcept QuickTime)

Intro and Overviews | 15
• Fast hard disk (7200rpm drive with dedicated ATA133 connection or better)
• Modern graphics card and monitor capable of 1024x768 display size
s in the minimum specification)
•
• ATA or SCSI striped RAID (RAID 0) hard disk array for
n primary
ents, there are m
Optional
• r digitizing and editing analogue video sources
• ows XP Service Pack 2 (for HDV video capture)
DVD±R
Ideal (beyond the item• Multi-processor modern system architecture
1GB or more RAM
IDE, S-improved disk performance
• Multi-monitor display capable of 1280x1024 display size oscreen
In addition to the typical processing, disk, and graphics requiremso e optional items that may enhance your use of MoviePlus.
• FireWire (IEEE1394) support for connecting DV cameras
Video capture card fo
Wind
• or CD-R drive for Disc writing (requires MoviePlus 5.0 Resource CD)
• Apple QuickTime software (included with install; up to 143MB)
Optimizing Performance your hardware meets the requirements shown here but you are experiencing uttering playback of your project during preview, or are experiencing ropped frames during video capture, please read the Performance Notes on . 207 for advice.
Ifstdp

16 | Intro and Overviews
Fir
automatically starts the Setup process and all you n questions. If the AutoRun does not start the
he
MaTo re-install the software or to change any part of the installation at a later date, select Control Panel from the Windows Start menu and then double-click the Add/Remove Programs icon. Make sure the correct CD is inserted into your CD-ROM drive, choose Serif MoviePlus 5.0, and click the Install… button. You’ll have the choice of removing or adding objects, re-installing objects, or removing all objects.
st-time install To install MoviePlus, simply insert the Program CD into your CD-ROM drive. The AutoRun feature need to do is answer the on-screeinstall, use the manual install instructions below.
If you’ve also obtained the MoviePlus 5 Resources CD and/or Director's Collection DVD, install it now following the same procedure you used for tProgram CD.
nual install/re-install

Getting Started
2

18 | Getting Started
Getting Started | 19
Before You Start Movie editing can be both a serious business and a great deal of fun, depending on the nature of your project and whether you have deadlines to face or other critical requirements to meet... in any event you can help yourself before embarking on your projects by considering the following:
Prepare your video, audio, and image sources If you are to capture footage from a camera or other video device, read Capturing Video on. p. 24 to achieve the best possible results.
Most projects are started with some intent—you are likely to already have a good idea of what video and audio footage you would like to edit and make into a movie. Once you've decided on your final selection, you can add your media to your Media pane—a really useful resource for media assembly, storyboarding of your project, and any possible trimming of sources (see p. 31).
If you are yet to create your video footage, prepare a shooting plan before you start; this can save a great deal of time and effort and is likely to have a very positive impact on your results.
Give your computer a performance check There are several performance checks you can perform to help optimize your computer for video editing. These will help overall speed, but in particular will help with data-intensive operations like composing and exporting a movie with MoviePlus! See Performance Notes on p. 207.
Lastly, don't worry, dive in and enjoy yourself! You can get help with all of MoviePlus's features in the Help system, so don't be daunted. Whether you are new to video editing or just new to MoviePlus, its richness will be unearthed as you use the program and the possibilities available to you will be revealed. All of the terminology, buttons, cursors and more are all described so that you will learn how to edit your movies like a professional...
...and of course there is always the Undo button (also available by pressing Ctrl+Z) so you can tweak and experiment without limit. MoviePlus's editing functions do not damage the source media that your project uses so you can feel free to try a range of trims, stretches, loops, transitions, effects and more, safe in the knowledge that you can undo your experimental operations with the click of a button and start again. Remember to share your results by exporting your movie and distributing it to friends, family, colleagues, or the rest of the world via the Internet or via DVD/VCD!

20 | Getting Started
Starting a New Project The Startup Wizard
The MoviePlus Startup Wizard offers easy access to the most common starting tasks after you launch MoviePlus (or when you click File>New). You can start from scratch (which will launch the Project Settings dialog), open a project (browse your PC for saved MoviePlus .MVP files), view tutorials (see tutorials aimed to get you started using MoviePlus) or view samples (open sample projects created in MoviePlus).
The Use the startup wizard next time button gives you the option of either using the startup wizard the next time MoviePlus is launched or displaying the user interface directly. The startup wizard can also be switched on or off in Tools>Options>General at any time.
Click the cancel button or press Escape on your keyboard to bypass the Startup Wizard and launch MoviePlus with an empty project. The type of project will match the last project you selected.
MoviePlus Projects... MoviePlus bases its movie compositions around "projects". You can save and reopen your projects at any time for ongoing editing. A MoviePlus project file is a collection of project settings (the video size and shape, audio properties etc.) plus information about how all your video, audio, image, text, QuickShape and background sources are arranged and edited on the Timeline. It's worthwhile choosing a project type before you embark on your movie creation—amongst other things the project settings will determine how your video looks when it is previewed.

Getting Started | 21
Because the makeup of your project will determine the look of your video during the editing phase and final output, take a moment before you get started to define your project settings. You can access the Project Settings dialog via the Startup Wizard's start from scratch link, the Project Settings button on the Standard toolbar, or the File>Project Settings menu item.
The Project Settings dialog (above) shows that there is a list of preset projects to choose from, encompassing all of the most popular types of movie production—DV presets for maintaining DV film quality, DVD presets for projects intended for ultimately writing to DVD disc for display on a TV, plus VCD and SVCD preset formats. Each of these major formats also offers NTSC/PAL choices for you to choose depending on your local standard, and a Widescreen variant in each case. The specific settings for each of these formats is fixed in order to maintain correct technical compatibility with the formats specified, but you can also edit the presets list for customized projects.
Choosing a project preset Choose a Project Setting preset to best match your desired output—if your source footage is from a DV camera but you already know you wish to export your movie to DVD, choosing a DVD-based project preset will help you gain a better appreciation of how your movie will look after export. Choosing such a project type would ensure that your previews will be of DVD size, aspect ratio, and more. If your source footage is high-resolution and you know your exports will be small and optimized for the Web, you should still set your
22 | Getting Started
project to match your planned export settings so that your previews match your expected results.
As an example of choosing a project: if you live in the UK and have used a typical British digital video camera to record your movie, you could choose either a DV PAL or DV PAL Widescreen project in MoviePlus in order to edit your DV footage and maintain it in the DV format for writing back to your DV camera. If you know it is destined for a DVD to be shared with friends and family, you should choose a PAL DVD project to complement this export format. You can export your project in a different format from those offered in your Project Settings dialog if you wish, but choosing a suitable project from the outset will make your previews look as intended. When your project settings match your intended output format, your previews will be closer to your intended output—and the preview is offered in real-time with no pre-rendering of effects and transitions.
Changing Project Settings If you are concerned that you have not picked the correct project template or other project settings don’t worry. MoviePlus is very flexible and will allow you to alter these settings by selecting File>Project Settings at any time.
In addition, if you want to change your project settings to match the settings of a video or audio source in your project, click the source on the Timeline, right-click and choose Set Project Video to Match or Set Project Audio to Match, respectively.

Getting Started | 23
NTSC or PAL? NTSC is the broadcast and recording standard used mainly in North and South American continents, plus parts of eastern Asia including Japan and South Korea. If you wish to export your project in a format suitable for sharing in these areas, your project and export settings should be an NTSC preset.
PAL is used widely throughout Europe, Africa, the Middle East, Asia, and Oceania. If you wish to export your project in a format suitable for sharing in these areas, your project and export settings should be a PAL preset.
Customizing project settings Should you wish to make a general-purpose movie for playback on a computer and the list of preset project types in the Project Settings dialog does not meet your requirements, you can select a suitable preset to modify (and save as a preset for future use, too).
Select the project preset that best matches your requirements (or select the Multimedia preset for general use), then click the Modify button.
The project settings will now be editable. You can change various parameters including the pixel size of your project, the pixel aspect ratio (many types of output use stretched pixels), the video frame rate (number of frames per second, and Interlacing options. When you are happy with your settings you can save your project template for reuse—simply click the Save button, type a preset name and click OK.
What next? Now that you've started a new project and defined its settings, you will be presented with an empty Timeline ready for you to begin composing your movie project.
MoviePlus makes it easy to capture your own video footage from digital cameras or analogue video sources, to store it on your PC, and to locate and add captured video or other media files to your Timeline. MoviePlus supports a range of media files including various types of video, audio, image files, all accessible via the Explorer pane, and managed in your Media pane.

24 | Getting Started
Capturing Video MoviePlus includes a Capture module that can "import" video footage and associated audio from HDV, DV, or Mini DV cameras, as well as USB Web cams and analogue video sources (analogue video cameras, VHS, TV; all via a capture card). The Capture process saves video to a hard drive for use in MoviePlus or other video projects.
To open the Capture module, choose Capture from the Tools menu, or click the Capture button.
The Capture Video dialog
This image shows in-progress capture of digital video footage with associated audio from a DV camera (connected by FireWire).
The procedure to follow: Connect your camera or other video source If your camera is properly connected and supported (and is set to playback mode rather than record mode if appropriate), you should see a video preview in the preview window of the Capture Video dialog when your video source is playing. Controls under the preview window allow you to play and pause the tape in your camera to find the footage you wish to capture—these controls are only applicable to HDV, DV, and Mini DV cameras; for other sources you will need to control the device yourself, a remote control may be handy here.
If you are using an analogue video source, ensure that it is connected to your video capture card (or a USB socket in the case of a Web cam).

Getting Started | 25
Choose an appropriate capture format If your source footage is on a DV camera, MoviePlus will capture using the DV format so you can’t adjust the video and audio capture settings available via the Source Properties button (in fact they are greyed out for DV capture).
If your source footage is being captured via a video capture card or USB Web cam, you can choose a file format suited to your video type.
It is recommended that you capture at a resolution and quality as high as possible to achieve high quality results—it is best to aim as high as the source footage resolution and quality. Even when you ultimately aim for your resulting video to be very compact, for instance to make it suitable for download from the Internet, you can defer the file-size-smashing resizing and compression operations to final export time, don't compromise your captured quality!
Set a suitable file storage location Captured video footage can occupy a large amount of hard drive space when it is transferred to your PC, so it is important to choose a drive location with lots of room when capturing video. The standard DV format occupies approximately 3.5MB per second of footage—that's approximately 200MB per minute, or 12GB per hour. DV camera footage is always captured as DV; analogue video sources allow you to choose a different format. As an example of the size of raw captured full resolution video, if you choose to capture your video footage at DV or DVD resolution (720x576 pixels) and store it as a full quality uncompressed AVI, the file size would increase to 1.75GB per minute; 105GB per hour.
You can specify the file storage location in advance of capture by:
• right-clicking on a folder in the Explorer pane and choosing Set Capture folder.
OR
• choosing Options>Folders from the Tools menu, then browsing for a different folder in the Capture folder: option.
Your chosen hard drive location for storing captured video should have plenty of space to accommodate your chosen footage; preferably it should also be a fast drive to handle the large amount of data being transferred in a short amount of time. If you would like some advice about improving system performance, please read the Performance Notes on p. 207.

26 | Getting Started
The captured video footage will also show in your Media pane automatically on closing the Capture Video dialog. The files are still physically located in your Capture Folder.
Preview and cue your video footage If you have connected an HDV, DV, or Mini DV camera to your PC via FireWire you will be able to cue your tape to the point at which you would like capture to start. Cue to a suitable start point for your capture by using the "tape transport" controls underneath the preview window, or by using manual controls on your video device.
Ensure that Video and Audio Capture checkboxes in the Capture Video dialog are checked if you want to capture both audio and video.
Choose whether to capture scenes to separate files The Split files by scene checkbox, available from the Configure Output button, offers the chance for all your shots or scenes to be saved as separate video files as part of the capture process. For DV capture, the default is for the box to be checked so that scenes are split by timestamp; for non-DV capture, the box is unchecked which means that scene detection and sensitivity adjustment should be made via the Explorer pane (see Scene Detection on p. 38).
Record
Play your video source from at least a couple of seconds before the point at which you'd like capture to start (to allow the video device to begin playing smoothly) then click the Record button in this dialog to begin the capture. If there is a section of your tape that you would like to skip during capture, pause the process by clicking the Pause button, cue the tape to the point you would like to proceed from, then click Pause again to resume the capture. Again, it's better to capture too much footage rather than too little, it can always be trimmed later, so don't worry too much about exactly how much is captured if you are uncertain.
When you are happy that the required footage has been captured, click the Stop button. You can begin recording to capture subsequent files.
When MoviePlus captures your video or audio footage, it will automatically name and incrementally number your files if you do not specify a particular filename (by default the Prefix "Capture" is used; the number is added as a suffix). To change the prefix name, click the Configure Output button in the Capture Video dialog and enter a new name in the Prefix: option.
Getting Started | 27
Watch for dropped frames, maximum CPU usage, and peak audio levels during capture During the capture process it is recommended that you keep an eye on the CPU usage meter and Dropped frames count. You should aim for zero dropped frames for perfect capture. If your CPU (system processor) reaches maximum usage, it is likely that frames of video will be dropped (meaning that capture of your video footage is incomplete as some frames were not transferred to the PC quickly enough during the video playback and capture).
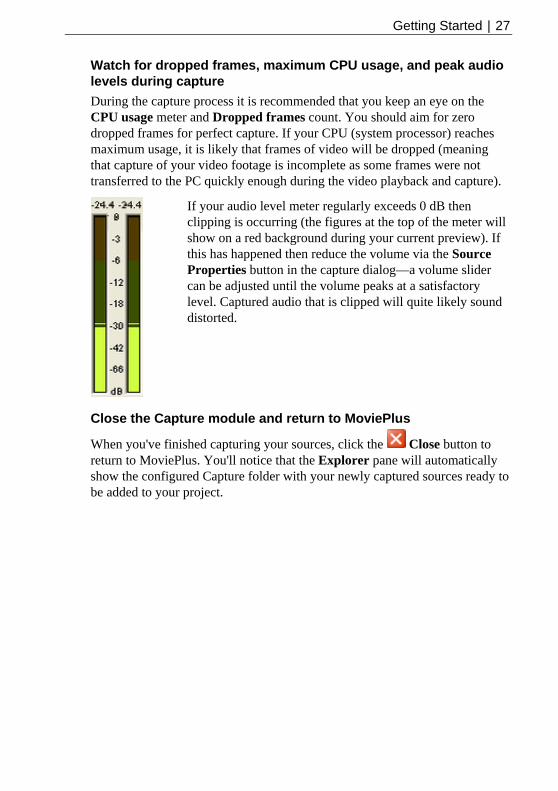
If your audio level meter regularly exceeds 0 dB then clipping is occurring (the figures at the top of the meter will show on a red background during your current preview). If this has happened then reduce the volume via the Source Properties button in the capture dialog—a volume slider can be adjusted until the volume peaks at a satisfactory level. Captured audio that is clipped will quite likely sound distorted.
Close the Capture module and return to MoviePlus
When you've finished capturing your sources, click the Close button to return to MoviePlus. You'll notice that the Explorer pane will automatically show the configured Capture folder with your newly captured sources ready to be added to your project.

28 | Getting Started
General information The DV format "DV" stands for digital video, and while this is a term that can encompass all video data stored on a computer or other digital media, when written as DV it is normally referring to a specific format of video as now used in most digital video cameras. DV was developed as a high-quality consumer digital video format by a consortium of companies including Sony, Panasonic, JVC and Philips.
For DV and Mini DV video sources, MoviePlus will always capture your footage in its native format to maintain as much quality as possible during the capture and editing phases of your project. As a modern method of storing video data, DV offers higher resolution and three times more colour information when compared to analogue VHS and S-VHS video, storing even more colour information than the NTSC broadcast standard. DV cameras also record audio in a digital format that rivals CD quality.
DV occupies a fair amount of hard drive space on computers, significantly less than uncompressed video though, and it is suitable for converting into DVD-quality output. As a video format it is compressed with an approximate 5:1 ratio, meaning it occupies roughly one-fifth of the amount of hard drive space as uncompressed video of the same quality.
MoviePlus is optimized for working with 'DV' video sources.
The HDV Format "HDV", short for High Definition Video, is a new video format designed to compress HDTV video onto existing DV or Mini DV media. Developed by Canon, Sharp, Apple, Sony and JVC, the standard utilizes the MPEG-2 Video standard which allows for a much higher video resolution compared to DV.
HDV capture requires Windows XP Service Pack 2 to be installed on your computer, and saves to a .MPG file type.
Other video sources You can also capture video footage from analogue sources such as VCRs and simple live video sources such as Web cams, although for devices such as video cassette recorders you will need a capture card. A capture card receives the analogue video information from your video device and converts it into a digital format suitable for editing and playing on computers. In addition to the video being supplied by the capture card in its chosen format, you can choose to save the media in a format of your choosing during the capture process, but it is recommended that you capture at as high a quality as possible without further compressing your video or audio data.
Getting Started | 29
For some analogue or Web cam captures you may need to have a separate audio input to capture audio at the same time as your video.
If you don't possess a capture card or are experiencing problems with analogue capture (and you possess a DV camera), a useful tip is to capture the analogue source directly into your DV camera, then bring the video into MoviePlus in DV format.
Capturing analogue audio from CD For a full description, see MoviePlus help (search for Capturing in the Help Index).
Troubleshooting Although MoviePlus is optimized for modern systems with special processor instruction sets, some slower systems may encounter 'dropped frames' during video capture. To rule out some system inefficiencies to improve video capture, please see the Performance Notes on p. 207.
30 | Getting Started
Browsing for and Adding Media Files Composing your own MoviePlus projects involves combining (or editing) existing video, audio and image files; your MoviePlus projects would be utterly bleak if you weren't able to add a selection of media files to them!
The files you use for your project could have been obtained by Capturing Video, download from the Internet, digital camera, CD, hard drive, or network drive. Whatever method is used to derive your project input you will always have to select your files from the Explorer pane, and either drag your chosen source(s) either directly onto your Timeline or place them into your Media pane for movie project management prior to Timeline addition. Captured video is always added to your Media pane directly.
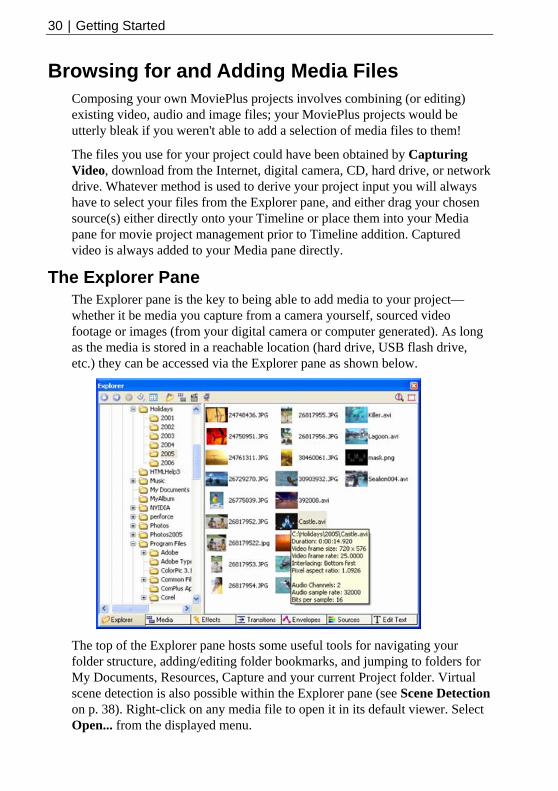
The Explorer Pane The Explorer pane is the key to being able to add media to your project—whether it be media you capture from a camera yourself, sourced video footage or images (from your digital camera or computer generated). As long as the media is stored in a reachable location (hard drive, USB flash drive, etc.) they can be accessed via the Explorer pane as shown below.
The top of the Explorer pane hosts some useful tools for navigating your folder structure, adding/editing folder bookmarks, and jumping to folders for My Documents, Resources, Capture and your current Project folder. Virtual scene detection is also possible within the Explorer pane (see Scene Detection on p. 38). Right-click on any media file to open it in its default viewer. Select Open... from the displayed menu.
Getting Started | 31
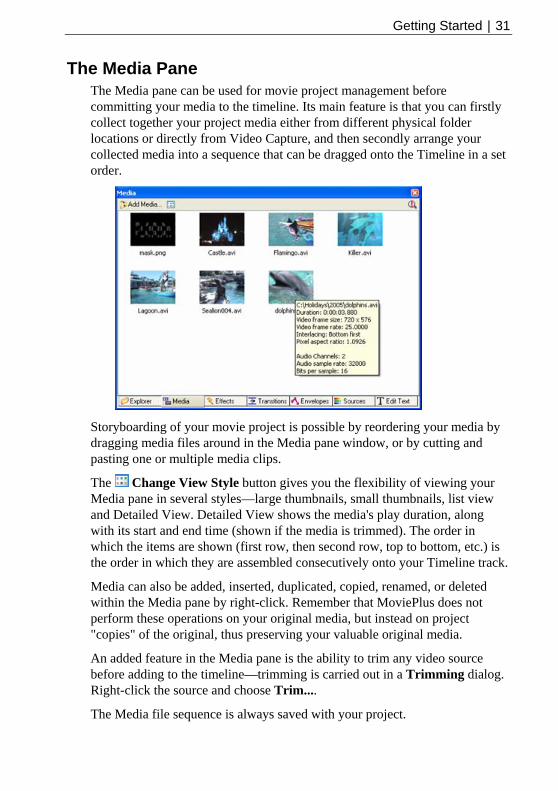
The Media Pane The Media pane can be used for movie project management before committing your media to the timeline. Its main feature is that you can firstly collect together your project media either from different physical folder locations or directly from Video Capture, and then secondly arrange your collected media into a sequence that can be dragged onto the Timeline in a set order.
Storyboarding of your movie project is possible by reordering your media by dragging media files around in the Media pane window, or by cutting and pasting one or multiple media clips.
The Change View Style button gives you the flexibility of viewing your Media pane in several styles—large thumbnails, small thumbnails, list view and Detailed View. Detailed View shows the media's play duration, along with its start and end time (shown if the media is trimmed). The order in which the items are shown (first row, then second row, top to bottom, etc.) is the order in which they are assembled consecutively onto your Timeline track.
Media can also be added, inserted, duplicated, copied, renamed, or deleted within the Media pane by right-click. Remember that MoviePlus does not perform these operations on your original media, but instead on project "copies" of the original, thus preserving your valuable original media.
An added feature in the Media pane is the ability to trim any video source before adding to the timeline—trimming is carried out in a Trimming dialog. Right-click the source and choose Trim....
The Media file sequence is always saved with your project.
32 | Getting Started
Trimming in the Media pane If you have sources stored in your Media pane you can trim the source in a Trimming dialog before committing to the Timeline. Right-click on the source and choose Trim... from the menu. The Trimmer dialog shows the source's frame preview and the source's timeline. You can click on the ruler and drag the caret to the point where you wish to trim, or use the controls under the frame preview for accurate frame-by-frame navigation.
Once you're happy with your caret's position, simply click the Set Start Time or Set End Time buttons (depending on whether you're trimming the start or end of your source). Once trimmed, the unwanted portion of the source will appear in blue shading and the source will show the adjusted Start or End time in the Media pane (set Change View Style to Detailed view).
You can only resize the dialog when trimming a video clip.
Adding Media to the Media pane You can add media file(s) to the end of your file sequence in your Media Pane by:
• performing Video Capture (the captured files are added to the pane as they are captured). OR
• right-clicking on the file(s) in MoviePlus's Explorer pane, then selecting Add to Media Pane.... You can use right-click Select All, Shift-click to select a contiguous range of files or Ctrl-click to select non-contiguous multiple files. OR
• using the button (at the top of Media pane). OR
• right-clicking anywhere in the Media pane window and selecting Add Media.... Locate then select the file for addition.
To insert a file before a media file in the sequence, select the media file in the Media pane and choose Insert Media.... Locate then select the file for insertion.
Getting Started | 33
Adding media to the Timeline From the Explorer Pane Click the Explorer tab in your docked panes to display the contents of the Explorer pane. If your Explorer pane is not visible, you can enable it using the View>Panes menu flyout or by pressing Ctrl+Alt+E.
Browse the tree structure in the left-hand menu of the Explorer pane to switch between drives and folders to locate your media files. To add media to your projects, click on your chosen media file in the right-hand window of the Explorer pane, holding the mouse button down and dragging the media file onto your Timeline. Release the mouse button when you are happy with the position of the outlined "drop target". You can add video and images to video tracks and of course you can add audio files to audio tracks.
If you want to quickly access your video capture folder, click the Capture button.
If the video you add to your Timeline already has audio of its own, the audio will be added to an audio track at the same time, both sources being linked together. Linked audio sources are identified as having a pink selection outline when you select the video source (and vice versa). When you cut, copy, delete, move, trim, or extend a linked source, other sources linked to it will also be affected.
From the Media Pane Click the Media tab in your docked panes to display the contents of the Media pane. If your Media pane is not visible, you can enable it using the View>Panes menu flyout or by pressing Ctrl+Alt+A.
If you've already created your storyboard and have trimmed all necessary media you can go ahead and select your media (marquee select, Shift-select, or press Ctrl+A) and drag it onto your chosen video track. Sources will be added one by one along the Timeline.
Choosing a drop target Where you drag your sources onto the Timeline is up to you, the area is "freeform"; video and image sources must be located on video tracks, and of course audio on audio tracks. It is normal to place sources in an empty spot and manoeuvre them to the desired precise spot if necessary afterwards. In general terms remember that further left on the Timeline is closer to the start of your movie and further right is later in the movie project. Being placed on a track higher up the Timeline will mean your source could obscure underlying elements (sources higher up the Timeline are perfect as overlays or picture-in-
34 | Getting Started
picture sources) and underlying tracks are perfect as backgrounds behind video, image, or text overlays.
Where sources on the same track overlap, MoviePlus's default behaviour is to add an automatic crossfade transition in the overlap region. You can drag and drop an alternative transition from the Transitions tab into this overlap region to replace the crossfade (see Applying Transitions on p. 142), or select and delete the blue bar representing the transition region (just hit the Delete key to delete selected components).
Adding multiple sources at once It is possible to select multiple source files and drag them all onto the Timeline in one operation, either from the Explorer or Media Pane. All the selected sources will be added to one track. This approach would typically be useful if you wanted to use some still images as part of your project or you wanted to add all detected movie scenes onto the Timeline. MoviePlus will add your sources in lexicographic order (from Explorer pane) or storyboard order (from Media pane). Lexicographic order means using a dictionary order.
If you rename or change the physical location of your sources present on your timeline, the next time you open your project you will be prompted to locate the renamed/moved file(s) or ignore the missing source(s) one by one; missing sources will be shown in black fill. If you relocate the source, the source is relinked to the original file.
Optimizing file import Extending Explorer pane support for more file extensions You can modify the list of file types that MoviePlus's Explorer pane will display. This is really useful if you have some files in a supported format which use a variant of the normal extension, e.g. an MP3 file may be unusually named songtitle.mpeg3; you could add mpeg3 to the list of file extensions and files of that extension name would be displayed in the Explorer pane. You can also remove items from the supported file types list if you do not want them displayed in the Explorer pane. Use the Tools>Options>File Types dialog to modify the supported file extensions list.
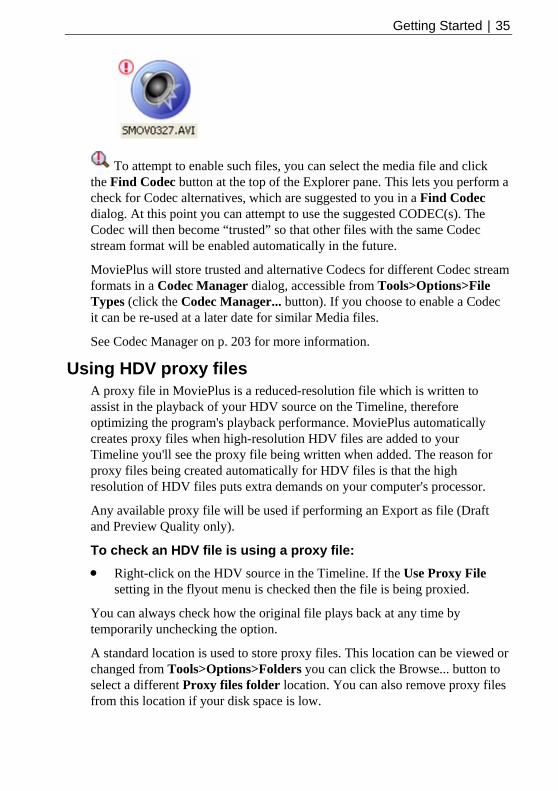
Using Codec Manager MoviePlus stores a set of reliable Codecs which are used to correctly play your Media files. However, some Media files you may encounter use Codec streams that are not known to MoviePlus. To handle such Media files you need to explicitly enable such files for them to be used in your project. These files are easy to spot as they do not display the video's thumbnail in your Explorer pane but instead a standard thumbnail (below)—an easy way of showing that the file needs attention!
Getting Started | 35
To attempt to enable such files, you can select the media file and click the Find Codec button at the top of the Explorer pane. This lets you perform a check for Codec alternatives, which are suggested to you in a Find Codec dialog. At this point you can attempt to use the suggested CODEC(s). The Codec will then become “trusted” so that other files with the same Codec stream format will be enabled automatically in the future.
MoviePlus will store trusted and alternative Codecs for different Codec stream formats in a Codec Manager dialog, accessible from Tools>Options>File Types (click the Codec Manager... button). If you choose to enable a Codec it can be re-used at a later date for similar Media files.
See Codec Manager on p. 203 for more information.
Using HDV proxy files A proxy file in MoviePlus is a reduced-resolution file which is written to assist in the playback of your HDV source on the Timeline, therefore optimizing the program's playback performance. MoviePlus automatically creates proxy files when high-resolution HDV files are added to your Timeline you'll see the proxy file being written when added. The reason for proxy files being created automatically for HDV files is that the high resolution of HDV files puts extra demands on your computer's processor.
Any available proxy file will be used if performing an Export as file (Draft and Preview Quality only).
To check an HDV file is using a proxy file: • Right-click on the HDV source in the Timeline. If the Use Proxy File
setting in the flyout menu is checked then the file is being proxied.
You can always check how the original file plays back at any time by temporarily unchecking the option.
A standard location is used to store proxy files. This location can be viewed or changed from Tools>Options>Folders you can click the Browse... button to select a different Proxy files folder location. You can also remove proxy files from this location if your disk space is low.
36 | Getting Started
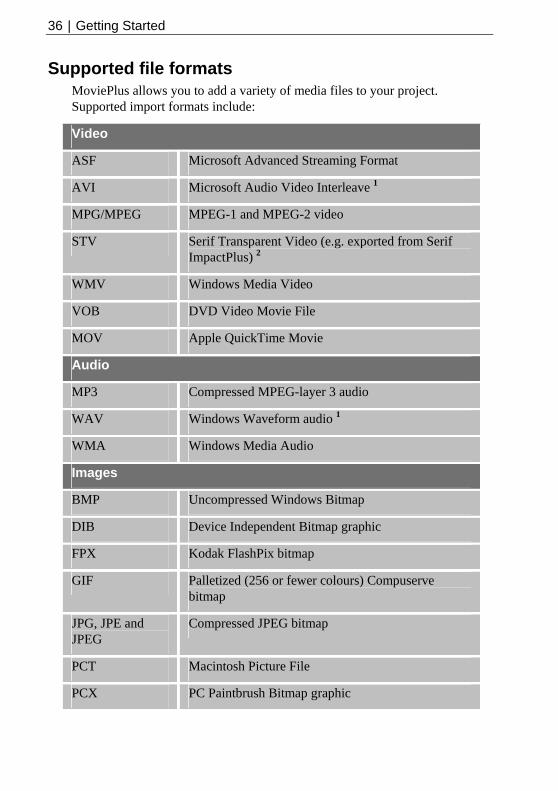
Supported file formats MoviePlus allows you to add a variety of media files to your project. Supported import formats include:
Video
ASF Microsoft Advanced Streaming Format
AVI Microsoft Audio Video Interleave 1
MPG/MPEG MPEG-1 and MPEG-2 video
STV Serif Transparent Video (e.g. exported from Serif ImpactPlus) 2
WMV Windows Media Video
VOB DVD Video Movie File
MOV Apple QuickTime Movie
Audio
MP3 Compressed MPEG-layer 3 audio
WAV Windows Waveform audio 1
WMA Windows Media Audio
Images
BMP Uncompressed Windows Bitmap
DIB Device Independent Bitmap graphic
FPX Kodak FlashPix bitmap
GIF Palletized (256 or fewer colours) Compuserve bitmap
JPG, JPE and JPEG
Compressed JPEG bitmap
PCT Macintosh Picture File
PCX PC Paintbrush Bitmap graphic
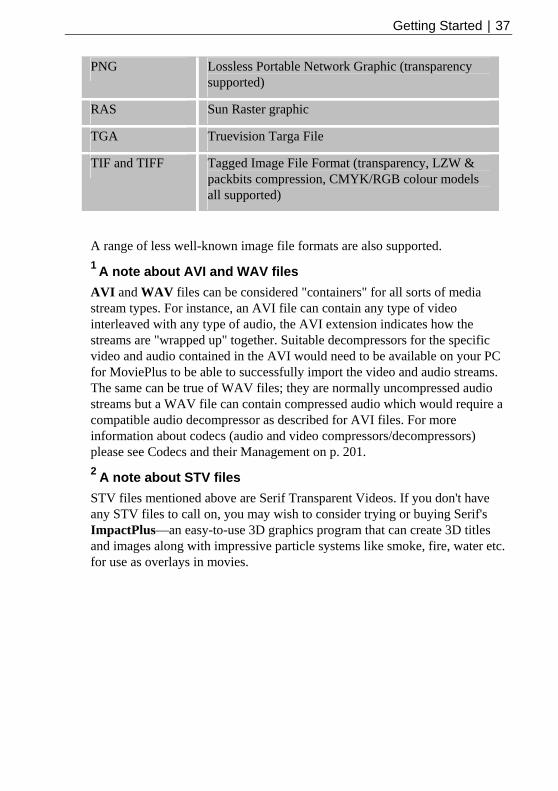
Getting Started | 37
PNG Lossless Portable Network Graphic (transparency supported)
RAS Sun Raster graphic
TGA Truevision Targa File
TIF and TIFF Tagged Image File Format (transparency, LZW & packbits compression, CMYK/RGB colour models all supported)
A range of less well-known image file formats are also supported. 1 A note about AVI and WAV files AVI and WAV files can be considered "containers" for all sorts of media stream types. For instance, an AVI file can contain any type of video interleaved with any type of audio, the AVI extension indicates how the streams are "wrapped up" together. Suitable decompressors for the specific video and audio contained in the AVI would need to be available on your PC for MoviePlus to be able to successfully import the video and audio streams. The same can be true of WAV files; they are normally uncompressed audio streams but a WAV file can contain compressed audio which would require a compatible audio decompressor as described for AVI files. For more information about codecs (audio and video compressors/decompressors) please see Codecs and their Management on p. 201. 2 A note about STV files STV files mentioned above are Serif Transparent Videos. If you don't have any STV files to call on, you may wish to consider trying or buying Serif's ImpactPlus—an easy-to-use 3D graphics program that can create 3D titles and images along with impressive particle systems like smoke, fire, water etc. for use as overlays in movies.

38 | Getting Started
Scene Detection Scene detection during video capture
During the capture process, MoviePlus can use detected time stamps in DV footage, or an average scene detection value for analogue footage, to split your scenes into separate physical media files. The Split files by scene box must be checked in the Capture dialog (via the Configure Output button). If unchecked, no scene detection is performed. Refer to Capturing video on p. 24 for full details.
As an alternative, virtual scene detection can be carried out (this is non-destructive and leaves your video file unharmed) at any time after video capture.
Scene detection after video capture
MoviePlus can perform scene detection on any video file (including captured files) before you drag your video sources to your Timeline.
Click the Show/hide scenes button at the top right of the Explorer pane to reveal (or hide) the scene panel.
For any selected video source you can click the Detect Scenes button to let MoviePlus analyze your video and create a series of smaller clips in the scene panel.
Your original video file is not damaged by this process because the clips generated are "virtual scenes"; they are real clips that you can drag straight on to your Timeline, but they are merely references to the original video file with separately-stored information about where each scene begins and ends. Even if your video file is moved or renamed, once the scenes have been generated MoviePlus will be able to show you the detected scenes for your media.

Getting Started | 39
Scene detection for non-DV video files For non-DV video files, MoviePlus detects scenes by searching for discontinuity between frames. If one frame is very different from its previous frame (based on changes to their colour histograms) it is likely to be considered to be in a separate scene and a scene break is made.
Scene detection for DV video files For DV AVI sources, MoviePlus will attempt to use time stamps recorded by the DV camera to detect scenes. Where these DV time stamps exist and are valid, MoviePlus will base the scene detection process on them for crisp and accurate scene breaks.
Scene detection sensitivity For non-DV video files, you can adjust the sensitivity of MoviePlus's scene detection simply by adjusting the slider in the scene panel. This is something that should happen in real-time, you do not need to click the Detect Scenes button again.
Moving the slider to the left results in fewer scenes, moving to the right results in a greater number of detected scenes. Changing the number of detected scenes will not invalidate previously-detected scenes that you have already used on your Timeline. Each time you regenerate scenes based on new detection sensitivity, your scenes are named accordingly, e.g. yourmovie.avi (clip 2 of 12) could be generated initially and used on your Timeline, but if you later redetect scenes at different sensitivity the names would alter to yourmovie.avi (clip 2 of 20).
It is safe to move video files from one folder to another without losing scene detection data.

40 | Getting Started
Previewing Your Project
3

42 | Previewing Your Project
Previewing Your Project | 43
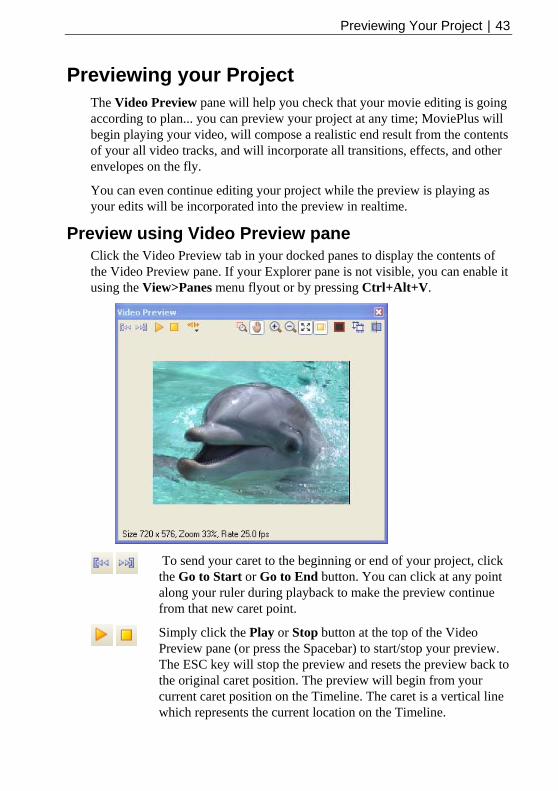
Previewing your Project The Video Preview pane will help you check that your movie editing is going according to plan... you can preview your project at any time; MoviePlus will begin playing your video, will compose a realistic end result from the contents of your all video tracks, and will incorporate all transitions, effects, and other envelopes on the fly.
You can even continue editing your project while the preview is playing as your edits will be incorporated into the preview in realtime.
Preview using Video Preview pane Click the Video Preview tab in your docked panes to display the contents of the Video Preview pane. If your Explorer pane is not visible, you can enable it using the View>Panes menu flyout or by pressing Ctrl+Alt+V.
To send your caret to the beginning or end of your project, click the Go to Start or Go to End button. You can click at any point along your ruler during playback to make the preview continue from that new caret point.
Simply click the Play or Stop button at the top of the Video Preview pane (or press the Spacebar) to start/stop your preview. The ESC key will stop the preview and resets the preview back to the original caret position. The preview will begin from your current caret position on the Timeline. The caret is a vertical line which represents the current location on the Timeline.

44 | Previewing Your Project
The button displays a jog shuttle bar.
This allows you to perform "trick play", i.e. to adjust the play speed and direction by dragging the control arrow. Click anywhere along the shuttle bar (at a point matching the speed you'd like to preview your project) and then drag the pointer to change the speed if you wish, or drag to the centre of the slider to pause playback. The further right you click or drag, the faster your preview will play. If you click or drag left of centre the preview will being playing in reverse, increasing in speed the further left you drag.
If your preview was already playing before you used the shuttle bar, it will continue playing when you release your mouse. If your preview was not playing before you used the shuttle bar, the preview will stop when you release your mouse and the caret will stay where the preview stopped.
The Text alignment or Transform button switches on text alignment guides or the Transform region to let you adjust your titling and Transform positioning, respectively. The button will only show if a Text source or a Transform envelope is selected.
The Zoom button lets you focus on a particular area of your video, while the Pan button lets you navigate around your “zoomed in” video preview with a hand cursor. This is not to be confused with panning for adjusting audio balance.
The previous four buttons toggle between each other so that only one can be active at any one time.
The Preview pane itself also offers Zoom In and Zoom Out controls.
The AutoFit button ensures that your preview will fit to the best zoom level within the Preview pane. The pane can be resized and undocked from its default position; it is particularly useful to be able to locate your Preview pane on a secondary screen if you are running a dual monitor setup.
The Stretch Pixels button will affect how your preview is generated. Many types of project use stretched pixels... the dots of light that make up the image are not square for these types of project, they are rectangular, whether the project is regular or a

Previewing Your Project | 45
widescreen variant. The amount of stretching is described in your project's pixel aspect ratio setting, a number greater than one meaning that the pixels are wider than they are tall. Clicking the Stretch Pixels button will ensure that your preview is stretched by the same amount that your project is, according to its pixel aspect ratio setting. This button is recommended to be always left enabled, although you can switch off to check the true representation of your source (e.g., testing anti-aliasing on text/shape edges).
The TV Safe Borders button switches on/off a translucent border (coloured in red, 10% of frame size, 50% opacity) placed over your video preview. This is used as a guide to help prevent titles and movie action from being cropping when your movie is played back on some older CRT TVs. Use TV Preview (via DV device) to check your project while fine-tuning the size of the TV Safe border in percentage increments until the border just disappears during preview. Adjustments to border size, colour and opacity are made in Tools>Options>Preview.
The Copy Frame button copies the current frame of your project to your Clipboard. The image can then be pasted into other applications. It may be useful to copy a frame into an imaging program such as Serif PhotoPlus to export it as a still for your MoviePlus project or as part of a cover graphic.
The final button, Render Quality, determines at what quality your movie will be previewed and will determine how hard MoviePlus will work to draw your movie. Quality options range from Draft to Best—if you are experiencing stuttering playback, especially where transitions or effects are in progress, you can reduce the preview quality to improve playback speed without harming your project. You can still export your end results at high quality even if your preview render quality is set to Draft.
46 | Previewing Your Project
Preview on TV (via DV device) If you are intending to produce a DV movie for viewing on TV you can preview your movie before committing to export (or even writing to DVD). You may wish to check how colours appear, if interlacing is correct (see MoviePlus help), and if your TV Safe Borders are set correctly.
In order to do this you must interface your DV camera between your computer (running MoviePlus) and a TV. Use a FireWire cable (computer to DV camera) and an analogue composite, S-video or component connection (DV camera to TV). Component connections provide the best quality with dedicated Red, Green and Blue cables directly into the TV. The physical interface on the camera end of the cable may differ depending on the camera make and model.
To enable previewing on TV, check the TV Preview (via DV) option in Tools>Options>Preview, set your camera to playback mode and play your movie in MoviePlus. You can check Preview audio on TV or leave the option unchecked to preview audio on your sound card (this will have a better sound quality). If unchecked, you may have to adjust the Synchronization offset slider, to compensate for the audio delay between the computer and the TV.
You must use the Convert non-DV video formats to option to preview non-DV projects—pick a DV format (NTSC, PAL or widescreen) from the drop-down menu before TV preview.
Preview video in preview pane also displays your preview in MoviePlus's Video Preview pane as well as on the target TV.
Isolating an object for preview You can isolate a single object in your project, whether it is an audio,
video or other source, a track, a group, or group of groups! Simply click the Solo button in the Properties pane belonging to that object.
Muting Any source, track or group can be muted at any time during video preview. You may want to temporarily switch off an audio track while you are editing and previewing the same track again and again. Equally, you may want to mute or “black out” a particular video source while testing your project.
Muting is possible by switching on or off the Mute buttons on a video or audio track's header, respectively. For a video or audio source, you can right-click and select the Mute option.

Editing Your Video
4

48 | Editing Your Video

Editing Your Video | 49
Timeline Basics Introduction
The Timeline in MoviePlus can be considered the editing heart of MoviePlus, a place where you can organize all your video and audio footage, trim or otherwise edit your media, sequence clips one after the other, add and edit envelopes, effects, and much more. The Timeline offers the equivalent of all the manual editing operations that traditional film editors need to be able to carry out, and it allows for post-production alterations.
The Timeline has two basic dimensions, height and length. Horizontal length relates to the duration of your project... your Timeline has markings along a ruler at the top to indicate the passing of time, starting with zero at the left of the Timeline. Video or other source media added to your Timeline will follow a playback sequence from left to right. You can position the start point for previews (or the point at which you'd like to perform an edit) using a vertical marker called the caret. During playback and some editing operations you will also see a scrolling preview marker (also positioned vertically) to indicate the frame that is currently being displayed in your project preview. The height of the Timeline is related to the number of video or audio tracks used—simple movie compositions made from a sequential series of video clips or images with straightforward cuts or transitions between them can generally use a single video track; you may only need to introduce more tracks if tackling advanced editing techniques including overlays, masking, blue-screening etc.

50 | Editing Your Video
Timeline elements Strips Strips are the horizontal "stripes" running the length of the Timeline (to the right of the headers section) that can store your media sources to allow you to edit and arrange them, as well as being a place where you can edit effects, transitions, and envelopes. Each strip is accompanied by a header to its left.
Headers Headers are like little "control panels" for the strip they are attached to. In the case of tracks and groups, adjustments to the header can affect all the tracks in a group or all the sources on a track (or both). You can select the object by clicking its name, mute (and unmute) strips to disable or enable their contents in the project composition, and display envelopes for Opacity, Crop and Transform (video objects) or Volume and Pan (audio objects).
Source A source is a media element; an "object" you can place on your Timeline for inclusion in your video project. Sources can include video files, audio files,
Editing Your Video | 51
coloured backgrounds, text, QuickShapes and images. It's important to appreciate the difference between sources, tracks and groups because MoviePlus will allow you to add effects, for instance, to each or all of them with differing results.
Track A track is just a straightforward combination of a single audio or video strip and its header. You can add multiple clips to a track by dropping a multiple selection from the Explorer pane or Media pane onto your track header and they will be added to the Timeline in succession with a default overlap. You can apply effects and envelope adjustments (like opacity or a transform) to tracks, which will have a resulting effect on all the clips on that track. MoviePlus supports multiple audio and video tracks so that it is possible to compose more complicated projects with "layers" of video using fades (or other methods of achieving transparency) to reveal underlying layers.
Groups MoviePlus supports audio groups, video groups and video effect groups. They are not only a way of keeping complex compositions tidy, you can also choose for effects—including the partial revealing of video using masks—to be applied to selected tracks only by placing them inside a group. The View menu also has an option for showing or hiding Master Groups, a top-level group to allow you to mute, apply effects to, or adjust envelopes for all video or all audio at once.
Keyframe View When you add an envelope or effect to a source, track, or group, or when you want to edit an existing envelope, effect or transition, the Keyframe View is displayed directly underneath the object.
Keyframes Keyframes are points along a strip belonging to an object (source, track, or group) or object’s attributes (envelope, effect, or transition). The Keyframe stores your chosen settings for use at a specific point of time along your Timeline. Using more than one Keyframe along a strip, MoviePlus automatically (and gradually) changes from one Keyframe's settings to the next Keyframe's settings as time passes between them. For example, on an Opacity envelope strip, a Keyframe at time zero with a setting of 0% opacity followed by another Keyframe two seconds later with a setting of 100% would cause a gradual "fade in" effect over a period of two seconds. The Keyframes can have their properties modified in the Properties pane when selected, they can be moved along the Timeline to different points, and you can alter the rate of change of values between Keyframes (right-click the Keyframe and choose a curve type).
52 | Editing Your Video
Envelopes, Effects and Transitions Any time an object's Keyframe View is displayed the strips that show belong to one or more attributes of that object. Each attributes can be of type envelope, effect or transition, and are grouped together for easy management. Normally you see all envelopes, effects or transitions but not all three attribute types all at once (this saves valuable Timeline space). Each source cannot possess more than one Opacity, Crop or Transform envelope; only two transitions can be set on any single source (you can't set a transition on a track). There is no restriction on the number of effects an object can have.
Markers Markers act as guides on your Timeline to indicate key time location or events that occur within your project. They can be labelled, positioned and navigated equally.
Chapter Point A Chapter Point is a type of marker which is used exclusively for DVD creation. Each Chapter Point placed on your Timeline defines the start of your chapters shown in your DVD's menu.
Caret The caret, the blue vertical line you can see spanning the height of the Timeline and its ruler, is most easily thought of as your editing marker. It allows you to set a precise position for splits and trims, allows sources and keyframes to be accurately positioned on your project Timeline, and can be used along the Timeline Ruler to play back a preview of your project from that point. You can also position your caret over the start/end of a source then single-click to set a precise caret position.
Ruler The ruler runs along the top of the Timeline and shows you the current time range for the visible part of your project. You can zoom in or out of the Timeline using a mouse wheel to display more or less of your project Timeline on screen. A single-click on the ruler will position the caret marker for editing or video preview. You can alter your ruler units using the View menu's Ruler Units flyout. The default setting of "Time and Frames" is in the format hh:mm:ss/ff, representing hours, minutes, seconds and frames (of video), respectively.
Counter The counter sits at the top-left of your Timeline and shows you the current caret or if previewing, the Preview Marker position. It uses the format set in the View menu's Ruler Units flyout.

Editing Your Video | 53
Preview Marker The preview marker is a vertical indicator of your playback position during playback, and looks a lot like a moving caret. During playback, your caret, used for editing functions, remains in place until the playback is paused, when it jumps to that paused location.
Source/track indicators and buttons Sources have some useful features in addition to the preview-like "poster frames" running along their length. An LED in the top-left corner indicates if the source is included in the composition (green) or if it is temporarily disabled (red). If you mute a track/group, the track/group header and each source on that track/group would show a red LED to indicate that they are disabled. Sources also have blue triangular handles at each end that can be dragged to introduce an automatic cross fade (the fade can be replaced with a different transition by dragging and dropping a transition preset onto the source's blue transition bar).
On sources and track/group headers—clicking the Attributes button displays an Attributes menu which is used to show envelopes, effects or transitions applied (along with their keyframes). The button will display in different colours according to attribute selection and if the object's attributes have been modified, i.e.
Grey/White. Attributes unselected and unmodified.
Red/White. Attributes selected and unmodified.
Grey/Yellow. Attributes unselected and modified.
Red/Yellow. Attributes selected and modified.
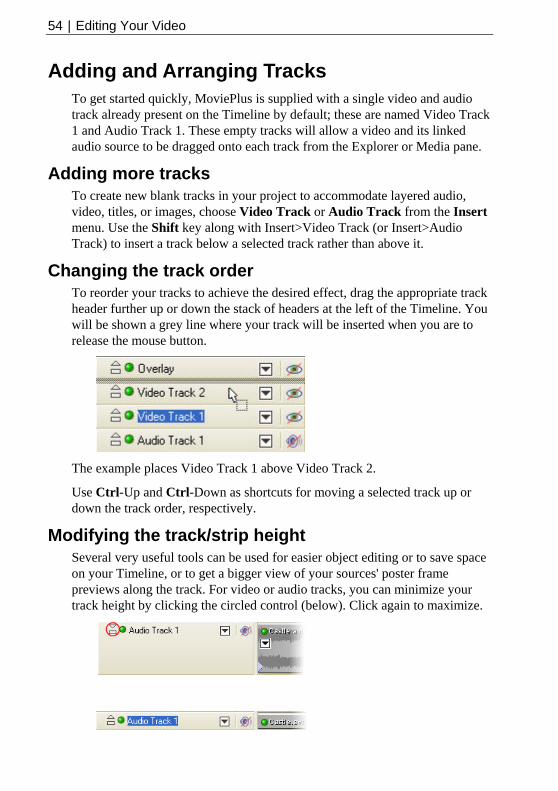
54 | Editing Your Video
Adding and Arranging Tracks To get started quickly, MoviePlus is supplied with a single video and audio track already present on the Timeline by default; these are named Video Track 1 and Audio Track 1. These empty tracks will allow a video and its linked audio source to be dragged onto each track from the Explorer or Media pane.
Adding more tracks To create new blank tracks in your project to accommodate layered audio, video, titles, or images, choose Video Track or Audio Track from the Insert menu. Use the Shift key along with Insert>Video Track (or Insert>Audio Track) to insert a track below a selected track rather than above it.
Changing the track order To reorder your tracks to achieve the desired effect, drag the appropriate track header further up or down the stack of headers at the left of the Timeline. You will be shown a grey line where your track will be inserted when you are to release the mouse button.
The example places Video Track 1 above Video Track 2.
Use Ctrl-Up and Ctrl-Down as shortcuts for moving a selected track up or down the track order, respectively.
Modifying the track/strip height Several very useful tools can be used for easier object editing or to save space on your Timeline, or to get a bigger view of your sources' poster frame previews along the track. For video or audio tracks, you can minimize your track height by clicking the circled control (below). Click again to maximize.

Editing Your Video | 55
When minimized, all source thumbnails (or for audio sources, the waveform display) on the track are not displayed, leaving a grey source strip. Alternatively, you can also manually drag a track header's upper or lower edge to increase or decrease its height (during a resize it will "snap" to its original height for ease of use.).
If you are working on a specific source and are using the Attributes menu frequently, you can click on a handy drawing pin next to your displayed envelope(s), effect(s) or transition(s) to keep the attribute strip open for future editing. This avoids the time consuming process of having to access the menu again to display each envelope, effect or transition one by one.
To make the attribute strip disappear, click the pin.
56 | Editing Your Video
Selecting Sources When you are editing your movie and have already added a range of media clips to your Timeline, all your editing operations (including moves, trims, properties changes and other adjustments) are carried out on the selected object(s). So, let's cover how you go about selecting objects!
The good news is that you can simply click on objects to select them. A regular single-click of the mouse! Whether it's a video, image, Background, QuickShape, or Text source, a click will outline the object in red to show you that it is selected. Track or group names (in the header) are highlighted in red.
Selecting multiple sources You can select multiple sources (includes sources that are linked) on your Timeline (to move or otherwise edit multiple source objects at once) by three main methods:
• To select non-contiguous sources, hold the Ctrl key down on your keyboard and click each source you would like to include in the selection. Ctrl+click a source a second time to remove a source from the current selection.
• To select contiguous sources on a single track, click a source at one end of your proposed selection range, hold the Shift key down and click on the source at the other end. All sources in between, plus the selected sources, are selected.
• For marquee selection, hold your primary mouse button down and drag a rectangle on your Timeline—anything touching (and also anything inside) the rectangle will become selected.
When multiple sources are selected, you can perform stretching on all sources simultaneously (see p. 90).
To make your multiple selection a permanent feature of your Timeline for continuous easy editing, you can create a Link as described in Arranging Sources on p. 60.
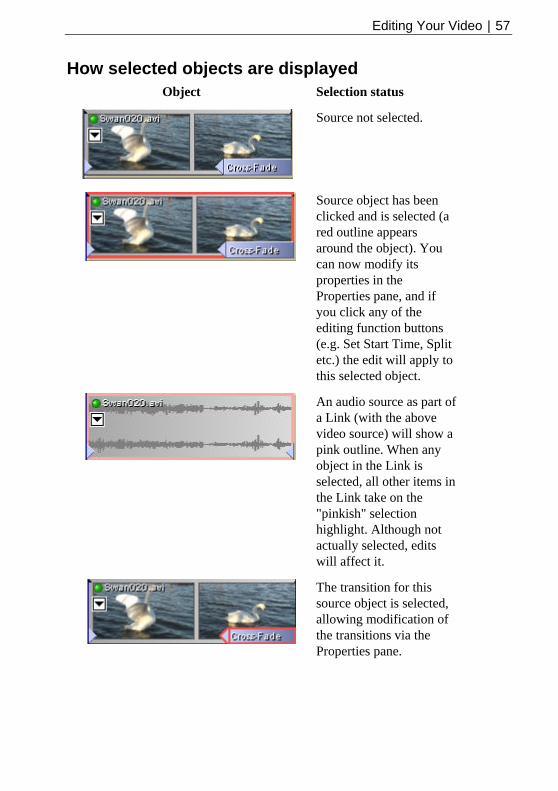
Editing Your Video | 57
How selected objects are displayed Object Selection status
Source not selected.
Source object has been clicked and is selected (a red outline appears around the object). You can now modify its properties in the Properties pane, and if you click any of the editing function buttons (e.g. Set Start Time, Split etc.) the edit will apply to this selected object.
An audio source as part of a Link (with the above video source) will show a pink outline. When any object in the Link is selected, all other items in the Link take on the "pinkish" selection highlight. Although not actually selected, edits will affect it.
The transition for this source object is selected, allowing modification of the transitions via the Properties pane.
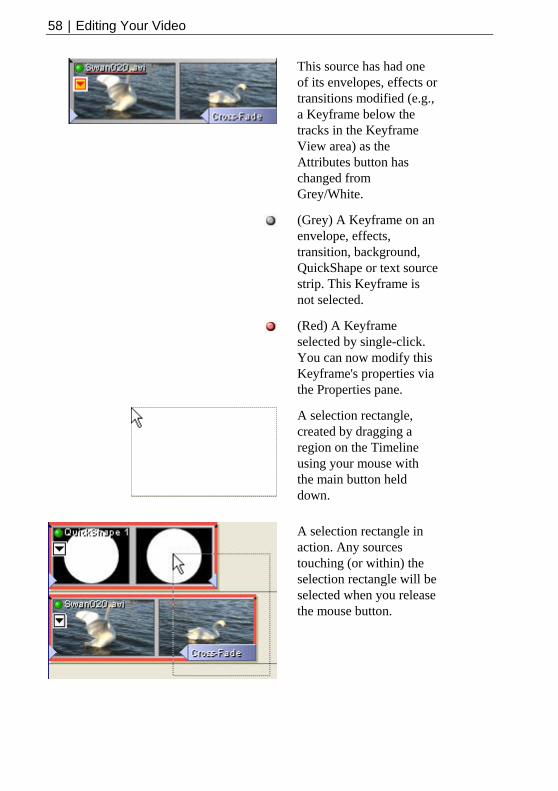
58 | Editing Your Video
This source has had one of its envelopes, effects or transitions modified (e.g., a Keyframe below the tracks in the Keyframe View area) as the Attributes button has changed from Grey/White.
(Grey) A Keyframe on an envelope, effects, transition, background, QuickShape or text source strip. This Keyframe is not selected.
(Red) A Keyframe selected by single-click. You can now modify this Keyframe's properties via the Properties pane.
A selection rectangle, created by dragging a region on the Timeline using your mouse with the main button held down.
A selection rectangle in action. Any sources touching (or within) the selection rectangle will be selected when you release the mouse button.
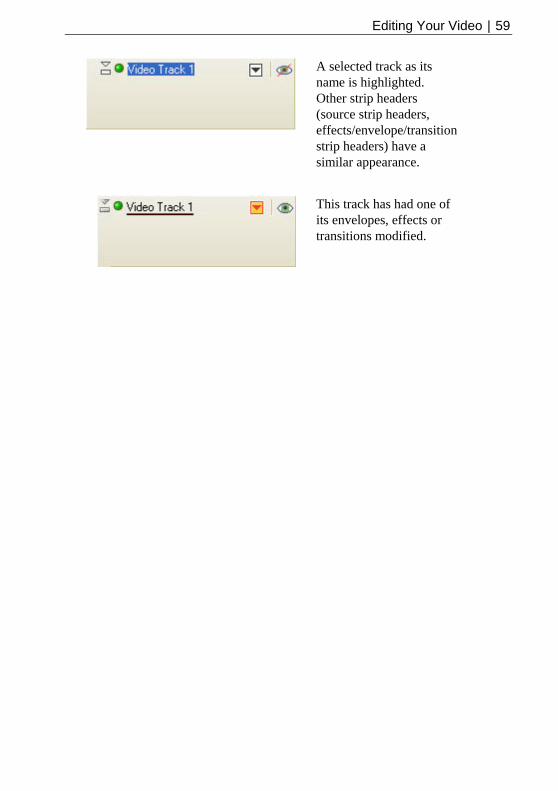
Editing Your Video | 59
A selected track as its name is highlighted. Other strip headers (source strip headers, effects/envelope/transition strip headers) have a similar appearance.
This track has had one of its envelopes, effects or transitions modified.
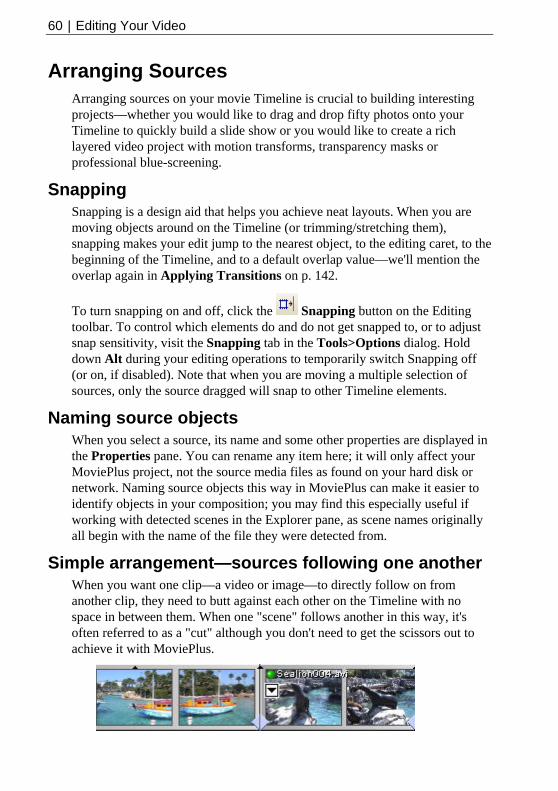
60 | Editing Your Video
Arranging Sources Arranging sources on your movie Timeline is crucial to building interesting projects—whether you would like to drag and drop fifty photos onto your Timeline to quickly build a slide show or you would like to create a rich layered video project with motion transforms, transparency masks or professional blue-screening.
Snapping Snapping is a design aid that helps you achieve neat layouts. When you are moving objects around on the Timeline (or trimming/stretching them), snapping makes your edit jump to the nearest object, to the editing caret, to the beginning of the Timeline, and to a default overlap value—we'll mention the overlap again in Applying Transitions on p. 142.
To turn snapping on and off, click the Snapping button on the Editing toolbar. To control which elements do and do not get snapped to, or to adjust snap sensitivity, visit the Snapping tab in the Tools>Options dialog. Hold down Alt during your editing operations to temporarily switch Snapping off (or on, if disabled). Note that when you are moving a multiple selection of sources, only the source dragged will snap to other Timeline elements.
Naming source objects When you select a source, its name and some other properties are displayed in the Properties pane. You can rename any item here; it will only affect your MoviePlus project, not the source media files as found on your hard disk or network. Naming source objects this way in MoviePlus can make it easier to identify objects in your composition; you may find this especially useful if working with detected scenes in the Explorer pane, as scene names originally all begin with the name of the file they were detected from.
Simple arrangement—sources following one another When you want one clip—a video or image—to directly follow on from another clip, they need to butt against each other on the Timeline with no space in between them. When one "scene" follows another in this way, it's often referred to as a "cut" although you don't need to get the scissors out to achieve it with MoviePlus.
Editing Your Video | 61
Simply drag sources along on the same track so that they are positioned next to each other. When two sources are close together the one you are dragging will snap into place. Multiple sources can be dragged onto the Timeline with a default cross-fade transition overlap (see Browsing for and Adding Media Files on p. 30).
Making one source appear on top of another MoviePlus uses multiple tracks in a similar fashion to the way photo-editors (such as Serif's own PhotoPlus) use multiple layers. The question of whether you need to use multiple layers—or tracks in the case of MoviePlus—can be answered in the same way for both types of program... many compositions are perfectly fine with one "layer" but you can introduce some interesting effects by layering your images or videos on top of each other.
MoviePlus composes your video based on Timeline content, working from the top downwards. If you have multiple tracks in your project with a full-size video on the top layer, it could well obscure all underlying tracks because you can't see through it... but if your top-most track (or sources on it) contains Images (with transparency), Background, QuickShape or Text sources with reduced opacity, resized video or images using a Transform envelope, video with a mask applied or a Chroma Key effect, you will be able to see through to underlying tracks.
So, to make one source an overlay appearing on top of other sources, you need to add an additional video track. Use the Insert menu to add more tracks to your project. Place the video or image you would like to appear as an overlay on the top track. All tracks support images or video with transparency, and all tracks follow the same Timeline, so objects are almost as easy to arrange when using multiple tracks as they are for single-track projects.
Click the Resources button in the Explorer pane and select the Overlays folder to see a range of images that can be used as overlays in your projects.
Deleting Sources Any selected source on your Timeline can be deleted by pressing the Delete key. Any accompanying linked source will also be deleted, i.e. a video source and associated audio source is removed simultaneously.
62 | Editing Your Video
Linking sources together for easy editing Automatically-linked sources When you add a video file to your Timeline, you will normally find that two sources are added to your Timeline—one video source and one audio source, on a video and audio track, respectively. This is because the video file contained both an audio and video stream that MoviePlus has separated for you for editing purposes. Because these two streams came from the same location, MoviePlus automatically links them together. When sources are linked, edits to one of the objects will affect other linked objects. If you select your video source and perform a split, for instance, the linked audio source will split in the same place.
You can forge your own links between sources using the right-click menu's Link flyout. Note that you'll need a multiple selection of objects to forge a link (Ctrl+click objects to add them to a selection). When you select an object it is highlighted in red, linked objects adopt a "pinkish" selection outline at the same time.
Linked items that are on different tracks will still move to new spots on the Timeline providing there is enough space on each track for your sources to relocate to.
Manually-linked sources You can manually create, edit, and destroy links of your own, too, to make a collection of sources easier to move or otherwise edit. The operations described below as being available in a right-click menu are all also available in MoviePlus's Edit menu.
Creating a Link Select multiple sources as described in Selecting Sources on p. 56, right-click over one of your selected sources and choose Create Link from the Link flyout.
Adding or removing a source from a Link Right-click the single source object you would like to add or remove from the Link (or Ctrl+select multiple items from the link) and choose either Add to Link or Remove from Link in the right-click menu's Link flyout.
Destroying a Link To remove a Link, right-click any source object in the link and choose Destroy Link in the right-click menu's Link flyout.

Editing Your Video | 63
Temporarily disabling Linking
There are occasions where you may find the need to temporarily disable Linking, for instance when trying to trim sources that are part of a Link where other linked sources start or end outside the range of the source you are editing... in such instances some editing functions are unavailable because they cannot be applied to the entire contents of the Link group. Other reasons for unlinking include deleting an unwanted audio track and copying a source independently of its linked sources. In such instances you would need to switch Linking off using the Linking button on the Editing toolbar, perform your edit, then switch Linking back on using the same button.
Aligning frames The Align to Frames option in the Arrange menu will enable and disable snapping to the nearest frame of video. Video frames are typically about 30 or 40 milliseconds apart (there's typically 25 or 30 frames per second of video), so you can choose whether your caret-based editing snaps to these divisions or is totally freeform. Frame snapping, or align to frames, is the normal mode to work with unless you are trimming audio to a very fine degree.
Rippling Rippling is a design aid that takes some of the headache out of making
room on your Timeline, or taking up slack (empty) space on the Timeline, keeping your sources' relative positions constant when you make edits (this also includes a source's keyframes). Rippling saves you the effort of manoeuvring multiple sources for the sake of what is often a minor edit, perhaps to make room at the start of your project for titles or a new intro or the deletion of a section of video from the middle of a project. You can enable and disable Rippling using either the Rippling button on the Editing toolbar, or by using the command on the Arrange menu.
Moving sources Rippling affects other sources (and its envelope, effect or transition's Keyframes) starting at the same time or after the source you are moving; when you move a source, those other sources that start at the same point or later on the Timeline will shuffle left or right to account for your move.
When trimming or extending the end of a source Rippling only affects other sources that both start after your edited source starts and end after the end of your edited source.
64 | Editing Your Video
When trimming the start of a source Rippling affects other sources that start and end after the start of your edited source, and it also moves your edited source to the same "start time" it had before you trimmed its start, shuffling other affected sources at the same time.
Ripple mode
Rippling can be set to work in one of four modes: it can affect the track you are working on, all tracks of the same level (e.g., those within a group), all tracks on the same level including marker rippling, or the whole Timeline (with marker rippling). The last two options allow markers to maintain their positions relative to the moved sources otherwise marker positions will not alter when rippling takes place.
Rippling with complex projects For complex multi-track projects, you might worry that Rippling won't manage all the necessary moves—don't worry, Rippling works regardless of the number and type of sources or tracks involved. Providing you have selected the appropriate Ripple mode as mentioned above, you can move a large number of sources that span multiple tracks by having Rippling enabled. Be sure to select an appropriate Timeline zoom level when selecting and moving your sources—you may wish to use a low zoom level (too see all of your project) to make the move easy, but you might find that using a higher zoom level (seeing just a few small sources) allows you to more easily select and drag the correct source. MoviePlus will automatically scroll the Timeline in the direction of your drag until you centre your mouse to choose a "drop zone", but you could instead type a new start time for your selected source in the Properties pane—Rippling works however a source is moved.
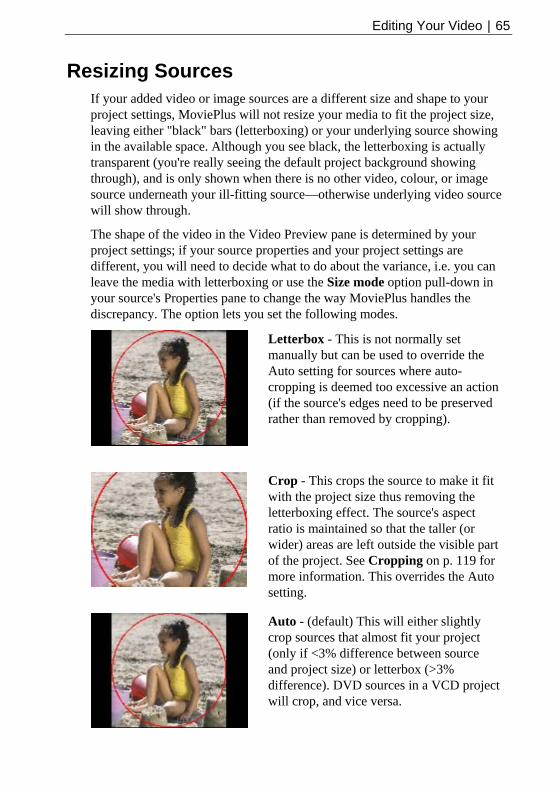
Editing Your Video | 65
Resizing Sources If your added video or image sources are a different size and shape to your project settings, MoviePlus will not resize your media to fit the project size, leaving either "black" bars (letterboxing) or your underlying source showing in the available space. Although you see black, the letterboxing is actually transparent (you're really seeing the default project background showing through), and is only shown when there is no other video, colour, or image source underneath your ill-fitting source—otherwise underlying video source will show through.
The shape of the video in the Video Preview pane is determined by your project settings; if your source properties and your project settings are different, you will need to decide what to do about the variance, i.e. you can leave the media with letterboxing or use the Size mode option pull-down in your source's Properties pane to change the way MoviePlus handles the discrepancy. The option lets you set the following modes.
Letterbox - This is not normally set manually but can be used to override the Auto setting for sources where auto-cropping is deemed too excessive an action (if the source's edges need to be preserved rather than removed by cropping).
Crop - This crops the source to make it fit with the project size thus removing the letterboxing effect. The source's aspect ratio is maintained so that the taller (or wider) areas are left outside the visible part of the project. See Cropping on p. 119 for more information. This overrides the Auto setting.
Auto - (default) This will either slightly crop sources that almost fit your project (only if <3% difference between source and project size) or letterbox (>3% difference). DVD sources in a VCD project will crop, and vice versa.

66 | Editing Your Video
Stretch - Stretches your video or image horizontally or vertically to match the project video size—removing the letterboxing effect, but changing the source's aspect ratio.
Custom - The mode is adopted automatically when a Crop envelope has been applied to your video or image source. This overrides the project settings and has no effect when manually selected from the Properties pane.
You can always change your project settings to select a different video standard (e.g., switch from DV PAL Widescreen to DVD PAL which has different dimensions) or make the project settings match those of your selected video source (right-click your source to select the Set Project Video to Match option).

Editing Your Video | 67
Copying and Pasting For envelopes, effects or transitions
Any envelope, effect or transition can be copied by right-clicking on its header and choosing Copy. When an envelope is copied to the clipboard, it can be pasted to another selected object to replace the existing envelope of that object, e.g. an Opacity envelope from one video source will overwrite the Opacity envelope of another video source by copy and paste.
If an envelope, effect or transition is copied and pasted from one source to another source further down the Timeline, associated keyframes can be scaled so they are in proportion with the new source (see Adjusting Keyframes on p. 75). This also useful if you are changing the total length of the track as the Keyframes are scaled to that new length.
Another advantage of scaling is that you can save your own complex envelopes, effects and transitions to the Envelope, Effects or Transitions pane, safe in the knowledge that the Keyframes are never stored with absolute times, and instead can be scaled easily to any object on the Timeline! MoviePlus's preset envelope, effects and transitions (in their respective panes) are saved with the Keyframe Mode set to Proportional—they can be dropped on your objects without keyframe re-editing.
Drag and Drop is fully supported in the cut and paste process. Select an envelope or effect and drag to a new source. In addition, use the Ctrl or Shift key to select multiple envelopes or effects and then drag them to other sources. Use the Ctrl key while dragging an envelope, effect or transition to copy keyframes directly.
The flexibility of MoviePlus also allows you to copy not only from track to track, and group to group, but also track to group, source to track, and vice versa.
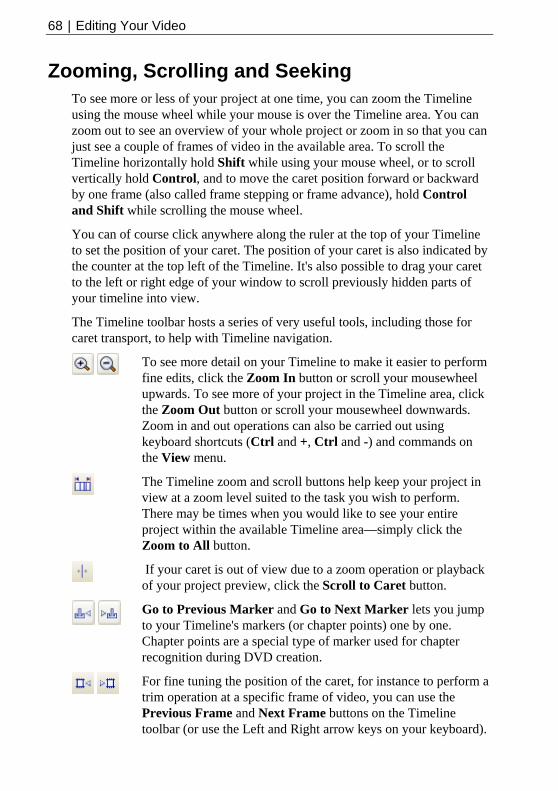
68 | Editing Your Video
Zooming, Scrolling and Seeking To see more or less of your project at one time, you can zoom the Timeline using the mouse wheel while your mouse is over the Timeline area. You can zoom out to see an overview of your whole project or zoom in so that you can just see a couple of frames of video in the available area. To scroll the Timeline horizontally hold Shift while using your mouse wheel, or to scroll vertically hold Control, and to move the caret position forward or backward by one frame (also called frame stepping or frame advance), hold Control and Shift while scrolling the mouse wheel.
You can of course click anywhere along the ruler at the top of your Timeline to set the position of your caret. The position of your caret is also indicated by the counter at the top left of the Timeline. It's also possible to drag your caret to the left or right edge of your window to scroll previously hidden parts of your timeline into view.
The Timeline toolbar hosts a series of very useful tools, including those for caret transport, to help with Timeline navigation.
To see more detail on your Timeline to make it easier to perform fine edits, click the Zoom In button or scroll your mousewheel upwards. To see more of your project in the Timeline area, click the Zoom Out button or scroll your mousewheel downwards. Zoom in and out operations can also be carried out using keyboard shortcuts (Ctrl and +, Ctrl and -) and commands on the View menu.
The Timeline zoom and scroll buttons help keep your project in view at a zoom level suited to the task you wish to perform. There may be times when you would like to see your entire project within the available Timeline area—simply click the Zoom to All button.
If your caret is out of view due to a zoom operation or playback of your project preview, click the Scroll to Caret button.
Go to Previous Marker and Go to Next Marker lets you jump to your Timeline's markers (or chapter points) one by one. Chapter points are a special type of marker used for chapter recognition during DVD creation.
For fine tuning the position of the caret, for instance to perform a trim operation at a specific frame of video, you can use the Previous Frame and Next Frame buttons on the Timeline toolbar (or use the Left and Right arrow keys on your keyboard).
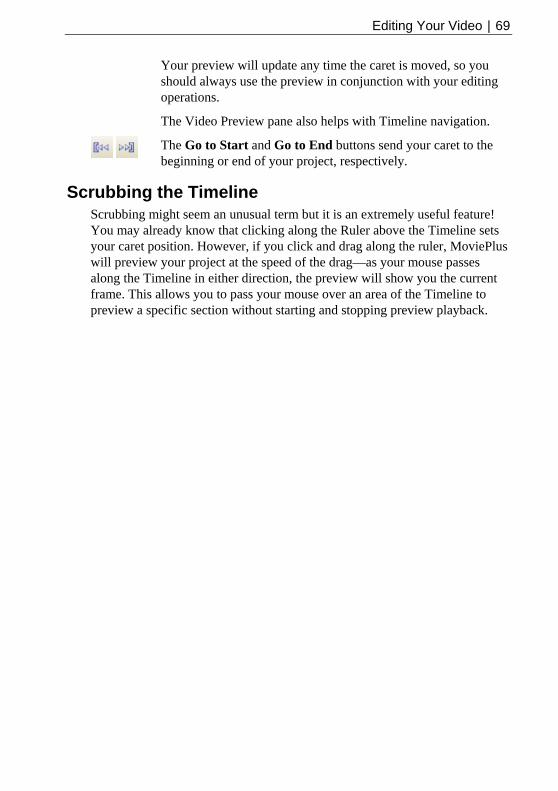
Editing Your Video | 69
Your preview will update any time the caret is moved, so you should always use the preview in conjunction with your editing operations.
The Video Preview pane also helps with Timeline navigation.
The Go to Start and Go to End buttons send your caret to the beginning or end of your project, respectively.
Scrubbing the Timeline Scrubbing might seem an unusual term but it is an extremely useful feature! You may already know that clicking along the Ruler above the Timeline sets your caret position. However, if you click and drag along the ruler, MoviePlus will preview your project at the speed of the drag—as your mouse passes along the Timeline in either direction, the preview will show you the current frame. This allows you to pass your mouse over an area of the Timeline to preview a specific section without starting and stopping preview playback.
70 | Editing Your Video
Trimming and Splitting With audio or video clips, both duration and playback speed come into play. Most often, you'll want to shorten a clip without altering its playback speed—this is usually called trimming. For example, source media files seldom begin or end exactly where you'd like; there may be extra frames at the beginning or end, or you may want to use a short section from the middle of the file. The solution is to trim the media file—adjusting its start and end point to include just the piece you want. You can also perform cuts just like a film editor using the Split command.
When you trim a source, it takes up less space on the Timeline, and the movie as a whole gets shorter. You may need to adjust other sources to fill in the gaps this creates (either manually or automatically via Rippling).
Simple trimming with mouse drag Trimming the start of a source
Position your mouse cursor over the left edge of the source object you want to trim so that it changes to the Set Start Time cursor, then click and hold your primary mouse button. Drag the mouse to the right to trim away the start of your source. Use your Video Preview pane to locate the frame you want to trim to.
Trimming the end of a source
Position your mouse cursor over the right edge of the source object you want to trim so that it changes to the Set End Time cursor, then click and hold your primary mouse button. Drag the mouse to the left to trim away the end of your source. Use your Video Preview pane to locate the frame you want to trim to.
Note about dragging to trim Note that if you drag the start of a source to the left, or the end of a source to the right, you are increasing its duration on the Timeline. This stretching of video, as opposed to trimming, is covered in Stretching and Speeding Up on p. 90.
Trimming to a specific frame If you would like to perform an accurate trim while dragging, position your caret at the exact position you want to trim to, then drag the edge of your source to the caret—as you approach the caret the source will snap to it (unless Snapping is disabled). Trimming occurs before the visible frame, so if you want to trim at a scene break, ensure you position the caret so that the first frame of the new scene is visible.
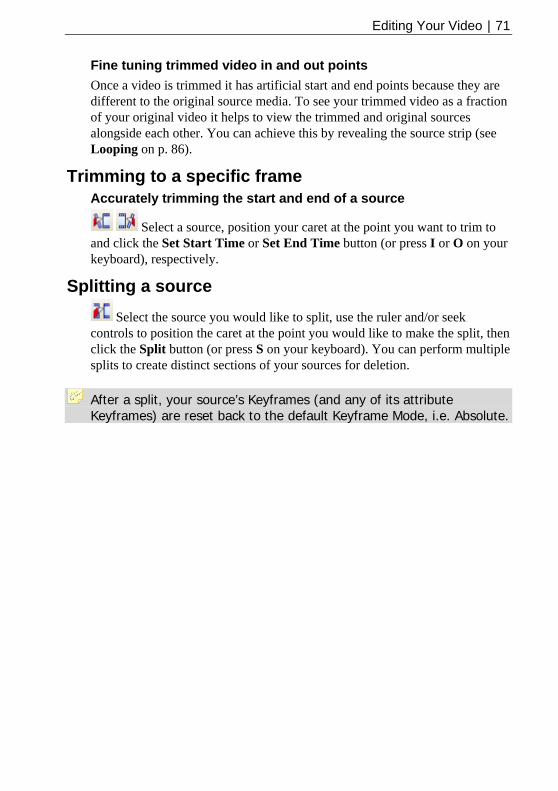
Editing Your Video | 71
Fine tuning trimmed video in and out points Once a video is trimmed it has artificial start and end points because they are different to the original source media. To see your trimmed video as a fraction of your original video it helps to view the trimmed and original sources alongside each other. You can achieve this by revealing the source strip (see Looping on p. 86).
Trimming to a specific frame Accurately trimming the start and end of a source
Select a source, position your caret at the point you want to trim to and click the Set Start Time or Set End Time button (or press I or O on your keyboard), respectively.
Splitting a source Select the source you would like to split, use the ruler and/or seek
controls to position the caret at the point you would like to make the split, then click the Split button (or press S on your keyboard). You can perform multiple splits to create distinct sections of your sources for deletion.
After a split, your source’s Keyframes (and any of its attribute Keyframes) are reset back to the default Keyframe Mode, i.e. Absolute.

72 | Editing Your Video
Using Envelopes Envelopes in this context are not an item of stationery, they are a method of applying change to an object's properties over time. Imagine an envelope as a hidden "track" that runs along with each source, track, and group in your project and at specific times you determine how it changes its properties. Between the specific times you specify envelope settings, MoviePlus can calculate smooth changes to the properties.
There are different types of envelopes that all work in very similar ways for controlling cropping, opacity, and transforms for video sources, and volume and stereo pan for audio sources. Once you learn how to display and modify one type of envelope, you can apply the same principle to all other envelope types. However, there is a distinction between some envelope types, i.e.:
• Opacity, Volume and Pan: These simple envelopes can adjust the properties of an object over its duration on the Timeline. They appear as thick strips because the envelope only affects one attribute (e.g., volume level). This lets you position buttons (called Keyframes) in the vertical axis to create fade-ins or fade-outs of opacity, volume and pan. For example, a Volume envelope could be used to fade-in the sound at the start of your video track, i.e.
• Crop, Transform: These more complex envelopes can also adjust the properties of an object over the Timeline, but as they possess multiple properties which are often inter-related, they can't be easily represented on the Timeline. Therefore, they appear as a thin strip stretching the duration of the source, track or group, leaving the envelope's Properties pane to take on the configuration role. Here's a simple Crop envelope, containing three Keyframes (as in the Volume envelope above).
Envelopes can be displayed, edited, copied, pasted and muted (to temporarily switch off). Editing of the envelope is possible on the whole envelope or on individual Keyframes within the envelope itself.

Editing Your Video | 73
Dis envelopes
playingEnvelopes can be displayed for different objects in the MoviePlus workspace,depending on what is selected.
Sources Click on the button on top of your source on your Timeline to reveal an
the lope
in the envelope strip on the Timeline.
Attributes menu. When an Opacity, Crop or Transform envelope is selected from the menu, the source's Keyframe View is displayed directly belowsource. All envelopes are shown in separate strips with your chosen envealready selected (see the envelope headers to the left of the Timeline). To change to a different envelope either click another envelope's name in the video header or click anywhere
The button being grey/white, will change colour to red/white when selected. If your envelope has been modified it will adopt a red/yellow colour.
Video Tracks and Groups Click on the
,
button in the header section of a selected track or group. This reveals an Attributes menu (as for a video source) from which you select an Opacity or Transform envelope. Adjustments to envelopes will affect all sources on the track, or all tracks in the group. For example, adjustments to video group's Opacity envelope will result in opacity changes to the composite result of the group's contents. For example, if a video group contains four tracks each with a Transform envelope that makes each tra
a
ck fill just one a, all four videos would simultaneously have their ou modify their group's Opacity envelope. Groups are
Preset Envelopes
uryouit fo
r on at
Alternatively, you can right-click on your object, and choose Apply lder then the preset from the subsequent dialog.
quarter of the visible areopacity adjusted when yalso used when cropping or masking video, so you may want to adjust the group's opacity—rather than individual tracks or sources.
MoviePlus provides a great selection of preset envelopes to apply to your so ces, tracks or groups. Use the presets to get you started or to simply save
time. If necessary you can modify the preset when applied and even save r future use.
• To apply an envelope preset, open the Envelopes pane, select a foldethe left then drag your chosen preset directly onto your object. Notice thyour envelope is automatically displayed under your object.
Envelope..., picking a fo
Tracks and groups can adopt Opacity and Transform envelope presets.

74 | Editing Your Video
Ed
p. 75).
ly when changing object length), and enable the effects of an envelope on an object).
ect,
Reeleted but instead its resident Keyframes can be
the envelope back to its default state. Simply
Sa
iting envelopes All envelopes are made powerful because of the manipulation of existing or added Keyframes along the envelope's length. This Keyframe control is at the heart of not only envelope management, but also the management of effects and transitions, and is described in detail in Adjusting keyframes (see An envelope can be edited to control Keyframe Mode (this dictates envelope Keyframe positions automaticalMute (to temporarily disable
All envelopes have one default Keyframe positioned at the start of the objwhich will always be present.
setting Envelopes An envelope cannot be ddeleted, effectively resettingselect the envelope and press the Delete key.
ving Envelopes To save your envelope to a new name (in the Envelopes pane) along with
your existing presets, use the Add to Gallery button in the Envelope's Properties pane.
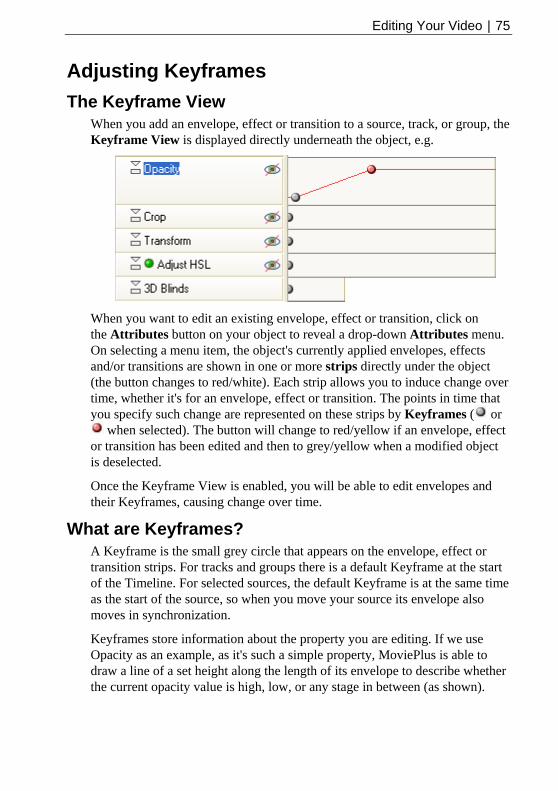
Editing Your Video | 75
Adjusting Keyframes The Keyframe View
When you add an envelope, effect or transition to a source, track, or group, the Keyframe View is displayed directly underneath the object, e.g.
When you want to edit an existing envelope, effect or transition, click on the Attributes button on your object to reveal a drop-down Attributes menu. On selecting a menu item, the object's currently applied envelopes, effects and/or transitions are shown in one or more strips directly under the object (the button changes to red/white). Each strip allows you to induce change over time, whether it's for an envelope, effect or transition. The points in time that you specify such change are represented on these strips by Keyframes ( or
when selected). The button will change to red/yellow if an envelope, effect or transition has been edited and then to grey/yellow when a modified object is deselected.
Once the Keyframe View is enabled, you will be able to edit envelopes and their Keyframes, causing change over time.
What are Keyframes? A Keyframe is the small grey circle that appears on the envelope, effect or transition strips. For tracks and groups there is a default Keyframe at the start of the Timeline. For selected sources, the default Keyframe is at the same time as the start of the source, so when you move your source its envelope also moves in synchronization.
Keyframes store information about the property you are editing. If we use Opacity as an example, as it's such a simple property, MoviePlus is able to draw a line of a set height along the length of its envelope to describe whether the current opacity value is high, low, or any stage in between (as shown).
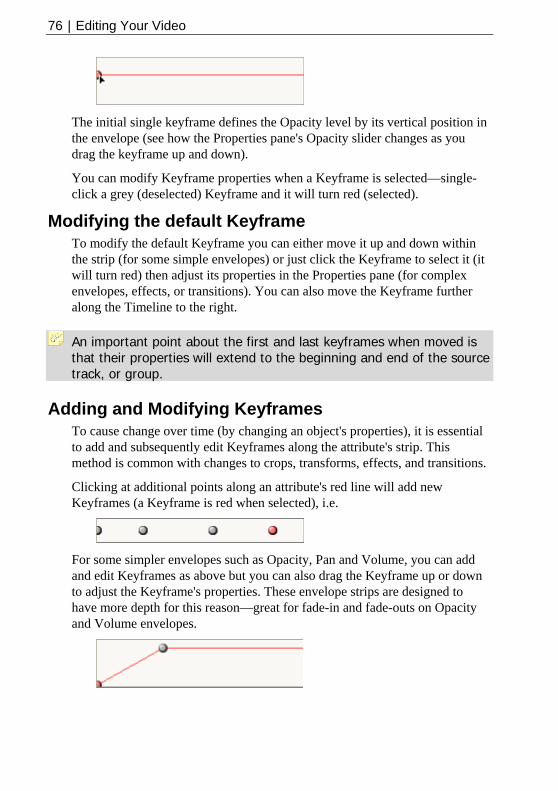
76 | Editing Your Video
The initial single keyframe defines the Opacity level by its vertical position in the envelope (see how the Properties pane's Opacity slider changes as you drag the keyframe up and down).
You can modify Keyframe properties when a Keyframe is selected—single-click a grey (deselected) Keyframe and it will turn red (selected).
Modifying the default Keyframe To modify the default Keyframe you can either move it up and down within the strip (for some simple envelopes) or just click the Keyframe to select it (it will turn red) then adjust its properties in the Properties pane (for complex envelopes, effects, or transitions). You can also move the Keyframe further along the Timeline to the right.
An important point about the first and last keyframes when moved is that their properties will extend to the beginning and end of the source track, or group.
Adding and Modifying Keyframes To cause change over time (by changing an object's properties), it is essential to add and subsequently edit Keyframes along the attribute's strip. This method is common with changes to crops, transforms, effects, and transitions.
Clicking at additional points along an attribute's red line will add new Keyframes (a Keyframe is red when selected), i.e.
For some simpler envelopes such as Opacity, Pan and Volume, you can add and edit Keyframes as above but you can also drag the Keyframe up or down to adjust the Keyframe's properties. These envelope strips are designed to have more depth for this reason—great for fade-in and fade-outs on Opacity and Volume envelopes.

Editing Your Video | 77
In this example, a Volume envelope on an Audio track fades in at the start ofmovie. MoviePlus will draw the rate of volume change as a line between the Keyframes.
a
fied via the Properties pane—simply select the r
Se
Keyframes. You can also change e multiple Keyframes and
accessing a flyout menu. MoviePlus lets you select multiple Keyframes as for y
ct each Keyframe in turn.
Mo
u can also set a selected Keyframe's time position in the
ttings
points yframe at a specific location, perhaps a
Naect Previous Keyframe
on a strip (also available on the Edit menu).
Any Keyframes can be modiKeyframe (making it red) and then press F4. The Properties pane is shown fothe Keyframe.
lecting Keyframes At some point you may want to select more than one Keyframe at the same time—typically to cut, copy, or move Int rpolation or Keyframe Mode by right-clicking on
an other object on the Timeline, i.e.
• Use Ctrl-click to seleOR
• Drag a marquee around a region containing your Keyframes.
ving Keyframes You can move one or more Keyframes left and right along the strip which has the effect of moving them earlier or later along the project Timeline. For more precision, yoProperties pane.
The further apart your Keyframes are, the slower the change between sewill occur.
Placing Keyframes at specific time If you want to position your Kespecific frame, you should first position your caret (see p. 68), then click and drag your Keyframe to snap to the caret.
viga g Keyframes Use the Ctrl+< and Ctrl+> keyboard shortcuts to Sel
tin
and Select Next Keyframe
If you’re using the Properties pane frequently, you can navigate between Keyframes by using the navigation buttons.

78 | Editing Your Video
Congle
(or multiple keyframes with the Ctrl key), right-click and select
Altlt, where you have two Keyframes with different values, MoviePlus
t altering the rate of change between a pair of Keyframes means one m ick
it can sometimes detr
Using a right-click on the first volume change towards the
pying Keyframes Any selected keyframe can be copied to the clipboard. Simply select a sikeyframeCopy.
When keyframes are on the clipboard, they can be pasted into any attribute strip of the same type they came from. They will be pasted at the caretlocation.
ering rate of change between Keyframes By defauwill gradually step from one range of settings to the next in a smooth manner—this is known as Linear interpolation. MoviePlus is interpolating (calculating) values between the Keyframes and the change is linear, i.e. half way between the values you will have encountered half the required amount ofchange.
To alter the rate of change between Keyframes, select the first Keyframe (looking aKeyframe will be first and another will be second), and choose a preset frothe Interpolation drop-down in the Properties pane. You can also right-clon a Keyframe to alter the interpolation (or "curve type"), which also offers handy previews of the rates of change as curved or straight lines, like a graph or chart.
It's handy to be able to alter the rate of change, as in video production it's usually a good idea to aim for smoothness—sudden starts or ends to movement (as with other effects) is not always desirable as
act from the video.
the Volume envelope example below, Keyframe will allow you to adjust the rate of second Keyframe—a curve appears between Keyframes.
The first Keyframe is subject to a Quadratic Slow curve to start and end the fade-in slowly.

Editing Your Video | 79
Keyframe Mode When you modify an object or you intend to copy and paste an attribute's strip to another object's attribute strip (of different length) you can choose various mode options to decide how MoviePlus will reposition a Keyframe.
• In the Keyframe Properties section of the Properties pane, the Keyframe Mode setting affects only the currently selected keyframe.
The mode setting can be one of the following:
• Absolute: Keyframe does not move (default). Great for corresponding your keyframes to an event on the Timeline.
• Proportional: Keyframe moves in proportion to the new object's length (i.e., duration). Useful for creating presets (e.g., envelopes) whose Keyframes will scale to any target object.
• Relative to Start: Keyframe moves relative to the start of the object if its length is changed. Use for Fade-ins.
• tive to the end of the object if its
yframes on p. 77), right-click, and pick a new setting from the flyout menu.
Relative to End: Keyframe moves relalength is changed. Use for Fade-outs.
If you want to apply the same Keyframe Mode to multiple Keyframes, you can select your Keyframes (see Selecting Ke
When keyframes have a Keyframe mode of "Absolute" they are affected by Rippling (if turned on). Other modes will be unaffected by rippling.

80 | Editing Your Video
Using Groups Groups serve a couple of important functions in MoviePlus... firstly they can help keep related tracks together for easy management. Applying an effect, for instance, to a video group means that all tracks within the group inherit the effect. For example, for a Solarize effect.
Video Group 1 contains Video Track 1 and Video Track 2 (but not the Background Video track). The Solarize effect has been applied to the Group (and therefore Tracks 1 and 2 simultaneously). Background Video is not subject to the Solarize effect.
The next main function for groups is more complicated but very useful, i.e. limiting the range of a transparency effect or mask. Masks and the Chroma Key effect are both methods of achieving transparency (see p. 96 and 102).
Adding Video or Audio Groups Once you have arranged some sources on your tracks and you feel it is time to place them inside a group (either to tidy your composition or set the range of tracks an effect will be applied over); insert a video or audio group by using Insert>Video Group or Insert>Audio Group.
Adding Tracks to Groups To move a track into a video group, drag and drop it over the video group header at the left of the Timeline view.
To drag a track out of a group, aim to drop the track at the bottom edge of the group; note that the drop target is only as wide as the track header, not as wide as the group header... when dragging a track out of a group you may need to position the mouse at the left of the screen, the drop target will be the full width of the header section for a successful "drag out of group".
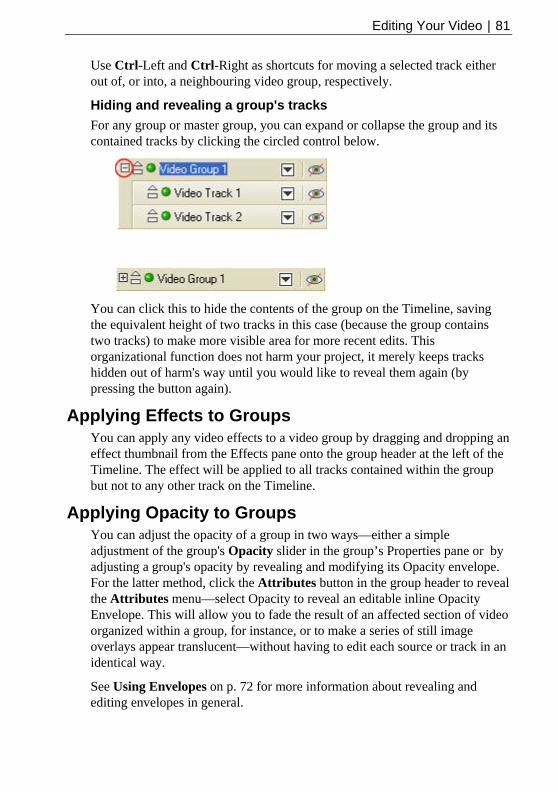
Editing Your Video | 81
Use Ctrl-Left and Ctrl-Right as shortcuts for moving a selected track either out of, or into, a neighbouring video group, respectively.
Hiding and revealing a group's tracks For any group or master group, you can expand or collapse the group and its contained tracks by clicking the circled control below.
You can click this to hide the contents of the group on the Timeline, saving the equivalent height of two tracks in this case (because the group contains two tracks) to make more visible area for more recent edits. This organizational function does not harm your project, it merely keeps tracks hidden out of harm's way until you would like to reveal them again (by pressing the button again).
Applying Effects to Groups You can apply any video effects to a video group by dragging and dropping an effect thumbnail from the Effects pane onto the group header at the left of the Timeline. The effect will be applied to all tracks contained within the group but not to any other track on the Timeline.
Applying Opacity to Groups You can adjust the opacity of a group in two ways—either a simple adjustment of the group's Opacity slider in the group’s Properties pane or by adjusting a group's opacity by revealing and modifying its Opacity envelope. For the latter method, click the Attributes button in the group header to reveal the Attributes menu—select Opacity to reveal an editable inline Opacity Envelope. This will allow you to fade the result of an affected section of video organized within a group, for instance, or to make a series of still image overlays appear translucent—without having to edit each source or track in an identical way.
See Using Envelopes on p. 72 for more information about revealing and editing envelopes in general.
82 | Editing Your Video
Transforms—perspective, scaling, and motion You can apply transforms, such as perspective effects, resizing, or animated motion, to video groups. Such an effect would allow for the composite result of a group to be used as an inset video, for instance. To learn how to edit a Transform envelope, please see p. 75.
Audio Groups It is possible to add audio tracks to audio groups to adjust overall gain (volume) or pan (stereo balance). Volume and Pan envelopes allow for simple adjustments as well as introducing changing levels over time; please see Using Envelopes and Adjusting keyframes on p. 72 and p. 75 for more information.
Master Groups Show Master Groups is an option available in the View menu which lets you choose whether master groups are on view in your Timeline header region or not. There are two Master Groups, one for video and one for audio. The Master Groups each encapsulate all the video and audio of your project so you can adjust the master volume, for instance, by adjusting the Volume envelope for the master audio group, or apply a final video effect to the entirety of the video in your project by applying it to the master video group.
If there's no need to affect all the audio or all the video in one fell swoop, you should leave the Show Master Groups view option unchecked in the View menu.
Video Effect Groups Video Effect groups are not used frequently but are essential if you wish to blend affected and unaffected video, also called mix back. The affected video would have cumulative effects applied which could be blended in and out of the mix by adjusting the keyframes of the Video Effect Group's envelope.

Editing Your Video | 83
Using Markers and Chapter Points Markers are useful reference points that you can add along the top of your Timeline, just like guides are used in drawing programs. They serve several purposes including locating important points occurring within your sources, e.g. sound or action, and also to permanently mark the start and end of sources on more complex multi-track projects (for positioning and arranging). A special type of marker, called a Chapter Point, is used exclusively to indicate the beginning of chapters when creating DVDs/VCDs (see Write to DVD/VCD on p. 177).
Inserting Markers Markers can be added to any point on your Timeline—they can be labelled as well as navigated.
• To insert a marker at a caret point, click on the Timeline ruler to set its position and select Add Marker from the Timeline toolbar. OR Set a caret point, right-click and choose Add Marker. Remember that you can position your caret over the start/end of a source then single-click to set the caret precisely at its start/end.
By default, markers will be named Marker 1, Marker 2, etc. To rename, go to the selected marker's Properties pane and edit the Name field.
• To jump to the previous or next marker, right-click on the marker and choose Go to Previous or Go to Next from the menu. If the currently selected marker is the first or last on the Timeline the caret will jump to the beginning or end of the timeline with the above commands, respectively. OR Use Shift+left or Shift+right arrow keys. OR
Use Go to Marker... on the Transport menu (or Ctrl+M) to select from all markers listed in a dialog.
• To select any marker, simply click the marker box on the Timeline ruler (use Shift-click to select multiple markers).

84 | Editing Your Video
• To delete any marker, right-click on it and select Delete.
If you want to convert a marker to a chapter point, simply check Chapter Point in the selected marker's Properties pane, and set the additional chapter point options as required.
If Rippling is enabled, your marker positions will not move with moved sources unless a rippling mode is set which includes marker repositioning. See Rippling on p. 63 for more information.
Inserting Chapter Points Chapter Points are a type of marker used to define where chapters play from in your generated DVD/VCD—much the same as the initial menu shown in any Movie DVD from your local movie store. In the DVD/VCD Setup Wizard or Menu Designer, Chapter Points inserted in your Timeline will be detected and the associated chapters will be thumbnailed automatically in a variety of menu designs for you to choose from (see Menu Designer on p. 182). For now, lets look at Chapter Points on the Timeline.
• To insert a Chapter Point on the Timeline, position your caret point and select Add Chapter Point from the Timeline toolbar. OR Set a caret point, right-click and choose Add Chapter Point.
• By default, markers will be named Chapter 1, Chapter 2, etc. To rename, go to the selected Chapter Point's Properties pane and edit the Name field. It's a good idea to change the default names, otherwise chapters shown in your DVD menu will unhelpfully say "Chapter 1", "Chapter 2", etc. Don't worry too much as you can edit the names in the template too (this will update the Timeline's Chapter Point names at the same time).
• rag the Chapter Unhappy with your Chapter Point positioning? Simply dPoint along your Timeline ruler to its new position.
• You can navigate your Chapter Points as for Markers.

Editing Your Video | 85
• You can control the Chapter end action expected once the DVD/VCD o next
ely,
enu once the chapter has played. This latter e unrelated
ExamA h ine repr 2
chapter has finished playing in your DVD player. If the Progress tchapter is enabled the next chapter is played automatically. Alternativthe Return to title menu option keeps your chapters independent of each other, by returning to the moption would be useful if your DVD/VCD is to contain separatmovies.
ple oliday movie could have Chapter Points inserted onto the timelesenting the start of each day—they could be named Day 1, Day
(selected), Day 3, Day 4, etc.
When you decide to create your DVD/VCD, the chapters will be recognized so that your chosen template will display each day as a separate menu item, labelled the same as your Chapter Point names (Day 1, Day 2, Day 3, Day 4, etc.).
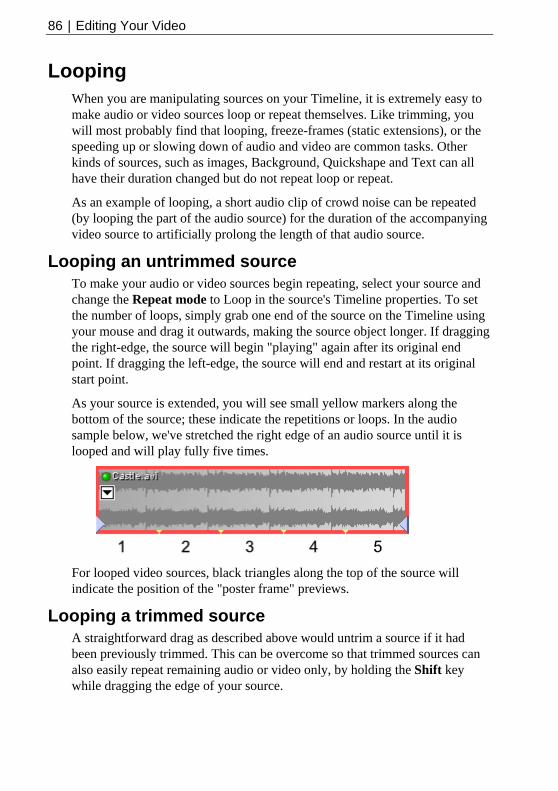
86 | Editing Your Video
Looping When you are manipulating sources on your Timeline, it is extremely easy to make audio or video sources loop or repeat themselves. Like trimming, you will most probably find that looping, freeze-frames (static extensions), or the speeding up or slowing down of audio and video are common tasks. Other kinds of sources, such as images, Background, Quickshape and Text can all have their duration changed but do not repeat loop or repeat.
As an example of looping, a short audio clip of crowd noise can be repeated (by looping the part of the audio source) for the duration of the accompanying video source to artificially prolong the length of that audio source.
Looping an untrimmed source To make your audio or video sources begin repeating, select your source and change the Repeat mode to Loop in the source's Timeline properties. To set the number of loops, simply grab one end of the source on the Timeline using your mouse and drag it outwards, making the source object longer. If dragging the right-edge, the source will begin "playing" again after its original end point. If dragging the left-edge, the source will end and restart at its original start point.
As your source is extended, you will see small yellow markers along the bottom of the source; these indicate the repetitions or loops. In the audio sample below, we've stretched the right edge of an audio source until it is looped and will play fully five times.
For looped video sources, black triangles along the top of the source will indicate the position of the "poster frame" previews.
Looping a trimmed source A straightforward drag as described above would untrim a source if it had been previously trimmed. This can be overcome so that trimmed sources can also easily repeat remaining audio or video only, by holding the Shift key while dragging the edge of your source.

Editing Your Video | 87
Seeing the whole source using the source strip To gain a direct appreciation of the length of your media files, the length of the source as it appears on the Timeline, and what is being repeated, you can reveal the source strip. Double-click on any source (audio or video) to display it in a strip of its own underneath the track it appears on.
For fine-tuning of a source's In and Out points, you can hover over the clip at the pale blue window edge (on the source strip). When the cursor changes you can drag to change the In/Out points without affecting the clip length.
In the example above, the displayed source strip allows for some fine editing. The audio clip has been trimmed in length by dragging both the left and right edges inwards (see Trimming and Splitting on p. 70 for more details). The section labelled "Trimmed source" represents the duration of the trimmed media—the regions left and right of the trim region represent original audio we could reintroduce by "untrimming" our clip. The right-edge of the trimmed source was then dragged to the right while holding Shift, otherwise we would indeed have untrimmed the trimmed clip; holding Shift while dragging to the right maintained the trim region, increased the duration, and kept the play speed normal.
You do not need to reveal the source strip to be able to perform the loop operation, but it may help you see which section of a trimmed source is being repeated when working with trimmed sources.
To return to your normal view, hiding the source strip, double-click on the source again.

88 | Editing Your Video
Time shifting
You can change which section of your original video source is being played within the trimmed region, without altering the position of your trimmed source on the Timeline, by clicking where the special cursor is and dragging left or right. You can imagine that the trimmed region is a small window that can only "see" a small region of the landscape of your video. The drag we've described means you can move left or right to change your view, leaving the window where it is; this has the effect of shifting the trimmed video's in- and out-points relative to the original video source.

Editing Your Video | 89
Static Extensions Also called freeze-frame, a static extension is a useful way to begin or end a clip. A static extension of the first frame could allow for a fade in or other transition, a zoom to give the subject emphasis, or a background against which titles can be overlaid. A static extension at the end of a clip similarly allows time for a transition, a background for credits etc.
Some special editing effects may also call for a static extension, to allow you to freeze the action while overlaying a cool particle system special effect made with Serif's ImpactPlus, for example.
Applying a static extension to your sources To make your video or audio sources extend, select your source and change the Repeat mode to Static in your source's Timeline properties (Properties pane). To freeze either the first or last frame, simply grab one end of the source on the Timeline using your mouse and drag it outwards, making the source object longer. If dragging the right-edge, the source will "freeze" the final frame. If dragging the left-edge, the source will freeze the first frame.
As your source is extended, you will see a small yellow marker (under the source) indicating the original start or end point of your source before your static extension was applied. The black triangles along the top of the source merely indicate the position of the "poster frame" previews. In the sample below, we've stretched the right edge of a source video until it is extended by 30%. Note the "trim" cursor on the right edge of the source; we are effectively "untrimming" the video.
Because extensions like this (and looping/repeating) are like "untrimming" video, what happens when the video has already been trimmed, how do we stop the extension from untrimming the source?
Extending a trimmed source To make trimmed sources extend, rather than untrim, when their edges are dragged, hold Shift during the mouse drag. Release the mouse button before releasing Shift to extend your trimmed clips.

90 | Editing Your Video
Stretching and Speeding Up As with looping (for repeating sources) and "freeze frame" static extensions, simple drag operations on the Timeline can perform intricate editing operations. Being able to speed up or slow down the rate of play of your video or audio source is another powerful editing function that MoviePlus is able to offer.
When a video plays faster or slower, it has a shorter or longer duration, respectively. This means less space on your Timeline when played faster and vice versa.
To increase or decrease the play rate, hold the Ctrl key down and drag an edge of your video source inwards or outwards, respectively. For example, to stretch a single video source, drag the stretch cursor outwards.
.
When multiple sources are selected, you can perform stretching on all sources simultaneously. Simply drag from the first or last source in the selection—the opposite end of the selection will remain anchored during the stretching operation. You can also stretch from the start or end of any interim source (check that the cursor indicates the correct stretch direction). There's no need to use the Ctrl key as the stretch cursor will appear at the end of a multiple selection automatically.
You can also use the source's Timeline properties (Properties pane) to adjust the Play speed, though this will affect the length of your source on the Timeline.
Reverse Playback Although not strictly speaking a transformation, it is possible to make any video or audio source play in reverse. Typically, you would use this sparingly, maybe for a specific source—to achieve a comedic effect or to quickly grab the viewer’s attention.
To reverse a source’s playback: 1. Select the video or audio source and press F4 (to view the Properties pane).
2. Check the Reverse box in the Timeline section of the source’s Properties pane.

Editing Your Video | 91
Transparency & Opacity Transparency and opacity are intrinsically linked, like different sides of the same coin. Opacity means a state of being opaque—you cannot see through a video or other source to those underneath if it is totally opaque. By contrast of course, you can see through video that is partially or wholly transparent, or has regions that are partially or wholly transparent, with no opacity. MoviePlus generally refers to opacity rather than transparency, but you should keep both concepts in mind during your editing to help understand various features such as Chroma Key (matting/blue screening) and masks.
Let’s firstly take a look at different ways in which opacity can be used on whole sources, tracks, groups and effects in MoviePlus. A general level of opacity can be applied to:
• a source, to allow you to "fade" video or images in and out of vision over other video sources.
• a whole video track, to make a collection of sources more or less visible.
• a group of tracks, so that the composite result of a collection of grouped tracks can be made less or more visible as part of the overall composition.
• a video effect group (i.e., allowing mix back to blend original with affected video).
For all of the above, an Opacity Envelope is used to set a constant level of opacity or to alter opacity over time for that object. See Using Envelopes and Adjusting keyframes on p. 72 and 75 for more information.
A specific region of transparency or opacity can be created for:
• ue-screening). This .
• ffect to a subject's face rather than the whole video,
removing a specific region of video, see Removing Backgrounds on p. 95.
Removing a solid-coloured background (also called blis achieved using a video effect called Chroma Key
• Creating a cut-out region, using a mask.
Creating a limited region for an effect to be applied over, e.g. only applying a mosaic ealso using a mask.
• Cropping using a mask.
For a preface to the concepts involved in
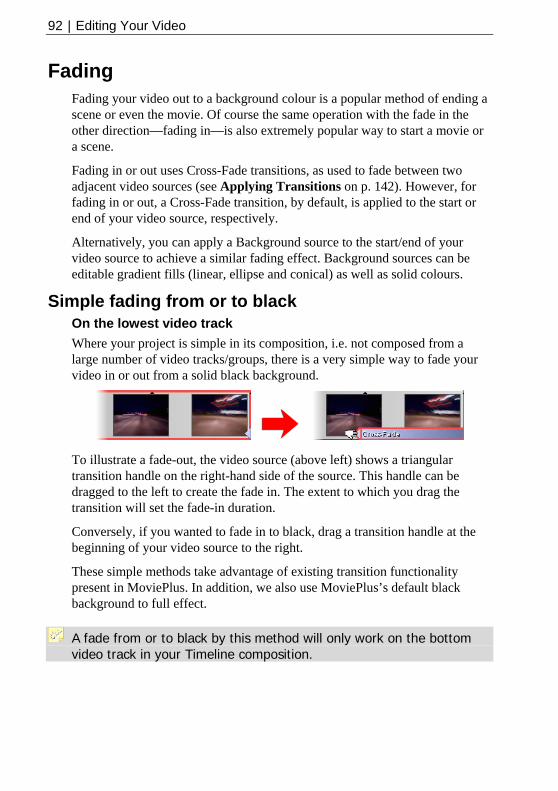
92 | Editing Your Video
Fading Fading your video out to a background colour is a popular method of ending a scene or even the movie. Of course the same operation with the fade in the other direction—fading in—is also extremely popular way to start a movie or a scene.
Fading in or out uses Cross-Fade transitions, as used to fade between two adjacent video sources (see Applying Transitions on p. 142). However, for fading in or out, a Cross-Fade transition, by default, is applied to the start or end of your video source, respectively.
Alternatively, you can apply a Background source to the start/end of your video source to achieve a similar fading effect. Background sources can be editable gradient fills (linear, ellipse and conical) as well as solid colours.
Simple fading from or to black On the lowest video track Where your project is simple in its composition, i.e. not composed from a large number of video tracks/groups, there is a very simple way to fade your video in or out from a solid black background.
To illustrate a fade-out, the video source (above left) shows a triangular transition handle on the right-hand side of the source. This handle can be dragged to the left to create the fade in. The extent to which you drag the transition will set the fade-in duration.
Conversely, if you wanted to fade in to black, drag a transition handle at the beginning of your video source to the right.
These simple methods take advantage of existing transition functionality present in MoviePlus. In addition, we also use MoviePlus’s default black background to full effect.
A fade from or to black by this method will only work on the bottom video track in your Timeline composition.
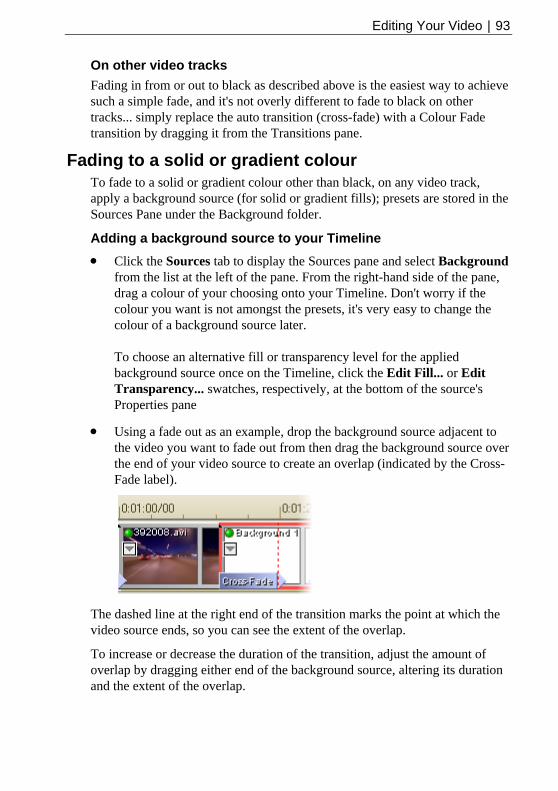
Editing Your Video | 93
On other video tracks Fading in from or out to black as described above is the easiest way to achieve such a simple fade, and it's not overly different to fade to black on other tracks... simply replace the auto transition (cross-fade) with a Colour Fade transition by dragging it from the Transitions pane.
Fading to a solid or gradient colour To fade to a solid or gradient colour other than black, on any video track, apply a background source (for solid or gradient fills); presets are stored in the Sources Pane under the Background folder.
Adding a background source to your Timeline • Click the Sources tab to display the Sources pane and select Background
from the list at the left of the pane. From the right-hand side of the pane, drag a colour of your choosing onto your Timeline. Don't worry if the colour you want is not amongst the presets, it's very easy to change the colour of a background source later. To choose an alternative fill or transparency level for the applied background source once on the Timeline, click the Edit Fill... or Edit Transparency... swatches, respectively, at the bottom of the source's Properties pane
• Using a fade out as an example, drop the background source adjacent to the video you want to fade out from then drag the background source over the end of your video source to create an overlap (indicated by the Cross-Fade label).
The dashed line at the right end of the transition marks the point at which the video source ends, so you can see the extent of the overlap.
To increase or decrease the duration of the transition, adjust the amount of overlap by dragging either end of the background source, altering its duration and the extent of the overlap.
94 | Editing Your Video
Conversely, to fade in to your video, place the background source to the left of a video source and drag it to the right to overlap your video source's left-hand end.
If the source you want to fade in to is already at the left edge of your Timeline, leaving no room for a new source at the beginning of the Timeline, you should move your video source to the right on the Timeline, creating some room at the start of your project. If you have already created a complex composition with multiple sources and tracks—so moving the first video source would disrupt the rest of your project—MoviePlus can move all of your later sources at the same time when a source is dragged. This automatic moving of sources is called Rippling.
To extend the length of time the background source is displayed before your video starts fading in, drag its left edge further to the left.
Saving a colour for future use
When you have altered a background source to meet your needs, you can save it for future use amongst the presets in the Sources pane (Background folder) by clicking the Add to Gallery button in the Properties pane. You are prompted to enter a name for the new Background source—type in a new source name and press Enter. You can now reuse this background source by dragging and dropping it onto your Timeline at any time.

Editing Your Video | 95
Removing Backgrounds There are a number of reasons you might want to "remove" a region of your video:
• To isolate a foreground subject in order to place them against a different background, e.g. blue-screening such as used for movie special effects and daily favourites like weather presenting.
• To cut out a hole in a video, e.g. a billboard advertising area or sports stadium big screen, in order to place a video of your own in the cut out region.
• To limit the extent of an effect e.g. to just mosaic someone's face to respect their privacy but leave the remainder of the video unaffected.
• To crop your movie, e.g. leave just a rectangular or other-shaped portion of your video and discard the remainder, perhaps leaving room for other cropped videos on screen to sit alongside to form a montage, popularised by comic book hero movies.
The cutting out of regular shapes and cropping of video is something you can achieve using masks. The removal of a solid-coloured background can be achieved using a Chroma Key effect, also called blue-screening/green-screening, matting, colour keying and colour separation overlays.
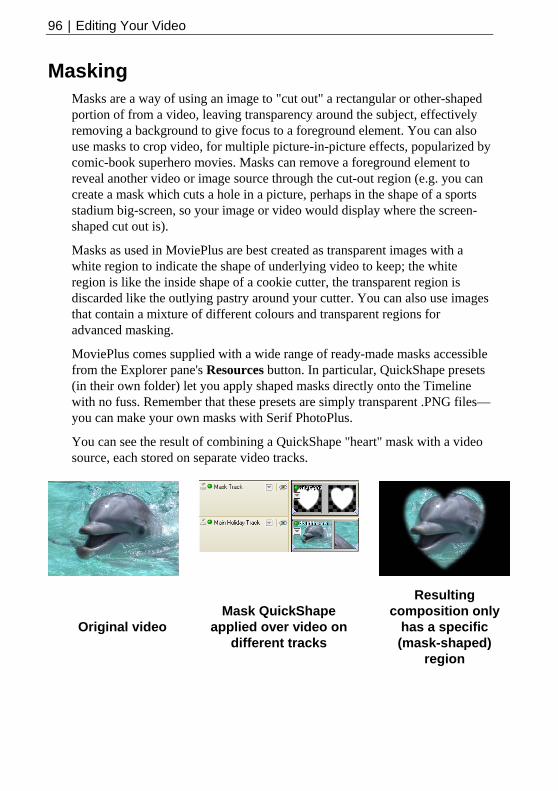
96 | Editing Your Video
Masking Masks are a way of using an image to "cut out" a rectangular or other-shaped portion of from a video, leaving transparency around the subject, effectively removing a background to give focus to a foreground element. You can also use masks to crop video, for multiple picture-in-picture effects, popularized by comic-book superhero movies. Masks can remove a foreground element to reveal another video or image source through the cut-out region (e.g. you can create a mask which cuts a hole in a picture, perhaps in the shape of a sports stadium big-screen, so your image or video would display where the screen-shaped cut out is).
Masks as used in MoviePlus are best created as transparent images with a white region to indicate the shape of underlying video to keep; the white region is like the inside shape of a cookie cutter, the transparent region is discarded like the outlying pastry around your cutter. You can also use images that contain a mixture of different colours and transparent regions for advanced masking.
MoviePlus comes supplied with a wide range of ready-made masks accessible from the Explorer pane's Resources button. In particular, QuickShape presets (in their own folder) let you apply shaped masks directly onto the Timeline with no fuss. Remember that these presets are simply transparent .PNG files—you can make your own masks with Serif PhotoPlus.
You can see the result of combining a QuickShape "heart" mask with a video source, each stored on separate video tracks.
Original video Mask QuickShape
applied over video on different tracks
Resulting composition only
has a specific (mask-shaped)
region

Editing Your Video | 97
Video tracks Before you go ahead and add a mask to your Timeline, it's useful to know in advance how masks and the organization of your video tracks work hand in hand. Masks need to occupy a track of their own to have an affect on underlying video compositions... the masks' white regions determine which regions of underlying video sources you see—the mask sits on top of other video to act as a virtual cookie cutter.
Using the Mask Blend Mode Masking is made possible by the correct arrangement of tracks (as described above), but also by the setting of the Mask track's Blend Mode. When set to "Mask", the Blend Mode on the top-most track in your project will affect transparency on tracks below it.
Restricting Mask effects with Video groups To limit which tracks are affected (the depth to which the cookie cutter actually cuts), you can store the mask track with blend mode applied (and other video tracks you want affected) within a Video Group, leaving other video tracks you do not want affected outside the group.
Looking at the track names in the example below, "Holiday Track 2" is not subject to the heart-shaped clipping that the Mask Track is performing because it is outside the video group—the mask's effect is limited to tracks within its video group, i.e. the Main Holiday Track only.
The Main Holiday Track footage is masked as it is in the same group as Mask Track; Holiday Track 2 is
kept outside Video Group 1.
The mask only cuts out
the image of the dolphin. The underlying video, outside of the video
group, is unaffected by masking!
98 | Editing Your Video
Adding a mask to your video
You must install the MoviePlus 5 Director's Collection DVD to use ready-made masks.
To add a ready-made mask to your project: 3. Create a new video track to accommodate your mask image and move the new
track above the other existing video tracks you would like to affect. Masks work in a special track mode so they should not be on the same video track as other types of sources. Tracks containing masks should be placed within a Video Group if you would like to limit the extent of their masking power.
4. Select the Explorer pane and click the Resources button. In the folder view at the left of the pane, the Resources folder will be selected; under this folder resides your Masks folder.
5. Select the Masks folder and choose a folder to suit the type of mask you require (Divisions or QuickShapes). From the presets available at the right side of the pane, drag and drop a mask on to the new video track you created in your Timeline.
6. View the Properties pane for the video track containing your mask, and select Mask from the Blend Mode drop-down menu. The white shape in the mask will then represent a visible region of video.
Video tracks containing sources below the mask will now have an area of visible video as created by the white regions of the mask image. The transparent region will draw as black unless your mask track is within a video group and you have additional video sources below the group.
Creating your own masks To create a mask it is recommended you use a bitmap (photo) editing program that fully supports transparency, such as Serif's PhotoPlus. Some other programs that can easily create shapes with or without soft edges (and can export images with transparency, such as 32-bit PNG) are also useful for creating masks—Serif's DrawPlus is an example. You should aim to use white to create the region you wish to maintain in your video, and transparency for the areas you wish to cut away. Partial transparency is supported, so you can create regions of translucency as well as using a mask to create solid regions of opacity and transparency in your video.

Editing Your Video | 99
Remember to create your masks at a suitable size for your project, taking pixel aspect ratio into account. For the majority of output formats, MoviePlus creates non-square (rectangular) pixels at export time: your DVD video in PAL regions, for instance, is created at 720 pixels wide, but after pixel stretching (as carried out by DVD players and the MoviePlus’s Video Preview pane) the video is stretched to the equivalent of 787 pixel wide, 655 pixels wide in the case of NTSC. The pixel aspect ratio for DVD PAL is 1.0926 and this is the factor by which the video is affected by stretching (mask images need to be wider than the project size by the same factor). To know how much your project will be stretched, in order to know how much wider (or narrower) to make your mask images, please see Advanced Export Settings in MoviePlus help. As a quick guide, you should multiply the project's pixel aspect ratio x frame width = width you need to create your mask.
Once your masks are ready for use in MoviePlus you can always adjust their size and position using a Transform envelope.
To add your own masks to your project, browse to their saved location using the Explorer pane, and drag your mask image onto a track of its own, positioned above the video you would like to mask.
Using colour in your masks Your own masks do not need to be just regions of white and transparency as the mask presets are, you can also use regions of colour to mix a mask and overlay within a single image. Incorporating a colour other than white in your mask will mean your mask image performs two functions—the white and transparent regions will continue to create regions of opacity and transparency in underlying video, and any other colours will act like celluloid filters, colourizing the underlying video. You can also achieve some interesting mask effects by choosing which luminance or colour component elements of an image will affect transparency, for instance selecting to isolate just the red components of an image to mask out underlying video. See the Mask effect in MoviePlus help for more information.
Resizing and moving masks Where your mask does not quite match the area of video that you would like to make transparent, you can resize or move it for better results. You can also animate a mask so that it moves to match movement of a subject in an underlying video source, for instance to mosaic a face that moves slightly within the frame.

100 | Editing Your Video
Selecting the mask to modify its properties Click the button on top of your mask on your Timeline to reveal a drop-down Attributes menu. When Transform is selected from the menu, the source's Keyframe View is displayed directly below the source. The envelopes are shown in separate strips with the chosen Transform envelope already selected. As the first Keyframe is already selected its properties are shown in the Properties pane immediately.
Resizing a mask Either:
• Set the Size mode of the mask object to Stretch (view the mask's Source Properties to do this). This stretches the image to the current project dimensions.
or:
• With the mask object selected, view its Transform envelope. With the envelope selected, switch to the Video Preview pane. You should see the Transform region for the mask—hold Shift on your keyboard and, using a corner handle, click and drag a handle to resize your mask. Do not hold Shift if you would like freeform adjustment of height and width; keep holding Shift until after you've released your mouse button if you would like your mask to maintain its original shape.
Moving a mask With the Transform envelope's Keyframe selected, drag the Transform region around the Video Preview pane with your mouse to alter the mask's position. Use in conjunction with resizing for powerful Transforms.
Animating a mask To animate a mask you will need more than one Keyframe in the Transform envelope. MoviePlus will automatically move the mask between the positions defined by Keyframes, so in an extended clip that requires some movement of a mask you may only need to define a few important positions at certain points along the Timeline, allowing MoviePlus to calculate the in-between steps.
While your mask is selected and the Keyframe View is active, click at a point along the Timeline on the Transform envelope's strip where you would like to add another Keyframe. Modify the Keyframe's properties using either the Properties pane or by moving/resizing the selected object, using the Transform control available in the Video Preview pane. Corner handles resize, side handles stretch or compress, clicking and dragging within the handles performs a move operation, clicking and dragging outside of the handles results in rotation.
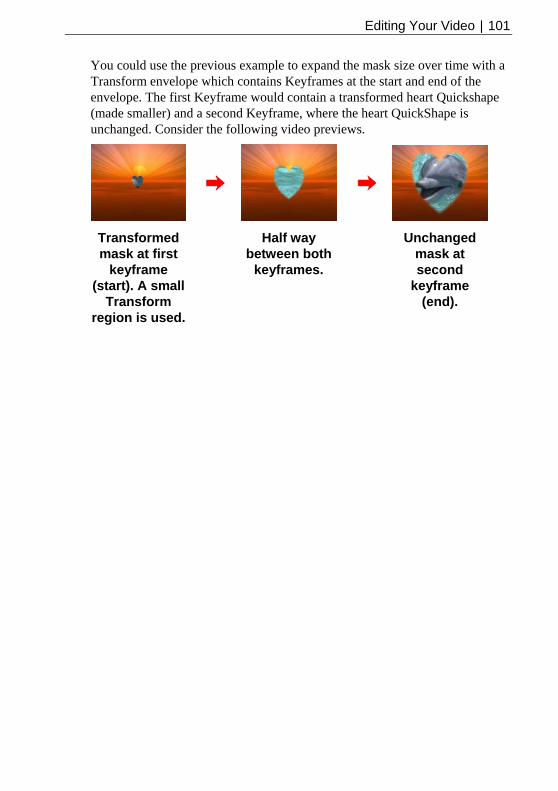
Editing Your Video | 101
You could use the previous example to expand the mask size over time with a Transform envelope which contains Keyframes at the start and end of the envelope. The first Keyframe would contain a transformed heart Quickshape (made smaller) and a second Keyframe, where the heart QuickShape is unchanged. Consider the following video previews.
Transformed mask at first
keyframe (start). A small
Transform region is used.
Half way between both
keyframes.
Unchanged mask at second
keyframe (end).
102 | Editing Your Video
Blue Screening (Chroma Key) Introduction
The Blue Screening process, referred to as Chroma Key in MoviePlus, enjoys a few other names including colour keying, matting, green-screening, and colour separation overlay. It is a method of removing a colour (or a colour range) from one video or image to reveal another video or image behind it. The "removed" colour becomes transparent. MoviePlus achieves this transparency by using colour-detection routines to convert your video into a hidden black and white mask, used in behind-the-scenes processing, where white remains opaque but the selected colour range shows as black, which represents the transparent region.
This process is commonly used for weather broadcasts and of course in many movie blockbusters. To start with, the foreground subject—a weather presenter for instance—is filmed against a solid-coloured and evenly-illuminated backdrop. Using MoviePlus (or expensive studio wizardry in the case of live TV weather slots), the solid coloured region of this video can be made transparent using a Chroma Key effect, revealing an underlying video. In the case of some weather presenting, the video "behind" the presenter can show a computer-generated weather map with animated symbols or weather systems. In movies, the process saves actors being put in dangerous positions, such as visually-stunning explosions, or in places that cannot be reached for practical or budgetary reasons, such as across the other side of the globe or in space, but it also allows for useful presentation of information as demonstrated by popular weather presenting.
It's not only a background that can be removed; you can, for instance, hold up a solid-coloured card while being filmed and later remove that solid colour from the video to create a card-shaped cut-out. The alternate "background" video would then display through this "hole".

Editing Your Video | 103
Blue screening in action
Simple blue-screen filming of a hand against a solid-
coloured background, a
wooden frame with blue cloth stretched over it in this case.
Background video, placed on the track
below the blue-screen footage on
the Timeline.
The upper video source on the
Timeline, the blue-screen footage, has had a Chroma Key effect applied to it. Properties sliders were adjusted to
remove all the blue.
Applying the Chroma Key effect Effects in MoviePlus can be applied to individual video sources, whole tracks, or video group. While Chroma Key can also be applied to all three hierarchies, it is most commonly used with individual video sources in MoviePlus, as it is not usual for there to be multiple sources with the same background colour to be made transparent.
Applying to a video source, track or group: Select the Effects pane, click the Chroma Key entry in the list at the left, then drag and drop a chosen Chroma Key effect thumbnail from the right-hand side of the pane either directly onto a video source, or onto a video track or group's header.
The Attributes button will change from grey/white to red/yellow to denote that the effect has been applied. The Keyframe View is displayed automatically below the Timeline to show the Chroma Key effect strip.
Applying the Chroma Key effect to a track or group means that MoviePlus will try to "remove" a coloured region from every video source on that track or every track in that group!
104 | Editing Your Video
Settings in the Properties pane Changing the Chroma Key colour The Chroma Key effect automatically removes whichever colour is associated with the Chroma Key effect preset applied to your video. For example, if you use the "Home Blue screen" preset then the preset's colour (RGB 98,141,223) is removed. If you would like to select a different colour you can display the effect's Properties pane and either:
• use the colour picker pipette to select a new colour value from anywhere on your screen (hold down the mouse button, and drag the pipette over the colour you require, and release). OR
• define a new colour by clicking the Colour spectrum and, from the Adjust Colour dialog, select an RGB, HSL or HTML code.
It is recommended that when you change the colour you first Mute the Chroma Key effect by clicking the Mute button in the effect's header at the left of the Timeline, then un-mute the effect to see the results. The rest of your Timeline composition should now be visible through the transparent region of the affected source, track or group.
Changing thresholds and blurring MoviePlus lets you fine-tune the Chroma Key effect to help the colour-detection processes determine which bits of your video to make transparent. It is very useful to be able to set a Low and High threshold for colour detection—this transparency is set according to brightness levels. Blur lets you blur the shape of the transparent region generated by the Chroma Key effect.
Changing the Chroma Key effect over time You can adjust the Chroma Key settings so that they change over time, perhaps to account for a change in lighting conditions that affects the colour you're trying to remove. Your Chroma Key effect can start by removing pale blue and slowly change to removing a stronger blue, for instance.
To introduce change to your Chroma Key settings over time, reveal the Keyframe View for your source, track or group (depending what you've applied the effect to) by clicking the Attributes button on top of the source, or on the header of the track or group. This will display the effect strip below the Timeline. You can then click at a point along the Chroma Key strip on the Timeline to add additional Keyframes, which can each have modified settings.
Editing Your Video | 105
MoviePlus will gradually blend from one Keyframe's settings to the next as your video is played. You can also affect the rate of change between Keyframes. For more information, see Adjusting keyframes on p. 75.
Other considerations If your blue-screen (or other background colour) footage is not perfect for keying the solid colour out, you may also need to use a mask or some other effects. A mask can be added to a track above the Chroma Keyed footage to cut out more of the video; this could be a shaped white and transparent image used to cut out the regions that the Chroma Key effect could not.
You can also consider using colour-correction effects prior to applying the Chroma Key in order to improve the quality of your background source (video, image, or CG source). Using multiple effects and choosing the order in which they are applied is discussed in Applying Effects (see p. 129).
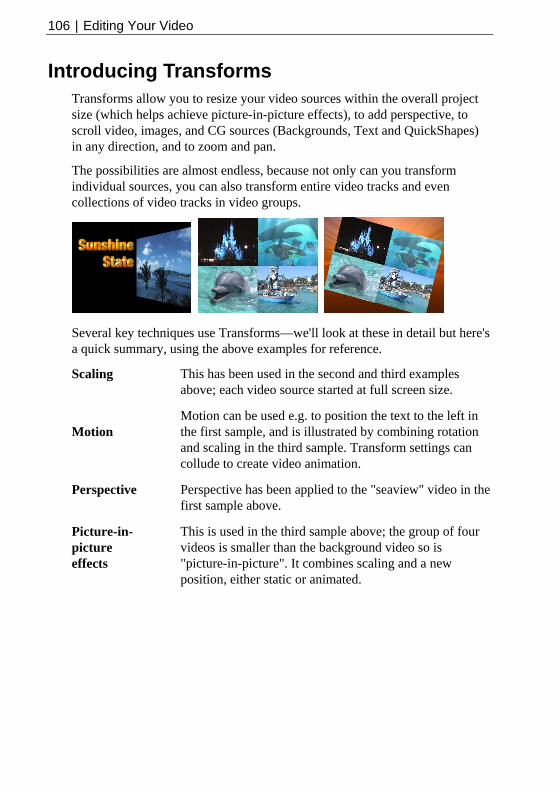
106 | Editing Your Video
Introducing Transforms Transforms allow you to resize your video sources within the overall project size (which helps achieve picture-in-picture effects), to add perspective, to scroll video, images, and CG sources (Backgrounds, Text and QuickShapes) in any direction, and to zoom and pan.
The possibilities are almost endless, because not only can you transform individual sources, you can also transform entire video tracks and even collections of video tracks in video groups.
Several key techniques use Transforms—we'll look at these in detail but here's a quick summary, using the above examples for reference.
Scaling This has been used in the second and third examples above; each video source started at full screen size.
Motion
Motion can be used e.g. to position the text to the left in the first sample, and is illustrated by combining rotation and scaling in the third sample. Transform settings can collude to create video animation.
Perspective
Perspective has been applied to the "seaview" video in the first sample above.
Picture-in-picture effects
This is used in the third sample above; the group of four videos is smaller than the background video so is "picture-in-picture". It combines scaling and a new position, either static or animated.
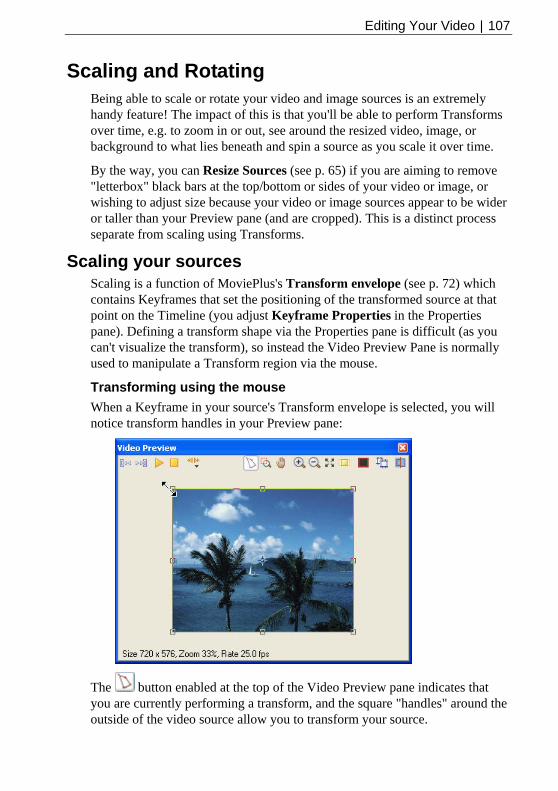
Editing Your Video | 107
Scaling and Rotating Being able to scale or rotate your video and image sources is an extremely handy feature! The impact of this is that you'll be able to perform Transforms over time, e.g. to zoom in or out, see around the resized video, image, or background to what lies beneath and spin a source as you scale it over time.
By the way, you can Resize Sources (see p. 65) if you are aiming to remove "letterbox" black bars at the top/bottom or sides of your video or image, or wishing to adjust size because your video or image sources appear to be wider or taller than your Preview pane (and are cropped). This is a distinct process separate from scaling using Transforms.
Scaling your sources Scaling is a function of MoviePlus's Transform envelope (see p. 72) which contains Keyframes that set the positioning of the transformed source at that point on the Timeline (you adjust Keyframe Properties in the Properties pane). Defining a transform shape via the Properties pane is difficult (as you can't visualize the transform), so instead the Video Preview Pane is normally used to manipulate a Transform region via the mouse.
Transforming using the mouse When a Keyframe in your source's Transform envelope is selected, you will notice transform handles in your Preview pane:
The button enabled at the top of the Video Preview pane indicates that you are currently performing a transform, and the square "handles" around the outside of the video source allow you to transform your source.

108 | Editing Your Video
• Hover on a corner handle until you see a resize cursor (see top-left corner of the example preview window above) and drag to resize the video or image. Drag inwards to reduce the video or image size; drag outwards to increase it.
Use the Shift key while dragging to
maintain the aspect ratio (the
rectangular shape) of your source during resize.
Use the Ctrl key to move the
transform handle independently,
creating a skewed transform.
Use the Alt key to resize your video object about its
own centre.
• Click and drag inside the transform region to reposition your resized video—avoid clicking the small handle in the centre, it has a special purpose to do with rotation. If your resized video/image is above other video or image sources, you will have just created a picture-in-picture effect!
Transforming using accurate values Rather than dragging the transform corner handles with your mouse to resize your video or image, you can adjust selected Keyframe properties in the Properties pane. You can, for instance, set the video/image size to be 25% of your project size by making the video 50% of its original width and 50% of its original height (set X Scale and Y Scale to 50%).
Transforming using Envelope Presets MoviePlus comes equipped with some powerful Transform envelope presets—you can drag and drop presets that perform Split screen or Quad transforms on individual tracks and sources. In simple terms, this gives you a quick way to produce double-, triple- or quadruple-screen video with minimum effort.
The MoviePlus 5 "Children's Party" tutorial provides an excellent example of the use of Split screen transforms.

Editing Your Video | 109
In technical terms, each video source is placed on its own track, and each trackis assigned a different preset. For Sp
lit Screen Transform presets, you apply a
set o her than applexample, for a triple screen video:
f transforms to multiple tracks (rat y a single transform). For
lt is an eVideo Tracks 1, 2 and 3 have transform presets "Triple Split
Screen-Right", "Triple Split reen-Middle" and "Triple Spl
Screen-Left" applied, respectively. Don't forget to correct each
ect ratio
Sc it
source's asp by applying the "Triple Split Screen Transform"
The resu xciting composite triple-screen
video!
preset!
You can treat each transform as a starting point for your own presets. Once you've chosen a preset and modified it to your liking you can save it to a new name (in the root Transform folder of the Envelopes pane) along with
allery button in the transform's
f
-in-picture effects, you need a multi-track project with layered video or image sources—see Picture-in-picture Effects on p. 116 for more information.
your existing presets, by using the Add to GProperties pane.
Achieving Picture-in-Picture effects Making a video source (or a collection of sources on a track or in a group) smaller than the original size means that you can see underneath that part oyour project to any underlying sources. The examples on p. 108 have a black background because there is no video, image, or colour source on a track below the transformed source. To achieve picture

110 | Editing Your Video
Zooming in or out To achieve a zoom effect using a Transform envelope, you will need to use multiple Keyframes—two is enough for basic zooms, each Keyframe set at a different time with a different set of transform properties. MoviePlus will smoothly calculate all the steps between the two Keyframes to achieve smooth zooming. See Using Envelopes and Adjusting keyframes on p. 72 and 75 to learn how to modify Transform envelopes by making Keyframe adjustments.
Rotating your sources Select a source then a Keyframe on its Transform envelope. Within your Video Preview pane, position your mouse cursor outside the transform handles (still within the Preview pane). When you hover over a transform handle, a rotate cursor will appear.
• Click and drag in a gentle circle to rotate your video or image. Hold Shift on your keyboard to constrain the rotation to 15° jumps.
To introduce a moving "spin" to your transform, you will need to add multiple Keyframes to your Transform envelope, each with different rotation property settings. You can of course set these values using the Properties pane. Combine your knowledge about achieving a rotation and modifying Transform envelopes to create spinning sources.
Centre of rotation By default your rotation will make the source spin about its own centre. You can move the centre of rotation to create an arc movement by clicking and dragging the central transform "handle" prior to rotation. Alternatively, you can set absolute X Centre and Y Centre values for a Transform envelope's keyframe (Properties pane).
Editing Your Video | 111
Working with tracks and groups We've looked exclusively at sources, whether they are classed as video, image, or computer-generated (backgrounds, QuickShapes or text). However, transforms can be equally applied to Video Tracks or Video Groups.
• Video Tracks - Apply a transform to a track if you want to affect all the sources on that track. As each source is located at a different point in time along the project Timeline, a transform applied to the whole track is often only useful if the transform itself does not change over time, i.e. it has just one Keyframe.
• Video Groups - In general terms you should use groups where you want multiple sources and tracks treated as one video element. You can transform sources to make them of reduced size, then place their video tracks in a video group and apply additional transforms.
Need more room in your Preview pane to carry out transforms?
If you are increasing the size of your video or rotating it using a transform, you might find that space becomes a bit tight in your Video Preview pane. This is normal, each MoviePlus user tends to customize the interface in some way to suit particular needs or preference, so there are lots of ways you can permanently or temporarily increase the pane size—or perhaps just click the Zoom Out button at the top of the pane, making the preview and transform smaller.
112 | Editing Your Video
Source, Track, and Group Motion Transforms are a powerful tool in the video editor's arsenal. Transforms are an envelope attached to a source, video track, or video group. Like other envelopes, you can apply change over time—in the case of transforms this means video motion—by utilizing more than one Keyframe along your Transform envelope strip.
Some motion-inducing techniques are easily done by simply manipulating the Transform region in the Video Preview pane. Others lend themselves to more accurate adjustments of the Transform envelope's Keyframe properties. As a rule of thumb, try the former method and if you get good results stick with it! If not, use the Properties pane.
See Using Envelopes (see p. 72) and Adjusting keyframes (see p. 75) to learn how to modify envelopes by making Keyframe adjustments.
Practical examples Panning Use at least two Keyframes, with different positional information in each Keyframe. You can achieve this by adjusting the X Position and Y Position values in the each Keyframe's Properties pane. For instance, to move across your "screen" from left to right, the first Keyframe could have an X position value of 100% and the second Keyframe could have an X Position value of -100%.
Zooming Use at least two Keyframes (you will only need two for a simple zoom) with different X Scale and Y Scale values for each Keyframe. To Zoom in on your source, increase these values on the second Keyframe or decrease values on the first Keyframe, and vice versa for Zoom out. To discover how to resize your video objects using the transform feature, see Scaling and Rotation on p. 107.
Spinning For accurate Keyframe positioning on the Timeline and accurate rotation values, add Keyframes at regular intervals, adjusting the Rotation value in each Keyframe's Properties pane. For information about achieving rotation using a transform, see Scaling and Rotation on p. 107.
For full rotation(s) it is recommended that you introduce a new Keyframe for every 120° of rotation to ensure you don't encounter any accidental switching of rotation direction as your object spins.

Editing Your Video | 113
Perspective Use two or more Keyframes with a different shape applied in each case. Hold down the Ctrl key while dragging transform handles in the Video Preview pane to modify perspective in a freeform way, or hold Control+Alt+Shift and drag a corner handle to constrain perspective to a more uniform adjustment.
Combining different types of transforms Each Keyframe on a Transform envelope stores full information about size, position, rotation, and any perspective or skewing.... so to combine a zoom and a pan, all you need to do is modify the size and position of your object with each Keyframe, you do not need (and cannot use) multiple Transform envelopes for a single video object—although you can use a separate Transform envelope for a source, track and group independently of each other.

114 | Editing Your Video
Perspective Perspective can give a feeling of depth to your project—a sense that objects appear to get smaller the further away they are. Whether applied to source, track or group, perspective can be applied as a transform in MoviePlus in the Video Preview pane (by adjusting a visible transform region).
Perspective changes, like scaling, rotation and panning can all be animated—MoviePlus supports multiple Keyframes along the Transform envelope (see Using envelopes on p. 72), each with different transform settings. MoviePlus automatically interpolates (calculates the in-between steps) between two Keyframes, allowing you to set "before and after states" (or a series of before and after states if using more that two Keyframes).
Even perspective Hold the Ctrl+Alt+Shift down then click and drag a transform corner handle in the Video Preview pane. Dragging a top corner handle downwards will have a corresponding mirrored affect on the position of the corner handle beneath it. Dragging a corner handle sideways will have a corresponding affect on the opposing corner handle at the other side of your video object.
Optionally, once you have achieved a suitable amount of "compression" of your video at one end, release the mouse button and keyboard keys then drag one of the sides' middle handles inwards.
Control+Alt+Shift drag of corner handle
Drag of a middle handle
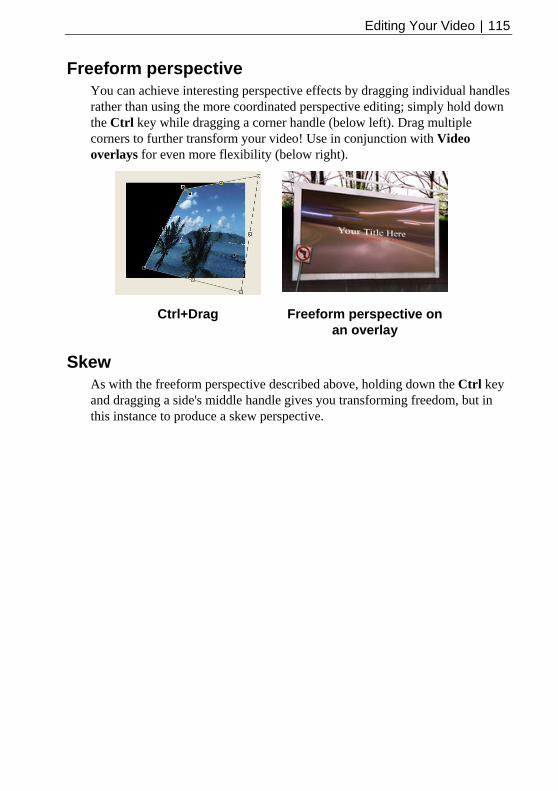
Editing Your Video | 115
Freeform perspective You can achieve interesting perspective effects by dragging individual handles rather than using the more coordinated perspective editing; simply hold down the Ctrl key while dragging a corner handle (below left). Drag multiple corners to further transform your video! Use in conjunction with Video overlays for even more flexibility (below right).
Ctrl+Drag Freeform perspective on an overlay
Skew As with the freeform perspective described above, holding down the Ctrl key and dragging a side's middle handle gives you transforming freedom, but in this instance to produce a skew perspective.

116 | Editing Your Video
Picture-in-Picture Effects Picture-in-Picture, an exciting way of displaying more than one video simultaneously on-screen, is a feature available thanks to Transform envelopes. To achieve a picture-in-picture effect of any kind, you will by definition need more than one source playing at once, i.e. your project has multiple tracks each with a source at the same point on the Timeline, otherwise they cannot play at the same time!
Popular uses Although a text overlay is not often thought of as picture-in-picture, the same principles apply to both concepts—one source sits on top of another with the upper source being resized and/or positioned using a Transform envelope. So you can use picture-in-picture technology for:
• A video replay (you can make this slow motion by adjusting playback speed)
• Text overlays like a flashing "Replay" logo
• Video montages (often used to show events in brief)
The samples shown below could all be described as picture-in-picture, although the term picture-and-picture is applicable where video or images do not "overlap".
Two tracks present, each containing one source. An upper "count-down" source has been scaled down in an applied Transform envelope.
Two tracks present, each
containing one source. An upper
Text source "Sunshine State"
is used with a perspective
transform of a second source,
showing a holiday scene.
Four tracks present, each
containing one source. Each
source has been resized in a Transform
envelope to occupy a quarter
of the screen area.

Editing Your Video | 117
Picture-and-picture effects The third of the three samples above shows four video sources of equal size each occupying a different "position" in the available area. This was achieved by organizing each of the sources on a track of their own so that they could be positioned one atop the other to play simultaneously, then each source had a one of a set of Quad Transform envelope presets applied (see Scaling and Rotation on p. 107).
Using groups There may be occasions where you would like to transform a collection of sources or tracks, as in the sample below.
The tracks containing the four sources described in the picture-and-picture section above have been dragged into a video group to achieve the rotation of all four sources. In addition to each source having a transform applied, the group of four tracks also has a transform applied, scaling and rotating the composite result of the group. Each source can still have its own opacity, effects, and as mentioned transforms, and thereafter additional effects and envelopes can be applied to the tracks and groups.
118 | Editing Your Video
Blend Modes You can think of blend modes as different rules for merging overlapping video or image pixels together at the video track level to create a resulting colour. In MoviePlus, you'll encounter blend modes as a track property. The video group, track or source opacity setting interacts with the track blend mode to produce varying results.
Blend modes are also used in filter effects (p. 137)—including shadows, glow, bevel, emboss, and colour fills as well as 3D Pattern Maps—the blend mode is one of many settings that determine a colour change superimposed on the original object's pixels. Because the change is part of a filter effect, it doesn't actually alter the original pixel values. Note that blend modes work in relation to the colours of the object itself, and don't interact with background or underlying object colours. Changing the blend mode produces more dramatic results with some effects than with others (for example, with shadows they have negligible impact because the shadow is basically a blend with the background).
Applying a blend mode To change the way a track blends its video content with the underlying video, select an item from the Blend Mode drop-down menu in the track's Properties pane.
Aside from special "colour" effects, the blend mode is also used when cropping or cutting out video using masks.

Editing Your Video | 119
Cropping Cropping within MoviePlus lets you remove everything outside a defined crop area in your preview, and then resizes the project to that crop area. While used frequently on Image sources (of unusual dimensions or if in Landscape orientation), you can also apply cropping to video sources—although it's important to ensure items of interest are not cropped out throughout the video source's duration.
Taking an example of a holiday beach scene you can apply a crop to encompass the unwanted upper grassy area and the “uninteresting” left and right edges of the frame, to focus in on subjects of interest, in this case the key players in a serious construction project!
Crop Selection area positioned and sized
accurately
Resulting Video preview
The cropping function operates in a similar manner to the way a Transform is applied, i.e. like a transform, cropping uses a dedicated envelope which is accessible for any source from the Attributes menu. This Crop envelope is displayed, controlled and modified as for any other envelope. It can host one or more keyframes along the envelopes length (called the strip) to dictate the crop selection area, i.e. with one keyframe you apply a static (non-changing) crop for the source's duration, or if multiple keyframes you can change the cropping area over time. See Using Envelopes and Adjusting Keyframes on p. 72 and 75, respectively, for more information.
MoviePlus opens up some interesting possibilities when cropping over time as you can pan in any direction, zoom, pan/zoom together and create panoramas as the cropping area changes. To recreate these cropping effects and many more, MoviePlus's Envelopes pane provides a range of Crop envelope presets to get you up and running quickly.
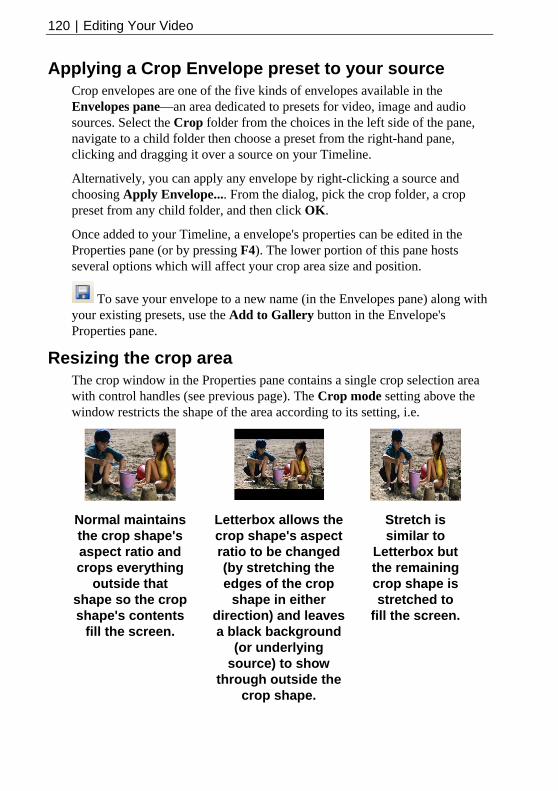
120 | Editing Your Video
Applying a Crop Envelope preset to your source Crop envelopes are one of the five kinds of envelopes available in the Envelopes pane—an area dedicated to presets for video, image and audio sources. Select the Crop folder from the choices in the left side of the pane, navigate to a child folder then choose a preset from the right-hand pane, clicking and dragging it over a source on your Timeline.
Alternatively, you can apply any envelope by right-clicking a source and choosing Apply Envelope.... From the dialog, pick the crop folder, a crop preset from any child folder, and then click OK.
Once added to your Timeline, a envelope's properties can be edited in the Properties pane (or by pressing F4). The lower portion of this pane hosts several options which will affect your crop area size and position.
To save your envelope to a new name (in the Envelopes pane) along with your existing presets, use the Add to Gallery button in the Envelope's Properties pane.
Resizing the crop area The crop window in the Properties pane contains a single crop selection area with control handles (see previous page). The Crop mode setting above the window restricts the shape of the area according to its setting, i.e.
Normal maintains the crop shape's aspect ratio and crops everything
outside that shape so the crop shape's contents
fill the screen.
Letterbox allows the crop shape's aspect ratio to be changed (by stretching the edges of the crop
shape in either direction) and leaves a black background
(or underlying source) to show
through outside the crop shape.
Stretch is similar to
Letterbox but the remaining crop shape is stretched to
fill the screen.
Editing Your Video | 121
Once a mode has been selected, the crop area can be resized by dragging a corner handle or, if in Letterbox or Stretch mode, a side handle to alter the aspect ratio. Alternatively, you can set a crop area manually by entering Top, Bottom, Left or Right percentage values in the Crop Envelope's Properties pane.
You can double-click on the crop area to reset its size back to the project’s dimensions.
Applying a crop mode will automatically change your current source's Size mode to "Custom". Whenever you see this setting on a source you can be sure that a Crop Envelope has been applied.
Cropping with Masks As a very powerful way of cropping irregular shaped objects (as opposed to cropping to square or rectangle areas), cropping video with masks involves using a simple image overlay to describe which areas of your video should remain visible and which areas should become transparent.
As a quick recap, masks are usually simple images made with a transparent region and a white region; when applied correctly in the MoviePlus Timeline, these images affect underlying video, with white in the mask translating to visible regions of your video and transparency in your mask translating to transparent (cut/cropped) regions of the video. You can use this functionality to hide (or crop away) portions of your video that you do not want included. Masks allow for irregular cropping, cropping with soft edges, animated cropping; the possibilities are infinite, as are the number of mask images or videos you can create.
For more information, see Masks on p. 96.
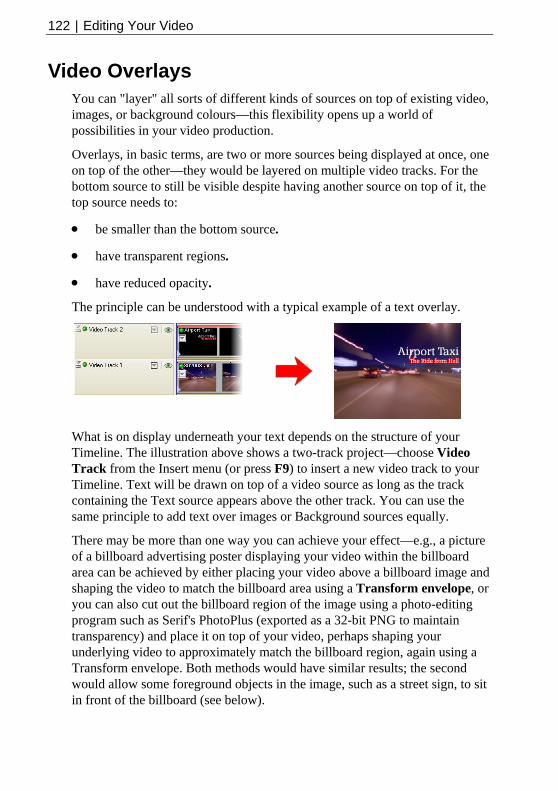
122 | Editing Your Video
Video Overlays You can "layer" all sorts of different kinds of sources on top of existing video, images, or background colours—this flexibility opens up a world of possibilities in your video production.
Overlays, in basic terms, are two or more sources being displayed at once, one on top of the other—they would be layered on multiple video tracks. For the bottom source to still be visible despite having another source on top of it, the top source needs to:
• be smaller than the bottom source.
• have transparent regions.
• have reduced opacity.
The principle can be understood with a typical example of a text overlay.
What is on display underneath your text depends on the structure of your Timeline. The illustration above shows a two-track project—choose Video Track from the Insert menu (or press F9) to insert a new video track to your Timeline. Text will be drawn on top of a video source as long as the track containing the Text source appears above the other track. You can use the same principle to add text over images or Background sources equally.
There may be more than one way you can achieve your effect—e.g., a picture of a billboard advertising poster displaying your video within the billboard area can be achieved by either placing your video above a billboard image and shaping the video to match the billboard area using a Transform envelope, or you can also cut out the billboard region of the image using a photo-editing program such as Serif's PhotoPlus (exported as a 32-bit PNG to maintain transparency) and place it on top of your video, perhaps shaping your underlying video to approximately match the billboard region, again using a Transform envelope. Both methods would have similar results; the second would allow some foreground objects in the image, such as a street sign, to sit in front of the billboard (see below).

Editing Your Video | 123
Top source made smaller When you add an opaque source to the upper track so that it is displayed on top of other sources, it is likely to occlude them completely or almost completely, blocking out the source below so all you can see is the content of the top-most track. To resize your top source so you can see "around it" to underlying sources, use a Transform envelope on the upper source or track. You can also reshape your source, deform with perspective (as shown above) and you can even animate the resizing/reshaping process. See Introducing Transforms on p. 106 to learn more.
Top source has transparent regions Overlaid STV video Serif's ImpactPlus is an example of a program that can create video containing transparency—the STV file format, Serif Transparent Video, is a high-quality format based on a lossless 32-bit image format, which supports 256 levels of transparency in every frame and, despite being compressed, does not lose image quality when saved. When exported as STV, animations created using ImpactPlus can make for compelling effects in your movies, including smoke, fire, ethereal mists, sparkling fireworks and more. If you own Serif ImpactPlus see its Online Help for information about exporting your scenes as video; remember to choose the STV format if you want your video to have a transparent background!
When you add a STV video file to a track above existing video or images, you do not need to take any further action, MoviePlus will smoothly overlay the STV on top of the video, colour or image on the lower track, revealing underlying sources through the video's transparent region.
Overlaid text or images Text When text is applied to anything other than the bottom video track, it has a transparent background. This makes it very easy to overlay titles or scrolling credits on top of video or images in your project.

124 | Editing Your Video
Images Images overlaid on tracks above other images or video can make for some fun projects (like the billboard composition, above). If the image on the top track has built-in transparency you will automatically be able to see through the transparent region to the underlying sources.
Creating images with transparency is a straightforward task for an application like Serif PhotoPlus, pictured above, but you can also use the Overlays folder in the Explorer pane (click the Resources button and navigate to the folder) for a varied selection of preset overlay designs that can be adopted as an overlay over an existing video source. Overlays are available from sub-folders such as Commercial, Photo, and Themed (includes holidays, Christmas, weddings, to name a few).
The MoviePlus Director's Collection DVD offers many more image overlays to choose from.

Editing Your Video | 125
Top source with reduced opacity There are a number of ways to reduce opacity of upper sources to partially reveal underlying sources—the quickest is to adjust overall track opacity using the Opacity slider in the selected Video track's Properties pane.
You can also adjust the opacity of a track (or even the source itself) over time by manipulating its Opacity envelope and associated keyframes. See Using Envelopes (p. 72) and Adjusting Keyframes (p. 75) to learn how to modify envelopes by making keyframe adjustments.

126 | Editing Your Video
Video Effects and Transitions
5

128 | Video Effects and Transitions
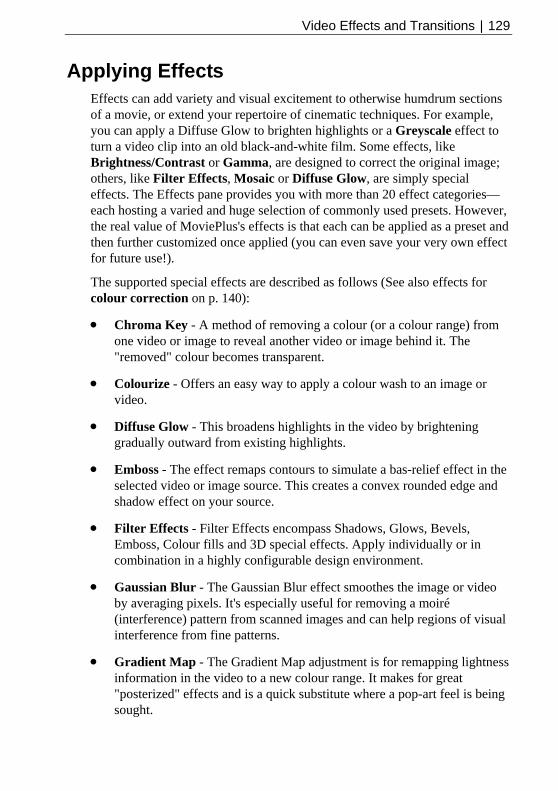
Video Effects and Transitions | 129
Applying Effects Effects can add variety and visual excitement to otherwise humdrum sections of a movie, or extend your repertoire of cinematic techniques. For example, you can apply a Diffuse Glow to brighten highlights or a Greyscale effect to turn a video clip into an old black-and-white film. Some effects, like Brightness/Contrast or Gamma, are designed to correct the original image; others, like Filter Effects, Mosaic or Diffuse Glow, are simply special effects. The Effects pane provides you with more than 20 effect categories—each hosting a varied and huge selection of commonly used presets. However, the real value of MoviePlus's effects is that each can be applied as a preset and then further customized once applied (you can even save your very own effect for future use!).
The supported special effects are described as follows (See also effects for colour correction on p. 140):
• Chroma Key - A method of removing a colour (or a colour range) from one video or image to reveal another video or image behind it. The "removed" colour becomes transparent.
• Colourize - Offers an easy way to apply a colour wash to an image or video.
• Diffuse Glow - This broadens highlights in the video by brightening gradually outward from existing highlights.
• Emboss - The effect remaps contours to simulate a bas-relief effect in the selected video or image source. This creates a convex rounded edge and shadow effect on your source.
• ally or in
• r video
ed images and can help regions of visual
• ghtness
ed" effects and is a quick substitute where a pop-art feel is being
Filter Effects - Filter Effects encompass Shadows, Glows, Bevels, Emboss, Colour fills and 3D special effects. Apply individucombination in a highly configurable design environment.
Gaussian Blur - The Gaussian Blur effect smoothes the image oby averaging pixels. It's especially useful for removing a moiré (interference) pattern from scanninterference from fine patterns.
Gradient Map - The Gradient Map adjustment is for remapping liinformation in the video to a new colour range. It makes for great "posterizsought.
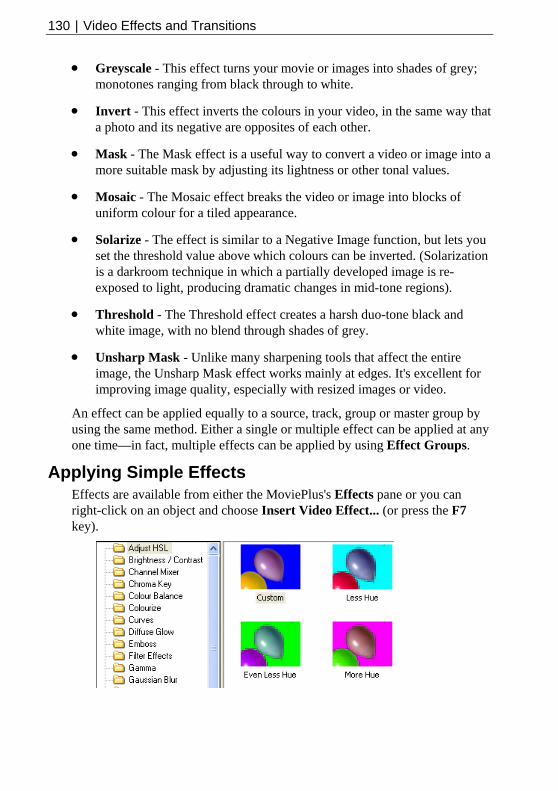
130 | Video Effects and Transitions
• Greyscale - This effect turns your movie or images into shades of grey; monotones ranging from black through to white.
• Invert - This effect inverts the colours in your video, in the same way that a photo and its negative are opposites of each other.
• Mask - The Mask effect is a useful way to convert a video or image inmore suitable mask by adjusting its light
to a ness or other tonal values.
• s you ion
ed image is re-
•
a source, track, group or master group by any
Ap e Effects or you can
righ press the F7 key
• Mosaic - The Mosaic effect breaks the video or image into blocks of uniform colour for a tiled appearance.
Solarize - The effect is similar to a Negative Image function, but letset the threshold value above which colours can be inverted. (Solarizatis a darkroom technique in which a partially developexposed to light, producing dramatic changes in mid-tone regions).
Threshold - The Threshold effect creates a harsh duo-tone black and white image, with no blend through shades of grey.
• Unsharp Mask - Unlike many sharpening tools that affect the entire image, the Unsharp Mask effect works mainly at edges. It's excellent for improving image quality, especially with resized images or video.
An effect can be applied equally tousing the same method. Either a single or multiple effect can be applied at one time—in fact, multiple effects can be applied by using Effect Groups.
plying SimplEffects are available from either the MoviePlus's Effects pane
t-click on an object and choose Insert Video Effect... (or ).

Video Effects and Transitions | 131
To a sen effect onto your obj rectly under the object in
pply an effect from the Effects pane, drag the choect. The object's Effects strip will be displayed di
the Keyframe View, e.g. for an applied Adjust HSL effect:
By clicking on the Keyframe at the start of the Effects strip, the Keyframproperties for that effect can be ad
e justed so that the effect is modified for the
the source, track or group (you alter each Keyframe's properties in duration of the Properties pane). Keyframe control is described in general terms in Adjusting Keyframes on p. 75.
Incidentally, you can switch on or off the effects strip display in the r group whenever you like. Choose Hide
ec
header of your video source, track oAttributes from the object's Attributes menu or click the drawing pin next to
ts the effect name.
Customizing your Eff
s
s
Any effect added to your project will have itown set of properties associated with it (the properties are stored in the first Keyframe for the effect). The effect's properties can be altered via a Properties Pane, just like any other object's properties in MoviePlus. Try clicking the effect name in an effect's header and view the Properties Pane. The exampleshows an Adjust HSL effect called "Vibrant".
The ability to customize effects by changing these property settings is the fundamental process by which effects can be changed. Thimeans that the presets supplied are merely a starting point for you to further create and save your own effects to your own requirements.
To save your effect to a new name (in the Effects pane) along with your existing presets, use the Add to Gallery button in the Effect's Properties pane.
132 | Video Effects and Transitions
Applying Effects over Time While it's possible to apply an effect for the entire duration of a source, track or group as discussed previously, it may be more effective for effects to be applied more sparingly over a specific, perhaps shorter, time duration.
It is possible to specify how an effect is applied along your Timeline by use of Keyframes at different points. These Keyframes are added along the source, track or groups effect strip, and modifying each in turn, to define how an effect's properties are to be applied at that point on the Timeline. During preview, as the caret passes over each keyframe the video will use the effect properties of the last visited effect keyframe. The effect can be faded-in, faded-out, toggled on or toggled off. See Adjusting keyframes on p. 75.
Ordering Effects Effects are organized in the Timeline's header region in a vertical sequence, composed from the top downwards just like video and audio tracks (effects at the top of the stack are applied first). Changing the sequence in which effects are applied is likely to produce very different results—experimentation is the key!
Effect Groups While it is not necessary to use effects groups in many cases, they are necessary if you wish to blend affected and unaffected video, also called mix back. Mix back is a term used to describe the blending of video with effects (affected video) back with the unaffected original video. This is extremely useful, as most effects do not offer "opacity" (strength of visibility) of their own. Mix back can be achieved by manipulation of the Video Effect Group envelope (see Using Envelopes on p. 72).
To create an effects group: • Go to Insert>Video Effect Group when a video group, track or source is
selected. An Effect Group strip appears directly under your chosen group, track or source.

Video Effects and Transitions | 133
To add and edit effects to Effect Groups: 1. Add the effect (and any others you wish to include) to the effects group by
dragging and dropping directly onto your Effect Group. The applied effects will be listed under the Effect Group, e.g.
2. Select the Effect Group header, and edit or add Keyframes along the effect group's Timeline, moving Keyframes up or down to affect the level of mix back.
In the above example, the influence of the cumulative effect on the whole Video track is reduced slightly over time as, firstly, the effect belongs to a Video Effect Group and, secondly, the group's opacity decreases. This is done by clicking on the strip's line to create a second keyframe and dragging this new Keyframe downwards in the strip.

134 | Video Effects and Transitions
Applying Shadows, Glow, Bevel/emboss, Colour fill
MoviePlus provides a variety of 2D filter effects that you can use to transform any source, track or group. "3D" filter effects (see p. 137) let you create the impression of a textured surface. The Colour Fill effect applies a colour over any existing fill. Other filter effects are especially well adapted to text, as shown here:
Drop Shadow
Inner Shadow
Outer Glow
Inner Glow
Inner Bevel
Outer Bevel
Emboss
Pillow Emboss
• Drop Shadow adds a diffused shadow "behind" solid regions on a layer, while Inner Shadow adds a diffused shadow effect inside the edge an object.
• Outer Glow adds a colour border (stroke) outside the edge of an object.
• Inner Glow adds a colour border (stroke) inside the edge of an object.
• Bevel and Emboss offers some different effects according to its Style drop-down menu, i.e.
• rounded-edge effect (resembling a drop shadow)
.
• boss adds a concave rounded edge and shadow effect to an object.
Outer Bevel adds a outside an object.
• Inner Bevel adds a rounded-edge effect inside an object.
• Emboss adds a convex rounded edge and shadow effect to an object
Pillow Em

Video Effects and Transitions | 135
To apply a shadow, glow, bevel, or emboss filter effect: 1. From the Effects pane, select the Filter Effects menu option and drag the
Filter Effects preset onto the source, track or group.
2. From the Properties pane, right-click the object and select the Edit Effects... button. The Effects dialog appears.
3. To edit an effect which is checked (i.e., enabled), select its name and vary the dialog controls. Adjust the sliders or enter specific values to vary the combined effect. (You can also select a slider and use the keyboard arrows.) Options differ from one effect to another. You can enable other effects by checking its effect name in the left-hand menu.
• For Shadow and Glow effects, choose a Blend Mode from the list. Click the Colour swatch to display the Adjust Colour dialog and change the base highlight or shadow colour from its default (either white or black).
• For Bevel and Emboss effects, choose a Highlight Blend Mode from the list and set the Opacity slider. Click the Colour swatch to display the Adjust Colour dialog and change the highlight colour from its default (white). Then choose a Shadow blend mode, opacity, and colour (default black).
4. Click OK to apply the effect to the selected object, or Cancel to abandon changes.
Colour Fill The Colour Fill effect applies colour effects over any existing source, achieving some effects that are not possible with other controls. For example, you can use Colour Fill in conjunction with an effect Blend Mode such as Multiply or Burn to produce darkening effects.
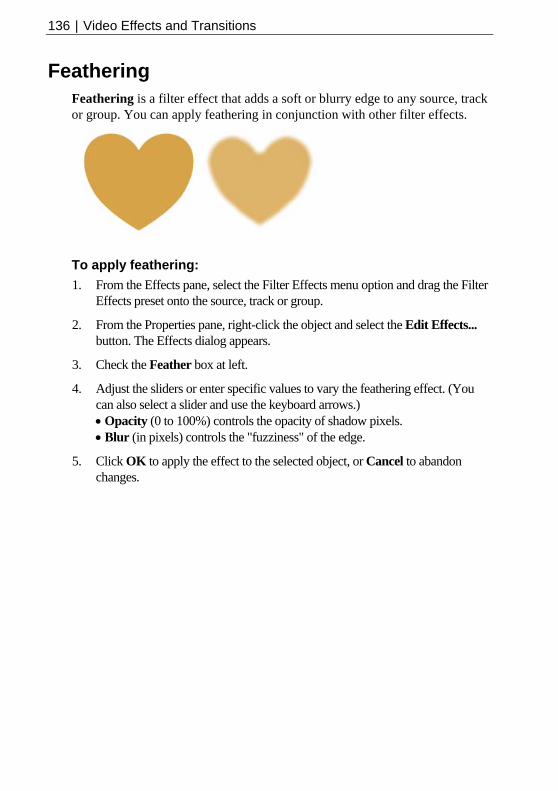
136 | Video Effects and Transitions
Feathering Feathering is a filter effect that adds a soft or blurry edge to any source, track or group. You can apply feathering in conjunction with other filter effects.
To apply feathering: 1. From the Effects pane, select the Filter Effects menu option and drag the Filter
Effects preset onto the source, track or group.
2. From the Properties pane, right-click the object and select the Edit Effects... button. The Effects dialog appears.
3. Check the Feather box at left.
4. Adjust the sliders or enter specific values to vary the feathering effect. (You can also select a slider and use the keyboard arrows.) • Opacity (0 to 100%) controls the opacity of shadow pixels. • Blur (in pixels) controls the "fuzziness" of the edge.
5. Click OK to apply the effect to the selected object, or Cancel to abandon changes.

Video Effects and Transitions | 137
Using 3D Filter Effects 3D filter effects create the impression of a textured surface on the source, track or group itself. You can use an Effects dialog to apply one or more effects to the same object—3D Bump Map, 3D Pattern Map, and 3D Lighting are all available. Some impressive effects can be achieved on a whole range of objects, particularly Text, Background and QuickShape sources.
To apply a 3D filter effect to a selected source, track or group: 1. Go to the Effects pane, and select the Filter Effects category.
2. Select and drag the Filter Effects preset onto the object (Note that accompanying presets have simple 3D effects already configured).
3. To display the Filter Effects dialog, click the Edit Effects... button on the selected object's Properties pane.
4. The displayed Effects dialog shares shadow, glow, bevel, emboss, colour fill, and feather effects, with a range of 3D effects. The 3D effects are displayed in the lower portion of the menu. Check to enable any of the 3D effects.
3D Effects is a master switch for this group, and its settings of Blur and Depth make a great difference; you can click the "+" button to unlink them for independent adjustment.
3D Lighting provides a "light source" without which any depth information in the effect wouldn't be visible. The lighting settings let you illuminate your 3D landscape and vary its reflective properties.
You may wonder why 3D effects seem to have "map" in their name. The concept of a map is the key to understanding how these effects work: it means a channel of information overlaid on the object, storing values for each underlying fill pixel. You can think of the fill as a picture printed on a flexible sheet, which is flat to start with. Each 3D filter effect employs a map that

138 | Video Effects and Transitions
interacts with the underlying fill to create the visual impression of a textured surface.
• 3D Bump Maps superimpose depth information for a bumpy, peak-and-valley effect. Using the flexible sheet metaphor, the bump map adds up-and-down contours and the object's fill "flexes" along with these bumps, like shrink-wrap, while a light from off to one side accentuates the contours.
• 3D Pattern Maps contribute colour variations using a choice of blend modes and opacity, for realistic (or otherworldly!) depictions of marbling, blotching or striations of all kinds.
You can combine multiple 3D filter effects, as in the illustration above. The effects are applied cumulatively.
The procedures for applying 3D Filter Effects are covered in the MoviePlus Help but here's a quick review of each effect type.
3D Bump Map The 3D Bump Map effect creates the impression of a textured surface by applying a mathematical function you select to add depth information, for a peak-and-valley effect. You can use 3D Bump Map in conjunction with one or more additional 3D filter effects.
3D Pattern Map The 3D Pattern Map effect creates the impression of a textured surface by applying a mathematical function you select to introduce colour variations. You can use 3D Pattern Map in conjunction with one or more other 3D filter effects.
3D Lighting The 3D Lighting effect works in conjunction with other 3D effects to let you vary the surface illumination and reflective properties.
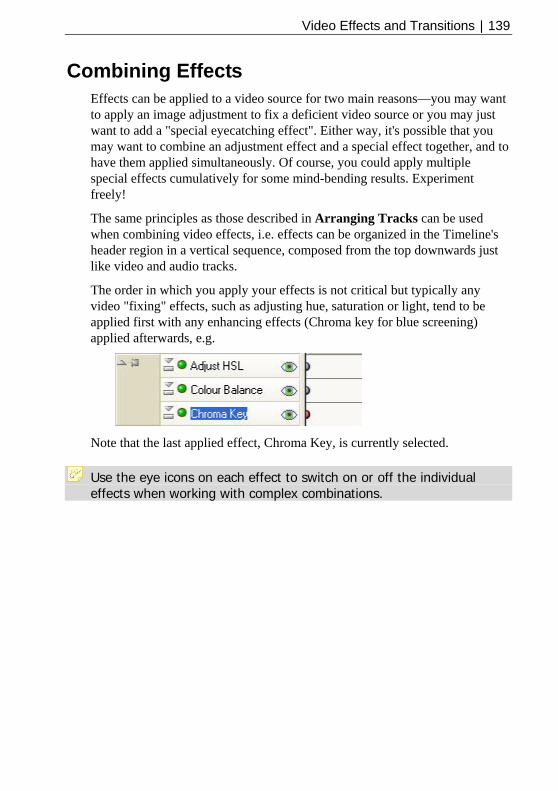
Video Effects and Transitions | 139
Combining Effects Effects can be applied to a video source for two main reasons—you may want to apply an image adjustment to fix a deficient video source or you may just want to add a "special eyecatching effect". Either way, it's possible that you may want to combine an adjustment effect and a special effect together, and to have them applied simultaneously. Of course, you could apply multiple special effects cumulatively for some mind-bending results. Experiment freely!
The same principles as those described in Arranging Tracks can be used when combining video effects, i.e. effects can be organized in the Timeline's header region in a vertical sequence, composed from the top downwards just like video and audio tracks.
The order in which you apply your effects is not critical but typically any video "fixing" effects, such as adjusting hue, saturation or light, tend to be applied first with any enhancing effects (Chroma key for blue screening) applied afterwards, e.g.
Note that the last applied effect, Chroma Key, is currently selected.
Use the eye icons on each effect to switch on or off the individual effects when working with complex combinations.
140 | Video Effects and Transitions
Colour Correction The Effects pane includes a wide variety of colour adjustment presets that you can apply to sources. These adjustments—to brightness, contrast, hue, and so on—are normally carried out on video sources, as most deficiencies will be inherited from the recording of the source (e.g., over-exposure, poor weather conditions, etc.).
Colour correction effect are applied and managed in the same way as any other effect, i.e. go to the Effects pane, select an effect folder from the left-hand menu and drag a chosen effect thumbnail onto the video source on the Timeline. Use the Properties pane to alter the adjustment settings. See Applying Effects on p. 129 for more information.
Let's take a look at the colour adjustment effect categories in turn.
Adjust HSL Hue, Saturation, and Lightness (HSL) are components of a standard colour model that's used to identify colours. Generally speaking, Hue refers to the colour's tint—what most of us think of as rainbow or spectrum colours with name associations, like "blue" or "magenta." Saturation describes the colour's purity—a totally unsaturated video has only greys. Lightness is what we intuitively understand as relative darkness or lightness—ranging from full black at one end to full white at the other. Adjust HSL lets you alter these components independently.
Brightness / Contrast
Brightness refers to overall lightness or darkness, while contrast describes the tonal range, or spread between lightest and darkest values. This is a "quick and dirty" way of correcting a video source, for example one that was over-exposed or under-exposed.
Channel Mixer
The Channel Mixer adjustment lets you adjust each separate colour channel (Red, Green, or Blue) using a mix of all the current colour channels.

Video Effects and Transitions | 141
Colour Balance
The Colour Balance adjustment lets you adjust colour balance for general colour correction in the video source. Combinations of Cyan/Red, Magenta/Green and Yellow/Blue can be adjusted to lower or raise each colour mix.
Curves The Curves adjustment lets you correct the tonal range of a source—the spread of lightness values through shadow, midtone, and highlight regions—and control individual colour components.
Gamma The Gamma adjustment lets you adjust the amount of mid-tone brightness in your video source. Think of midtones as the grey shading that lie between shadows and highlights present throughout your video source.
Levels The Levels adjustment lets you emphasize mid-tone lightness regions in each or all of the three primary video colours, red, green, and blue.
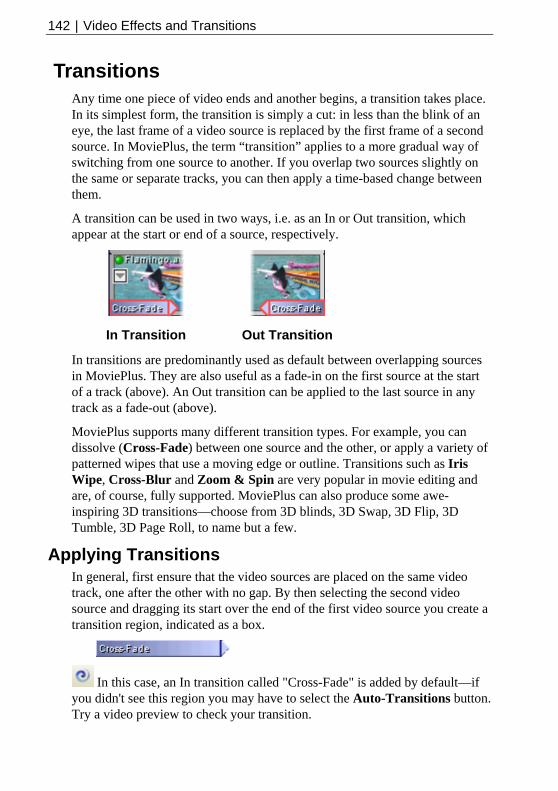
142 | Video Effects and Transitions
Transitions Any time one piece of video ends and another begins, a transition takes place. In its simplest form, the transition is simply a cut: in less than the blink of an eye, the last frame of a video source is replaced by the first frame of a second source. In MoviePlus, the term “transition” applies to a more gradual way of switching from one source to another. If you overlap two sources slightly on the same or separate tracks, you can then apply a time-based change between them.
A transition can be used in two ways, i.e. as an In or Out transition, which appear at the start or end of a source, respectively.
In Transition Out Transition
In transitions are predominantly used as default between overlapping sources in MoviePlus. They are also useful as a fade-in on the first source at the start of a track (above). An Out transition can be applied to the last source in any track as a fade-out (above).
MoviePlus supports many different transition types. For example, you can dissolve (Cross-Fade) between one source and the other, or apply a variety of patterned wipes that use a moving edge or outline. Transitions such as Iris Wipe, Cross-Blur and Zoom & Spin are very popular in movie editing and are, of course, fully supported. MoviePlus can also produce some awe-inspiring 3D transitions—choose from 3D blinds, 3D Swap, 3D Flip, 3D Tumble, 3D Page Roll, to name but a few.
Applying Transitions In general, first ensure that the video sources are placed on the same video track, one after the other with no gap. By then selecting the second video source and dragging its start over the end of the first video source you create a transition region, indicated as a box.
In this case, an In transition called "Cross-Fade" is added by default—if you didn't see this region you may have to select the Auto-Transitions button. Try a video preview to check your transition.

Video Effects and Transitions | 143
A Cross-fade In transition will be applied on the second of two overlapping sources—this transition type has no associated properties. However, all other transition types have associated properties which can be modified at any time.
You can change the transition duration by either dragging the left or right-hand end (as shown below) of the transition region to stretch or shrink it, or specify an absolute value in the transition's Properties pane.
Remember that each transition takes time to happen—so make sure the video in the overlap region is not part of the main action. If you expect to use transitions, it’s a good idea to allow a couple of seconds of non-essential material at the start and end of clips when you initially capture them.
Auto Transitions
If you are moving sources around on your Timeline you may not want MoviePlus to automatically create default Cross-Fade transitions on your overlapping sources. To have sources cut between each other without transition you can disable the Auto Transitions button on the Editing toolbar.
When you want to blend from one video or image source to another without the sharp "cut" where two sources butt against each other, you will need to overlap your sources. When the Auto Transitions button is enabled you will see an automatically-created cross-fade transition in the overlap region.
Snapping
If snapping is enabled with the Snapping button (Editing toolbar), the transition will conveniently fit into the overlap region. If snapping is disabled, or you drag the transition to an overlapping area between tracks, it will adopt a default overlap time as set in Tools>Options>Editing. Any applied transition should always match the overlap region, i.e. where two video sources are co-existing on the Timeline. If snapping is enabled with the Snapping button, your sources will be "sticky" when you drag sources near the default overlap period (MoviePlus offers a 1-second sticky overlap point by default). This makes it easy to keep a standard transition duration throughout your project without manually editing each transition duration in the Properties pane (or very carefully dragging your sources) for each overlap; MoviePlus makes it easy to use a standard value that you can alter in the Tools>Options>Editing dialog.

144 | Video Effects and Transitions
The overlap value is also used as a default transition duration when you add multiple image sources to the Timeline simultaneously—great for making quick slide shows!
Changing your Transitions Different transitions can be applied to either end of a source from either MoviePlus's Transitions pane (below) or by right-clicking on a source.
The Transitions pane offers a series of presets, all stored under different folders depending on transition type.
To apply a transition from the Transitions pane, drag a selected thumbnail on top of the existing transition region on your source (this swaps the old transition for the new one)—there's no need to select the source in advance. The transition name changes, e.g. to swap the default "Cross-Fade" In transition with a "3D page Roll" In transition:
In the example above, the example to the right shows a vertical caret (editing marker) at the end of the transition. In the first source, the overlap region, and the transition all end where the dashed red line is drawn.
You can also right-click on any transition's label and choose Replace Transition—either From Gallery... (by picking a preset from a gallery) or reset back to the Cross-Fade Default.

Video Effects and Transitions | 145
This offers a method of swapping a single transition, but what about swapping multiple transitions? You can apply multiple transitions by right-clicking selected sources (use the Ctrl key while selecting), and choosing either Apply In Transition or Apply Out Transitions. This method avoids having to drag and drop the same transition onto multiple sources many times over. A sub-menu offers the following choices:
• From Gallery - Use to select a transition preset from a dialog (of similar appearance to the Transitions pane). Select a transition folder depending on type, then a preset before clicking OK.
• Clipboard - If a transition has been previously copied to the Clipboard you can apply it by selecting this option. This is great if you've modified a transition (perhaps by applying source Keyframes) and wish to apply it to other sources by copying and pasting.
• Default - Use to revert the selected source's In or Out transitions back to the default transition, i.e. Cross-Fade.
• None - Removes the selected source's In or Out transitions.
Adjusting Transition properties Any Transition (apart from Cross-Fade) has properties that can be adjusted in the Properties pane. A transition, when applied, possesses a single Keyframe which dictates the transition duration, interpolation, and settings particular to the type of transition, e.g. Blur, transition direction, etc.
Keyframes are shown in a Transition strip, shown directly below the source when double-clicking the transition region (double-click again to hide the strip). In and out transitions are shown in separate strips with your chosen transition already selected. All transitions are shown in separate strips with your chosen transition already selected. For example, for an In transition "3D Page Roll" and Out transition "Iris Wipe" applied to a single source:
By clicking on the Keyframe (the button on each strip) on either transition, the properties of that transition can be modified for the duration of the transition (you alter each Keyframe's properties in the Properties pane). Keyframe control is described in general terms in Adjusting Keyframes on p. 75.

146 | Video Effects and Transitions
If one Keyframe is modified the change is applied over the transition's duration. However, more exciting transitions can be made by applying transitions over time.
Applying Transitions over Time It is possible to specify how a transition alters throughout its duration by setting Keyframes at different points on its strip, but only within the transition's duration (and not over a whole video source or track). The strip allows keyframes to be place along its length, which can be modified in turn to define how a transition's properties are to be applied at that point on the Timeline. The 3D Page Roll transition above could have a second Keyframe (with different properties) added at the end of the transition, to allow the transition to change over time, i.e.
During video preview, as the caret passes along the Timeline the video's transition will change over time by using the differing properties of the last visited keyframe and the next keyframe on the Timeline. The transition can be interpolated linearly or can adopt different types of quadratic or cubic algorithms to effect different rates of change.
Customizing your Transitions Transitions added to your project will have their own set of properties associated with them. These are highly customizable via the Properties Pane, just like any other object in MoviePlus. Try selecting a transition region and check its properties in the Properties Pane.
The ability to customize transitions by changing these property settings means that the presets supplied are merely a starting point for you to further create and save your own transitions to your own requirements.
To save your transition to a new name (in the Transitions pane) along with your existing presets, use the Add to Gallery button in the Transition's Properties pane.

Computer-generated (CG) Sources
6

148 | Computer-generated (CG) Sources

Computer-generated (CG) Sources | 149
Using CG Sources Several types of Computer-generated (CG) Sources exist within MoviePlus. They differ from video or audio sources in that they are not captured by video camera but are obtained from within MoviePlus from preset galleries. The following sources are available:
• Backgrounds To apply solid or gradient colour to your Timeline.
• QuickShapes To add modifiable drawn shapes such as stars, hearts, spirals and many more.
• Text To add text in various fonts and font sizes. Vary solid or colour gradients while applying shadows and other filter effects.
What CG sources all share is that they are managed in a very similar way within MoviePlus. They are added to the Timeline by drag and drop, and can have colour, transparency and effects applied to them.
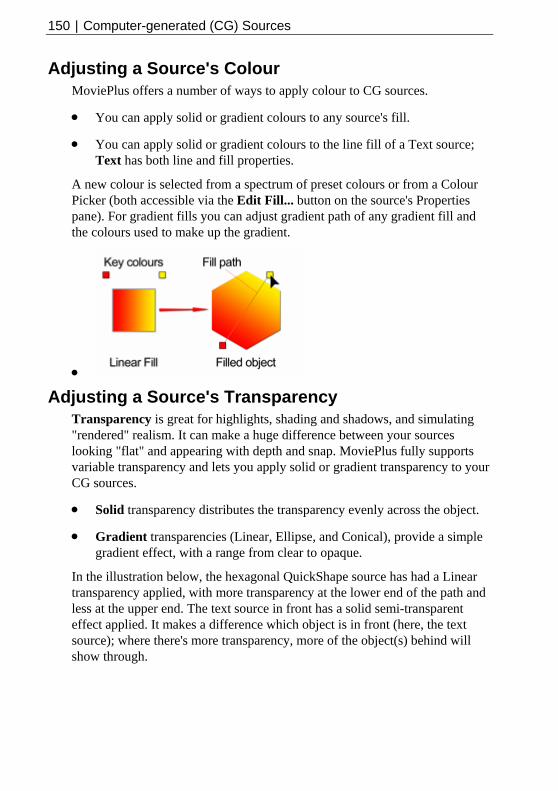
150 | Computer-generated (CG) Sources
Adjusting a Source's Colour MoviePlus offers a number of ways to apply colour to CG sources.
• You can apply solid or gradient colours to any source's fill.
• You can apply solid or gradient colours to the line fill of a Text source; Text has both line and fill properties.
A new colour is selected from a spectrum of preset colours or from a Colour Picker (both accessible via the Edit Fill... button on the source's Properties pane). For gradient fills you can adjust gradient path of any gradient fill and the colours used to make up the gradient.
•
Adjusting a Source's Transparency Transparency is great for highlights, shading and shadows, and simulating "rendered" realism. It can make a huge difference between your sources looking "flat" and appearing with depth and snap. MoviePlus fully supports variable transparency and lets you apply solid or gradient transparency to your CG sources.
• Solid transparency distributes the transparency evenly across the object.
• Gradient transparencies (Linear, Ellipse, and Conical), provide a simple gradient effect, with a range from clear to opaque.
In the illustration below, the hexagonal QuickShape source has had a Linear transparency applied, with more transparency at the lower end of the path and less at the upper end. The text source in front has a solid semi-transparent effect applied. It makes a difference which object is in front (here, the text source); where there's more transparency, more of the object(s) behind will show through.

Computer-generated (CG) Sources | 151
Varying the transparency of a CG source gives the effect of variable erasure, but it leaves the original object intact—you can always remove or alter the transparency later. Transparencies work rather like fills that use "disappearing ink" instead of colour. A gradient transparency varies from more "disappearing" to less, as in the hexagon above.
Solid transparency can be set with a percentage slider as opposed to gradient transparency which can be set by selecting from swatches showing various gradations from light to dark and then, if necessary, by editing the transparency path.

152 | Computer-generated (CG) Sources
Backgrounds Applying a background source is an excellent way to break up your movie content by introducing colour either as part of a fade-in or fade-out, or, as its name suggests, for use as a background. Many video techniques can benefit from using backgrounds including:
• Applying text and titles over a background colour.
• Applying colorization to a semi-opaque video source.
• Masking shapes or text over a background colour.
MoviePlus comes equipped with a range of solid colours or gradient colours for use as backgrounds which can be easily applied to your Timeline. Animation by colour transition is also possible.
Adding Background Sources Background sources are one of the three kinds of sources available in the Sources pane—an area dedicated to computer-generated sources (rather than the video/image/audio files available via the Explorer pane). Select Background from the choices on the left side of the pane, navigate to a folder then choose a background source from the right-hand pane, clicking and dragging it onto your Timeline.
Alternatively, you can insert any source onto your Timeline by positioning your caret, right-clicking on the Video Track header and selecting Insert CG Source.... Choose a background source from the dialog and click OK. The source will be positioned directly at your caret point.
As for video and audio sources, background sources possess properties which can be edited in the selected source's Properties pane (or by pressing F4). In particular, you can modify the fill and transparency, as well as scaling options.
Editing Backgrounds Background sources can be edited easily once added to your Timeline. Select your source previously added to the Timeline and view the Properties pane. The lower portion of this frame hosts two swatches which, when clicked, let you Edit Fill... (the left thumbnail) or Edit Transparency... (the right thumbnail). The swatches change to reflect the source's current colour or transparency.

Computer-generated (CG) Sources | 153
Changing Colours A F ch you can:
•
X ew solid colour and click OK.
• gallery by clicking the Add to
, e two white nodes around
ndow. If you want more advanced gradient fill
Edit picked from a single percentage slider,
Linear, Ellipse or Conical can be changed
ill dialog is displayed when you click Edit Fill... from whi
• select a different solid colour from the replacement swatches.
apply a Shade(-)/Tint(+) to the selected solid colour.
• click the Edit... button to modify the selected solid colour. An Adjust Colour dialog is shown. Enter an RGB value, HSL value or HTML HEcode to select a n
save the new colour to the solid colour Gallery button.
• swap the Fill type from Gradient to Solid or Solid to Gradient, revealing separate swatches for each type of fill.
For gradient fills you can perform all of the above, but you can choose from Linear, Elliptical, or Conical gradient fill galleries. Once a gallery is selectedyou can modify any gradient fill's path by moving thin the gradient fill preview wiediting to hand, click the Edit... button, and from the Object Fill dialog customize the gradient fill (see MoviePlus help).
Changing Transparency In much the same way as you can change colour as described above you can use a similar series of dialogs to choose various transparency options. A Transparency dialog (see MoviePlus help) is displayed when you click Transparency.... Solid transparency is while gradient transparency of typewith respect to its transparency path—advanced transparency editing is possible (see MoviePlus help).
Saving Background Sources
To save your edited background to a new name in the Sources pane's Background folder, click the Add to Gallery button in the Source's Properties pane. Enter a new name for your Background colour.
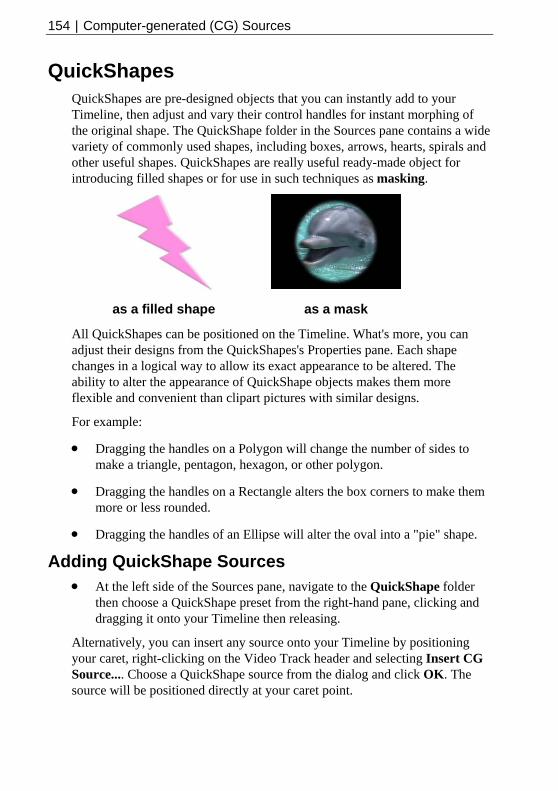
154 | Computer-generated (CG) Sources
QuickShapes QuickShapes are pre-designed objects that you can instantly add to your Timeline, then adjust and vary their control handles for instant morphing of the original shape. The QuickShape folder in the Sources pane contains a wide variety of commonly used shapes, including boxes, arrows, hearts, spirals and other useful shapes. QuickShapes are really useful ready-made object for introducing filled shapes or for use in such techniques as masking.
as a filled shape as a mask
All QuickShapes can be positioned on the Timeline. What's more, you can adjust their designs from the QuickShapes's Properties pane. Each shape changes in a logical way to allow its exact appearance to be altered. The ability to alter the appearance of QuickShape objects makes them more flexible and convenient than clipart pictures with similar designs.
For example:
• Dragging the handles on a Polygon will change the number of sides to make a triangle, pentagon, hexagon, or other polygon.
• Dragging the handles on a Rectangle alters the box corners to make them more or less rounded.
• Dragging the handles of an Ellipse will alter the oval into a "pie" shape.
Adding QuickShape Sources • At the left side of the Sources pane, navigate to the QuickShape folder
then choose a QuickShape preset from the right-hand pane, clicking and dragging it onto your Timeline then releasing.
Alternatively, you can insert any source onto your Timeline by positioning your caret, right-clicking on the Video Track header and selecting Insert CG Source.... Choose a QuickShape source from the dialog and click OK. The source will be positioned directly at your caret point.

Computer-generated (CG) Sources | 155
Editing QuickShapes Once added to your Timeline, a QuickShape's properties can be edited in the selected source's Properties pane (or by pressing F4). The lower portion of this pane hosts several options which will affect your QuickShape's appearance, i.e.
• Change the QuickShape type. This swaps out the original QuickShape for another QuickShape selected from the drop-down menu.
• Two swatches which, when clicked, let you Edit Fill... (left thumbnail) or Edit Transparency... (right thumbnail). The swatches change to reflect the source's current colour or transparency. See the Object Fill dialog or Object Transparency dialog topics in MoviePlus help for a closer look at how to edit a QuickShape's colour.
• The Stretch to project size checkbox, if checked, will ensure that the QuickShape will fully occupy the frame size.
• The QuickShape preview window shows the current QuickShape, without colour fills or effect applied. This lets you focus on the main purpose of the window—to morph your QuickShape with ease.
• e t
rol
binations of control handle adjustments. It's nt!
ng QuickShapes
In the preview window, select a control handle appearing next to thshape. Different QuickShapes have different handles. To find ouwhat each handle does for a particular shape, move the conthandles while reading the Status Bar. You can alter shapes dramatically with combest to experime
Savi
To save your edited QuickShape to a new name in the Sources pane's QuickShape folder, click the Add to Gallery button in the Source's Properties
. Enter a new name for your QuickShape.
pane

156 | Computer-generated (CG) Sources
Text and Titles MoviePlus provides a high level of support for managing text in your project. Typically, text within MoviePlus can be used for:
• overlays (over other sources).
• titles or credits (static or scrolling).
• masks (for creating text-shaped video cut-outs).
Text is classed as a Computer-generated (CG) source, just like Background and QuickShape sources described previously. As a result, text can be altered to change its fill colour, transparency, and fill outline, and can adopt 2D and 3D Filter Effects. Unique to text, MoviePlus lets you perform other essential text functions such as:
• Editing the text's line style, including line weight and line fill
•
wn, Left or Right)
Ad
urce from the right-
and click OK. The source
d e lowest video track reveals a default black background.
Edns that
s if required. The Edit Text pane allows you to edit any selected text source.
Positioning of text in the Video Preview pane
• Scrolling the text on-screen (Up, Do
ding text to your Timeline Text sources, like Backgrounds and QuickShapes, are hosted in the Sources pane—the location for all computer-generated sources. Select Text from the choices in the left side of the pane, then choose a Text sohand pane, clicking and dragging it onto your Timeline.
Alternatively, you can insert any source onto your Timeline by positioning your caret, right-clicking on the Video Track header and selecting Insert CGSource.... Choose a Text source from the dialog will be positioned directly at your caret point.
When text is applied to anything other than the bottom video track, it has a transparent background, showing underlying sources behind the displayetext. Text on th
iting text Using the presets available in the Text folders in the Sources pane meayou have a few easy starting points for your project text, but you can customize each Text source used to suit your need
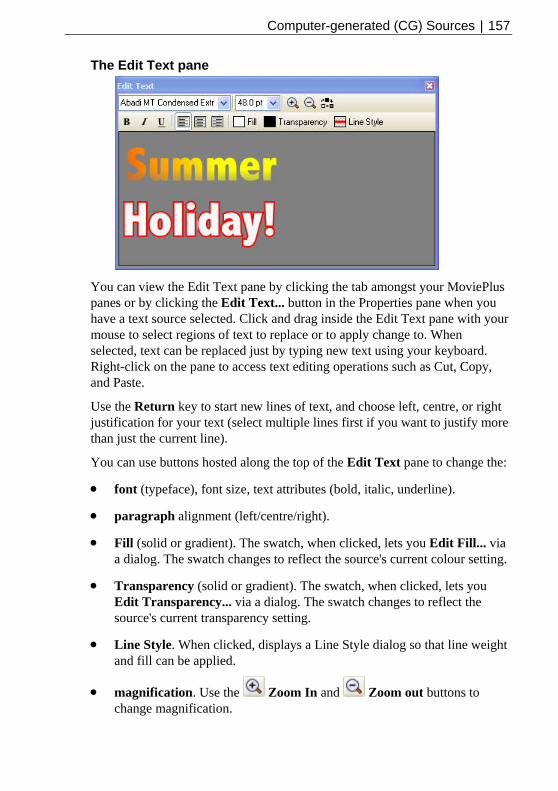
Computer-generated (CG) Sources | 157
The Edit Text pane
You can view the Edit Text pane by clicking the tab amongst your MoviePlus panes or by clicking the Edit Text... button in the Properties pane when you have a text source selected. Click and drag inside the Edit Text pane with your mouse to select regions of text to replace or to apply change to. When selected, text can be replaced just by typing new text using your keyboard. Right-click on the pane to access text editing operations such as Cut, Copy, and Paste.
Use the Return key to start new lines of text, and choose left, centre, or right justification for your text (select multiple lines first if you want to justify more than just the current line).
You can use buttons hosted along the top of the Edit Text pane to change the:
• font (typeface), font size, text attributes (bold, italic, underline).
• paragraph alignment (left/centre/right).
• Fill (solid or gradient). The swatch, when clicked, lets you Edit Fill... via a dialog. The swatch changes to reflect the source's current colour setting.
• Transparency (solid or gradient). The swatch, when clicked, lets you Edit Transparency... via a dialog. The swatch changes to reflect the source's current transparency setting.
• d, displays a Line Style dialog so that line weight and fill can be applied.
•
Line Style. When clicke
magnification. Use the Zoom In and Zoom out buttons to change magnification.

158 | Computer-generated (CG) Sources
• background. Click the Change Background Colour button (for this pane only) to swap between black, white and grey. Useful when creating titling with a dark fill—simply switch to a white or grey background for better contrast.
Changing the line style: • To adjust the currently selected text's line weight either drag the slider to
the right or enter a point size value in the input box.
• For changes to Line fill, double-click the Line fill swatch to let you Edit Fill... via a dialog.
• Uncheck Behind Fill if you want the line fill to show over the top of your colour fill rather than behind it.
Positioning text The Edit Text pane is great for basic editing and formatting of text but is not intended for text positioning. Instead, the Video Preview pane is used exclusively for this purpose. In the same way that you can modify your Transform envelope from within this pane, you can drag text around the preview window into your ideal position (this position change is reflected in your Text source).
In the above example, the "Summer Holiday" text has been dragged around the preview window. The accompanying Text source's Properties shows that the top-left corner of the text (as Alignment Anchor is set to Top Left) is horizontally positioned 5% in from the project's frame edge (X Centre) and vertically positioned 25% in from the top of the project's frame edge.
Set a different Alignment anchor to change the point from which the X Centre and Y Centre values will report. You can also set the text position by changing these values directly (rather than drag the text around the preview window).
Computer-generated (CG) Sources | 159
Scrolling text Scrolling text is used to move your whole text block to a different part of the available video area, to scroll your text up, down or across the screen, and to create custom text animation.
Select the text source you want to scroll and take a look at the available options in the Properties pane.
The Scrolling option offers a pull-down list with Up, Down, Left and Right choices. Each of these will cause your text to smoothly animate in the direction specified, starting and ending "off-screen".
To slow down the scrolling, increase the duration of your text source on the Timeline.
Custom animations To create a non-standard scroll, pan, or other animation, you can use a Transform envelope (see p. 72). Transform envelopes can be modified for any text, colour, image or video source, as well as video tracks and collections of tracks in video groups.
Applying text effects A whole range of eye-catching filter effects can be applied to your text, including shadow, glow, bevel, emboss, colour fill, feathering and 2D/3D filter effects. See Applying Effects on p. 129.
• You can display the Filter effects dialog by clicking the Edit Effects... button in your selected text's Properties pane. The dialog hosts all of the above effects which can be enabled individually or in combination by checking the entry next to the effect you're interested in.
Using Animation Animation offers some interesting possibilities—you can change your text's solid colour over time, change between solid and gradient fills, alter the direction of your gradient fill, as well as scrolling text in any direction. This is all made possible by modifying Source Keyframe properties on the Timeline. Set different properties between each Keyframe in the source's strip (you have to add one or more extra keyframes) so that the text source will gradually take on differing properties as the caret passes over each source's keyframe during playback. By the way, this is standard keyframe behaviour, and is widely utilized in the changing of envelopes, effects and transitions over time. See Adjusting Keyframes on p. 75 for a general look at Keyframe usage.

160 | Computer-generated (CG) Sources
Importing Text MoviePlus allows you to cut and paste as .RTF from other Word processing packages directly into the Edit Text pane.
Managing Audio
7

162 | Managing Audio
Managing Audio | 163
Introducing Audio In most instances, the addition of a media file to the Timeline will create an audio source along with your video source. For instance, a typical AVI file obtained from a DV camera will contain video and audio elements which "split" into their corresponding video and audio. The audio element would contain your accompanying soundtrack to your days filming—complete with background traffic background noise, overflying aircraft and the dreaded wind! While MoviePlus can't remove all these incidental annoyances it can offer audio level control and an opportunity to swap out a poor audio source with a replacement audio source (perhaps obtained from a more controlled environment). On a more artistic level, you may simply choose to use some background music, narration, or vocal instructions as a straight replacement of or in addition to your existing audio source.
For these situations, it is possible to capture alternative audio sources from a range of input devices, such as microphones and CDs. For this reason, MoviePlus possesses purpose-built dialogs for Capture Video or Capture CD (see MoviePlus Help). The capture video process is capable of capturing just the audio element from combined video/audio input. Either method lets you capture Audio files as .AVI (minus the video element) or .WAV files.
Audio Editing Audio can play an essential part in any movie, and creative audio editing is an art in itself. Standard ingredients of a soundtrack might include:
• Production sound as originally recorded (and later captured) “in sync” along with the video, e.g. video camera footage of your last holiday
• Theme music or background sound from a variety of sources, often added as one or more longer clips that run “under” spoken-word or foreground sound
• Voiceover passages recorded separately, often serving as a commentary or a bridge between sections
• Sound effects or single-shot audio events, perhaps added for emphasis (“sweetening”) or comic relief
If you would like your movie to include more than basic production sound, allow yourself some time to do it right! Skillful sound editing is a combination of technique and judgment. Fortunately, MoviePlus makes the technical part straightforward.

164 | Managing Audio
Getting sound to coincide properly with the visual track, to come in on cue and end (or fade out) at just the right moment, to blend well with other audio... all are easily accomplished via the Timeline.
Here's a few tips concerning audio compression and recording.
Audio Tips • If recording audio through your system’s sound card, check MoviePlus's
Capture Video dialog settings to ensure that:
• the Input: field is set accordingly (for example, "Microphone" or "Line In" is selected).
• the volume level for the input channel is set correctly. Click the Source Properties button, and in the dialog's Pin Line Input Mix box, ensure the Pin Line drop-down menu reports the correct input type (e.g., "Microphone" or "Line In") before setting the correct volume level (the vertical slider). Note that the input volume setting is separate from the master (Windows) playback volume setting. The input level will affect your recordings; the playback level will not. If you hear feedback when capturing via your sound card, you may wish to uncheck the Preview button in the Capture Video dialog in MoviePlus—this is in the Audio section.
• For voice recording and many soundtrack situations, one of the “Mono” options in the Format: field of the Capture Video dialog may be acceptable. MoviePlus will monoize (combine) the left and right sides of the input signal. But when connecting your audio source, try to avoid feeding a mono signal to just one side of a sound card’s stereo jack; that will leave an empty channel (i.e. noise) on the other side, and the noise will degrade the signal somewhat. It’s sometimes advantageous to use a Y-connector to distribute a mono signal to both sides of a stereo input.
•
ven out widely disparate levels prior to bringing the files into MoviePlus.
Whether an audio clip plays separately or is blended with an overlapping clip on another track, setting the right volume level is critical (to prevent clipping). In general, try to record your original audio files at a consistent level. You can also employ an external sound editing program to e

Managing Audio | 165
As a rule, you will want all the sounds in your movie to maintain the same peak level. At the start of a project, and in each editing session, it’s a good idea to play back a standard audio clip with suitable peak levels. Using this reference clip, adjust your volumes by adjusting the Gain slider on your audio source(s), track(s) or group(s) and calibrate your speakers or headphones for a normal level. Setting a consistent baseline is the best way to tell if a particular clip is too loud or too soft.

166 | Managing Audio
Adding and Replacing Audio Adding Audio to MoviePlus
Whenever you add a video source with an audio component to the Timeline, e.g. an AVI file, the audio portion (if present) is automatically added to an available audio track underneath the video track. These two sources maintain a linkage by default, as shown when you select either source—a strong red border indicates the current selection, while a pink border indicates the linked accompanying source.
When you add a standalone audio file (AVI, MP3, WAV, WMA) or video file (with only the audio element present, e.g., AVI, MOV, WMV, etc.) it can be dragged onto a new or existing audio track.
Audio tracks are managed in much the same way as video tracks, and by the same token, audio sources are managed as for video sources. Please see Adding and Arranging Tracks and Arranging Sources on p. 54 and p. 60, respectively, for more information.
Audio Sources An audio source differs from a video source on the Timeline as it doesn't have any frame thumbnails to display. However, the audio source will display an Audio Waveform Display of the audio source—in other words a visual indication of the audio's dynamic range along the source's length. The display makes it easy to spot cues and any unforeseen audio events.
Note that the waveform display does not reflect the audio volume, as volume and dynamic range represent two different elements of audio. If you increase the volume the dynamic range does not change (and vice versa).
The above example shows a stereo waveform display. For a mono waveform display, only a single waveform (channel) is shown.

Managing Audio | 167
The waveform display can be hidden by minimizing the audio track—simply click the Minimize/Restore button in the track header. Alternatively, switch off the waveform in Tools>Options>General. Switch on at any point by right-clicking on the source and checking Show Audio Waveforms.
Audio Fading In a similar way to video in/out transitions, any audio source can have an audio transition. By default, when overlapping audio sources have been placed on the Timeline (normally as a result of adding multiple video sources with accompanying audio sources) a Fade transition of type "Crossfade" is produced at the end and start of overlapping audio sources; the default overlap duration is set to 1 s. The crossfade smoothly blends the first source's audio with the second source's audio while maintaining the same audio levels throughout the transition.
For non-overlapping audio sources, a Fade transition called "Single Fade" can be applied—this fades-in or fades-out an audio source at the start or end of that source. To apply, simply drag the blue triangular handle to the left (shown below) or right to produce the Fade transition. The length of the transition dictates the duration of the fade in/out.
The duration of any crossfade transition can also be changed by dragging its handles or changing the Duration value in the transition's Properties pane.
Replacing an Audio Source You can unlink an audio source from its video source at any time, e.g. to replace the audio with some other sound, e.g. a piece of music, your favourite song or soundtrack.
1. Select the audio source to be unlinked.
2. Click the Linking button on the Standard toolbar to unlink the sources.
3. Delete the audio source by pressing the Delete key.
4. Drag an alternative audio source into the position on the audio track that the deleted source came from. You may need to trim the audio source to fit the remaining area. See Trimming on p. 70

168 | Managing Audio
Switch off Rippling if you plan to remove an unlinked and unwanted audio source. This prevents your other audio sources from automatically repositioning themselves on the audio track's Timeline.
If you're still worried about your sources being repositioned, why not try swapping out your audio by choosing the Replace Media... button on the audio source's Properties pane. The duration and position of the audio source on the Timeline is preserved.
.
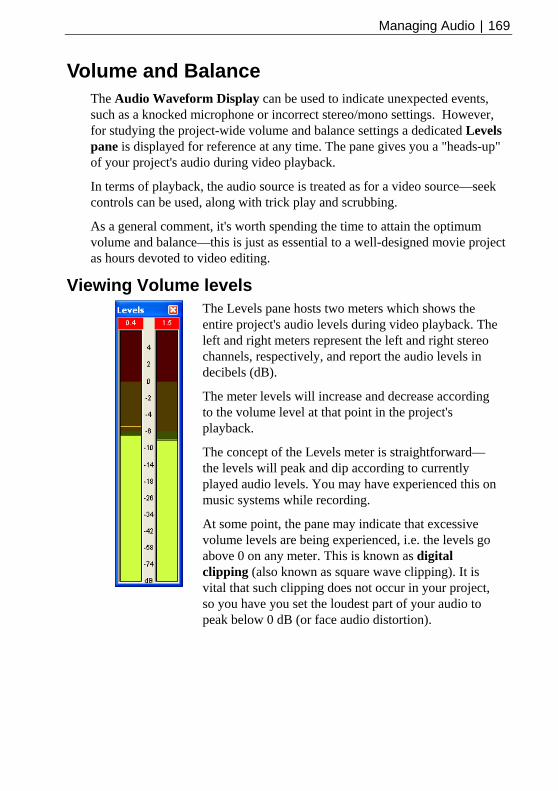
Managing Audio | 169
Volume and Balance The Audio Waveform Display can be used to indicate unexpected events, such as a knocked microphone or incorrect stereo/mono settings. However, for studying the project-wide volume and balance settings a dedicated Levels pane is displayed for reference at any time. The pane gives you a "heads-up" of your project's audio during video playback.
In terms of playback, the audio source is treated as for a video source—seek controls can be used, along with trick play and scrubbing.
As a general comment, it's worth spending the time to attain the optimum volume and balance—this is just as essential to a well-designed movie project as hours devoted to video editing.
Viewing Volume levels
The Levels pane hosts two meters which shows the entire project's audio levels during video playback. The left and right meters represent the left and right stereo channels, respectively, and report the audio levels in decibels (dB).
The meter levels will increase and decrease according to the volume level at that point in the project's playback.
The concept of the Levels meter is straightforward—the levels will peak and dip according to currently played audio levels. You may have experienced this on music systems while recording.
At some point, the pane may indicate that excessive volume levels are being experienced, i.e. the levels go above 0 on any meter. This is known as digital clipping (also known as square wave clipping). It is vital that such clipping does not occur in your project, so you have you set the loudest part of your audio to peak below 0 dB (or face audio distortion).

170 | Managing Audio
How do you know when clipping occurs? At the top of the example meters above, you'll notice two numbers on a dark background (actually red). The values represent the maximum level or "high-watermark" for each channel if clipping occurs during the current playback. Again using the example, the left channel has at some point peaked at +0.4 dB, while the right channel has peaked at +1.5 dB. You can leave your project to play, then return to check for clipping—if no values appear in red then no clipping has occurred. This saves you from having to watch the Levels pane for the entire project's playback duration!
These values are always reset when playback is restarted.
The Levels pane only gives an accurate indication of incorrectly set audio tracks or source—whether high or low. The prime objective is therefore to adjust the volume to acceptable levels which we'll look at next.
Adjusting Volume Volume Adjustment of project The easiest way to adjust volume to prevent clipping is to alter the volume of the entire project. This is carried out by checking the Show Master Groups option in the View menu. You'll notice a master group called "Audio Master" appear on the Timeline. To reduce the volume of the master group (and therefore the whole project) during playback, drag the Gain slider to the left.
Remember to play the entire project again to recheck audio levels, ensuring that clipping no longer occurs.
Volume Adjustment of objects The volume adjustment on any audio source, track or group can be made by adjustment of a Gain slider. For example, for a track header, the Gain can be reduced or increased by dragging the slider to the left or right (from its default 0 dB position). This is located in the object's Properties pane.

Managing Audio | 171
Volume Adjustment over Time For volume adjustment over time, any audio source, track or group
provides a small strip, called the Volume envelope, showing the volume level over time—click the Attributes button on the source (or on the track/group's header) and click Volume to shown the Volume envelope. By adjusting this envelope, you can set each audio clip’s starting, peak, and ending levels and achieve smooth fade-ups and fade-downs.
This Volume envelope for Audio Track 1 produces an abrupt “cut-in” at the start of the clip, with the sound instantly reaching its peak and ending as a “cut-out” just as abruptly when it’s done. Audio sources and groups also possess a Volume Envelope which can be adjusted similarly.
See Using Envelopes and Adjusting keyframes on p. 72 and 75, respectively, to learn how to modify envelopes by making keyframe adjustments.
Muting You don’t have to delete a track from the Timeline to exclude it from playback. Switching off a particular Audio track can be extremely helpful when editing the mix. For example, you might want to see how your movie plays back if you temporarily mute a sound, or switch off a particular Audio track.
To exclude an audio track, select the track and click the Mute button in the track header.
Adjusting Balance Adjusting the balance follows the same principles as adjusting volume. For simple adjustments, a Pan slider is available in the source, track or group's header. For adjustments to the balance over time, use the Pan Envelope below the Volume envelope to add keyframes. These keyframes and their vertical and horizontal positioning across the Timeline will allow balance to change over time.

172 | Managing Audio

Sharing Your Movie
8

174 | Sharing your Movie

Sharing Your Movie | 175
Sharing Your Movies There are a number of ways you can share your movie once you've edited it with MoviePlus... the project might look fantastic in your Video Preview pane, but there's likely to be an upper limit to how many people can crowd around your monitor and watch your preview, so you'll need to export your movie in a standard distributable format to allow others to share the experience!
The considerations you'll face when deciding how to share your MoviePlus creations are the same for all video editors—the most important is "what device will the video be watched on and how am I going to deliver the video to the intended viewers?" This double-barrelled question, once answered, will help determine how you should export your movie for best results.
Viewing on TVs with DVD player I have a DVD Writer MoviePlus can "burn" DVDs which is amongst the highest quality formats you can use along with DV output for DV cameras. To create DVDs including menu support, simply click the File>Export Movie>To Disc, and follow the three stages—Setup Wizard, Menu Designer, and Write to Disc. For more information, please see Write to DVD/VCD on p. 177.
I have a CD Writer MoviePlus supports the creation of Video CD (VCD) discs with menus. The VCD format uses the older MPEG-1 standard and is of relatively lower quality compared to more modern DVD format, but is useful if only a CD-R drive is present rather than a DVD±R drive. To create a VCD movie of your project, click the File>Export Movie>To Disc, and follow the stages as described for DVD.
Viewing on a computer Delivery via the Internet The Internet has been promising to offer widespread video content for some time and the rise of domestic broadband connections makes this closer to reality. You can include videos on your own Web space for your site's visitors to download; raw video is still too large to download in any reasonable time and too large to store on typical computers so streaming technology is used to offer an export that is optimized to the speed of Internet connection your target audience is expected to use.
If you’re sure that you are distributing your movie to Windows PC owners via the Internet, there is an excellent chance that they will have a recent version of
176 | Sharing your Movie
Windows Media Player installed. MoviePlus offers a WMV (Windows Media Video) export with templates offering different streaming rates (e.g., Dual-Channel ISDN, Broadband, and LAN). WMV also makes it easy because you don't have to worry about "Codecs", but viewers do generally need Windows Media Player to be present to play the video. Although Windows Media Player is normally required, it is possible that PC or Mac owners may be using alternate media playing software that supports WMV files. For Mac owners, the QuickTime MOV format also offers streaming options for Internet; QuickTime Player is used instead of Windows Media Player.
Delivery on a DVD DVD is probably still the best option if you know that the recipient has a DVD drive and DVD media playing software. You could create a DVD with a video file on it, but computers with a DVD drive typically support the playback of DVD video, so for simplicity it is a good choice for high quality video.
To create DVDs, click the File>Export Movie>To Disc. please see Write to DVD/VCD on p. 177.
For delivery on a CD For computers with only a CD drive, you can create a VCD by clicking File>Export Movie>To Disc. Please see Write to DVD/VCD on p. 177.
Sharing Your Movie | 177
Write to DVD/VCD
You must install the MoviePlus 5 Resource CD to enable the Disc writing feature.
MoviePlus can export your project directly to DVD or Video CD (VCD), producing a movie which will autoplay in virtually all DVD players and will also be similarly supported by DVD drives in computers with DVD-playback software. The export process also lets you create your own menus based on one of an impressive array of templates—all easily modified to suit your taste. If you're not ready to create a DVD/VCD just yet, you can simply create a disc image in a folder for writing to disc at a later date. A complementary Write Disc from Image... option lets you create a physical DVD/VCD from the created image.
Three stages make up the DVD creation process:
• Setup Wizard (optional). To setup Disc Settings, Chapter Points and menu music for your DVD/VCD.
• Menu Designer. Menu creation tool hosting preset templates.
• Write Project. To initialize and create the DVD/VCD directly, create a disc image for later "burning", or write disc from an existing image.
The user is led through each stage seamlessly, culminating in the completion of your MoviePlus project.
Chapter points, a type of marker, are used exclusively in the process of creating your own DVDs/VCDs. They are used to define where chapters play from in your generated DVD/VCD—much the same as the initial menu shown in any Movie DVD from your local movie store. In the Setup Wizard or Menu Designer, the chapter points are detected in your project and their poster thumbnails can be altered.
Before venturing too much further, it's important to understand the difference between DVD and VCD, when you can use one format instead of another, and the merits of each format.

178 | Sharing your Movie
The DVD vs. VCD format DVD Format VCD Format
Use if your computer is equipped with a DVD±R drive
Use if your computer is equipped with a CD-R drive
High resolution Lower resolution than DVD.
Utilizes higher capacity DVD±R media (normally 4.7Gb)
Utilizes lower capacity CD-R media (normally 700Mb)*
Supports menu system navigable by arrow buttons
Supports menu system navigable by number only (like TV remote control)
Generally speaking the most common scenario for MoviePlus will be to create DVDs using a modern computer equipped with a DVD±R drive.
Disc Settings For some projects, DVD/VCDs can be created using disc settings which match your MoviePlus project settings directly (i.e., PAL DVD and PAL Video CD projects and their variants). This makes DVD/VCD creation easy—you simply run through the Setup Wizard, Menu Designer then finally create the DVD/VCD. However, some projects do not write transparently because their project settings (e.g., frame height, frame rate and/or pixel aspect ratio) are incompatible with MoviePlus's disc settings. These include not only DV and Super VCD (SVCD) projects, but custom projects possessing unusual dimensions or other characteristics. As a result, MoviePlus will determine the most appropriate disc settings from the project settings to "massage" the project into an export format suitable for DVD/VCD creation. This best-matching process is done automatically at the start of the Setup Wizard. You can make alterations to the disc setting, such as swapping the video standard or media type if necessary. This can be done in either the Setup Wizard or the Menu Designer.
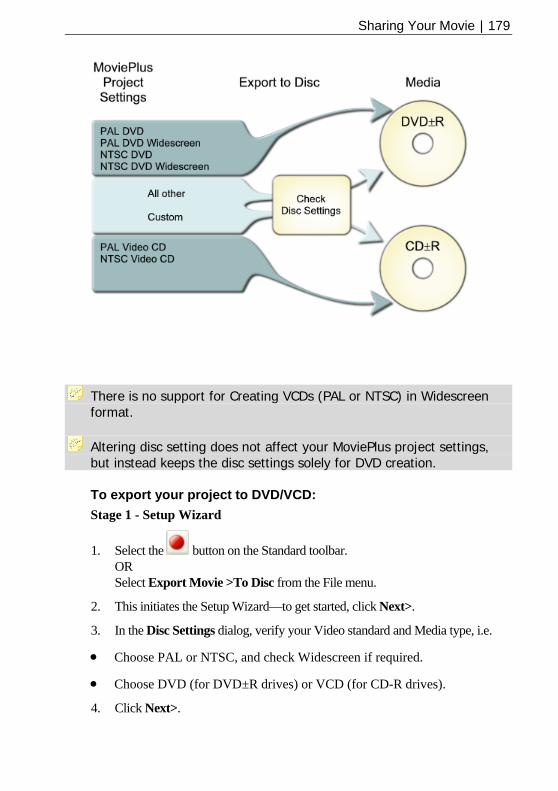
Sharing Your Movie | 179
There is no support for Creating VCDs (PAL or NTSC) in Widescreen format.
Altering disc setting does not affect your MoviePlus project settings, but instead keeps the disc settings solely for DVD creation.
To export your project to DVD/VCD: Stage 1 - Setup Wizard
1. Select the button on the Standard toolbar. OR Select Export Movie >To Disc from the File menu.
2. This initiates the Setup Wizard—to get started, click Next>.
3. In the Disc Settings dialog, verify your Video standard and Media type, i.e.
• Choose PAL or NTSC, and check Widescreen if required.
• Choose DVD (for DVD±R drives) or VCD (for CD-R drives).
4. Click Next>.
180 | Sharing your Movie
5. In the Chapters dialog, the current chapters in your project are listed. To change the chapter thumbnail, select a chapter from the list then click Edit Properties.... Use the seek cursor in the display to navigate to a new frame in the source. You can also change your chapter name and the chapter's end action (i.e., Progress to next chapter or Return to title menu), then click Next>.
6. Interested in some background music for your DVD/VCD menu? From the dialog, click Play this background music, navigate and select an audio or video file (video file must contain audio).
7. To complete the Setup Wizard, click Finish.
You can avoid steps 2 to 7, by unchecking Use Setup Wizard in the Menu Designer's Options menu.
Stage 2 - Menu Designer
8. The Menu Designer is launched. This lets you design your own menu, based on a selection of pre-designed menus, modify your Chapter Point thumbnails, and write the project to DVD/VCD, to disc image, or write from disc image. See Using Menu Designer on p. 182 for an in-depth look. Choose a menu and, once you're happy with your design, click the Write Project button (giving three write options).
Stage 3 - Write Project
9. Click the Write Disc menu option:
• The Write Disc dialog is used for the disc creation process. Apart from defining your write Speed and device Drive, all you have to do is name your disc Label and click the Write button to start the process. Your completed DVD/VCD will be ejected once the process is completed.
Or, click the Write Disc Image menu option:
• The Write Disc Image dialog is used for making a disc image, rather than a physical DVD/VCD. You have to define a folder location and then click the Write button to start the process.
Sharing Your Movie | 181
Or, click the Write Disc from Image menu option:
• You are prompted for a Disc Image File (previously created). Once selected, click OK to reveal a dialog used for the disc creation process. Apart from defining your write Speed and device Drive, click the Write button to start the process. Your completed DVD/VCD will be ejected once the process is completed.
When writing DVDs, MoviePlus will automatically increase project compression (the default exported bit rate of 8000 Kbps is reduced) to make the project fit to disc—you’ll see the Bitrate setting in the Write Disc dialog reduce in value when compression occurs. The greater the compression, the lower the quality of the exported video.
PAL vs. NTSC Video Standards Whether you choose a PAL or NTSC template should depend on whether you intend for the video to be viewed in a PAL region or NTSC region. NTSC is the broadcast and recording standard used mainly in North and South American continents, plus parts of eastern Asia including Japan and South Korea. PAL is used widely throughout Europe, Africa, the Middle East, Asia, and Oceania.

182 | Sharing your Movie
Using Menu Designer The Menu Designer is used for designing your DVD/VCD menus and writing your project to disc (or disc image). Its user interface is made as easy to follow as possible, while its flexibility lets you design your own menus or adopt a professional set of preset design elements—choose either according to the extent of your design ability!
Menu Designer User Interface
Galleries To make life as simple as possible you can adopt one of a series of "themed" templates, stored in galleries such as Modern, Seasons, Funky and Moods, amongst many others.
Click the Gallery button to display an upper menu above a gallery of Template presets for a selected menu item (as shown in example above). Choose a menu item, navigate the gallery, click a thumbnail of your chosen template, and then view your design.
Click on "Click to change title" and type your DVD/VCD name. If you're happy with the design, go straight to Write Disc or Write Disc Image. However, it's more likely that some level of customization of your menu is needed—to customize the look and feel to suit your taste.
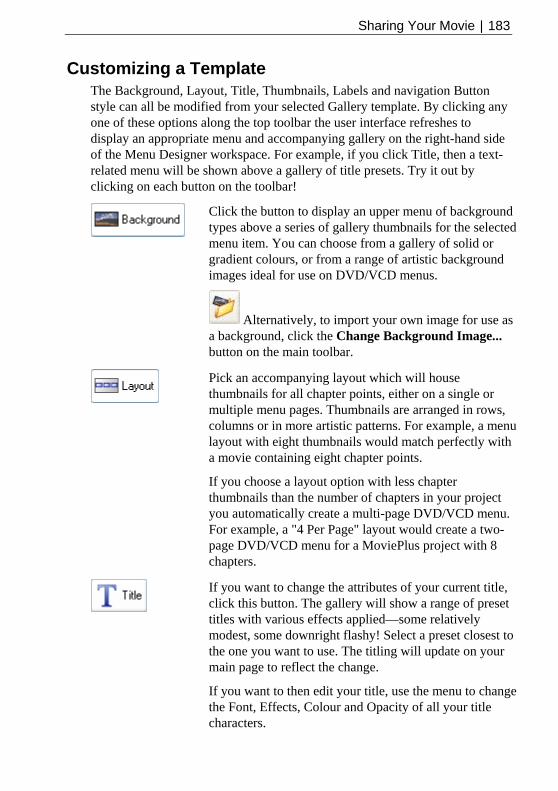
Sharing Your Movie | 183
Customizing a Template The Background, Layout, Title, Thumbnails, Labels and navigation Button style can all be modified from your selected Gallery template. By clicking any one of these options along the top toolbar the user interface refreshes to display an appropriate menu and accompanying gallery on the right-hand side of the Menu Designer workspace. For example, if you click Title, then a text-related menu will be shown above a gallery of title presets. Try it out by clicking on each button on the toolbar!
Click the button to display an upper menu of background types above a series of gallery thumbnails for the selected menu item. You can choose from a gallery of solid or gradient colours, or from a range of artistic background images ideal for use on DVD/VCD menus.
Alternatively, to import your own image for use as a background, click the Change Background Image... button on the main toolbar.
Pick an accompanying layout which will house thumbnails for all chapter points, either on a single or multiple menu pages. Thumbnails are arranged in rows, columns or in more artistic patterns. For example, a menu layout with eight thumbnails would match perfectly with a movie containing eight chapter points.
If you choose a layout option with less chapter thumbnails than the number of chapters in your project you automatically create a multi-page DVD/VCD menu. For example, a "4 Per Page" layout would create a two-page DVD/VCD menu for a MoviePlus project with 8 chapters.
If you want to change the attributes of your current title, click this button. The gallery will show a range of preset titles with various effects applied—some relatively modest, some downright flashy! Select a preset closest to the one you want to use. The titling will update on your main page to reflect the change.
If you want to then edit your title, use the menu to change the Font, Effects, Colour and Opacity of all your title characters.

184 | Sharing your Movie
The Menu Designer supports in-place text editing, which means direct editing of title text is possible. Either click on the title and type to replace the title text or type at a insertion point to add more text. You can perform all the common text editing functions such as copy (Ctrl+C), paste (Ctrl+V), and delete; you can also add a soft carriage return with Shift-Return.
Select this button then choose a category (e.g., Ellipse, Star, Diamond, amongst others) from the upper menu then pick a preset from the lower gallery—a whole range of thumbnail shapes and styles are available. Once applied, change the thumbnail style from the upper menu with respect to border width, effects (e.g., shadows), and opacity.
Chapter thumbnail labels can be modified as described above for Titles. Note that the change affects all labels and not an individual label.
In-place text editing is supported.
For VCD menus, the labels will be prefixed with a number, which can be pressed from your remote control.
Navigation buttons are used to navigate between multi-page DVD/VCD menus. You can swap out the current buttons, especially if a colour clash occurs with your background (preset or imported). Click the button to reveal a gallery of buttons. Pick a button style, then select your chosen button colour from the menu above the button gallery.
Navigating DVD/VCD menus For DVDs, you can use your remote control's navigation buttons to jump between chapters and pages. For VCDs, the navigation process is a little more complicated as VCD is an older format, unable to take advantage of DVD's newer technology. VCD chapter labels are prefixed with a number when you see the VCD menu on-screen (you won't see the numbers in Menu Designer). Use the numbers on your remote control to pick a chapter. For example, a "4 Per Page" layout will have each thumbnail prefixed with "1. ", "2. ", "3. ", and "4. ." Select a number from 1 to 4 to jump to that chapter.

Sharing Your Movie | 185
If you are on the first page of a multi-page VCD menu, to navigate to the next page, pick the next available number on the remote control (this would be 5 using the example). If you are on the last page of a multi-page VCD menu, to navigate to the previous page, pick the next available number on the remote control (this would again be 5). For any pages in-between, select "5" to jump to a previous page, or select "6" to jump to the next page.
Edit Chapters From the Options menu, the Edit Chapters... button displays a Chapters dialog—this is really useful for viewing your chapter names but also for swapping any chapter thumbnail for another. Click the Edit Properties button to do this.
From the dialog, you can select a more suitable thumbnail selected from video frames in the dialog, and rename chapters as well as setting their end actions. The video frames displayed are those spanning between the selected and the next Chapter Point on the Timeline (if no Chapter Point exists after the current one the remainder of the movie is shown). It's likely that one particular frame typifies a chapter much more than any other—think of an iconic image such as a fairy castle, the Statue of Liberty, etc. Simply use the controls to navigate then pick the right frame.
On the Seek: bar you can drag your caret (a vertical line which represents your current location) to any point in the video (between current and the next Chapter Point).
To send your caret to the current or next Chapter Point location, click the Go to Start or Go to End button, respectively.
For fine tuning the position of the caret, you can use the Previous Frame and Next Frame buttons. Your preview will update any time the caret is moved.
Click the Play button to start previewing the video between Chapter Points. The preview will begin from your current caret position.
Using any of the above navigation aids, once you're happy with the thumbnail shown in the preview window, click the Jump to Caret button (this aligns the red Image: indicator under the caret position). This thumbnail will now be used for your chapter.
186 | Sharing your Movie
Use the Zoom In and Zoom Out buttons to locate specific frames more easily. For longer chapters, picking the correct frame may be more difficult as the entire chapter is made to fit the window.
Alternatively, you can drag the red indicator, which realigns then synchronizes the caret to it. This automatic alignment provides a simple method for alternative thumbnail selection (avoiding the Jump to Caret operation).
One final set of options in the Chapter Properties dialog is the ability to alter chapter name and chapter end action, i.e. the action expected once the chapter has finished playing in your DVD player. The usual action is to Progress to next chapter, but it is also possible to Return to title menu.
Changing the thumbnails does not affect the Chapter Point positions on the Timeline. However, moving Chapter Points on the Timeline will reposition your modified thumbnail, so remember to always check thumbnails are correctly set in the Wizard.
Disc Setting The Disc Settings... option on the Options menu shows the Disc Setting dialog. Identical to that used in the Setup Wizard, it lets you check the current Disc settings before committing to disc.
Setting Background Music
If you want to add some background Music as an accompaniment for your DVD/VCD menu simply click the Set Background Music button on the main toolbar—use it for adding narration, instructions or to simply play background music.
• From the dialog, click Play this background music, navigate and select an audio or video file (video file must contain audio). Common Audio files such as .MP3, .WAV, and .WMA are supported, as well as video files such as .AVI, .MPG, .MOV, .WMV and .ASF.
• Use the Play button to preview the audio. When playback starts, the button changes to a Stop button allowing you to stop the audio preview.
• To swap out the current audio file for another, click the Change... button. From the dialog, navigate to and select an alternative audio file.

Sharing Your Movie | 187
Writing Project
The main toolbar hosts a button which displays a drop-down menu with the following options:
• Write Disc. This initiates the final phase of disc writing—a Write Disc dialog is displayed. OR
• Write Disc Image. This creates a disc image for writing to disc at a later date. OR
• Write Disc From Image. This creates a DVD/VCD from a previously created disc image.
Exiting the Menu Designer If you don't want to create your DVD/VCD just yet, you can exit from the Menu Designer at any time by choosing Return to MoviePlus in the Options menu. You will be prompted to save your project if it is currently unsaved. Your updated template will be shown by default the next time you load the Menu Designer.
Notes You can by-pass the Setup Wizard by unchecking Use Setup Wizard on the File menu. This is especially useful if you're spending a lot of time in the Menu Designer and the current wizard settings are just as you want them. The next time you create a DVD/VCD you'll jump straight to the Menu Designer!

188 | Sharing your Movie
Export as File There are many different reasons for exporting your movie as a file, but they all share the need or wish to get other people viewing your video masterpiece. Crowds around your own computer screen using the MoviePlus Preview pane to watch your video just aren't practical! Whether your driving force is to attain a small file size to share a little video by email or over the Internet, MoviePlus can export your projects in a suitable format to help you achieve your goal.
Your basic choice of sharing format as well as any necessary "fine tuning" settings will help decide how best to export your project.
File types MoviePlus exports four basic kinds of video file and two types of audio file. Here's a table showing what these formats can be used for:
Export Format
Type What is it and what is it used for?
MPG Video An acronym for "Motion Picture Experts Group", MPEG format video is compressed and widely supported by computers and DVD players. MPEG-1 files are better supported by computers and are also used to make Video CDs; newer MPEG-2 files are often higher quality and are typically used to make DVDs. Note: MPEG-1 Layer 3 is more commonly known as MP3.
AVI Video Windows "Audio Video Interleave" file, for playback on a computer. Defined by Microsoft, it supports different types of video and audio content and compression (compressed with a wide variety of codecs). AVIs are mainly for viewing on a computer, but some types of AVI can also be played on modern DVD players supporting compressed "MPEG-4" and similar files. Appropriate codecs have to be installed on the computer. See Codecs and their Management on p. 201.
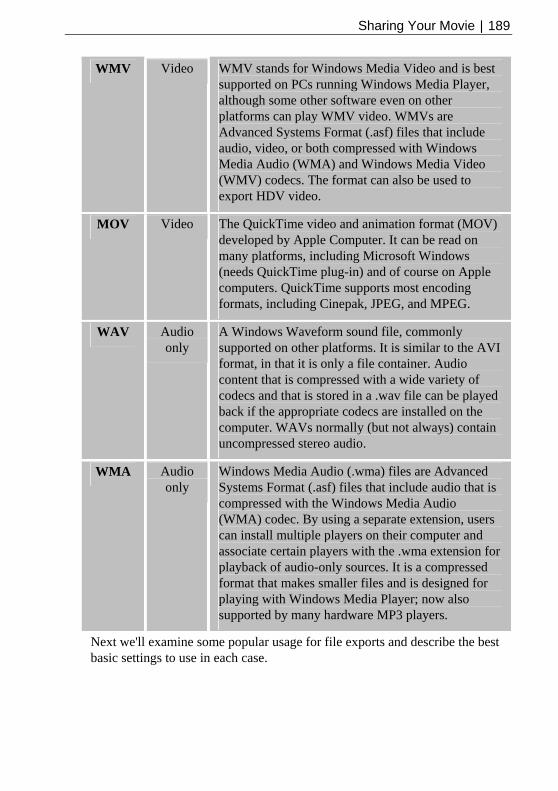
Sharing Your Movie | 189
WMV Video WMV stands for Windows Media Video and is best supported on PCs running Windows Media Player, although some other software even on other platforms can play WMV video. WMVs are Advanced Systems Format (.asf) files that include audio, video, or both compressed with Windows Media Audio (WMA) and Windows Media Video (WMV) codecs. The format can also be used to export HDV video.
MOV Video The QuickTime video and animation format (MOV) developed by Apple Computer. It can be read on many platforms, including Microsoft Windows (needs QuickTime plug-in) and of course on Apple computers. QuickTime supports most encoding formats, including Cinepak, JPEG, and MPEG.
WAV Audio only
A Windows Waveform sound file, commonly supported on other platforms. It is similar to the AVI format, in that it is only a file container. Audio content that is compressed with a wide variety of codecs and that is stored in a .wav file can be played back if the appropriate codecs are installed on the computer. WAVs normally (but not always) contain uncompressed stereo audio.
WMA Audio only
Windows Media Audio (.wma) files are Advanced Systems Format (.asf) files that include audio that is compressed with the Windows Media Audio (WMA) codec. By using a separate extension, users can install multiple players on their computer and associate certain players with the .wma extension for playback of audio-only sources. It is a compressed format that makes smaller files and is designed for playing with Windows Media Player; now also supported by many hardware MP3 players.
Next we'll examine some popular usage for file exports and describe the best basic settings to use in each case.

190 | Sharing your Movie
Export Procedure Standard
• Click the Export to File button on the Standard toolbar, or choose the File>Export Movie>To File menu item.
• Select your chosen export type from the File type and Template drop-down list according to the type of output format you require.
• Specify a name for file in the Filename box, clicking Browse and selecting a new location if you first wish to choose an alternate drive or folder to store your file. When you are happy with your filename, type, and template, you can set an export quality and then click the Export button. Your project will then be composed and converted into the specified format and you will be shown a progress bar during this process.
Use the Match project settings button to reinitialize the export settings from the project settings.
The DVD templates listed in the Template drop-down list are adopted automatically for DVD/VCD creation so they don’t need to be selected in Export as File operations.
Popular Output Formats Reason for Export File Type Template1
SVCD-compliant file for later use in a disc-authoring program
MPEG Video (*.mpg) SVCD PAL, SVCD NTSC, SVCD PAL Widescreen, SVCD NTSC Widescreen
Note: MoviePlus can export an SVCD file (with menus and other advanced features) in readiness of you writing in a third-party application.
general-purpose use (high compatibility; low quality)
MPEG Video (*.mpg) MPEG-1
Note: MPEG-1 files are widely supported so they are a good choice for short snippets of video for general consumption. They can be written to CD or made available for download via the Internet. The format does not need special decompression software (codecs).

Sharing Your Movie | 191
general-purpose use (low compatibility; high quality)
MPEG Video (*.mpg) MPEG-2
Note: MPEG-2 files are quite widely supported but they generally require specialised software to enable playback. This is because MPEG-2 decoding comes at a price, so it is not often supported by free media playing software. This format does support high-quality video so is still preferred for some uses above and beyond general-purpose MPEG-1 video.
Internet ready Windows Media audio and video (*.wmv) OR
Apple QuickTime (*.mov)
Any 2
Note: Take advantage of the widely distributed WMV format and its inherent streaming capabilities, optimized for viewing in the popular Windows Media Player. The format does not require any specific codec. Use QuickTime as an alternative to the .WMV file format, with streaming support. Target PC needs QuickTime installed to view exported file.
For CD distribution (to Windows PC)
Windows Media audio and video (*.wmv) Apple QuickTime (*.mov)
Any 2
Note: As for Internet ready above.
For CD distribution (to non-Windows PC)
MPEG Video (*.mpg) or Video for Windows (*.avi)
Note: The type of file you export for distribution on CD is dependent on how you want people to use the CD, and how they will view the video you are distributing.

192 | Sharing your Movie
general-purpose use or export movie back to a DV camera
Video for Windows (*.avi)
DV PAL, DV NTSC, DV PAL Widescreen, DV NTSC Widescreen
Note: The DV video format is used extensively by digital video cameras, so many video sources exist in this format before being edited.
Use to maintain high video quality but at the expense of file size, which will larger than with an equivalent export in .WMV format. Export to DV camera offers a convenient archiving solution.
To maintain compliance with the DV standard, it is not possible to modify the Advanced settings for the standard DV export templates, but if you wish to fine-tune your export you can copy a DV template in the Advanced tab and make changes to the new template.
If you have a particular Codec installed you can export with that Codec stream format (e.g. a DivX AVI can be exported).
Audio export Waveform audio (*.wav)
32 kHz Stereo, 44.1 kHz Stereo, 48 kHz Stereo
Note: You may find occasion where it is useful to export just the audio from your project. MoviePlus will compose all of your tracks and editing operations to generate a single audio output in mono3 or stereo.
44.1 kHz is the standard for CD-quality audio, 44 kHz is the modern standard for DVD movies and other digital audio formats. You can alter the compression format (select a codec), switch between mono and stereo output, and alter the sample frequency. Lower sample frequencies can be used for low-fidelity audio, such as speech, and are suitable where you are trying to reduce the audio file's size.
1 If you are not sure whether to choose a PAL or NTSC template, see below. 2 Template choices reflect the throughput (i.e., connection speed) that you can serve to your intended audience on your WWW site. The templates are listed in the order of low- to high-speed Internet connections, giving increasing levels of video quality. 3 For Mono, use the Advanced tab to create a new template and then change the Channels option to Mono.
Sharing Your Movie | 193
Export Quality The Export Quality setting will perform additional video and audio processing as the quality increases. Exports at Best quality take a long time for most formats so be prepared for a high-quality DV export to be quite slow. If your video is intended for general viewing by friends and family you can set a lower export quality. Draft and Preview settings are good as tests; with Normal, Good or High quality you will enjoy great results and the export will take notably less time than at Best quality.
PAL vs. NTSC Whether you choose a PAL or NTSC template should depend on whether you intend for the video to be viewed in a PAL region or NTSC region. NTSC is the broadcast and recording standard used mainly in North and South American continents, plus parts of eastern Asia including Japan and South Korea. PAL is used widely throughout Europe, Africa, the Middle East, most of Asia, and Oceania.
The Export Progress box During export, you will see a progress bar displaying the progress made through rendering your project and encoding it to the selected output format. Upon completion, you can click Open to play the resulting video in your default media player software, click Open Folder to view the folder containing your export in Windows Explorer, or click Close to close the progress box and return to MoviePlus.
Note that you can click Cancel to abort the export process (you'll be prompted to confirm this in case of an accidental key press and be offered to delete the file). When the export is complete, you may wish to click Open or Open Folder to view the file or the file's folder, respectively.
194 | Sharing your Movie
Advanced Export Settings Templates
The list of templates changes according to the type of file export you have chosen:
• for AVI exports, there are templates for DV and Multimedia AVIs.
• for MPG you have choices encompassing VCD, SVCD, DVD, MPEG1 and MPEG2.
• for MOV and WMV you have various options related to your preferred streaming bitrate. WMV also has HDV templates for exporting in HDV format.
You can change your selected template by selecting another from this list; the change will also be reflected in the Basic tab of the Export dialog, as this setting is available from both locations. In order to maintain compatibility with some video formats, some templates do not allow modification of their settings—for this reason you can make a copy of a template to further modify it settings.
Copying, Renaming, Deleting Templates You can create your own templates based on existing entries in the Templates list. You may wish to create a few different templates to save time in changing settings when you export your projects, or perhaps modify an existing template to enhance quality or adjust another setting.
Choose a template to modify then click the Copy button. Type in a suitable name for your template, such as "Optimized DivX Internet AVI 160x120". Make adjustments to the template settings to suit your needs.
Once a template has been created in this way, you can later rename or delete it using the Rename and Delete buttons.
Start/End Time Rather than exporting your entire project, you can specify a Start time and End time to export just part of your project.
Quality This setting matches that offered in the Basic tab of the Export dialog. You can determine what kind of processing is carried out during the export of your project by choosing one of six preset quality settings.
Sharing Your Movie | 195
Exports at Best quality take a long time for most formats so be prepared for a high quality DVD export to be notably slow. If your video is intended for general viewing by friends and family you can set a lower export quality. Draft and Preview settings are good as tests; with Normal, Good or High quality you will enjoy great results and the export will take notably less time than at Best quality.
Video Details Standard and Custom frame sizes can be set. For Standard frame sizes, select from the drop-down menu: DV or DVD movies can only be 720x576 (W,H) for the PAL format or 720x480 (W,H) for the NTSC format. For custom frame sizes, the Width and Height, given in pixels, determine the screen size of your custom sized movie—remember that movies can range down to tiny sizes suitable for animations on the Internet. Try and keep the pixel sizes divisible by 16 for good compatibility with different video formats—some AVI codecs are particular about the size of the video they are able to encode.
Pixel aspect ratio determines whether pixels are squashed, stretched, or left in their native (square) format as needed to achieve a particular movie screen size. You should use the setting automatically included with the template but if you wish to modify the pixel aspect ratio, use a ratio written as a decimal number near 1.0; lower than 1.0 is squashed, larger than 1.0 is stretched—e.g. for DVD PAL Widescreen compliance use 1.4568.
Frame rate (in frames per second or fps) of source material is typically determined by the broadcast television standard in use, i.e. NTSC or PAL. NTSC generally uses 29.97 or 24 frames per second, the PAL standard is 25. For general purpose video you should still conform to the standard in your region, but you can reduce the frame rate if you wish to optimize the file size of your video for Internet download.
Interlacing: Interlaced video (such as an analogue TV signal) builds each frame by splitting alternate lines from two separate scans of the picture area. The first or upper lines (or "field") contain the odd scanlines; the second or "lower" contains the even scanlines. (To visualize this, imagine that each of your hands is a separate video field, then interlace your fingers.) Non-interlaced ("no fields") or progressive digital video uses just one scan per frame.
The Codec list shows video compressor/decompressors available on your system. For information about choosing a codec, please see Codecs and their Management on p. 201. The Codec Properties button will allow you to fine-tune the export settings for the particular codec you have chosen, providing that the codec manufacturer offers a properties window for their codec.
196 | Sharing your Movie
Adjust the Quality slider (if available) for best results when you've selected a particular codec. Moving the slider to the right will increase export quality (and the time taken to export the project). This slider, unlike the basic quality setting, can affect the size of your movie as more video data is used per second of video to achieve a higher quality result.
Audio Details Uncheck Export Audio to export the movie without an audio component. In most cases this will reduce the file size, so uncheck it if you don't need (or don't have) a soundtrack.
Select the number of Channels to record. Mono means that just one audio stream is included, with no difference between left and right speakers when played back through a stereo device. Don't use "Stereo" unless necessary—two channels means a larger file size.
Bits per sample and Sample frequency together determine the amount of bandwidth allocated to each audio channel, which again translates directly to file size. As a rule, use "8-bit" for voice only, 16-bit for richer audio. The higher the frequency range you select, the more sound will be sampled—so choose a number consistent with the sound quality you need to preserve. 44100 Hz is the CD-audio standard.
The Codec list shows audio compressor/decompressors available on your system. Change the setting if you have a specific reason for doing so.
Select a Format (if available) for best results when you've selected a particular codec.
Advanced Settings If necessary, adjust settings for the type of AVI video file you want to capture.
Check Version 1 AVI to export an AVI file which is compatible with older software (but cannot be larger than 2GB in size). Leave the box unchecked to export an OpenDML (AVI version 2.0) compatible file that can be any size.
Adjust the Interleave rate slider (or enter a specific value in milliseconds) for faster or slower interleaving of audio and video data. Smaller values mean larger file sizes but more rapid cueing and startup when the file is played back (for example, in Media Player).

Sharing Your Movie | 197
Export to DV Camera (Print to Tape) The DV video format is used extensively by digital video cameras, so many video sources exist in this format before being edited. Although MoviePlus can export your project to many types of video format, you can choose to export as DV to a connected DV camera or export your project as a DV file for later writing to a DV camera. Either way, this is an important feature if you want to archive your completed movie to tape.
Exporting directly to your DV camera is a two-step process as MoviePlus first creates a suitable DV file before transferring it to your DV camera. However, if you already have a DV file that you want to archive you can initiate the second step by using the Write file to DV Camera... in the Tools menu.
To export to camera (also called print to tape): Step one 1. Select the File>Export Movie>To Camera menu item.
A DV AVI file will be exported from MoviePlus before it is sent to your camera, to provide a smoother export and transfer process.
2. Specify a name for the file in the Filename box, clicking Browse and selecting a new location if you first wish to choose an alternate drive or folder to store your file.
3. The File type is set to "Video for Windows (*.AVI)" and cannot be changed.
4. Select a DV template from the Template drop-down list that suits your needs. Choose a Widescreen template if your source footage or project settings are already Widescreen. For information about choosing PAL or NTSC, please see NTSC vs. PAL on p. 193.
5. The export Quality setting will perform additional video and audio processing as the quality increases. Choose Good quality or higher for high-standard export processing, choose Draft or Preview for test purposes.
6. When you are happy with your chosen settings, you can then click Export.
Your project's objects and attribute settings will then be composed into a DV video file and you will be shown a progress bar during this process. When the export is complete MoviePlus will allow you to transfer the DV file to a connected DV camera.
198 | Sharing your Movie
Step two 1. Once the first stage of exporting is complete, click the Exporting dialog's
Continue button.
2. To view the movie as it will play back on your camera, select the Preview on Device tab.
3. On the Write to Device tab, use the control buttons to locate a suitable in-point on the tape. Place your camera in Stop mode.
4. Adjust the Write Delay value if necessary to insert a timed pause before MoviePlus begins feeding data to the camera. A DV camera may be digital, but it's also mechanical and different transport mechanisms have different response times. A few tests will establish exactly how long your camera takes to start recording once it's activated. (When in doubt, it's better to set the delay slightly too long than too short.)
5. To begin recording, click Write to Device.
Appendices
9

200 | Appendices

Appendices | 201
Codecs and their Management If you have made or played an AVI video file in the past, you have—knowingly or otherwise—used something called a Compressor / DECompressor (CODEC). A codec is a solution to a problem; the problem being that uncompressed broadcast-quality video is very large as a computer file, it occupies 20 Megabytes of data per second—excessive for reasonable hard drive storage.
The basics AVI stands for Audio Video Interleave and it is a common and flexible PC video format that has gained wide support on other computing platforms, too. AVI files are like containers for any kind of video interleaved with any kind of audio, unlike fixed file formats such as those used by DVD which only support very strict video/audio specifications.
If AVI video can be of almost any flavour, how can someone make a video in a format that everyone can watch? The answer is that there's no truly universal AVI format, anyone who wants to watch an AVI needs to have the right codec installed, one that matches or is compatible with the codec used to create (compress) the AVI file. No single media player has all codecs included with it, as some require licensing fees and new codecs are always under development, so additional or new codecs can typically be downloaded or purchased. While there is no single universal AVI format—except maybe the simple "uncompressed" video format mentioned above, which can occupy gigabytes of drive space in a trice—most PCs have an installed copy of Windows Media Player or an equivalent that automatically supports quite a wide range of types of video.
What codec should I use when making my AVIs? Your choice of codec should depend very much on what it is you intend to do with the video you are creating. If you are aiming to present your video on a television, you need to choose a different format when compared to presenting the video for download via the Internet. In the case of television, you would need a good quality and quite high resolution output format, whereas for Internet delivery it would be best to focus on the compression to achieve a small file size for speedier download. We'll explore some scenarios below.
202 | Appendices
Before you export your final version... Some AVI codecs heavily compress the video data, sometimes while retaining decent video quality, but such heavy compression takes a fair amount of processing power during editing or playback. For this reason it is worthwhile choosing a format like DV. DV retains good quality during the capture and editing process but creates quite large files, so you could consider an alternative choice for your final export and just use DV throughout the capture and editing phases of your project. You can write DV video back to a DV camera if you wish, also called printing to tape.
Video for viewing using a television and DVD player Having said that your intended use should define the choice of codec, it's important to point out that many videos are still intended for viewing on a television, in which case you should be considering a video format that is supported by DVD players—MPEG rather than AVI. Some DVD players do support a limited number of AVI formats, usually based around MPEG-4 video and its derivatives (including DivX®, XviD, and Microsoft's MPEG-4 v1, v2, v3 codecs), but most only play MPEG video in Video CD or DVD formats. For those players that do support it; MPEG-4 video and its derivatives are well known for combining good quality video with compact file sizes and this format is often referred to as the MP3 of the video world. For a 320x240 video with 25 frames per second you can typically achieve excellent quality using an MPEG-4 codec with under 800 Kbps (kilobits per second) of data, roughly 100KB per second. Essentially, if your intent is playing your video on a television, MPEG-2 is still the preferred format in the majority of cases and is used by digital cable and satellite broadcast companies. Once you have created your MPEG-2 video, you would need to author a DVD using MoviePlus.
When sharing video with other Windows-based PC users In addition to AVI and MPEG video, MoviePlus 5 supports the creation of WMV, Windows Media Video. This format is supported by the Windows Media Player included on most PCs so this is a suitable format for sharing your video with other Windows users, without the worry that they may not have the codec required to support your AVI file. Despite the word Windows in its name, this format is also supported by some cross-platform media players such as the free VideoLan Client, so WMV files can in fact be played on Windows, Mac OS X, Be OS, and different flavours of Linux.
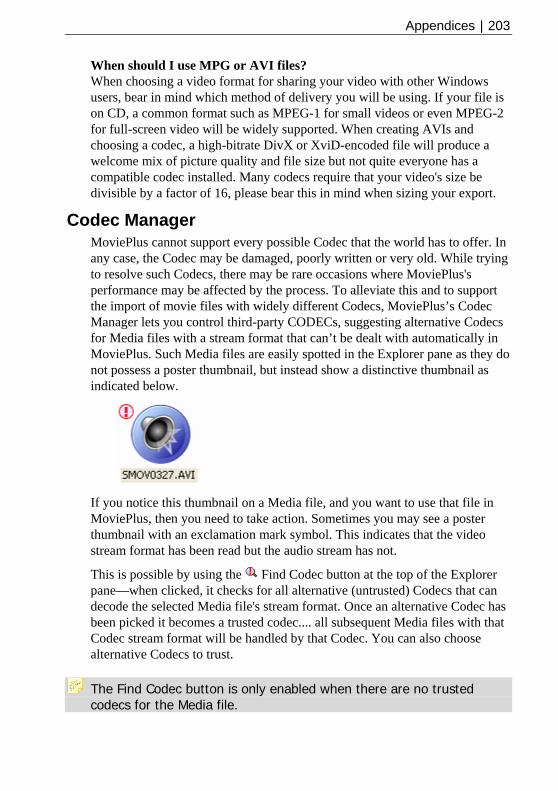
Appendices | 203
When should I use MPG or AVI files? When choosing a video format for sharing your video with other Windows users, bear in mind which method of delivery you will be using. If your file is on CD, a common format such as MPEG-1 for small videos or even MPEG-2 for full-screen video will be widely supported. When creating AVIs and choosing a codec, a high-bitrate DivX or XviD-encoded file will produce a welcome mix of picture quality and file size but not quite everyone has a compatible codec installed. Many codecs require that your video's size be divisible by a factor of 16, please bear this in mind when sizing your export.
Codec Manager MoviePlus cannot support every possible Codec that the world has to offer. In any case, the Codec may be damaged, poorly written or very old. While trying to resolve such Codecs, there may be rare occasions where MoviePlus's performance may be affected by the process. To alleviate this and to support the import of movie files with widely different Codecs, MoviePlus’s Codec Manager lets you control third-party CODECs, suggesting alternative Codecs for Media files with a stream format that can’t be dealt with automatically in MoviePlus. Such Media files are easily spotted in the Explorer pane as they do not possess a poster thumbnail, but instead show a distinctive thumbnail as indicated below.
If you notice this thumbnail on a Media file, and you want to use that file in MoviePlus, then you need to take action. Sometimes you may see a poster thumbnail with an exclamation mark symbol. This indicates that the video stream format has been read but the audio stream has not.
This is possible by using the Find Codec button at the top of the Explorer pane—when clicked, it checks for all alternative (untrusted) Codecs that can decode the selected Media file's stream format. Once an alternative Codec has been picked it becomes a trusted codec.... all subsequent Media files with that Codec stream format will be handled by that Codec. You can also choose alternative Codecs to trust.
The Find Codec button is only enabled when there are no trusted codecs for the Media file.
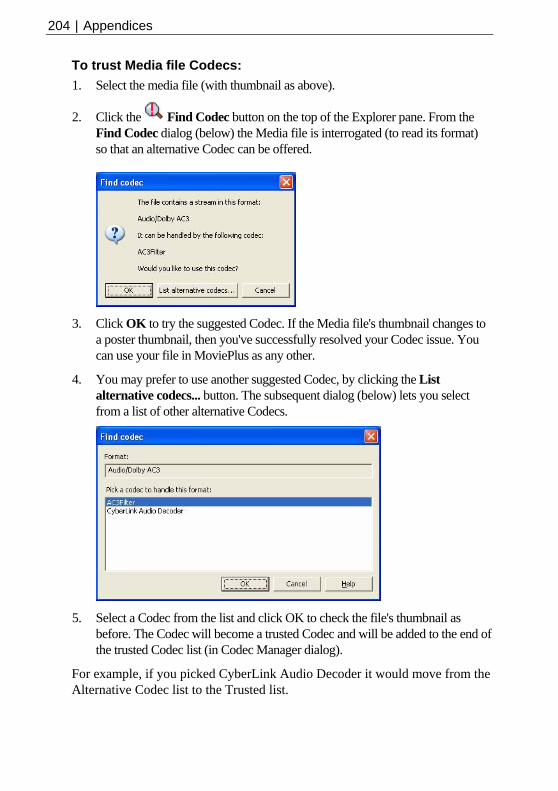
204 | Appendices
To trust Media file Codecs: 1. Select the media file (with thumbnail as above).
2. Click the Find Codec button on the top of the Explorer pane. From the Find Codec dialog (below) the Media file is interrogated (to read its format) so that an alternative Codec can be offered.
3. Click OK to try the suggested Codec. If the Media file's thumbnail changes to
a poster thumbnail, then you've successfully resolved your Codec issue. You can use your file in MoviePlus as any other.
4. You may prefer to use another suggested Codec, by clicking the List alternative codecs... button. The subsequent dialog (below) lets you select from a list of other alternative Codecs.
5. Select a Codec from the list and click OK to check the file's thumbnail as
before. The Codec will become a trusted Codec and will be added to the end of the trusted Codec list (in Codec Manager dialog).
For example, if you picked CyberLink Audio Decoder it would move from the Alternative Codec list to the Trusted list.

Appendices | 205
It is possible that you may find video sources already present on your Timeline which no longer possess poster thumbnails. This may be because:
• the Codecs which were previously trusted by a third party may not be present on your computer (if you are inheriting a MoviePlus project from another computer). OR
• MoviePlus has started in Safe Mode after experiencing Codec problems. The third-party Codecs will have been switched off automatically.
To enable such sources again, right-click on the source, select Find Codec... from the menu, and follow the instructions described in To trust Media file Codecs previously.
Codec Manager dialog Codecs are managed from Tools>Options>File Types. The dialog stores records of trusted and alternative Codecs that reside on your computer after installing third-party software (codec packs and media players). It is possible to build up a list of trusted codecs for each format listed in the Formats: box this can be done manually or automatically when selecting an alternative Codec during the Find Codec operation (see above).
These trusted Codecs can be prioritized with the Move Up or Move Down buttons such that the topmost Codec is highest priority.
The Select button allows you to add a Codec from the Alternative codec list into the Trusted Codec list for the currently selected Format. The Remove button does the opposite.
206 | Appendices
What if MoviePlus has problems? There are several reasons why MoviePlus may have problems but, assuming the Minimum System Requirements have been met, the chances are that a third-party Codec has been incorrectly trusted during Media file import. If you've been experimenting with third-party Codecs prior to problems occurring then you may well have your cause!
In the event of MoviePlus unexpectedly closing down, it will launch in Safe Mode the next time it is run.
Safe Mode This mode is MoviePlus's way of protecting itself from the original problem returning—the only difference you'll see is that:
• the poster thumbnails in Explorer Pane or Media pane will not be shown (instead a list view is shown).
• the Enable third-party codecs check box in Tools>Options>File Types will be unchecked. No third-party Codecs will be loaded (see above).
To return to normal operation, go to Tools>Options>File Types and click Codec Manager. In the dialog, remove any suspected third-party Codecs from the Trusted box (select the Codec entry and click the Remove button). You can then check the Enable third-party codecs... check box to get back to normal. Finally, keep clicking the Change View Style button in the Explorer pane or Media pane so that your poster thumbnails will be viewable again.

Appendices | 207
Performance Notes While MoviePlus has been engineered from the ground up to provide a fast working environment, video editing is still a task that demands a great deal from a typical computer. The amount of data being moved between the system's hard drive, memory, and processor (and back again) can be immense, stretching the capabilities of many PCs. At the same time the system processor (CPU) has to perform the additional task of visual effects processing and composing your edited clips into a resulting movie.
Improving system performance If you are experiencing stuttering playback of your video project or dropped frames during video capture, there may be some changes you can make to MoviePlus or your system to improve your playback or video-editing performance. They include but are not limited to:
Adjusting Video Preview settings If your preview playback is stuttering, you may wish to reduce the quality of the preview to improve performance.
Click the Render Quality button at the top-right of the Video Preview pane and select a lower quality, or do the same by right-clicking in the pane and choosing Render Quality>Preview. You can also reduce the size of your preview (zoom out) by clicking the Zoom Out button or by choosing the same option from the Preview menu. Your exported movie will not be affected by your preview quality.
Disabling Anti-Virus on-access scanning/live protection Many anti-virus programs offer a live virus-checking service running in the background, often called auto-protect, active shield service, or on-access scanning. This increases the level of security offered by your PC as all files being accessed are checked for viruses instead of waiting for a full system scan once a week to know you're safe, but this of course does slow down disk access for other programs. If MoviePlus performance is not as you expect, it might be worth investigating your current auto-protect or on-access virus scanning settings as they may be affecting disk performance while using MoviePlus.
It's worth noting that if your system does become infected by a virus, trojan horse (a malicious program that often offers remote access to your PC), or spyware and malware (malicious data-tracking or key-logging programs), your system's performance will also be compromised—sometimes severely—and you may also be perpetuating the spread of such software to other
208 | Appendices
computer users. It is therefore important to use virus and spyware removal software (and a security firewall if you are amongst the majority of PC users who connect to the Internet).
Enabling DMA Mode for improved hard drive performance DMA (Direct Memory Access) mode in this context allows hard disks to transfer data using less of the system processor's power, typically a proportional reduction of 40% in CPU usage with the exact same hardware. To enable DMA mode (or check that it is enabled) see Microsoft's how-to guide for Windows XP (search for DMA mode at www.microsoft.com), detailing the use of the Device Manager in the System Control Panel.
Disabling write-behind caching Write-behind caching is a Windows feature that monitors a number of small file edits and rather than writing them in real-time instead stores them up and writes them in bulk. Disabling this Windows feature for the drive used for video capture may improve capture performance. Write-behind caching is an option on a disk drive's device Properties page (Policies tab), accessible via the Device Manager.
Disk defragmentation When files are written to your hard drive, they occupy the necessary amount of space on the disk and are subsequently caged in to their space by newer data. As changes are made to your "caged-in" files, new data is written as new file fragments elsewhere on your drive, hence the need for a drive to be "defragmented". This defragmentation process reunites all a file's segments back into one piece, so the hard drive does less work when reading a file, and the "clean space" area of the drive is neater and faster to write to. Some "defrag" software will also move frequently-modified files to the end of the drive and frequently-accessed files to the beginning to improve performance. A defragmented drive or dedicated empty drive is preferred for video editing work.
You can defragment your drive using a built-in Windows tool, normally available by right-clicking a drive in Windows Explorer and choose Properties, the Tools tab, then click Defragment Now....
Windows swap file location If you are a power user familiar with the Windows swap file or virtual memory settings, you may like to consider moving your swap file location to a drive other than the one used to store or process your video. This may help improve performance when Windows is using your virtual memory in complex compositions or exports.
Appendices | 209
Optional system changes For Windows XP, two standard services can sap a proportion of a system's speed. Unfortunately, these services can also be quite useful so it is not recommended that you disable them unless you understand the consequences. They are System Restore (a service that keeps track of system changes and allows you to roll-back your system to a previous state) and the Indexing Service (a service that tracks file usage and speeds up file searches). Microsoft's System Restore and Indexing Service articles may help you better understand these processes and how to manage them.
Clean up cache To conserve valuable disk space, you can check Clean up caches on exit in Tools>Options>General. Cached waveform displays, clips produced by virtual scene detection, and gallery thumbnails are removed on MoviePlus exit. This means that you will need to redetect scenes again when your MoviePlus project is opened; waveform displays and thumbnails will be recreated.
The feature attempts to minimize the size of the Windows user's Application Data folder, and is applicable when large folder sizes slow down the restoration of user profiles (on PC startup) in a network environment.
This feature does not remove any saved components such as your custom gallery presets.
PC technologies While it may not be necessary to upgrade a computer in order to run MoviePlus, there are some affordable technologies that you may wish to consider in the event of a new PC purchase or upgrade, if your video editing warrants the attention. These include:
A GOOD modern processor MoviePlus is programmed to take advantage of the capabilities of modern processors. Specifically, MoviePlus is optimized for processors with MMX, SSE and SSE2 processor instruction sets. Pentium 4 or higher processors from Intel support SSE2, as do AMD Athlon 64 processors. MoviePlus is also optimized for HyperThreaded processing and multiple processors; at the time of writing this, HyperThreading is an Intel Pentium 4 feature. It is sometimes the case that budget processors, such as Celeron or Duron/Sempron chips, have fewer processor features compared to their full-priced counterparts and this may be more notable when using an intensive application like MoviePlus.
210 | Appendices
To find out if your current processor supports all the modern speed-enhancing instruction sets including SSE2, use the free CPU-Z tool from www.cpuid.com.
Appendices | 211
Changing the Layout Once you are working with a project in MoviePlus, you'll actively be using the Timeline area, most likely making frequent visits to the Explorer and Properties panes, plus occasional visits to the Media, Effects, Transitions, Envelopes and Sources panes, too. The Toolbars may also be altered now and then.
Juggling these screen areas to gain the easiest access for best efficiency is a task that will be a little different for each person using MoviePlus, as each project can have slightly different requirements. If you learn how to switch on/off, moving and resizing elements of the MoviePlus interface, you'll be able to customize MoviePlus to suit your needs.
Controlling your Panes Switching on/off - This is possible by either selecting the close window
button at the top right-hand corner of your pane or selecting View>Panes and switching on/off via a check box.
Resizing - As with any window it is possible to click on the top, bottom, left and right of the window and drag to re-dimension the window size. Watch for the resize cursor when you hover over the area.
Docking - This is a great window management feature. By default, the panes are docked together so that only one pane is on display at any one time - the rest can be viewed in the same window space by clicking on the appropriate tab at the bottom of the window. However, by double clicking the tab you can release the pane to be free floating. This is particularly useful when want to go to a full-screen Video Preview - perhaps even on a second monitor. If the pane is not docked, double-click its header to dock it back with the other panes.
Changing between panes - To change to a different pane, click on a tab, e.g. Properties, in the tab list.
Moving - You can alter the pane order by selection of the tab name and dragging it to its new position in the tab list.
Controlling your Toolbars Toolbars are just as easy to control as they behave in a similar manner to panes, i.e.
• All toolbars, like panes, can be switched on of off but via View>Toolbars.
• Toolbar can be clicked on and dragged to a new location.
• The toolbar can be docked and undocked from the toolbar.
212 | Appendices
Dual-screen displays While it's far from essential that MoviePlus operates on a dual-screen display, it is certainly a supported feature and one that helps improve efficiency. We recommend placing your Video Preview pane on your Secondary display, giving you a good size preview and room for fine adjustments. This will still leave a fair number of panes visible on your Primary display but you'll need these close to hand when building your MoviePlus projects.
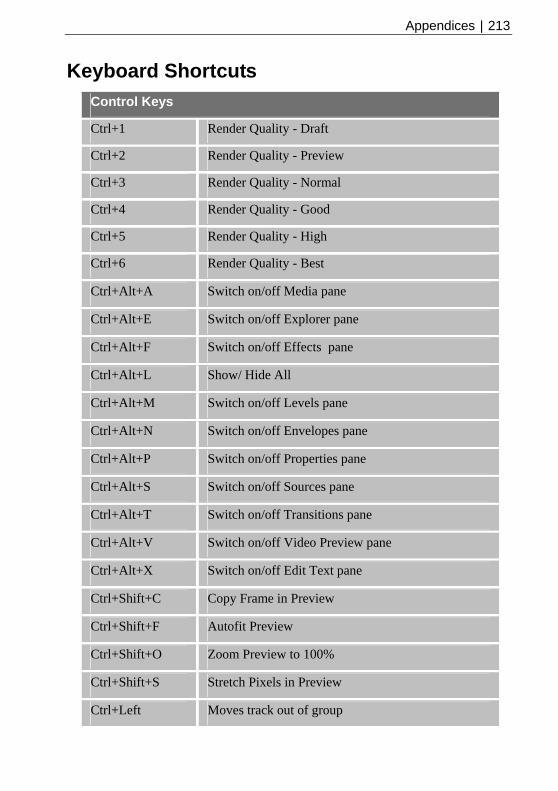
Appendices | 213
Keyboard Shortcuts Control Keys
Ctrl+1 Render Quality - Draft
Ctrl+2 Render Quality - Preview
Ctrl+3 Render Quality - Normal
Ctrl+4 Render Quality - Good
Ctrl+5 Render Quality - High
Ctrl+6 Render Quality - Best
Ctrl+Alt+A Switch on/off Media pane
Ctrl+Alt+E Switch on/off Explorer pane
Ctrl+Alt+F Switch on/off Effects pane
Ctrl+Alt+L Show/ Hide All
Ctrl+Alt+M Switch on/off Levels pane
Ctrl+Alt+N Switch on/off Envelopes pane
Ctrl+Alt+P Switch on/off Properties pane
Ctrl+Alt+S Switch on/off Sources pane
Ctrl+Alt+T Switch on/off Transitions pane
Ctrl+Alt+V Switch on/off Video Preview pane
Ctrl+Alt+X Switch on/off Edit Text pane
Ctrl+Shift+C Copy Frame in Preview
Ctrl+Shift+F Autofit Preview
Ctrl+Shift+O Zoom Preview to 100%
Ctrl+Shift+S Stretch Pixels in Preview
Ctrl+Left Moves track out of group

214 | Appendices
Ctrl+Right Moves track into group
Ctrl+Up Move track or group up the stack
Ctrl+Down Move track or group down the stack
Ctrl++ Zoom in
Ctrl+- Zoom out
Ctrl+[ Zoom to all
Ctrl+] Zoom to Selection
Ctrl+< Select Previous Keyframe
Ctrl+> Select Next Keyframe
Ctrl+C Copy
Ctrl+D Duplicates source in Media pane
Ctrl+E Export Movie to File
Ctrl+Home Scroll to caret
Ctrl+M Go to Marker (or Chapter Point)
Ctrl+N New MoviePlus Project
Ctrl+O Open MoviePlus Project
Ctrl+P MoviePlus Project Settings
Ctrl+S Save MoviePlus Project
Ctrl+V Paste
Ctrl+X Cut
Ctrl+Y Redo
Ctrl+Z Undo
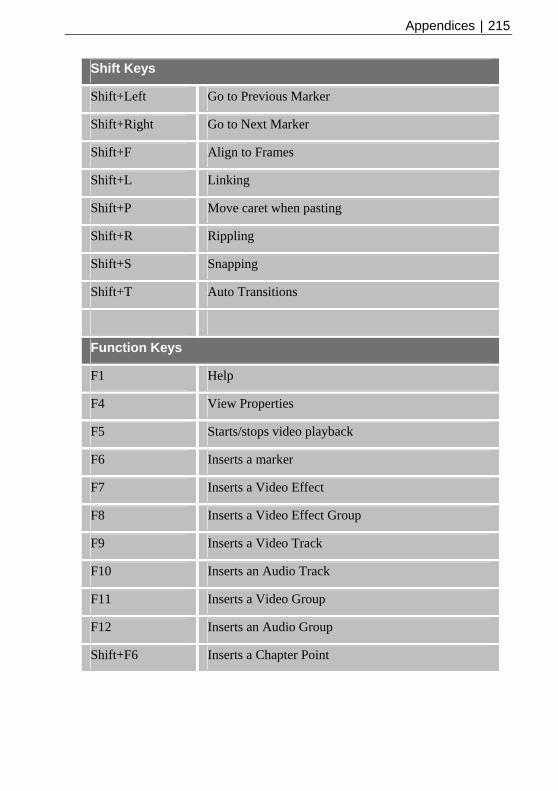
Appendices | 215
Shift Keys
Shift+Left Go to Previous Marker
Shift+Right Go to Next Marker
Shift+F Align to Frames
Shift+L Linking
Shift+P Move caret when pasting
Shift+R Rippling
Shift+S Snapping
Shift+T Auto Transitions
Function Keys
F1 Help
F4 View Properties
F5 Starts/stops video playback
F6 Inserts a marker
F7 Inserts a Video Effect
F8 Inserts a Video Effect Group
F9 Inserts a Video Track
F10 Inserts an Audio Track
F11 Inserts a Video Group
F12 Inserts an Audio Group
Shift+F6 Inserts a Chapter Point

216 | Appendices
Misc Keys
Del Delete
End Go to End of Movie
Esc Stop the Movie
Home Go to Start of Movie
I Set Start Time
Left Go to Previous Frame
M Mute
O Set End Time
Right Go to Next Frame
S Split
Space Play/Pause the Movie
Index

Index
Index
2D Filter Effects, 134
3D Filter Effects, 137 Transitions, 142
3D Bump Map, 138 3D Lighting, 138 3D Pattern Map, 138 Anti-virus software, 207 Archiving, 197 Attributes menu, 53, 75 Audio, 163
Adding, 166 Adding tracks, 54 Adjusting Balance in, 171 Capturing, 24 Capturing from CD, 29 Editing, 163 Fading, 167 Levels, 169 Replacing, 167 Sources, 166 Waveform Display, 166
Auto Transitions, 143 Background Sources, 149, 152 Backgrounds, 95
Removing, 95 Before You Start, 19 Blend Modes, 118 Blue Screening, 102 Camera
Capture from, 24 Export to DV, 197
Capturing From a Video Source, 24 From an Audio Source, 24 Split Files by Scene in, 26
Caret, 52 Moving the, 68
CG Sources. See Computer-generated (CG) Sources
Chapter points, 52, 83, 177, 185 Inserting, 84
Chroma Key, 102 Clean up cache, 209 Clipping (audio), 169 Codec Manager, 34, 203 Codecs, 201
Colour, 92 Correcting, 140
Colour Picker, 150 Computer-generated (CG) Sources, 149
Adjusting Colour of, 150 Adjusting Transparency of, 150
Counter, 52 Crop Envelope, 72 Cropping, 119
with Masks, 96 Cut-outs, 95 Defragmentation, 208 Detect Scenes, 38 DV format, 28 DVD
fit project to, 181 Menu Designer for, 182 Writing, 177
from Disc Image, 187 of Disc, 187 of Disc Image, 187
DVD/VCD Disc Settings, 178, 186 Setup Wizard, 177
DVDs/VCDs background music for menus, 186
Edit Text pane, 13 Editing
Multi-track, 49 Effect Groups, 132 Effects, 52, 129
Applying, 130 Applying, over Time, 132 Combining, 139 Copying, 67 Filter, 134
Effects pane, 12 Envelopes, 52, 72
Copying, 67 Crop, 119 Displaying, 73 Editing, 74 Opacity, 91 Pan, 171 Resetting, 74 Saving, 74 Transform, 107, 112, 114, 116 Volume, 171

Index
Envelopes pane, 13 Explorer pane, 11, 30 Export
Advanced settings for, 194 As file, 188 File Types, 188 Quality, 193 to DV Camera, 197
Fading, 92 in Audio, 167 to Black, 92 to Colour, 93
Feathering, 136 Feature List, 3 File Formats
Supported, 36 Filter Effects, 129
2D, 134 3D, 137
Find Codec, 35 Freeze-frame, 89 Getting Started, 20 Groups, 51, 80
Adding, 80 Adding Tracks to, 80 Applying Effects to, 54, 81 Audio, 82 Effect, 132 Master, 82 Video, 80 Video Effect, 82
HDV format, 28 proxy files for, 35
Headers, 50 Keyboard Shortcuts, 213 Keyframe Mode, 79 Keyframe View, 75 Keyframes, 51, 75
Adding, 76 Copying, 78 Modifying, 76 Moving, 77 Navigating, 77 Selecting, 77 View, 51
Levels pane, 13, 169 Linking, 62 Looping, 86 Markers, 52, 83
Inserting, 83 Masks, 96
Adding, 98 Creating, 98 Resizing, 99
Master Groups, 170 Matting, 102 Media
Adding, 30 Capturing, 24 Supported, 36
Media files Optimizing Import of, 34
Media pane, 11 Trimming in, 32
Media Pane, 31 Menu Designer, 177
customizing templates in, 183 Menu Designer (for DVD/VCD), 182 Menus, 10 Motion, 112 MoviePlus
Layout, 13 Safe Mode, 206 Welcome to, 3
Muting, 46 NTSC, 23, 181 Opacity, 91 Opacity Envelope, 72 Optimizing performance, 207 Overlays, 122 PAL, 23, 181 Pan Envelope, 72 Pan Slider, 171 Panes, 10 Panning, 169 Performance, optimizing, 207 Perspective, 114 Picture-in-Picture Effects, 116 Play Controls, 43 Playback
reverse, 90 Preview, 43 Preview Marker, 53 Print to Tape, 197 Project
Export, as File, 188 Exporting, as DVD/VCD, 177 Starting a new, 20

Index
Project Settings, 21 Changing, 22
Properties Pane, 12 proxy files
for HDV, 35 QuickShape Sources, 149, 154 Render Quality, 45 Reverse playback, 90 Rippling, 63 Rotating, 107 Ruler, 52 Safe Mode, 206 Scaling, 107 Scene Detection, 38 Scrolling, 68 Scrubbing the Timeline, 69 Seek Controls, 68 Sharing Your Movies, 175 Snapping, 60 Soloing, 46 Sources, 50
Adding, 30 Arranging, 60 Audio, 166 Background, 149, 152 Computer-generated (CG), 149 Deleting, 61 Linking, 62 QuickShape, 149, 154 Resizing, 65 Rotating, with Transforms, 110 Scaling, 107 Selecting, 56 Text, 149, 156 Trimming, 70
Sources pane, 13 Speeding up playback, 90 Splitting sources, 71 Static Extensions, 89 Status bar, 10 Stretch Pixels, 44 Stretching video playback, 90 Strips, 50 STV, 37 System Requirements, 14 Text Sources, 149, 156
Applying effects to, 159 Timeline, 11, 49
Basics of, 49
Scrolling the, 68 Scrubbing, 69 Zooming the, 68
Titles Scrolling, 159
Toolbars, 10 Tracks, 51
Adding, 54 Arranging, 54
Transform Envelope, 72 Transforms, 106
Rotating with, 110 Scaling with, 107
Transitions, 52, 142 Applying, 142 Applying, over Time, 146 Changing, 144 Copying, 67
Transitions pane, 12 Transparency, 91 Trick Play, 44 Trimmed sources
Extending, 89 Trimming, 70
in Media pane, 32 TV Preview, 46 TV Safe Borders, 45 User Interface, 10
Changing Layout for, 211 Visual Reference, 10
VCD Menu Designer for, 182 Writing, 177
from Disc Image, 187 of Disc, 187 of Disc Image, 187
Video Adding sources, 30 Adding tracks, 54 Capturing, 24 Groups, 80 Previewing, 43 Sources, 60
Video Effect Group, 82 Video Preview pane, 12, 43 Video Standards, 23, 181 Visual Reference, 10 Volume, 169 Volume Envelope, 72

Index
Waveform Display (Audio), 166 Write Disc, 180 Write Disc from Image, 181 Write Disc Image, 180
Write File to DV Camera, 197 Write Project, 177 Zooming, 68
Notes


