28
How to Excavate an Archaeological Test Pit Handbook Guide June 2013 © Suffolk County Council Archaeological Service

How to Excavate an Archaeological Test Pit
Handbook Guide
June 2013
© Suffolk County Council Archaeological Service


Contents
1. Introduction 1
What is a Test Pit? 2
What am I looking for? 3
2. Health and Safety 4
3. Equipment 5
4. Step by Step Guide 6
5. Frequently Asked Questions 19
6. Further Information 22


1. Introduction
First of all thank you for volunteering to take part in the Test Pit project for your village. Although
it is going to involve some hard work hopefully you’re going to have fun and learn something
about the past history of your house and garden, as well as the village as a whole. The project
will also give you the chance to talk with the team from the Suffolk County Council
Archaeological Service (SCCAS) who will circulate around the test pits giving help and advice,
so that you can learn a bit about what it is that professional archaeologists actually do; how they
excavate and record archaeological sites, and identify finds. By the end of the two or three
days you’ll be a trained amateur archaeologist!
This booklet explains how to dig and record an archaeological test pit somewhere in your
garden. It includes a step by side guide, together with some health and safety tips and a list of
equipment you’ll need. If at any point you’re stuck or confused and need a bit of help, or even
think you have found something important, then please ask one of the SCCAS archaeologists
for help.
Finally if by the end of the project you’re keen to get more involved in archaeology there’s also a
list of further sources of information, both local and national, to help you do so.
On the first morning SCCAS will hold an initial briefing at the ‘Operations Room’ for the
weekend. Here you will be given a Test Pit Recording pack, project timetable and will be able to
borrow any needed equipment. The Operations Room will be open during the event and
everyone will be encouraged to report back their progress and findings throughout the project
so that the SCCAS team can let everybody know what else is going on and allow you to watch
the story of your village unfold.
1

What is a Test Pit?
A Test Pit is a small archaeological excavation, consisting of a square trench measuring 1m by
1m and up to 1m deep that can dug be by hand, by anyone, in an open space in their garden.
The Test Pit is dug methodically, i.e. layer by layer, and carefully recorded, with the aim of
identifying evidence of past human activity, usually by finding pieces of pottery and other
material, or, if you’re lucky, archaeological features such as rubbish pits, building postholes or
wall foundations.
While we can learn a great deal about the history of our towns and villages through study of
historical documents and maps, place names, aerial photographs and so on, archaeological
excavation is often the best or only way to add to or confirm the results of such research. The
opportunity for large-scale excavation however, particularly within our established settlements,
is usually rare and so the excavation of a collection of Test Pits, which can be squeezed in
anywhere throughout a village is a good alternative. Test Pits are also a great way of allowing a
community, with the help of professional archaeologists, to investigate its past history and learn
a bit about how archaeological excavation works.
By collating the results from all the Test Pits the archaeologists will try to establish a general
picture of the origins and development of a settlement, and hopefully find out something about
the people who lived there.
2

What am I looking for?
Archaeological excavation aims to identify any evidence of past human activity that may be
buried below ground at any given site. This evidence usually consists of features, such as
buried soil layers, rubbish pits, ditches, graves or parts of former buildings such as postholes,
wall foundations and floor surfaces and the finds material that has ended up within the features.
Although some finds will have been deliberately buried, such as grave goods or treasure
hoards, most of the finds material found by archaeologists is the discarded rubbish from the
activities of everyday life and work in a settlement.
Due to the small size of a Test Pit you might need a bit of luck to find a proper archaeological
feature such as a pit or building but you’ll almost certainly find the bits and pieces that people
have thrown away or lost over the years, mixed in both the topsoil or within buried older soil
layers. Finds will consist of man-made items such as sherds of pottery, metalwork, glass and
building material, as well as organic or environmental material such as pieces of animal bone or
shell.
If you are not sure if you should keep something then KEEP IT. It can always be discarded later
at any stage during assessment and analysis by an archaeological finds specialist.
3

4
2. Health and Safety
Anybody is welcome to take part in the event but all children under the age of 16 must be
supervised at all times by a responsible adult.
All participants will be asked to complete an SCCAS Volunteer form at the start of the event
and, if aged between 12 and 80, will be treated as SCCAS employees for insurance purposes.
First Aid
Certain members of the SCCAS staff have First Aid training and will carry first aid kits.
Another First Aid kit will be available at the Operations Room. You will be told at the briefing
who the First Aiders are. First Aid can only be offered to those signing the volunteer form.
Safe digging practices
In order to dig safely please follow these simple rules
Work carefully and use your common sense!
Wear protective clothing, i.e gloves, sturdy footwear (steel toe-capped boots if you have
them) etc.
Don't dig your hole along the line of a path or other walkway.
Don't dig your hole too deep (no more than 1m) and enclose with temporary fencing or cover
it with something solid if it is to be left open and unattended. SCCAS has limited supplies of
temporary fencing if required.
Don't work too closely together - there are lots of different tasks to be done (e.g. digging,
sieving, recording) so it should be possible to avoid getting in each other's way.
Be aware of where people are so that you don't accidentally hit them with a spade or
mattock.
Don't raise tools above your shoulder height.
Don't over do it. Its important to work at your own pace, at a speed you’re comfortable with.
It doesn’t matter if, by the end of the project you haven’t quite finished the pit and above all
its not a race. If anything is too heavy to lift get someone to help share the load. Take
regular breaks/breathers.
Pay due regard to the weather, ie suncream, a hat and plenty to drink or wrap up warm
depending on conditions.
Be aware that flints can be sharp and that there may be glass in the soil, wear gloves while
digging and sieving.
STOP digging if you find anything that looks like a pipe or a cable.
STOP digging if you find heavily contaminated ground, ie dumps of asbestos, oil etc.

5
3. Equipment
To excavate and record your test pit you will need a basic range of digging (most of which you
hopefully have in your garden shed) and recording equipment. If you don’t have any of these
items please try to let us know in advance as SCCAS has limited supplies of some equipment
which can be loaned out at the briefing session.
At the initial briefing you will be given a recording pack. This will include the following items and
should be returned at the end of the project.
Test Pit Record booklet and Step by Step summary sheet
Project Timetable and Ordnance Survey Map extract showing your property
30cm photo scale
Photo board
Non-permanent and permanent marker pens
Labels
Other tools that you will need to try to provide include:
Digging tools
Spade and/or shovel
Hand shovel/garden trowel
Buckets/wheelbarrow
Garden sieve (1cm mesh)
Trowel (plasterers type, ideally with a 4”-6” blade)
A sheet of plastic/tarpaulin, c. 2m x 2m – on which to put your spoil heap if you want to
protect your lawn etc
Recording equipment
Digital camera
Washing up bowl
Soft nail brush/toothbrush
Garden seed trays
5m length of string
2 steel hand tape measures
4 large nails/tent pegs
Clipboard
Pencils, rubber, sharpener

6
4. Step by Step Guide
It may sound complicated but excavating an archaeological Test Pit is quite easy, and hopefully
fun. By following this Step by Step guide you will dig and record your pit properly to a set
standard. This will help us to compare all the pits at the end of the project and allow an overall
report on the project to be produced. A summary of this guide will be included with the Test Pit
Record booklet for easy reference.
SCCAS archaeologists will be making regular visits to all the Test Pits so please ask for help
and advice if you are uncertain of what to do. If you can please try to bring your finds, records
and camera to the Operations Room at least once a day so we can keep everyone updated.
Methodology
The basic idea of archaeological excavation is to identify the sequence of events that has
occurred in the area to leave your garden as it is now. Obviously we are only able to look for
events which have left an impact below ground-level but by looking for what might seem small
changes in the types of buried soil, which might show us where pits, ditches or postholes have
been dug in the past before being filled in, we can discover a lot about the history of a site. The
main aim in digging your Test Pit is to identify the different layers of soil and the finds contained
within them.
The test pit should be dug 10cm at a time in a series of Spits. Within a Spit you may find two or
more different types of soil, ie dark brown sand on one side, light grey on another, and you
should try to dig these separately. Each type of soil will be allocated a number and will have its
own Context Record Sheet in the Test Pit Record Book. Any finds in the Spit will be numbered
with the appropriate context number.
The idea of digging the pit in 10cm Spits is designed to make you excavate methodically and
carefully, making you stop every so often to consider what is happening in the pit and record it if
needed.
On a full archaeological site it can get a lot more complicated, with separate numbers being
given for the cut of a feature such as a pit (i.e. the actual hole itself), and a fill number for the
soil that later backfilled it, but the overall principle is the same. By recording the stratigraphic
sequence of the contexts, and identifying the finds within them, we can establish what has
happened on the site and when.

7
Step 1. Choose your test pit location
The first step in digging your Test Pit is choosing its location. This could have a major effect on
how easy your digging will be and what you might find so choose carefully. If you are in any
doubt about where to dig then please have a chat with one of the archaeologists who will be
happy to advise you. However if it is in your garden then please remember that you’ll probably
have a far better idea than anyone else of what might be a good spot.
The best or easiest spots will probably be in lawns or flower vegetable/beds, which should allow
relatively easy digging at first and will also be easy to backfill and reinstate. A spot with a thick
garden topsoil could mean that you’ll find lots of finds material mixed in it relating to the past
history of your house.
Try to choose somewhere fairly flat, with plenty of room to work. You also need to decide where
to put your spoilheap, perhaps laying down a tarpaulin if you want to protect your lawn. The
spoilheap needs to be at least 1m away from the edge of your test pit, to stop spoil falling back
in and to allow you safe access around the pit. Don’t place it to far away though as you’re going
to have to put the spoil back at the end of the dig…
Try to find avoid being under tree canopies or in close proximity to bushes so that you don’t
have to work around or cut roots.
Avoid any areas where there may be buried services, such as your electric or water supply.
Avoid any areas where you think there might have been substantial recent disturbance or
heavy landscaping, i.e old cess tank or footings for a former garage, or where 50cm of soil
has been imported in.
Keep at least a 1m distance from any walls – you don’t want to be digging out the contents
of a modern wall foundation trench, or risk undermining an existing wall.

8
Step 2. Marking out your test pit
Once you have chosen your location you need to mark out your 1m square. To start push two
nails into the ground 1m apart and attach the string to the first nail and pull it round the second.
Next put in a third nail 1m away from and at right angles to the second nail, and then repeat for
the fourth.
To get the right angles either use an object with a right angle (or this booklet) as a guide to help
set the square, or if you have two tapes measure 100cm from the first nail, and 141.5cm from
the second. Put your third nail where the tapes overlap. Then repeat for the fourth nail.
However you mark it out your test pit should measure 141.5cm across both diagonals (this is
explained by Pythagoras’ Theory if you can remember it!).
Step 3. Recording your test pit location.
Now look at your Test Pit Record booklet and fill in the details on the cover. Next fill in the Test
Pit Location and Description page.
Draw a sketch plan of your test pits location within your site or garden in the space provided. It
doesn’t have to be to scale although preferably north should be at the top (please draw an
arrow showing the direction of north in the space provided. Number the corners of your Test Pit
1-4 in a clockwise direction from top left.
Show on your sketch plan any nearby features such as walls or fences, including at least two
which are shown on the Ordnance Survey map given to you at the briefing. Select a point on
these features, preferably a corner, and measure from it to two adjacent corners of the test pit.
Record these measurements on your sketch plan and then repeat the exercise for a second
point. If there are no corners available you will need to simply measure from your pit to the
nearest point on a linear boundary. Additional measurements on more than two points will
increase the accuracy.
SCCAS will also try to record the position and height of each test pit with a GPS unit but, in
areas of dense buildings or tall trees an accurate measurement is not always possible. Your
site plan may therefore be the only record of where it was dug, so please try to make it as
accurate and clear as possible.
Finally take 1 or more photographs of your test pit location and its surroundings and write some
details about each photo in the space provided.

Example of a completed location map sheet.
9

De-turfing
If your test pit is in your lawn you’ll need a spade to remove the turf. Put the spade just inside
the string and gradually work along each side cutting the turf as you go. When you have cut the
turf all the way round begin cutting the middle into a series of squares like a chessboard. Each
turf should be about 20 centimetres square. Once you have done this slide the spade under a
piece of turf and gently lift it out and stack by the side of the trench. Carry on until all your turfs
are lifted.
When you stack the turf make sure you put it well out of the way so that you don’t fall over it.
Start by putting the first layer grass side down, then the second layer grass side up and so on.
Alternatively lay your turfs out in a reassembled square so that you can replace them back in
the same pattern at the end of the dig.
Deturfing
10

11
Step 4. Context Recording (pre-excavation check)
Your final task before you start to dig each 10cm Spit is to assess whether there is anything
important to record. Please ask an SCCAS archaeologist if you’re not sure but by important we
mean are there any new visible contexts, i.e. has the soil changed to a new uniform layer or are
there areas of different types of soil or inclusions.
If there is a new type of soil layer, whether across the whole pit of in just one part of it, then you
should allocate it a Context Number and complete the description section of a new Context
Record Sheet. Some prompts are included on the sheet but add any information you think
relevant. A photograph should then be taken of the pit (see below).
If there are any visible differences within the pit, i.e two or more visible contexts then you should
also draw a plan before starting to dig (see below).
Photography
Each photograph should be taken as vertically as possible (i.e. looking down on the square) and
from the same direction. Try to avoid glare from the sun or shadows in the picture and make
sure that the camera is picking up the light reading from the soil rather than the surroundings.
Using a non-permanent marker write the Site Code, Test Pit Number, Context No on the
supplied photo board, with an arrow pointing towards north. Place the whiteboard and 30cm
scale ruler close to the test pit (but not obscuring it) and make sure that they are visible in each
context photo. Make a record of all the photographs that you take on the rear page of the Test
Pit Record Book.
Please feel free to take as many other photographs as you want
throughout the project, of people digging, of your finds and so on, so
we can build a photographic record of the whole event.
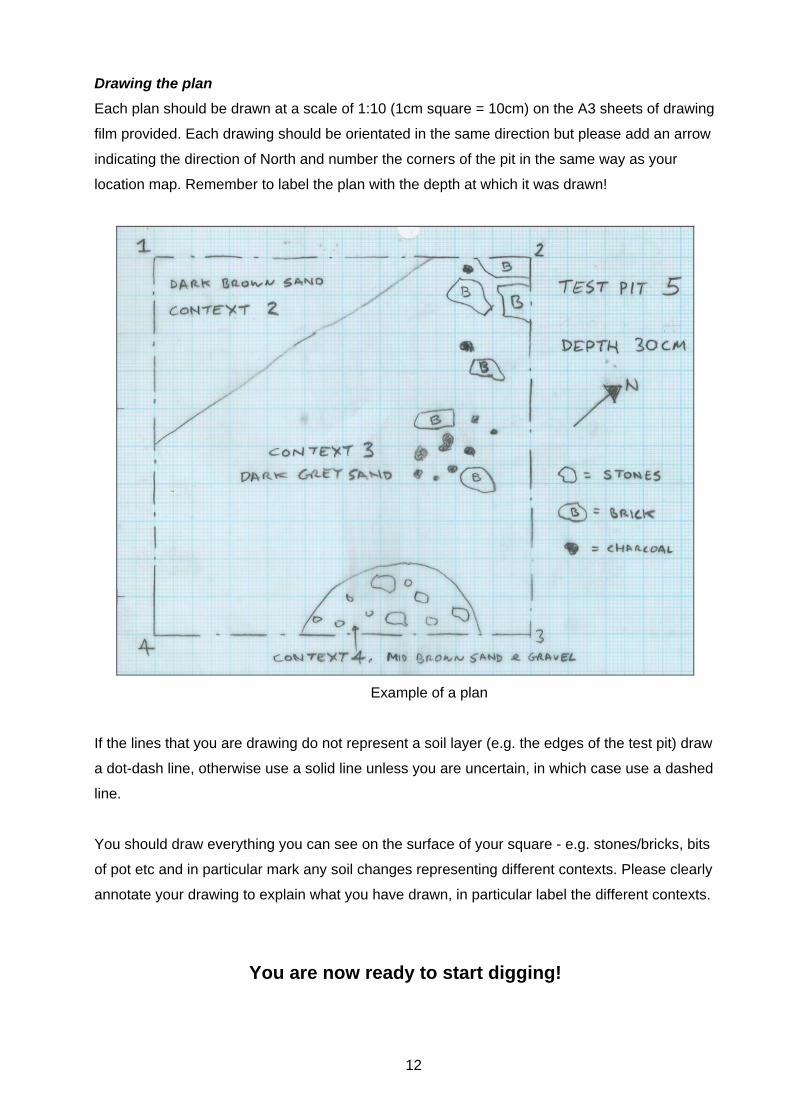
Drawing the plan
Each plan should be drawn at a scale of 1:10 (1cm square = 10cm) on the A3 sheets of drawing
film provided. Each drawing should be orientated in the same direction but please add an arrow
indicating the direction of North and number the corners of the pit in the same way as your
location map. Remember to label the plan with the depth at which it was drawn!
Example of a plan
If the lines that you are drawing do not represent a soil layer (e.g. the edges of the test pit) draw
a dot-dash line, otherwise use a solid line unless you are uncertain, in which case use a dashed
line.
You should draw everything you can see on the surface of your square - e.g. stones/bricks, bits
of pot etc and in particular mark any soil changes representing different contexts. Please clearly
annotate your drawing to explain what you have drawn, in particular label the different contexts.
You are now ready to start digging!
12

Step 5. Dig a 10cm Spit.
Digging
Use the side of your trowel to carefully scrape off the soil, making sure that you keep the bottom
of the test pit as level as possible and ensure that the sides remain vertical. One of the most
important rules as an archaeologist is to be as methodical, neat and tidy as possible as you dig.
Don’t remove any objects such as bricks, stones or finds if they extend down into the next 10cm
Spit, or into the sides of the Test Pit. Keep an eye out for colour changes or concentrations of
particular materials and if you hit anything hard like a wall or a floor surface then stop! The
SCCAS archaeologists will look at what you have found and, hopefully, will be able to explain
what is and help you to record and carry on digging.
Removing the first Context
You may want to cut small roots but, unless you’re planning on removing your nearby tree leave
larger ones in place and clean round them. You may also want to make separate heaps for your
topsoil and any underlying soil layers so that they later go back into the pit as they came out.
Stop digging when you have reached a depth of 10cm. Make sure that you leave the bottom
and sides of the Test Pit as clean as possible, usually by cleaning back into a corner and then
removing the last spoil from a position outside your pit. Don’t climb back into your pit until you
have recorded it and are ready to start digging again!
13

Step 6. Sieving and finds
To ensure you recover as many finds as possible you should try to sieve the spoil as you
remove it, usually by pouring soil into your sieve from a bucket directly over your spoilheap.
However this may not always be practical if your spoil is heavy with clay or if it has been raining.
If sieving is proving difficult and time-consuming it may be more suitable to only sieve a
proportion of the spoil - ask one of the SCCAS archaeologists for advice.
Put all finds from the Spit into an empty seed tray, if they are from different contexts then keep
them separate. Put a label with each group of finds with the following information; Site Code,
Test Pit number, Spit Number and Context Number.
SBN 096
Test Pit 03
Spit 5
Context 7
If you are not sure about something keep it and ask one of the SCCAS archaeologists when
they visit. Be careful not to mix finds from different contexts as they are the main way we can
find out how old each Context is.
Make a note of the finds from each Spit on the relevant context sheets. It is also very important
to note what percentage of the Spit was sieved so that we can compare the finds results from
each Test Pit properly.
Sieving
14

15
Step 7. Finds washing
Fill a bowl with cold water and using a soft nail brush or toothbrush, gently clean any dirt from
your finds (avoid scrubbing the finds as this can damage them) paying particular attention to the
broken edges of the pottery so that the fabric can be examined. Do not wash metal objects or
anything which is particularly fragile. Once washed each find should be put into back into the
relevant finds tray to dry (wash the tray if it is very muddy and make sure that you don't lose the
label or allow contexts to get mixed up). Don’t put your finds in bags yet, particularly not if
they’re wet.
Please bring your cleaned finds to the village hall at lunchtime and/or the end of each day so
that we can see what has been uncovered across the village as we go.
Step 8. Context Recording (post-excavation)
Once the 10cm Spit has been excavated you need to review your Context Record Sheets. Did
the excavation tell you any more about what each context was made of? Was there lots of
charcoal, brick etc that you didn’t see on the surface of the Spit? Have you removed all the
context now, in which case how thick was it?
Step 9. Onto the next Spit
Once you have completed digging your first 10cm Spit and filled in the Context Record Sheets
you can move to the next Spit. Repeat steps 4-8 for each 10cm Spit until you reach a maximum
depth of either 1m or you come down onto the natural undisturbed geology. If you’re lucky you
may be able to stop earlier because you find a solid archaeological feature such as a wall
foundation or floor!
Step 10. Completing the Test Pit
At some point you will hopefully either reach natural undisturbed ground or a solid
archaeological feature. Its also possible that archaeological layers may go deeper than 1m in
which case you will simply have to call a halt. If you don’t have time to finish your pit don’t worry
but make sure you stop and allow an hour or two to backfill it.

Keep the sides and bottom of your test pit clean and ensure that the finished test pit has vertical
sides and a flat base. Record the final depth of the trench on the Final Comments sheet and
give a brief description of its base. Take a final photograph of the completed pit.
Step 11. Photograph and draw the Test Pit sections
The final task is to record the sides of the Test Pit as these are showing a cross-section through
all the archaeological layers, indicating how they have developed over time. Take a photograph
of each of the four sides, from as close to horizontal an angle as possible, using a scale and
number board as before.
A completed pit
Next, on a final sheet of gridded film, draw all four sides of the pit. This should be done in much
the same way as the plans, except you are looking at a vertical not horizontal surface. Place a
tape measure along the edge of the pit and take measurements vertically from it. Draw and
label any changes in the soil and include any finds or inclusions that are sticking out the side. If
the lines that you are drawing do not represent a soil layer (e.g. the edges of the test pit) draw a
dot-dash line, otherwise use a solid line unless you are uncertain in which case use a dashed
line.
Remember to label the corners of the pit, this will tell us which section it is.
16

Example of a section
CONGRATULATIONS.
That’s it, You’ve excavated and recorded your pit!
Step 12. Records Check
Double-check your records to see that everything has been filled in, and ask an SCCAS
archaeologist to check as well.
Please take some time as well to fill in the feedback section as SCCAS would like to know what
you thought of the event and if you have any suggestions for improvements we could make to
future projects.
Once everybody’s happy then its time to backfill the pit.
17

18
Step 13. Backfilling
Carefully shovel the soil back into the test pit, treading it down at regular intervals. Try to put the
soil back in roughly the same order as it came out, so that your topsoil is back at the top. If you
kept a pile of sieved out stones etc you want to put this back in first. When you have replaced all
the soil, replace the turfs that you removed at the beginning so that there are no gaps and that
the edges do not overlap. Take care to leave the site neat and tidy, and to ensure that you get
all the soil back in; if that leaves the turf a little high (less than 5cm), that is OK as it should
settle down slightly in time.
Step 14. Project End
Please bring your finds, record sheets, camera and any borrowed equipment back to the Village
Hall once your pit has been backfilled.
Depending on the time and staff available an SCCAS archaeologist will download a copy of any
pictures from your camera and take your Record Book. They will then help you make an initial
assessment of your finds trays. This may involve immediate discarding of some material, or the
discarding of other pieces such as brick fragments etc after a note has been made of quantity
and/or weight. The SCCAS archaeologist will then help you to quantify what remains, see if
anything can be dated, and enter the details onto a Finds Record Sheet. The finds will then be
bagged up by separate contexts, ready to be taken for analysis in the SCCAS office.
Step 15. Project End Briefing
Hopefully by the afternoon of the last day all Test Pits will have been completed and backfilled,
allowing time for all the completed records and finds collections to be looked at by SCCAS.
With any luck we’ll have found and identified a good range of archaeological finds and deposits,
and we’ll be able to give everybody a short summary of the results.
Step 16. Post-project presentation
SCCAS will take all the site records and finds back to our offices in Bury St Edmunds for
archaeological analysis. A summary report of the results will be produced and a copy will be
lodged with the Suffolk Historic Environment Record so that it is available to both future
archaeological researchers and the general public. A copy of the report will also be emailed to
everybody who took part.
SCCAS will also prepare a short presentation about the event and its results, to be given at a
future meeting of the Project Group.

19
5. Frequently Asked Questions
I’ve never done this before, any hints and tips?
Don’t overdo it. The two or three days of the project should be plenty of time to dig and
record your pit, and process your finds. Find a steady pace that you’re happy with, a careful
and methodical approach is more important than speed.
But also don’t get bogged down in the first Spits, worrying about collecting every last tiny
piece of the finds. As a very general rule allow 45-90 mins per Spit (depending on if the
Project is over 2 or 3 days). This should mean that you can complete a 1m deep test pit by
early/mid afternoon on the last day and will allow time for you to backfill your pit and bringing
your finds, recording booklet and photos to the operations room for initial analysis. If you
finish early as your Test Pit is quite shallow you could always start a new one or go to help
someone else.
Keep your workspace tidy, don’t leave tools lying around for people to trip over. You don’t
want anyone falling in your pit, they might damage your finds…
Teamwork. The test pit will be too small, particularly as you get deeper for more than one
person to dig easily at a time. Take it in turns to do the various jobs of digging, sieving, finds
washing and recording.
Don’t step in your trench when cleaned, or let anyone else do so, until it has been
photographed. Repeatedly having to clean up other peoples footprints will get annoying…
Don’t make too much spoil at once, it easier to see what you’re doing if you keep your pit
clean as you go along.
Get your pit sides as straight and vertical as you can. It makes it easier and better to record
but also means you’ll look professional.
Resist the temptation to burrow down chasing your big find. Leave it in place and lower the
whole trench evenly around it.
Always put your wheelbarrow in the direction you’re going to go before filling it up.
Why do I have to do all this paperwork?
Anyone can dig a hole looking for buried treasure but if we want to learn anything about the past
through excavation we have to thoroughly record all that we do. The importance of any
archaeological find, and the information we can gather from it, is always far greater if we know
exactly where it came from and in what circumstances.

20
It is important to remember that archaeological excavation is destructive, once that Roman
rubbish pit has been excavated that’s it, its gone forever, and so the excavation records we
make are all that is left. In principle it is always preferred to leave archaeological deposits ‘in
situ’ unless they are threatened.
This is why a lot of excavations are now carried out in advance of development, excavation
being the last resort to ‘preserve by record’ those archaeological sites which, while important,
are not important enough to be protected as Scheduled Monuments and preserved intact.
What happens to our finds?
All finds found during the excavation of the test pits will be initially sorted during the event and
then taken by SCCAS to their office In Bury St Edmunds for standard archaeological cleaning,
identification and recording so that a summary report of the entire project can be produced. A
copy of the results will then be lodged with the Suffolk Historic Environment Record, the publicly
available database of information on archaeological sites, monuments and buildings in Suffolk.
Who owns the finds?
All of the finds from a test pit belong to the landowner, regardless of who is doing the digging
and actually finds them, unless any private arrangement has been made.
If desired all finds will be returned to the landowner after the recording work detailed above is
completed. However all owners of the finds will be asked to consider donating or loaning them
to form a part of the complete project archive. The project archive will, by default, be kept by
SCCAS in the County Archaeological Store, where it will be available to the public for further
research. All or part of the archive will however be given to the Project Group if preferred,
perhaps to be used in a permanent local display etc.
What happens if I find something valuable?
All finders of items classed as treasure under the Treasure Act of 1996 have a legal obligation
to report such items to the coroner for the district in which they are found within 14 days.

21
This reporting can be done via the local Portable Antiquities Scheme Finds Liaison Officer
(FLO) for Suffolk, Andrew Brown ([email protected], 01284 741236). A FLO
officer may be present during the weekend but if not the SCCAS staff will be able to assist.
The following finds are classed as Treasure under the Act:
Any metallic object, other than a coin, provided that at least 10 per cent by weight of metal is
precious metal (that is, gold or silver) and that it is at least 300 years old when found. If the
object is of prehistoric date it will be Treasure provided any part of it is precious metal.
Any group of two or more metallic objects of any composition of prehistoric date that come
from the same find (see below).
All coins from the same find provided they are at least 300 years old when found (but if the
coins contain less than 10 per cent of gold or silver there must be at least ten of them).
Only the following groups of coins will normally be regarded as coming from the same find:
Hoards that have been deliberately hidden.
Smaller groups of coins, such as the contents of purses, that may been dropped or lost.
Votive or ritual deposits.
Any object, whatever it is made of, that is found in the same place as, or had previously
been together with, another object that is Treasure.
If whilst digging the test pits you do uncover anything that you think may be treasure please
leave it in the ground and report to a member of the SCCAS team as soon as possible.
Please see http://finds.org.uk/treasure for more details.
If during the digging of my Test Pit I find something really interesting does this
mean my garden will have to be dug up?
No, as long as your garden stays as it is, the underlying archaeology will remain preserved for
many years to come and there will be no need to dig it up. In principle it is always preferred to
leave archaeological deposits ‘in situ’ unless they are threatened by development.
Any archaeological finds or features detected during excavation of the Test Pit will be recorded
on the County Historic Environment Record and so if any development is ever planned in the
future that could cause damage it will be known that your garden is of potential interest.

22
6. Further Information
If you enjoy digging your Test Pit and want to learn more about the history and archaeology of
your area, or take part in more fieldwork there are lots of ways to do so. A brief summary of
useful contacts and websites is given below.
Suffolk
Suffolk County Council Archaeological Service:
http://www.suffolk.gov.uk/libraries-and-culture/culture-and-heritage/archaeology/
Conservation Team: [email protected] 01284741230
Advice about the conservation of Suffolk's historic environment.
Historic Environment Record ([email protected], 01284 741232)
Field Team: [email protected] 01284741250 or 01473 265879
Commercial contracting unit. Occasional opportunities for volunteers or community projects.
Outreach and Education Officer - ([email protected], 01473 265876)
The Suffolk Institute of Archaeology and History: http://www.suffolkinstitute.org.uk/
Local historical society, newsletter, annual journal, field group.
National
National Heritage List for England: http://www.english-heritage.org.uk/professional/protection/process/national-heritage-list-for-england/
English Heritage database of all nationally designated heritage assets including Listed Buildings, Scheduled Monuments, and more
Heritage Gateway: http://www.heritagegateway.org.uk/gateway/
Online database of the UK’s HER’s and other heritage resources.
Portable Antiquities Scheme: http://finds.org.uk Recording of archaeological objects found by members of the public in England and Wales.
Council for British Archaeology: http://new.archaeologyuk.org/
Independent charitable organisation. Regular magazine, training excavation lists.
Young Archaeologist Club: http://www.yac-uk.org/
Junior branch of the CBA.
Institute for Archaeologists: http://www.archaeologists.net/
Professional standards body.
British Archaeological Jobs Resource (BAJR): http://www.bajr.org/
Independent jobs website, discussion forum and general resources


Archaeological Service Field Projects Team
Delivering a full range of archaeological services
Desk-based assessments and advice
Site investigation
Outreach and educational resources
Historic Building Recording
Environmental processing
Finds analysis and photography
Graphics design and illustration
Contact:
Rhodri Gardner
Tel: 01473 265879 Fax: 01473 216864
www.suffolk.gov.uk/business/business-services/archaeological-services


