19
A Basic Overview Cognos Reporting University of Dayton Updated on: 07.16.10
A Basic Overview
Cognos Reporting
University of Dayton
Updated on: 07.16.10
Table of Contents
Accessing Cognos ........................................................................................................ 1
Tab Descriptions .......................................................................................................... 3
Creating a Report View in My Folders ......................................................................... 4
Changing the Properties of a Report View .................................................................. 6
Running a Report .......................................................................................................... 8
Checking a Report’s Status ........................................................................................ 12
Deleting Report Views from My Folders .................................................................... 14
Scheduling a Report to Run Automatically ............................................................... 15
Using the List and Details View ................................................................................. 16
Cognos Reporting: A Basic Overview
Updated on 07.16.10 1
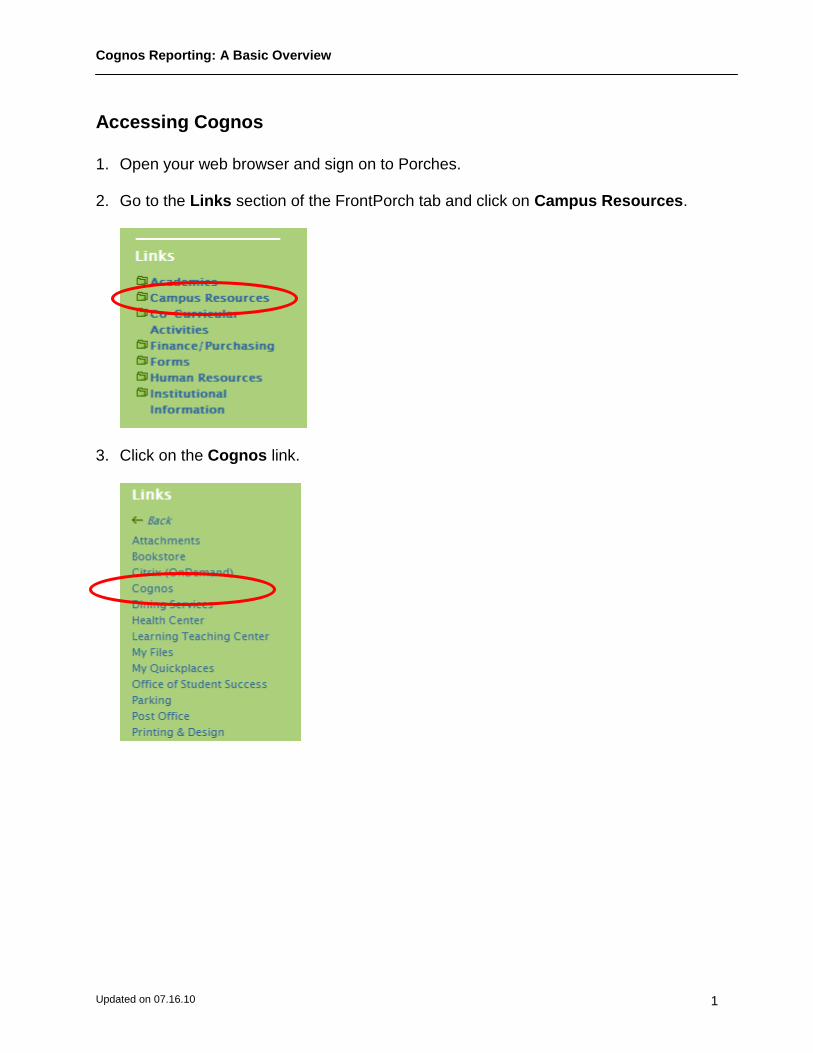
Accessing Cognos
1. Open your web browser and sign on to Porches.
2. Go to the Links section of the FrontPorch tab and click on Campus Resources.
3. Click on the Cognos link.
Cognos Reporting: A Basic Overview
Updated on 07.16.10 2
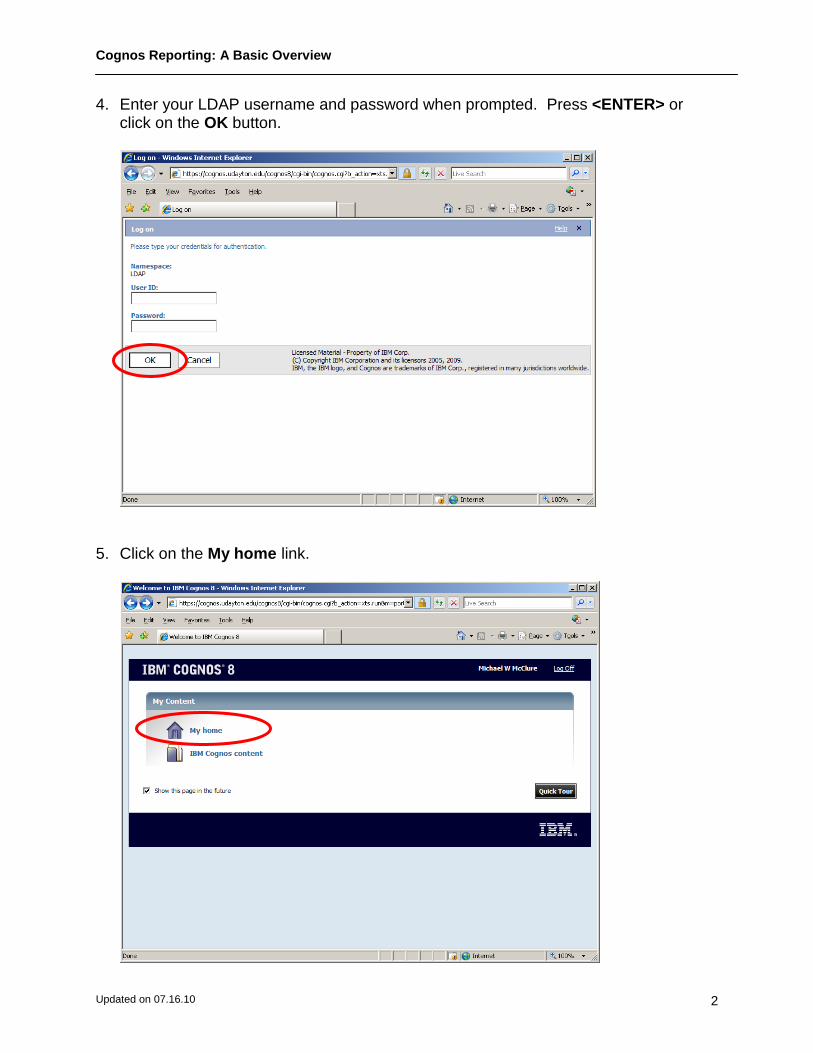
4. Enter your LDAP username and password when prompted. Press <ENTER> or click on the OK button.
5. Click on the My home link.

Cognos Reporting: A Basic Overview
Updated on 07.16.10 3
Tab Descriptions
Public Folders: Displays entries that are shared by most users such as Student
Reports. My Folders: Displays entries that are only accessible to the user logged in to
Cognos Connection (you).
Cognos Reporting: A Basic Overview
Updated on 07.16.10 4
Creating a Report View in My Folders
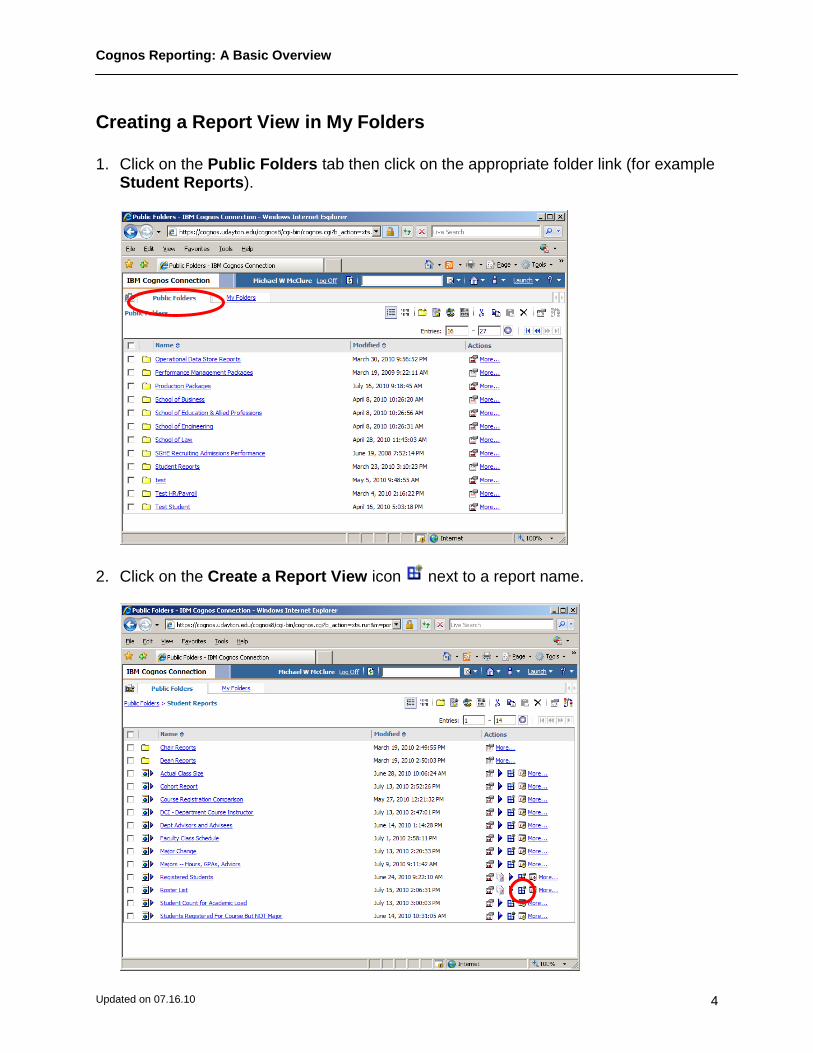
1. Click on the Public Folders tab then click on the appropriate folder link (for example
Student Reports).
2. Click on the Create a Report View icon next to a report name.
Cognos Reporting: A Basic Overview
Updated on 07.16.10 5
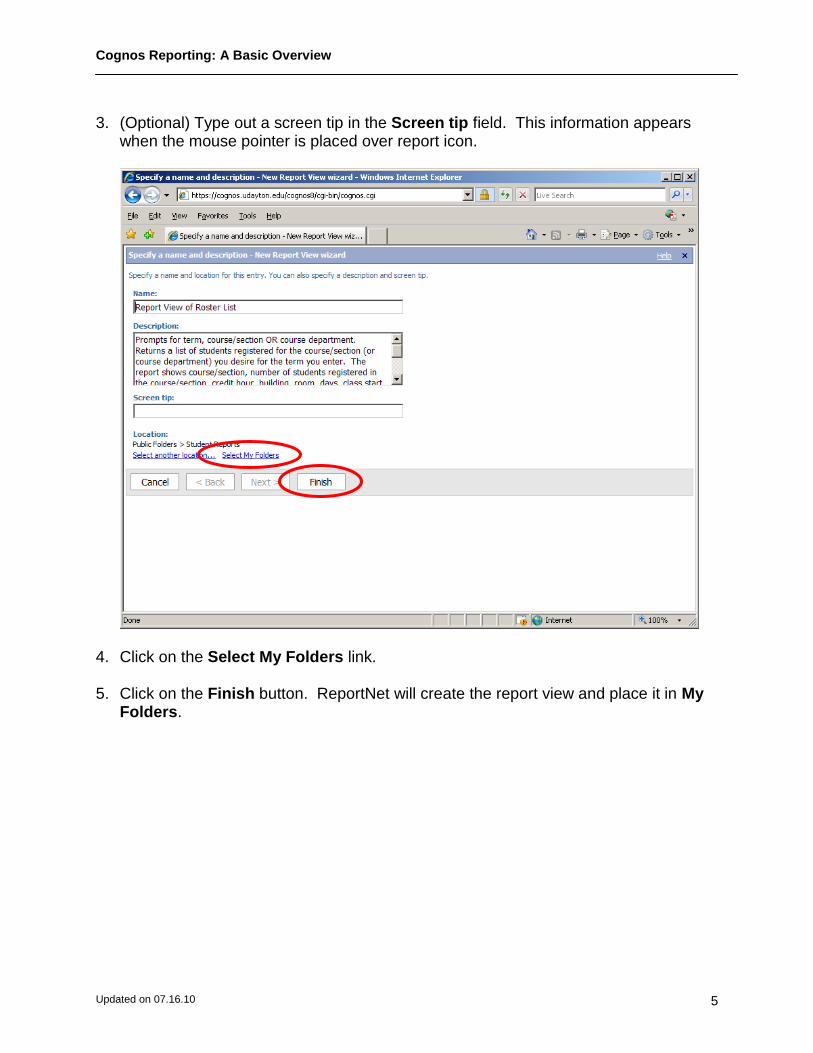
3. (Optional) Type out a screen tip in the Screen tip field. This information appears
when the mouse pointer is placed over report icon.
4. Click on the Select My Folders link. 5. Click on the Finish button. ReportNet will create the report view and place it in My
Folders.
Cognos Reporting: A Basic Overview
Updated on 07.16.10 6
Changing the Properties of a Report View
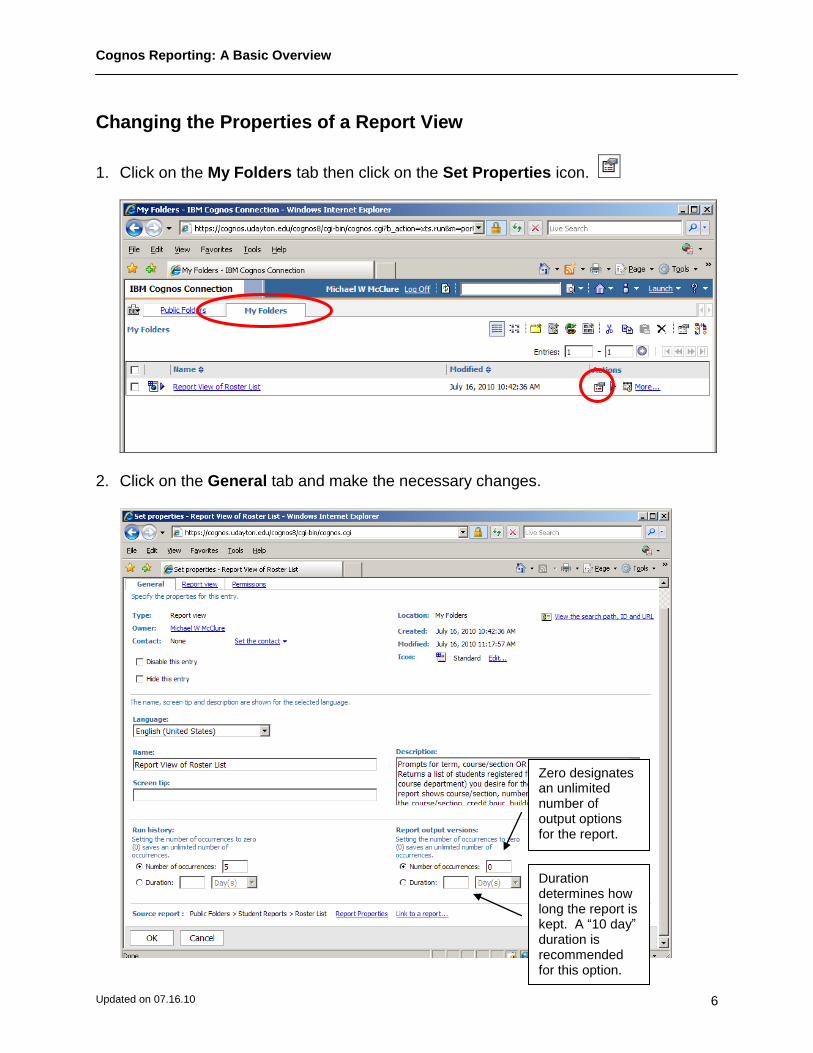
1. Click on the My Folders tab then click on the Set Properties icon.
2. Click on the General tab and make the necessary changes.
Zero designates an unlimited number of output options for the report. Duration determines how long the report is kept. A “10 day” duration is recommended for this option.
Cognos Reporting: A Basic Overview
Updated on 07.16.10 7
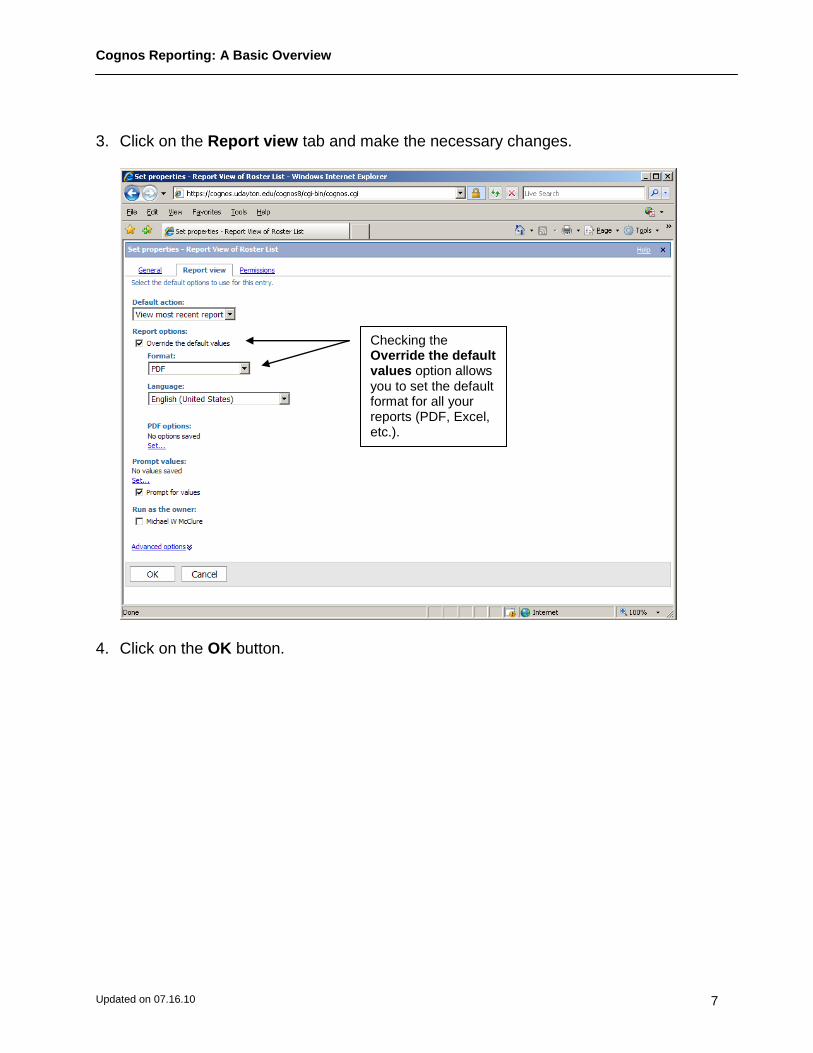
3. Click on the Report view tab and make the necessary changes.
4. Click on the OK button.
Checking the Override the default values option allows you to set the default format for all your reports (PDF, Excel, etc.).
Cognos Reporting: A Basic Overview
Updated on 07.16.10 8
Running a Report
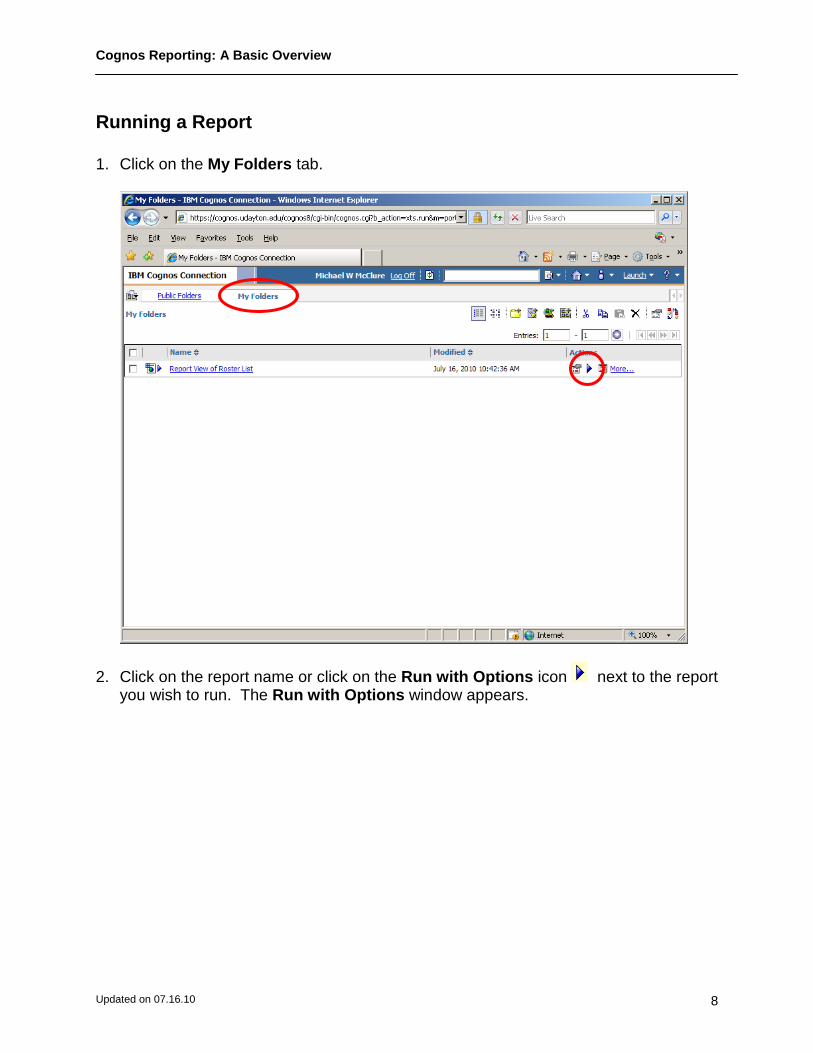
1. Click on the My Folders tab.
2. Click on the report name or click on the Run with Options icon next to the report you wish to run. The Run with Options window appears.
Cognos Reporting: A Basic Overview
Updated on 07.16.10 9
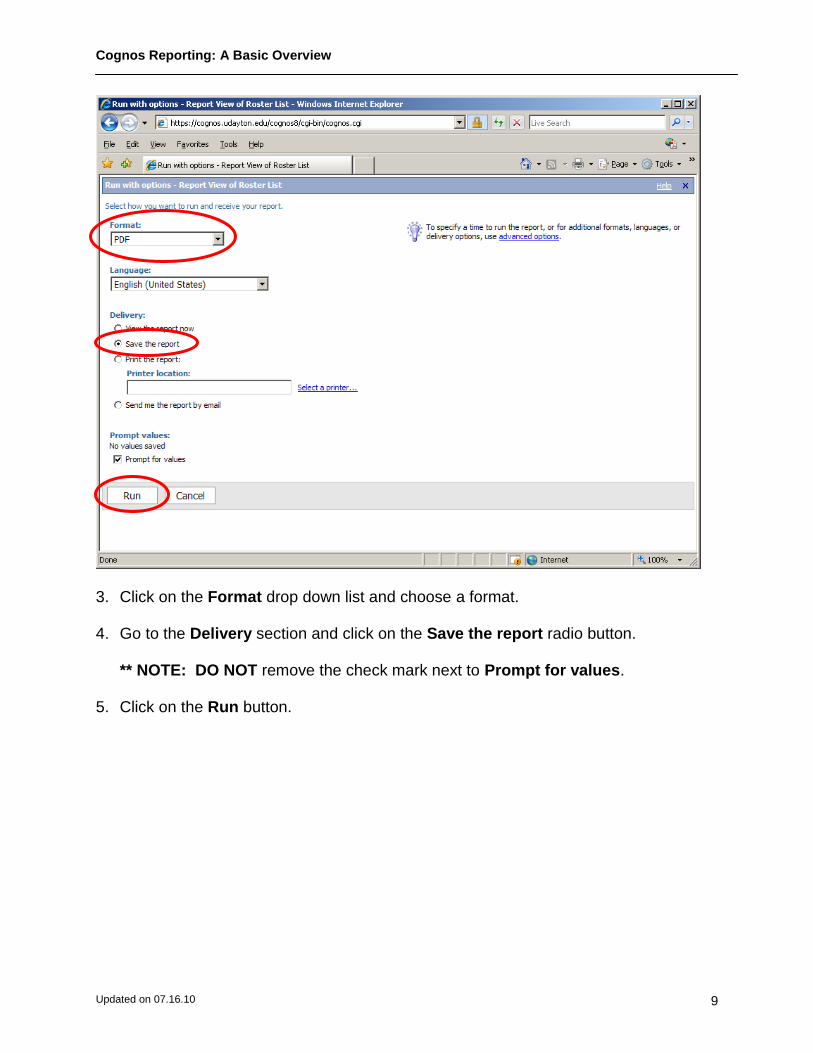
3. Click on the Format drop down list and choose a format. 4. Go to the Delivery section and click on the Save the report radio button.
** NOTE: DO NOT remove the check mark next to Prompt for values. 5. Click on the Run button.
Cognos Reporting: A Basic Overview
Updated on 07.16.10 10
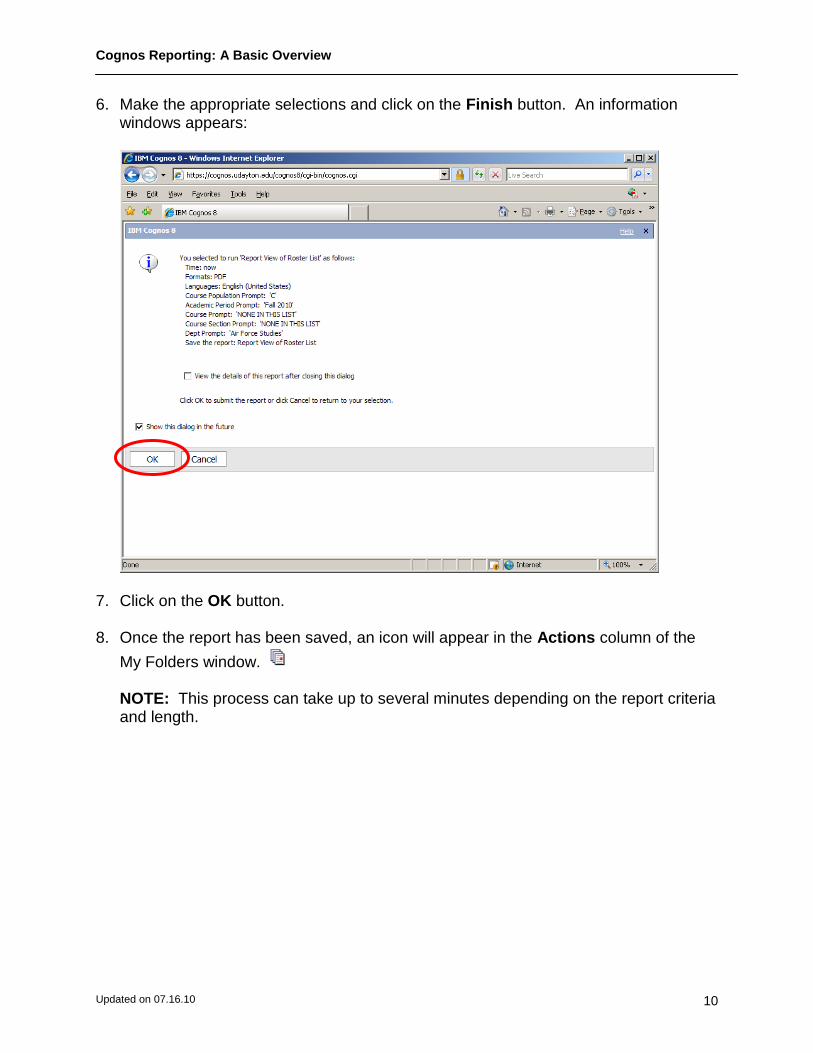
6. Make the appropriate selections and click on the Finish button. An information windows appears:
7. Click on the OK button.
8. Once the report has been saved, an icon will appear in the Actions column of the
My Folders window. NOTE: This process can take up to several minutes depending on the report criteria and length.
Cognos Reporting: A Basic Overview
Updated on 07.16.10 11
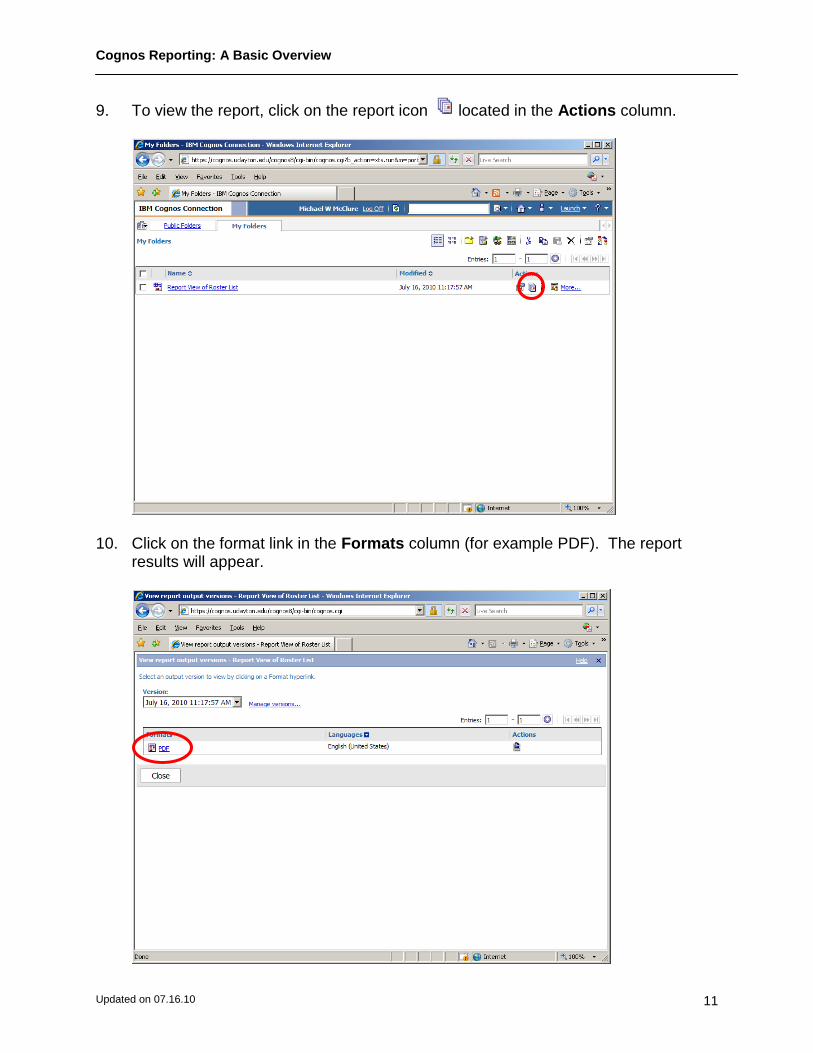
9. To view the report, click on the report icon located in the Actions column.
10. Click on the format link in the Formats column (for example PDF). The report results will appear.
Cognos Reporting: A Basic Overview
Updated on 07.16.10 12
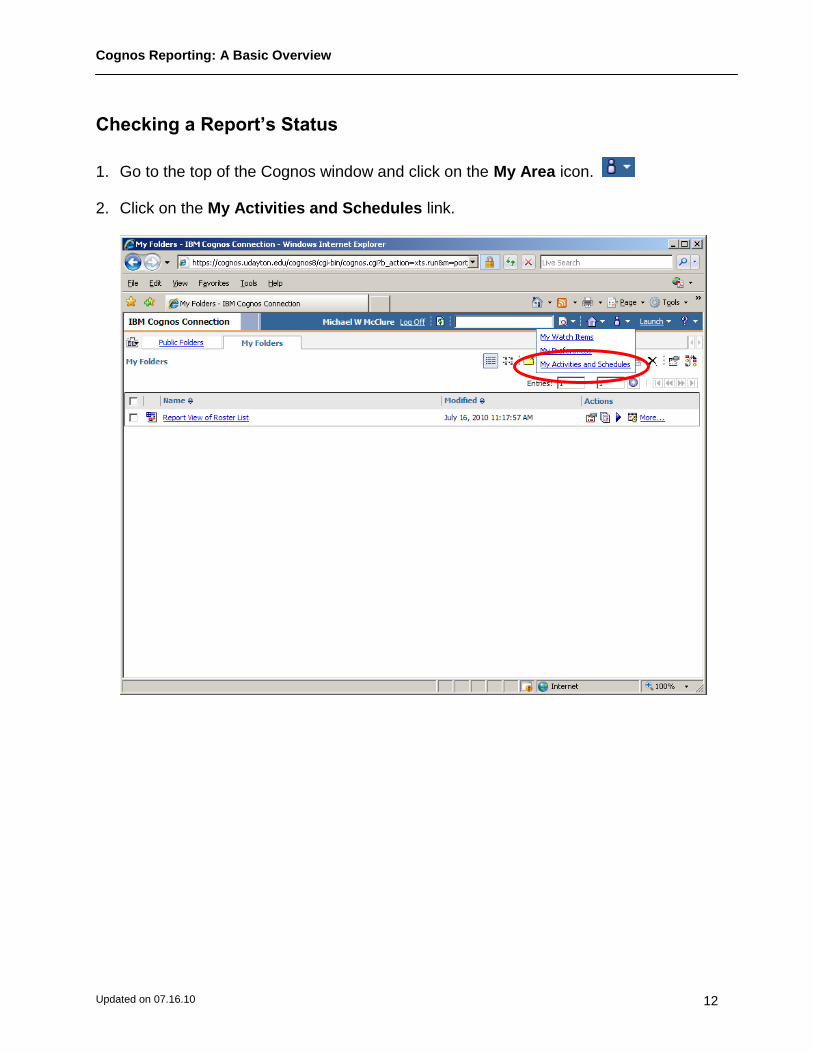
Checking a Report’s Status
1. Go to the top of the Cognos window and click on the My Area icon.
2. Click on the My Activities and Schedules link.
Cognos Reporting: A Basic Overview
Updated on 07.16.10 13
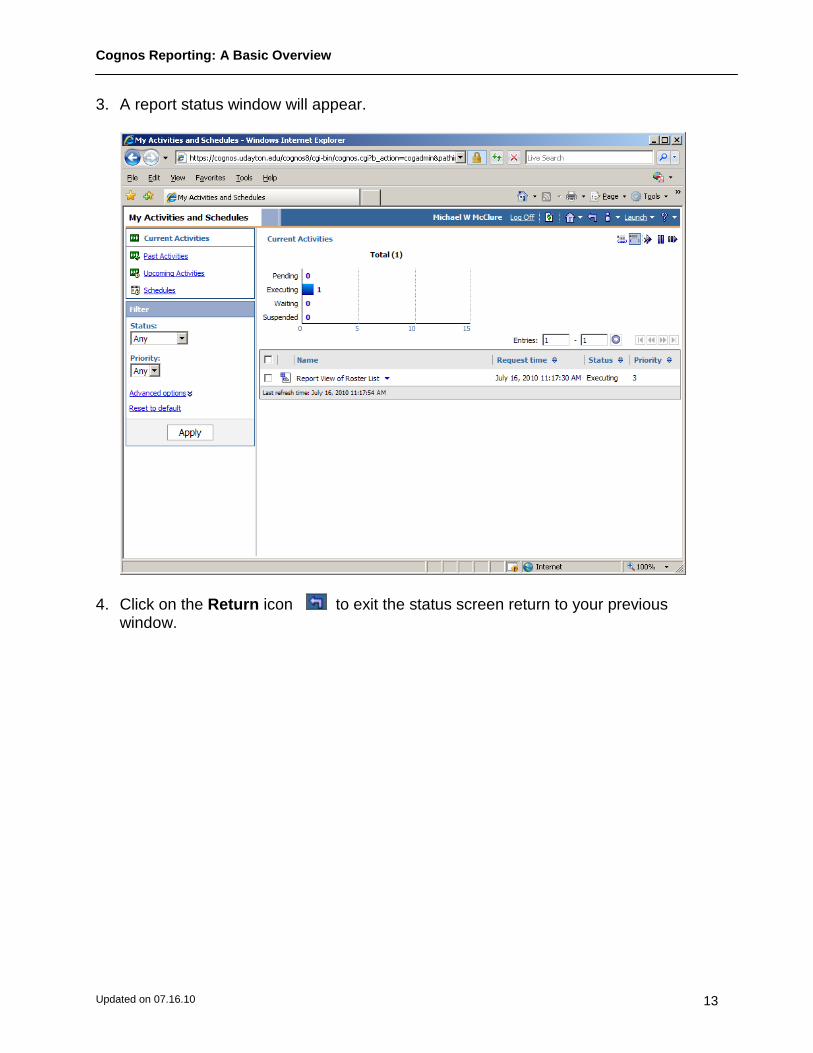
3. A report status window will appear.
4. Click on the Return icon to exit the status screen return to your previous window.
Cognos Reporting: A Basic Overview
Updated on 07.16.10 14
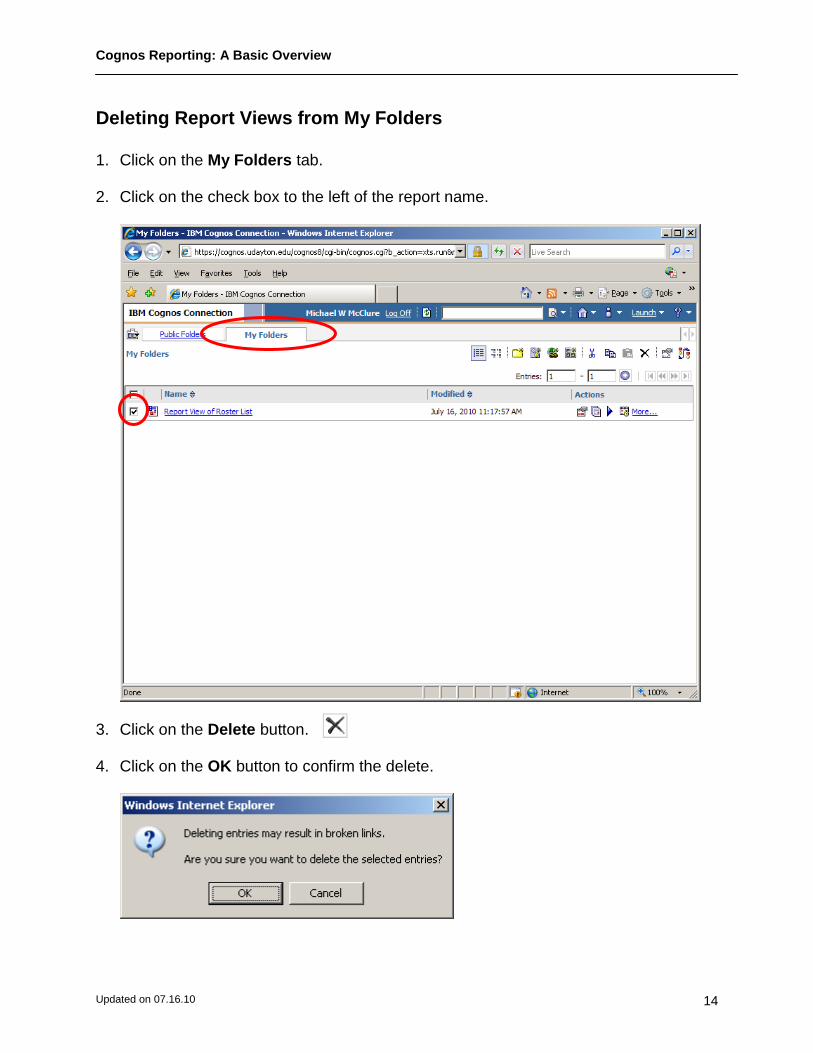
Deleting Report Views from My Folders
1. Click on the My Folders tab.
2. Click on the check box to the left of the report name.
3. Click on the Delete button.
4. Click on the OK button to confirm the delete.
Cognos Reporting: A Basic Overview
Updated on 07.16.10 15
Scheduling a Report to Run Automatically
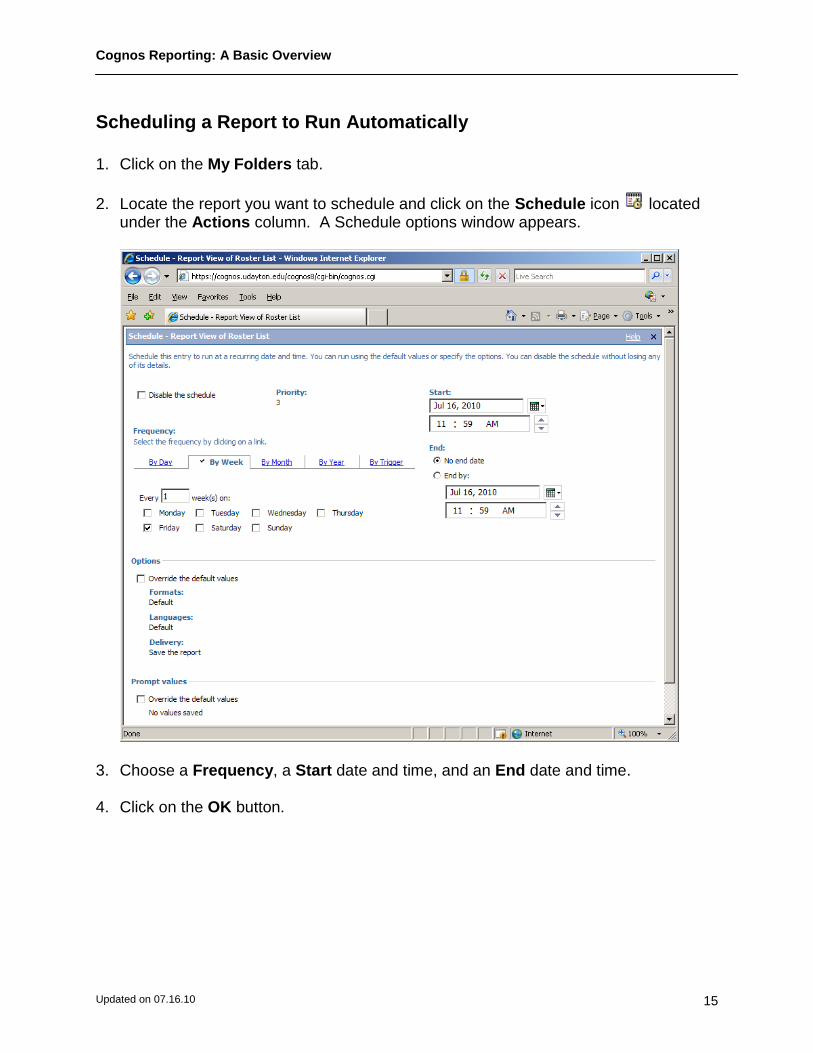
1. Click on the My Folders tab.
2. Locate the report you want to schedule and click on the Schedule icon located under the Actions column. A Schedule options window appears.
3. Choose a Frequency, a Start date and time, and an End date and time.
4. Click on the OK button.
Cognos Reporting: A Basic Overview
Updated on 07.16.10 16
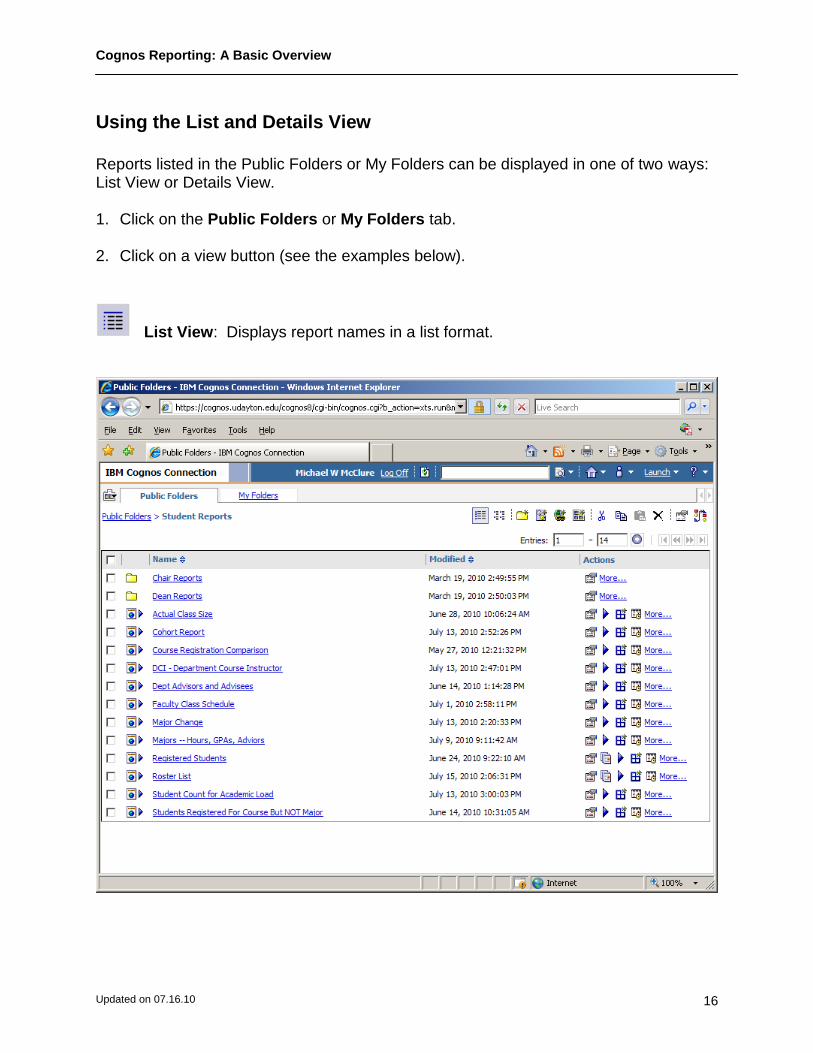
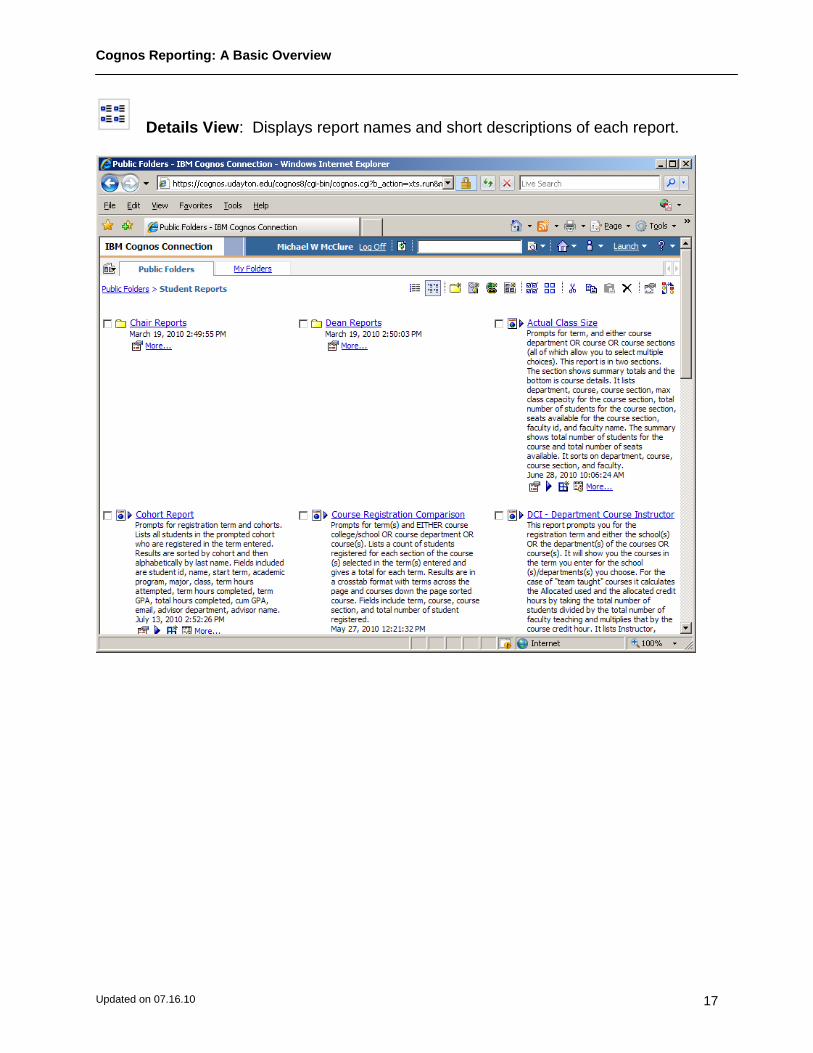
Using the List and Details View
Reports listed in the Public Folders or My Folders can be displayed in one of two ways: List View or Details View. 1. Click on the Public Folders or My Folders tab. 2. Click on a view button (see the examples below).
List View: Displays report names in a list format.
Cognos Reporting: A Basic Overview
Updated on 07.16.10 17
Details View: Displays report names and short descriptions of each report.


