Page | 1 Idaho State University CASHNet iPAD App Step-By-Step Training Guide Login & Navigation Overview This section contains instructions for logging in and out of the app and provides an overview of the app’s primary navigation tools. Login Procedure: Provided your system administrator has configured the app’s database, you need to enter your Operator ID, password, Station, and Client Code to log in to the app. Here is an example: CASHNet Production Login Info: Operator ID: ISU Email username (e.g: Name: Jessica Hill, User Name: hilljess) Password: (It will be provided by the CASHNet System Admin Weston or Waqas) Station: (It will be provided by the CASHNet System Admin Weston or Waqas) Client Code: ISU_PROD
Transcript
Page | 1
Idaho State University CASHNet iPAD App Step-By-Step Training
Guide Login & Navigation Overview
This section contains instructions for logging in and out of the app and provides an overview of the app’s primary navigation tools.
Login Procedure: Provided your system administrator has configured the app’s database, you need to enter your Operator ID, password, Station, and Client Code to log in to the app. Here is an example:
CASHNet Production Login Info: Operator ID: ISU Email username (e.g: Name: Jessica Hill, User Name: hilljess) Password: (It will be provided by the CASHNet System Admin Weston or Waqas) Station: (It will be provided by the CASHNet System Admin Weston or Waqas) Client Code: ISU_PROD
Page | 2
Navigation Tools: There are two main features to navigate through the mobile app: the Home screen and the Menu bar. Note: App features you can see in each of these navigation features may vary depending on your institution’s CASHNet services and your app’s settings.
Home Screen: Upon initial login, the Home screen loads by default, displaying icons that you can tap to access different app features, consisting of Cashiering, eMarket, Transactions, and Settings. Note: Your system administrator may have configured the app to load a different screen upon login. If so, you can use the Menu bar to navigate to Home and different app features.
Menu Bar Navigation: At the bottom of the main feature screens, there is a Menu bar, which enables you navigate to Home or other app features.
Logout Procedure: When you’re not using the app or are away from the device, log out. To log out:
1. Navigate to the Home screen
2. In the upper-right corner, tap Logout.
Page | 3
Cashiering The app’s Cashiering features generally mirror those of the browser version. You can use the app to process transactions as well as create new batches and check out at the end of the day. However, there are a few features that the app does not support, including endorsements, receipt printing, comments, departmental deposits, and refunds.
Batch Selection If you have any existing batches open, when you launch Cashiering, you’ll need to select one or create a new one. If you don’t have any batches open, Cashiering will automatically create a new batch and skip to the Student Selection screen. The next time you return to Cashiering, you’ll be able to select the batch, view its details, and perform any additional batch features. To select an existing batch or start a new one: 1. In the app’s Home screen or Menu bar, tap Cashiering.
2. Either select an existing batch or create a new one: a) To select a batch, tap the arrow at the right end of the batch’s row. b) To create a new batch, tap the Add button.
Customer Selection After you select a batch, the customer selection screen loads. There are a few ways to select a customer. You can (a) enter a full Student ID or Customer ID and directly select the Customer; (b) enter a Name or Email to browse for a Customer; or (c) select a Last Customer.
Page | 4
Item Selection: Once you’ve selected a customer, the Cashiering item selection screen loads, enabling you to select Open and New Charge associated with the customer’s account. Note: The sections below link to Item Selection, which contains detailed instructions for both Cashiering.
In Cashiering, the process for selecting items consist of selecting items, adding and reviewing items, and proceeding to checkout. Through item selection, you can also set your favorite items. Additionally, in Cashiering only, you can add multiple customers to a transaction.
Adding & Reviewing Items When you select an item, the item’s details screen loads, through which you can add the item to the transaction. Prior to adding the item, however, make sure you review and, if applicable, modify the item’s details.
Select the Item Code to add the charges to the cutomer.
Click on the Amount Drop Down Arrow to add charges.
Page | 5
Reviewing & Modifying Item Details
Once you have selected the Drop Down arrow , the Enter Amount field will appear with an arrow at the top of the item’s details.
Adding Items to Shopping Cart Once you’ve reviewed item details, you can add the item to the shopping cart. After adding an item, the app will return you to the Favorites list, enabling you to select additional items.
Once you have selected the Drop Down
To set the item amount: 1. Tap the arrow next to the listed amount.
A drop-down menu appears, enabling you to enter an amount.
2. In the Enter Amount field, enter the amount.
3. Tap Done.
A dropto enter an amount.
To add an item to the shopping cart, in the item’s detail view,
tap the Add Button.
Page | 6
Proceeding to Checkout When you have added and reviewed all of your customer’s items in the transaction, proceed to checkout by tapping
Pay in the upper-right corner.
Note: Prior to checking out, if you want to remove any items from the transaction, tap the item’s trash can icon .
Payment Processing After selecting item in Cashiering, you must process your payment.
Prior to checking out, if you want to remove any items from the transaction, tap the item’s trash can
Pay
Note:
Page | 7
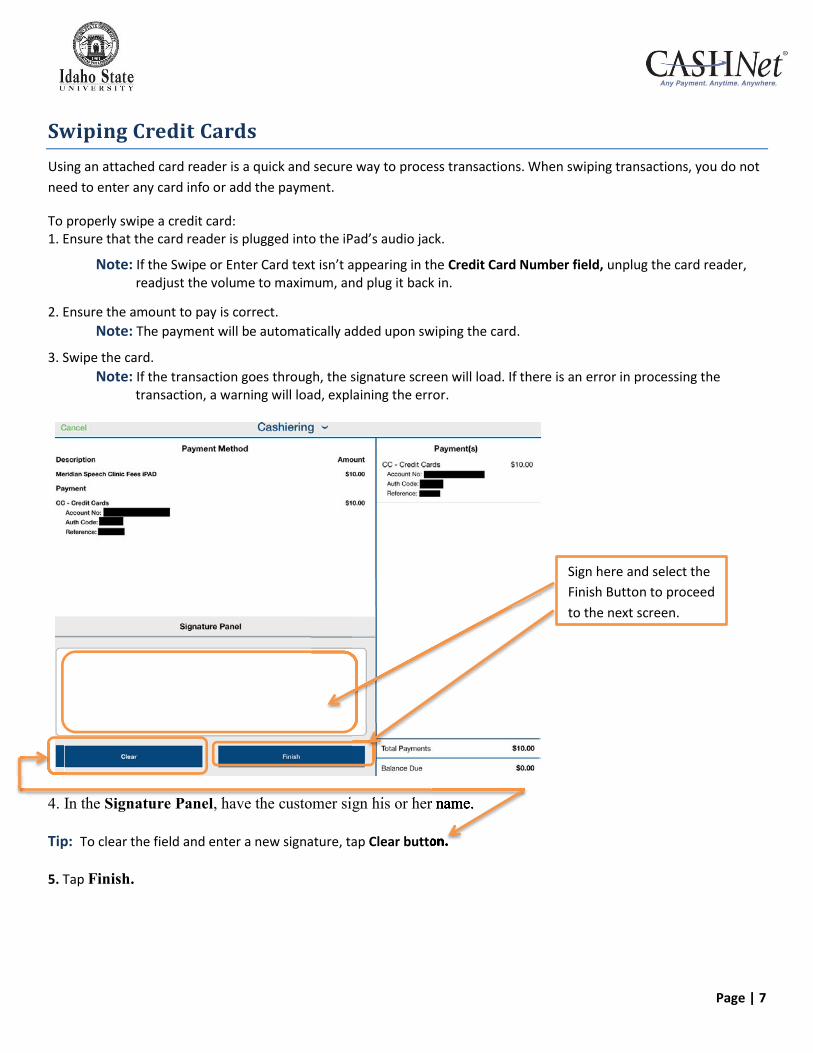
Swiping Credit Cards Using an attached card reader is a quick and secure way to process transactions. When swiping transactions, you do not need to enter any card info or add the payment.
To properly swipe a credit card: 1. Ensure that the card reader is plugged into the iPad’s audio jack.
Note: If the Swipe or Enter Card text isn’t appearing in the Credit Card Number field, unplug the card reader, readjust the volume to maximum, and plug it back in.
2. Ensure the amount to pay is correct. Note: The payment will be automatically added upon swiping the card.
3. Swipe the card. Note: If the transaction goes through, the signature screen will load. If there is an error in processing the transaction, a warning will load, explaining the error.
4. In the Signature Panel, have the customer sign his or her name.
Tip: To clear the field and enter a new signature, tap Clear button.
5. Tap Finish.
Sign here and select the Finish Button to proceed to the next screen.
In the , have the customer sign his or her name. , have the customer sign his or her name.
button.
, have the customer sign his or her name.
Page | 8
Receipts After processing a transaction in Cashiering or accessing transaction details through Transactions—the transaction’s
receipt loads. Using receipts, you can email and close the receipt, view transaction details, and void the transaction.
Emailing Receipts The top of the receipt indicates whether or not to email the receipt to the customer. To change the email address for the receipt, tap the field and enter a new email address.
Depending on your app’s settings and the module you’re using, emailing receipts will be automatically set to either On or Off. You can, however, change the setting for the receipt by using the On-Off switch.
To close the receipt and, if selected, email it, tap Done button.
Tap the field and enter a new email address
In the main receipt pane, the receipt displays transaction details, including customer, transaction, and payment information.
Page | 9
Checking Out a Batch
In addition to processing transactions, you can perform additional, batch-related Cashiering tasks, including checking out a batch. Through the Batch Checkout screen, you can balance your batch payments against the system balance and close out the batch at the end of the day.
To close out a batch: 1. In the left side of the Batches screen, tap a batch Checkout link.
2. The Batch Checkout screen loads.
3. In the upper-right corner, tap Done. The app closes out your batch and returns you to the Batches screen.
1. In the left side of the Batches screen, tap a batch Checkout
Done. The app closes out your batch and returns you to the Batches screen.
Page | 10
Transactions
Transactions is a simplified version of the browser’s Find Transactions and enables you to search for transactions using a
number of search criteria.
Opening a transaction loads the receipt, which enables you to view transaction details, email the receipt, and void or reverse the transaction.
Note: Transactions you can search for and access are determined by your user permissions
Transactions Search
In Transactions, you can use a number of Search fields to locate transactions. These tools and their data entry guidelines are listed in the table below.
Page | 11
Find Transactions Lookup Fields Description
Field Entry Guidelines
Student ID Enter a full Customer ID; you cannot browse by partial Customer ID
Name Enter either part of or a full first name or last name. If entering both a first name and last name, enter them in this format: Last Name, First Name.
Email Enter a full email address.
Alternate ID Not Applicable.
Transaction Number Enter either a full or partial transaction number.
Merchant Code Not Applicable.
Actual Date In the left (“from”) date field, select a start date. In the right (“to”) date field, either select an end date or, if you want to indicate present, leave the field blank.
Transactions Search
Example Search Criteria:
Page | 12
Upon initiating a search, transactions meeting those criteria will load. To access a transaction’s receipt, tap a transaction row.
Printer Installation Setup Instructions To receive installation instructions for the Epson printers, please email [email protected] or call 1-800-231-9182.
Hot-Swap Program Higher One Payments Inc. provides a service to handle hardware issues in an easier and timelier fashion than is normally provided by the manufacturer. An annual hardware hot-swap fee provides the University with support on any hardware problems.
First, we will attempt to troubleshoot the problem over the phone. If we are unable to resolve the problem, Higher One Payments Inc. will overnight a replacement to the University. Only equipment purchased through Higher One Payments Inc. is eligible for the hot-swap program.
Servers With the hosted implementation, additional hardware such as a server is not necessary. With your subscription to CASHNet Cashiering, any PC with a browser can become a workstation since the solution is web-based. For cashiers and other non-student users, the browser must be Internet Explorer. Internet Explorer is necessary for the use of ActiveX Controls, browser plug-ins that allow CASHNet to control peripherals such as receipt printers and check imagers.
Return Policy You may return most new unopened items sold and fulfilled by Higher One Payments Inc. within 30 days of delivery for a full refund. We’ll also pay the return costs if the return is a result of our error. Items should be returned in their original product packaging. For any opened equipment returned within 30 days of delivery there will be 15% restocking fee. No returns are accepted after 30 days of delivery.
IDTECH Shuttle Card Reader
This credit card reader is specifically for use with Higher One's Payments app for iPad. It reads credits cards and keeps the data in an encrypted form until it reaches the CASHNet data center.
Utilizes the iPad headphone jack. Requires iPad 2 or later. This device cannot read student ID cards. This device cannot be used for PIN-based debit transactions.
Requires subscription to the Higher One's Payments app for iPad and to the CardShield module. Please contact your Sales Executive for details.
Price: $50.00 (Hot-swap service not available for this product)
General Information All prices include standard ground shipping. The sales tax must be added for shipments to California. Please specify terms of Net 10.
Payments:
Submit Purchase Orders to Higher One Inc. 80 Swan Way, Suite 200, Oakland, CA 94621 or fax to (510) 769- 9983 Attention Purchasing Department.