17
iFM Website User Guide
iFM Website User Guide
iFM Website User Guide – General System Notes ii
Cincinnati Children’s Hospital
Computer Aided Facilities Management
(CAFM)
iFM Website User Guide
Index Index ………………………………………………………. i Contents ………………………………………………….. ii General System Notes ………………………………….. Section A Infrabrowser / Drawings ………………………………… Section B Space Management …………………………………….. Section C Move Management ……………………………………… Section D ICSR Management ……………………………………….. Section E Key Management ……………………………………….. Section F
If you need help or have any questions please, Contact: Jack Randall
in4mation, a division of GBBN Architects, Inc. 332 East Eighth Street Cincinnati, Ohio 45202 513.241.4414 [email protected]

iFM Website User Guide iii
General System Notes
Section A
Contents
Website Notes …………………………………………... A-1 Definitions ………………………………………………… A-2 Drawing Viewer ………………………………………….. A-3 Internet Explorer Settings ………………………………. A-6 Bulletin Board ……………………………………………. A-8 Request Submittal ………………………………………. A-9 System Login ……………………………………………. A-10 Pull-Down Menus ……………………………………….. A-11 Select Lists ………………………………………………. A-12
Website Notes
iFM Website User Guide – General System Notes A-1
Note to Macintosh Users
Macintosh computer (Mac) users are required to install a program, Virtual PC, which emulates a Windows environment in order to view Cincinnati Children’s drawings via iFM. A Mac can run almost any type of Window Software with Virtual PC installed. This program can also run at the same time as, and along side of, any Mac software. Please note that if a Mac user wants to view data and reports only, then Virtual PC is not required. Virtual PC is only required when viewing drawings. Please contact a member of your in-house Information Services staff to discuss compatibility issues. Please visit the Connectix website for more details: http://www.connectix.com. Open a session of Virtual PC and then follow this guide.
Note to All Users
The web site background software will be upgraded from time to time. Some areas may seem different than what you are familiar with. These types of changes will occur from time to time and enhance the web site. Most web site changes are minimal and should be easy to navigate through. There is contact information located at the bottom of the index page of this manual and throughout the system should you need any assistance with the site.

Definitions
iFM Website User Guide – General System Notes A-2
Module The Facility Management software is comprised of several Modules, each providing a unique set of functional activities. CAFM Web Site A website has been developed to provide easy access to the Facility Management software, known as CAFM (Computer Aided Facility Management). This guide has been developed to provide step-by-step instructions and guidance to navigate and use the CAFM website.
Ellipsis Button An ellipsis button that follows a text box indicates that the value entered already exists as a record in a background table. An ellipsis button ensures that only correct values can be submitted. You may choose from a list of all possible values by clicking on this button. You may also type a value manually. However, if you enter a value that cannot be validated, the submission will fail and a list of values requiring correction will be displayed. Pop-Up Menu/List Pop-Up menus are utilized to provide static information lists from which a selection can be made. Examples include “Departments, Divisions, and Personnel lists.” Text Box A Text Box is a field that can capture free-form text, including characters and numbers. Text boxes can be used for comments or notes.
Drop-Down Button (Pull-Down Menu) Drop-down buttons are used to retrieve values from a pre-established list. A field that uses a drop-down button will not accept free form text. Examples include Priority or Status fields. Link Links are utilized to open a new page, or connect to a different part of the website. Also referred to as “URL Links,” they are characterized by text that highlights and/or underlines when the mouse pointer is hovering over it. Button Buttons provide links that open new pages, or perform actions on the web page. Examples include “Submit” and “Update.” Tab vs. Screen (Page) Tabs are indexed sheets that are used to enter multiple types of information for the same record. Screens refer to the entire browser window that is visible on your monitor. Screens may also be referred to as “pages.” Alert Message The system will provide status messages at various times while processing a request. One example is a pop-up message that appears after submitting a report request.

Drawing Viewer
iFM Website User Guide – General System Notes A-3
AutoDesk Drawing Viewer Download
Step 1: Start Internet Explorer.
Step 2: Browse to the following address:
http:// ifm.asset-fm.com/iFM-chmc/index.cfm
Step 3: Click on the “Help” link.
The system will display the Help Topics. Click the General System Requirements link.
This page contains recommendations for best viewing of the site.
See the next image below for an example of what this page looks like.

Drawing Viewer
iFM Website User Guide – General System Notes A-4
Step 4: Click on the “Download AutoDesk Design Review 2010” link.
This link changes from time to time but it will be in the same position of the page.
It allows the system to view AutoDesk .dwf file formats that contain the facilities drawings for Cincinnati Children’s.
When you do this an image similar to the one below will pop up:
The best thing to do at this point is click on Run to install the download.

Drawing Viewer
iFM Website User Guide – General System Notes A-5
You must have administrative rights or permission to install programs on your machine to do this. Otherwise the Design Review will not install and you will not be able to review drawings.
Warning: This is an ActiveX plug-in for Internet Explorer. It will require you to allow ActiveX plug-ins to run when using this system. Internet Explorer (the web browser) will may be set to not allow this.
If you have any questions or problems installing this download please contact:
in4mation, a division of GBBN 513.241.8700
Ask for one of the following individuals for assistance: Jack Randall Lindsey Weaver
Once you have loaded the drawing viewer you are ready to login and begin using the Cincinnati Children’s Computer Aided Facilities (CAFM) website!
Drawing Viewer
iFM Website User Guide – General System Notes A-6
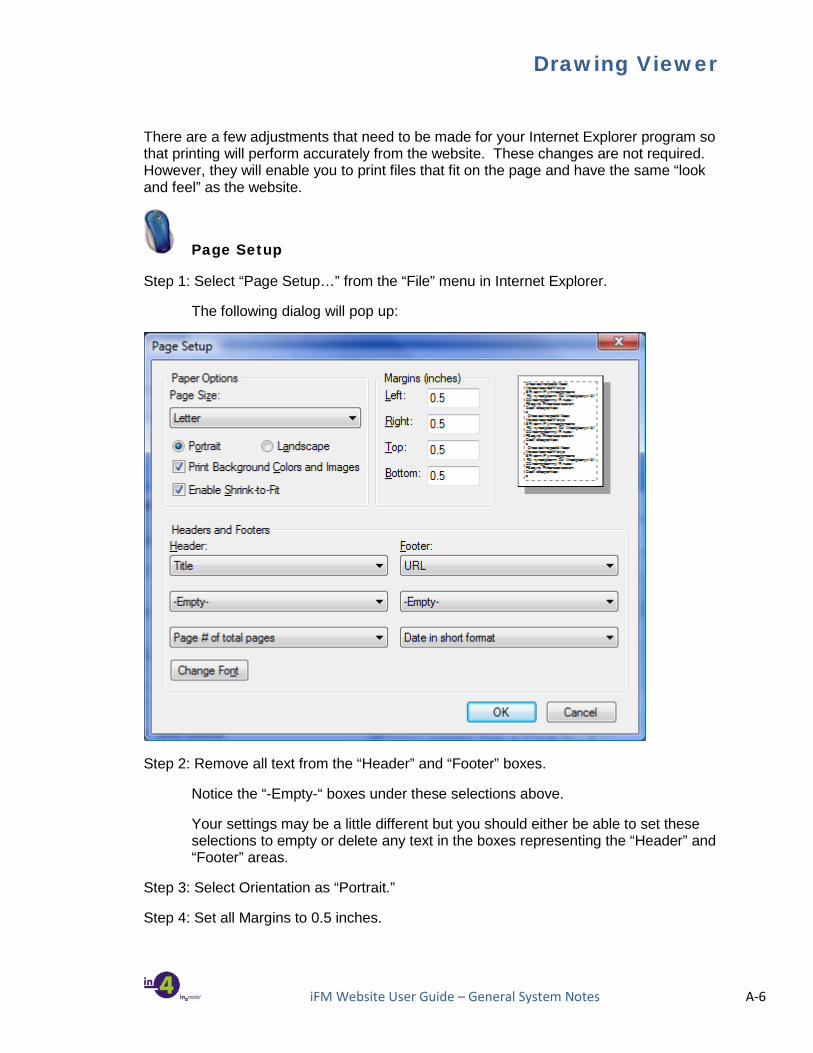
There are a few adjustments that need to be made for your Internet Explorer program so that printing will perform accurately from the website. These changes are not required. However, they will enable you to print files that fit on the page and have the same “look and feel” as the website.
Page Setup
Step 1: Select “Page Setup…” from the “File” menu in Internet Explorer.
The following dialog will pop up:
Step 2: Remove all text from the “Header” and “Footer” boxes.
Notice the “-Empty-“ boxes under these selections above.
Your settings may be a little different but you should either be able to set these selections to empty or delete any text in the boxes representing the “Header” and “Footer” areas.
Step 3: Select Orientation as “Portrait.”
Step 4: Set all Margins to 0.5 inches.

Internet Explorer Settings
iFM Website User Guide – General System Notes A-7
After the “Page Setup” has been modified then the Internet Options may also need to be updated:
Internet Options - Printing
Step 1: Select “Internet Options” from the “Tools” menu.
The “Internet Options” dialog will pop up.
Step 2: Select the “Advanced” tab.
Step 3: Scroll down to the printer settings.
Step 4: Check “Print background colors and images” as seen in the image above.
Step 5: Click the “OK” button to apply and save these settings.
Bulletin Board
iFM Website User Guide – General System Notes A-8
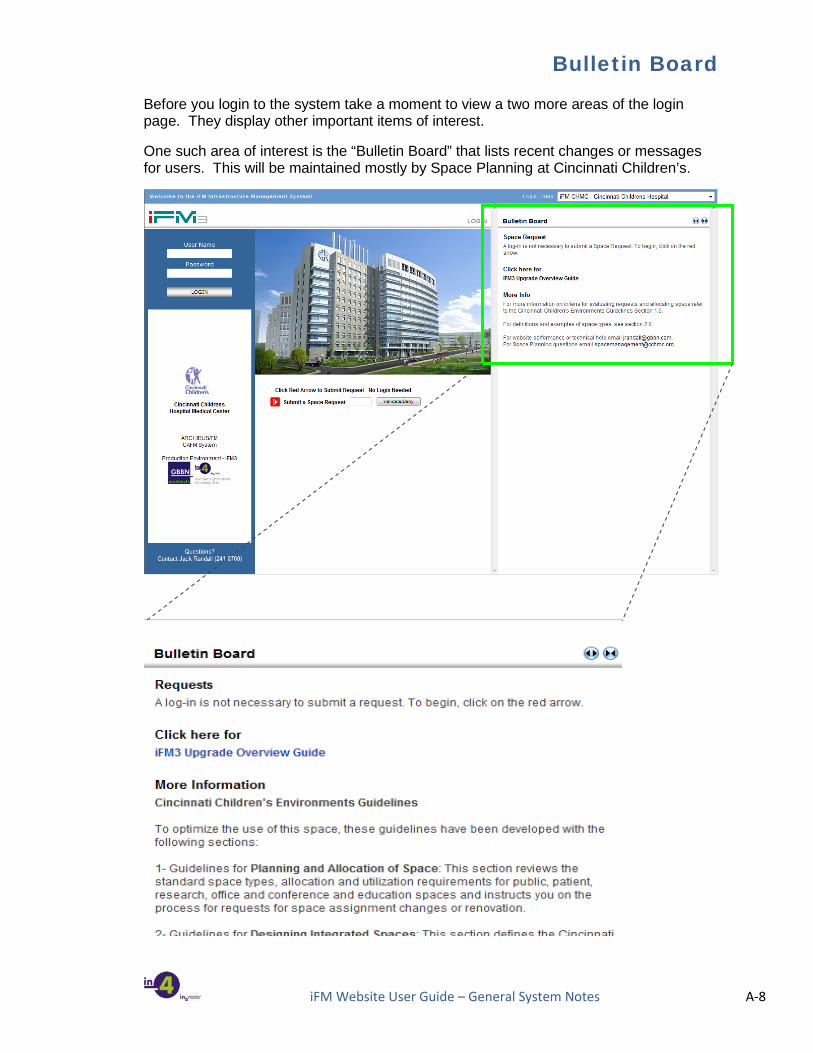
Before you login to the system take a moment to view a two more areas of the login page. They display other important items of interest.
One such area of interest is the “Bulletin Board” that lists recent changes or messages for users. This will be maintained mostly by Space Planning at Cincinnati Children’s.

Bulletin Board
iFM Website User Guide – General System Notes A-9
Another important area on the login page, and perhaps the most important, is the area where requests can be submitted. You do not need to be logged into the system to submit a request.
You can submit the requests as listed above for approval and processing.
More about each of these requests are illustrated in later sections of the system documentation.

System Login
iFM Website User Guide – General System Notes A-10
Access to selected menu items or portions of a report will be based upon the user’s security level. Login authentication will determine the level of secure access. Please contact Space Planning or Jack Randall if you believe that you are an authenticated user and cannot login at this site. You may also be restricted from viewing content that you believe you should have access to. In any case please feel free to use the contact information listed on the Index page of this guide.
Logging into the System Step 1: Enter your assigned username. Step 2: Enter your password. Step 3: Click on the “LOGIN” button.

Pull-Down Menus
iFM Website User Guide – General System Notes A-11
A “Pull-Down Menu is a field that has a short selection for use in the designated field. This can be seen on many form entry pages. The example below can be found on the form for submitting a Space Request. It is for the “Type of Request”.
Pull-Down Menu Functionality Step 1: Click on the down arrow to display the list as above. Step 2: Select the row that is needed for your entry. This will place that entry into the respective field.

Select Lists
iFM Website User Guide – General System Notes A-12
Most select lists have an ellipsis at the end of the field requiring the entry. For example, the Key Request requires a Business Unit field as seen in the image below:
Select List using an Ellipsis
Step 1: Click on the ellipsis to open the select list. The list page will display.
If the list is short enough the system will display the entire list.
Step 2: Click on the row that corresponds to the entry you need. Then the selection list will close and the corresponding field(s) will be filled in with the selection data.

Select Lists
iFM Website User Guide – General System Notes A-13
There are a few select lists that have a button near the field requiring the entry. For example, the Key Request requires a “Person Who will be Using Key” field as seen in the image below:
Select List using a Select Button
Step 1: Click on the button to open the select list. Since there are over 16,000 employees that work for Cincinnati Children’s it would not be efficient for the system to list all the employees. So you must restrict the list as described in Step 2. Step 2: Enter a few letters of the last name in the “Last Name” field.
Alternatively, you may enter the first couple of numbers in the “Employee ID” field as well. Use any one of the fields as seen in the image below to restrict the list:
Step 3: Click in the place highlighted by the green box above or hit the “Enter” key on
your keyboard.

Select Lists
iFM Website User Guide – General System Notes A-14
The restricted selection list will display as seen below, provided you have restricted it to less than 400 records:
Step 4: Click on the row that corresponds to the entry you need. Then the selection list will close and the corresponding field(s) will be filled in with the selection data.


