12
Read Me First Installation Instructions Ingenico iCT250 (PSTN/IP) ©TRANSAX Merchant Services. All rights reserved. TRANSAX is a registered trademark of FIS Payments (UK) Ltd.
TMS, iCT250 PSTN/IP, Read Me First Installation Instructions, 1215 v2
Read Me FirstInstallation Instructions
Ingenico iCT250 (PSTN/IP)
©TRANSAX Merchant Services. All rights reserved. TRANSAX is a registered trademark of FIS Payments (UK) Ltd.
TMS, iCT250 PSTN/IP, Read Me First Installation Instructions, 1215 v2
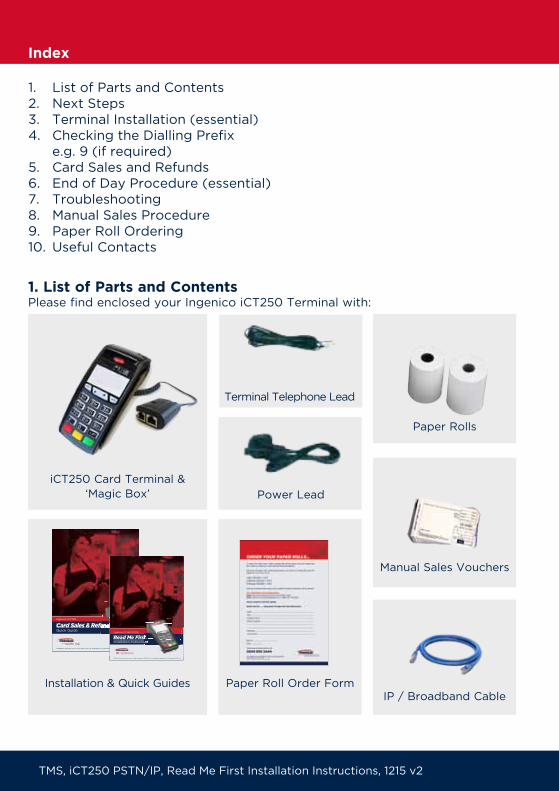
1. List of Parts and Contents Please find enclosed your Ingenico iCT250 Terminal with:
Index
1. List of Parts and Contents2. Next Steps3. Terminal Installation (essential)4. Checking the Dialling Prefix
e.g. 9 (if required)5. Card Sales and Refunds6. End of Day Procedure (essential)7. Troubleshooting8. Manual Sales Procedure9. Paper Roll Ordering10. Useful Contacts
Paper Roll Order Form
iCT250 Card Terminal & ‘Magic Box’
Installation & Quick Guides
TMS, iCT250, Card Sales & Refunds Quick Guide, 1215 v2
Card Sales & RefundQuick Guide
Ingenico iCT220
©TRANSAX Merchant Services. All rights reserved. TRANSAX is a registered trademark of FIS Payments (UK) Ltd.
Card Sales & Refund
TMS, iCT250 PSTN, Read Me First Installation Instructions, 1215 v2
Read Me FirstInstallation Instructions
Ingenico iCT250 (PSTN)
©TRANSAX Merchant Services. All rights reserved. TRANSAX is a registered trademark of FIS Payments (UK) Ltd.
Read Me FirstInstallation Instructions
IP / Broadband Cable
Manual Sales Vouchers
Power Lead
Terminal Telephone Lead
Paper Rolls
TMS, iCT250 PSTN/IP, Read Me First Installation Instructions, 1215 v2
• Terminal Telephone Lead • IP / Broadband Cable • Paper Rolls x2 • Power Lead • Terminal Installation Instructions (this booklet) • Card Sales & Refunds Quick Guide • Paper Roll Order Form • Manual Sales Vouchers • PSTN Line splitter (double adaptor) - not shown • Supervisor Card - not shown
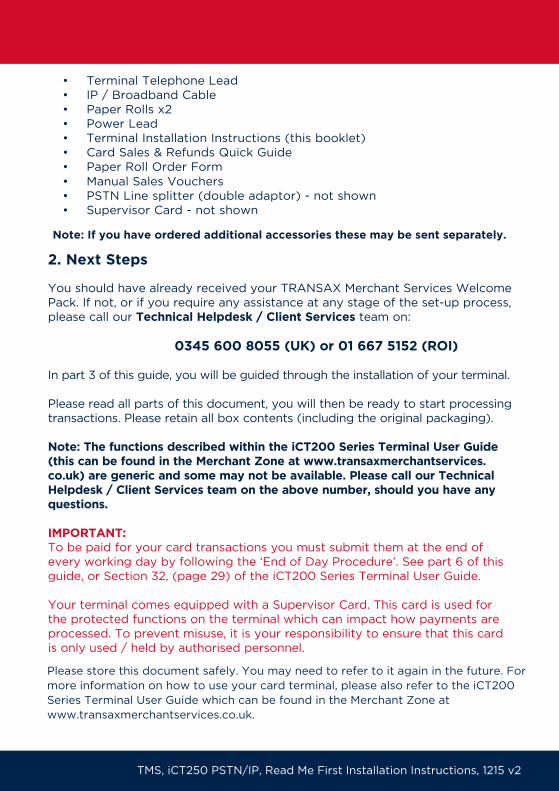
2. Next Steps You should have already received your TRANSAX Merchant Services Welcome Pack. If not, or if you require any assistance at any stage of the set-up process, please call our Technical Helpdesk / Client Services team on:
0345 600 8055 (UK) or 01 667 5152 (ROI)
In part 3 of this guide, you will be guided through the installation of your terminal.
Please read all parts of this document, you will then be ready to start processing transactions. Please retain all box contents (including the original packaging).
Note: The functions described within the iCT200 Series Terminal User Guide (this can be found in the Merchant Zone at www.transaxmerchantservices.co.uk) are generic and some may not be available. Please call our Technical Helpdesk / Client Services team on the above number, should you have any questions.
IMPORTANT: To be paid for your card transactions you must submit them at the end of every working day by following the ‘End of Day Procedure’. See part 6 of this guide, or Section 32, (page 29) of the iCT200 Series Terminal User Guide.
Your terminal comes equipped with a Supervisor Card. This card is used for the protected functions on the terminal which can impact how payments are processed. To prevent misuse, it is your responsibility to ensure that this card is only used / held by authorised personnel.
Note: If you have ordered additional accessories these may be sent separately.
Please store this document safely. You may need to refer to it again in the future. For more information on how to use your card terminal, please also refer to the iCT200 Series Terminal User Guide which can be found in the Merchant Zone at www.transaxmerchantservices.co.uk.
TMS, iCT250 PSTN/IP, Read Me First Installation Instructions, 1215 v2
3. Terminal Installation (essential)
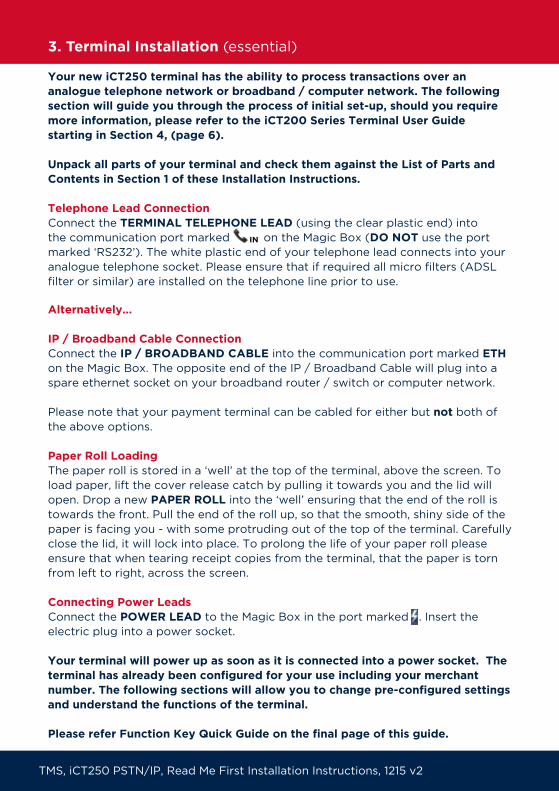
Your new iCT250 terminal has the ability to process transactions over an analogue telephone network or broadband / computer network. The following section will guide you through the process of initial set-up, should you require more information, please refer to the iCT200 Series Terminal User Guide starting in Section 4, (page 6).
Unpack all parts of your terminal and check them against the List of Parts and Contents in Section 1 of these Installation Instructions.
Telephone Lead Connection Connect the TERMINAL TELEPHONE LEAD (using the clear plastic end) into the communication port marked on the Magic Box (DO NOT use the port marked ‘RS232’). The white plastic end of your telephone lead connects into your analogue telephone socket. Please ensure that if required all micro filters (ADSL filter or similar) are installed on the telephone line prior to use.
Alternatively...
IP / Broadband Cable Connection Connect the IP / BROADBAND CABLE into the communication port marked ETH on the Magic Box. The opposite end of the IP / Broadband Cable will plug into a spare ethernet socket on your broadband router / switch or computer network.
Please note that your payment terminal can be cabled for either but not both of the above options. Paper Roll Loading The paper roll is stored in a ‘well’ at the top of the terminal, above the screen. To load paper, lift the cover release catch by pulling it towards you and the lid will open. Drop a new PAPER ROLL into the ‘well’ ensuring that the end of the roll is towards the front. Pull the end of the roll up, so that the smooth, shiny side of the paper is facing you - with some protruding out of the top of the terminal. Carefully close the lid, it will lock into place. To prolong the life of your paper roll please ensure that when tearing receipt copies from the terminal, that the paper is torn from left to right, across the screen.
Connecting Power Leads Connect the POWER LEAD to the Magic Box in the port marked . Insert the electric plug into a power socket.
Your terminal will power up as soon as it is connected into a power socket. The terminal has already been configured for your use including your merchant number. The following sections will allow you to change pre-configured settings and understand the functions of the terminal.
Please refer Function Key Quick Guide on the final page of this guide.
IN
TMS, iCT250 PSTN/IP, Read Me First Installation Instructions, 1215 v2
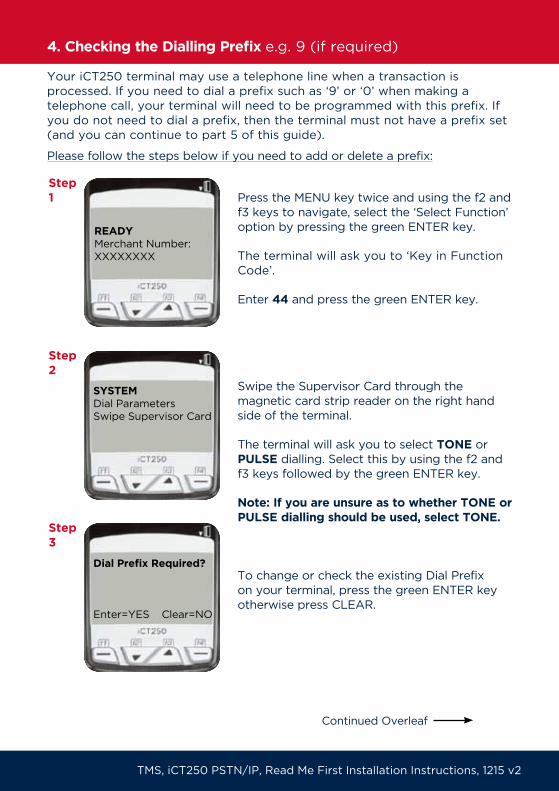
4. Checking the Dialling Prefix e.g. 9 (if required)
Your iCT250 terminal may use a telephone line when a transaction is processed. If you need to dial a prefix such as ‘9’ or ‘0’ when making a telephone call, your terminal will need to be programmed with this prefix. If you do not need to dial a prefix, then the terminal must not have a prefix set (and you can continue to part 5 of this guide).
Please follow the steps below if you need to add or delete a prefix:
Press the MENU key twice and using the f2 and f3 keys to navigate, select the ‘Select Function’ option by pressing the green ENTER key.
The terminal will ask you to ‘Key in Function Code’.
Enter 44 and press the green ENTER key.
Swipe the Supervisor Card through the magnetic card strip reader on the right hand side of the terminal.
The terminal will ask you to select TONE or PULSE dialling. Select this by using the f2 and f3 keys followed by the green ENTER key.
Note: If you are unsure as to whether TONE or PULSE dialling should be used, select TONE.
To change or check the existing Dial Prefix on your terminal, press the green ENTER key otherwise press CLEAR.
Continued Overleaf
Step 1
READYMerchant Number:XXXXXXXX
SYSTEMDial ParametersSwipe Supervisor Card
Step 2
Dial Prefix Required?
Enter=YES Clear=NO
Step 3
TMS, iCT250 PSTN/IP, Read Me First Installation Instructions, 1215 v2
5. Card Sales and Refunds
When your terminal has been installed and successfully configured, you can start to accept and process card payment transactions.
Most credit and debit cards issued in the UK and Ireland will be Chip and PIN (Personal Identification Number) type cards. For security reasons, the cardholder will need to confirm the transaction by typing their PIN into the terminal.
For further information on how to process a Chip and PIN card transaction please refer to Section 7, (page 10) of the iCT200 Series Terminal User Guide.
The iCT200 Series Terminal User Guide also provides information on how to process other types of card transaction.
6. End of Day Procedure (essential)
The End of Day procedure should be done at the end of every working day to ensure that your card transaction data is captured and that you will be paid (’settlement’) for the transactions.
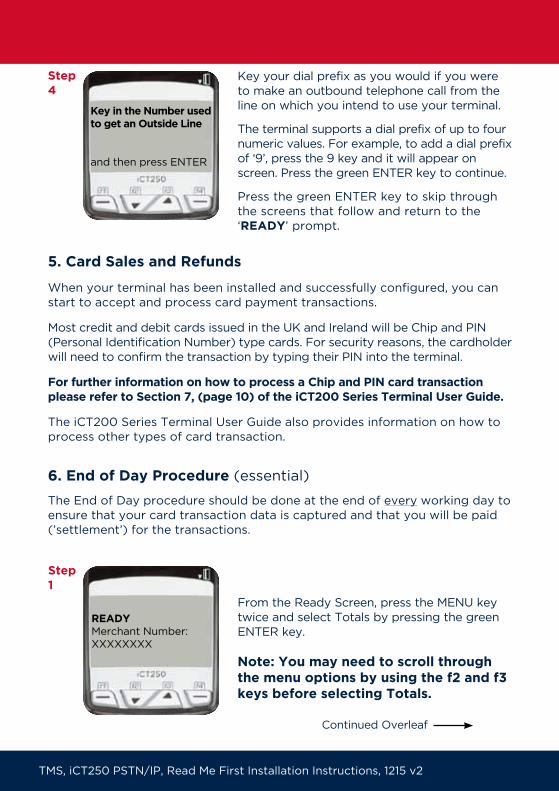
Key your dial prefix as you would if you were to make an outbound telephone call from the line on which you intend to use your terminal.
The terminal supports a dial prefix of up to four numeric values. For example, to add a dial prefix of ‘9’, press the 9 key and it will appear on screen. Press the green ENTER key to continue.
Press the green ENTER key to skip through the screens that follow and return to the ‘READY’ prompt.
From the Ready Screen, press the MENU key twice and select Totals by pressing the green ENTER key.
Note: You may need to scroll through the menu options by using the f2 and f3 keys before selecting Totals.
Continued Overleaf
Key in the Number used to get an Outside Line
and then press ENTER
Step 4
READYMerchant Number:XXXXXXXX
Step 1
TMS, iCT250 PSTN/IP, Read Me First Installation Instructions, 1215 v2
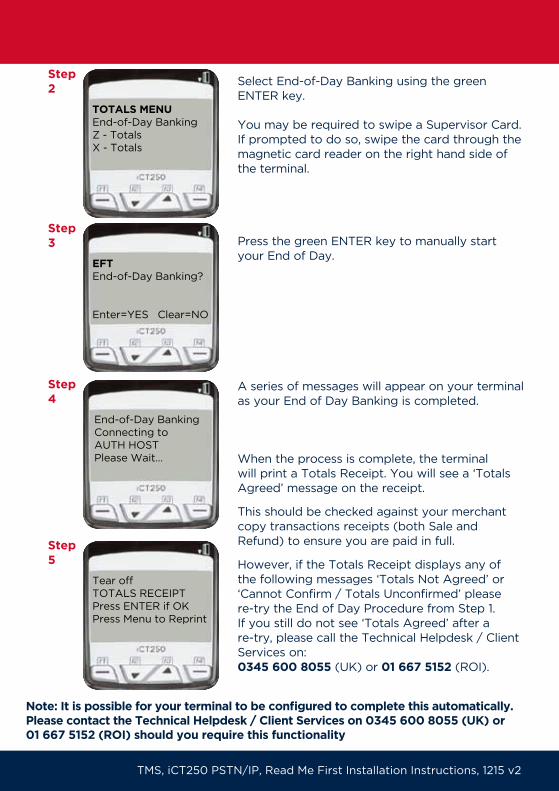
Select End-of-Day Banking using the green ENTER key.
You may be required to swipe a Supervisor Card. If prompted to do so, swipe the card through the magnetic card reader on the right hand side of the terminal.
Press the green ENTER key to manually start your End of Day.
A series of messages will appear on your terminal as your End of Day Banking is completed.
When the process is complete, the terminal will print a Totals Receipt. You will see a ‘Totals Agreed’ message on the receipt.
This should be checked against your merchant copy transactions receipts (both Sale and Refund) to ensure you are paid in full.
However, if the Totals Receipt displays any of the following messages ‘Totals Not Agreed’ or ‘Cannot Confirm / Totals Unconfirmed’ please re-try the End of Day Procedure from Step 1. If you still do not see ‘Totals Agreed’ after a re-try, please call the Technical Helpdesk / Client Services on: 0345 600 8055 (UK) or 01 667 5152 (ROI).
TOTALS MENUEnd-of-Day BankingZ - Totals X - Totals
Step 2
EFTEnd-of-Day Banking?
Enter=YES Clear=NO
Step 3
End-of-Day BankingConnecting toAUTH HOSTPlease Wait...
Step 4
Tear offTOTALS RECEIPT Press ENTER if OKPress Menu to Reprint
Step 5
Note: It is possible for your terminal to be configured to complete this automatically. Please contact the Technical Helpdesk / Client Services on 0345 600 8055 (UK) or 01 667 5152 (ROI) should you require this functionality
TMS, iCT250 PSTN/IP, Read Me First Installation Instructions, 1215 v2
7. Troubleshooting
Communication Errors - PSTN The most common errors are due to loss or prevention of communications; your terminal may alert you to such issues on screen.
Should your terminal be communicating over an analogue telephone network, prevention or loss of communications may occur when the telephone line is unavailable. The cause can be one of many reasons, consider the following:
1. Ensure the telephone lead is securely attached to the ‘Magic Box’ of the terminal using the connection port marked (and not the port marked ‘RS232’) and into an analogue telephone wall socket. Also check that the cable is not damaged.
2. Ensure your telephone line is working correctly. Plug an analogue telephone handset into the same telephone wall socket and listen for a dial tone. No dial tone or background noise on the line may prevent the terminal from working, contact your telecoms provider.
3. If you are using a double adaptor (or ‘splitter’) unplug it from the telephone wall socket and put the terminal’s telephone lead directly into the socket.
4. Any other devices using the telephone line such as a telephone or fax machine may also prevent the machine from dialling out if used at the same time.
5. If you receive a broadband connection into the building all telephone sockets should be equipped with an ADSL microfilter or similar. The line on which the terminal is installed will need this microfilter to operate effectively.
6. When making an external telephone call, do you need to dial a prefix (e.g. ‘9’) for an outside line? If so refer to section 4 of this guide.
7. Have any changes recently been made to the telephone system? e.g. the addition of broadband. If yes contact your telecoms / broadband provider.
8. Should you receive a ‘Totals Not Agreed’ message when completing your ‘End of Day’ procedure (either manually or automatically) please retry a manual End of Day procedure (see section 6 of this guide) before calling the Technical Helpdesk / Client Services.
9. Please note that Function Codes should only be used when instructed to do so by your terminal documentation or the Technical Helpdesk / Client Services. Use of Function Codes outside of these scenarios may damage your terminal and prevent future transactions taking place.
Should you require any further assistance please contact the Technical Helpdesk / Client Services on 0345 600 8055 (UK) or 01 667 5152 (ROI).
IN

TMS, iCT250 PSTN/IP, Read Me First Installation Instructions, 1215 v2
Communication Errors - IP / Broadband The most common errors are due to loss or prevention of communications; these are typically caused by either an issue when first installing the terminal or issues with / outages on your network connection. Consider the following:
1. Ensure the IP / Broadband cable is securely attached into the correct port (marked ETH) on the MAGIC BOX and into the correct port of your router or network. Also check that the cable is not damaged.
2. Ensure your network is working correctly. Can you access the Internet via a PC or laptop using the same network? Do other IP devices work? If not, please contact your network provider.
3. Have any changes recently been made to the network? e.g. firewall changes or security enhancements?
Should you require any further assistance please contact the Technical Helpdesk / Client Services on 0345 600 8055 (UK) or 01 667 5152 (ROI).
TMS, iCT250 PSTN/IP, Read Me First Installation Instructions, 1215 v2
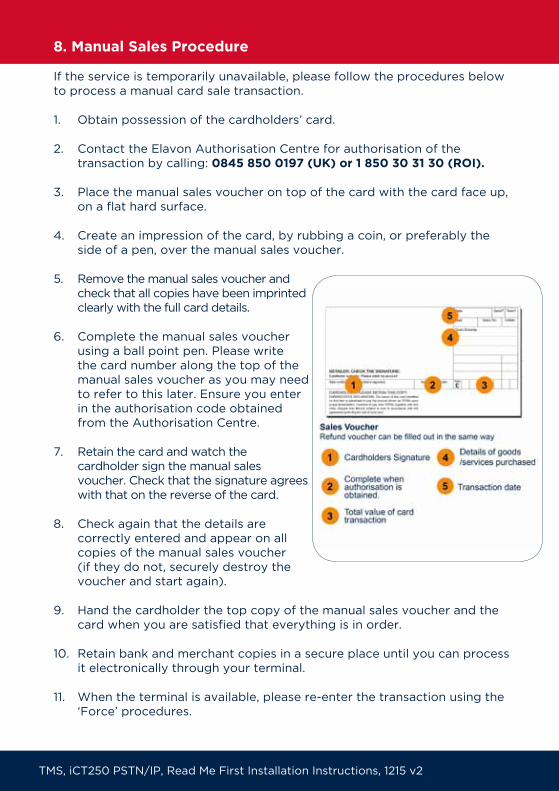
8. Manual Sales Procedure
If the service is temporarily unavailable, please follow the procedures below to process a manual card sale transaction.
1. Obtain possession of the cardholders’ card.
2. Contact the Elavon Authorisation Centre for authorisation of the transaction by calling: 0845 850 0197 (UK) or 1 850 30 31 30 (ROI).
3. Place the manual sales voucher on top of the card with the card face up, on a flat hard surface.
4. Create an impression of the card, by rubbing a coin, or preferably the side of a pen, over the manual sales voucher.
5. Remove the manual sales voucher and check that all copies have been imprinted clearly with the full card details.
6. Complete the manual sales voucher using a ball point pen. Please write the card number along the top of the manual sales voucher as you may need to refer to this later. Ensure you enter in the authorisation code obtained from the Authorisation Centre.
7. Retain the card and watch the cardholder sign the manual sales voucher. Check that the signature agrees with that on the reverse of the card.
8. Check again that the details are correctly entered and appear on all copies of the manual sales voucher (if they do not, securely destroy the voucher and start again).
9. Hand the cardholder the top copy of the manual sales voucher and the card when you are satisfied that everything is in order.
10. Retain bank and merchant copies in a secure place until you can process it electronically through your terminal.
11. When the terminal is available, please re-enter the transaction using the ‘Force’ procedures.
TMS, iCT250 PSTN/IP, Read Me First Installation Instructions, 1215 v2
9. Paper Roll Ordering
Ordering more paper rolls Your iCT250 terminal is supplied with 2 paper rolls. The terminal does not require a cartridge or ink. We strongly advise that you place your order for additional paper rolls well in advance.
For your convenience, we have enclosed spare copies of the paper roll order form. Please complete in block capitals and fax back to the number provided at the foot of the form, or email your request to [email protected]. Please include your merchant number and the quantity of paper rolls you would like to order. You can also order your paper rolls online at www.transaxmerchantservices.co.uk in the ‘Merchant Zone’. Each box contains 20 high quality paper rolls and the price quoted includes delivery (dispatched to you within 5 working days).
To prolong the life of your paper roll please ensure that when tearing receipt copies from the terminal, that the paper is torn from left to right, across the screen.
10. Useful Contacts
TRANSAX Merchant Services
Technical Helpdesk (for terminal queries) 0345 600 8055 (UK)
Client Services (for general enquiries) 0345 602 2444 (UK)
Irish customers: Client Services (all enquiries) 01 667 5152 (ROI)
Email: [email protected]
TRANSAX Cheque Warranty
Cheque Operator Service 0800 110 999 (UK)
Irish customers: Cheque Operator Service 1 800 409 409 (ROI)
Elavon
Manual Authorisations: 0845 850 0197 (UK) or 1 850 30 31 30 (ROI)
Merchant Services (transaction queries) 0845 850 0195 (UK) or 1 850 20 21 20 (ROI)

TMS, iCT250 PSTN/IP, Read Me First Installation Instructions, 1215 v2TRANSAX Merchant Services is a trading name of FIS Payments (UK) Ltd and FIS Payments (Ireland) Ltd. Telephone: 0345 602 2444 (UK). Calls charged at no more than national rate). 01 667 5152 (Rep. of Ireland). Calls to and from the company may be recorded. Part of FIS (Fidelity National Information Services Inc.) Services are covered by the Financial Ombudsman Service (in the UK).
PO Box 885
Birmingham B16 9DH
United Kingdom
T 0345 601 4486
W transaxmerchantservices.co.uk
Carmichael House
60 Lower Baggot
Street
Dublin 2
Ireland
T 01 667 5152
Function Keys Quick Guide
F1 - F4 Keys: Function keys which enable scrolling up and down menus
Menus Key: To enter the application menus press the MENU key from the READY prompt. Pressing the key again moves to the next menu (if available)
Correction Keys: When entering numbers or letters, the yellow CLEAR key deletes one character at a time, whilst the red CANCEL key deletes the entire line (this key also cancels transactions),
Confirmation Key: The green ENTER key is used to confirm anything that has been typed into the card terminal.
Paper Feed Key: To test the feeding of the paper through the printer, press and hold the CLEAR key.

![Ingenico ICT250 Download Instructions - IPinfo.vantiv.com/rs/048-BUR-972/images/Vantiv ICT250 Download IP v3.pdfStep 19 Press the [YELLOW] key to clear the Application Name Enter the](https://static.documents.pub/doc/80x56/5f7e91a80c39d27c0b6566bc/ingenico-ict250-download-instructions-ict250-download-ip-v3pdf-step-19-press.jpg)


