Installation Instructions Jeep Wrangler 4 Door Unlimited (JK) Soft Top For Model Years 2007-2015 Please read instructions thoroughly before starting installation **Remove all contents of the Softopper carefully to protect from scratches.** Windows scratch easily! Keep protective layer placed between them when they are stacked. Estimated Installation Time: 1-2 hours Beginning Note: It is best to do the initial installation in warmer temperatures (70+ degrees F). The fabric of the top is at its tightest when it is new. Installing it in warmer temperatures initially will ensure that the fabric is easier to work with. The fabric of the top will relax slightly with time and become easier to put on. 1-800-810-7227 www.softopper.com Page 1 1 - 8 0 0 - 8 1 0 - 7 2 2 7
Transcript
Installation Instructions Jeep Wrangler 4 Door Unlimited (JK) Soft Top
For Model Years 2007-2015
Please read instructions thoroughly before starting installation
**Remove all contents of the Softopper carefully to protect from scratches.**Windows scratch easily! Keep protective layer placed between them when they are stacked.
Estimated Installation Time: 1-2 hours
Beginning Note: It is best to do the initial installation in warmer temperatures (70+ degrees F). The fabric of the top is at its tightest when it is new. Installing it in warmer temperatures initially will ensure that the fabric is easier to work with. The fabric of the top will relax slightly with time and become easier to put on.
**Safety Notes** Please read the following before driving with the Softopper installed:
1. Never operate the vehicle with this Windshield Header Assembly in the forward position, with or without the Soft Top Canopy attached, unless it is secured down properly with both Turn Knob Latches. Even at slow speeds wind can raise the Windshield Header Assembly and force it quickly rearward in a manner that may cause damage to the Windshield Header Assembly and severe injury to rear-seat occupants.
2. This product is designed to shield the occupants from ordinary weather conditions.3. DO NOT rely in any way on the soft top to contain occupants within the vehicle, or to protect
against injury or death in the event of an accident or a roll-over.4. This top will not protect the occupants from falling or flying objects Never operate vehicle in
excess of manufacturer’s recommendations or specifications.
Table of Contents1. Softopper kit inventory list and pictures……..32. Tools needed to complete installation……….43. Hard Top Removal Instructions………………44. Installation Instructions………………………..6
1. Frame……………………………………….61. Upper Front Door Surrounds…………62. Upper Rear Door Surrounds…………..103. Vertical Rear Door Surrounds…………134. Pivoting Header Bar Assembly………..165. Rear Tailgate Bar Brackets…………….196. Overhead Bow Supports……………….21
2. Softopper Canopy1. Canopy and Straps……………………..212. Softopper Side Windows………………253. Softopper Rear Window……………….264. Retracting Softopper……………………28
5. Softopper Care and Maintenance…………….296. Warranty Information…………………………..30
- #2 Phillips Screwdriver- #3 Phillips Screwdriver- 1/2 “ wrench or socket wrench- 7/16” wrench or socket wrench - Torx T40 Driver or Socket (if removing hard top)- Vice Grips or Locking Pliers- Razor or Scissors- Step stool or small ladder
Hard Top Removal Instructions
1. If you have a Freedom Top or other hard top, remove the 2 detachable front panels first.2. Open tailgate and raise rear window.3. Locate all 8 bolts (4 on each side); 6 holding the rear of the hard top onto the rear Jeep rails; 2
holding hard top on the roof above the door pillars (see photo below).
4. Remove bolts using the Torx T40 driver or socket wrench.
5. Locate the rear wiper motor plug and the windshield washer fluid hose in the rear driver side corner of Jeep. They are bound together by a rippled, black, plastic casing.
6. Unplug square plug by sliding the red clip and detaching.7. Unplug windshield washer fluid hose by pulling hoses apart at the coupler.8. The hard top is now ready to be safely removed and stored.9. Save all hardware for any future reinstallation of your hard top.
Upper Front Door Surrounds**Colored instructions available for download on our website under “Installation Instructions”. 1. Open front doors and roll down all windows.2. Unzip zippers on the roll bar padding above front seats.3. Locate the rear most mounting hole in the front driver side roll bar. It may be necessary to
remove the foam blocks from within the padding surrounding the roll bar if you cannot access the rear most mounting hole in front roll bar. Forcefully pull to remove foam.
4. Now that you have access to the rear mounting slot, temporarily place padding back in place.1-800-810-7227 www.softopper.com Page �6
5. Locate Bag A and the 4 upper door surrounds. There are 2 front bars, and 2 rear bars. In Bag A, there are 8 mounting brackets, (21) 10/32 x 3/8” Flat screws (1 extra in case you loose one), 2 plastic bow supports, 1 small bag containing (4) 2 1/4” front surround mounting bolts, (2) 2 1/2” rear surround mounting bolts, 6 nuts, 6 washers, and 1 small bag containing (2) 2 1/2” weather strips.
6. Assemble front and rear upper door surrounds using a #2 Phillips screwdriver, the 8 mounting brackets, 2 plastic bow supports, and (21) 10/32 x 3/8” flat head screws (1 extra in case you loose one). Note that driver side and passenger side door surrounds have opposing structures, so ensure that you have the correct vehicle side door surrounds before beginning assembly. Driver side assembly shown. The small bags containing the larger mounting bolts, nuts, washers, and weather stripping will be used later to mount door surrounds to vehicle.
7. Ensure that the pre-installed weather stripping on the front of the front door surrounds is pressed securely into the door surround piece.
8. Locate rear mounting slot through fabric using fingers.9. Using a razor or scissors cut a 1 1/2” horizontal slit in padding centered next to the
mounting slot about one inch outward from the slot. Repeat on passenger side.
10.Place driver side front door assembly atop roll bar as shown below. Make sure that the front of the bar is forward and the orientation of the bar is such that the brackets point toward the inside of the vehicle and the tops of the bracket screws face upward as shown below.
11. Line up mounting bracket holes with roll bar holes by sliding the brackets through the slits cut in the padding in step 8. Make sure that the door surround is on top of the rubber that is on the center door pillar as shown.
12. Using the 1/2” socket wrench, lightly fasten the 2 1/4” carriage bolt (nut and washer on bottom) through the rear mounting hole and roll bar. The 2 longer carriage bolts will be used to mount the rear door surround. Ensure you use the 4 shorter bolts on the front door surrounds.
13. Repeat through the front mounting hole with another 2 1/4” carriage bolt, nut and washer.
14. Close the door, and make sure the door surround is flush with the door’s outer surface, as shown.
15. While holding door surround in its flush position, tightly secure the carriage bolts. It will take more inward pressure on the front of the door surround to create the seal where the door surround meets the rubber portion of the upper windshield area.
16. Repeat all of the above on passenger side front door.
1. Open rear door2. Unzip zipper of padding surrounding roll bar. Pull back padding until bolts are visible.3. Locate the front, outer most bolt above the rear door.
4. Using a razor or scissors create another horizontal 1 1/2” slit in the padding, about one centimeter below the zipper, directly outward from the front bolt (shown below).
5. Using a 1/2” wrench or socket, remove front bolt.
6. Place rear door surround atop vehicle aligning front bracket with front bolt hole. 7. With padding zipper still open, slide the front mounting bracket through the slit you created in step
8. Using a 1/2” wrench or socket, reinstall the bolt that you removed in step 5 through the front bracket and roll bar. Fasten lightly.
9. Using a 2 1/2” Carriage bolt (nut and washer on bottom) lightly fasten rear bracket through rear mounting hole in roll bar.
10. Make sure the door surround is oriented correctly with the front of it facing forward and placed within 1/8” from the rear of the front door surround (as shown below). Also ensure that it sits on top of the rubber door seal on the center door pillar.
11.Tightly fasten the front and rear mounting bolts while holding the rear door surround in a flush position to the outer surface of the door.
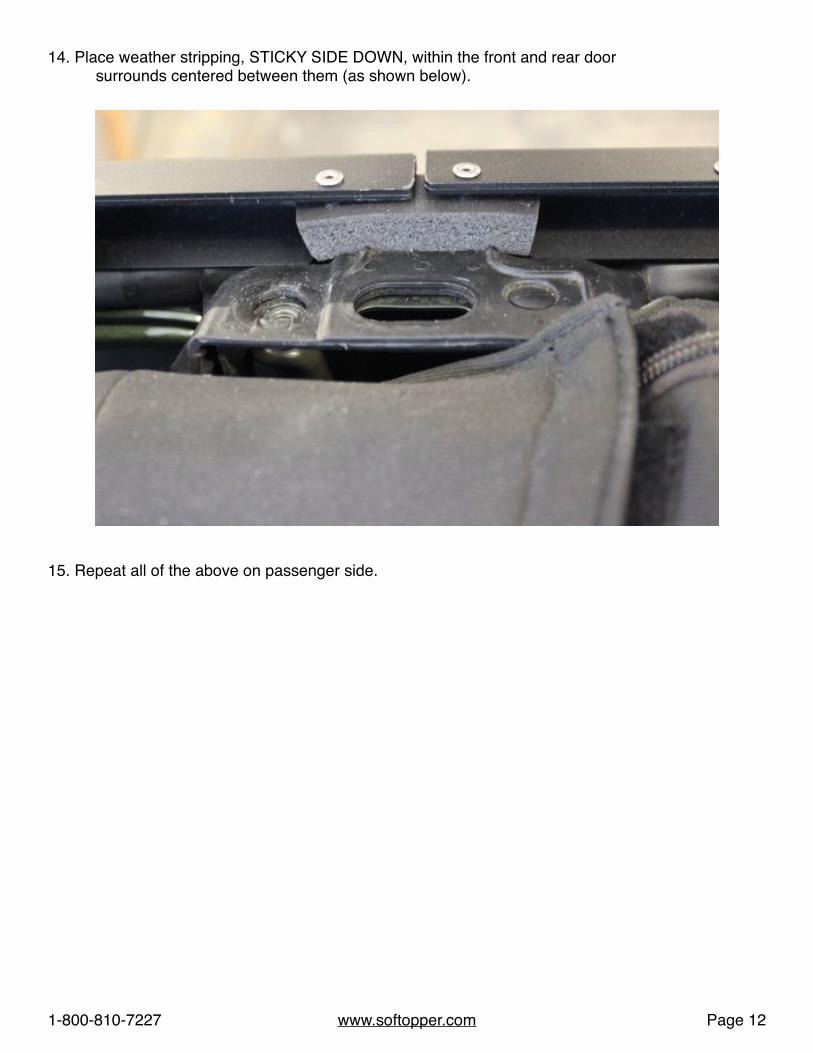
12. Zip up the zipper on the roll bar padding.13. Locate the provided 2” piece of weather stripping and remove the white film, exposing the
1. Locate Vertical Rear Door Surrounds along with hardware Bag B.
2. Open rear driver side door3. Place the top of the driver side vertical rear door surround directly under the rear of the horizontal
rear door surround.4. Ensure that you have the driver side vertical door surround and not the passenger side by
ensuring that the vertical, angled lip running the length of the surround is facing the front of the vehicle.
5. Using a 7/16” wrench or socket, lightly fasten the 1/4”-20 x 1/2” bolt and washer through the horizontal and vertical rear door surrounds. Make sure the steel washer is on top and the bolt is put on from above going down and not from below going up.
6. Remove small, black, plastic plug from the base of the rear door using a sharp edge. This will expose the hole which the bottom of the vertical rear door surround will be bolted through.
7. Place the hole on the bottom of the vertical door surround in line with the hole which the plastic plug came out of.
8. Place the Nylon washer onto the 1/4”-20 x 1” Panhead Screw, and using vice grips or locking pliers, securely pinch the 1/4”-20 Coupler Nut.
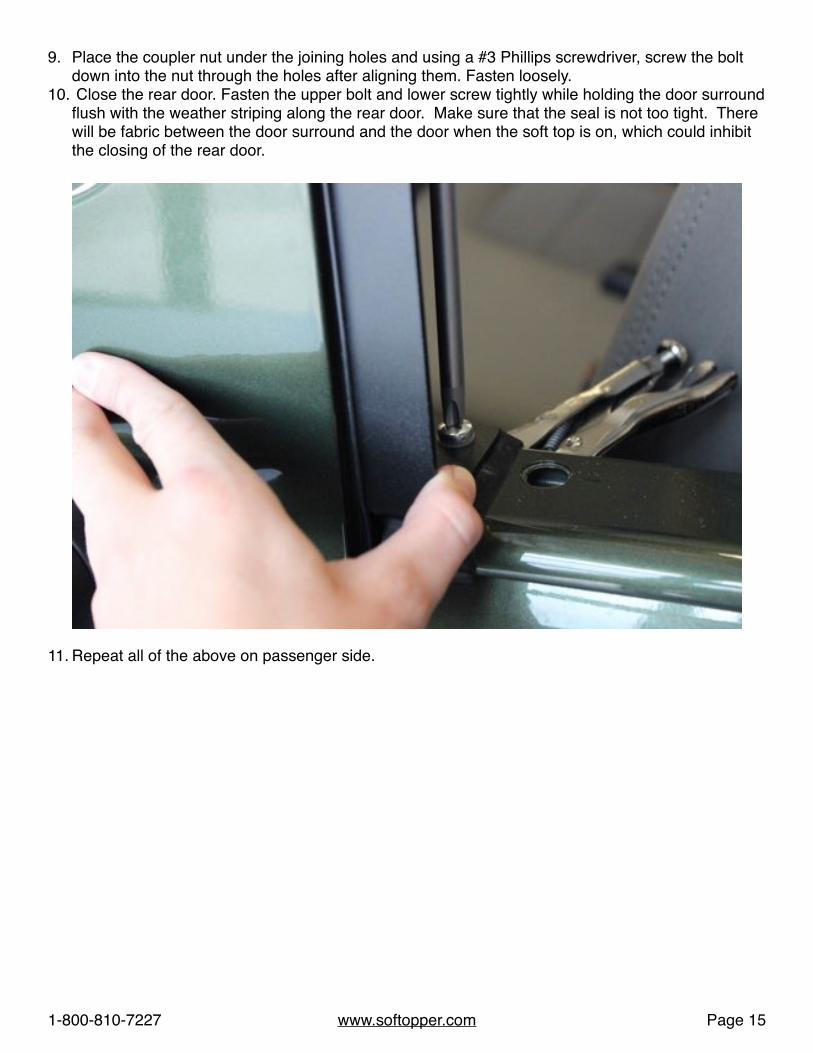
9. Place the coupler nut under the joining holes and using a #3 Phillips screwdriver, screw the bolt down into the nut through the holes after aligning them. Fasten loosely.
10. Close the rear door. Fasten the upper bolt and lower screw tightly while holding the door surround flush with the weather striping along the rear door. Make sure that the seal is not too tight. There will be fabric between the door surround and the door when the soft top is on, which could inhibit the closing of the rear door.
1. Locate the Header Bar, the 2 Pivot Bars, and hardware Bag C.
2. Using a #2 Phillips screwdriver, screw each of the Pivot bars onto the Header Bar with the (8) 8-32 x 3/8” Panhead Screws from outside to inside. Ensure the pivot bar is oriented with center
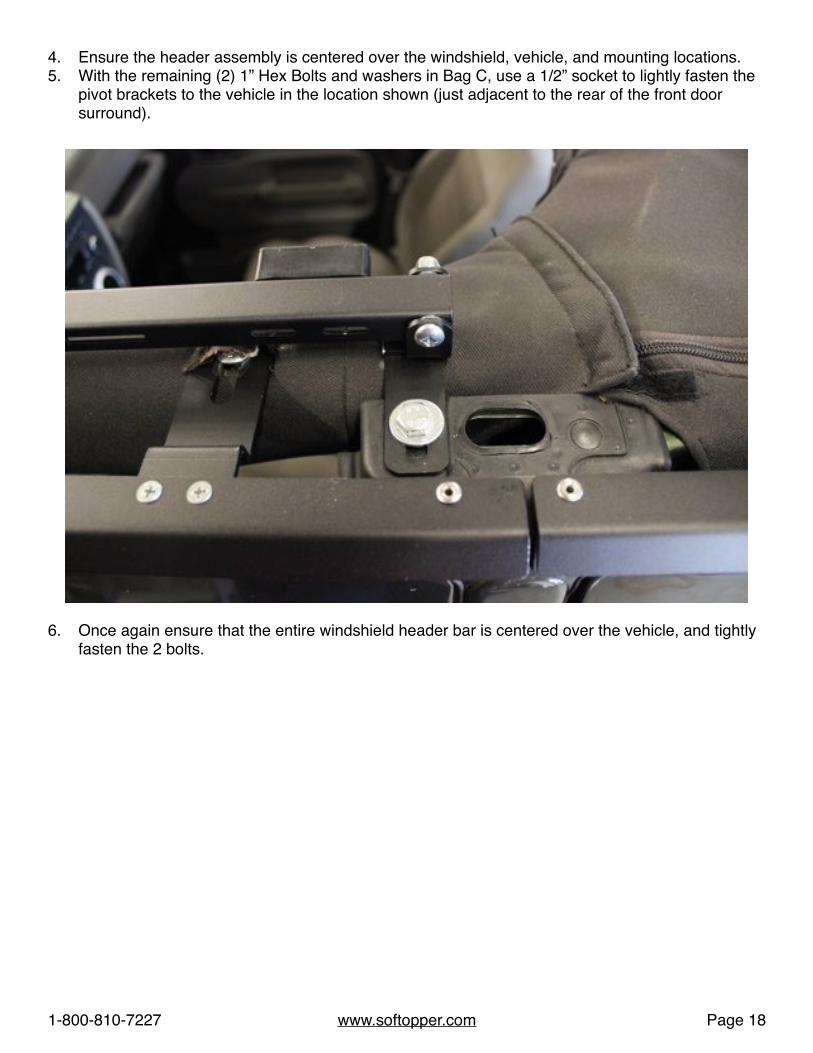
4. Ensure the header assembly is centered over the windshield, vehicle, and mounting locations.5. With the remaining (2) 1” Hex Bolts and washers in Bag C, use a 1/2” socket to lightly fasten the
pivot brackets to the vehicle in the location shown (just adjacent to the rear of the front door surround).
6. Once again ensure that the entire windshield header bar is centered over the vehicle, and tightly fasten the 2 bolts.
1. Locate hardware Bag D including the following: the 2 Upper Rear Tailgate Bar Brackets, 2 (right and left) Lower Tailgate Bar Brackets, (4) 1/4”-20 x 1” Panhead Screws, 4 Nylon Washers, and 4 Nuts.
2. For the driver side tailgate bracket assembly, place the upper bar bracket on the lower bracket with holes aligning as shown below.
3. Place washers on top and screws through the tops of the holes of the bracket assembly as shown above.
4. Locate the driver side mounting holes on the vehicle to the left of the tailgate. If there is any hardware remaining from a previous top, remove the hardware. Remove the plastic plugs in mounting holes.
5. Place the screws into the mounting holes with the brackets lined up as shown above. 6. Make sure the orientation of the lower bracket is such that the angled bit on the bottom left
(bottom right on the passenger side) slides nicely into the slit in the frame.7. Place the nut under the lip of the frame, and using a #2 Phillips screwdriver and a 7/16” wrench,
tightly fasten the nuts onto the screws.
8. Repeat all of the above to the right of the passenger side tailgate using the remaining brackets.
1. Locate Rear Overhead Bow Support (the longer of the two).
2. Make sure the bow support bows upward. Flex the bow and insert each end into the rear plastic bow supports that are installed on the rear door surrounds.
3. Repeat with the Front Overhead Bow Support into the front plastic bow supports located on the pivot bars.
Hardware installation is complete.
Soft Top Canopy
1. Place the windshield header assembly in the forward and down position.2. Drape the Roof Canopy into place atop the vehicle with the front most portion folded back
exposing the snaps on the under side of the canopy as shown.
3. Fold the windshield header bar back, and rest it on top of the canopy.
7. At the back of the canopy, wrap the rear straps around the roll bar below the seat belt attachment. Make sure the strap has no twists in it and is flush against the roll bar as shown below.
8. Feed strap through ladder lock up from underneath and back through and down as shown. Tighten each side securely and evenly, centering the roof canopy.
9. Above the rear door, with the door open, place the plastic strip that is sewn into the canopy down, around, and up into the slit underneath the outer edge of the door surround.
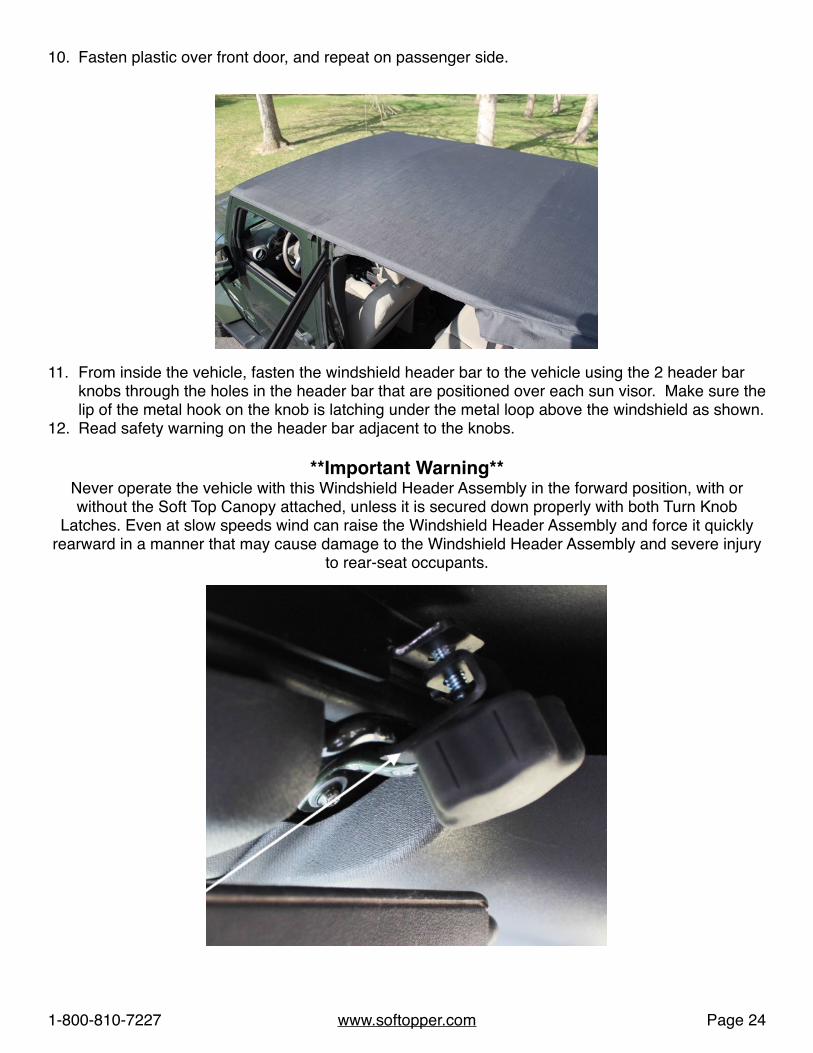
10. Fasten plastic over front door, and repeat on passenger side.
11. From inside the vehicle, fasten the windshield header bar to the vehicle using the 2 header bar knobs through the holes in the header bar that are positioned over each sun visor. Make sure the lip of the metal hook on the knob is latching under the metal loop above the windshield as shown.
12. Read safety warning on the header bar adjacent to the knobs.
**Important Warning**Never operate the vehicle with this Windshield Header Assembly in the forward position, with or without the Soft Top Canopy attached, unless it is secured down properly with both Turn Knob
Latches. Even at slow speeds wind can raise the Windshield Header Assembly and force it quickly rearward in a manner that may cause damage to the Windshield Header Assembly and severe injury
1. Locate the 2 side window panels and the 2 aluminum side window stiffeners.2. Insert each stiffener into the sewn pocket in each window panel. Make sure the stiffener is
positioned so that it rounds outward as shown.
3. Push the stiffeners all the way to the bottom of the sewn pockets.4. Place the window panel up onto the vehicle just behind the rear door, and snap it to the top of the
vertical rear door surround. Driver side window depicted below.
5. Velcro the front flap of the window panel around the rear door surround so that the velcro lines up straight as shown. This will ensure that the rest of the window panel lines up correctly and is easy to zip to the rear window panel.
6. Loosely velcro the top of the panel just so it doesn’t fall off while installing the rear window panel.
7. Repeat on passenger side. Note: The rear window panel can also be installed before the two side window panels. Install in whichever order you find easiest.
Soft Top Rear Window Panel
1. Place the rear window panel up to the canopy with the tailgate open.2. Secure the upper zipper of the panel to the upper rear canopy zipper. Zip across completely.
Zippers are installed at the factory, but may require slight adjustment up and down or side to side.
3. Push the bar on the bottom of the rear window panel into the rear tailgate bar brackets.4. Secure the zippers of the side window panels to the rear window panel. Only partially zip them
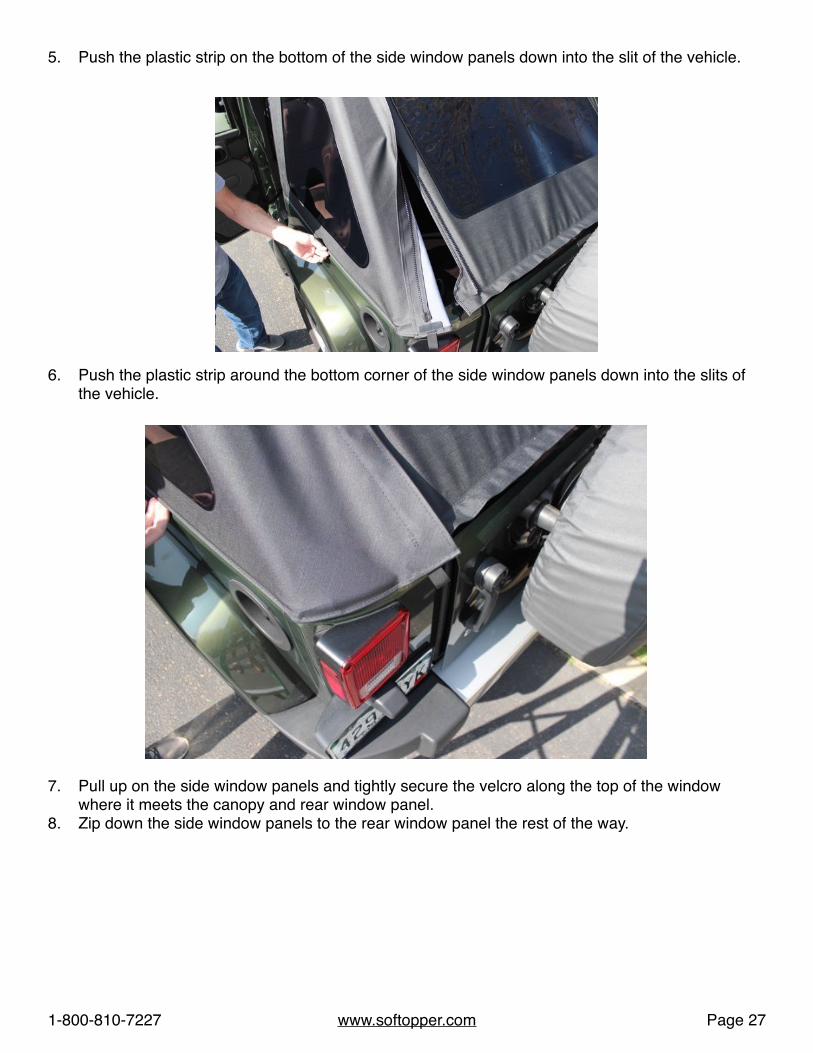
9. Push the final plastic tab on the bottom of the side window panels underneath the rear tailgate bar brackets as shown. Softopper installation complete.
Retracting Soft Top
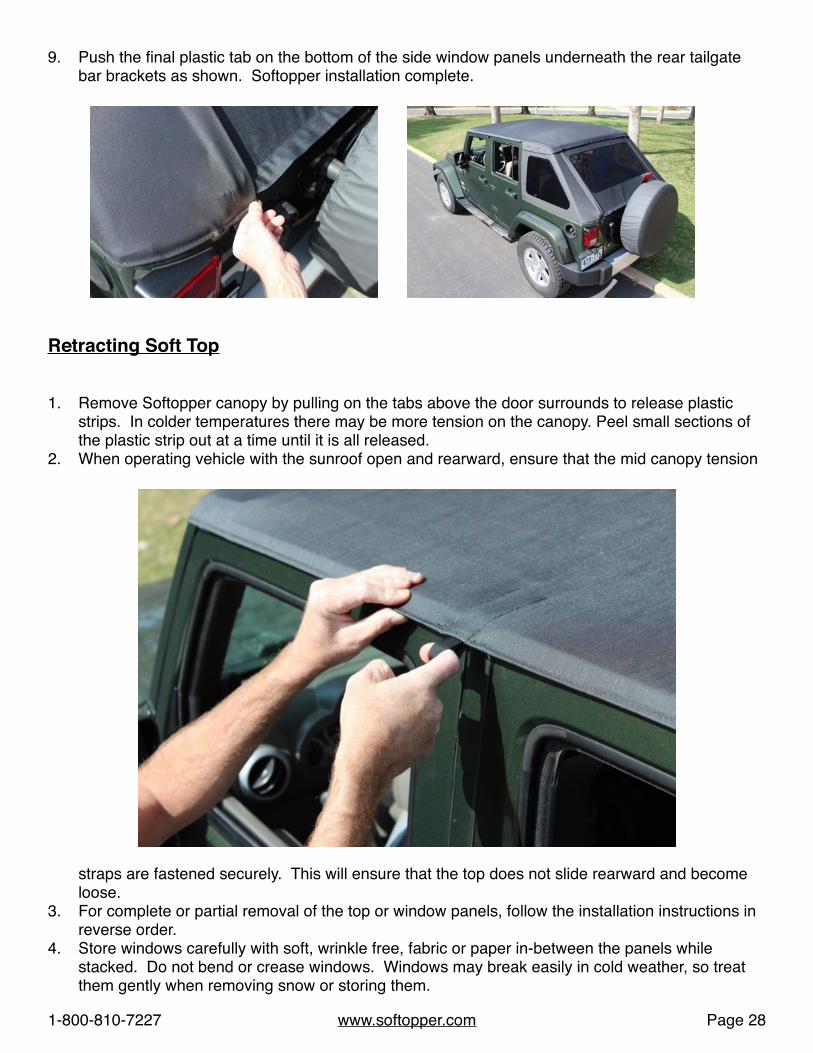
1. Remove Softopper canopy by pulling on the tabs above the door surrounds to release plastic strips. In colder temperatures there may be more tension on the canopy. Peel small sections of the plastic strip out at a time until it is all released.
2. When operating vehicle with the sunroof open and rearward, ensure that the mid canopy tension
straps are fastened securely. This will ensure that the top does not slide rearward and become loose.
3. For complete or partial removal of the top or window panels, follow the installation instructions in reverse order.
4. Store windows carefully with soft, wrinkle free, fabric or paper in-between the panels while stacked. Do not bend or crease windows. Windows may break easily in cold weather, so treat them gently when removing snow or storing them.
Softopper Care and Maintenance Your top is made of the finest materials available. To keep it looking new and for product longevity and durability, it will need periodic cleaning and maintenance.
Washing: The fabric should be washed from time to time using a mild soap and warm water. Be sure to rinse all soap off the top when washing is complete.
Vinyl Windows: Windows should be kept clean to avoid scratching. Wash with a water-soaked sponge or cloth and a mild dishwashing detergent. Do not use a coarse brush on the windows and never wipe the windows when they are dry.
COLD WEATHER IS TROUBLE: As with all automotive and marine clear vinyls, extreme care must be taken when rolling up or folding in cold temperatures. This point cannot be stressed enough! Clear vinyl becomes stiff in cold temperatures and may crack. Retracting the Softopper in cold temperatures is not recommended and will void the warranty for the windows (see Warranty information for more detail on length of window warranties). When opening the rear of the Softopper in cold weather, be sure to raise the zippers as high as possible so that any folding will occur to the topper fabric and not to the clear vinyl window.
Zippers: Keeping the zippers clean and lubricated with a silicone lubricant will help prevent damage and keep the zippers in smooth working condition.
Leakage: As with any sewn automotive top there is always a slight risk of leakage. Right out of the box the Softopper may not be 100% waterproof. If you experience any water seeping through at the seams, apply Seam Sure on the inside of the affected seams. Shake Seam Sure well and apply liberally to the inside seams concentrating on areas where needle and thread penetrated the fabric.
Snaps: Keep snaps clean and lubricated with a silicone lubricant to help prevent snaps from sticking to the studs. If a snap does become stuck to a stud, use a screwdriver and gently pry apart to prevent damage to the snap or top fabric. If any snaps need to be replaced due to sticking or damage please call Softopper and we can send out a small do-it-yourself repair kit.
For further information please contact: Softopper LLC, customer service (800) 810-7227 or (303) 304-0533
Warranty We warrant our 4Runner, Jeep Wrangler, Blazer, Jimmy, Scout, Bronco, and RamCharger Softoppers to be free from defects in material and workmanship for a period of one year, with the exception of vinyl windows and zippers, provided there has been normal use and proper maintenance.
Vinyl Windows are warranted for a period of 3 months from the date of purchase.
Zippers are guaranteed to be in perfect working condition when leaving the factory. Due to atmospheric conditions, dirt, sand, road grime, dust, and abrasive cleaners, etc., zippers are warranted for a period of 6 months from the date of purchase.
Toyota 4 Runner, Jeep Wrangler, Blazer, Jimmy, Scout, Bronco, and RamCharger side curtain windows are warranted for 45 days from the date of purchase. Retracting or closing the top when the temperature is below 40 degrees may void the warranty on the side windows, as clear vinyl plastic can crack very easily at these temperatures. Use caution when retracting the top or cleaning off the windows in freezing temperatures.
Returns must be pre-approved and have Softopper’s issued RGA number attached. Any defective items must be returned with proof of purchase to Softopper 4750 Nautilus Court South, Unit B Boulder CO 80301, freight pre-paid. Items returned must be carefully packed, in clean condition, with plastic windows protected from scratching and creasing. This warranty does not cover damage resulting from abuse, misuse, alteration, accident or damage in transit. Softopper’s obligations under this warranty are limited to the aforementioned repair or replacement of warranty defects for which return authorization has been received during the warranty period, and Softopper SHALL NOT BE LIABLE FOR ANY INCIDENTAL OR CONSEQUENTIAL DAMAGES ARISING FROM BREACH OF THIS OR ANY IMPLIED WARRANTY. This warranty applies to the original purchaser only. All remedies under this warranty are limited to repair or replacement of any item or items found to be defective by the factory within the time period specified.
For further information or request for repair work, please contact: Softopper LLC, customer service (800)810-7227 or (303) 304-0533