24
Installation, Operation and Maintenance Instructions Power IT LV Capacitor Banks APC

1
Installation, Operation and Maintenance Instructions
PowerIT LV Capacitor Banks APC

2
Table of contents
Read this first ..........................................................................................................................3
1 About this instruction manual ........................................................................................................32 Safety .........................................................................................................................................33 APC types ...................................................................................................................................34 Inspection....................................................................................................................................35 Guarantee ...................................................................................................................................46 Storage.......................................................................................................................................47 Handling......................................................................................................................................48 Electric insulation test ..................................................................................................................4
APC description .....................................................................................................................5
1 Power modules ............................................................................................................................62 Ventilation system........................................................................................................................6
Installation.................................................................................................................................8
1 Location ......................................................................................................................................82 Harmonics...................................................................................................................................83 Fixation .......................................................................................................................................83.1 APCL1 and APCL2 ......................................................................................................................83.2 APCM1, APCM2 and APCR .........................................................................................................84 Connection ..................................................................................................................................94.1 Electrical diagram ........................................................................................................................94.2 Connection of several units in parallel ...........................................................................................94.3 Power cables connection............................................................................................................ 10
4.3.1 APCL1 and APCL2 ........................................................................................................ 104.3.2 APCM1, APCM2 and APCR ........................................................................................... 11
4.4 Current transformer connection................................................................................................... 124.5 Earth connection........................................................................................................................ 13
Easy commissioning......................................................................................................... 14
Troubleshooting................................................................................................................... 18
Maintenance ........................................................................................................................... 19
1 APC maintenance...................................................................................................................... 192 APCR capacitors module replacement ........................................................................................ 193 Access to reactors ..................................................................................................................... 21
Appendices............................................................................................................................. 22
A1 Technical specifications.............................................................................................................. 22A2 Dimensions and weights............................................................................................................. 23

3
Read this first
1. About this Instruction Manual
This instruction manual is intended to help you install and operate, quickly and efficiently, your APCautomatic capacitor bank, with the guarantee of optimum operation.
2. Safety
Before installation and operation of the APC automatic capacitor bank, read this instruction manual carefully.Keep it at the disposal of the people in charge of the installation, operation and maintenance.
Do not introduce or store any extraneous body in the automatic capacitor bank.Take care not to obstruct the ventilation grids.
Power capacitors operate continuously at full load. Please respect the points below:
2.1. Installation and maintenance must only be carried out by authorised and qualified personnel, inaccordance with current local regulations.
2.2. Isolate the equipment from the power supply before attempting to gain access.
2.3. Wait five minutes to allow the capacitor to discharge through the discharge resistors. As an additionalprecaution before starting work, short circuit the capacitor terminals with a piece of insulated cable (bare atthe ends) to confirm discharge.
2.4. Check that the secondary winding of the current transformer is short circuited or connected to anotherparallel load (with a sufficiently low impedance) while connecting or disconnecting measuring instruments orrelays. An open secondary winding of a loaded current transformer may cause dangerous overvoltages.
2.5. The APC automatic capacitor bank must be installed according to EN 60831-1&2 and localspecifications.
3. APC types
The APC exists in five different types :2 types of boxes: APCL1 and APCL23 types of cubicles: APCM1, APCM2 and APCR
4. Inspection on reception
Make sure that the packaging has not been damaged in transit.
Any loss or damage should be notified immediately to your closest local ABB agent.
The small boxes (APCL1) are delivered upright.The big boxes (APCL2) are delivered on their side and 2 units maximum can be stacked one on top of theother for transit and storage.The cubicles (APCM1 et APCM2) are also delivered on their side and 2 units maximum can be stacked oneon top of the other for transit and storage.No stacking allowed for APCR.

4
5 Guarantee
Prior to dispatch, all our equipment is tested in compliance with the requirements of EN 60831-1 & 2 (for ACcapacitors up to 1000V) and EN 60439 (for low voltage equipment) and it is guaranteed in accordance withour standard sales conditions.
6 Storage
The APC must be stored indoors, in a dry, dust free, non-corrosive atmosphere and protected from vibrationsor shocks.
The storage temperature must be between -20°C and + 60°C.
7 Handling
After having carefully unpacked the equipment, check that- the characteristics noted on the nameplates correspond to the ones specified in your purchase order.- the material does not appear to be damaged and particularly the central frame, the rear and top panels.
Any damage should be notified immediately to your closest local ABB agent.
Be very careful to avoid personal injury and damage to the equipment while setting upright the boxes andcubicles.
Suitable equipment for handling the cubicles such as a hoist is highly recommended. Use the lifting lugs thatare provided for this purpose.Avoid shocks and bumps.Take care not to damage the plinth of the cubicles while setting upright them.
8 Electric insulation test
Before applying voltage, make an electric insulation test of 2.5 kV between the earth and the short circuitedphases.Any damage resulting of this test should be notified immediately to your closest local ABB agent.
End this test by removing the short circuit of the phases.
U Please refer to § 4.2 Current transformer connection.
APCM and APCRsetting upright

5
APC description
APCL1
APCL2
APCM1
APCM2APCR
V
10 1 4 5
3 9 7 8 2 6
APCL2 of 120kvar/400V
2
78
4
1
APCM2 of 480kvar/400V
6 3 5 9
2
1’
3
4
5
6
11
87
9
APCR of 300kvar/400V
1 LVCP capacitors 1’ CLMD33 modules 2 RVC controller 3 UA type contactors 4 Power cables connections 5 HRC fuses 6 Fan(s) 7 Cont rol circuit fuses 8 Current transformer connection 9 Fan supply10 Discharge resistors11 Reactors modules

6
1 Power modules
2 Ventilation System
APCL2, APCM1, APCM2 and APCR are provided with one or several fans.APCL1 is provided with air grids allowing a natural ventilation.
APCL1 APCL2 APCM1 APCM2 APCR
Fan(s) quantity 0 1 2 3 1
Fan(s) position / door top 2 on topand 1 inside
top
Example of a front view Example of a rear view (APCM module) (APCM module)
Example of a front face Example of a rear face (APCR module) (APCR module)
1 Fuses2 Contactors3 Capacitors4 Reactors
2
3
1
3
4
1
2

7
Thermistor
Each fan is of DC type and is equipped with its own thermistor.This thermistor will adapt the speed of the fan (“vario fan” type) to the APC internal temperature.This fan operates from a 30°C temperature and delivers a maximum airflow for a 50°C temperature.
Temperature probe
Each APC is also equipped with a temperature probe in order to switch off the controller power supply. Incase of overtemperature around 60°C, the APC is automatically disconnected.

8
Installation
1 Location
The APC are suitable for indoor installation, on appropriate surfaces. Shelter the equipment from dust andmoisture and place it in a well-ventilated area where the ambient temperature doesn’t exceed the followingvalues:
40°C maximum;35°C over 24h;25°C over one year.
Appropriate action must be taken for ambient temperature down to -5°C or above 40°C.
2 Harmonics
The installation of capacitors on networks disturbed by harmonics may require special precautions especiallywhen there is a risk of resonance.Consult your closest local ABB agent if it is the case.
3 Fixation
3.1 APCL1 and APCL2 boxes
Fix the boxes on the wall by means of the fixation kit provided for this purpose.The ground clearance must be of 10 cm minimum.It’s advised to keep a distance of 10 cm between the boxes.
3.2 APCM1, APCM2 and APCR cubicles
The cubicles must be placed on the ground.Their back must be positioned at a minimum distance of 5 cm from the wall.
The air grids that must be fixed in the bottom of each cubicle are not pre-mounted. These grids must be fixedin the cuts-out made for this purpose.
The three cable entry plates that must be fixed in the top, in the upper and lower part of each cubicle are notpre-mounted.These plates must be fixed in the cuts-out made for this purpose.
View of the air grids tofix in the bottom of eachcubicle
View of the cable entryplate to fix in the bottomof each cubicle
APCM APCR

9
4 Connection
Cabling of equipment requires three main power connections (no neutral required) and two control wiresfrom the current transformer.
4.1 Electrical diagram
Regarding the standard wiring of the ABB controllers, the voltage reference for the controllers is taken fromL2 and L3 phases and the current transformer is sited on the L1 phase.
If the current transformer is sited on another phase, it’s useless to modify the voltage and currentconnections since the APC bank is provided with an ABB controller with automatic adaptation to networkphase-rotation and CT terminals.
For an installation equipped with a generating set, switch off the APC bank before connecting it.To do it, remove the connection wire sited beside the terminal block that carries the grey CT jumper (seepicture page 12), in order to switch off the power supply phase L2 of the controller.Warning : hazard of electrical shock : be sure that the APC isolating switchgear is open before everymanipulation.
4.2 Connection of several units in parallelHigher ratings will be obtained by connecting several units in parallel.
APCR1
APCR2
CT1
TO LOAD TO FEEDER
APCR1
APCR2
CT1
TO LOAD TO FEEDER
CT2
The switching delay time of each unit must slightly differ from the other ones.If the controllers are set to normal mode, we recommend using a switching time delay difference of 1 sec.(e.g. 40s, 41s, 42s, …)If the controllers are set to integral mode, we recommend using a switching time delay difference of at least 21 sec.(e.g. 120s, 141s, 162s, …)

10
4.3 Power cables connection
When selecting the appropriate cable size due consideration should be given to possible future extension ofthe equipment. Cables and isolating switchgear should be rated at 1.5 times the nominal capacitor current ofthe total capacitor bank and should always be coordinated with the current rating of the back up fuses.
Cross section of supply cables
The different parameters like localisation, temperature, etc… and other factors which may exist, do not allowto cover all the possible cases of installation and simple rules. The standards in force in the concernedcountry have to be taken into consideration keeping in mind that the current must be considered as aminimum 1.5 times the nominal current.
Master switch and fuses
At the location of the bank installation, the power of the network short-circuit must be taken into considerationto define the main connection fuses, or rating of the circuit breaker.
To disconnect the unit from the network, we suggest preferably a circuit breaker. A 3-phase disconnectingfuse or a 3-phase switch with fuses may nevertheless be used.
The apparatus should be chosen with a nominal current rating of minimum 1.5 times the rating of thecapacitor.
It is to be noted however that the fuses, if any, must be calibrated to protect the cables and at least at 1.6times the rating current of the capacitor.
4.3.1 APCL1 and APCL2 boxes
APCL1 and APCL2 are factory mounted with a bottom cable entry.A knock out is provided for this purpose.
APCL1 power cablesconnection to the incomingpower terminals
APCL2 power cablesconnection to the incomingpower terminals

11
4.3.2 APCM1, APCM2 and APCR cubicles
The standard APCM1, APCM2 and APCR cubicles are designed for a bottom cable entry.One of the three white plates that has to be fixed in the left bottom of the cubicle is provided to allow cableentry (see picture page 8).
If a top cable entry cubicle has been ordered, use the two other white plates sited on top and on upper partof the cubicle.Run the power cable through a gland of a suitable diameter in order to keep the protection level of thecubicle.
APCM1 power cablesconnection to the incomingpower terminals (top orbottom cable entry)
APCM2 power cablesconnection to the incomingpower terminals (top orbottom cable entry)
APCR power cablesconnection to the incomingpower terminals (top orbottom cable entry)

12
4.4 Current transformer connection
Current transformers of Class 1 accuracy and appropriate burden with secondary current 5A will normally beused. In case CT and the automatic capacitors are close to each other a 5VA burden is sufficient if no otherloads are connected to the CT.
1) The current transformer must be sited in a position to monitor the total load (i.e. inductive load andcapacitive load). This will normally be close to the incoming supply metering position. A range of ring andsplit core C.T.’s exists on the market to ease installation.
2) Current transformers are normally marked P1/P2 and S1/S2 and should be positioned so that P1 facesthe incoming supply while P2 faces the load side.
3) Control wires from S1 terminal go to terminal marked k on the circuit diagram and from S2 toterminal marked l on the diagram. When the connection has been made, the shorting link (greyjumper) may be removed.
To easy guide control wires, a cable profile is fixed in each box.Each cubicle has several base supports on its central frame to receive cable ties.
4) When a multi ration split core C.T. is used the appropriate ratio is selectedby connecting either S2 or S3 or S4 to terminal marked l. The C.T. ratioshould be selected as near as possible to suit the supply loading.
5) When a summation current transformer is used the terminal markingswill usually be P1, P2, P3, P4 and S1, S2. The secondary connectionsS1 and S2 should be made to k and l respectively as before.
Grey jumper to short-circuit theCT secondary winding
Power release contact forgenerating set

13
The first C.T. should be connected with S1 and S2 to P1 and P2 on the summation C.T. while the secondC.T. should be connected with S1 and S2 to P3 and P4 on the summation C.T. It is important that all C.T.’smonitor current in the same direction.
6) When a summation C.T. is used or the CT monitors only part load (i.e. two cables per phase with the C.T.on one cable only) the total system current that gives 5A in the relay current coil is used to calculate relaysetting.
4.5 Earth connection
The APCL earth connections are made by means of a stud(∅ M6). This one is welded inside the APCL in the lower rightcorner.The door is already connected to this stud. It only remains toconnect the earth wire if the power cable is fitted with it.
For the APCM and APCR, the earth connection could bemade by means of one of the two stud (∅ M8) located in theupper and lower left corners.
14
Easy commissioning
1. With the equipment isolated from the supply check tightness of all connections, earth bonding, fuses,free movement of contactors.
2. Check that the requirements for the cable cross section and the fuses are respected with regard tothe total bank power.
3. Check that the C.T. is properly located on line L1 i.e. the only line where the PF Controller voltage isnot taken (The PF Controller should be connected between L2 and L3).
4. Remove the C.T. short circuit by opening or removing the bridge of the C.T. wire connector (insidethe bank).
Note : The APC is normally equipped with an RVC controller. To carry on with this commissioning,follow the points below. If your APC is equipped with an optional RVT, refer to RVT instructionmanual and don’t follow the points below.
5. Switch the voltage on.After a power outage, the reset delay time is 40 seconds. During this delay time, the alarm iconblinks and the alarm contact remains closed.
Check that all the fans are in good working order.If it’s not working properly, refer to the “troubleshooting” paragraph on page 13.
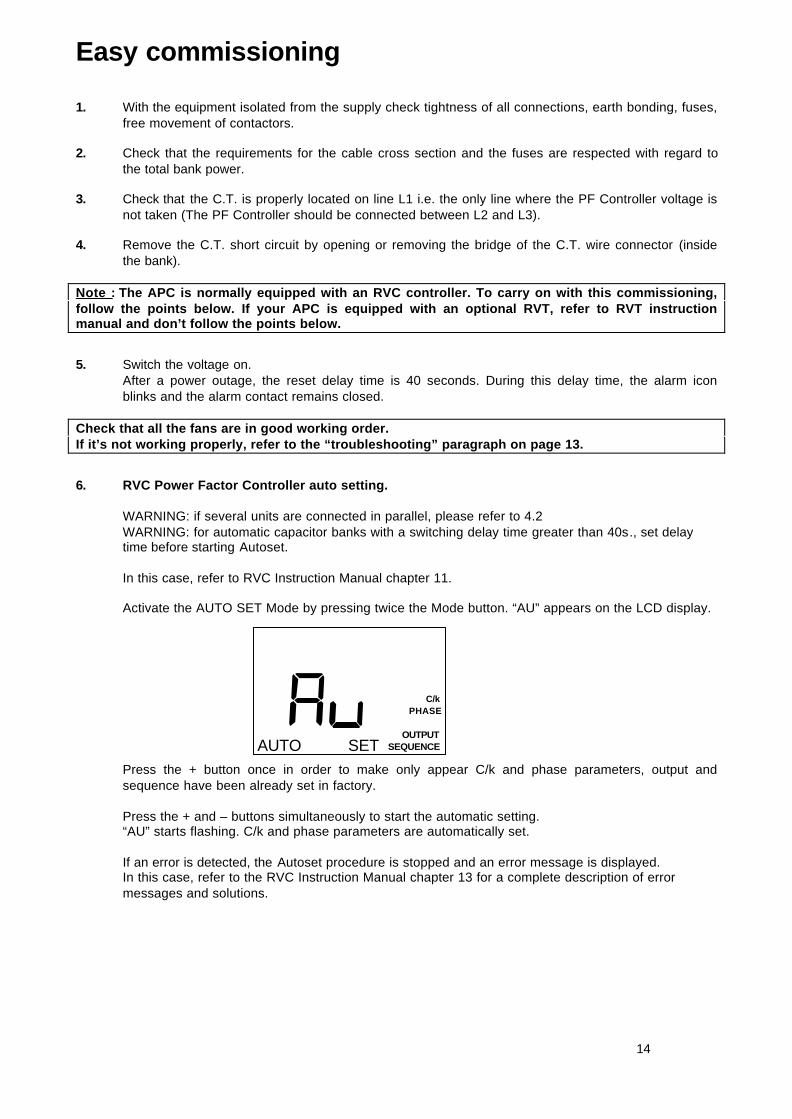
6. RVC Power Factor Controller auto setting.
WARNING: if several units are connected in parallel, please refer to 4.2WARNING: for automatic capacitor banks with a switching delay time greater than 40s., set delaytime before starting Autoset.
In this case, refer to RVC Instruction Manual chapter 11.
Activate the AUTO SET Mode by pressing twice the Mode button. “AU” appears on the LCD display.
Press the + button once in order to make only appear C/k and phase parameters, output andsequence have been already set in factory.
Press the + and – buttons simultaneously to start the automatic setting.“AU” starts flashing. C/k and phase parameters are automatically set.
If an error is detected, the Autoset procedure is stopped and an error message is displayed.In this case, refer to the RVC Instruction Manual chapter 13 for a complete description of errormessages and solutions.
AUTO SET
PHASE
OUTPUTSEQUENCE
C/k
15
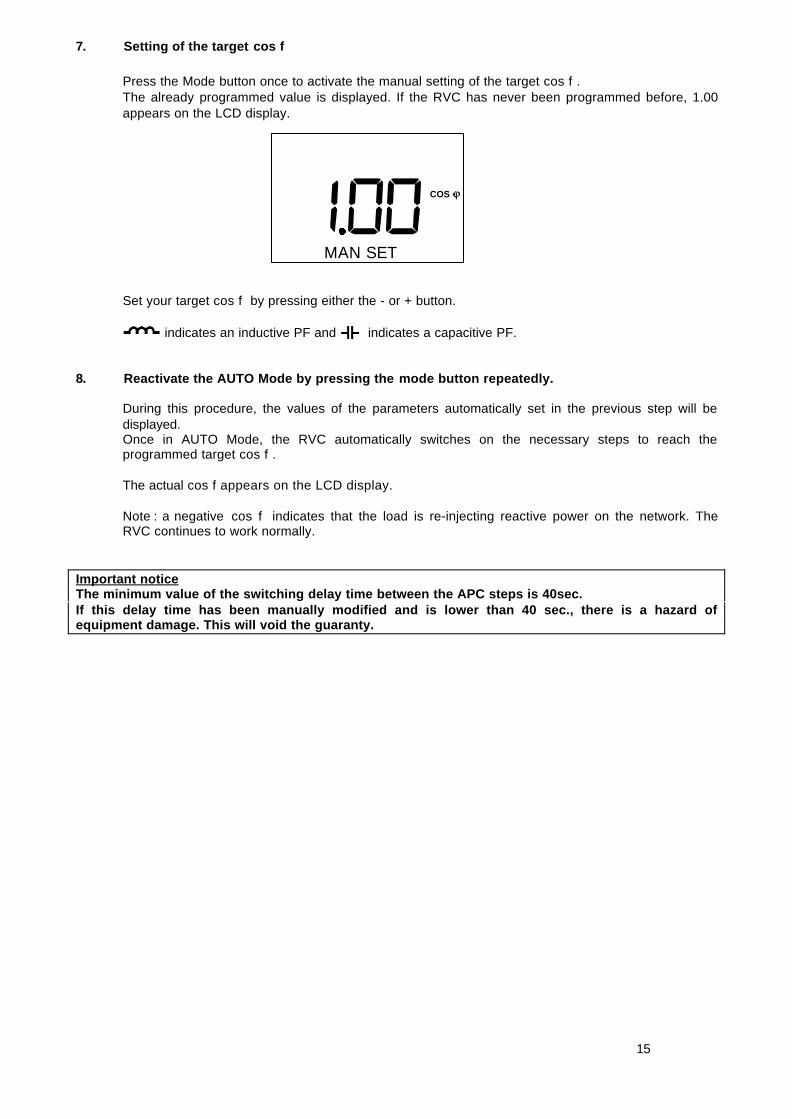
7. Setting of the target cos f
Press the Mode button once to activate the manual setting of the target cos f .The already programmed value is displayed. If the RVC has never been programmed before, 1.00appears on the LCD display.
Set your target cos f by pressing either the - or + button.
indicates an inductive PF and indicates a capacitive PF.
8. Reactivate the AUTO Mode by pressing the mode button repeatedly.
During this procedure, the values of the parameters automatically set in the previous step will bedisplayed.Once in AUTO Mode, the RVC automatically switches on the necessary steps to reach theprogrammed target cos f .
The actual cos f appears on the LCD display.
Note : a negative cos f indicates that the load is re-injecting reactive power on the network. TheRVC continues to work normally.
Important noticeThe minimum value of the switching delay time between the APC steps is 40sec.If this delay time has been manually modified and is lower than 40 sec., there is a hazard ofequipment damage. This will void the guaranty.
MAN SET
COS

16
Front view
A. LCD display
1. Activated outputs 7. Numerical display2. Inductive PF 8. Programmable parameters3. Capacitive PF 9. Modes4. Undercompensation alarm5. Overtemperature Indication6. Demand for switching on or off capacitor steps
AUTOSET
MODE
1
7
2
8
3
9
4
10
5
11
6
12
AUTO MAN SET
COS
PHASEDELAY
OUTPUTSEQUENCE
C/k
A
1
2
3
4
5
B
6
7
8
12
9
B. Keypad
10. Mode Bouton11. - button12. + button

17
Rear view
k, l: leads of the current transformerL2, L3: 2 of the 3 phases (not monitored by the CT)M1, M2: leads of the normally closed contactA: output relay common source1-12: outputs

18
TroubleshootingMost of the APC operating problems may be detected thanks to the controller.Refer to the troubleshooting paragraph of the controller instruction manual.
If the controller is connected but doesn’t display anything, check the voltage presence to its leads.If there is no voltage, this may be explained by:
- a discontinuity of the circuit (check the wiring, fuses, etc…)- an overtemperature of 60°C having caused the opening of the temperature probe and thus the power
supply cut off. This overtemperature may be due to an ambient temperature upper to the maximumallowed temperature.
- a ventilation system as well as a defective temperature probe causing the RVC power supply cut off at85°C.
- a defective temperature probe opening without overtemperature.

19
MaintenanceEnsure safety procedures are completed as earlier stated.
1 APC maintenance
Your capacitors are an investment, protect them by regular maintenance.
Annual maintenance should include:- Remove dust deposits, clean all parts, paint metalwork as required;- Check fuse condition;- Check condition of discharge resistors;- Check contactor condition and operation – replace as necessary;- Check isolator connections and operation;- Check operation of PF Controller;- Check ambient temperature and equipment ventilation;- The cleaning of the entry grid are to be checked regularly, the frequency of controls are under
end-user’s responsibility.
Check that ventilation grids are not obstructed by neither dust, nor any extraneous body.
2 APCR capacitors module replacement
E.g.: APCR 200kvar n°3 module replacement
Module 2
Module 1
Module 3
Module 4

20
Disconnect the 2 contactorcontrol cables
Disconnect the 3 inputcables of the contactor
Remove the supporting plate by Withdraw the capacitor moduleunscrewing the 4 screws
Remark: It is likely that screws with biggerdiameter will have to be used when reassemblingthe plates.
Disconnect protectionfuses (∅ M8)
Disconnect protectionfuses (∅ M8)

21
3 Access to reactors
Withdraw the capacitor module (see § 2) Cut the flexible cable locks to free theRemove the protection plate by power cablesunscrewing the 4 screws
Remove the protection plate Easy access to reactor and connections

22
Appendices
A.1 Technical specifications
Nominal voltage and frequency:
230V – 50Hz (standard range),
400V – 50Hz (standard range),
400V – 50Hz (reinforced range rated at 465 V),
400, 415, 525, 690V – 50Hz (de-tuned capacitor bank),
240, 380, 480, 600V – 60Hz (de-tuned capacitor bank).
Connection:
Three phase.
Power factor setting:
From 0.7 inductive to 0.7 capacitive.
Starting current setting (C/k):
From 0.05 A to 1 A for the RVC controller.
From 0.01 A to 5 A for the RVT controller (optional for theAPCM1, APCM2 and APCR).
Operation:
Automatic or manual setting of the controller with
indication of :
- The number of active outputs
- The inductive or capacitive power factor
- Alarm conditions
- Overtemperature
- Demand for switching on/off a capacitor step
Losses:
Dielectric losses: less than 0.2 Watt/kvar.
Capacitor total losses: less than 0.5 Watt/kvar
(discharge resistors included).
Automatic bank total losses at 400 V 50 Hz:
- without reactors: less than 1.5 Watt/kvar
(including accessories losses),
- with reactors: less than 5.5 Watt/kvar
(including accessories losses).
Capacitors:
Dry type self healing according to EN 60831-1&2.
Voltage test: 2.15 * Un between terminals during10 s. at rated frequency (above EN60831-1&2).
Acceptable overloads: - Overvoltage tolerance:
10% max. intermittently.
- Overcurrent tolerance:
30% permanently.
Reactors:
- Type : dry type resin embedded according to IEC 289, IEC 76
- Linearity : Ilin = K X Inp (%): 5.67 6 7 12.5
K: 2.45 2.23 1.9 1.49
- Maximal harmonic voltage distortion:
U3/U1 = 0.5 % U5/U1 = 6.0 %
U7/U1 = 5.0 % U11/U1 = 3.5 %
U13/U1 = 3.0 % (not exceeding a THDU of 8 %).
The automatic capacitor bank complies with EN 60439.
Automatic capacitor bank tests:
- Functional test
- Insulation test
CE Marked
Protection :
IP23D (closed door).
Protected against direct and accidental contacts (open door).
Execution:
Indoor.
Colour:
Beige RAL 7032.
Ambient temperature:
-5°C/+40°C according to EN 60439.
Ventilation:
- Natural for the APCL1.
- Forced for the APCL2 and the APCM1, APCM2 and APCR.
(temperature-dependent speed control fans).
Installation:
APCL: - Wall mounting (fixation brackets included).
- Bottom cable entry.
APCM & APCR: - Floor fixation.
- Equipped with a plinth.
- Lifting lugs provided.
- Top or bottom cable entry.
Important notice:
The installation of capacitors on networks disturbed byharmonics may require special precautions especially whenthere is a risk of resonance.

23
A.2 Dimensions and weights
* thickness of the air grid (25mm) not included.
APCL1* :Max 26kg
APCL2* :Max 42kg
APCM1 :Max 100kg
APCM2 :Max 175kg
APCR :Max 500kg

24
This product has been certified by ABB Group as IndustrialIT EnabledT M - Information Level .All product information is supplied in interactive electronic format, based on ABB AspectObjectT M technology.The Industrial IT commitment from ABB ensures that every enterprise building block isequipped with the integral tools necessary to install, operate, and maintain it efficientlythroughout the product lifecycle.
While all care has been taken to ensure that the information contained in this publication iscorrect, no responsibility can be accepted for any inaccuracy. We reserve the right to alter ormodify the information contained herein at any time in the light of technical or otherdevelopments. Technical specifications are valid under normal operating conditions only. Wedo not accept any responsibility for any misuse of the product and cannot be held liable forindirect or consequential damages.
2GC
S20
1012
A00
40
The
Indu
stria
lIT w
ordm
ark
and
all a
bove
-men
tione
d pr
oduc
t na
mes
in t
he f
orm
Pow
erIT a
re r
egis
tere
d or
pen
ding
tra
dem
arks
of
AB
B.
Asea Brown Boveri Jumet S.A.Zoning Industriel de JumetB-6040 Charleroi, BelgiumPhone : +32 71 250 811Fax : +32 71 344 007


