57
INTEGRATED EXPLOSION PROOF HIGH SPEED CAMERA INSTALLATION&PROGRAMMING MANUAL (English Version)

INTEGRATED EXPLOSION PROOF HIGH SPEEDCAMERA
INSTALLATION&PROGRAMMING MANUAL(English Version)


Contents
Chapter 1 INSTRUCTION
1.1 Forward
1.2 Appearance1.3 Function explanation
Chapter 2 Notice proceeding of Installation2.1 Safety Notice2.2 Preparation of installation2.3 Notice of installation
Chapter 3 Notice proceeding of Installation3.1 Pedestal stand mode3.2 Wall stand mode
Chapter 4: TECHNICAL PARAMETER4.1 Structure4.2 Rotation Index4.3 Electric Index4.4 Camera module Parameter4.5 IR lamps Parameter
Chapter 5 OPERATION5.1 Auto configure after Power On5.2 Basic Function Operation5.3 Special Function Preset5.4 screen character display
Chapter 6 OSD OPERATION6.1 Operation Introduction6.2 Main Menu6.3 Second Menu
6.3.1 System Menu6.3.2 Screen display setting menu6.3.3 Camera parameter setting menu6.3.4 Pan/Tilt Menu6.3.5 Privacy Zone Menu6.3.6 Power on Mode6.3.7 AUX Control6.3.8 Language setting menu6.3.9 Camera Reset
Appendix 1 Dial Switching SettingAppendix 2 Pelco P ProtocolAppendix 3 Pelco D ProtocolAppendix 4 Troubleshooting and Resolution

Chapter 1: INSTALLATION MANUAL1.1 FORWARD
1.2 Appearance1.3 Function explanation
1.1 FORWARD
This manual introduces the function, installation and operation of the shock-proof integrated high speed camera in
details. Please thoroughly familiarize yourself with the information in this manual prior to installation.
This series integrated camera system is ideal for special occasions, such as airports, frontier defense, customs and
highway etc. It has many features: reliable, stable, airproof, acid water proof, , be able to bear high temperature, aging,
strong wind and so on. It adapt to the following hard conditions, such as high wind power, gap difference temperature
conditions, high electromagnetism and thunder disturb, all day working conditions.
This series system is high speed,changeable system and it can run smoothly and stablely.
This series camera is integrated with high speed decoder, IOP shield, heater, wiper, sun shade and insulating materials.
The optical module with a changeable focus lens which is DSP(Digital Signal Processing) camera.
Protocol P/D is used in this series of cameras. It can support most popular system platforms. This manual will not explain
the operation of other system if connecting with other system, please contact with the system manufacture or dealer.
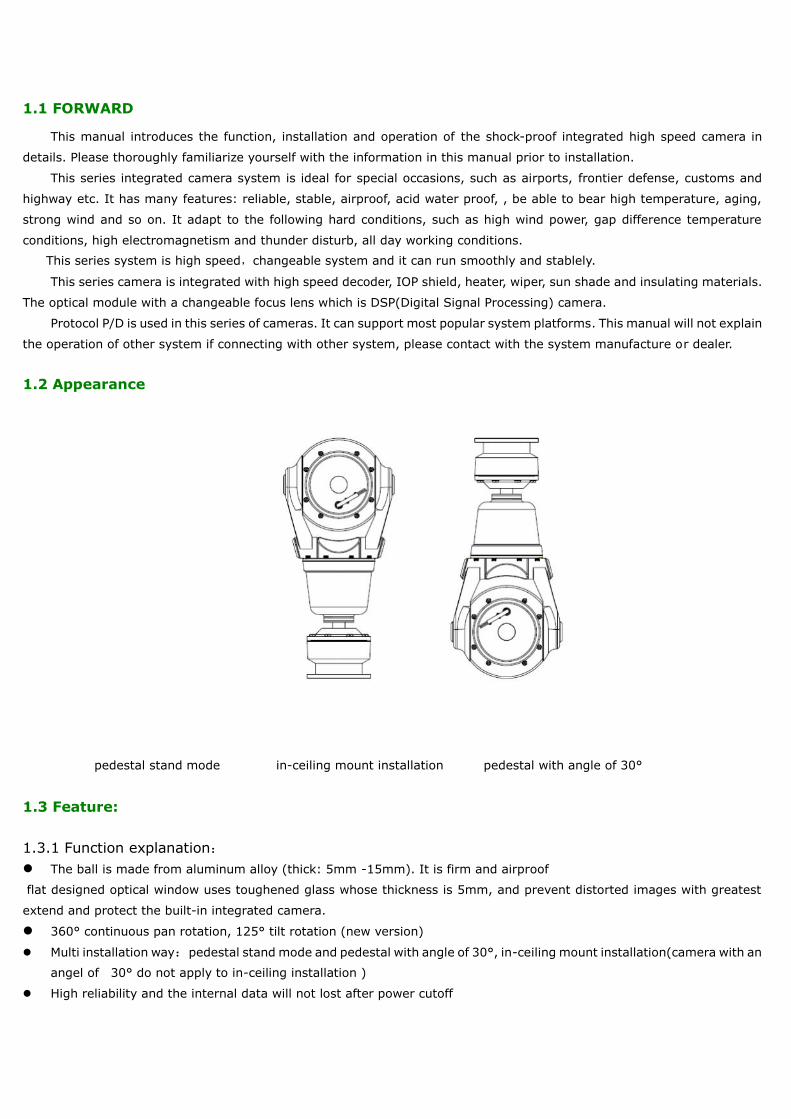
1.2 Appearance
pedestal stand mode in-ceiling mount installation pedestal with angle of 30°
1.3 Feature:
1.3.1 Function explanation: The ball is made from aluminum alloy (thick: 5mm -15mm). It is firm and airproof
flat designed optical window uses toughened glass whose thickness is 5mm, and prevent distorted images with greatest
extend and protect the built-in integrated camera.
360° continuous pan rotation, 125° tilt rotation (new version)
Multi installation way:pedestal stand mode and pedestal with angle of 30°, in-ceiling mount installation(camera with an
angel of 30° do not apply to in-ceiling installation )
High reliability and the internal data will not lost after power cutoff

Pan/Tilt feature: Accurate step motor driving, smart operation, sensitive reaction and accurate orientation
Manual control speed for pan: 0.10 ~900/sec
Manual control speed for tilt: 0.10 ~400/sec
Preset target speed: 900/sec for pan, 400/sec for tilt
Alterable auto scan speed: 10~400 /sec can be set by the in-built menu
Variable Apple peel scan speed: 1º-40º/sec for pan; 1º-20º/sec for tilt
a pair of IR lamps available, more than 100meters of IR distance or laser lamp with distance of 300m(outdoor)
Tilt rotation for pedestal stand mode:-35°~ +90° (0°for pan)
Tilt rotation for pedestal with pitching angle of 30°: -65°~+90° (0°for pan)
Tilt rotation for conversed mount: -35°~ +90° (0°for pan)
Camera Features: Built-in high resolution and variable high zoom camera module
Black Light Compensation function
Selectable Color or B&W image function
Wide Dynamic Video function
Image Stabilizer function
Privacy mask function, can support up to 24 privacy zones
Video Freeze function for high speed presets
Built in Decoder features: Integrated multi decoder controller: PELCO P/D protocol
RS-485 feed back the orientation the pan& tilt
Baud rate: 1200/2400/4800/9600b selectable
Soft address and hard address are selectable
Built-in function menu, the function of camera and pan/tilt can be set.
Environment checking function, check the inside temperature real time;
High reliability and the internal data will not lost after power cutoff
Powering on self-restoring function: users can assign the camera
movement after powering on.
Change speed proportionally function: Pan/tilt speed and
the depth of zoom lens decline proportionally and continuously
The Pan/tilt orientation displays and camera zoom displays
variably. Data feedbacks the PTZ orientation.
With pan auto scan function, the pitching angle can be set
Virtual home position can be set
With apple peel scan function
2 pattern function
4 presets tour function, dwell time can be set
255 preset positions with precision error less than ± 0.10
5 channels fixed time auto activate function, to run the preset movements
3 modes to control the wiper function
Camera orientation display function(N,NE,E,SE,S,SW,W,NW total 8 orientations)
2 alarms input, 1 AUX output

OSD Menu Features:
Built-in Chinese/English menu, easy to switch menu between 2 languages
With OSD passport protect function
Support Chinese/English input, can edit title of the user name, camera position and preset position
Can set, run, clear presets, preset tours, privacy zone by menu
Inside temperature and pan tilt orientation information display
Protect Features: Embed in surge and lightning protector
Meeting IP66 standards, CE,ROHS, FCC standards
1.3.2 Function explanation
Screen menu function (OSD)
It has screen menu function. All information of camera and pan& tilt can be displayed by menu and to set the
function and parameter
Multi-camera control function
Select different camera only by mending dial switch setting, no any hardware or software needed. It supports SONY,
HITACHI cameras and so on.
Proportional pan
Horizontal and tilt speed change automatically with the zoom changes. When zooming wide, the camera speeds down;
then zooming narrow, the camera speeds up to catch better tracing effect.
Auto scan
Auto scan refers to the function of 3600 continuous scan the images at certain speed on the horizontal lever when
keeping the pitching angle unchanged. The left and right limits can be set for continuous scan at certain speed on the
horizontal lever.
AUTO FLIP
When the camera tilts downward and goes just beyond the vertical poison, the dome rotates 180°. When the dome
rotates, the camera starts moving upward as you continue to hold the joystick in the down position. Once you let go of
the joystick after the dome rotates, joystick control returns to normal operation. The auto flip function is useful for
following a person who passes directly beneath the camera.
Preset
Any position of dome camera PTZ can be conserved. We call it preset (pre-established position). The preset can be
transferred and cleaned.
Preset tour
The dome camera will transfer pre- established preset 1-8 every 10 second. It will leap over to next preset position if
position in not among 1-8.
Pattern
The PTZ orientation move track of the camera can be stored, we call it pattern. The pan& tilt’s UP, DOWN, LEFT, RIGHT
and the lens’ FAR, NEAR can be stored. Also we can call the presetting. This function can be used to record and simulate
the operator’s operation process.

Zero test
The camera will turn to horizontal and tilt zero by preset 34 when the inevitable desynchronizing appears or the
operator wants to find zero position during working process. It can reset the orientation and is convenient for operator
Low pharosage (colors/ black& white swift) function
The camera automatically changes CCD pharosage according to surrounding light. Color image changes to black&
white one in low pharosage; black& white image changes to color one in high pharosage.(related to camera)
Auto focus
The camera automatically adjusts lens focus to keep clear image if auto focus mode. Manually operate FAR or NEAR
focus adjustment can also adjust focus. The dome camera will recover auto focus adjustment function if operate
horizontal, vertical rotation or control lens zoom.
Auto iris function
The camera automatically adjusts iris to keep normal brightness in auto iris mode. Manually operate OPEN or CLIOSE
iris adjustment button can also adjust iris. The dome camera will recover auto adjustment function if operate horizontal,
vertical rotation or control lens zoom.
Backlight compensation
The object will become black as the shadow if strong light appears in background. Backlight compensation function
can compensate the brightness automatically to dark objects in bright light background and adjust the brightness
background to avoid the image full of brightness and get clear image. Too strong backlight can make the object
illegibility.
WDR (Wide Dynamic Range)
If there is quite dark and quite bright in the image, WDR can make the darkest and brightest balance to keep clear
image
Privacy Zone
Be sure protected zone be blocked when using the speed dome camera. The covered image moves with the rotation
of pan/tilt and varies with zoom, to keep the privacy zone covered.

Chapter 2 Notice proceeding of Installation2.4 Safety Notice2.5 Preparation of installation2.6 Notice of installation
2.1 Safety NoticeAim to guarantee user to use the product correctly and avoid danger or loss of property.
Defence measure is including two parts “Warning” and “Notice” as follows:
Warning: Ignoring warning may cause death or great damage.
Notice: Ignoring notice may cause damage or loss of property.
Warning remind user to defend potential
factor of causing death and great
damage
Noitce remind user to defend potential
factor of causing damage or loss of
property.
Warning1, Completely according to the national or regional electric specification when installing and using the product.
2, Please using adapters from normal supplier.
Don’t connect multi cameras with one adaptor ( Exceeding the loading of adapter may generate excess heat or fire)
3, Turn off the power supply when connecing or dismantling the camera, never operate the dome camera with power.
4, Completely fix the speed dome camera when installing the item on wall.
5, If there is fume, fetor or noisy of the dome camera, please turn off power supply immediatly and pull out the cable; And
contact with our sales department right away.
6, If the camera can’t work normally, please contact with us and never dismantle it. (We are not responsible for any
unauthorized modification or dismantling.
Notice
Prior to installation and use of this product, the following WARNING should be observed. This product can be only used
in specified range in order to avoid any damage or danger.
Installation and servicing should only be done by qualified service personnel;
It can not be used in unqualified temperature( over 55℃ or below -40℃), high humidity ( otherwise firing may be
caused)
Only use replacement parts recommended by us.
After replacement/repair of this unit’s electronic components, conduct a resistance measurement by multimeter to
avoid short circuit or turnoff.
Please use the soft cloth to clean the camera. Use neuter cleanser if bad smeared. No use the strong or corrosive
cleanser avoiding scuffing.
The installation bracket should be capable of supporting five times the total weight of the integrated camera.
Keep the product away from anti-magnet fied, make sure not to install it shook and impactive area, and never let
other objects fall on the product. (ignoring the tip may cause equirpment damage)
Please thoroughly read this manual prior to installation and operation.

2.2 Preparation of Installation1, Basic requirement
1) All electric working must be accorded to latest electric, fire proof and related specification.
2) Be sure all accessories are included as packing list and application and installation way are as required. If not, please
contact with supplier.
3) Be sure the product is suitable for the working environment.
2, Check installation space.
Make sure there be enough space for the product and accessory.
3, Make sure the wall can afford 5 times of the speed dome camera and accessories.
4, Preparation of cable.
Using video cable according to transmitting distance. Specification of video coaxial cable is:
1) 75 ohm resistance
2) copper core cable
3) 95% copper shield.
2.3 Safety notice of installation.1, Prior installation, read the instruction carefully.
2, To use the power supply and voltage as the label instruction of cable, standard voltage is AC24V, DC12V 、DC24V is
available; Best voltage is AC24V±10%. Long time excess high or low voltage will cause damage of speed dome camera.
Electric power must be kept over 50W, otherwise abnormal reset and control may occur.
3, Don’t aim the lens at high light object, otherwise CCD will abate and no image or image fuzzy.

Chapter 3 Notice proceeding of Installation
3.1 Pedestal stand mode3.2 Wall stand mode

3.1 Pedestal stand mode
Remark: Installation of pedestal stand mode with pitching angle 30°, pedestal reversed mode
and pedestal stand mode is same.
3.1.1 Equipment list:
The mode of camera contains following parts. Inspect each package to make sure all parts are present.
Integrated high speed PTZ camera Power supply box
Camera body 1 pc
Connecting cable 1 pc
Manual 1 copy
Guarantee 1 copy
Certification 1 copy
Glove 1 pair
Power Supply box 1 pcsM8×35 hexagonal Screw 6pcsNut cap spanner 1pcs

Steps of installation:
STEP 1 Locate the floor or impending base level that can support 5 times the weight of camera. Fix the bulgy snail Φ8mm
on the floor or firm surface.
Step 2 fix the camera body on the floor or impending base level
STEP 3 Put power supply, video output, RS485 control input wiring through waterproof connector plugs, and connect them
correspondingly to power supply, video, RS485 wiring of the connecting cable.
Remark: Cable can be from either side or bottom. Just take camera with cable from side for example
Connect the cable refer to the following picture:

STEP 4 screws loose the nut cover on the camera, then you will see the 8 bit dial switch. Set the protocol, boud rate,
address for the camera making reference to Appendix 1. Screw tight the nut cover when finish setting.
STEP 5 turn on the power after finishing check
3.2 Wall pedestal stand mode
Remark: Installation of pedestal stand mode with pitching angle 30° and pedestal stand mode is same.
3.2.1 Equipment list:
The mode of camera contains following parts. Inspect each package to make sure all parts are present.
Integrated high speed PTZ camera Power supply box(undetermined) Wall mout bracket connecting tray
螺母盖

Camera body 1 pc
Connecting cable 1 pc
Wall mount bracket (choosable) 1 pc
Connecting Tray 1 pc
10. outer hexagonal wrench 1pcs
6. inner hexagonal wrench 1pcs
13. two-sides outer hexagonal wrench 1pcs
Manual 1 copy
Guarantee 1 copy
Certification 1 copy
Glove 1 pair
M8X35 inner Hexagon bolt 4pcs
Power Supply box(undetermined) 1 pcs
M8×35 Outer hexagonal screws 6pcs
nut cap spanner 1pcs
3.2.2 Steps of installation:STEP 1 Locate the wall or impending base level that can support 5 times the weight of camera. Fix the bulgy snail Φ8mm
on the floor or firm surface.
STEP 2 If the power supply box is needed, fix the power supply box on the wall firstly, then fix the wall bracket on the
power supply box; If the power supply box is not needed, then fix the wall bracket on the wall directly.

STEP 3 Put power supply, video output, RS485 control input wiring through waterproof connector plugs, and connect them
correspondingly to power supply, video, RS485 wiring of the connecting cable.
Connect the cable refer to the following picture
STEP 4 Install the PTZ camera, insert the cables to the wall bracket, fix the bracket wall and connecting tray with 4pcs M8
x 35 outer hexangular screws, and then fix the PTZ camera with connecting tray by M8 x 30 outer hexangular screws.
STEP 5 screws loose the nut cover on the camera, then you will see the 8 bit dial switch. Set the protocol, bound rate,
address for the camera. Screw tight the nut cover when finish setting.
STEP 6 turn on the power after finishing check
螺母盖
Chapter 4: TECHNICAL PARAMETER4.1 Structure4.2 Rotation Index4.3 Electric Index4.4 Camera module Parameter4.5 IR lamps Parameter
4.1 Structure

●Integrated dome drive: aluminum-alloy
●Standard weight loading: 5KGway of installation: pedestal mount wall mount, in-ceiling mount
the requirement for bracket :can stand more than 5 times the weight of camera
Net weight shipping weight
12kg 14kg
●Operation Environment: indoor/outdoor
●working temperature: -40ºC ~55ºC(outdoor)
4.2 Rotating index:
Pan rotation 360ºcontinuous rotation
Tilt rotation Pedestal stand mode: -35º~+90º
Reversed mount: +35º~-90º
Manual control speed
pan 0.1º~80º/Second manual operation
Tilt 0.1º~40º/Second manual operation
Preset speed
Pan 80º/ Second
Tilt 40º/Second
4.3 Electric index
Input voltage Standard AC24V, DC12V or DC24VC is optional
Input power
Without IR lamps 20W
The minimum requirement for coaxial cable:75 ohms resistance; complete copper core conductor;complete copper shield
layer, shield cover range 95%
4.4 camera, lamps parameter

Mode 26×D/N 26x D/N (with stabilizer) 36×D/N
Optical zoom 26 26 36
Digital zoom 12
Signal system PAL/NTSC
Scan system 2:1 interlacing scan
CCD 1/4”CCD
Effective Pixel 795(H)×596(V)
Horizontal
resolution
>480TVL >480TVL >520TVL
Lens focus F1.4(f=2.5-91mm) F1.4(f=2.5-91mm) F1.4(f=3.4-122.4mm)
Horizontal
angel
3.5mm wide angel 54.2º
91mm narrow angle 2.2º
3.5mm wide angel 54.2º
91mm narrow angle 2.2º
3.4mm wide angel 57.8º,
119mm narrow angle 1.7º
Focus Ctrl Auto/ Manual first
Minimum
illumination
1/50sec Shutter Speed
(color)1.0Lux
1/3Shutter Speed ( color )
0.1Lux
1/50 sec Shutter Speed(color)
1.0Lux
1/3sec Shutter Speed( color)
0.1Lux
1/50 sec Shutter Speed(color)
1.4Lux
1/3sec Shutter Speed( color)
0.1Lux
Sync system built-in Sync
Shutter Speed auto、1/4-1/10000 auto、1/4-1/10000 auto、1/4-1/10000
Iris Ctrl Auto/ Manual first
Gain Ctrl Auto/ Manual
Video Output 1.0±0.2VP-P(75Ω,complex)
S/N Ratio 50dB
White Balance Auto/ Manual

Chapter 5 OPERATION5.1 Auto configure after Power On5.2 Basic Function Operation5.3 Special Function Preset5.4 screen character display

5.1. Auto configure after power onAfter connect all wirings as the instruction and turn on the power, the camera will display its configure information. And after
it finish configure, the menu will show “configure OK” information. If the user sets the POWER UP DONE, the camera will
execute this movement and the tips information disappear; if the user does not set the POWER UP DONE, the tips information
will be kept until the camera receive the control command, then the tips information will disappear and show the system
communication control is normal. If the camera does not receive the control command, the tip information will disappear
automatically after 3 minutes.
Power up display:
Chinese menu English menu
When configuring:
Chinese menu English menu
Configure OK::
Chinese menu English menu

NOTE:
1:1. VERSION 1.0 is the software version number of the camera, and it will change as the product’s upgrade.
2. PROTOCOL P/D is control agreement, can support P, D protocol, and it will change as the dial switch chooses
different protocol.
3. ADDRESS 1 for Protocol P is control address, can support 256 addresses, and it will change as the dial switch
chooses different protocol.
4:ADDRESS 0 for Protocol D is control address, can support 256 addresses, and it will change as the dial switch
chooses different protocol.
5: COMM 2400.N.8.1 is communication information, 2400 is communication baud rate, there are 1200, 2400, 4800,
9600 four baud rate for different dial switch. N.8.1 means no verify, 8 data byte, 1 dwell position.
After the dome finish configure, you can operate the camera as the following way:
5.2 Basic Function OperationOPERATION PROCEDURE
Pan/Tilt 1. To rocker control keyboard, camera will rotate to the operation
direction if the rocker leans to one direction of up/down/left/right.
The speed depends on the distance between rocker and center. The
camera will move slowly to the operation direction if move the
rocker lightly in one direction. The camera will speed to MAX. Speed
of continuously move the rocker in one direction. The camera will
stop when the rocker returns to the center.
2. To 2-dimension control keyboard, the camera will rotate to the
operating direction if press direction key. The speed depends on the
current speed code. To our KBD100 keyboard, press any one of 1-9,
and then press direction key. The pressed number key is the speed
stage. The larger number it is, the higher speed will be. The camera
stops action of release the key.
3. To computer software control, press the direction key of control,
the camera will rotate to the operating direction. The speed
depends on current speed code. Some software can implement
continuous rotation and some only can implement dot movement.
Please refer to the software instruction provided by the
manufacture for detailed operations.
This dome can do 3600 continuous pan rotation and +20~-920
vertical rotations. It will stop rotate when reaching tilt limit.
STOP SCAN Preset 96(hit“9”+“6”+ “Preset”)
PRESET TOUR Preset 98(hit“9”+“8”+ “Preset”)
AUTO SCAN Preset 99(hit“9”+“9”+ “Preset”)
Pattern 1. press pattern scan setting to start
2. run the camera as the designed route
3. press pattern scan setting to stop
4. run the pattern scan, the camera will run the recorded route

ZOOM WIDE 1.Press the ZOOM WIDE button or turn the joystick clockwise until
you have the picture you want
2.release the button or joystick
ZOOM TELE 1.Press the ZOOM TELE button or turn the joystick anti-clockwise
until you have the picture you want
2.release the button or joystick
IRIS OPEN Continuously press key OPEN to open iris and increase brightness
gain
IRIS CLOSE Continuously press key CLOSE to close iris and increase brightness
gain
FOCUS NEAR Continuously press key NEAR, focus become near from far, the
image becomes fog from clear or becomes clear from fog.
FOCUS FAR Continuously press key FAR, focus become far from near, the image
becomes fog from clear or becomes clear from fog.
PRESETS 1. When set presetting, press “preset No.”+ key ”PRESET”(about
for 3 seconds)
2. When use presetting, press “preset No.”+ key ”PRESET”
3. Please refer to operation instruction book for controller.
Wiper Control Preparation:
1, Press preset 95 to enter into OSD menu.
2, Enter WIPER in AUX menu , there will be three kind of wiper
running option: single mode, linkage mode, circle mode.
Way 1:
Presse preset 77 to set it “ON”, wiper stops after 60 seconds, wiper
stops if pressing preset 78 to set it “OFF” within 60secs
Way 2:
Use Pelco keyboard or UV900-KBD keyboard, press “1”+”ON” to set
wiper “ON”, wiper stops after 60 seconds, wiper stops if pressing
“1”+ “OFF”to set it “OFF” within 60secs
IR Lamps Control Way 1:
1, Enter into menu by pressing preset 95
2, Enter INFRARED in the AUX menu. ON means open IR, it will
starts work when the illumination is lower than ILUX. OFF means
close IR.
Way 2:
Pressing Preset 75 to set it “ON”, pressing preset 76 to set it “OFF”
Way 3:
Use Pelco Keyboard or UV900-KBD, pressing “2”+ “ON” to set IR
lamps ON, pressing “1” + “OFF” to set IR lamps OFF.

5.3 Special Function PresetThe following stipulations are for presetting,
Preset() function
1-8 Parking Position
33 180º flip
34 lever home place
63 Repeat to run preset 63, open or close displayed
centre line
64 (Setting) display all privacy zone. (Transfer) close all
privacy zone
75 Open IR lamps
76 Close IR lamps
77 Open Wiper
78 Close Wiper
79 Open zoom in
80 Close zoom in
81 Auto low lux shift
82 Open law lux shift (B&W menu)
83 Close law lux shift (color menu)
84 Open wide dynamic
85 Close wide dynamic
86 Open Backlight Compensation
87 Close Backlight Compensation
88 Open video freeze
89 Close video freeze
92-93 Scan control limit
94 Exit menu
95 Enter menu
96 Scan stop
98 Preset tour
99 Auto scan

5.4 Screen Character DisplayTo keep convenient operation, the camera provides a series of display of screen characters. The displayable characters
including lens zoom, orientation, date, time, week, the inner temperature of the pan/tilt, user header, camera position title,
presets setting, running , clearing, pattern scan setting, close, and running display.
The camera zoom display, display format: X36, 36 means the optical zoom of the camera.
The orientation display: for example:”E”, means the East orientation.
(Total 8 orientation: E, S, W, N, SE, SW, NE, NW)
Date, time, week display: for example: 2009-9-3 Thu
The inner temperature display: for example: 36oC
The user Title: initialization is “Minrray Industry Co.,Ltd”, user can set the title by the menu.
The Camera Position Title: initialization is” Ganlanpeng Garden, No.3030, Caitian Rd” user can set the camera position title
by the menu.
The Presets display:
Set Preset Display: “Set: Preset000001”, means the 001 preset has been set successfully, the title of this preset is
“Preset000001”
Run Preset Display: “Preset000001” means run preset 00001 successfully, the title of this preset is “Preset000001”
Clear Preset Display: “Clear: Preset000001”, means the 001 preset has been cleared successfully, the title of this preset is
“Preset000001”
Set Pattern 1 display: “P 1 Set” means pattern 1 setting starts.
Stop Pattern 1 display: “P 1 Stop” means pattern 1 setting stops.
Run Pattern 1 display: “P 1 Run” means to run the pattern 1 .
Set Pattern 2 display: “P 2 Set” means pattern 2 setting starts.
Stop Pattern 2 display: “P 2 Stop” means pattern 2 setting stops.
Run Pattern 2 display: “P 2 Run” means to run the pattern 2 .

Chapter 6 OSD OPERATION6.1 Operation Introduction6.2 Main Menu6.3 Second Menu
6.3.1 System Menu6.3.2 Screen display setting menu6.3.3 Camera parameter setting menu6.3.4 Pan/Tilt Menu6.3.5 Privacy Zone Menu6.3.6 Power on Mode6.3.7 AUX Control6.3.8 Language setting menu6.3.9 Camera Reset

English menu index

6.1 Operation IntroductionThe basic operation of the menu includes: move menu bar, enter next menu, turn back to previous menu, change setting
value, confirm change and cancel change.
Control up and down command: move menu bar and change setting.
Iris open command: enter camera menu or select menu to verify change.
Iris closed command: return former menu and cancel change.
This series camera is stipulated according to P/D protocol, and use preset position No.95 to open the main menu. For
other protocol equipment, please refer to protocol instruction.
Press “9”+”5”+”PRESET”
Press key 95+ PRESET to enter dome camera menu
Press “9”+”4”+”PRESET”
Press key 94+ PRESET to exit dome camera menu
NOTE:
1 “< >”symbol means it contains next menu
2 use “up, down” key to move cursor “→”, use “OPEN or CLOSE” key to confirm or exit the menu
3 when press “OPEN” key, the cursor becomes”★”, then can use “UP or DOWN” key to amend the parameter;
press OPEN key when finish your amendment.
6.2 MAIN MENUChinese Menu English Menu
(System Information)
display all the system information and Pan/Tilt address setting
(Display Setup)
set all kinds of screen display information
(Camera)
set the parameters of the camera
(Pan/Tilt)
set the parameters of the Pan/Tilt

(Privacy Zone)
set the parameters of the privacy zone
(Power Up)
set the power-up action
(Time)
set the clock and the time finishing the assignment
(Aux)
set the wiper mode and the IR lamps switch
(Alarm)
set the action responding to the alarm input
(Language)
set the language
(Reset)
reset the camera
(Exit)
exit the menu
6.3 Second Menu6.3.1 System Menu
Chinese Menu English Menu
(Type)
The model of the Pan/Tilt
(Comm)
Comm,4800: baud rate, N: no verify, 8: 8 data byte, 1: I dwell position

(Protocol)
The type of the protocol will be different based on the change of the dial switch.
(Address P)
Address P, Pan/Tilt will respond to the control command based on the address.
(Address D)
Address D, Pan/Tilt will respond to the control command based on the address.
(Version)
Version number, it will change with the product’s upgrade
(Enable Password)
Open or close the menu password protection function
(Auto Exit Time)
Auto exit time: 2、3、4、5、6、7、8、9、10 minutes choosable
(<Address Set>)
Address set, the type include: software address, hardware address. Press the OPEN for Iris, address set menu will be
displayed in the screen. If the address using is hardware address, the menu will be as follows:
Chinese Menu English Menu
(Addr Type)
Address type: software address and hardware address. The software address will be set by the user in the menu of Address
Set, while the hardware address will be decided by the dial switch.
(HardAddr P)
HardAddr P, Pan/Tilt will respond to the control command based on the address.
(HardAddr D)
HardAddr D, Pan/Tilt will respond to the control command based on the address.
(Back)
Return to the former menu
If the address using is software address, the menu will be as follows:

Chinese Menu English Menu
Ways to change the software address:
The first step: move the cursor to the confirm code according to the number of the Identify Code and press the open button,
the first X will begin to flicker, then edit the inputted numerical value
The second step; Press the rightward button after the first number was inputted, the flicker of the first number will be
cancelled and the second X will begin to flicker, then input the second number according to the former way. The third and
forth number can edited in the same way.
The third step; Input the 4 numbers that are same with the Identify Code and press OPEN button to confirm, the screen will
display “Correct Identify Code” and English menu will display ”Right” if the confirmed Identify Code is identical to the number
that system offered, the screen will display “Wrong Identify Code” and English menu will display ” Wrong” if the Confirmed
Identify Code is different to the number that system offered.
Fourth, remove cursor to Protocol P or Protocol D and use UP/DOWN to change Protocol P address or Protocol D address to
the targeted address. (Once one of the address changed, the other one will change automatically)
Fifth, after changement, open IRIS to affirm the address; and on the bottom of the screen it will note: Please Change
Controller’s Address, which means the address, has been changed successfully and the controller’s address also needs to be
changed.
(Back)
Return to the former menu
Note: Except the “ Enable Password”, “ Auto Exit Time”, : Address Set”, other items can only be displayed, can not be changed
in this menu.
6.3.2 Screen Display Setting MenuChinese Menu English Menu

(User Name Label) Default Setting::(Off)
Setting mode: On and Off
(<User Name Set>)
Set the user self-defined Label: press the Open for Iris, and user Name Set menu will be displayed in the screen
Chinese Menu English Menu
English menu label input step:

(Camera Label) Default setting:(Off)
Setting mode: On and Off
(<Camera Label Set>)
Set the Camera Label, press the Open for Iris, Camera Label Set menu will be displayed in the screen. The process of
Camera Label Set and User Label Set are the same.
Chinese Menu English Menu

(System Time Label) Default Setting:(Off)
Setting mode: On and Off
(< System Time Set>)
System Time Set: press Open in Iris, the System Time Set menu will be displayed in the screen
Chinese Menu English Menu
Day Default Setting: Local Time
Time Default Setting: Beijing Time
Orientation Label Default Setting: On
Setting mode: On and Off
Temperature Default Setting: Off
Setting mode: On and Off
Zoom Label Default Setting: On
Setting mode: On and Off
(Back)
Return to the former menu
6.3.3 Camera parameter setting menuChinese Menu English Menu

Note: The function of STABILIZER, Video Freeze will be only available when the camera has such functions. If the camera has,
it can be set in the menu. If camera hasn’t, None item will be showed in the menu, and can not be set.
AUTO FOCUS(ZOOM RANGE): default setting is ON
ON&OFF,.
ZOOM LIMIT: default setting is: X432
Different cameras will show different zoom limit
ZOOM SPEED : default setting is:5
There are 0~7 grade zoom speed, different cameras will show different zoom speed.
SHARPNESS LEVEL: default setting is:AUTO
There are0~15 grade sharpness, but it available only when AUTO SHARPNESS setting is ON
BACKLIGHT COMP default setting is:OFF
ON&OFF,
VIDEO FREEZE: default setting is:OFF
There are two video freeze modes: ON& OFF
DAY/NIGHT: default setting is:AUTO
AUTO, DAY and NIGHT can be chosen
STABILIZER :default setting is:OFF
There are two stabilizer modes: ON& OFF, and it only available in the menu for camera which has this function.
(<Next>)
Chinese Menu English Menu
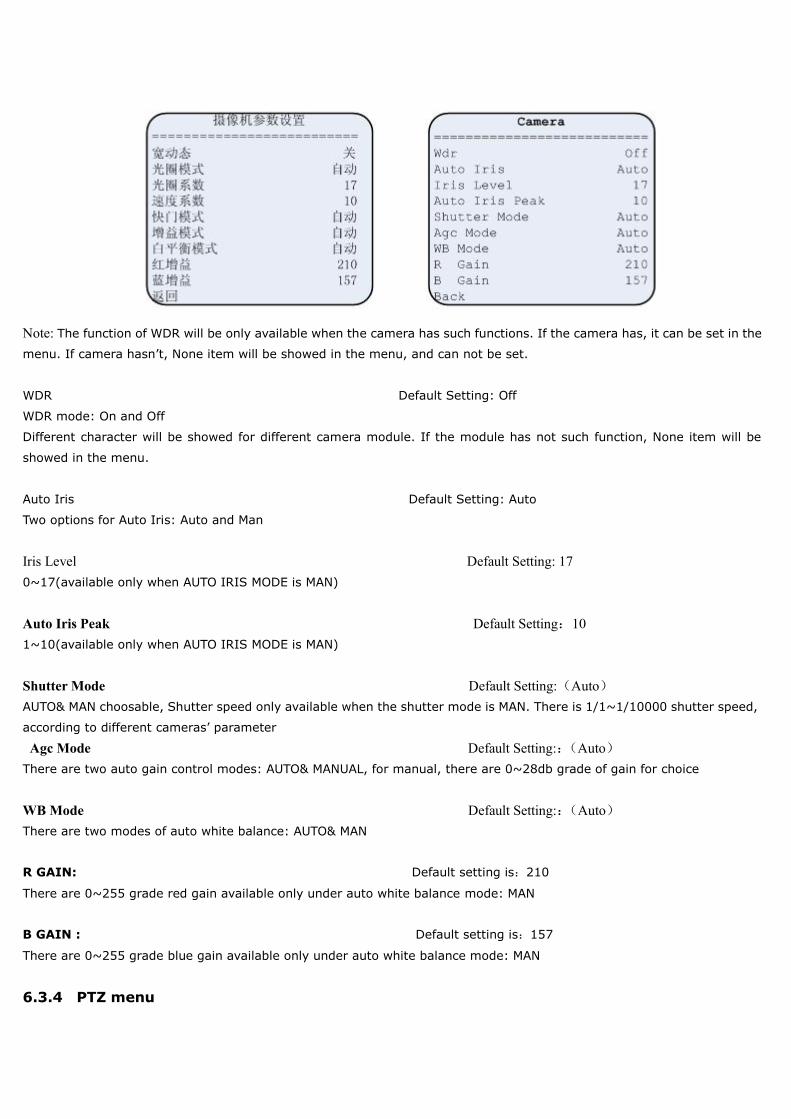
Note: The function of WDR will be only available when the camera has such functions. If the camera has, it can be set in the
menu. If camera hasn’t, None item will be showed in the menu, and can not be set.
WDR Default Setting: Off
WDR mode: On and Off
Different character will be showed for different camera module. If the module has not such function, None item will be
showed in the menu.
Auto Iris Default Setting: Auto
Two options for Auto Iris: Auto and Man
Iris Level Default Setting: 170~17(available only when AUTO IRIS MODE is MAN)
Auto Iris Peak Default Setting:101~10(available only when AUTO IRIS MODE is MAN)
Shutter Mode Default Setting:(Auto)AUTO& MAN choosable, Shutter speed only available when the shutter mode is MAN. There is 1/1~1/10000 shutter speed,
according to different cameras’ parameter
Agc Mode Default Setting::(Auto)There are two auto gain control modes: AUTO& MANUAL, for manual, there are 0~28db grade of gain for choice
WB Mode Default Setting::(Auto)There are two modes of auto white balance: AUTO& MAN
R GAIN: Default setting is:210
There are 0~255 grade red gain available only under auto white balance mode: MAN
B GAIN : Default setting is:157
There are 0~255 grade blue gain available only under auto white balance mode: MAN
6.3.4 PTZ menu

Chinese Menu English Menu
Mount Mode Default setting is:Up
There are three kinds of installation: Up, Down, Up30
Auto Flip Default setting is:OffON and OFF for choice
Proportional Pan Default setting is:OffON and OFF for choice
<Scan Speed Set>Chinese Menu English Menu
Pan Scan Speed Default setting is:10O/SPan Scan Speed:1~40 O/S
Tilt Scan Speed Default setting is:10O/STilt Scan Speed:1~20 O/S
<Limit Set>Chinese Menu English Menu

Manual Limit Default setting is:Off
Manual Limit: On and Off
Scan Limit Default setting is:Off
Scan Limit: On and Off
<Park Set>Chinese Menu English Menu
Park Action Default setting is:None
Park Action mode: None、Preset1~Preset8、Scan、P&T Scan、Tour、Pattern1、Pattern2 14 choices selectable
Park Time Default setting is:10 m
Park Time:2~60 Min selectable
<Preset Tour>
Chinese Menu English Menu

Tour NO. Default setting:No. 1
Tour No.:1~4 tour line for choice
<Tour Set>Chinese Menu English Menu
(NO.)
Tour No.: 1~8 for choice
(Preset NO.)
Preset No.: 1~32 for choice
(Time(S))
Time: 5~99 seconds for choice. It is the dwell time after preset reach the point.
(Tour Run)
Press Open key, there will be tip in the right of this column: confirm (Flash status); press Open once more, menu shows
Success. PTZ system begin to execute Preset Tour, the preset line is the line with tour No.
(Tour Clear)
Press Open key, there will be tip in the right of this column: confirm (Flash status); press Open once more, menu shows
Success, clear the tour successfully. If enter Tour Parameter Setting menu, the column of Preset No, will shows None, and
time shows as “0”
(<Preset Set>)Chinese Menu English Menu

Preset No.: 1~256 for choice, among them, 33、34、75~99 is the special preset. The special preset can be run in the
menu(set and call preset has the same function). When enter the menu, the preset No, will be shows as No.1.
(Title)
Note: English Label can only contain 12 characters.
Preset Label: Based on different preset No, users can edit theirselves’ preset label. Enter this column, Edit Preset Label
item will be showed in the screen. For the setting of this item, please make reference to the Edit User Label item.
Chinese Menu English Menu
(State)
State: Display the status of selected preset position. States include: Defined and Undefined.
(Set)
Set preset: cursor stays in this column, press Open, and enter the Set preset item; Then move the PTZ to the position
user want to set preset, press Open again, the preset set action has been finished.
(Call)
Call: cursor stays in this column, press Open, means confirm. Press Open again, the preset call has been finished; the
PTZ will run to the preset position quickly.
(Clear)
Clear preset: cursor stays in this column, press Open, means confirm. Press Open again, the preset clear has been
finished
(Back)
Return to the previous menu
(Set Azimuth Zero)
Set Azimuth Zero: Self-define Set Azimuth Zero, user can move the camera to the place which need to be defined, then
press Open to confirm the set.
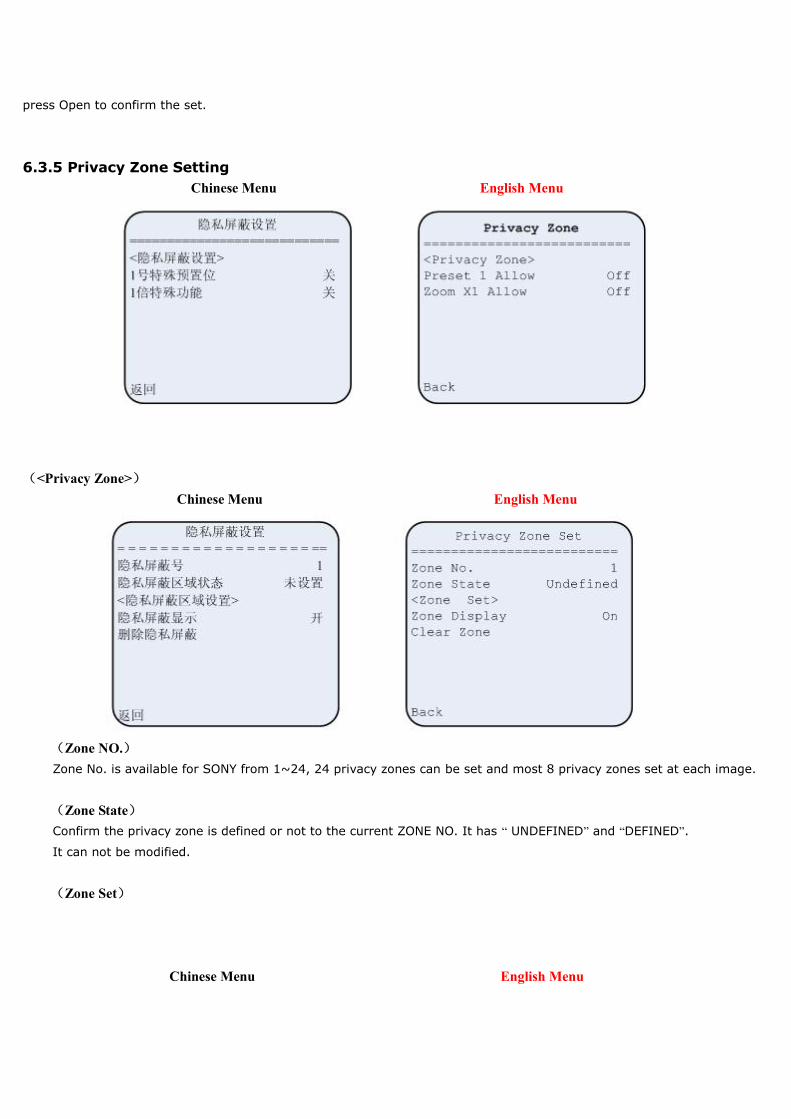
6.3.5 Privacy Zone SettingChinese Menu English Menu
(<Privacy Zone>)Chinese Menu English Menu
(Zone NO.)Zone No. is available for SONY from 1~24, 24 privacy zones can be set and most 8 privacy zones set at each image.
(Zone State)Confirm the privacy zone is defined or not to the current ZONE NO. It has “ UNDEFINED” and “DEFINED”.
It can not be modified.
(Zone Set)
Chinese Menu English Menu

Note: When it is selected, a central line appears in the image, user can change the position by moving the vertical and
horizontal position. When user chooses a effective position and presses “OPEN”, a new privacy zone is defined, exit <ZONE
POSITION SET> and central line is closed; If user chooses a effective position and presses “Close”, prior privacy zone is kept,
exit <ZONE POSITION SET> and central line is closed; If user doesn’t choose effective position, pressing “OPEN” is valid and
pressing “close” to exit <ZONE POSITION SET>, central line is closed.
(Zone Height)Zone height is optional from 1~255.
(Zone Width)Zone width is optional from 1~255.
(Zone Color)Zone color concludes BLACK、GRAY1、GRAY2、GRAY3、GRAY4、GRAY5、GRAY6、WHITE、RED、GREEN、BLUE、CYAN、YELLOW、
MAGENTA
(Transparency)
Zone transparency has “ON” and “OFF”
(Back)
Return to the previous menu
(Zone Display)
It has “ ON” and “OFF”. When it is “ON”, current privacy zone displays; when it is “OFF”, current privacy zone closes.
(Clear Zone)
Delete current privacy zone.
(Preset 1 Allow) Default setting is :(Off)
Preset 1 special function has selection of “ON” or “OFF”
Note: “ON” means allow preset 1 special function; “OFF” means forbid preset 1 special function

When allowed preset 1 special function, on non-menu status, PTZ camera run to preset 1 position after transfering preset 1,
all privacy zones are closed. Privacy zone appears as soon as PTZ camera move or zoom at preset 1.
ZOOM X1 ALLOW(1 zoom special function) default setting is:OFF
Zoom x 1 Allow has selection of “ON” and “OFF”
Note: “ON” means allow ZOOM x1 ALLOW special function; “OFF” means forbid ZOOM x1 ALLOW.
When ZOOM X1 ALLOW opens, optical zoom in zoom X1 status, all privacy zones won’t display; over zoom X1, all privacy
zones display. When ZOOM X1 ALLOW closes, all privacy zones display in any zoom status.
Special Circs: Under the circumstance that ZOOM x1 ALLOW and PRESET 1 ALLOW are both “ON”, all privacy zones close
when run the preset 1; when the camera moves or zooms at Preset 1, all privacy zones appear if the optical zoom is more
than 1, and all privacy zones disappear if the optical zoom is less than 1. When camera runs to the other preset position,
privacy zones won’t display if the optical zoom is less than 1 and privacy zone displays if the optical zoom is more than 1.
(Back)
Return to the previous menu
6.3.6 Power Up MenuChinese Menu English Menu
(Power Up Action) default setting is:(None)
There are 15 power up action modes: NONE、1PRESET~8PRESET、 SCAN、P & T Scan、PRESET TOUR、Pattern1、Pattern2、
return to the status before power-off.
POWER UP TIME : default setting is:10min
2 ~10 minutes for choice
(Back)
Return to the previous menu
6.3.6 Task SettingChinese Menu English Menu

Note: 1 Regular time period settings do not allow the various time periods overlap.
2 When running the power-up action or park action, the current action will stop when the set time arrives; then execute
the task.
3 During the task time, the current action will stop if the user operate the dome. If within 10 sec no other operation and
it is still in the task time period, the task action will run continuously.
(Task) Default setting is:(None)
Task: Power-on option: There are 14 power up action modes: NONE、1PRESET~8PRESET、SCAN、P & T Scan、PRESET TOUR、
Pattern1、Pattern2
(Start Time) Default setting is:00:00
The format of Start Time:hour:minute。hour:00~23,minute:00~59。
(End Time) Default setting is:00:00
The format of End Time:hour:minute。hour:00~23,minute:00~59。
(Back)
Return to the previous menu
6.3.7 Aux MenuChinese Menu English Menu
(Wiper Mode) default setting is:(Single)The wiper control output has three kind of options: SINGLE, CYCLE, COMBINE
INFRARED(IR lamps control) default setting is:OFF

IR lamps control can choose ON、OFF
When the IR lamp is OFF, the IR lamp will not work when it is above 1Lux; When the IR lamp is On, the IR lamp will work when
it is below 1Lux, and then it will stop work when it is above 1Lux.
(Back)
Return to the previous menu
6.3.8Alarm Set MenuChinese Menu English Menu
(Alarm1) default setting is:(None)Alarm input is for the situation when there is alarm, the action speed dome need to execute. There are 14 action modes:
NONE、1PRESET~8PRESET、 SCAN、P & T Scan、PRESET TOUR、Pattern1、Pattern2
(Alarm2) default setting is:(None)
Alarm input is for the situation when there is alarm, the action speed dome need to execute. There are 14 action modes:
NONE、1PRESET~8PRESET、 SCAN、P & T Scan、PRESET TOUR、Pattern1、Pattern2
(Back)
Return to the previous menu
6.3.9 Language setting menuChinese Menu English Menu
(Language) default setting is : English
Chinese and English for option
(Back)
Return to the former menu
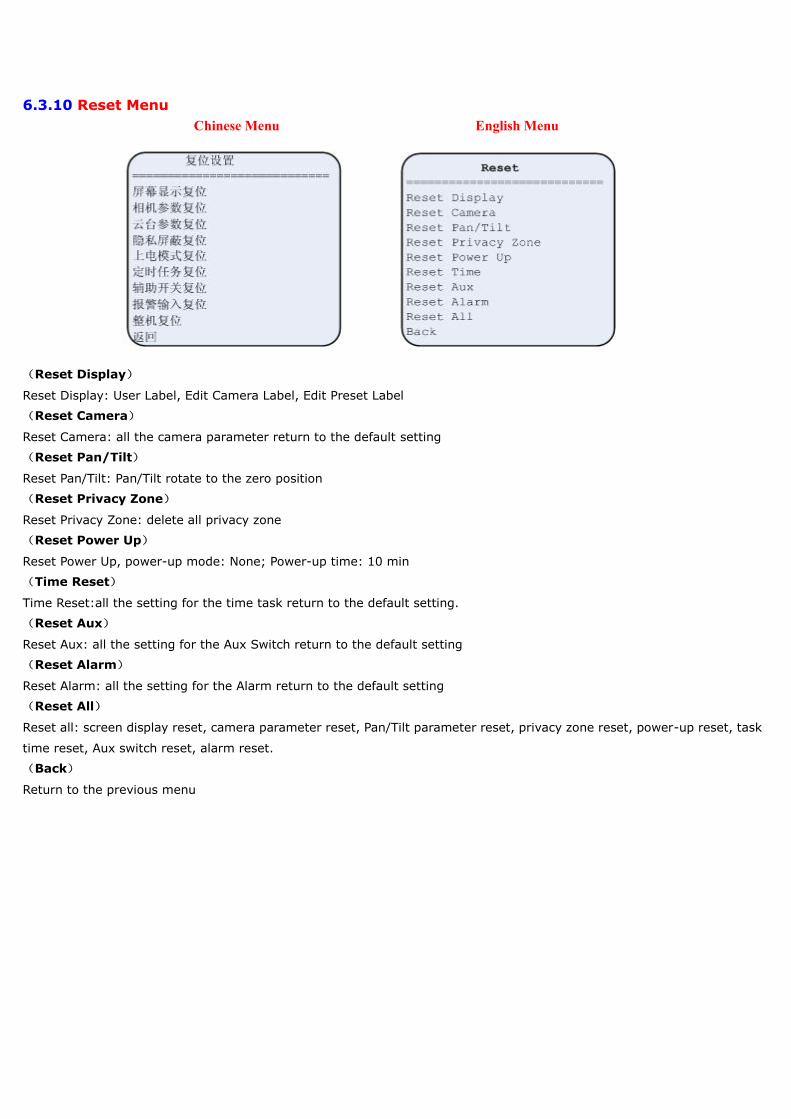
6.3.10 Reset MenuChinese Menu English Menu
(Reset Display)
Reset Display: User Label, Edit Camera Label, Edit Preset Label
(Reset Camera)
Reset Camera: all the camera parameter return to the default setting
(Reset Pan/Tilt)
Reset Pan/Tilt: Pan/Tilt rotate to the zero position
(Reset Privacy Zone)
Reset Privacy Zone: delete all privacy zone
(Reset Power Up)
Reset Power Up, power-up mode: None; Power-up time: 10 min
(Time Reset)
Time Reset:all the setting for the time task return to the default setting.
(Reset Aux)
Reset Aux: all the setting for the Aux Switch return to the default setting
(Reset Alarm)
Reset Alarm: all the setting for the Alarm return to the default setting
(Reset All)
Reset all: screen display reset, camera parameter reset, Pan/Tilt parameter reset, privacy zone reset, power-up reset, task
time reset, Aux switch reset, alarm reset.
(Back)
Return to the previous menu

Appendix 1 Dial Switching SettingAppendix 2 Pelco P ProtocolAppendix 3 Pelco D ProtocolAppendix 4 Troubleshooting and Resolution
Appendix 1

1.1 CAMERA CONTROL
Note: When one control bus controls several(more than 2)dome cameras, it needs merging a 120ohm resistance at
anode& cathode Com 485 in the farthest dome camera in order to ensure the normal work of control signal.
1.2 Switch setting for SW1
Note: Switch SW1 is used to set protocol, camera and baud rate
Protocol, camera
, baud rate
SW1 setting
1 2 3 4 5 6 7 8VCL OFF OFF —— —— —— —— —— ——PELCO-P ON OFF —— —— —— —— —— ——PELCO-D OFF ON —— —— —— —— —— ——FV ON ON —— —— —— —— —— ——
SONY —— —— ON OFF ON OFF —— ——HITACHI —— —— OFF ON ON OFF —— ——
1200 —— —— —— —— —— —— OFF OFF2400 —— —— —— —— —— —— ON OFF4800 —— —— —— —— —— —— OFF ON9600 —— —— —— —— —— —— ON ON
1.3 Switch setting for SW2
Note: Switch SW2 is used to set receiving address.
Protocol P addresses setting:
AddressSwitch setting
SW2-1 SW2-2 SW2-3 SW2-4 SW2-5 SW2-6 SW2-7 SW2-8
1 OFF OFF OFF OFF OFF OFF OFF OFF
2 ON OFF OFF OFF OFF OFF OFF OFF
3 OFF ON OFF OFF OFF OFF OFF OFF
4 ON ON OFF OFF OFF OFF OFF OFF
5 OFF OFF ON OFF OFF OFF OFF OFF
6 ON OFF ON OFF OFF OFF OFF OFF
7 OFF ON ON OFF OFF OFF OFF OFF
8 ON ON ON OFF OFF OFF OFF OFF
9 OFF OFF OFF ON OFF OFF OFF OFF
10 ON OFF OFF ON OFF OFF OFF OFF
11 OFF ON OFF ON OFF OFF OFF OFF
12 ON ON OFF ON OFF OFF OFF OFF
13 OFF OFF ON ON OFF OFF OFF OFF
14 ON OFF ON ON OFF OFF OFF OFF
15 OFF ON ON ON OFF OFF OFF OFF
16 ON ON ON ON OFF OFF OFF OFF
17 OFF OFF OFF OFF ON OFF OFF OFF

18 ON OFF OFF OFF ON OFF OFF OFF
19 OFF ON OFF OFF ON OFF OFF OFF
20 ON ON OFF OFF ON OFF OFF OFF
21 OFF OFF ON OFF ON OFF OFF OFF
22 ON OFF ON OFF ON OFF OFF OFF
23 OFF ON ON OFF ON OFF OFF OFF
24 ON ON ON OFF ON OFF OFF OFF
25 OFF OFF OFF ON ON OFF OFF OFF
26 ON OFF OFF ON ON OFF OFF OFF
27 OFF ON OFF ON ON OFF OFF OFF
28 ON ON OFF ON ON OFF OFF OFF
29 OFF OFF ON ON ON OFF OFF OFF
30 ON OFF ON ON ON OFF OFF OFF
31 OFF ON ON ON ON OFF OFF OFF
32 ON ON ON ON ON OFF OFF OFF
33 OFF OFF OFF OFF OFF ON OFF OFF
34 ON OFF OFF OFF OFF ON OFF OFF
35 OFF ON OFF OFF OFF ON OFF OFF
36 ON ON OFF OFF OFF ON OFF OFF
37 OFF OFF ON OFF OFF ON OFF OFF
38 ON OFF ON OFF OFF ON OFF OFF
39 OFF ON ON OFF OFF ON OFF OFF
40 ON ON ON OFF OFF ON OFF OFF
41 OFF OFF OFF ON OFF ON OFF OFF
42 ON OFF OFF ON OFF ON OFF OFF
43 OFF ON OFF ON OFF ON OFF OFF
44 ON ON OFF ON OFF ON OFF OFF
45 OFF OFF ON ON OFF ON OFF OFF
46 ON OFF ON ON OFF ON OFF OFF
47 OFF ON ON ON OFF ON OFF OFF
48 ON ON ON ON OFF ON OFF OFF
49 OFF OFF OFF OFF ON ON OFF OFF
50 ON OFF OFF OFF ON ON OFF OFF
51 OFF ON OFF OFF ON ON OFF OFF
52 ON ON OFF OFF ON ON OFF OFF
53 OFF OFF ON OFF ON ON OFF OFF
54 ON OFF ON OFF ON ON OFF OFF
55 OFF ON ON OFF ON ON OFF OFF
56 ON ON ON OFF ON ON OFF OFF
57 OFF OFF OFF ON ON ON OFF OFF
58 ON OFF OFF ON ON ON OFF OFF
59 OFF ON OFF ON ON ON OFF OFF
60 ON ON OFF ON ON ON OFF OFF

61 OFF OFF ON ON ON ON OFF OFF
62 ON OFF ON ON ON ON OFF OFF
63 OFF ON ON ON ON ON OFF OFF
64 ON ON ON ON ON ON OFF OFF
------- ------ ------ ------ ------- ----- ------ ------ ------
255 OFF ON ON ON ON ON ON ON
256 ON ON ON ON ON ON ON ON
Protocols D address setting:
AddressSwitch setting
SW2-1 SW2-2 SW2-3 SW2-4 SW2-5 SW2-6 SW2-7 SW2-8
1 ON OFF OFF OFF OFF OFF OFF OFF
2 OFF ON OFF OFF OFF OFF OFF OFF
3 ON ON OFF OFF OFF OFF OFF OFF
4 OFF OFF ON OFF OFF OFF OFF OFF
5 ON OFF ON OFF OFF OFF OFF OFF
6 OFF ON ON OFF OFF OFF OFF OFF
7 ON ON ON OFF OFF OFF OFF OFF
8 OFF OFF OFF ON OFF OFF OFF OFF
9 ON OFF OFF ON OFF OFF OFF OFF
10 OFF ON OFF ON OFF OFF OFF OFF
11 ON ON OFF ON OFF OFF OFF OFF
12 OFF OFF ON ON OFF OFF OFF OFF
13 ON OFF ON ON OFF OFF OFF OFF
14 OFF ON ON ON OFF OFF OFF OFF
15 ON ON ON ON OFF OFF OFF OFF
16 OFF OFF OFF OFF ON OFF OFF OFF
17 ON OFF OFF OFF ON OFF OFF OFF
18 OFF ON OFF OFF ON OFF OFF OFF
19 ON ON OFF OFF ON OFF OFF OFF
20 OFF OFF ON OFF ON OFF OFF OFF
21 ON OFF ON OFF ON OFF OFF OFF
22 OFF ON ON OFF ON OFF OFF OFF
23 ON ON ON OFF ON OFF OFF OFF
24 OFF OFF OFF ON ON OFF OFF OFF
25 ON OFF OFF ON ON OFF OFF OFF
26 OFF ON OFF ON ON OFF OFF OFF
27 ON ON OFF ON ON OFF OFF OFF
28 OFF OFF ON ON ON OFF OFF OFF
29 ON OFF ON ON ON OFF OFF OFF
30 OFF ON ON ON ON OFF OFF OFF
31 ON ON ON ON ON OFF OFF OFF

32 OFF OFF OFF OFF OFF ON OFF OFF
33 ON OFF OFF OFF OFF ON OFF OFF
34 OFF ON OFF OFF OFF ON OFF OFF
35 ON ON OFF OFF OFF ON OFF OFF
36 OFF OFF ON OFF OFF ON OFF OFF
37 ON OFF ON OFF OFF ON OFF OFF
38 OFF ON ON OFF OFF ON OFF OFF
39 ON ON ON OFF OFF ON OFF OFF
40 OFF OFF OFF ON OFF ON OFF OFF
41 ON OFF OFF ON OFF ON OFF OFF
42 OFF ON OFF ON OFF ON OFF OFF
43 ON ON OFF ON OFF ON OFF OFF
44 OFF OFF ON ON OFF ON OFF OFF
45 ON OFF ON ON OFF ON OFF OFF
46 OFF ON ON ON OFF ON OFF OFF
47 ON ON ON ON OFF ON OFF OFF
48 OFF OFF OFF OFF ON ON OFF OFF
49 ON OFF OFF OFF ON ON OFF OFF
50 OFF ON OFF OFF ON ON OFF OFF
51 ON ON OFF OFF ON ON OFF OFF
52 OFF OFF ON OFF ON ON OFF OFF
53 ON OFF ON OFF ON ON OFF OFF
54 OFF ON ON OFF ON ON OFF OFF
55 ON ON ON OFF ON ON OFF OFF
56 OFF OFF OFF ON ON ON OFF OFF
57 ON OFF OFF ON ON ON OFF OFF
58 OFF ON OFF ON ON ON OFF OFF
59 ON ON OFF ON ON ON OFF OFF
60 OFF OFF ON ON ON ON OFF OFF
61 ON OFF ON ON ON ON OFF OFF
62 OFF ON ON ON ON ON OFF OFF
63 ON ON ON ON ON ON OFF OFF
64 OFF OFF OFF OFF OFF OFF ON OFF
------- ------ ------ ------ ------- ----- ------ ------ ------
254 OFF ON ON ON ON ON ON ON
255 ON ON ON ON ON ON ON ON
Appendix 2: P control protocol
1. Command format

BYTE VALUE FUNCTION
1 $A0 STX(start transmission)
2 $00 to $FF Address
3 Data byte 1
4 Data byte 2
5 Data byte 3
6 Data byte 4
7 $AF ETX(end transmission)
8 $00-$FF Check sum (XOR 1-7 bytes)
2. Instruction command
Bit number 7 6 5 4 3 2 1 0
Data 1 0 Camera on Auto scan
on
Camera
on/off
Iris
Close
Iris
Open
Focus
Near
Focus far
Data 2 0 Zoom Wide Zoom Tele Tile Down Tile Up Pan
Left
Pan
Right
0 (for
pan/tilt)
1 (extended
Data 3 Pan speed $00 to $3F and $40 for turbo
Data 4 Tilt speed $00 to $3F
3. Special command format
COMMAND DATA BYTE1 DATA BYTE2 DATA BYTE3 DATA BYTE4
Set Preset .xx 00 03 00 01 to FF
Clear Preset .xx 00 05 00 01 to FF
Go to preset .xx 00 07 00 01 to FF
Flip 00 07 00 21
Zero pan position 00 07 00 22
Set aux. xx 00 09 00 01 to 08
Clear aux. xx 00 0B 00 01 to 08

Pattern start 00 1F 00 00
Pattern stop 00 21 00 00
Run pattern 00 23 00 00
Start Sequence
prepos
81 81 00 00
Insert prepos in stack 82 81 00 Prepos number
Delete prepos from
stack
83 81 00 Prepos number
Clear seq. Stack 84 81 00 00
Show seq. Stack 85 81 00 00
Sequence dwell time 86 81 00 (0-255)second
Home function 87 81 Prepos number 10X1 sec
time-out
Auto-panning speed 88 81 1 (0-255)speed
Auto-panning limit 88 81 2 1(left)/2(right)
Auto-panning start 88 81 3 0
PT Speed 89 81 P speed(0-255) T speed(0-255)
Example: No.1 address rotator speed:30
Right A0 00 00 02 30 00 AF 3D
Left A0 00 00 04 30 00 AF 3B
Up A0 00 00 08 00 30 AF 37
Down A0 00 00 10 00 30 AF 2F
NEAR A0 00 02 00 00 00 AF 0D
FAR A0 00 01 00 00 00 AF 0E
OPEN A0 00 04 00 00 00 AF 0B
CLOSE A0 00 08 00 00 00 AF 07
Appendix 3: PELCO D control protocol

1, Command format:
BYTE VALUE FUNCTION
1 $FF STX (start transmission)
2 $01 TO $1F Address
3 Data byte 1
4 Data byte 2
5 Data byte 3
6 Data byte 4
7 $00-$FF Checksum(add byte 2,3,4,5,6)
2, Instruction command:
Bit number 7 6 5 4 3 2 1 0
Data1 0 0 0 0 0 Iris close Iris open Focus near
Data2 Focus
far
Zoom
wide
Zoom
tele
Tilt
down
Tilt
up
Pan left Pan right 0(for pan/tilt)
1 (extended)
Data3 Pan speed $00 to $40 for turbo
Data4 Tilt speed $00 to $3F
3, Special command format:
COMMAND DATA BYTE1 DATA BYTE2 DATA BYTE3 DATA BYTE4
Set preset. xx 00 03 00 01 to FF
Clear preset. xx 00 05 00 01 to FF
Go to preset. xx 00 07 00 01 to FF
Flip (rotate 180) 00 07 00 21
Zero pan position 00 07 00 22
Set aux. xx 00 09 00 01 to 08
Clear aux. xx 00 0B 00 01 to 08
Pattern start 00 1F 00 00
Pattern stop 00 21 00 00
Run pattern 00 23 00 00
Example: No.1 address
Right FF 01 00 02 20 00 23
Left FF 01 00 04 23 00 28
Up FF 01 00 08 00 23 2C
Down FF 01 00 10 00 23 34
OPEN FF 01 02 00 00 00 03
CLOSE FF 01 04 00 00 00 05
NEAR FF 01 01 00 00 00 02
FAR FF 01 00 80 00 00 81
Appendix 4, TROUBLESHOOTING
1. Image
Ask: No image displayed monitor?
→First check if the power supply wire connection, voltage, indicator and dome camera work well, and then check the
video wires, or it may be the drive trouble.
Ask: Image becomes black after self check, but can be controlled
→Disturb of control system changes the camera iris parameters. Enter the camera menu then reset camera.
Ask: Image becomes fog when dome camera connects with hard disk video recorder.
→Maybe it is related with the compressed card of hard disk video recorder.
Ask: abnormal display of image
→Check the video connecting wires is well and other connecting sockets and camera flat wires are well.
Ask: Iris is small with many snowflakes after connection
→The camera parameter changed. Please enter the menu to reset the camera.
Ask: The camera can only works at one focus, other position can not be focused.
→Change the position to see if this phenomenon still exists. If yes, it may be caused by camera control drive focus
control system trouble.
Ask: image cannot be clearly seen even at MAX. Zoom
→Maybe electronic zoon open or the observed object is too close to imaging.
Ask: the image is reddish or greenish. Does the WB parameter change?
→The camera parameter changed. Enter the menu to reset the camera.
Ask: the color-to black& white camera can not change to black& white or cannot return to color
→Check if the pharosage is too high or too low. Rotate control to other angle to see if normal. If no, reset camera
parameter.
Ask: the image wobbles at MAX. Zoom
→ It is related to the firm of installation position if there are quaky machines or objects.
2. Control
Ask: the single dome camera cannot be controlled by keyboard or other control equipments?
→First check if control line 485 is well connected to designed position with right direction. Then check the control
equipment and dome control protocol, baud rate and address. If it still can not be controlled, use elimination to check
whether the control equipments or camera has troubles.
Ask: single camera can be controlled but multi-cameras cannot be controlled
→It may be caused by reflection of signal 485. Merge a 120 ohm resistance to the 485 anode and cathode control wires
of the farthest camera.
Ask: other controls are normal except it can not rotate at a direction.
→First check if any mechanical troubles without electrifying. If it can run well, check if the belt broke or loose. If yes, it
is caused by the control decode board troubles.
Ask: the camera automatically rotates after electrifying.
→First check if the electrifying mode is auto scan mode; if not, firstly cut 485 control lines to see if it happens. If stopping,
it may be caused by the scrambled code from controller or disturb to 485 lines.
Ask: the provided keyboard software can control, but the DVR cannot control or only can control some?
→DVR control protocol is not agreed with our company or the function is not completed.

Ask: why does the same dome have different control speeds at different hard disk video recorder?
→Speed command codes in control software of DVR are different.
Ask: DVR cannot control speed of camera
→Control command code of control software in DVR only has a fixed speed.
Ask: the camera rotates disorderly. The image is blackish or whitish.
→There are disturbs to 485 lines, check the equipments in the lines such as optical transmitter and receiver.
Ask: the dome camera can be controlled normally in the morning and evening, but it cannot be controlled at the noon of
summer.
→High temperature may cause lower down of control line anti-jamming or change to control equipment and CMOS chips
parameters to make troubles. Check if the temperature is over than the specified limit and the radiator fan.
3. Installation
Ask: what kind of power supply is needed?
→AC 18V power supply is recommended. If it is not standard configuration, please use the construction on the cable as
standard.
Ask: what is the MAX. Distance of AC 18V power wire and what requirements does it have to wire materials?
→Normally, the power wires have some resistance. There is some loss during voltage transmission. The longer the wire
is and the smaller the wire diameter is, the worse loss will be. Please refer to following wire diameter and distance
requirement in order to avoiding the abnormal work caused by insufficient voltage.
Power wires diameter 0.5mm2(20#) 1.0 mm2(18#) 1.5 mm2(16#) 2.5 mm2(14#)
Dome camera distance 10m(37 ft) 20m(60 ft) 30m(95 ft) 45m(152 ft)
For example: the distance to power supply from the dome camera is 35mm. It must take 2.5 mm2 above section copper-core
power wires or it may cause insufficient power supply leading to abnormal work
Ask: what is the MAX. Distance of video wire and what requirements does it have to wire materials?
→The video wire also has inner loss as the power wire. The more the wire is and the small the specification is, the worse
loss it will be. The high the signal frequency is, the obvious the loss is. The normal video wires models and the MAX.
Transmission distance is listed in following table:
Video wire model Max. distance Video wire model Max. distance
75-2 About 150m 75-5 About 370m
75-3 About 200m 75-7 About 500m
75-4 About 270m 75-9 About 680m
Ask: what wire and transmission distance should RS 485 control line take?
→Transmission distance of RS 485 is related to wire diameter and transmission speed. Max. transmission distance for RS 485 is 1200M
according to the specified 9600b/s transmission speed for 1.0mm2 UTP.
Remarks: the same model wires may be different for produced by different manufacturers. Above data is the normal wire
transmission reference distance.


