45
INTEGRATIONS MARKETPLACE USER GUIDE

INTEGRATIONS
MARKETPLACE USER GUIDE

Copyright © 2021 SimplyCast
i
Integrations Marketplace User Guide
Table of Contents
Overview ...................................................................................................................................................... 1
Marketplace................................................................................................................................................. 1
View the List of Integrations ................................................................................................................. 1
Install an Integration .............................................................................................................................. 2
My Integrations ........................................................................................................................................... 2
Add an Integration ................................................................................................................................. 2
View Your Added Integrations .............................................................................................................. 2
Edit an Added Integration ..................................................................................................................... 2
Delete an Added Integration ................................................................................................................ 3
Integration Installation .............................................................................................................................. 3
Active Directory (LDAP) .......................................................................................................................... 3
Edit a Connection ............................................................................................................................... 6
Enable/Disable a Connection ............................................................................................................ 7
Delete a Connection ........................................................................................................................... 7
View the Connection Reports ........................................................................................................... 7
Microsoft Dynamics CRM ...................................................................................................................... 7
Edit a Connection ............................................................................................................................. 10
Enable/Disable a Connection .......................................................................................................... 10
Delete a Connection ......................................................................................................................... 11
View the Connection Reports ......................................................................................................... 11
OnePageCRM ........................................................................................................................................ 11
Edit a Connection ............................................................................................................................. 14

Copyright © 2021 SimplyCast
i
Integrations Marketplace User Guide
Enable/Disable a Connection .......................................................................................................... 14
Delete a Connection ......................................................................................................................... 14
View the Connection Reports ......................................................................................................... 15
Office 365 Outlook ............................................................................................................................... 15
Edit a Connection ............................................................................................................................. 18
Enable/Disable a Connection .......................................................................................................... 18
Delete a Connection ......................................................................................................................... 18
View the Connection Reports ......................................................................................................... 18
Pipedrive ................................................................................................................................................ 19
Edit a Connection ............................................................................................................................. 21
Enable/Disable a Connection .......................................................................................................... 22
Delete a Connection ......................................................................................................................... 22
View the Connection Reports ......................................................................................................... 22
Salesforce Live Update ........................................................................................................................ 23
Edit a Connection ............................................................................................................................. 26
Enable/Disable a Connection .......................................................................................................... 27
Delete a Connection ......................................................................................................................... 27
View the Connection Reports ......................................................................................................... 27
Vtiger ...................................................................................................................................................... 28
Edit a Connection ............................................................................................................................. 31
Enable/Disable a Connection .......................................................................................................... 31
Delete a Connection ......................................................................................................................... 31
View the Connection Reports ......................................................................................................... 31
Zapier ..................................................................................................................................................... 32
Copyright © 2021 SimplyCast
i
Integrations Marketplace User Guide
Zoho CRM .............................................................................................................................................. 33
Edit a Connection ............................................................................................................................. 36
Enable/Disable a Connection .......................................................................................................... 36
Delete a Connection ......................................................................................................................... 36
View the Connection Reports ......................................................................................................... 36
Settings ...................................................................................................................................................... 37
Reports ....................................................................................................................................................... 37
View the List of Reports ....................................................................................................................... 37
Navigate Multiple Pages of Reports ................................................................................................... 38
Search Reports ...................................................................................................................................... 38
Filter Reports ......................................................................................................................................... 39
View a Report ........................................................................................................................................ 39
View Report Details .......................................................................................................................... 39
Filter the Report ................................................................................................................................ 40
Download the Report ....................................................................................................................... 40

Copyright © 2021 SimplyCast
Integrations Marketplace User Guide 6.18.2021
1
Overview
The SimplyCast application is able to integrate with many third-party systems to help you
effectively and efficiently manage your data. The Integrations Marketplace is a tool within the
SimplyCast application where you can
choose from one of the many tools we have
already integrated with.
SimplyCast’s robust inbound and outbound
APIs allow for easy integration with these, as
well as any other potential solutions you
may wish to use.
Marketplace
From the main SimplyCast dashboard, the Integrations Marketplace application can be found in
the Account column of the Applications dropdown menu in the top left corner of the screen.
Click the Integrations icon from this column to be directed to the dashboard. The first tab in the
menu on the left side of your screen is the Marketplace tab.
From here, you are able to:
View the List of Integrations
Immediately upon entering the Integrations Marketplace you will see a list of nine tools that
SimplyCast has already developed integrations for. For most of these, you will be able to see
the logo of the tool, plus its name underneath, along with an Install option.

Copyright © 2021 SimplyCast
Integrations Marketplace User Guide 6.18.2021
2
Install an Integration
To install a new integration for your SimplyCast account:
• Locate the integration you wish to install.
• Click on the gray Install button that appears below the integration’s name.
• A pop-up window will come up with more details about the integration as well as a short
feature list. If you would still like to install this integration, click the green Install button, or
click the gray Close button to close the pop-up and choose another integration.
• Refer to Integration Installation section for the next steps in installing a new integration.
My Integrations
The second tab in the Integrations Marketplace is the My Integrations tab. This is where you will
find any integrations that you have currently installed or have begun to install.
On this page you are able to:
Add an Integration
At the top of the My Integrations page there is a
green Add Integration button that, when clicked,
will re-direct you to the Marketplace tab where
you can choose which of the available
integrations you wish to install. Refer to the Integration Installation section for more information.
View Your Added Integrations
Underneath the green Add Integration button, you will see a list of all the
integrations you have already added (if any), including the logo of the
integration as well as the name you provided the integration upon
configuration.
Edit an Added Integration
If you have added an integration to your account, it will appear
underneath the green Add Integration button at the top of the My
Integrations page.
To edit an added integration:

Copyright © 2021 SimplyCast
Integrations Marketplace User Guide 6.18.2021
3
• Locate the gray Edit button below the name of the added integration you wish to edit. When
clicked, you will be directed to the configuration page for the integration. Refer to a specific
integration for more information about this page.
• When you have finished your edits, click the blue Save button in the
bottom right-hand corner of your screen, or click on the gray Back
button if you would not like to save your changes.
Delete an Added Integration
If you have added an integration to your account, it will appear underneath the green Add
Integration button at the top of the My Integrations page.
To delete an added integration:
• Locate the Delete button that appears below
the name of the added integration you wish to
delete. When clicked, this will cause a pop-up
window to appear where you will be asked to
confirm the deletion of the integration.
• Click on the red Delete button to delete the
integration and close the pop-up window, or click on the gray Cancel button to close the
pop-up without deleting the integration.
Integration Installation
Currently, SimplyCast has developed integrations with nine external tools. Each of these tools
works with the open API to connect with the SimplyCast application, though each has a slightly
different process to complete for installation, as seen below.
Active Directory (LDAP)
Before you install the Active Directory integration, you will need:
• A valid Active Directory account
• Your Active Directory username and password
• Your Active Directory LDAP URL
• A distinguished name of an Active Directory entry
To install the integration:

Copyright © 2021 SimplyCast
Integrations Marketplace User Guide 6.18.2021
4
• Select the Active Directory integration from the Marketplace list and click the gray Install
button.
• Review the information provided for the Active Directory integration in the window that
appears and click the green Install button.
• You will then be directed to the configuration page for the integration where you must fill
out the following pieces of information:
> My Integration Label: This is what you would like this
integration to be called.
> User Name: Your Microsoft Dynamics username
> Password: Your Microsoft Dynamics password
> Active Directory LDAP URL: The URL of the server hosting
your Active Directory with LDAP enabled
> Distinguished Name: A direct reference to an Active Directory entry containing
contacts you wish to import
• Next, select the green Create button appearing under the Active Connections section.
Give your connection a name and choose to create a Contact Synchronization
connection from the dropdown available. Click Create to create the connection.
• Configure your connection by providing a name in the Connection Name field and
selecting the processing interval (how often synchronization tasks occur) from the
Processing Interval dropdown menu in the General Settings section at the top of this
page.

Copyright © 2021 SimplyCast
Integrations Marketplace User Guide 6.18.2021
5
• Then, name the destination contact list where you would like the contacts to be placed
in the Destination List field in this section. This is a mandatory field. This list will be
created in the SimplyCast CRM once the first operation is run.
[Note: A new list is created for each connection. You cannot choose an existing list.]
• Next, configure your field mapping for the connection. There are four pieces of
information to configure:
> Source Columns: These are the information fields coming from Active
Directory
> Data Flow: This is a visual representation of how your data is
synchronizing: syncing between both systems, exporting only, importing
only, or ignored
> SimplyCast Columns: These are the fields in the SimplyCast CRM
> Synchronization Type: This is how you want the data to synchronize
- Ignore: Do nothing on either end with the data
- Import Only: Only bring data from Active Directory to update SimplyCast
• You may also choose to add a custom Active Directory attribute as a source column. To do
this, click the green Add a Custom Attribute button above the field mapping field and enter
a name for the custom attribute in the LDAP Attribute Name field in the pop-up window
that appears. Then click the green Create button, or click Cancel to close the pop-up window
without adding a custom attribute.

Copyright © 2021 SimplyCast
Integrations Marketplace User Guide 6.18.2021
6
• Click the blue Save button to save your synchronization configuration or Back to return to
the configuration page without creating an active connection.
• Returning to the integration configuration page, you will see a table containing your newly
created active connection. There are seven
information columns in this table:.
> Enabled: Whether the connection is
currently operational or not
> Name: The name you provided the connection with upon creation
> Type: The type of connection (contact, lead, etc.)
> State: This is the current integration state (queued, processing, error, etc.)
> Last Sync: The date and time when the connection was last synced
> Next Sync: The date and time the connection is due to sync
> Created On: The date and time when the active connection was created
[Note: You will notice that your connection is inactive. Select the connection you have just
created and click Enable. Your connection should now show as active.]
[Note: Once you have activated your connection it can take 5-10 minutes for your contacts to
show up in your new list. After this time, they will synchronize based on the interval you have
set.]
Edit a Connection
To edit an active connection:
• Check off the radio button located to the left of an active connection. This will cause several
buttons to appear above the Active Connections table.
• Click the blue Edit button to be directed to the configuration page for the connection.
• When you have finished modifying the connection, click the blue Save button at the bottom
right to save your changes and continue modifying the connection; click the green Complete
button to save your changes and return to the main integration configurations page, or click
the gray Back button to return to the previous
screen without making any changes to the
connection.

Copyright © 2021 SimplyCast
Integrations Marketplace User Guide 6.18.2021
7
Enable/Disable a Connection
To enable or disable an active connection:
• Check off the radio button located to the left of an active connection. This will cause several
buttons to appear above the Active Connections table.
• Click the blue Enable or Disable button to immediately enable or disable the connection.
Delete a Connection
To delete an active connection:
• Check off the radio button
located to the left of an active connection. This will cause several buttons to appear above
the Active Connections table.
• Click the red Delete button.
• A pop-up window will appear asking you to confirm the deletion. Click the red Delete button
to delete the connection or click Cancel to close the pop-up without deleting the active
connection.
View the Connection Reports
To view the report for an active connection:
• Check off the radio button located to the left of an active connection. This will cause several
buttons to appear above the Active Connections table.
• Click the gray View Reports button to be directed to the report for the active connection.
Refer to the Reports section for more information about reporting.
Microsoft Dynamics CRM
Before you install the Microsoft Dynamics integration, you will
need:
• A valid Microsoft Dynamics account
• Your Microsoft Dynamics username and password
• Your Microsoft Dynamics site URL
To install the integration:

Copyright © 2021 SimplyCast
Integrations Marketplace User Guide 6.18.2021
8
• Select the Microsoft Dynamics integration from the Marketplace list and click the gray Install
button located next to the integration’s name.
• Review the information provided for the Microsoft Dynamics integration in the window that
appears and click the green Install button.
• You will then be directed to the configuration page for the integration where you must fill
out the following pieces of information:
> My Integration Label: This is what you would like this
integration to be called.
> User Name: Your Microsoft Dynamics username
> Password: Your Microsoft Dynamics password
> CRM URL: The URL of your Microsoft Dynamics CRM site
• Next, select the green Create button appearing under the Active Connections section. Give
your connection a name and choose to create a Contact Synchronization connection from
the dropdown available. Click Create to create the connection.
• Configure your connection by providing a name in the Connection Name field and
selecting the processing interval (how often synchronization tasks occur) from the
Processing Interval dropdown menu in the General Settings section at the top of this
page.

Copyright © 2021 SimplyCast
Integrations Marketplace User Guide 6.18.2021
9
• Then, name the destination contact list where you would like the contacts to be placed
in the Destination List field in this section. This is a mandatory field. This list will be
created in the SimplyCast CRM once the first operation is run.
[Note: A new list is created for each connection. You cannot choose an existing list.]
• Next, configure your field mapping for the connection. There are four pieces of
information to configure:
> Source Columns: These are the information fields coming from
Microsoft Dynamics
> Data Flow: This is a visual representation of how your data is
synchronizing: syncing between both systems, exporting only, importing
only, or ignored
> SimplyCast Columns: These are the fields in the SimplyCast CRM
> Synchronization Type: This is how you want the data to synchronize
- Ignore: Do nothing on either end with the data
- Synchronize: Push data both ways from Microsoft Dynamics to SimplyCast and
vice versa
- Import Only: Only bring data from Microsoft Dynamics to update SimplyCast
- Export Only: Only send data from SimplyCast to update Microsoft Dynamics
• Click the blue Save button to save your synchronization configuration or Back to return to
the configuration page without creating an active connection.

Copyright © 2021 SimplyCast
Integrations Marketplace User Guide 6.18.2021
10
• Click the green Complete button to save the
synchronization settings, enable the connection,
and return to the configuration page.
• Returning to the integration configuration page, you will see a table containing your newly
created connection in the Active Connections section. There are seven information columns
in this table:
> Enabled: Whether the connection is currently active or not
> Name: The name you provided the connection upon creation
> Type: The type of connection (contact, lead, etc.)
> State: This is the current integration state (queued, processing, error, etc.)
> Last Sync: The date and time when the connection was last synced
> Next Sync: The date and time the connection is due to sync
> Created On: The date and time when the active connection was created
There are a few other actions you can take with your active connections:
Edit a Connection
To edit an active connection:
• Check off the radio button located to the left of an active connection. This will cause several
buttons to appear above the Active Connections table.
• Click the blue Edit button to be directed to the configuration page for the connection.
• When you have finished modifying the connection, click the blue Save button at the bottom
right to save your changes and continue modifying the connection; click the green Complete
button to save your changes and return to the main integration configurations page, or click
the gray Back button to return to the previous
screen without making any changes to the
connection.
Enable/Disable a Connection
To enable or disable an active connection:
• Check off the radio button located to the left of an active connection. This will cause several
buttons to appear above the Active Connections table.

Copyright © 2021 SimplyCast
Integrations Marketplace User Guide 6.18.2021
11
• Click the blue Enable or Disable button to immediately enable or disable the connection.
Delete a Connection
To delete an active connection:
• Check off the radio button
located to the left of an active connection. This will cause several buttons to appear above
the Active Connections table.
• Click the red Delete button.
• A pop-up window will appear asking you to confirm the deletion. Click the red Delete button
to delete the connection or click Cancel to close the pop-up without deleting the active
connection.
View the Connection Reports
To view the report for an active connection:
• Check off the radio button located to the left of an active connection. This will cause several
buttons to appear above the Active Connections table.
• Click the gray View Reports button to be directed to the report for the active connection.
Refer to the Reports section for more information about reporting.
OnePageCRM
Before you install the OnePageCRM integration, you will need:
• A valid OnePageCRM account
• Your OnePageCRM username and password
To install the integration:
• Select the OnePageCRM integration from the Marketplace list and
click the gray Install button located next to the integration’s name.
• Review the information provided for the OnePageCRM integration in the window that
appears and click the green Install button.

Copyright © 2021 SimplyCast
Integrations Marketplace User Guide 6.18.2021
12
• You will then be directed to the configuration page for the integration where you must fill
out the following pieces of information:
> My Integration Label: This is what you would like this
integration to be called.
> User Name: Your OnePageCRM username
> Password: Your OnePageCRM password
• Next, select the green Create button appearing under the Active
Connections section. Give your connection a name and choose to create a Contact
Synchronization connection from the dropdown available. Click Create to create the
connection.
• Configure your connection by providing a name in the Connection Name field and
selecting the processing interval (how often synchronization tasks occur) from the
Processing Interval dropdown menu in the General Settings section at the top of this
page.

Copyright © 2021 SimplyCast
Integrations Marketplace User Guide 6.18.2021
13
• Then, name the destination contact list where you would like the contacts to be placed
in the Destination List field in this section. This is a mandatory field. This list will be
created in the SimplyCast CRM once the first operation is run.
[Note: A new list is created for each connection. You cannot choose an existing list.]
• Next, configure your field mapping for the connection. There are four pieces of information
to configure:
> Source Columns: These are the information fields coming from
OnePageCRM
> Data Flow: This is a visual representation of how your data is
synchronizing: syncing between both systems, exporting only, importing
only, or ignored
> SimplyCast Columns: These are the fields in the SimplyCast CRM
> Synchronization Type: This is how you want the data to synchronize
- Ignore: Do nothing on either end with the data
- Synchronize: Push data both ways from OnePageCRM to SimplyCast and vice
versa
- Import Only: Only bring data from OnePageCRM to update SimplyCast
- Export Only: Only send data from SimplyCast to update OnePageCRM
• Click the blue Save button to save your synchronization configuration or Back to return to
the configuration page without creating an active connection.
• Click the green Complete button to save the
synchronization settings, enable the connection,
and return to the configuration page.
• Returning to the integration configuration page, you will see a table containing your newly
created connection in the Active Connections section. There are seven information columns
in this table:
> Enabled: Whether the connection is currently active or not
> Name: The name you provided the connection upon creation

Copyright © 2021 SimplyCast
Integrations Marketplace User Guide 6.18.2021
14
> Type: The type of connection (contact, lead, etc.)
> State: This is the current integration state (queued, processing, error, etc.)
> Last Sync: The date and time when the connection was last synced
> Next Sync: The date and time the connection is due to sync
> Created On: The date and time when the active connection was created
There are a few other actions you can take with your active connections:
Edit a Connection
To edit an active connection:
• Check off the radio button located to the left of an active connection. This will cause several
buttons to appear above the Active Connections table.
• Click the blue Edit button to be directed to the configuration page for the connection.
• When you have finished modifying the connection, click the blue Save button at the bottom
right to save your changes and continue modifying the connection; click the green Complete
button to save your changes and return to the main integration configurations page, or click
the gray Back button to return to the previous
screen without making any changes to the
connection.
Enable/Disable a Connection
To enable or disable an active connection:
• Check off the radio button located to the left of an active connection. This will cause several
buttons to appear above the Active Connections table.
• Click the blue Enable or Disable button to immediately enable or disable the connection.
Delete a Connection
To delete an active connection:
Copyright © 2021 SimplyCast
Integrations Marketplace User Guide 6.18.2021
15
• Check off the radio button located to the left of an active connection. This will cause several
buttons to appear above the Active Connections table.
• Click the red Delete button.
• A pop-up window will appear asking you to confirm the deletion. Click the red Delete button
to delete the connection or click Cancel to close the pop-up without deleting the active
connection.
View the Connection Reports
To view the report for an active connection:
• Check off the radio button located to the left of an active connection. This will cause several
buttons to appear above the Active Connections table.
• Click the gray View Reports button to be directed to the report for the active connection.
Refer to the Reports section for more information about reporting.
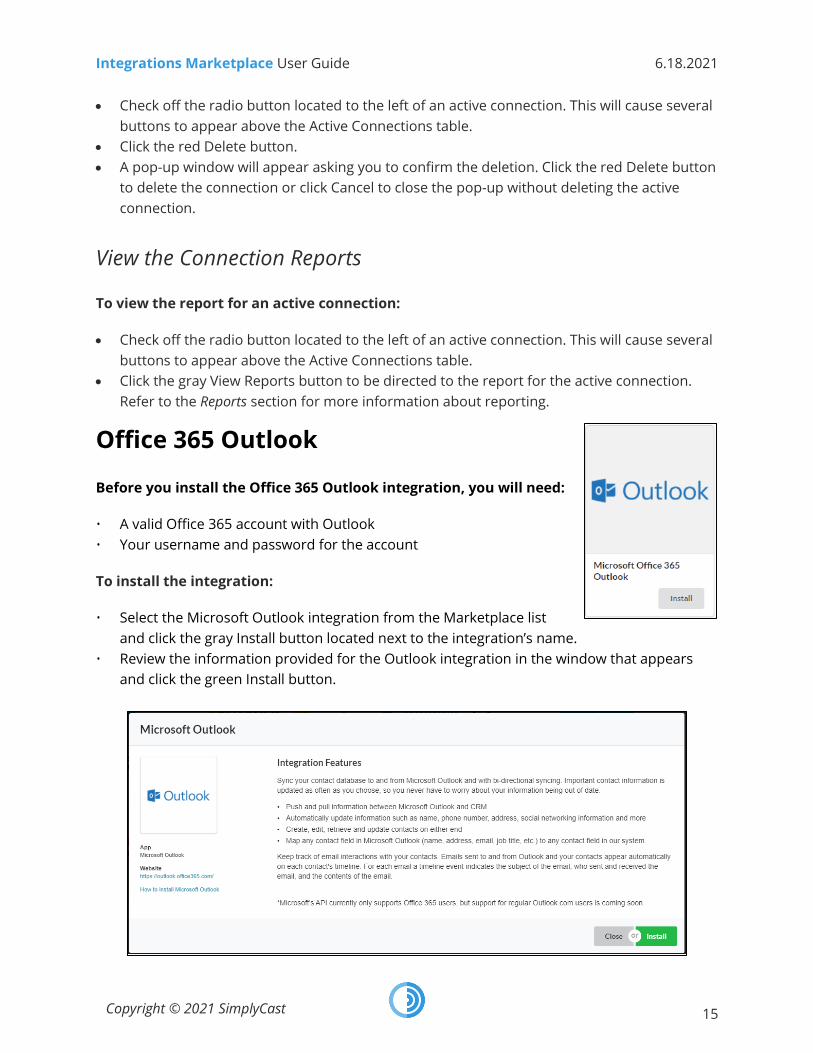
Office 365 Outlook
Before you install the Office 365 Outlook integration, you will need:
• A valid Office 365 account with Outlook
• Your username and password for the account
To install the integration:
• Select the Microsoft Outlook integration from the Marketplace list
and click the gray Install button located next to the integration’s name.
• Review the information provided for the Outlook integration in the window that appears
and click the green Install button.

Copyright © 2021 SimplyCast
Integrations Marketplace User Guide 6.18.2021
16
• You will be directed to the Office 365 login page where you will be asked to sign in if you are
not already. Then, you’ll be asked to authorize SimplyCast to access data from your account.
• You will then be directed to the configuration page for the integration where you must fill
out the following piece of information:
> My Integration Label: This is what you would like this
integration to be called.
• Next, select the green Create button appearing under the Active
Connections section. Give your connection a name and select the
type of connection you would like it to be (Contact). Click Create to
create the connection.
• Configure your connection by providing a name in the Connection Name field and
selecting the processing interval (how often synchronization tasks occur) from the
Processing Interval dropdown menu in the General Settings section at the top of this
page.
• Then, name the destination contact list where you would
like the contacts to be placed in the Destination List field in
this section. This is a mandatory field. This list will be
created in the SimplyCast CRM once the first operation is
run.
[Note: A new list is created for each connection. You cannot
choose an existing list.]
• You can also choose to enable the Show
Emails on Timeline toggle located
underneath the destination List field.
Enabling this feature means that emails
from synced contacts will appear in their CRM contact profile timeline.
• Next, configure your field mapping for the connection. There are four pieces of information
to configure:

Copyright © 2021 SimplyCast
Integrations Marketplace User Guide 6.18.2021
17
> Source Columns: These are the information fields coming from Outlook
> Data Flow: This is a visual representation of how your data is
synchronizing: syncing between both systems, exporting only, importing
only, or ignored
> SimplyCast Columns: These are the fields in the SimplyCast CRM
> Synchronization Type: This is how you want the data to synchronize
- Ignore: Do nothing on either end with the data
- Synchronize: Push data both ways from Outlook to SimplyCast and
vice versa
- Import Only: Only bring data from Outlook to update SimplyCast
- Export Only: Only send data from SimplyCast to update Outlook
• Click the blue Save button to save your synchronization configuration or Back to return to
the configuration page without creating an active connection.
• Click the green Complete button to save the
synchronization settings, enable the connection,
and return to the configuration page.
• Returning to the integration configuration page, you will see a table containing your newly
created connection in the Active Connections section. There are seven information columns
in this table:
> Enabled: Whether the connection is currently active or not
> Name: The name you provided the connection upon creation
> Type: The type of connection (contact, lead, etc.)
> State: This is the current integration state (queued, processing, error, etc.)
> Last Sync: The date and time when the connection was last synced
> Next Sync: The date and time the connection is due to sync
> Created On: The date and time when the active connection was created
There are a few other actions you can take with your active connections:

Copyright © 2021 SimplyCast
Integrations Marketplace User Guide 6.18.2021
18
Edit a Connection
To edit an active connection:
• Check off the radio button located to the left of an active connection. This will cause several
buttons to appear above the Active Connections table.
• Click the blue Edit button to be directed to the configuration page for the connection.
• When you have finished modifying the connection, click the blue Save button at the bottom
right to save your changes and continue modifying the connection; click the green Complete
button to save your changes and return to the main integration configurations page, or click
the gray Back button to return to the previous
screen without making any changes to the
connection.
Enable/Disable a Connection
To enable or disable an active connection:
• Check off the radio button located to the left of an active connection. This will cause several
buttons to appear above the Active Connections table.
• Click the blue Enable or Disable button to immediately enable or disable the connection.
Delete a Connection
To delete an active connection:
• Check off the radio button
located to the left of an active connection. This will cause several buttons to appear above
the Active Connections table.
• Click the red Delete button.
• A pop-up window will appear asking you to confirm the deletion. Click the red Delete button
to delete the connection or click Cancel to close the pop-up without deleting the active
connection.
View the Connection Reports
To view the report for an active connection:
• Check off the radio button located to the left of an active connection. This will cause several
buttons to appear above the Active Connections table.

Copyright © 2021 SimplyCast
Integrations Marketplace User Guide 6.18.2021
19
• Click the gray View Reports button to be directed to the report for the active connection.
Refer to the Reports section for more information about reporting.
Pipedrive
Before you install the Pipedrive integration, you will need:
• A valid Pipedrive account
• Your API token
To install the integration:
• Select the Pipedrive integration from the Marketplace list and click
the gray Install button located next to the integration’s name.
• Review the information provided for the Pipedrive integration in the window that appears
and click the green Install button.
• You will then be directed to the configuration page for the integration where you must fill
out the following piece of information:
> My Integration Label: This is what you would like this
integration to be called.
> API Token: This is where you need to enter your Pipedrive
API token.
• Next, select the green Create button appearing under the Active
Connections section. Give your connection a name and select the type of connection you
would like it to be (the most common types are Organization and People.) Click Create to
create the connection.

Copyright © 2021 SimplyCast
Integrations Marketplace User Guide 6.18.2021
20
• Configure your connection by providing a name in the Connection Name field and selecting
the processing interval (how often synchronization tasks occur) from the Processing Interval
dropdown menu in the General Settings section at the top of this page.
• Then, name the destination contact list where you would
like the contacts to be placed in the Destination List field
in this section. This is a mandatory field. This list will be
created in the SimplyCast CRM once the first operation is
run.
[Note: A new list is created for each connection. You cannot
choose an existing list.]
• Next, configure your field mapping for the connection. There are four pieces of information
to configure:
> Source Columns: These are the information fields coming from
Pipedrive
> Data Flow: This is a visual representation of how your data is
synchronizing: syncing between both systems, exporting only, importing
only, or ignored
> SimplyCast Columns: These are the fields in the SimplyCast CRM
> Synchronization Type: This is how you want the data to synchronize
- Ignore: Do nothing on either end with the data
- Synchronize: Push data both ways from Pipedrive to SimplyCast and
vice versa
- Import Only: Only bring data from Pipedrive to update SimplyCast
- Export Only: Only send data from SimplyCast to update Pipedrive

Copyright © 2021 SimplyCast
Integrations Marketplace User Guide 6.18.2021
21
• Click the blue Save button to save your synchronization configuration or Back to return to
the configuration page without creating an active connection.
• Click the green Complete button to save the
synchronization settings, enable the connection,
and return to the configuration page.
• Returning to the integration configuration page, you will see a table containing your newly
created connection in the Active Connections section. There are seven information columns
in this table:
> Enabled: Whether the connection is currently active or not
> Name: The name you provided the connection upon creation
> Type: The type of connection (contact, lead, etc.)
> State: This is the current integration state (queued, processing, error, etc.)
> Last Sync: The date and time when the connection was last synced
> Next Sync: The date and time the connection is due to sync
> Created On: The date and time when the active connection was created
There are a few other actions you can take with your active connections:
Edit a Connection
To edit an active connection:
• Check off the radio button located to the left of an active connection. This will cause several
buttons to appear above the Active Connections table.
• Click the blue Edit button to be directed to the configuration page for the connection.
• When you have finished modifying the connection, click the blue Save button at the bottom
right to save your changes and continue modifying
the connection; click the green Complete button to

Copyright © 2021 SimplyCast
Integrations Marketplace User Guide 6.18.2021
22
save your changes and return to the main integration configurations page, or click the gray
Back button to return to the previous screen without making any changes to the
connection.
Enable/Disable a Connection
To enable or disable an active connection:
• Check off the radio button located to the left of an active connection. This will cause several
buttons to appear above the Active Connections table.
• Click the blue Enable or Disable button to immediately enable or disable the connection.
Delete a Connection
To delete an active connection:
• Check off the radio button
located to the left of an active connection. This will cause several buttons to appear above
the Active Connections table.
• Click the red Delete button.
• A pop-up window will appear asking you to confirm the deletion. Click the red Delete button
to delete the connection or click Cancel to close the pop-up without deleting the active
connection.
View the Connection Reports
To view the report for an active connection:
• Check off the radio button located to the left of an active connection. This will cause several
buttons to appear above the Active Connections table.
• Click the gray View Reports button to be directed to the report for the active connection.
Refer to the Reports section for more information about reporting.

Copyright © 2021 SimplyCast
Integrations Marketplace User Guide 6.18.2021
23
Salesforce Live Update
Before you install the Salesforce integration, you will need:
• A valid Salesforce account
• Your Salesforce username and password
To install the integration:
• Select the Salesforce integration from the Marketplace list and click
the gray Install button located next to the integration’s name.
• Choose either Live Environment or Sandbox Environment as the location for your
integration in the window that appears and click the green Install button.
• You will then be taken to Salesforce site where you are asked to log in with your credentials
and grant access to SimplyCast. Once you confirm by clicking the blue Allow button, you will
be taken back to the integration in SimplyCast.
[Note: The integration will not work if you have a free or trial Salesforce account.]
• Next, select the green Create button appearing under the Active
Connections section. Give your connection a name and select the
type of connection you would like it to be (Account, Contact, or Lead
Synchronization.) Click Create to create the connection.

Copyright © 2021 SimplyCast
Integrations Marketplace User Guide 6.18.2021
24
• Configure your connection by providing a name in the Connection Name field and selecting
the processing interval (how often synchronization tasks occur) from the Processing Interval
dropdown menu in the General Settings section at the top of this page.
• Then, name the destination contact list where you would
like the contacts to be placed in the Destination List field
in this section. This is a mandatory field. This list will be
created in the SimplyCast CRM once the first operation is
run.
[Note: A new list is created for each connection. You cannot
choose an existing list.]
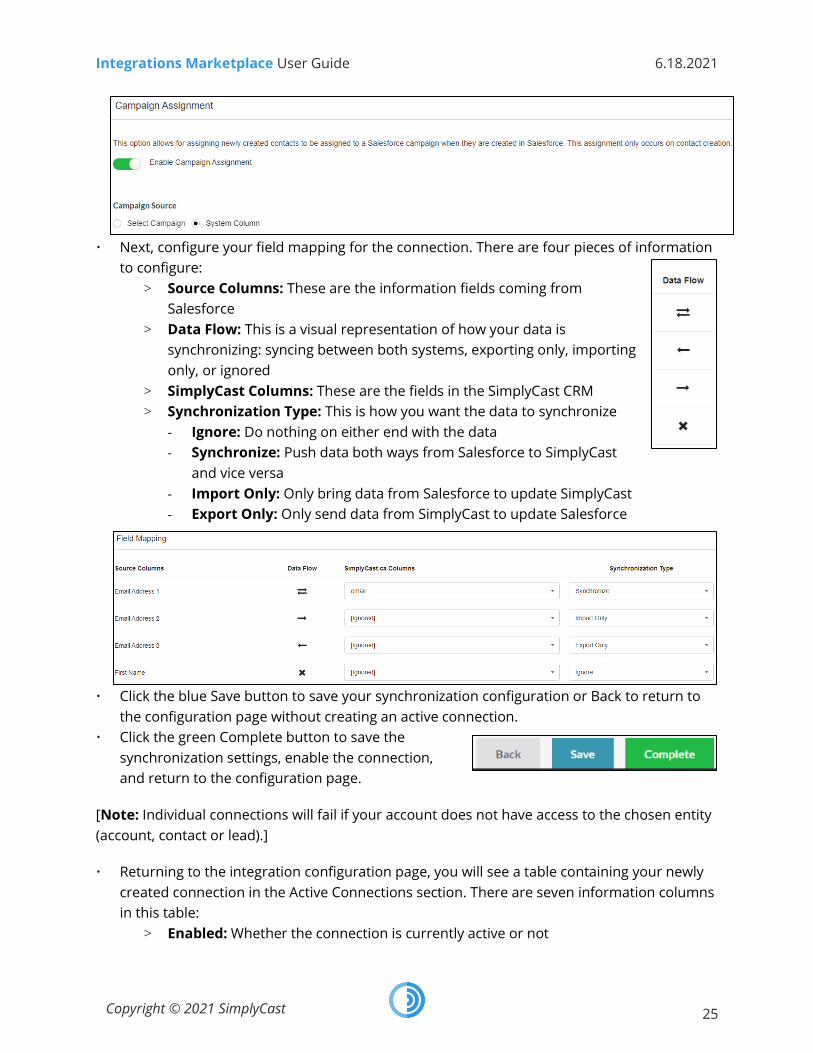
• For Lead connection type, you have the option to enable campaign assignment for the
connection. This option allows you to automatically assign newly-created contacts to a
Salesforce campaign. Enable this option by clicking the toggle in this section so that is
positioned to right and colored green.
> Once enabled, choose your campaign source in the new section that appears. Click
either the Select Campaign or System Column option.
> If you chose Select Campaigns, you will be able to choose which Salesforce campaign
to add the new contact to from the list of available campaigns (if there are any
available).
> If you chose System Column, you will be able to choose which custom contact
columns to use for new contacts from the list of available columns (if there are any
available).
Copyright © 2021 SimplyCast
Integrations Marketplace User Guide 6.18.2021
25
• Next, configure your field mapping for the connection. There are four pieces of information
to configure:
> Source Columns: These are the information fields coming from
Salesforce
> Data Flow: This is a visual representation of how your data is
synchronizing: syncing between both systems, exporting only, importing
only, or ignored
> SimplyCast Columns: These are the fields in the SimplyCast CRM
> Synchronization Type: This is how you want the data to synchronize
- Ignore: Do nothing on either end with the data
- Synchronize: Push data both ways from Salesforce to SimplyCast
and vice versa
- Import Only: Only bring data from Salesforce to update SimplyCast
- Export Only: Only send data from SimplyCast to update Salesforce
• Click the blue Save button to save your synchronization configuration or Back to return to
the configuration page without creating an active connection.
• Click the green Complete button to save the
synchronization settings, enable the connection,
and return to the configuration page.
[Note: Individual connections will fail if your account does not have access to the chosen entity
(account, contact or lead).]
• Returning to the integration configuration page, you will see a table containing your newly
created connection in the Active Connections section. There are seven information columns
in this table:
> Enabled: Whether the connection is currently active or not

Copyright © 2021 SimplyCast
Integrations Marketplace User Guide 6.18.2021
26
> Name: The name you provided the connection upon creation
> Type: The type of connection (contact, lead, etc.)
> State: This is the current integration state (queued, processing, error, etc.)
> Last Sync: The date and time when the connection was last synced
> Next Sync: The date and time the connection is due to sync
> Created On: The date and time when the active connection was created
[Note: You will notice that your connection is inactive. Select the connection you have just
created and click Enable. Your connection should now show as active.]
[Note: Salesforce has required fields for the different connections. If you do not give these
fields values inside of SimplyCast and bi-directional syncing is turned on, you will see
“undefined” in Salesforce for those fields. The required fields are as follows: Account, Contact,
and Lead.]
[Note: Salesforce accounts may have session expiry settings that are not ideal for this
integration. It is recommended that users change these settings to a session timeout period of
24 hours. You may have to reauthenticate the access tokens by clicking the gray Re-
authenticate button.]
There are a few other actions you can take with your active connections:
Edit a Connection
To edit an active connection:
• Check off the radio button located to the left of an active connection. This will cause several
buttons to appear above the Active Connections table.
• Click the blue Edit button to be directed to the configuration page for the connection.

Copyright © 2021 SimplyCast
Integrations Marketplace User Guide 6.18.2021
27
• When you have finished modifying the connection, click the blue Save button at the bottom
right to save your changes and continue modifying the connection; click the green Complete
button to save your changes and return to the main integration configurations page, or click
the gray Back button to return to the previous
screen without making any changes to the
connection.
Enable/Disable a Connection
To enable or disable an active connection:
• Check off the radio button located to the left of an active connection. This will cause several
buttons to appear above the Active Connections table.
• Click the blue Enable or Disable button to immediately enable or disable the connection.
Delete a Connection
To delete an active connection:
• Check off the radio button
located to the left of an active connection. This will cause several buttons to appear above
the Active Connections table.
• Click the red Delete button.
• A pop-up window will appear asking you to confirm the deletion. Click the red Delete button
to delete the connection or click Cancel to close the pop-up without deleting the active
connection.
View the Connection Reports
To view the report for an active connection:
• Check off the radio button located to the left of an active connection. This will cause several
buttons to appear above the Active Connections table.
• Click the gray View Reports button to be directed to the report for the active connection.
Refer to the Reports section for more information about reporting.

Copyright © 2021 SimplyCast
Integrations Marketplace User Guide 6.18.2021
28
Vtiger
Before you install the Vtiger integration, you will need:
• A valid Vtiger account
• Your Vtiger username
• Your access key for Vtiger
• Your Vtiger site URL
To install the integration:
• Select the Vtiger integration from the Marketplace list and click the gray Install button
located next to the integration’s name.
• Review the information provided for the Vtiger integration in the window that appears and
click the green Install button.
• You will be directed to the configuration page for the integration where you must fill out
four pieces of information:
> My Integration Label: This is what you would like this integration to be called
> User Name: Your Vtiger username
> Access Key: Your access key for Vtiger
> CRM URL: Your Vtiger site URL

Copyright © 2021 SimplyCast
Integrations Marketplace User Guide 6.18.2021
29
• Next, select the green Create button appearing under the Active
Connections section. Give your connection a name and select the type
of connection you would like it to be (Contact, Lead, or Organization).
Click Create to create the connection.
• Configure your connection by providing a name in the Connection Name field and selecting
the processing interval (how often synchronization tasks occur) from the Processing Interval
dropdown menu in the General Settings section at the top of this page.
• Then, name the destination contact list where you would like the contacts to be placed in
the Destination List field in this section. This is a mandatory field. This list will be created in
the SimplyCast CRM once the first operation is run.
[Note: A new list is created for each connection. You cannot choose an existing list.]
• Next, configure your field mapping for the connection. There are four pieces of information
to configure:
> Source Columns: These are the information fields coming from Vtiger

Copyright © 2021 SimplyCast
Integrations Marketplace User Guide 6.18.2021
30
> Data Flow: This is a visual representation of how your data is
synchronizing: syncing between both systems, exporting only, importing
only, or ignored
> SimplyCast Columns: These are the fields in the SimplyCast CRM
> Synchronization Type: This is how you want the data to synchronize
- Ignore: Do nothing on either end with the data
- Synchronize: Push data both ways from Vtiger to SimplyCast and
vice versa
- Import Only: Only bring data from Vtiger to update SimplyCast
- Export Only: Only send data from SimplyCast to update Vtiger
• Click the blue Save button to save your synchronization configuration or Back to return to
the configuration page without creating an active connection.
• Click the green Complete button to save the
synchronization settings, enable the connection,
and return to the configuration page.
• Returning to the integration configuration page, you will see a table containing your newly
created connection in the Active Connections section. There are seven information columns
in this table:
> Enabled: Whether the connection is currently active or not
> Name: The name you provided the connection upon creation
> Type: The type of connection (contact, lead, etc.)
> State: This is the current integration state (queued, processing, error, etc.)
> Last Sync: The date and time when the connection was last synced
> Next Sync: The date and time the connection is due to sync
> Created On: The date and time when the active connection was created
There are a few other actions you can take with your active connections:

Copyright © 2021 SimplyCast
Integrations Marketplace User Guide 6.18.2021
31
Edit a Connection
To edit an active connection:
• Check off the radio button located to the left of an active connection. This will cause several
buttons to appear above the Active Connections table.
• Click the blue Edit button to be directed to the configuration page for the connection.
• When you have finished modifying the connection, click the blue Save button at the bottom
right to save your changes and continue modifying the connection; click the green Complete
button to save your changes and return to the main integration configurations page, or click
the gray Back button to return to the previous
screen without making any changes to the
connection.
Enable/Disable a Connection
To enable or disable an active connection:
• Check off the radio button located to the left of an active connection. This will cause several
buttons to appear above the Active Connections table.
• Click the blue Enable or Disable button to immediately enable or disable the connection.
Delete a Connection
To delete an active connection:
• Check off the radio button
located to the left of an active connection. This will cause several buttons to appear above
the Active Connections table.
• Click the red Delete button.
• A pop-up window will appear asking you to confirm the deletion. Click the red Delete button
to delete the connection or click Cancel to close the pop-up without deleting the active
connection.
View the Connection Reports
To view the report for an active connection:
• Check off the radio button located to the left of an active connection. This will cause several
buttons to appear above the Active Connections table.

Copyright © 2021 SimplyCast
Integrations Marketplace User Guide 6.18.2021
32
• Click the gray View Reports button to be directed to the report for the active connection.
Refer to the Reports section for more information about reporting.
Zapier
Before you install the Zapier integration, you will need:
• A valid Zapier account
To install the integration:
• Select the Zapier integration from the Marketplace list and click the
gray Install button located next to the integration’s name.
• Review the information provided for the Zapier integration in the window that appears and
click the link to check out the integration to be directed to
the Zapier web page.
• Select the orange Accept Invite & Build a Zap button on
this page.
• You will be directed to the main Zapier dashboard where you are able to create zaps
connected to your SimplyCast account.
• Choose SimplyCast as your app to connect with Zapier. You will be asked to provide a public
and private API for your SimplyCast account. Refer to the SimplyCast My Profile User Guide to
learn how to create a new API key that you can use for this step.
• Once you have added SimplyCast as an app, you are able to create a new zap. Refer to
Zapier to learn how to create a new zap and manage existing zaps.
• When creating a new zap for SimplyCast, there are two types of trigger events you can
choose from:
> New Contact in List: Triggers when a contact is added to a SimplyCast contact list
> New Contact: Triggers when a new contact is added to the SimplyCast CRM

Copyright © 2021 SimplyCast
Integrations Marketplace User Guide 6.18.2021
33
Zoho CRM
Before you install the Zoho integration, you will need:
• A valid Zoho account
• Your Zoho username and password
To install the integration:
• Select the Zoho integration from the Marketplace list and click the
gray Install button located next to the integration’s name.
• Review the information provided for the Zoho integration in the window that appears and
click the green Install button.
• If you are not currently signed into your Zoho account, you will then
be asked to do so. Enter your username and password into the
fields provided and click the green Accept button to allow
SimplyCast to access to your Zoho data.
• You will then be directed to the configuration page for the
integration where you must fill out the following piece of
information:
> My Integration Label: This is what you would like this
integration to be called.

Copyright © 2021 SimplyCast
Integrations Marketplace User Guide 6.18.2021
34
• Next, select the green Create button appearing under the Active Connections section. Give
your connection a name and select the type of connection you would like it to be (the most
common types are Contact and Lead.) Click Create to create the connection.
• Configure your connection by providing a name in the Connection Name field and selecting
the processing interval (how often synchronization tasks occur) from the Processing Interval
dropdown menu in the General Settings section at the top of this page.
• Then, name the destination contact list where you would like the contacts to be placed in
the Destination List field in this section. This is a mandatory field. This list will be created in
the SimplyCast CRM once the first operation is run.
[Note: A new list is created for each connection. You cannot choose an existing list.]
• Next, configure your field mapping for the connection. There are four pieces of information
to configure:

Copyright © 2021 SimplyCast
Integrations Marketplace User Guide 6.18.2021
35
> Source Columns: These are the information fields coming from Zoho
> Data Flow: This is a visual representation of how your data is
synchronizing: syncing between both systems, exporting only, importing
only, or ignored
> SimplyCast Columns: These are the fields in the SimplyCast CRM
> Synchronization Type: This is how you want the data to synchronize
- Ignore: Do nothing on either end with the data
- Synchronize: Push data both ways from Zoho to SimplyCast and
vice versa
- Import Only: Only bring data from Zoho to update SimplyCast
- Export Only: Only send data from SimplyCast to update Zoho
• Click the blue Save button to save your synchronization configuration or Back to return to
the configuration page without creating an active connection.
• Click the green Complete button to save the
synchronization settings, enable the connection,
and return to the configuration page.
• Returning to the integration configuration page, you will see a table containing your newly
created connection in the Active Connections section. There are seven information columns
in this table:
> Enabled: Whether the connection is currently active or not
> Name: The name you provided the connection upon creation
> Type: The type of connection (contact, lead, etc.)
> State: This is the current integration state (queued, processing, error, etc.)
> Last Sync: The date and time when the connection was last synced
> Next Sync: The date and time the connection is due to sync
> Created On: The date and time when the active connection was created
There are a few other actions you can take with your active connections:
Copyright © 2021 SimplyCast
Integrations Marketplace User Guide 6.18.2021
36
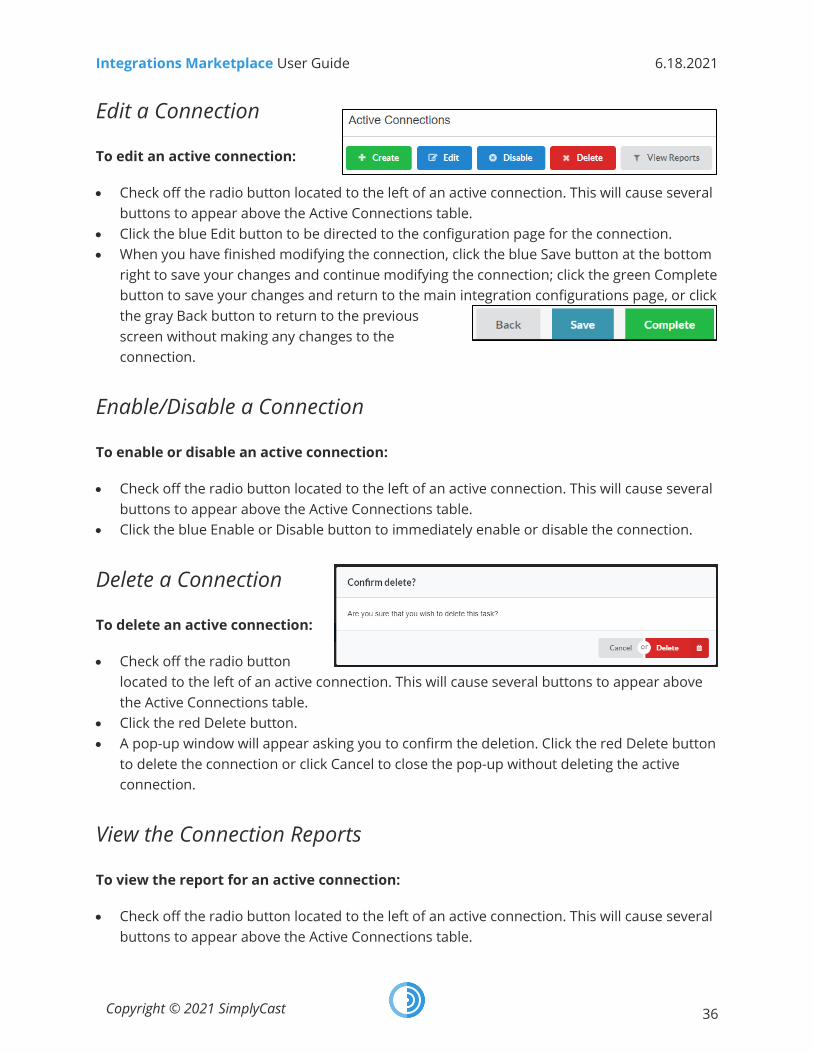
Edit a Connection
To edit an active connection:
• Check off the radio button located to the left of an active connection. This will cause several
buttons to appear above the Active Connections table.
• Click the blue Edit button to be directed to the configuration page for the connection.
• When you have finished modifying the connection, click the blue Save button at the bottom
right to save your changes and continue modifying the connection; click the green Complete
button to save your changes and return to the main integration configurations page, or click
the gray Back button to return to the previous
screen without making any changes to the
connection.
Enable/Disable a Connection
To enable or disable an active connection:
• Check off the radio button located to the left of an active connection. This will cause several
buttons to appear above the Active Connections table.
• Click the blue Enable or Disable button to immediately enable or disable the connection.
Delete a Connection
To delete an active connection:
• Check off the radio button
located to the left of an active connection. This will cause several buttons to appear above
the Active Connections table.
• Click the red Delete button.
• A pop-up window will appear asking you to confirm the deletion. Click the red Delete button
to delete the connection or click Cancel to close the pop-up without deleting the active
connection.
View the Connection Reports
To view the report for an active connection:
• Check off the radio button located to the left of an active connection. This will cause several
buttons to appear above the Active Connections table.

Copyright © 2021 SimplyCast
Integrations Marketplace User Guide 6.18.2021
37
• Click the gray View Reports button to be directed to the report for the active connection.
Refer to the Reports section for more information about reporting.
Settings
The third tab in the Integrations Marketplace application is the Settings tab,
where you can set up the notification
settings for your integrations.
The first section on this page asks you to
choose if and how you wish to be notified
if an error ever causes an integration to
become deactivated. There are two
notification options to choose from:
• Notification Message: A notification
will appear in the notifications bar of the platform
accessible from your account ID.
• Email Message: A notification will be sent to your
email inbox. Checking this option will activate the
field below where you can enter in the email address
you wish the system to send the notifications to.
Choose one or both of these options if you wish to receive notifications for your integrations.
Click the blue Save Settings button to save your changes.
Reports To view a report for any of your integrations, you must navigate to
the SimplyCast Reporting interface:
• Locate the Reports tab on the left of your screen to be directed to
the Reports dashboard for your integrations.
Once in the Integrations Reporting dashboard, you are able to:
View the List of Reports
Copyright © 2021 SimplyCast
Integrations Marketplace User Guide 6.18.2021
38
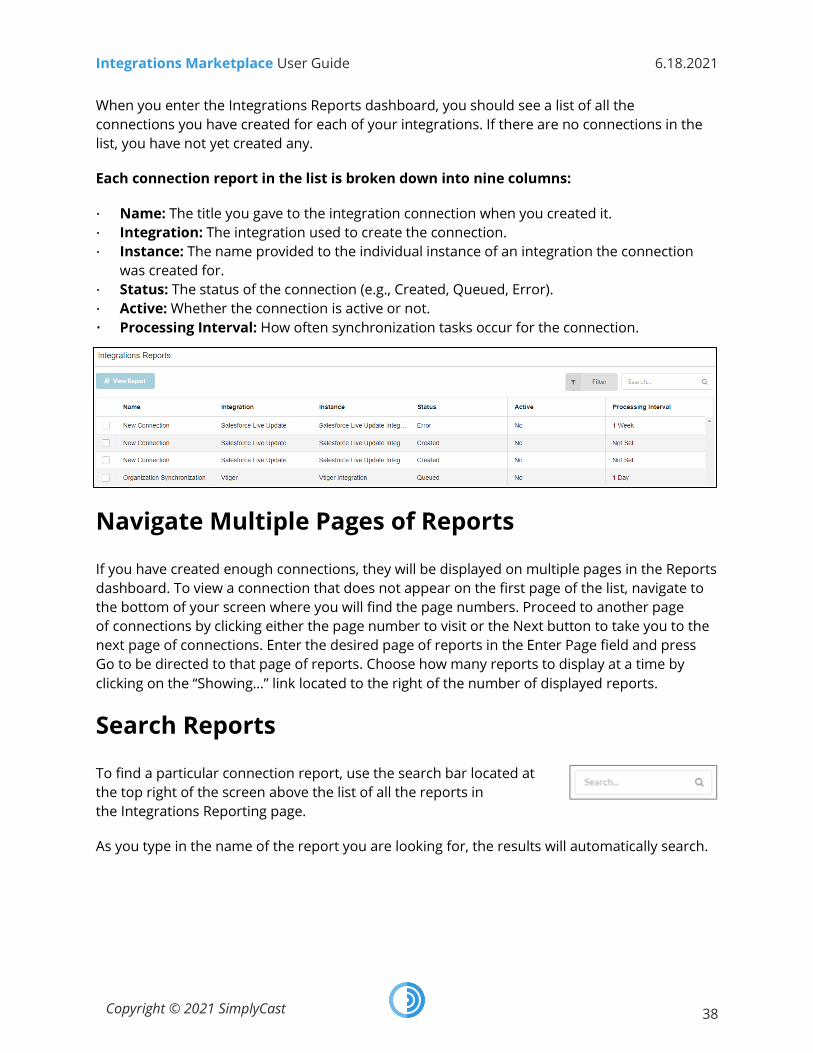
When you enter the Integrations Reports dashboard, you should see a list of all the
connections you have created for each of your integrations. If there are no connections in the
list, you have not yet created any.
Each connection report in the list is broken down into nine columns:
• Name: The title you gave to the integration connection when you created it.
• Integration: The integration used to create the connection.
• Instance: The name provided to the individual instance of an integration the connection
was created for.
• Status: The status of the connection (e.g., Created, Queued, Error).
• Active: Whether the connection is active or not.
• Processing Interval: How often synchronization tasks occur for the connection.
Navigate Multiple Pages of Reports
If you have created enough connections, they will be displayed on multiple pages in the Reports
dashboard. To view a connection that does not appear on the first page of the list, navigate to
the bottom of your screen where you will find the page numbers. Proceed to another page
of connections by clicking either the page number to visit or the Next button to take you to the
next page of connections. Enter the desired page of reports in the Enter Page field and press
Go to be directed to that page of reports. Choose how many reports to display at a time by
clicking on the “Showing…” link located to the right of the number of displayed reports.
Search Reports
To find a particular connection report, use the search bar located at
the top right of the screen above the list of all the reports in
the Integrations Reporting page.
As you type in the name of the report you are looking for, the results will automatically search.

Copyright © 2021 SimplyCast
Integrations Marketplace User Guide 6.18.2021
39
Filter Reports
You can filter integration reports to
show connection synced on a particular date, at a
particular time, or within a certain window of time.
To filter your connection reports:
• Find the gray Filter button that is located at the top right-hand side of your screen.
• Click the Filter button and a dropdown menu will appear with two boxes that say Click to Set
Date.
• Click either box and another dropdown menu will show up with two fields labeled Date
and Time where you can manually insert the date and time you would like to filter
connection reports from.
• Below these fields there is a calendar you can also use to choose the date to filter reports
from.
• Click the blue Apply button to implement the filter. Or, click Clear if you do not wish
to filter your reports, which will close the dropdown menu.
[Note: When a filter is applied, the formerly gray Filter button will appear green. To remove a
filter, click the green button and then select Clear.]
View a Report
To view the report of a particular integration connection:
• Select the connection to see the report for by checking off the box
that appears to the left of the name.
• The blue View Report button on top of the campaign list will
become active and able to be selected once you have checked off a
connection report. Click the View Report button to be directed to the report for
that integration.
In the report, you can:
View Report Details
There are three columns of information in the report for an integration connection:
• Timestamp: The date and time the system received a piece of information from the
connection sync
• Level: The type of information received from the connection sync (e.g., info, error, notice)

Copyright © 2021 SimplyCast
Integrations Marketplace User Guide 6.18.2021
40
• Message: A description of the information received from the connection sync
Filter the Report
• You can filter your integration connection report to show synchronizations that occurred on
a particular date, at a particular time, or within a certain window of time.
To filter your messages:
• Find the gray Filter button that is located at the top
right-hand side of your screen.
• Click the Filter button and a dropdown menu will
appear with two boxes that say Click to Set Date.
• Click on the Set Date box and another dropdown
menu will show up with two fields labeled Date and
Time.
• Manually insert the date and time you would like
to filter your synchronizations from.
• Below the Date and Time fields there is a calendar you can also use to choose the date that
you would like to filter synchronizations from.
• You can also filter your report by level. Click the Level field and a dropdown of options will
appear.
• Options will automatically search.
• Click Apply to implement the filter. Or, click Clear if you do not wish to filter your report.
This will close the dropdown menu.
[Note: When a filter is applied, the formerly gray Filter button will appear green. To remove a
filter, click the green button and then select Clear.]
Download the Report
To download the entire connection report to your device, there is a blue download button
located to the right of the Filter button, on top of the Activity tab in the report.

Copyright © 2021 SimplyCast
Integrations Marketplace User Guide 6.18.2021
41
When you click the download button:
• A sidebar will appear from the right of your
screen.
• Enter a name for your download into the Name
field. Or, leave it as the default name provided.
• Choose to download the report in either CSV or
XLSX format by selecting the appropriate option
from the File Type dropdown menu.
• Next, you need to decide what information you
would like to include in report download. By
default, all information is selected but you may not need to download all report
information. Deselect any of the three available fields to remove them from the report
download
• Re-add any deselected fields to the download using the search
field and associated dropdown menu and select which field(s)
to add to the report.
• Once you have determined what information to include in the download file, click the blue
Download button at the bottom of the sidebar. Or, click Cancel to close the sidebar without
continuing the download.
• You will be directed to the Downloads page with all of your requested downloads in a table
showing the name of the report, the status, the file type, and the date it was created.
• Click the report you wish to download and then click the blue Download Report button on
this page to complete the download of the report.


