46
Intel® Dialogic® System Release 6.1 CompactPCI for Windows Administration Guide April 2006 05-1884-003

Intel® Dialogic® System Release 6.1 CompactPCI for WindowsAdministration Guide
April 2006
05-1884-003

SR 6.1 CompactPCI for Windows Administration Guide – April 2006
INFORMATION IN THIS DOCUMENT IS PROVIDED IN CONNECTION WITH INTEL® PRODUCTS. NO LICENSE, EXPRESS OR IMPLIED, BY ESTOPPEL OR OTHERWISE, TO ANY INTELLECTUAL PROPERTY RIGHTS IS GRANTED BY THIS DOCUMENT. EXCEPT AS PROVIDED IN INTEL'S TERMS AND CONDITIONS OF SALE FOR SUCH PRODUCTS, INTEL ASSUMES NO LIABILITY WHATSOEVER, AND INTEL DISCLAIMS ANY EXPRESS OR IMPLIED WARRANTY, RELATING TO SALE AND/OR USE OF INTEL PRODUCTS INCLUDING LIABILITY OR WARRANTIES RELATING TO FITNESS FOR A PARTICULAR PURPOSE, MERCHANTABILITY, OR INFRINGEMENT OF ANY PATENT, COPYRIGHT OR OTHER INTELLECTUAL PROPERTY RIGHT. Intel products are not intended for use in medical, life saving, or life sustaining applications.
Intel may make changes to specifications and product descriptions at any time, without notice.
This document as well as the software described in it is furnished under license and may only be used or copied in accordance with the terms of the license. The information in this manual is furnished for informational use only, is subject to change without notice, and should not be construed as a commitment by Intel Corporation. Intel Corporation assumes no responsibility or liability for any errors or inaccuracies that may appear in this document or any software that may be provided in association with this document.
Except as permitted by such license, no part of this document may be reproduced, stored in a retrieval system, or transmitted in any form or by any means without express written consent of Intel Corporation.
Copyright © 2004-2006 Intel Corporation.
Dialogic, DM3, Intel, Intel logo, and Intel NetStructure are trademarks or registered trademarks of Intel Corporation or its subsidiaries in the United States and other countries.
*Other names and brands may be claimed as the property of others.
Publication Date: April 2006
Intel Converged Communications1515 Route 10Parsippany, NJ 07054
For Technical Support, visit the Intel Telecom Support Resources website at:http://developer.intel.com/design/telecom/support/
For Products and Services Information, visit the Intel Communications Systems Products website at:http://www.intel.com/design/network/products/telecom/index.htm
For Sales Offices and other contact information, visit the Intel Telecom Building Blocks Sales Offices page at:http://www.intel.com/buy/networking/telecom.htm

Contents
Revision History . . . . . . . . . . . . . . . . . . . . . . . . . . . . . . . . . . . . . . . . . . . . . . . . . . . . . . . . . . . . . . 9
About This Publication . . . . . . . . . . . . . . . . . . . . . . . . . . . . . . . . . . . . . . . . . . . . . . . . . . . . . . . 11
Purpose . . . . . . . . . . . . . . . . . . . . . . . . . . . . . . . . . . . . . . . . . . . . . . . . . . . . . . . . . . . . . . . 11Intended Audience. . . . . . . . . . . . . . . . . . . . . . . . . . . . . . . . . . . . . . . . . . . . . . . . . . . . . . . 11How to Use This Publication . . . . . . . . . . . . . . . . . . . . . . . . . . . . . . . . . . . . . . . . . . . . . . . 11Related Information . . . . . . . . . . . . . . . . . . . . . . . . . . . . . . . . . . . . . . . . . . . . . . . . . . . . . . 12
1 Administration Overview . . . . . . . . . . . . . . . . . . . . . . . . . . . . . . . . . . . . . . . . . . . . . . . . . . . . . . 13
1.1 Stopping and Starting the System . . . . . . . . . . . . . . . . . . . . . . . . . . . . . . . . . . . . . . . . . . . 131.2 High Availability Support . . . . . . . . . . . . . . . . . . . . . . . . . . . . . . . . . . . . . . . . . . . . . . . . . . 13
1.2.1 Redundant Host . . . . . . . . . . . . . . . . . . . . . . . . . . . . . . . . . . . . . . . . . . . . . . . . . . 131.2.2 Peripheral Hot Swap. . . . . . . . . . . . . . . . . . . . . . . . . . . . . . . . . . . . . . . . . . . . . . . 14
1.3 Administrative Utilities . . . . . . . . . . . . . . . . . . . . . . . . . . . . . . . . . . . . . . . . . . . . . . . . . . . . 151.4 Troubleshooting . . . . . . . . . . . . . . . . . . . . . . . . . . . . . . . . . . . . . . . . . . . . . . . . . . . . . . . . 15
2 Stopping and Starting the System . . . . . . . . . . . . . . . . . . . . . . . . . . . . . . . . . . . . . . . . . . . . . . 17
2.1 Stopping the System . . . . . . . . . . . . . . . . . . . . . . . . . . . . . . . . . . . . . . . . . . . . . . . . . . . . . 172.2 Starting the System . . . . . . . . . . . . . . . . . . . . . . . . . . . . . . . . . . . . . . . . . . . . . . . . . . . . . . 17
2.2.1 Starting the Devices After a Reboot . . . . . . . . . . . . . . . . . . . . . . . . . . . . . . . . . . . 172.3 Applying Configuration Changes . . . . . . . . . . . . . . . . . . . . . . . . . . . . . . . . . . . . . . . . . . . . 19
2.3.1 System Level Changes. . . . . . . . . . . . . . . . . . . . . . . . . . . . . . . . . . . . . . . . . . . . . 192.3.2 Board Level Changes . . . . . . . . . . . . . . . . . . . . . . . . . . . . . . . . . . . . . . . . . . . . . . 19
3 Peripheral Hot Swap. . . . . . . . . . . . . . . . . . . . . . . . . . . . . . . . . . . . . . . . . . . . . . . . . . . . . . . . . . 21
3.1 Adding a New CompactPCI Board to an Active System . . . . . . . . . . . . . . . . . . . . . . . . . . 213.2 Removing a CompactPCI Board From an Active System . . . . . . . . . . . . . . . . . . . . . . . . . 233.3 Replacing a CompactPCI Board in an Active System . . . . . . . . . . . . . . . . . . . . . . . . . . . . 24
4 Administrative Utilities. . . . . . . . . . . . . . . . . . . . . . . . . . . . . . . . . . . . . . . . . . . . . . . . . . . . . . . . 27
4.1 QScript Utilities . . . . . . . . . . . . . . . . . . . . . . . . . . . . . . . . . . . . . . . . . . . . . . . . . . . . . . . . . 274.1.1 QScript Utility Requirements. . . . . . . . . . . . . . . . . . . . . . . . . . . . . . . . . . . . . . . . . 28
4.2 Alarms Utility . . . . . . . . . . . . . . . . . . . . . . . . . . . . . . . . . . . . . . . . . . . . . . . . . . . . . . . . . . . 294.3 Event Viewer Utility . . . . . . . . . . . . . . . . . . . . . . . . . . . . . . . . . . . . . . . . . . . . . . . . . . . . . . 294.4 IPT Admin Utility . . . . . . . . . . . . . . . . . . . . . . . . . . . . . . . . . . . . . . . . . . . . . . . . . . . . . . . . 304.5 LineAdmin Utility . . . . . . . . . . . . . . . . . . . . . . . . . . . . . . . . . . . . . . . . . . . . . . . . . . . . . . . . 314.6 Listboards Utility . . . . . . . . . . . . . . . . . . . . . . . . . . . . . . . . . . . . . . . . . . . . . . . . . . . . . . . . 32
4.6.1 Options . . . . . . . . . . . . . . . . . . . . . . . . . . . . . . . . . . . . . . . . . . . . . . . . . . . . . . . . . 334.6.2 Guidelines. . . . . . . . . . . . . . . . . . . . . . . . . . . . . . . . . . . . . . . . . . . . . . . . . . . . . . . 33
4.7 STD Config Utility . . . . . . . . . . . . . . . . . . . . . . . . . . . . . . . . . . . . . . . . . . . . . . . . . . . . . . . 344.8 TSP Config . . . . . . . . . . . . . . . . . . . . . . . . . . . . . . . . . . . . . . . . . . . . . . . . . . . . . . . . . . . . 364.9 TSP Monitor . . . . . . . . . . . . . . . . . . . . . . . . . . . . . . . . . . . . . . . . . . . . . . . . . . . . . . . . . . . . 374.10 TSP Tracer . . . . . . . . . . . . . . . . . . . . . . . . . . . . . . . . . . . . . . . . . . . . . . . . . . . . . . . . . . . . 38
5 Troubleshooting . . . . . . . . . . . . . . . . . . . . . . . . . . . . . . . . . . . . . . . . . . . . . . . . . . . . . . . . . . . . . 41
5.1 General Troubleshooting Information . . . . . . . . . . . . . . . . . . . . . . . . . . . . . . . . . . . . . . . . 41
SR 6.1 Comp
actPCI for Windows Administration Guide 3
Contents
5.2 Checking Configuration . . . . . . . . . . . . . . . . . . . . . . . . . . . . . . . . . . . . . . . . . . . . . . . . . . . 415.3 Event Viewer. . . . . . . . . . . . . . . . . . . . . . . . . . . . . . . . . . . . . . . . . . . . . . . . . . . . . . . . . . . . 415.4 Checking Which Packages Are Installed . . . . . . . . . . . . . . . . . . . . . . . . . . . . . . . . . . . . . . 425.5 Checking Hardware . . . . . . . . . . . . . . . . . . . . . . . . . . . . . . . . . . . . . . . . . . . . . . . . . . . . . . 42
Index . . . . . . . . . . . . . . . . . . . . . . . . . . . . . . . . . . . . . . . . . . . . . . . . . . . . . . . . . . . . . . . . . . . . . . . 43
4
SR 6.1 CompactPCI for Windows Administration Guide
SR 6.1 CompactPCI for Windows Administration Guide 5
Figures
1 High Availability Capability. . . . . . . . . . . . . . . . . . . . . . . . . . . . . . . . . . . . . . . . . . . . . . . . . . . . . 142 DCM Main Window - System Menu. . . . . . . . . . . . . . . . . . . . . . . . . . . . . . . . . . . . . . . . . . . . . . 183 DCM Main Window - Device Menu . . . . . . . . . . . . . . . . . . . . . . . . . . . . . . . . . . . . . . . . . . . . . . 204 DCM Main Window - Settings Menu . . . . . . . . . . . . . . . . . . . . . . . . . . . . . . . . . . . . . . . . . . . . . 225 DCM Main Window - Device Menu . . . . . . . . . . . . . . . . . . . . . . . . . . . . . . . . . . . . . . . . . . . . . . 236 Alarms Display. . . . . . . . . . . . . . . . . . . . . . . . . . . . . . . . . . . . . . . . . . . . . . . . . . . . . . . . . . . . . . 297 DCM Main Window - View Menu. . . . . . . . . . . . . . . . . . . . . . . . . . . . . . . . . . . . . . . . . . . . . . . . 308 Line Admin Display . . . . . . . . . . . . . . . . . . . . . . . . . . . . . . . . . . . . . . . . . . . . . . . . . . . . . . . . . . 329 Listboards Display . . . . . . . . . . . . . . . . . . . . . . . . . . . . . . . . . . . . . . . . . . . . . . . . . . . . . . . . . . . 3410 STD Config Display . . . . . . . . . . . . . . . . . . . . . . . . . . . . . . . . . . . . . . . . . . . . . . . . . . . . . . . . . . 3511 TSP Config Display . . . . . . . . . . . . . . . . . . . . . . . . . . . . . . . . . . . . . . . . . . . . . . . . . . . . . . . . . . 3712 TSP Monitor Display . . . . . . . . . . . . . . . . . . . . . . . . . . . . . . . . . . . . . . . . . . . . . . . . . . . . . . . . . 3813 TSP Tracer Display . . . . . . . . . . . . . . . . . . . . . . . . . . . . . . . . . . . . . . . . . . . . . . . . . . . . . . . . . . 39

6 SR 6.1 CompactPCI for Windows Administration Guide
Figures

SR 6.1 CompactPCI for Windows Administration Guide 7
Tables
1 Administrative Utilities . . . . . . . . . . . . . . . . . . . . . . . . . . . . . . . . . . . . . . . . . . . . . . . . . . . . . . . . 15

8 SR 6.1 CompactPCI for Windows Administration Guide
Tables

Revision History
This revision history summarizes the changes made in each published version of this document.
Document No. Publication Date Description of Revisions
05-1884-003 April 2006 Global: Branding, cross reference, and hypertext link updates. Changed “Redundant System Slot” to “Redundant Host.”
Administrative Utilities: In Table 1, changed description of stdconfig utility.
QScript Utilities: In File Directories, revised location for tools.
LineAdmin Utility: Revised parameter description for -line <n>.
Redundant Host: Added a note about Redundant Host failover. Changed title of section from Redundant System Slot to Redundant Host.
05-1884-002 September 2004 section: Added that Redundant Host is supported by Windows 2000* only and when a failover occurs, the SBC that went from ACTIVE to STANDBY must be rebooted before becoming ACTIVE again. Added note about Redundant Host steps required after initial installation of the Intel® Dialogic® System Software.
05-1884-001 October 2002 Initial version of document.
SR 6.1 CompactPCI for Windows Administration Guide — April 2006 9

Revision History
10 SR 6.1 CompactPCI for Windows Administration Guide — April 2006

About This Publication
The following topics provide information about this publication:
• Purpose . . . . . . . . . . . . . . . . . . . . . . . . . . . . . . . . . . . . . . . . . . . . . . . . . . . . . . . . . . . . . 11
• Intended Audience . . . . . . . . . . . . . . . . . . . . . . . . . . . . . . . . . . . . . . . . . . . . . . . . . . . . . 11
• How to Use This Publication. . . . . . . . . . . . . . . . . . . . . . . . . . . . . . . . . . . . . . . . . . . . . 11
• Related Information . . . . . . . . . . . . . . . . . . . . . . . . . . . . . . . . . . . . . . . . . . . . . . . . . . . . 12
Purpose
This publication provides information about performing administrative tasks on an active Windows*-based system that uses the Intel® Dialogic® System Release Software. The information applies to a system that has been successfully installed and configured, and has been in operation.
Intended Audience
This publication is written for the following audience:
• System Integrators
• Independent Software Vendors (ISVs)
• Original Equipment Manufacturers (OEMs)
• Telephony Equipment Manufacturers (TEMs)
• Network Equipment Providers
• Distributors
How to Use This Publication
Refer to this publication after you have installed and configured the Intel Dialogic System Software and associated hardware. This publication assumes that you are familiar with the Windows operating system.
The information in this guide is organized as follows:
• Chapter 1, “Administration Overview” provides an overview of the administrative tasks associated with a system using the Intel Dialogic System Software.
• Chapter 2, “Stopping and Starting the System” provides information about stopping and starting the Intel Dialogic system and applying configuration changes to supported boards.
• Chapter 3, “Peripheral Hot Swap” provides procedures for adding, removing, or replacing boards in an active system.
SR 6.1 CompactPCI for Windows Administration Guide 11

About This Publication
• Chapter 4, “Administrative Utilities” describes the administrative utilities, including a description of each parameter used with that utility. The utilities are listed in alphabetical order.
• Chapter 5, “Troubleshooting” provides general information about troubleshooting a system that uses the Intel Dialogic System Software.
Related Information
Refer to the following documents for more information about the System Release Software:
• For timely information that may affect installation and configuration, refer to the Release Guide and Release Update.
Be sure to check the Release Update for the system release you are using for any updates or corrections to this publication. The Release Update is available on the Telecom Support Resources Web site at http://resource.intel.com/telecom/support/documentation/releases/index.htm.
• For information about installing the system software, refer to the Intel® Dialogic® System Release Software Installation Guide.
• For information about configuring the Intel® boards, refer to the Intel NetStructure® DM3 Architecture for CompactPCI on Windows Operating Systems Configuration Guide.
• For diagnostics information, refer to the Intel® Dialogic® System Software Diagnostics Guide.
• For information about using the SNMP Agent Software, refer to the SNMP Agent Software for Windows Operating Systems Administration Guide.
• For development software documentation relating to administrative tasks see the Standard Runtime Library (SRL) API for Windows Operating Systems Library Reference and the Event Service API for Windows Operating Systems Library Reference.
• For hardware installation instructions, see the Quick Install Card that comes with each board. Quick Install Cards also can be accessed from the Intel® Networking and Communications Telecom Support Resources Web site at http://developer.intel.com/design/telecom/support.
The Intel Networking and Communications Telecom Support Resources Web site provides technical support and wide-ranging information in the form of technical notes, problem tracking reports, application notes, and other helpful documentation.
• For product information, visit the Intel® Telecom Products Web site at http://www.intel.com/design/network/products/telecom/index.htm.
12 SR 6.1 CompactPCI for Windows Administration Guide

1Administration Overview
This chapter provides an overview of the administrative tasks that can be performed on a system that uses the Intel® Dialogic® System Software. These tasks include:
• Stopping and Starting the System . . . . . . . . . . . . . . . . . . . . . . . . . . . . . . . . . . . . . . . . . 13
• High Availability Support . . . . . . . . . . . . . . . . . . . . . . . . . . . . . . . . . . . . . . . . . . . . . . . 13
• Administrative Utilities . . . . . . . . . . . . . . . . . . . . . . . . . . . . . . . . . . . . . . . . . . . . . . . . . 15
• Troubleshooting . . . . . . . . . . . . . . . . . . . . . . . . . . . . . . . . . . . . . . . . . . . . . . . . . . . . . . . 15
1.1 Stopping and Starting the System
To reconfigure the Intel Dialogic System Software, the system must first be stopped and then restarted again, after the configuration has been completed, so that the new configuration will take effect. Selecting the Stop System option from the Intel® Dialogic® Configuration Manager (DCM) Service pulldown menu stops all Intel computer telephony system resources in the system. Selecting the Start System option from the DCM System pulldown menu starts all Intel computer telephony system resources in the system.
Notes: 1. Stopping and starting the Intel Dialogic System Software stops and starts all of the active boards installed in the system.
2. When the system is rebooted, the Intel Dialogic System Software can be configured to start automatically.
1.2 High Availability Support
The Intel Dialogic System Release Software supports high availability by providing redundant Single Board Computers (SBCs) in the Intel NetStructure® High Availability Platform, as well as basic Hot Swap in out-of-box configurations. Figure 1 shows the high availability capability provided.
The following sections provide additional information about specific High Availability capability:
• Redundant Host
• Peripheral Hot Swap
1.2.1 Redundant Host
For additional information about Redundant Host operation, refer to the documentation included with the Intel NetStructure High Availability Platform and the High Availability for Windows Operating Systems Demo Guide.
Note: Redundant Host has also been known as Redundant System Slot.
SR 6.1 CompactPCI for Windows Administration Guide — April 2006 13

Administration Overview
The Intel NetStructure® High Availability Platform supports Redundant Host operation on Windows 2000* only. When used in conjunction with a user application based on sample code provided by the High Availability Demo, one of the Single Board Computers (SBCs) operates in the active mode, while the second (redundant) SBC operates in the standby mode.
When Redundant Host is fully operational, the drivers of the active SBC are loaded during initialization and the application starts. If during operation, the system senses a problem with the active SBC, the system will automatically switch operation to the standby SBC. The drivers of the standby SBC are loaded, the Intel Dialogic System Service restarts (re initializes) all boards in the system, and the application can then be restarted, using the standby SBC. This is referred to as a failover. However, keep in mind that when a failover occurs, the SBC that went from Active to Standby must be rebooted before becoming Active again.
Notes: 1. After Redundant Host failover, the Standby SBC must be rebooted before failover can occur again.
2. When the Intel Dialogic System Software is installed for the first time on both SBCs, only the Active SBC will have the drivers installed and the boards enumerated. The Standby SBC will not have the boards enumerated in the system. To address this, you must prep the boards on the Standby SBC by performing a cooperative switchover and enabling the boards. After this is done, the Standby SBC can download and activate the boards when a failover occurs.
Figure 1. High Availability Capability
1.2.2 Peripheral Hot Swap
A CompactPCI peripheral board can be replaced, without interrupting the system services, by stopping the individual board, removing the board, installing a replacement board, and then starting the new (replacement) board. This is referred to as Basic Hot Swap. Also, a new board may be added to an active system without interrupting the system service.
Single Board Computers (SBCs) Peripheral Boards
Active/Standby SBC Active/Standby SBC
Add Board Remove Board Replace Board
Redundant Host (RH) Peripheral Hot Swap (PHS)
CompactPCI System
RIntel Dialogic R
14 SR 6.1 CompactPCI for Windows Administration Guide — April 2006

Administration Overview
1.3 Administrative Utilities
A number of utilities allow you to perform administrative tasks on a system using Intel NetStructure boards. Table 1, “Administrative Utilities” lists these utilities.
Table 1. Administrative Utilities
1.4 Troubleshooting
After a condition has been diagnosed, troubleshooting can be performed to correct the faulty condition. Troubleshooting tasks that apply to an initial startup include checking the configuration files, checking which packages have been installed, and checking that all boards have been securely installed in their slots.
Additional troubleshooting information is available at the following Web site: http://developer.intel.com/design/telecom/support
Utility Description
alarms Monitors the alarms on a T-1 or E-1 line.
signaleditor Allows you to dynamically view and modify CAS signal identification parameters (transitions, pulses, trains, or sequences) so you can test them before changing the.config file.
Event Viewer Displays error and administrative messages using the Windows Event Viewer.
lineadmin Puts lines into service so you can run a number of the other utilities. Also, monitors T-1 and E-1 alarms.
listboards Displays information about the Intel NetStructure boards that are installed in the system.
pmacadmin Allows you to reset an Intel NetStructure IPT Series board.
stdconfig Configures component parameters.
tspconfig Allows you to change T-1 CAS or ISDN protocol variant parameters.
tspmon Allows you to monitor the Global Call Resource protocol.
tsptrace Allows you to trace CAS protocol operations and includes timing information.
SR 6.1 CompactPCI for Windows Administration Guide — April 2006 15

Administration Overview
16 SR 6.1 CompactPCI for Windows Administration Guide — April 2006

2Stopping and Starting the System
This chapter covers the following topics about starting and stopping the Intel® Dialogic® System Service:
• Stopping the System . . . . . . . . . . . . . . . . . . . . . . . . . . . . . . . . . . . . . . . . . . . . . . . . . . . 17
• Starting the System . . . . . . . . . . . . . . . . . . . . . . . . . . . . . . . . . . . . . . . . . . . . . . . . . . . . 17
• Applying Configuration Changes . . . . . . . . . . . . . . . . . . . . . . . . . . . . . . . . . . . . . . . . . 19
2.1 Stopping the System
Before you stop the system, the application must be stopped and the application must ensure that all channels have been closed.
The system is stopped using the Intel® Dialogic® Configuration Manager (DCM). From the DCM main window, click the Stop System option from the System pulldown menu or click the Stop All Enabled Devices icon. See Figure 2 for a display of the DCM main window.
2.2 Starting the System
Startup should only be performed when the system is stopped.
You only have to reboot the system for the initial startup. To start the system at any time after the initial startup, from the DCM main window, click the Start System option from the System pulldown menu or click the Start All Enabled Devices icon. See Figure 2 for a display of the DCM main window.
For information about startup messages, see the Intel® Dialogic® System Release Software Installation Guide.
2.2.1 Starting the Devices After a Reboot
The Intel Dialogic devices may be configured to start automatically or manually after the system is rebooted. The default configuration is for the devices to be manually started. The DCM Settings pulldown menu option Device Autostart is set by default to Detect Only (Don’t Start). If the system is rebooted with this configuration selected, you will then need to manually restart the devices by selecting the Start System option from the DCM System pulldown menu.
To change the system to automatically start the Intel Dialogic system devices after a reboot, perform the following:
1. Stop the application and ensure that all channels have been closed.
SR 6.1 CompactPCI for Windows Administration Guide 17

Stopping and Starting the System
2. Click the Stop System option from the System pulldown menu on the DCM main window or click the Stop All Enabled Devices icon.
3. From the DCM main window, click Detect and Start Device from the Settings pulldown menu Device Autostart option.
4. Reboot the system.
5. Restart the application.
Note: Do not use the Windows Services menu to change the Intel Dialogic System Service startup mode from Automatic to Manual. Always use the DCM menu options to modify the behavior of the Intel Dialogic System Service.
Figure 2. DCM Main Window - System Menu
18 SR 6.1 CompactPCI for Windows Administration Guide

Stopping and Starting the System
2.3 Applying Configuration Changes
Configuration changes can be made at both the system level and board level. The following topics are include in this section:
• System Level Changes
• Board Level Changes
2.3.1 System Level Changes
Whenever a system-level configuration change is made, the system must first be stopped before the change is made and then restarted after the change has been made, but you do not have to reboot the system.
1. Before you stop the system, the application must be stopped and the application must ensure that all channels have been closed.
2. Stop the system from the DCM main window by clicking the Stop System option from the System pulldown menu or by clicking the Stop All Enabled Devices icon. See Figure 2 for a display of the DCM main window.
3. Modify configuration parameters as necessary.
4. Start the system from the DCM main window by clicking the Start System option from the System pulldown menu or by clicking the Start All Enabled Devices icon. See Figure 2 for a display of the DCM main window.
5. Restart the application.
For information about startup messages, refer to the Intel® Dialogic® System Release Software Installation Guide.
2.3.2 Board Level Changes
To modify one or more parameters on a single board without stopping the system, perform the following:
1. Inform the application to stop all activity on the board and close all open device handles.
The Standard Runtime Library (SRL) functions can be used to determine the devices on the board with the specified AUID, and the devices can be closed using dx_close( ), dt_close( ), etc. For information about these functions, see the Standard Runtime Library (SRL) API for Windows Operating Systems Library Reference.
2. When the application has stopped using devices associated with the board, use the Intel Dialogic Configuration Manager (DCM) to stop the board. From the DCM main window, highlight the board that you wish to stop and then click the Stop Device option from the Device pulldown menu to inform the driver to release the operating system resources assigned to the board. See Figure 3 for a display of the Device menu.
SR 6.1 CompactPCI for Windows Administration Guide 19

Stopping and Starting the System
Figure 3. DCM Main Window - Device Menu
The board and all virtual devices associated with the board must not be used until the board is restarted.
3. Start the board using the DCM. From the DCM main window, with the board still highlighted, click the Start Device option from the Device pulldown menu to download the revised configuration and initialize the board.
The board and all virtual devices on the board can be used once the download and initialization have completed.
Note: When the board is started, the DLGC_EVT_BLADE_STARTED event is generated by the event notification framework. For an application to receive this event, the application must be registered with the ADMIN_CHANNEL. For additional information about events, refer to the Event Service API for Windows Operating Systems Library Reference.
4. Inform the application to start using the board.
The standard runtime library (SRL) functions can be used to determine the devices that are in service again on the board with the specified AUID, and the devices can be opened using dx_open( ), dt_open( ), etc. For information about these functions, see the Standard Runtime Library (SRL) API for Windows Operating Systems Library Reference.
20 SR 6.1 CompactPCI for Windows Administration Guide

3Peripheral Hot Swap
This chapter provides information and procedures associated with the peripheral hot swap capability. The following topics are included:
• Adding a New CompactPCI Board to an Active System . . . . . . . . . . . . . . . . . . . . . . . 21
• Removing a CompactPCI Board From an Active System. . . . . . . . . . . . . . . . . . . . . . . 23
• Replacing a CompactPCI Board in an Active System. . . . . . . . . . . . . . . . . . . . . . . . . . 24
Note: The procedures described in this section require that you have the Windows Hot Swap Kit (HSK) installed on your system.
3.1 Adding a New CompactPCI Board to an Active System
The following procedure describes how to add a new CompactPCI board to an active system.
1. If the new cPCI board includes a rear I/O module, install the rear I/O module following the instructions provided with the Quick Install Card.
2. Install the baseboard following the instructions provided with the Quick Install Card. Depending on the DCM System/Device Autostart option selected, the new board will be detected by the system and either be started using the default values, or remain in the stopped state, allowing you to manually configure and start the board.
Note: How the system reacts to adding a new board depends on how the system settings have been configured using DCM. If the DCM Settings>System/Device Autostart option has been set to Detect and Start, the new board will be detected by the system, displayed in the DCM main window, and automatically started, once the POST has successfully completed, using the system default configuration for that board type. See Figure 4 for a display of the DCM main window. If the Detect Only (Don’t Start) option has been selected, then the new board will be detected by the system and displayed in the DCM main window, but will not be started.
3. Ensure that the new board’s Power On Self Test (POST) has completed. This will be indicated by the LEDs on the board becoming extinguished. For detailed information about POST, refer to the Intel® Dialogic® System Software Diagnostics Guide.
Note: This does not apply to the Intel NetStructure IPT Series boards. In this case, you should wait about 80 seconds for the POST to complete.
4. If the System/Device Autostart option is set to Detect Only (Don’t Start), start the new board using the DCM. From the DCM main window, highlight the new board and then click the Start Device option from the Device pulldown menu to download and initialize the board.
The board and all virtual devices that will use the board can be used once the download and initialization have completed.
SR 6.1 CompactPCI for Windows Administration Guide — April 2006 21

Peripheral Hot Swap
Note: When the board is started, the DLGC_EVT_BLADE_STARTED event is generated by the event notification framework. For an application to receive this event, the application must be registered with the ADMIN_CHANNEL. For additional information about events, refer to the Event Service API for Windows Operating Systems Library Reference.
5. Inform the application to start using the board.
The standard runtime library (SRL) functions can be used to determine the devices that are in service on the board with the specified AUID, and the devices can be opened using dx_open( ), dt_open( ), etc. For information about these functions, see the Standard Runtime Library (SRL) API for Windows Operating Systems Library Reference.
Figure 4. DCM Main Window - Settings Menu
22 SR 6.1 CompactPCI for Windows Administration Guide — April 2006

Peripheral Hot Swap
3.2 Removing a CompactPCI Board From an Active System
The following procedure describes the basic steps for removing a CompactPCI board from an active system.
1. Inform the application to stop all activity on the board and close all open device handles.
The Standard Runtime Library (SRL) functions can be used to determine the devices on the board with the specified AUID, and the devices can be closed using dx_close( ), dt_close( ), etc. For information about these functions, see the Standard Runtime Library (SRL) API for Windows Operating Systems Library Reference.
2. When the application has stopped using devices associated with the board, use the Intel Dialogic Configuration Manager (DCM) to stop the board. From the DCM main window, highlight the board that you wish to stop and then click the Remove/Uninstall Device option from the Device pulldown menu to inform the driver to release the operating system resources assigned to the board. See Figure 5 for a display of the Device menu.
Figure 5. DCM Main Window - Device Menu
SR 6.1 CompactPCI for Windows Administration Guide — April 2006 23

Peripheral Hot Swap
Note: When the board has been stopped, the DLGC_EVT_BLADE_REMOVED event is generated by the event notification framework. For an application to receive this event, the application must be registered with the ADMIN_CHANNEL. For additional information about events, refer to the Event Service API for Windows Operating Systems Library Reference.
3. After the OUT OF SERVICE LED on the faceplate of the cPCI baseboard lights, physically remove the board according to the instructions in the Quick Install Card that came with the board. If the board uses a rear I/O Module, remove the baseboard first, and then remove the rear I/O Module.
4. If the board uses a rear I/O Module, remove the rear I/O Module following the instructions provided with the Quick Install Card.
3.3 Replacing a CompactPCI Board in an Active System
The following procedure describes the basic steps for removing and replacing a CompactPCI board in an active system.
1. Inform the application to stop all activity on the board and close all open device handles.
The Standard Runtime Library (SRL) functions can be used to determine the devices on the board with the specified AUID, and the devices can be closed using dx_close( ), dt_close( ), etc. For information about these functions, see the Standard Runtime Library (SRL) API for Windows Operating Systems Library Reference.
Note: If the board being replaced was previously functioning as the Primary Clock Master or Reference Master, and the system has now automatically switched to a backup Clock Master and/or Reference Master because this board failed, replacing this board will not cause the system to automatically revert back to using the replacement board as the Primary Clock Master and/or Reference Master.
2. When the application has stopped using devices associated with the board, use the Intel Dialogic Configuration Manager (DCM) to stop the board. From the DCM main window, highlight the board that you wish to stop and then click the Remove/Uninstall Device option from the Device pulldown menu to inform the driver to release the operating system resources assigned to the board. See Figure 5 for a display of the Device menu.
Note: When the board has been stopped, the DLGC_EVT_BLADE_REMOVED event is generated by the event notification framework. For an application to receive this event, the application must be registered with the ADMIN_CHANNEL. For additional information about events, refer to the Event Service API for Windows Operating Systems Library Reference.
The board and all virtual devices associated with the board must not be used until the replacement board is restarted.
3. After the OUT OF SERVICE LED on the faceplate of the CompactPCI baseboard lights, physically remove the board according to the instructions in the Quick Install Card that came with the board. If the board uses a rear I/O Module, remove the baseboard first, and then remove the rear I/O Module.
24 SR 6.1 CompactPCI for Windows Administration Guide — April 2006

Peripheral Hot Swap
4. If the baseboard uses a rear /I/O Module, remove and replace the rear I/O Module following the instructions provided with the Quick Install Card.
5. Insert the replacement baseboard in the vacated slot following the instructions provided with the Quick Install Card. Depending on the DCM System/Device Autostart option selected, the new board will be detected by the system and either be started using the default values, or remain in the stopped state, allowing you to manually configure and start the board.
Note: How the system reacts to replacing a board depends on how the system settings have been configured using DCM. If the DCM Settings>System/Device Autostart option has been set to Detect and Start, the new board will be detected by the system, displayed in the DCM main window, and automatically started, once the POST has successfully completed, using the system default configuration for that board type. See Figure 4 for a display of the DCM main window. If the Detect Only (Don’t Start) option has been selected, then the new board will be detected by the system and displayed in the DCM main window, but will not be started.
6. Ensure that the new board’s Power On Self Test (POST) has completed. This will be indicated by the LEDs on the board becoming extinguished. For detailed information about POST, refer to the Intel® Dialogic® System Software Diagnostics Guide.
Note: This does not apply to the Intel NetStructure IPT Series boards. In this case, you should wait about 80 seconds for the POST to complete.
7. If the System/Device Autostart option is set to Detect Only (Don’t Start), start the new board using the DCM. From the DCM main window, highlight the new board and then click the Start Device option from the Device pulldown menu to download and initialize the board.
The board and all virtual devices on the board can be used once the download and initialization have completed.
Note: When the board is started, the DLGC_EVT_BLADE_STARTED event is generated by the event notification framework. For an application to receive this event, the application must be registered with the ADMIN_CHANNEL. For additional information about events, refer to the Event Service API for Windows Operating Systems Library Reference.
8. Inform the application to start using the board.
The standard runtime library (SRL) functions can be used to determine the devices that are in service again on the board with the specified AUID, and the devices can be opened using dx_open( ), dt_open( ), etc. For information about these functions, see the Standard Runtime Library (SRL) API for Windows Operating Systems Library Reference.
SR 6.1 CompactPCI for Windows Administration Guide — April 2006 25

Peripheral Hot Swap
26 SR 6.1 CompactPCI for Windows Administration Guide — April 2006
4Administrative Utilities
This section gives a description and parameters for each administrative utility. The utilities are listed alphabetically. A description of each utility is provided, including a description of each associated parameter. This section includes the following:
• Alarms Utility . . . . . . . . . . . . . . . . . . . . . . . . . . . . . . . . . . . . . . . . . . . . . . . . . . . . . . . . 29
• Event Viewer Utility . . . . . . . . . . . . . . . . . . . . . . . . . . . . . . . . . . . . . . . . . . . . . . . . . . . 29
• IPT Admin Utility . . . . . . . . . . . . . . . . . . . . . . . . . . . . . . . . . . . . . . . . . . . . . . . . . . . . . 30
• LineAdmin Utility . . . . . . . . . . . . . . . . . . . . . . . . . . . . . . . . . . . . . . . . . . . . . . . . . . . . . 31
• Listboards Utility . . . . . . . . . . . . . . . . . . . . . . . . . . . . . . . . . . . . . . . . . . . . . . . . . . . . . . 32
• STD Config Utility . . . . . . . . . . . . . . . . . . . . . . . . . . . . . . . . . . . . . . . . . . . . . . . . . . . . 34
• TSP Config . . . . . . . . . . . . . . . . . . . . . . . . . . . . . . . . . . . . . . . . . . . . . . . . . . . . . . . . . . 36
• TSP Monitor . . . . . . . . . . . . . . . . . . . . . . . . . . . . . . . . . . . . . . . . . . . . . . . . . . . . . . . . . 37
• TSP Tracer . . . . . . . . . . . . . . . . . . . . . . . . . . . . . . . . . . . . . . . . . . . . . . . . . . . . . . . . . . . 38
Note: With the exception of the Event Viewer and IPT Admin utilities, the utilities documented in this section do not apply to Intel NetStructure IPT Series boards.
4.1 QScript Utilities
The QScript utilities are a subset of the administrative utilities. QScript is an object-oriented scripting tool developed for the Intel NetStructure on DM3 architecture products. QScript is intended for use while developing demonstration or test programs and is implemented using the Tcl/Tk generic scripting language. All Qscript utilities can be run from the Windows operating system.
QScript utilities use board and line numbers as follows: board numbers are 0-based and line numbers are 1-based. That is, the first board is typically board 0 and the first line is line 1.
The following administrative utilities use QScript:
• Alarms Utility
• LineAdmin Utility
• STD Config Utility
• TSP Config
• TSP Monitor
• TSP Tracer
SR 6.1 CompactPCI for Windows Administration Guide 27

Administrative Utilities
4.1.1 QScript Utility Requirements
The following information gives details specific to QScript utilities:
• File Directories
• QScript Environment Variables
4.1.1.1 File Directories
The directory for the Windows batch file used to invoke the QScript tools is:
%systemroot%\program files\dialogic\bin
The QScript tools developed by Intel Dialogic are located in:
%systemroot%\program files\dialogic\qscript\tools
Note: Do not run a <toolname>.qs file directly. Batch files have been created which call the QScript interpreter to run the <toolname>.qs file. To use a QScript utility, specify the utility name and parameters on the command line.
4.1.1.2 QScript Environment Variables
QSCRIPT_DIR Environment Variable:
In a Windows environment, this variable is set during the Intel Dialogic System Release install.
Single Session Variable:
Set the variable for a single session using the set command. To permanently set the environment variable for all login sessions, update the variable in the System Properties Environment tab.
Remote Systems:
The remote system containing the board does not need to have QScript installed, but must be running the RemoteQHostServer application included with QScript and installed in the bin directory.
To run QScript tools against a board in a remote system, set the REMOTE_QHOST environment variable to the name of the machine that contains the board you want to access. Set REMOTE_QHOST to:
hostname:port
where hostname is the machine name or TCP/IP address, and port is optional and specified only if RemoteQHostServer was started on a special port.
28 SR 6.1 CompactPCI for Windows Administration Guide

Administrative Utilities
4.2 Alarms Utility
The Alarms utility is used for sending and monitoring the alarm states on a T-1 or E-1 line. However, if you are already using the LineAdmin utility to put lines into service, you may not need to use Alarms because LineAdmin displays much of the same information. See Section 4.5, “LineAdmin Utility”, on page 31 for information about the LineAdmin utility.
Command Line: alarms [parameter_list]
The Alarms utility uses the following command line parameters:
Example: This example monitors the alarm states on line 1 of board 0:
alarms -board 0 -line 1
Figure 6 shows a typical Alarms display.
Figure 6. Alarms Display
4.3 Event Viewer Utility
The Event Viewer utility displays the Windows Event Viewer which allows you to view error and administrative messages generated by the system. The Event Viewer utility is accessed through the Intel Dialogic Configuration Manager (DCM). From the DCM main window, click the Log File option from the View pulldown menu to display the Windows Event Viewer. See Figure 7 for a display of the DCM main window.
Parameter Description
-board <n> Board number (required). Use the Listboards utility to obtain the board number.
-line <n> Line number (required)
SR 6.1 CompactPCI for Windows Administration Guide 29

Administrative Utilities
Figure 7. DCM Main Window - View Menu
4.4 IPT Admin Utility
The IPT Admin utility is used to reset an Intel NetStructure IPT Series board. The board may require resetting if an IPML-based application receives IPMEV_ERROR events or if a Global Call-based application receives GCEV_TASKFAIL events.
Command Line: pmacadmin [parameter_list]
The IPT Admin utility uses the following command line parameters:
Parameter Description
-e Causes a hard reset of the Intel NetStructure IPT Series board.
-i Initializes the Intel NetStructure IPT Series board.
-c Sets the Intel NetStructure IPT Series board to the configured state.
-s Starts the Intel NetStructure IPT Series board.
30 SR 6.1 CompactPCI for Windows Administration Guide

Administrative Utilities
Examples:
This example, in sequence, resets, initializes, configures and then starts all Intel NetStructure IPT Series boards in the system:
pmacadmin -eics
This example, in sequence, resets, initializes, configures and then starts the Intel NetStructure IPT Series board in physical slot 8:
pmacadmin -eics -P 8
4.5 LineAdmin Utility
The LineAdmin utility puts lines into service so you can run many of the other diagnostic utilities. LineAdmin, like Alarms, is used for sending and monitoring the alarm states on a T-1 or E-1 line but LineAdmin is recommended as a more useful tool.
A flexible logging feature is available that includes the ability to log the status of the DM3 trunks and alarm conditions.
Command Line: lineadmin [parameter_list]
The LineAdmin utility uses the following command line parameters:
Example: This example runs the LineAdmin utility on board 1, lines 1, 2, 3, and 4:
-B <pcibus> -S <pcislot> Specifies the Intel NetStructure IPT Series board identified by this PCIBus and PCISlot number. Use the Intel Dialogic Configuration Manager (DCM) to obtain the board’s PCIBus number and PCISlot number.
-P <slot> Specifies the Intel NetStructure IPT Series board located in this physical slot. Physical slots are numbered from left to right on a chassis, starting with the number 1. Use the DCM to obtain the board’s physical slot number.
Parameter Description
Parameter Description
-board <n> Board number (required). Use the Listboards utility to obtain the board number.
-line <n> Line number (optional, default is all lines). If no -line parameter is provided, the display will show all lines.
-lines {n n+ …}
Line numbers. This parameter is used when more than 1 line is monitored (optional, default is {1 2 3 4})
-advanced <n> The presence or absence of the following alarms on the line: AIS, CRC, and D-Channel
SR 6.1 CompactPCI for Windows Administration Guide 31

Administrative Utilities
lineadmin -board 1 -lines {1 2 3 4}
Figure 8 shows the LineAdmin display. This example shows four trunks (an Intel NetStructure® DMV product). The alarm setting is on the left and the alarm indicators are on the right.
Figure 8. Line Admin Display
4.6 Listboards Utility
Listboards displays information for DM3 board(s) present in the system and recognized by the device driver. Listboards displays complete information regarding the current status of the baseboard along with a list of attached digital network interface and processing daughter boards (if any).
32 SR 6.1 CompactPCI for Windows Administration Guide

Administrative Utilities
4.6.1 Options
Command Line: listboards [parameter_list]
The Listboards utility uses the following command line parameters:
Example: This example lists all the board attributes for board 0. If any daughter boards are present, their attributes are also listed:
listboards –b0
4.6.2 Guidelines
Listboards only provides a logical board number. The logical board number should be used when running any of the administrative utilities that require a board number.
Board numbers are dynamically assigned. Listboards prints out the logical board number along with the board’s serial number. Use the serial number to physically identify the board on the CompactPCI chassis.
Note: Listboards will fail if you specify a board number that does not exist on the system.
To use Listboards, you must start the boards using the Intel® Dialogic® Configuration Manager (DCM). Then invoke listboards from the Command Prompt window. Figure 9 shows the results of running listboards.
Parameters Description
-b <n> Board number (optional). If no board number is specified, the status of all boards in the system will be given.
-d <level> Application debug level (optional)
-h Help (optional)
-i <board number> Retrieve hardware information (optional)
-v Version (optional)
SR 6.1 CompactPCI for Windows Administration Guide 33

Administrative Utilities
Figure 9. Listboards Display
4.7 STD Config Utility
The STD Config utility provides a flexible way to configure DM3 component parameters. You put the parameters to be set and retrieved for a particular component into a file. You can create and modify these files. When used in conjunction with the STD Config utility these component parameters (for example, lineadmin, CCS, player) can be easily configured.
Command Line: stdconfig [parameter_list]
The STD Config utility uses the following command line parameters:
34 SR 6.1 CompactPCI for Windows Administration Guide

Administrative Utilities
Example: This example runs the STD Config utility on board 0:
stdconfig -board 0
Figure 10 shows the STD Config display.
Figure 10. STD Config Display
Parameter Description
-board <n> Board number (required). Use the Listboards utility to obtain the board number.
-file <name.ext> The file name of the containing the relevant parameters of the component to be configured (such as tsc.prm, ccscomp.prm).
-inst <n> Specifies the particular instance (of the component) whose parameters the user wants to modify.
-comptype <n> Standard Dialogic component types (1 - 255).
-class <name> One of the standard Dialogic components (such as TSC, LCON, CHP). This should match the relevant -file parameter.
SR 6.1 CompactPCI for Windows Administration Guide 35

Administrative Utilities
4.8 TSP Config
The TSP Config utility sets and retrieves DM3 protocol variant parameters. Using this utility the user can change protocol variant parameters dynamically from one call to the next.
This tool can be used on any DM3 product that has a T1 CAS or T1/E1 ISDN TSP resource. The tool does not work for R2MF protocols or Analog protocols.
Command Line: tspconfig [parameter_list]
The TSP Config utility uses the following command line parameters:
Example: This example runs the TSP Config utility on board 0:
tspconfig -board 1
Figure 11 shows the TSP Config display.
Parameter Description
-board <n> Board number (required). Use the Listboards utility to obtain the board number.
-id <n> Protocol variant id (1 - 32), whose parameters you are configuring dynamically. For example, tspconfig -board 0 -id 2, will display the parameters of protocol variant id 2.
36 SR 6.1 CompactPCI for Windows Administration Guide

Administrative Utilities
Figure 11. TSP Config Display
4.9 TSP Monitor
TSP Monitor performs the following:
• Monitors one or two DM3 GlobalCall resource channels.
• Traces all levels of the protocol including:
– DM3 GlobalCall resource call control operations from clients
– DM3 GlobalCall resource call state changes
– DM3 GlobalCall resource channel state changes
– CAS signaling bits
• Launches an audio tool for recording/playback purposes on the channel(s). It plays audio data (a file from the host) using the TSP.
• Checks timing via point and click on GUI
• Tunes protocols and identifies configuration problems
Command Line: tspmon [parameter_list]
The TSP Monitor utility uses the following command line parameters:
SR 6.1 CompactPCI for Windows Administration Guide 37
Administrative Utilities
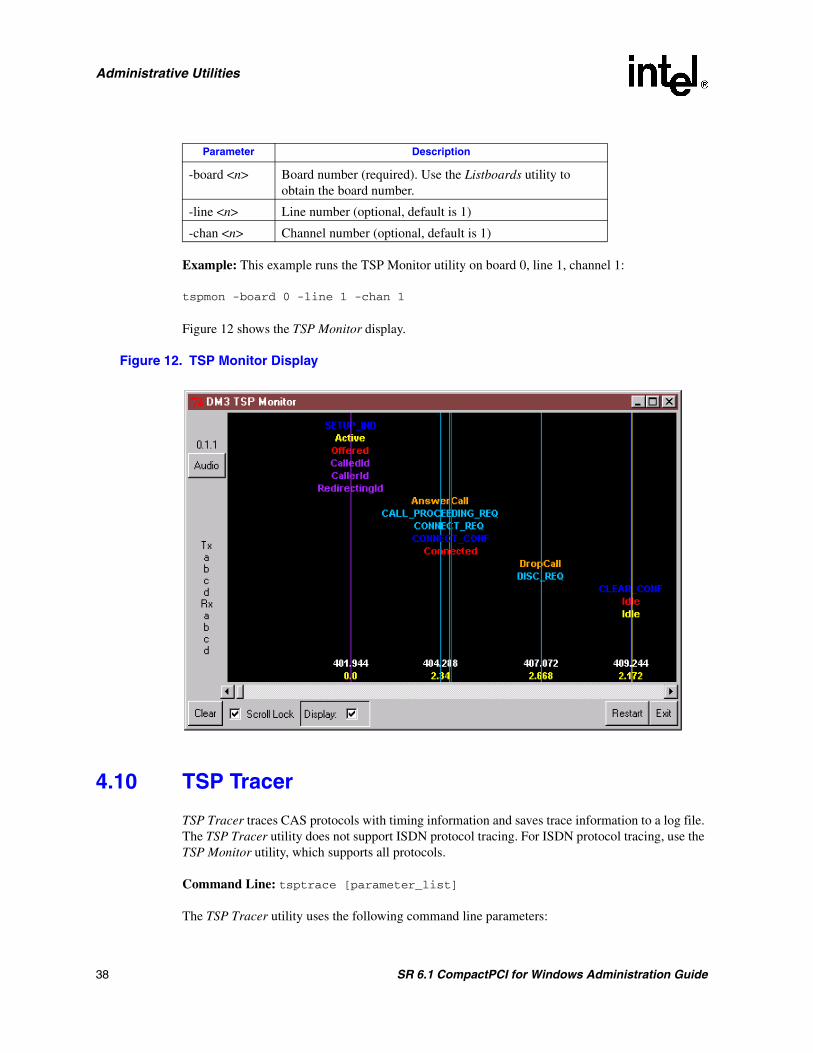
Example: This example runs the TSP Monitor utility on board 0, line 1, channel 1:
tspmon -board 0 -line 1 -chan 1
Figure 12 shows the TSP Monitor display.
Figure 12. TSP Monitor Display
4.10 TSP Tracer
TSP Tracer traces CAS protocols with timing information and saves trace information to a log file. The TSP Tracer utility does not support ISDN protocol tracing. For ISDN protocol tracing, use the TSP Monitor utility, which supports all protocols.
Command Line: tsptrace [parameter_list]
The TSP Tracer utility uses the following command line parameters:
Parameter Description
-board <n> Board number (required). Use the Listboards utility to obtain the board number.
-line <n> Line number (optional, default is 1)
-chan <n> Channel number (optional, default is 1)
38 SR 6.1 CompactPCI for Windows Administration Guide

Administrative Utilities
Example: This example runs the TSP Tracer utility on board 0, line 1, channel 1:
tsptrace -board 0 -line 1 -chan 1
Figure 13 shows a typical TSP Tracer display.
Figure 13. TSP Tracer Display
Parameter Description
-board <n> Board number (required). Use the Listboards utility to obtain the board number.
-line <n> Line number (optional, default is 1)
-chan <n> Channel number (optional, default is 1)
SR 6.1 CompactPCI for Windows Administration Guide 39

Administrative Utilities
40 SR 6.1 CompactPCI for Windows Administration Guide

5Troubleshooting
This chapter discusses the following topics about troubleshooting:
• General Troubleshooting Information . . . . . . . . . . . . . . . . . . . . . . . . . . . . . . . . . . . . . . 41
• Checking Configuration. . . . . . . . . . . . . . . . . . . . . . . . . . . . . . . . . . . . . . . . . . . . . . . . . 41
• Event Viewer . . . . . . . . . . . . . . . . . . . . . . . . . . . . . . . . . . . . . . . . . . . . . . . . . . . . . . . . . 41
• Checking Which Packages Are Installed. . . . . . . . . . . . . . . . . . . . . . . . . . . . . . . . . . . . 42
• Checking Hardware . . . . . . . . . . . . . . . . . . . . . . . . . . . . . . . . . . . . . . . . . . . . . . . . . . . . 42
5.1 General Troubleshooting Information
Solutions to many problems can be found in the technical notes on the Intel® Telecom Support Resources Web site at http://developer.intel.com/design/telecom/support.. In addition, check the online Release Update for the latest information about any issues, restrictions, or limitations that may affect the installation.
Problems on initial startup are typically caused by errors in your configuration. Hardware related problems are also a possibility. The following sections provide some general information for troubleshooting these problems.
In addition, refer to the Intel® Dialogic® System Release Software Installation Guide and check that all of the necessary procedures were performed.
5.2 Checking Configuration
Check that your system has been configured correctly. Use the Intel® Dialogic® Configuration Manager (DCM) to verify the configuration.
For a new configuration to take effect if system-level changes are made, the system must first be stopped and then restarted after the changes have been made. For configuration changes to a single board to take effect, the board must first be stopped and then restarted after the changes have been made. See Chapter 2, “Stopping and Starting the System”.
5.3 Event Viewer
Check the Windows* Event Viewer for error and event messages. The Event Viewer can be accessed through DCM.
SR 6.1 CompactPCI for Windows Administration Guide — April 2006 41

Troubleshooting
From the DCM main window, click the Log File option from the View pulldown menu to display the Event Viewer. Highlight System Log to display the Intel® Dialogic® system error and event messages.
5.4 Checking Which Packages Are Installed
Ensure that you installed all of the packages that you need. For a list and description of all system release software packages, see Checking Which Packages to Install in the in the Intel® Dialogic® System Release Software Installation Guide.
5.5 Checking Hardware
Ensure that each board is securely installed in its slot. Check that the correct cables are used and that they are connected properly.
For hardware testing information, see the Intel® Dialogic® System Release Diagnostics Guide.
42 SR 6.1 CompactPCI for Windows Administration Guide — April 2006

Index
Aadding a board to an active system 21
administrative utilitiesoverview of 15
Alarms utility 29
applying board-level configuration changes 19
applying system-level configuration changes 19
Bbasic hot swap 14
boardadding 21removing 23replacing 24
board power on self test 21, 25
board removal procedure 23
board replacement procedure 24
board-level configuration changes 19
Cchanging system startup mode 17
checking error and event messages 41
checking hardware 42
checking installed packages 42
checking the configuration 41
configuration changesboard level 19system level 19
DDCM
Remove/Uninstall Device option 23, 24Start Device option 21, 25System/Device Autostart option 21, 25
displayed messages 17
Eerror and event messages 41
event viewer 41
Hhardware installation
troubleshooting 42
high availabilityperipheral hot swap 14Redundant Host 14support 13
high availability platform 14
high availability support 13
how to use this publication 11
IIntel® Dialogic® devices
starting after a reboot 17
Intel® Dialogic® systemapplying board-level configuration changes 19applying system-level configuration changes 19starting after initial startup 17stopping 17
intended audience 11
IPT Admin utility 30
LLineAdmin utility 29, 31
Listboards utility 32
Mmessages 17
messages displayed 17
OOUT OF SERVICE LED 24
SR 6.1 Comp
actPCI for Windows Administration Guide 43
overviewadministrative utilities 15high availability support 13peripheral hot swap 14Redundant Host 14single board computer 14starting and stopping the system 13troubleshooting 15
Pperipheral hot swap
overview 14
POST 21, 25
power on self test 21, 25
primary clock master 24
proceduresadding a board to an active system 21removing a board in an active system 23replacing a board in an active system 24
publicationhow to use 11intended audience 11
QQscript utilities
environment variables 28file directories 28QSCRIPT_DIR environment variables 28remote systems 28single session variable 28
RRedundant Host 14
redundant single board computer 14
Redundant System Slot 13
reference master 24
related information 12
remote systems, Qscript utilities 28
Remove/Uninstall Device option 23, 24
removing a board in an active system 23
replacing a board in an active system 24
Ssingle board computer 14
single session variable, Qscript utilities 28
Start Device option 21, 25
starting and stopping the systemoverview of 13
starting devices after a reboot 17
starting the Intel® Dialogic® system 17
starting the system 17
STD Config utility 34
stopping the Intel® Dialogic system 17
stopping the system 17
system startup modechanging 17
System/Device Autostart option 21, 25
system-level configuration changes 19
Ttroubleshooting
checking configuration 41checking event and error messages 41general information 41hardware 42overview of 15package installation 42
TSP Config utility 36
TSP Monitor utility 37
TSP Trace utility 38
Uutilities
Alarms 29IPT Admin 30LineAdmin 31Listboards 32STD Config 34TSP Config 36TSP Monitor 37TSP Trace 38
WWindows® Event Viewer 41
Windows® Hot Swap Kit 21
SR 6.1 Comp
actPCI for Windows Administration Guide 44
SR 6.1 Comp
actPCI for Windows Administration Guide 45
46 SR 6.1 CompactPCI for Windows Administration Guide


