66
Intel ® Dialogic ® System Release 6.1 for PCI and CompactPCI on Linux* Operating Systems Administration Guide September 2005 05-1845-004
Intel® Dialogic® System Release 6.1 for PCI and CompactPCI on Linux* Operating SystemsAdministration Guide
September 2005
05-1845-004

SR 6.1 for PCI and CompactPCI on Linux Administration Guide – September 2005
INFORMATION IN THIS DOCUMENT IS PROVIDED IN CONNECTION WITH INTEL® PRODUCTS. NO LICENSE, EXPRESS OR IMPLIED, BY ESTOPPEL OR OTHERWISE, TO ANY INTELLECTUAL PROPERTY RIGHTS IS GRANTED BY THIS DOCUMENT. EXCEPT AS PROVIDED IN INTEL'S TERMS AND CONDITIONS OF SALE FOR SUCH PRODUCTS, INTEL ASSUMES NO LIABILITY WHATSOEVER, AND INTEL DISCLAIMS ANY EXPRESS OR IMPLIED WARRANTY, RELATING TO SALE AND/OR USE OF INTEL PRODUCTS INCLUDING LIABILITY OR WARRANTIES RELATING TO FITNESS FOR A PARTICULAR PURPOSE, MERCHANTABILITY, OR INFRINGEMENT OF ANY PATENT, COPYRIGHT OR OTHER INTELLECTUAL PROPERTY RIGHT. Intel products are not intended for use in medical, life saving, or life sustaining applications.
Intel may make changes to specifications and product descriptions at any time, without notice.
This Intel® Dialogic® System Release 6.1 for PCI and CompactPCI on Linux* Operating Systems Administration Guide as well as the software described in it is furnished under license and may only be used or copied in accordance with the terms of the license. The information in this manual is furnished for informational use only, is subject to change without notice, and should not be construed as a commitment by Intel Corporation. Intel Corporation assumes no responsibility or liability for any errors or inaccuracies that may appear in this document or any software that may be provided in association with this document.
Except as permitted by such license, no part of this document may be reproduced, stored in a retrieval system, or transmitted in any form or by any means without express written consent of Intel Corporation.
Copyright © 2002, 2004-2005, Intel Corporation
BunnyPeople, Celeron, Chips, Dialogic, EtherExpress, ETOX, FlashFile, i386, i486, i960, iCOMP, InstantIP, Intel, Intel Centrino, Intel Centrino logo, Intel logo, Intel386, Intel486, Intel740, IntelDX2, IntelDX4, IntelSX2, Intel Inside, Intel Inside logo, Intel NetBurst, Intel NetMerge, Intel NetStructure, Intel SingleDriver, Intel SpeedStep, Intel StrataFlash, Intel Xeon, Intel XScale, IPLink, Itanium, MCS, MMX, MMX logo, Optimizer logo, OverDrive, Paragon, PDCharm, Pentium, Pentium II Xeon, Pentium III Xeon, Performance at Your Command, Sound Mark, The Computer Inside., The Journey Inside, VTune, and Xircom are trademarks or registered trademarks of Intel Corporation or its subsidiaries in the United States and other countries.
* Other names and brands may be claimed as the property of others.
Publication Date: September 2005
Document Number: 05-1845-004
Intel Converged Communications, Inc.1515 Route 10Parsippany, NJ 07054
For Technical Support, visit the Intel Telecom Support Resources website at:http://developer.intel.com/design/telecom/support
For Products and Services Information, visit the Intel Telecom Products website at:http://www.intel.com/design/network/products/telecom
For Sales Offices and other contact information, visit the Where to Buy Intel Telecom Products page at:http://www.intel.com/buy/wtb/wtb1028.htm

SR 6.1 for PCI and CompactPCI on Linux Administration Guide – September 2005 3
Contents
Revision History . . . . . . . . . . . . . . . . . . . . . . . . . . . . . . . . . . . . . . . . . . . . . . . . . . . . . . . . . . . . . . 9
About This Publication . . . . . . . . . . . . . . . . . . . . . . . . . . . . . . . . . . . . . . . . . . . . . . . . . . . . . . . 11
Purpose . . . . . . . . . . . . . . . . . . . . . . . . . . . . . . . . . . . . . . . . . . . . . . . . . . . . . . . . . . . . . . . 11Applicability . . . . . . . . . . . . . . . . . . . . . . . . . . . . . . . . . . . . . . . . . . . . . . . . . . . . . . . . . . . . 11Intended Audience. . . . . . . . . . . . . . . . . . . . . . . . . . . . . . . . . . . . . . . . . . . . . . . . . . . . . . . 11How to Use This Publication . . . . . . . . . . . . . . . . . . . . . . . . . . . . . . . . . . . . . . . . . . . . . . . 12Related Information . . . . . . . . . . . . . . . . . . . . . . . . . . . . . . . . . . . . . . . . . . . . . . . . . . . . . . 12
1 Administration Overview . . . . . . . . . . . . . . . . . . . . . . . . . . . . . . . . . . . . . . . . . . . . . . . . . . . . . . 15
1.1 Stopping and Starting the System . . . . . . . . . . . . . . . . . . . . . . . . . . . . . . . . . . . . . . . . . . . 151.2 High Availability Support . . . . . . . . . . . . . . . . . . . . . . . . . . . . . . . . . . . . . . . . . . . . . . . . . . 15
1.2.1 Redundant Host . . . . . . . . . . . . . . . . . . . . . . . . . . . . . . . . . . . . . . . . . . . . . . . . . . 151.2.2 Peripheral Hot Swap. . . . . . . . . . . . . . . . . . . . . . . . . . . . . . . . . . . . . . . . . . . . . . . 17
1.3 Administrative Utilities . . . . . . . . . . . . . . . . . . . . . . . . . . . . . . . . . . . . . . . . . . . . . . . . . . . . 171.4 Troubleshooting . . . . . . . . . . . . . . . . . . . . . . . . . . . . . . . . . . . . . . . . . . . . . . . . . . . . . . . . . 18
2 Stopping and Starting the System . . . . . . . . . . . . . . . . . . . . . . . . . . . . . . . . . . . . . . . . . . . . . . 21
2.1 Stopping the System Services. . . . . . . . . . . . . . . . . . . . . . . . . . . . . . . . . . . . . . . . . . . . . . 212.2 Starting the System Services. . . . . . . . . . . . . . . . . . . . . . . . . . . . . . . . . . . . . . . . . . . . . . . 212.3 Applying Configuration Changes . . . . . . . . . . . . . . . . . . . . . . . . . . . . . . . . . . . . . . . . . . . . 21
3 Peripheral Hot Swap. . . . . . . . . . . . . . . . . . . . . . . . . . . . . . . . . . . . . . . . . . . . . . . . . . . . . . . . . . 23
3.1 Adding a New CompactPCI Board to an Active System . . . . . . . . . . . . . . . . . . . . . . . . . . 233.2 Removing a CompactPCI Board From an Active System . . . . . . . . . . . . . . . . . . . . . . . . . 243.3 Replacing a CompactPCI Board in an Active System (Basic Hot Swap) . . . . . . . . . . . . . 25
3.3.1 Requirements for Replacing a Clock Master Board in an Active System . . . . . . . 263.3.2 Clock Recovery or Fallback . . . . . . . . . . . . . . . . . . . . . . . . . . . . . . . . . . . . . . . . . 263.3.3 Clock Master Assignment . . . . . . . . . . . . . . . . . . . . . . . . . . . . . . . . . . . . . . . . . . . 273.3.4 Instructions for Replacing a CompactPCI Board in an Active System (Basic Hot
Swap)273.4 Replacing a Primary Clock Master That Has Failed (No Fallback) . . . . . . . . . . . . . . . . . . 28
4 Administrative Utilities. . . . . . . . . . . . . . . . . . . . . . . . . . . . . . . . . . . . . . . . . . . . . . . . . . . . . . . . 31
4.1 Administrative Utilities Product Support. . . . . . . . . . . . . . . . . . . . . . . . . . . . . . . . . . . . . . . 314.2 QScript Utilities . . . . . . . . . . . . . . . . . . . . . . . . . . . . . . . . . . . . . . . . . . . . . . . . . . . . . . . . . 32
4.2.1 QScript Utility Requirements. . . . . . . . . . . . . . . . . . . . . . . . . . . . . . . . . . . . . . . . . 334.2.1.1 File Directories . . . . . . . . . . . . . . . . . . . . . . . . . . . . . . . . . . . . . . . . . . . 334.2.1.2 QScript Environment Variables. . . . . . . . . . . . . . . . . . . . . . . . . . . . . . . 344.2.1.3 Requirements for tcl . . . . . . . . . . . . . . . . . . . . . . . . . . . . . . . . . . . . . . . 34
4.3 Audio Control Utility (audio) . . . . . . . . . . . . . . . . . . . . . . . . . . . . . . . . . . . . . . . . . . . . . . . . 354.4 CAS Signal Editor Utility (signaleditor) . . . . . . . . . . . . . . . . . . . . . . . . . . . . . . . . . . . . . . . 35
4.4.1 Options . . . . . . . . . . . . . . . . . . . . . . . . . . . . . . . . . . . . . . . . . . . . . . . . . . . . . . . . . 364.4.2 Guidelines. . . . . . . . . . . . . . . . . . . . . . . . . . . . . . . . . . . . . . . . . . . . . . . . . . . . . . . 36
4.5 Hot Swap Configuration Utility (hsdemo). . . . . . . . . . . . . . . . . . . . . . . . . . . . . . . . . . . . . . 374.6 IPT Series Administration Utility (pmacadmin) . . . . . . . . . . . . . . . . . . . . . . . . . . . . . . . . . 39

4 SR 6.1 for PCI and CompactPCI on Linux Administration Guide – September 2005
Contents
4.7 IPT Series Firmware Update Utility (iptfwupdate). . . . . . . . . . . . . . . . . . . . . . . . . . . . . . . . 404.8 Line Administration Utility (lineadmin). . . . . . . . . . . . . . . . . . . . . . . . . . . . . . . . . . . . . . . . . 424.9 List Board Information Utility (listboards) . . . . . . . . . . . . . . . . . . . . . . . . . . . . . . . . . . . . . . 434.10 Remove Board Utility (removebrd) . . . . . . . . . . . . . . . . . . . . . . . . . . . . . . . . . . . . . . . . . . . 464.11 Standard DM3 Configuration Utility (stdconfig). . . . . . . . . . . . . . . . . . . . . . . . . . . . . . . . . . 474.12 Start Board Utility (startbrd) . . . . . . . . . . . . . . . . . . . . . . . . . . . . . . . . . . . . . . . . . . . . . . . . 484.13 Stop Board Utility (stopbrd). . . . . . . . . . . . . . . . . . . . . . . . . . . . . . . . . . . . . . . . . . . . . . . . . 49
4.13.1 Stopping Primary Clock Master in System With Clock Fallback Capability . . . . . . 504.13.2 Stopping Primary Clock Master in System Without Clock Fallback Capability . . . 50
4.14 Start System Services Utility (dlstart) . . . . . . . . . . . . . . . . . . . . . . . . . . . . . . . . . . . . . . . . . 504.15 Stop System Services Utility (dlstop) . . . . . . . . . . . . . . . . . . . . . . . . . . . . . . . . . . . . . . . . . 514.16 System Logging . . . . . . . . . . . . . . . . . . . . . . . . . . . . . . . . . . . . . . . . . . . . . . . . . . . . . . . . . 514.17 TDM Bus Information Utility (tblist) . . . . . . . . . . . . . . . . . . . . . . . . . . . . . . . . . . . . . . . . . . . 524.18 TSP Configuration Utility (tspconfig). . . . . . . . . . . . . . . . . . . . . . . . . . . . . . . . . . . . . . . . . . 544.19 TSP Monitor Utility (tspmon). . . . . . . . . . . . . . . . . . . . . . . . . . . . . . . . . . . . . . . . . . . . . . . . 554.20 TSP Tracer Utility (tsptrace) . . . . . . . . . . . . . . . . . . . . . . . . . . . . . . . . . . . . . . . . . . . . . . . . 56
5 Troubleshooting . . . . . . . . . . . . . . . . . . . . . . . . . . . . . . . . . . . . . . . . . . . . . . . . . . . . . . . . . . . . . 59
5.1 General Troubleshooting Information . . . . . . . . . . . . . . . . . . . . . . . . . . . . . . . . . . . . . . . . . 595.2 Checking Compliance with Prerequisites . . . . . . . . . . . . . . . . . . . . . . . . . . . . . . . . . . . . . . 595.3 Checking Configuration Files . . . . . . . . . . . . . . . . . . . . . . . . . . . . . . . . . . . . . . . . . . . . . . . 605.4 Checking Log Files . . . . . . . . . . . . . . . . . . . . . . . . . . . . . . . . . . . . . . . . . . . . . . . . . . . . . . . 60
5.4.1 Intel Dialogic Log Files. . . . . . . . . . . . . . . . . . . . . . . . . . . . . . . . . . . . . . . . . . . . . . 605.4.2 Linux Error Log File . . . . . . . . . . . . . . . . . . . . . . . . . . . . . . . . . . . . . . . . . . . . . . . . 60
5.5 Checking Which Packages Are Installed . . . . . . . . . . . . . . . . . . . . . . . . . . . . . . . . . . . . . . 605.6 Checking Hardware . . . . . . . . . . . . . . . . . . . . . . . . . . . . . . . . . . . . . . . . . . . . . . . . . . . . . . 615.7 Checking Version of Linux Kernel. . . . . . . . . . . . . . . . . . . . . . . . . . . . . . . . . . . . . . . . . . . . 61
Index . . . . . . . . . . . . . . . . . . . . . . . . . . . . . . . . . . . . . . . . . . . . . . . . . . . . . . . . . . . . . . . . . . . . . . . 63

SR 6.1 for PCI and CompactPCI on Linux Administration Guide – September 2005 5
Figures
1 High Availability Capability. . . . . . . . . . . . . . . . . . . . . . . . . . . . . . . . . . . . . . . . . . . . . . . . . . . . . 162 Audio Control Display . . . . . . . . . . . . . . . . . . . . . . . . . . . . . . . . . . . . . . . . . . . . . . . . . . . . . . . . 353 CAS Signal Editor Display . . . . . . . . . . . . . . . . . . . . . . . . . . . . . . . . . . . . . . . . . . . . . . . . . . . . . 374 Hot Swap Configuration Utility Display . . . . . . . . . . . . . . . . . . . . . . . . . . . . . . . . . . . . . . . . . . . 385 IPT Series Firmware Update Sample Output . . . . . . . . . . . . . . . . . . . . . . . . . . . . . . . . . . . . . . 416 Line Administration Utility Display . . . . . . . . . . . . . . . . . . . . . . . . . . . . . . . . . . . . . . . . . . . . . . . 437 Listboards Level 1 Example Output. . . . . . . . . . . . . . . . . . . . . . . . . . . . . . . . . . . . . . . . . . . . . . 458 Listboards Level 2 Example Output. . . . . . . . . . . . . . . . . . . . . . . . . . . . . . . . . . . . . . . . . . . . . . 469 Standard DM3 Configuration Display . . . . . . . . . . . . . . . . . . . . . . . . . . . . . . . . . . . . . . . . . . . . 4810 TDM Bus Information Display . . . . . . . . . . . . . . . . . . . . . . . . . . . . . . . . . . . . . . . . . . . . . . . . . . 5311 TSP Configuration Display. . . . . . . . . . . . . . . . . . . . . . . . . . . . . . . . . . . . . . . . . . . . . . . . . . . . . 5412 TSP Monitor Display . . . . . . . . . . . . . . . . . . . . . . . . . . . . . . . . . . . . . . . . . . . . . . . . . . . . . . . . . 5613 TSP Tracer Display . . . . . . . . . . . . . . . . . . . . . . . . . . . . . . . . . . . . . . . . . . . . . . . . . . . . . . . . . . 57

6 SR 6.1 for PCI and CompactPCI on Linux Administration Guide – September 2005
Figures

SR 6.1 for PCI and CompactPCI on Linux Administration Guide – September 2005 7
Tables
1 Administrative Utilities . . . . . . . . . . . . . . . . . . . . . . . . . . . . . . . . . . . . . . . . . . . . . . . . . . . . . . . . 182 Administrative Utilities Support by Product Family . . . . . . . . . . . . . . . . . . . . . . . . . . . . . . . . . . 323 Firmware Files Used by IPT Series Boards. . . . . . . . . . . . . . . . . . . . . . . . . . . . . . . . . . . . . . . . 404 Listboards Level 1 Parameters . . . . . . . . . . . . . . . . . . . . . . . . . . . . . . . . . . . . . . . . . . . . . . . . . 445 Listboards Level 2 Parameters . . . . . . . . . . . . . . . . . . . . . . . . . . . . . . . . . . . . . . . . . . . . . . . . . 45

8 SR 6.1 for PCI and CompactPCI on Linux Administration Guide – September 2005
Tables
SR 6.1 for PCI and CompactPCI on Linux Administration Guide — September 2005 9
Revision History
This revision history summarizes the changes made in each published version of this document.
Document No. Publication Date Description of Revisions
05-1845-004 September 2005 Revision for Intel® Dialogic® System Release 6.1 for Linux Service Update, supporting PCI and CompactPCI.
Administration Overview chapter : Added information about Redundant Host in Redundant Host section.
05-1845-003 August 2005 Revision for Intel® Dialogic® System Release 6.1 for Linux, supporting PCI and CompactPCI. Includes information from System Release 6.1 for PCI on Linux Administration Guide (05-2404-001).
Global changes: Changed all occurrences of DM3_cfg.sh utility to Intel Dialogic Configuration Manager utility. The DM3_cfg.sh utility has been replaced by this new utility.For information on Hot Swap Kit installation installation, changed all references from the Configuration Guide to the Installation Guide. Removed information about Redundant Host as it is not supported in this release.
Administration Overview chapter : Added IPT Series Firmware Update (iptfwupdate) utility to Administrative Utilities table in Administrative Utilities section. Also added note pointing to new Administrative Utilities Product Support section.
Stopping and Starting the System chapter : Combined two notes into one and updated the note in Applying Configuration Changes section.
Peripheral Hot Swap chapter : Added note about IPT Series boards to step 4 in Adding a New CompactPCI Board to an Active System section. Added note about Logical ID and SlotNumber parameters to step 6 in Adding a New CompactPCI Board to an Active System section. Added note about IPT Series boards to step 9 in Replacing a CompactPCI Board in an Active System (Basic Hot Swap) section. Added fifth bullet about hot swapping a board using the same slot in Requirements for Replacing a Clock Master Board in an Active System section.
Administrative Utilities chapter : Added new Administrative Utilities Product Support section indicating product support for each utility.Added information about product support for a utility in various sections of this chapter.Added new Requirements for tcl section for QScript utilities.Updated table of parameters IPT Series Administration Utility (pmacadmin) section: added -l parameter. Added new IPT Series Firmware Update Utility (iptfwupdate) section.Added fourth note about Logical ID and SlotNumber parameters in Start Board Utility (startbrd) section.Updated System Logging section. Added details on logging levels and how to set up logging.
10 SR 6.1 for PCI and CompactPCI on Linux Administration Guide — September 2005
Revision History
05-1845-002
(continued on next page)
March 2005 Revision for SR 6.1 Linux Feature Release 2, supporting PCI and CompactPCI*.
Global Changes: Merged information from the SR 6.1 Feature Release 1 for PCI on Linux Administration Guide (05-2404-001), so that the document now includes information on PCI and CompactPCI*. Replaced all Intel Dialogic directory paths with environment variables: ${INTEL_DIALOGIC_DIR} for /usr/dialogic; ${INTEL_DIALOGIC_CFG} for /usr/dialogic/cfg; ${INTEL_DIALOGIC_QSCRIPT} for /usr/dialogic/qscript. Changed terminology from Redundant System Slot (RSS) to Redundant Host (RH).
05-1845-002 (cont.)
March 2005 Peripheral Hot Swap chapter : Made major revisions to procedures, including updating how the TDM bus clocking daemon works. The clocking daemon operation in SR 6.1 FR2 represents a change from the operation in SR 6.0 for CompactPCI*. It no longer promotes slave boards to the role of clock master if the Primary or Secondary Clock Master fails or is stopped. This fallback behavior was removed because it was not controllable through configuration and occurred implicitly. The clocking daemon continues to allow fallback to a secondary board as long as the board is operational and was configured as a Secondary Clock Master prior to system services start-up. If the system was not configured with a Secondary Clock Master, and the Primary Master fails or is stopped, the system clocking will be compromised because there will be no clocking signal in the bus. (Also, made some similar changes to the sections on the removebrd, startbrd, and stopbrd utilities.)
Administrative Utilities chapter : Replaced the pbl utility with the List Board Information Utility (listboards). Replaced the alarms utility with the Line Administration Utility (lineadmin). Added installation dependency note to the List Board Information Utility (listboards) saying that it requires that you install the DLGCdmdev RPM regardless of the type of board you use (e.g., Springware or DM3 architecture). Added oam.log to the System Logging section and other places. Corrected the executable name of the Hot Swap Configuration Utility (hsdemo), changing it from hsconfig to hsdemo.Added a note to the Start Board Utility (startbrd) indicating that the MasterStatus parameter (TDM clock function) in the SCD file is ignored when using startbrd.
05-1845-001 September 2002 Initial version of document for CompactPCI* only on SR 6.0 for Linux operating systems.
Document No. Publication Date Description of Revisions
SR 6.1 for PCI and CompactPCI on Linux Administration Guide — September 2005 11
About This Publication
The following topics provide information about this publication:
• Purpose
• Applicability
• Intended Audience
• How to Use This Publication
• Related Information
Purpose
This publication provides information about performing administrative tasks on a Linux-based system that uses the Intel® Dialogic® System Release Software. The information applies to a system that has been successfully installed and configured, and has been in operation.
Applicability
This document is published for Intel® Dialogic® System Release 6.1 for Linux.
This document may also be applicable to later Intel Dialogic system releases, including service updates. Check the Release Guide for your software release to determine whether this document is supported.
Intended Audience
This publication is written for the following audience:
• System Integrators
• Independent Software Vendors (ISVs)
• Original Equipment Manufacturers (OEMs)
• Telephony Equipment Manufacturers (TEMs)
• Network Equipment Providers
• Distributors

12 SR 6.1 for PCI and CompactPCI on Linux Administration Guide — September 2005
About This Publication
How to Use This Publication
Refer to this publication after you have installed and configured the Intel Dialogic System Release Software and associated hardware. This publication assumes that you are familiar with the Linux operating system.
The information in this guide is organized as follows:
• Chapter 1, “Administration Overview” provides an overview of the administrative operations associated with a system using the Intel Dialogic System Release Software.
• Chapter 2, “Stopping and Starting the System” provides information about stopping and starting the system services and applying configuration changes.
• Chapter 3, “Peripheral Hot Swap” provides procedures for adding, removing, or replacing boards in an active system.
• Chapter 4, “Administrative Utilities” describes each administrative utility, including a description of each parameter used with that utility. The utilities are listed in alphabetical order.
• Chapter 5, “Troubleshooting” provides general information about troubleshooting a system that uses the Intel Dialogic System Release Software.
Related Information
Refer to the following documents for more information about the Intel Dialogic System Release Software. Documents on software installation, configuration, diagnostics, OA&M, product release information, and more for the system release you are using are available on the Telecom Support Resources website at http://resource.intel.com/telecom/support/documentation/releases/index.htm.
• For timely information that may affect installation and configuration, refer to the Release Guide and Release Update.
Be sure to check the Release Update for the system release you are using for any updates or corrections to this publication. The Release Update is available on the Telecom Support Resources website at http://resource.intel.com/telecom/support/releases/index.html.
• For information about installing the system software, refer to the Software Installation Guide.
• For information about configuring the Intel telecom boards, refer to the appropriate Configuration Guide.
• For information about building applications using the Operations, Administration, and Maintenance (OA&M) API, refer to the OA&M API for Linux Operating Systems Programming Guide and the OA&M API for Linux Operating Systems Library Reference.
• For diagnostics information, refer to the Diagnostics Guide.
• For information about using the SNMP Agent Software, refer to the SNMP Agent Software for Linux Operating Systems Administration Guide.
• For information about installing and configuring the Hot Swap Kit (HSK) and the Redundant Host software, refer to the Installation Guide.

SR 6.1 for PCI and CompactPCI on Linux Administration Guide — September 2005 13
About This Publication
• For hardware installation instructions, see the Quick Install Card that comes with each board. Quick Install Cards also can be accessed from the Intel Networking and Communications Telecom Support Resources Web site at http://developer.intel.com/design/telecom/support.
The Intel Networking and Communications Telecom Support Resources Web site provides technical support and wide-ranging information in the form of technical notes, problem tracking reports, application notes, and other helpful documentation.

14 SR 6.1 for PCI and CompactPCI on Linux Administration Guide — September 2005
About This Publication

SR 6.1 for PCI and CompactPCI on Linux Administration Guide — September 2005 15
1Administration Overview
This chapter provides an overview of the administrative operations associated with an operational system that uses the Intel Dialogic System Release Software. The following topics are included:
• Stopping and Starting the System . . . . . . . . . . . . . . . . . . . . . . . . . . . . . . . . . . . . . . . . . 15
• High Availability Support . . . . . . . . . . . . . . . . . . . . . . . . . . . . . . . . . . . . . . . . . . . . . . . 15
• Administrative Utilities . . . . . . . . . . . . . . . . . . . . . . . . . . . . . . . . . . . . . . . . . . . . . . . . . 17
• Troubleshooting . . . . . . . . . . . . . . . . . . . . . . . . . . . . . . . . . . . . . . . . . . . . . . . . . . . . . . . 18
1.1 Stopping and Starting the System
To reconfigure the Intel Dialogic System Release Software, the system services must first be stopped and then restarted again after the configuration has been completed, so that the new configuration will take effect. Invoking the dlstop utility stops all Intel computer telephony system resources in the system. Invoking the dlstart utility starts all Intel computer telephony system resources in the system.
Notes: 1. Stopping and starting the system services stops and starts all of the active boards installed in the system.
2. When the system is rebooted, by default, the system services is automatically restarted.
1.2 High Availability Support
The Intel Dialogic System Release Software supports high availability by providing redundant Single Board Computers (SBCs) in the Intel NetStructure® High Availability Platform, as well as basic Hot Swap in out-of-box configurations. Figure 1 shows the high availability capability provided.
The following sections provide additional information about specific High Availability capability:
• Redundant Host
• Peripheral Hot Swap
1.2.1 Redundant Host
The Intel NetStructure High Availability Platform supports Redundant Host operation. When used in conjunction with a user application based on sample code provided by the High Availability Demo, one of the Single Board Computers (SBCs) operates in the active mode, while the second (redundant) SBC operates in the standby mode.

16 SR 6.1 for PCI and CompactPCI on Linux Administration Guide — September 2005
Administration Overview
When Redundant Host is fully operational, the drivers of the active SBC are loaded during initialization and the application starts. If during operation, the system senses a problem with the active SBC, the system will automatically switch operation to the standby SBC. The drivers of the standby SBC are loaded, the Intel Dialogic system service restarts and re-initializes all boards in the system, and the application can then be restarted, using the standby SBC.
For additional information about Redundant Host operation, refer to the documentation included with the Intel NetStructure High Availability Platform and the High Availability for Linux Demo Guide.
Note: For information on Redundant Host software installation, see the Installation Guide.
Figure 1. High Availability Capability
Single Board Computers (SBCs) Peripheral Boards
Active/Standby SBC Active/Standby SBC
Add Board Remove Board Replace Board
PreConfigured Configured atInsertion
Redundant Host (RH) Peripheral Hot Swap (PHS)
CompactPCI System
RIntel Dialogic R

SR 6.1 for PCI and CompactPCI on Linux Administration Guide — September 2005 17
Administration Overview
1.2.2 Peripheral Hot Swap
A CompactPCI* peripheral board can be replaced, without interrupting the system services, by stopping the individual board, removing the board, installing a replacement board, and then starting the new (replacement) board. This is referred to as Basic Hot Swap. Also, a new board may be added to an active system without interrupting the system services. The slot for a new board can either be pre-configured or the new board can be configured at the time of insertion.
For detailed information on peripheral hot swap, see Chapter 3, “Peripheral Hot Swap”.
1.3 Administrative Utilities
A number of utilities allow you to perform administrative tasks on a system containing boards that use Intel Dialogic System Release Software. Table 1, “Administrative Utilities” lists these utilities according to their command line name.

18 SR 6.1 for PCI and CompactPCI on Linux Administration Guide — September 2005
Administration Overview
Table 1. Administrative Utilities
Note: Not all utilities are supported on all board families. For details, see Section 4.1, “Administrative Utilities Product Support”, on page 31.
1.4 Troubleshooting
After a condition has been diagnosed, troubleshooting can be performed to correct the faulty condition. Troubleshooting tasks that apply to an initial startup include checking the configuration
Utility Description
audio QScript utility that controls the player and recording resources.
dlstart Starts the Intel Dialogic system services and downloads and configures all boards in the system.
dlstop Resets all boards in the system and stops the Intel Dialogic system services.
hsdemo Displays events associated with adding, removing, or replacing a board.
iptfwupdate Updates the firmware on an Intel NetStructure IPT Series board.
lineadmin QScript utility that puts lines into service so you can run a number of other utilities. Also monitors T-1 and E-1 alarms.
Note: This utility replaces the alarms utility.
listboards Displays information about the Intel telecom boards that are installed in the system.
Note: This utility replaces the pbl utility.
pmacadmin Allows you to reset an Intel NetStructure IPT Series board.
removebrd Informs the driver to release the operating system resources assigned to the specified board.
signaleditor QScript utility that allows you to dynamically view and modify CAS signal identification parameters (transitions, pulses, trains, or sequences) so you can test them before changing the configuration file.
startbrd Starts the specified board.
stdconfig QScript utility that compares component parameters.
stopbrd Stops the specified board.
System Logging Common logging facility for administrative and error information.
tblist Displays TDM bus information for boards that have been started.
tspconfig QScript utility that allows you to change T-1 CAS or ISDN protocol variant parameters.
tspmon QScript utility that allows you to monitor the Global Call Resource protocol.
tsptrace QScript utility that allows you to trace CAS protocol operations and includes timing information.

SR 6.1 for PCI and CompactPCI on Linux Administration Guide — September 2005 19
Administration Overview
files, checking which packages have been installed, and checking that all boards have been securely installed in their slots.
Additional troubleshooting information is available on the Telecom Support web site at http://developer.intel.com/design/telecom/support.

20 SR 6.1 for PCI and CompactPCI on Linux Administration Guide — September 2005
Administration Overview
SR 6.1 for PCI and CompactPCI on Linux Administration Guide — September 2005 21
2Stopping and Starting the System
This chapter covers the following topics about starting and stopping the Intel® Dialogic® system services:
• Stopping the System Services . . . . . . . . . . . . . . . . . . . . . . . . . . . . . . . . . . . . . . . . . . . . 21
• Starting the System Services . . . . . . . . . . . . . . . . . . . . . . . . . . . . . . . . . . . . . . . . . . . . . 21
• Applying Configuration Changes . . . . . . . . . . . . . . . . . . . . . . . . . . . . . . . . . . . . . . . . . 21
2.1 Stopping the System Services
Before you stop the system services, the application must be stopped and the application must ensure that all channels have been closed.
To stop the Intel Dialogic system services, invoke the dlstop utility by entering:
dlstop
at the command prompt.
A number of messages will be displayed followed by the command prompt. The messages displayed depend on the boards installed in your system. The display of the command prompt at the end of the messages indicates that the system services have been stopped.
2.2 Starting the System Services
Startup should only be performed when the system is stopped, that is, after the dlstop utility has been invoked.
To start the Intel Dialogic system services at any time, invoke the dlstop utility, followed by the dlstart utility.
For information about system startup messages, see the Software Installation Guide.
2.3 Applying Configuration Changes
If you want to make configuration changes to one or more boards in your system, use the instructions in this section to restart the system services. When you restart the system services, you do not have to reboot the system. You only have to reboot the system for the initial startup of the system services after installation of the system software.
22 SR 6.1 for PCI and CompactPCI on Linux Administration Guide — September 2005
Stopping and Starting the System
The instructions for applying configuration changes are as follows:
1. Before you stop the system services, the application must be stopped and the application must ensure that all channels have been closed.
2. To stop the system services, invoke the dlstop utility by entering:
dlstop
at the command prompt. The messages displayed depend upon the type of boards installed.
3. Modify configuration parameters as necessary. Refer to the appropriate Configuration Guide for detailed configuration information.
4. To start the system services, invoke the dlstart utility by entering:
dlstart
at the command prompt. The messages displayed depend upon the type of boards installed. For information about startup messages, refer to the Software Installation Guide.
Startup should only be performed when the system is stopped; that is, after the dlstop utility has been invoked.
Note: Rather than using the dlstop and dlstart utilities, you can stop and restart an individual board using the stopbrd and startbrd utilities if configuration changes are specific to a board. Note that the stopbrd and startbrd utilities are supported on DM3 boards and IPT Series boards only. For more information, see Section 4.12, “Start Board Utility (startbrd)”, on page 48 and Section 4.13, “Stop Board Utility (stopbrd)”, on page 49.

SR 6.1 for PCI and CompactPCI on Linux Administration Guide — September 2005 23
3Peripheral Hot Swap
This chapter provides information and procedures associated with the peripheral hot swap capability. The following topics are included:
• Adding a New CompactPCI Board to an Active System . . . . . . . . . . . . . . . . . . . . . . . 23
• Removing a CompactPCI Board From an Active System. . . . . . . . . . . . . . . . . . . . . . . 24
• Replacing a CompactPCI Board in an Active System (Basic Hot Swap) . . . . . . . . . . . 25
• Replacing a Primary Clock Master That Has Failed (No Fallback) . . . . . . . . . . . . . . . 28
Notes: 1. The procedures described in this chapter require that you have the Hot Swap Kit (HSK) installed on your system. For information on HSK installation, see the Installation Guide.
2. These procedures do not apply to Springware architecture boards.
3. If a board is in a slot that becomes defective or fails, follow instructions for Removing a CompactPCI Board From an Active System; then follow instructions for Adding a New CompactPCI Board to an Active System.
3.1 Adding a New CompactPCI Board to an Active System
Note: Although this procedure instructs you to configure a new board after you have inserted it, you can configure the empty slot any time beforehand. Do not use the Intel® Dialogic® Configuration Manager for Linux utility to establish this configuration; instead, you should edit the SCD file directly (see the information on configuring empty slots in the Configuration Guide).
The following procedure describes how to add a new CompactPCI board to an active system.
1. You may run the Hot Swap Configuration utility to monitor and confirm the events associated with adding a board to the system. For details on this utility, see Section 4.5, “Hot Swap Configuration Utility (hsdemo)”, on page 37.
2. If the new CompactPCI board includes a rear I/O module, first install the rear I/O module following the instructions provided with the Quick Install Card.
3. Install the baseboard following the instructions provided with the Quick Install Card.
4. Ensure that the new board’s Power On Self Test (POST) has completed. This will be indicated by the LEDs on the board becoming extinguished.
Note: On Intel NetStructure IPT Series boards, there are no indicators as to when POST has completed. For these boards, you should wait about 80 seconds for the POST to complete.

24 SR 6.1 for PCI and CompactPCI on Linux Administration Guide — September 2005
Peripheral Hot Swap
5. Use the List Board Information utility to determine the new board’s physical slot number. For details, see Section 4.9, “List Board Information Utility (listboards)”, on page 43.
6. If you previously configured the vacant slot to accommodate this board, proceed to the next step. Otherwise, configure the newly inserted board in the SCD file according to the instructions in the Configuration Guide. Do not use the Intel Dialogic Configuration Manager utility to establish this configuration; instead, you should edit the SCD file directly.
Note: You should configure the MasterStatus (TDM clock function) parameter as Slave when you edit the SCD file. This parameter only takes effect when you use the Start System Services utility (dlstart) to start the system services. When performing a single board start with the Start Board (startbrd) utility, this parameter is ignored and the clocking daemon assigns the board as a Slave. Even though the clocking daemon assigns the board as a Slave, you need to configure the MasterStatus parameter in the SCD file so that later if the system is restarted, the board is recognized properly.
Note: The Logical ID (Board Number) and the SlotNumber parameter values must be unique for every board in the system. For example, if a slot in the chassis becomes defective and you need to move the board to a new slot, you cannot reuse the Logical ID previously established for the board. You must configure a new, unique Logical ID and SlotNumber for the board in the SCD file.
7. To download and initialize the board (where <slot> is the physical slot number determined in step 4), start the new board with the Start Board utility as follows:
startbrd -p <slot>
The board and its virtual devices can be used when the utility has completed.
Note: When the Start Board utility is invoked, the DLGC_EVT_BLADE_STARTED event is generated by the OA&M event notification framework. For an application to receive this event, the application must be registered with the ADMIN_CHANNEL. For additional information about events, see the OA&M API for Linux Library Reference.
8. After the board has been started, use the TDM Bus Information utility to confirm the clock role that has been assigned to the board. For details, see Section 4.17, “TDM Bus Information Utility (tblist)”, on page 52.
9. Inform the application to start using the board.
3.2 Removing a CompactPCI Board From an Active System
The following procedure describes the basic steps for removing a CompactPCI board from an active system.
1. You may run the Hot Swap Configuration utility to monitor and confirm the events associated with removing a board from the system. For details on this utility, see Section 4.5, “Hot Swap Configuration Utility (hsdemo)”, on page 37.
SR 6.1 for PCI and CompactPCI on Linux Administration Guide — September 2005 25
Peripheral Hot Swap
2. Determine the board to be removed. Use the List Board Information utility to obtain the board’s physical slot number; for details on this utility, see Section 4.9, “List Board Information Utility (listboards)”, on page 43.
3. Inform the application to stop all activity on the board and close all open device handles.
4. Use the Stop Board utility to stop the specified board, where <slot> is the physical slot number determined in step 2:
stopbrd -p <slot>
Note: When the utility is invoked, the DLGC_EVT_BLADE_STOPPED event is generated by the OA&M event notification framework. For an application to receive this event, the application must be registered with the ADMIN_CHANNEL. For additional information about events, refer to the OA&M API for Linux Library Reference.
5. Use the Remove Board utility to inform the driver to release the operating system resources assigned to the board, where <slot> is the physical slot number determined in step 2:
removebrd -p <slot>
Caution: If you should decide not to remove the board after invoking this utility, you must still physically remove and re-insert the board before the system will allow you to restart the board using the Start Board utility or the dlstart utility.
6. After the board is taken out of service as indicated by the OUT OF SERVICE LED on the faceplate of the baseboard, physically remove the board according to the instructions in the Quick Install Card that came with the board.
Note: When the board is physically removed, the DLGC_EVT_BLADE_REMOVED event is generated by the OA&M event notification framework. For an application to receive this event, the application must be registered with the ADMIN_CHANNEL. For additional information about events, refer to the OA&M API for Linux Library Reference.
7. If the board being removed includes a rear I/O module, remove the rear I/O module following the instructions provided with the Quick Install Card.
3.3 Replacing a CompactPCI Board in an Active System (Basic Hot Swap)
Note: The TDM bus clocking daemon operation in the current Intel Dialogic System Release Software represents a change from the operation in System Release 6.0 for CompactPCI*. The clocking daemon no longer promotes slave boards to the role of clock master if the Primary or Secondary Clock Master fails or is stopped. This fallback behavior was removed because it was not controllable through configuration and occurred implicitly. The clocking daemon continues to allow fallback to a secondary board as long as the board is operational and was configured as a Secondary Clock Master prior to system services start-up. If the system was not configured with a Secondary Clock Master, and the Primary Master fails or is stopped, the system clocking will be compromised because there will be no clocking signal in the bus.

26 SR 6.1 for PCI and CompactPCI on Linux Administration Guide — September 2005
Peripheral Hot Swap
The following topics provide information on replacing a CompactPCI board in an active system:
• Requirements for Replacing a Clock Master Board in an Active System
• Clock Recovery or Fallback
• Clock Master Assignment
• Instructions for Replacing a CompactPCI Board in an Active System (Basic Hot Swap)
3.3.1 Requirements for Replacing a Clock Master Board in an Active System
To accomplish a hot swap of a Primary Clock Master (PM) or Secondary Clock Master (SM) board, you must meet the following requirements:
• You must have both a PM and a SM in the system.
• The PM and SM must have been configured prior to starting the system services with dlstart.
• To replace the PM or SM, at least one of the boards must be functioning properly.
• To replace the PM or SM, you must use an equivalent board.
• To replace the PM or SM, you must hot swap the board using the same slot (that is, you cannot move the board to another slot and retain it as a clocking master board).
The instructions in the following sections assume that these requirements are fulfilled.
3.3.2 Clock Recovery or Fallback
When the PM fails or is stopped, the clocking daemon will fall back to use the secondary board, so that the SM will become the new PM. You can then hot swap the failed master board (or restart it if it was stopped for other reasons), and it will become the new SM. Examples:
• If you stop the SM with stopbrd (or if the board fails and you hot swap it with an equivalent replacement board), when you restart the board with startbrd, the clocking daemon restores it to function as the SM.
• If the PM board fails (or if you stop it with stopbrd), a clock fallback condition occurs and the SM becomes the new PM. Assuming the board failed and you hot swap it with an equivalent board and then restart it with startbrd, it will function as a SM. Whenever you hot swap an active PM, fallback occurs, and assuming you replace and restart the board properly, the master clock boards will toggle, or ping-pong, between the two roles of primary and secondary.
• If the primary fails and no secondary exists for fallback, you must replace the board and completely restart the system. For details, see Section 3.4, “Replacing a Primary Clock Master That Has Failed (No Fallback)”, on page 28.
• At any time, if you do a dlstop and dlstart, the system goes back to its original state due to using the configuration specified in the SCD file.
SR 6.1 for PCI and CompactPCI on Linux Administration Guide — September 2005 27
Peripheral Hot Swap
3.3.3 Clock Master Assignment
The TDM bus clocking daemon assigns the clock master boards the role of PM or SM as follows:
• When starting the system services with dlstart, the boards are assigned the role of PM or SM as specified by the MasterStatus parameter (TDM clock function) in the pyramid.scd file.
• When starting a clock master board with startbrd (for example, after the board failed or was stopped with stopbrd), the clock master board will be assigned as the SM (regardless of the SCD file configuration).
Note: You can display the clock role assigned to a board using the tblist utility, which is documented in Section 4.17, “TDM Bus Information Utility (tblist)”, on page 52.
3.3.4 Instructions for Replacing a CompactPCI Board in an Active System (Basic Hot Swap)
The following procedure describes the basic steps for removing and replacing a CompactPCI board in an active system.
1. You may run the Hot Swap Configuration utility to monitor and confirm the events associated with replacing a board in the system. For details on this utility, see Section 4.5, “Hot Swap Configuration Utility (hsdemo)”, on page 37.
2. Determine the board to be replaced. This can be done by invoking the listboards utility to obtain the board’s physical slot number.
3. Inform the application to stop all activity on the board and close all open device handles.
4. When the application has stopped using devices associated with the board, to stop and reset the specified board, use the stopbrd utility as follows (where <slot> is the physical slot number determined in step 2):
stopbrd -p <slot>
Note: When the stopbrd utility is invoked, the DLGC_EVT_BLADE_STOPPED event is generated by the OA&M event notification framework. For an application to receive this event, the application must be registered with the ADMIN_CHANNEL. For additional information about events, refer to the OA&M API for Linux Library Reference.
5. After the board has been stopped, to inform the driver to release the operating system resources assigned to the board, use the removebrd utility as follows (where <slot> is the physical slot number determined in step 2):
removebrd -p <slot>
Caution: If you should decide not to remove the board after invoking the removebrd utility, you must still physically remove and re-insert the board before the system will allow you to restart the board using the startbrd or dlstart utility.
28 SR 6.1 for PCI and CompactPCI on Linux Administration Guide — September 2005
Peripheral Hot Swap
6. After the board is taken out of service as indicated by the OUT OF SERVICE LED on the faceplate of the baseboard, physically remove the board according to the instructions in the Quick Install Card that came with the board.
Note: When the board is physically removed, the DLGC_EVT_BLADE_REMOVED event is generated by the OA&M event notification framework. For an application to receive this event, the application must be registered with the ADMIN_CHANNEL. For additional information about events, refer to the OA&M API for Linux Library Reference.
7. If the baseboard uses a rear I/O module, remove and replace the rear I/O module following the instructions provided with the Quick Install Card.
8. Insert the replacement baseboard in the vacated slot following the instructions provided with the Quick Install Card.
9. Ensure that the new board’s Power On Self Test (POST) has completed. This will be indicated by the LEDs on the board becoming extinguished.
Note: On Intel NetStructure IPT Series boards, there are no indicators as to when POST has completed. For these boards, you should wait about 80 seconds for the POST to complete.
10. To download and initialize the stopped board, start the replacement board with the startbrd utility as follows (where <slot> is the physical slot number determined in step 2):
startbrd -p <slot>
The board and its virtual devices can be used when the startbrd utility has completed.
Note: When the startbrd utility is invoked, the DLGC_EVT_BLADE_STARTED event is generated by the OA&M event notification framework. For an application to receive this event, the application must be registered with the ADMIN_CHANNEL. For additional information about events, refer to the OA&M API for Linux Library Reference.
11. Use the tblist utility to determine the clock status of the board after the board has been started. For details on this utility, see Section 4.17, “TDM Bus Information Utility (tblist)”, on page 52.
12. Inform the application to start using the board.
3.4 Replacing a Primary Clock Master That Has Failed (No Fallback)
If the Primary Clock Master fails and there is no Secondary Clock Master, the system will be compromised because there is no clock signal in the bus. You must replace the board and completely restart the system as described in the following steps. (If there is a Secondary Clock Master, you can hot swap the failed primary board with an equivalent board, and it will then

SR 6.1 for PCI and CompactPCI on Linux Administration Guide — September 2005 29
Peripheral Hot Swap
function as a Secondary Clock Master. For more information, see Section 3.3, “Replacing a CompactPCI Board in an Active System (Basic Hot Swap)”, on page 25.)
1. Stop the system service by invoking the dlstop utility:
dlstop
2. Remove the current Primary Clock Master (Refer to Section 3.2, “Removing a CompactPCI Board From an Active System”, on page 24).
3. Physically insert a new Clock Master capable board in the empty slot.
4. Edit the pyramid.scd file and designate the new board as the Primary Clock Master.
5. Start the system services by invoking the dlstart utility:
dlstart
6. Use the tblist utility to determine the clock status of the boards after the system has been started. For details on this utility, see Section 4.17, “TDM Bus Information Utility (tblist)”, on page 52.

30 SR 6.1 for PCI and CompactPCI on Linux Administration Guide — September 2005
Peripheral Hot Swap
SR 6.1 for PCI and CompactPCI on Linux Administration Guide — September 2005 31
4Administrative Utilities
This chapter describes each administrative utility and its parameters. The utilities are listed alphabetically according to their descriptive name (command line name is included in parentheses). This chapter also provides a table of the utilities and the board families that support these utilities.
• Administrative Utilities Product Support . . . . . . . . . . . . . . . . . . . . . . . . . . . . . . . . . . . 31
• QScript Utilities . . . . . . . . . . . . . . . . . . . . . . . . . . . . . . . . . . . . . . . . . . . . . . . . . . . . . . . 32
• Audio Control Utility (audio) . . . . . . . . . . . . . . . . . . . . . . . . . . . . . . . . . . . . . . . . . . . . 35
• CAS Signal Editor Utility (signaleditor) . . . . . . . . . . . . . . . . . . . . . . . . . . . . . . . . . . . . 35
• Hot Swap Configuration Utility (hsdemo) . . . . . . . . . . . . . . . . . . . . . . . . . . . . . . . . . . 37
• IPT Series Administration Utility (pmacadmin) . . . . . . . . . . . . . . . . . . . . . . . . . . . . . . 39
• IPT Series Firmware Update Utility (iptfwupdate) . . . . . . . . . . . . . . . . . . . . . . . . . . . . 40
• Line Administration Utility (lineadmin) . . . . . . . . . . . . . . . . . . . . . . . . . . . . . . . . . . . . 42
• List Board Information Utility (listboards) . . . . . . . . . . . . . . . . . . . . . . . . . . . . . . . . . . 43
• Remove Board Utility (removebrd) . . . . . . . . . . . . . . . . . . . . . . . . . . . . . . . . . . . . . . . . 46
• Standard DM3 Configuration Utility (stdconfig) . . . . . . . . . . . . . . . . . . . . . . . . . . . . . 47
• Start Board Utility (startbrd) . . . . . . . . . . . . . . . . . . . . . . . . . . . . . . . . . . . . . . . . . . . . . 48
• Start System Services Utility (dlstart) . . . . . . . . . . . . . . . . . . . . . . . . . . . . . . . . . . . . . . 50
• Stop Board Utility (stopbrd) . . . . . . . . . . . . . . . . . . . . . . . . . . . . . . . . . . . . . . . . . . . . . 49
• Stop System Services Utility (dlstop) . . . . . . . . . . . . . . . . . . . . . . . . . . . . . . . . . . . . . . 51
• System Logging . . . . . . . . . . . . . . . . . . . . . . . . . . . . . . . . . . . . . . . . . . . . . . . . . . . . . . . 51
• TDM Bus Information Utility (tblist) . . . . . . . . . . . . . . . . . . . . . . . . . . . . . . . . . . . . . . 52
• TSP Configuration Utility (tspconfig) . . . . . . . . . . . . . . . . . . . . . . . . . . . . . . . . . . . . . . 54
• TSP Monitor Utility (tspmon) . . . . . . . . . . . . . . . . . . . . . . . . . . . . . . . . . . . . . . . . . . . . 55
• TSP Tracer Utility (tsptrace) . . . . . . . . . . . . . . . . . . . . . . . . . . . . . . . . . . . . . . . . . . . . . 56
4.1 Administrative Utilities Product Support
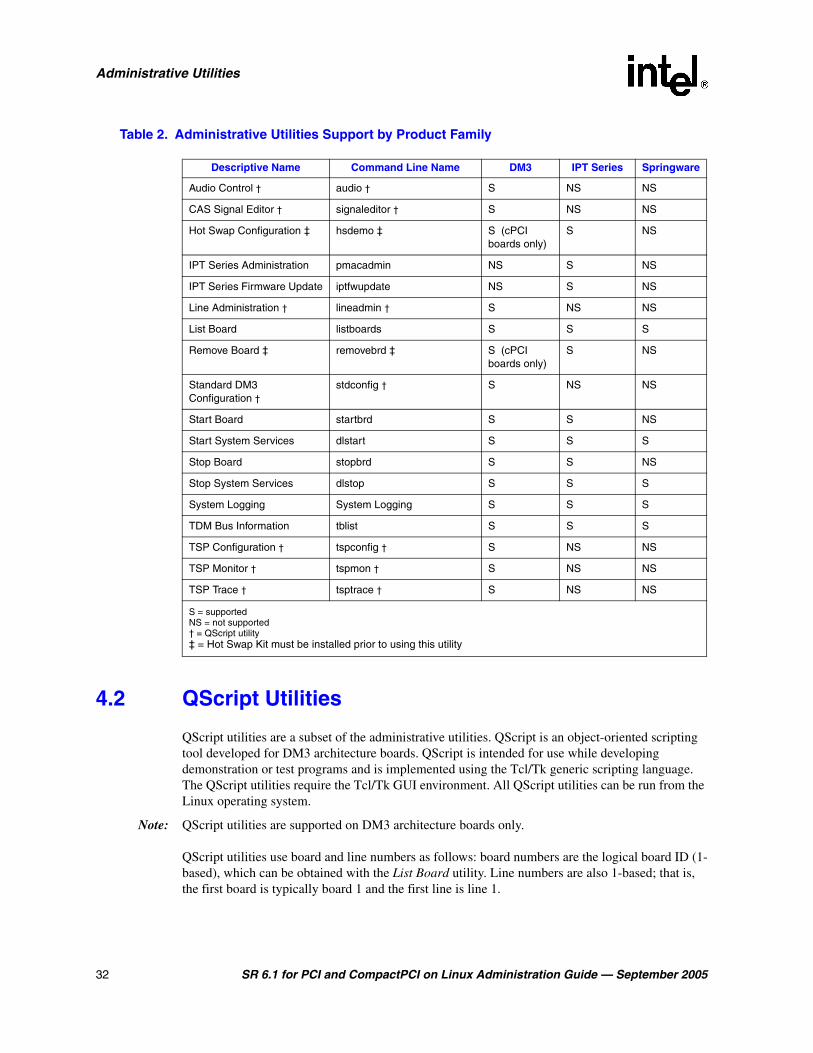
Board support for the administrative utilities provided in the system release vary. Table 2 lists the utilities and the board families supported by each utility. Unless otherwise noted in this chapter, a utility is supported on all board families.
Note: For information on the callinfo, digitdetector, phone, and pstndiag utilities, see the Diagnostics Guide.
32 SR 6.1 for PCI and CompactPCI on Linux Administration Guide — September 2005
Administrative Utilities
Table 2. Administrative Utilities Support by Product Family
4.2 QScript Utilities
QScript utilities are a subset of the administrative utilities. QScript is an object-oriented scripting tool developed for DM3 architecture boards. QScript is intended for use while developing demonstration or test programs and is implemented using the Tcl/Tk generic scripting language. The QScript utilities require the Tcl/Tk GUI environment. All QScript utilities can be run from the Linux operating system.
Note: QScript utilities are supported on DM3 architecture boards only.
QScript utilities use board and line numbers as follows: board numbers are the logical board ID (1-based), which can be obtained with the List Board utility. Line numbers are also 1-based; that is, the first board is typically board 1 and the first line is line 1.
Descriptive Name Command Line Name DM3 IPT Series Springware
Audio Control † audio † S NS NS
CAS Signal Editor † signaleditor † S NS NS
Hot Swap Configuration ‡ hsdemo ‡ S (cPCI boards only)
S NS
IPT Series Administration pmacadmin NS S NS
IPT Series Firmware Update iptfwupdate NS S NS
Line Administration † lineadmin † S NS NS
List Board listboards S S S
Remove Board ‡ removebrd ‡ S (cPCI boards only)
S NS
Standard DM3 Configuration †
stdconfig † S NS NS
Start Board startbrd S S NS
Start System Services dlstart S S S
Stop Board stopbrd S S NS
Stop System Services dlstop S S S
System Logging System Logging S S S
TDM Bus Information tblist S S S
TSP Configuration † tspconfig † S NS NS
TSP Monitor † tspmon † S NS NS
TSP Trace † tsptrace † S NS NS
S = supported NS = not supported† = QScript utility‡ = Hot Swap Kit must be installed prior to using this utility

SR 6.1 for PCI and CompactPCI on Linux Administration Guide — September 2005 33
Administrative Utilities
The following administrative utilities use QScript:
• Audio Control Utility (audio)
• CAS Signal Editor Utility (signaleditor)
• Line Administration Utility (lineadmin)
• Standard DM3 Configuration Utility (stdconfig)
• TSP Configuration Utility (tspconfig)
• TSP Monitor Utility (tspmon)
• TSP Tracer Utility (tsptrace)
The following QScript utilities documented in the Diagnostics Guide may also be of use in system administration (see the Diagnostics Guide for more information):
• callinfo
• digitdetector
• phone
• pstndiag (which incorporates several utilities)
4.2.1 QScript Utility Requirements
The following information gives details specific to the QScript utilities:
• File Directories
• QScript Environment Variables
• Requirements for tcl
4.2.1.1 File Directories
To use a QScript utility, use the script file. Specify the utility name and parameters on the command line. The location of the script files used to invoke the QScript tools is as follows:
${INTEL_DIALOGIC_DIR}/bin
The QScript tools developed by Intel are located in:
${INTEL_DIALOGIC_QSCRIPT}/tools
Note: Do not run a <toolname>.qs file directly from this directory. Use the script file located in the script file directory, which calls the QScript interpreter to run the <toolname>.qs file.
The QScript tools developed by Intel use classes in:
${INTEL_DIALOGIC_QSCRIPT}
34 SR 6.1 for PCI and CompactPCI on Linux Administration Guide — September 2005
Administrative Utilities
4.2.1.2 QScript Environment Variables
QSCRIPT_DIR Environment Variable
To run the QScript tools in a Linux environment, the QSCRIPT_DIR environment variable needs to be set to the following:
${INTEL_DIALOGIC_QSCRIPT}
Single Session Variable
Set the variable for a single session using the setenv command (C Shell) or set and export command (K and Bourne Shell). To permanently set the environment variable for all login sessions, update the user’s profile file to include the variable and associated values.
Remote Systems
The remote system containing the board does not need to have QScript installed, but must be running the RemoteQHostServer application included with QScript and installed in the bin directory.
To run QScript tools against a board in a remote system, set the REMOTE_QHOST environment variable to the name of the machine that contains the board you want to access. Set REMOTE_QHOST to:
hostname:port
where hostname is the machine name or TCP/IP address, and port is optional and specified only if RemoteQHostServer was started on a special port.
4.2.1.3 Requirements for tcl
The QScript utilities were designed for use with tcl 8.3 and tk 8.3. If you are using a Linux OSD that supports version 8.4 of tcl and tk, such as Mandriva* (formerly Mandrakesoft) PowerPack 9.2, and you want to use a QScript utility, you must create new symbolic links in the /usr/lib directory for QScript to find the tcl/tk libraries. To create these links, do the following:
> ln –s libtcl8.4.so libtcl8.3.so
> ln –s libtk8.4.so libtk8.3.so
The links will look like the following:
libtcl8.3.so -> libtcl8.4.so
libtk8.3.so -> libtk8.4.so

SR 6.1 for PCI and CompactPCI on Linux Administration Guide — September 2005 35
Administrative Utilities
4.3 Audio Control Utility (audio)
The Audio Control utility, a QScript utility, demonstrates the use of the player and recorder components. This utility provides control of the player and recorder resources, including speed and volume control. It also supports remote audio monitoring.
Note: QScript utilities are supported on DM3 architecture boards only.
Command Line: audio [parameter_list]
The Audio Control utility uses the following command line parameters:
Example: The following command runs the Audio Control utility on line 1, channel 1 of board with a logical ID of 2:
audio -board 2 -line 1 -channel 1
See Figure 2, “Audio Control Display” for a sample display.
Figure 2. Audio Control Display
4.4 CAS Signal Editor Utility (signaleditor)
The CAS Signal Editor, a QScript utility, allows you to dynamically view and modify CAS signal identification parameters (transitions, pulses, trains, or sequences) so you can test them before changing the configuration file.
Note: QScript utilities are supported on DM3 architecture boards only.
Signal identification parameters are defined in the .config file and downloaded to the board. To modify the parameters without the CAS Signal Editor utility, you must modify the signal definitions contained in the .config file, and then restart or download the board so that it uses the new settings (this process is described in the Configuration Guide). Using the CAS Signal Editor
Parameter Description
-board <n> Logical board number (required). Use the listboards utility to obtain the board’s logical ID number (Log ID).
-line <n> Line number (optional, default is 1)
-chan <n> Channel number (optional, default is 1)

36 SR 6.1 for PCI and CompactPCI on Linux Administration Guide — September 2005
Administrative Utilities
utility, you can retrieve the current signal identification parameters and reconfigure them at runtime without downloading to the board.
4.4.1 Options
Command Line: signaleditor [parameter_list]
The CAS Signal Editor utility uses the following command line parameters:
Example: This command runs the CAS Signal Editor utility on board with a logical ID of 4:
signaleditor -board 4
4.4.2 Guidelines
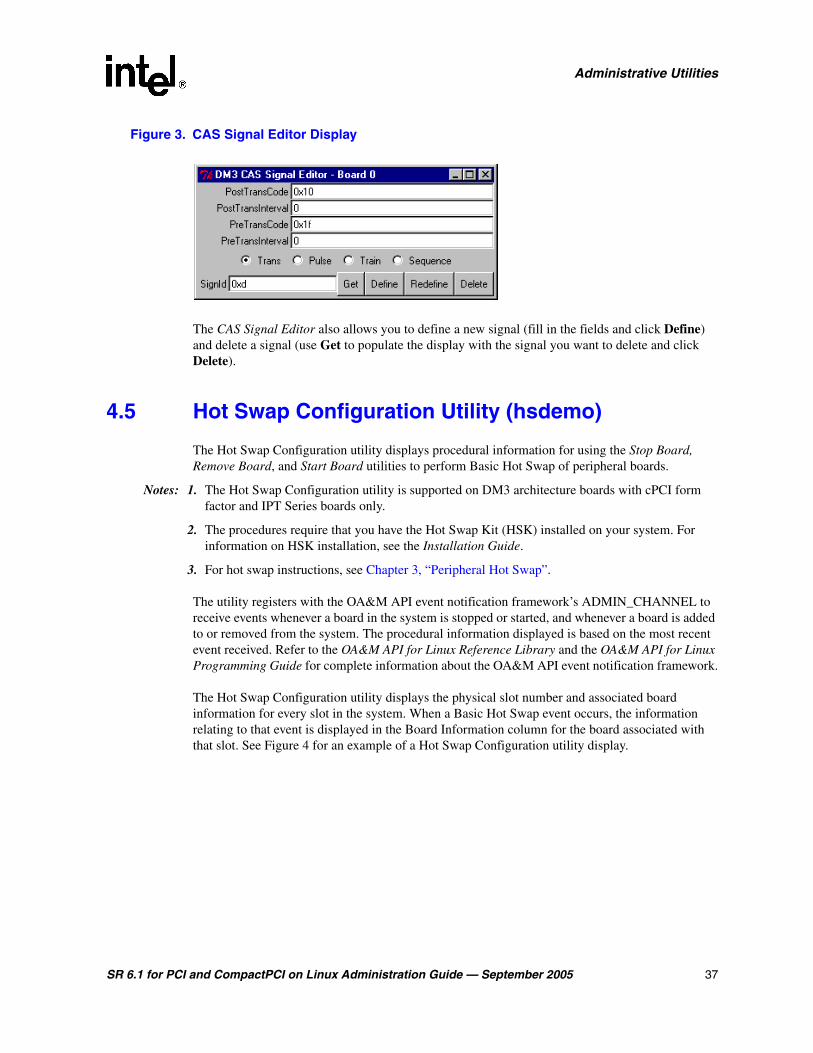
Once you start the utility, a window will open in which you can choose the signal that you want to edit. See Figure 3, “CAS Signal Editor Display” for a sample display. For signal IDs, refer to the Configuration Guide. You can edit a signal and check the results as follows:
1. In the SignalId field of the display, enter the ID of the signal you want to edit.
2. Select the appropriate category (Trans, Pulse, Train, or Sequence).
3. Click Get. The display will show the signal information you requested.
4. Edit the signal information as desired.
5. Click Redefine to apply the update.
6. If you wish, use Phone and TSP Monitor to check the changes you made to the signal. For more information on Phone, see the Diagnostics Guide. For more information on TSP Monitor, see Section 4.19, “TSP Monitor Utility (tspmon)”, on page 55.
Parameter Description
-board <n> Logical board number (required). Use the listboards utility to obtain the board’s logical ID number (Log ID).
-signal <n> Signal ID (optional)
SR 6.1 for PCI and CompactPCI on Linux Administration Guide — September 2005 37
Administrative Utilities
Figure 3. CAS Signal Editor Display
The CAS Signal Editor also allows you to define a new signal (fill in the fields and click Define) and delete a signal (use Get to populate the display with the signal you want to delete and click Delete).
4.5 Hot Swap Configuration Utility (hsdemo)
The Hot Swap Configuration utility displays procedural information for using the Stop Board, Remove Board, and Start Board utilities to perform Basic Hot Swap of peripheral boards.
Notes: 1. The Hot Swap Configuration utility is supported on DM3 architecture boards with cPCI form factor and IPT Series boards only.
2. The procedures require that you have the Hot Swap Kit (HSK) installed on your system. For information on HSK installation, see the Installation Guide.
3. For hot swap instructions, see Chapter 3, “Peripheral Hot Swap”.
The utility registers with the OA&M API event notification framework’s ADMIN_CHANNEL to receive events whenever a board in the system is stopped or started, and whenever a board is added to or removed from the system. The procedural information displayed is based on the most recent event received. Refer to the OA&M API for Linux Reference Library and the OA&M API for Linux Programming Guide for complete information about the OA&M API event notification framework.
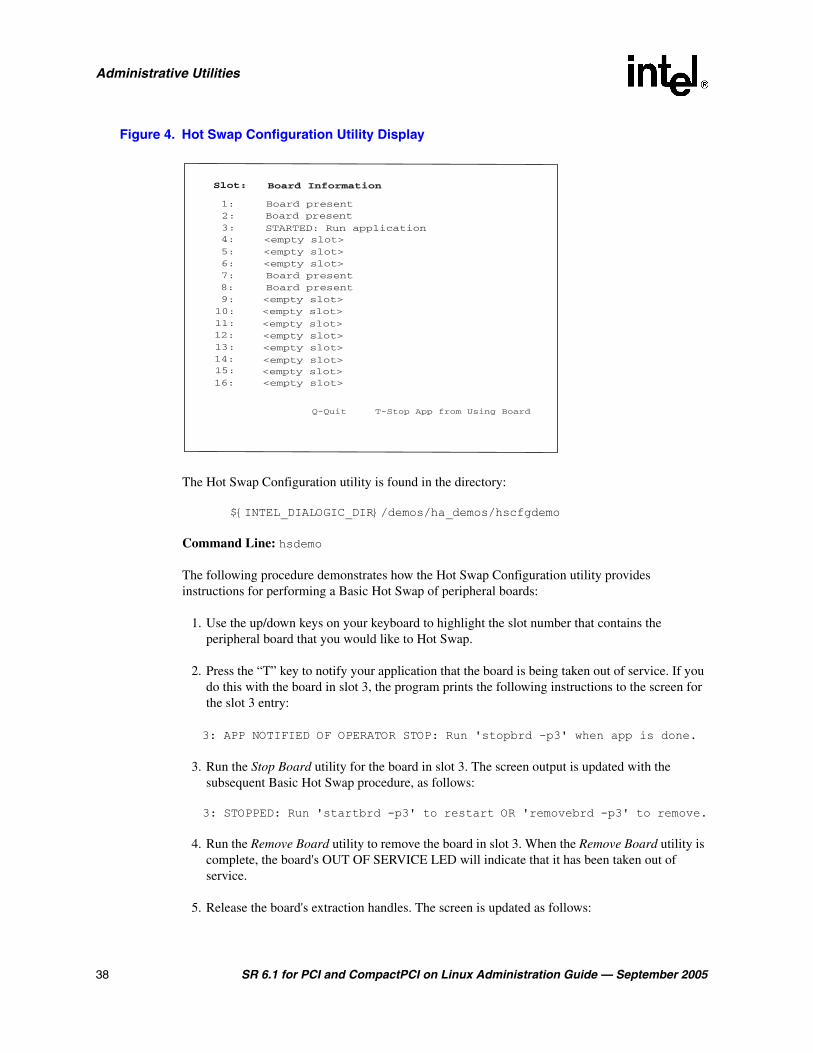
The Hot Swap Configuration utility displays the physical slot number and associated board information for every slot in the system. When a Basic Hot Swap event occurs, the information relating to that event is displayed in the Board Information column for the board associated with that slot. See Figure 4 for an example of a Hot Swap Configuration utility display.
38 SR 6.1 for PCI and CompactPCI on Linux Administration Guide — September 2005
Administrative Utilities
Figure 4. Hot Swap Configuration Utility Display
The Hot Swap Configuration utility is found in the directory:
${INTEL_DIALOGIC_DIR}/demos/ha_demos/hscfgdemo
Command Line: hsdemo
The following procedure demonstrates how the Hot Swap Configuration utility provides instructions for performing a Basic Hot Swap of peripheral boards:
1. Use the up/down keys on your keyboard to highlight the slot number that contains the peripheral board that you would like to Hot Swap.
2. Press the “T” key to notify your application that the board is being taken out of service. If you do this with the board in slot 3, the program prints the following instructions to the screen for the slot 3 entry:
3: APP NOTIFIED OF OPERATOR STOP: Run 'stopbrd -p3' when app is done.
3. Run the Stop Board utility for the board in slot 3. The screen output is updated with the subsequent Basic Hot Swap procedure, as follows:
3: STOPPED: Run 'startbrd -p3' to restart OR 'removebrd -p3' to remove.
4. Run the Remove Board utility to remove the board in slot 3. When the Remove Board utility is complete, the board's OUT OF SERVICE LED will indicate that it has been taken out of service.
5. Release the board's extraction handles. The screen is updated as follows:
Slot: Board Information
1:2:3:4:
5:6:7:
Board present
8:9:10:11:12:13:14:15:
16:
Board presentBoard present
<empty slot>
<empty slot>
<empty slot><empty slot>
<empty slot>
<empty slot><empty slot><empty slot>
<empty slot><empty slot><empty slot>
Board present
STARTED: Run application
Q-Quit T-Stop App from Using Board

SR 6.1 for PCI and CompactPCI on Linux Administration Guide — September 2005 39
Administrative Utilities
3: Extraction handles unlocked
6. Remove the board from your system. The screen is updated as follows:
3: REMOVED: <empty slot>
7. Insert a board into physical slot 3. The screen output is updated as follows:
3: INSERTED: Wait for POST to finish then run 'startbrd -p3'
Note: On Intel NetStructure IPT Series boards, there are no indicators as to when POST has completed. For these boards, you should wait about 80 seconds for the POST to complete.
8. Run the Start Board utility to start the inserted board. The screen is updated as follows:
3: STARTED: Run application.
9. Stop the Hot Swap Configuration utility by pressing 'q'.
4.6 IPT Series Administration Utility (pmacadmin)
The IPT Series Administration utility is used to reset an Intel NetStructure IPT Series board. The board may require resetting in rare cases if an IPML-based application receives IPMEV_ERROR events or if a Global Call-based application receives GCEV_TASKFAIL events.
Note: This utility is supported on IPT Series boards only.
Command Line: pmacadmin [parameter_list]
The IPT Series Administration utility uses the following command line parameters:
Examples:
The following command resets, initializes, configures, and then starts all IPT Series boards in the system in that order:
Parameter Description
-c Sets the Intel NetStructure IPT Series board to the configured state.
-e Causes a hard reset of the Intel NetStructure IPT Series board.
-i Initializes the Intel NetStructure IPT Series board.
-l Lists all Intel NetStructure IPT Series boards in the system.
-s Starts the Intel NetStructure IPT Series board.
-B <pcibus> -S <pcislot> Specifies the Intel NetStructure IPT Series board identified by this PCIBus and PCISlot number. Use the listboards utility to obtain the board’s PCIBus number and PCISlsot number.
-P <slot> Specifies the Intel NetStructure IPT Series board located in this physical slot. You may also use the listboards utility to obtain the board’s physical slot number.
40 SR 6.1 for PCI and CompactPCI on Linux Administration Guide — September 2005
Administrative Utilities
pmacadmin -eics
The following command resets, initializes, configures, and then starts the IPT Series board in physical slot 8 in that order:
pmacadmin -eics -P 8
4.7 IPT Series Firmware Update Utility (iptfwupdate)
The IPT Series Firmware Update utility facilitates the updating of the firmware residing in flash memory on an Intel NetStructure IPT Series board. Removal or disassembly of the board is not necessary to perform the update.
Note: This utility is supported on IPT Series boards only.
Command Line: iptfwupdate -[parameter_list]
The IPT Series Firmware Update utility uses all of the following command line parameters:
The firmware file used by each IPT Series board is listed below. You must update the firmware file based on the board model in use.
Table 3. Firmware Files Used by IPT Series Boards
Example: The following command downloads the pmac_stl.bin firmware file to board number 0:
iptfwupdate -f $INTEL_DIALOGIC_DIR/data/pmac_stl.bin -b 0 -t 1
Parameter Description
-f <filename> Identifies the directory path and file name of the binary file containing the new firmware.
-b <board #> Identifies the board number whose firmware is to be updated. Use the IPT Series Administration Utility (pmacadmin) to determine this number.
-t <update type> Specifies the update type (currently only one type is available):• 1 – Flash Binary Download, which downloads the complete flash
image, including the boot ROM from a complete 4 Mbyte flash binary file
IPT Series Board Model Firmware File Used
IPT1200C pmac_stl
IPT2400C pmac_stl
IPT4800C pmac_stl_672
IPT6720C pmac_stl_672
IPT10000C pmac_stl_1024
SR 6.1 for PCI and CompactPCI on Linux Administration Guide — September 2005 41
Administrative Utilities
The following procedure provides instructions for using the IPT Series Firmware Update utility:
1. Check and record the version number of the current firmware file prior to installing the update by entering the following command:
strings $INTEL_DIALOGIC_DIR/data/pmac_stl.bin | grep PMAC.binary
Note: The value returned is the version number of the firmware file and not the version number on the board.
Note: You may want to copy the current firmware file to a safe location as a backup.
2. Obtain the new firmware file for IPT Series boards which is located in the /data directory under INTEL_DIALOGIC_DIR following standard installation. This firmware file is typically installed as part of a system release or a service update.
3. Check the version number of the firmware file after installing the update by entering the following command.
strings $INTEL_DIALOGIC_DIR/data/pmac_stl.bin | grep PMAC.binary
4. Optional. To determine the board number if it is not already known (this number is used as input to -b parameter in step 5), invoke the IPT Series Administration utility:
pmacadmin -l
5. If the firmware file obtained in step 3 is newer than the one recorded in step 1, then invoke the IPT Series Firmware Update utility to download the firmware to the board. For example:
iptfwupdate -f $INTEL_DIALOGIC_DIR/data/pmac_stl.bin -b 0 -t 1
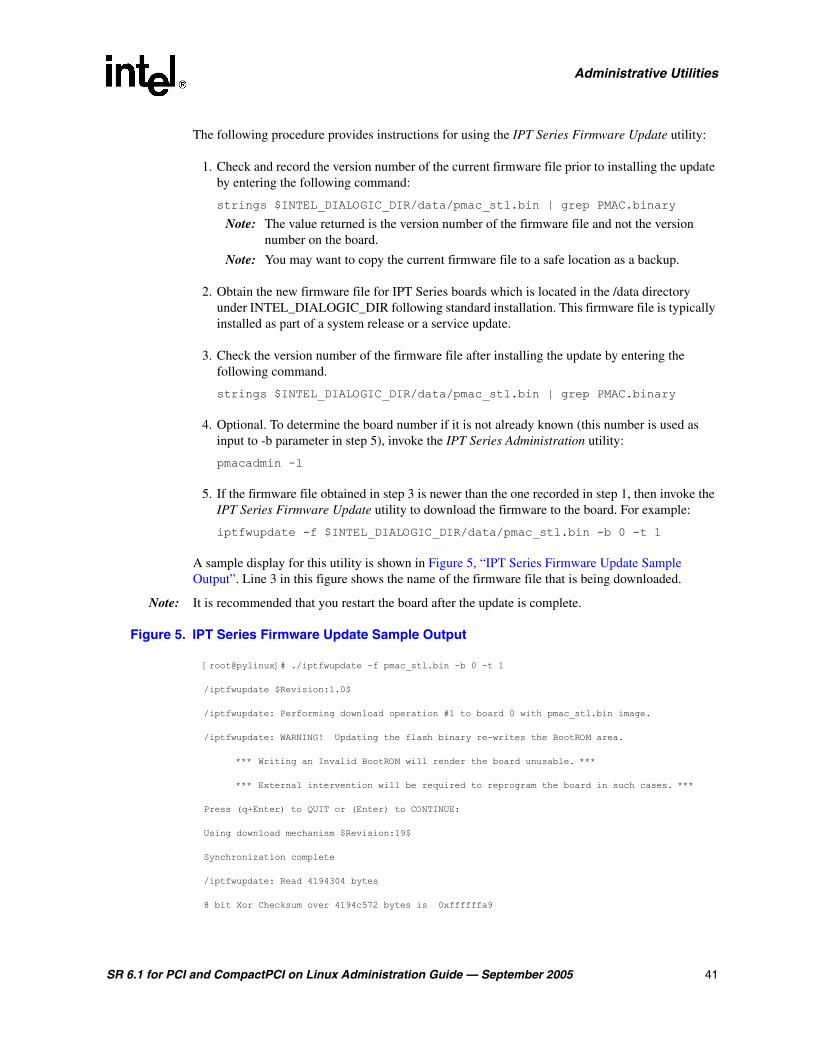
A sample display for this utility is shown in Figure 5, “IPT Series Firmware Update Sample Output”. Line 3 in this figure shows the name of the firmware file that is being downloaded.
Note: It is recommended that you restart the board after the update is complete.
Figure 5. IPT Series Firmware Update Sample Output
[root@pylinux]# ./iptfwupdate -f pmac_stl.bin -b 0 -t 1
/iptfwupdate $Revision:1.0$
/iptfwupdate: Performing download operation #1 to board 0 with pmac_stl.bin image.
/iptfwupdate: WARNING! Updating the flash binary re-writes the BootROM area.
*** Writing an Invalid BootROM will render the board unusable. ***
*** External intervention will be required to reprogram the board in such cases. ***
Press (q+Enter) to QUIT or (Enter) to CONTINUE:
Using download mechanism $Revision:19$
Synchronization complete
/iptfwupdate: Read 4194304 bytes
8 bit Xor Checksum over 4194c572 bytes is 0xffffffa9

42 SR 6.1 for PCI and CompactPCI on Linux Administration Guide — September 2005
Administrative Utilities
/iptfwupdate: Downloading Firmware..
#################################################################
/iptfwupdate: NOTE: Writing and Verification to flash can take up to 5 minutes...
Waiting for Update completion response from the board.
..................
/iptfwupdate: Resetting the board.
++++++++++++
/iptfwupdate: You may restart the Board.
[root@pylinux]#
4.8 Line Administration Utility (lineadmin)
The Line Administration utility, a QScript utility, puts lines into service so you can run many of the other utilities. This utility is used for sending and monitoring the alarm states on a T-1 or E-1 line.
Note: QScript utilities are supported on DM3 architecture boards only.
A flexible logging feature is available that includes the ability to log the status of the trunks and alarm conditions. For Linux systems, this utility also has the ability to re-initialize itself after every board download (based on a reset command from the user).
Command Line: lineadmin [parameter_list]
The Line Administration utility uses the following command line parameters:
Example: The following command runs the Line Administration utility on lines 1, 2, 3, and 4 of the board having a logical ID of 3:
lineadmin -board 3 -lines {1 2 3 4}
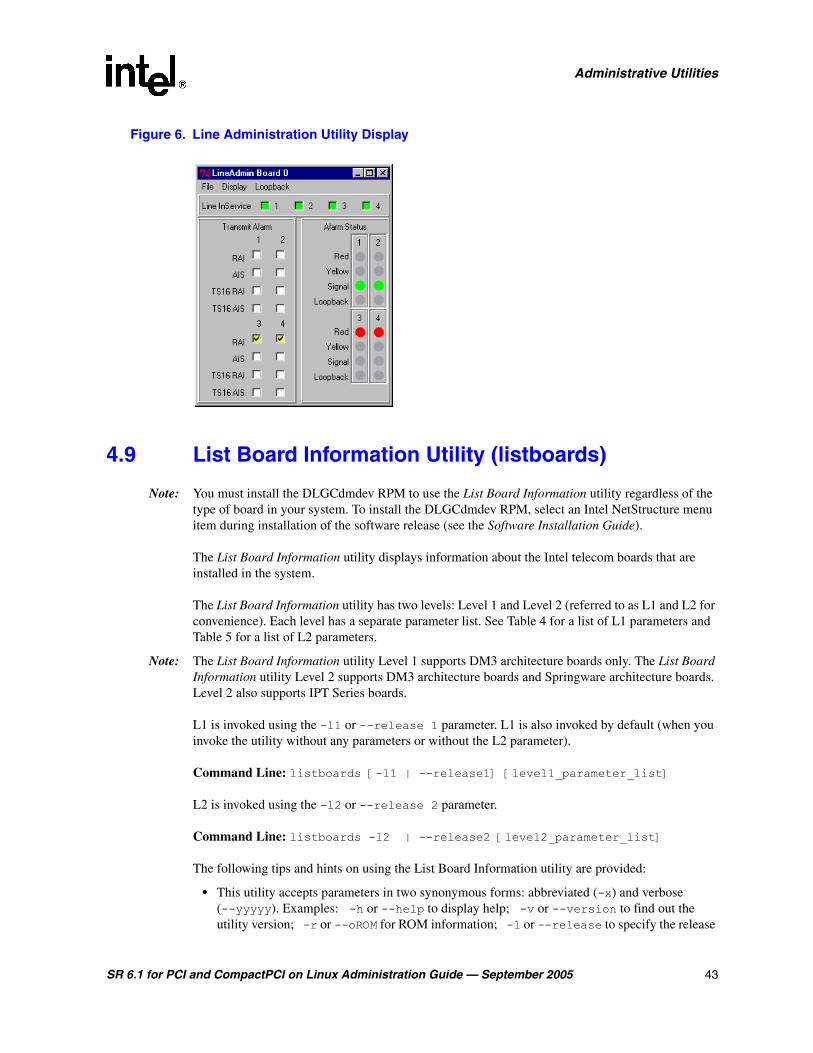
See Figure 6, “Line Administration Utility Display” for a sample display. This example shows four trunks (an Intel NetStructure MediaSpan product). The alarm setting is on the left and the alarm indicators are on the right.
Parameter Description
-board <n> Logical board number (required). Use the listboards utility to obtain the board’s logical ID number (Log ID).
-line <n> Line number (optional, default is 1)
-lines {n n+ …} Line numbers. This parameter is used when more than 1 line is monitored (optional, default is {1 2 3 4})
-advanced <n> The presence or absence of the following alarms on the line: AIS, CRC, and D-Channel
SR 6.1 for PCI and CompactPCI on Linux Administration Guide — September 2005 43
Administrative Utilities
Figure 6. Line Administration Utility Display
4.9 List Board Information Utility (listboards)
Note: You must install the DLGCdmdev RPM to use the List Board Information utility regardless of the type of board in your system. To install the DLGCdmdev RPM, select an Intel NetStructure menu item during installation of the software release (see the Software Installation Guide).
The List Board Information utility displays information about the Intel telecom boards that are installed in the system.
The List Board Information utility has two levels: Level 1 and Level 2 (referred to as L1 and L2 for convenience). Each level has a separate parameter list. See Table 4 for a list of L1 parameters and Table 5 for a list of L2 parameters.
Note: The List Board Information utility Level 1 supports DM3 architecture boards only. The List Board Information utility Level 2 supports DM3 architecture boards and Springware architecture boards. Level 2 also supports IPT Series boards.
L1 is invoked using the -l1 or --release 1 parameter. L1 is also invoked by default (when you invoke the utility without any parameters or without the L2 parameter).
Command Line: listboards [-l1 | --release1] [level1_parameter_list]
L2 is invoked using the -l2 or --release 2 parameter.
Command Line: listboards -l2 | --release2 [level2_parameter_list]
The following tips and hints on using the List Board Information utility are provided:
• This utility accepts parameters in two synonymous forms: abbreviated (-x) and verbose (--yyyyy). Examples: -h or --help to display help; -v or --version to find out the utility version; -r or --oROM for ROM information; -l or --release to specify the release
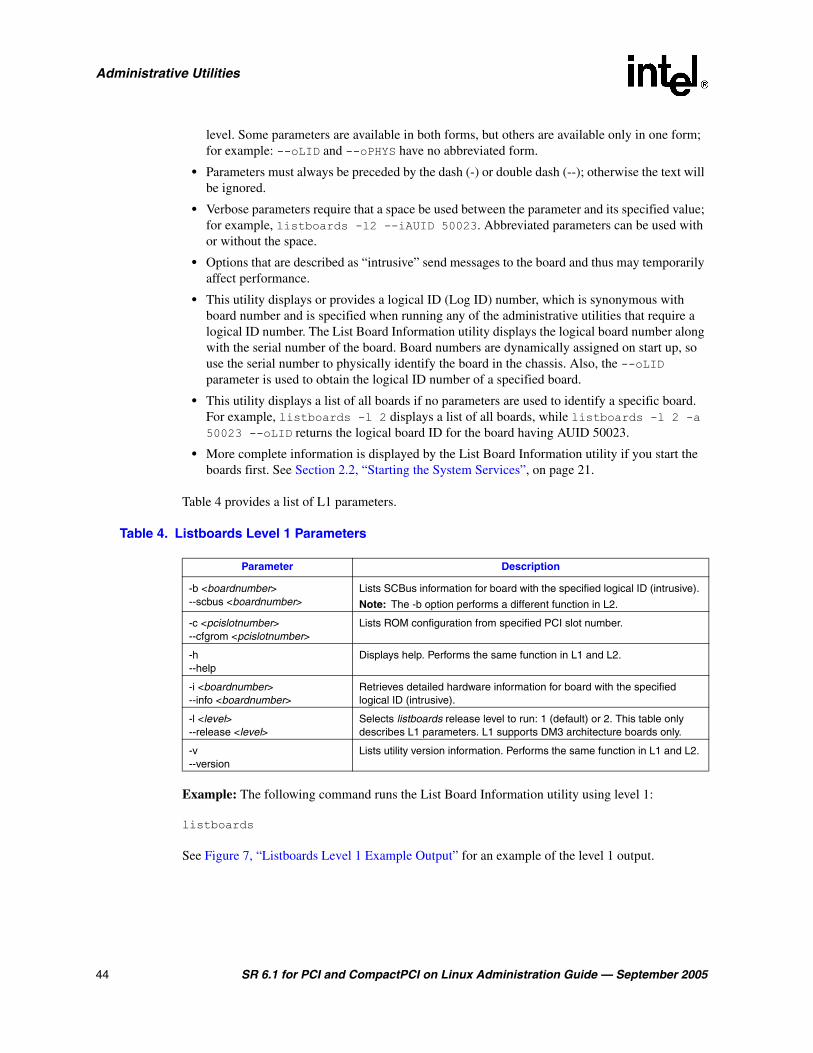
44 SR 6.1 for PCI and CompactPCI on Linux Administration Guide — September 2005
Administrative Utilities
level. Some parameters are available in both forms, but others are available only in one form; for example: --oLID and --oPHYS have no abbreviated form.
• Parameters must always be preceded by the dash (-) or double dash (--); otherwise the text will be ignored.
• Verbose parameters require that a space be used between the parameter and its specified value; for example, listboards -l2 --iAUID 50023. Abbreviated parameters can be used with or without the space.
• Options that are described as “intrusive” send messages to the board and thus may temporarily affect performance.
• This utility displays or provides a logical ID (Log ID) number, which is synonymous with board number and is specified when running any of the administrative utilities that require a logical ID number. The List Board Information utility displays the logical board number along with the serial number of the board. Board numbers are dynamically assigned on start up, so use the serial number to physically identify the board in the chassis. Also, the --oLID parameter is used to obtain the logical ID number of a specified board.
• This utility displays a list of all boards if no parameters are used to identify a specific board. For example, listboards -l 2 displays a list of all boards, while listboards -l 2 -a 50023 --oLID returns the logical board ID for the board having AUID 50023.
• More complete information is displayed by the List Board Information utility if you start the boards first. See Section 2.2, “Starting the System Services”, on page 21.
Table 4 provides a list of L1 parameters.
Table 4. Listboards Level 1 Parameters
Example: The following command runs the List Board Information utility using level 1:
listboards
See Figure 7, “Listboards Level 1 Example Output” for an example of the level 1 output.
Parameter Description
-b <boardnumber> --scbus <boardnumber>
Lists SCBus information for board with the specified logical ID (intrusive).
Note: The -b option performs a different function in L2.
-c <pcislotnumber>--cfgrom <pcislotnumber>
Lists ROM configuration from specified PCI slot number.
-h --help
Displays help. Performs the same function in L1 and L2.
-i <boardnumber> --info <boardnumber>
Retrieves detailed hardware information for board with the specified logical ID (intrusive).
-l <level> --release <level>
Selects listboards release level to run: 1 (default) or 2. This table only describes L1 parameters. L1 supports DM3 architecture boards only.
-v --version
Lists utility version information. Performs the same function in L1 and L2.

SR 6.1 for PCI and CompactPCI on Linux Administration Guide — September 2005 45
Administrative Utilities
Figure 7. Listboards Level 1 Example Output
BrdNum CfgId Type Bus Slot PhysAddr RamSize Irq State 1 0 P 0 0 ff000000 80000 0xa DOWNLOADED 2 1 P 2 2 faf00000 80000 0xb DOWNLOADED 3 2 P 2 6 fae80000 80000 0xb DOWNLOADED
Table 5 provides a list of L2 parameters.
Table 5. Listboards Level 2 Parameters
Parameter Description
-a <auid> --iAUID <auid>
Lists board with matching AUID. This parameter is also used with the --oLID or --oPHYS parameters.
-b <pcibus> -s <pcislot>--iPCIBus <pcibus> --iPCISlot <pcislot>
Lists board with matching PCI bus number and PCI slot number. Both parameters are required. These parameters can also be used with the --oLID or --oPHYS parameters.
Note: The -b option performs a different function in L1, and the -s option is not supported in L1.
-e --extrainfo
Provides extra DM3 information on model number, driver configuration ID, driver state, and admin state.
Note: Supported on DM3 architecture boards only.
-f --forceproc
Forces use of Linux /proc instead of libhssd (libhsssd requires the Hot Swap Kit).
Note: Supported on CompactPCI* boards only.
-h --help
Displays help. Performs the same function in L1 and L2.
-l <level> --release <level>
Selects listboards release level to run: 1 (default) or 2. This table only describes L2 parameters. L2 supports DM3 architecture boards and Springware architecture boards. L2 also supports IPT Series boards.
-p <phys_id> | <wheel_id> --iPHYS <phys_id> | <wheel_id>
Lists board with matching physical ID for CompactPCI or thumbwheel ID for PCI.
-q --quiet
Lists in quiet mode (without the title bar).
-r --oROM
Outputs ROM of found board.
Note: Supported on DM3 architecture boards only.
-s <pcislotnumber> --iPCISlot <pcislotnumber>
Specifies the PCI slot number of a board (for --oLID or --oPHYS). This parameter must be used with the -b <pcibus> parameter. These parameters can also be used with the --oLID or --oPHYS parameters.
Note: The -b option performs a different function in L1, and the -s option is not supported in L1.
-v --version
Lists utility version information. Performs the same function in L1 and L2.

46 SR 6.1 for PCI and CompactPCI on Linux Administration Guide — September 2005
Administrative Utilities
Example: The following command runs the List Board Information utility using level 2:
listboards -l2
See Figure 8, “Listboards Level 2 Example Output” for an example of level 2 output.
Figure 8. Listboards Level 2 Example Output
| AUID |CT Platform|PCIBus|PCISlot|ThumbWheel|Log ID|Serial Num|ModelNum
50002 DM3 0 13 0 1 KS014983 0x100 50011 DM3 2 9 2 2 KS014980 0x100 50020 DM3 2 10 6 3 GG000104 0x1E01 50045 Springware 2 11 4 4 GP689090 <un>
Total number of boards: 4
Note: Display of the model number is not supported for Springware architecture boards.
4.10 Remove Board Utility (removebrd)
The Remove Board utility removes the board’s resources from the operating system. Invoke this utility before the board is physically removed from the system. Once the utility is invoked, the Linux kernel will no longer retain any information about the board and the List Board Information utility will only include partial information about this board in the display.
Notes: 1. This utility is supported on DM3 architecture boards with cPCI form factor and on IPT Series boards only.
2. After invoking the Remove Board utility, if you decide not to remove the board, you will not be able to restart the board without first physically removing and reinserting the board. You may then restart the board using the Start Board utility or dlstart utility.
3. TDM Bus Clock Master Fallback occurs when the Primary Clock Master is stopped. Any subsequent dlstart will still attempt to use the original board (defined in the pyramid.scd file) as the Primary Clock Master. However, if this board is removed (whether logically or physically) from the system after it is stopped, the pyramid.scd file must be modified to designate another board as Primary Clock Master before dlstart is again invoked. Otherwise, the system start will
<board> --oLID Outputs logical ID of specified <board>. The board must be specified with the -a option or with the -b and -s options (otherwise it uses the first board by default).
Note: This parameter must be used in the sequence shown; that is, the specified board (input) must precede the --oLID parameter (output).
<board> --oPHYS Outputs physical ID (CompactPCI* with Hot Swap Kit) or thumbwheel ID (PCI, or CompactPCI* without Hot Swap Kit) of specified <board>. The board must be specified with the -a option or with the -b and -s options (otherwise it uses the first board by default).
Note: This parameter must be used in the sequence shown; that is, the specified board (input) must precede the --oPHYS parameter (output).
Parameter Description

SR 6.1 for PCI and CompactPCI on Linux Administration Guide — September 2005 47
Administrative Utilities
fail (because the clock daemon cannot find the user-defined Primary Clock Master board in the system).
Command Line: removebrd [parameter_list]
Also see Section 4.5, “Hot Swap Configuration Utility (hsdemo)”, on page 37 for a description of this utility which displays helpful information related to stopping, removing, and starting a board.
The Remove Board utility uses any one of the following command line parameters:
Example: The following command removes the resources associated with the board located in physical slot 8:
removebrd -p 8
4.11 Standard DM3 Configuration Utility (stdconfig)
The Standard DM3 Configuration utility, a QScript utility, provides a flexible way to configure DM3 component parameters. You put the parameters to be set and retrieved for a particular component into a file. You can create and modify these files. When used in conjunction with the stdconfig utility, these component parameters (for example, lineadmin, CCS, player) can be easily configured.
Note: QScript utilities are supported on DM3 architecture boards only.
Command Line: stdconfig [parameter_list]
The Standard DM3 Configuration utility uses the following command line parameters:
Parameter Description
-a <auid> Specifies the board having this AUID (Addressable Unit Identifier).
-p <slot> Specifies the board located in this physical slot.The physical slots are numbered from left to right on a chassis, starting with the number 1.
-b <pcibus> -s <pcislot> Specifies the board identified by this PCIBus and PCISlot number. Use the listboards utility to determine the board’s PCIBus number and PCISlot number.
Parameter Description
-board <n> Logical board number (required). Use the listboards utility to obtain the board’s logical ID number (Log ID).
-file <name.ext> The name of the file containing the relevant parameters of the component to be configured (such as tsc.prm, ccscomp.prm).
-inst <n> Specifies the particular instance (of the component) whose parameters the user wants to modify.
-comptype <n> Standard Intel Dialogic component types (1 - 255).
-class <name> One of the standard Intel Dialogic components (such as TSC, LCON, CHP). This should match the relevant -file parameter.

48 SR 6.1 for PCI and CompactPCI on Linux Administration Guide — September 2005
Administrative Utilities
Example: The following command runs the utility on a board with a logical ID of 2:
stdconfig -board 2
See Figure 9, “Standard DM3 Configuration Display” for a sample display.
Figure 9. Standard DM3 Configuration Display
4.12 Start Board Utility (startbrd)
The Start Board utility is used to start a single board in the system.
Notes: 1. This utility is supported on DM3 architecture boards and on IPT Series boards only.
2. You should execute the Stop Board utility before running this utility.
3. If you change the configuration of any system-level parameters, you must start the system services using the dlstart utility for the changes to take effect. The same applies to the following board-level parameter that affects the system.
The MasterStatus parameter (TDM clock function) in the SCD file only takes effect when a dlstart starts the system services. When performing a single board start with the Start Board utility, this parameter is ignored and the clocking daemon assigns the clock function of the board. If a new board is being added to an active system, the board is assigned as a Slave. However, if you are hot swapping (or stopping and restarting) a Primary or Secondary Clock Master, see Section 3.3, “Replacing a CompactPCI Board in an Active System (Basic Hot Swap)”, on page 25 for a description of how the clocking daemon assigns the clocking function. You can display the clock role assigned to a board using the tblist utility; see Section 4.17, “TDM Bus Information Utility (tblist)”, on page 52.
4. The Logical ID (Board Number) and the SlotNumber parameter values must be unique for every board in the system. For example, if you move a board in the system to a new slot, you

SR 6.1 for PCI and CompactPCI on Linux Administration Guide — September 2005 49
Administrative Utilities
cannot reuse the Logical ID previously established for the board. You must configure a new, unique Logical ID and SlotNumber for the board in the SCD file.
Command Line: startbrd [parameter_list]
Also see Section 4.5, “Hot Swap Configuration Utility (hsdemo)”, on page 37 for a description of this utility which displays information related to stopping, removing, and starting a board.
The Start Board utility uses any one of the following command line parameters:
Example: The following command starts the board installed in physical slot 4:
startbrd -p 4
4.13 Stop Board Utility (stopbrd)
The Stop Board utility is used to stop a single board in the system. When stopping a board that is currently serving as the Primary Clock Master, the following items need to be considered:
• Stopping Primary Clock Master in System With Clock Fallback Capability
• Stopping Primary Clock Master in System Without Clock Fallback Capability
Note: This utility is supported on DM3 architecture boards and on IPT Series boards only.
Command Line: stopbrd [parameter_list]
Also see Section 4.5, “Hot Swap Configuration Utility (hsdemo)”, on page 37 for a description of this utility which displays information related to stopping, removing, and starting a board.
The Stop Board utility uses any one of the following command line parameters:
Parameter Description
-a <auid> Specifies the board having this AUID (Addressable Unit Identifier).
-p <slot> Specifies the board located in this physical slot. The physical slots are numbered from left to right on a chassis, starting with the number 1.
-b <pcibus> -s <pcislot> Specifies the board identified by this PCIBus and PCISlot number. Use the listboards utility to determine the board’s PCIBus number and PCISlot number.
Parameter Description
-a <auid> Specifies the board having this AUID (Addressable Unit Identifier).
-p <slot> Specifies the board located in this physical slot. The physical slots are numbered from left to right on a chassis, starting with the number 1.
-b <pcibus> -s <pcislot> Specifies the board identified by this PCIBus and PCISlot number. Use the listboards utility to determine the board’s PCIBus number and PCISlot number.

50 SR 6.1 for PCI and CompactPCI on Linux Administration Guide — September 2005
Administrative Utilities
Example: The following command stops the board located in PCIBus 0, PCISlot 6:
stopbrd -b 0 -s 6
4.13.1 Stopping Primary Clock Master in System With Clock Fallback Capability
If the board to be stopped is the Primary Clock Master and a Secondary Clock Master is defined, clock fallback will occur and the system timing will not be affected. However, if a dlstop is subsequently issued, the next dlstart will attempt to assign the role of Primary Clock Master to the board defined in the pyramid.scd file as the Primary Clock Master. (For related information, see Section 3.3, “Replacing a CompactPCI Board in an Active System (Basic Hot Swap)”, on page 25.)
4.13.2 Stopping Primary Clock Master in System Without Clock Fallback Capability
If the board to be stopped is the Primary Clock Master and the system does not have a Secondary Clock Master defined, the integrity of the system will be compromised when this board is stopped because there will be no clock signal in the bus.
To recover from this situation, perform the following steps to halt system operation temporarily and replace the board. (For related information, see Section 3.4, “Replacing a Primary Clock Master That Has Failed (No Fallback)”, on page 28.)
1. Invoke the dlstop utility to terminate execution of the system software.
2. Physically replace the current Primary Clock Master board with another Master capable board.
3. Edit the pyramid.scd file and designate the new board as the Primary Clock Master.
4. Invoke the dlstart utility to start the system software. When you invoke the dlstart utility, the board designated as the Primary Clock Master in the pyramid.scd file is assigned the role of Primary Clock Master.
4.14 Start System Services Utility (dlstart)
The Start System Services utility starts the Intel Dialogic system services. This utility also loads the device drivers, downloads and configures all of the boards in the system, and starts system services such as the event notification service and clocking daemon. When the utility completes, all boards in the system are ready to run applications.
Note: You should execute a Stop System Services (dlstop) before running this utility.
Command Line: dlstart
SR 6.1 for PCI and CompactPCI on Linux Administration Guide — September 2005 51
Administrative Utilities
4.15 Stop System Services Utility (dlstop)
The Stop System Services utility resets all boards in the system and stops the Intel Dialogic system services that were started using the Start System Services (dlstart) utility.
Command Line: dlstop
4.16 System Logging
The System Logging facility provides a method for all of the administration daemons and components to log information to a common log file. Logging is off by default. To enable logging, set the DLG_TRACE_LEVEL environment variable as follows:
Command Line: export DLG_TRACE_LEVEL=<level>
where <level> is an integer from 1 to 7. The command line can also be placed in a PATH statement.
Notes: 1. The higher the level of system logging, the more detail is logged. Logging affects system performance, including performance when starting system services on boards. The higher the level, the greater the effect on performance.
2. Changing the logging level requires that you stop system services, then restart system services with the new trace level. You cannot modify the logging level while the system is running.
3. The Start Board or Stop Board utilities have no effect on the system logging level.
The system logging levels are cumulative. The logging performed by each successive level includes the logging of previous levels. For example, if level 4 is enabled, logging for levels 1 through 4 are included. The various levels of system logging are as follows:
• Level 0 = disabled
• Level 1 = critical or fatal software errors
• Level 2 = user input errors
• Level 3 = warnings
• Level 4 = eventing tracing for OA&M events
• Level 5 = miscellaneous debug information
• Level 6 = API entry tracing
• Level 7 = API exit tracing
Example: The following command enables system logging at level 4:
export DLG_TRACE_LEVEL=4
All error and administration information is logged to the following file:
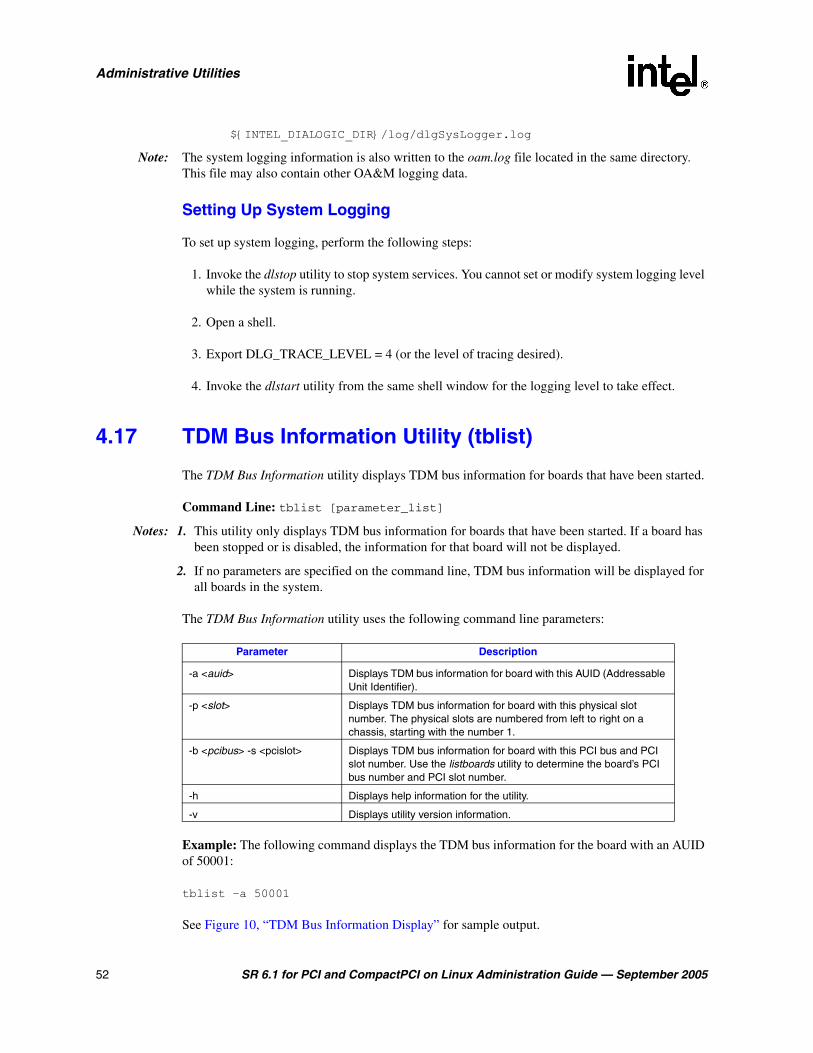
52 SR 6.1 for PCI and CompactPCI on Linux Administration Guide — September 2005
Administrative Utilities
${INTEL_DIALOGIC_DIR}/log/dlgSysLogger.log
Note: The system logging information is also written to the oam.log file located in the same directory. This file may also contain other OA&M logging data.
Setting Up System Logging
To set up system logging, perform the following steps:
1. Invoke the dlstop utility to stop system services. You cannot set or modify system logging level while the system is running.
2. Open a shell.
3. Export DLG_TRACE_LEVEL = 4 (or the level of tracing desired).
4. Invoke the dlstart utility from the same shell window for the logging level to take effect.
4.17 TDM Bus Information Utility (tblist)
The TDM Bus Information utility displays TDM bus information for boards that have been started.
Command Line: tblist [parameter_list]
Notes: 1. This utility only displays TDM bus information for boards that have been started. If a board has been stopped or is disabled, the information for that board will not be displayed.
2. If no parameters are specified on the command line, TDM bus information will be displayed for all boards in the system.
The TDM Bus Information utility uses the following command line parameters:
Example: The following command displays the TDM bus information for the board with an AUID of 50001:
tblist –a 50001
See Figure 10, “TDM Bus Information Display” for sample output.
Parameter Description
-a <auid> Displays TDM bus information for board with this AUID (Addressable Unit Identifier).
-p <slot> Displays TDM bus information for board with this physical slot number. The physical slots are numbered from left to right on a chassis, starting with the number 1.
-b <pcibus> -s <pcislot> Displays TDM bus information for board with this PCI bus and PCI slot number. Use the listboards utility to determine the board’s PCI bus number and PCI slot number.
-h Displays help information for the utility.
-v Displays utility version information.

SR 6.1 for PCI and CompactPCI on Linux Administration Guide — September 2005 53
Administrative Utilities
Figure 10. TDM Bus Information Display
In the display, the following information is available:
AUIDAddressable Unit Identifier of the board
Clk RoleIdentifies whether this board is a primary clock master (Pri), secondary clock master (Sec), or clock slave (Slv)
Bus TypeType of TDM bus that the board interfaces with. Bus Types are H.100 or H.110.
On Bus?Identifies whether or not board is connected (Yes) to the TDM bus or not (No).
CTBus LineIdentifies which CT Bus Line the primary or secondary clock master is using to provide system clocking: Line A or Line B.
Clk SrcIdentifies the clock source that the primary or secondary clock master is using to drive the primary (A) or secondary (B) line. Clock sources include IntOsc (Internal Oscillator), NetRef1, or NetRef2.
Clk SrcSpdIdentifies the clock source speed. Value of speed can be 2MHz, 4MHz, or 8MHz.
NetRf SrcIf this board contains the interface to the network line that drives NETREF_1 or NETREF_2, the network interface (NetInt1, NetInt2, NetInt3, or NetInt4) is displayed.
NetRf SrcSpd If this board contains the interface to the network line that drives NETREF_1 or NETREF_2, the network interface source speed is displayed. Value can be 8 KHz, 1.536MHz, 1.544MHz, or 2.048MHz.
Stand alone? Board does not support the TDM bus configuration or the board does not have TDM bus capability.
Num TimeSlotsLists the number of time slots supported by this board.
==============================================================================AUID Role Type Bus? Line Src SrcSpd Src SrcSpd alone? TimeSlots Clk Bus On CTBus Clk Clk NetRf NetRf Stand- Num
C:\>tblist
50001 Pri H.100 Yes A NetRf1 8MHz NetInt1 8KHz No 240
50002 Slv H.100 Yes A N/A 8MHz N/A No ---50003 Sec H.100 Yes A NetRf1 8MHz N/A 8KHz No ---
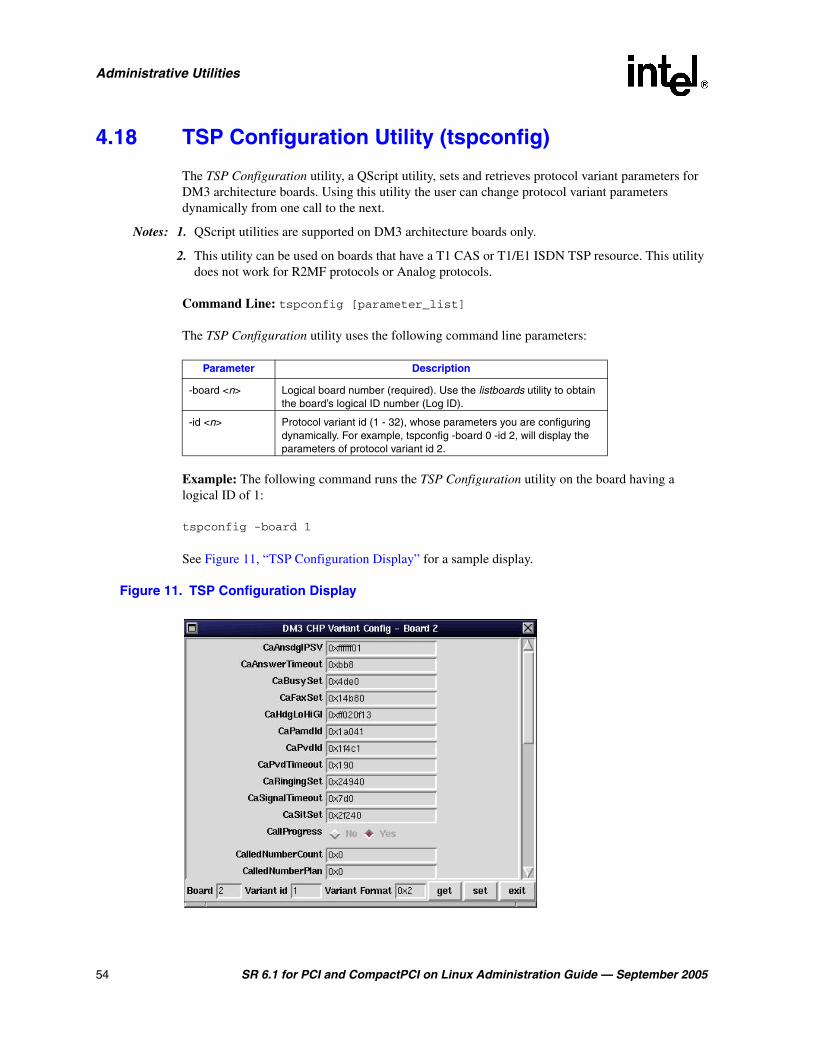
54 SR 6.1 for PCI and CompactPCI on Linux Administration Guide — September 2005
Administrative Utilities
4.18 TSP Configuration Utility (tspconfig)
The TSP Configuration utility, a QScript utility, sets and retrieves protocol variant parameters for DM3 architecture boards. Using this utility the user can change protocol variant parameters dynamically from one call to the next.
Notes: 1. QScript utilities are supported on DM3 architecture boards only.
2. This utility can be used on boards that have a T1 CAS or T1/E1 ISDN TSP resource. This utility does not work for R2MF protocols or Analog protocols.
Command Line: tspconfig [parameter_list]
The TSP Configuration utility uses the following command line parameters:
Example: The following command runs the TSP Configuration utility on the board having a logical ID of 1:
tspconfig -board 1
See Figure 11, “TSP Configuration Display” for a sample display.
Figure 11. TSP Configuration Display
Parameter Description
-board <n> Logical board number (required). Use the listboards utility to obtain the board’s logical ID number (Log ID).
-id <n> Protocol variant id (1 - 32), whose parameters you are configuring dynamically. For example, tspconfig -board 0 -id 2, will display the parameters of protocol variant id 2.
SR 6.1 for PCI and CompactPCI on Linux Administration Guide — September 2005 55
Administrative Utilities
4.19 TSP Monitor Utility (tspmon)
TSP Monitor, a QScript utility, performs the following:
• Monitors one or two Global Call resource channels on a DM3 architecture board.
• Traces all levels of the protocol including:
– DM3 Global Call resource call control operations from clients
– DM3 Global Call resource call state changes
– DM3 Global Call resource channel state changes
– CAS signaling bits
• Launches an audio tool for recording/playback purposes on the channel(s). It plays audio data (a file from the host) using the TSP.
• Checks timing via point and click on GUI.
• Tunes protocols and identifies configuration problems.
Note: QScript utilities are supported on DM3 architecture boards only.
Command Line: tspmon [parameter_list]
The TSP Monitor utility uses the following command line parameters:
Example: The following command runs the TSP Monitor utility on line 2, channel 16 of the board with a logical ID of 6:
tspmon -board 6 -line 2 -chan 16
See Figure 12, “TSP Monitor Display” for an example of the TSP Monitor display.
Parameter Description
-board <n> Logical board number (required). Use the listboards utility to obtain the board’s logical ID number (Log ID).
-line <n> Line number (optional, default is 1)
-chan <n> Channel number (optional, default is 1)

56 SR 6.1 for PCI and CompactPCI on Linux Administration Guide — September 2005
Administrative Utilities
Figure 12. TSP Monitor Display
4.20 TSP Tracer Utility (tsptrace)
TSP Tracer, a QScript utility, traces CAS protocols with timing information and saves data to a log file. It does not support ISDN protocol tracing (for this, use TSP Monitor utility, which supports all protocols).
Note: QScript utilities are supported on DM3 architecture boards only.
Command Line: tsptrace [parameter_list]
The TSP Tracer utility uses the following command line parameters:
Example: The following command runs the utility on line 3, channel 12 of board with logical ID 4:
tsptrace -board 4 -line 3 -chan 12
See Figure 13, “TSP Tracer Display” for a sample TSP Tracer display.
Parameter Description
-board <n> Logical board number (required). Use the listboards utility to obtain the board’s logical ID number (Log ID).
-line <n> Line number (optional, default is 1)
-chan <n> Channel number (optional, default is 1)

SR 6.1 for PCI and CompactPCI on Linux Administration Guide — September 2005 57
Administrative Utilities
Figure 13. TSP Tracer Display

58 SR 6.1 for PCI and CompactPCI on Linux Administration Guide — September 2005
Administrative Utilities
SR 6.1 for PCI and CompactPCI on Linux Administration Guide — September 2005 59
5Troubleshooting
This chapter discusses the following topics about troubleshooting:
• General Troubleshooting Information . . . . . . . . . . . . . . . . . . . . . . . . . . . . . . . . . . . . . . 59
• Checking Compliance with Prerequisites . . . . . . . . . . . . . . . . . . . . . . . . . . . . . . . . . . . 59
• Checking Configuration Files . . . . . . . . . . . . . . . . . . . . . . . . . . . . . . . . . . . . . . . . . . . . 60
• Checking Log Files . . . . . . . . . . . . . . . . . . . . . . . . . . . . . . . . . . . . . . . . . . . . . . . . . . . . 60
• Checking Which Packages Are Installed. . . . . . . . . . . . . . . . . . . . . . . . . . . . . . . . . . . . 60
• Checking Hardware . . . . . . . . . . . . . . . . . . . . . . . . . . . . . . . . . . . . . . . . . . . . . . . . . . . . 61
• Checking Version of Linux Kernel . . . . . . . . . . . . . . . . . . . . . . . . . . . . . . . . . . . . . . . . 61
5.1 General Troubleshooting Information
Solutions to many problems can be found in the technical notes on the Intel Telecom Support Resources Web site at http://developer.intel.com/design/telecom/support. In addition, check the online Release Update for the latest information about any issues, restrictions, or limitations that may affect the installation.
Problems on initial startup are typically caused by errors in your configuration. Hardware-related problems are also a possibility. The following sections provide some general information for troubleshooting these problems.
In addition, refer to the Software Installation Guide and check that all of the necessary procedures were performed. For example, if your /etc/hosts file is not configured properly, you will have problems when downloading Intel Dialogic boards.
5.2 Checking Compliance with Prerequisites
Ensure that your system has a working IP hostname resolution. Otherwise, you will have problems during system services startup. For more information, see the Software Installation Guide section on ensuring the system has a valid IP hostname resolution.
Check other prerequisites for software installation documented in the Software Installation Guide.
Also check assumptions and prerequisites documented in the Configuration Guide.
60 SR 6.1 for PCI and CompactPCI on Linux Administration Guide — September 2005
Troubleshooting
5.3 Checking Configuration Files
The main configuration file for all DM3 architecture boards is the pyramid.scd file; for Springware architecture boards, it is the dialogic.cfg. (These files are located in ${INTEL_DIALOGIC_CFG}.) Depending on your configuration, additional files may be applicable. Refer to the parameter information in the Configuration Guide, and check all configuration files.
For the new configuration to take effect, see Section 2.3, “Applying Configuration Changes”, on page 21.
5.4 Checking Log Files
Check the following log files for error and event messages:
• Intel Dialogic Log Files
• Linux Error Log File
5.4.1 Intel Dialogic Log Files
The Intel Dialogic log files include the system log file and the OA&M log file. The system log file contains messages from the system logging facility. Various system error and administrative information is logged to the file. See Section 4.16, “System Logging”, on page 51. The system logging information is also written to the OA&M log file, which may also contain other OA&M logging data.
5.4.2 Linux Error Log File
The system will log any driver error messages to the standard Linux error log file, which is located in the following directory:
/var/log/messages
5.5 Checking Which Packages Are Installed
Ensure that you installed all of the packages that you need. For a list and description of all system release software packages, see Determining Which Packages to Install in the in the Software Installation Guide. To check which packages were installed, enter:
rpm -qa | grep DLGC
If you need to install any additional packages, rerun the install.sh script and select the additional packages you need.
SR 6.1 for PCI and CompactPCI on Linux Administration Guide — September 2005 61
Troubleshooting
5.6 Checking Hardware
Ensure that each board is securely installed in its slot. Check that the correct cables are used and that they are connected properly.
For hardware testing information, see the Diagnostics Guide.
5.7 Checking Version of Linux Kernel
To check the version of the Linux kernel installed, enter the following command:
uname -r

62 SR 6.1 for PCI and CompactPCI on Linux Administration Guide — September 2005
Troubleshooting
SR 6.1 for PCI and CompactPCI on Linux Administration Guide — September 2005 63
Index
Aadding a board 23
adding a board to an active system 23
administrative utilitiesoverview 17product support 32
applying configuration changes 21
Audio Control utility 35
Bbasic hot swap 17
board model number 46
board number (logical ID) 44
board removal procedure 24
board replacement procedure 27
Ccallinfo utility 31, 33
CAS Signal Editor utility 35
checking configuration files 60
checking hardware 61
checking installed packages 60
checking Linux kernel version 61
checking log files 60
clocking daemon 10, 24, 26, 27, 28, 48
configuration files 60
DDiagnostic Guide QSscript utilities 31, 33
digitdetector utility 31, 33
displayed messages 21
Eenvironment variables 34, 51
Ffallback, clock master 10, 24, 26, 28, 46, 48, 50, 53
file directories 33
firmware update utility, IPT Series boards 40
Hhardware installation
troubleshooting 61
high availabilityperipheral hot swap 17redundant system slot 15support 15
high availability platform 15
Hot Swap Configuration utility 37
Hot Swap Kit 23, 37
IIntel Dialogic System Service
applying configuration changes 21restarting after initial startup 21stopping 21
IPT Series boardsadministration utility 39firmware update utility 40
Llineadmin utility 42
Linux kernel version 61
listboards utility 43
log files 60
logging 51
logical board ID 44
Mmaster clock 10, 24, 26, 28, 46, 48, 50, 53
MasterStatus 24, 27, 48, 53
64 SR 6.1 for PCI and CompactPCI on Linux Administration Guide — September 2005
messages 21
messages displayed 21
model number 46
OOUT OF SERVICE LED 25, 28, 38
overviewadministrative utilities 17high availability support 15peripheral hot swap 17redundant system slot 15starting and stopping the system 15troubleshooting 18
Pperipheral hot swap
adding a board 23overview 17removing a board 24replacing a board 27
phone utility 31, 33
pmacadmin utility 39
primary clock master 10, 24, 26, 28, 46, 48, 50, 53
proceduresadding a board to an active system 23applying configuration changes 21removing a board in an active system 24replacing a board in an active system 27
pstndiag utility 31, 33
QQScript utilities
Diagnostic Guide 31, 33environment variables 34file directories 33QSCRIPT_DIR environment variables 34remote systems 34single session variable 34
QSCRIPT_DIR environment variables 34
Rrecovery of clock 26
redundant single board computer 15
redundant system slotoverview 15
remote systems 34
removebrd utility 46
removing a board 24
replacing a board 27
restarting the Intel Dialogic System Service 21
restarting the system 21
Ssecondary clock master 10, 24, 26, 28, 46, 48, 50, 53
secondary master 28
single board computer 15
single session variable 34QScript utilities 34
slave 24, 46, 48, 53
Springware board model number 46
Start System Services utility 50
startbrd utility 48
starting and stopping the systemoverview 15
stdconfig utility 47
Stop System Services utility 51
stopbrd utility 49
stopping the Intel Dialogic System Service 21
stopping the system 21
system logging 51
Ttblist utility 52
TDM bus clock daemon 27
TDM bus clock fallback 10, 24, 26, 28, 46, 48, 50, 53
TDM Bus Information utility 52
telephony bus information 52
tracing levels 51
troubleshootingconfiguration files 60general information 59hardware 61Linux kernel version 61log files 60overview of 18package installation 60

65 SR 6.1 for PCI and CompactPCI on Linux Administration Guide — September 2005
TSP Config utility 54
TSP Monitor utility 55
TSP Trace utility 56
Uutilities
audio 35dlstart 50dlstop 51Hot Swap Configuration 37iptfwupdate 40lineadmin 42pmacadmin 39removebrd 46signaleditor 35startbrd 48stdconfig 47stopbrd 49tblist 52TSP Config 54TSP Monitor 55TSP Trace 56

66 SR 6.1 for PCI and CompactPCI on Linux Administration Guide — September 2005


