53
INTERLUDE Owners’ Notes 2017 Beneteau Oceanis 41.1 ©2018 Crosswinds Sailing, LLC [email protected] Last Updated May 1, 2018

INTERLUDEOwners’ Notes
2017 Beneteau Oceanis 41.1
©2018 Crosswinds Sailing, LLC
Last Updated May 1, 2018

Interlude Owners’ Notes 2018
2 – 53
Welcome Aboard Interlude!
Dear guests: Our 2017 Beneteau Oceanis 41.1 is a wonderful choice for your cruising vacation. As veteran Pacific Northwest sailors, when we decided to purchase a boat we looked carefully for the perfect San Juan and the Canadian Gulf Islands cruiser. We found it in Interlude and you’ll treasure every day aboard her. HULL: Interlude’s Finot-Conq-designed hull has hard chines in the stern sections that increase interior volume and reduce heel. Interlude has a flat bottom, a deep single spade rudder and a 7ft 2in deep keel, with side thrusters in the bow that make docking in small marinas surprisingly easy. COCKPIT: The Beneteau cockpit is spacious: two seats are separated by a massive drop-leaf table. Twin helms allow for outboard steering and clear sightlines forward. Engine controls are on the port side, and the B&G multi-function display (MFD) can be pivoted so it is easily visible from either helm. An all-season dodger and bimini keep you dry and warm. The companionway stairs are a true 45° for easy access. CABIN: Interlude has a comfortable, spacious salon with three cabins and two heads, both equipped with electric toilets and showers. All beds are queen-sized and the forward cabin suite has a bed that is easy to enter and exit. The aft head has a folding shower wall to keep your accessories dry. The galley has a gas stove, microwave, sink, and refrigerator with a freezer section. A large drop-leaf dining table is the center of the cabin, with two wine storage bins built into the table in true French fashion. ELECTRONICS & ENTERTAINMENT: Interlude offers nearly every navigation and instrument system you can imagine to make your travels easy and safe. We’ve provided a 40-inch Samsung 1080p HD SmartTV© with DVD/Blue Ray player for the occasional rainy day. Books, movies and games are available in the salon, and there are warm throws for late-night stargazing in the cockpit. A FUSION audio system with USB and Bluetooth connections lets you play your favorite music. SAILING: Interlude is a pleasure to sail in light to moderate winds. The chined hull gives greater stability and speed in higher winds. A furling main and genoa makes deploying the sails easy, with all lines accessible in the cockpit. ENGINE: With just under 18,000 lbs. of displacement, the 45hp Yanmar with saildrive has plenty of power. Interlude has a 53-gallon fuel tank, providing a range of nearly 600 nautical miles. In musical terms, an interlude is a “pause” or “respite” between movements. It’s our hope that your travels aboard our Interlude are a time of rest and enjoyment for you and your guests. We love sailing in this part of the world, and we’ve chosen the very best boat to make this a special experience for you. Wishing you smooth seas and fair winds, Bob and Wendy Hatheway Lin and Susan Lindsey

Interlude Owners’ Notes 2018
3 – 53
TABLE OF CONTENTS
TABLE OF CONTENTS ..................................................................................................................................... 3
USING THE OWNERS NOTES ......................................................................................................................... 4
QUICK CHECK LIST ......................................................................................................................................... 5
BOAT SPECIFICATIONS ................................................................................................................................ 10 INTERLUDE NUANCES ................................................................................................................................. 11
ANCHORING ................................................................................................................................................ 12
BARBEQUE OPERATIONS ............................................................................................................................ 14
BATTERIES, CHARGING, SHORE POWER AND INVERTER ............................................................................ 15
BERTHS ........................................................................................................................................................ 17 BILGE PUMPS .............................................................................................................................................. 18
BOW THRUSTER .......................................................................................................................................... 19
CRAB POT .................................................................................................................................................... 20
CUSHIONS ................................................................................................................................................... 20 DINGHY ....................................................................................................................................................... 20
DODGER, BIMINI, AND SIDE PANELS ........................................................................................................... 22
ELECTRICAL PANEL ...................................................................................................................................... 23
ELECTRONICS – NAVIGATION, INSTRUMENTATION AND COMMUNICATION SYSTEMS ............................ 24 EMERGENCY & SAFETY EQUIPMENT........................................................................................................... 32
ENGINE AND HANDLING ............................................................................................................................. 33
ENTERTAINMENT SYSTEM .......................................................................................................................... 38
FUEL TANK & REFUELING ............................................................................................................................ 40 GALLEY ........................................................................................................................................................ 40
HEADS, SHOWERS AND HOLDING TANKS ................................................................................................... 42
HEATING SYSTEM ........................................................................................................................................ 45
KEEL DEPTH ................................................................................................................................................. 46 OUTBOARD ENGINE .................................................................................................................................... 46
PROPANE ..................................................................................................................................................... 48
SAILS AND RIGGING .................................................................................................................................... 48
SWIM PLATFORM ........................................................................................................................................ 51 TABLES ......................................................................................................................................................... 52
TOOLS AND SPARES .................................................................................................................................... 52
WATER......................................................................................................................................................... 52

Interlude Owners’ Notes 2018
4 – 53
USING THE OWNERS NOTES
Essential information for operating Interlude’s systems are provided in alphabetical order of the topics covered, starting with the “Anchoring” section. Please read the Owner’s Notes before arriving onboard to start your charter so you have familiarized yourself with the major aspects of living onboard. The San Juan Sailing (SJS) staff will take you through the boat at check-in and reading the Notes in advance will make their explanations clearer and give you time to ask questions and take notes. We’ve provided helpful hints and safety notes in several sections. Look for the labels “OPERATING TIP” and “SAFETY REMINDER” to help you get the most out of the boat’s systems and be aware of any safety issues that might arise. We’ve provided a “Quick Check List” section at the beginning of this document that you may find helpful once you’ve read the notes and been on the boat for a bit. It’s not a substitute for reading the entire Owners’ Notes, it’s simply intended to provide a quick reminder where to find or how to do something. OPERATING TIP: San Juan Sailing has provided an excellent set of resources on their Web site that cover many topics that will make your trip easier and more enjoyable. Check them out at http://www.sanjuansailing.com/about/resources.html. We truly hope you’ll have a wonderful time on Interlude and that you’ll come back to enjoy her and the San Juan and Canadian Gulf Islands again and again. We’d love to hear from you, whether to offer suggestions for improving the Owners Notes, to tell us about your adventures, or to suggest things we could do to make your charter experience more enjoyable. Please e-mail us at [email protected] and visit us on Facebook at Interlude at San Juan Sailing. If you’ve taken some amazing photos, send them along to us, we’d love to share them on our Facebook page. If you need to contact someone about your charter, here are the phone numbers to reach us:
� San Juan Sailing office: 800-677-7245 � SJS’s owner, Roger Van Dyken – Cell: 360-224-4300, Home: 360-354-5770 � Maintenance pro Mike Hasbrouck (Deep Blue Marine): 808-640-8609 � Owners:
� Bob & Wendy Hatheway – Cell: 425-305-7220; Home: 425-868-4228 � Lin & Susan Lindsey – Cell: 206-979-1314; Home: 425-836-8693

Interlude Owners’ Notes 2018
5 – 53
QUICK CHECK LIST
Anchor & Windlass� Standard scope ratio in the Islands is 4:1. Average anchorage depths at high tide are ~25 feet
equating to ~100 feet of chain rode. � Turn on yellow breaker in aft port cabin to use windlass; windlass will only work while the
engine is running; hand-held controller is in anchor locker. � Chain is marked with paint as follows (color key is taped to inside of anchor locker hatch):
� 10 ft. Orange (anchor just below water surface) � 25 ft. Blue (average bottom depth of many anchorages) � 100 ft. Yellow (common scope length – 4:1 for 25’ water depth) � 150 ft. Red � 200 ft. Blue � 250 ft. Yellow
� Proceed very slowly when anchor is clear of the water to avoid hitting the hull with a swinging anchor; pulse the windlass in short bursts; use the boat hook to fend off a swinging anchor.
� Snubber line (stored in anchor locker) should be hooked to the chain and cleated so all the load is on the snubber and not the windlass whenever the anchor is deployed.
� Wash mud and debris off the chain and anchor as it is retrieved using the anchor wash-down hose; switch for the hose is in the anchor locker.
� Distribute chain “mountain” with wooden dowel (also stored in anchor locker).
Barbeque� Open propane tank regulator; open gas valve for BBQ (small red handle, bottom of propane locker). � Activate solenoid switch in galley (left of oven; controls gas to both stove and grill). � Push-in and rotate grill’s valve to HIGH; light with push-button piezo lighter; rotate valve to
regulate gas for cooking temp. � Grilling tools, meat thermometers stored with utensils in galley. � Close gas valve in propane locker when done; turn off stove solenoid.
Battery Switches & Breakers� Located in aft port cabin. � Ground (black) – always “ON.” � House batteries (red) – always “ON.” � Engine batteries (red) – “ON” to run engine; “OFF” while docked (prevents theft, since engine
uses keyless start). Never turn OFF while engine is running (serious damage can result). � Windlass (yellow) – always “ON.”
Bow Thruster� Press Left (red) and Right (green) buttons simultaneously to turn “ON / OFF;” will turn itself off
after ~15 minutes of inactivity.

Interlude Owners’ Notes 2018
6 – 53
� Left (red) button moves bow to left; Right (green) button moves bow to right. � Operate in short bursts.
Chart Plotter Multi-Function Display (MFD)� To activate the MFD and all instruments (including depth sounder, knotmeter and radar):
� Turn “ON” Navigation Instruments switch on electrical panel. � Press the “POWER” button on the MFD. � Tap “ACCEPT” to accept the software license agreement. � Use the “HOME” button, “MENU” buttons, and touch screen to operate.
� To deactivate: � Press and hold the “POWER” button on the MFD for a couple of seconds. � Turn off the Navigation Instruments switch on the electrical panel.
Cushions� Main salon – Please separate Velcro tabs with fingers before pulling cushions away. � Cockpit – Stored in an aft cabin; please store flat; only clean with damp cloth and soapy water.
Dinghy� Tow the dinghy ~5 feet off the stern so the bow rides out of the water. Cleat it to the starboard
stern cleat for towing (this keeps it away from the engine exhaust). � Please don’t tow with the outboard engine mounted on the dinghy. � Avoid driving dinghy onto the beach; stop short of the beach and lift dinghy over rocks. � Use the black adapter on the foot pump to add air to the main chambers; use the grey adapter
to add air to the centerline “keel” chamber.
Dodger, Bimini� Wash “Plexiglas” windows with copious fresh water to remove salt. Pat dry or let air dry. � Please don’t lean against dodger windows.
Electrical Panel Switches� A/C outlets – “ON” when on shore power or running Inverter. � Anchor light – “ON” at night when at anchor. � Battery charger – “ON” whenever connected to shore power (batteries won’t charge otherwise). � Bilge – Always on “AUTO.” � Hot water – “ON” when on shore power if you need hot water. � Inverter – “OFF” except when needed for AC appliances. � Navigation Instruments – “ON” while underway; turn off after turning off the MFD. � Refrigerator – Leave “ON” unless batteries are dipping below 12 volts. � Shore Power – No switch per se, “ON” whenever connected to shore power. � Water Pressure – “ON” while anchored or docked (you can hear pump working). “OFF” while
underway except when needing to use water,.

Interlude Owners’ Notes 2018
7 – 53
Emergency Equipment� Fire extinguishers located 1) in Galley, 2) under Nav station and 3) in port cockpit locker. � Adult PFDs in each hanging locker in cabins; Lifesling on starboard cockpit rail. � Flashlights mounted next to main cabin fire extinguishers. � First aid kit and emergency flares in salon cabinet (wine cabinet). � Carbon monoxide (CO) detector in aft port cabin.
Engine� Start
� Check fuel level, oil, coolant, and water strainer at start of each day. � Confirm red engine battery switch in aft port cabin is “ON.” � Press bottom “POWER” button on engine control panel at port helm. � Press top “START” button; the engine should start immediately. � Check for water pumping out of exhaust. � Allow engine to run in Neutral for a few minutes to warm up before using.
� Stop � Allow engine to run in Neutral for ~5 minutes to cool. � Press middle “STOP” button to turn off engine. � Press bottom “POWER” button until engine fan falls silent. � Never press the POWER button while the engine is running. � Never turn off the engine battery switch while engine is running.
Fuel� Fuel gauge on electrical panel. � Fuel filler cap located in propane locker (look for red ring; water tank fill port ring is blue). � Fill slowly, do not overfill – at first sound of “gurgle” in fill pipe STOP, tank should be full. � Plan a refueling stop at one of the fuel docks in the Islands once tank reaches ½ full.
Heads & Showers� Sinks & showers use fresh water; marine toilets use raw water. � Showers have sump pumps to drain water; switches for the pumps are located in both heads. � Don’t put anything down a marine toilet that hasn’t gone through the sailor first. Baggies are
provided for disposing of used toilet paper and other disposable products. � Please flush a ½ cap-full of “No Flex” holding tank treatment into each tank, each day.
Heater� Controls located next to electrical panel. � Heater ON: Press power button, LED light will turn green. � Heater OFF: Press power button, LED light will turn white while system cools down, then turn off. � Temperature setting: rotate the dial to choose your temperature.

Interlude Owners’ Notes 2018
8 – 53
Inverter� Use to power AC outlets when on batteries; avoid using high wattage items like hair dryers. � ON/OFF switch and voltmeter located next to electrical panel.
Outboard� Start / Stop
� Push fuel valve lever to the back of the engine housing, pull out the choke. � Open the air vent on the top of the fuel cap; attach “kill” clip to red shut-off knob. � Turn the handle throttle ¼ turn counter-clockwise. � Gently pull cord 6-12 inches out then use a smooth, firm pull to start the engine. � Push the choke back in shortly after the engine starts. � Turn throttle to speed up, slow down; rotate engine 180 degrees to go in reverse. � Throttle down and pull “kill” clip to stop engine; close fuel valve; close air vent.
� Please do not tow dinghy with outboard attached, return engine to rail mounting bracket.
Propane� Propane locker located in deck locker between the helms. The propane tanks supply fuel for
both the galley stove and the BBQ grill. There is a separate valve in the locker for the BBQ. � Open valve on tank in propane locker. There is a solenoid switch next to the stove that turns fuel
ON/OFF to stove and BBQ. BBQ has its own valve for lighting the grill and adjusting heat level. � If you need to switch tanks, the tank-hose coupling rotates right to remove, left to tighten.
Refrigerator� Turn “ON” fridge using switch on the electrical panel. � If the house battery level is low (<12V) we turn fridge OFF at night. � Pull out the locking knob to release the support arm holding the top fridge lid open.
Sails & Sailing� Except under heavy winds, recommend deploying headsail first, then mainsail. Steer on
starboard tack with wind slightly off starboard bow while unfurling/furling (close hauled). � When unfurling mainsail, stop outhaul “cart” at black vertical mark on rear of boom. When
furling, stop when black vertical mark on sail reaches mast, leaving ~12 inches of sail exposed. � Maintain light pressure on mainsail furling line when deploying, on outhaul when furling. When
furling, don’t let wrinkles form in sail as it rolls into mast. � Maintain light pressure on jib sheet when furling headsail. � Each sail has a pair of reef marks, indicated by vertical black lines. We recommend reefing when
winds reach 12-14 knots. At 15+ knots you will want to be reefed.
Shore Power� Disconnecting
� Turn off onshore breaker (typically near onshore plug). � Unplug cable from shore power outlet. � Unplug cable from boat (port helm).

Interlude Owners’ Notes 2018
9 – 53
� Connecting � Connect cable to boat (at port helm). � Connect cable to shore power outlet and turn “ON” onshore breaker (if available). � Look for blue LED light on boat connector and red AC power light on electrical panel.
Stove� Activate the solenoid valve next to the stove to turn ON the propane. � Press in the left or right burner knob, turn to the left to the flame symbol, and light the burner
with a “Bic” lighter (stored with the utensils). Rotate the knob to increase / decrease flame. � To light the oven press in the oven knob, turn to the left to the flame symbol, insert the “Bic”
lighter in the hole in the bottom of the oven and light. Adjust the flame level with the knob.
Swim Platform� Slide locking bar, located on starboard side of swim deck, open to deploy; close bar when done. � Switch at starboard helm; hold red button while pressing down / up black toggle switch. � Watch for restraining cables getting pinched between platform and hull, move them as needed. � Remote control fob is in Nav table.
Tables� Cockpit: Lift leaves to lock in place; simultaneously press 2 latches under each leaf to lower. � Salon: Lift leaf and swing 2 support arms into place, locking tongue into grove under top; lift top
to swing arms aside and lower.
TV / DVD-Blu-ray� Turn “ON” AC Outlets (turn “ON” inverter first if running on batteries). � Remote controls for TV and disk player are in starboard storage tray behind salon seat. � HDMI cable for connecting another device (e.g., PC) is draped over back of TV.
VHF Radio� Hail vessels on Channel 16, then ask the other boat to switch to a working channel – e.g., 78, 79. � Check weather on Channels 3 or 4.
Water� Tank water level gauges on electrical panel. � Aft tank fill port in propane locker, has blue ring; forward tank fill port on port deck. � Water tank valves located in engine compartment; use Tank 1 (aft) first, then Tank 2 (forward).

Interlude Owners’ Notes 2018
10 – 53
BOAT SPECIFICATIONS
Make Beneteau
Model Oceanis 41.1
Year 2017
LOA 40’ 9” Hull Length 39’ 4”
LWL 37’ 4”
Beam 13’ 9”
Draft 7’ 2”
Displacement 17,271 lbs Mast height above WL 63’
Furling Mainsail Area 355 ft2
Furling Genoa Area 452 ft2 (106% overlap)
Fuel 53 gal Water 63 gal aft (Tank 1) and 87 gal forward (Tank 2) for 150 gal total
Holding tanks 20 gal each Fwd and Aft heads
House battery capacity 420 Amp-Hours (AH)
No. cabins 3 with queen-size berths + salon settee converts to bed No. heads 2 with electric toilets, showers
Hull number BEYKL025J617
U.S. Coast Guard Number 1277560
MMSI No. (AIS identification) 367783890 FCC Call Sign WDJ5062
WA State Registration Number 12445 (permanent); 1740 (2018)
WA State Parks Pass Number 80079 (2018)
Customs Decal Number 8539689

Interlude Owners’ Notes 2018
11 – 53
INTERLUDE NUANCES
Here are some features and characteristics of Interlude that are unique to her or that you might not have encountered with another charter.
1. Draft: Interlude’s draft is 7’2”, which makes her a joy to maneuver but also makes her more susceptible to close encounters with rocks! Please mind your depth as you travel among the islands and follow San Juan Sailing’s guidelines for areas to avoid.
2. Prop walk: Almost non-existent, a bit to starboard in reverse.
3. Bow thruster: For the thruster to work the engine must be running. The thrusters are useful for maneuvering in tight spaces, please operate them in short bursts. The controller is activated by pressing both left (red) and right (green) buttons simultaneously. Tap the directional arrows to move the bow – right (green) button moves the bow to the right, left (red) button moves the bow to the left. Turn off when done maneuvering by simultaneously pressing both buttons. The thruster will turn itself off after about 15 minutes of inactivity (you’ll hear a “beep” tone).
4. Cabin hatch: The companionway has a sliding top panel and two doors that must all be closed together to lock the hatch. The sliding panel must be lifted over the top edge of the doors. To open the hatch, lift the top panel slightly and slide it forward. Release the locking bolt at the bottom of starboard door. To lock the hatch when leaving the boat, close the doors, slide the starboard door bolt to the closed position, then slide hatch forward and gently lift it over the top of the doors lifting. Lock the hatch with the key provided (we gently press the doors toward the lock to get the latch to fully engage).
5. Electronics: Interlude is equipped with a full complement of B&G navigation and instrument systems including the Zeus2 12” touchscreen multi-function display (MFD), GPS Chartplotter, autopilot, B&G’s patented “SailSteer” system, Broadband 4G™ radar, AIS, VHF mobile and portable radios, and GoFree™ Wi-Fi gateway, which mirrors the Zeus2 displays anywhere on the boat using the GoFree™ apps available from the Apple and Android app stores.
6. Heads and holding tanks: Both heads are equipped with electric raw water toilets and 20-gallon holding tanks. Pump-out access ports are on the starboard deck above each head.
7. Fuel and water: The access ports for the fuel tank and the aft water tank (Tank 1) are found in the propane locker. The fill port for the forward water tank (Tank 2) is located on the forward port deck. The valves for selecting which water tank to draw from are in the engine compartment.
8. Electric swim platform: The swim platform has a sliding lock bolt located on the starboard side, which must be opened before deploying the platform. The switch for the platform is located at the starboard helm. Simultaneously press the red button and toggle the black rocker switch down to open the platform. Reverse this process to retract the deck and then slide the bolt lock to secure the platform in the up position. There is a remote-control fob stored in the Nav table.
9. Storing the fenders and dock lines: We like to stow one or two fenders, the roving fender and bow line in the forward anchor chain locker. We put the remaining fenders and dock lines in the port cockpit lazarette.
10. Boat hook: Stored in the port cockpit locker.

Interlude Owners’ Notes 2018
12 – 53
ANCHORING
Anchoring HighlightsMain anchor: 44# Delta mounted on the bow, with 300 feet of 3/8” chain marked with paint as follows:
� 10 ft. Orange (when retrieving the anchor and the orange mark appears, the anchor will be just below the surface; please proceed slowly at this point to avoid dinging the bow)
� 25 ft. Blue (average depth in many island anchorages when the anchor will reach the bottom)
� 100 ft. Yellow
� 150 ft. Red
� 200 ft. Blue
� 250 ft. Yellow
The yellow paint mark at 100’ is 10 feet long; all the other paint marks are 5 feet long.1 There is a color-coded key to the chain markings taped to the inside of the anchor locker, and another in the Nav table. Windlass: The engine must be running for the windlass to work. The circuit breaker for the windlass is located near the battery switches in the aft port cabin. The remote control for the windlass is in the chain locker. Wash-down pump: Located in chain locker, uses raw water. Use to hose off mud and debris as you retrieve the anchor. “ON/OFF” switch is in the chain locker. Snubber line: 15’ heavy snubber line with chain hook located in the anchor locker. Please, always use the snubber to carry the load of the chain and anchor once you have set the anchor.
Secondary anchor: Heavy duty aluminum Fortress anchor stowed in the starboard cockpit locker, with 30’ 3/8” chain and 130’ rope rode. Polypropylene line: Spool with 600’ of line located in cockpit locker under the starboard helm. Use for stern tie in narrow anchorages to keep the boat from swinging.
1 Marked lengths are relative to the anchor; for example, the orange section of chain begins at 10’ from the anchor and extends to 15’ from the anchor.
Anchor & Windlass
Anchor Locker with Windlass Controller (1), Wash-down Hose (2) and Wash-down Pump Switch (3)
1 2
3

Interlude Owners’ Notes 2018
13 – 53
Deploying the Anchor1. Check the tide tables to determine high and low water levels while you are anchored. We prefer
to anchor in 20-25 feet of water because the tidal range in the Islands can be as much as 10-12 feet. The bottom can slope upwards sharply near the shore; make certain you will have enough water under you as the boat swings with the tidal currents.
2. Check the weather forecast for expected wind conditions overnight to anticipate how the boat will swing during the night and if there’s going to be a strong wind that calls for a secondary anchor. Monitor VHF Channel 3 or 4 and listen for “Northern Inland Waters.”
3. Normal scope for the islands is 4:1. To calculate the amount of chain rode to deploy, use the following formula (all units in feet):
Rode = (Current Water Depth + Max Tidal Rise + Freeboard) x 4
For example, if the current water depth is 25 feet, the expected tidal rise is an additional 10 feet, and the freeboard (bow to water line) is 5 feet, then the amount of rode to use is (25’+10’+5’) x 4 = 160’. The chain is marked Red at 150’, so if you deploy the chain until the Red mark just disappears over the bow and into the water you’ll be nearly spot on!
4. Check the windlass breaker in the port aft cabin near the battery switches (we always leave this on but other users may not). The windlass remote control is in the chain locker. “UP” and “DOWN” buttons control the windlass.
5. Pick the spot where you want to stop the boat when the anchor is set, turn into the wind or current, and motor forward 2-3 boat lengths.
6. The anchor will swing between the bow and the water line. Proceed slowly using short bursts of the windlass until the anchor is in the water. We like to hand-push the anchor forward, keeping the shank level before gradually allowing it to ease into the hanging position. Then we lower the anchor using the windlass remote to approximately the number of feet on the depth sounder so it is on or near the bottom (the Blue mark starts at 25 feet).
7. Signal the helmsman to put the transmission in Idle Reverse and deploy the desired amount of chain rode while backing down to your desired anchorage point. Use hand signals to instruct the helmsman or use the portable radios to communicate with each other (see “Communications”).
8. Once all the rode is deployed allow the anchor to set and stop the boat while continuing in Idle Reverse for 30 seconds or so. Line up two objects on shore - you are holding firm if the boat is not moving relative to the targets.
9. Finally, always set the snubber line. Tie-off the snubber on a bow cleat and hook the chain below the roller. Keep some tension on the snubber and use the windlass to ease out some chain so that the snubber takes the load and the chain is slack. Now relax and enjoy a lovely evening!
Retrieving the Anchor1. Start the engine; take the boat hook forward (useful for fending off the anchor so it doesn’t hit
the bow); turn “ON” the anchor wash-down hose in the anchor locker.

Interlude Owners’ Notes 2018
14 – 53
2. Signal the helmsman to put the transmission in Idle Forward, begin raising the anchor. Instruct the helmsman how to steer to keep the boat aligned with the chain and how to adjust speed to avoid motoring over the anchor chain as it is being retrieved and avoid pulling the boat forward with the windlass. Use the wash-down hose to wash off any mud and debris on the chain.
OPERATING TIP: As soon as you begin retrieving the anchor the snubber line should fall off by itself and you can retrieve it when the anchor is recovered. If the snubber doesn’t fall off you’ll need to retrieve it by hand before you can proceed.
3. The chain will pile up in the chain locker as it is retrieved - avoid that “chain mountain” by pushing the chain forward in the well using the wooden dowel stored in the locker.
4. Watch closely for the Blue 25’ mark on the chain. Once past this point the anchor should be off the bottom. Signal the helmsman to stop the boat.
5. Continue raising the anchor. Look for the Orange mark on the anchor that indicates it is near the surface. Stop retrieval when the anchor is just below the surface. Now raise the anchor slowly to ensure it doesn’t swing and hit the hull. Fend it off with the boat hook as needed.
6. Use the windlass to bring the anchor shank up and over the bow roller very carefully by tapping the UP button on the windlass control. We seat the anchor by hand and snug up any slack chain.
7. Retrieve the snubber line and store in the chain locker. Return the windlass remote to its cradle. Turn off the anchor wash-down hose switch in the anchor locker.
Safety Suggestions for Anchoring� If strong winds are forecast (>15 knots), test the anchor hold by putting the transmission in
reverse and running the engine at a RPM equal to half the projected wind speed for 30 seconds (1,000 RPM for winds to 20 knots; 1,500 RPM for 30 knots, etc.).
� For storm conditions, you can increase the scope if there is adequate room to swing. The secondary anchor is also available for additional holding power if a storm is anticipated. It’s best to set it before the storm hits! Use the dingy to deploy the anchor off the bow in a V-shape pattern relative to the primary anchor.
� If anchored in a small cove where you don’t want the boat to swing with the winds or tidal currents, you can deploy a line ashore. We have provided a 600’ floating polypropylene on a reel inside the cockpit locker under the helms. Use the mop handle as an axle for the reel, positioned between the helm seats. Run the line to shore with the dinghy, take it around a secure object like a tree trunk, then bring it back to the boat and cleat it. When you are ready to retrieve the line just uncleat it and spin the reel to wind it back onto the spool.
BARBEQUE OPERATIONS
Interlude is equipped with a Magma propane BBQ grill. The propane supply for the BBQ is provided by the same propane tank used for the galley stove. To turn on the gas for the grill, open the propane tank valve, open the small red valve at the bottom of the locker that controls the flow of gas to the grill (see photo), and then activate the solenoid switch for the galley stove next to the stove (see “Propane”).

Interlude Owners’ Notes 2018
15 – 53
To light the grill, push-in the valve and rotate it slightly to the “HIGH” position, which will start the flow of fuel. Press the piezo lighter button located next to the valve (you should hear some audible clicks as the lighter activates). Adjust the heat setting by turning the valve. When you’re finished, shut off the fuel by turning the grill’s valve clockwise to the “OFF” position and allow to cool. Close the red-handled valve in the propane locker. Clean the grill grates with the brush provided, and close and lock the lid. That’s all there is to it, happy grilling! OPERATING TIP: We’ve found that cooking with the lid closed provides the best heat distribution and shortest cooking times. The grill can cook quite hot, so monitor your desired temperatures and cooking times carefully. There is a meat thermometer in the galley drawer that holds the cooking utensils, we use it regularly when cooking onboard.
BATTERIES, CHARGING, SHORE POWER AND INVERTER
Electrical System Highlights� Batteries: Located under aft port bunk; 420 amps for house services, 105 amps for engine
starter. Volt meters are on the electrical panel, do not let voltages drop below 12V.
� Battery switches: Located on front of aft port bunk; leave ON (if leaving the boat for an extended period we turn OFF the engine battery switch and lock the companionway).
� Charging: Turn on Battery Charging switch on electrical panel whenever connected to shore power to charge the batteries.
� Shore power: 50 ft. AC power cable located in port cockpit locker; blue LED will illuminate on the boat plug when connected to shore power.
� Inverter: ON/OFF switch located on electrical panel. Do not use appliances that draw lots of power, like hair dryers.
Propane Tank with Master Valve (top) and Red BBQ Valve (red arrow – valve in open position)
BBQ Valve (1) and Piezo Lighter Button (2)
1 2

Interlude Owners’ Notes 2018
16 – 53
BatteriesInterlude’s battery system has been upgraded to include six (5) high capacity AGM batteries, four (4) for the house electronics (providing ~420 amp-hours) and one for starting the engine. The battery bank and battery switches are in the aft port cabin, with the batteries located under the berth. Under normal operations we leave all the battery switches set to “ON.”
The voltage readouts for the batteries are on the electrical panel in the main cabin. We monitor the voltage readouts regularly when running on battery power to ensure we don’t draw the batteries down too far, and we always check them before turning in at night. With proper power management, you can expect to use ~100 Ah overnight. If the charge level drops to just above 12V we turn off as many systems as we can, for example, the fridge. If the battery level drops to 11.8V we run the engine for about an hour at 1100 RPM to re-charge the batteries.
SAFETY REMINDER – Never turn off the batteries when the engine is running, as this will seriously damage the electrical system. If you have small children on board the nice big red & black switches can look like something fun to play with. Please make sure no one touches them while the engine is running.
ChargingWhen the engine is running you’ll be automatically charging the batteries. When on shore power, you charge the batteries by setting the battery charging switch on the electrical panel (left-hand side) to “ON.” We highly recommend charging the batteries whenever you’re on shore power.
Shore PowerInterlude is equipped with a 50-ft. shore power cable that attaches in the cockpit below the port helm (no more hanging over the back of the boat to connect the cable). When on shore power, a blue LED light will illuminate on the cable plug at the helm and a red light will be illuminated in the upper left-hand corner of the electrical panel (see inverter photo). Before connecting or disconnecting shore power please turn off the AC outlets and battery charger switches on the electrical panel. SAFETY REMINDER – To connect to shore power, first attach the power cable to the boat then to the shore power junction box. To disconnect shore power, reverse the process – detach the cable from the shore power junction box first then disconnect it at the boat. We typically store the power cable in the port cockpit lazarette.
Battery Bank – Aft Port Cabin Battery Switches – Aft Port Cabin

Interlude Owners’ Notes 2018
17 – 53
InverterInterlude is equipped with an inverter that provides AC power for the electrical outlets, microwave and entertainment system (TV-DVD/Blu-ray) when you are operating on battery power. The ON/OFF switch and volt meter for the inverter are on the electrical panel in the main cabin. When you are running on batteries and you need AC power, simply turn on the inverter and flip the AC outlet switch on the panel to “ON.” Please turn off the inverter when not in use to minimize drain on the battery. We recommend that you not use appliances that draw lots of power when operating the inverter (hair driers are especially notorious). The galley microwave is very efficient and it is perfectly OK to run it off the inverter, but we don’t recommend long cooking times (>10 minutes) while running off the inverter. The entertainment system draws minimal power. Curl up and enjoy Master and Commander: The Far Side of the World (our all-time favorite sailing flick) while swinging at anchor in Echo Bay!
AC OutletsAC outlets are available in each cabin. Use these for charging phones, operating electrical appliances, etc. The AC outlet switch on the electrical panel must be “ON” before the outlets will work.
Bow ThrustersThe bow thrusters have their own batteries and battery switch, located in the forward cabin under the berth. Under normal circumstances you don’t need to do anything with this system.
BERTHS
Interlude has three cabins with queen size beds, hanging lockers and storage areas. There are ample sources of lighting in each berth, with a master switch near the door and individual controls on each light fixture. All the deck hatches come equipped with sliding pull-out covers and sliding pull-out screens. In the forward cabin, you’ll find a grey round vent button on the hatch cover. Push this button up to help reduce condensation in the cabin when the hatch is closed. One of the things we love about Interlude is that the forward “Owner’s cabin” has a real bed with your head at the bow and feet pointed toward the stern. No more pivoting around to get into and out of a V-berth (aching backs, rejoice!). In the aft cabins you can sleep either way, feet toward the bow or the stern. The starboard cabin has its own door to the aft head for additional privacy and convenience. The settee in the main salon converts into a full-size bed:
� Drop the salon table leaves; remove the settee cushions.
� In the settee storage compartments find the crossbeams and folding panel insert.
� Insert the support cross beams into the notches and place the panel insert on top.
� Place the mattress insert on top (stored in the port aft cabin).
Inverter Controls: Voltmeter (1), ON/OFF Switch (2) AC Shore Power Light (3)
3

Interlude Owners’ Notes 2018
18 – 53
BILGE PUMPS
Please visually inspect the bilge every day. It’s accessed by lifting the floorboard in front of the table in the main salon. The refrigerator drains into the bilge, so most of the water that accumulates in the bilge is from melting ice and condensation. The intake tube is at the lowest point in the bilge.
� Electric Bilge Pump – The automatic float switch for the pump is in the cabin sole in front of the main salon table. The electrical panel switch labeled “Auto Bilge Pump” must be “ON” for the float switch to work (indicated by red light on the panel). Once a day move the switch to the manual position for a few seconds and confirm you hear the pump running. The bilge pump has an in-line screen strainer. If the pump fails to empty the bilge check the strainer in case it may have become clogged with debris. If there are any issues with the bilge pump contact San Juan Sailing.
� Emergency Hand-Operated Bilge Pump – This hand-operated pump is located at the starboard helm station behind a small access hatch. The bilge pump handle is clipped to the underside of the starboard cockpit locker hatch, under the starboard helm.
SAFETY REMINDER – In emergencies, the shower sump pumps can be turned on if water rises into the heads to speed up removing water from the main cabin.
12
3
4
5
1
Setting-up the Settee Berth
1. Settee storage compartments 2. Crossbeams installed 3. Folding panel insert 4. Panel insert resting on crossbeams 5. Mattress insert and cushions
3
1 1

Interlude Owners’ Notes 2018
19 – 53
BOW THRUSTER
� ON/OFF: Switch is located at port helm. Press both left (red) and right (green) buttons at same time to activate. Repeat to deactivate. Engine must be running before you can use thrusters.
� Operations: Tap red left button to direct bow to left. Tap green right button to direct bow to right. It is best to use the thrusters in short bursts.
The bow thruster is operated from the port helm. Turn “ON” by pressing both red and green buttons at the same time for 1 second. It will turn itself off after 15 minutes of inactivity and beep to indicate it has shut itself off. Thrusters can also be turned off by pressing both buttons at the same time.
The batteries for the bow thruster are located under the owner’s berth in the forward cabin. The batteries are charged whenever the engine is running or you’re on shore power. It is best to operate the thrusters in short bursts to conserve power and to have the best control of the boat (the thrusters are quite powerful and can spin the boat quickly if you are not paying attention).
OPERATING TIP: When approaching a dock under windy conditions we use the bow thrusters to control the position of the bow relative to the dock, so can focus on getting the spring and stern lines
Bow Thruster Controls (red arrow)
Operating the Manual Bilge Pump (handle clipped under starboard cockpit locker hatch)

Interlude Owners’ Notes 2018
20 – 53
cleated first. SAFETY REMINDER – The bow thruster is very powerful, capable of pushing the bow against a 30-knot side wind. It will rotate the boat on its keel and can swing the stern sharply. Please position a crew with a fender between the stern and the dock when departing and arriving at marinas to avoid hitting the dock, nearby boats or other objects.
CRAB POT
We have included a collapsible Danielson Pacific NW crab pot for your dining pleasure. The pot and accessories (buoy, line, weight, bait box, measuring tool) are stored in the starboard cockpit lazarette. The crab pot folds flat for storage. To set it up, raise the side panels and position the removable top over them. Snap the side panels to the top using the U-shaped retaining clips. Simply reverse this process to disassemble and store the pot. The bait box attaches on the inside of the top panel of the pot.
CUSHIONS
Salon CushionsWhen removing the salon cushions from seat backs or the bench seats, slide your fingers between the Velcro tabs and the attachment points to separate the two parts before pulling the cushion out. Pulling the cushions away from the bulkheads or seats without separating the Velcro first can tear the cushion covers.
Cockpit CushionsThe cockpit cushions are closed cell foam, which is subject to compression denting. Please store them flat (not rolled or folded), and not against anything that could leave a permanent impression. We leave them in the aft port cabin when they are not in use and when we return the boat to SJS. Clean the cushions with a damp sponge or cloth; please don’t use cleaners or solvents. Take care using sun-block lotion and insect repellent when using the cushions as these contain solvents that can damage the cushions. Holes and tears must be repaired without delay, so please report any damage to the cushions to SJS staff.
DINGHY
Interlude’s dinghy (we call her “Tubby,” you can probably tell why from her picture) is an inflatable 10’2” 5-person Zodiac Cadet outfitted with an aluminum panel floor, two seats, oars and an outboard engine (See the “Outboard” section). She’s a blast to use to visit the shore, skip docking and moor/anchor near the marina, go crabbing, or just motor around for fun.

Interlude Owners’ Notes 2018
21 – 53
Towing the DinghyAlways remove the outboard motor and any other loose items not fixed to the dinghy before towing. We leave the red spare gas can for the outboard engine in the dingy, tied off to the transom. Towing works best when the dinghy is brought close to the boat with 4-5 feet of painter line between the stern and the towing bridle of the dinghy. This lifts the bow out of the water and reduces drag. We tie the painter off at the starboard stern cleat with a standard cleat knot, then attach the bitter end to the stern rail using a rolling hitch or similar secure knot (tying off on the starboard side keeps the dinghy away from the engine exhaust).
OPERATING TIP: We usually leave the self-bailing valve (located in the stern) open when towing to let any accumulated water drain out. We close it when we’re ready to use the dinghy.
Beaching the DinghyPlease take special care when beaching the dinghy. Most of the beaches you’ll land on are strewn with sharp barnacle-covered rocks. When approaching the shore, we weight the dinghy aft by having the crew lean toward the back of the dinghy, reducing wear on the underside of the bow as the boat contacts the beach. Once you’ve landed, offload everyone over the bow. Lift the dinghy over the rocks and barnacles using the handles and set it down gently on the beach. Secure the painter under a rock or to a large driftwood log so the dinghy won’t float away when the tide comes in. We have very large tidal ranges in the Islands, up to 10-12 feet. On more than one occasion we’ve come back to the dinghy after a nice hike to find it floating but securely tied-off. We might have to wade a few feet to get to her but we’ve never had to swim after her! SAFETY REMINDER: Just as you get to the beach, turn off the outboard engine and tilt the engine forward so the prop is not damaged by hitting the bottom. When departing, push off from shore then release the locking lever on the left side of the engine when there is enough water so that the prop won’t hit the bottom. OPERATING TIP: When you go ashore to explore, we suggest you take with you the UNIDEN portable VHF radio we have provided (under the Nav table). Use it to stay in touch with any crew left on the boat, or to call for assistance should you need it. To talk with crew on the boat, tune Interlude’s radio and the VHF portable to an unused ship-to-ship channel, e.g., Channel 71, before you leave the boat.
Inflating the DinghyIf you find you need to put some air in the dinghy, the foot pump is in the cockpit starboard lazarette. The dinghy has three (3) baffles, each with an inflation valve located on the inside of the boat, plus an inflatable keel. The keel’s inflation valve is accessed through an opening in the bow floor board. Use the black adapter to inflate the main baffles. Use the grey adapter to inflate the keel.
Dinghy Being Towed from Starboard Cleat

Interlude Owners’ Notes 2018
22 – 53
The foot pump is held closed with a locking clasp. Release the clasp, insert the appropriate inflation nozzle onto the valve and give a ¼ turn to lock it in place. Inflate the baffle or keel with the foot pump until it is firm. When done, carefully detach the inflation hose. If the valve is still open, press it once to close it. If you need to make a repair, the repair kit and instructions can be found in in the tools and spare parts storage compartment located under the main salon seat.
DODGER, BIMINI, AND SIDE PANELS
Interlude’s dodger and bimini create a wonderful outdoor room, not to mention helping keep inclement weather out. On sunny days, it’s enjoyable to remove the center section of the bimini between the cockpit arch and the framework at the rear of the cockpit. The bimini panel that covers the twin helms always remains in place. The optional side panels can completely enclose the cockpit. The dodger’s “Plexiglas” windows are vulnerable to scratching from dirt and salt. When sea water spray dries on the glass, tiny salt crystals are deposited, at which point you may want to clean the windows. When cleaning please avoid directly touching the glass with a rag or sponge. Use generous amounts of fresh water and “flood” the glass panels to dissolve the salt crystals away, then allow them to air dry. We usually wait until we are docked and use fresh water from the marina, but there’s nothing preventing you from using the cockpit shower or fresh water brought up from the galley. If the dodger glass is clear, you can thank previous guests for their diligence. And we thank you too! OPERATING TIP: Most spray-on sunscreens and bug-sprays react chemically with the dodger’s Plexiglas. Please inform your crew to spray downwind of the dodger glass. And please don’t lean against the dodger with sunscreen on your back. Once that chemical reaction takes place, the glass is ruined.
Dodger and Bimini on Interlude

Interlude Owners’ Notes 2018
23 – 53
Side/rear enclosure panels are available for trips in colder months (late fall, winter, early spring); contact San Juan Sailing in advance of your charter to use the enclosure panels.
ELECTRICAL PANEL
Highlights for Using the Electrical Panel� Location: Main salon on the port side. Most switches are self-explanatory.
� Shore power: Automatically ON when connected, OFF when disconnected (no ON/OFF switch).
� Battery charger: Switch must be “ON” when connected to shore power to charge the batteries.
� Bilge pump: Leave in “AUTO” position.
� Fuses & breakers: Located behind the panel; access only if a breaker needs to be reset.
Switches and Controls on the Electrical PanelThe electrical panel is in the main salon on the port side. Here are some things to note:
� Shore Power: All the AC controls are along the left side of the panel. There is no “master switch” to turn on AC power; when you connect and disconnect shore power, AC is simply ON or OFF. When the AC is ON, a red LED light is illuminated in the upper left-hand corner of the panel. Please ensure that the switches for the AC items (water heater, battery charger, AC plugs) are turned OFF before connecting or disconnecting shore power.
� Water Heater: Activate the electric hot water heater when you are on shore power if you need more hot water (when the engine is running it heats the water). We usually have plenty of hot water the next morning after heating water the day before.
� Battery Charger: Turn ON the battery charger switch whenever you are connected to shore power. It must be “ON” to charge the batteries while on shore power.
� AC Plugs: Activate this switch to turn ON the AC electrical outlets located throughout the boat, run the microwave oven, operate the TV/DVD-Blu-ray entertainment system, etc.
� Bilge Pump: Always leave the bilge pump setting in “Auto.” Test the pump daily by switching to manual and listening for the pump to run, then return it to the “Auto” setting.
� Water Pump: If you don’t hear the pump start when you turn it ON at the panel, it means that the system is at working pressure – you should hear the pump start again after you use some
Electrical Panel – AC Controls on the Left, DC controls in the Middle; Toggle Switch and LED on the Right are used for Checking Battery Charge and Tank Levels (Fuel, Water)

Interlude Owners’ Notes 2018
24 – 53
fresh water. Note that the marine toilets use raw water and do not impact the fresh water supply. Showers and sinks in the heads use the fresh water supply, as does the cockpit shower.
OPERATING TIP: When we’re underway and no one is below decks, we turn the water pump OFF. If a water tank should run dry (e.g., a sink is left running), the pump could continue to run until it burns out and you might not hear it running while everyone is in the cockpit.
� Cabin Lights: This switch turns ON/OFF DC power to the LED lights located throughout the boat. It must be “ON” before you can turn on any lights on the boat.
� Fridge Unit: We usually leave the fridge switch “ON” whenever we’re on the boat (keeps our beverages nice and cold). If the house battery charge level drops to near 12V and you aren’t planning to run the engine or connect to shore power to recharge the batteries any time soon, then it would be wise to turn the fridge off.
� Navigation Instruments: turn this switch “ON” to activate the B&G electronics, instrumentation, and multi-function display in the cockpit. This switch also provides power for the radar, depth sounder and knotmeter.
� Anchor, Steaming and Deck Flood Lights: When anchored or mooring, turn on the Anchor Light at dusk (it’s located at the top of the mast). When motoring at night, turn on the mast-mounted Steaming Light. Turn on the deck Flood Light to provide illumination if you need to go forward on deck at night.
� Circular toggle switch and LED display: Cycle through this multi-function controller to display the fuel gauge, water gauges (Tank 1 - Aft and Tank 2 - Forward) and battery levels (Domestic and Engine) in the LED display panel. The accuracy of the fuel and water gauges can get somewhat questionable when they drop to ¼ full – at ¼ full it’s time to find the fuel dock!
ELECTRONICS – NAVIGATION, INSTRUMENTATION AND COMMUNICATION SYSTEMS
Overview of Electronic SystemsInterlude’s electronic systems begin with the B&G Zeus2 12” touchscreen multi-function display (MFD), which is housed in a waterproof swivel enclosure mounted under the cockpit table between the helms.2 The system rotates and tilts so no matter which helm you are using you can easily access it. To activate the MFD and the other electronic systems on the boat, first turn on the Navigation Instruments switch on the electrical panel in the main cabin. In addition to the Zeus2 MFD, Interlude is equipped with a B&G display repeater and autopilot controls, both located next to the port helm. Instrumentation and navigation systems interfaced to the Zeus2 include:
� Chartplotter with Navionics™ charts for US and Canadian Pacific Northwest waters
� GPS navigation
� Magnetic compass 2 The operating manual for the Zeus is kept in the main cabin near the Nav table.

Interlude Owners’ Notes 2018
25 – 53
� Autopilot with multiple navigation modes
� B&G’s patented “SailSteer” system (you’re going to love this!)
� Broadband 4G™ Radar
� Marine Automatic Identification System (AIS) transponder and receiver
� Depth sounder
� Knotmeter
� Masthead wind sensor (speed and direction used in the calculation of true and apparent winds)
� Rudder angle
� Waypoints, routing and tracking
� Tides and currents (direction, rates, timing)
� Alarms (e.g., shallow depth warning)
� FUSION audio system (controls selection of entertainment audio source and volume levels for the cockpit speakers; includes Bluetooth and USB connections for audio sources)
� GoFree™ Wi-Fi-1 gateway (mirrors the Zeus2 displays from anywhere on the boat using an iPad or Android tablet running the GoFree™ app)
In addition, there are 110V AC, 12V DC, and USB outlets for charging cell phones and other electronic devices located throughout the cabin. SAFETY REMINDER – The Chartplotter is your #1 friend when you are in the Islands. Depths can vary quickly around the islands, and rocks can come out of nowhere. Depths on the Chartplotter are shown in feet (whereas paper charts use fathoms, 1 fathom = 6 ft.). Starting at the 60-foot contour line (10 fathoms), depths are presented in blue. We start zooming-in the Chart display when we are motoring or sailing inside the 10-fathom limit. This lets us see as much detail as possible on our selected heading.
Basic OperationsTurn on the Zeus2 by pressing the Power button. Tap “Accept” at the license acceptance screen and the display will then show the page(s) last used, typically the Chart application. Most pages have a Menu to select various functions and change settings. The Menu button is green and located in the upper right-hand corner of a page. Tap it once to open a menu, tap it again to close a menu.
� Press the MFD’s Home button (above the rotary control knob) to call up the application selection panel.
� Select Charts if they are not already displayed. The standard chart panel is shown in the diagram below. By default, the boat’s position is displayed at the center of the chart with North up (towards the top of page). These defaults may have been changed by the last user, or you may want to use different settings. Several options are available (see below). Application Selection Panel

Interlude Owners’ Notes 2018
26 – 53
� Pan and Zoom the display by swiping/pinching with your fingers (just like you do on your smart devices) or rotate the control knob to zoom in/out.3
1 MOB (Man Over Board) mark 2 Vessel with extension lines 3 Waypoint with Laylines 4 North indicator 5 Route
6 Grid lines 7 Track 8 Range rings 9 Chart range scale 10 Range rings interval (optional)
� Tap anywhere on the Chart to position the cursor at that location. Select Clear Cursor to remove the cursor.
� To access the Systems Control dialog panel, tap the Power button quickly (works on any page). From the dialog panel, you can adjust screen brightness, adjust split screen displays, change what is shown on the instrument display bar, access system settings, turn the system off, etc.
� You can have more than one page displayed at a time. Press the Home key to get to the Apps page, press and hold the Charts icon to display the multi-screen presentations available.
� We often like to see where we are going on the Chart display (not just where we are) and then we switch from the default “North Up” display to “Heading Up” or “Course Up.” Extension lines from the boat’s icon show you which is which – blue is your heading, dark red is your course over ground (COG) (sailing laylines are shown in green and red). To change this display option, tap the Menu key in the upper left of the Chart display and select the Orientation menu item.
3 To select any item shown on the Zeus MFD, tap the item on the screen or select it with the rotary knob and press the knob button to activate it.
Chart Page Layout

Interlude Owners’ Notes 2018
27 – 53
SAFETY REMINDER – SJS will remind you of this but it’s good to repeat here – your heading and COG will often be different owing to the tidal currents in the Islands (30°-45° separation can and does happen). Monitor your COG when navigating to make sure you end up to where you wanted to go!
OPERATING TIP: If you turn off the Zeus2 you may start hearing beeps a short time later. That will be an indicator from the B&G helm repeater that it has lost GPS data. You can cancel the warning, turn the whole thing off at the electrical panel, or re-start the Zeus2.
Navigating with AutopilotThe easiest autopilot navigation option is simply to put Interlude on the heading of your choice and press the STBY/Auto button, either the button on the autopilot control panel at the helm, or the STBY/Auto button on the MFD display. The system will switch to auto-helm and maintain the heading you’ve selected. Monitor the dark red (COG) and blue (heading) extension lines.
� To return to manual steering, just press the STBY/Auto button again.
� While using the autopilot you can adjust your course left or right in 1° or 10° increments by using the buttons on the autopilot control panel or MFD display. Tap a button one time to change your heading by the indicated angle.
SAFETY REMINDER – An autopilot is a useful navigational aid but does not replace a human navigator. “Keep your head on a swivel” is still the best advice we ever got from our sailing instructors.
SailSteerThe SailSteer panel provides a composite view of key data while you are sailing. Press the Home key to access the Apps panel and select SailSteer. All data are displayed relative to the yacht’s bow, providing a clear and easy to understand image of important sailing data. The SailSteer display can be shown as a full screen panel, in a multi-panel page, and/or as an overlay on the Chart panel. It is also available on the port helm B&G repeater. The figure below shows the layout of the SailSteer panel:
1 User configurable data fields 2 Vessel heading 3 COG (Course Over Ground) 4 Apparent wind 5 Port (red) and starboard (green) laylines 6 Magnetic or True reference 7 TWA (True Wind Angle) 8 Bearing to current waypoint 9 Active (next) waypoint ID 10 Rudder angle 11 Magnetic variation 12 Tide rate and relative direction
SailSteer Panel

Interlude Owners’ Notes 2018
28 – 53
RadarInterlude’s radar is a key piece of safety equipment when fog or nighttime conditions descend on you and limit your visual range while you are underway. This is not normally a problem during the summer sailing months, which boast long days and (usually) clear skies. But weather conditions can change quickly in the Pacific Northwest and the radar can help you navigate to a safe harbor when they do. SAFETY REMINDER: If you have not yet departed your overnight moorage or anchorage and fog is present, please do not depart until visibility is at least ½ mile. Ferries and shipping traffic are traveling quickly in the area (upwards of 18 knots) and local boating can catch you by surprise. The basic rule of thumb in the Islands is “if in doubt, don’t go out!” Enjoy a leisurely breakfast and read a book or watch a movie. After all, you’re on vacation! The radar’s operational modes are controlled from the Zeus2 unit. The following modes are available:
� Off: The power to the radar scanner is turned off.
� Standby: The power to the radar scanner is on, but the radar is not transmitting.
� Transmit: The scanner is on and transmitting. Detected targets are drawn on the radar PPI (Plan Position Indicator).
The diagram below shows the features of the radar display:
1 Range 2 Orientation 3 Motion 4 Compass 5 Heading line
6 Rotary controls 7 Range rings 8 Range markers 9 Data bar
Radar Panel

Interlude Owners’ Notes 2018
29 – 53
Depth Sounder and KnotmeterFor the depth sounder and knotmeter to work you must first turn on the Navigation Instruments switch on the electrical panel. Please note that the depth sounder won’t give accurate readings beyond about 400’ of water depth. In deeper waters, the sensitivity on the unit increases as the transducer tries to get a return signal. Currents, changes in water temperature, schooling fish, seaweed, or mermaids4 can cause inaccurate readings. Use the depth sounder as an aid to navigation in shallow water. SAFETY REMINDER – The key to avoiding rocks is not to rely exclusively on the depth sounder – rather, it is always knowing where you are. Rocks are the greatest navigational and safety hazard in the islands, but they are all clearly marked on the charts. We zoom in the Chartplotter as we approach the 60-foot (10-fathom) contour line, so we can see what lies ahead of us in time to avoid any accidents. The knotmeter shows boat speed through the water in knots. Remember that boat speed and speed over ground (SOG) can be noticeably different in the Islands owing to the currents created by the tidal ranges experienced in this part of the country. During new moons and full moons there are places in the Islands where currents can exceed 4 knots. This can make for very slow going if you are headed into the current, and it can push you off your desired course when the current is on your beam. OPEATING TIP: Currents (direction and velocity) are presented on the Zeus2 Chart display and on the B&G repeater at the port helm. Cycle through the repeater displays by pressing the left-most page key until the current display screen is shown. SAFETY REMINDER – If the digital knotmeter shows a reading of 0.0 knots while underway, the impeller may be clogged with eelgrass, which can eventually float off by itself. If it is stubborn, we try removing it by traveling for a short distance in reverse. But if the knotmeter is temporarily “out of service,” use the speed over ground (SOG) data provided by the GPS navigation system.
Wind SensorsWind speed and wind direction sensors are located at the top of the mast. True and apparent winds are reported by the Zeus2 MFD and the B&G repeater located at the port helm.
AISInterlude’s AIS system will show the location and tracks of all vessels also carrying an AIS transponder. Targets appear on the Chart and Radar displays. The table below shows the meaning of the symbols used to display the AIS targets. You can tap a target on the MFD screen to call up its AIS identification and other relevant data about the vessel including navigation data (e.g., location, course, speed, etc.). SAFETY REMINDER: Please keep in mind, just because you don’t see an AIS target in front of you on the Chart display doesn’t mean there isn’t a possible vessel in your path. All crew should keep a look-out!
4 We can dream, right?

Interlude Owners’ Notes 2018
30 – 53
Sleeping AIS target (not moving or at anchor).
Moving and safe AIS target with course extension line.
Dangerous AIS target, illustrated with bold line.AtargetisdefinedasdangerousbasedontheCPAandTCPAsettings.
Lost AIS target. Whennosignals havebeen receivedwithina time limit, atarget is definedas lost. The target symbol represents the last valid positionof the target before the receptionofdatawas lost.
Selected AIS target, activated by selecting a target symbol.The target returns to the default target symbol when the cursor is removed from the symbol.
VHF Radio Communications Interlude is equipped with a VHF marine radio located next to the Nav station in the main cabin. The microphone for the radio is in a cradle just under the left side of the Nav table. Turn on the unit using the knob in the upper right corner, which also adjusts the volume (squelch is adjusted with the knob in the lower right corner; the 3rd knob changes channels). Channel 16 is the default setting, allowing you to monitor the US Coast Guard (USCG). We always leave the radio tuned to Channel 16 in case an emergency broadcast or request for assistance is issued. If you need to speak with another vessel, hail them on Channel 16 then direct them to move to another channel for further communications, e.g., Channel 78 (ship-to-ship). If you start chit-chatting on Channel 16 you will hear about it from the USCG operator! The VHF radio communications system includes a remote handheld unit that is stowed in a charging cradle under the Nav table. The wireless remote is slaved to the primary VHF radio and will only work on or near the boat with the primary VHF radio “ON.” We usually have the remote with us at the helm so we can quickly communicate with the Coast Guard or other boats. Please don’t take the remote with you when you leave the boat, you will quickly be out of its effective range. We have placed a UNIDEN portable VHF marine radio under the Nav table, feel free to use it like you would any other marine radio. Take it with you when you go ashore if you need to communicate with crewmates back on the boat or call for assistance (a good safety idea). We also like to use the wireless remote coupled with the portable UNIDEN VHF radio when anchoring. Remember to switch both units to a non-emergency channel, like Channels 78, 79 or 80.
VHF Radios and FUSION Entertainment System

Interlude Owners’ Notes 2018
31 – 53
Local marine weather conditions and forecasts are typically available on Channel 4 (NOAA Marine WX) and Channel 2 (Canadian WX Service). You also can just press the button labeled “WX” on the mobile radio, mic or wireless remote. Listen for the report on “Inland waters of western Washington” which covers the San Juan Islands and the Canadian Gulf Islands. You will also hear “Strait of Juan de Fuca” (south of the San Juan’s), “Georgia Strait” (north), and “Rosario Strait” (runs through the eastern part of the San Juans). In Canadian waters, listen to the Canadian weather station, which also transmits warnings of military area activity, such as area Whiskey Golf (WG) outside of Nanaimo.
VHF Radio Channels
Here’s a summary of the common radio channels you will use during your charter:
� Channels 2 & 4: Weather (press the button labeled “WX” on the radio, mic or remote)
� Channel 05A: Seattle Vessel Transit System (VTS) – interesting to monitor
� Channel 16: USCG primary channel – international distress, safety and ship hailing
� Channel 66A: Friday Harbor Marina
� Channels 71, 73: Where you may hear the whale watching boats speaking with each other
� Channels 78, 79 , 80: Ship-to-ship working channels
� Channel 78A: Roche Harbor Marina, Deer Harbor Marina, Rosaria Resort Marina
� Channel 80: San Juan Sailing during normal business hours
Interlude’s FCC call sign is WDJ5062 (licensee is Crosswinds Sailing, LLC) SAFETY REMINDER: If you need to declare an emergency, here is the protocol to use:
� Lift the red cover labeled DISTRESS and press and hold the Distress button on the radio until it beeps (this will send your information to the USCG).
� Call the USCG on Channel 16 with the following information: “MAYDAY, MAYDAY, MAYDAY, this is sailing vessel Interlude. [Repeat the MAYDAY call 3 times]. We are located at ____ degrees latitude, ___ degrees longitude. We are state nature of emergency – on fire, grounded, sinking, medical condition requiring immediate assistance, etc. We have number of people aboard. We are a 41-foot Beneteau monohull sailing vessel with white hull and white sails [if under sail] currently motoring / under sail / anchored /moored [state whichever applies]. If the situation is not immediately life threatening and you want to request assistance or send an urgent message, e.g., you need a tow, then use the phrase PAN – PAN instead of “MAYDAY.”
Wi-FiWe have added the optional B&G Wi-Fi GoFree™ system to Interlude, feel free to try it. It allows you to connect your iPad or Android tablet to the Zeus2 and use the GoFree™ application to mimic nearly all the functions of the Zeus2 MFD from anywhere on the boat. To use the GoFree™ Wi-Fi network:
� Download and install the GoFree™ application from the Apple or Google Play app store.
� Connect your device to the GoFree™ network using the network password listed below.

Interlude Owners’ Notes 2018
32 – 53
� Start the GoFree™ app and, if prompted, enter the network IP address provided below.
� Tap “ACCEPT” on the MFD display when it prompts you if you want to connect your device.
� Select “INTERLUDE” from the app to bring up the app user interface to see what is displayed and interact with the MFD.
OPERATING TIP: Keep in mind that whatever you do in the app will be mirrored on the MFD, and vice versa. This is a great help if you are the helmsman and you are using your tablet as a “repeater” for the MFD. But if you aren’t at the helm and you use the app to look at other settings, just remember the helmsman will see the same display on the MFD, which might not be what s/he wants to be looking at. Network Name: INTERLUDE Wi-Fi Network Password: QB482OQ0 (case sensitive) Network IP Address: 192.168.0.252
EMERGENCY & SAFETY EQUIPMENT
Bilge Pump (Manual)Manual pump behind access panel at starboard helm; pump handle clipped underneath starboard cockpit hatch cover (see “Bilge Pumps”).
CO DetectorThere is a carbon monoxide (CO) detector in the aft port cabin. It is wired into the DC power supply and has battery back-up. An alarm will sound if it detects carbon monoxide in the cabin.
Emergency TillerThe emergency tiller looks like a T-shaped metal pipe about 3 feet long; it is in the aft port cockpit locker under the port helm. The rudder post attachment point is in the propane locker in the deck between the two helms. Unscrew the cover, insert the pipe vertically and feel it engage with the steering post below. Turn the T-bar to turn the rudder. Travel at reduced speeds when in use.
Fenders and DocklinesFour primary docking fenders are provided along with three primary docklines. There is also a 60’ spring line and a roving fender. Spare lines are coiled and hanging in the aft starboard cockpit locker under the starboard helm. We usually store a couple of docking fenders plus the roving fender and the bow line in the anchor chain locker at the bow, the rest in the port cockpit lazarette.
Fire ExtinguishersThere are three (3) USCG-approved fire extinguishers onboard:
1. Galley – mounted on the bulkhead next to the sink.
2. Nav table – mounted on bulkhead beneath the table.
Emergency Tiller

Interlude Owners’ Notes 2018
33 – 53
3. Port cockpit lazarette.
They work just like the fire extinguishers you have at home – pull the locking pin, point the nozzle at the base of the fire, and press the handle to discharge the fire suppressant. Check the gauge before departing SJS. If a fire extinguisher is low on suppressant notify the SJS crew and get a replacement.
First Aid KitA USCG-approved first-aid kit is stored in a white mesh bag located in the wine cabinet next to the aft head.
FlaresVisual day/night distress signals are stored in the white mesh bag along with the first-aid kit.
FlashlightsThere are two (2) MagLite LED flashlights aboard. One is mounted next to the galley fire extinguisher, the other is mounted below the Nav station. Spare batteries are in the Nav table.
Life JacketsSix (6) adult-sized, vest-type life jackets are aboard. Each cabin should have two lifejackets in its hanging locker. Previous guests may have moved them, so we encourage you to locate them before departing.
LifeslingThe Lifesling is mounted on the starboard stern rail. If a crew member accidently falls overboard toss the Lifesling towards them and follow your man-overboard procedures to recover the victim. SAFETY REMINDER – Remember the old sailor’s adage, “one hand for the boat and one hand for yourself.” Hold onto the boat as you move around and work on deck.
ENGINE AND HANDLING
Engine HighlightsInterlude is equipped with a Yanmar 45hp 4-cylinder diesel with sail drive that will provide many hours of cruising pleasure. The saildrive helps eliminate shaft vibration, noise, and alignment problems. Under engine power, you will find Interlude to be quiet, balanced, maneuverable, and powerful.
OPERATING TIP: Maximum RPM is 3900. Cruising RPM is 2000-2500. Idle is around 900 RPM. It’s OK and in fact preferred to vary engine speed as you cruise.
Inspecting the EngineEngine access is provided by lifting the companionway stairs, which operate on hydraulic lifts – there are no latches, just lift it up, push it down. Side access is provided via hatches in the aft cabins.

Interlude Owners’ Notes 2018
34 – 53
We recommend you perform the following inspections each morning before getting underway. If you have any questions or concerns, speak with a member of the SJS staff.
� Lift the companionway steps to access the engine compartment. Look around and below the engine for any signs of oil or other fluid leaks.
� Check the oil level. The dipstick is on the starboard side of the engine and can be accessed from the starboard cabin (look down and to your left). It would be unusual if you needed to add oil, but if you do there is spare oil stored in the engine compartment. There are two (2) oil filler caps, one on top of the engine and one on the left side near the dipstick. Either can be used to add oil. Do not overfill, add no more than a cup at a time and re-check the oil level.
� Check the coolant level. Anywhere between the two lines (high and low) on the overflow reservoir is where you want to be.
� Inspect the raw water strainer for debris. If you ever get the engine overheat alarm, it most likely will be because eelgrass or other matter has been sucked into the cooling system and is clogging the strainer. Unscrew the top of the strainer, clean out any debris, then replace it.
� Check belt tightness by deflecting the belt inward with your fingers; you should not be able to depress it more than an inch or so.
The fuel filter is on the left (starboard) side at the front of engine. On the right as you look at engine is the water pump and the blue water lines that pump water from the tanks to the sinks and showers.
Starting the EngineThis is a keyless start system. The main battery engine switch, located in the aft port cabin, must be in the “ON” position to start the engine. OPERATING TIP: We leave the engine battery switch in the “ON” position; keep in mind when leaving the boat in a marina that anyone can start the engine from the helm without a key. If leaving the boat for an extended period, switch the engine battery switch to “OFF,” which prevents the engine from starting, and lock the companionway hatch.
Front and Side Views of Engine Compartment

Interlude Owners’ Notes 2018
35 – 53
1. Ensure that the throttle/gearshift is in neutral (12 o’clock, straight up).
OPERATING TIP: In colder weather or when you want to run the engine at a higher idle speed (e.g., to charge batteries), depress the red button at the base of the throttle and push the throttle slightly forward. This disengages the transmission and allows the engine to run at a higher idle RPM. We recommend targeting 1000-1200 RPM for warm-up and battery charging.
2. Tap the bottom “POWER” button once to turn on the ignition – do not hold the button or it will turn the ignition off. Red lights will illuminate on the tachometer dial.
3. Press top “START” button, which will start the engine.
4. Listen/look for water discharging from the aft starboard end of the hull. If water is not in the exhaust immediately shut the engine down and contact SJS.
OPERATING TIP: Allow 5-10 minutes of warm up before placing a load on the engine. It is very hard on a diesel to be placed under load when cold. Conversely, allowing a diesel engine to idle too long will cause carbon build-up.
Running the Engine� Engage forward or reverse gear by moving the transmission directly from Neutral to Idle-
Forward or Idle-Reverse (the transmission will click into each setting), then moving the throttle forward/backward smoothly to your desired RPM setting. Engaging the transmission in jerky incremental steps can slip the clutch, causing damage over time.
� To keep the transmission “healthy” when shifting from forward to reverse and vice-versa, pause ~2 seconds in the 12 o'clock neutral position (say “one and two and”) before shifting gears.
� An economical cruising speed of 5-7 knots is achieved at 2000-2500 RPM, which uses about 1 gallon of diesel per hour. Please do not exceed 3000 RPM because it’s hard on the engine and fuel consumption goes way up with very little increase in speed. We recommend keeping the engine speed under 2500 RPM for most operating conditions.
� To avoid the possibility of sucking in air or sludge when the fuel level approaches ¼ of a tank, refuel when the fuel drops below ½ full and before it reaches ¼ full. The tank holds 53 gallons, so topping up at about 25 gallons is a reasonable exercise and doesn’t take too long.
Shutting Down the Engine1. Allow the engine to idle for a few minutes in neutral to cool down.
2. Press the middle “OFF” button, which will stop the engine.
3. After engine stops press the bottom “POWER” button and hold for a second until you no longer hear the ventilation fan in the engine compartment. The red lights on the tachometer will turn off. If the bottom power button is not turned off, an alarm will sound periodically.
SAFETY REMINDER – Never stop the engine by turning off the battery switch. Doing so will seriously damage the diodes on the alternator and the batteries will no longer charge.

Interlude Owners’ Notes 2018
36 – 53
Boat Handling with the EngineThe Beneteau Oceanis 41.1 is by far the easiest and most fun boat to handle that we have ever used. Interlude has a large deep rudder coupled with a deep 7’2” keel, which makes her very quick to turn and able to turn in a narrow radius. Very small rudder adjustments will easily change course. San Juan Sailing offers free handling instruction before you leave for your charter if you’d like to practice with Interlude or just bone up on your boat handling skills. Spending 30-60 minutes practicing getting in and out of the Bellingham marina can be a great experience.5
Forward
Because the saildrive/propeller is almost directly below the engine, the wash from the prop takes a moment to reach the rudder; anticipate this delay when maneuvering in tight spaces. A short burst of throttle will shoot water at the rudder, which, if already turned, will result in a short, sharp turn with little forward movement – a strategy that can be handy when turning in confined spaces.
Reverse
Interlude has virtually no prop walk, just a bit to starboard in reverse. Driving in reverse is a pleasure. When you do so, we recommend you stand on the forward side of the port helm and face backwards, this will allow you to steer her just like a car (well, maybe an RV) with easy access to the throttle/transmission. Be sure to hang on tightly to the wheel when going in reverse. Water pressure on the aft edge of the rudder can slam the rudder over to one side or the other, which is very hard on the steering mechanism (and your arms).
Docking
Interlude carries momentum well. Unless there are high winds, we typically motor in the marina in Idle-Forward, which will produce a boat speed of about 2 knots. When we’re about 4 slips from our target dock, we shift to neutral and glide in. Use the engine to stop the boat at the dock, and don’t shut down the engine until the vessel is secured at the dock. SAFETY REMINDER: It’s very difficult for people holding lines on the dock to stop the momentum of a heavy cruising sailboat. It’s also a bad idea to use dock lines on a cleat to stop movement; this can result in a sudden swing of the boat and damage to cleats, boat, and/or dock. And please, no crew should jump to the dock. If you can’t step off calmly, back-up and try again. When coming into our docks in strong winds, or if you’d just like a little assistance on arrival, simply hail “San Juan Sailing” on VHF Channel 80. They’ll be glad to offer some coaching and/or catch your lines. In fact, most marinas in the Islands will help you if you hail them and ask for assistance. Asking for docking assistance is a sign of prudent seamanship. SAFETY REMINDER – SJS staff will talk about this at the crew briefing the night before you depart, but it’s good to repeat it here: whenever you are departing or arriving at the dock have a crew member
5 When we were charter guests of SJS we always appreciated taking the time to get to know our boat before departing.

Interlude Owners’ Notes 2018
37 – 53
designated as the “roving fender” team mate. This person should have the roving fender with them (white, stored in the anchor locker or starboard cockpit locker) and position themselves to put the fender between Interlude and any nearby boat or obstacle. If you are going to accidently “touch” a boat or other object, lower the fender to the point of contact.
Using the Bow Thruster
This is discussed elsewhere (see “Bow Thruster”) but worth repeating. The beauty of the bow thruster is that it lets you turn very tightly with little or no forward/backward momentum, and it can virtually eliminate having to worry about the bow line when departing or arriving. When departing, you can cast off the bow line first and use the thruster to reposition the bow if it is getting blown or drifting off or onto the dock. When docking, concentrate on getting the center line tied-off first followed by the stern line. If the wind is blowing the bow onto or off the dock just use the thruster to keep it positioned until your crew is able to cleat-off the bow line. And remember, short bursts are best!
Troubleshooting Engine ProblemsYanmar engines are incredibly durable and you shouldn’t have any problems on your voyage. Nevertheless, there are a few things to watch out for.
Engine Overheating
If the engine overheat buzzer sounds while the engine is running – about 99 times out of a hundred it’s no more serious than eelgrass plugging up the raw water strainer. The best solution to this problem is prevention – keep an eye out for eelgrass mats, especially along those “soapy” looking tide and eddy lines in the water, and don’t run over it. When eelgrass gets sucked into the engine cooling water intake, it collects in the raw water strainer. To clear eelgrass from the raw water strainer, stop the engine, twist off the clear screw-top and extract the eelgrass. Replace the lid and tighten by turning it clockwise until the lid is seated firmly on the rubber gasket. Don’t over tighten as the lid can crack. Make sure the lid’s threads are not crossed as this can give the appearance of a tightened lid but the gasket won’t seal. Then restart the engine. If after restarting the engine it overheats again, check the seal between the strainer, the rubber gasket, and the lid. If the strainer is drawing air, it won’t draw water. If needed, open and then retighten the lid on the strainer and check to make sure the rubber gasket is in place in the lid (and not lying in the bilge.) If the above steps fail to solve the problem, call San Juan Sailing for assistance.
Loss of Oil Pressure or Coolant
If the engine loses oil pressure, the warning buzzer will sound and the oil icon warning light on the tachometer will light up, so check which light is showing red. If it’s the oil light, shut down the engine, check the oil level, and contact San Juan Sailing. The alarm buzzer is more likely to indicate engine overheating, and the temperature icon light will light up. Before you shut down the engine, check for water gurgling out the exhaust. If you have a “wet exhaust,” check the coolant level in the overflow reservoir bottle. If none is seen, add enough to reach the top-level line on the bottle. After the engine cools down, remove the cap on the engine block and

Interlude Owners’ Notes 2018
38 – 53
add coolant. And check the bilge for a light green liquid (coolant). If coolant is found in the bilge, call San Juan Sailing, the problem may be more serious and require expert attention. If the coolant reservoir bottle is full, check to see if the engine threw a belt. Without a belt on the raw water pump, the coolant won’t circulate and cool the engine. Replacement belts are in the engine spares kit. One other possibility is that the impeller in the raw water pump has failed. While they are replaced each spring with a new one, it’s still possible that a hard object may be drawn in and break off an impeller blade. A replacement impeller is found with the engine spares. Call San Juan Sailing if you suspect you have an impeller problem. OPERATING TIP: Bottom line – you’re on vacation! If the engine is giving you problems, call SJS for assistance. They have repair teams in the Islands to assist you. Find a nice place to drop anchor or tie-up, sit back, and enjoy “island time” while they get the problem fixed.
ENTERTAINMENT SYSTEM
Highlights of the Entertainment SystemInterlude is equipped with a FUSION marine entertainment system for audio and a Samsung 1080p HD SMART television with DVD / Blu-ray player for watching movies and accessing streaming video services. Speakers for the FUSION system are in the main cabin and in the cockpit. Audio for the TV is provided by its own sound system. Highlights of the entertainment system include:
� FUSION audio system: AM/FM radio, wired and wireless (Bluetooth) connections for audio players (e.g., iPod), and VHF monitoring. Speakers are in the main cabin and in the cockpit. The audio system can be controlled from the FUSION unit in the main cabin and from the B&G Zeus2 navigation system located between the helms.
� TV: Samsung 40” 1080p LED HD SMART TV with built-in Wi-Fi.
� DVD / Blu-ray: Sony DVD / Blu-ray disk player. We’ve left a collection of some of our favorite movies onboard for your viewing pleasure.
� Remote controls: Remotes for the TV and video player are stored with the DVDs.
� Other video sources: Connect PC or other video source to TV with HDMI cable (provided).
FUSION Audio SystemThe FUSION unit is located next to the VHF radio near the Nav station. The system includes AM/FM radio, VHF audio (to monitor radio transmissions using the cabin and cockpit speakers) and wired (USB) and wireless (Bluetooth) connections for audio sources such as iPods. If using Bluetooth to connect an audio source, the FUSION unit will appear as MS-205 in the list of available BT connections shown on your device. To connect an iPod or other portable music player using the USB port, unscrew the cap from the USB connector to the right of the FUSION unit and plug in your device using your own cable. Use the menu

Interlude Owners’ Notes 2018
39 – 53
on the front panel of the FUSION unit to select your audio source. You can also control the FUSION unit from the Zeus2 MFD in the cockpit – you to adjust the volume, select radio channels, and select tracks from your audio devices.
TV – DVD / Blu-ray Video PlayerThe remote controls for the TV and video player are in the storage area on the starboard side with the DVDs behind the main salon bench. The system requires AC power so if you’re running on battery power, you’ll need to turn on the Inverter. Turn on the AC outlets using the switch on the instrument panel. It’s a good idea to turn everything off when you’re done using the TV or watching a movie to conserve battery power.
HD TV
The Samsung 40-inch 1080p LED “SMART” TV will give you access to online video services like NetFlix and Amazon Prime Video if you have a valid subscription. You’ll need an internet connection to access online video services. We can use a wireless hotspot from our cellular provider (T-Mobile) successfully in several places in the Islands, but coverage can be spotty. Wi-Fi is available in some of the marinas in the Islands (e.g., Bellingham, Roche Harbor, Deer Harbor). To connect the TV to a Wi-Fi hotspot:
� Activate your wireless hotspot.
� Turn on the TV with the Samsung remote.
� Press the Menu button on the remote.
� Select “Network” then select “Network Settings.”
� Select “Network Type – Wireless.”
� Select your wireless hotspot device from the list of wireless networks.
� Enter your network passcode, if required (use the remote to interact with the onscreen keyboard; select “Done” when ready to complete passcode entry).
� From the TV Menu select “Smart Hub” then “Open Smart Hub” and choose your video source – Netflix, Amazon, Hulu, etc. Login to the service with your credentials.
DVD / Blu-Ray Player
The DVD player is located behind the bench seat in the main cabin on the starboard side, next to the TV. The TV and DVD / Blu-ray player work just like at home. Turn both on using their remotes, open the video player disk drawer, insert a movie disk and close the door, and things should just happen automatically from there. If the movie doesn’t start to play automatically check that the video source for the TV is set to HDMI-2 (HDMI-1 is used for connecting other video sources like your PC).
Other Video Sources
You can connect your own playback device to the TV using a standard HDMI cable. There is a HDMI port on the right-hand side of the TV. We’ve left a 6 ft. HDMI cable onboard, which can be used to connect a PC to the TV, for example. We’ve left it plugged into the TV and draped over the top. It is connected to the HDMI-1 port on the TV.
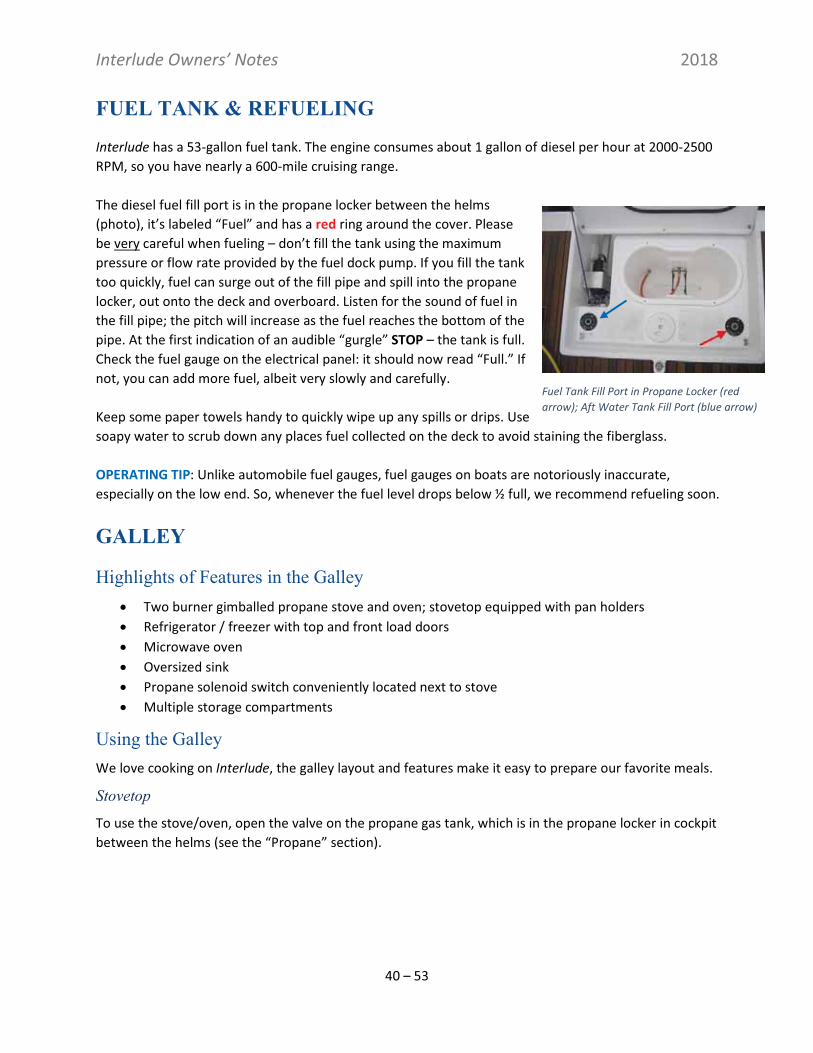
Interlude Owners’ Notes 2018
40 – 53
FUEL TANK & REFUELING
Interlude has a 53-gallon fuel tank. The engine consumes about 1 gallon of diesel per hour at 2000-2500 RPM, so you have nearly a 600-mile cruising range. The diesel fuel fill port is in the propane locker between the helms (photo), it’s labeled “Fuel” and has a red ring around the cover. Please be very careful when fueling – don’t fill the tank using the maximum pressure or flow rate provided by the fuel dock pump. If you fill the tank too quickly, fuel can surge out of the fill pipe and spill into the propane locker, out onto the deck and overboard. Listen for the sound of fuel in the fill pipe; the pitch will increase as the fuel reaches the bottom of the pipe. At the first indication of an audible “gurgle” STOP – the tank is full. Check the fuel gauge on the electrical panel: it should now read “Full.” If not, you can add more fuel, albeit very slowly and carefully.
Keep some paper towels handy to quickly wipe up any spills or drips. Use soapy water to scrub down any places fuel collected on the deck to avoid staining the fiberglass. OPERATING TIP: Unlike automobile fuel gauges, fuel gauges on boats are notoriously inaccurate, especially on the low end. So, whenever the fuel level drops below ½ full, we recommend refueling soon.
GALLEY
Highlights of Features in the Galley� Two burner gimballed propane stove and oven; stovetop equipped with pan holders � Refrigerator / freezer with top and front load doors � Microwave oven � Oversized sink � Propane solenoid switch conveniently located next to stove � Multiple storage compartments
Using the GalleyWe love cooking on Interlude, the galley layout and features make it easy to prepare our favorite meals.
Stovetop
To use the stove/oven, open the valve on the propane gas tank, which is in the propane locker in cockpit between the helms (see the “Propane” section).
Fuel Tank Fill Port in Propane Locker (red arrow); Aft Water Tank Fill Port (blue arrow)

Interlude Owners’ Notes 2018
41 – 53
Back in the galley, make sure the burner and oven control knobs are fully “OFF” (rotated CW all the way to the right). Push down and hold the red button on the solenoid toggle switch and toggle the rocker switch to the “ON” position (a green LED light indicates it is on). The solenoid switch is located to the left of the stove (see figure). The burner knobs for the stovetop are on the right side of the stove. When ready to light a burner, depress the knob and turn to the left (CCW) to the high flame indicator and light the burner with the butane lighter provided (with the utensils). After the flame is lit, turn the knob to set your desired temperature. When you’re done cooking, turn off the burners and/or oven and turn off the solenoid valve. During the day, we leave the valve on the propane tank open. At night, we close it as a safety precaution. If you want to cook while you are underway, release the gimbal lock so the stove can rotate to maintain a level cooking service as the boat heels. Use the pot/pan holders to keep cookware from sliding around.
Oven
To turn on the oven, use the control knob on the far left of the stove to start the flow of gas (depress and turn to left – CCW, just like the stovetop burners). Insert the propane igniter into the access hole in the oven pan or underneath the oven pan (either way works) and light the oven burner. Again, after the flame is lit you can adjust the flame/heat setting accordingly. If you are cooking while underway and have something in the oven, we recommend locking the oven door to avoid having something slide out accidently.
Refrigerator/Freezer
The fridge runs off both shore power and the house batteries. You’ll find the refrigeration ON/OFF switch on the electrical control panel in the main cabin. We suggest you start the unit cooling while still on shore power; once it has fully cooled down it retains its temperature very well. We continue to run the fridge on batteries so long as the charge level doesn’t get too low (12V or less). The top access is great for storing all your foods. The front door access is where we like to place drinks and other quick-access items. There’s a small freezer section that works well.6 Water from the fridge, such as melting ice, drains into the bilge and then overboard.
6 Keeps our Lopez Island Ice Cream nicely frozen!
Stove / Oven with Propane Solenoid Switch
Top and Front Access to Refrigerator

Interlude Owners’ Notes 2018
42 – 53
SAFETY REMINDER – When you open the top a support arm locks the lid in place. Please be sure to pull out the locking knob before closing the lid. If you try to force the lid closed you will damage the arm and lid.
Microwave
The microwave is in the storage cabinet on the far left of the galley, above the sink. It runs off AC power and works just like your microwave at home whenever you are on shore power. When you are running on batteries, the microwave runs off the inverter. Activate the inverter at the electrical panel and turn on the switch for the AC outlets. When running on batteries we use the microwave for simple, short cooking needs such as reheating, warming, thawing, making popcorn, melting butter for all that fresh crab we like to catch, etc. An alternative is to start the engine and run it in neutral at 1000-1500 RPM while cooking with the microwave to keep the batteries charged. If you do run the engine, please reduce the RPM to idle for a couple of minutes to allow it to cool down, then you can turn the engine off. When done using the microwave, turn off the inverter.
Galley Sink
Hot water for the sink is supplied by the hot water heater. When the engine is running, water is heated automatically and will stay hot for a long time. When connected to shore power and you need more hot water, turn on the electric hot water heater switch on the electrical panel.
Storage
All your cooking utensils, cutlery and mixing bowls are easily accessible in the drawers next to and under the stove. Dishes, drinking glasses and cups & mugs are kept in the upper cupboards. Frying pans are under the stove unit in a small cupboard; larger pans and bowls are stored under the settees next to the wine cabinet and the Nav station. When getting underway, secure drawers and cabinets by pushing their pull knobs all the way in, which prevents them from opening accidently when the boat is heeled.
Built-in Dustbin
You can easily sweep any spilled materials into this small box on the floor of the galley. The plastic liner can then be easily removed and emptied.
HEADS, SHOWERS AND HOLDING TANKS
Operating the HeadsInterlude is equipped with push-button, electric flush toilets in both heads. The toilets use raw water. Each head has two rocker switches (see photo). The top button flushes and fills the toilet like a toilet at home. The bottom rocker button is used to add water to the bowl (left) and to evacuate water (right).
Microwave Oven
Release Locking Knob to Close Top Lid

Interlude Owners’ Notes 2018
43 – 53
To use a toilet, wet the bowl first with the bottom rocker switch, then flush the bowl by pressing the top rocker switch. Once the waste is pumped out, wet the bowl again with clean water and fully evacuate it using the bottom rocker buttons. This helps push the waste all the way to the holding tanks and reduces the possibility of waste water leaking back into the bowl. Travel with the bowl dry and the seat and lid down to prevent water sloshing out into the head. OPERATING TIP: Offshore sailors have a rule: “Never put anything down a marine toilet that hasn’t gone through the sailor first.” This includes feminine items and items like “flushable wipes.” Offshore sailors put all soiled paper products in sealable baggies and deposit the baggies in the lined garbage cans provided in each head. San Juan Sailing highly recommends following this rule, and we adhere to it whenever we’re on the boat.
Using the ShowersTurn on the water pump switch at the electrical panel. The aft head provides a stand-alone shower with a folding door affixed to the wall. When not in use, please be sure the door is folded and secured against the wall. The forward head provides a combined sink-shower; the faucet for the sink can be pulled out and hung on a hook next to the door. Watch that the hose doesn’t get caught on any under-sink equipment. Each shower has a sump pump to drain the shower. Press the pump switch to remove water from the shower pan. Please use the squeegees provided to remove water from the walls and fixtures, then wipe remaining surfaces dry. This will protect the wood and help prevent odors. OPERATING TIP: The showers draw water from the fresh water storage tanks. Experienced cruisers know the “sailor’s shower” – get wet, turn off the water, soap up, rinse off. If the shower basin overflows, you’re using too much water. On warm, sunny days, an alternative to the below decks showers is the swim platform shower (with hot and cold fresh water) located next to the starboard helm. This is also a good way to rinse off salt water after swimming or dirty feet after going ashore.
Hot WaterHot water is stored in an insulated tank located under the aft starboard bunk. It takes about 30 minutes of running the engine to get the water hot. The water will remain hot for several hours. When connected to shore power, you can run the electric hot water heater by turning on the switch on the AC panel to the “ON” position. SAFETY REMINDER – The engine can heat water to scalding temperature so please be careful!
Cockpit Fresh Water Shower with (1) Hot/Cold Controls and (2) Pull-out Shower Head
Forward Head Shower
Head Rocker Switches

Interlude Owners’ Notes 2018
44 – 53
Managing the Holding TanksEach head has a 20-gallon black water holding tank that will need to be emptied every day or two depending on usage. The tanks are in the cabinet next to each toilet. The tanks are green and the waste level inside can be seen by shining a flashlight from the top downwards. San Juan Sailing staff will discuss holding tanks, overboard discharge and pump-outs during the charter briefing on the day of your arrival. OPERATING TIP: When pumping out the holding tanks, use a winch handle to remove / replace the “waste” tank caps located on the starboard deck above each tank (see photo). Please use gentle pressure to open/close the caps. Please add a ½ capfull of the “No Flex” marine toilet treatment to each holding tank each day. Add water to the bowl, add the treatment to the water, and flush the toilet. There is a container of “No Flex” in each head, look in the holding tank compartment or in the vanity storage area behind the mirrors. The overboard discharge valve for the aft head is located under a panel in the aft starboard cabin below and in front of the hanging locker. Lift the panel to access the valve. The discharge valve for the forward head is located behind the tilt-out storage compartment under the forward cabin bunk. Remove the compartment for easier access to the valve. OPERATING TIP: The tanks use a gravity discharge system. Tank contents will drain overboard in just a few seconds; you’ll hear a noticeable “whoosh” as a tank discharges. If you discharge overboard, please use the shower head to add a couple of gallons of fresh water to the toilet bowl, flush the water into the tank, and then discharge again. Overboard discharge is not allowed within 3 miles of shore in US waters, so use a pump-out facility instead. If you pump out the holding tank at a shore facility, please fill it with about 5 gallons of fresh water through the deck fitting to rinse, and then pump it out again. Thank you!
Black Water Holding Tanks
Forward Head Overboard Discharge Valve – Located in Forward Cabin next to Storage
Compartment under Bunk; the Compartment as been Removed for Easier Access
Aft Head Overboard Discharge Valve –Located in Starboard Cabin under Access Panel in Front of Hanging
Locker
Waste Tank Pump-out Access Ports Located on Starboard Deck Above Holding Tanks

Interlude Owners’ Notes 2018
45 – 53
HEATING SYSTEM
Heating System Quick-start� Heating controls: Located to left of electrical panel
� Heater on: Press POWER button, LED light will turn green
� Heater off: Press POWER button, LED light will turn white while system cools down, then turn off
� Temperature setting: Rotate the dial to choose your desired temperature
� Vents: Located in main cabin and in each berth and head; rotate to direct air flow; pivot louvers to open/close vents
Using the Heating SystemInterlude is equipped with a Webasto thermostatically controlled forced air diesel heating. The system uses the same diesel fuel as the engine and the heater’s fan is powered by the DC house batteries. The heating unit is in the aft starboard cockpit locker. The heater controls are located to the left of the electrical panel (see figure). To turn on heat, press the ON/OFF power button – the button will glow green when heating. Adjust the temperature by rotating the large black knob. This knob can also be pressed to cycle through the operating modes. The color of the ON/OFF button determines the mode the heating unit is in: � Continuous green –
heating � Continuous white – heat
off, cooling down � Continuous blue –
ventilation only � Flashing red – faults and
no heating � Flashing green – pre-
programmed heating � Flashing blue – pre-
programmed ventilation To turn off the heater, press the ON/OFF power button again – the button will initially glow white. The fan will run for a while because the heater unit needs to cool down before turning off. Leave the thermostat in this state and it will fully turn off when the heater has cooled down. You may hear the fan running while in cool down mode – this is normal.

Interlude Owners’ Notes 2018
46 – 53
KEEL DEPTH
Interlude has a deep fin keel and draws 7’2”, so figure on 8’ to be on the safe side. San Juan Sailing strongly recommends that you maintain a minimum of 10’-12’ under the keel, both underway and at low tide on anchor. SAFETY REMINDER: The depth sounder zero datum point is immediately in front of the keel, about 2 feet below the water line, with the keel extending down another 6 feet or so.
OUTBOARD ENGINE
Interlude is equipped with a 2017 Honda 4-stroke 2.3 horsepower outboard engine for the dinghy. This make and model has proven to be a practical and very reliable outboard, nearly all the boats in the SJS fleet use this same engine.
Fuel and Oil for the Outboard EngineSAFETY REMINDER: This is a 4-stroke engine and runs on regular gas (and it’s quite stingy on fuel, so a little goes a long ways). There is a small red gas can for the exclusive use of the outboard. We keep it tied into the dinghy both for convenience and as a safety measure (gasoline fumes are explosive and a dangerous fire hazard if gasoline is stored on a boat). Keep the spare gasoline container in the dinghy and tied to the dinghy’s transom so it stays upright. SJS staff should have the engine full, or nearly so, for your trip. Please check the fuel level in the engine and in the spare gas can when you first come aboard to make sure you have a gallon-plus for your trip.
Operating the Outboard EngineThe outboard is light and easy to transfer from the stern rail mount to the dinghy transom (and vice versa). When it is mounted on the dinghy please secure it to the transom with the safety line. Please do
1. Fuel lever (at back)2. Choke 3. Air vent (on top) 4. Kill switch with clip 5. Throttle 6. Pull chord 7. Tilt lever 8. Safety line (tied to rail)
1 2
3
4
5
6
7
Outboard Engine Controls
8
Interlude’s Hull and Keel

Interlude Owners’ Notes 2018
47 – 53
not cruise with the outboard on the dinghy; it will stop working if saltwater gets into the carburetor intake. We also recommend taking the outboard off the dinghy at night. We have seen dinghies get flipped over by strong wind waves or powerboat wakes.
Starting the Outboard
� Push the fuel valve lever (left rear corner of the engine housing as you are looking at it) towards the back of the engine housing to open the fuel valve.
� Pull out the choke (left forward corner of the housing as you are looking at it).
� Open the air vent on the top of the fuel cap (top of outboard) by turning to “ON” indicator.
� Make sure the black U-shaped kill clip (with the red lanyard) is clipped into the red shut-off knob (left forward corner of the outboard).
� Turn the throttle handle ¼ turn counter-clockwise.
� Pull the cord until it starts. Don’t jerk the cord out, instead gently pull 6-12 inches out then use a smooth, firm pull to start the engine. You shouldn’t have to pull it more than 2-3 times to get the engine to start.
Running the Outboard
� Push the choke back in shortly after the engine starts (after about 10 seconds).
� There is no transmission – just throttle up to go forward and throttle down to stop. If you want to go in reverse, just swivel the outboard around 180 degrees.
Shutting Off the Outboard
� Shut the outboard off by pushing in the red shut-off knob (where the kill clip is clipped in). Or just pull the red lanyard until the clip pops off.
� To avoid prop damage when approaching a landing spot on shore, shut the outboard off and raise it out of the water before you reach the beach. Tilt the outboard forward until the prop is out of the water and it clicks and stays in place; row the rest of the way to shore as needed. Release the stainless-steel lever on the left side of the shaft to drop the prop into the water.
When the Outboard is Not in Use
� Put the engine back on the outboard mount on the stern rail and tighten both braces.
� Attach the safety line with a bowline or another secure knot.
� Pull the fuel valve lever forward to close (right rear corner of the engine housing).
� Close the air vent on top of the fuel cap (top of outboard) by turning it clockwise.
TroubleshootingHere are some troubleshooting tips:
� If the engine won’t start, review the steps above, make sure there’s fuel in the tank, and check that the kill switch clip is installed correctly.

Interlude Owners’ Notes 2018
48 – 53
� If the outboard is running and the engine suddenly quits, it’s usually because a) the vent on the fuel cap isn’t open (the engine will die soon after starting), or b) you’ve run out of fuel. Open the vent cap and/or add fuel from the gas can to the engine.
PROPANE
The propane tank locker can be found in the cockpit storage compartment located in the deck between the helms. The propane tank(s) provide fuel for both the galley stove and the BBQ grill. When we first go onboard we check the propane locker to see if the tank valve is open or closed and to check the fuel level. The pressure gauge won’t tell you how much fuel is left in the tank, you have to lift it and judge the fuel remaining based on weight. If in doubt about how much fuel you have, ask the San Juan Sailing dock crew to check it and provide you a full cylinder(s) as needed. We normally leave the tank valve open during the day and close it at night before we turn in. To get gas flowing to the stove/oven and/or the grill, activate the solenoid switch located to the left of the stove in the galley – press down and hold the red button and toggle the switch to “ON.” A green LED light will appear when the valve is open. You can then light the stove and/or BBQ when you’re ready to use one or the other or both (see the “Galley” and “Barbeque” sections). When you are done cooking turn off the solenoid switch. That’s it, it’s a very simple system to use. OPERATING TIP – If you need to switch propane tanks, the old rule “leftie-loosie – rightie-tighty” does not apply. You must rotate the tank-hose coupling to the right to loosen and left to tighten. It’s a French designed boat, what more can you say?
SAFETY REMINDER – Propane is heavier than air and will sink to the bottom of the boat if there is a leak in the system. If you smell gas in the boat immediately turn off the stove, shut off the solenoid switch next to the stove, close the tank valve, and avoid using any electrical appliances (to eliminate sparking).
SAILS AND RIGGING
Sailing System Highlights� Mainsail: In-mast furling main with two reefing marks (vertical
black lines on foot of sail).
� Foresail: Roller-furling 106% genoa headsail with two reefing marks (vertical black lines on sail).
� Lines and sheets: All lines and sheets led aft to cockpit. There is no need to adjust the main or jib halyards, we just store them out of the way against the inside foot of the dodger.
Propane Locker with Emergency Tiller Access (arrow), Diesel Fuel Port (right) and Aft Water Tank Port (Left)
Running Rigging Lines

Interlude Owners’ Notes 2018
49 – 53
� Deploying: There is some debate about whether to unfurl the headsail or the mainsail first. Beneteau recommends unfurling the headsail first because this will take some pressure off the mainsail and make it easier to unfurl. Experiment to find what works best for you.
� Reefing: Recommend reefing when winds reach 15+ knots.
Deploying the MainsailHere are the steps we follow to deploy the mainsail:
1. Uncoil and prepare all needed lines – outhaul (red with white flecks), furling line (white & black), mainsheet (grey with black flecks) and boom vang (black).
2. Open the clutch for the outhaul and furling line. Ease the mainsheet and boom vang. Take 2-3 wraps of the outhaul around the winch, and have a winch handle handy to deploy the sail.
3. Put the engine in Idle Forward and keep it there until the sail(s) are deployed.
4. Have the helmsman steer the boat so that the wind is coming slightly over the starboard bow (i.e., close-hauled, starboard tack)
OPERATING TIP: The main favors unfurling and furling from the mast with the sail to port (starboard tack). In this configuration, the sail is easier to deploy and retract and, very importantly, it is much less likely to jam as it enters/exits the furling mechanism inside the mast.
5. Carefully deploy the sail by pulling smoothly on the outhaul, using the winch handle as necessary, keeping light tension on the furling line. Once the sail is about 1/3 of the way deployed it will be easier to unfurl.
6. Continue to unfurl the main until the aft end of the outhaul sliding “car” on the boom aligns with the black mark on the boom (see photo). The foot of the sail should be taut.
7. Close the clutch for the outhaul and main furling line. Re-tension the boom vang as wind conditions dictate. Sheet-in with the mainsheet and bear off when you are ready.
Furling the Mainsail Here are the steps we follow to furl the mainsail:
1. Prepare all the lines (uncoil the outhaul, furling line and mainsheet).
2. Start the engine, place the transmission in “Idle Forward.”
3. Ease the boom vang and mainsheet, uncleat the red outhaul, and take 2-3 turns of the white & black furling line around the winch. Have a winch handle handy.
4. Have the helmsman steer towards the wind with the wind coming slightly over the starboard bow (close
Outhaul Car Deployed to Black Line on Boom
Furled Mainsail & Foresail - Note Mainsail Clew Exposed and One Wrap of Jib Sheets around Genoa

Interlude Owners’ Notes 2018
50 – 53
hauled - starboard tack). Pull on or winch-in the mainsail furling line while maintaining light pressure on the outhaul. Keep a eye on the sail as it furls to ensure a snug wrap without wrinkles.
5. Stop furling when the vertical black mark reaches the mast. This will leave ~1 ft. of the sail at the clew visible and sticking out of the mast (see photo).
6. Tension the mainsheet, close the clutches for all lines, coil and store the lines in the hanging storage bag beneath the winch. The mainsheet is very long, we usually just coil it and hang it over the winch.
Reefing the Mainsail Reef the mainsail by easing the outhaul and furling the main part way. As you furl the main watch the sail carefully to avoid wrinkles in the sail as it enters the mast. Note the two vertical black marks at the foot of the sail near the mast – these are your reefing marks. The first vertical mark = one reef point, the second vertical mark = 2 reef points. Adjust the amount of reef as needed for wind conditions.
Deploying the ForesailTo deploy the genoa headsail, open the clutch on the furling line cleat (aft port deck next to cockpit) and uncoil the furling line. Have the helmsman steer the boat so it is on a slight starboard tack. Unfurl the genoa by pulling on the port jib sheet while keeping light tension on the furling line. Use the winch as needed to deploy the foresail. Trim the sail, cleat if off on the winch, and sail away. Take up the slack on the furling line and close the locking cleat on the deck.
Furling the ForesailPrepare the genoa furling line and jib sheets (uncoil the furling line, remove the unloaded job sheet from the winch). Open the clutch on the furling line cleat if it is closed. Have the helmsman head into the wind on a slight starboard tack and release the loaded job sheet from the winch. OPERATING TIP: We have found that furling is easiest if we don’t use the winch and just pull directly on the genoa furling line, but experiment to see what works best for you. Furl the genoa while maintaining light pressure on the jib sheet – this will keep the wraps snug. Furl until the sheets wrap once around the forestay. Coil and hang the furling line from the port safety line, again being careful not to allow line to fall in the water.
Reefing the ForesailReefing the foresail follows the same procedures as furling. There are two reefing marks to guide you as to how much sail to take in. Once the foresail is reefed tension the furling line and close its cleat.
Mainsail Reef Marks
Reefing Marks on Genoa

Interlude Owners’ Notes 2018
51 – 53
SWIM PLATFORM
Interlude is equipped with an electric swim platform, which is like adding a deck onto your home – it’s a great place to relax and dangle your feet in the water, and it makes loading and off-loading the dinghy easy. The controls for the swim platform are located at the starboard helm. Don’t sail or motor with the swim platform open, it is designed for use when anchored, on a mooring ball, or docked. To open / close the platform, first open the sliding lock bar on the starboard side of the deck, behind the starboard helm. Depress and hold down the red button on the rocker switch, then simultaneously press and hold the bottom of the rocker switch (to open) or top (to close). When closing the platform keep an eye on the restraining lines, which tend to get caught between the deck and the hull – move them as necessary. Close the sliding lock bar after retracting the platform and close the safety lines. Don’t forget to keep the safety lines at the stern closed when underway or if you don’t want someone to accidently walk off the back of the boat when the deck is down! There is a remote-control fob for the swim deck in the Nav table. Use it to open / close the deck when you are leaving the boat and want to make sure no one can gain access. If you leave the deck down while you are gone you might return to find an otter or two camped out on the boat sunning themselves!
Deploying the Swim Deck
Swim Deck Remote Fob
Swim Platform Controls – the Other Switches Control Cockpit
Lighting

Interlude Owners’ Notes 2018
52 – 53
TABLES
Interlude’s two main seating areas each have a folding table – the cockpit and the main cabin, which are great for entertaining or playing games.
Cockpit TableThe cockpit table has two leaves that lift up and fold down, with dual latches that lock it in place. They engage when you lift the leaf, and release when you reach under the table and depress the two latches simultaneously. The forward compartment is an insulated cooler with drainage for ice and drinks.
Main Salon TableThe salon table has two wings that can create a spacious dining area. There are a pair of supporting brackets that swing out to support each wing, which click into place to secure the table tops. To fold down a wing, gently lift it a few millimeters and swing the brackets into their stored positions, then lower the wing. There is built-in wine storage in the salon dining table as well; pull up the cover insert and you’ll see the storage area. There’s also wine storage at the base of the table. And in the “wine cabinet.” It’s a French-built boat, what did you expect?
TOOLS AND SPARES
We’ve provided a tool kit and collection of spare parts that might be needed to make repairs. These are located under the main salon seat on the starboard side. The manuals for the boat are also stored here. If you need assistance, here are contact numbers:
� San Juan Sailing office: 800-677-7245 � SJS’s owner, Roger Van Dyken – Cell: 360-224-4300, Home: 360-354-5770 � Maintenance pro Mike Hasbrouck (Deep Blue Marine): 808-640-8609 � Owners:
� Bob & Wendy Hatheway – Cell: 425-305-7220; Home: 425-868-4228 � Lin & Susan Lindsey – Cell: 206-979-1314; Home: 425-836-8693
WATER
Fresh Water TanksThere are two fresh water tanks on Interlude:
� The aft primary tank (Tank 1) is under the aft starboard berth (capacity = 53 gallons). The fill port is in the propane locker located in the aft deck cockpit between the helms (indicated by the red arrow in photo). This is the default tank, the first we use on a typical cruise. When it’s empty switch to the secondary tank.
� The forward secondary tank (Tank 2) is under the forward berth (capacity = 87 gallons). The fill port is on the forward port deck (see photo).

Interlude Owners’ Notes 2018
53 – 53
The water tank gauges are on the electrical panel. To switch tanks, you’ll find the water control unit in the engine compartment, lower right-hand side. The tank valves are labeled as Tank 1 and Tank 2 (shown below): There is a fresh water hose stored in the port cockpit lazarette. When filling the tanks, be sure you are using potable water. Both fill ports have a blue ring around them. OPERATING TIP: Only have the valve open for one tank at a time. If both valves are open, you could accidently drain both tanks and run out of water.
Hot WaterWhen the engine is running the water heater operates by heat recovery from the engine cooling system. The heater also runs off the AC electrical supply when you are connected to shore power. Turn “ON” the water heater switch on the electrical panel when connected to shore power to heat water. The water heater is very efficient – it will heat water quickly and the temperature is quite hot. The thermostat is set at the factory, so be ready for very hot water and adjust the mix of hot and cold water from sinks and showers accordingly.
Water System Controls in Engine Compartment
1. Water filter 2. Water unit 3. Expansion tank 4. Supply valve - Aft tank (Tank 1) 5. Supply valve - Forward tank (Tank 2)
Aft Water Tank Fill Port (red arrow) Forward Water Tank Fill Port - Port Deck


