42
Intermec Features Demo User Guide
| Date post: | 24-Oct-2014 |
| Category: |
Documents |
| Upload: | ramesh-reddy |
| View: | 33 times |
| Download: | 0 times |

Intermec Features Demo
User Guide

ii Intermec Features Demo User Guide
Intermec Technologies Corporation
Worldwide Headquarters 6001 36th Ave.W. Everett, WA 98203 U.S.A.
www.intermec.com
The information contained herein is provided solely for the purpose of allowing customers to operate and service Intermec-manufactured equipment and is not to be released, reproduced, or used for any other purpose without written permission of Intermec Technologies Corporation.
Information and specifications contained in this document are subject to change without prior notice and do not represent a commitment on the part of Intermec Technologies Corporation.
© 2010–2012 by Intermec Technologies Corporation. All rights reserved.
The word Intermec, the Intermec logo, Norand, ArciTech, Beverage Routebook, CrossBar, dcBrowser, Duratherm, EasyADC, EasyCoder, EasySet, Fingerprint, i-gistics, INCA (under license), Intellitag, Intellitag Gen2, JANUS, LabelShop, MobileLAN, Picolink, Ready-to-Work, RoutePower, Sabre, ScanPlus, ShopScan, Smart Mobile Computing, SmartSystems, TE 2000, Trakker Antares, and Vista Powered are either trademarks or registered trademarks of Intermec Technologies Corporation.
There are U.S. and foreign patents as well as U.S. and foreign patents pending.

Intermec Features Demo User Guide iii
Document Change RecordThis page records changes to this document. The document was originally released as Revision 001.
Version Number Date Description of Change
005 5/2012 Added Ink Capture and Abuse Count sections, and support information for the CV61 computer.
004 10/2011 Corrected information on Document Imaging focus modes.
003 7/2011 Added Magstripe Reader application.
002 2/2011 Revised manual to meet department style standards.

iv Intermec Features Demo User Guide

Contents
Intermec Features Demo User Guide v
ContentsBefore You Begin. . . . . . . . . . . . . . . . . . . . . . . . . . . . . . . . . . . . . . . . . . . . . . . . . . . . . . . . . . . . . . . . . vii
Global Services and Support . . . . . . . . . . . . . . . . . . . . . . . . . . . . . . . . . . . . . . . . . . . . . . viiWarranty Information. . . . . . . . . . . . . . . . . . . . . . . . . . . . . . . . . . . . . . . . . . . . viiWeb Support . . . . . . . . . . . . . . . . . . . . . . . . . . . . . . . . . . . . . . . . . . . . . . . . . . . . viiSend Feedback. . . . . . . . . . . . . . . . . . . . . . . . . . . . . . . . . . . . . . . . . . . . . . . . . . . viiTelephone Support . . . . . . . . . . . . . . . . . . . . . . . . . . . . . . . . . . . . . . . . . . . . . . vii
Who Should Read This Manual . . . . . . . . . . . . . . . . . . . . . . . . . . . . . . . . . . . . . . . . . . viiiRelated Documents . . . . . . . . . . . . . . . . . . . . . . . . . . . . . . . . . . . . . . . . . . . . . . . . . . . . . viii
About Intermec Features Demo . . . . . . . . . . . . . . . . . . . . . . . . . . . . . . . . . . . . . . . . . . . . . . . . . . . . 1Installing Features Demo . . . . . . . . . . . . . . . . . . . . . . . . . . . . . . . . . . . . . . . . . . . . . . . . . . 2
About Bar Code Scanning . . . . . . . . . . . . . . . . . . . . . . . . . . . . . . . . . . . . . . . . . . . . . . . . . . . . . . . . . 3Scanning a Bar Code . . . . . . . . . . . . . . . . . . . . . . . . . . . . . . . . . . . . . . . . . . . . . . . . . . . . . . 3Configuring Bar Code Symbology Settings . . . . . . . . . . . . . . . . . . . . . . . . . . . . . . . . . . 5
About the Magstripe Reader . . . . . . . . . . . . . . . . . . . . . . . . . . . . . . . . . . . . . . . . . . . . . . . . . . . . . . . 7Using an Attached Magstripe Reader . . . . . . . . . . . . . . . . . . . . . . . . . . . . . . . . . . . . . . . 7Using a Magstripe Reader in a Bluetooth Printer. . . . . . . . . . . . . . . . . . . . . . . . . . . . . 9
About Document Imaging . . . . . . . . . . . . . . . . . . . . . . . . . . . . . . . . . . . . . . . . . . . . . . . . . . . . . . . . 10Configuring Document Indexing Settings . . . . . . . . . . . . . . . . . . . . . . . . . . . . . . . . . 12Configuring Document Imaging Settings . . . . . . . . . . . . . . . . . . . . . . . . . . . . . . . . . . 12
About Image Capture . . . . . . . . . . . . . . . . . . . . . . . . . . . . . . . . . . . . . . . . . . . . . . . . . . . . . . . . . . . . 13Capturing an Image . . . . . . . . . . . . . . . . . . . . . . . . . . . . . . . . . . . . . . . . . . . . . . . . . . . . . . 13Configuring Image Capture Settings . . . . . . . . . . . . . . . . . . . . . . . . . . . . . . . . . . . . . . 14
About Ink Capture . . . . . . . . . . . . . . . . . . . . . . . . . . . . . . . . . . . . . . . . . . . . . . . . . . . . . . . . . . . . . . . 15
About Signature Capture . . . . . . . . . . . . . . . . . . . . . . . . . . . . . . . . . . . . . . . . . . . . . . . . . . . . . . . . . 16
About the Camera. . . . . . . . . . . . . . . . . . . . . . . . . . . . . . . . . . . . . . . . . . . . . . . . . . . . . . . . . . . . . . . . 18Taking a Picture . . . . . . . . . . . . . . . . . . . . . . . . . . . . . . . . . . . . . . . . . . . . . . . . . . . . . . . . . 18Configuring the Camera Settings. . . . . . . . . . . . . . . . . . . . . . . . . . . . . . . . . . . . . . . . . . 19
About the Gallery . . . . . . . . . . . . . . . . . . . . . . . . . . . . . . . . . . . . . . . . . . . . . . . . . . . . . . . . . . . . . . . . 19
Connecting to a Printer. . . . . . . . . . . . . . . . . . . . . . . . . . . . . . . . . . . . . . . . . . . . . . . . . . . . . . . . . . . 20About Bluetooth Printing . . . . . . . . . . . . . . . . . . . . . . . . . . . . . . . . . . . . . . . . . . . . . . . . 21About Wi-Fi Printing . . . . . . . . . . . . . . . . . . . . . . . . . . . . . . . . . . . . . . . . . . . . . . . . . . . . .21Printing a Sample Document . . . . . . . . . . . . . . . . . . . . . . . . . . . . . . . . . . . . . . . . . . . . . 23

Contents
vi Intermec Features Demo User Guide
About Global Positioning System (GPS) . . . . . . . . . . . . . . . . . . . . . . . . . . . . . . . . . . . . . . . . . . . 24Using GPS. . . . . . . . . . . . . . . . . . . . . . . . . . . . . . . . . . . . . . . . . . . . . . . . . . . . . . . . . . . . . . . 25Viewing Stored GPS Data from Pictures and Images . . . . . . . . . . . . . . . . . . . . . . . . 26About the Digital Compass . . . . . . . . . . . . . . . . . . . . . . . . . . . . . . . . . . . . . . . . . . . . . . . 26
About Abuse Count . . . . . . . . . . . . . . . . . . . . . . . . . . . . . . . . . . . . . . . . . . . . . . . . . . . . . . . . . . . . . . 27
Features Demo Support . . . . . . . . . . . . . . . . . . . . . . . . . . . . . . . . . . . . . . . . . . . . . . . . . . . . . . . . . . 28Supported Features . . . . . . . . . . . . . . . . . . . . . . . . . . . . . . . . . . . . . . . . . . . . . . . . . . . . . . 28Supported Printers . . . . . . . . . . . . . . . . . . . . . . . . . . . . . . . . . . . . . . . . . . . . . . . . . . . . . . . 32

Before You Begin
Intermec Features Demo User Guide vii
Before You BeginThis section provides you with safety information, technical support information, and sources for additional product information.
Global Services and SupportWarranty InformationTo understand the warranty for your Intermec product, visit the Intermec website at www.intermec.com and click Support > Returns and Repairs > Warranty.
Web SupportVisit the Intermec website at www.intermec.com to download our current manuals (in PDF).
Visit the Intermec technical knowledge base (Knowledge Central) at www.intermec.com and click Support > Knowledge Central to review technical information or to request technical support for your Intermec product.
Send FeedbackYour feedback is crucial to the continual improvement of our documentation. To provide feedback about this manual, please contact the Intermec Technical Communications department directly at [email protected].
Telephone SupportIn the U.S.A. and Canada, call 1-800-755-5505.
Outside the U.S.A. and Canada, contact your local Intermec representative. To search for your local representative, from the Intermec website, click About Us > Contact Us.
Note: Notes either provide extra information about a topic or contain special instructions for handling a particular condition or set of circumstances.

Before You Begin
viii Intermec Features Demo User Guide
Who Should Read This ManualThis Intermec Features Demo User’s Guide is for the person who is responsible for demonstrating the functions and features of different Intermec mobile computers.
Before you work with the Features Demo application, you should be familiar with your network and general networking terms, such as IP address.
Related DocumentsThe Intermec website at www.intermec.com contains our documents (as .pdf files) that you can download for free.
To download documents1 Visit the Intermec website at www.intermec.com.
2 Click the Products tab.
3 Using the Products menu, navigate to your product page. For example, to find the CN3 computer product page, click Computers > Handheld Computers > Your mobile computer.
4 Click the Manuals tab.
If your product does not have its own product page, click Support > Manuals. Use the Product Category field, the Product Family field, and the Product field to help you locate the documentation for your product.

Intermec Features Demo User Guide 9
About Intermec Features DemoIntermec Features Demo provides a simple way to explore the functions of an Intermec mobile computer. You can use Features Demo to evaluate these functions:
• Printing receipts and labels to portable printers
• Scanning bar codes
• Reading magnetic stripes (requires attached magstripe reader, or a Bluetooth printer with a magstripe reader)
• Capturing images of signatures and documents
• Saving images of drawings or signatures on the computer screen
• Taking pictures with an integrated camera
• Gathering location information using GPS
• Using the digital compass
For more information about which Features Demo functions are supported by your computer, see “Supported Features” on page 28.
Supported Computers and Related Documents
Supported Computers Related Documents
CK3 CK3 Mobile Computer User’s Manual
CK61 CK61 Mobile Computer with Windows Mobile User’s Manual CK61 Mobile Computers with Windows CE User’s Manual
CK70 / CK71 CN70 / CN70e
70 Series Mobile Computer User Manual
CN3 / CN3e CN3 Mobile Computer with Windows Mobile 5.0 User’s Manual CN3 Series Mobile Computer for Windows Mobile 6.1 User’s Manual
CN4 / CN4e CN4 Series Mobile Computer User’s Manual
CN50 CN50 Mobile Computer for Windows Mobile 6.1 User’s Manual CN50 Mobile Computer for Windows Embedded Handheld 6.5 User’s Manual
CS40 CS40 Mobile Computer User’s Manual
CV61 CV61 Vehicle Mount Computer User Manual(Windows 7)CV61 Vehicle Mount Computer User Manual (Windows XP)

10 Intermec Features Demo User Guide
Features Demo versions 2.0 and later are only supported on computers with Windows Embedded Handheld 6.5. This includes the CS40, CN50, and 70 Series computers.
Features Demo version 2.4 is also supported by the CV61 running Windows XP or WIndows 7..
Installing Features DemoYou can download Features Demo from the Intermec website at www.intermec.com. Select Products > Computers > Handheld Computers > Your mobile computer > Downloads tab.
• For the CV61, select Products > Computers > Fixed Vehicle Computers > CV61 Fixed Vehicle Mount Computer > Downloads tab.
You can install Features Demo on your mobile computer using Microsoft ActiveSync, a storage card or USB storage device, or SmartSystems.
To install Features Demo using Microsoft ActiveSync1 Connect your mobile computer using a communications dock.
2 Copy the Features Demo installation file from your desktop PC to your mobile computer. The default location on your PC is the C:\Program Files\Intermec folder.
3 On your mobile computer, tap the installation file to install the Features Demo application.
To install Features Demo using a storage card or USB storage device1 Copy the Features Demo installation file to a storage card or USB
storage device.
2 Insert the storage card or device in your Intermec computer. For help, see your mobile computer user’s manual.
Note: Some settings are shared between Features Demo and full applications, such as the directory in which document images are stored for Enhanced Mobile Document Imaging (eMDI). When you reset these settings to default values in Intermec Settings, these settings are sometimes reset to the full application default value instead of the Features Demo default value.

Intermec Features Demo User Guide 11
3 On your computer, run the installation file from the storage card.
To install Features Demo using SmartSystems1 Place the Features Demo installation file on your desktop PC.
2 Double-click the installation file to install it. An installation verification message appears.
3 Click OK. The files load into the Software Vault.
4 From the SmartSystems console in the Software Vault, drag and drop the application onto your mobile computer or to a folder. If you put the application into a folder, it will update all mobile computers in that folder.
After you have installed Features Demo, tap Start > Programs > Features Demo or Start > Features Demo to use the application.
About Bar Code ScanningIntermec mobile computers are equipped with imagers that can read many bar code symbologies. Vehicle mount computers such as the CV61 use a tethered or Bluetooth scanner to read bar codes.
The Bar Code Scanning feature uses the imager, Bluetooth scanner, or tethered scanner to read bar codes. When a bar code is successfully scanned, the value of the bar code appears in the edit box. The bar code symbology and the length of the string appear under the edit box.
Features Demo provides 1D, 2D, and postal bar codes for scanning. By default, the bar code scanner is configured to scan 1D and 2D bar codes. You may need to enable postal bar code scanning to use those symbologies with Features Demo.
Scanning a Bar Code1 On the Features Demo menu screen, tap Bar Code Scanning.
2 Hold the scanner window a few inches from the bar code.
3 Press and hold the Scan button. The illumination beam appears.
4 Use the illumination beam as a guide and aim it toward the middle of one of the following sample bar codes. Make sure that the illumination beam covers the bar code you want to read.

12 Intermec Features Demo User Guide
Sample UPC-A Bar Code
Sample Code 39 Bar Code
www.intermec.com
Sample PDF417 Bar Code
When the computer successfully reads a bar code label, the following information appears:
• bar code value
• symbology
• length

Intermec Features Demo User Guide 13
5 Release the Scan button.
6 To return to the Features Demo menu, tap OK or Options > Exit Scanner.
Configuring Bar Code Symbology SettingsThe Symbology Settings screen displays many of the most commonly supported bar code types. You can change the symbology settings to scan types of bar codes not included in Features Demo.
To configure bar code symbology settings1 On the Features Demo menu screen, tap Bar Code Scanning.
2 On the navigation bar, tap Options > Settings tab.
14 Intermec Features Demo User Guide
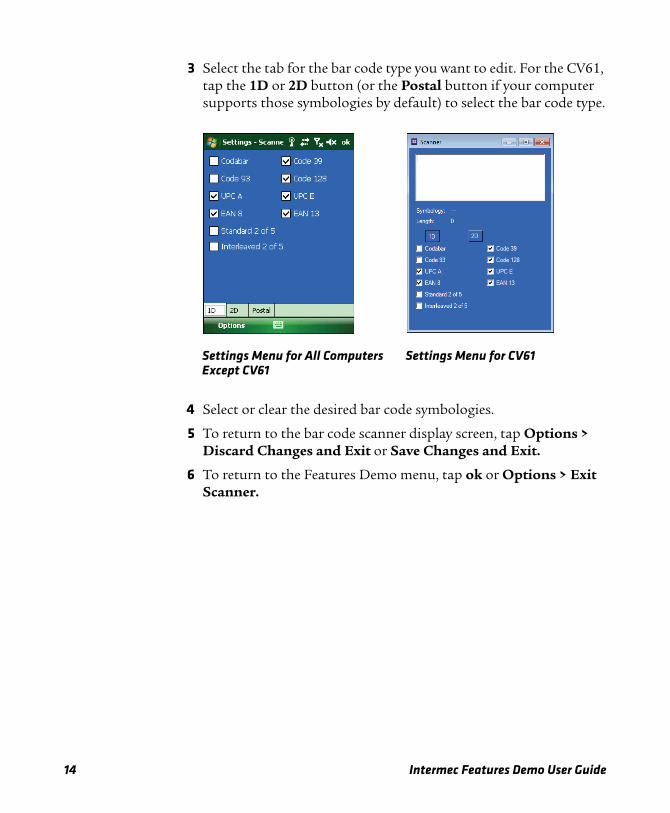
3 Select the tab for the bar code type you want to edit. For the CV61, tap the 1D or 2D button (or the Postal button if your computer supports those symbologies by default) to select the bar code type.
4 Select or clear the desired bar code symbologies.
5 To return to the bar code scanner display screen, tap Options > Discard Changes and Exit or Save Changes and Exit.
6 To return to the Features Demo menu, tap ok or Options > Exit Scanner.
Settings Menu for All Computers Except CV61
Settings Menu for CV61

Intermec Features Demo User Guide 15
About the Magstripe ReaderYou can use a magnetic stripe reader with most Intermec mobile computers to read information from credit cards or driver’s licenses. The Magstripe Reader demo application shows the information from the card, but the information is not stored or saved.
Magstripe readers are available for the 70 Series or CN50 computers. You can also use a 70 Series, CN50, CS40, or CV61 computer with an Intermec Bluetooth printer that includes a magstripe reader.
Before you start the Magstripe Reader demo application, attach a magstripe reader to your computer. Make sure that the reader is recognized and can be configured in Intermec Settings. For more information, see your computer user manual.
Using an Attached Magstripe ReaderBefore you begin, make sure the magstripe reader is correctly attached to the computer. For help, see the reader instructions.
To use Magstripe Reader with an attached reader1 On the Features Demo menu screen, tap Magstripe Reader.
Note: For other objects with magnetic stripes, Magstripe Reader only shows the number of characters read.

16 Intermec Features Demo User Guide
If you see an error message, or if the Swipe button is unavailable, tap Menu. If Attached Reader is not checked, remove and reinstall the reader and try again.
2 Tap Swipe and swipe the card.
When you successfully swipe a card, the information stored in the magnetic strip appears on the screen. When you unsuccessfully swipe a card, if the card is defective, or if the card information format is not recognized, an error message appears. You can swipe the card again, or swipe a different card.
3 To remove card information, tap Menu > Clear.
4 To return to the Features Demo menu, tap Menu > Exit or OK.
Magstripe Reader, showing card data (left) and error message (right)
Note: If you have attached a magstripe reader to the computer and the computer is also connected to a Bluetooth printer with a magstripe reader, tap Menu > Attached Reader to toggle between the two readers. When Attached Reader is checked, the attached magstripe reader is active.

Intermec Features Demo User Guide 17
Using a Magstripe Reader in a Bluetooth PrinterBefore you begin, make sure the Bluetooth connection to the printer is active. For more information, see your computer user manual.
To use Magstripe Reader with a reader in a Bluetooth printer1 On the Features Demo menu screen, tap Magstripe Reader.
2 Tap Swipe and swipe the card.
When you successfully swipe a card, the information stored in the magnetic stripe appears. When you unsuccessfully swipe a card, if the card is defective, or if the card information format is not recognized, an error message appears. You can swipe the card again, or swipe a different card.
3 To remove card information, tap Menu > Clear.
4 To return to the Features Demo menu, tap Menu > Exit or OK.
Magstripe Reader, showing card data (left) and error message (right)

18 Intermec Features Demo User Guide
About Document ImagingUse document imaging to convert full page paper documents into electronic document images that can be saved to your mobile computer.
You can download the full-featured version of Document Imaging from the Intermec website at www.intermec.com. Click Products > Computers > Your mobile computer > Downloads tab.
Some computers support the Intermec Enhanced Mobile Document Imaging (eMDI) application. Depending on the mobile computer model, the eMDI application uses either the scanner or the camera for document imaging.
Use the following table to determine if your computer supports eMDI, and if it uses the scanner or camera for document imaging.
For more information on the camera, see “About the Camera” on page 18. For more information on eMDI, see the Intermec Enhanced Mobile Document Imaging User’s Guide.
Mobile Computers that Support eMDI
Mobile Computer Color Camera EA21 Imager
CK70 / CK71 X
CN4 X
CN50 X
CN70 / CN70e X

Intermec Features Demo User Guide 19
To capture an image1 On the Features Demo menu screen, tap Document Imaging.
2 Point the scanner window at the desired image.
3 Press and hold the Scan button.
4 Depending on your mobile computer, either an onscreen frame or a laser frame flashes. Adjust the height of your computer and align the frame to the edges of the document.
If your computer has a camera and you are not using automatic focus, you can use the slide control on the screen, the volume buttons, or the Up and Down buttons next to the Scan button to adjust the camera focal depth.
5 When the image appears, use the buttons to delete ( ), zoom in ( ), zoom out ( ), or view ( ) the image in the gallery.
If your mobile computer has a camera, tap to set the Focus Mode to Fixed Focus - manual and lock the camera to the current focal depth. Tap to use automatic focus.
To see all of the saved document images that were captured on your computer, tap Options > Gallery.
Note: Use manual focus mode if the documents you are imaging are usually the same size. Use automatic focus mode if the documents you are imaging vary in size.

20 Intermec Features Demo User Guide
Configuring Document Indexing SettingsYou can edit the document name and document number to specify what image is associated with what document.
To configure indexing settings1 On the Features Demo menu screen, tap Document Imaging >
Options > Index Settings.
2 Enter the name of the document in the Document Name box and the number of the document in the Document # box.
3 To return to the document imaging screen, tap Options > Discard Changes and Exit or Save Changes and Exit.
Configuring Document Imaging SettingsYou can configure these document imaging settings for your needs and environment:
Document Imaging Settings
Setting Description
General Configure these settings to adjust format information such as focus check and file format.
Conditioning Configure these settings to adjust the image clarity.
Storage Configure these settings to adjust information such as the image name and storage location.
Advanced Configure these settings to adjust the brightness.

Intermec Features Demo User Guide 21
In most office environments, to capture the best document image, configure your settings to save images as a JPG file at 75% compression quality, and verify the document and background have high contrast and good lighting.
To configure document imaging settings1 From the Features Demo menu screen, tap Document Imaging >
Options > Settings.
2 Use the navigation tabs to configure the appropriate settings.
3 To return to the document imaging screen, tap Options > Discard Changes and Exit or Save Changes and Exit.
About Image CaptureIf the mobile computer is equipped with an area imager, you can use image capture to take a picture of an image similar to a camera.
The computer saves the image as either a .bmp or .jpg file, depending on settings. The file name is prefixed with the characters “IMG” for image capture files, followed by an automatically assigned 4-digit sequence number. The application assigns a number 1 digit higher than the highest value found for a captured image. The file suffix reflects the image type (.bmp or .jpg).
You can download a standalone version of Image Capture from the Intermec website at www.intermec.com. Select Products > Computers > Your mobile computer > Downloads tab.
Capturing an Image1 On the Features Demo menu, tap Image Capture. Streaming
video from the imager appears.
2 Adjust the brightness bar.
3 When you see the image you want on the screen, press Enter. The image appears.

22 Intermec Features Demo User Guide
4 Use the onscreen buttons to delete ( ), zoom in ( ), zoom out ( ), or save ( ) the image to the gallery. If you are zoomed in, tap-and-drag to scroll the image.
After you delete or save the image, the streaming video screen appears.
To view the gallery• On the image capture menu screen, tap Options > Gallery.
Configuring Image Capture SettingsYou can configure these image capture settings for your needs and environment:
• Conditioning - Configure these settings to adjust the image clarity.
• Storage - Configure these settings to change information such as the image name and storage location.
To configure image capture settings1 On the Features Demo menu screen, tap Image Capture >
Options > Settings.
2 Use the navigation tabs to configure the appropriate settings.
3 To return to the image capture screen, tap Options > Discard Changes and Exit or Save Changes and Exit.

Intermec Features Demo User Guide 23
About Ink CaptureYou can use the Ink Capture feature to capture drawings from the computer screen, or to save an image of an onscreen signature.
To use Ink Capture1 In the Features Demo menu screen, tap Ink Capture.
2 Use your finger or a stylus to draw on the screen or to write on the signature line.
• To change the ink color, tap Edit > Select Color and tap a color to select it. The next item drawn appears in the new color.
• To change the pen size, tap Edit > Pen Size and select Small, Medium, Large, or Extra Large from the menu.
• To undo the last action, tap Edit > Undo.
• To clear the entire screen, tap Edit > Clear.
3 To save the image:
a Tap File > Save As and enter the full path to the location where you want to save the image.
b In the File name field, enter a file name for the image.
c (Optional) The default image format is .jpeg. To select another format, select one from the Save as type list. Available formats include .bmp, .gif, .png, and .tiff.
d Tap Save.
4 To exit Ink Capture, tap File > Exit or tap the Close button.

24 Intermec Features Demo User Guide
About Signature CaptureSignature capture uses the imager to “photograph” signatures on business forms. The settings are based on scanning a bar code, which you can set in Intermec Settings or program manually.
Features Demo provides sample documents with the following symbologies:
• QR Code with leading characters “SIG”
• PDF417 containing 10 digits
You can also use one of the ESC/P sample documents to demonstrate signature capture. For help with printing an ESC/P sample, see “Printing a Sample Document” on page 23.
By default, the signature capture settings are configured to scan the sample documents.
To capture an image1 On the Features Demo menu screen, tap Signature Capture.
2 Follow the onscreen instructions to capture the signature of one of the following sample bar codes.
Note: Make sure the signature box and the bar code are in the bar code scanning area. For help, see “About Bar Code Scanning” on page 3..

Intermec Features Demo User Guide 25
Sample QR Code Bar Code
Sample PDF417 Bar Code

26 Intermec Features Demo User Guide
3 When the image appears, use the onscreen buttons to delete ( ), zoom in ( ), zoom out ( ), or save ( ) the image to the gallery.
4 To return to the Features Demo menu screen, tap ok or Options > Exit Signature Capture.
About the CameraThe built-in color camera takes a picture using video preview. You can configure the camera to take photos with varying levels of quality and size.
Pictures are saved as either a .bmp or .jpg file, depending on the settings. The file name is prefixed with the characters “CAM” to indicate a camera file, followed by an automatically assigned 4-digit sequence number. The application assigns a number one digit higher than the highest value found for a camera image. The file suffix reflects the image type (.bmp or .jpg).
If your mobile computer supports eMDI, the camera is used to capture a document. Use the procedure in this section to capture an image. For more information about image capture and eMDI, see “About Image Capture” on page 13.
Taking a Picture1 On the Features Demo menu screen, tap Camera.
2 When you see the image you want, press Enter. The camera takes a picture and the image appears.

Intermec Features Demo User Guide 27
3 Use the onscreen buttons to delete ( ), zoom in ( ), zoom out ( ), or save ( ) the image to the gallery. If you are zoomed in, tap-and-drag to scroll the image.
After you delete or save the image, the video preview screen appears.
4 To return to the Features Demo menu screen, tap ok or Options > Exit Camera.
To view the gallery• On the camera menu screen, tap Options > Gallery.
Configuring the Camera SettingsYou can configure these camera settings for your needs and environment:
• General - Adjust camera settings such as flash and resolution.
• Imprint - Add captioning information to your image.
• Storage - Adjust storage settings for your images such as file format and save location.
To configure camera settings1 On the Features Demo menu screen, tap Camera > Options >
Settings.
2 Use the navigation tabs to select the appropriate settings.
3 Configure the settings and tap OK to save your changes.
4 To return to the Features Demo menu screen, tap ok or Options > Exit Camera.
About the GalleryIn the gallery, you can view and delete one or all of the images previously captured from the camera, document imaging, image capture, and signature capture applications.
Note: You can also open the Gallery when using the camera, document imaging, and image capture applications.
28 Intermec Features Demo User Guide
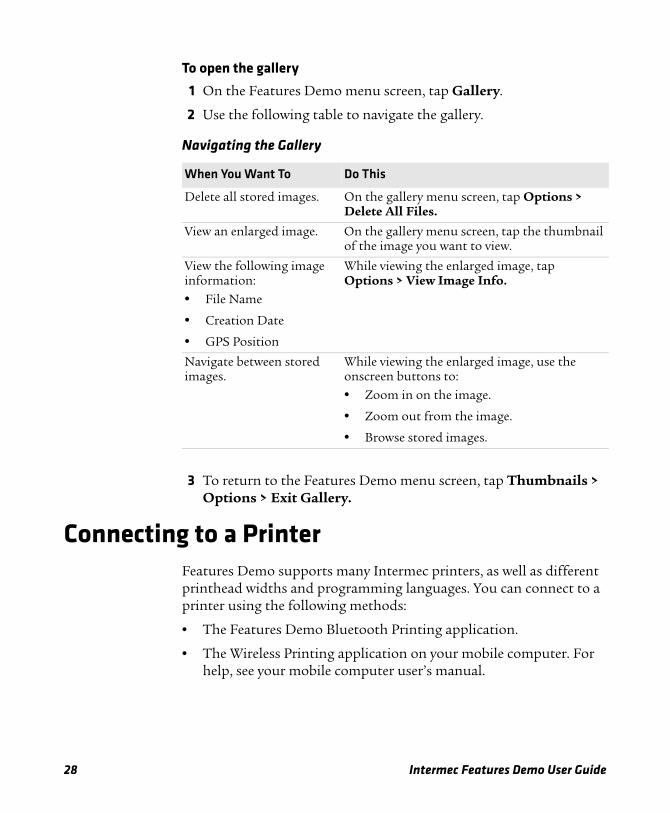
To open the gallery1 On the Features Demo menu screen, tap Gallery.
2 Use the following table to navigate the gallery.
3 To return to the Features Demo menu screen, tap Thumbnails > Options > Exit Gallery.
Connecting to a PrinterFeatures Demo supports many Intermec printers, as well as different printhead widths and programming languages. You can connect to a printer using the following methods:
• The Features Demo Bluetooth Printing application.
• The Wireless Printing application on your mobile computer. For help, see your mobile computer user’s manual.
Navigating the Gallery
When You Want To Do This
Delete all stored images. On the gallery menu screen, tap Options > Delete All Files.
View an enlarged image. On the gallery menu screen, tap the thumbnail of the image you want to view.
View the following image information:• File Name
• Creation Date
• GPS Position
While viewing the enlarged image, tap Options > View Image Info.
Navigate between stored images.
While viewing the enlarged image, use the onscreen buttons to:• Zoom in on the image.
• Zoom out from the image.
• Browse stored images.

Intermec Features Demo User Guide 29
About Bluetooth PrintingYou can use the Bluetooth application on the Features Demo menu screen to select a Bluetooth-enabled printer.
For more information on how to connect your computer to a Bluetooth printer, see your mobile computer user’s manual.
To establish a printer connection using Bluetooth1 On the Features Demo menu screen, tap BT Printer Discovery.
2 Scan the printer bar code, or tap the Discover icon.
3 If you tapped the Discover icon, select a printer from the list and tap the Select icon.
4 Tap the Test icon to verify the connection. If the printer also supports printing a test page, tap Print Test Page to verify printing.
5 To return to the Features Demo menu screen, tap ok or Options > Exit Select Printer.
About Wi-Fi PrintingFeatures Demo attempts to automatically detect the printer. If the detection is successful, the printer, printer head width, and printer language appear.
If the printer is not automatically detected or the settings are invalid, you can change these values. For help, see “Supported Printers” on page 32.

30 Intermec Features Demo User Guide
To establish a printer connection using Wi-Fi1 On the Features Demo menu screen, tap Print Sample. If an error
appears, tap ok to continue to the Printing menu screen.
2 In the navigation bar, tap Wi-Fi.
3 Type or scan your IP Address and TCP Port.
4 Tap OK.

Intermec Features Demo User Guide 31
Printing a Sample DocumentThe Features Demo installation file provides receipt and label samples in your \My Documents\DemoDocuments folder. You can add and print additional files from this folder if you use the following file naming convention:
Language_Printer Width_Document Name.prn
The following list provides examples of the file naming convention:
• ESCP_2_ Sample_Customer_List.prn
• FP_3_ UPS_Ground_Label.prn
• IPL_4_ UPS_Next_Day_Air_Label.prn
• XSIM_3_ Sample_Customer_List.prn
To print a sample document1 On the Features Demo menu screen, tap Print Sample. If an error
message appears, tap ok to continue.
2 If necessary, select the Printer Language and Printhead Width. For help determining these values, see “Supported Printers” on page 32.
3 Use the Selected Document drop-down menu to select a sample document. Only documents supported by the printer appear in the menu.
4 To print a sample document, tap Print.
5 To return to the Features Demo menu, tap ok or Exit.

32 Intermec Features Demo User Guide
About Global Positioning System (GPS)You can connect your mobile computer to GPS using:
• the Bluetooth GPS receiver.
• the internal GPS functionality on the computer.
For more information on connecting to GPS, see your mobile computer user’s manual.
When the GPS is in 2D or 3D mode, information is gathered from the GPS sentence, which is read by the GPS receiver. The following information appears on the GPS main screen:
• Location
• Altitude
• Velocity
• Heading
• HDOP
The GPS main screen also displays the connection status. Use the fix icons to determine the GPS connection status.
GPS Fix Icons
Status Icon Status Icon
No Data 2D
No Fix 3D

Intermec Features Demo User Guide 33
Using GPS1 On the Features Demo menu screen, tap GPS (status).
2 On the navigation bar, tap Connect.
3 The GPS information appears.
Your computer can display the GPS coordinates in many different formats.
To select the GPS display format1 On the Features Demo menu screen, tap GPS (status).
2 On the bottom navigation bar, tap Options > Settings tab.
3 Select your preferred display format.
4 To return to the GPS menu screen, tap Options > Discard Changes and Exit or Save Changes and Exit.

34 Intermec Features Demo User Guide
Viewing Stored GPS Data from Pictures and ImagesYour mobile computer writes a GPS record to accompany an image from the camera, document imaging, signature capture, or image capture when the following two conditions are met:
• GPS is turned on.
• The satellite fix type value is 2D or 3D.
The GPS data is stored with the image information.
To view the image GPS data1 On the Features Demo menu screen, tap Gallery.
2 Tap the thumbnail of the image. The enlarged image appears.
3 Tap Options > View Image Info. The GPS text file information appears.
4 To return to the Features Demo menu screen, tap Thumbnails > Options > Exit Gallery.
About the Digital CompassSome mobile computers are equipped with a digital compass. The digital compass enhances GPS navigation.
To use the digital compass1 On the Features Demo screen, tap Compass.
2 Rotate the computer to view the current orientation.
3 Select the Allow 3D Rotate check box to view the orientation in all directions.
4 To return to the Features Demo menu screen, tap ok or Options > Exit Compass.
Intermec Features Demo User Guide 35
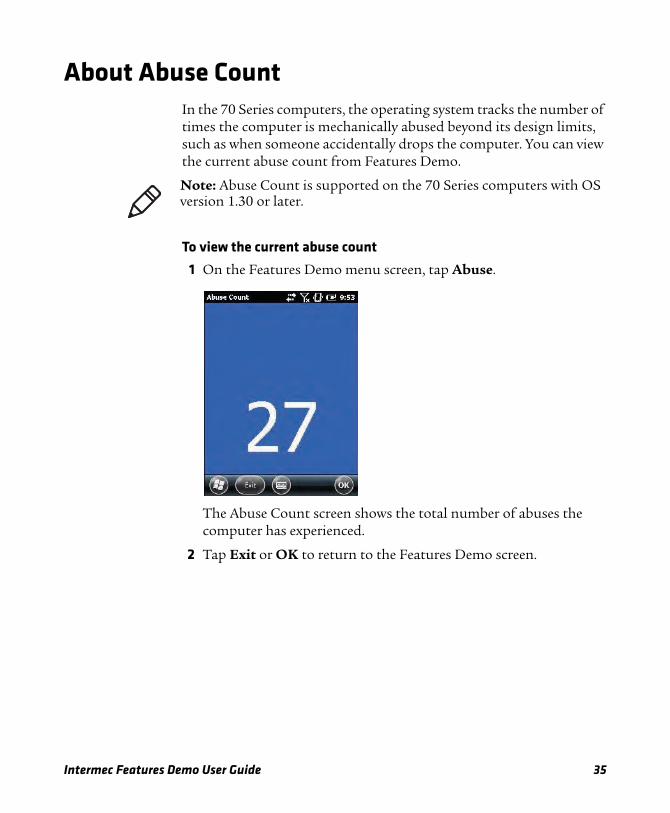
About Abuse CountIn the 70 Series computers, the operating system tracks the number of times the computer is mechanically abused beyond its design limits, such as when someone accidentally drops the computer. You can view the current abuse count from Features Demo.
To view the current abuse count1 On the Features Demo menu screen, tap Abuse.
The Abuse Count screen shows the total number of abuses the computer has experienced.
2 Tap Exit or OK to return to the Features Demo screen.
Note: Abuse Count is supported on the 70 Series computers with OS version 1.30 or later.

36 Intermec Features Demo User Guide
Features Demo SupportThis section provides detailed information about:
• the computers and scanners or imagers supported by Features Demo.
• the printers supported by Features Demo, the printhead width, and the supported printer programming languages.
Supported FeaturesThe following tables show the features offered on a specific mobile computer, depending on the capability of the mobile computer.
Magstripe Reader is supported on the CK70, CK71, CN50, CN70, and CN70e with an attached Magstripe reader, and on the CS40 and CV61 with an attached Bluetooth printer.
CK3 Capabilities
CK3 with EV12 Imager CK3 with EA20 or EX25 Imager
Bar code scanner X X
Gallery X
Image capture X
Printer (label) X X
Signature capture X
CK61 Capabilities
CK61 with ScannerCK61 with Area Imager CK61 with Neither
Bar code scanner X X
Gallery X
GPS (BT) X X X
Image capture X
Printer (receipt or label) X X X
Signature capture X

Intermec Features Demo User Guide 37
CK70/CK71 Capabilities
CK70 / CK71 with EA30 Imager
CK70 / CK71 with EV12 Imager
CK70 / CK71 with EX25 Imager
Abuse count (requires OS v1.30 or later)
X X X
Bar code scanner X X X
Bluetooth X X X
Color camera X X X
eMDI (via camera) X X
Gallery X X X
GPS CK70 only CK70 only CK70 only
Image capture X X (uses camera)
Ink capture X X X
Signature capture X X
Printer (receipt or label) X X X
CN3/CN3e Capabilities
CN3 / CN3e with Color Camera CN3 / CN3e with EA11 Imager
Bar code scanner X
Color camera X
Gallery X X
GPS X X
Image capture X
Printer (receipt) X X
Signature capture X
CN4/CN4e Capabilities
CN4 / CN4e with Color Camera CN4 / CN4e with EA21 Imager
Bar code scanner X
Color camera X
Document capture X
eMDI (via imager) X

38 Intermec Features Demo User Guide
Gallery X X
GPS X X
Image capture X
Printer (either) X X
Signature capture X
CN50 Capabilities
CN50 with EA11 Imager CN50 with EA21 Imager
Accelerometer X X
Bar code scanner X X
Color camera X X
Digital compass X X
Document capture X
Gallery X X
GPS X X
Ink capture X X
Printer (receipt) X X
Signature capture X X
CN70/CN70e Capabilities
CN70 / CN70e with EA30 Imager
Abuse count (requires OS v1.30 or later)
X
Bar code scanner X
Bluetooth X
Color camera X
eMDI (via camera) X
Gallery X
GPS X
Image capture X
Ink capture X
CN4/CN4e Capabilities (continued)
CN4 / CN4e with Color Camera CN4 / CN4e with EA21 Imager

Intermec Features Demo User Guide 39
Signature capture X
Printer (receipt) X
CS40 Capabilities
CS40 with EA11 Imager
Accelerometer X
Bar code scanner X
Bluetooth X
Color camera X
Gallery X
GPS X
Ink capture X
Printer (receipt) X
Signature capture X
CN70/CN70e Capabilities (continued)
CN70 / CN70e with EA30 Imager
CV61 Capabilities
CV61 with SF51, SR30, or SR61T Scanners
Bar code scanner X
Bluetooth X
Ink capture X
Printer (receipt) X
40 Intermec Features Demo User Guide
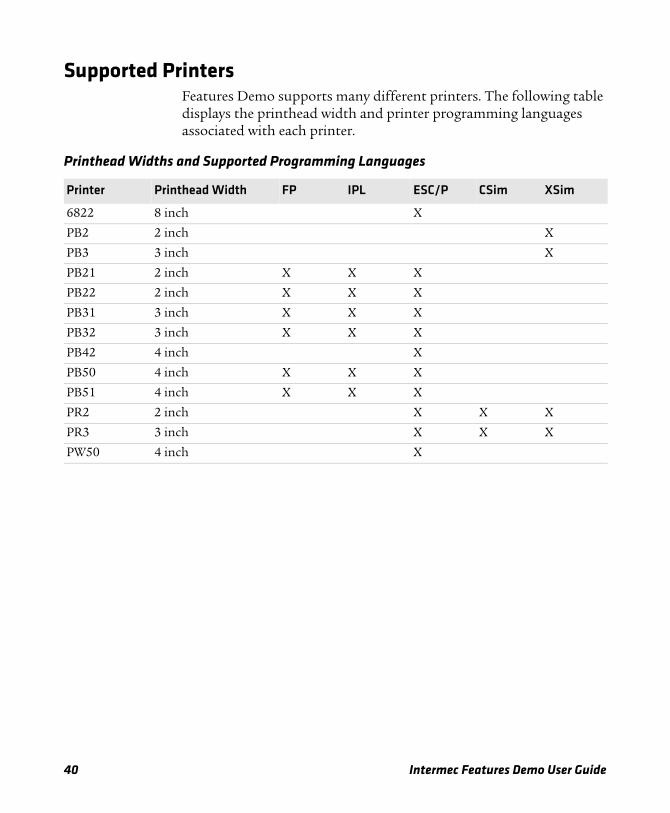
Supported PrintersFeatures Demo supports many different printers. The following table displays the printhead width and printer programming languages associated with each printer.
Printhead Widths and Supported Programming Languages
Printer Printhead Width FP IPL ESC/P CSim XSim
6822 8 inch X
PB2 2 inch X
PB3 3 inch X
PB21 2 inch X X X
PB22 2 inch X X X
PB31 3 inch X X X
PB32 3 inch X X X
PB42 4 inch X
PB50 4 inch X X X
PB51 4 inch X X X
PR2 2 inch X X X
PR3 3 inch X X X
PW50 4 inch X


Worldwide Headquarters6001 36th Avenue WestEverett, Washington 98203U.S.A.tel 425.348.2600fax 425.355.9551www.intermec.com
© 2012 Intermec Technologies Corporation. All rights reserved.
Intermec Features Demo User Guide
*934-056-005*P/N 934-056-005


