Contents Introducing Office 2007 9 Microsoft Office 2007 10 Ribbon Technology 11 What’s Needed 12 Installing Office 2007 13 Start an Application 14 The Application Window 15 Live Preview 16 Save the Document 18 Working With the Ribbon 19 Quick Access Toolbar 20 Office Document Types 21 File Extensions 22 Compatibility Mode 23 Convert to Office 2007 24 Solving Problems 25 Create Word Documents 27 Start a Word Document 28 Enter Text 29 Select and Copy Text 30 Save the Document 32 Correct Proofing Errors 33 Change Proofing Settings 34 Apply Styles 35 Outline View 36 Insert a Picture 38 Page Layout 40 Display in Columns 41 Word Count 42 Create a Table 43 Convert Text 44 1 Contents 2
Transcript
Contents
Introducing Office 2007 9
Microsoft Office 2007 10Ribbon Technology 11What’s Needed 12Installing Office 2007 13Start an Application 14The Application Window 15Live Preview 16Save the Document 18Working With the Ribbon 19Quick Access Toolbar 20Office Document Types 21File Extensions 22Compatibility Mode 23Convert to Office 2007 24Solving Problems 25
CreateWordDocuments 27
Start a Word Document 28Enter Text 29Select and Copy Text 30Save the Document 32Correct Proofing Errors 33Change Proofing Settings 34Apply Styles 35Outline View 36Insert a Picture 38Page Layout 40Display in Columns 41Word Count 42Create a Table 43Convert Text 44
1
Contents
2
Paste Special 45Print Document 46
ComplexDocuments 47
Start a Booklet 48Choose Page Arrangement 49Create the Structure 50Import Text 52Insert Illustrations 54Add Captions 55Table of Contents 56Table of Illustrations 58Insert Preface 60Update Table of Contents 61Decorate the Page 62Templates 64Publisher 66Create a Publication 67Print the Publication 68
Calculations 69
Start Excel 70Enter Data 72Quick Fill 74Sums and Differences 76Formatting 78Rounding Up 80Find a Function 82Goal Seeking 84Templates 86
4
3
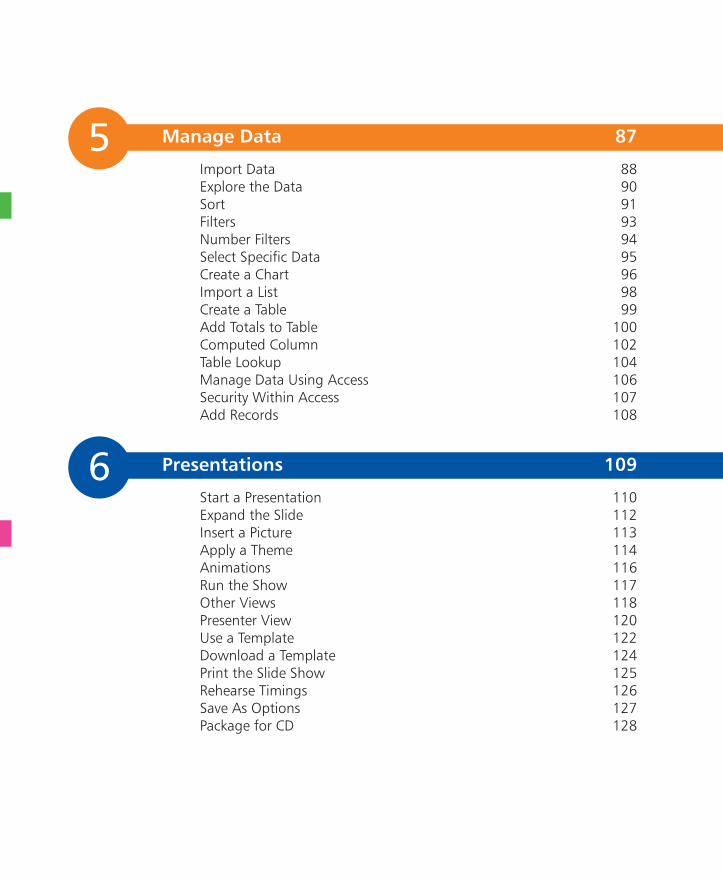
ManageData 87
Import Data 88Explore the Data 90Sort 91Filters 93Number Filters 94Select Specific Data 95Create a Chart 96Import a List 98Create a Table 99Add Totals to Table 100Computed Column 102Table Lookup 104Manage Data Using Access 106Security Within Access 107Add Records 108
Presentations 109
Start a Presentation 110Expand the Slide 112Insert a Picture 113Apply a Theme 114Animations 116Run the Show 117Other Views 118Presenter View 120Use a Template 122Download a Template 124Print the Slide Show 125Rehearse Timings 126Save As Options 127Package for CD 128
Paste Special 45Print Document 46
ComplexDocuments 47
Start a Booklet 48Choose Page Arrangement 49Create the Structure 50Import Text 52Insert Illustrations 54Add Captions 55Table of Contents 56Table of Illustrations 58Insert Preface 60Update Table of Contents 61Decorate the Page 62Templates 64Publisher 66Create a Publication 67Print the Publication 68
Calculations 69
Start Excel 70Enter Data 72Quick Fill 74Sums and Differences 76Formatting 78Rounding Up 80Find a Function 82Goal Seeking 84Templates 86
5
6
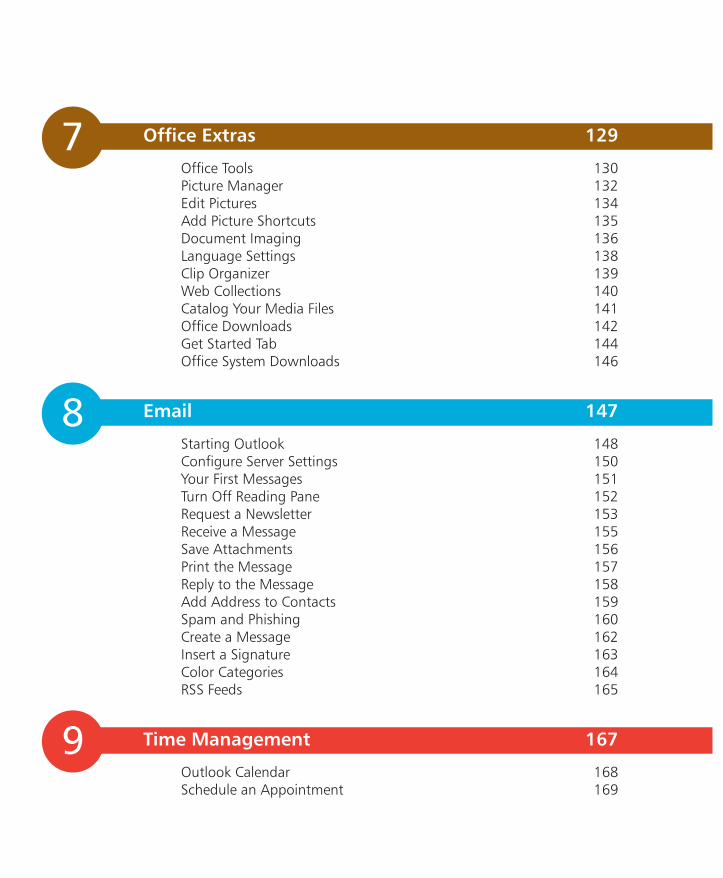
Office Extras 129
Office Tools 130Picture Manager 132Edit Pictures 134Add Picture Shortcuts 135Document Imaging 136Language Settings 138Clip Organizer 139Web Collections 140Catalog Your Media Files 141Office Downloads 142Get Started Tab 144Office System Downloads 146
Email 147
Starting Outlook 148Configure Server Settings 150Your First Messages 151Turn Off Reading Pane 152Request a Newsletter 153Receive a Message 155Save Attachments 156Print the Message 157Reply to the Message 158Add Address to Contacts 159Spam and Phishing 160Create a Message 162Insert a Signature 163Color Categories 164RSS Feeds 165
TimeManagement 167
Outlook Calendar 168Schedule an Appointment 169
7
8
9
Office Extras 129
Office Tools 130Picture Manager 132Edit Pictures 134Add Picture Shortcuts 135Document Imaging 136Language Settings 138Clip Organizer 139Web Collections 140Catalog Your Media Files 141Office Downloads 142Get Started Tab 144Office System Downloads 146
Email 147
Starting Outlook 148Configure Server Settings 150Your First Messages 151Turn Off Reading Pane 152Request a Newsletter 153Receive a Message 155Save Attachments 156Print the Message 157Reply to the Message 158Add Address to Contacts 159Spam and Phishing 160Create a Message 162Insert a Signature 163Color Categories 164RSS Feeds 165
TimeManagement 167
Outlook Calendar 168Schedule an Appointment 169
Change Appointment Details 170Recurring Appointments 171Create a Meeting 172Respond to an Invitation 174Report Free/Busy Time 176Schedule a Meeting 178Add Holidays 179Creating Tasks 180Assigning Tasks 182Accepting Task Requests 183Confirming the Assignment 184Notes 186Journal 188
ManageFiles 189
Windows XP Versus Vista 190Finding Files 192Recent Documents 194XML File Formats 196Save As PDF or XPS 198Fonts in Office 2007 200Create and Run ListAllMacros 202Document Recovery 204
Up to Date and Secure 205
Enable Updates 206Run Microsoft Update 208Office Help 210Explore Help Topics 211Online Help 212Developer Reference 213Remove Personal Information 214Protect Your Documents 216Restrict Permission 218Trust Center 220
11
10
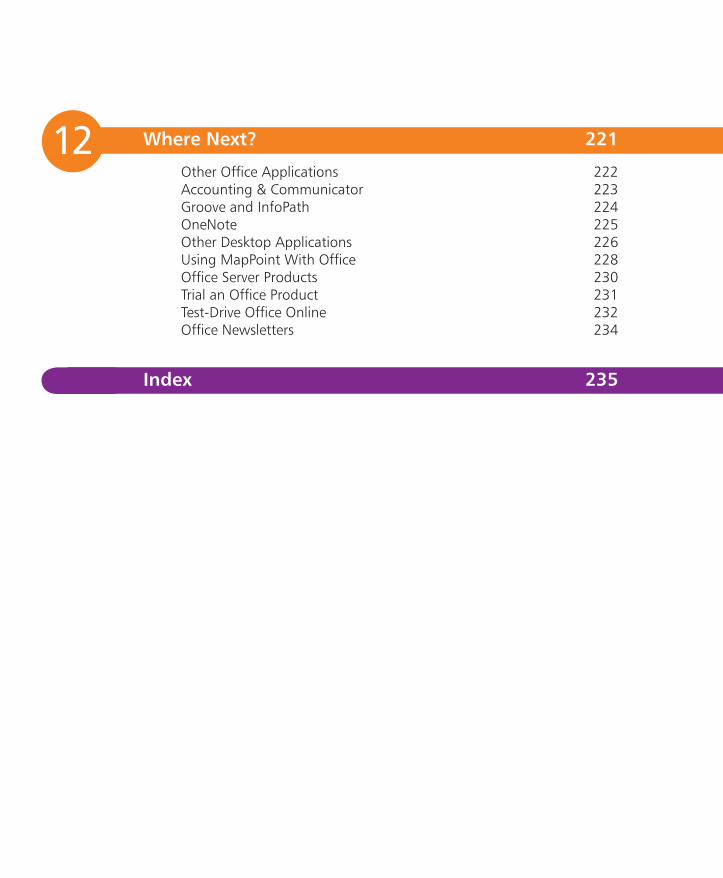
WhereNext? 221
Other Office Applications 222Accounting & Communicator 223Groove and InfoPath 224OneNote 225Other Desktop Applications 226Using MapPoint With Office 228Office Server Products 230Trial an Office Product 231Test-Drive Office Online 232Office Newsletters 234
Index 235
12
This chapter discusses the
latest version of Microsoft
Office with its new style of
user interface. It identifies
the range of editions and
outlines the requirements
for installation. Also covered
are the process of starting
applications, the main
features shared by Office
applications, a summary
of the new Office document
types and compatibility with
the older versions.
Microsoft Office 2007
Ribbon Technology
What’s Needed
Installing Office 2007
Start an Application
The Application Window
Live Preview
Save the Document
Working With the Ribbon
Quick Access Toolbar
Office Document Types
File Extensions
Compatibility Mode
Convert to Office 2007
Solving Problems
10
11
12
13
14
15
16
18
19
20
21
22
23
24
25
Introducing Office 20071
10In
trod
ucin
g O
ffice
200
7
}
Microsoft Office 2007
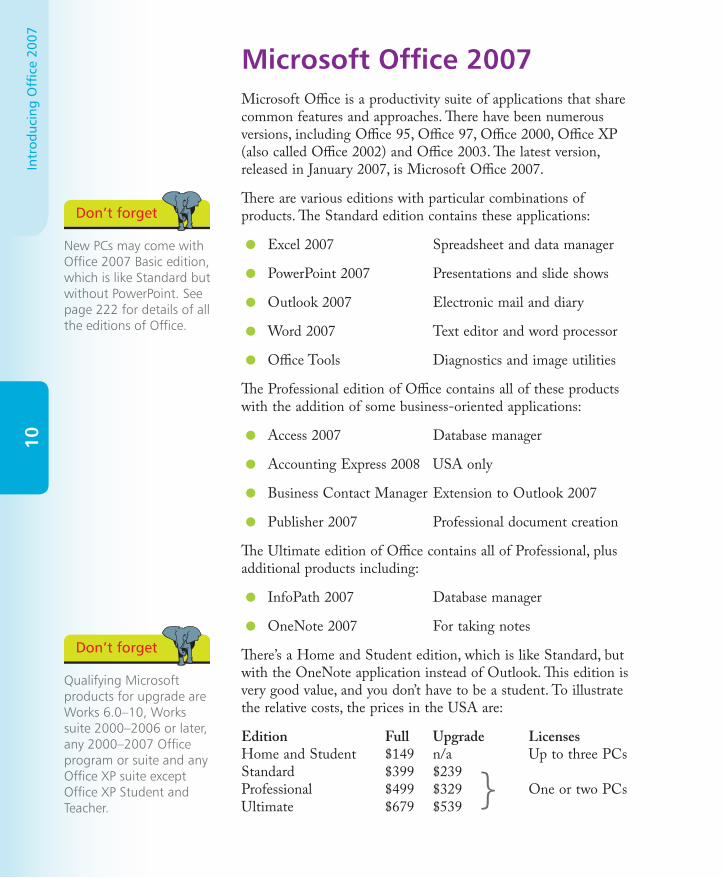
New PCs may come with Office 2007 Basic edition, which is like Standard but without PowerPoint. See page 222 for details of all the editions of Office.
Microsoft Office is a productivity suite of applications that share common features and approaches. There have been numerous versions, including Office 95, Office 97, Office 2000, Office XP (also called Office 2002) and Office 2003. The latest version, released in January 2007, is Microsoft Office 2007.
There are various editions with particular combinations of products. The Standard edition contains these applications:
• Excel 2007 Spreadsheet and data manager
• PowerPoint 2007 Presentations and slide shows
• Outlook 2007 Electronic mail and diary
• Word 2007 Text editor and word processor
• Office Tools Diagnostics and image utilities
The Professional edition of Office contains all of these products with the addition of some business-oriented applications:
• Access 2007 Database manager
• Accounting Express 2008 USA only
• Business Contact Manager Extension to Outlook 2007
• Publisher 2007 Professional document creation
The Ultimate edition of Office contains all of Professional, plus additional products including:
• InfoPath 2007 Database manager
• OneNote 2007 For taking notes
There’s a Home and Student edition, which is like Standard, but with the OneNote application instead of Outlook. This edition is very good value, and you don’t have to be a student. To illustrate the relative costs, the prices in the USA are:
Edition Full Upgrade Licenses Home and Student $149 n/a Up to three PCs Standard $399 $239 Professional $499 $329 One or two PCs Ultimate $679 $539
Qualifying Microsoft products for upgrade are Works 6.0–10, Works suite 2000–2006 or later, any 2000–2007 Office program or suite and any Office XP suite except Office XP Student and Teacher.
11
The new user interface also features extended ScreenTips that can contain images and links to more help, as well as text. The tips are displayed when you move the mouse pointer over a command, and they describe what the commands are able to do.
The result-oriented user interface in Office 2007 is officially known as Microsoft Office Fluent, but more commonly referenced as the Ribbon.
The Ribbon is featured in Word, Excel, PowerPoint, Access and (to a limited extent) Outlook. Other Office applications in the suite will be upgraded to the new user interface in later versions.
Whichever edition you have, the most notable feature of Office 2007 is the entirely new graphical user interface based on the Ribbon technology. This replaces the menus and toolbars that were the essence of all previous versions.
The Ribbon contains command buttons and icons, organized in a set of tabs, each containing groups of commands associated with specific functions. The purpose is to make the relevant features more intuitive and more readily available. This allows you to concentrate on the tasks you want to perform rather than the details of how you will carry out the activities.
Some tabs appear only when certain objects are selected. These are known as contextual tabs and provide functions that are specific to the selected object, for example an inserted image:
Ribbon Technology
12In
trod
ucin
g O
ffice
200
7
What’s Needed
The larger amount of disk space is required for the more comprehensive editions of Office 2007, such as Professional or Ultimate.
The illustrations in this book are usually based on Office Ultimate edition running under Windows Vista Ultimate. However, the tasks shown generally apply to any edition or operating environment.
These are the minimum requirements. A higher-speed processor with additional memory is the preferred configuration.
To use Microsoft Office 2007, you will need at least the following components in your computer:
• 500 MHz processor
• 256 MB memory
• 1.5–3.0 GB available disk space
• CD-ROM or DVD drive
• 1024×768-resolution monitor
• Windows Vista or Windows XP with SP2
Some functions impose more stringent requirements, for example:
• 512 MB memory for Outlook Instant Search
• 1.0 GB memory for Word grammar and contextual spelling
• Internet connection for online help
If your computer is running Windows Vista, you’ll find that the system specifications already meet or exceed requirements for Office 2007. You’ll also find that the Office 2007 user interface coordinates well with the visual style of Windows Vista and Aero.
13
If you’ve purchased a new copy of Office 2007, you will need to install it onto your computer. Insert the supplied CD or DVD, enter the 25-character product key and accept the terms and conditions. Follow the prompts to complete the installation.
l1 Select Install Now to accept the default settings
If you have an older version of Office, you may be offered the option to upgrade the existing installation.
Click the Microsoft Office entry and select “Run all from My Computer”, to install extras for all the components.
Installing Office 2007
l2 Select Customize to choose how items are installed, then click a component and choose “Run all from My Computer” to include all the extras
l3 Select Not Available to exclude the selected component
14In
trod
ucin
g O
ffice
200
7
Start an Application
This shows Windows Vista. However, the same folders are added to the Windows XP Start Menu.
Activating an application in Office activates all the other applications in the suite at the same time.
If you choose not to activate immediately, you can run the software for a total of 25 times before it makes features unavailable.
When you have installed Office 2007, a new folder of shortcuts will be added to the Start Menu.
l1 Select Start, All Programs
l2 Select Microsoft Office to display all the installed applications
l3 Select Microsoft Office Tools to display the various utilities
l4 Select the application that you wish to run, for example Word 2007
When you start any Office application, you are reminded that you must activate your installation to fully enable all the features.
l5 You can activate your copy of Office 2007 over the Internet or by telephone
15
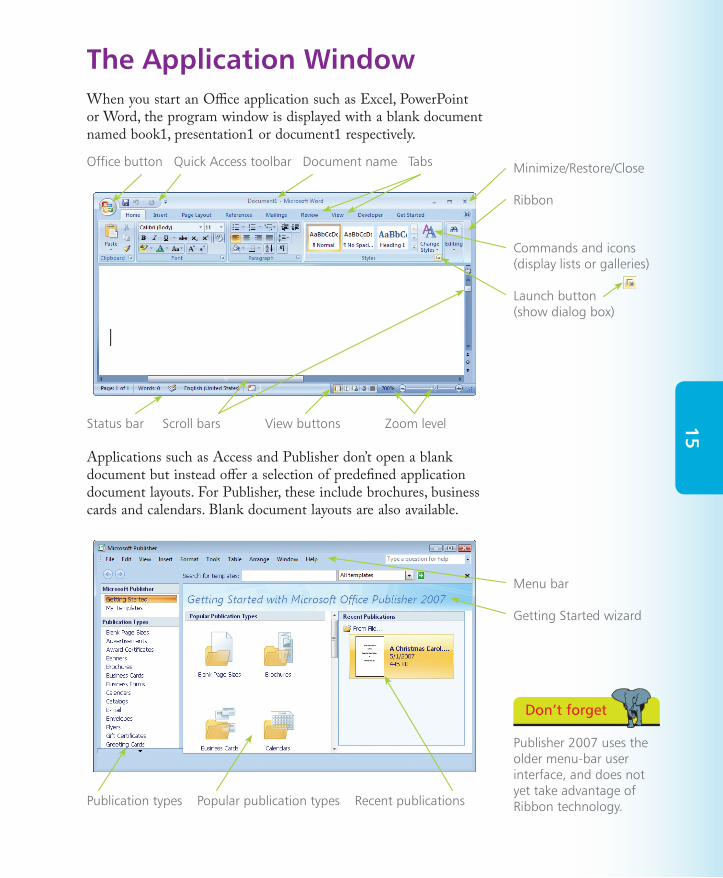
The Application WindowWhen you start an Office application such as Excel, PowerPoint or Word, the program window is displayed with a blank document named book1, presentation1 or document1 respectively.
Office button Quick Access toolbar Document name Tabs
Status bar Scroll bars View buttons Zoom level
Applications such as Access and Publisher don’t open a blank document but instead offer a selection of predefined application document layouts. For Publisher, these include brochures, business cards and calendars. Blank document layouts are also available.
Minimize/Restore/Close
Ribbon
Commands and icons (display lists or galleries)
Launch button (show dialog box)
Publication types Popular publication types Recent publications
Menu bar
Getting Started wizard
Publisher 2007 uses the older menu-bar user interface, and does not yet take advantage of Ribbon technology.
16In
trod
ucin
g O
ffice
200
7
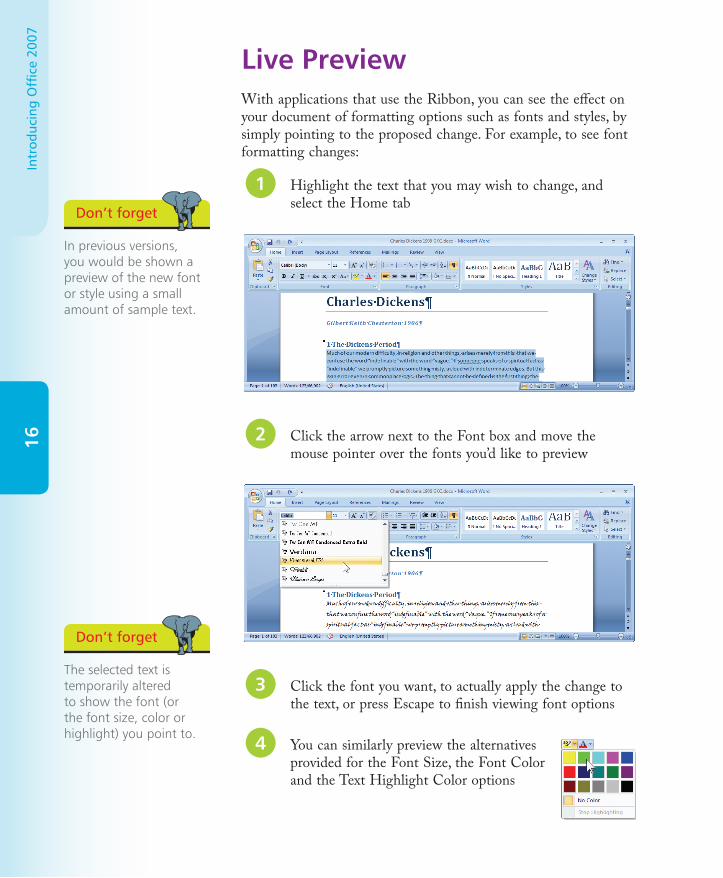
Live PreviewWith applications that use the Ribbon, you can see the effect on your document of formatting options such as fonts and styles, by simply pointing to the proposed change. For example, to see font formatting changes:
l1 Highlight the text that you may wish to change, and select the Home tab
In previous versions, you would be shown a preview of the new font or style using a small amount of sample text.
The selected text is temporarily altered to show the font (or the font size, color or highlight) you point to.
l2 Click the arrow next to the Font box and move the mouse pointer over the fonts you’d like to preview
l3 Click the font you want, to actually apply the change to the text, or press Escape to finish viewing font options
l4 You can similarly preview the alternatives provided for the Font Size, the Font Color and the Text Highlight Color options
17…cont’d
Live Preview is available for paragraph format options (e.g. bullets, numbering and shading) and for styles.
l1 Highlight the text that you may wish to change, and select the Home tab
l2 Display the list of paragraph options, and move the mouse pointer over any that you want to preview
l3 Display the list of styles (with no text selected) and preview the complete document in a variety of styles
The option will be previewed for the paragraph where the pointer is currently located, if no text has been selected.
This facility is not available in Excel, which does not offer the Paragraph group.
You can turn off Live Preview for individual applications. Click the Office button, select the application Options, click Popular and clear the Enable Live Preview box.
18In
trod
ucin
g O
ffice
200
7
You’ll use the appropriate commands on the Ribbon for each particular application, to create and amend the application document. You should save the document periodically, to avoid the possibility of losing the work you’ve done.
Save the Document
See page 28 for an example of creating a Word document, and page 72 for an Excel workbook.
A name such as book1 or book2 assigned to a blank document is a temporary name and a permanent name must be provided when the document is first saved.
For applications such as Access or Publisher that use the previous user interface, you’d select File, Save.
l1 To save the document, click the Office button and select Save
l2 For a document not yet named and saved, the Save As dialog opens and you can provide a name (or use the suggested name)
l3 On subsequent Saves, the document will be written to disk without any further action needed
19
The Ribbon takes up a significant amount of the window space, especially when you have a lower-resolution display. To hide it:
l1 Right-click the tab row and select Minimize the Ribbon
l2 The Office button, Quick Access toolbar and tab row will still be displayed while the Ribbon is minimized
When the application window is reduced below a certain width or depth, the Ribbon may get automatically hidden, along with the Office button, the tabs row and the Quick Access bar.
Hold down the Alt key and press the keys in sequence, for a two-letter shortcut such as PW (Watermark). Press Esc to go back up a level.
Working With the Ribbon
l3 The Ribbon reappears temporarily when you click one of the tabs, so you can select the required command
l4 Alternatively, press and release the Alt key to display keyboard shortcuts for the tabs
l5 Press Alt + shortcut key, for example Alt+P to select Page Layout, and display the Ribbon and shortcuts for that tab
Repeat step 1 to redisplay the Ribbon.
20In
trod
ucin
g O
ffice
200
7
Quick Access Toolbar
The Save As dialog will open the first time you click Save for a new document (see page 32).
You can click the Office button, then click the application Options, and select Customize to display this dialog.
The Quick Access toolbar contains a set of commands that are independent of the selected tab. There are initially four buttons:
Save Undo Redo Customize
l1 Click the Save button to write the current contents of the application document to the disk drive
l2 Click Undo to reverse the last action, click Redo to re-apply, and click the arrow to select several actions
l3 Click the Customize button to add or remove icons using the list of popular commands
l4 Click More Commands to display the full list of commands, then add and remove entries as desired
You can right-click any command on the Ribbon and select Add to Quick Access Toolbar.


![[MS-OFFDI]: Microsoft Office File Format Documentation … · 2017-09-19 · Microsoft Word 97 Microsoft Word 2000 Microsoft Word 2002 Microsoft Office Word 2003 Microsoft Office](https://static.documents.pub/doc/80x56/5edde022ad6a402d66691993/ms-offdi-microsoft-office-file-format-documentation-2017-09-19-microsoft-word.jpg)


