116
1 State of Connecticut Core-CT Continuing Education Initiative Introduction to Accounts Receivable
| Date post: | 09-Jan-2019 |
| Category: |
Documents |
| Upload: | truongdung |
| View: | 216 times |
| Download: | 0 times |
1
State of ConnecticutCore-CT
Continuing Education Initiative
Introduction to Accounts Receivable
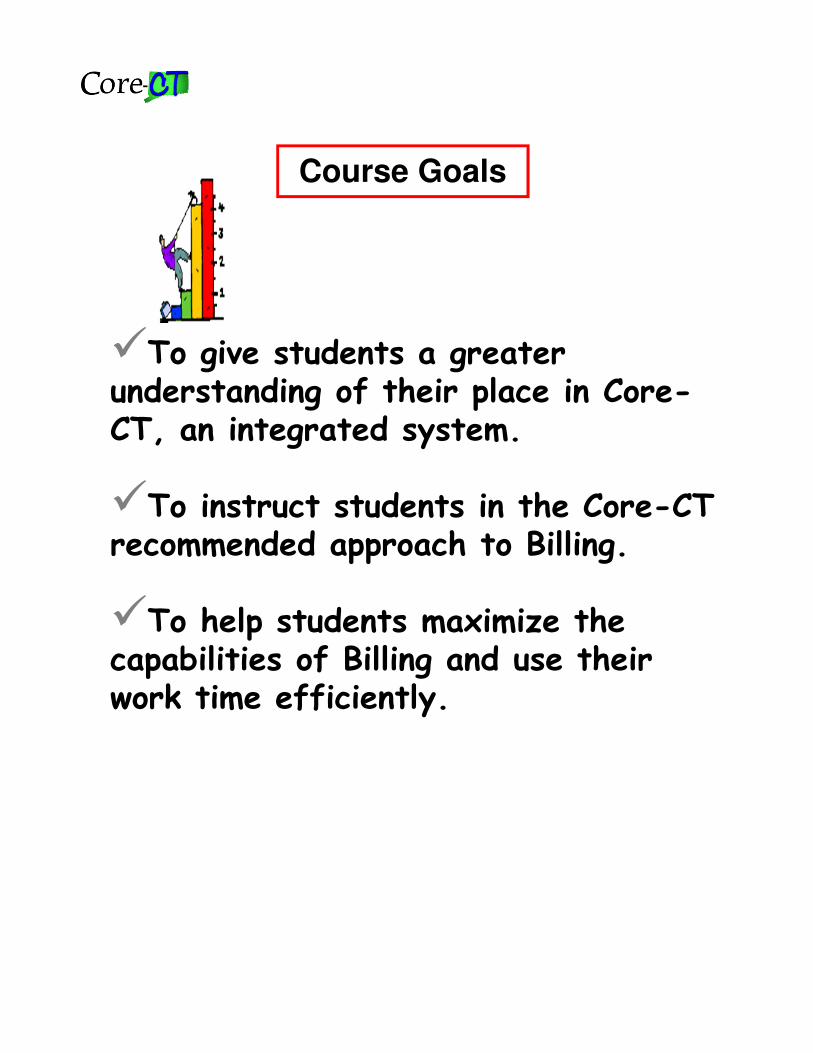
Course Goals
�To give students a greater understanding of their place in Core-CT, an integrated system.
�To instruct students in the Core-CT recommended approach to Billing.
�To help students maximize the capabilities of Billing and use their work time efficiently.
3
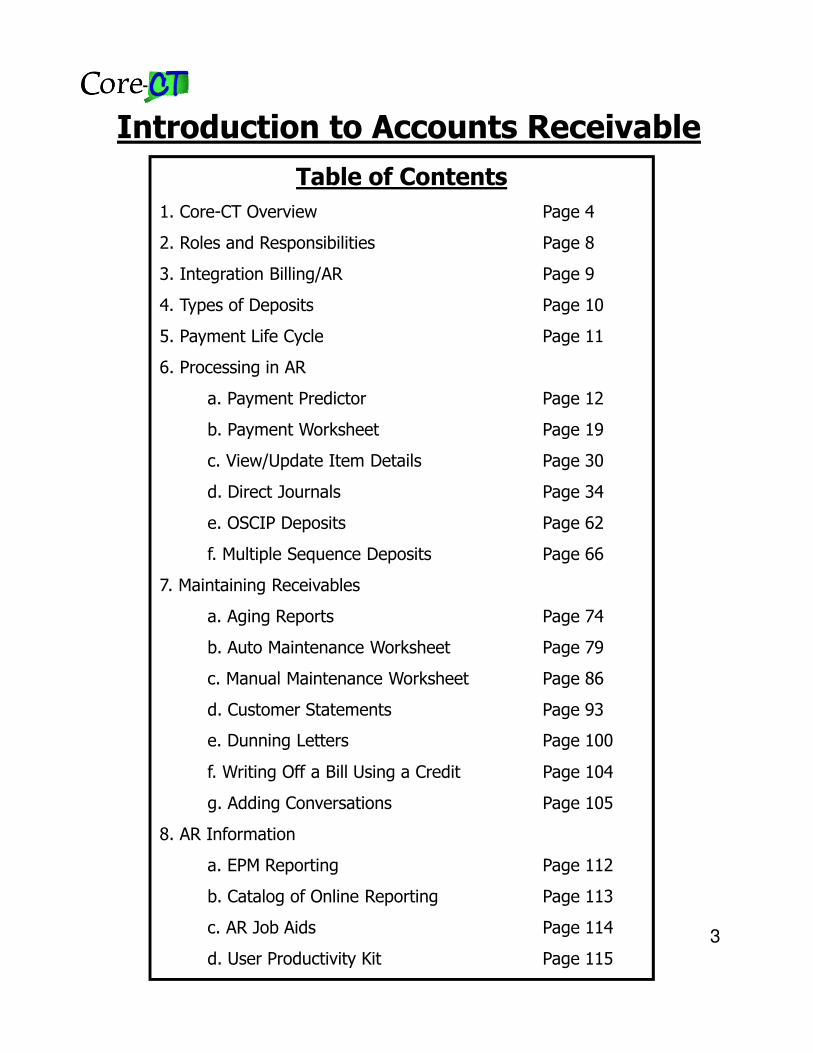
Introduction to Accounts Receivable
Table of Contents
1. Core-CT Overview Page 4
2. Roles and Responsibilities Page 8
3. Integration Billing/AR Page 9
4. Types of Deposits Page 10
5. Payment Life Cycle Page 11
6. Processing in AR
a. Payment Predictor Page 12
b. Payment Worksheet Page 19
c. View/Update Item Details Page 30
d. Direct Journals Page 34
e. OSCIP Deposits Page 62
f. Multiple Sequence Deposits Page 66
7. Maintaining Receivables
a. Aging Reports Page 74
b. Auto Maintenance Worksheet Page 79
c. Manual Maintenance Worksheet Page 86
d. Customer Statements Page 93
e. Dunning Letters Page 100
f. Writing Off a Bill Using a Credit Page 104
g. Adding Conversations Page 105
8. AR Information
a. EPM Reporting Page 112
b. Catalog of Online Reporting Page 113
c. AR Job Aids Page 114
d. User Productivity Kit Page 115
4
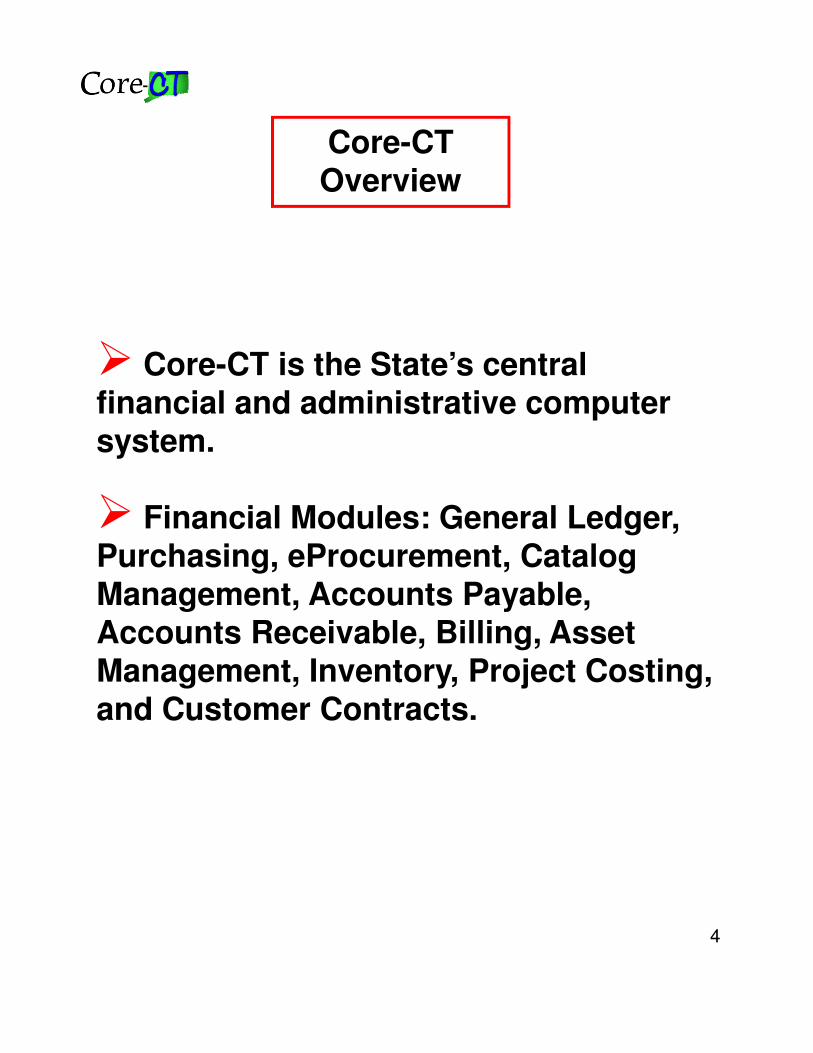
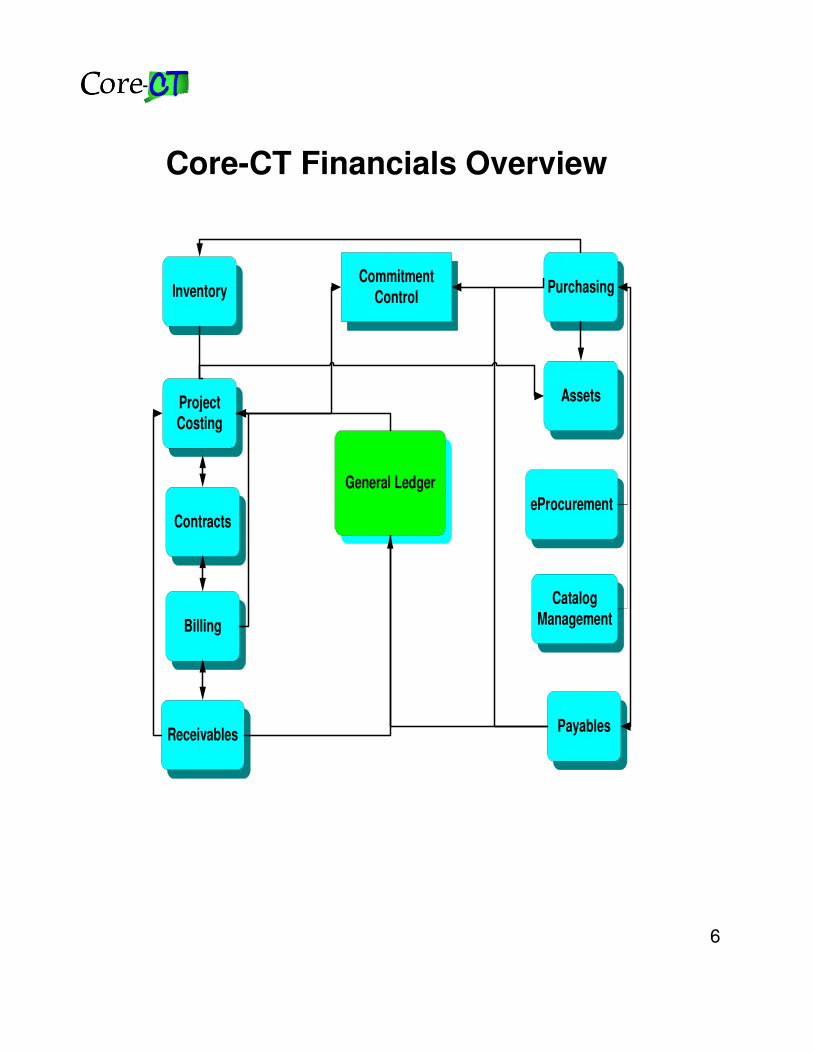
� Core-CT is the State’s central financial and administrative computer system.
� Financial Modules: General Ledger, Purchasing, eProcurement, Catalog Management, Accounts Payable, Accounts Receivable, Billing, Asset Management, Inventory, Project Costing, and Customer Contracts.
Core-CT Overview
5
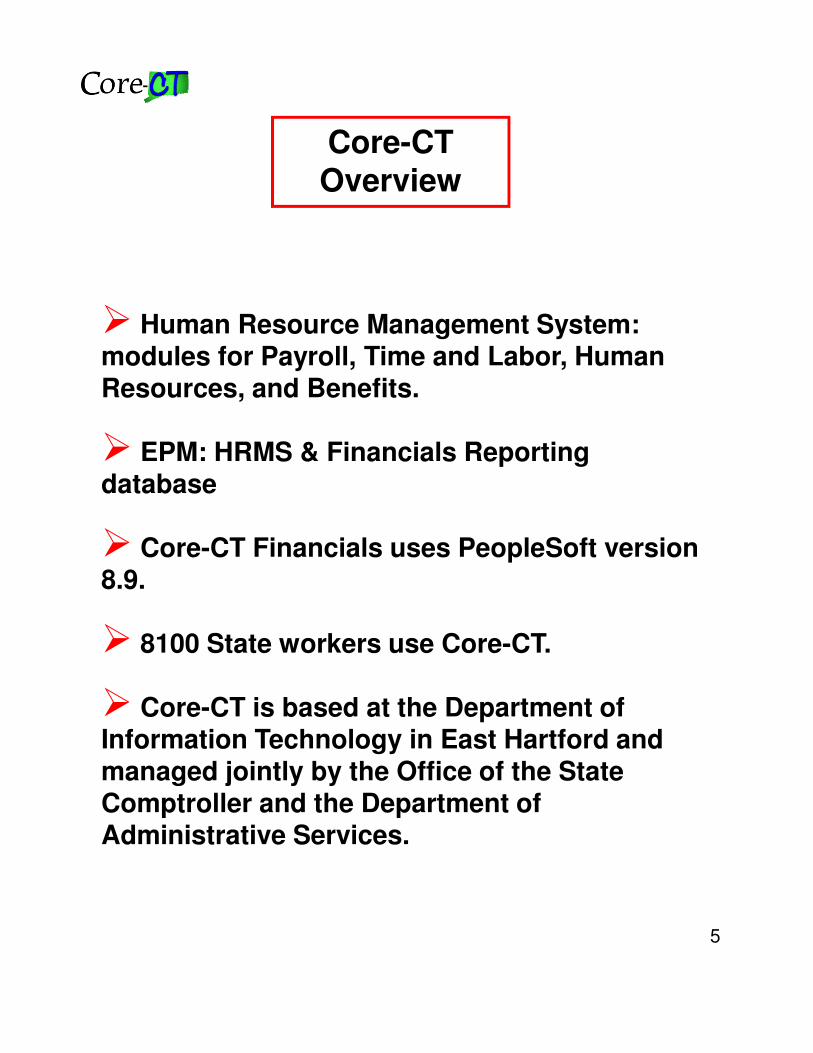
� Human Resource Management System: modules for Payroll, Time and Labor, Human Resources, and Benefits.
� EPM: HRMS & Financials Reporting database
� Core-CT Financials uses PeopleSoft version 8.9.
� 8100 State workers use Core-CT.
� Core-CT is based at the Department of Information Technology in East Hartford and managed jointly by the Office of the State Comptroller and the Department of Administrative Services.
Core-CT Overview
6
Core-CT Financials Overview
Purchasing
General Ledger
ProjectCosting
Payables
CatalogManagement
eProcurement
CommitmentControl
Assets
Inventory
Billing
Receivables
Contracts
7
�Single point of entry for HR, payroll, and financial data
�Improved ability to analyze both fiscal and HR information
�Eliminated redundant systems
�Ability to track statewide expenditures on a programmatic basis
�Continuous improvement in core system functionality
Core-CT Benefits
8
Roles and Responsibilities
Accounts Receivable: Liquid assets that are created as a result of a sale of product or services to a customer.
Receivable Processor: This role is responsible for updating Deposit Payment information and applying payments to customer Receivable Items.
AR Viewer: (Billing Viewer/Report Maker):This role has access to Core-CT delivered reports and inquiries.
EPM User: If the Receivable Processor has access to the EPM (Enterprise Performance Management) module, this role generates queries in accounts receivable.
• Accounts Receivable are usually short-term assets that are turned into cash from the date of the sales transaction.
• The Receivable Processor DRS has the same rights as other agency Receivable Processors. They are also responsible for Item Maintenance.
• The Receivable Processor Manual has the same rights as other agency Receivable Processors. They are also responsible for adding and updating Deposit Payment information. There are only five agencies that have this role: DEP, DMV, DOL, DOT, and TRB.
9
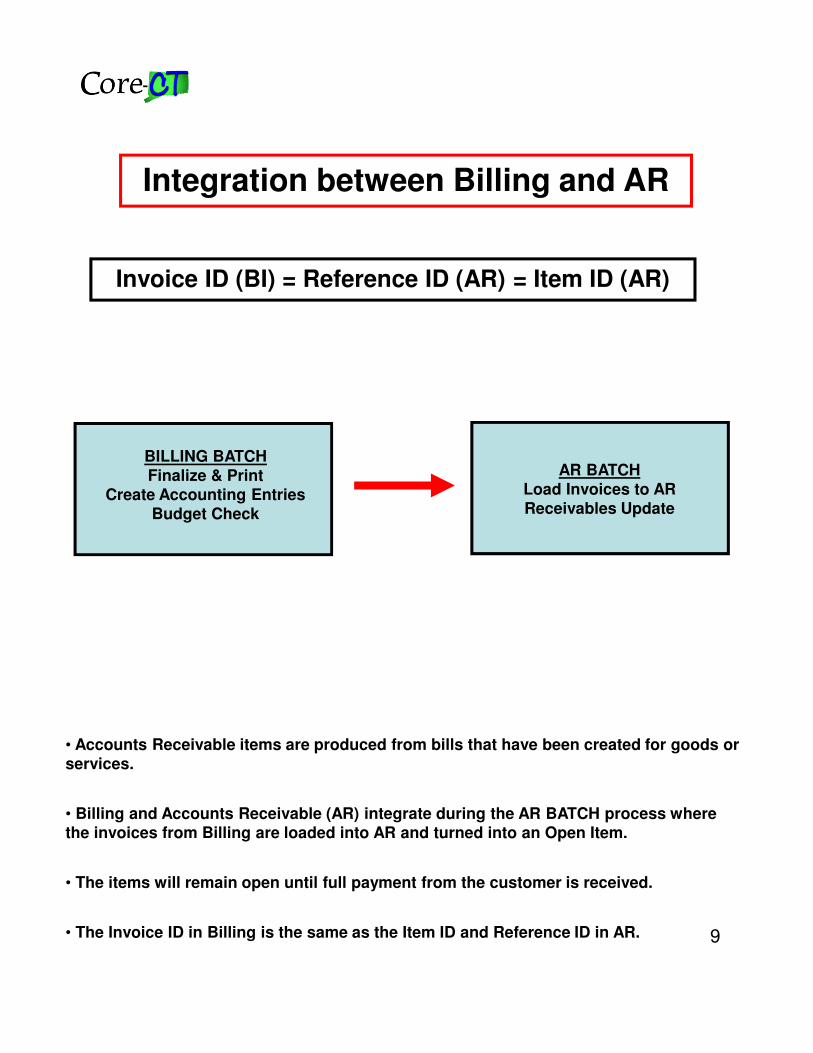
Integration between Billing and AR
• Accounts Receivable items are produced from bills that have been created for goods or services.
• Billing and Accounts Receivable (AR) integrate during the AR BATCH process where the invoices from Billing are loaded into AR and turned into an Open Item.
• The items will remain open until full payment from the customer is received.
• The Invoice ID in Billing is the same as the Item ID and Reference ID in AR.
BILLING BATCHFinalize & Print
Create Accounting EntriesBudget Check
AR BATCHLoad Invoices to ARReceivables Update
Invoice ID (BI) = Reference ID (AR) = Item ID (AR)
10
Types of Deposits
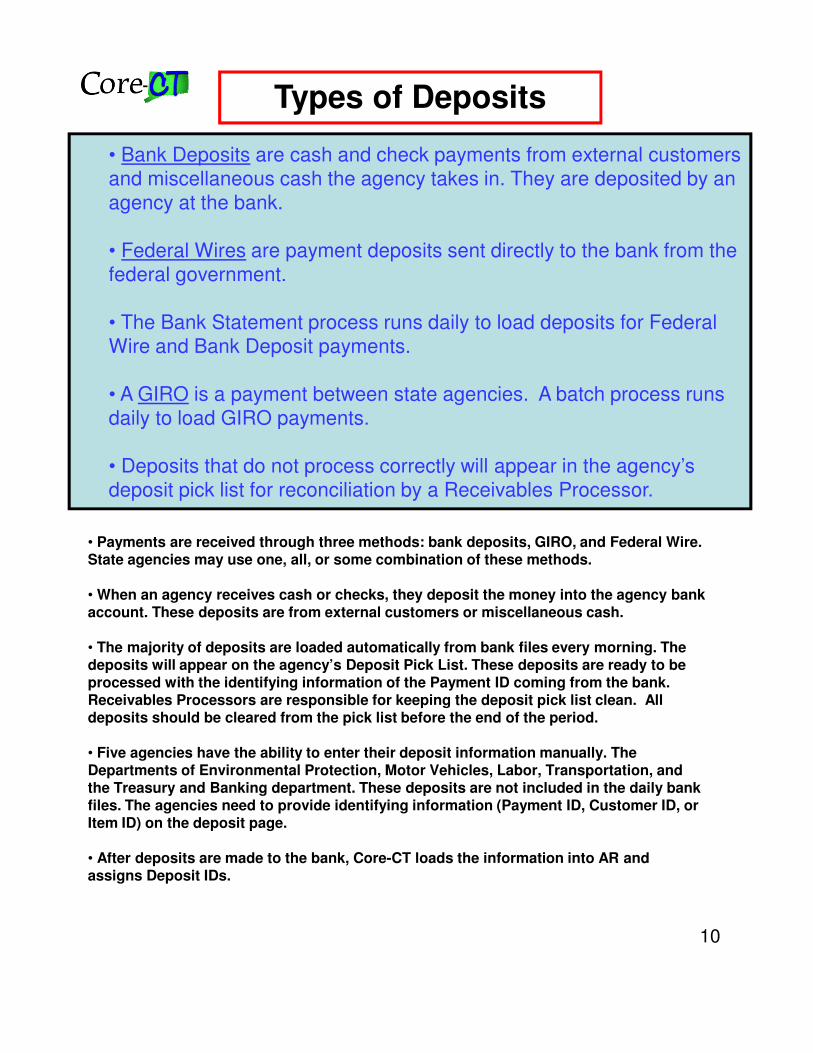
• Payments are received through three methods: bank deposits, GIRO, and Federal Wire. State agencies may use one, all, or some combination of these methods.
• When an agency receives cash or checks, they deposit the money into the agency bank account. These deposits are from external customers or miscellaneous cash.
• The majority of deposits are loaded automatically from bank files every morning. The deposits will appear on the agency’s Deposit Pick List. These deposits are ready to be processed with the identifying information of the Payment ID coming from the bank. Receivables Processors are responsible for keeping the deposit pick list clean. All deposits should be cleared from the pick list before the end of the period.
• Five agencies have the ability to enter their deposit information manually. The Departments of Environmental Protection, Motor Vehicles, Labor, Transportation, and the Treasury and Banking department. These deposits are not included in the daily bank files. The agencies need to provide identifying information (Payment ID, Customer ID, or Item ID) on the deposit page.
• After deposits are made to the bank, Core-CT loads the information into AR and assigns Deposit IDs.
• Bank Deposits are cash and check payments from external customers
and miscellaneous cash the agency takes in. They are deposited by an
agency at the bank.
• Federal Wires are payment deposits sent directly to the bank from the
federal government.
• The Bank Statement process runs daily to load deposits for Federal
Wire and Bank Deposit payments.
• A GIRO is a payment between state agencies. A batch process runs
daily to load GIRO payments.
• Deposits that do not process correctly will appear in the agency’s
deposit pick list for reconciliation by a Receivables Processor.
11
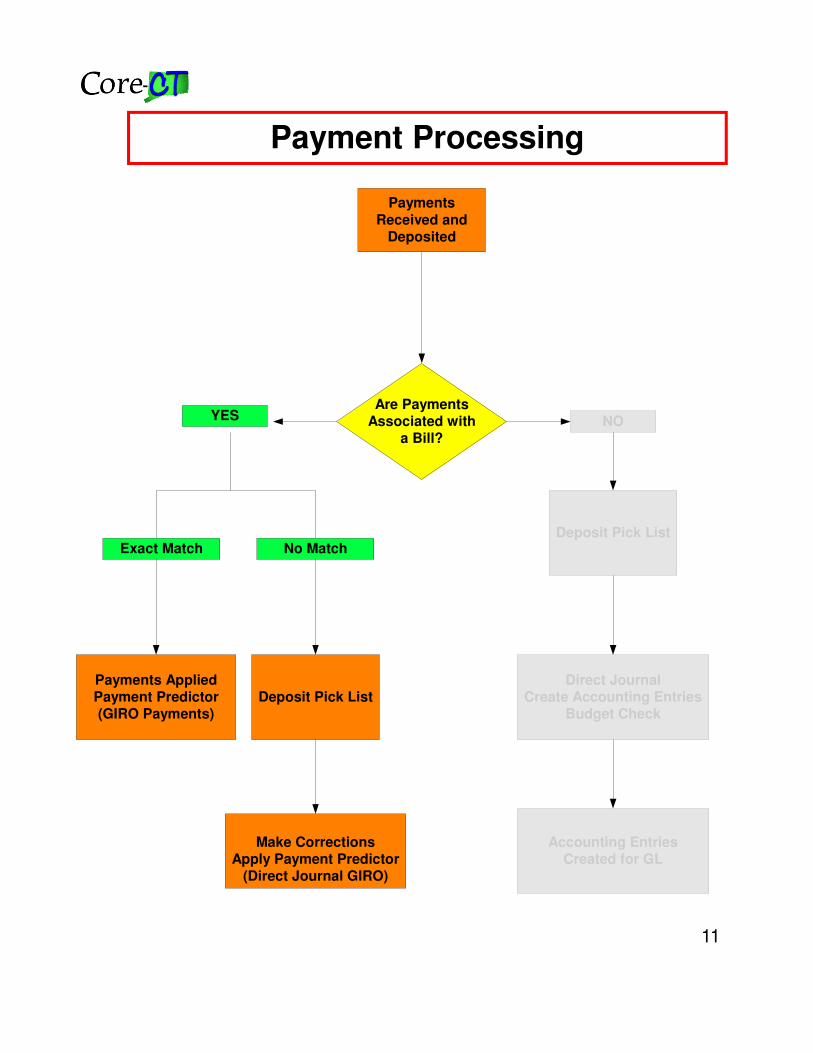
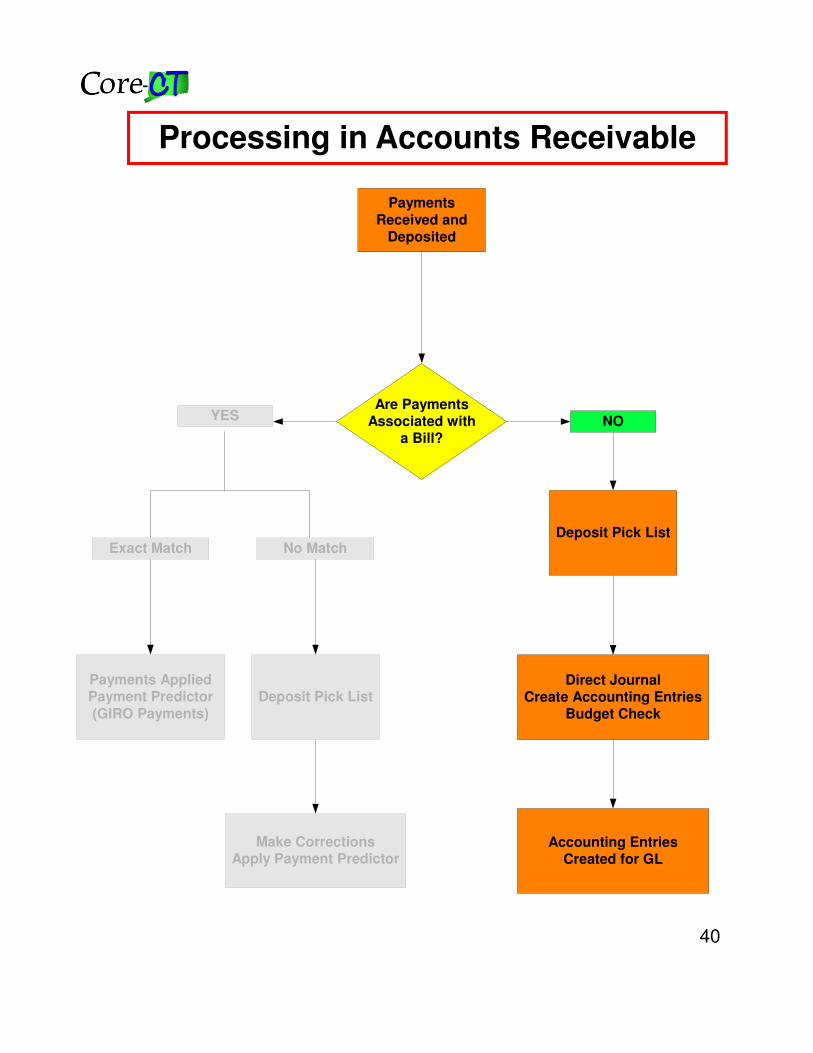
PaymentsReceived and
Deposited
Are PaymentsAssociated with
a Bill?NO
Payments AppliedPayment Predictor(GIRO Payments)
Deposit Pick List
Exact Match No Match
Make CorrectionsApply Payment Predictor
(Direct Journal GIRO)
Deposit Pick List
Direct JournalCreate Accounting Entries
Budget Check
Accounting EntriesCreated for GL
YES
Payment Processing
12
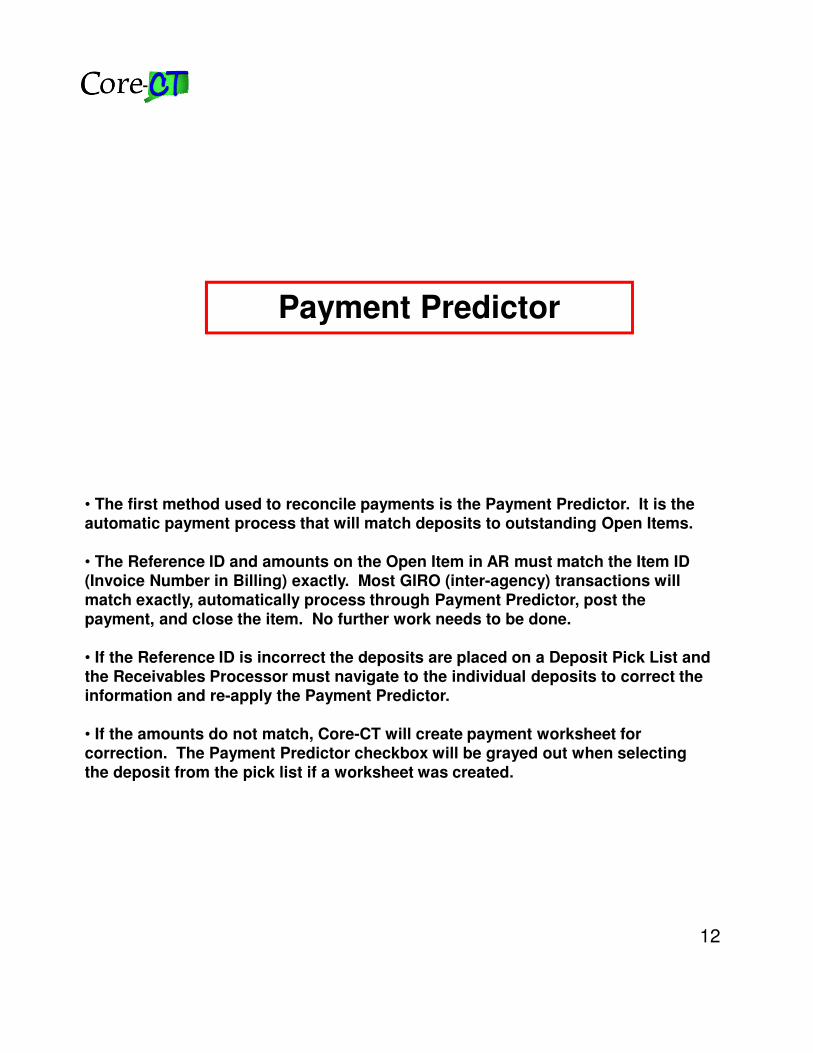
Payment Predictor
• The first method used to reconcile payments is the Payment Predictor. It is the automatic payment process that will match deposits to outstanding Open Items.
• The Reference ID and amounts on the Open Item in AR must match the Item ID (Invoice Number in Billing) exactly. Most GIRO (inter-agency) transactions will match exactly, automatically process through Payment Predictor, post the payment, and close the item. No further work needs to be done.
• If the Reference ID is incorrect the deposits are placed on a Deposit Pick List and the Receivables Processor must navigate to the individual deposits to correct the information and re-apply the Payment Predictor.
• If the amounts do not match, Core-CT will create payment worksheet for correction. The Payment Predictor checkbox will be grayed out when selecting the deposit from the pick list if a worksheet was created.
13
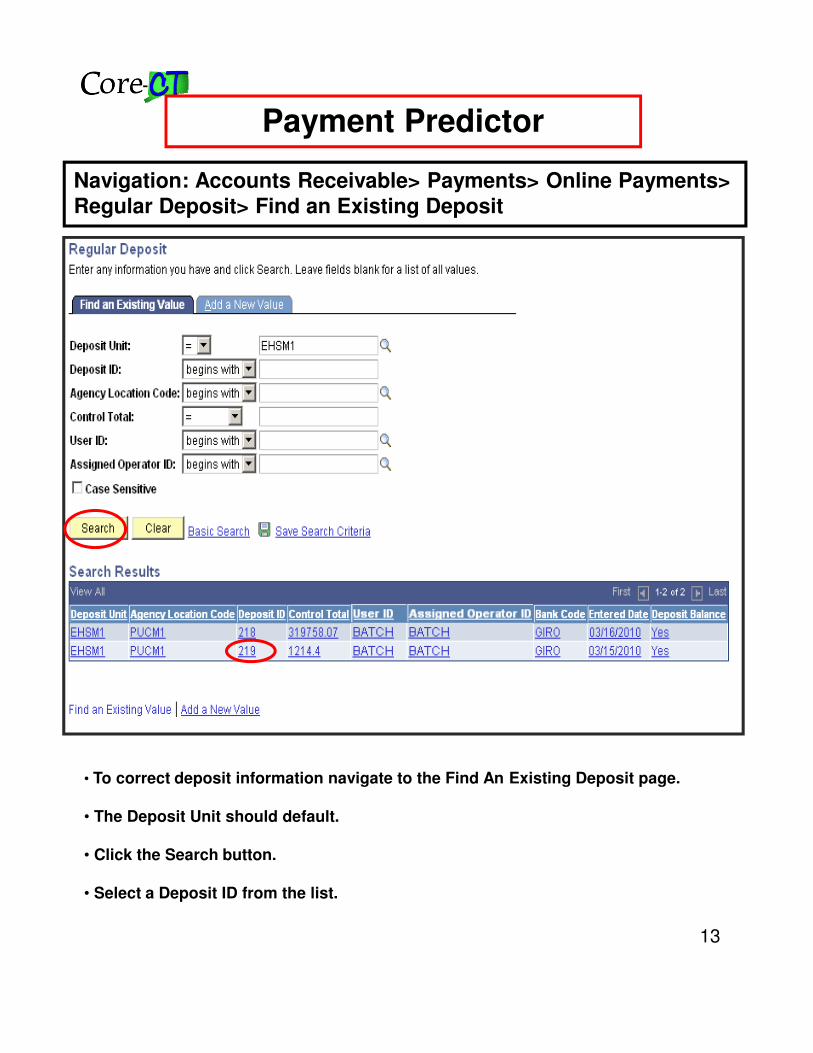
Payment Predictor
• To correct deposit information navigate to the Find An Existing Deposit page.
• The Deposit Unit should default.
• Click the Search button.
• Select a Deposit ID from the list.
Navigation: Accounts Receivable> Payments> Online Payments> Regular Deposit> Find an Existing Deposit
14
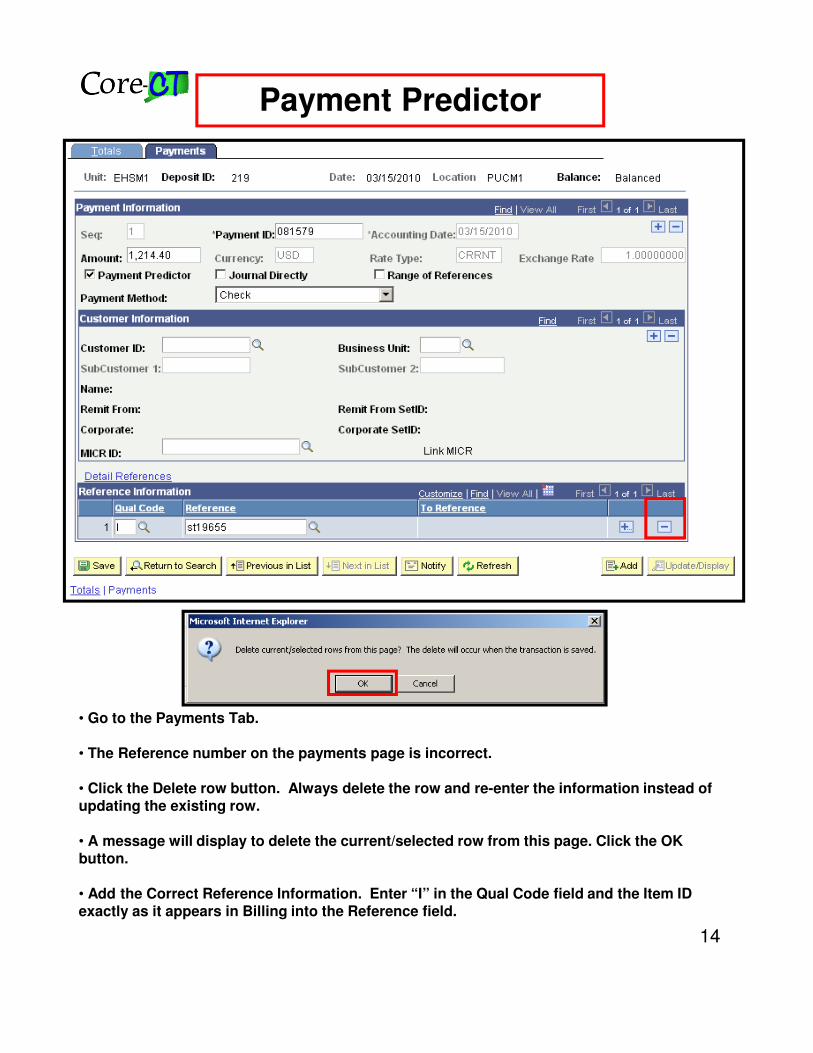
Payment Predictor
• Go to the Payments Tab.
• The Reference number on the payments page is incorrect.
• Click the Delete row button. Always delete the row and re-enter the information instead of updating the existing row.
• A message will display to delete the current/selected row from this page. Click the OK button.
• Add the Correct Reference Information. Enter “I” in the Qual Code field and the Item ID exactly as it appears in Billing into the Reference field.
15
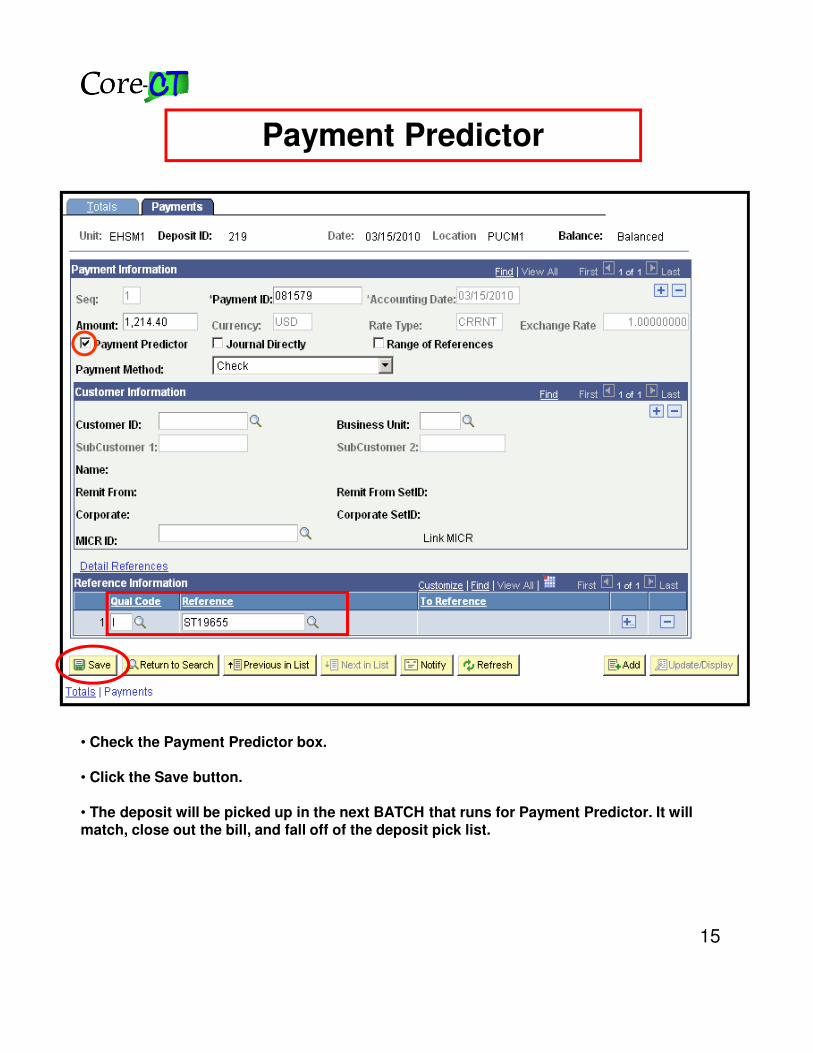
Payment Predictor
• Check the Payment Predictor box.
• Click the Save button.
• The deposit will be picked up in the next BATCH that runs for Payment Predictor. It will match, close out the bill, and fall off of the deposit pick list.
16
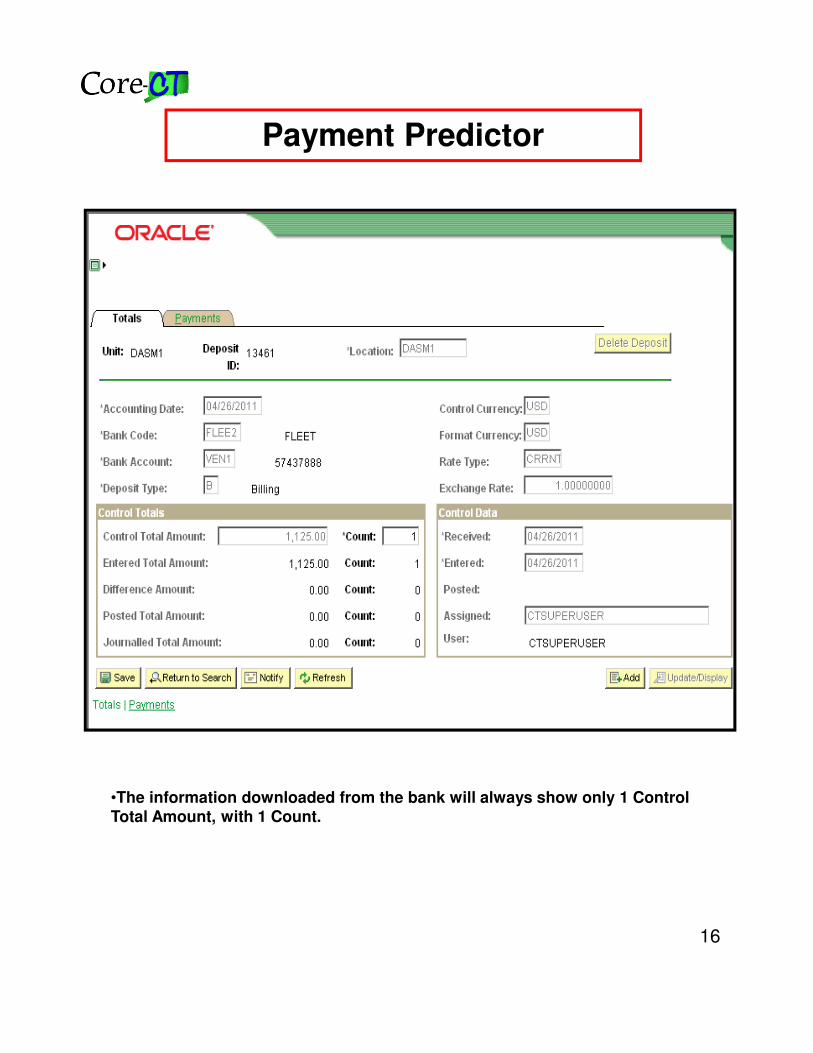
Payment Predictor
•The information downloaded from the bank will always show only 1 Control Total Amount, with 1 Count.
17
Payment Predictor
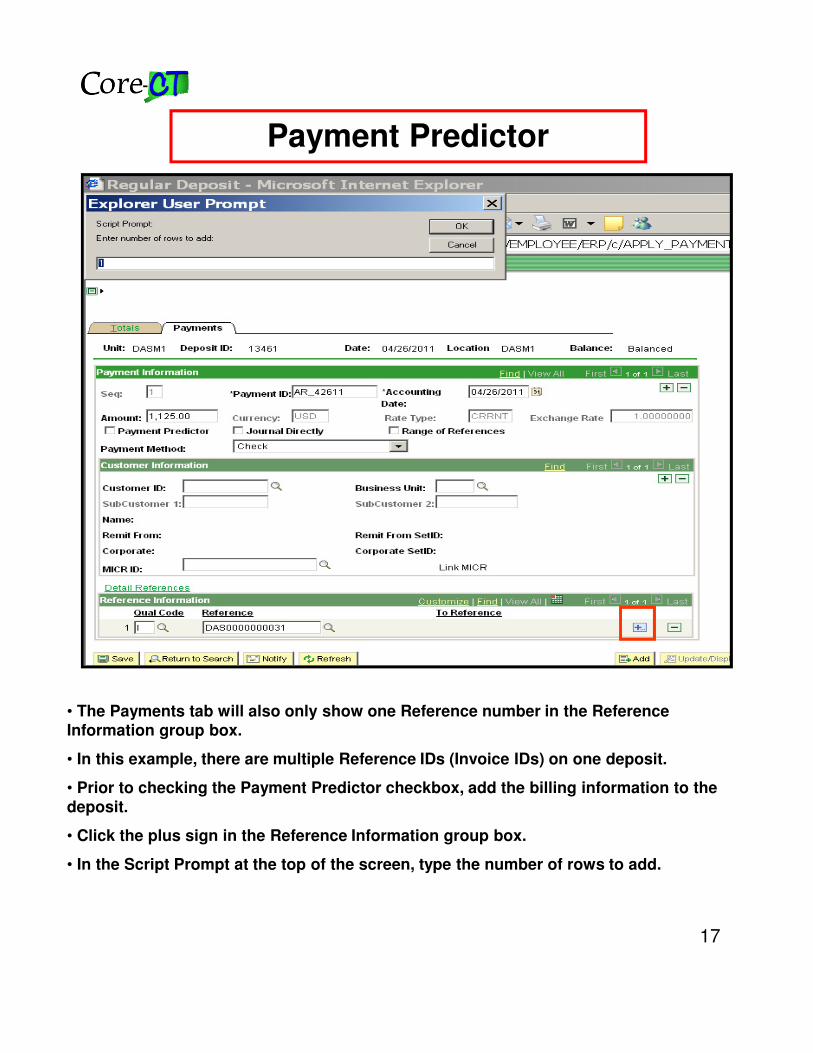
• The Payments tab will also only show one Reference number in the Reference Information group box.
• In this example, there are multiple Reference IDs (Invoice IDs) on one deposit.
• Prior to checking the Payment Predictor checkbox, add the billing information to the deposit.
• Click the plus sign in the Reference Information group box.
• In the Script Prompt at the top of the screen, type the number of rows to add.
18
Payment Predictor
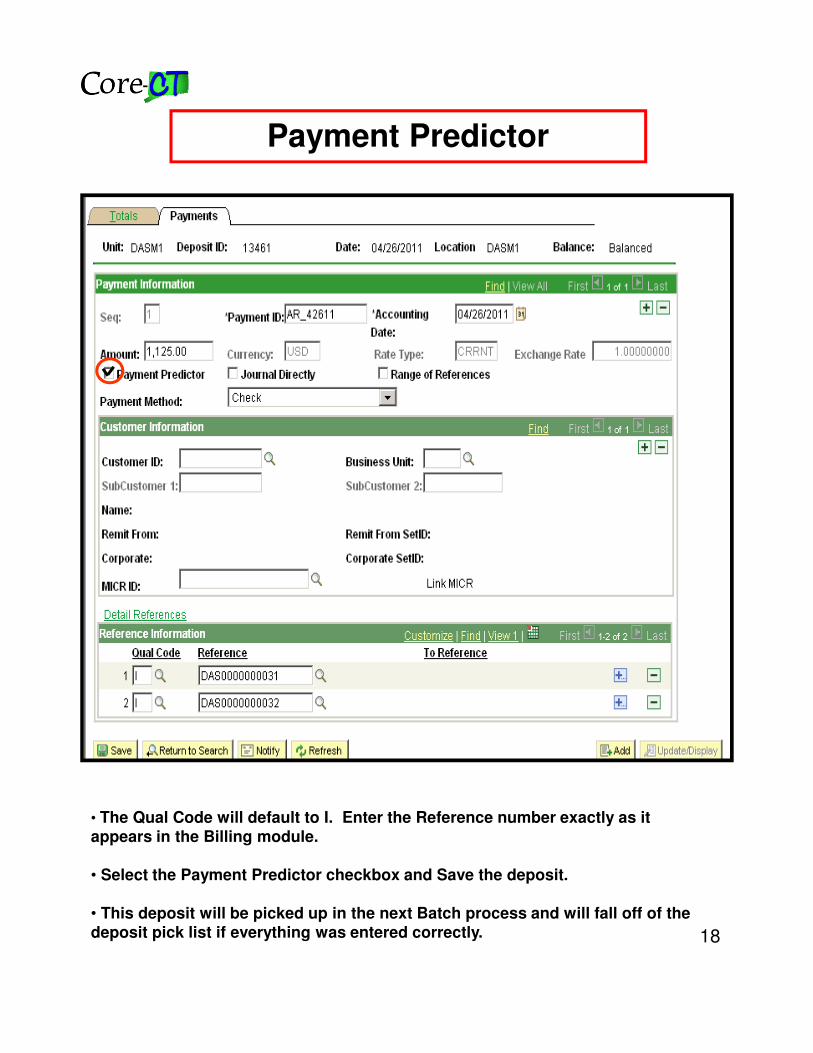
• The Qual Code will default to I. Enter the Reference number exactly as it appears in the Billing module.
• Select the Payment Predictor checkbox and Save the deposit.
• This deposit will be picked up in the next Batch process and will fall off of the deposit pick list if everything was entered correctly.
19
Payment Worksheet
20
Payment Worksheet
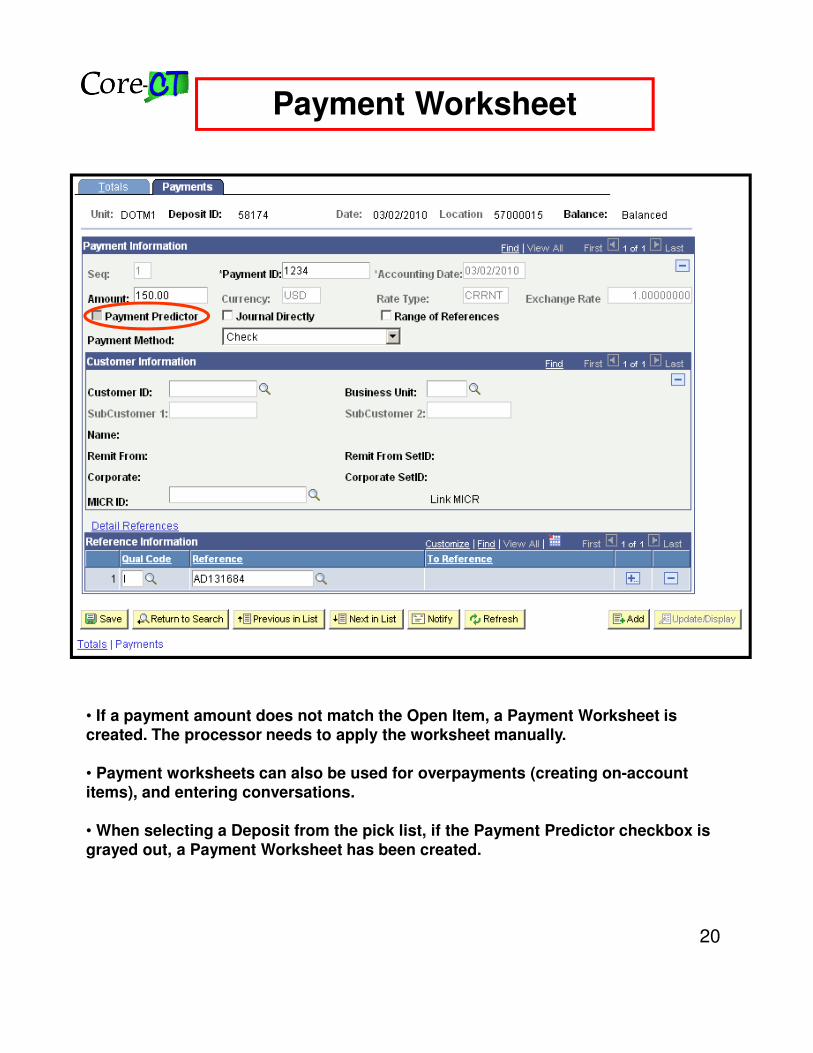
• If a payment amount does not match the Open Item, a Payment Worksheet is created. The processor needs to apply the worksheet manually.
• Payment worksheets can also be used for overpayments (creating on-account items), and entering conversations.
• When selecting a Deposit from the pick list, if the Payment Predictor checkbox is grayed out, a Payment Worksheet has been created.
21
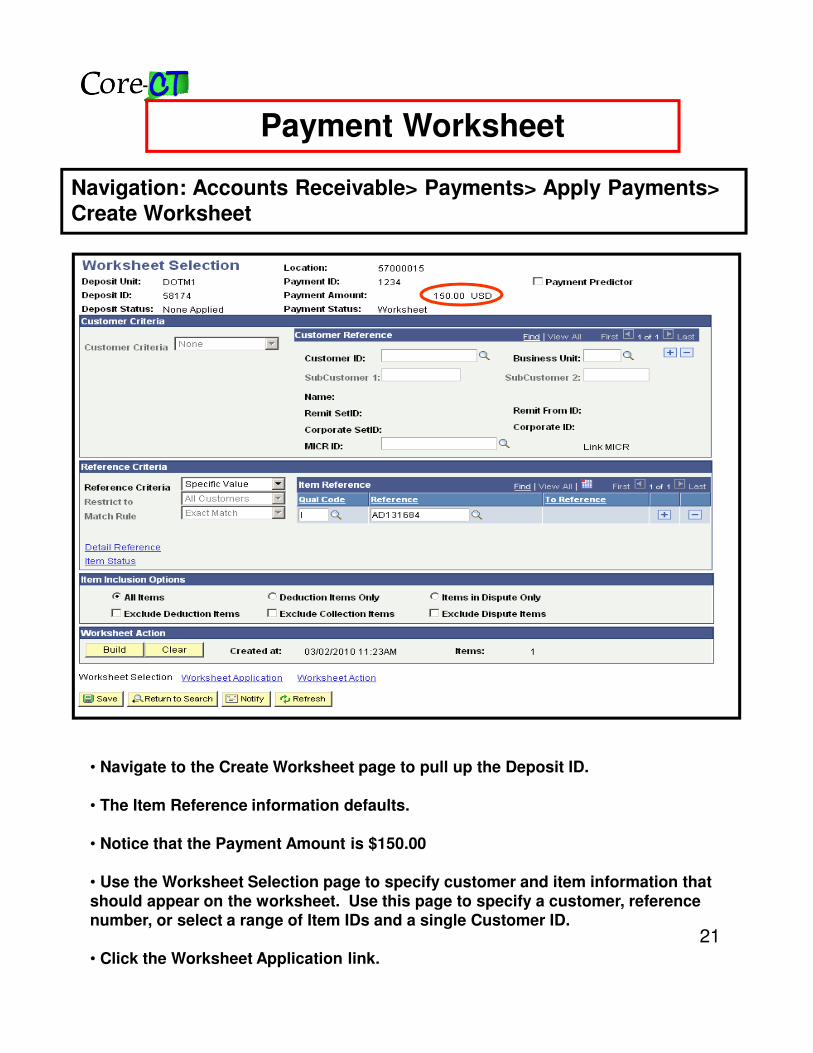
Payment Worksheet
• Navigate to the Create Worksheet page to pull up the Deposit ID.
• The Item Reference information defaults.
• Notice that the Payment Amount is $150.00
• Use the Worksheet Selection page to specify customer and item information that should appear on the worksheet. Use this page to specify a customer, reference number, or select a range of Item IDs and a single Customer ID.
• Click the Worksheet Application link.
Navigation: Accounts Receivable> Payments> Apply Payments> Create Worksheet
22
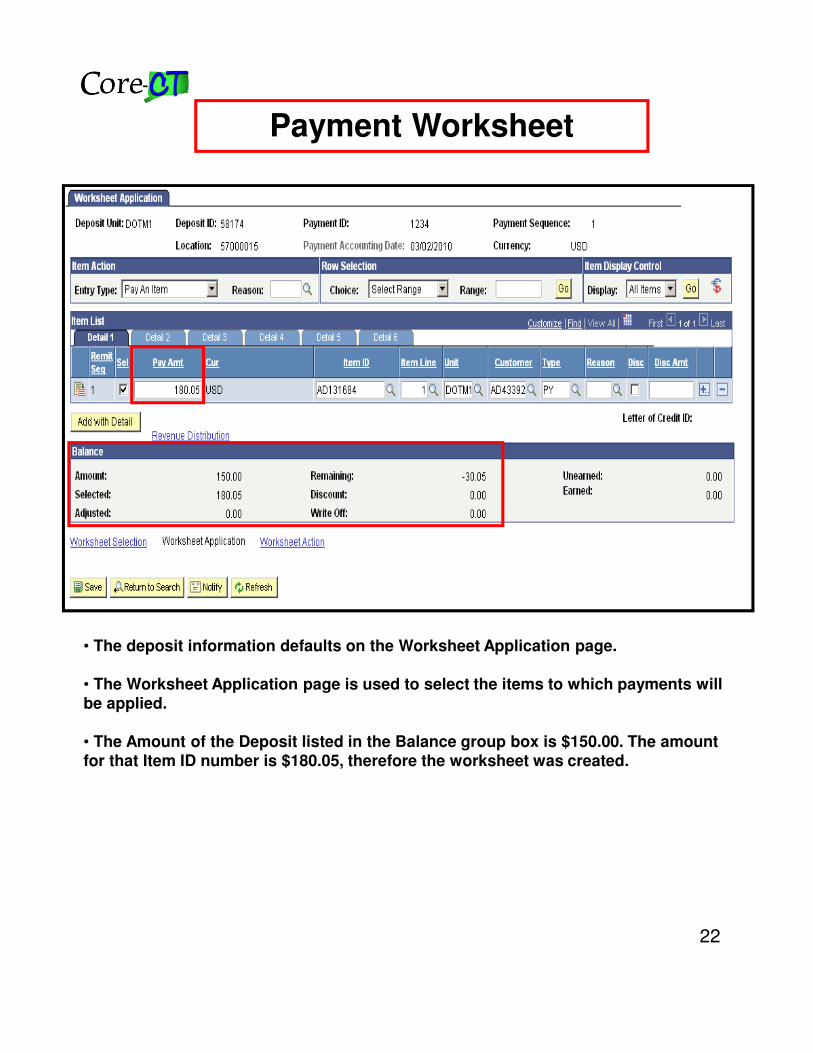
Payment Worksheet
• The deposit information defaults on the Worksheet Application page.
• The Worksheet Application page is used to select the items to which payments will be applied.
• The Amount of the Deposit listed in the Balance group box is $150.00. The amount for that Item ID number is $180.05, therefore the worksheet was created.
23
Payment Worksheet
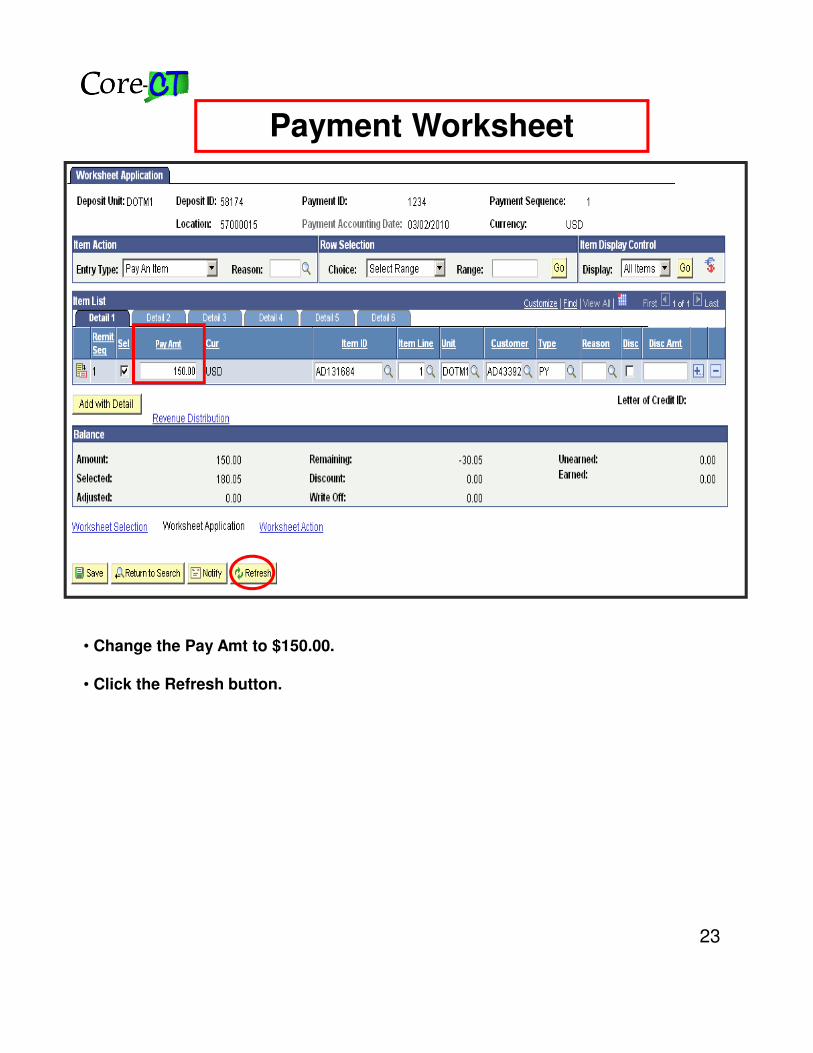
• Change the Pay Amt to $150.00.
• Click the Refresh button.
24
Payment Worksheet
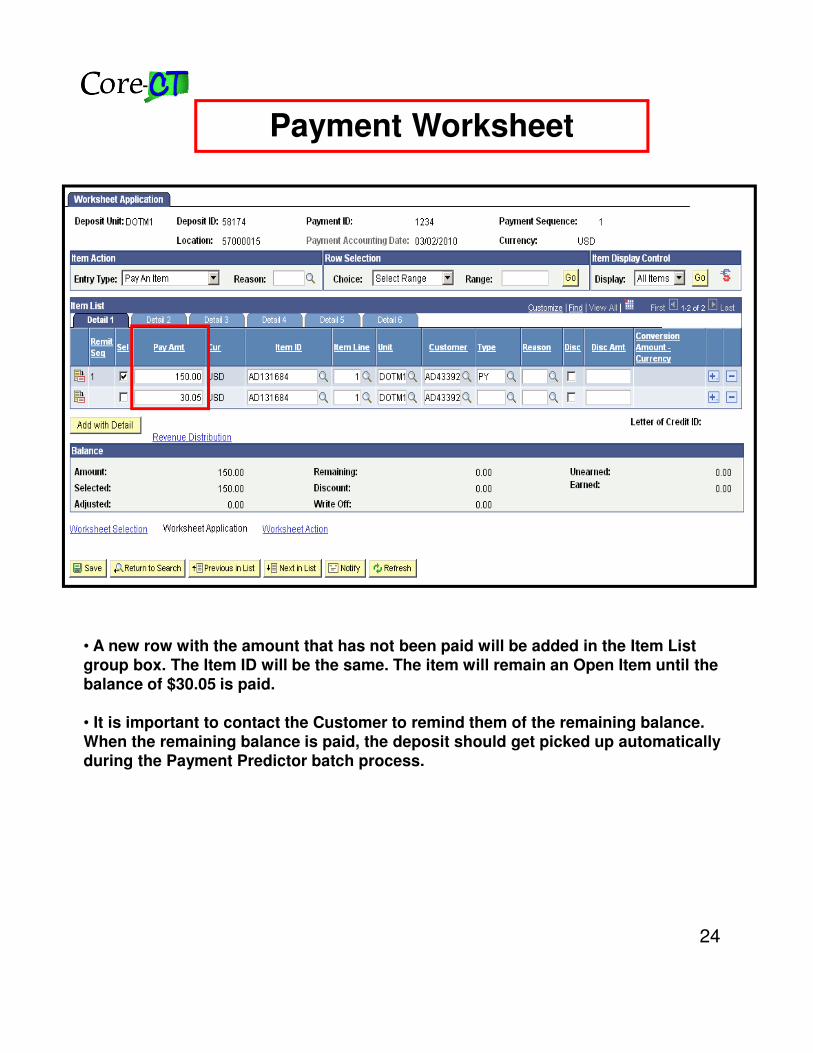
• A new row with the amount that has not been paid will be added in the Item List group box. The Item ID will be the same. The item will remain an Open Item until the balance of $30.05 is paid.
• It is important to contact the Customer to remind them of the remaining balance. When the remaining balance is paid, the deposit should get picked up automatically during the Payment Predictor batch process.
25
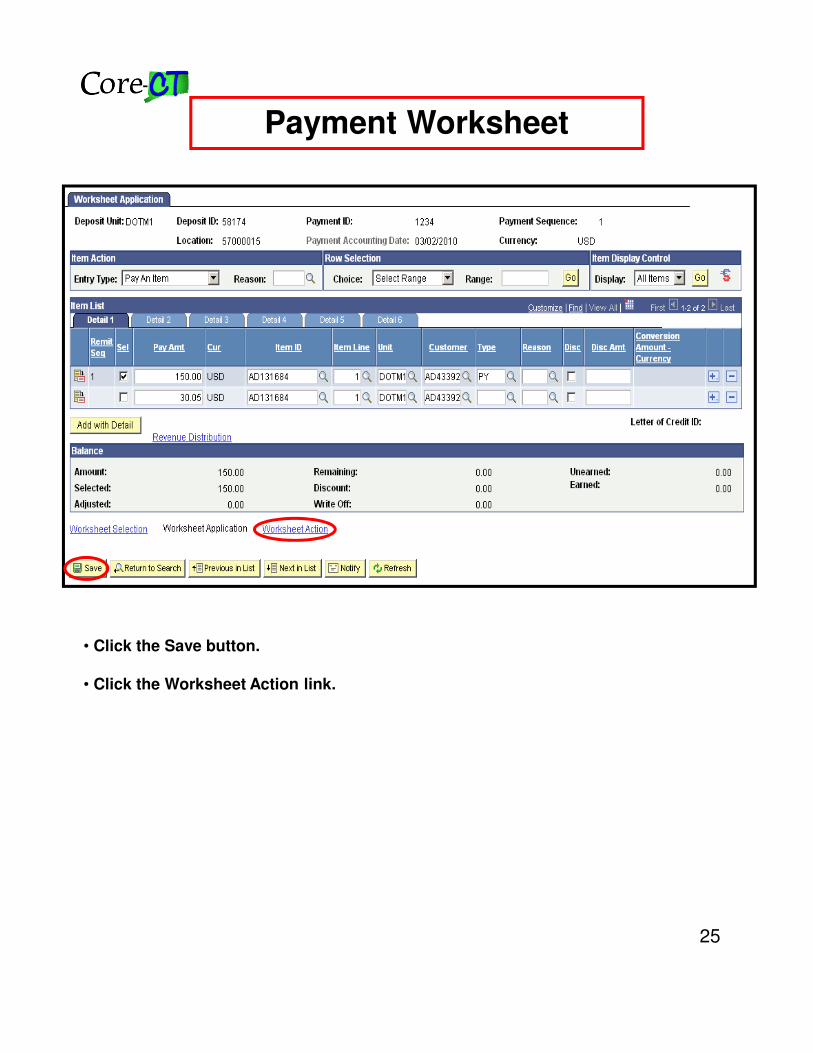
Payment Worksheet
• Click the Save button.
• Click the Worksheet Action link.
26
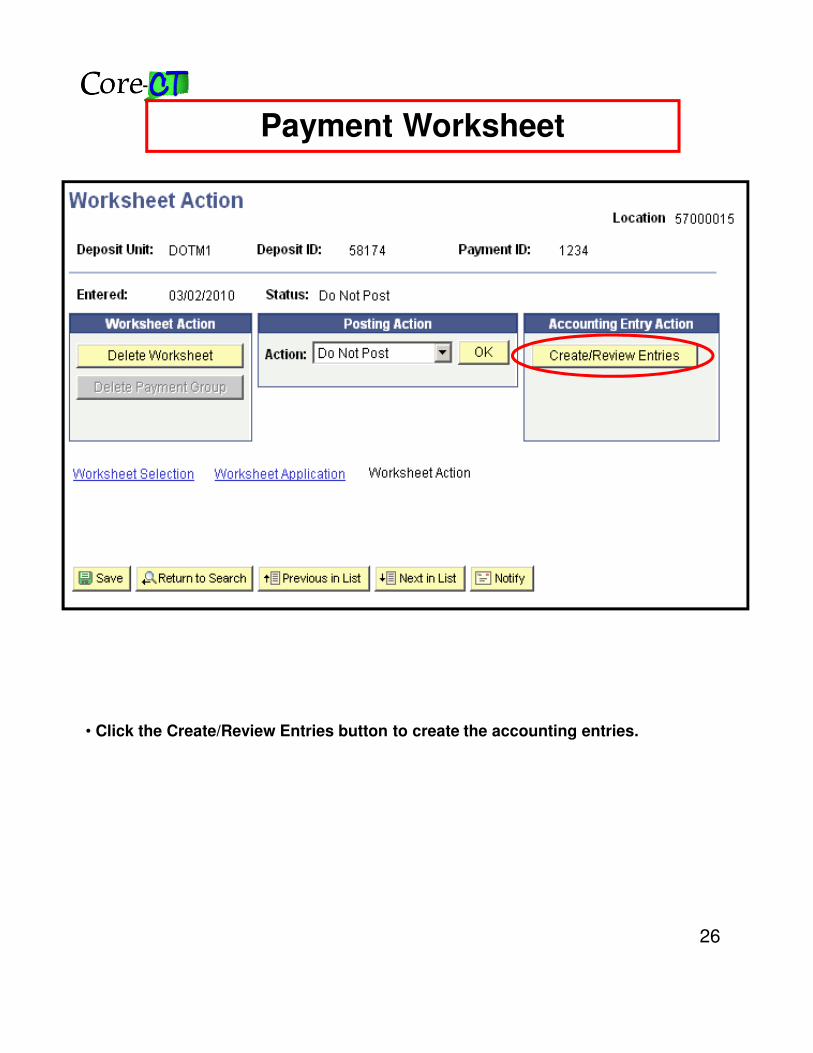
Payment Worksheet
• Click the Create/Review Entries button to create the accounting entries.
27
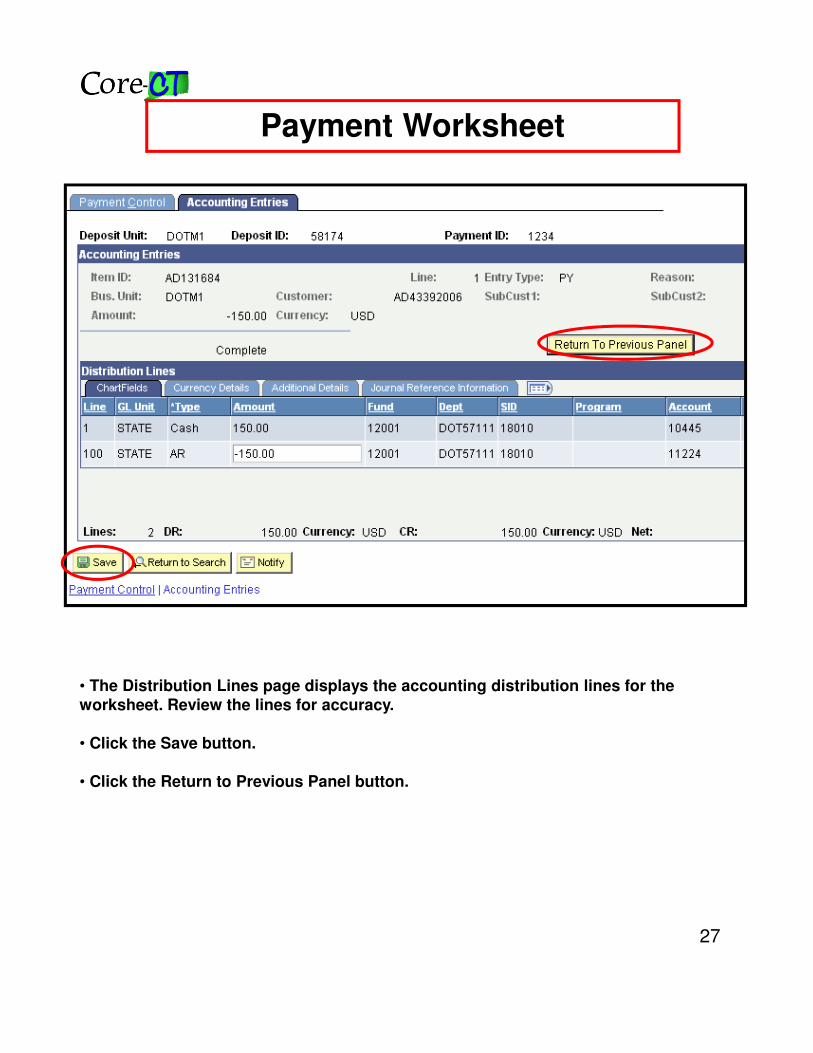
Payment Worksheet
• The Distribution Lines page displays the accounting distribution lines for the worksheet. Review the lines for accuracy.
• Click the Save button.
• Click the Return to Previous Panel button.
28
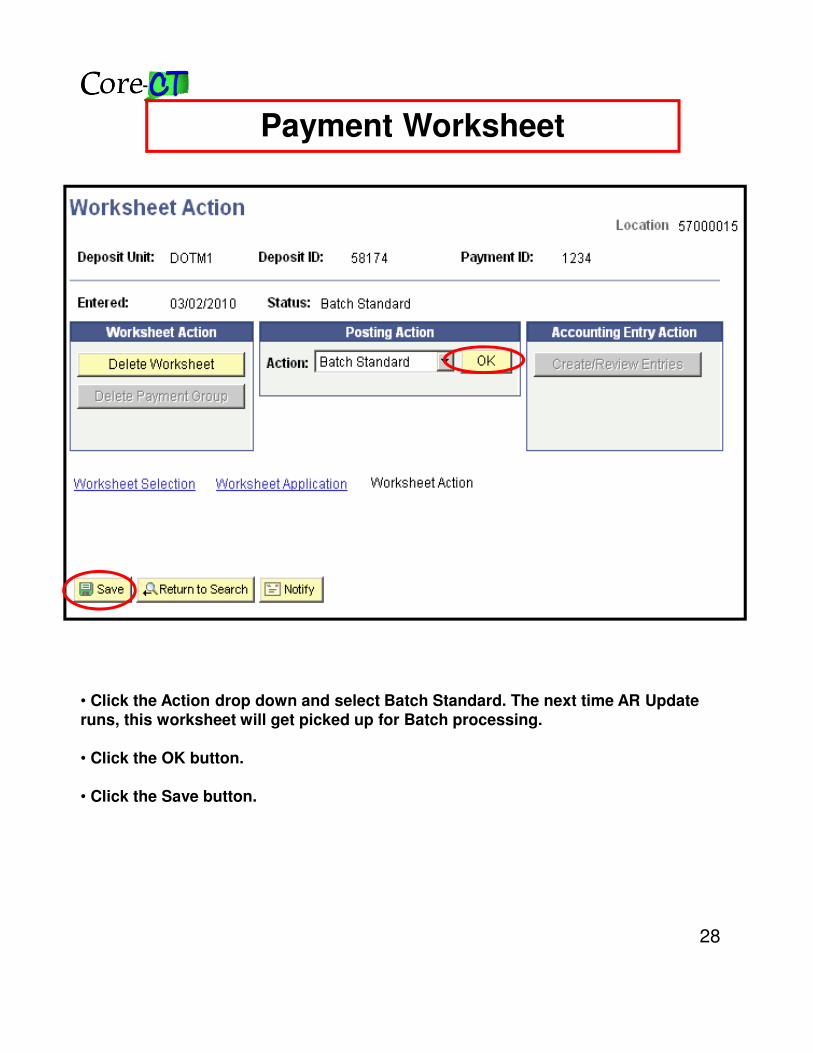
Payment Worksheet
• Click the Action drop down and select Batch Standard. The next time AR Update runs, this worksheet will get picked up for Batch processing.
• Click the OK button.
• Click the Save button.
29
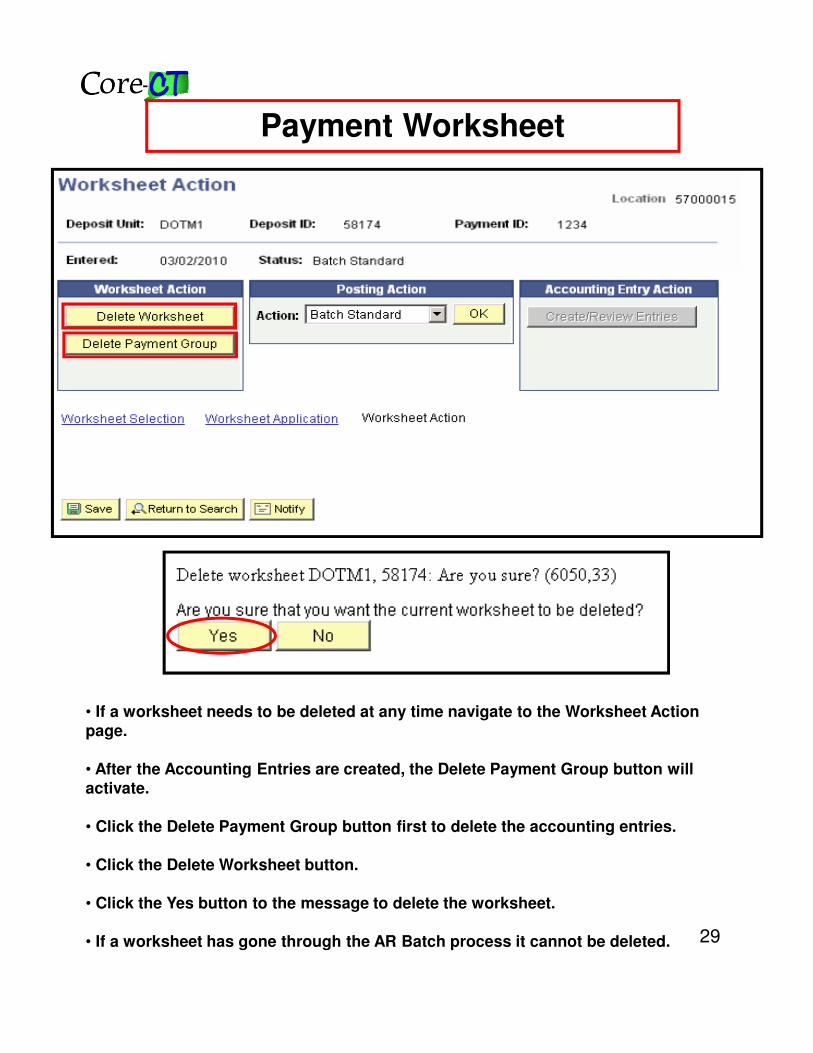
Payment Worksheet
• If a worksheet needs to be deleted at any time navigate to the Worksheet Action page.
• After the Accounting Entries are created, the Delete Payment Group button will activate.
• Click the Delete Payment Group button first to delete the accounting entries.
• Click the Delete Worksheet button.
• Click the Yes button to the message to delete the worksheet.
• If a worksheet has gone through the AR Batch process it cannot be deleted.
30
Adding a Conversation
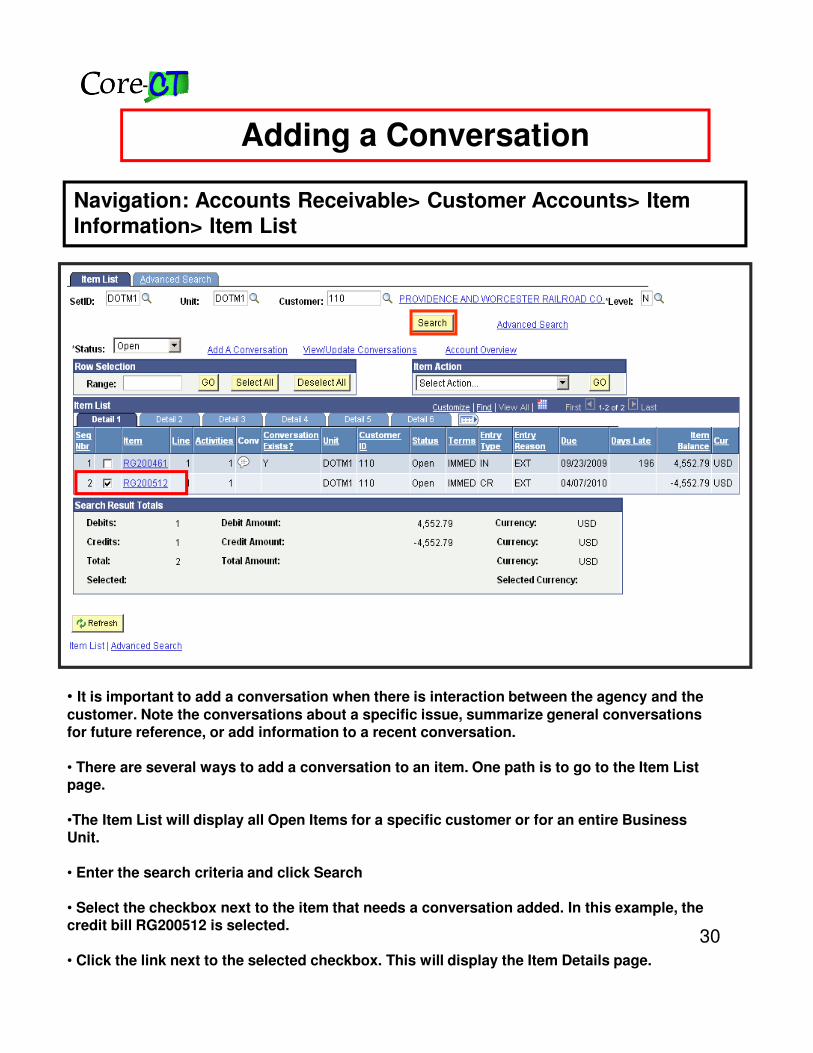
• It is important to add a conversation when there is interaction between the agency and the customer. Note the conversations about a specific issue, summarize general conversations for future reference, or add information to a recent conversation.
• There are several ways to add a conversation to an item. One path is to go to the Item List page.
•The Item List will display all Open Items for a specific customer or for an entire Business Unit.
• Enter the search criteria and click Search
• Select the checkbox next to the item that needs a conversation added. In this example, the credit bill RG200512 is selected.
• Click the link next to the selected checkbox. This will display the Item Details page.
Navigation: Accounts Receivable> Customer Accounts> Item Information> Item List
31
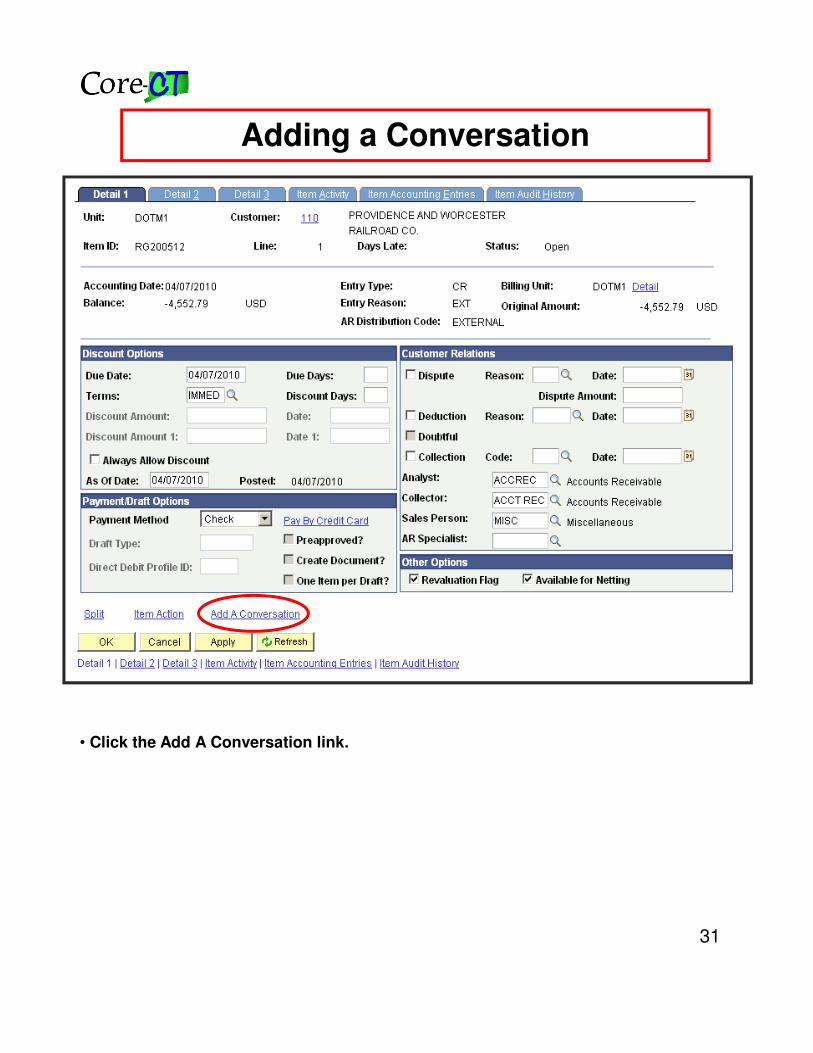
• Click the Add A Conversation link.
Adding a Conversation
32
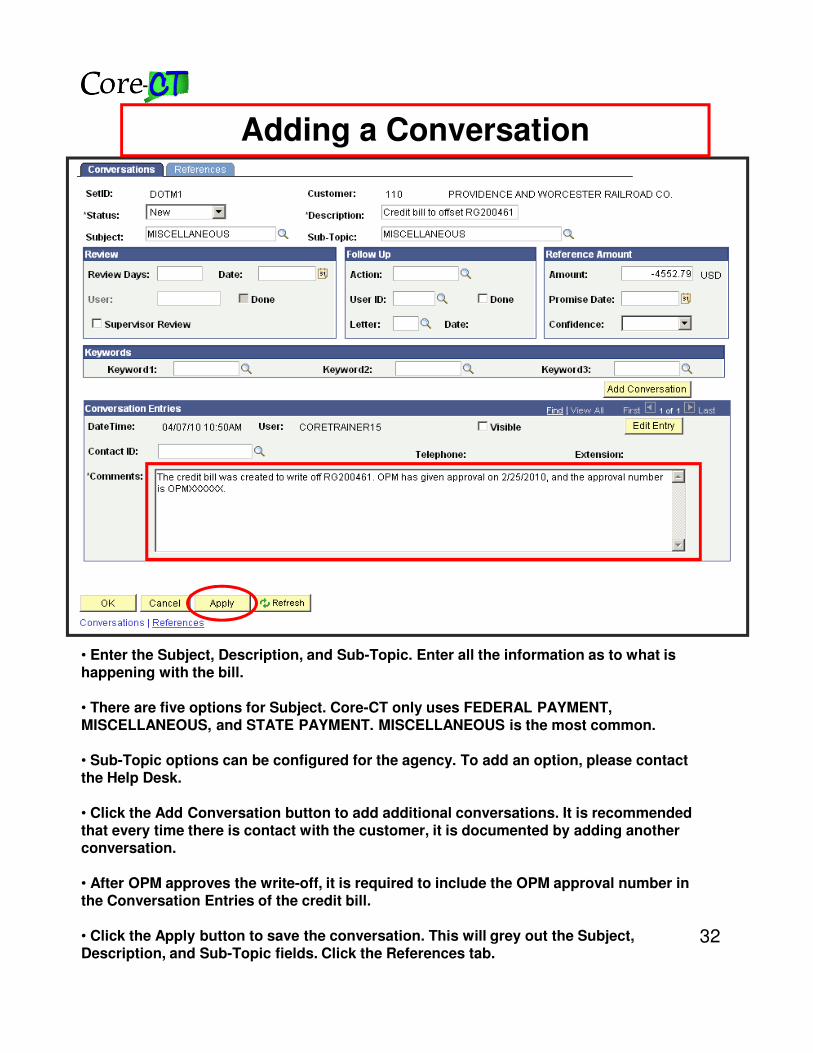
• Enter the Subject, Description, and Sub-Topic. Enter all the information as to what is happening with the bill.
• There are five options for Subject. Core-CT only uses FEDERAL PAYMENT, MISCELLANEOUS, and STATE PAYMENT. MISCELLANEOUS is the most common.
• Sub-Topic options can be configured for the agency. To add an option, please contact the Help Desk.
• Click the Add Conversation button to add additional conversations. It is recommended that every time there is contact with the customer, it is documented by adding another conversation.
• After OPM approves the write-off, it is required to include the OPM approval number in the Conversation Entries of the credit bill.
• Click the Apply button to save the conversation. This will grey out the Subject, Description, and Sub-Topic fields. Click the References tab.
Adding a Conversation
33
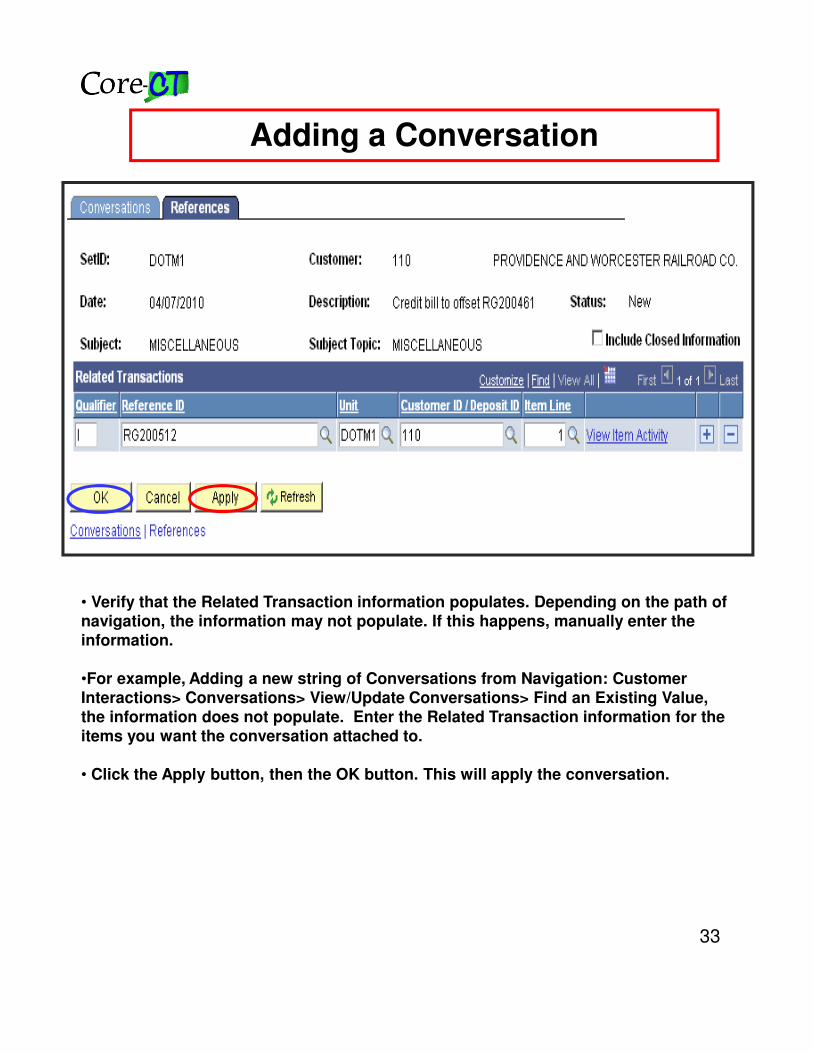
• Verify that the Related Transaction information populates. Depending on the path of navigation, the information may not populate. If this happens, manually enter the information.
•For example, Adding a new string of Conversations from Navigation: Customer Interactions> Conversations> View/Update Conversations> Find an Existing Value, the information does not populate. Enter the Related Transaction information for the items you want the conversation attached to.
• Click the Apply button, then the OK button. This will apply the conversation.
Adding a Conversation
34
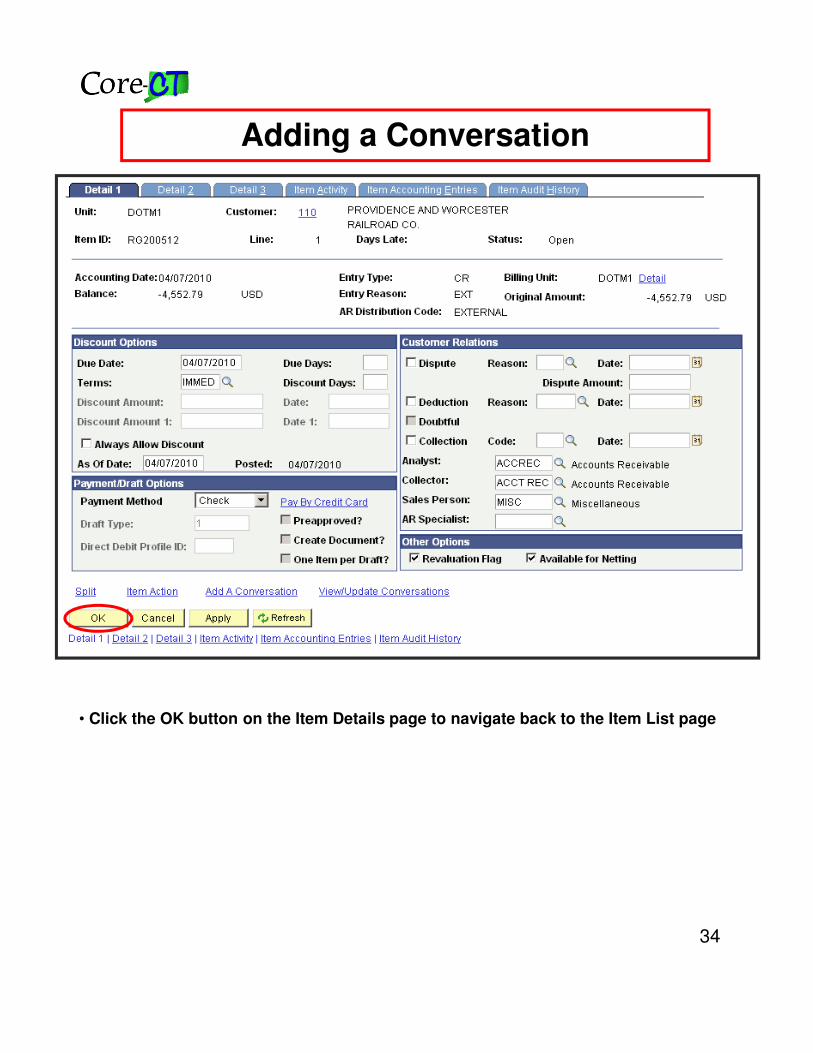
• Click the OK button on the Item Details page to navigate back to the Item List page
Adding a Conversation
35
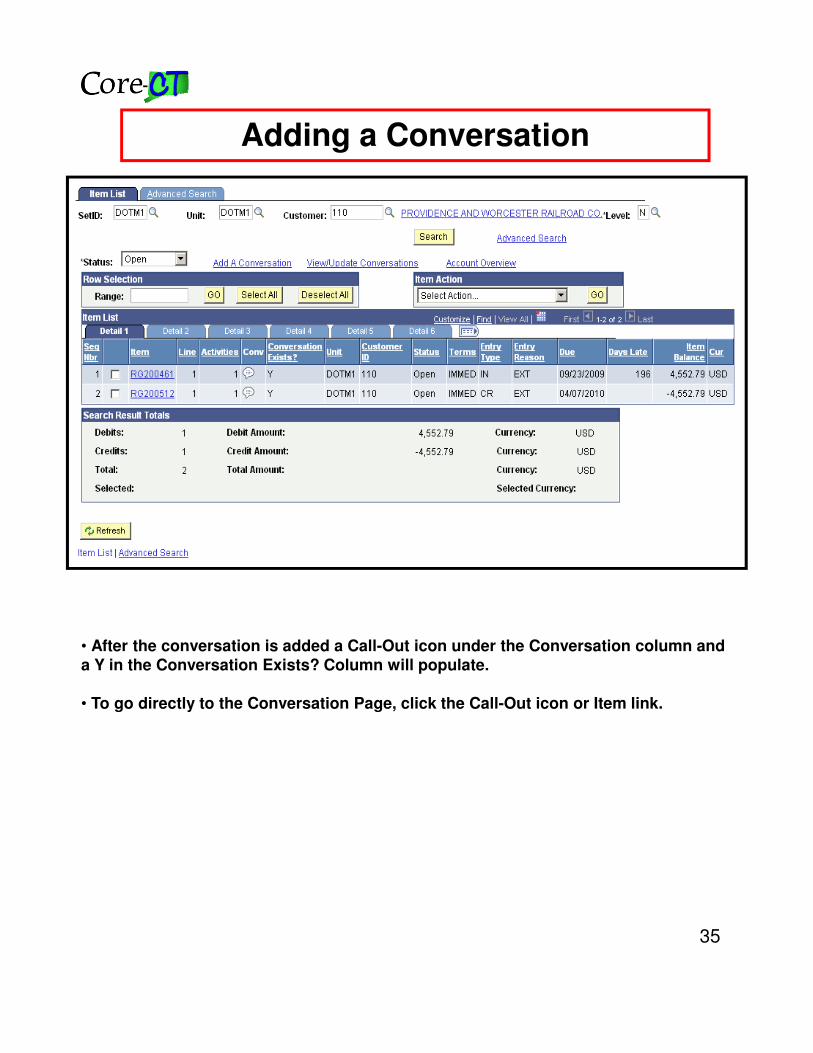
• After the conversation is added a Call-Out icon under the Conversation column and a Y in the Conversation Exists? Column will populate.
• To go directly to the Conversation Page, click the Call-Out icon or Item link.
Adding a Conversation
36
View/Update Item Details
Navigation: Accounts Receivable> Customer Accounts> Item Information> View/Update Item Details
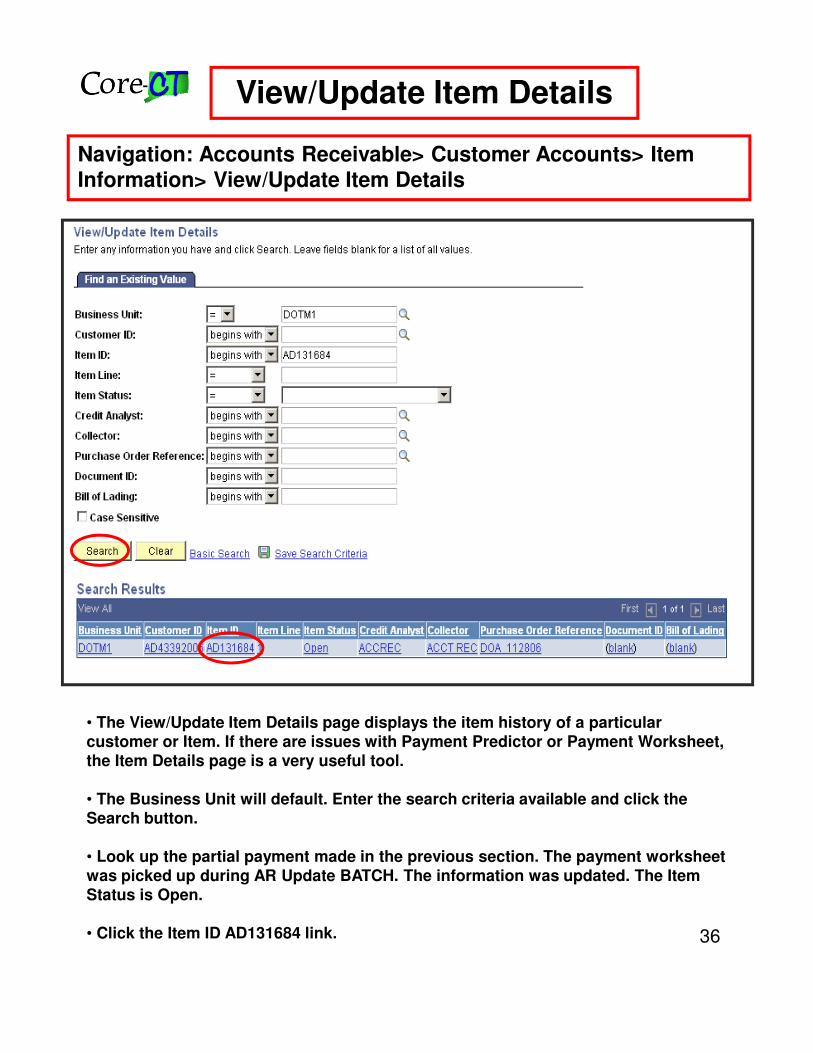
• The View/Update Item Details page displays the item history of a particular customer or Item. If there are issues with Payment Predictor or Payment Worksheet, the Item Details page is a very useful tool.
• The Business Unit will default. Enter the search criteria available and click the Search button.
• Look up the partial payment made in the previous section. The payment worksheet was picked up during AR Update BATCH. The information was updated. The Item Status is Open.
• Click the Item ID AD131684 link.
37
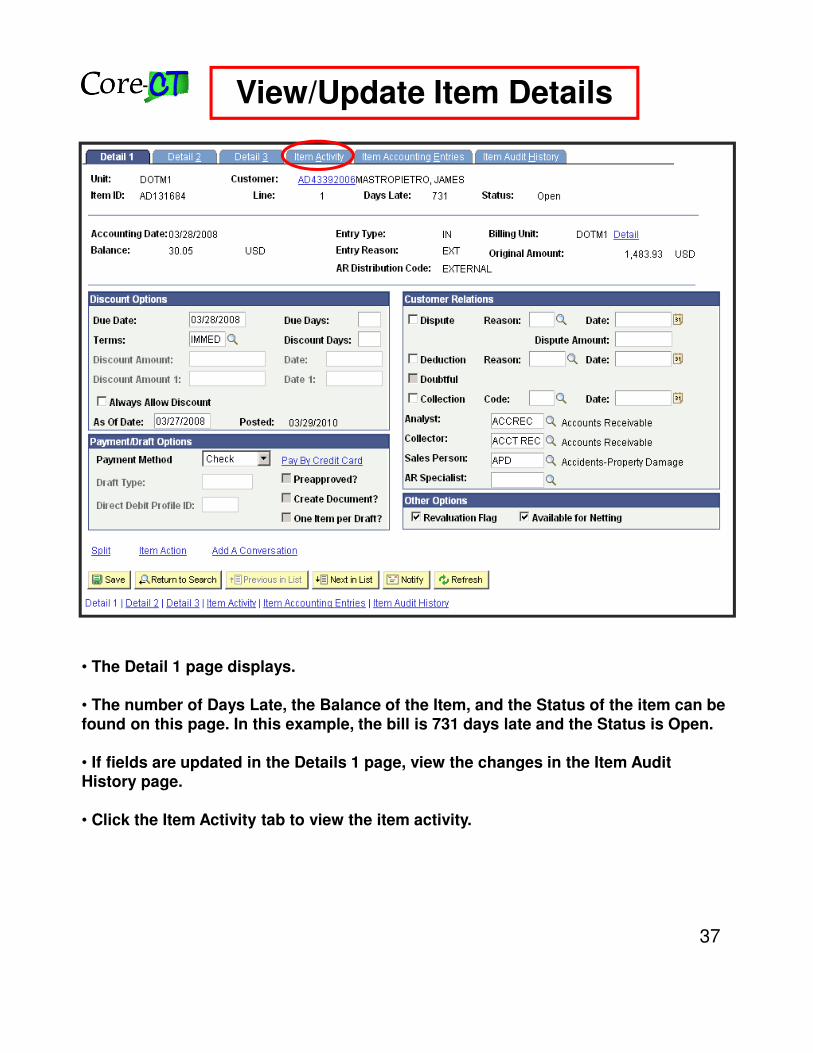
• The Detail 1 page displays.
• The number of Days Late, the Balance of the Item, and the Status of the item can be found on this page. In this example, the bill is 731 days late and the Status is Open.
• If fields are updated in the Details 1 page, view the changes in the Item Audit History page.
• Click the Item Activity tab to view the item activity.
View/Update Item Details
38
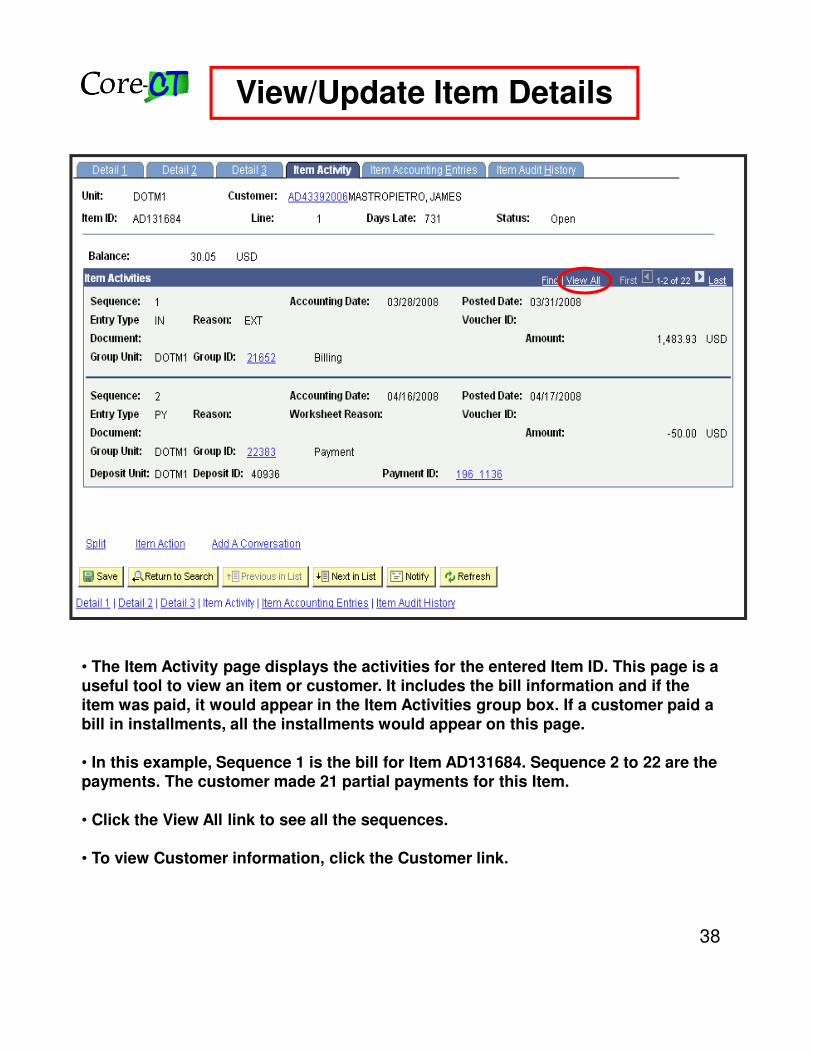
• The Item Activity page displays the activities for the entered Item ID. This page is a useful tool to view an item or customer. It includes the bill information and if the item was paid, it would appear in the Item Activities group box. If a customer paid a bill in installments, all the installments would appear on this page.
• In this example, Sequence 1 is the bill for Item AD131684. Sequence 2 to 22 are the payments. The customer made 21 partial payments for this Item.
• Click the View All link to see all the sequences.
• To view Customer information, click the Customer link.
View/Update Item Details
39
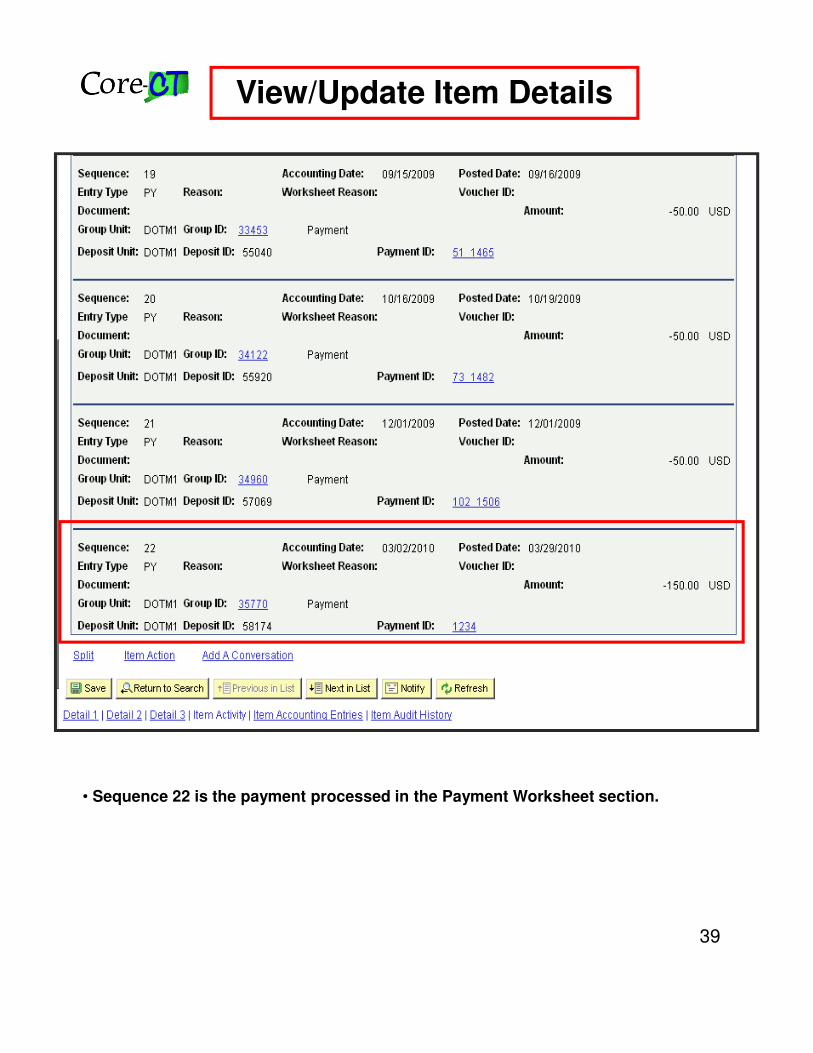
• Sequence 22 is the payment processed in the Payment Worksheet section.
View/Update Item Details
40
PaymentsReceived and
Deposited
Are PaymentsAssociated with
a Bill?NO
Payments AppliedPayment Predictor(GIRO Payments)
Deposit Pick List
Exact Match No Match
Make CorrectionsApply Payment Predictor
Deposit Pick List
Direct JournalCreate Accounting Entries
Budget Check
Accounting EntriesCreated for GL
YES
Processing in Accounts Receivable
41
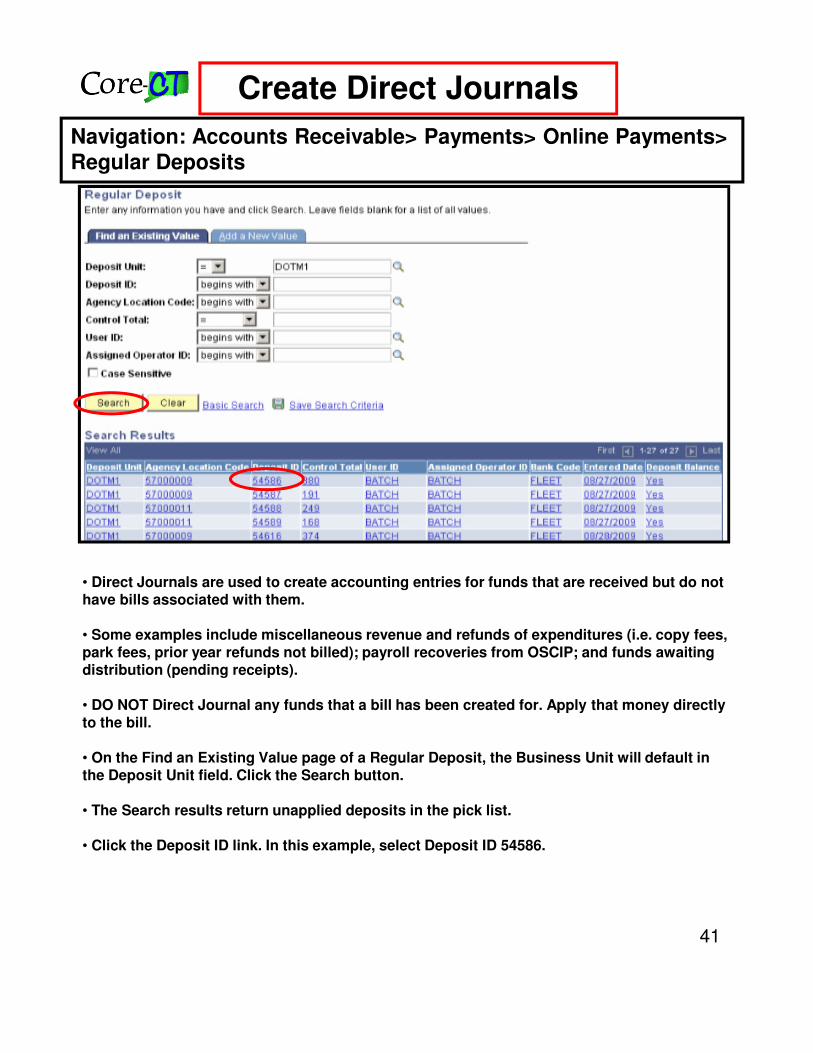
Create Direct Journals
• Direct Journals are used to create accounting entries for funds that are received but do not have bills associated with them.
• Some examples include miscellaneous revenue and refunds of expenditures (i.e. copy fees, park fees, prior year refunds not billed); payroll recoveries from OSCIP; and funds awaiting distribution (pending receipts).
• DO NOT Direct Journal any funds that a bill has been created for. Apply that money directly to the bill.
• On the Find an Existing Value page of a Regular Deposit, the Business Unit will default in the Deposit Unit field. Click the Search button.
• The Search results return unapplied deposits in the pick list.
• Click the Deposit ID link. In this example, select Deposit ID 54586.
Navigation: Accounts Receivable> Payments> Online Payments> Regular Deposits
42
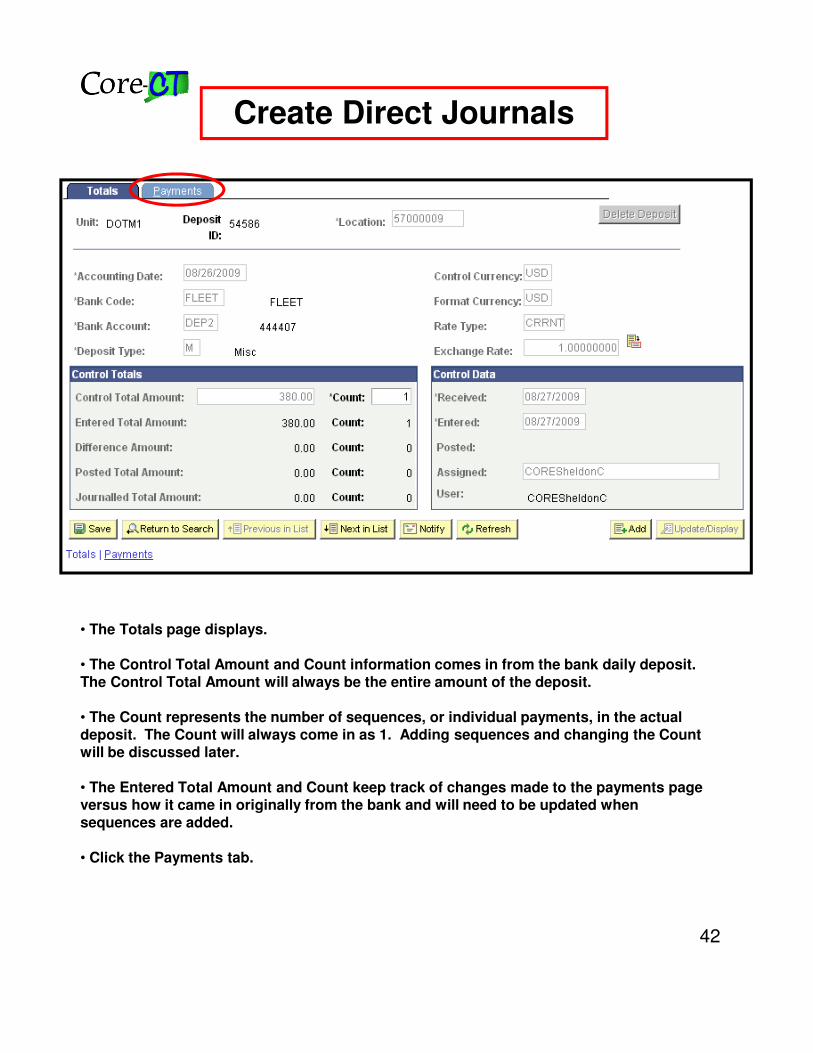
Create Direct Journals
• The Totals page displays.
• The Control Total Amount and Count information comes in from the bank daily deposit. The Control Total Amount will always be the entire amount of the deposit.
• The Count represents the number of sequences, or individual payments, in the actual deposit. The Count will always come in as 1. Adding sequences and changing the Count will be discussed later.
• The Entered Total Amount and Count keep track of changes made to the payments page versus how it came in originally from the bank and will need to be updated when sequences are added.
• Click the Payments tab.
43
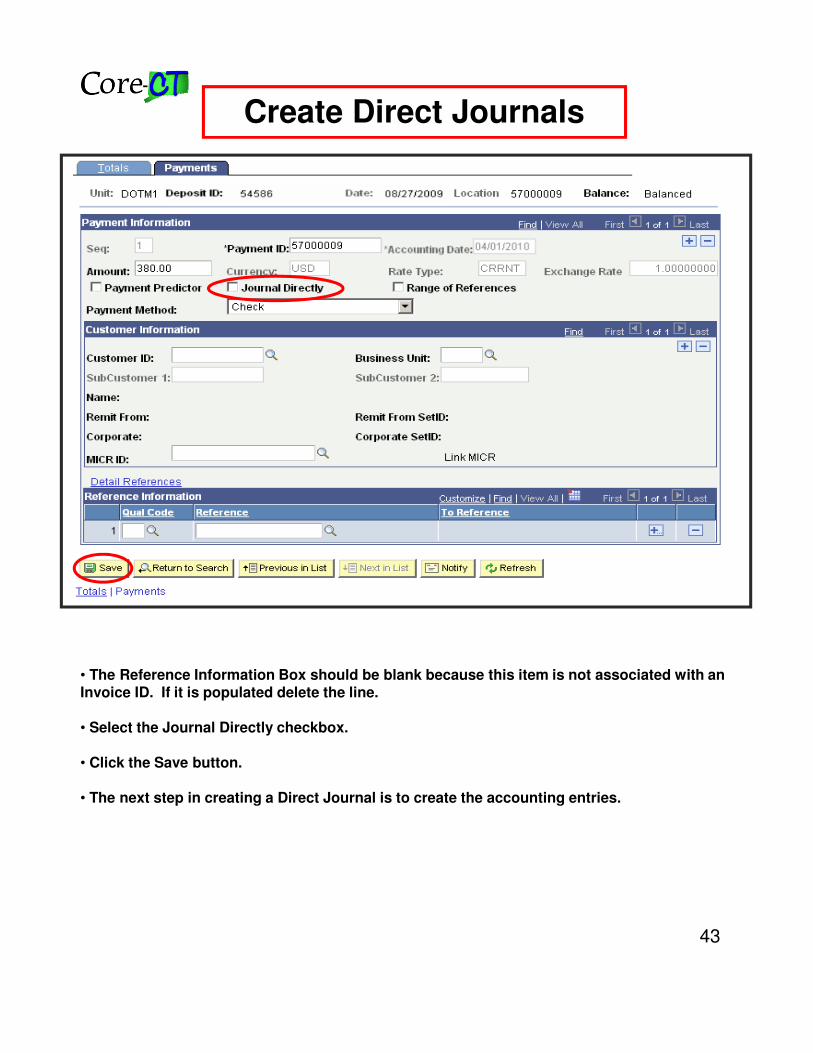
Create Direct Journals
• The Reference Information Box should be blank because this item is not associated with an Invoice ID. If it is populated delete the line.
• Select the Journal Directly checkbox.
• Click the Save button.
• The next step in creating a Direct Journal is to create the accounting entries.
44
Create Direct Journals
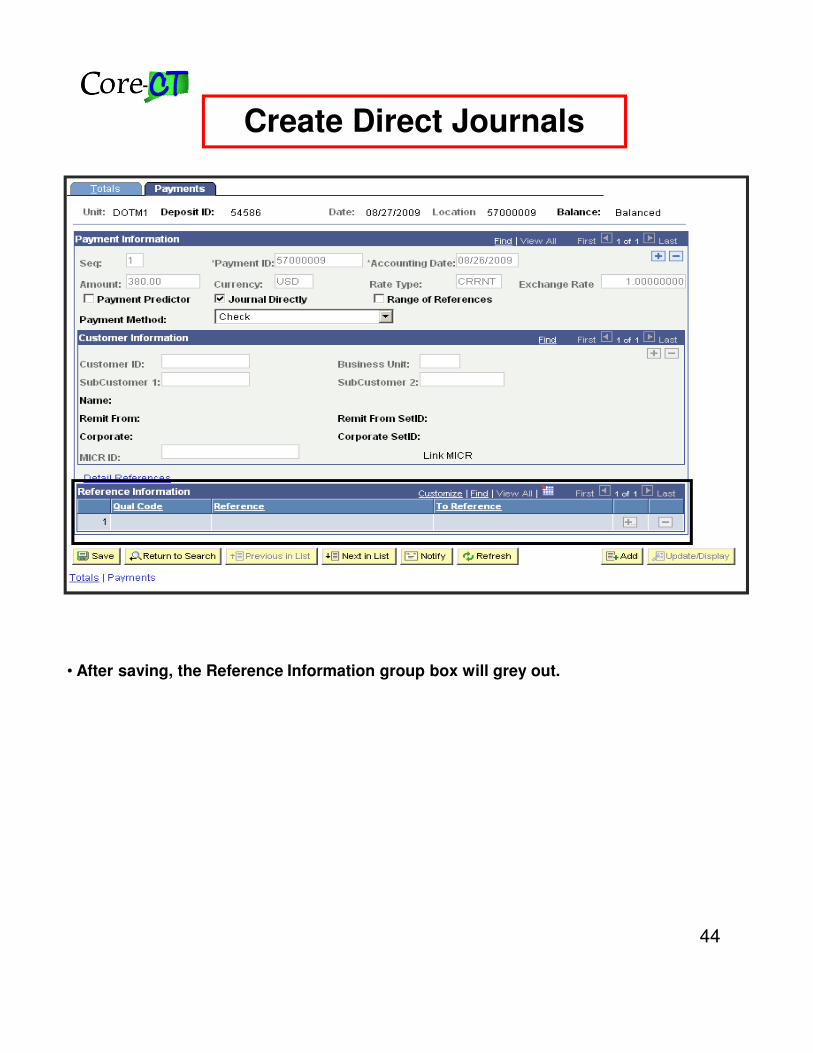
• After saving, the Reference Information group box will grey out.
45
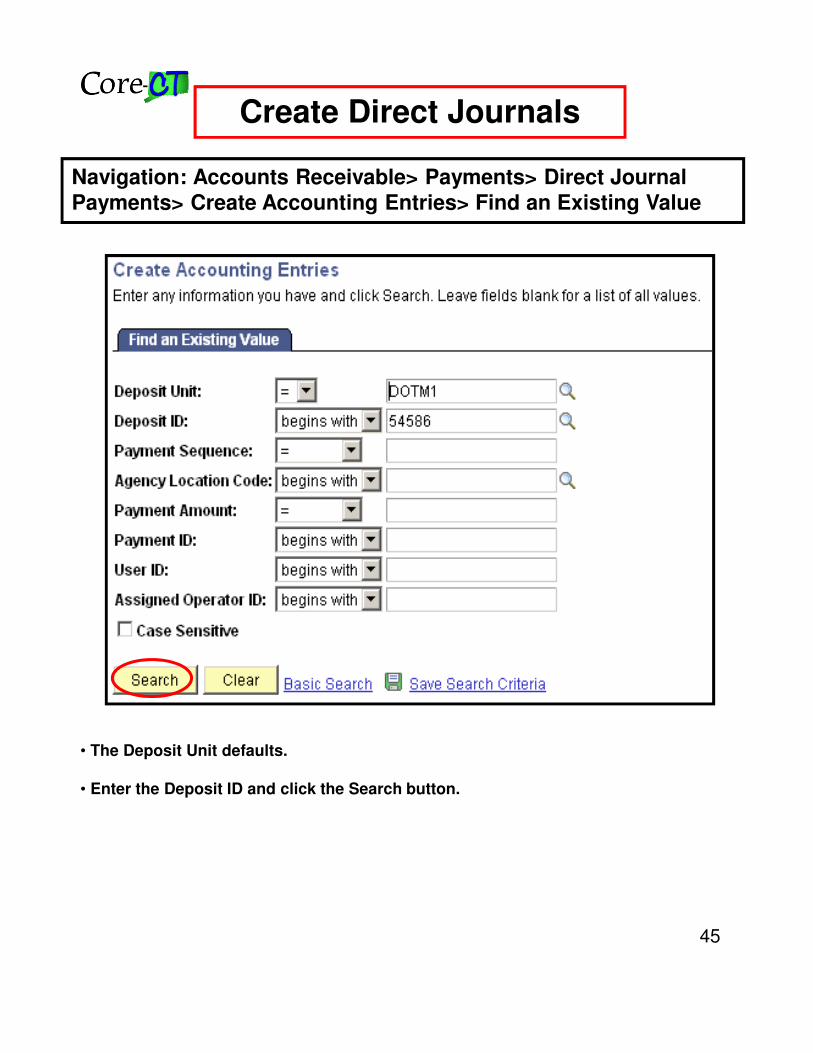
Create Direct Journals
• The Deposit Unit defaults.
• Enter the Deposit ID and click the Search button.
Navigation: Accounts Receivable> Payments> Direct Journal Payments> Create Accounting Entries> Find an Existing Value
46
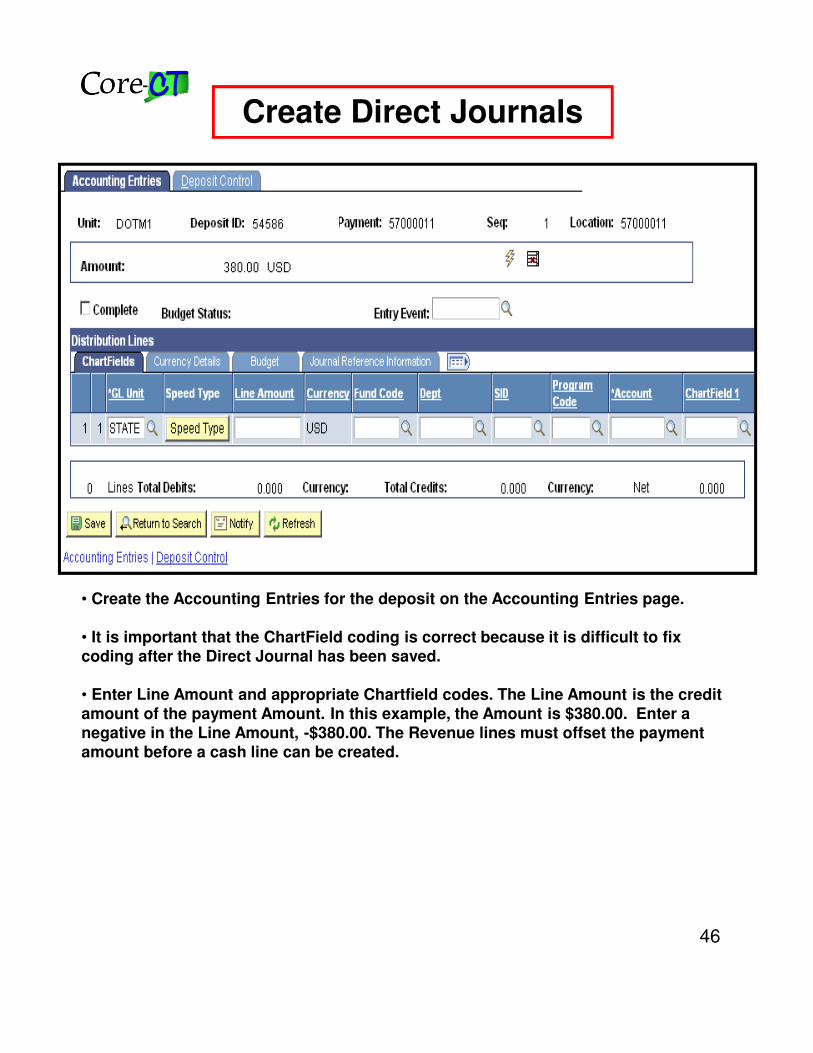
Create Direct Journals
• Create the Accounting Entries for the deposit on the Accounting Entries page.
• It is important that the ChartField coding is correct because it is difficult to fix coding after the Direct Journal has been saved.
• Enter Line Amount and appropriate Chartfield codes. The Line Amount is the credit amount of the payment Amount. In this example, the Amount is $380.00. Enter a negative in the Line Amount, -$380.00. The Revenue lines must offset the payment amount before a cash line can be created.

47
Create Direct Journals
• Click the Create icon (lightning bolt) to generate the offset cash entries in Core-CT.
48
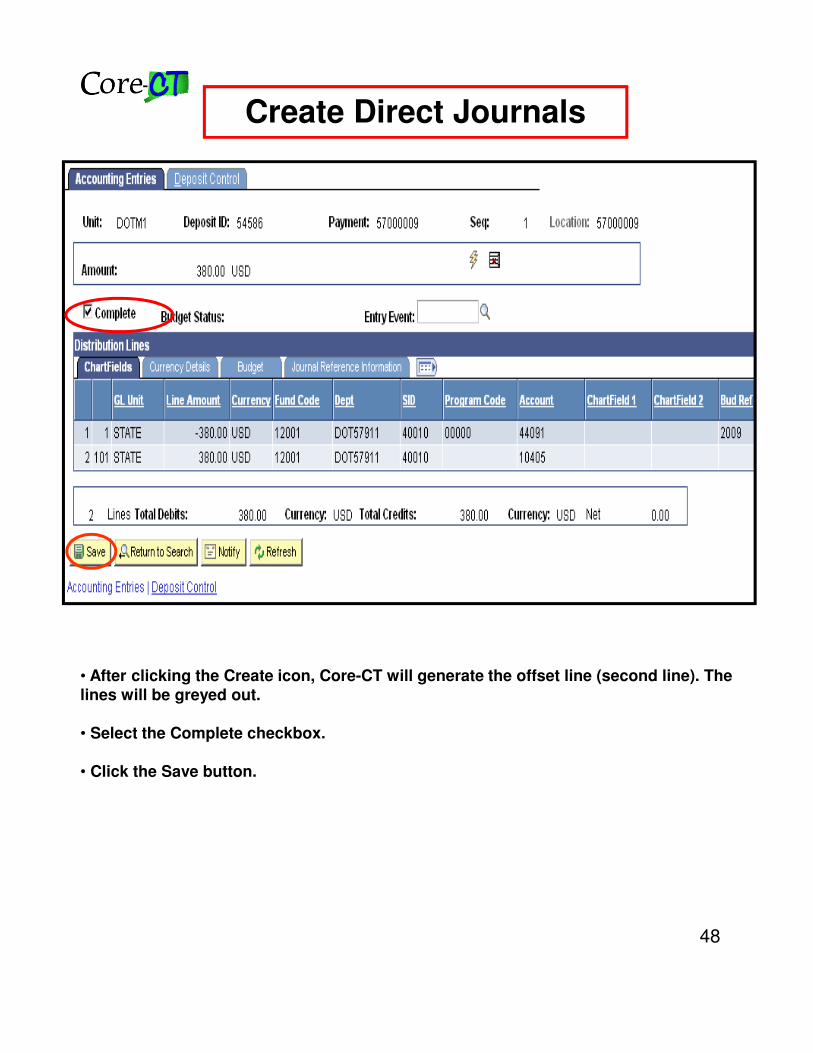
Create Direct Journals
• After clicking the Create icon, Core-CT will generate the offset line (second line). The lines will be greyed out.
• Select the Complete checkbox.
• Click the Save button.
49
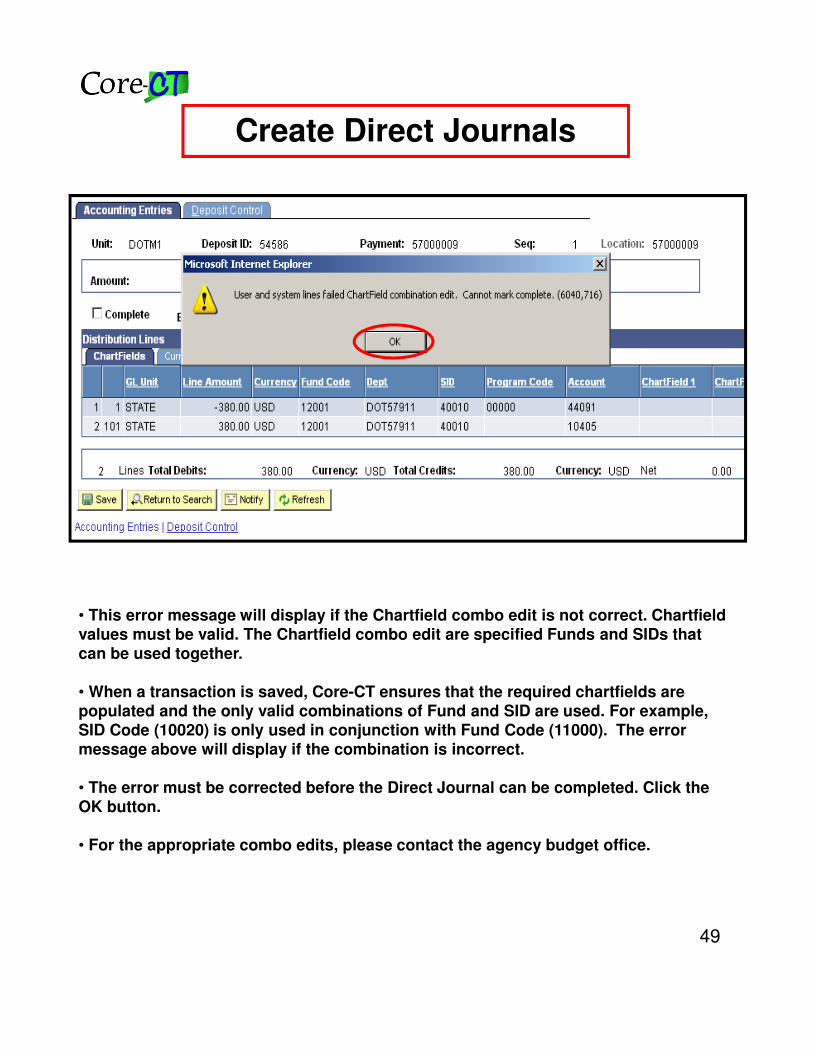
Create Direct Journals
• This error message will display if the Chartfield combo edit is not correct. Chartfield values must be valid. The Chartfield combo edit are specified Funds and SIDs that can be used together.
• When a transaction is saved, Core-CT ensures that the required chartfields are populated and the only valid combinations of Fund and SID are used. For example, SID Code (10020) is only used in conjunction with Fund Code (11000). The error message above will display if the combination is incorrect.
• The error must be corrected before the Direct Journal can be completed. Click the OK button.
• For the appropriate combo edits, please contact the agency budget office.
50
Create Direct Journals
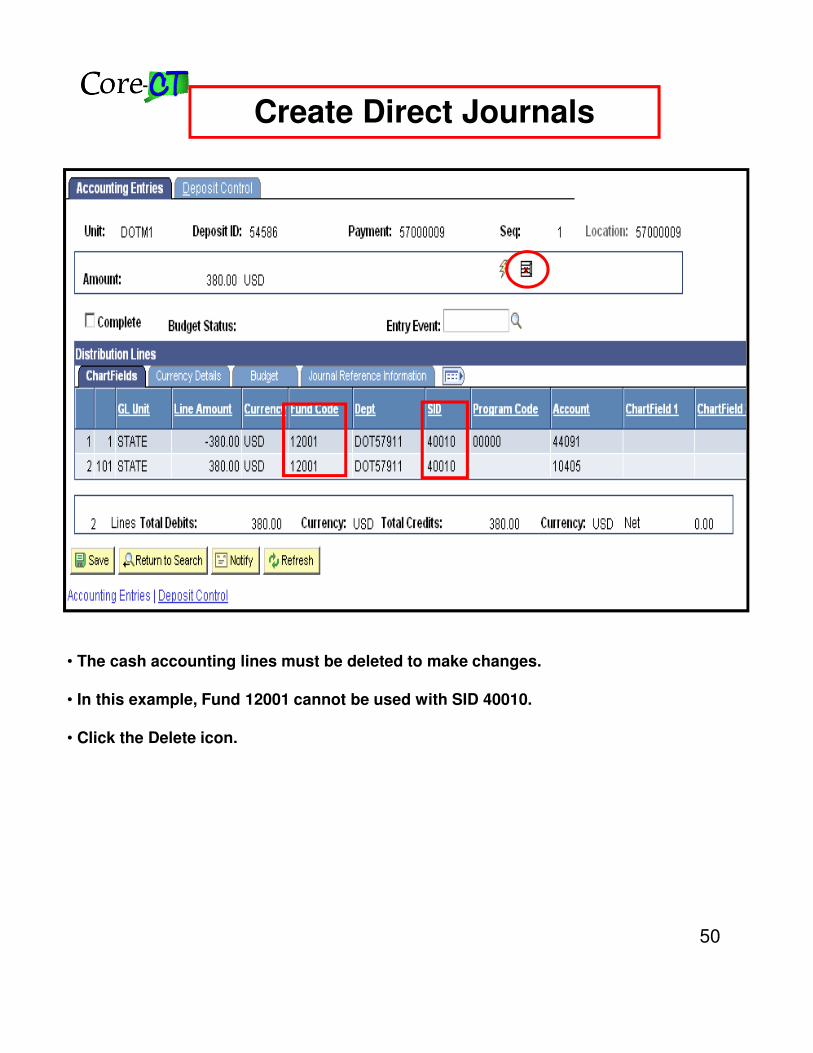
• The cash accounting lines must be deleted to make changes.
• In this example, Fund 12001 cannot be used with SID 40010.
• Click the Delete icon.
51
Create Direct Journals
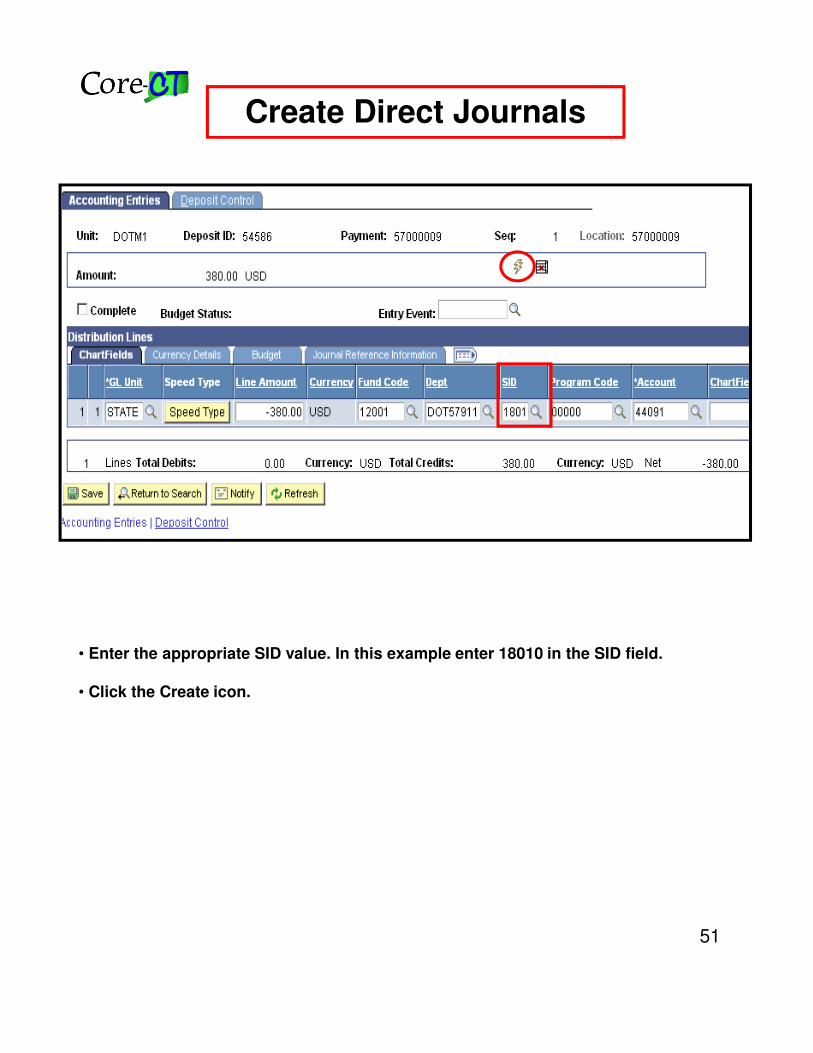
• Enter the appropriate SID value. In this example enter 18010 in the SID field.
• Click the Create icon.
52
Create Direct Journals
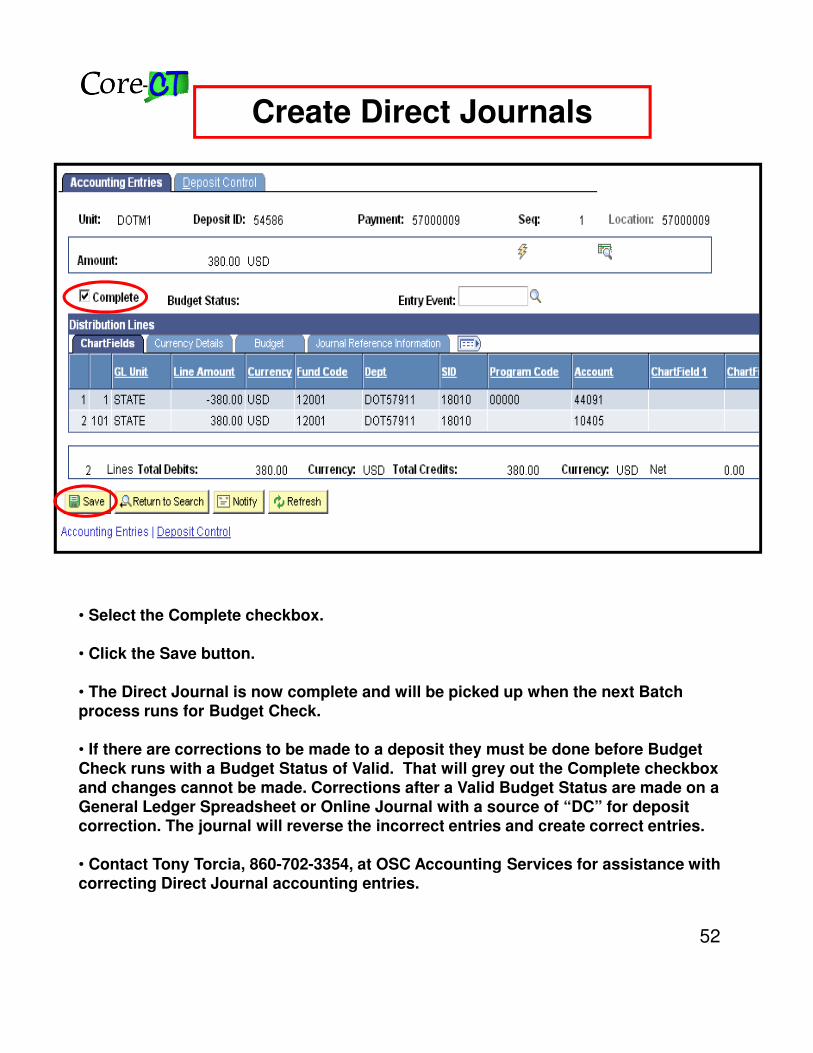
• Select the Complete checkbox.
• Click the Save button.
• The Direct Journal is now complete and will be picked up when the next Batch process runs for Budget Check.
• If there are corrections to be made to a deposit they must be done before Budget Check runs with a Budget Status of Valid. That will grey out the Complete checkbox and changes cannot be made. Corrections after a Valid Budget Status are made on a General Ledger Spreadsheet or Online Journal with a source of “DC” for deposit correction. The journal will reverse the incorrect entries and create correct entries.
• Contact Tony Torcia, 860-702-3354, at OSC Accounting Services for assistance with correcting Direct Journal accounting entries.
53
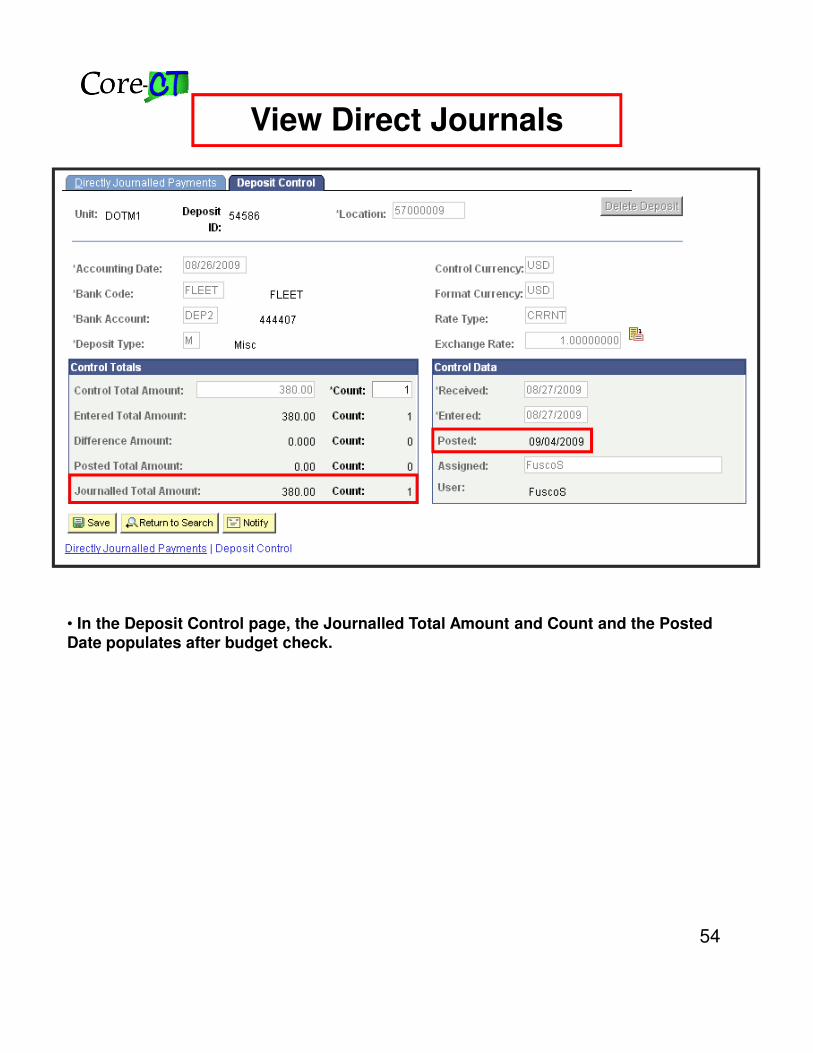
View Direct Journals
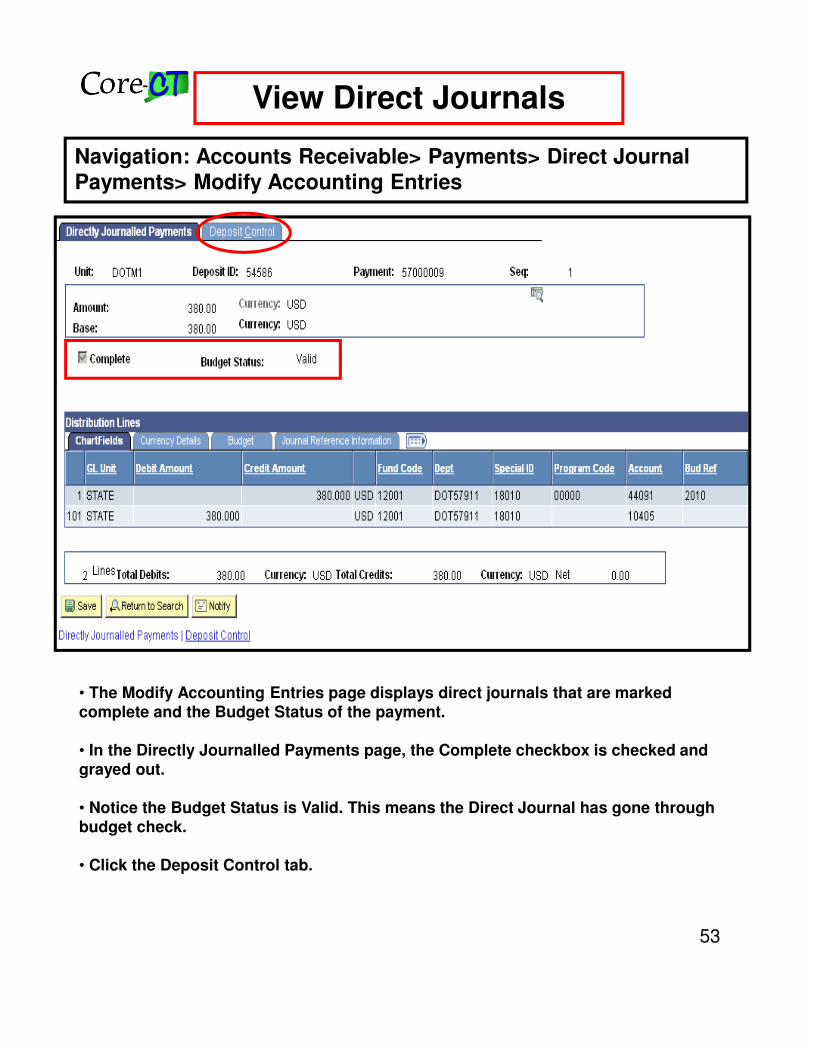
• The Modify Accounting Entries page displays direct journals that are marked complete and the Budget Status of the payment.
• In the Directly Journalled Payments page, the Complete checkbox is checked and grayed out.
• Notice the Budget Status is Valid. This means the Direct Journal has gone through budget check.
• Click the Deposit Control tab.
Navigation: Accounts Receivable> Payments> Direct Journal Payments> Modify Accounting Entries
54
View Direct Journals
• In the Deposit Control page, the Journalled Total Amount and Count and the Posted Date populates after budget check.
55
Direct Journal – Budget Errors
56
Correcting Direct Journals
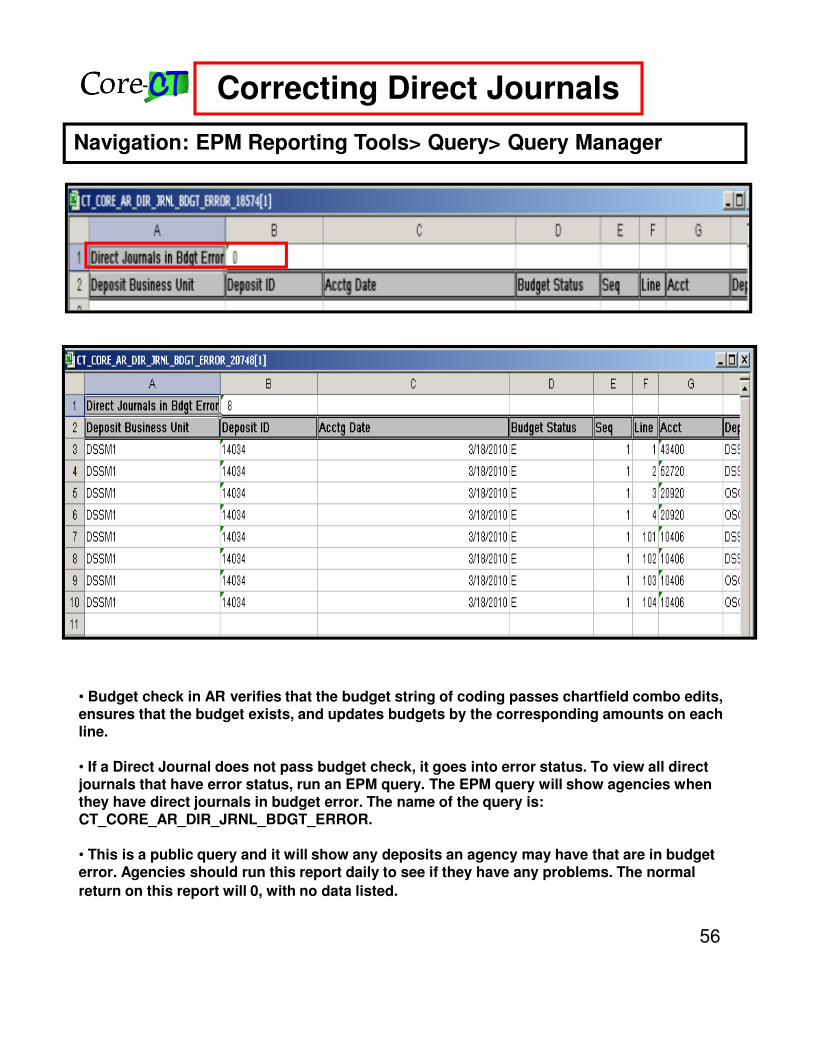
• Budget check in AR verifies that the budget string of coding passes chartfield combo edits, ensures that the budget exists, and updates budgets by the corresponding amounts on each line.
• If a Direct Journal does not pass budget check, it goes into error status. To view all direct journals that have error status, run an EPM query. The EPM query will show agencies when they have direct journals in budget error. The name of the query is: CT_CORE_AR_DIR_JRNL_BDGT_ERROR.
• This is a public query and it will show any deposits an agency may have that are in budget error. Agencies should run this report daily to see if they have any problems. The normal
return on this report will 0, with no data listed.
Navigation: EPM Reporting Tools> Query> Query Manager
57
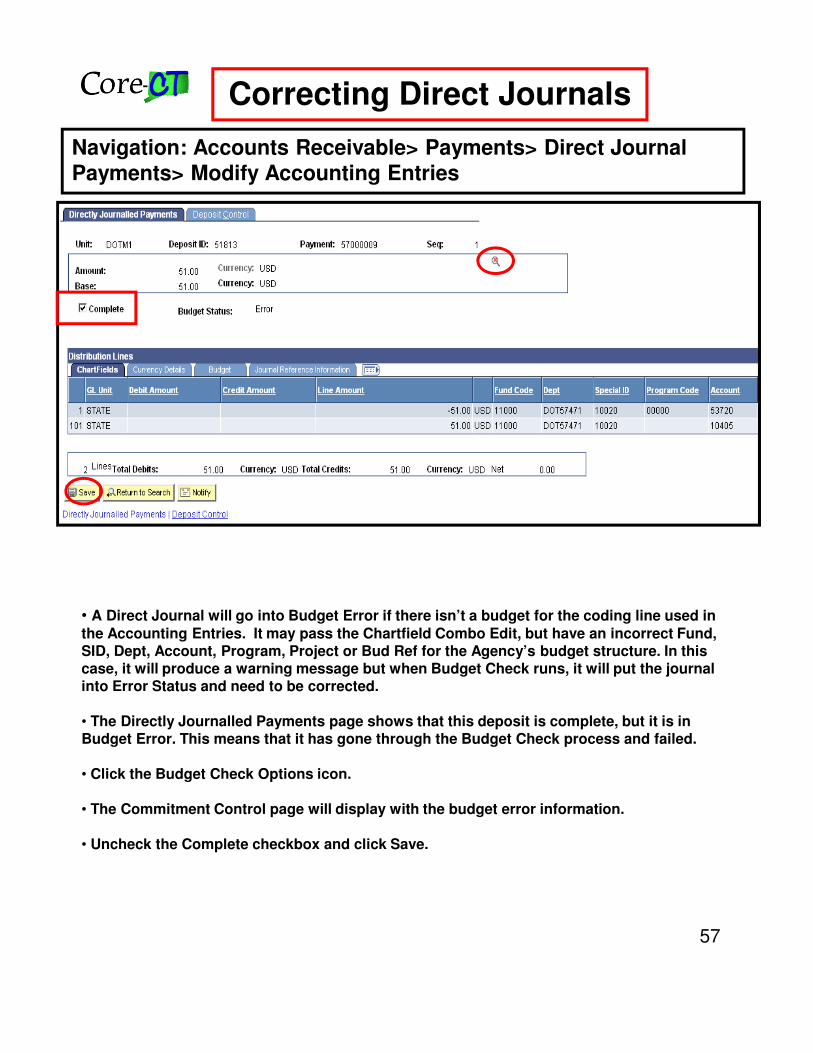
Correcting Direct Journals
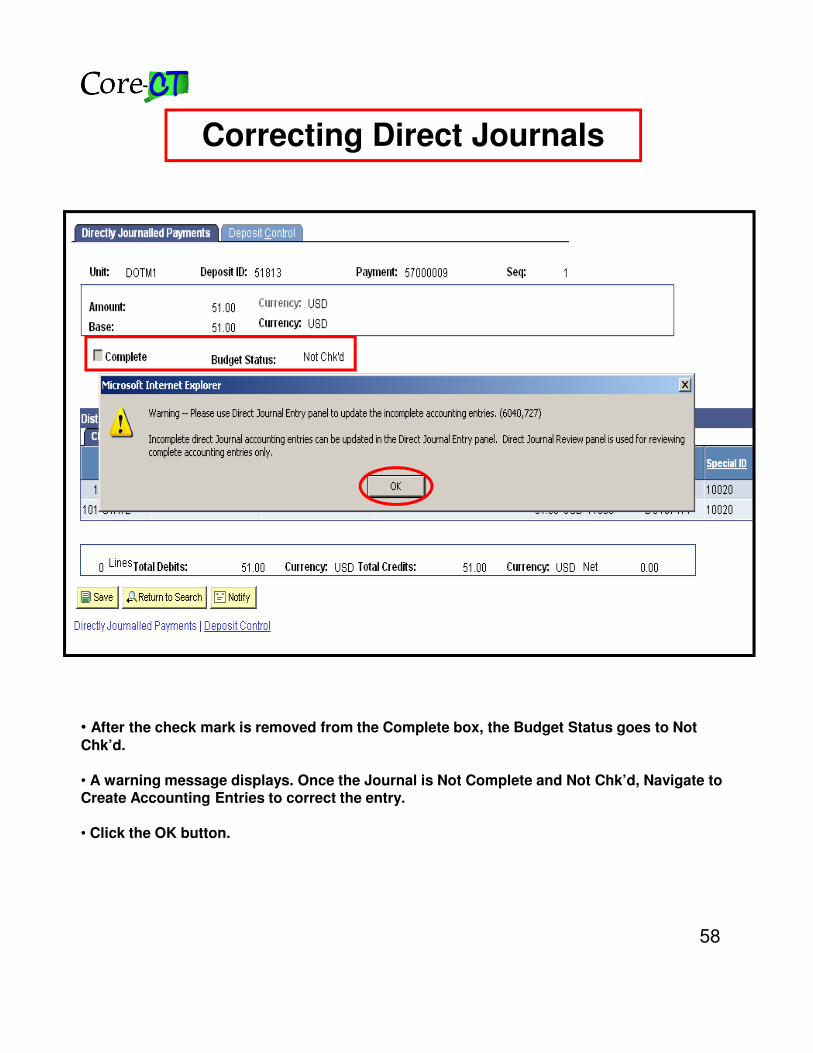
• A Direct Journal will go into Budget Error if there isn’t a budget for the coding line used in the Accounting Entries. It may pass the Chartfield Combo Edit, but have an incorrect Fund, SID, Dept, Account, Program, Project or Bud Ref for the Agency’s budget structure. In this case, it will produce a warning message but when Budget Check runs, it will put the journal into Error Status and need to be corrected.
• The Directly Journalled Payments page shows that this deposit is complete, but it is in Budget Error. This means that it has gone through the Budget Check process and failed.
• Click the Budget Check Options icon.
• The Commitment Control page will display with the budget error information.
• Uncheck the Complete checkbox and click Save.
Navigation: Accounts Receivable> Payments> Direct Journal Payments> Modify Accounting Entries
58
Correcting Direct Journals
• After the check mark is removed from the Complete box, the Budget Status goes to Not Chk’d.
• A warning message displays. Once the Journal is Not Complete and Not Chk’d, Navigate to Create Accounting Entries to correct the entry.
• Click the OK button.
59
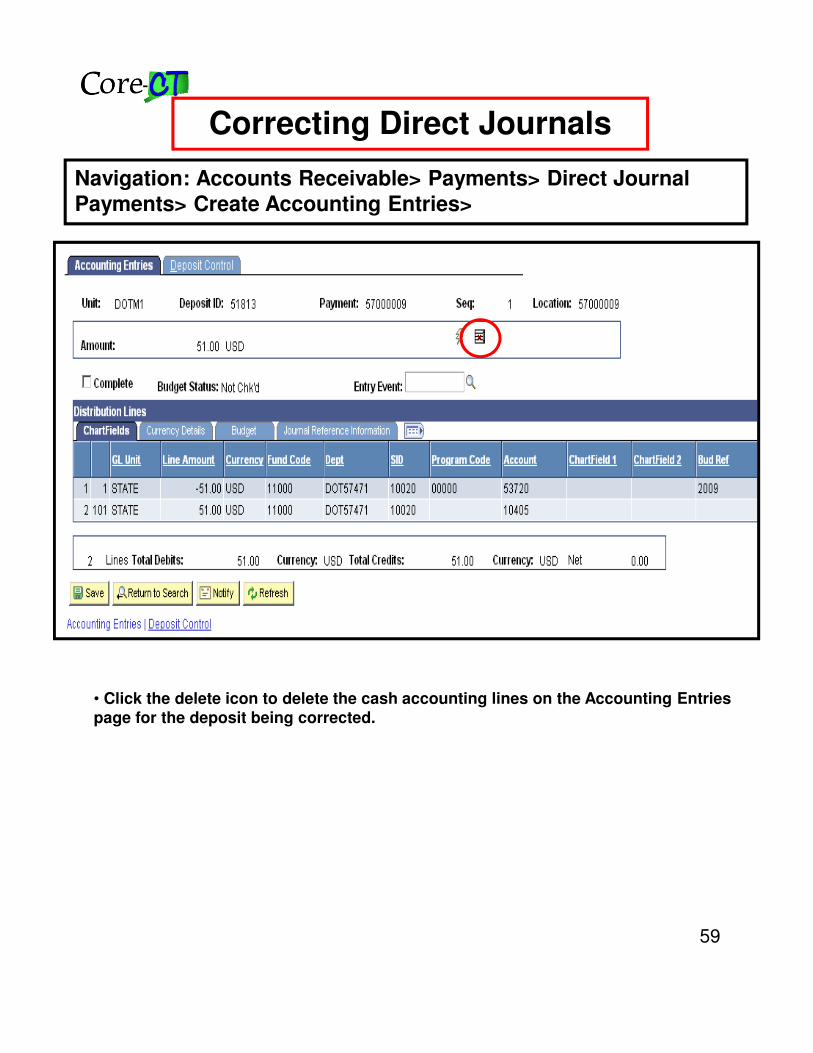
Correcting Direct Journals
• Click the delete icon to delete the cash accounting lines on the Accounting Entries page for the deposit being corrected.
Navigation: Accounts Receivable> Payments> Direct Journal Payments> Create Accounting Entries>

60
Correcting Direct Journals
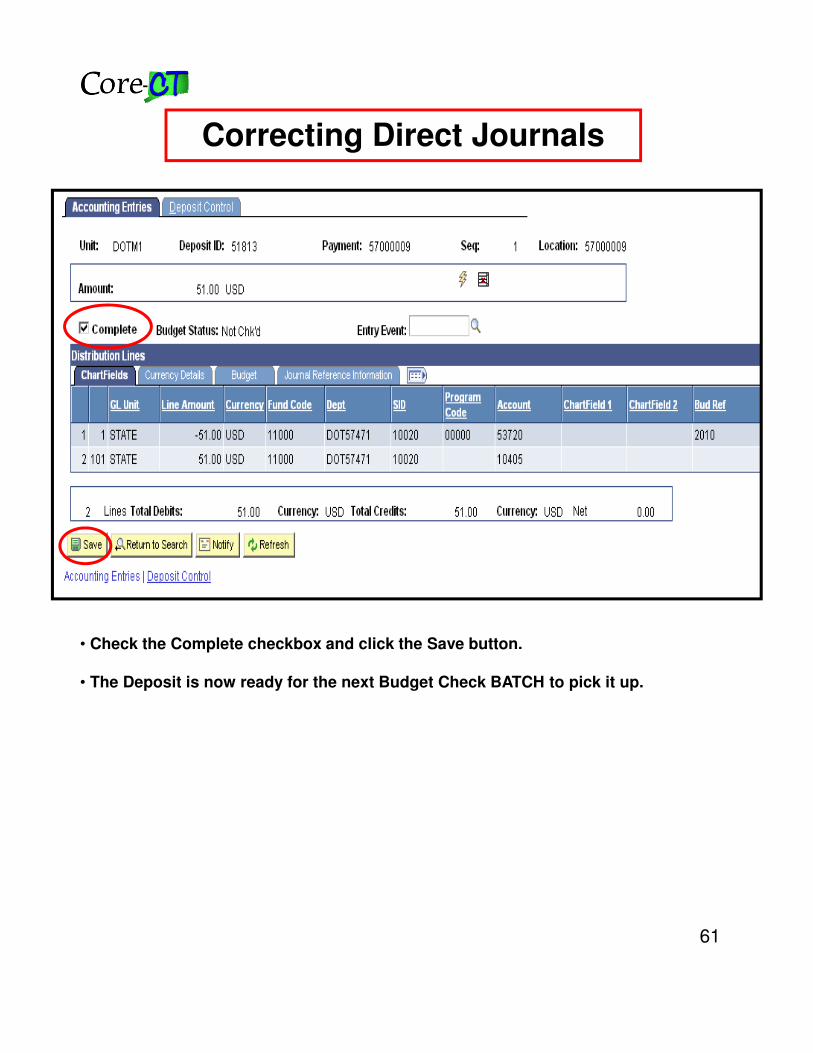
• Make the appropriate changes and click the Save button.
• In this example, change the Bud Ref to 2010.
• Click the Create button to create the new cash line.
61
Correcting Direct Journals
• Check the Complete checkbox and click the Save button.
• The Deposit is now ready for the next Budget Check BATCH to pick it up.
62
Correcting Direct Journals
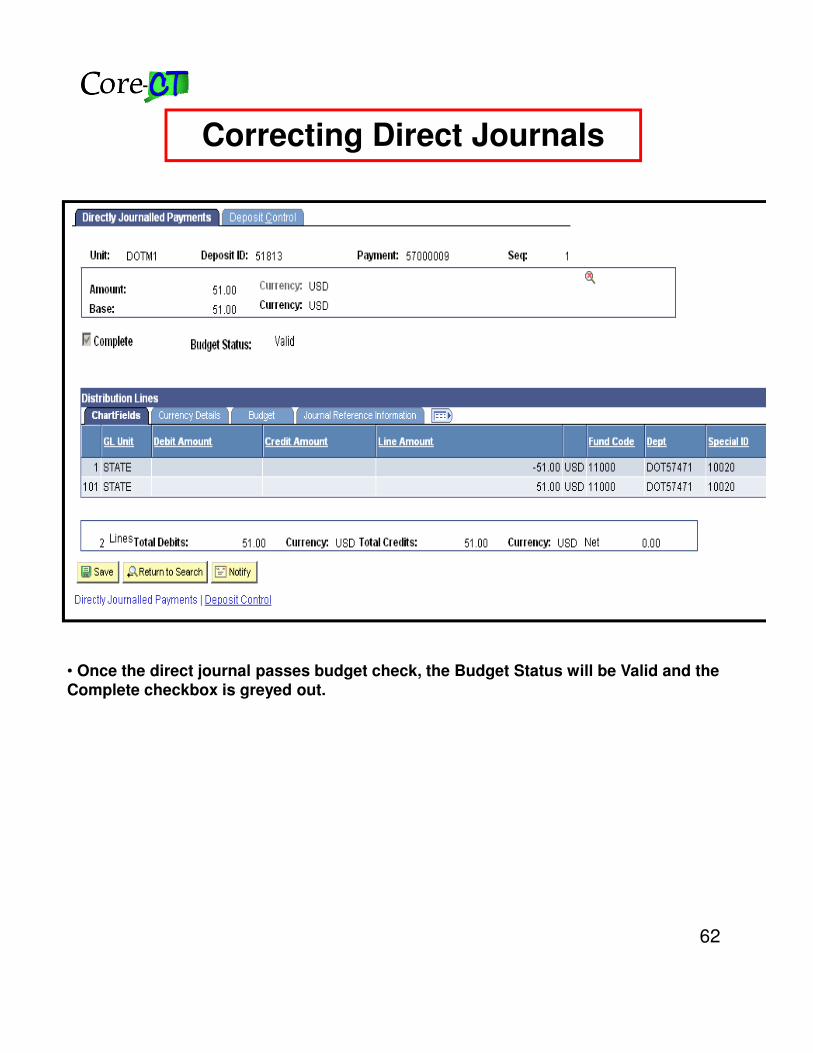
• Once the direct journal passes budget check, the Budget Status will be Valid and the Complete checkbox is greyed out.
63
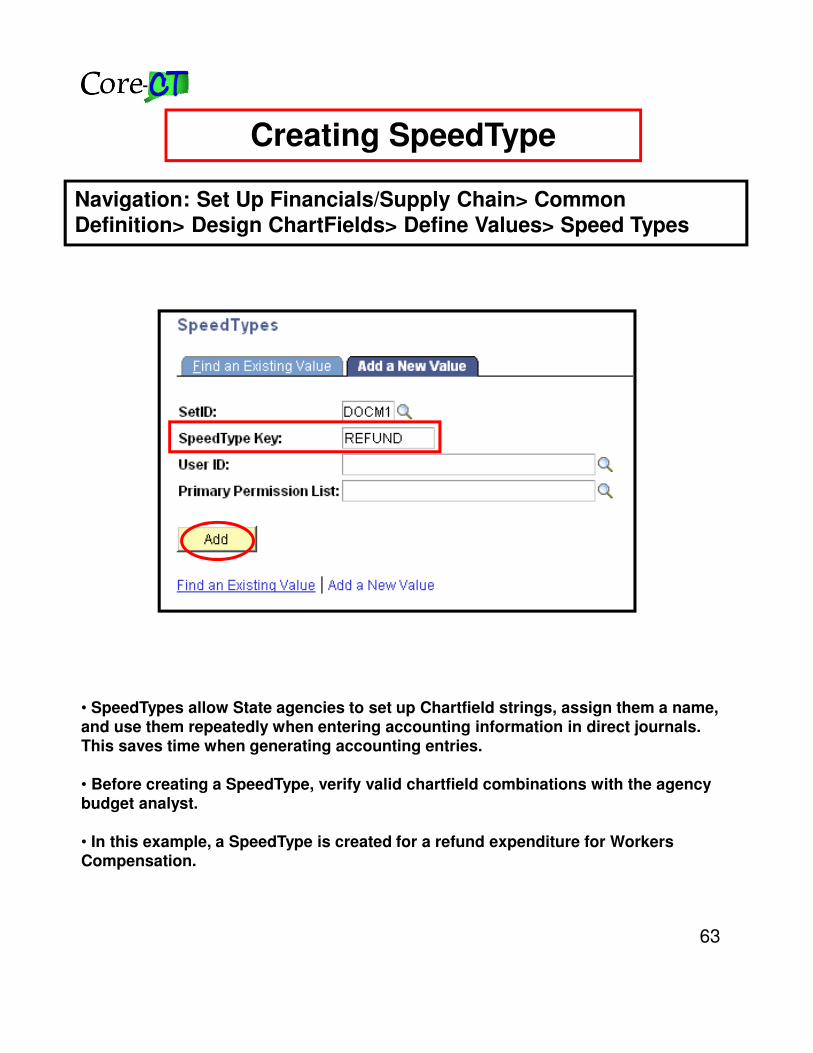
Creating SpeedType
• SpeedTypes allow State agencies to set up Chartfield strings, assign them a name, and use them repeatedly when entering accounting information in direct journals. This saves time when generating accounting entries.
• Before creating a SpeedType, verify valid chartfield combinations with the agency budget analyst.
• In this example, a SpeedType is created for a refund expenditure for Workers Compensation.
Navigation: Set Up Financials/Supply Chain> Common Definition> Design ChartFields> Define Values> Speed Types

64
Creating SpeedType
• Enter the Description.
• Enter the appropriate chartfield information. If one of the chartfield values varies with the deposit, leave it blank here and enter it manually when creating the direct journal.
• Click the Save button.
65
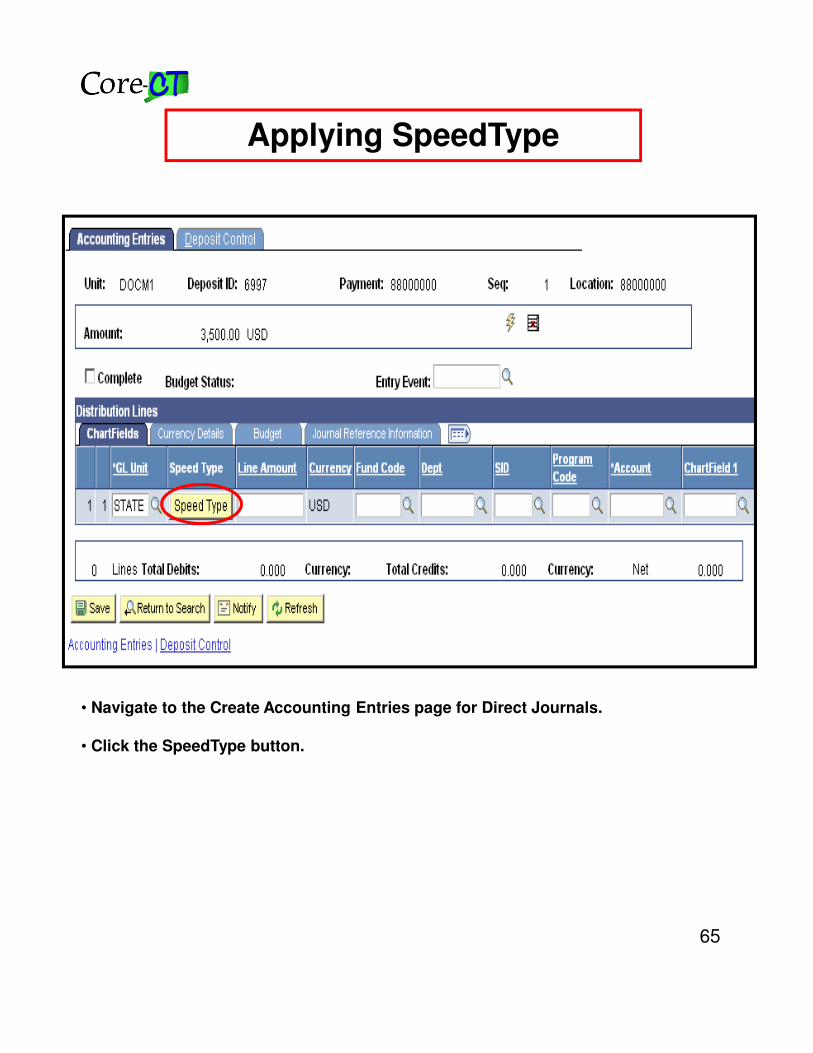
Applying SpeedType
• Navigate to the Create Accounting Entries page for Direct Journals.
• Click the SpeedType button.
66
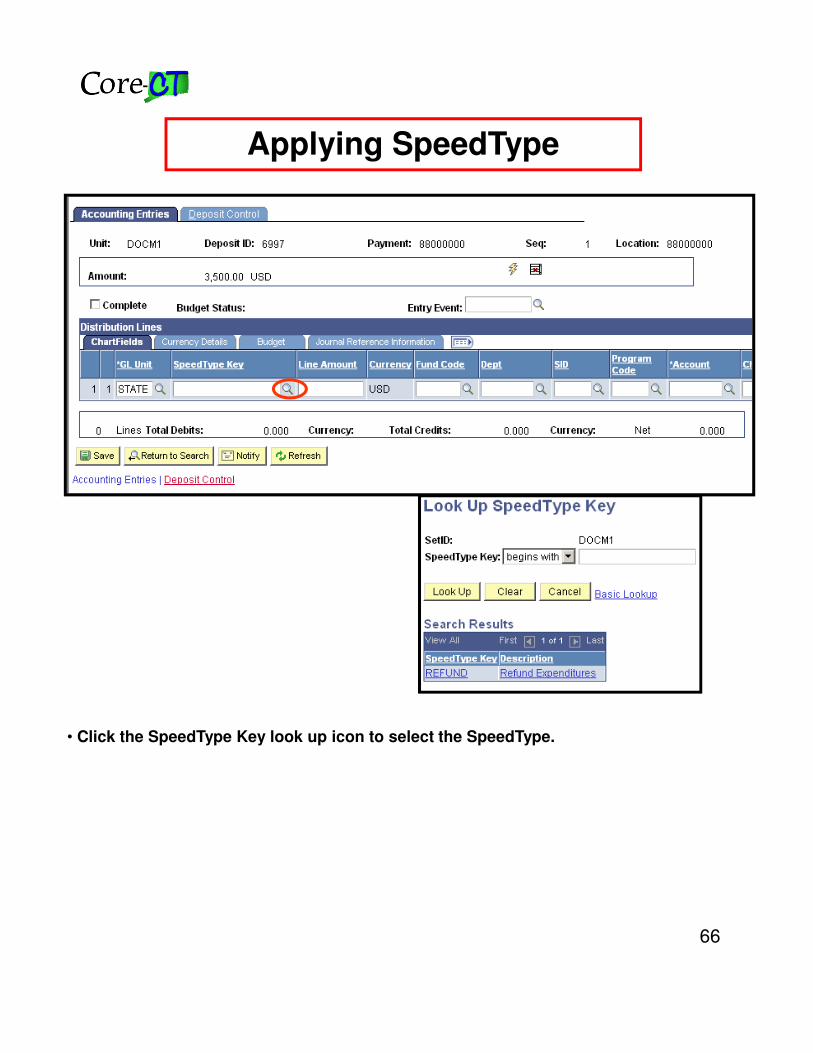
Applying SpeedType
• Click the SpeedType Key look up icon to select the SpeedType.
67
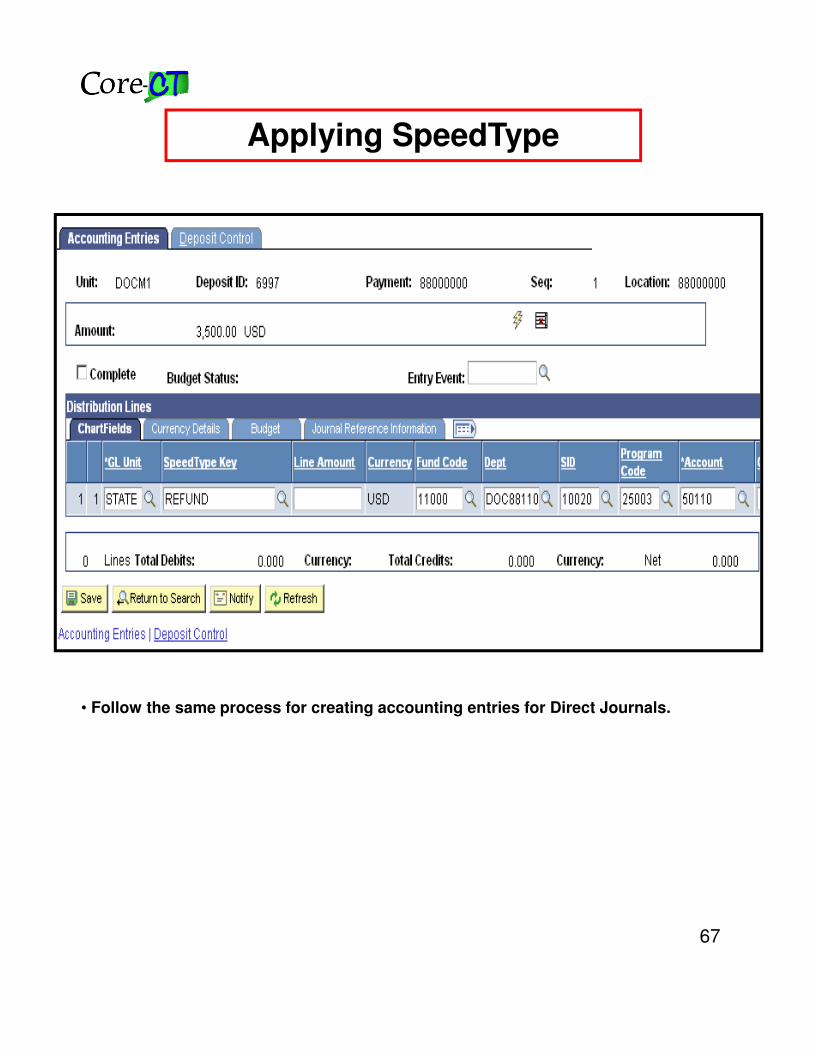
Applying SpeedType
• Follow the same process for creating accounting entries for Direct Journals.
68
OSCIP Deposits
69
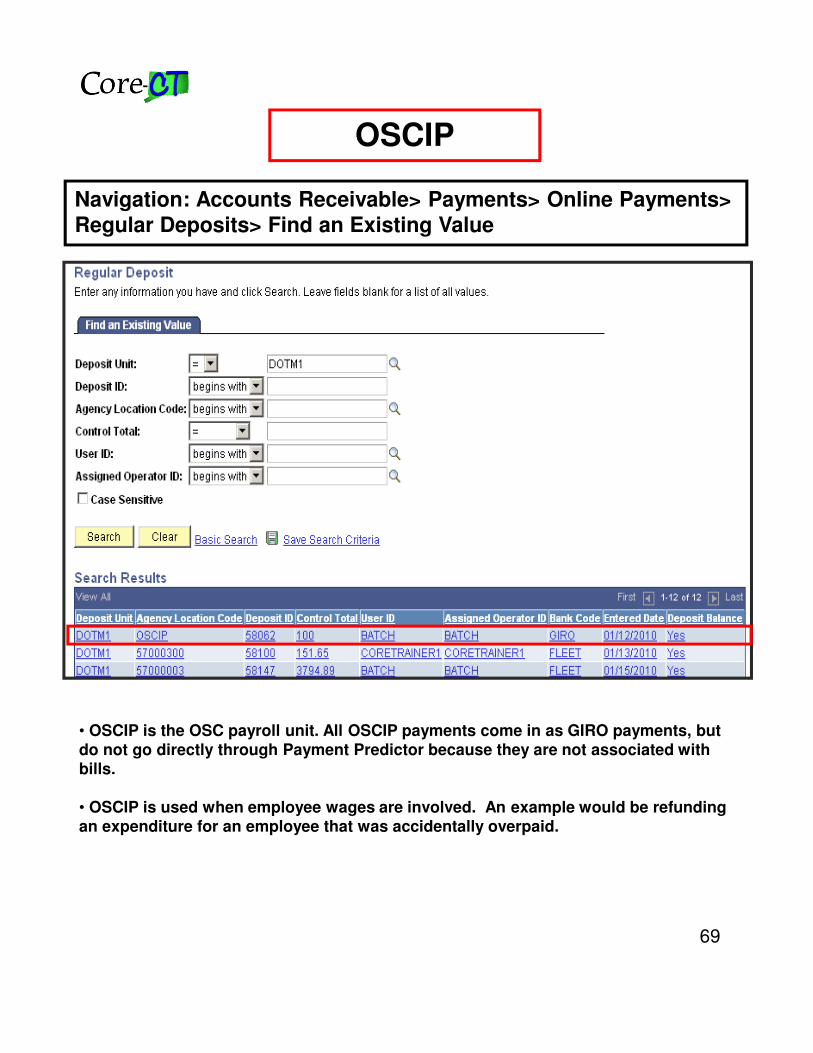
OSCIP
• OSCIP is the OSC payroll unit. All OSCIP payments come in as GIRO payments, but do not go directly through Payment Predictor because they are not associated with bills.
• OSCIP is used when employee wages are involved. An example would be refunding an expenditure for an employee that was accidentally overpaid.
Navigation: Accounts Receivable> Payments> Online Payments> Regular Deposits> Find an Existing Value
70
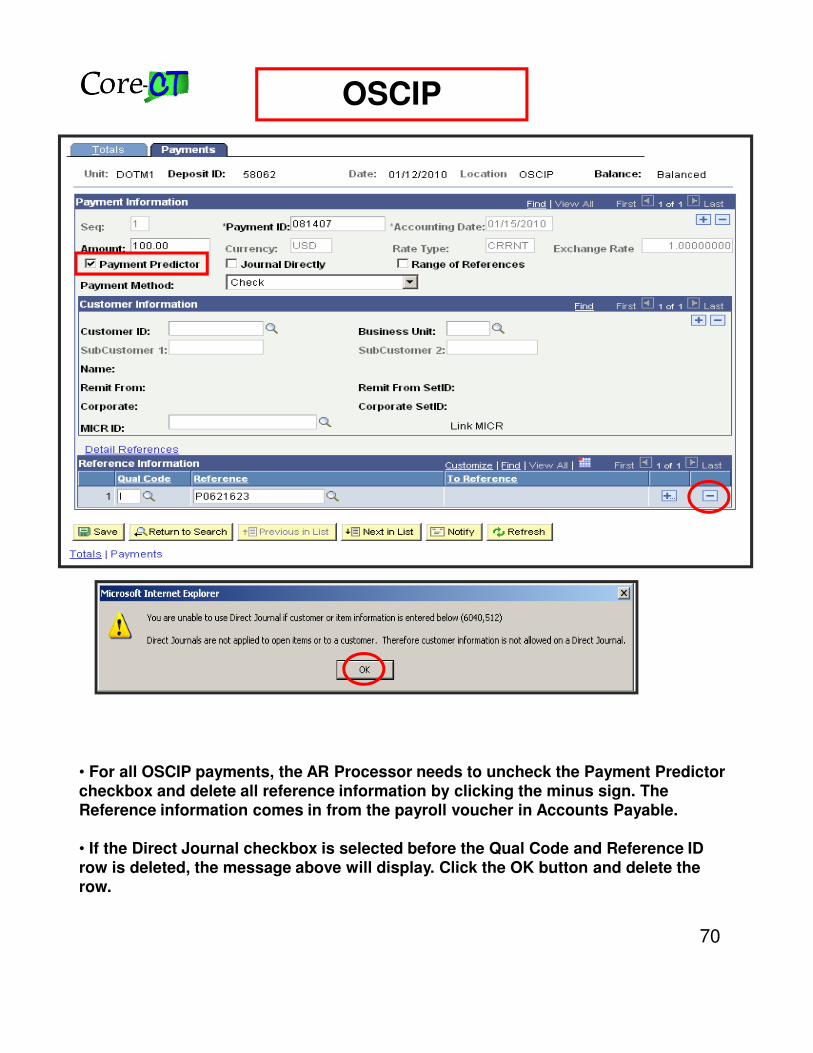
OSCIP
• For all OSCIP payments, the AR Processor needs to uncheck the Payment Predictor checkbox and delete all reference information by clicking the minus sign. The Reference information comes in from the payroll voucher in Accounts Payable.
• If the Direct Journal checkbox is selected before the Qual Code and Reference ID row is deleted, the message above will display. Click the OK button and delete the row.
71
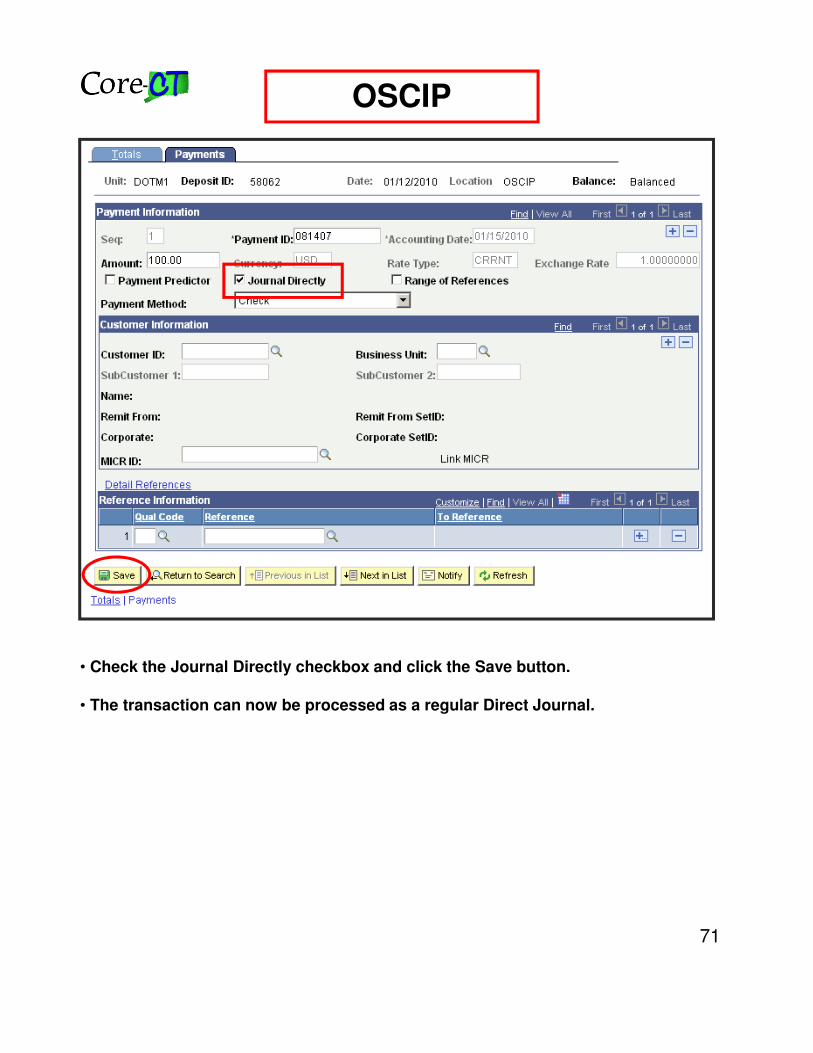
OSCIP
• Check the Journal Directly checkbox and click the Save button.
• The transaction can now be processed as a regular Direct Journal.
72
Multiple Sequence Deposits
• As stated earlier, regardless of the number of checks deposited to the bank, the bank deposit in Core-CT will show the total, not the individual deposit amounts. Multiple sequences must be created for any deposit that has both Open Items with reference numbers and miscellaneous cash, or for deposits that have payments from more than one customer.
73
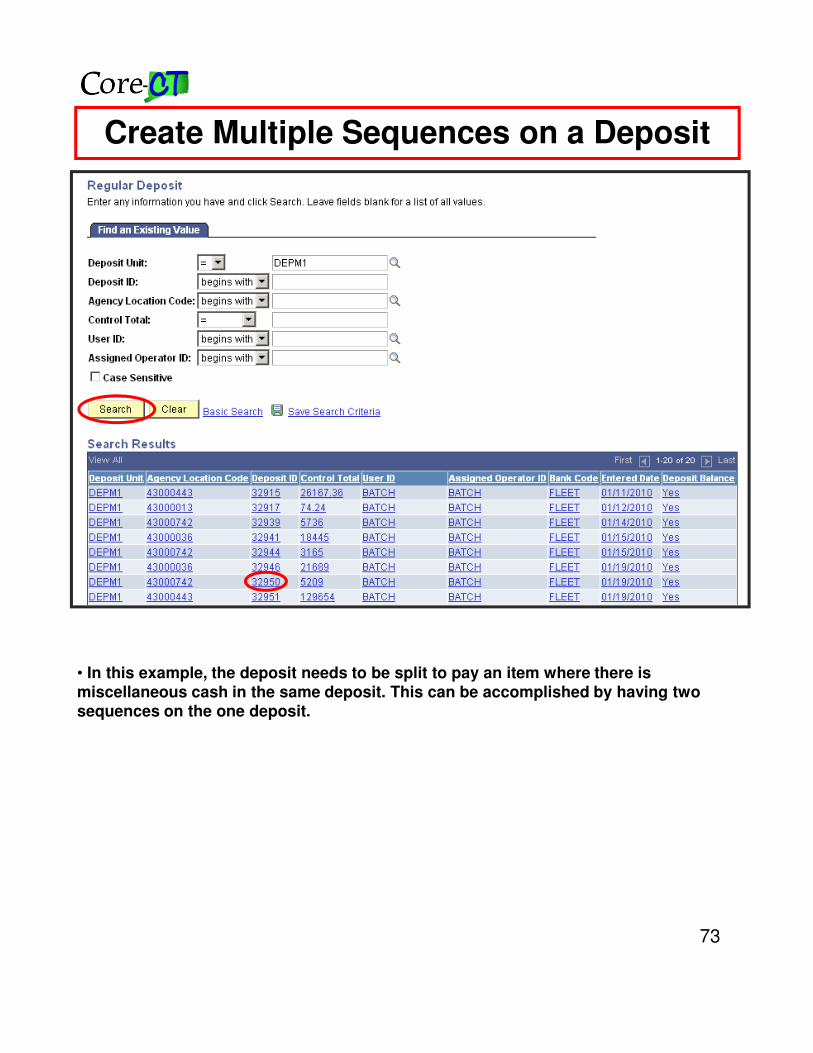
Create Multiple Sequences on a Deposit
• In this example, the deposit needs to be split to pay an item where there is miscellaneous cash in the same deposit. This can be accomplished by having two sequences on the one deposit.
74
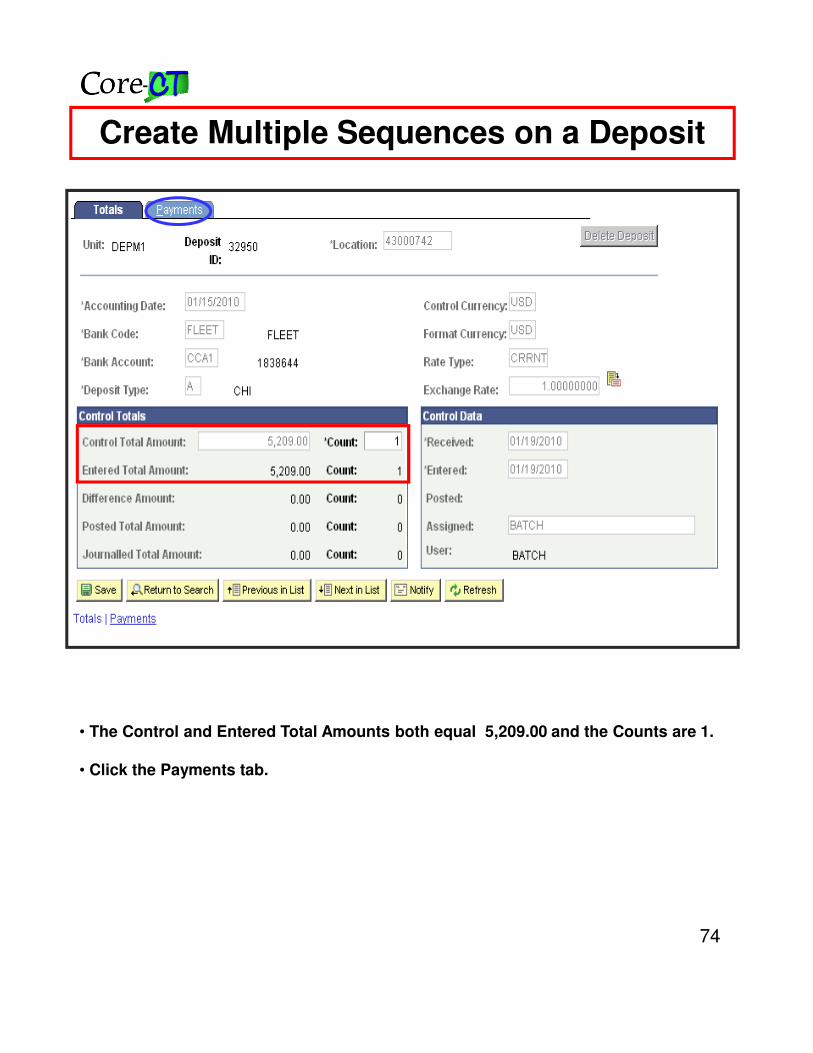
• The Control and Entered Total Amounts both equal 5,209.00 and the Counts are 1.
• Click the Payments tab.
Create Multiple Sequences on a Deposit

75
• On the Payments page, there is only one sequence for the total Amount of 5,209.00, but there are two different items that need to be applied.
• Item ID DEP0000000047 for 5,000.00 needs to be applied in addition to miscellaneous cash of 209.00.
• Click the Add a new row in Sequence 1 button to add another sequence. Click the Add a new row button in the Payment Information group box.
• Do not click the Customer Information plus sign by mistake.
Create Multiple Sequences on a Deposit
76
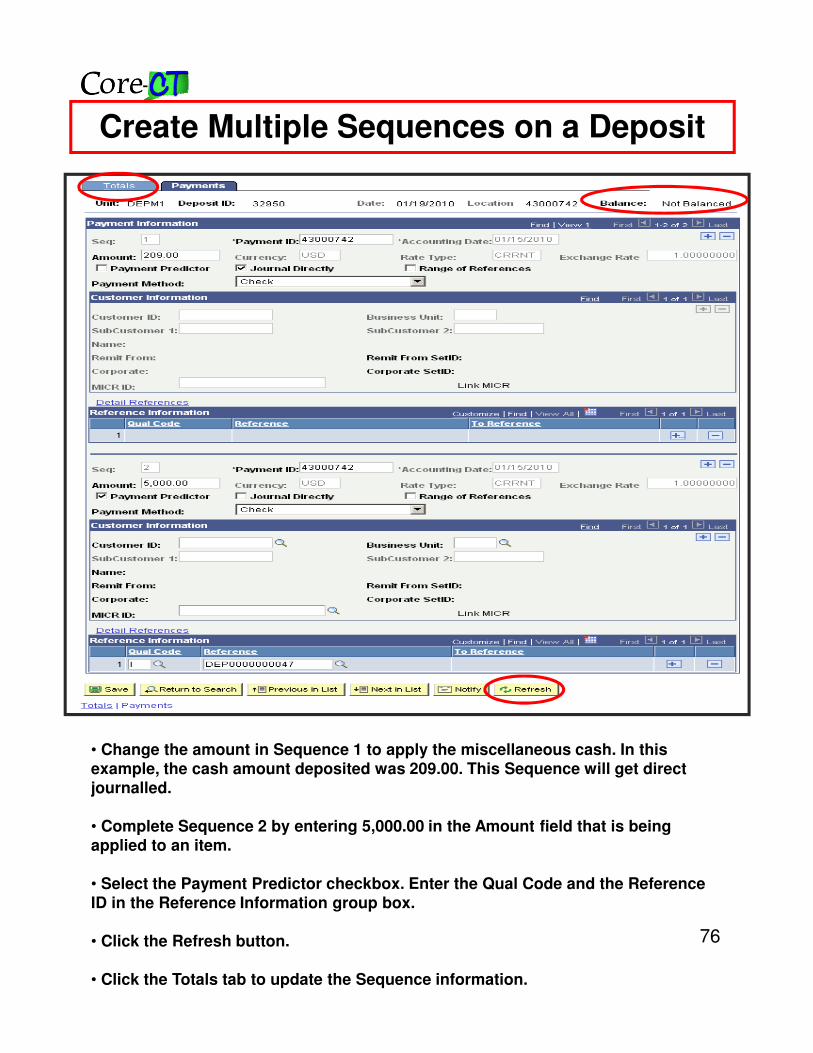
• Change the amount in Sequence 1 to apply the miscellaneous cash. In this example, the cash amount deposited was 209.00. This Sequence will get direct journalled.
• Complete Sequence 2 by entering 5,000.00 in the Amount field that is being applied to an item.
• Select the Payment Predictor checkbox. Enter the Qual Code and the Reference ID in the Reference Information group box.
• Click the Refresh button.
• Click the Totals tab to update the Sequence information.
Create Multiple Sequences on a Deposit
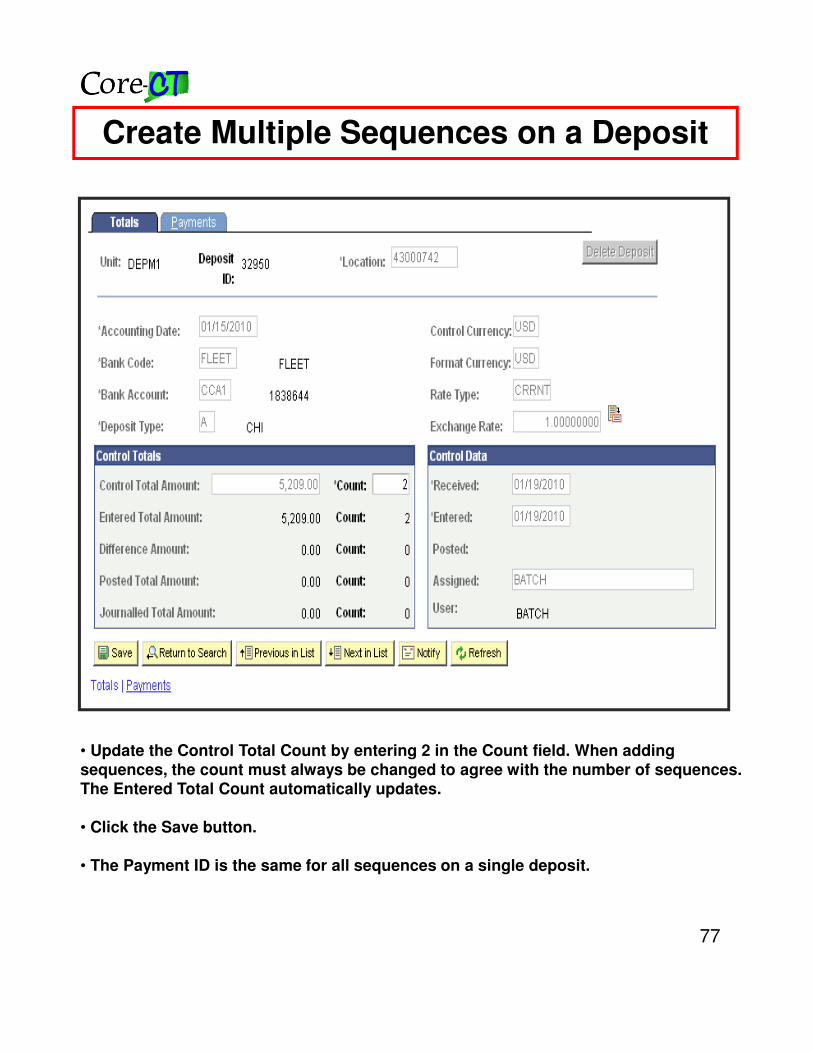
77
• Update the Control Total Count by entering 2 in the Count field. When adding sequences, the count must always be changed to agree with the number of sequences. The Entered Total Count automatically updates.
• Click the Save button.
• The Payment ID is the same for all sequences on a single deposit.
Create Multiple Sequences on a Deposit
78
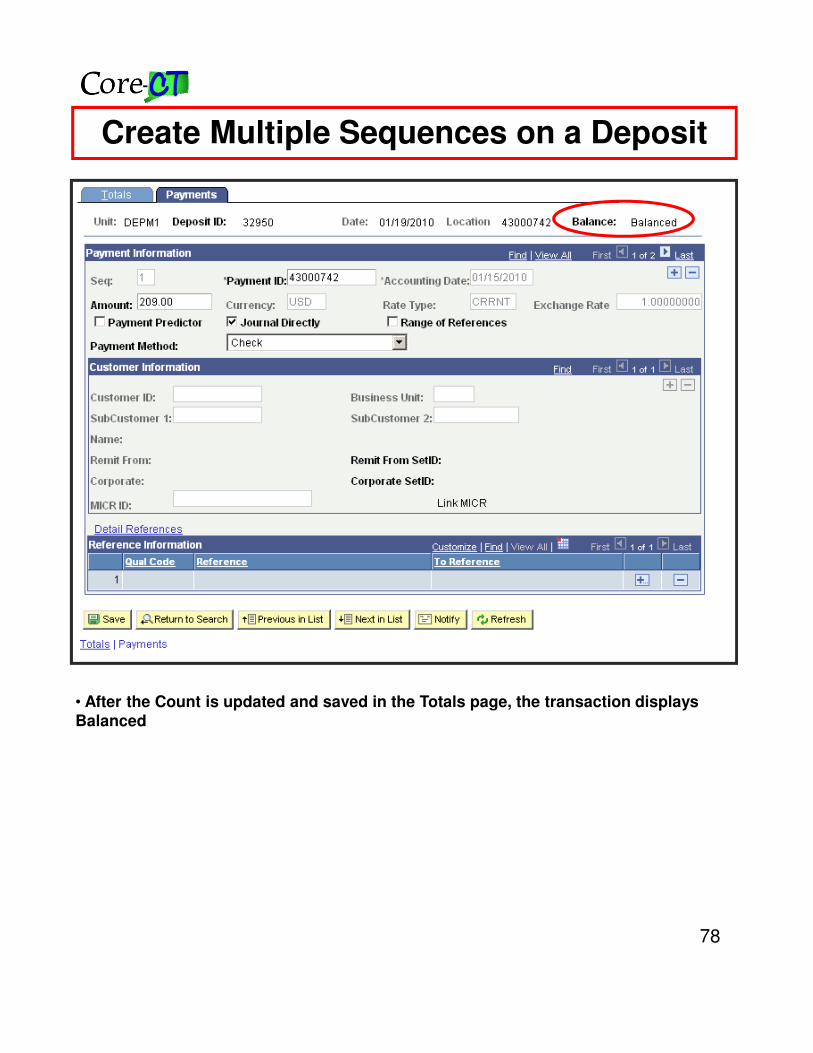
• After the Count is updated and saved in the Totals page, the transaction displays Balanced
Create Multiple Sequences on a Deposit
79
Maintaining Receivables
80
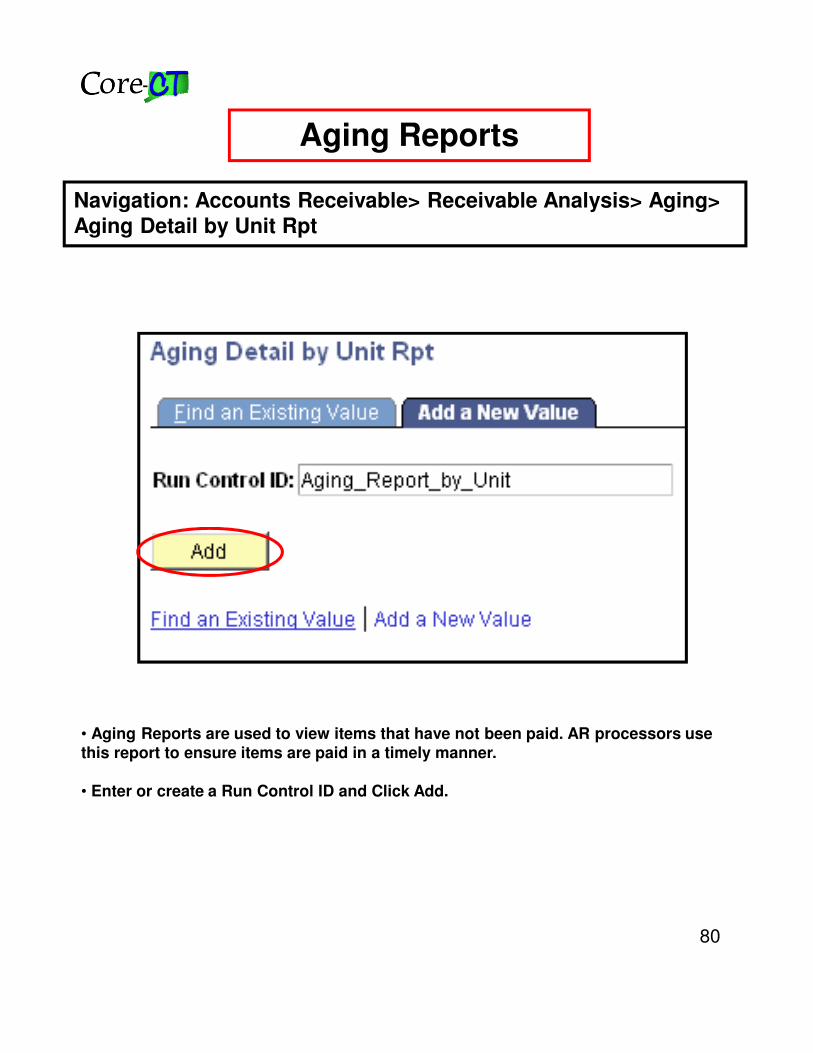
Aging Reports
• Aging Reports are used to view items that have not been paid. AR processors use this report to ensure items are paid in a timely manner.
• Enter or create a Run Control ID and Click Add.
Navigation: Accounts Receivable> Receivable Analysis> Aging> Aging Detail by Unit Rpt
81
Aging Reports
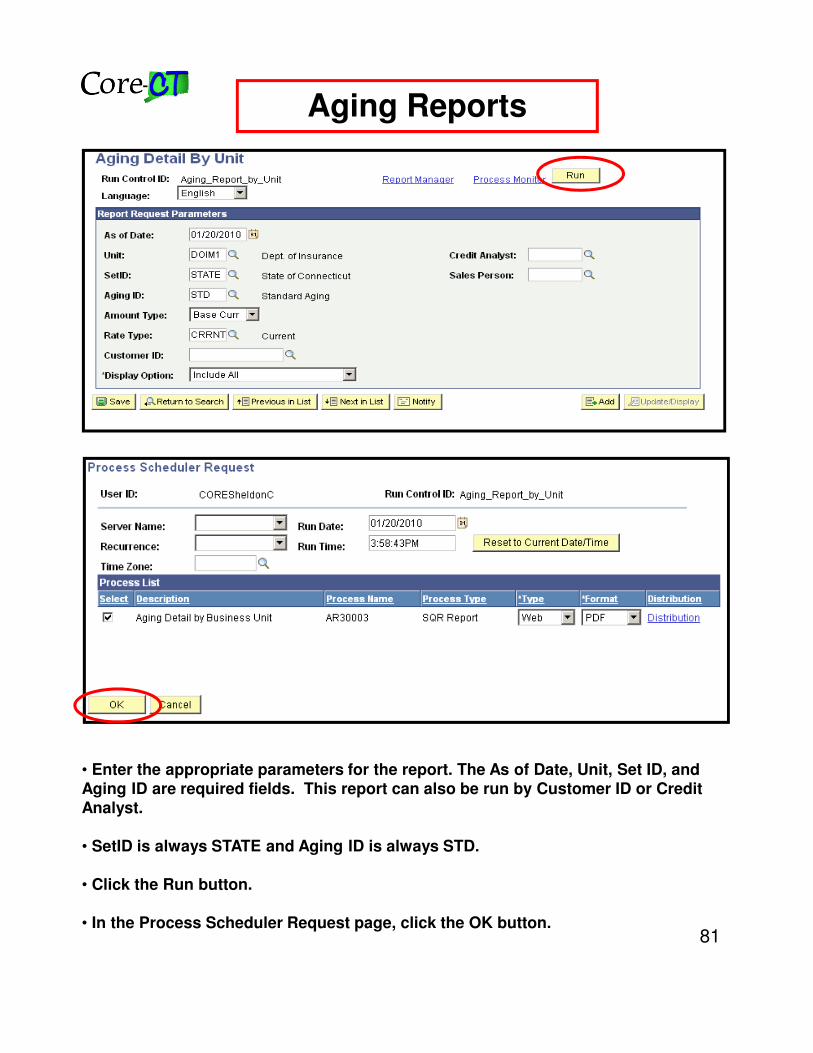
• Enter the appropriate parameters for the report. The As of Date, Unit, Set ID, and Aging ID are required fields. This report can also be run by Customer ID or Credit Analyst.
• SetID is always STATE and Aging ID is always STD.
• Click the Run button.
• In the Process Scheduler Request page, click the OK button.
82
Aging Reports
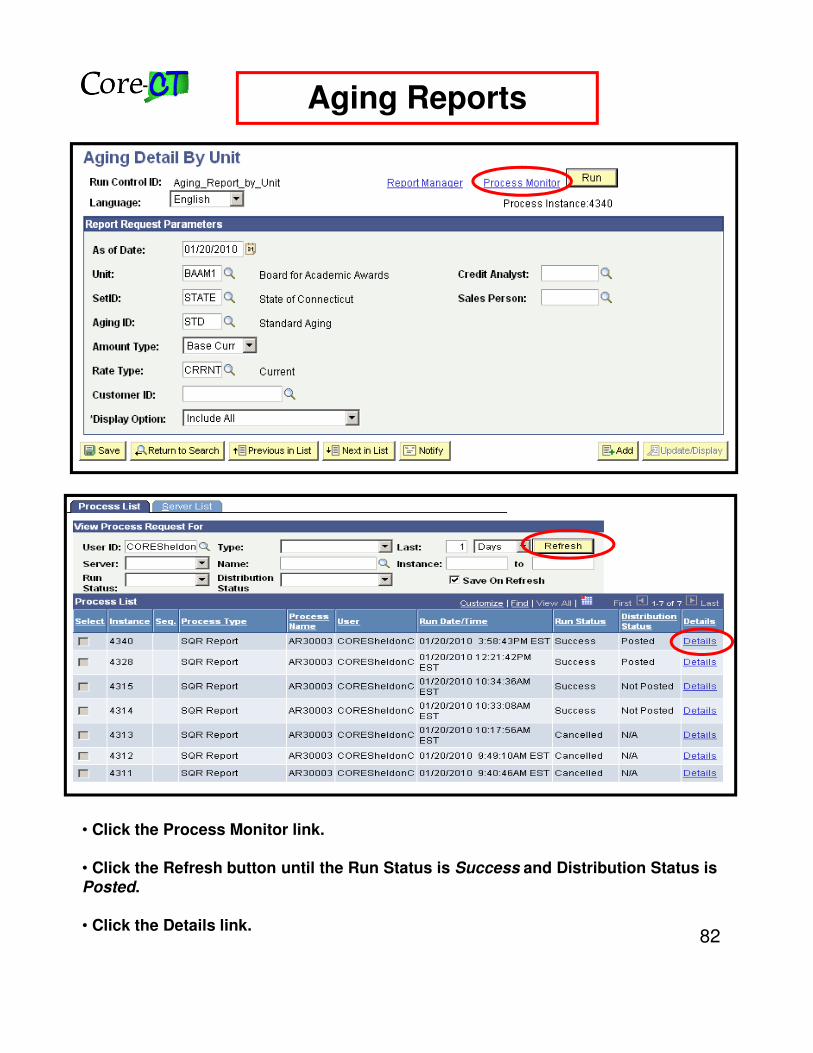
• Click the Process Monitor link.
• Click the Refresh button until the Run Status is Success and Distribution Status is Posted.
• Click the Details link.
83
Aging Reports
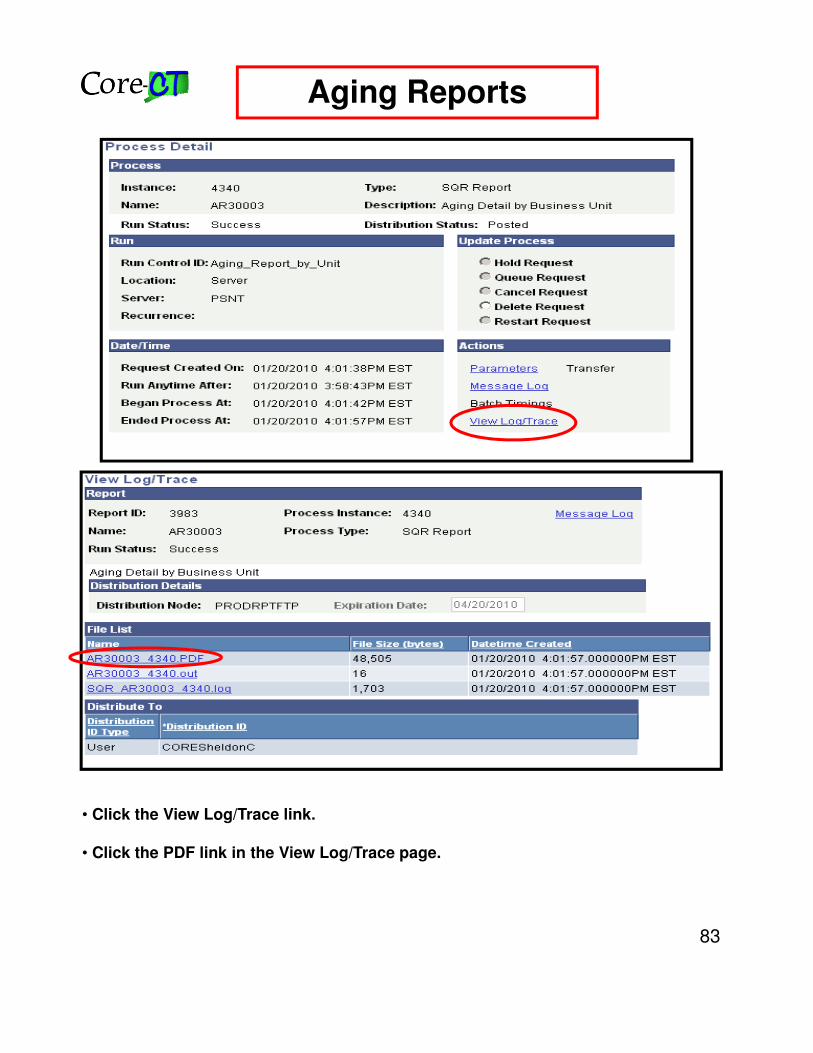
• Click the View Log/Trace link.
• Click the PDF link in the View Log/Trace page.
84
Aging Reports
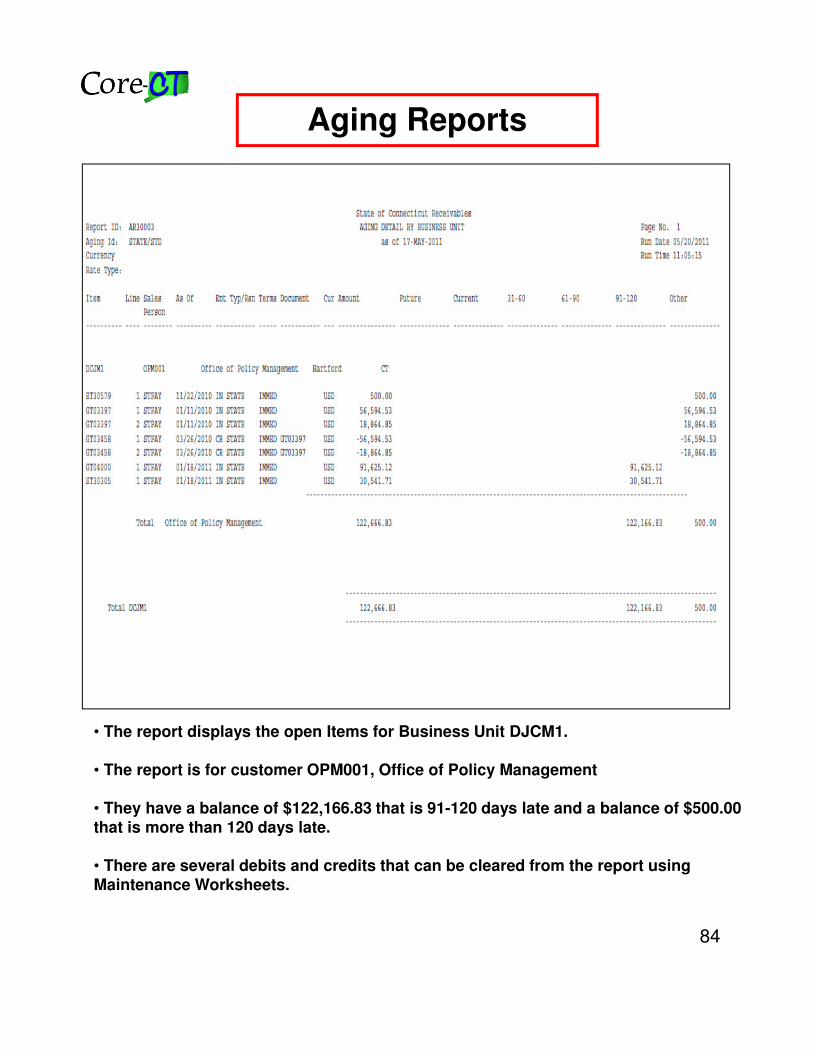
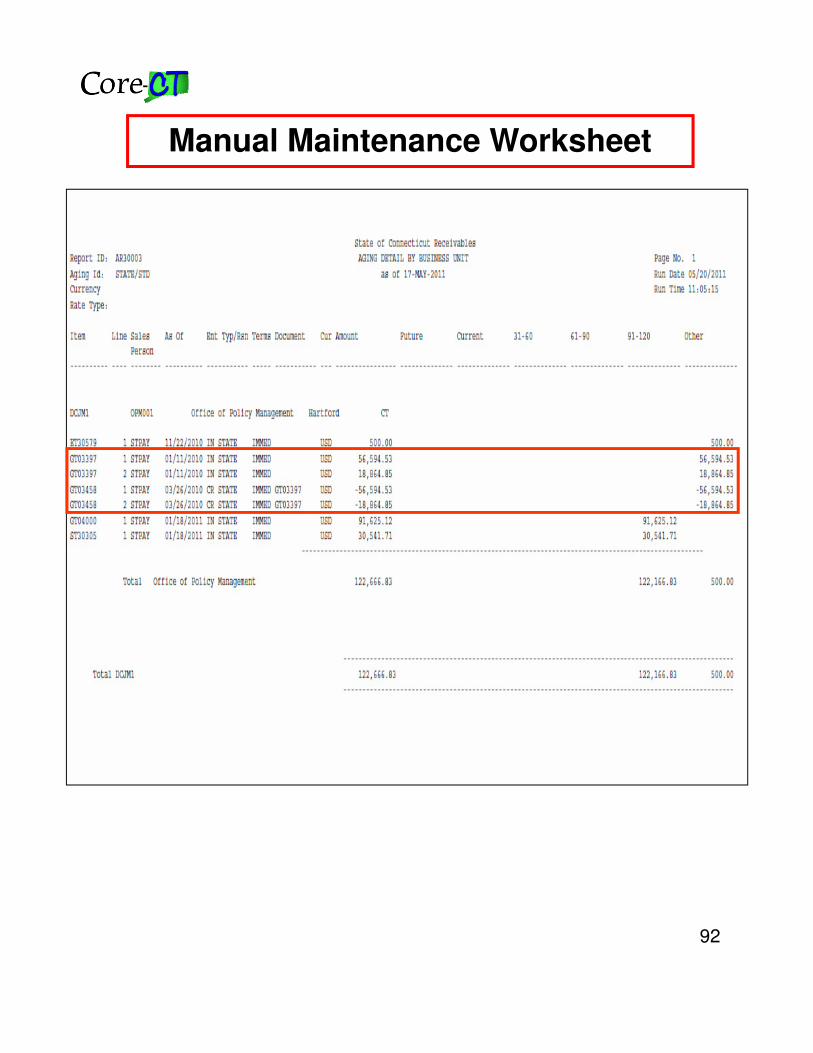
• The report displays the open Items for Business Unit DJCM1.
• The report is for customer OPM001, Office of Policy Management
• They have a balance of $122,166.83 that is 91-120 days late and a balance of $500.00 that is more than 120 days late.
• There are several debits and credits that can be cleared from the report using Maintenance Worksheets.
85
Auto Maintenance Worksheet
• If a bill was created using the “Adjust Entire Bill” or “Adjust Selected Bill Line” functions in Billing, there isn’t a corresponding deposit to close the item.
• Auto Maintenance is a process that matches the adjusted bill with the original bill and waits for completion of the Maintenance Worksheet.
• When Auto Maintenance creates the worksheet, the User ID will be BATCH. It is important to look at the Update Worksheet page to see if there are any worksheets that were already created for the same items. Users can manually create worksheets and close out the items.
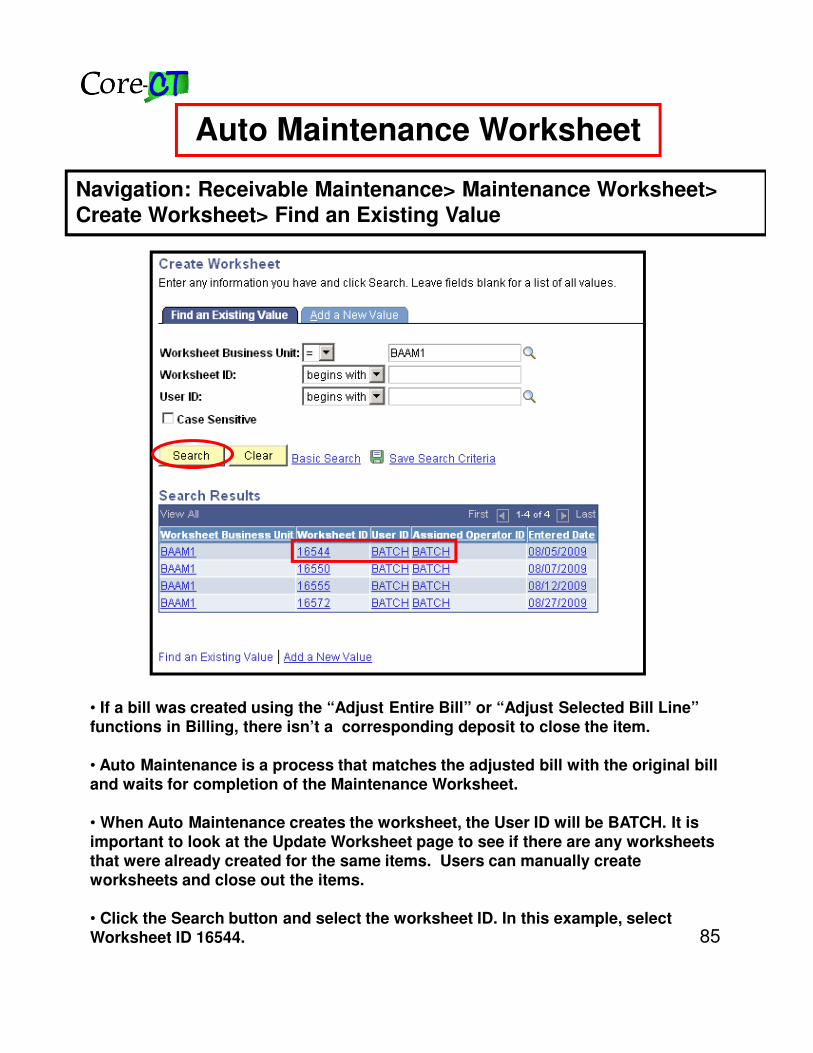
• Click the Search button and select the worksheet ID. In this example, select Worksheet ID 16544.
Navigation: Receivable Maintenance> Maintenance Worksheet> Create Worksheet> Find an Existing Value
86
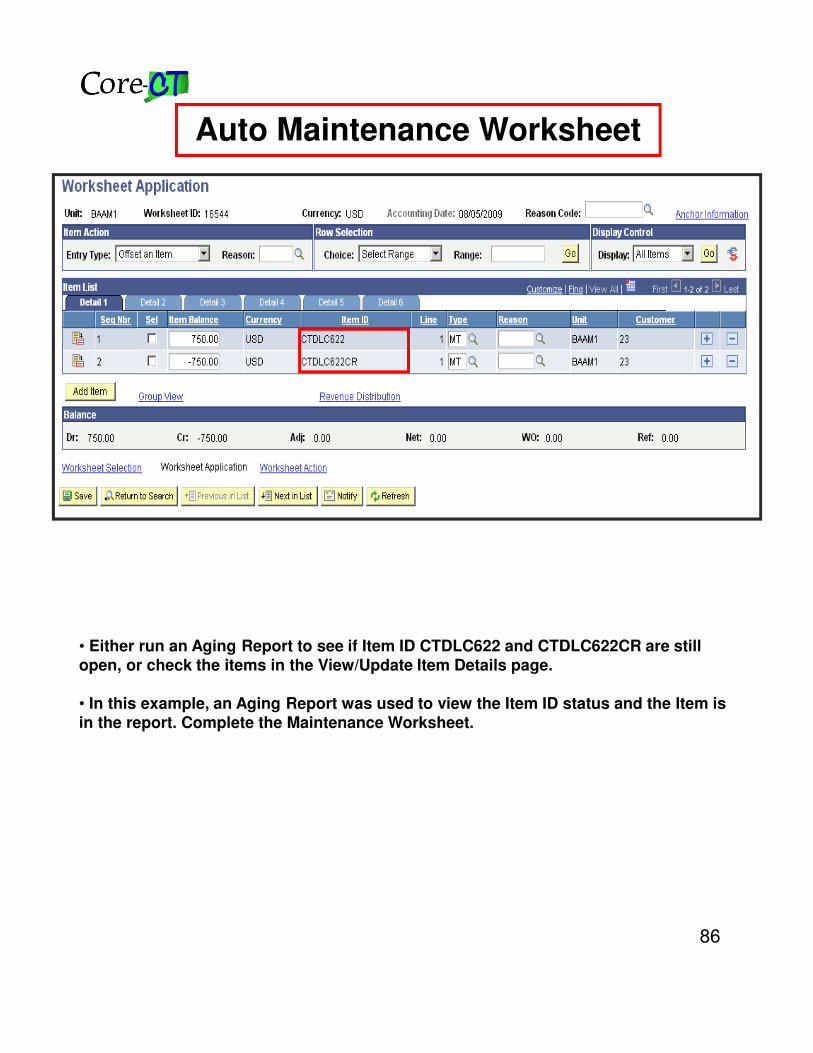
• Either run an Aging Report to see if Item ID CTDLC622 and CTDLC622CR are still open, or check the items in the View/Update Item Details page.
• In this example, an Aging Report was used to view the Item ID status and the Item is in the report. Complete the Maintenance Worksheet.
Auto Maintenance Worksheet
87
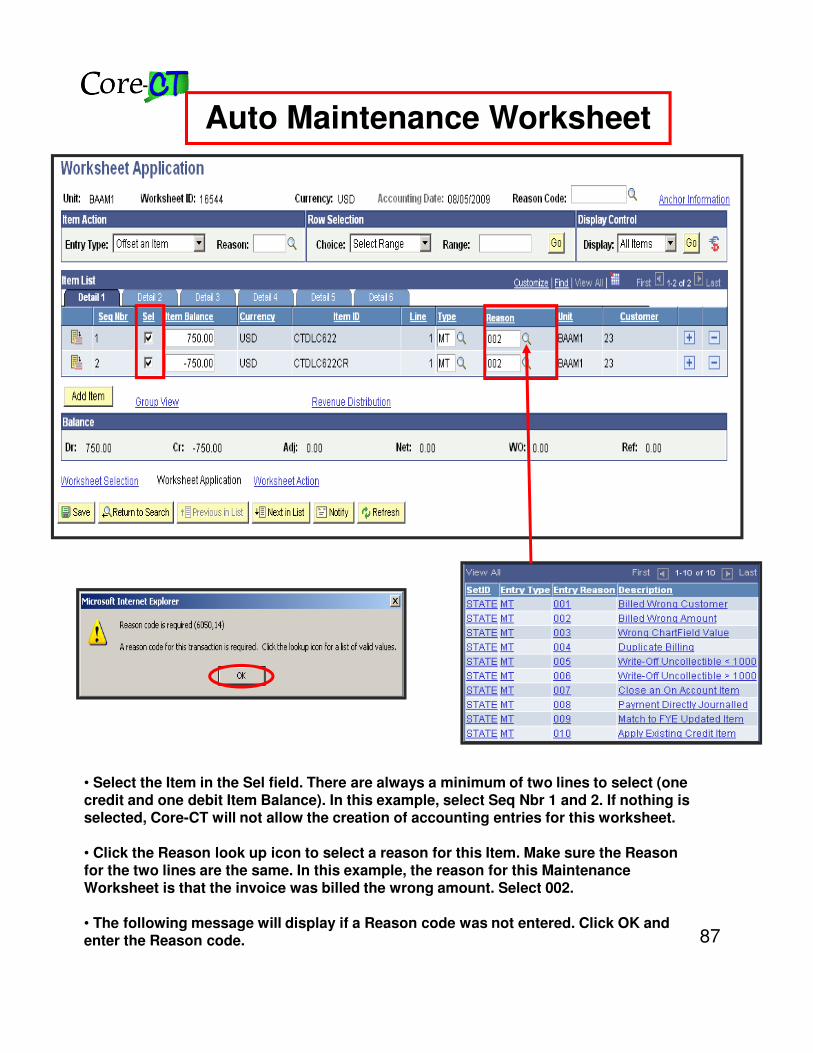
• Select the Item in the Sel field. There are always a minimum of two lines to select (one credit and one debit Item Balance). In this example, select Seq Nbr 1 and 2. If nothing is selected, Core-CT will not allow the creation of accounting entries for this worksheet.
• Click the Reason look up icon to select a reason for this Item. Make sure the Reason for the two lines are the same. In this example, the reason for this Maintenance Worksheet is that the invoice was billed the wrong amount. Select 002.
• The following message will display if a Reason code was not entered. Click OK and enter the Reason code.
Auto Maintenance Worksheet
88
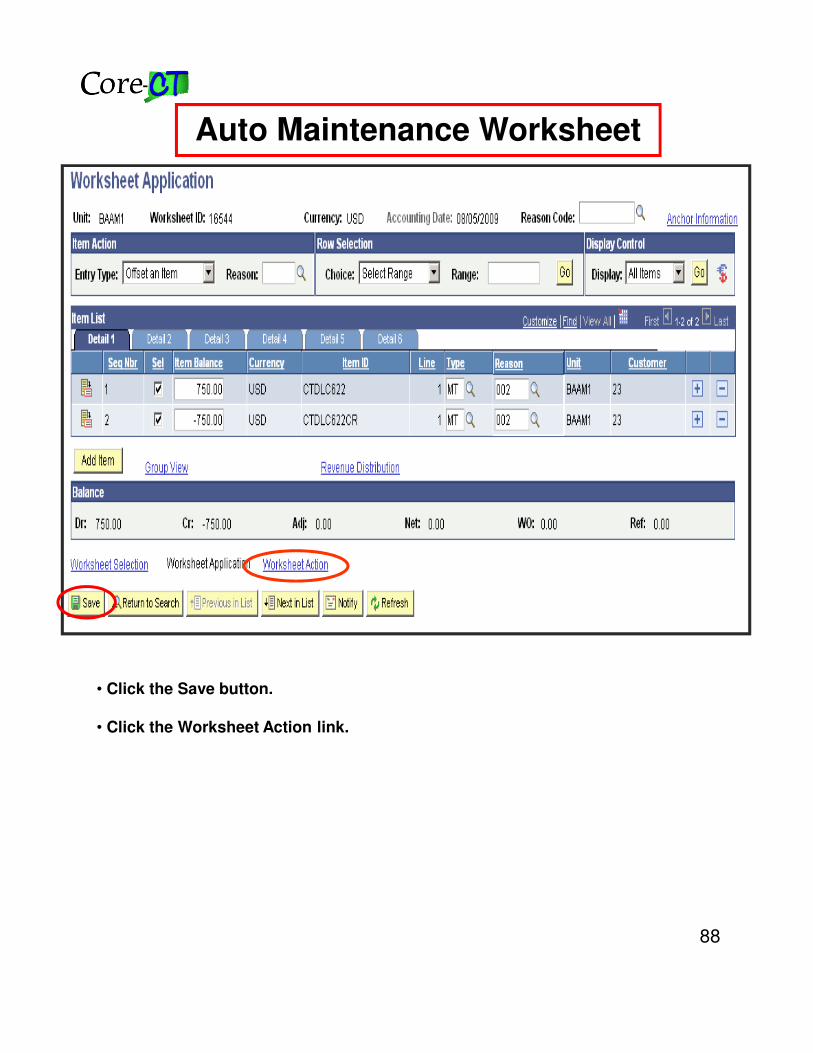
• Click the Save button.
• Click the Worksheet Action link.
Auto Maintenance Worksheet
89
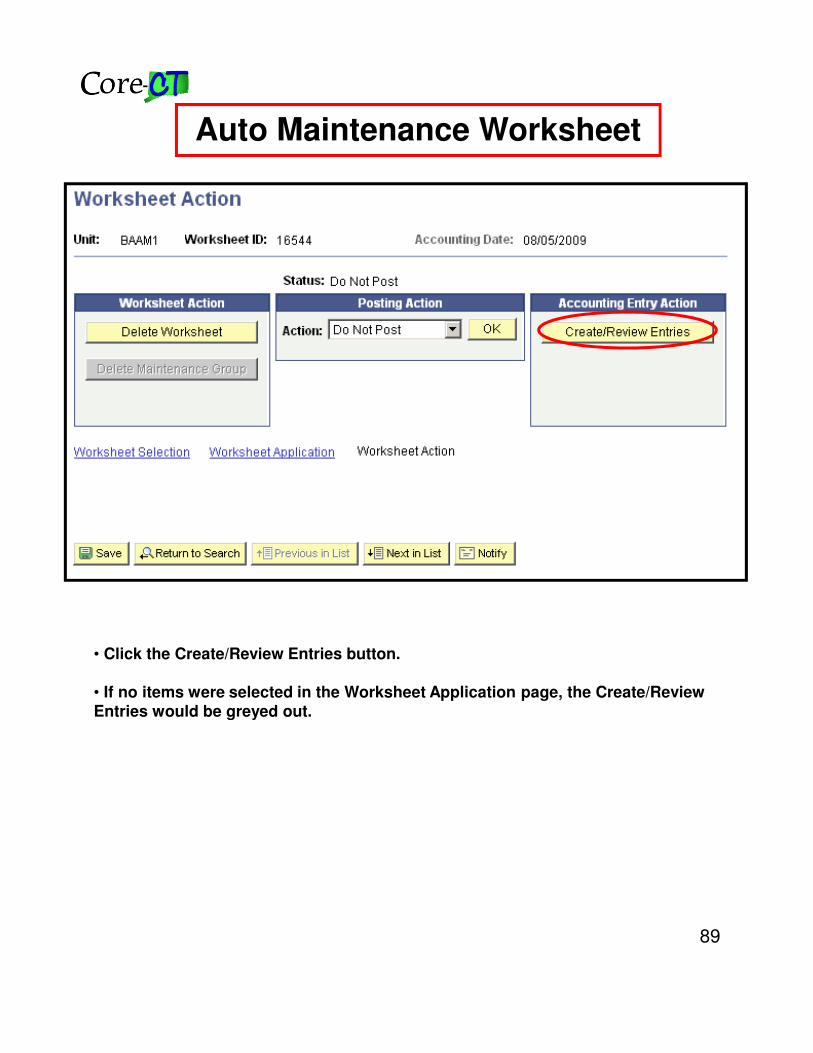
• Click the Create/Review Entries button.
• If no items were selected in the Worksheet Application page, the Create/Review Entries would be greyed out.
Auto Maintenance Worksheet
90
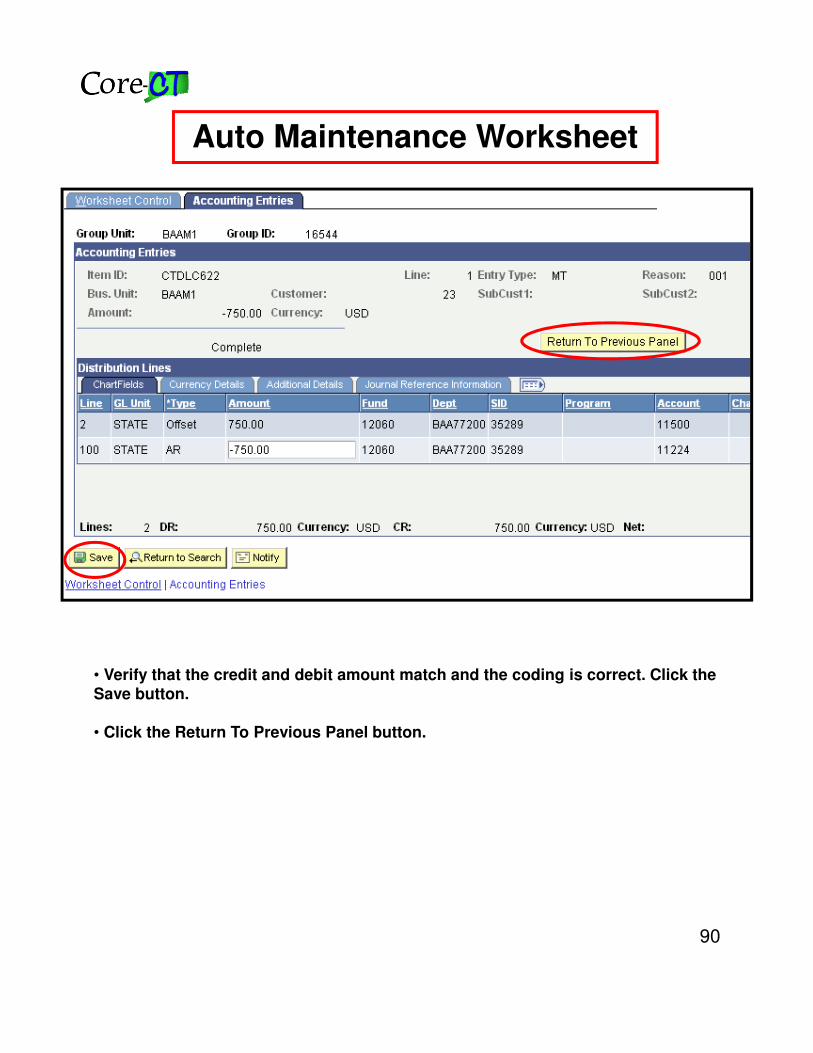
• Verify that the credit and debit amount match and the coding is correct. Click the Save button.
• Click the Return To Previous Panel button.
Auto Maintenance Worksheet
91
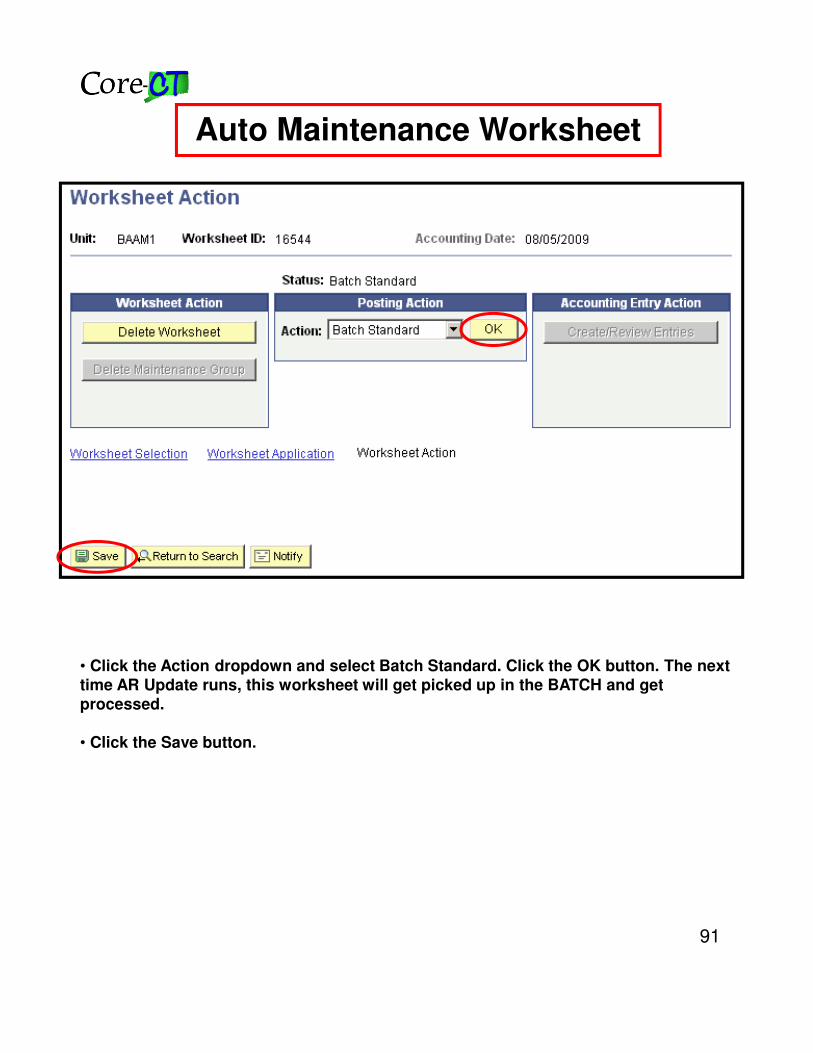
• Click the Action dropdown and select Batch Standard. Click the OK button. The next time AR Update runs, this worksheet will get picked up in the BATCH and get processed.
• Click the Save button.
Auto Maintenance Worksheet
92
Manual Maintenance Worksheet
93
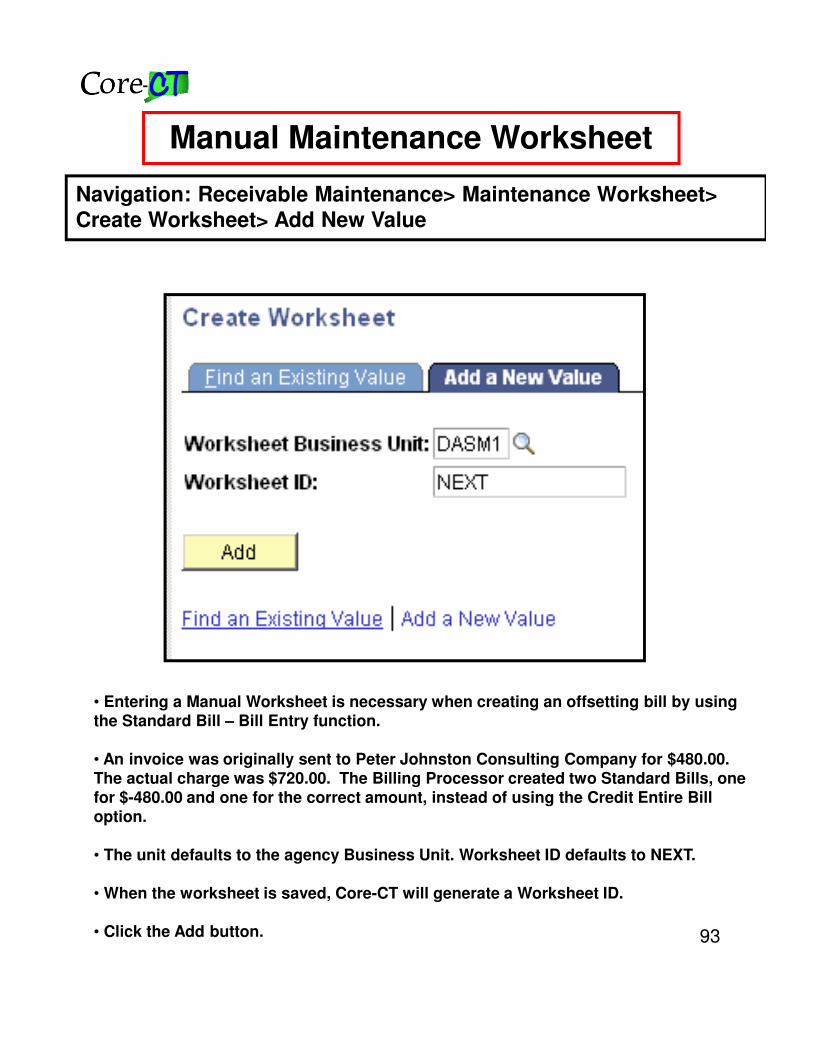
Manual Maintenance Worksheet
• Entering a Manual Worksheet is necessary when creating an offsetting bill by using the Standard Bill – Bill Entry function.
• An invoice was originally sent to Peter Johnston Consulting Company for $480.00. The actual charge was $720.00. The Billing Processor created two Standard Bills, one for $-480.00 and one for the correct amount, instead of using the Credit Entire Bill option.
• The unit defaults to the agency Business Unit. Worksheet ID defaults to NEXT.
• When the worksheet is saved, Core-CT will generate a Worksheet ID.
• Click the Add button.
Navigation: Receivable Maintenance> Maintenance Worksheet> Create Worksheet> Add New Value
94
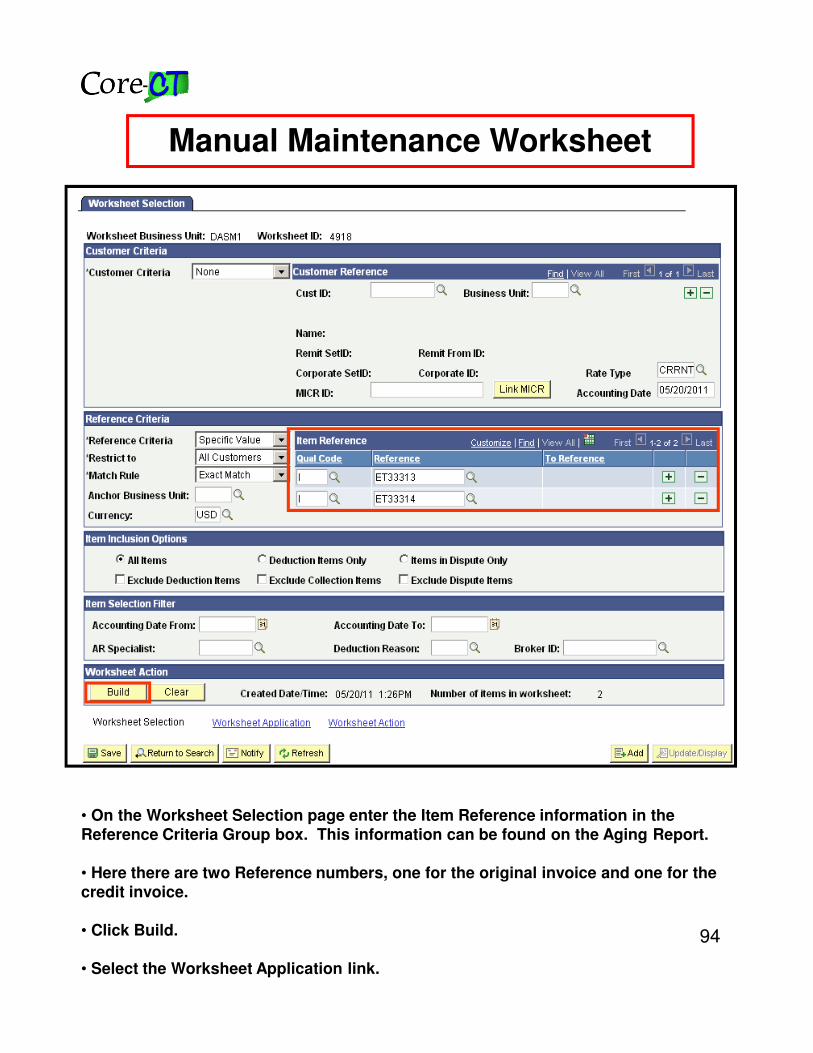
Manual Maintenance Worksheet
• On the Worksheet Selection page enter the Item Reference information in the Reference Criteria Group box. This information can be found on the Aging Report.
• Here there are two Reference numbers, one for the original invoice and one for the credit invoice.
• Click Build.
• Select the Worksheet Application link.
95
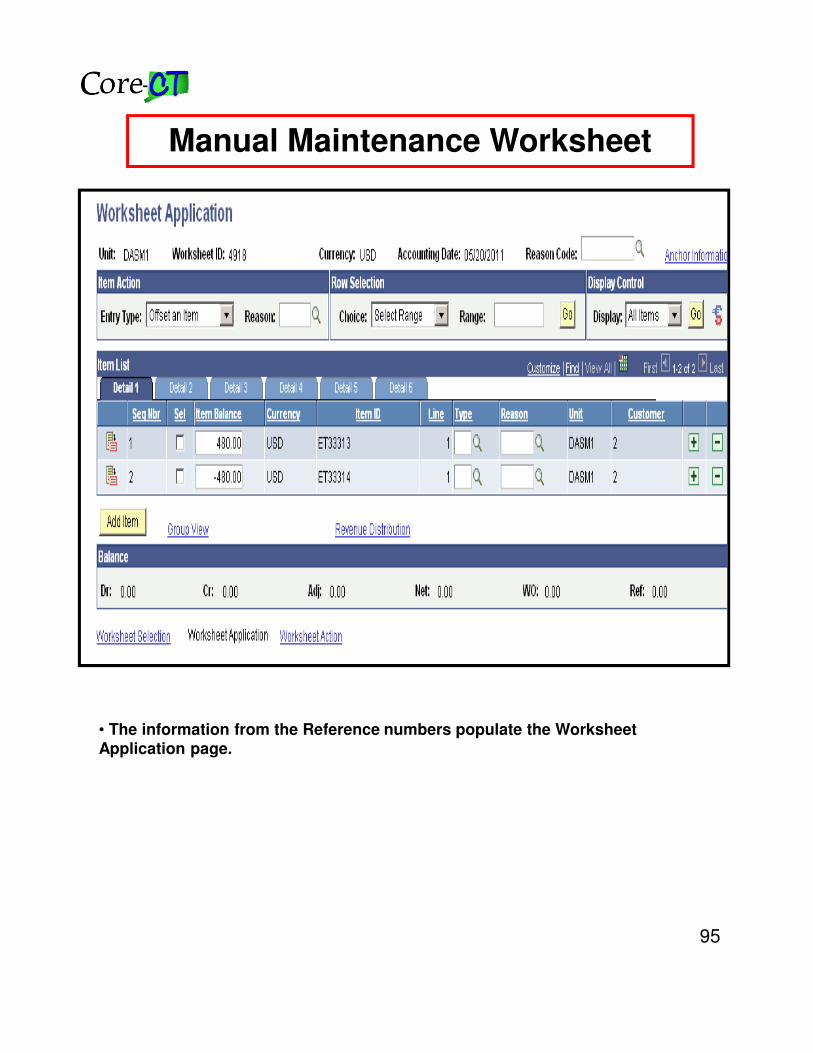
Manual Maintenance Worksheet
• The information from the Reference numbers populate the Worksheet Application page.
96
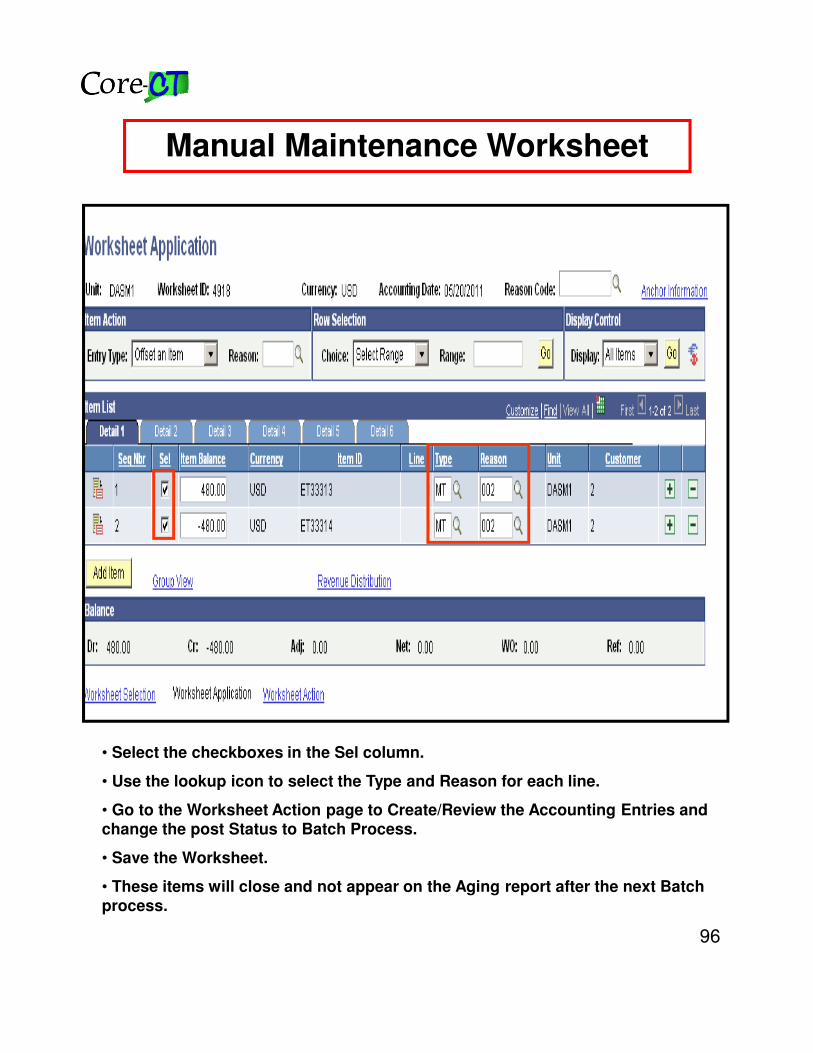
Manual Maintenance Worksheet
• Select the checkboxes in the Sel column.
• Use the lookup icon to select the Type and Reason for each line.
• Go to the Worksheet Action page to Create/Review the Accounting Entries and change the post Status to Batch Process.
• Save the Worksheet.
• These items will close and not appear on the Aging report after the next Batch process.
97
Deleting a Maintenance Worksheet
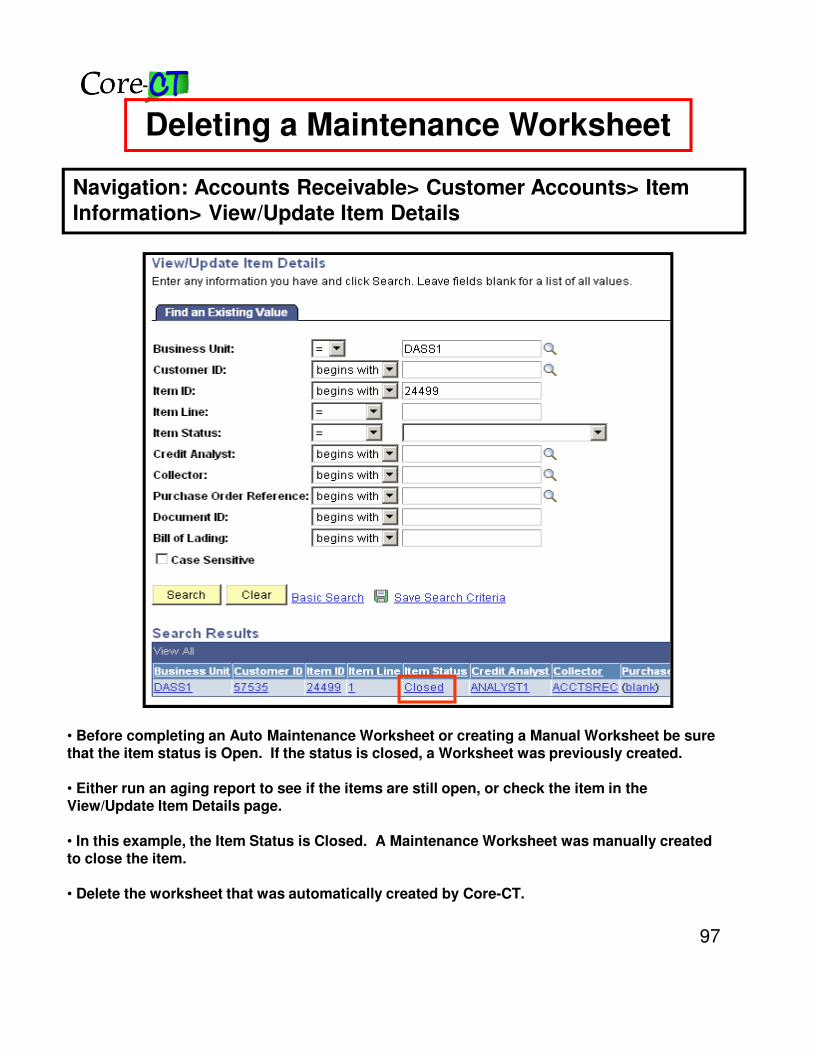
• Before completing an Auto Maintenance Worksheet or creating a Manual Worksheet be sure that the item status is Open. If the status is closed, a Worksheet was previously created.
• Either run an aging report to see if the items are still open, or check the item in the View/Update Item Details page.
• In this example, the Item Status is Closed. A Maintenance Worksheet was manually created to close the item.
• Delete the worksheet that was automatically created by Core-CT.
Navigation: Accounts Receivable> Customer Accounts> Item Information> View/Update Item Details
98
Deleting a Maintenance Worksheet
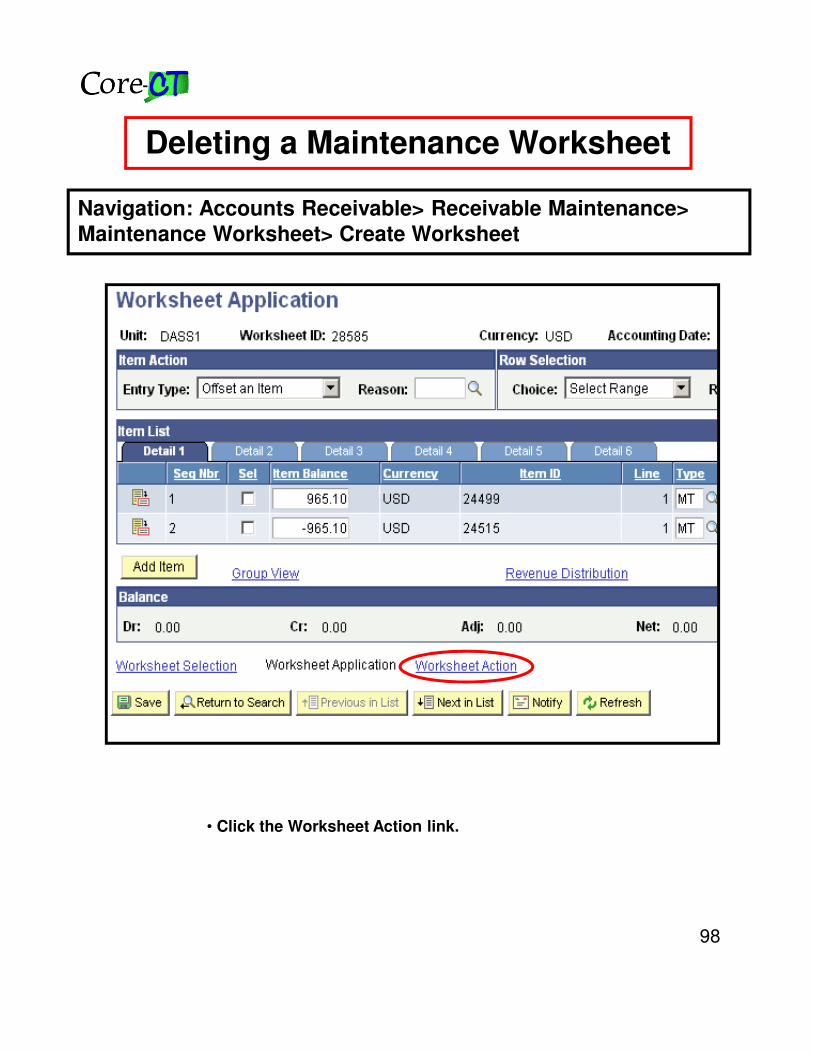
• Click the Worksheet Action link.
Navigation: Accounts Receivable> Receivable Maintenance> Maintenance Worksheet> Create Worksheet
99
Deleting a Maintenance Worksheet
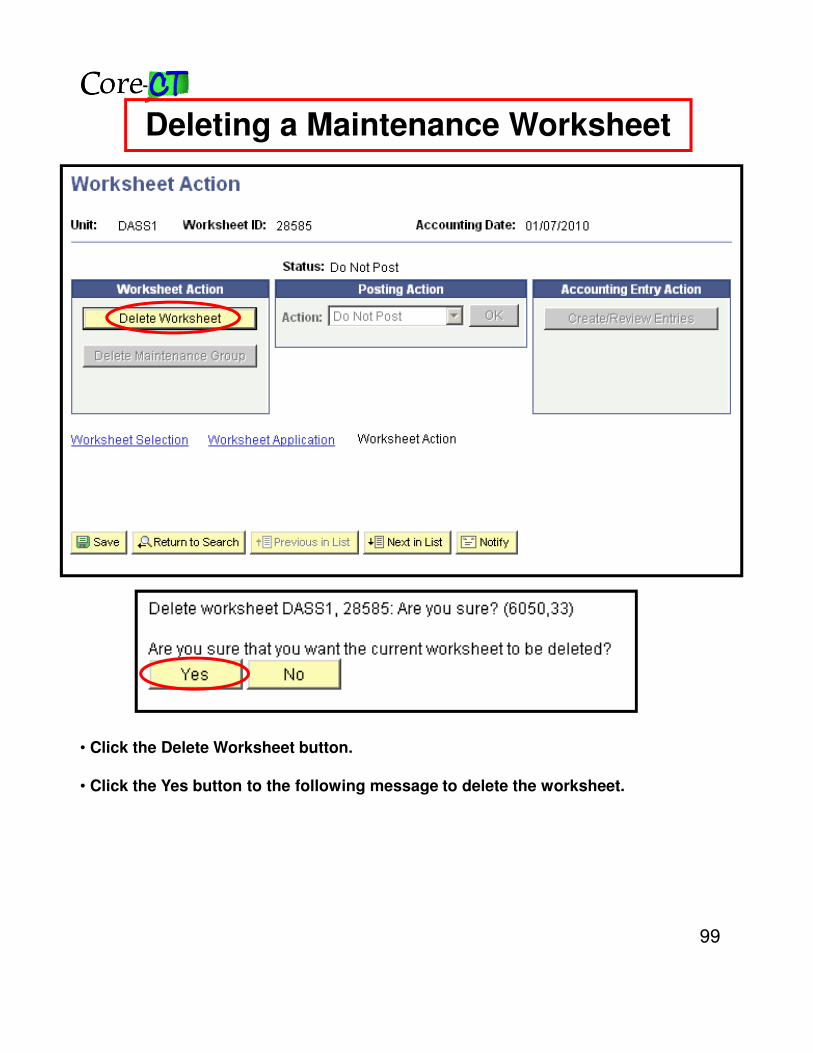
• Click the Delete Worksheet button.
• Click the Yes button to the following message to delete the worksheet.
100
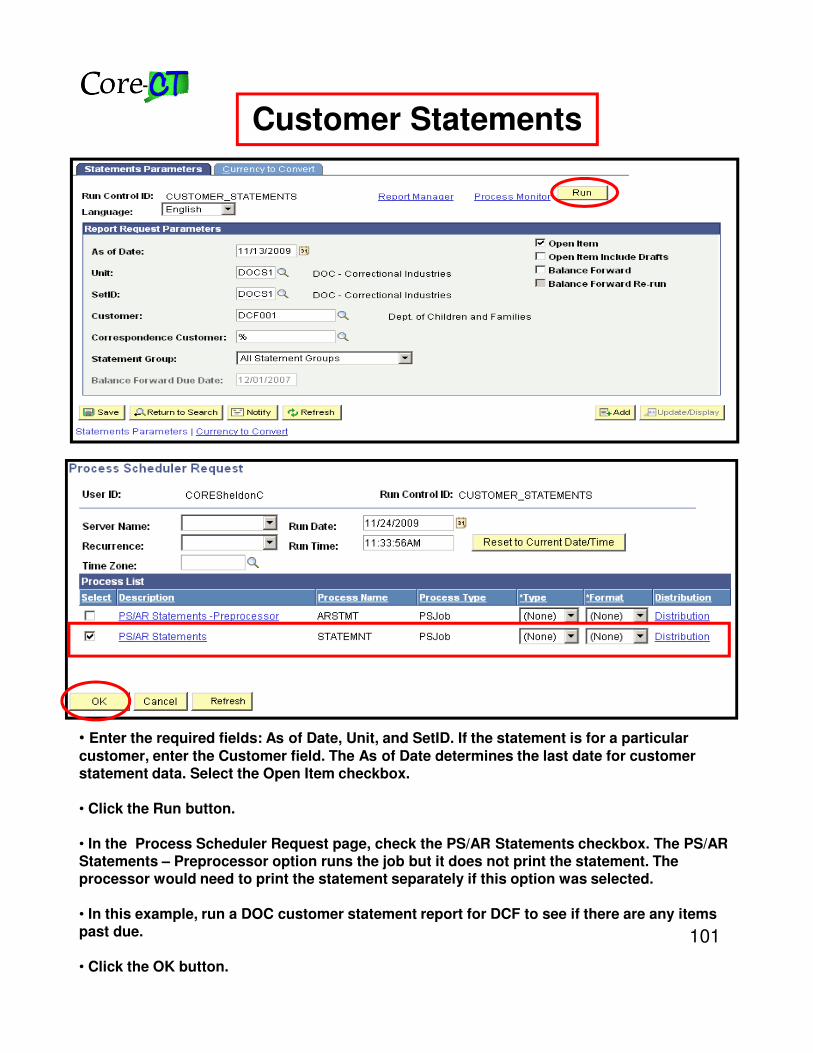
Customer Statements
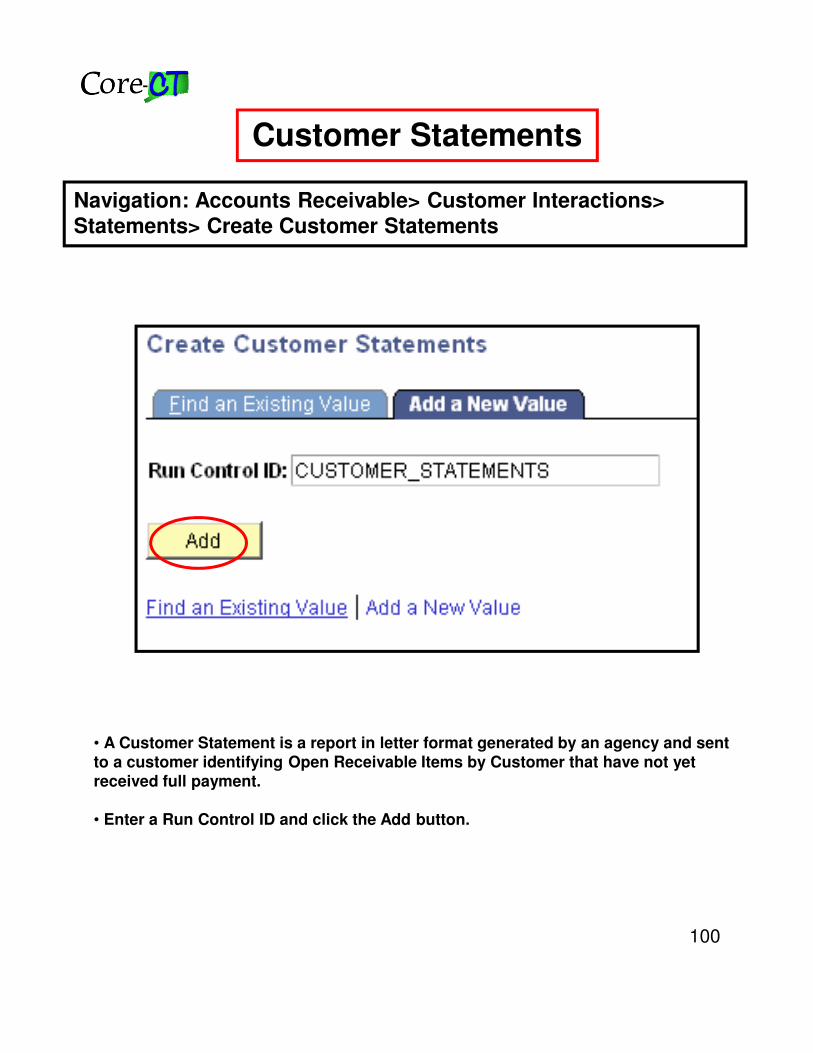
• A Customer Statement is a report in letter format generated by an agency and sent to a customer identifying Open Receivable Items by Customer that have not yet received full payment.
• Enter a Run Control ID and click the Add button.
Navigation: Accounts Receivable> Customer Interactions> Statements> Create Customer Statements
101
Customer Statements
• Enter the required fields: As of Date, Unit, and SetID. If the statement is for a particular customer, enter the Customer field. The As of Date determines the last date for customer statement data. Select the Open Item checkbox.
• Click the Run button.
• In the Process Scheduler Request page, check the PS/AR Statements checkbox. The PS/AR Statements – Preprocessor option runs the job but it does not print the statement. The processor would need to print the statement separately if this option was selected.
• In this example, run a DOC customer statement report for DCF to see if there are any items past due.
• Click the OK button.
102
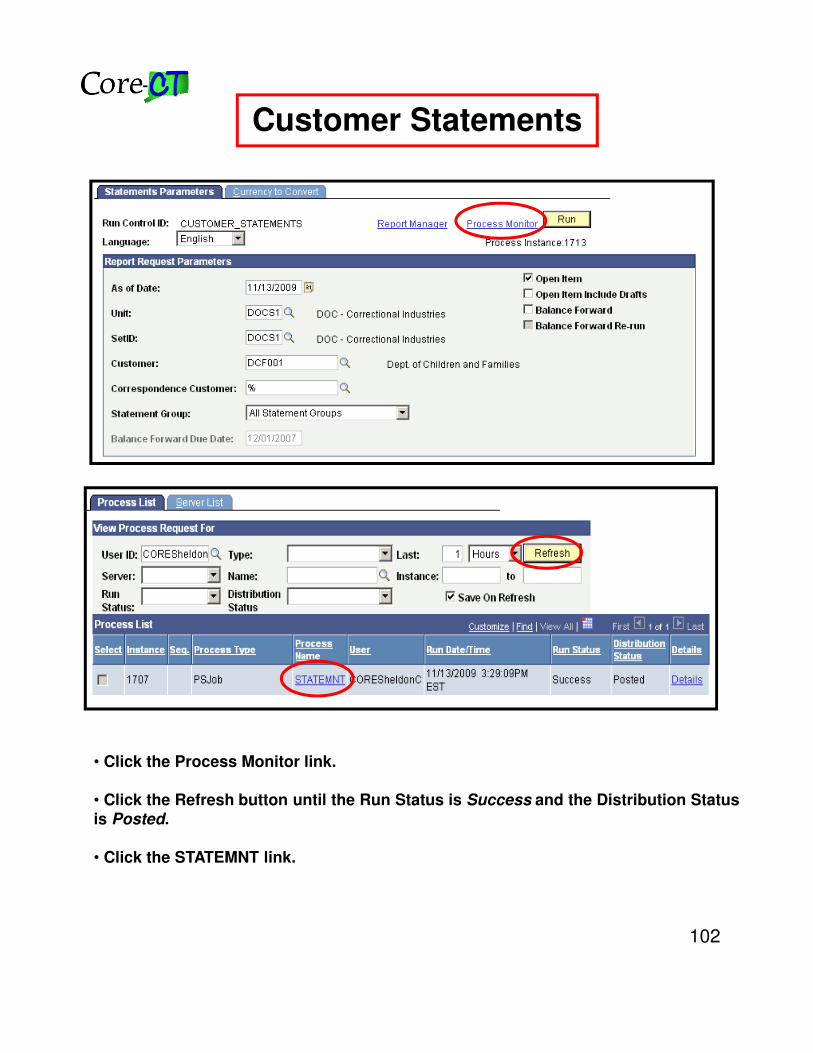
Customer Statements
• Click the Process Monitor link.
• Click the Refresh button until the Run Status is Success and the Distribution Status is Posted.
• Click the STATEMNT link.
103
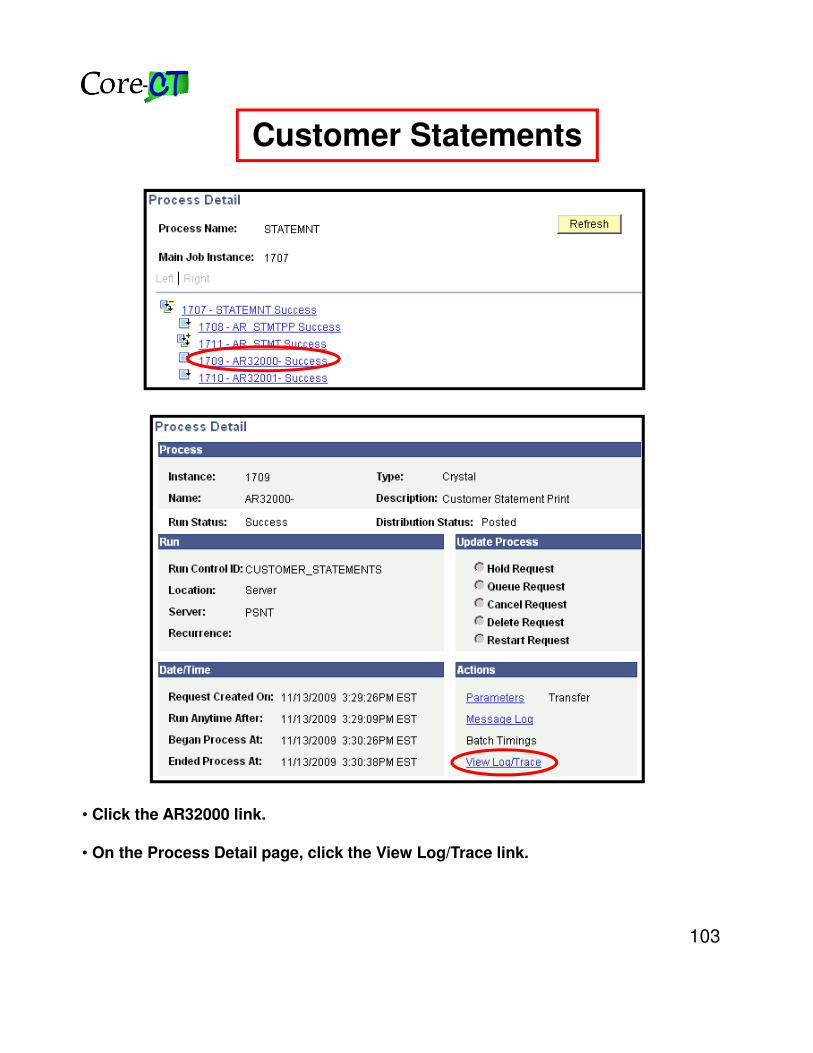
Customer Statements
• Click the AR32000 link.
• On the Process Detail page, click the View Log/Trace link.
104
Customer Statements
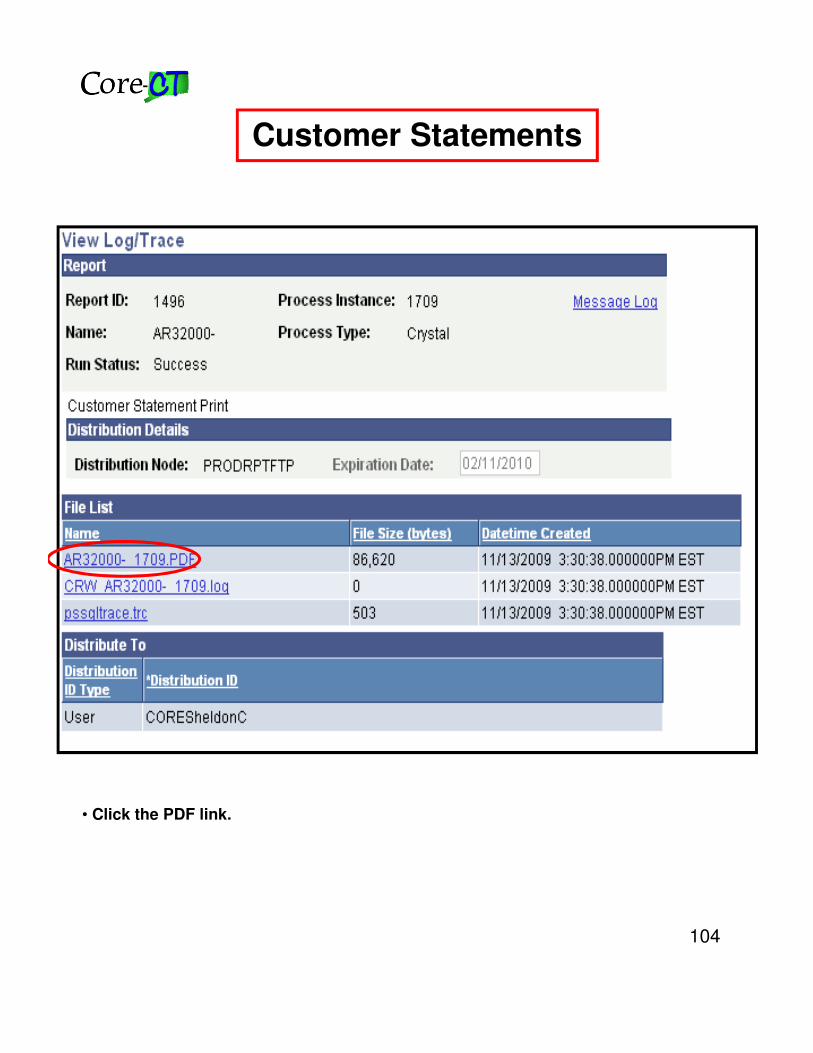
• Click the PDF link.
105
Customer Statements
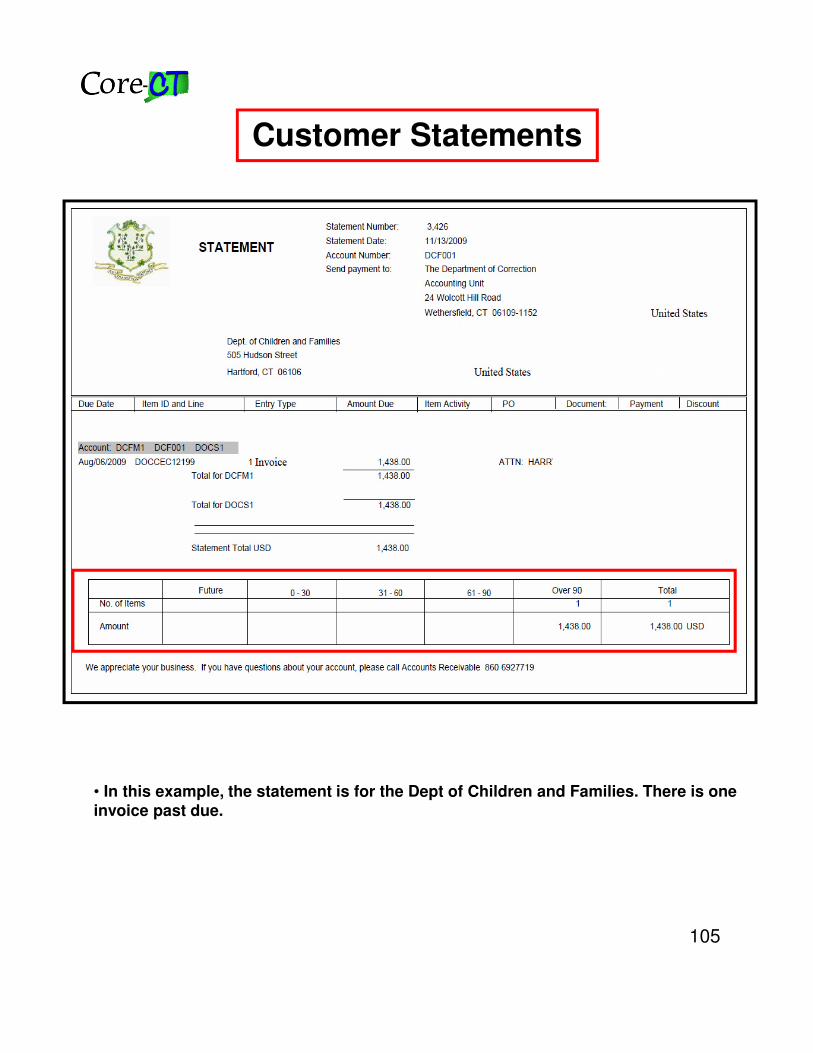
• In this example, the statement is for the Dept of Children and Families. There is one invoice past due.

106
Dunning Letters
• A Dunning Letter is a report in letter format generated by an agency and sent to customers identifying Open Receivable Items by Customer and Number of Days Late. The agency is responsible for the dunning language that is written on the Dunning Letter. Generally, the language in the Dunning Letter is more firm as the Open Receivable Items increase in the Number of Days Late.
• A Dunning Letter allows an agency to add comments to the letter and add/delete information that is not needed in the letter.
• Enter a Run Control ID and click Add.
Navigation: Accounts Receivable> Customer Interactions> Dunning Letters> Extract Dunning Letter Info
107
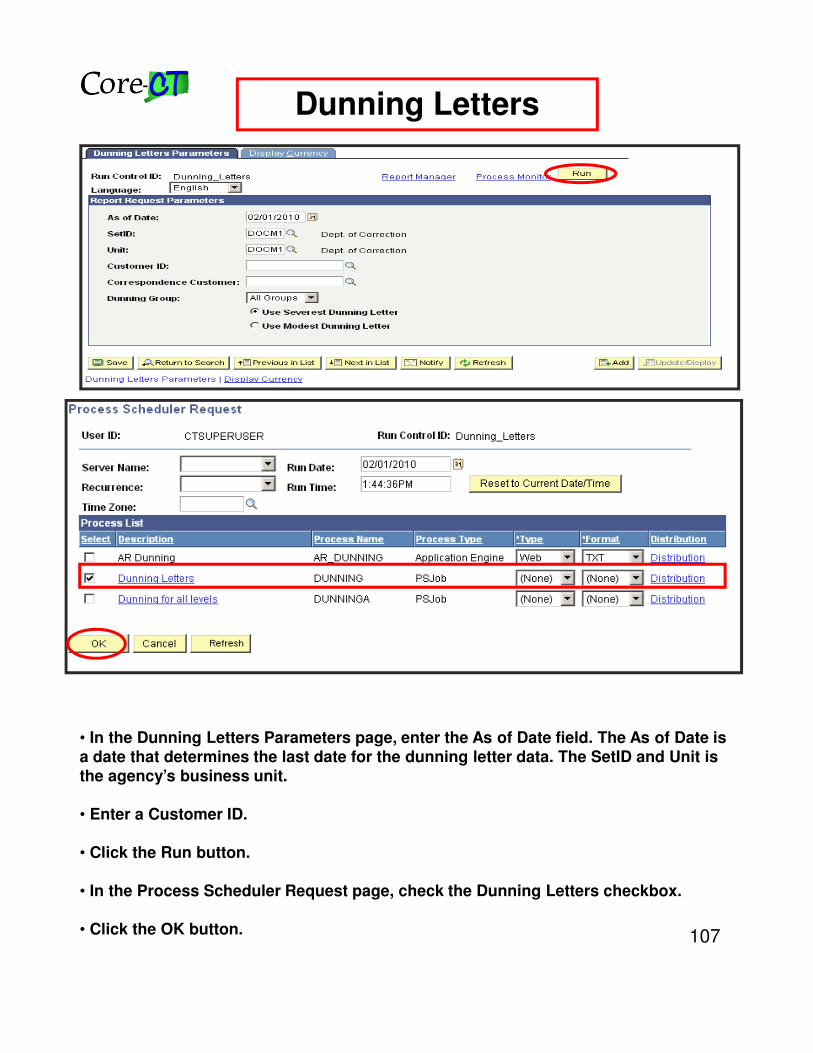
Dunning Letters
• In the Dunning Letters Parameters page, enter the As of Date field. The As of Date is a date that determines the last date for the dunning letter data. The SetID and Unit is the agency’s business unit.
• Enter a Customer ID.
• Click the Run button.
• In the Process Scheduler Request page, check the Dunning Letters checkbox.
• Click the OK button.
108
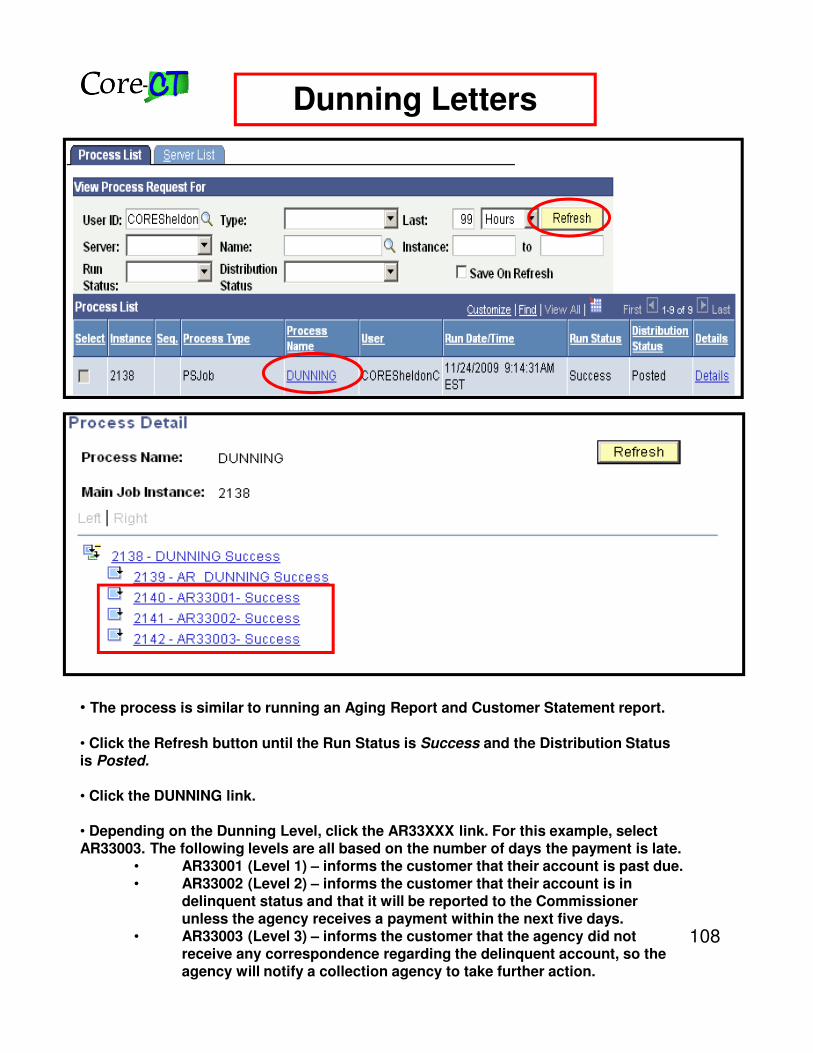
Dunning Letters
• The process is similar to running an Aging Report and Customer Statement report.
• Click the Refresh button until the Run Status is Success and the Distribution Status is Posted.
• Click the DUNNING link.
• Depending on the Dunning Level, click the AR33XXX link. For this example, select AR33003. The following levels are all based on the number of days the payment is late.
• AR33001 (Level 1) – informs the customer that their account is past due.• AR33002 (Level 2) – informs the customer that their account is in
delinquent status and that it will be reported to the Commissioner unless the agency receives a payment within the next five days.
• AR33003 (Level 3) – informs the customer that the agency did not receive any correspondence regarding the delinquent account, so the agency will notify a collection agency to take further action.
109
Dunning Letters
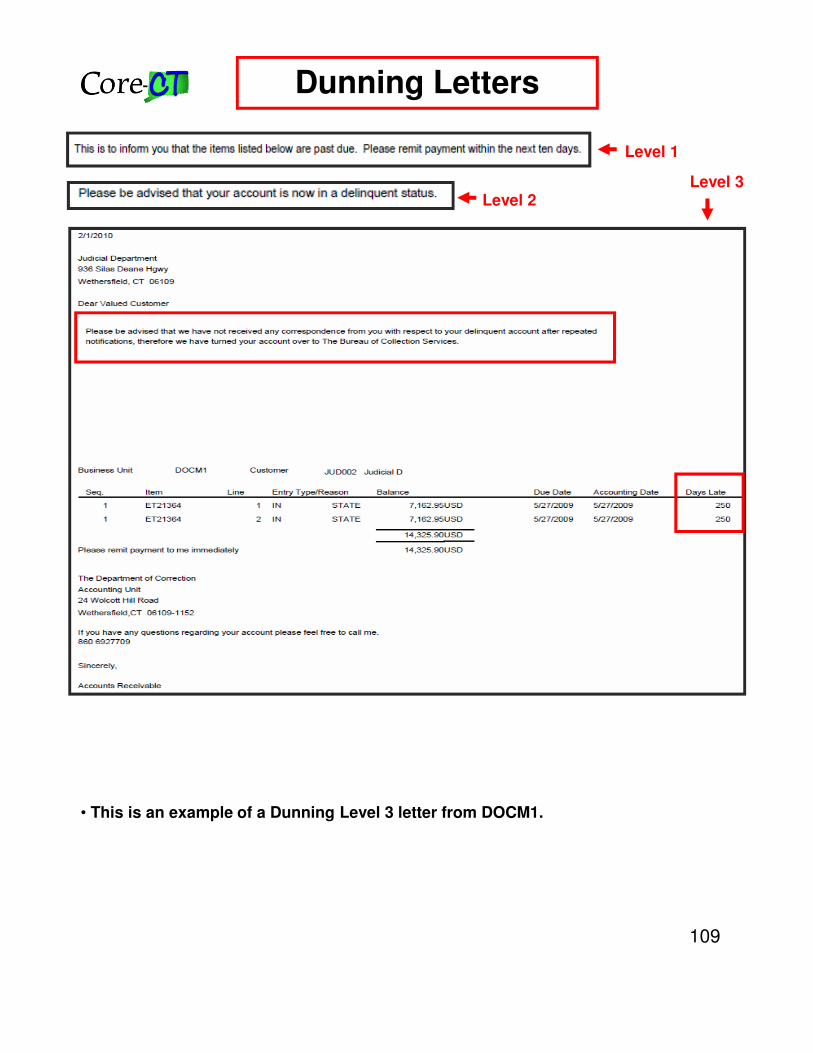
• This is an example of a Dunning Level 3 letter from DOCM1.
Level 1
Level 2Level 3
110
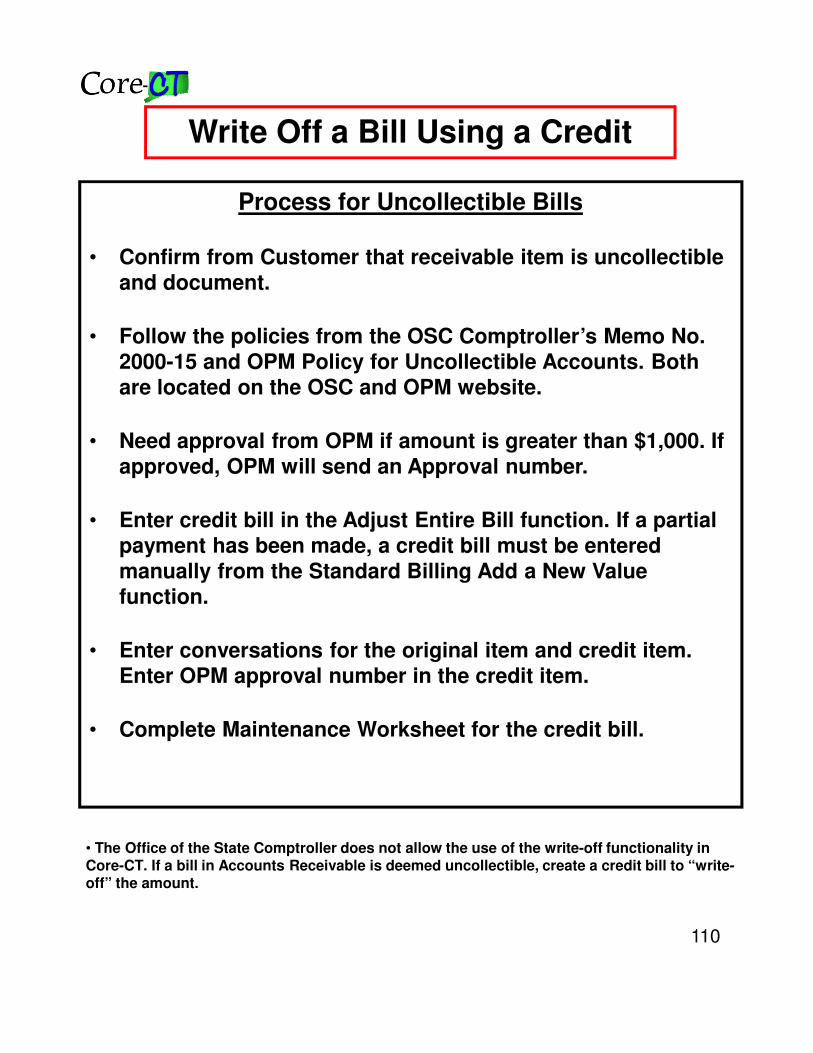
Write Off a Bill Using a Credit
• The Office of the State Comptroller does not allow the use of the write-off functionality in Core-CT. If a bill in Accounts Receivable is deemed uncollectible, create a credit bill to “write-off” the amount.
Process for Uncollectible Bills
• Confirm from Customer that receivable item is uncollectible and document.
• Follow the policies from the OSC Comptroller’s Memo No. 2000-15 and OPM Policy for Uncollectible Accounts. Both are located on the OSC and OPM website.
• Need approval from OPM if amount is greater than $1,000. If approved, OPM will send an Approval number.
• Enter credit bill in the Adjust Entire Bill function. If a partial payment has been made, a credit bill must be entered manually from the Standard Billing Add a New Value function.
• Enter conversations for the original item and credit item. Enter OPM approval number in the credit item.
• Complete Maintenance Worksheet for the credit bill.
111
Accounts Receivable Information
112
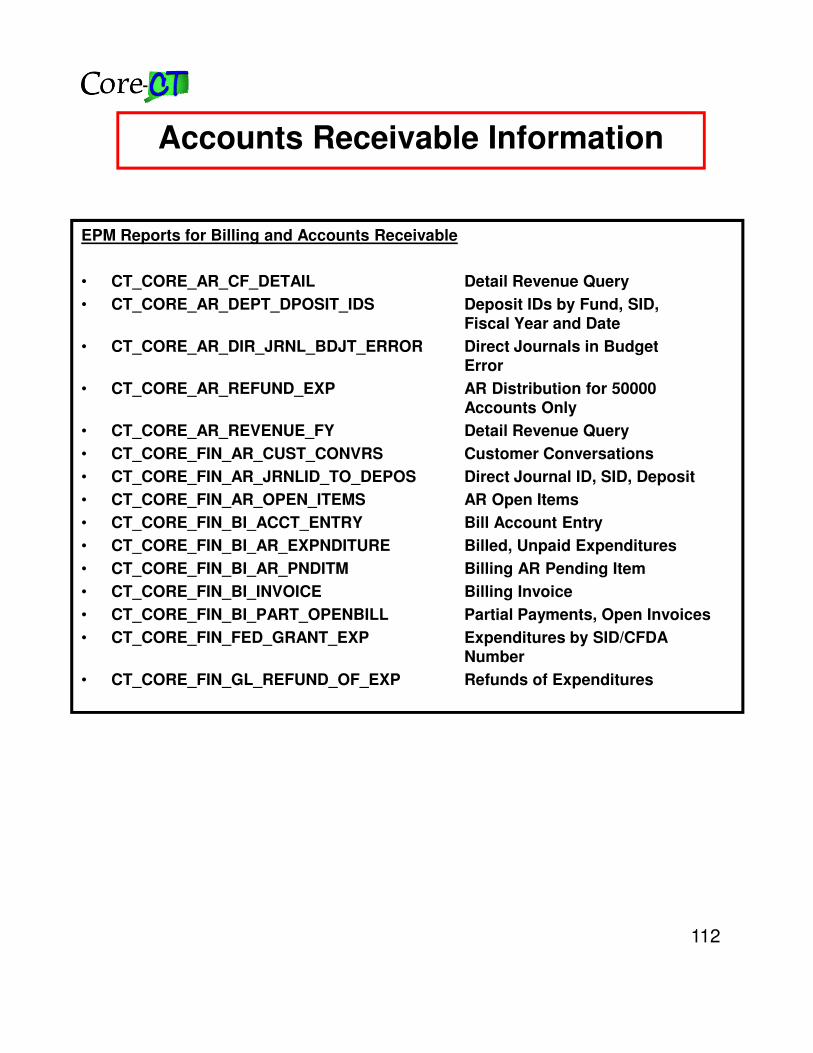
EPM Reports for Billing and Accounts Receivable
• CT_CORE_AR_CF_DETAIL Detail Revenue Query
• CT_CORE_AR_DEPT_DPOSIT_IDS Deposit IDs by Fund, SID, Fiscal Year and Date
• CT_CORE_AR_DIR_JRNL_BDJT_ERROR Direct Journals in Budget Error
• CT_CORE_AR_REFUND_EXP AR Distribution for 50000 Accounts Only
• CT_CORE_AR_REVENUE_FY Detail Revenue Query
• CT_CORE_FIN_AR_CUST_CONVRS Customer Conversations
• CT_CORE_FIN_AR_JRNLID_TO_DEPOS Direct Journal ID, SID, Deposit
• CT_CORE_FIN_AR_OPEN_ITEMS AR Open Items
• CT_CORE_FIN_BI_ACCT_ENTRY Bill Account Entry
• CT_CORE_FIN_BI_AR_EXPNDITURE Billed, Unpaid Expenditures
• CT_CORE_FIN_BI_AR_PNDITM Billing AR Pending Item
• CT_CORE_FIN_BI_INVOICE Billing Invoice
• CT_CORE_FIN_BI_PART_OPENBILL Partial Payments, Open Invoices
• CT_CORE_FIN_FED_GRANT_EXP Expenditures by SID/CFDA Number
• CT_CORE_FIN_GL_REFUND_OF_EXP Refunds of Expenditures
Accounts Receivable Information

113
Accounts Receivable Information
www.core-ct.state.ct.us/reports/
Catalog of Online Reporting: Catalog of Online reports are delivered or custom reports designed to provide “real-time” access to financial data. These reports are available within system modules according to user security profiles and roles.
• Group Control by Entry Date
• Pending Item by Entry Date
• Deposit Control by Entry Date
• Payment Summary
• Receivable Activity
• Payment Predictor Detail Report
• Payment Predictor Summary
• Aging Detail by Business Unit
• Aging Summary by Unit
• Aging by Chartfield
• Customers by SetID
• Customers by Unit
• Contacts by SetID
• Contacts by Unit
• Accounting Entries
• Business Unit Activity
114
Accounts Receivable Information
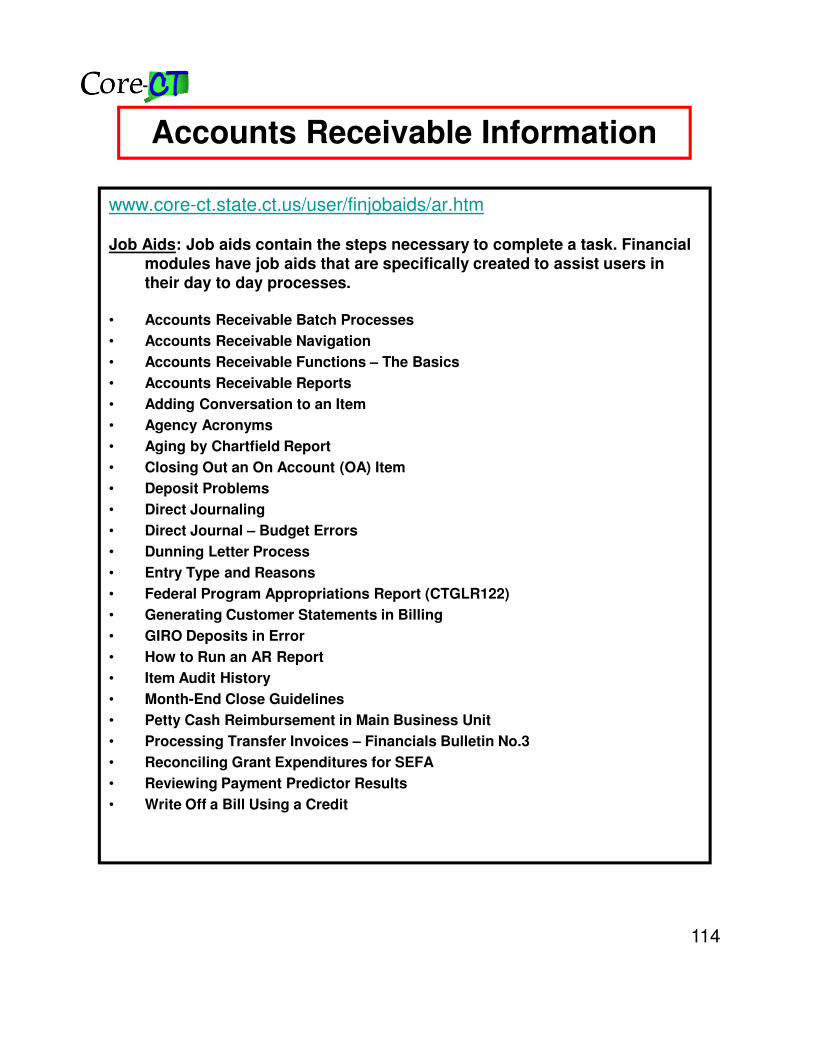
www.core-ct.state.ct.us/user/finjobaids/ar.htm
Job Aids: Job aids contain the steps necessary to complete a task. Financial modules have job aids that are specifically created to assist users in their day to day processes.
• Accounts Receivable Batch Processes
• Accounts Receivable Navigation
• Accounts Receivable Functions – The Basics
• Accounts Receivable Reports
• Adding Conversation to an Item
• Agency Acronyms
• Aging by Chartfield Report
• Closing Out an On Account (OA) Item
• Deposit Problems
• Direct Journaling
• Direct Journal – Budget Errors
• Dunning Letter Process
• Entry Type and Reasons
• Federal Program Appropriations Report (CTGLR122)
• Generating Customer Statements in Billing
• GIRO Deposits in Error
• How to Run an AR Report
• Item Audit History
• Month-End Close Guidelines
• Petty Cash Reimbursement in Main Business Unit
• Processing Transfer Invoices – Financials Bulletin No.3
• Reconciling Grant Expenditures for SEFA
• Reviewing Payment Predictor Results
• Write Off a Bill Using a Credit
115
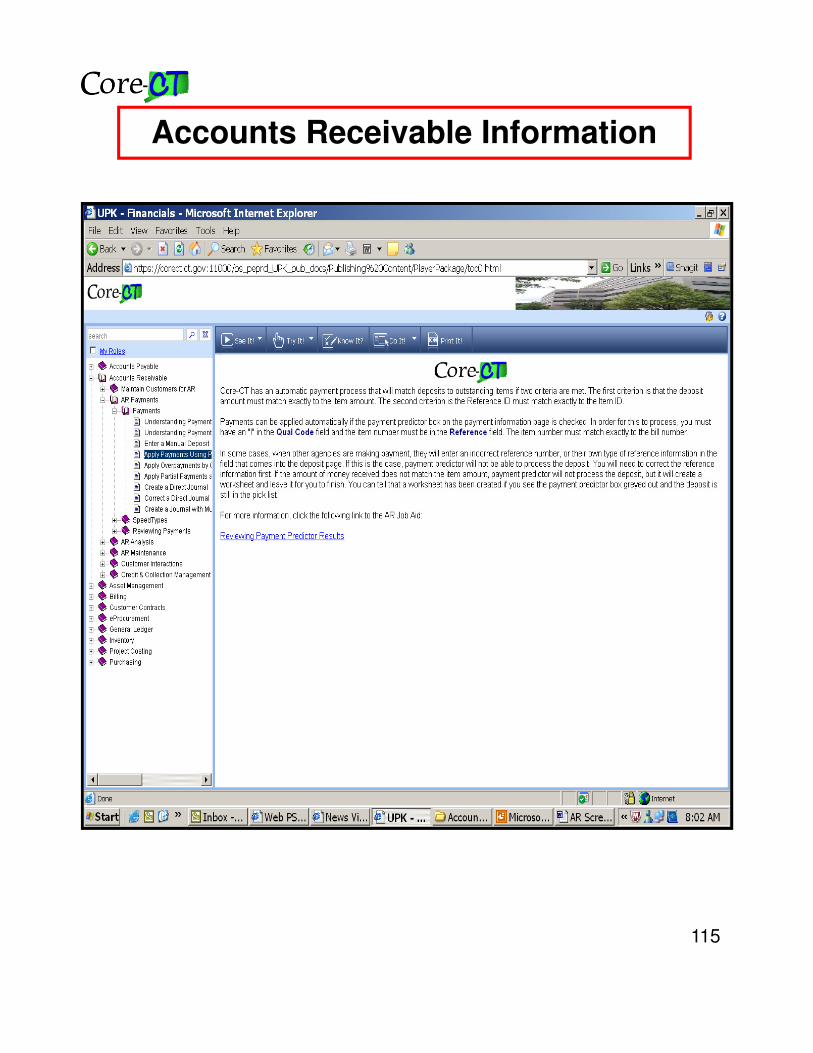
Accounts Receivable Information
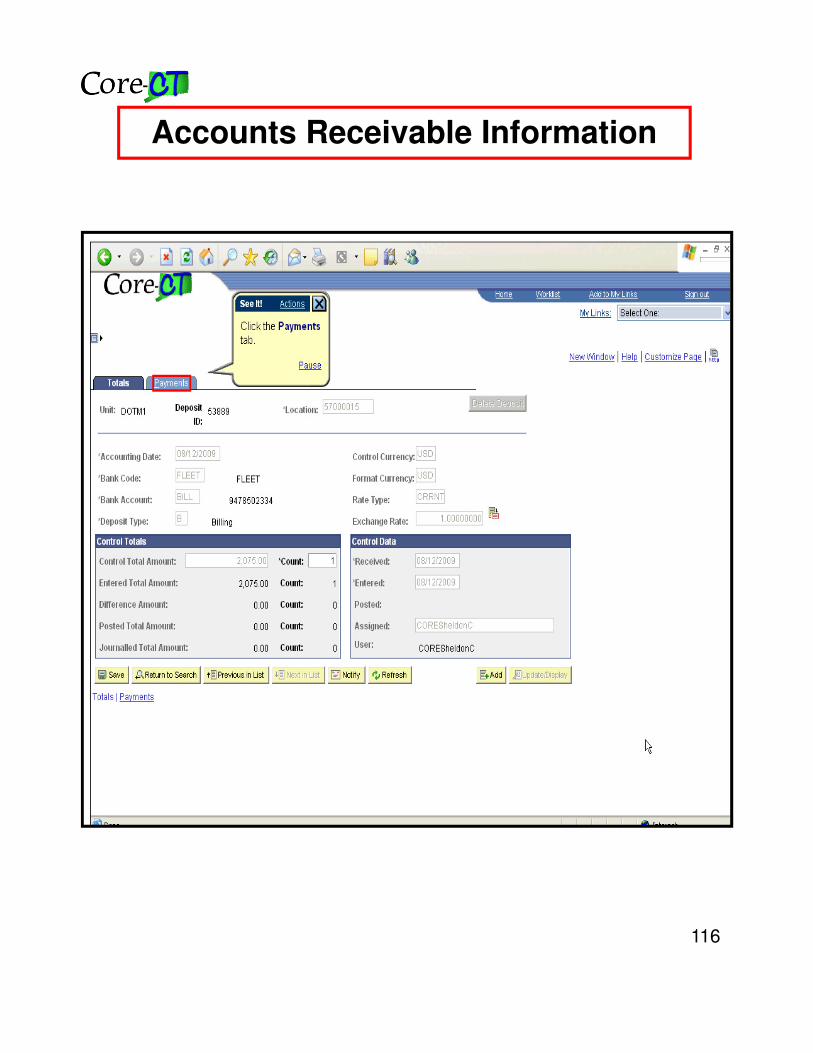
116
Accounts Receivable Information


