IP Routing: RIP Configuration Guide, Cisco IOS XE Release 3S Americas Headquarters Cisco Systems, Inc. 170 West Tasman Drive San Jose, CA 95134-1706 USA http://www.cisco.com Tel: 408 526-4000 800 553-NETS (6387) Fax: 408 527-0883
Transcript
IP Routing: RIP Configuration Guide, Cisco IOS XE Release 3S
Americas HeadquartersCisco Systems, Inc.170 West Tasman DriveSan Jose, CA 95134-1706USAhttp://www.cisco.comTel: 408 526-4000 800 553-NETS (6387)Fax: 408 527-0883
THE SPECIFICATIONS AND INFORMATION REGARDING THE PRODUCTS IN THIS MANUAL ARE SUBJECT TO CHANGE WITHOUT NOTICE. ALL STATEMENTS,INFORMATION, AND RECOMMENDATIONS IN THIS MANUAL ARE BELIEVED TO BE ACCURATE BUT ARE PRESENTED WITHOUT WARRANTY OF ANY KIND,EXPRESS OR IMPLIED. USERS MUST TAKE FULL RESPONSIBILITY FOR THEIR APPLICATION OF ANY PRODUCTS.
THE SOFTWARE LICENSE AND LIMITEDWARRANTY FOR THE ACCOMPANYING PRODUCT ARE SET FORTH IN THE INFORMATION PACKET THAT SHIPPED WITHTHE PRODUCT AND ARE INCORPORATED HEREIN BY THIS REFERENCE. IF YOU ARE UNABLE TO LOCATE THE SOFTWARE LICENSE OR LIMITED WARRANTY,CONTACT YOUR CISCO REPRESENTATIVE FOR A COPY.
NOTWITHSTANDINGANYOTHERWARRANTYHEREIN, ALL DOCUMENT FILES AND SOFTWARE OF THESE SUPPLIERS ARE PROVIDED “AS IS"WITH ALL FAULTS.CISCO AND THE ABOVE-NAMED SUPPLIERS DISCLAIM ALL WARRANTIES, EXPRESSED OR IMPLIED, INCLUDING, WITHOUT LIMITATION, THOSE OFMERCHANTABILITY, FITNESS FORA PARTICULAR PURPOSEANDNONINFRINGEMENTORARISING FROMACOURSEOFDEALING, USAGE, OR TRADE PRACTICE.
IN NO EVENT SHALL CISCO OR ITS SUPPLIERS BE LIABLE FOR ANY INDIRECT, SPECIAL, CONSEQUENTIAL, OR INCIDENTAL DAMAGES, INCLUDING, WITHOUTLIMITATION, LOST PROFITS OR LOSS OR DAMAGE TO DATA ARISING OUT OF THE USE OR INABILITY TO USE THIS MANUAL, EVEN IF CISCO OR ITS SUPPLIERSHAVE BEEN ADVISED OF THE POSSIBILITY OF SUCH DAMAGES.
Any Internet Protocol (IP) addresses and phone numbers used in this document are not intended to be actual addresses and phone numbers. Any examples, command display output, networktopology diagrams, and other figures included in the document are shown for illustrative purposes only. Any use of actual IP addresses or phone numbers in illustrative content is unintentionaland coincidental.
Cisco and the Cisco logo are trademarks or registered trademarks of Cisco and/or its affiliates in the U.S. and other countries. To view a list of Cisco trademarks, go to this URL: http://www.cisco.com/go/trademarks. Third-party trademarks mentioned are the property of their respective owners. The use of the word partner does not imply a partnershiprelationship between Cisco and any other company. (1110R)
C H A P T E R 2 IPv6 Routing: Route Redistribution 11
Finding Feature Information 11
Information About IPv6 Route Redistribution 11
RIP for IPv6 11
How to Configure IPv6 Route Redistribution 12
Redistributing Routes into an IPv6 RIP Routing Process 12
Configuring Route Tags for IPv6 RIP Routes 13
Filtering IPv6 RIP Routing Updates 14
Configuration Examples for IPv6 Route Redistribution 17
Example: Enabling the RIP for IPv6 Process 17
Additional References 18
Feature Information for IPv6 Routing: Route Redistribution 19
C H A P T E R 3 Configuring Routing Information Protocol 21
IP Routing: RIP Configuration Guide, Cisco IOS XE Release 3S iii
Finding Feature Information 21
Prerequisites for RIP 21
Restrictions for RIP 22
Information About Configuring RIP 22
RIP Overview 22
RIP Routing Updates 22
RIP Routing Metric 22
Authentication in RIP 23
Exchange of Routing Information 23
RIP Route Summarization 24
Split Horizon Mechanism 25
Interpacket Delay for RIP Updates 25
RIP Optimization over WAN Circuits 25
Source IP Addresses of RIP Routing Updates 25
Neighbor Router Authentication 26
IP-RIP Delay Start Overview 27
Offset-list 27
Timers 27
How to Configure RIP 28
Enabling RIP and Configuring RIP Parameters 28
Specifying a RIP Version and Enabling Authentication 30
Summarizing RIP Routes 31
Enabling or Disabling Split Horizon 33
Disabling the Validation of Source IP Addresses 34
Configuring Interpacket Delay 36
Optimizing RIP over WAN 37
Configuring IP-RIP Delay Start for Routers Connected by a Frame Relay Network 39
Prerequisites 39
Restrictions 39
Configuring RIPv2 39
Configuring Frame Relay on a Serial Subinterface 41
Configuring IP with MD5 Authentication for RIPv2 and IP-RIP Delay on a Frame
Relay Subinterface 43
Configuration Examples for RIP 45
Route Summarization Example 45
IP Routing: RIP Configuration Guide, Cisco IOS XE Release 3Siv
Contents
Split Horizon Examples 45
Address Family Timers Example 46
Example: IP-RIP Delay Start on a Frame Relay Interface 47
Additional References 47
Feature Information for Configuring RIP 49
Glossary 51
C H A P T E R 4 BFD for RIPv2 Support 53
Finding Feature Information 53
Prerequisites for BFD for RIPv2 Support 53
How to Configure BFD for RIPv2 Support Feature 54
Configuring BFD on RIPv2 Neighbors 54
Configuration Example for BFD for RIPv2 Support Feature 55
Example Configuring BFD for a RIPv2 Neighbor 55
Additional References 55
Feature Information for BFD for RIPv2 Support 56
C H A P T E R 5 IPv6: RIPng VRF-Aware Support 59
Finding Feature Information 59
Information About IPv6: RIPng VRF-Aware Support 59
IPv6 Routing: RIP for IPv6 59
IPv6: RIPng VRF-Aware Support 60
How to Configure IPv6: RIPng VRF-Aware Support 60
Configuring IPv6: RIPng VRF-Aware Support 60
Configuration Examples for IPv6: RIPng VRF-Aware Support 62
Example: Configuring IPv6: RIPng VRF-Aware Support 62
Example: Verifying IPv6: RIPng VRF-Aware Support 63
Additional References for IPv6: RIPng VRF-Aware Support 63
Feature Information for IPv6: RIPng VRF-Aware Support 64
IP Routing: RIP Configuration Guide, Cisco IOS XE Release 3S v
Contents
IP Routing: RIP Configuration Guide, Cisco IOS XE Release 3Svi
Contents
C H A P T E R 1IPv6 Routing: RIP for IPv6
IPv6 Routing Information Protocol (RIP) functions the same and offers the same benefits as IPv4 RIP. RIPenhancements for IPv6, detailed in RFC 2080, include support for IPv6 addresses and prefixes and the useof the all-RIP-devices multicast group address, FF02::9, as the destination address for RIP update messages.
• Finding Feature Information, page 1
• Information About RIP for IPv6, page 1
• How to Configure RIP for IPv6, page 2
• Configuration Examples for RIP for IPv6, page 6
• Additional References, page 7
• Feature Information for RIP for IPv6, page 8
Finding Feature InformationYour software release may not support all the features documented in this module. For the latest caveats andfeature information, see Bug Search Tool and the release notes for your platform and software release. Tofind information about the features documented in this module, and to see a list of the releases in which eachfeature is supported, see the feature information table at the end of this module.
Use Cisco Feature Navigator to find information about platform support and Cisco software image support.To access Cisco Feature Navigator, go to www.cisco.com/go/cfn. An account on Cisco.com is not required.
Information About RIP for IPv6
RIP for IPv6IPv6 RIP functions the same and offers the same benefits as RIP in IPv4. RIP enhancements for IPv6, detailedin RFC 2080, include support for IPv6 addresses and prefixes, and the use of the all-RIP-devices multicastgroup address FF02::9 as the destination address for RIP update messages.
In the Cisco software implementation of IPv6 RIP, each IPv6 RIP process maintains a local routing table,referred to as a Routing Information Database (RIB). The IPv6 RIP RIB contains a set of best-cost IPv6 RIProutes learned from all its neighboring networking devices. If IPv6 RIP learns the same route from two differentneighbors, but with different costs, it will store only the lowest cost route in the local RIB. The RIB also storesany expired routes that the RIP process is advertising to its neighbors running RIP. IPv6 RIP will try to insertevery non-expired route from its local RIB into the master IPv6 RIB. If the same route has been learned froma different routing protocol with a better administrative distance than IPv6 RIP, the RIP route will not beadded to the IPv6 RIB but the RIP route will still exist in the IPv6 RIP RIB.
Nonstop Forwarding for IPv6 RIPCisco nonstop forwarding (NSF) continues forwarding packets while routing protocols converge, thereforeavoiding a route flap on switchover. When an RP failover occurs, the Forwarding Information Base (FIB)marks installed paths as stale by setting a new epoch. Subsequently, the routing protocols reconverge andpopulate the RIB and FIB. Once all NSF routing protocols converge, any stale routes held in the FIB areremoved. A failsafe timer is required to delete stale routes, in case of routing protocol failure to repopulatethe RIB and FIB.
RIP registers as an IPv6 NSF client. Doing so has the benefit of using RIP routes installed in the Cisco ExpressForwarding table until RIP has converged on the standby.
How to Configure RIP for IPv6
Enabling IPv6 RIP
Before You Begin
Before configuring the router to run IPv6 RIP, globally enable IPv6 using the ipv6 unicast-routing commandin global configuration mode, and enable IPv6 on any interfaces on which IPv6 RIP is to be enabled.
If you want to set or change a global value, follow steps 1 and 2, and then use the optional ipv6 routerripcommand in global configuration mode.
SUMMARY STEPS
1. enable2. configure terminal3. ipv6 unicast-routing4. interface type number5. ipv6 rip name enable
DETAILED STEPS
PurposeCommand or Action
Enables privileged EXEC mode.enableStep 1
IP Routing: RIP Configuration Guide, Cisco IOS XE Release 3S2
IPv6 Routing: RIP for IPv6Nonstop Forwarding for IPv6 RIP
PurposeCommand or Action
Example:
Router> enable
• Enter your password if prompted.
Enters global configuration mode.configure terminal
Example:
Router# configure terminal
Step 2
Enables the forwarding of IPv6 unicast datagrams.ipv6 unicast-routing
Example:
Router(config)# ipv6 unicast-routing
Step 3
Specifies the interface type and number, and entersinterface configuration mode.
interface type number
Example:
Router(config)# interface gigabitethernet 0/0/0
Step 4
Enables the specified IPv6 RIP routing process on aninterface.
To avoid routing loops after the IPv6 default route (::/0) isoriginated out of any interface, the routing process ignores alldefault routes received on any interface.
Note
• Specifying the only keyword originates the default route (::/0) butsuppresses all other routes in the updates sent on this interface.
• Specifying the originate keyword originates the default route (::/0)in addition to all other routes in the updates sent on this interface.
IP Routing: RIP Configuration Guide, Cisco IOS XE Release 3S4
IPv6 Routing: RIP for IPv6Verifying IPv6 RIP Configuration and Operation
Configuration Examples for RIP for IPv6
Example: Enabling the RIP for IPv6 ProcessIn the following example, the IPv6 RIP process named process1 is enabled on the router and on GigabitEthernet interface 0/0/0. The IPv6 default route (::/0) is advertised in addition to all other routes in routerupdates sent on Gigabit Ethernet interface 0/0/0. Additionally, BGP routes are redistributed into the RIPprocess named process1 according to a route map where routes that match a prefix list are also tagged. Thenumber of parallel paths is set to one to allow the route tagging, and the IPv6 RIP timers are adjusted. A prefixlist named eth0/0-in-flt filters inbound routing updates on Gigabit Ethernet interface 0/0/0.ipv6 router rip process1maximum-paths 1redistribute bgp 65001 route-map bgp-to-ripdistribute-list prefix-list eth0/0-in-flt in Gigabitethernet0/0/0!interface Gigabitethernet0/0/0ipv6 address 2001:DB8::/64 eui-64ipv6 rip process1 enableipv6 rip process1 default-information originate!ipv6 prefix-list bgp-to-rip-flt seq 10 deny 2001:DB8:3::/16 le 128ipv6 prefix-list bgp-to-rip-flt seq 20 permit 2001:DB8:1::/8 le 128!ipv6 prefix-list eth0/0-in-flt seq 10 deny ::/0ipv6 prefix-list eth0/0-in-flt seq 15 permit ::/0 le 128!route-map bgp-to-rip permit 10match ipv6 address prefix-list bgp-to-rip-fltset tag 4In the following example, output information about all current IPv6 RIP processes is displayed using the showipv6 rip command:Device> show ipv6 rip
RIP process "process1", port 521, multicast-group FF02::9, pid 62Administrative distance is 120. Maximum paths is 1Updates every 5 seconds, expire after 15Holddown lasts 10 seconds, garbage collect after 30Split horizon is on; poison reverse is offDefault routes are generatedPeriodic updates 223, trigger updates 1
In the following example, output information about a specified IPv6 RIP process database is displayed usingthe show ipv6 rip command with the name argument and the database keyword. In the following output forthe IPv6 RIP process named process1, timer information is displayed, and route 2001:DB8::16/64 has a routetag set:Device> show ipv6 rip process1 database
RIP process "process1", local RIB2001:DB8::/64, metric 2
Gigabitethernet0/0/0/FE80::A8BB:CCFF:FE00:B00, expires in 13 secs2001:DB8::/16, metric 2 tag 4, installed
Gigabitethernet0/0/0/FE80::A8BB:CCFF:FE00:B00, expires in 13 secs2001:DB8:1::/16, metric 2 tag 4, installed
Gigabitethernet0/0/0/FE80::A8BB:CCFF:FE00:B00, expires in 13 secs2001:DB8:2::/16, metric 2 tag 4, installed
Gigabitethernet0/0/0/FE80::A8BB:CCFF:FE00:B00, expires in 13 secs
IP Routing: RIP Configuration Guide, Cisco IOS XE Release 3S6
IPv6 Routing: RIP for IPv6Configuration Examples for RIP for IPv6
::/0, metric 2, installedGigabitethernet0/0/0FE80::A8BB:CCFF:FE00:B00, expires in 13 secs
In the following example, output information for a specified IPv6 RIP process is displayed using the showipv6 rip command with the name argument and the next-hops keyword:Device> show ipv6 rip process1 next-hops
RIP process "process1", Next HopsFE80::A8BB:CCFF:FE00:A00/Gigabitethernet0/0/0 [4 paths]
Additional ReferencesThe following sections provide references related to configuring Routing Information Protocol.
Related Documents
Document TitleRelated Topic
Configuring IP Routing Protocol-IndependentFeatures
Protocol-independent features, filtering RIP information,keymanagement (available in RIPVersion 2), and VLSM
Cisco IOS IP Routing: RIP Configuration GuideIPv6 Routing: RIP for IPv6
Triggered Extensions to RIP to Support DemandCircuits
RFC 2091
RIP version 2RFC 2453
Technical Assistance
LinkDescription
http://www.cisco.com/cisco/web/support/index.htmlThe Cisco Support website provides extensive onlineresources, including documentation and tools fortroubleshooting and resolving technical issues withCisco products and technologies.
To receive security and technical information aboutyour products, you can subscribe to various services,such as the Product Alert Tool (accessed from FieldNotices), the Cisco Technical Services Newsletter,and Really Simple Syndication (RSS) Feeds.
Access to most tools on the Cisco Support websiterequires a Cisco.com user ID and password.
Feature Information for RIP for IPv6The following table provides release information about the feature or features described in this module. Thistable lists only the software release that introduced support for a given feature in a given software releasetrain. Unless noted otherwise, subsequent releases of that software release train also support that feature.
Use Cisco Feature Navigator to find information about platform support and Cisco software image support.To access Cisco Feature Navigator, go to www.cisco.com/go/cfn. An account on Cisco.com is not required.
IP Routing: RIP Configuration Guide, Cisco IOS XE Release 3S8
IPv6 Routing: RIP for IPv6Feature Information for RIP for IPv6
RIP enhancements for IPv6 includesupport for IPv6 addresses andprefixes, and the use of theall-RIP-devices multicast groupaddress FF02::9 as the destinationaddress for RIP update messages.
The following commands wereintroduced or modified: debugipv6 rip, ipv6 ripdefault-information, ipv6 ripenable, ipv6 router rip, ipv6unicast-routing,maximum-paths,show ipv6 rip, show ipv6 route.
12.2(2)T
12.2(17a)SX1
12.2(25)SEA
12.2(25)SG
12.2(33)SRA
12.3
15.0(2)SG
Cisco IOS XE Release 2.1
Cisco IOS XE Release 3.2.0SG
IPv6 Routing: RIP for IPv6(RIPng)
The IPv6 RIPng nonstopforwarding feature is supported.
IPv6 Routing: RIP for IPv6Feature Information for RIP for IPv6
IP Routing: RIP Configuration Guide, Cisco IOS XE Release 3S10
IPv6 Routing: RIP for IPv6Feature Information for RIP for IPv6
C H A P T E R 2IPv6 Routing: Route Redistribution
IPv6 route redistribution allows routes to be specified by prefix, using a route-map prefix list, or by tag,using the route-map "match tag" function.
• Finding Feature Information, page 11
• Information About IPv6 Route Redistribution, page 11
• How to Configure IPv6 Route Redistribution, page 12
• Configuration Examples for IPv6 Route Redistribution, page 17
• Additional References, page 18
• Feature Information for IPv6 Routing: Route Redistribution, page 19
Finding Feature InformationYour software release may not support all the features documented in this module. For the latest caveats andfeature information, see Bug Search Tool and the release notes for your platform and software release. Tofind information about the features documented in this module, and to see a list of the releases in which eachfeature is supported, see the feature information table at the end of this module.
Use Cisco Feature Navigator to find information about platform support and Cisco software image support.To access Cisco Feature Navigator, go to www.cisco.com/go/cfn. An account on Cisco.com is not required.
Information About IPv6 Route Redistribution
RIP for IPv6IPv6 RIP functions the same and offers the same benefits as RIP in IPv4. RIP enhancements for IPv6, detailedin RFC 2080, include support for IPv6 addresses and prefixes, and the use of the all-RIP-devices multicastgroup address FF02::9 as the destination address for RIP update messages.
In the Cisco software implementation of IPv6 RIP, each IPv6 RIP process maintains a local routing table,referred to as a Routing Information Database (RIB). The IPv6 RIP RIB contains a set of best-cost IPv6 RIP
routes learned from all its neighboring networking devices. If IPv6 RIP learns the same route from two differentneighbors, but with different costs, it will store only the lowest cost route in the local RIB. The RIB also storesany expired routes that the RIP process is advertising to its neighbors running RIP. IPv6 RIP will try to insertevery non-expired route from its local RIB into the master IPv6 RIB. If the same route has been learned froma different routing protocol with a better administrative distance than IPv6 RIP, the RIP route will not beadded to the IPv6 RIB but the RIP route will still exist in the IPv6 RIP RIB.
How to Configure IPv6 Route Redistribution
Redistributing Routes into an IPv6 RIP Routing ProcessThe maximum metric that RIP can advertise is 16, and a metric of 16 denotes a route that is unreachable.Therefore, if you are redistributing routes with metrics greater than or equal to 16, then by default RIP willadvertise them as unreachable. These routes will not be used by neighboring routers. The user must configurea redistribution metric of less than 15 for these routes.
You must to advertise a route with metric of 15 or less. A RIP router always adds an interface cost--thedefault is 1--onto the metric of a received route. If you advertise a route with metric 15, your neighborwill add 1 to it, making a metric of 16. Because a metric of 16 is unreachable, your neighbor will notinstall the route in the routing table.
Note
If no metric is specified, then the current metric of the route is used. To find the current metric of the route,enter the show ipv6 route command.
SUMMARY STEPS
1. enable2. configure terminal3. interface type number4. ipv6 rip word enable5. redistribute protocol [process-id] {level-1 | level-1-2| level-2} [metric metric-value]
• The rip keyword and process-id argument specify an IPv6RIP routing process.
The connected keyword refers to routes that areestablished automatically by assigning IPv6 addressesto an interface.
Note
Configuring Route Tags for IPv6 RIP RoutesWhen performing route redistribution, you can associate a numeric tag with a route. The tag is advertised withthe route by RIP and will be installed along with the route in neighboring router’s routing table.If you redistribute a tagged route (for example, a route in the IPv6 routing table that already has a tag) intoRIP, then RIP will automatically advertise the tag with the route. If you use a redistribution route map tospecify a tag, then RIP will use the route map tag in preference to the routing table tag.
Specifies a list of IPv6 prefixes to be matched.match ipv6 address {prefix-list prefix-list-name |access-list-name
Step 4
Example:
Router(config-route-map)# match ipv6 addressprefix-list bgp-to-rip-flt
Sets the tag value to associate with the redistributedroutes.
set tag tag-value
Example:
Router(config-route-map)# set tag 4
Step 5
Filtering IPv6 RIP Routing UpdatesRoute filtering using distribute lists provides control over the routes RIP receives and advertises. This controlmay be exercised globally or per interface.
IP Routing: RIP Configuration Guide, Cisco IOS XE Release 3S14
Filtering is controlled by distribute lists. Input distribute lists control route reception, and input filtering isapplied to advertisements received from neighbors. Only those routes that pass input filtering will be insertedin the RIP local routing table and become candidates for insertion into the IPv6 routing table.
Output distribute lists control route advertisement; Output filtering is applied to route advertisements sent toneighbors. Only those routes passing output filtering will be advertised.
Global distribute lists (which are distribute lists that do not apply to a specified interface) apply to all interfaces.If a distribute list specifies an interface, then that distribute list applies only to that interface.
An interface distribute list always takes precedence. For example, for a route received at an interface, withthe interface filter set to deny, and the global filter set to permit, the route is blocked, the interface filter ispassed, the global filter is blocked, and the route is passed.
IPv6 prefix lists are used to specify certain prefixes or a range of prefixes that must be matched before a permitor deny statement can be applied. Two operand keywords can be used to designate a range of prefix lengthsto be matched. A prefix length of less than, or equal to, a value is configured with the lekeyword. A prefixlength greater than, or equal to, a value is specified using the ge keyword. The ge and le keywords can beused to specify the range of the prefix length to be matched in more detail than the usual ipv6-prefix /prefix-length argument. For a candidate prefix to match against a prefix list entry three conditions can exist:
• The candidate prefix must match the specified prefix list and prefix length entry.
• The value of the optional le keyword specifies the range of allowed prefix lengths from the prefix-lengthargument up to, and including, the value of the le keyword.
• The value of the optional ge keyword specifies the range of allowed prefix lengths from the value of thege keyword up to, and including, 128.
Note that the first condition must match before the other conditions take effect.Note
An exact match is assumed when the ge or le keywords are not specified. If only one keyword operand isspecified then the condition for that keyword is applied, and the other condition is not applied. The prefix-lengthvalue must be less than the ge value. The ge value must be less than, or equal to, the le value. The le valuemust be less than or equal to 128.
[ge ge-value] [le le-value5. Repeat Steps 3 and 4 as many times as necessary to build the prefix list.6. ipv6 router rip name7. distribute-list prefix-list prefix-list-name in | out} [interface-type interface-number
Configuration Examples for IPv6 Route Redistribution
Example: Enabling the RIP for IPv6 ProcessIn the following example, the IPv6 RIP process named process1 is enabled on the router and on GigabitEthernet interface 0/0/0. The IPv6 default route (::/0) is advertised in addition to all other routes in routerupdates sent on Gigabit Ethernet interface 0/0/0. Additionally, BGP routes are redistributed into the RIPprocess named process1 according to a route map where routes that match a prefix list are also tagged. Thenumber of parallel paths is set to one to allow the route tagging, and the IPv6 RIP timers are adjusted. A prefixlist named eth0/0-in-flt filters inbound routing updates on Gigabit Ethernet interface 0/0/0.ipv6 router rip process1maximum-paths 1redistribute bgp 65001 route-map bgp-to-ripdistribute-list prefix-list eth0/0-in-flt in Gigabitethernet0/0/0!interface Gigabitethernet0/0/0ipv6 address 2001:DB8::/64 eui-64ipv6 rip process1 enableipv6 rip process1 default-information originate!ipv6 prefix-list bgp-to-rip-flt seq 10 deny 2001:DB8:3::/16 le 128ipv6 prefix-list bgp-to-rip-flt seq 20 permit 2001:DB8:1::/8 le 128!ipv6 prefix-list eth0/0-in-flt seq 10 deny ::/0ipv6 prefix-list eth0/0-in-flt seq 15 permit ::/0 le 128!route-map bgp-to-rip permit 10match ipv6 address prefix-list bgp-to-rip-fltset tag 4In the following example, output information about all current IPv6 RIP processes is displayed using the showipv6 rip command:Device> show ipv6 rip
RIP process "process1", port 521, multicast-group FF02::9, pid 62Administrative distance is 120. Maximum paths is 1Updates every 5 seconds, expire after 15Holddown lasts 10 seconds, garbage collect after 30Split horizon is on; poison reverse is offDefault routes are generatedPeriodic updates 223, trigger updates 1
In the following example, output information about a specified IPv6 RIP process database is displayed usingthe show ipv6 rip command with the name argument and the database keyword. In the following output forthe IPv6 RIP process named process1, timer information is displayed, and route 2001:DB8::16/64 has a routetag set:Device> show ipv6 rip process1 database
RIP process "process1", local RIB2001:DB8::/64, metric 2
Gigabitethernet0/0/0/FE80::A8BB:CCFF:FE00:B00, expires in 13 secs2001:DB8::/16, metric 2 tag 4, installed
Gigabitethernet0/0/0/FE80::A8BB:CCFF:FE00:B00, expires in 13 secs2001:DB8:1::/16, metric 2 tag 4, installed
Gigabitethernet0/0/0/FE80::A8BB:CCFF:FE00:B00, expires in 13 secs2001:DB8:2::/16, metric 2 tag 4, installed
Gigabitethernet0/0/0/FE80::A8BB:CCFF:FE00:B00, expires in 13 secs
IPv6 Routing: Route RedistributionConfiguration Examples for IPv6 Route Redistribution
::/0, metric 2, installedGigabitethernet0/0/0FE80::A8BB:CCFF:FE00:B00, expires in 13 secs
In the following example, output information for a specified IPv6 RIP process is displayed using the showipv6 rip command with the name argument and the next-hops keyword:Device> show ipv6 rip process1 next-hops
RIP process "process1", Next HopsFE80::A8BB:CCFF:FE00:A00/Gigabitethernet0/0/0 [4 paths]
Additional ReferencesRelated Documents
Document TitleRelated Topic
IPv6 Configuration GuideIPv6 addressing and connectivity
Cisco IOSMaster Commands List,All Releases
Cisco IOS commands
Cisco IOS IPv6 CommandReference
IPv6 commands
Cisco IOS IPv6 Feature MappingCisco IOS IPv6 features
Standards and RFCs
TitleStandard/RFC
IPv6 RFCsRFCs for IPv6
MIBs
MIBs LinkMIB
To locate and downloadMIBs for selected platforms,Cisco IOS releases, and feature sets, use Cisco MIBLocator found at the following URL:
http://www.cisco.com/go/mibs
IP Routing: RIP Configuration Guide, Cisco IOS XE Release 3S18
http://www.cisco.com/cisco/web/support/index.htmlThe Cisco Support and Documentation websiteprovides online resources to download documentation,software, and tools. Use these resources to install andconfigure the software and to troubleshoot and resolvetechnical issues with Cisco products and technologies.Access to most tools on the Cisco Support andDocumentation website requires a Cisco.com user IDand password.
Feature Information for IPv6 Routing: Route RedistributionTable 2: Feature Information for IPv6 Routing: Route Redistribution
Feature InformationReleasesFeature Name
Routes may be specified by prefix,using a route-map prefix list, or bytag, using the route-map “matchtag” function.The following commands wereintroduced or modified:distribute-list prefix-list, ipv6prefix list, ipv6 rip enable, ipv6router rip, match ipv6 address,redistribute, route-map, set tag,show ipv6 rip.
IP Routing: RIP Configuration Guide, Cisco IOS XE Release 3S20
IPv6 Routing: Route RedistributionFeature Information for IPv6 Routing: Route Redistribution
C H A P T E R 3Configuring Routing Information Protocol
Routing Information Protocol (RIP) is a commonly used routing protocol in small to medium TCP/IPnetworks. It is a stable protocol that uses a distance-vector algorithm to calculate routes.
• Finding Feature Information, page 21
• Prerequisites for RIP, page 21
• Restrictions for RIP, page 22
• Information About Configuring RIP, page 22
• How to Configure RIP, page 28
• Configuration Examples for RIP, page 45
• Additional References, page 47
• Feature Information for Configuring RIP, page 49
• Glossary, page 51
Finding Feature InformationYour software release may not support all the features documented in this module. For the latest caveats andfeature information, see Bug Search Tool and the release notes for your platform and software release. Tofind information about the features documented in this module, and to see a list of the releases in which eachfeature is supported, see the feature information table at the end of this module.
Use Cisco Feature Navigator to find information about platform support and Cisco software image support.To access Cisco Feature Navigator, go to www.cisco.com/go/cfn. An account on Cisco.com is not required.
Prerequisites for RIPYou must configure ip routing command before you configure RIP.
Restrictions for RIPRouting Information Protocol (RIP) uses hop count as the metric to rate the value of different routes. The hopcount is the number of devices that can be traversed in a route. A directly connected network has a metric ofzero; an unreachable network has a metric of 16. This limited metric range makes RIP unsuitable for largenetworks.
Information About Configuring RIP
RIP OverviewThe Routing Information Protocol (RIP) uses broadcast UDP data packets to exchange routing information.Cisco software sends routing information updates every 30 seconds, which is termed advertising. If a devicedoes not receive an update from another device for 180 seconds or more, the receiving device marks the routesserved by the nonupdating device as unusable. If there is still no update after 240 seconds, the device removesall routing table entries for the nonupdating device.
A device that is running RIP can receive a default network via an update from another device that is runningRIP, or the device can source the default network using RIP. In both cases, the default network is advertisedthrough RIP to other RIP neighbors.
The Cisco implementation of RIP Version 2 (RIPv2) supports plain text and message digest algorithm 5(MD5) authentication, route summarization, classless interdomain routing (CIDR), and variable-length subnetmasks (VLSMs).
RIP Routing UpdatesThe Routing Information Protocol (RIP) sends routing-update messages at regular intervals and when thenetwork topology changes. When a device receives a RIP routing update that includes changes to an entry,the device updates its routing table to reflect the new route. The metric value for the path is increased by 1,and the sender is indicated as the next hop. RIP devices maintain only the best route (the route with the lowestmetric value) to a destination. After updating its routing table, the device immediately begins transmittingRIP routing updates to inform other network devices of the change. These updates are sent independently ofthe regularly scheduled updates that RIP devices send.
RIP Routing MetricThe Routing Information Protocol (RIP) uses a single routing metric to measure the distance between thesource and the destination network. Each hop in a path from the source to the destination is assigned a hop-countvalue, which is typically 1. When a device receives a routing update that contains a new or changed destinationnetwork entry, the device adds 1 to the metric value indicated in the update and enters the network in therouting table. The IP address of the sender is used as the next hop. If an interface network is not specified inthe routing table, it will not be advertised in any RIP update.
IP Routing: RIP Configuration Guide, Cisco IOS XE Release 3S22
Configuring Routing Information ProtocolRestrictions for RIP
Authentication in RIPThe Cisco implementation of the Routing Information Protocol (RIP) Version 2 (RIPv2) supports authentication,key management, route summarization, classless interdomain routing (CIDR), and variable-length subnetmasks (VLSMs).
By default, the software receives RIP Version 1 (RIPv1) and RIPv2 packets, but sends only RIPv1 packets.You can configure the software to receive and send only RIPv1 packets. Alternatively, you can configure thesoftware to receive and send only RIPv2 packets. To override the default behavior, you can configure the RIPversion that an interface sends. Similarly, you can also control how packets received from an interface areprocessed.
RIPv1 does not support authentication. If you are sending and receiving RIP v2 packets, you can enable RIPauthentication on an interface.
The key chain determines the set of keys that can be used on the interface. Authentication, including defaultauthentication, is performed on that interface only if a key chain is configured. For more information on keychains and their configuration, see the “Managing Authentication Keys” section in the “Configuring IP RoutingProtocol-Independent Features” chapter in the Cisco IOS IP Routing: Protocol-Independent ConfigurationGuide.
Cisco supports two modes of authentication on an interface on which RIP is enabled: plain-text authenticationand message digest algorithm 5 (MD5) authentication. Plain-text authentication is the default authenticationin every RIPv2 packet.
Do not use plain text authentication in RIP packets for security purposes, because the unencryptedauthentication key is sent in every RIPv2 packet. Use plain-text authentication when security is not anissue; for example, you can use plain-text authentication to ensure that misconfigured hosts do not participatein routing.
Note
Exchange of Routing InformationRouting Information Protocol (RIP) is normally a broadcast protocol, and for RIP routing updates to reachnonbroadcast networks, you must configure the Cisco software to permit this exchange of routing information.
To control the set of interfaces with which you want to exchange routing updates, you can disable the sendingof routing updates on specified interfaces by configuring the passive-interface router configuration command.
You can use an offset list to increase increasing incoming and outgoing metrics to routes learned via RIP.Optionally, you can limit the offset list with either an access list or an interface.
Routing protocols use several timers that determine variables such as the frequency of routing updates, thelength of time before a route becomes invalid, and other parameters. You can adjust these timers to tunerouting protocol performance to better suit your internetwork needs. You can make the following timeradjustments:
• The rate (time, in seconds, between updates) at which routing updates are sent
• The interval of time, in seconds, after which a route is declared invalid
• The interval, in seconds, during which routing information about better paths is suppressed
Configuring Routing Information ProtocolAuthentication in RIP
• The amount of time, in seconds, that must pass before a route is removed from the routing table
• The amount of time for which routing updates will be postponed
You can adjust the IP routing support in the Cisco software to enable faster convergence of various IP routingalgorithms, and hence, cause quicker fallback to redundant devices. The total effect is to minimize disruptionsto end users of the network in situations where quick recovery is essential
In addition, an address family can have timers that explicitly apply to that address family (or Virtual Routingand Forwarding [VRF]) instance). The timers-basic command must be specified for an address family or thesystem defaults for the timers-basic command are used regardless of the timer that is configured for RIProuting. The VRF does not inherit the timer values from the base RIP configuration. The VRF will alwaysuse the system default timers unless the timers are explicitly changed using the timers-basic command.
RIP Route SummarizationSummarizing routes in RIP Version 2 improves scalability and efficiency in large networks. Summarizing IPaddresses means that there is no entry for child routes (routes that are created for any combination of theindividual IP addresses contained within a summary address) in the RIP routing table, reducing the size ofthe table and allowing the router to handle more routes.
Summary IP address functions more efficiently thanmultiple individually advertised IP routes for the followingreasons:
• The summarized routes in the RIP database are processed first.
• Any associated child routes that are included in a summarized route are skipped as RIP looks throughthe routing database, reducing the processing time required. Cisco routers can summarize routes in twoways:
• Automatically, by summarizing subprefixes to the classful network boundary when crossing classfulnetwork boundaries (automatic summary).
Automatic summary is enabled by default.Note
• As specifically configured, advertising a summarized local IP address pool on the specified interface(on a network access server) so that the address pool can be provided to dialup clients.
When RIP determines that a summary address is required in the RIP database, a summary entry is created inthe RIP routing database. As long as there are child routes for a summary address, the address remains in therouting database. When the last child route is removed, the summary entry also is removed from the database.This method of handling database entries reduces the number of entries in the database because each childroute is not listed in an entry, and the aggregate entry itself is removed when there are no longer any validchild routes for it.
RIP Version 2 route summarization requires that the lowest metric of the "best route" of an aggregated entry,or the lowest metric of all current child routes, be advertised. The best metric for aggregated summarizedroutes is calculated at route initialization or when there are metric modifications of specific routes atadvertisement time, and not at the time the aggregated routes are advertised.
IP Routing: RIP Configuration Guide, Cisco IOS XE Release 3S24
Configuring Routing Information ProtocolRIP Route Summarization
The ip summary-address rip routerconfiguration command causes the router to summarize a given set ofroutes learned via RIP Version 2 or redistributed into RIP Version 2. Host routes are especially applicablefor summarization.
See the "Route Summarization Example, on page 45" section at the end of this chapter for examples of usingsplit horizon.
You can verify which routes are summarized for an interface using the show ip protocols EXEC command.You can check summary address entries in the RIP database. These entries will appear in the database onlyif relevant child routes are being summarized. To display summary address entries in the RIP routing databaseentries if there are relevant routes being summarized based upon a summary address, use the show ip ripdatabase command in EXEC mode. When the last child route for a summary address becomes invalid, thesummary address is also removed from the routing table.
Split Horizon MechanismNormally, devices that are connected to broadcast-type IP networks and that use distance-vector routingprotocols employ the split horizon mechanism to reduce the possibility of routing loops. The split horizonmechanism blocks information about routes from being advertised by a device out of any interface fromwhichthat information originated. This behavior usually optimizes communications among multiple devices,particularly when links are broken. However, with nonbroadcast networks, such as Frame Relay and theSwitchedMultimegabit Digital System (SMDS), situations can arise for which this behavior is less than ideal.In such situations, you may want to disable split horizon with the Routing Information Protocol (RIP).
If an interface is configured with secondary IP addresses and split horizon is enabled, updates might not besourced by the secondary address. If split horizon is enabled, one routing update is sourced per networknumber.
Split horizon is not disabled by default for interfaces using any of the X.25 encapsulations. For all otherencapsulations, split horizon is enabled by default.
Interpacket Delay for RIP UpdatesBy default, the software adds no delay between packets in a multiple-packet RIP update being sent. If youhave a high-end router sending to a low-speed router, you might want to add such interpacket delay to RIPupdates, in the range of 8 to 50 milliseconds.
RIP Optimization over WAN CircuitsDevices are used on connection-oriented networks to allow potential connectivity to many remote destinations.Circuits on the WAN are established on demand and are relinquished when the traffic subsides. Dependingon the application, the connection between any two sites for user data could be short and relatively infrequent.
Source IP Addresses of RIP Routing UpdatesBy default, the Cisco software validates the source IP address of incoming Routing Information Protocol(RIP) routing updates. If the source address is not valid, the software discards the routing update. You mustdisable this functionality if you want to receive updates from a device that is not part of this network. However,disabling this functionality is not recommended under normal circumstances.
Configuring Routing Information ProtocolSplit Horizon Mechanism
Neighbor Router AuthenticationYou can prevent your router from receiving fraudulent route updates by configuring neighbor routerauthentication. When configured, neighbor authentication occurs whenever routing updates are exchangedbetween neighbor routers. This authentication ensures that a router receives reliable routing information froma trusted source.
Without neighbor authentication, unauthorized or deliberately malicious routing updates could compromisethe security of your network traffic. A security compromise could occur if an unfriendly party diverts oranalyzes your network traffic. For example, an unauthorized router could send a fictitious routing update toconvince your router to send traffic to an incorrect destination. This diverted traffic could be analyzed to learnconfidential information about your organization or merely used to disrupt your organization’s ability toeffectively communicate using the network. Neighbor authentication prevents any such fraudulent routeupdates from being received by your router.
When neighbor authentication has been configured on a router, the router authenticates the source of eachrouting update packet that it receives. This is accomplished by the exchange of an authenticating key (sometimesreferred to as a password) that is known to both the sending and the receiving router.
There are two types of neighbor authentication used: plain text authentication and Message Digest AlgorithmVersion 5 (MD5) authentication. Both forms work in the same way, with the exception that MD5 sends a"message digest" instead of the authenticating key itself. The message digest is created using the key and amessage, but the key itself is not sent, preventing it from being read while it is being transmitted. Plain textauthentication sends the authenticating key itself over the wire.
Note that plain text authentication is not recommended for use as part of your security strategy. Its primaryuse is to avoid accidental changes to the routing infrastructure. Using MD5 authentication, however, is arecommended security practice.
Note
In plain text authentication, each participating neighbor router must share an authenticating key. This key isspecified at each router during configuration. Multiple keys can be specified with some protocols; each keymust then be identified by a key number.
In general, when a routing update is sent, the following authentication sequence occurs:
1 A router sends a routing update with a key and the corresponding key number to the neighbor router. Inprotocols that can have only one key, the key number is always zero. The receiving (neighbor) routerchecks the received key against the same key stored in its own memory.
2 If the two keys match, the receiving router accepts the routing update packet. If the two keys do not match,the routing update packet is rejected.
MD5 authentication works similarly to plain text authentication, except that the key is never sent over thewire. Instead, the router uses the MD5 algorithm to produce a "message digest" of the key (also called a"hash"). The message digest is then sent instead of the key itself. This ensures that nobody can eavesdrop onthe line and learn keys during transmission.
Another form of neighbor router authentication is to configure key management using key chains. When youconfigure a key chain, you specify a series of keys with lifetimes, and the Cisco IOS software rotates througheach of these keys. This decreases the likelihood that keys will be compromised. To find complete configurationinformation for key chains, refer to the "Managing Authentication Keys" section in the Configuring IP Routing
IP Routing: RIP Configuration Guide, Cisco IOS XE Release 3S26
Configuring Routing Information ProtocolNeighbor Router Authentication
Protocol-Independent Features module of the Cisco IOS IP Routing: Protocol-Independent ConfigurationGuide.
IP-RIP Delay Start OverviewThe IP-RIP Delay Start feature is used on Cisco devices to delay the initiation of Routing Information ProtocolVersion 2 (RIPv2) neighbor sessions until the network connectivity between the neighbor devices is fullyoperational, thereby ensuring that the sequence number of the first message digest algorithm 5 (MD5) packetthat the device sends to the non-Cisco neighbor device is 0. The default behavior for a device configured toestablish RIPv2 neighbor sessions with a neighbor device using MD5 authentication is to start sending MD5packets when the physical interface is up.
The IP-RIP Delay Start feature is often used when a Cisco device is configured to establish a RIPv2 neighborrelationship using MD5 authentication with a non-Cisco device over a Frame Relay network. When RIPv2neighbors are connected over Frame Relay, it is possible for the serial interface connected to the Frame Relaynetwork to be up while the underlying Frame Relay circuits are not yet ready to transmit and receive data.When a serial interface is up and the Frame Relay circuits are not yet operational, any MD5 packets that thedevice attempts to transmit over the serial interface are dropped. When MD5 packets are dropped because theFrame Relay circuits over which the packets need to be transmitted are not yet operational, the sequencenumber of the first MD5 packet received by the neighbor device after the Frame Relay circuits become activewill be greater than 0. Some non-Cisco devices will not allow an MD5-authenticated RIPv2 neighbor sessionto start when the sequence number of the first MD5 packet received from the other device is greater than 0.
The differences in vendor implementations of MD5 authentication for RIPv2 are probably a result of theambiguity of the relevant RFC (RFC 2082) with respect to packet loss. RFC 2082 suggests that devices shouldbe ready to accept either a sequence number of 0 or a sequence number higher than the last sequence numberreceived. For more information about MD5 message reception for RIPv2, see section 3.2.2 of RFC 2082 atthe following url: http://www.ietf.org/rfc/rfc2082.txt.
The IP-RIP Delay Start feature is supported over other interface types such as Fast Ethernet and GigabitEthernet.
Cisco devices allow an MD5-authenticated RIPv2 neighbor session to start when the sequence number of thefirst MD5 packet received from the other device is greater than 0. If you are using only Cisco devices in yournetwork, you do not need to use the IP-RIP Delay Start feature.
Offset-listAn offset list is the mechanism for increasing incoming and outgoing metrics to routes learned via RIP. Thisis done to provide a local mechanism for increasing the value of routing metrics. Optionally, you can limitthe offset list with either an access list or an interface.
TimersRouting protocols use several timers that determine such variables as the frequency of routing updates, thelength of time before a route becomes invalid, and other parameters. You can adjust these timers to tunerouting protocol performance to better suit your internetwork needs. You can make the following timeradjustments:
• The rate (time in seconds between updates) at which routing updates are sent
• The interval of time (in seconds) after which a route is declared invalid
• The interval (in seconds) during which routing information regarding better paths is suppressed
• The amount of time (in seconds) that must pass before a route is removed from the routing table
• The amount of time for which routing updates will be postponed
It also is possible to tune the IP routing support in the software to enable faster convergence of the various IProuting algorithms, and, hence, quicker fallback to redundant routers. The total effect is to minimize disruptionsto end users of the network in situations where quick recovery is essential.
Configuring Routing Information ProtocolEnabling RIP and Configuring RIP Parameters
Specifying a RIP Version and Enabling Authentication
SUMMARY STEPS
1. enable2. configure terminal3. router rip4. version {1 | 2}5. exit6. interface type number7. ip rip send version [1] [2]8. ip rip receive version [1] [2]9. ip rip authentication key-chain name-of-chain10. ip rip authentication mode {text |md5}11. end
DETAILED STEPS
PurposeCommand or Action
Enables privileged EXEC mode.enableStep 1
Example:
Device> enable
• Enter your password if prompted.
Enters global configuration mode.configure terminal
Example:
Device# configure terminal
Step 2
Enters router configuration mode.router rip
Example:
Device(config)# router rip
Step 3
Enables the Cisco software to send only RIP Version 2(RIPv2) packets.
version {1 | 2}
Example:
Device(config-router)# version 2
Step 4
IP Routing: RIP Configuration Guide, Cisco IOS XE Release 3S30
Configuring Routing Information ProtocolSpecifying a RIP Version and Enabling Authentication
PurposeCommand or Action
Exits the router configurationmode and enters the globalconfiguration mode.
exit
Example:
Device(config-router)# exit
Step 5
Specifies an interface and enters interface configurationmode.
interface type number
Example:
Device(config)# interface Ethernet 3/0
Step 6
Configures an interface to send only RIPv2 packets.ip rip send version [1] [2]
Example:
Device(config-if)# ip rip send version 2
Step 7
Configures an interface to accept only RIPv2 packets.ip rip receive version [1] [2]
Device(config-if)# ip rip authenticationkey-chain chainname
Step 9
Configures the interface to use message digest algorithm5 (MD5) authentication (or let it default to plain-textauthentication).
ip rip authentication mode {text |md5}
Example:
Device(config-if)# ip rip authentication modemd5
Step 10
Exits interface configuration mode and returns toprivileged EXEC mode.
end
Example:
Device(config-if)# end
Step 11
Summarizing RIP RoutesRIP Version 2 supports automatic route summarization by default. The software summarizes subprefixes tothe classful network boundary when classful network boundaries are crossed. If you have disconnected subnets,disable automatic route summarization to advertise the subnets. When route summarization is disabled, the
Configuring Routing Information ProtocolSummarizing RIP Routes
software sends subnet and host routing information across classful network boundaries. To disable automaticsummarization, use the no auto-summary command in router configuration mode.
Supernet advertisement (advertising any network prefix less than its classful major network) is not allowedin RIP route summarization, other than advertising a supernet learned in the routing tables. Supernetslearned on any interface that is subject to configuration are still learned. For example, the followingsummarization is invalid: (invalid supernet summarization)
Router(config)# interface Ethernet 1Router(config-if)# ip summary-address rip 10.0.0.0 252.0.0.0..>
Note
SUMMARY STEPS
1. enable2. configure terminal3. interface type number4. ip summary-address rip ip-address network-mask5. exit6. router rip7. no auto-summary8. end
DETAILED STEPS
PurposeCommand or Action
Enables privileged EXEC mode.enableStep 1
Example:
Router> enable
• Enter your password if prompted.
Enters global configuration mode.configure terminal
Example:
Router# configure terminal
Step 2
Enters the interface configuration mode.interface type number
Example:
Router(config)# interface Ethernet 3/0
Step 3
IP Routing: RIP Configuration Guide, Cisco IOS XE Release 3S32
Configuring Routing Information ProtocolSummarizing RIP Routes
PurposeCommand or Action
Specifies the IP address and network mask that identifythe routes to be summarized.
ip summary-address rip ip-address network-mask
Example:
Router(config-if)# ip summary-address rip10.2.0.0 255.255.0.0
Step 4
Exits the interface configuration mode.exit
Example:
Router(config-if)# exit
Step 5
Enters the router configuration mode.router rip
Example:
Router(config)# router rip
Step 6
Used in router configuration mode, disables automaticsummarization.
no auto-summary
Example:
Router(config-router)# no auto-summary
Step 7
Exits router configurationmode and returns to privilegedEXEC mode.
end
Example:
Router(config-router)# end
Step 8
Enabling or Disabling Split HorizonTo enable or disable split horizon, use the following commands in interface configuration mode, as needed.
SUMMARY STEPS
1. enable2. configure terminal3. interface type number4. ip split-horizon5. no ip split-horizon6. end
Configuring Routing Information ProtocolEnabling or Disabling Split Horizon
DETAILED STEPS
PurposeCommand or Action
Enables privileged EXEC mode.enableStep 1
Example:
Router> enable
• Enter your password if prompted.
Enters global configuration mode.configure terminal
Example:
Router# configure terminal
Step 2
Enters interface configuration mode.interface type number
Example:
Router(config)# interface Ethernet 3/0
Step 3
Enables split horizon.ip split-horizon
Example:
Router(config-if)# ip split-horizon
Step 4
Disables split horizon.no ip split-horizon
Example:
Router(config-if)# no ip split-horizon
Step 5
Exits interface configuration mode and returns toprivileged EXEC mode.
end
Example:
Router(config-if)# end
Step 6
Disabling the Validation of Source IP AddressesPerform this task to disable the default function that validates the source IP addresses of incoming routingupdates.
IP Routing: RIP Configuration Guide, Cisco IOS XE Release 3S34
Configuring Routing Information ProtocolDisabling the Validation of Source IP Addresses
Split horizon for Frame Relay and SMDS encapsulation is disabled by default. Split horizon is not disabledby default for interfaces using any of the X.25 encapsulations. For all other encapsulations, split horizon isenabled by default.
In general, changing the state of the default is not recommended unless you are certain that your applicationrequires making a change in order to advertise routes properly. Remember that if split horizon is disabled ona serial interface (and that interface is attached to a packet-switched network), you must disable split horizonfor all routers in any relevant multicast groups on that network.
Note
Summarized network will not be advertised when split horizon is enabled.Note
SUMMARY STEPS
1. enable2. configure terminal3. interface type number4. ip split-horizon5. exit6. router rip7. no validate-update-source8. end
DETAILED STEPS
PurposeCommand or Action
Enables privileged EXEC mode.enableStep 1
Example:
Router> enable
• Enter your password if prompted.
Enters global configuration mode.configure terminal
Example:
Router# configure terminal
Step 2
Enters interface configuration mode.interface type number
Configuring Routing Information ProtocolOptimizing RIP over WAN
• Even on fixed, point-to-point links, the overhead of periodic RIP transmissions could seriously interruptnormal data transfer because of the quantity of information that passes through the line every 30 seconds.
To overcome these limitations, triggered extensions to RIP cause RIP to send information on the WAN onlywhen there has been an update to the routing database. Periodic update packets are suppressed over the interfaceon which this feature is enabled. RIP routing traffic is reduced on point-to-point, serial interfaces. Therefore,you can save money on an on-demand circuit for which you are charged for usage. Triggered extensions toRIP partially support RFC 2091, Triggered Extensions to RIP to Support Demand Circuits .
Perform the following task to enable triggered extensions to RIP and to display the contents of the RIP privatedatabase.
SUMMARY STEPS
1. enable2. configure terminal3. interface serial controller-number4. ip rip triggered5. end6. show ip rip database [prefix mask]
DETAILED STEPS
PurposeCommand or Action
Enables privileged EXEC mode.enableStep 1
Example:
Router> enable
• Enter your password if prompted.
Enters global configuration mode.configure terminal
Example:
Router# configure terminal
Step 2
Configures a serial interface.interface serial controller-number
Example:
Router(config)# interface serial3/0
Step 3
Enables triggered extensions to RIP.ip rip triggered
Example:
Router(config-if)# ip rip triggered
Step 4
IP Routing: RIP Configuration Guide, Cisco IOS XE Release 3S38
Configuring Routing Information ProtocolOptimizing RIP over WAN
PurposeCommand or Action
Returns to privileged EXEC mode.end
Example:
Router(config-if)# end
Step 5
Displays the contents of the RIP private database.show ip rip database [prefix mask]
Example:
Router# show ip rip database
Step 6
Configuring IP-RIP Delay Start for Routers Connected by a Frame Relay NetworkThe tasks in this section explain how to configure a router to use the IP-RIP Delay Start feature on a FrameRelay interface.
Cisco routers allow an MD5-authenticated RIPv2 neighbor session to start when the sequence number ofthe first MD5 packet received from the other router is greater than 0. If you are using only Cisco routersin your network, you do not need to use the IP-RIP Delay Start feature.
Timesaver
PrerequisitesYour router must be running Cisco IOS Release 12.4(12) or a later release.
The IP-RIP Delay Start feature is supported over other interface types such as Fast Ethernet and GigabitEthernet. If your Cisco router cannot establish RIPv2 neighbor sessions using MD5 authentication witha non-Cisco device, the IP-RIP Delay Start feature might resolve the problem.
Note
RestrictionsThe IP-RIP Delay Start feature is required only when your Cisco router is configured to establish a RIPv2neighbor relationship with a non-Cisco device and you want to use MD5 neighbor authentication.
Configuring RIPv2This required task configures RIPv2 on the router.
This task provides instructions for only one of the many possible permutations for configuring RIPv2 on yourrouter.
Enters global configuration mode.configure terminal
Example:
Router# configure terminal
Step 2
Enables a RIP routing process, which places you in routerconfiguration mode.
router rip
Example:
Router(config)# router rip
Step 3
Associates a network with a RIP routing process.network ip-network
Example:
Router(config-router)# network 192.168.0.0
Step 4
Configures the software to receive and send only RIP Version1 or only RIP Version 2 packets.
version {1 | 2}
Example:
Router (config-router)# version 2
Step 5
Disables or restores the default behavior of automaticsummarization of subnet routes into network-level routes.
[no] auto-summary
Example:
Router(config-router)# no auto-summary
Step 6
IP Routing: RIP Configuration Guide, Cisco IOS XE Release 3S40
Configuring Routing Information ProtocolConfiguring IP-RIP Delay Start for Routers Connected by a Frame Relay Network
Configuring Frame Relay on a Serial SubinterfaceThis required task configures a serial subinterface for Frame Relay.
This task provides instructions for only one of the many possible permutations for configuring FrameRelay on a subinterface. For more information about and instructions for configuring Frame Relay, seethe Configuring Frame Relay part of the Cisco IOS Wide-Area Networking Configuration Guide .
Note
SUMMARY STEPS
1. enable2. configure terminal3. interface type number4. no ip address5. encapsulation frame-relay [mfr number | ietf]6. frame-relay lmi-type {cisco | ansi | q933a}7. exit8. interface type number/subinterface-number {point-to-point |multipoint}9. frame-relay interface-dlci dlci [ietf | cisco]
DETAILED STEPS
PurposeCommand or Action
Enables privileged EXEC mode.enableStep 1
Example:
Router> enable
• Enter your password if prompted.
Enters global configuration mode.configure terminal
Example:
Router# configure terminal
Step 2
Specifies an interface and enters interface configurationmode.
interface type number
Example:
Router(config)# interface serial3/0
Step 3
Removes a previously configured IP address from theinterface.
Configuring Routing Information ProtocolConfiguring IP-RIP Delay Start for Routers Connected by a Frame Relay Network
PurposeCommand or Action
Configures the key string.key-string string
Example:
Device(config-keychain-key)# key-stringabcde
Step 5
Exits key chain key configuration mode.exit
Example:
Device(config-keychain-key)# exit
Step 6
Exits key chain configuration mode.exit
Example:
Device(config-keychain)# exit
Step 7
Specifies a subinterface and enters subinterface configurationmode.
interface type number
Example:
Device(config)# interface serial 3/0.1
Step 8
Disables Cisco Discovery Protocol options on the interface.no cdp enableStep 9
Example:
Device(config-subif)# no cdp enable
CiscoDiscovery Protocol is not supported by non-Ciscodevices; and the IP-RIP Delay Start feature is requiredonly when you are connecting to a non-Cisco device.Therefore, you should disable CiscoDiscovery Protocolon any interfaces on which you want to configure theIP-RIP Delay Start feature.
Note
Configures an IP address for the Frame Relay subinterface.ip address ip-address subnet-mask
Example:
Device(config-subif)# ip address 172.16.10.1255.255.255.0
Step 10
Specifies the mode for RIPv2 authentication.ip rip authentication mode {text |md5}
Example:
Device(config-subif)# ip rip authenticationmode md5
Step 11
IP Routing: RIP Configuration Guide, Cisco IOS XE Release 3S44
Configuring Routing Information ProtocolConfiguring IP-RIP Delay Start for Routers Connected by a Frame Relay Network
PurposeCommand or Action
Specifies a previously configured key chain for RoutingInformation Protocol Version (RIPv2) message digest algorithm5 (MD5) authentication.
ip rip authentication key-chainname-of-chain
Example:
Device (config-subif)# ip rip authenticationkey-chain rip-md5
Step 12
Configures the IP-RIP Delay Start feature on the interface. Thedevice will delay sending the first MD5 authentication packet
ip rip initial-delay delay
Example:
Device(config-subif)# ip rip initial-delay45
Step 13
to the RIPv2 neighbor for the number of seconds specified bythe delay argument. The range is from 0 to 1800.
Exits the subinterface configuration mode and returns toprivileged EXEC mode.
end
Example:
Device(config-subif)# end
Step 14
Configuration Examples for RIP
Route Summarization ExampleThe following example shows how the ip summary-address riprouter configuration command can be usedto configure summarization on an interface. In this example, the subnets 10.1.3.0/25, 10.1.3.128/25, 10.2.1.0/24,10.2.2.0/24, 10.1.2.0/24 and 10.1.1.0/24 can be summarized as shown below while sending the updates overan interface.
Split Horizon ExamplesTwo examples of configuring split horizon are provided.
Example 1
The following configuration shows a simple example of disabling split horizon on a serial link. In this example,the serial link is connected to an X.25 network.
Configuring Routing Information ProtocolConfiguration Examples for RIP
Router(config-if)# encapsulation x25
Router(config-if)# no ip split-horizon
Example 2
In the next example, the figure below illustrates a typical situation in which the no ip split-horizon interfaceconfiguration command would be useful. This figure depicts two IP subnets that are both accessible via aserial interface on Router C (connected to a Frame Relay network). In this example, the serial interface onRouter C accommodates one of the subnets via the assignment of a secondary IP address.
The Ethernet interfaces for Router A, Router B, and Router C (connected to IP networks 10.13.50.0,10.155.120.0, and 10.20.40.0, respectively all have split horizon enabled by default, while the serial interfacesconnected to networks 172.16.1.0 and 192.168.1.0 all have split horizon disabled with the no ip split-horizoncommand.The figure below shows the topology and interfaces.
In this example, split horizon is disabled on all serial interfaces. Split horizon must be disabled on Router Cin order for network 172.16.0.0 to be advertised into network 192.168.0.0 and vice versa. These subnetsoverlap at Router C, interface S0. If split horizon were enabled on serial interface S0, it would not advertisea route back into the Frame Relay network for either of these networks.
Configuration for Router A
interface ethernet 1ip address 10.13.50.1!interface serial 1ip address 172.16.2.2encapsulation frame-relayno ip split-horizon
Configuration for Router B
interface ethernet 2ip address 10.155.120.1!interface serial 2ip address 192.168.1.2encapsulation frame-relayno ip split-horizon
Configuration for Router C
interface ethernet 0ip address 10.20.40.1!interface serial 0ip address 172.16.1.1ip address 192.168.1.1 secondaryencapsulation frame-relayno ip split-horizon
Address Family Timers ExampleThe following example shows how to adjust individual address family timers. Note that the address family"notusingtimers" will use the system defaults of 30, 180, 180, and 240 even though timer values of 5, 10, 15,
IP Routing: RIP Configuration Guide, Cisco IOS XE Release 3S46
Configuring Routing Information ProtocolAddress Family Timers Example
and 20 are used under the general RIP configuration. Address family timers are not inherited from the generalRIP configuration.
http://www.cisco.com/cisco/web/support/index.htmlThe Cisco Support website provides extensive onlineresources, including documentation and tools fortroubleshooting and resolving technical issues withCisco products and technologies.
To receive security and technical information aboutyour products, you can subscribe to various services,such as the Product Alert Tool (accessed from FieldNotices), the Cisco Technical Services Newsletter,and Really Simple Syndication (RSS) Feeds.
Access to most tools on the Cisco Support websiterequires a Cisco.com user ID and password.
Feature Information for Configuring RIPThe following table provides release information about the feature or features described in this module. Thistable lists only the software release that introduced support for a given feature in a given software releasetrain. Unless noted otherwise, subsequent releases of that software release train also support that feature.
Use Cisco Feature Navigator to find information about platform support and Cisco software image support.To access Cisco Feature Navigator, go to www.cisco.com/go/cfn. An account on Cisco.com is not required.
Table 3: Feature Information for Configuring Routing Information Protocol
Feature InformationReleasesFeature Name
The IP-RIP Delay Start feature isused on Cisco routers to delay theinitiation of RIPv2 neighborsessions until the networkconnectivity between the neighborrouters is fully operational, therebyensuring that the sequence numberof the first MD5 packet that therouter sends to the non-Cisconeighbor router is 0. The defaultbehavior for a router configured toestablish RIPv2 neighbor sessionswith a neighbor router using MD5authentication is to start sendingMD5 packets when the physicalinterface is up.
The following commands wereintroduced or modified: ip ripinitial-delay.
The IP Summary Adddress forRIPv2 feature introduced theability to summarize routes.Summarizing routes in RIPVersion2 improves scalability andefficiency in large networks.Summarizing IP addresses meansthat there is no entry for childroutes (routes that are created forany combination of the individualIP addresses contained within asummary address) in the RIProuting table, reducing the size ofthe table and allowing the router tohandle more routes.
The following commands wereintroduced or modified by thisfeature: ip summary-address rip.
Routing Information Protocol (RIP)is a commonly used routingprotocol in small to mediumTCP/IP networks. It is a stableprotocol that uses a distance-vectoralgorithm to calculate routes.
12.2(27)SBB 15.0(1)M12.2(33)SRE 15.0S
Routing Information Protocol
Triggered RIP was introduced toovercome constant RIP updatesover expensive circuit-basedWANlinks. Triggered extensions to RIPcause RIP to send information ontheWAN only when there has beenan update to the routing database.Periodic update packets aresuppressed over the interface onwhich this feature is enabled. RIProuting traffic is reduced onpoint-to-point, serial interfaces.
The following commands wereintroduced or modified: ip riptriggered, show ip rip database.
12.0(1)T 15.0(1)M 12.2(33)SRE15.0S
Triggered RIP
IP Routing: RIP Configuration Guide, Cisco IOS XE Release 3S50
Configuring Routing Information ProtocolFeature Information for Configuring RIP
Glossaryaddress family --A group of network protocols that share a common format of network address. Addressfamilies are defined by RFC 1700.
IS-IS --Intermediate System-to-Intermediate System. OSI link-state hierarchical routing protocol based onDECnet Phase V routing, where routers exchange routing information based on a single metric, to determinenetwork topology.
RIP --Routing Information Protocol.RIP is a dynamic routing protocol used in local and wide area networks.
VRF --VPN routing and forwarding instance. A VRF consists of an IP routing table, a derived forwardingtable, a set of interfaces that use the forwarding table, and a set of rules and routing protocols that determinewhat goes into the forwarding table. In general, a VRF includes the routing information that defines a customerVPN site that is attached to a PE router.
IP Routing: RIP Configuration Guide, Cisco IOS XE Release 3S52
Configuring Routing Information ProtocolGlossary
C H A P T E R 4BFD for RIPv2 Support
The BFD for RIPv2 Support feature is used to facilitate an alternate path selection when a neighboring routeris inactive.
Routing Information Protocol (RIP) uses the timeout of prefixes of a particular neighbor to identify if aneighbor is inactive. By default, the timeout is 180 seconds; that is, although the next-hop router is inactive,the RIP router will still broadcast prefixes for up to 180 seconds.
Bidirectional Forward Detection (BFD) is a protocol that provides subsecond failure detection using a single,common standardized mechanism that is independent of media and routing protocols.
• Finding Feature Information, page 53
• Prerequisites for BFD for RIPv2 Support, page 53
• How to Configure BFD for RIPv2 Support Feature, page 54
• Configuration Example for BFD for RIPv2 Support Feature, page 55
• Additional References, page 55
• Feature Information for BFD for RIPv2 Support, page 56
Finding Feature InformationYour software release may not support all the features documented in this module. For the latest caveats andfeature information, see Bug Search Tool and the release notes for your platform and software release. Tofind information about the features documented in this module, and to see a list of the releases in which eachfeature is supported, see the feature information table at the end of this module.
Use Cisco Feature Navigator to find information about platform support and Cisco software image support.To access Cisco Feature Navigator, go to www.cisco.com/go/cfn. An account on Cisco.com is not required.
Prerequisites for BFD for RIPv2 SupportBFD is independent of RIPv2 and must be enabled and functional on the router.
Configuring BFD on RIPv2 NeighborsPerform this task to configure BFD on RIPv2 neighbors:
SUMMARY STEPS
1. enable2. configure terminal3. router rip4. bfd all-interfaces5. end
DETAILED STEPS
PurposeCommand or Action
Enables privileged EXEC mode.enableStep 1
Example:
Router> enable
• Enter your password if prompted.
Enters global configuration mode.configure terminal
Example:
Router# configure terminal
Step 2
Configures the RIP routing process and enters router configurationmode.
router rip
Example:
Router(config)# router rip
Step 3
Enables BFD on all interfaces associated with the routing process.bfd all-interfacesStep 4
Example:
Router(config-router)# bfdall-interfaces
• RIPv2 registers with BFD and creates sessions for the neighborwhen RIP updates are received. New neighbors are automaticallyenabled for BFD when the update packets are received.
Alternatively, you can use the neighbor ip-addressbfdcommand to enable BFD for a specific RIP neighbor.
Note
IP Routing: RIP Configuration Guide, Cisco IOS XE Release 3S54
BFD for RIPv2 SupportHow to Configure BFD for RIPv2 Support Feature
PurposeCommand or Action
Exits router configuration mode and returns to global configurationmode.
end
Example:
Router(config-router)# end
Step 5
Configuration Example for BFD for RIPv2 Support Feature
Example Configuring BFD for a RIPv2 NeighborThe following example shows how to configure BFD for all interfaces associated with a RIPv2 neighbor:
http://www.cisco.com/cisco/web/support/index.htmlThe Cisco Support and Documentation websiteprovides online resources to download documentation,software, and tools. Use these resources to install andconfigure the software and to troubleshoot and resolvetechnical issues with Cisco products and technologies.Access to most tools on the Cisco Support andDocumentation website requires a Cisco.com user IDand password.
Feature Information for BFD for RIPv2 SupportThe following table provides release information about the feature or features described in this module. Thistable lists only the software release that introduced support for a given feature in a given software releasetrain. Unless noted otherwise, subsequent releases of that software release train also support that feature.
Use Cisco Feature Navigator to find information about platform support and Cisco software image support.To access Cisco Feature Navigator, go to www.cisco.com/go/cfn. An account on Cisco.com is not required.
IP Routing: RIP Configuration Guide, Cisco IOS XE Release 3S56
BFD for RIPv2 SupportFeature Information for BFD for RIPv2 Support
BFD for RIPv2 SupportFeature Information for BFD for RIPv2 Support
IP Routing: RIP Configuration Guide, Cisco IOS XE Release 3S58
BFD for RIPv2 SupportFeature Information for BFD for RIPv2 Support
C H A P T E R 5IPv6: RIPng VRF-Aware Support
The IPv6: RIPng VRF-Aware Support feature uses separate routing tables for every provider edge-customeredge (PE-CE) scenario, thus allowing improved route protection, modularity, and a potential reduction inthe size of the routing table.
• Finding Feature Information, page 59
• Information About IPv6: RIPng VRF-Aware Support, page 59
• How to Configure IPv6: RIPng VRF-Aware Support, page 60
• Configuration Examples for IPv6: RIPng VRF-Aware Support, page 62
• Additional References for IPv6: RIPng VRF-Aware Support, page 63
• Feature Information for IPv6: RIPng VRF-Aware Support, page 64
Finding Feature InformationYour software release may not support all the features documented in this module. For the latest caveats andfeature information, see Bug Search Tool and the release notes for your platform and software release. Tofind information about the features documented in this module, and to see a list of the releases in which eachfeature is supported, see the feature information table at the end of this module.
Use Cisco Feature Navigator to find information about platform support and Cisco software image support.To access Cisco Feature Navigator, go to www.cisco.com/go/cfn. An account on Cisco.com is not required.
Information About IPv6: RIPng VRF-Aware Support
IPv6 Routing: RIP for IPv6IPv6 Routing Information Protocol (RIP) functions the same and offers the same benefits as IPv4 RIP. RIPenhancements for IPv6, detailed in RFC 2080, include support for IPv6 addresses and prefixes and the use ofthe all-RIP-devices multicast group address, FF02::9, as the destination address for RIP update messages.
IPv6: RIPng VRF-Aware SupportWhen not in Virtual Routing and Forwarding (VRF) mode, every IPv6 Routing Information Protocol(RIP)—also know as RIP Next Generation (RIPng)—process and the configuration associated with it, keepsall the routes in the same routing table. In other routing protocols, it is often required to keep the protocol-relatedroutes stored in separate routing tables.
The IPv6: RIPng VRF-Aware Support feature enables isolation, modularity, and potential performanceimprovement by reducing the number of routes stored in a single routing table. It also allows a networkadministrator to create different RIP routing tables and share the same protocol configuration stored in a singleRIP protocol configuration block.
IPv6: RIPng VRF-Aware SupportConfiguring IPv6: RIPng VRF-Aware Support
PurposeCommand or Action
Binds the interface to the specified VRF routing instancetable and removes all the Layer 3 interface configuration thatis available when the command is entered.
vrf forwarding vrf-name
Example:Device(config-if)# vrf forwarding vrf1
Step 12
Enables IPv6 on the interface.ipv6 enable
Example:Device(config-if)# ipv6 enable
Step 13
Enables an IPv6 RIP routing process on the interface.ipv6 rip rip-process-name enable
Example:Device(config-if)# ipv6 rip myrip enable
Step 14
Exits interface configuration mode and returns to privilegedEXEC mode.
end
Example:Device (config-if)# end
Step 15
Displays debugging information related to VRF support forthe specified IPv6 RIP VRF routing table instance.
debug ipv6 rip vrf vrf-name
Example:Device# debug ipv6 rip vrf vrf1
Step 16
Displays the next hops in the specified VRF RIPng routingtable.
show ipv6 rip vrf vrf-name next-hops
Example:Device# show ipv6 rip vrf vrf1 next-hops
Step 17
Displays the associated RIP local routing information base(RIB).
show ipv6 rip vrf vrf-name database
Example:Device# show ipv6 rip vrf vrf1 database
Step 18
Configuration Examples for IPv6: RIPng VRF-Aware Support
Example: Configuring IPv6: RIPng VRF-Aware Support
http://www.cisco.com/supportThe Cisco Support website provides extensive onlineresources, including documentation and tools fortroubleshooting and resolving technical issues withCisco products and technologies.
To receive security and technical information aboutyour products, you can subscribe to various services,such as the Product Alert Tool (accessed from FieldNotices), the Cisco Technical Services Newsletter,and Really Simple Syndication (RSS) Feeds.
Access to most tools on the Cisco Support websiterequires a Cisco.com user ID and password.
Feature Information for IPv6: RIPng VRF-Aware SupportThe following table provides release information about the feature or features described in this module. Thistable lists only the software release that introduced support for a given feature in a given software releasetrain. Unless noted otherwise, subsequent releases of that software release train also support that feature.
Use Cisco Feature Navigator to find information about platform support and Cisco software image support.To access Cisco Feature Navigator, go to www.cisco.com/go/cfn. An account on Cisco.com is not required.
IP Routing: RIP Configuration Guide, Cisco IOS XE Release 3S64
IPv6: RIPng VRF-Aware SupportFeature Information for IPv6: RIPng VRF-Aware Support
When not virtual routing andforwarding (VRF) aware, IPv6Routing Information Protocol(RIP), also known as RIP NextGeneration (RIPng), works onlywith routes that are available in thedefault global routing table. Whenoperating in VRF mode, RIPng,creates a separate routing table foreach VRF instance. The IPv6:RIPngVRF-Aware Support featureenables the availability of separaterouting tables for every provideredge-customer edge (PE-CE)scenario, thus allowing improvedroute protection, modularity, and apotential reduction in the size ofthe routing table.
The following commands wereintroduced or modified: clear ipv6rip,debug ipv6 rip , ipv6 ripvrf-mode enable, and show ipv6rip.


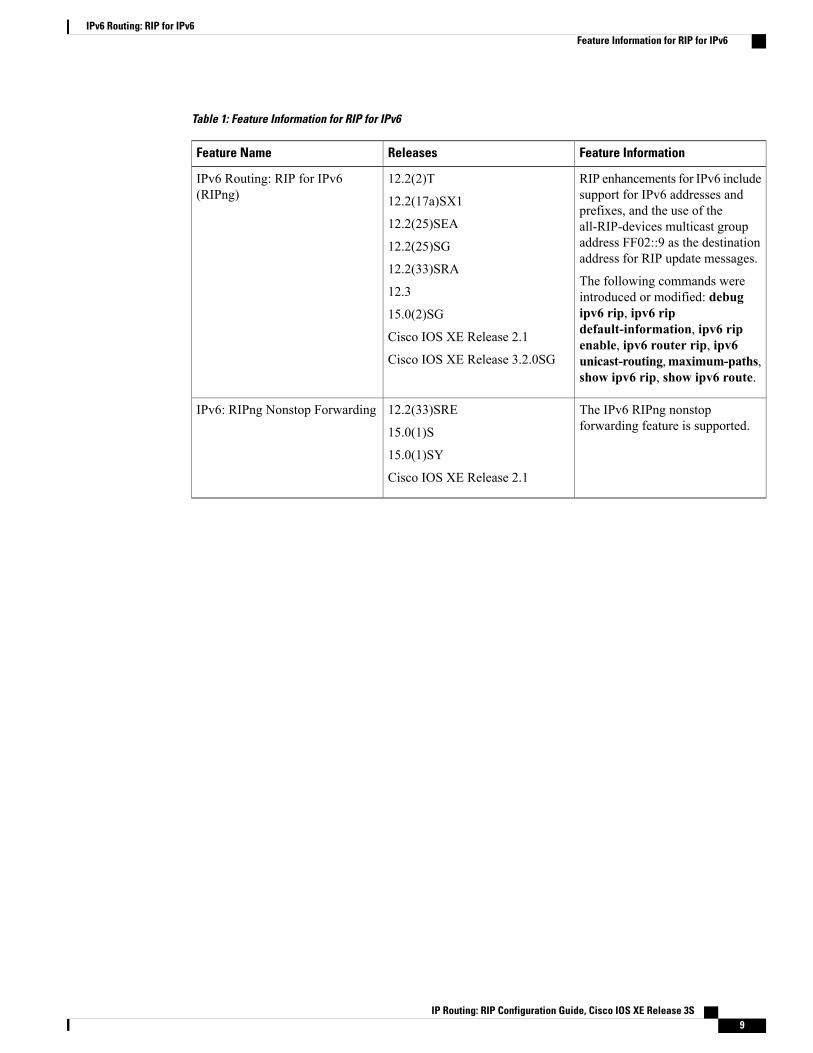

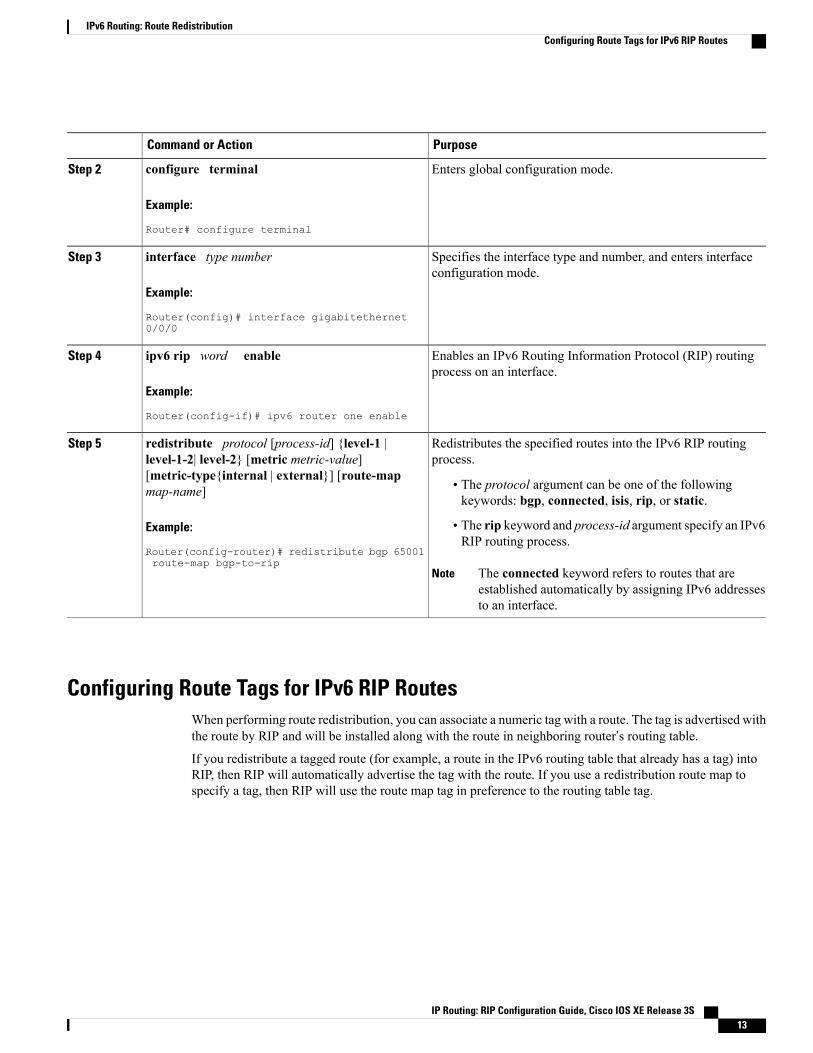

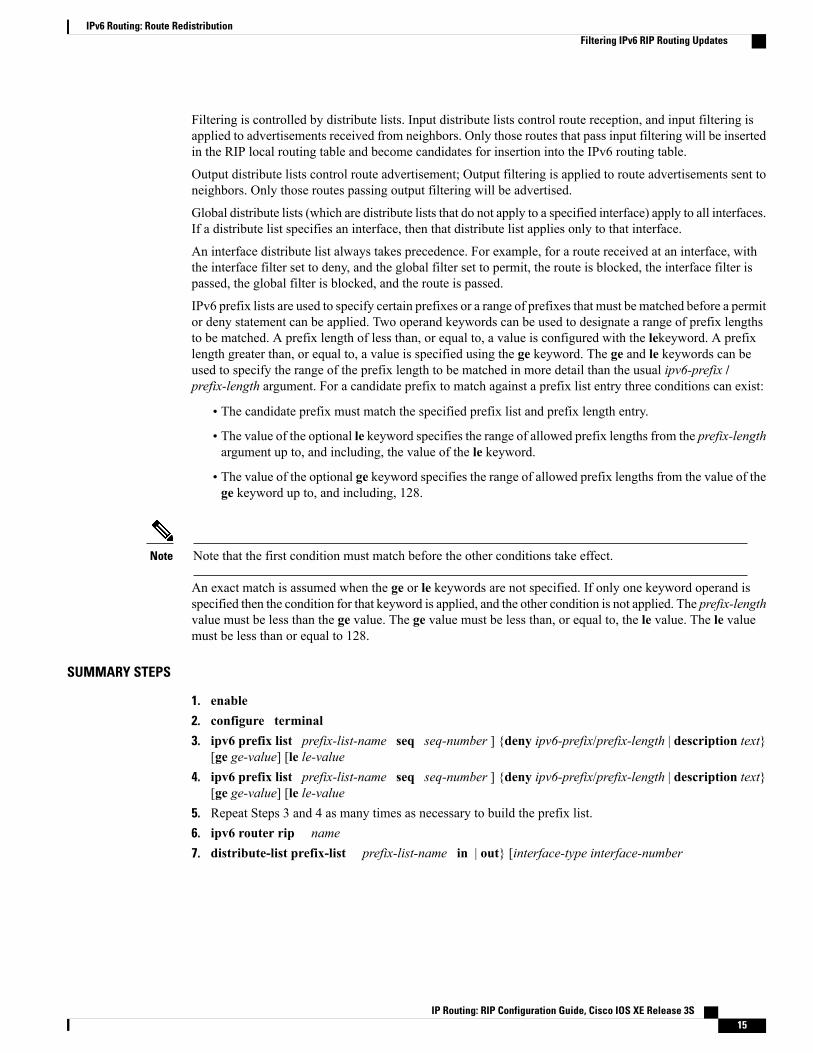
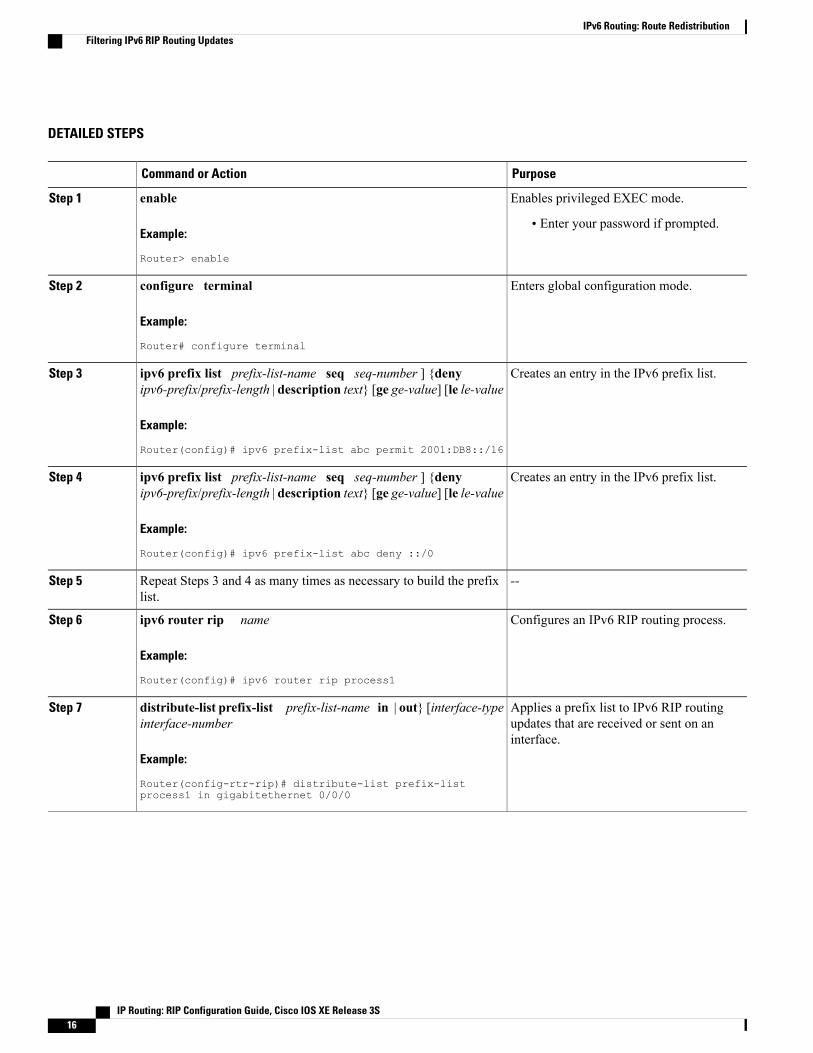


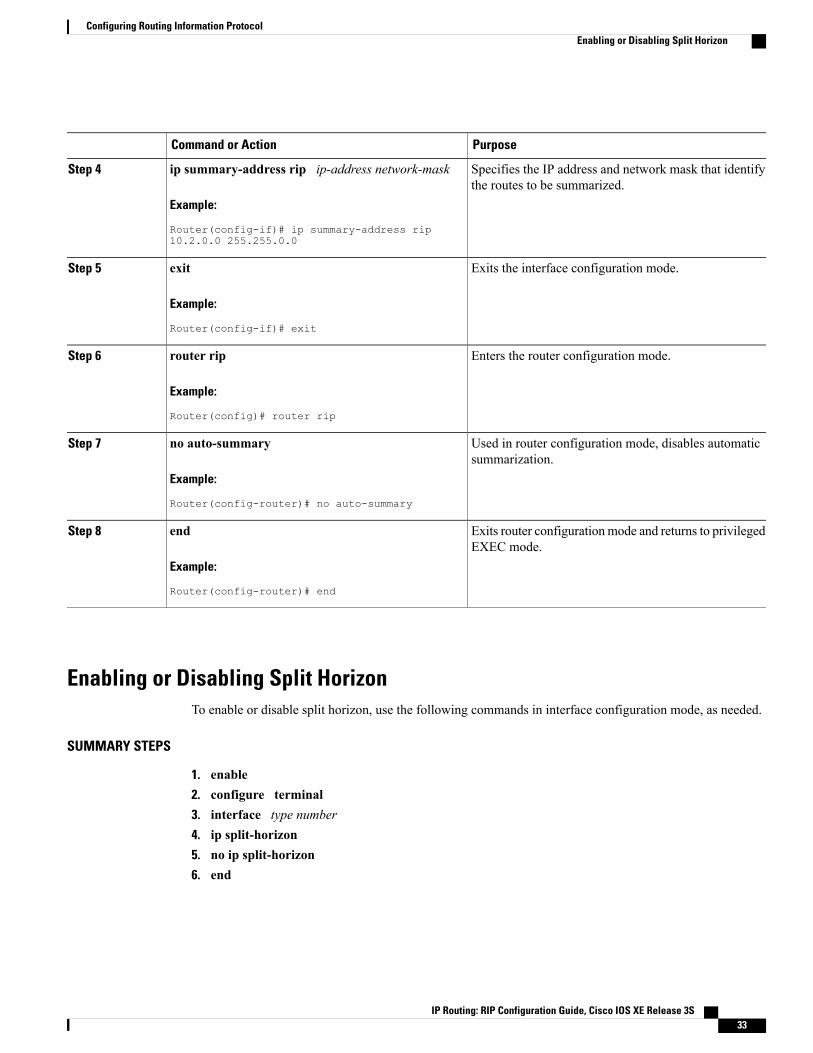
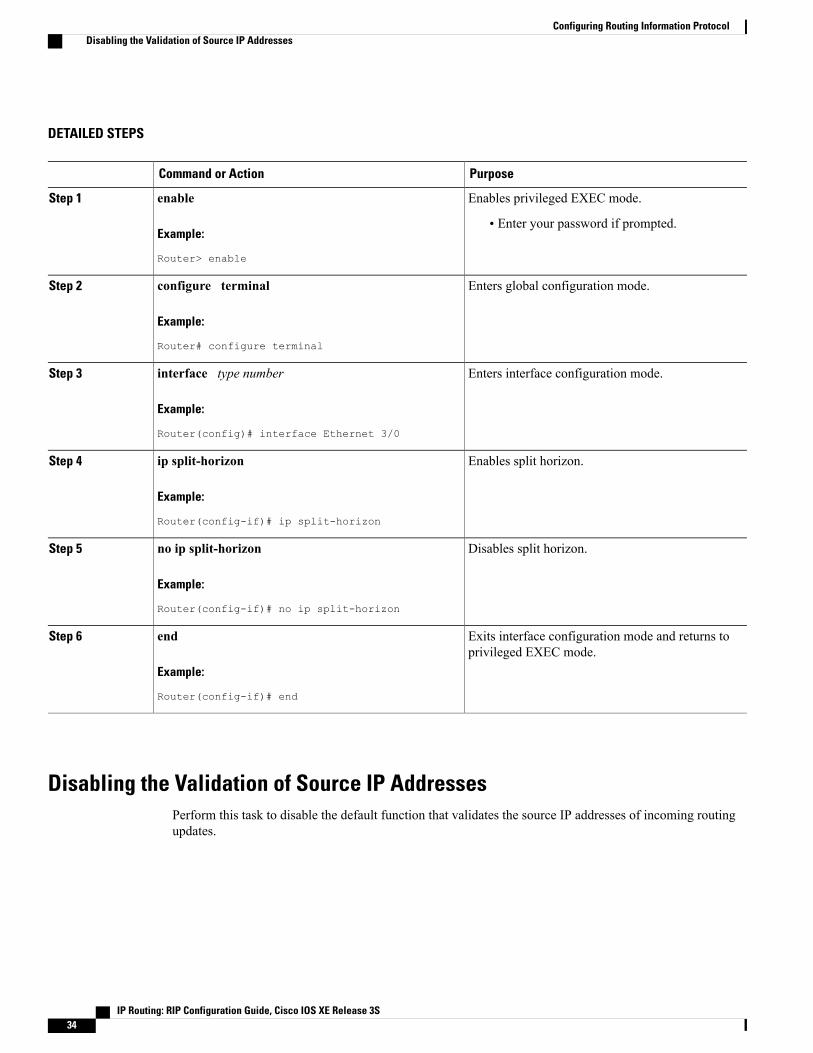
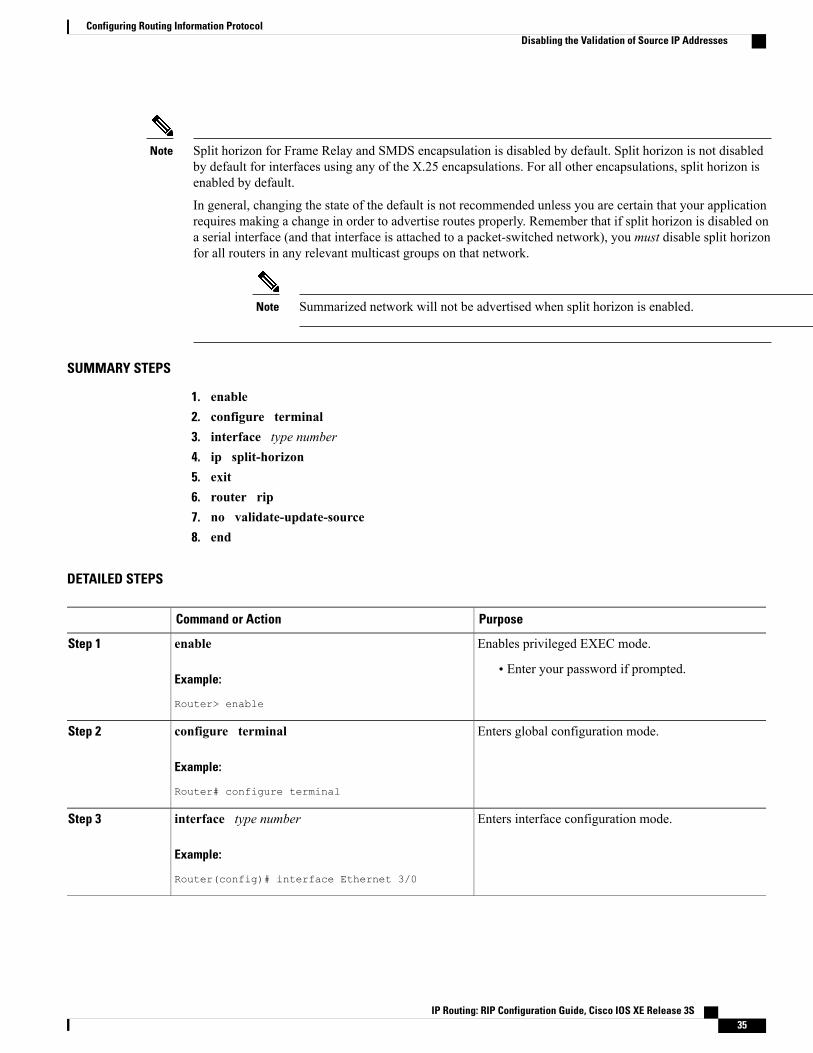


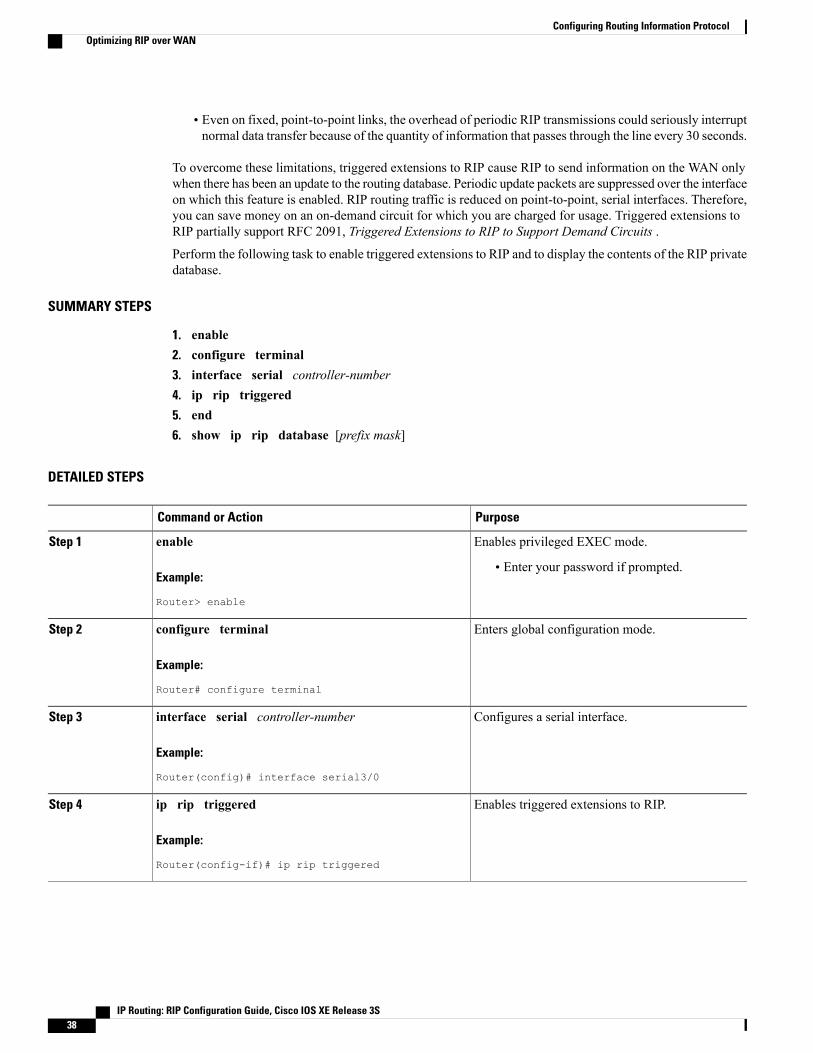


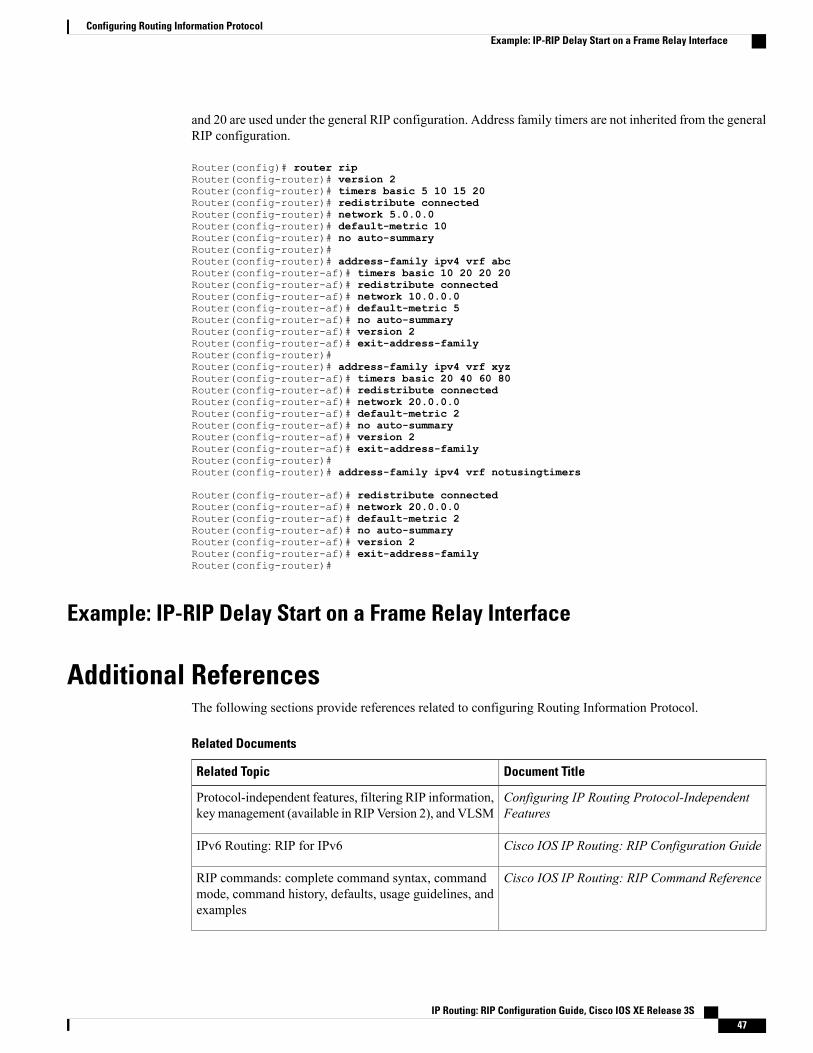


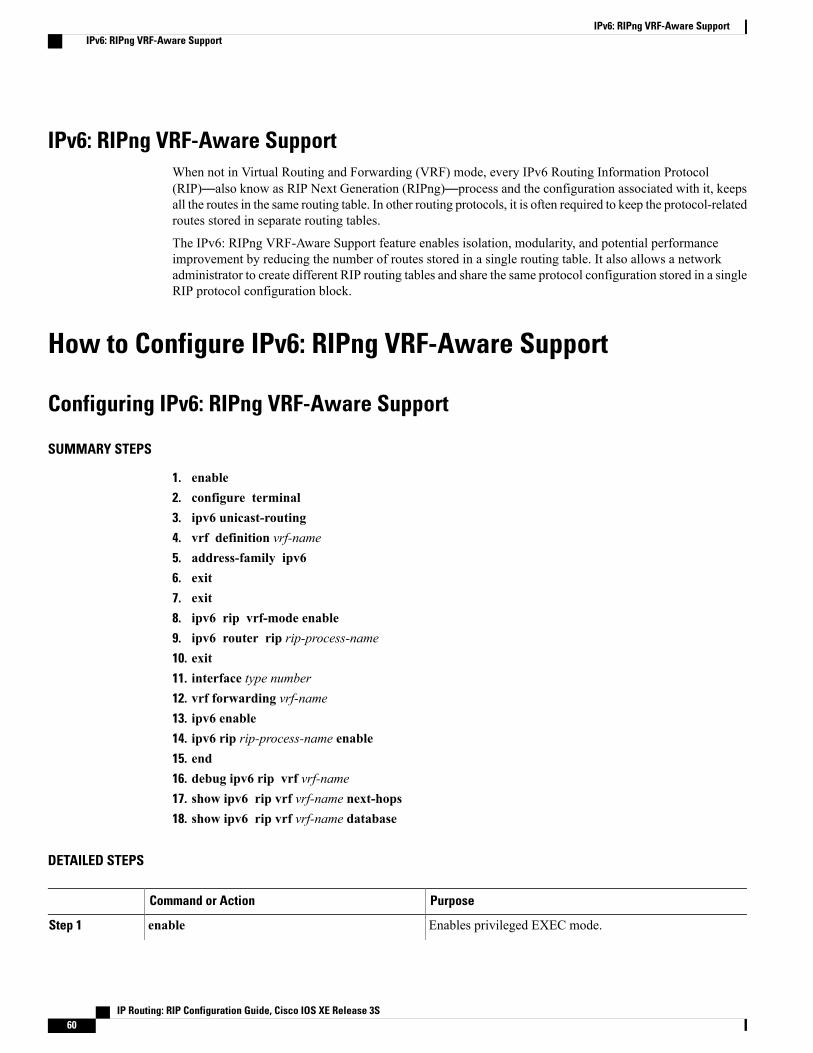

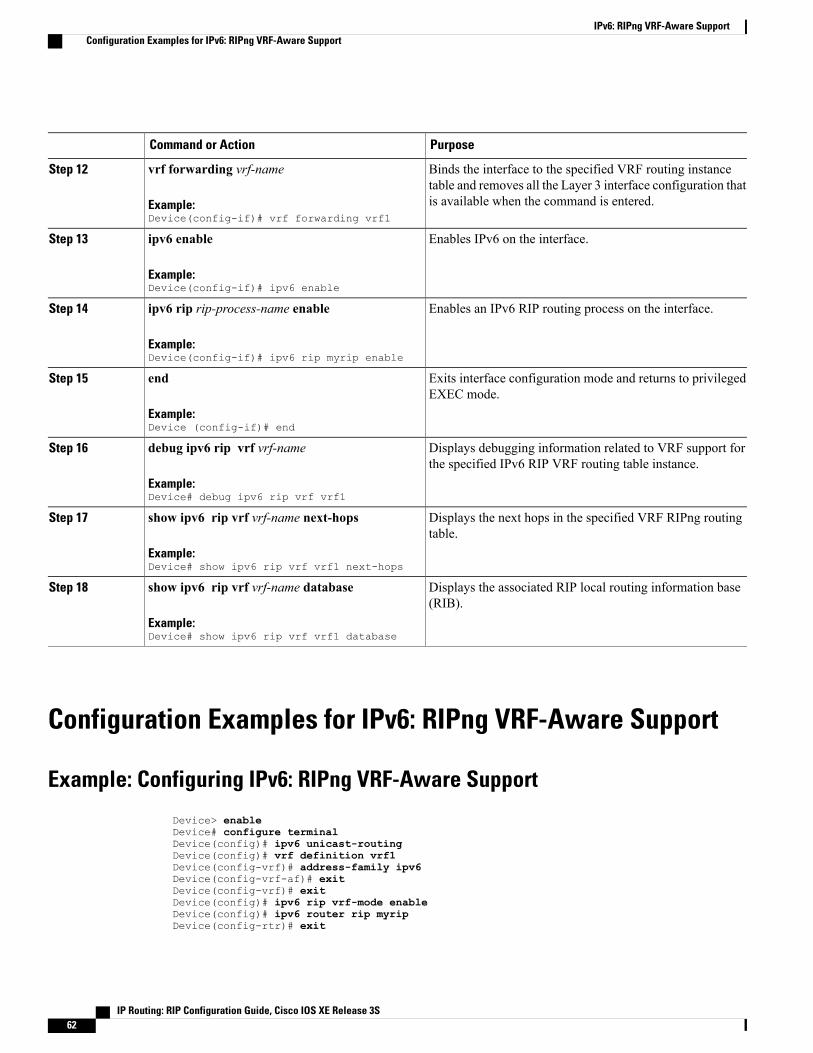


![ELECTRON CONFIGURATIONS Sulfur 1s 2 2s 2 sp 6 3s 2 3p 4 Chromium 1s 2 2s 2 2p 6 3s 2 3p 6 4s 2 3d 4 Lead (give the noble gas configuration) [Xe]6s 2 4f.](https://static.documents.pub/doc/80x56/56649cd75503460f9499f2eb/electron-configurations-sulfur-1s-2-2s-2-sp-6-3s-2-3p-4-chromium-1s-2-2s-2.jpg)


