49

Jean - Claude Mougin
Palladium
the palladium and platinum salts image
© Mougin Jean-Claude37, rue du Dr Griveaud71600 Paray-le-Monial
www.platine-palladium.comwww.platine-palladium.fr
October 2012
Picto Benelux - Beau Site, Première Avenue 7 - B-1330 Rixensart (Belgique)

The substance of art is not substanceThe matter of art is not matterThe subject of art is not the subjectThe object of art is not the objectThe manner of art is not the mannerTechnique in art is techniqueQualities in art are qualities
Ad Reinhardt: Art as Art
2

I - THE OBJECT
3

1. The Words
palladium / pal-la-di-om’ ; also pronounced as pal-la-di-on /.
1. Statue of Pallas considered as a pawn for Troy's conservation. The palladium, although fallen from heaven, was nothing else than the sacred pawn of Pallas' protection; through the palladium, it was the goddess that was worshipped.By extension, name given to various objects which were representing their life expectancy for some cities or empires. The sacred shield, fallen from the sky during Numa's reign, was the palladium of Rome and its empire.
In its figurative sense: guarantee, protection. "Civil law is the palladium of property", Montesq. Espr. XXVI, 15.
2. palladium / pal-la-di-om’ / . Chemistry term. It designates a rare and lustrous silvery-white metal, very difficult to melt and quite malleable, discovered by Wollaston in crude platinum ore, and named with reference to the goddess Pallas.
pallas / pal-lâs /.
1. Term from the Greco-Latin religion, equivalent to Minerva. Pallas' or Minerva's bird: the owl Pallas' or Minerva's tree: olive tree created by this goddessPallas' or Minerva's fruit: the olive.
2. Planet discovered by Olbers. Its distance from the sun is about 49 million myriameters, and its orbit completed in 1682 days. It belongs to the telescopic planets.
3. Variety of tulips.1
1 : Littré dictionary (French)
4

2. Athena Pallas and the Origin of Art
Homer calls Athena "polymetis", the goddess of many counsels. What is the meaning of counseling? It means premeditating something, providing for it in advance and making sure it will succeed. For this reason, Athena reigns wherever men are producing, updating, implementing or completing something, wherever they are acting and doing...
Everyone who excels in producing, who is capable, skilled and has an expertise in its profession is "technites". The way we understand this word when we translate it by "craftsman" is much too restrictive. Even those who erect monuments are called "technitaï". This because their action is directed by a comprehension which bears the name "techne".
The word designates a form of knowledge, not the work or production itself. Knowledge means: having a clear view from the beginning of what is at stake in the production of an image or a work of art. The work may as well be a creation of science , philosophy, poetry or eloquence. Art is "techne", but not technique. The artist is "technites", but neither technician, nor craftsman.
Because art as "techne" relies on knowledge, because such a knowledge is a preliminary beholding of what shows the shape and gives the measure, but still is invisible and has first to be brought to the visibility and perceptibility of the work – for these reasons, looking into what hasn't been given yet to be seen singularly requires a vision and clarity.
This prior vision borne by art needs illumination. By whom could this be given to art, if not by a goddess who, while being "polymetis" – of many counsels – is also "glaukopis"? The adjective "glaukos" means the radiant glow of the sea, the stars and the moon, but also the shimmer of olive trees. The eye of Athena is the eye which lights and glows. Therefore the owl, "glaux" is attributed to her , as a sign of her capacity: the owl's eye has not only the intensity of fire, it also crosses the
night and makes visible what would otherwise be "invisible" 1.
1- Martin Heidegger: La provenance de l’Art et la destination de la Pensée. in “ Les Cahiers de l’Herne “.(english title: On the Origin of Art and the Destination of Thinking)
5

3. The Idol, the Icon, the Image
Palladium, Pallas, these words remind us that originally, the image is an idol. In greek, ” eidôlon” means image, but above all form, figure, face; in brief “what looks at us”. Such is the palladium, the antique “xoana” fallen from heaven, and hidden in the “cella”, the secret of the temple, which cannot be approached without being paralysed with fear and caught by the sacred. In what is revealed, in the presence of the invisible, it is the goddess herself who appears, simultaneously showing up and standing behind. With the idol, the image is the thing itself.
With Christianity and the Incarnation mystery, the idol becomes icon. The sacred image is internalized and offered to contemplation. It becomes anagogical, a way for the soul to go back from the image to its model. "The honor paid to the icon is transferred to the prototype," said St. Basil. Also, as stated the iconophile Nicephorus, the icon is "chora tôn achoretôn" an otherness that "gives place" for being but that cannot contain, an emptiness that can only be filled with light and divine grace. The image has lost its material reality. It becomes ecstatic. Its reality lies elsewhere, in a "beyond the visible".
And then the image becomes effect of art, a product of human freedom, as stated by Kant. This leads to aesthetics judging the artwork, not by itself any more, but according to its effect on the sensitivity of the beholder, of those who enjoy it. The next step is the emergence of the figure of the genius, of the creative artist, "the beloved child of nature"; a full individuality assumed in an ego: "this is how I see the world." Henceforth the subject, idol or icon, doesn't matter. This is the beginning of the reign of representation, of the idea, of the concept. Hegel can announce the death of art.
Evidence of the image's dissolution in representation and concepts, and of art's death announced over and over again, is given by the reign of pretences and of the Virtual on the walls of our contemporary art museums as well as on our screens .
"Everything is art", this slogan which could have been from Duchamp and was illustrated so well by his "Fountain", finds its counterpoint in the "Merda d'artista" by Piero Manzoni. Art is nothing, or better "anything". Only remains the genius of the artist, the idea, the "we could have thought of it before! ". Art has become empty, empty of objects, and aesthetics a discourse running idle on tasteless objects devoid of any substance.
Result is that scanned and computerized images pass everywhere on our screens, making up our images' emptiness with a constant stream of video recordings. The vacuum's aesthetics meet the vacuousness of our fiction; constantly duplicated images like mass consumption objects; ready-to-use, pre-digested, used forever, obsolete images.
6

4. The Aura
Walter Benjamin was a perfect witness of this disenchanted world, a world of desolation where the gods have fled, and of the collapse of the sacred. His slogan is well known: facing the increasing risk of politics aestheticization, it is urgent to politicize art. Faced with the danger of an imaginary serving the established authorities, it is important to return to the images their power of changing the world.
Hence the importance of Benjamin's symptomatic reading of the history of photography which repeated, in the time span of a century (we are in 1936) and in a surprising shortcut, several millennia of pictures' history.This history has three key moments:
1. a golden age, that of the photography primitives, such as the first calotypists Hill, Bayard, Hugo, and the great portrait painters that were Nadar and Julia Margaret Cameron. The photographic image shows all the characteristics of the idol, and the strangeness of its appearance, its "aura". 2. an age of popularisation and industrialization. The image becomes a commodity (Disdéri) dedicated to a middle class, hungry for "trivial images," in the words of Baudelaire.For Benjamin, the return to art for the sake of art advocated by the pictorialists in response to this popularisation, is only leading to a stalemate . The aura becomes nothing more than a pretense. 3. Arrives the redeeming moment, the end of the bourgeois illusions. Exits the picturesque, Atget invents the aesthetics of vacuum, "the crime scene." Exits the portrait, the "trivial image"; Sanders doesn't create a picture book, but an "atlas of exercises." Exits photography as art, making room for "art as photography." 4. Finally, the line is clear for the project to politicize art. "Art must unmask and build." This will be the programme of Moholy-Nagy, Rodchenko or Eisenstein.
Thereby the history of photography at the age of mechanical reproductibleness actually is the symptom of the world's uniformization and standardization process, which is a property inherent to all mercantile societies. Its terminus is the "liquidation of the aura".
The aura of a work is what happens "here" to the work in its beauty. But this "here" remains inaccessible, because as said by Goethe, "the beautiful is what, in essence, only remains similar to itself provided it stays veiled". Such is the weirdness of the work of art, summarized by Benjamin as follows: "What is the aura, strictly speaking ? A singular frame of space and time: a unique appearance of the distant, as close as it might be".
Therefore the artwork exists, in its authenticity, in what's giving it the "authority of the thing" and yet "reality does not allow itself to be reached " through it. Its dimension is the sacred.
7

"By defining the aura as the unique appearance of the distant, as close as it might be, we simply transposed into space and time categories a formula referring to the worship value of the work of art. Distant as opposed to near. Distance is essentially the unapproachable. As a matter of fact, the main quality of a worship image is to be unapproachable. By its very nature it is "always far away, as close as it might be. " it is possible to approach its material reality, but without prejudice to the remoteness it keeps once appeared".
The aura might eventually be wound up with the "age of mechanical reproductibility", when objects lose their character of things and become merchandise. Without mystery and uniqueness, they are exposed and moved around, as they are designed to be appropriated and consumed. "In front of a painting, the onlooker never gets satiated, while photography is rather like food that soothes the hunger, like beverage that quenches thirst".
So, what else remains from the earlier world, if not the image of a world that Baudelaire describes as "veiled by nostalgia's tears".
This yearning for pictures was experienced by Benjamin when looking at Octavius Hill's photography of New Haven's Fisherwomen, where he felt "that something impossible to silence, requesting insistently the name of whom lived there". But this aura would not have existed without the specific technical approach of the calotypist. As Brentano, quoted by Benjamin, said: "an 1850's photographer rises to the challenge of his instrument". He still considered photography as a "big mysterious experience". Qualified, skillfull and experienced, the photographer excelled in discovering the secrets of texture, revealing the images and fixing them forever in the grainy thickness of the paper. The paper negative was then like a score available to all sorts of interpretations. The image was a single object, enigmatic in its extreme softness, and in the depth of a third dimension, that of its presence amongst the fibers of the paper.
Walter Benjamin:- Short History of Photography- The Work of Art in the Age of Mechanical Reproduction- On Some Motifs in Baudelaire
8

5. The World and the Earth
Athena's palladium as well as the "aura" of Benjamin put us on the path of the origin of art; its roots in the sacred which is the limit of our mortal condition, in a world that is our residency.
The world, as demonstrated by Heidegger, is the framework gathering those worldly things: stones, trees, houses, temples, sacred places of worship, herds and men busy about their business. The setting is the world in which things unfold in their being of things. It gives the world its image.
In it sings the quartet, the harmony that brings together four in simplicity.
– Land and its free stretch of rocks, sand and water, offering itself as plant and animal, stay and transhumance for mortals
– The sky and the measurement of the sun, the path of the moon, light and dusk, the accumulation of clouds and depth of the azure
– The divine and the signs of divinity, their sacred power– The mortals who in the quartet are those who live and have the custody of
the site: saving the earth and taking care of it, giving free rein to the sky, and to a fair appreciation of the happy days and seasons, being alert to the gods' signs, "keeping the mind open for the secret"
In this harmony of the quartet, comes the work of art as object. Quite as the antique idol, the work of art represents nothing. " The work of art never presents anything, and this for the simple reason that it has nothing to present, being itself what initially creates what enters the open for the first time thanks to it". Such is indeed the mystery of appearing that, in the open, what shows itself stands back quite at the same time. This conflict is called by Heidegger the "fight of the world and the earth".
The world in the work of art is what joins, gathers and unifies people in their history, in their fate. It is what gives its meaning to the work, makes it accessible to our intelligence, in our desire to understand and to subject it. Because of the world, the work of art seems bright, obvious to us . It is close.
"Settling a world, the work calls for the earth". The earth is at first the dark influence of the beginning when the possibilities of the work to come are still hidden .
It is thereafter the material itself, the marble of the temple, the pigments of the painting, the metallic thickness of the palladium. The earth is what reaches the brightness of its appearance in a work, while keeping veiled its secret, because in the earth something holds on and withdraws and, in its strangeness, remains inaccessible.
But above this, the earth is the home, the close friend, the regular visitor of our house. It is the nature where all comes to life, the "phusis" where every thing
9

grows, blossoms and comes to die. But such is the power of Eros, that in a single day he grows, dies and is reborn. In his desire to procreate in the beautiful, the artist participates of this " regrowth of the being" for a long time , as for a long time the alive aspires to the divine, and longs to overcome the death.
" Isn't indeed the initial appearance of man heavy of what is in his own eyes the initial mystery of birth? Isn't it connecting at the same time this mystery to eroticism and death?"
Martin Heidegger : Building Dwelling Thinking The Origin of the Work of Art
Plato : The banquet Georges Bataille : The Tears of Eros
10

6. The Offshoot
In presence of a devastated world, what is left to us after this progress through the words, ideas and images, apart from the nostalgia for the origins, the nostalgia for the aura that knew how to say the nearness of the gods, and finally this truth, that the work of art is like the living, an object rooted in the darkness and the withdrawal of the earth?
Can we then hope for a return to the origins? Certainly not, and there will be no question here to redo images in the old fashion. We know too well the misguided ways of pictorialism and its impasses.
We should rather be rethinking here the modernity, as a "new twig from the root", as "rejection" 1. Rejection of what became worn out, but also offshoot, in the sense of "regrowth of the being".
The following presentation is not merely technical. Let us remember that "art is techné but not technique", and that art rests on a knowledge that requires preliminary looking, like Athena Pallas whose eye shines and glitters.
“ And bright-eyed Pallas' self their hands endowed With more than mortal skill her rarest works to mould „ 2
.
1- term borrowed from Hubert Damisch in Art minimal II(note by translator: in French, "offshoot" and "rejection" translate in one same word "rejet")2- Pindar: 7th Olympian
11

II - THE TECHNIQUE
Note of the author: the ✌ sign refers to a personal interpretation of the technique discussed
12

1. Historical Background
1803. Wollaston discovers palladium.1886. Döbereiner realizes the reduction of platinum chloride by light.1831. The same chemist discovers the light sensitivity of ferric oxalate.1844. Robert Hunt, in his work " Researches on Light " reports on his experiments
with platinum.Hunt covered a sheet of paper with a mixture of ferric oxalate and platinum chloride which were darkening when exposed to light. But he was not able
to discover the principle of its processing for permanency.1873. William Willis, son of a famous English engraver, works out the process.
Three patents for a platinotype process were successively granted to him:British Patents of June 5th, 1873; August 20th, 1878 and August 15th, 1880.
1880. Willis founded the Platinotype Company marketing his platinum paper inEngland. The Willis & Clements company from Philadelphia distributes it inthe United States. From 1911 onwards, those two companies are selling upto 15 types of papers.
1882. Giuseppe Pizzighelli and Arthur Baron Hübl, two Austrian Army officers,describe a manual method enabling photographers to prepare their ownpaper. Their dissertation incurred the wrath of the Platinotype Company which will try to disconsider their formulae. Il will be translatedsuccessively into English and French and even today, it is still considered a reference.
1883. Creation of the Platino-Union in Austria. Platinum papers platinums aresubsequently marketed by Ilford Company and Hesekiel in England, Gevaert in Belgium, Hesekiel Jacoby in Germany, American Aristotype Co., Anscoand Kodak in the United States.
Nevertheless the platinotype wasn't quite successful in France where thephotographers used to prefer the carbon, Artigue and Fresson processes.
Famous photographers adopted the platinotype process, such as: Frederik Evans, Emerson, Stieglitz, Steichen, Coburn, Strand, Weston, Tina Modetti, and Manuel Álvarez-Bravo.
1914. From this date, the platinum rates are skyrocketing, until reaching five times the value of gold, which results in a gradually decreasing demand for these papers.
1916. The Platinotype Company introduces a cheaper palladium paper, the "palladiotype", as well as a silver-platinum based paper.
1916. Kodak stops the manufacturing platinum paper.1937. No platinum paper is imported in the United States any more.1941. Production is stopped in Great Britain.1990. Creation of the Palladio Company in the United States, marketing a paper
sensitized with platinum related metals.
13

2. The Revival of the Process
Over recent years, the platinum and palladium processes are reviving, for following reasons:
1. The disappearing of quality bromide and chlorobromide papers, replaced by resin coated papers of questionable aesthetic quality
2. The arrival of photography on the art market. Due to its permanence qualities, its matt appearance similar to that of engravings, its unrivaled physical presence, its "tactile" aspect, its rendering of an extremely broad range of shades, and a big variety of colors, the platinum-palladium image increasingly becomes essential as the process of reference and is considered a significant bonus by galleries and collectors.
3. The simplicity and the flexibility of the process. It is accessible to any photographer having good darkroom skills. It suits an important range of supports, of papers with various textures. It allows to produce images in a broad range of contrasts and colors.
Luis Nadeau: History and Pratice of Platinum Printing
14

3. Summary Description
Palladium and platinum salts are not photosensitive, and therefore have to be combined with ferric oxalate which is light sensitive.
The mixture is coated with a brush on a good quality paper. This can be done under tungsten light without any problem, as the ferric oxalate is sensitive only to ultraviolet rays.
After drying, the negative is contact printed on paper under the sun or under a U.V. lamp.
The action of the light transforms the ferric oxalate in ferrous oxalate.
After exposure, the image is developed in a bath of ammonium citrate or potassium oxalate. These substances dissolve the ferrous salts and reduce palladium or platinum salts to a metallic state. The image, hardly visible after exposure, appears almost immediately when immersed into the developing bath.
The ferrous salts remaining in the paper and giving it a yellow stain are dissolved in a bath of diluted hydrochloric, oxalic or citric acid.
The image is finally washed in order to eliminate all acid substances, and dried. It is now entirely formed by palladium or by platinum which are stable metals. The permanence of such an image therefore equals that of its support.
The process has nevertheless a limitation. It is not possible to print an enlarged image. Unless using large format negatives, negatives at the size of the final print have to be made in the darkroom.
The formulae
U.V. Ferric oxalate ----------------------------> ferrous oxalate
Fe2 (C204)3 ----------------------------> Fe (C204)
Ferric oxalate+Sodium Chloropalladite } --------> {
Ferrous oxalate+Iron chloride+Potassium chloride+Palladium metal
6Fe(C2O4)+ 3Na2PdCl4
}
--------> {2Fe2(C2O4)3+ 2(FeCl3)
+ 6KCl+ 3Pd
15

4. The Negative
4.1. Large format negatives
For platinum - palladium printing, it is necessary to start from a negative having the size of the final positive print. It would therefore be ideal to use a large format camera, providing 4"x5", 5"x7" or 8"x10" negatives for instance.
When doing so, it is advisable to process the film in order to get a contrasty negative, necessary to provide details in the highlights, and dense enough to preserve details in the shadows. For an optimal rendering of the tonal range in a subject, the negative density range from shadows to highlights should be somewhere between 1.3 and 1.5. This corresponds in the Zone System to N+1 or N+2 negatives. A N+1 negative has a density of about 1.3 and is printed on grade 1 paper. A N+2 negative has a density of 1.5 and is printed on grade 0 paper.
4.2. Measuring the contrast of a negative
Normally, a densitometer should be used, but this unfortunately is an extremely expensive device. A more affordable means is to use a step wedge such as the "Kodak Step Tablet #2" or the "Agfatrans", the latter being much less expensive.
The Agfatrans, Kodak, or Stouffer step wedges are film strips having a series (usually 21) of progressively and uniformly darker steps, the difference of density between two steps being 0.15. Their size usually is around 1"or 1/2" x 5" (13 or 25 x 125 mm); Stouffer also proposes different sizes, such as 4"x5".
AGFATRANS / KODAK TABLET / STOUFFER
N° Density1 0.052 0.203 0.354 0.505 0.656 0.807 0.958 1.109 1.25
10 1.40 11 1.55
12 1.70 13 1.85 14 2.00
15 2.15 16 2.30 17 2.45 18 2.60 19 2.75 20 2.90
21 3.05
16

In order to determine the density range that a negative should have for a specific type of emulsion, the step wedge has to be contact printed on this emulsion. After the processing and drying of the sample, the density of the first black step which cannot be differenciated from the previous one is noted. Next, the density of the last step showing a difference with pure white is noted also. The difference between both densities indicates the actual density range.
To determine the contrast of a given negative, it has to be contact printed on a sheet of multigrade paper, side by side with the step wedge, adapting the exposure until a well-balanced print of the negative is obtained. Its density range can then be estimated from the step wedge, using the same method as above.
4.3. Various methods for making an enlarged negative
4.3.1 Inversion during the processing of the enlarged positive • Don Pardoe in “Lumen IV” 1984 • Roger Kockaerts: Procédés Nobles En Photographie
4.3.2. Enlarging the negative to obtain a positive, and finally get a negative of the required size by contact or enlargement
• Roger Kockaerts: op. cit.The author gives directions for the processing of three emulsions:
• Gevatone N31p • Ilford Ortho • Kodak Commercial Film
Those films do not exist any more. It is possible to use Ilford FP4 sheet film in complete darkness . The same film has an ortho version that can be handled under red safelight. Maco Genius Print Film is a continuous tone film, which is also marketed under various brands, such as Bergger or Freestyle.
5. The Negative: My Method ✌
5.1. Equipment & materials used
• Beseler 45V-XL enlarger w/ dichro 45S color head , Nikon 5,6 /135 mm lens• Ilford Multigrade IV RC MGD 25 M satin paper• Ilford FP4 sheet film• Ilford PQ Universal developer• a rotary paper processor• N+1 developed 2.4"x2.4" negatives, for printing on grade 2 paper (or
without filter for multigrade) under a diffuser enlarger
17

5.2. The making of a reference print
Make a print from a chosen negative as usual, with all the corrections you consider useful.Process in PQ 1+9, 1 mn 15, at 20°C. This print will be used as a reference. Keep notes on the opening of the f-stop and time of exposure, for instance 10 seconds at f16.
5.3. The making of a 4"x5" positive
The positive should be dense and low contrast; more specifically, it should not have any fully transparent area.On no account it has to look like a normal slide. The highlights, last clear zone showing some texture, should have a density of approximately 0.95 (step 7 of the Stouffer wedge). And the shadows, the darkest zone, a density of 2.15 (step 15 of the Stouffer wedge).
5.3.1. Exposure
Put in the easel under the enlarger, instead of a variable contrast paper but under same conditions, a 4"x5" FP4 sheet film, the clearest part above. This has to be done in total darkness.
Reduce exposure to 1/4th of the one used for the paper print, for instance 5 seconds at f11 for the example above. Add 200 CY and 200 YE filters, and apply the same reduction to all correction exposures, if there were any.
5.3.2. Processing
Process the 4"x5" sheet film in a rotary processor, such as the Jobo.• Pour the developer in the tank and start rotation.• stop the development after 12 mn by a water rinse• fix 1 min. in Hypam 1+4 with continuous agitation• wash, drain, dry
5.4. The making of the final 8"x8" or 8"x10" negative
Set the height of the enlarger so that the negative carrier is at H 303 on the scale. Enlarge the 4"x5" negative , using T/2 time. The negative should look rather dense with details in the shadows and a density range between 1.7 and 1.9.
☞ This protocol is given as a rough guide, and should be adapted according to your own experiments, to take into account possible equipment differences.
18

6. The Paper
6.1. Handmade, machine made
The appearance and the archival qualities of a palladium print depend heavily on the choice of the paper used as emulsion support.There are two paper types: handmade or machine made.The first usually is 100 % rag, made from a pulp (often cotton rags), using a frame, or mould. The mould is dipped into the wet pulp, shaken to distribute the fibers and drained of its excess water. The newly formed sheet may be hot pressed or cold pressed, to obtain a smooth or more or less rough surface. It finally is dried against blankets or (hot) air dried The second is made on very rapid running machines producing consistent quantities of sheets or rolls. It usually is made from sulphite pulp, containing bleached wood cellulose. It may contain a variable proportion of cotton rags. A paper with high cotton content has a more or less pronounced ivory tint. An extrawhite paper is generally of low quality.
6.2. Sides
There is a difference between the two sides of a sheet of art paper. The reverse side sometimes keeps a slight texture from the felt or cylinder against which it was pressed. The front side has a smoother surface and a more homo-geneous structure. This difference can be noticed visually, and is even more recognizeable when the sheet is held to the light.Some papers have watermarks. Its design is imprinted on the back side of the sheet, which explains that the trademark appears inverted, when the sheet is held to the light. Other papers have an embossed mark which allows to identify the front side. 6.3. Sizing
Sizing a paper improves its surface; substances are added to provide resistance to the absorption of moisture or to eliminate ink feathering and bleed through. These substances can be gelatin, starch or synthetic.Calendered paper were glazed or smoothed by passing between rollers to get an extremely glossy and smooth surface. This is the case for bristol papers for instance, which are not adequate for platinum-palladium printing. 6.4. pH – can be measured with a pH pen (Atlantis)
The current preservation standards for papers as well as environment protection requirements induced changes in paper manufacturing. Basal binders were substituted for the acid ones, and sometimes papers are buffered with alkaline substances such as sodium carbonate.
19

These changes are a source of almost insoluble problems. The sensitizing substances being acid react with the basal support and lead to disastrous results, in particular with platinum salts which became practically unusable with modern papers. It is possible to acidify the paper by soaking it for 10 to 20 minutes in a 5% oxalic acid solution, and finally rinsing and drying it. (Dick Arentz gives more detailed information for specific papers). A double sizing layer can help also.
6.5. Which paper?
Preference should be given to a paper having good physical qualities and a high rag content as well as a neutral or slightly acid pH. The paper has indeed to resist the treatments as well as the repeated or long soakings inherent to the process, and to guarantee a long life span to the print.The choice can be influenced by aesthetic criteria. The tint of the paper influences the final color of the print. Its sizing also: starch gives warmer tones, gelatin colder.The smoother papers give sharper images, while textured papers, especially watercolor papers with "torchon" surfaces rather enhance a pictorialist character. Usually, rag papers for engraving do not suit. Their sizing is not sufficient and their alkalinity is too high.Watercolor papers generally work well, at least when their chemical charac-teristics are adequate. Contrast and sharpness might be low; but the "tactile" aspect of the prints made on such papers is sometimes looked for.The so-called technical papers, when they are of good quality, give generally very good results when maximum contrast is what you are looking for. The blacks are deeper and the sharpness of the image is good. Today however, either they have disappeared, or they are unusable because of their alkalinity.
6.6. Usable papers
➢ distributed by Bostick & Sullivan• Cranes Kid Finish has become unusable • Weston Diploma • Stonehenge (not tested)
➢ watercolor papers • Arches satin grain - pads or sheets (has to be acidified)• Arches Platine, currently the best paper • Bergger COT-320, very similar to Arches Platine • Rives BFK, has to be sized and acidified • Fabriano Artistico, has to be acidified
➢ japanese papers• japanese papers usually have an acid pH, but are unfortunately quite
absorbent and have therefore to be sized.
20
➢writing papers• Currently, all writing papers are alkaline. It is possible to find adequate
old papers on Ebay – ream papers or correspondence papers.➢papers from the Ruscombe Mill, made in accordance with Mike Ware's advice
• Buxton paper, excellent but with a rough texture.
• A new Herschel paper is proposed, which is a linen paper instead of cotton rag; it is said to be smoother.
7. The Sensitizing Solutions
7.1. Required equipment/products
• a scale with 0,1gr resolution• 3 brown bottles of 125 cc or more• ferric oxalate from Bostick and Sullivan
or the ferric oxalate made according to the technique given in my "small treatise on iron salts" (recipe 3, see further)
• potassium chlorate and/or a 3 % solution of hydrogen peroxide (10-volume)and/or a 4 % solution of potassium dichromate
• sodium chloropalladiteor palladium chloride + sodium chloride
• potassium chloroplatinite
7.2. The classic method
The sensitizing solution is prepared from three primary solutions:1. A solution of ferric oxalate.2. A solution of ferric oxalate supplemented with an oxidizing
substance the purpose of which is to increase the emulsion's contrast. The classic formulae use potassium chlorate.
3. A palladium or platinum salt solution.
These solutions have to be prepared with the usual precautions.
WARNING :
Use only glass or plastic containers. Any contact with metal must be banned.
Label the solutions and keep them in a cool, dark place.
21

7.2.1. Preparation of solution #1
• distilled water at 50°C ......................... 55cc• oxalic acid .............................................. 1gr• ferric oxalate ......................................... 15gr
This is a 27 % solution of ferric oxalate. This percentage is not critical. Literature mentions dilutions ranging from 20 to 27 %. These differences have no influence on the quality of the image.Dissolving is not easy; it requires constant agitation and patience. Raising the temperature beyond 50 °C, but below boiling point, will help.
7.2.2. Preparation of #2 palladium solution
• distilled water at 38°C ......................... 55,0cc• oxalic acid ............................................... 1,0gr• ferric oxalate ........................................ 15,0gr• potassium chlorate ............................. 0,3gr
7.2.3. Preparation of #3 platinum solution
• distilled water at 38°C ......................... 50cc• potassium chloroplatinite .................. 10gr
7.2.4. Preparation of #3a palladium solution
• distilled water at 38°C ......................... 60cc• sodium chloropalladite ....................... 9gr
7.2.5. Preparation of #3b palladium solution
• distilled water at 38°C ......................... 40,0cc• sodium chloride ..................................... 3,5gr• palladium chloride ............................... 5,0gr
22

7.2.6. Fine-tuning for contrast
The print contrast is controlled by adapting the proportions of #1 and #2 solutions according to following formulae:
very contrasty negative: density range 1.8
solution #1 .............................. 24 drops solution #2 .............................. 0 drops solution #3 .............................. 24 drops
contrasty negative: density range 1.5
solution #1 .............................. 20 drops solution #2 .............................. 4 drops solution #3 .............................. 24 drops
medium contrast negative: density range 1.35
solution #1 .............................. 16 drops solution #2 .............................. 8 drops solution #3 .............................. 24 drops
moderate contrast negative: density range 1.2
solution #1 .............................. 12 drops solution #2 .............................. 12 drops solution #3 .............................. 24 drops
low contrast negative: density range 1.05
solution #1 .............................. 0 drops solution #2 .............................. 24 drops solution #3 .............................. 24 drops
23

7.3. Other methods
7.3.1. Personal method #1 ✌While solution #1 keeps its qualities for several months, this is not the case
for solution #2. The latter should be discarded after a few days, unless you are prepared to accept a significant loss in quality, with decreasing contrast and an indelible yellow veil.It therefore is preferable to prepare this solution in small quantities and to increase its potassium chlorate concentration.
Solution #1
• distilled water at 50°C ......................... 55cc• oxalic acid .............................................. 1gr• ferric oxalate (*) ......................................... 15gr
(*): use homemade, following recipe 3 in my "small treatise on iron salts"
Solution #2
• solution #1 (see above) ......................... 2,5cc• potassium chlorate ................................ 0,1gr
Prepare solution #2 the day before use; discard after 2-3 daysFor a maximal tone range, it is advised to avoid too soft or contrasty negatives.This allows to restrict ourselves to only the three following formulae:
contrasty negative: density range 1.5
solution #1 .............................. 23 drops solution #2 .............................. 1 drops solution #3 .............................. 24 drops
medium contrast negative: density range 1.35
solution #1 .............................. 22 drops solution #2 .............................. 2 drops solution #3 .............................. 24 drops
moderate contrast negative: density range 1.2
solution #1 .............................. 21 drops solution #2 .............................. 3 drops solution #3 .............................. 24 drops
24

7.3.1. Personal method #2 ✌
With this more convenient method the oxidizer is introduced in the developer – and not, as previously, in the emulsion.This allows to save some potassium chlorate which is an unstable product, dangerous to manipulate, and difficult to weigh.Two oxidizers were tested: a 3% hydrogen peroxide solution, and a 4 % potassium dichromate solution.
Tests completed on Arches Platine paper
very contrasty negative: density range 1.95
potassium oxalate ................. 24 cc oxidizer .................................... 0 cc
contrasty negative: density range 1.8
ammonium citrate ............... 100cc oxidizer .................................. 0 cc
potassium oxalate ............... 100 cc oxidizer .................................. 1 cc
medium contrast negative: density range 1.35
ammonium citrate ............... 100,0cc oxidizer .................................. 0,5 cc
potassium oxalate ............... 100,0 cc oxidizer .................................. 1,0 cc
moderate contrast negative: density range 1.20
ammonium citrate ............... 100cc oxidizer .................................. 1cc
potassium oxalate ............... 100cc oxidizer .................................. 2cc
low contrast negative: density range 1.05
ammonium citrate ............... 100cc oxidizer .................................. 2cc
potassium oxalate ............... 100cc oxidizer .................................. 4cc
For warm tones, process in citrate developer (see below).Sodium citrate, which is my preferred developer, can be used at t° as low as 7°C.Contrast increases and tones are colder.
25

8. Sensitizing the Paper
8.1. Required equipment
• one of the papers selected under 6.6• the prepared ferric oxalate, palladium & oxidizer solutions • in each 125cc bottle, a 1ml syringe without its tip : 1 ml BD PLASTIPAK or
similar – they will be used as measuring instrument or dropper and stay permanently with their respective bottles
• cover the syringe's graduations with tape to avoid them to be dissolved in the solutions
• a graduated set square and a fine pencil ( 0.5) • various types of tape: Scotch, Tesa Post-it, microporous bandages• 1 brush similar to Pébéo Orion brush series 9451 (flat brushes made of
yellow polyamide fibre with very fine tips, stainless steel furrule and a long handle.)
• cover metallic furrule with tape to avoid every metal-emulsion contact • a plastic or porcelain cup • a lab wash bottle filled with distilled or mineral (Volvic..) water• kitchen roll
8.2. Define the borders of the area to be sensitized
Determine an area to be sensitized corresponding to the size of the negative. If you wish to have straight edges, mark them with pressure-sensitive adhesive tape:• with Scotch Tape for the "technical" papers • with Scotch or Tesa tape, without excessive pressure, for Arches or
watercolor papers
8.3. Prepare the iron-palladium mixture
• measure the surface • multiply this surface expressed in cm² by 4, and divide the result by
1000. The result corresponds to the quantity of emulsion (in cc) sufficient to cover the delimitated surface : For instance, in case of a 150 cm² area150 x 4 = 600 : 1000 = 0,6 corresponding to 0,3 cc of ferric oxalate and 0,3 cc of palladium
• Syringes should be preferred to droppers for measuring those quantities, as droppers give rather unpredictable results.
• A drop usually is equivalent to 0,05 cc, which means that about 10 drops are needed for 150 cm2.
26

• Take the ferric oxalate and the palladium from their bottles, mix both liquids in the cup and replace the syringes, without rinsing, in their respective bottles. (It is possible to keep the iron-palladium mixture in one same bottle for one or two weeks).
8.4. Sensitizing the paper
• this stage can be completed under dim tungsten light • moisten toroughly the brush with the wash bottle• wipe it toroughly with kitchen roll to get it hardly damp • dip the tip of the brush in the emulsion • spread the emulsion from an edge of the paper, without hurry, crossing
the strokes• holding the brush flat, equalize very delicately• when finished, rinse the brush and cup with the washing bottle
8.5. Sensitizing timing
• This time is extremely important, especially with technical papers, and has to be controlled precisely.• Technical papers are very hard, and the emulsion penetrates the paper quite slowly. This is in fact a quality; the emulsion remains on the surface and does not "sink" too much into the paper, which is why these papers give deep blacks and a high resolution. The risk, however, is that the emulsion doesn't go at all into the paper and could be washed away by the developer during the processing. We can then see black streaks coming off the image.• Arches Platine requires to be sensitized for 3 minutes. After being sensitized, the paper shouldn't show any shine. Leaving it for 5 minutes in the dark allows the emulsion to sink into the paper.
9. Drying the Paper
9.1. Required equipment
• A hair dryer of the 1000w type, with an intermediate heat setting. Avoid too powerful dryers.
9.2. Drying procedure
This is an important stage, which has to be completed very carefully.The drying has to be done from the backside, holding the hairdryer a few cm. away, moving it smoothly, with the heat set on the intermediate position.
27
If the coating comes off in the developer, the procedure has to be adapted. In that case, after the sensitizing, the paper should be left for 5 minutes, face up and in the dark (an empty box can be used for this purpose). After this, the print can be dried from the backside.
• The heat should not exceed 40°C• 2 min. drying for the front side, 1 min. for the backside• Dick Arentz recommends to use a damp paper, as for Ziatypes. The
humidity fosters the printing out of the blacks, and shortens the necessary exposure; this will however cause a self-masking and might prevent from reaching maximum blacks. I therefore recommend the "dry" method which allows to obtain maximum Dmax, with darkening continuing deep into the paper fibers for as long as 2 hours of exposure. Longer exposures would cause solarization; this might have an aesthetic effect, which would however hardly be reproducible.
10. Exposure
10.1. required equipment
• Ultraviolet printing light:✔ HID lamps (metal halide / mercury vapor), such as HPR 125 w Philips✔ a light box with U.V. tubes
• The HID lamps are twice as actinic at 32cm, than the U.V. tubes at 5cm. But the light box is more convenient as it produces less heat and easily allows for even illumination of negatives larger than 5"x7".
• Printing frame, Paterson or other• Sunglasses, to protect your eyes from ultraviolet rays• Timing device
10.2. Exposure
The palladium emulsion is sensitive only to ultraviolet light. The print could be exposed to the sun, but using U.V. printing lights is more convenient.
• position the printing frame with a negative/palladium paper sandwich:✔ at 5cm from the U.V. tubes✔ at 30cm from the HID lamp; the lamp requires 5 minutes to reach full
intensity• Exposure may vary from 10 to 30 min. • Light sensitivity depends also on the type of paper.
It has to be noted that the exposure is influenced by the type of paper and sizing."Cold", gelatin-sized papers, such as Arches, need exposures twice as long as for starch-sized papers. (see also paragraph 6.6).
28
10.3. Exposure timing
Proceed as usual, making test strips and after processing and drying of the sample, determining the exposure time and possible corrections.
Those using a densitometer and the Zone System, might have a look at my "Z/S" document (in French), downloadable for free from www.platine-palladium.com
• First test: unexposed but processed negative; find Standard Print Time (PST) giving visually maximum black (usually between 15 and 30 minutes).
• Make a test with a 4"x5" Stouffer step wedge; find zone1, film speed and tonal range for a given processing.
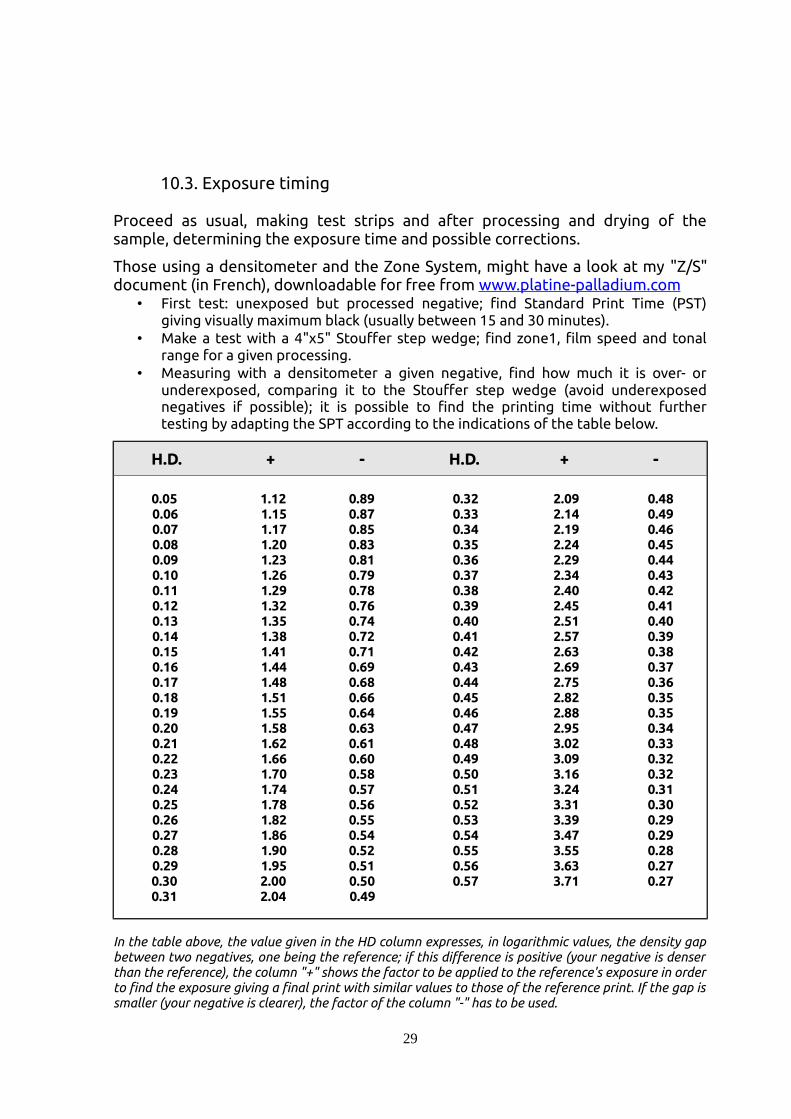
• Measuring with a densitometer a given negative, find how much it is over- or underexposed, comparing it to the Stouffer step wedge (avoid underexposed negatives if possible); it is possible to find the printing time without further testing by adapting the SPT according to the indications of the table below.
H.D. + - H.D. + -
0.05 1.12 0.89 0.32 2.09 0.48 0.06 1.15 0.87 0.33 2.14 0.49 0.07 1.17 0.85 0.34 2.19 0.460.08 1.20 0.83 0.35 2.24 0.450.09 1.23 0.81 0.36 2.29 0.440.10 1.26 0.79 0.37 2.34 0.430.11 1.29 0.78 0.38 2.40 0.420.12 1.32 0.76 0.39 2.45 0.410.13 1.35 0.74 0.40 2.51 0.400.14 1.38 0.72 0.41 2.57 0.390.15 1.41 0.71 0.42 2.63 0.380.16 1.44 0.69 0.43 2.69 0.370.17 1.48 0.68 0.44 2.75 0.360.18 1.51 0.66 0.45 2.82 0.350.19 1.55 0.64 0.46 2.88 0.350.20 1.58 0.63 0.47 2.95 0.340.21 1.62 0.61 0.48 3.02 0.330.22 1.66 0.60 0.49 3.09 0.320.23 1.70 0.58 0.50 3.16 0.320.24 1.74 0.57 0.51 3.24 0.310.25 1.78 0.56 0.52 3.31 0.300.26 1.82 0.55 0.53 3.39 0.290.27 1.86 0.54 0.54 3.47 0.290.28 1.90 0.52 0.55 3.55 0.280.29 1.95 0.51 0.56 3.63 0.270.30 2.00 0.50 0.57 3.71 0.270.31 2.04 0.49
In the table above, the value given in the HD column expresses, in logarithmic values, the density gap between two negatives, one being the reference; if this difference is positive (your negative is denser than the reference), the column "+" shows the factor to be applied to the reference's exposure in order to find the exposure giving a final print with similar values to those of the reference print. If the gap is smaller (your negative is clearer), the factor of the column "-" has to be used.
29

Example: Reference negative = a Stouffer step wedge, from which the best possible print was made, based on the necessary test strips. Let's suppose that the final print required an exposure of 15 minutes. Considering a specific step – step 9 for example – we see that this step has a certain density, say 1.33. In the print made from the step wedge, this density corresponds to a given grey value , close to the neutral grey of the "Kodak Gray Card".Take now your negative.Identify a part of the negative which you would like to see in neutral grey on your final print. Measuring this part of the negative, you get a density value – let's say 1.63. The difference of your negative's density with the one of the step wedge is thus: 1.63 - 1.33 = 0.3 (denser) which corresponds to a correction factor of 2. You will have to expose your print for 15minx2=30min. The same kind of calculation can be made if you want to get a denser/lighter print.
10.4. Corrections
It is possible to apply some corrections by increasing or reducing the exposure on certain areas of the print, but these actions can sometimes be quite time consuming.It is easier to modify the exposure when using HID lamps instead of a light box, as exposure time can be reduced significantly by bringing the lamp closer to the printing frame (the tubes banks being already very close leave less leeway). Remember that the light intensity is inversely proportional to the square of the distance from the light source.
11. Processing
The process consists in precipitating metallic palladium with appropriate salts, mainly potassium oxalate, ammonium citrate, sodium citrate, and sodium acetate.
11.1. The traditional method
With this method, the palladium print is immersed after exposure in a slightly acidified solution of potassium oxalate. The image appears almost immediately. Agitate for one or two minutes.
11.2. Developer formulae
potassium oxalate ............................. 500 grwater, at 50°C or more ............................. 1500 cc maintain pH at ............................. 5.5 / 6
cold bath (not tested)
potassium oxalate ............................. 500 grmonobasic potassium phosphate .......... 60 grwater, at 50°C or more ............................. 1500 cc maintain pH at ............................. 5.5 / 6
30

Baths to be used at temperatures between 15°C and 20°C
ammonium citrate ............................. 500 grwater, at 50°C or more ............................. 1500 cc maintain pH at ............................. 5.5 / 6
sodium citrate ............................. 500 grwater, at 50°C or more ............................. 1500 cc maintain pH at ............................. 5.5 / 6
Homebrewers: see chapter III Recipes, §3, 4 and 5
The literature insists on the fact that the developer is considered inexhaustible and can be used infinitely; it is even said that he would improve in time provided the pH is maintained at 5.5.
11.3. My personal method ✌
My experience contradicts these facts. Indeed the developer gets loaded with particles of palladium, but also of ferrous oxalate which in strong concentration eventually veils the print in an indelible way. It therefore is preferable to use one-shot baths, which certainly is more expensive, but has the merit to give quality results. The inconvenience of the price is reduced when you homebrew your developers. Homebrewers: see chapter III Recipes, §4, 5 and 6
Processing procedure
• use trays with a flat bottom, slightly larger than the print to be processed• prepare 50 cc of developer for a print up to 8"X10". Check the pH, if
necessary; it should be kept between 5 and 6.• when working at high temperature, add the oxidizer necessary for contrast
at the last moment, and agitate well to homogenize the solution• place the print on the bottom of the tray• pour rapidly the developer on the print, agitate regularly for 1 min. Timing
is not critical, and doesn't cause any increase of contrast • clarify
11.4. Temperature & contrast
Palladium prints usually are processed at room temperature. Platinum prints require high temperatures, between 50°C and 100°C, otherwise they will be grainy.
31

Contrast varies with temperature – increasing at lower temperatures, decreasing when temperatures get higher. A palladium print can be processed from as low as 7°C up to 100°C with sodium citrate.
11.5. Temperature & color
Temperature influences significantly the color of palladium prints – the colder the developer (to as low as 7°C), the colder the tone of the print; the warmer the developer (up to 100°C), the warmer the print tone.This is less true for platinum prints, which are naturally cold-toned and actually appreciated for that very reason.On the other hand, platinum prints require a high temperature, well over 50°C and up to 100°C, if order to avoid grainy prints. If a very warm developer is used, the oxidizer has to be added at the last moment, as he will be neutralized by the heat.
11.6. Oxidizer & color: Palladium prints on Arches Platine
• The coldest developer is sodium citrate at 7°C with potassium dichromate.
• Ammonium citrate with hydrogen peroxide is warmer. • Potassium oxalate with potassium dichromate gives warm tones, and
even more so hydrogen peroxide.• It is important to note that color changes can vary significantly,
depending on the brand – and even the batch – of the paper being used.
11.7. pH of the developers
For platinum as well as for palladium prints, it is imperative to have an acid pH (pH 5-6); with a basal pH, the clearing of the paper will indeed be impossible.
11.8. Platinum or Palladium prints?
• It becomes increasingly difficult to make platinum prints, due to the excessive alkalinity of modern papers.
• Platinum prints are 2 to 4 times more expensive than palladium prints.• Platinum prints demand high processing temperatures – 50+°C – if
maximum quality is the objective. • Platinum prints have problems with oxidizer concentrations above 2%;
at that point, they become quite grainy. • Platinum prints have less trouble to stand the clearing process.• Platinum prints are appreciated for their cold tones.
11.9. Platinum tones with palladium salts?
• Typical platinum print tones can be reached when using palladium salts; you will even get better blacks and contrast.
32

• All paper types can be used provided they are sized with one or two layers of warm gelatin. Use about same volume as for the emulsion, coat with brush and heat dry. Gelatin preparation: recipe 2, chapter III.
• It is advised to use Arches Platine paper, processed in sodium citrate with dichromate at the lowest possible temperature – 7°C or less.
12. Clearing
This manipulation aims at eliminating the ferrous oxalate remaining in the print after development by means of a very diluted acid: hydrochloric acid, oxalic acid, citric acid , phosphoric acid or E.D.T.A.E.D.T.A. (Ethylene diamine tetracetic acid) is the acid recommended and marketed by Bostick and Sullivan. It is not easy to find it in France, and it is quite expensive. (Not tested)
12.1. Classic method
• For platinum prints, prepare three baths of diluted hydrochloric acid, from 0,5 % to 1% , i.e. 5-10 cc of acid by liter
• after development, put the print for 5 minutes in the first bath, agitate continuously during the first minute, and then 3 or 4 times per minute
• repeat this twice, 5 minutes each time, in 2 fresh baths
12.2. My method ✌
• Prefer oxalic acid to other acids. It is effective, less dangerous than hydrochloric acid, and it has no effect on the palladium metal
• The concentration is about a coffee spoon or more oxalic acid for 500 ml of water. Precise weighings are unnecessary
• use water at roughly 50°C. Warm tap water will do • For Arches Platine, when acid baths stop clearing any further the print
from its ferrous oxalate, use a sodium sulphite bath until clearing is complete. Concentration is not critical
• Examine the clearing progress by transparence, in front of a window by daylight. Do not use the acid baths more than necessary, as they might eventually weaken the image
• A persisting yellow stain might indicate that the paper or developer are too alkaline, or that the ferric oxalate is too old or polluted
It has to be noted however that this yellow stain was sometimes looked for by the early platinum printers for its aesthetic qualities, to the detriment of preservation.
13. Washing, Drying, Finishing – My Method ✌
33

• neutralizing the acids for one or two minutes with some diluted sodium bicarbonate will be sufficient. For washing, agitate and go through 10 water changes. The mechanical effect of washing too long in the tray would weaken the image
• Drying can be done at room temperature or with heat• The prints can be flattened with a dry-mount press, or with the
following technique, which produces superb results: after having carefully blotted it with a kitchen roll, put the damp print on a glass sheet. This has to be done carefully, as the damp surface is still fragile. Make sure it adheres. Fix the edges with Kraft paper tape. Let dry and finally use a cutter to remove the print. It will be perfectly flat and have a really nice velvety aspect.
• Retouching can be done as usual, and more specifically with watercolor. A particularly elegant solution is to rub a still wet test strip in order to have palladium particles getting off it, and to prepare a mixture with them for retouching the print while it still is wet.
34

III - THE RECIPES
35
WARNING
The Platino-Palladiotype process involves chemicals which should be regarded as potentially harmful. It is the responsibility of everyone who decides to work with these processes to take all necessary precautions to safeguard themselves, others, and the environment – and particularly to keep all the products involved out of reach of children.
• Be careful not to mix incompatible chemicals• Take all necessary precautions to safeguard the
environment• Do not discard acids before having neutralized them• Palladium & platine salts are poisonous, avoid
swallowing or inhalation• Ferric oxalate is highly toxic by ingestion. Wear a mask to
avoid inhalation• Oxalic acid is highly toxic• Potassium oxalate is toxic• Ammonium & sodium citrates are moderately toxic• Potassium chlorate is dangerous to manipulate;
explosive when in contact with combustible materials• Dichromates are poisonous• Hydrochloric acid is highly toxic and irritating by
inhalation• Selenium is highly toxic and can be slowly poisining by
accumulation
36

1. Contrast Intensification for Negatives
The following formula, inspired from Ansel Adams' “The Negative” is quite convenient and allows for a significant increase of contrast.Agitate a thoroughly washed and fixed negative for one or several minutes in a solution of Kodak Rapid Selenium Toner diluted 1+3.Finally, the negative is fixed, washed and dried.
2. Paper Sizing
• Dissolve 20 grams of gelatin in 500cc of water. Let it soak for 10 minutes; then the mixture is warmed to 45°C and the gelatin starts to melt.• With a soft pencil, mark the upper edge of the sheet to be sized, and soak it for 1 min. in the warm solution. Take it out and remove the excess gelatin, if necessary, by pulling it over the edge of the tray for instance. Hang the sheet to dry with a clothes peg, pencil mark above. Repeat the procedure, but this time hang the sheet upside down. If you want to harden the sizing, put the dried sheet for one minute in a 2.5% solution of formaldehyde (irritating!)• Sizing always is a tedious activity. It is easier to use a brush to coat the paper with a warm 2% gelatin solution, or a 1% arrowroot starch mixture brought to the boil for one minute ✌
3. Making your own Ferric Oxalate
3.1. Making iron hydrate (based on the works of Pizzighelli and Hübl -1883)
✌ for a complete and detailed description, see my "Short Treatise on Iron Salts" downloadable from www.platine-palladium.com
3.1.1 Equipment:
• a 0.1gr precision scale• Iron chloride (Joop Stoop, or suppliers to engraving businesses - 10€ / kg)
• Sodium hydroxide pearls (drugstores, hardware stores) • a 10 liter bucket• 3 nylon coffee filters (super markets. replace Melitta-like paper filters)• 3 one-liter containers to hold the nylon coffee filters• highly recommended, a Büchner vacuum pump ( about 50$ on Ebay;
search for «buchner pump» • 10 test tubes (10cc) and their rack• a hydrometer
37

3.1.2 Procedure
• Heat 500cc of mineral (Volvic) or distilled water to 100°C (212°F).• Dissolve 50 gr of iron chloride, add slowly (wear protective glasses).• Add slowly 25 gr of sodium hydroxide (caustic soda); caution: this may
boil & splatter (wear protective glasses). • Put this mixture in a bucket filled with 10 liter of hot tap water and
leave it to rest for 15 min. (pH14). After 15 min. one can see the iron hydrate having settled on the bottom.
• Siphon off as much clear water as possible without sucking up the iron hydrate from the bottom of the bucket: leave 2 or 3 cm of clear water.
• Repeat this operation 5 times until the water has a neutral pH (pH7).• After a last siphoning off, distribute evenly the brown mass of iron
hydrate between the three coffee filters.• At the beginning, stir from time to time to accelerate the water draining
from the iron hydrate. Let it drain for at least four hours, but you can leave it also overnight.
• It is important to eliminate as much water as possible, otherwise the ferric oxalate solution will be much too diluted. It is easier anyway, if necessary, to add water than having to remove it.
• A maximum of liquid will be eliminated when using a filtration set including a Büchner funnel, a filter and a vacuum pump. This kind of equipment can be found on eBay ( with 250 ml filtration flask) for about US$50.
• The 7 cm paper filters usually supplied with these sets will need to be cut down to 5cm in order to fit properly ; a double layer of paper Melitta-like coffee filters can be used instead. Moisten the filter and put it on the bottom of the porcelain funnel to block up its holes. Fill the funnel with iron hydrate mixture and pump to reach the 600 mark on the pressure gauge. Wait till the gauge returns to zero. Repeat this twice, or even 3 times. Then start the same cycle with the remaining of the iron hydrate mixture.
• Take the remaining iron hydrate from the filter; it should have the consistency of a pasta similar to a rather thick chocolate cream.
3.2 Making ferric oxalate
• Weigh 42 gr of oxalic acid for 100 gr of iron hydrate.• Mix both ingredients under tungsten light, avoid natural / fluorescent light• Stir the mixture until it gets liquid.• Warm to no more than 30° C (86 F), using a bain-marie (double boiler); a
higher temperature would transform the ferric into ferrous oxalate.• Let stand for one hour in the dark. • Fill the clarification test-tubes. At the bottom of the bowl there will be
some oxalic acid left: throw it away.
38

• Allow the mixture to settle for at least 4 hours in the tubes. The ferric oxalate starts to decant as an emerald green liquid, clearly separated from the iron that wasn’t reduced by the acid. • Filter the iron oxalate through a funnel having its tip filled with cotton wool. The Büchner vacuum pump can be reused here to speed up filtering.• Repeat the filtering several times if necessary, until you get a perfectly clear liquid.
3.3 Determining the ferric oxalate concentration
The percentage can be read on the specific gravity chart printed below.
This chart shows for example that a gravity coefficient of 1.17 corresponds to a 27 % concentration. The simplest way of measuring this concentration is to use an hydrometer. A 24 % instead of a 27% concentration will not show any real difference in the resulting print.Another way of proceeding is to weigh the same volumes of water and of ferric oxalate: the ratio between both results has to be 1.174. When getting a density higher than 1.17, add water. When getting a density lower than 1.15, as the ferric oxalate cannot be heated without damage, the whole procedure has to be started over again, and more water has to be extracted in order to get a less humid iron hydrate.
39

4. Making Potassium Oxalate
• dissolve 220 gr of sodium carbonate in 500 cc of hot water • dissolve 200 gr of oxalic acid in 500cc of hot water• Mix both liquids very gradually, as there is a very important gaseous
release – pH 5 to 6
5. Making Ammonium Citrate
• dissolve 120 g of citric acid in 280 cc of water; the container should be in glass or porcelain. Heat until complete dissolving and add 120 cc of 20% ammonia. The ammonia sold in drugstores can be used.
• Heat until boiling• Regulate pH between 5 and 6 through adding either citric acid or
ammonia, as necessary
Richard S. Sullivan: Labnotes
6. Making Sodium Citrate
• dissolve 140 gr of citric acid in 200 cc of hot water• dissolve 78 gr of sodium carbonate in 200 cc of hot water• mix together and complete up to 450 cc – pH 5 to 6
Richard S.Sullivan: Labnotes
7. Making a U.V. light box ✌
7.1. Required equipment
• 7 U.V. light bulbs such as Philips TL 20W/ 05• 14 sockets• 7 ballasts et 7 corresponding starters• marine plywood of 3 cm thickness• colored electrical wire• drill, screws .....
7.2. Mounting procedure• On one side of a plywood plate the size of which is adapted to the length and the width of the light bulbs, screw the 14 sockets in such a way that the tubes, when mounted, will be side by side and nearly in contact • Drill the necessary holes to allow the wiring to get trough to the other side of the plate • On the opposite side of the plate, screw the ballasts and starters in staggered rows, so that the ballasts will not be immediately side by side. • Connect the tubes in parallel.
40

• Follow the sketch below for the wiring.
• Connect respectively all "+" and all "-" wires to a terminal block first, and then to a switch and a power socket.
• Make a fitting system allowing to modify the printing frame/light bulb distance from 5 to 10 cm .
• Allow for adequate ventilation of the "electrical side".
8. Resources
Pharmaciesyour pharmacist can provide you with most raw chemicals & other materials, such as:
• oxalic and citric acid• sodium and potassium carbonate• sodium sulphite• microporous bandages• 0.5 or 1 ml syringes
Drugstores or chemical dealers/distributors
• oxalic acid• ammonia• sodium sulphite, ...
41

Bostick & Sullivan – P.O. Box 2155 - Van Nuys, Ca. 91404 - USAhttp://www.bostick-sullivan.com/
• ferric oxalate• platinum and palladium salts, 3-4 times cheaper than in France• Stonehenge paper, japanese Kozo paper• technical books
Payment with credit card. Overseas shipments: ask for USPS International Airmail; chances are that you will not have to pay for customs duties. Avoid USPS Express Mail, UPS, Fedex, as you will have to pay for VAT and customs duties, and to provide an invoice to customes services as well.
Artcraft Chimicalhttp://www.artcraftchemicals.com
• All chemicals• The cheapest for palladium chloride. Ships USPS International Airmail. Quite helpful and knowledgeable – an excellent address!
Stouffer industrieshttp://www.stouffer.net
• Step wedges & tablets • Ask for the 4"x5" TP4x5-21 model, ideal for reference tests
Prophot – 37-39, rue Condorcet - 75009 Paris, Francehttp://www.materiel-photo-pro.com/
• all photography products• raw chemicals
Artista-photohttp://www.artista.fr
• Canson Arches Platine paper
42

Ruscombe Paper Millhttp://www.ruscombepaper.com/
• Buxton and Herschel papers, developed with Mike Ware
El Museu Molí Paperer de Capelladeshttp://mmp-capellades.net/
• Handmade paper of very good quality, with a slight texture
Atlantis Francehttp://www.atlantis-france.com/
• PH pen
43

IV - BIBLIOGRAPHY
44

ABNEY, William Wiveleslie de Platinotype: its preparation and manipulationScovill & Adams N.Y. 1896
ALVAREZ BRAVO, Manuel in Nude: Theory Lustrum Press, NY, 1979
ARENTZ, Dick An Outline For Platinum Palladium Printing The author, Flagstaff AZ 1990
ARENTZ, Dick Platinum & Palladium Printing Focal Press, 1999
ARNOW, Jan Handbook Of Alternative Photographic Processes Van Nostrand Reinhold Co, N.Y., 1982.
BOSTICK & SULLIVAN Platinum Printing MaterialsVan Nuys CA,1992.
BOSTICK & SULLIVAN LUMEN - vol. I to VA Journal Of Handcoated Photography Van Nuys, CA
CHRISTOPHER, James The Book of Alternative Photographic ProcessesDelmar Thomson Learning, Albany, NY
CLERC, L.P. La Photographie Pratique Charles Mendel Paris, 1942.
CRAWFORD, William The Keepers Of Light Morgan & Morgan, N.Y., 1979.
MATHIAS, Jeffrey D. Guide To Platinum Palladium Photographic PrintmakingDownloaded from internet 1993
KODAK Encyclopédie de la Photographie, Volume 7Alpha éditions, 1979.
ENFIELD, JILL Procédés Photo AlternatifsEyrolles 2004
GALINDO, Julio Manual de Impresion Para Procesos Antiguos: Paladio y Platino Mexico1995
GLAFKIDES, P. Chimie et Physique Photographique Paul Montel Paris, 1976.
KOCKAERTS, Roger Procédés Nobles En Photographie pH7 Bruxelles, 1998.
NADEAU, Luis The History and Practice of Platinum Printing Atelier Nadeau, Fredericton, CDN 1986.
45

PARDOE, Don Reversal Process, in Lumen IV,Bostick& Sullivan Van Nuys, 1984.
PIZZIGHELLI, G.& HÜBL, A. La PlatinotypieGauthier-Villars Paris, 1883.Reprint, Jean-Michel Place Paris, 1986.
REXROTH, Nancy The Platinotype Violet Press, Yellow Springs, 1977.
RICHARDSON, Carlos Palladium Printing Camera Lucerne, 2-1979.
RICE, Ted Palladium Printing, Made EasyEagle Eye Santa Fe 1994.
SANDERSON, Andrew Procédés Alternatifs en PhotographieLa Compagnie du livre, Paris 2002
SULLIVAN, Richard Labnotes Bostick&Sullivan Van Nuys CA, 1982.
SULLIVAN, Richard The New Platinum Print& WEESE, Carl Working Pictures Press 1998
TICE, Georges in Les Joies de la PhotographieTime Life International, 1979.
TICE, Georges Platinum Printing, in Darkroom - volume 1Lustrum Press N.Y., 1977.
TRUTAT, E. Les Tirages Photographiques aux Sels de Fer Gauthier-Villars Paris, 1904.
46

V - TABLE OF CONTENTS
I. THE OBJECT
1. The Words 42. Athena Pallas and the Origin of Art 53. The Idol, the Icon, the Image 64. The Aura 75. The World and the Earth 96. The Offshoot 11
II. THE TECHNIQUE
1. Historical Background 132. The Revival of the Process 143. Summary Description 154. The Negative 165. The Negative: My Method 176. The Paper 197. The Sensitizing Solutions 218. Sensitizing the Paper 269. Drying the Paper 2710. Exposure 2811. Processing 3012. Clearing 3313. Washing, Drying, Finishing – My Method 34
III. THE RECIPES
1. Contrast Intensification for Negatives 372. Paper Sizing 373. Making your own Ferric Oxalate 374. Making Potassium Oxalate 405. Making Ammonium Citrate 406. Making Sodium Citrate 407. Making a U.V. Light Box 408. Resources 41
IV. BIBLIOGRAPHY 44
V. TABLE OF CONTENTS 47
47

We would like to thank Mr Jean-Claude Moulin, who accepted to have his original document translated and distributed by Picto Benelux. The general and technical information included really deserves the widest possible publication.Picto Benelux is an informal group, open to everybody in the Benelux countries having an active interest in photographic processes developed from the very beginning of Photography. The aim is to revisit them, while respecting anyone's creative approach.
http://www.picto.info/
Translation: Jacques Kevers - Oct. 2012 - [email protected]


