Journal Editors’ Guide Accessing Editors’ Tools from the My Account Page: When you log in to the bepress site, you can access all of your editor tools from your My Account page. 1. Navigate to Trace’s homepage [http://www.trace.tennessee.edu/] and click the My Account option on the left-hand menu. 2. Enter your NetID and password, and click Login. Your My Account page displays the tools for your publication. The editor tools reflect the major areas of the EdiKit system. The basics are: Manage Submissions: This includes handling peer review, editorial de- cisions, and publishing. Upload: Allows you to upload submissions to your journal. Reports: Displays usage reports for how many people have down- loaded articles Configuration: Settings to establish the workflow, reviewer policies, permissions, and tools to create new volumes/issues.
Transcript
Journal Editors’ Guide Accessing Editors’ Tools from the My Account Page: When you log in to the bepress site, you can access all of your editor tools from your My Account page. 1. Navigate to Trace’s homepage [http://www.trace.tennessee.edu/] and
click the My Account option on the left-hand menu. 2. Enter your NetID and password, and click Login.
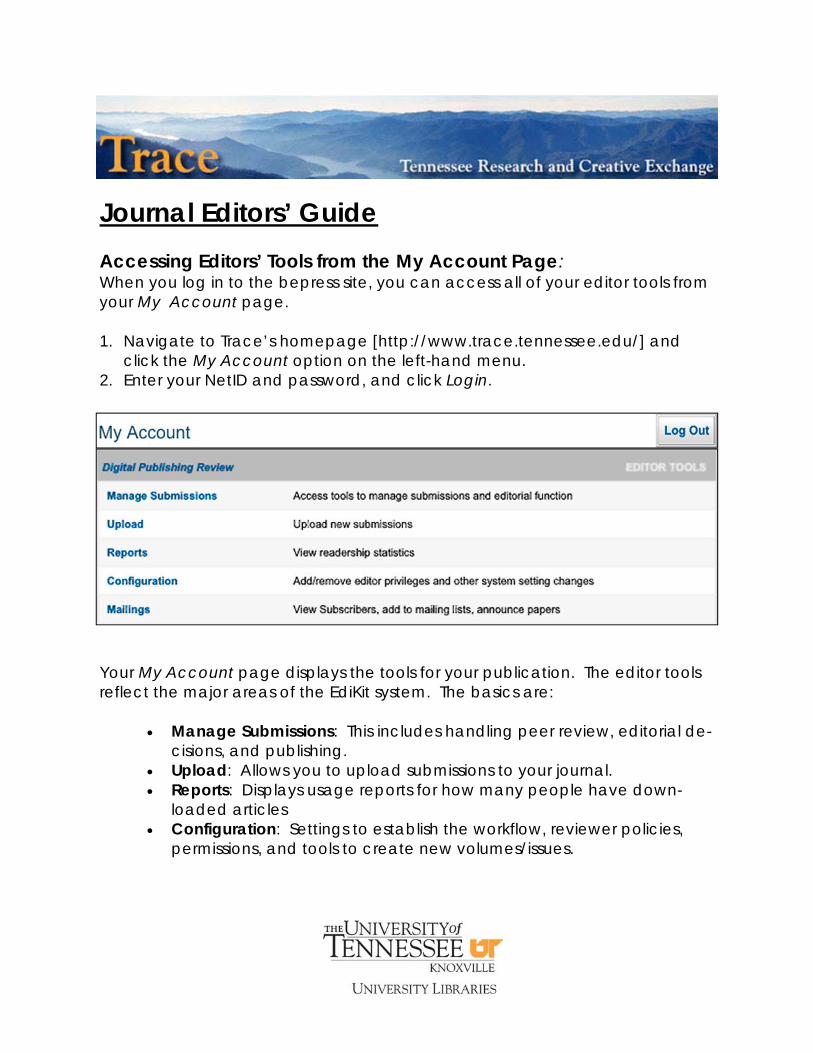
Your My Account page displays the tools for your publication. The editor tools reflect the major areas of the EdiKit system. The basics are:
Manage Submissions: This includes handling peer review, editorial de-cisions, and publishing.
Upload: Allows you to upload submissions to your journal. Reports: Displays usage reports for how many people have down-
loaded articles Configuration: Settings to establish the workflow, reviewer policies,
permissions, and tools to create new volumes/issues.
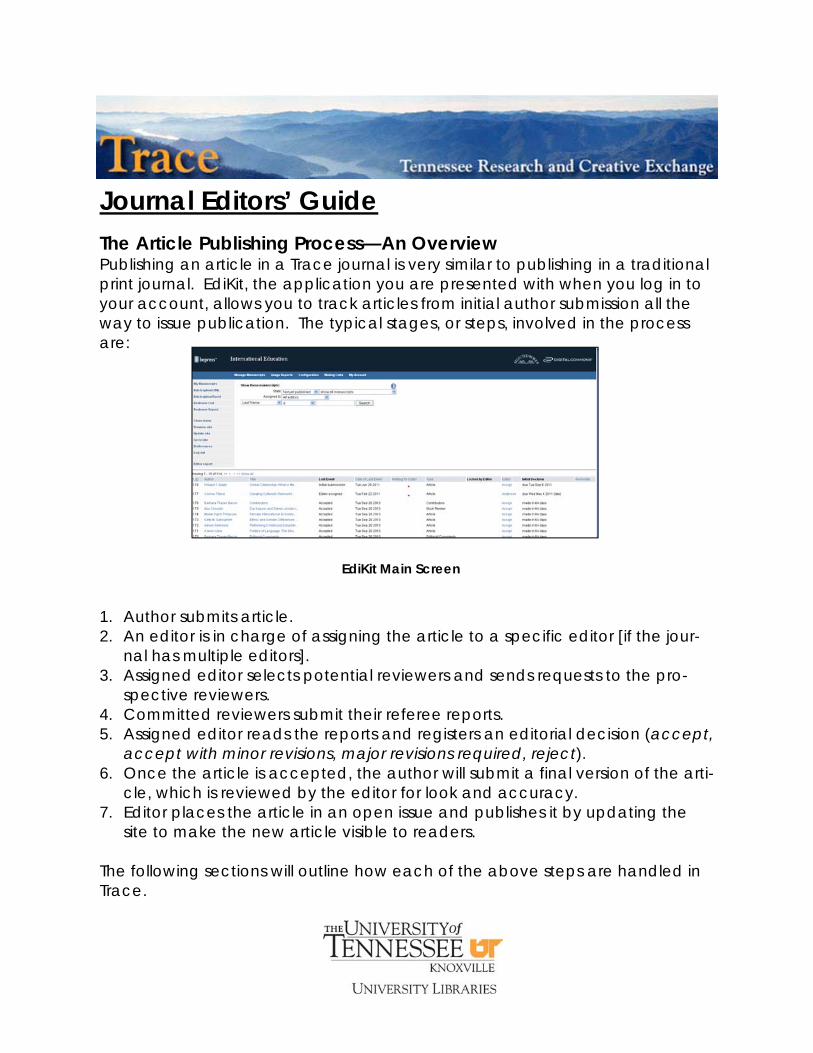
Journal Editors’ Guide The Article Publishing Process—An Overview Publishing an article in a Trace journal is very similar to publishing in a traditional print journal. EdiKit, the application you are presented with when you log in to your account, allows you to track articles from initial author submission all the way to issue publication. The typical stages, or steps, involved in the process are: 1. Author submits article. 2. An editor is in charge of assigning the article to a specific editor [if the jour-
nal has multiple editors]. 3. Assigned editor selects potential reviewers and sends requests to the pro-
spective reviewers. 4. Committed reviewers submit their referee reports. 5. Assigned editor reads the reports and registers an editorial decision (accept,
accept with minor revisions, major revisions required, reject). 6. Once the article is accepted, the author will submit a final version of the arti-
cle, which is reviewed by the editor for look and accuracy. 7. Editor places the article in an open issue and publishes it by updating the
site to make the new article visible to readers. The following sections will outline how each of the above steps are handled in Trace.
EdiKit Main Screen
Journal Editors’ Guide Submitting Manuscripts There are two ways to upload submissions to the publication: (1) where the au-thor submits his/her article independently, or (2) where the editor will receive the article and then upload on behalf of the author. This guide will focus on the editor submission option, as this is pertinent when first establishing a journal. To submit manuscripts for an author: 1. Navigate to your My Account page. 2. In the Editor Tools section, click Upload. 3. Enter the author’s contact information and select Add Author. Do the same
for any co-authors. When finished, click Continue. 4. The next screen is the submission screen, where you will be asked to upload
the manuscript and provide all related information. [NOTE: some fields and the order of the fields may vary by publication]
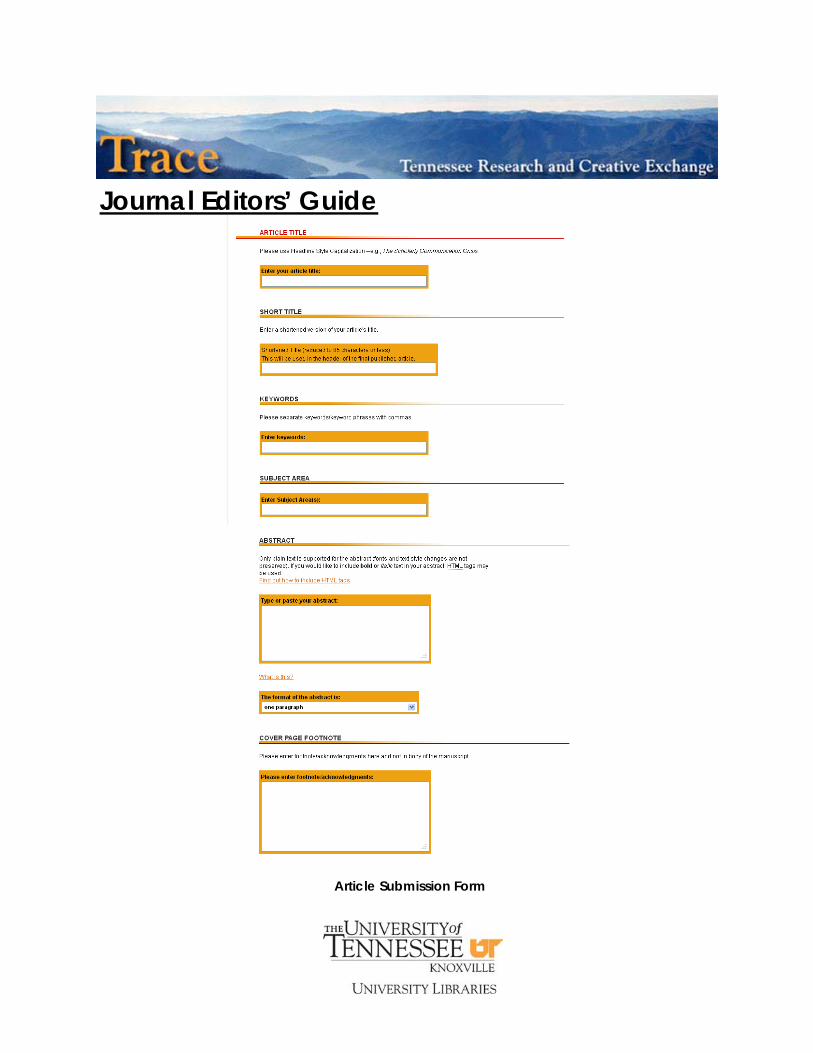
Title: Enter this exactly as it should appear on the final published version. Short Title: shortened version of the title that will appear in the article’s headers. Keywords: separate by commas. Subject Area: this will vary by discipline. Type of Submission: Customizable drop-down menus are available. Acknowledgements/Cover Page FootNote: This will appear on the ab-stract page of the PDF (which follows the title page). Abstract: Paste or type the abstract into the text box provided. Note: be sure to also choose the appropriate option in the drop-down menu underneath the text box to describe the layout of the abstract. Full text of submission: You can upload a MS Word, WordPerfect, RTF, or PDF file. After submission the system will convert any non-PDF into a PDF document.
By default, authors will receive email notification of the automatic PDF conver-sions of any manuscripts uploaded on their behalf. Additionally, they will re-ceive email notification if an editor revises a manuscript.
Journal Editors’ Guide
Article Submission Form
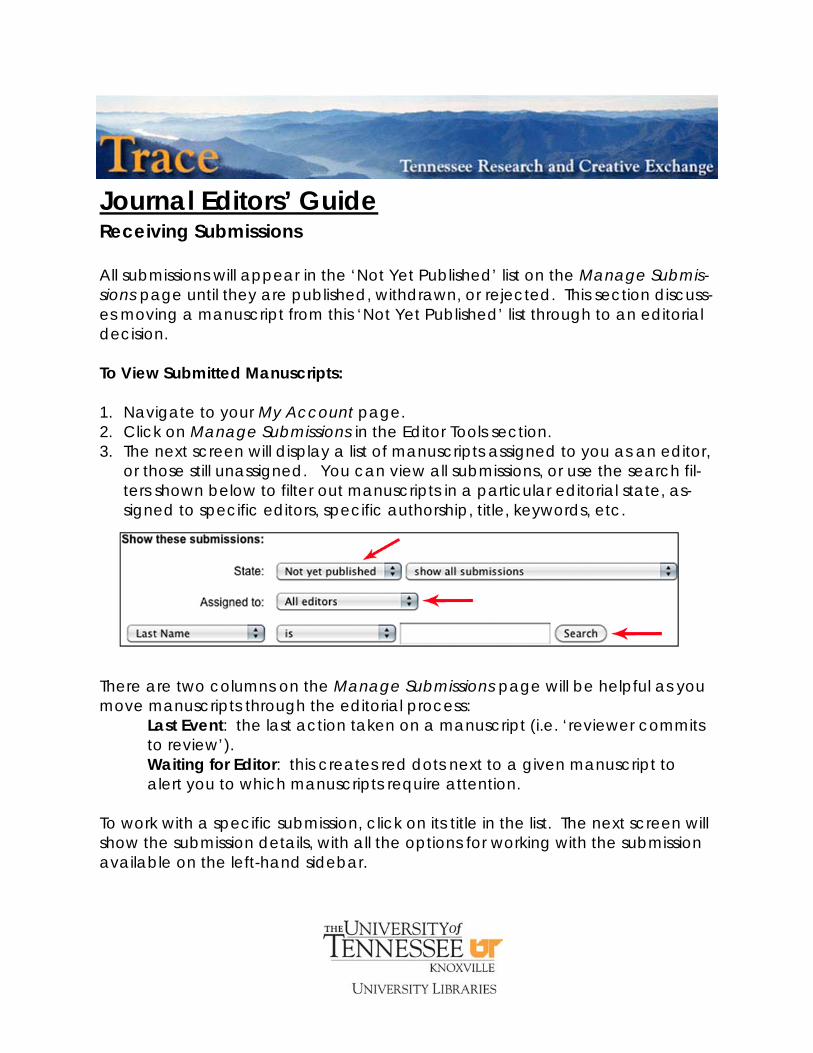
Journal Editors’ Guide Receiving Submissions All submissions will appear in the ‘Not Yet Published’ list on the Manage Submis-sions page until they are published, withdrawn, or rejected. This section discuss-es moving a manuscript from this ‘Not Yet Published’ list through to an editorial decision. To View Submitted Manuscripts: 1. Navigate to your My Account page. 2. Click on Manage Submissions in the Editor Tools section. 3. The next screen will display a list of manuscripts assigned to you as an editor,
or those still unassigned. You can view all submissions, or use the search fil-ters shown below to filter out manuscripts in a particular editorial state, as-signed to specific editors, specific authorship, title, keywords, etc.
There are two columns on the Manage Submissions page will be helpful as you move manuscripts through the editorial process: Last Event: the last action taken on a manuscript (i.e. ‘reviewer commits to review’). Waiting for Editor: this creates red dots next to a given manuscript to alert you to which manuscripts require attention. To work with a specific submission, click on its title in the list. The next screen will show the submission details, with all the options for working with the submission available on the left-hand sidebar.
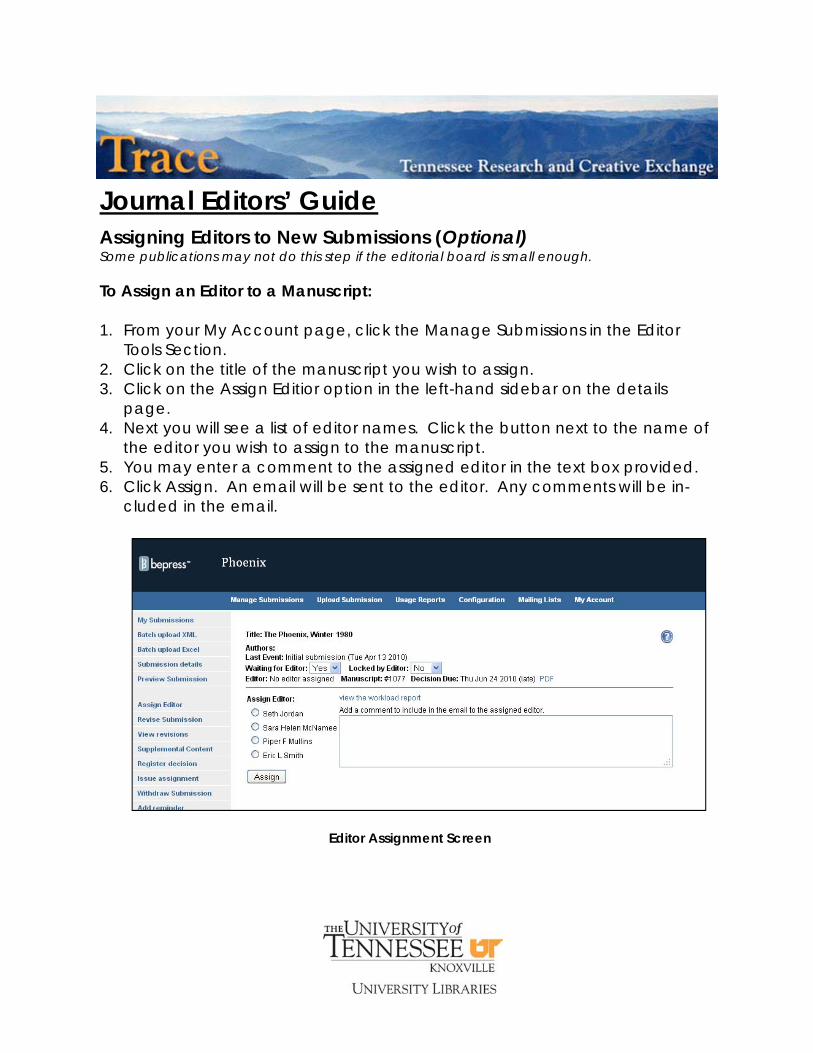
Journal Editors’ Guide Assigning Editors to New Submissions (Optional) Some publications may not do this step if the editorial board is small enough. To Assign an Editor to a Manuscript: 1. From your My Account page, click the Manage Submissions in the Editor
Tools Section. 2. Click on the title of the manuscript you wish to assign. 3. Click on the Assign Editior option in the left-hand sidebar on the details
page. 4. Next you will see a list of editor names. Click the button next to the name of
the editor you wish to assign to the manuscript. 5. You may enter a comment to the assigned editor in the text box provided. 6. Click Assign. An email will be sent to the editor. Any comments will be in-
cluded in the email.
Editor Assignment Screen
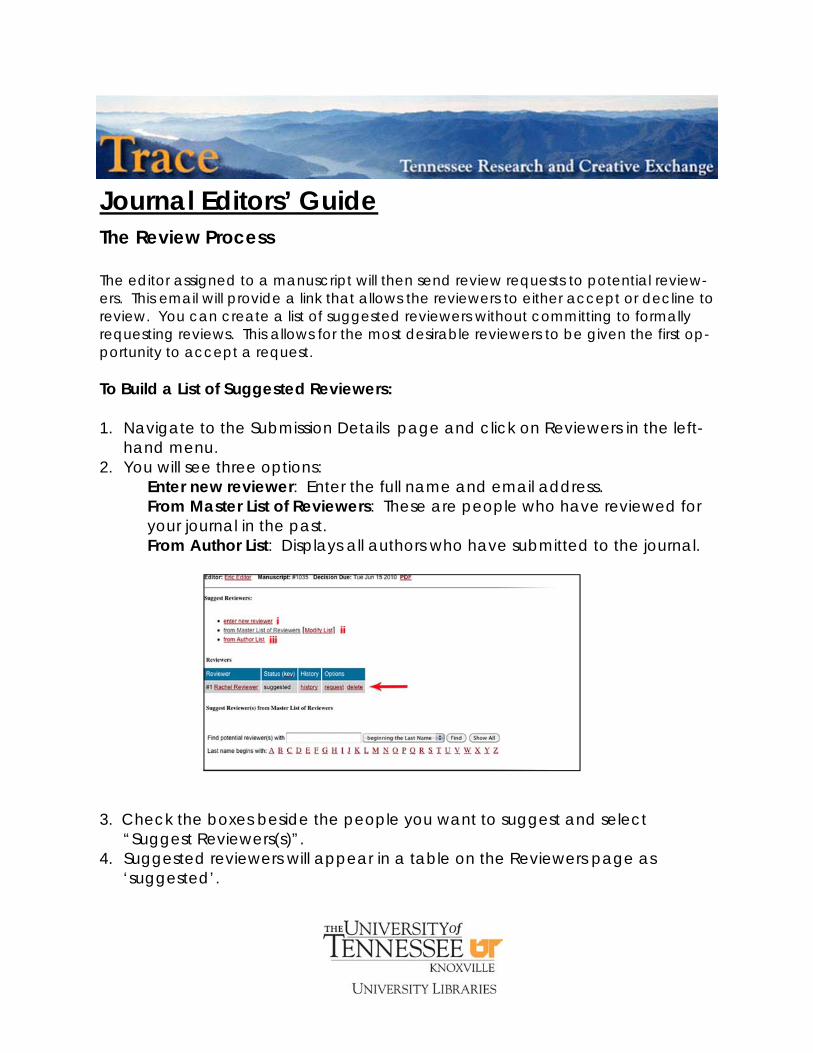
Journal Editors’ Guide The Review Process The editor assigned to a manuscript will then send review requests to potential review-ers. This email will provide a link that allows the reviewers to either accept or decline to review. You can create a list of suggested reviewers without committing to formally requesting reviews. This allows for the most desirable reviewers to be given the first op-portunity to accept a request. To Build a List of Suggested Reviewers: 1. Navigate to the Submission Details page and click on Reviewers in the left-
hand menu. 2. You will see three options:
Enter new reviewer: Enter the full name and email address. From Master List of Reviewers: These are people who have reviewed for your journal in the past. From Author List: Displays all authors who have submitted to the journal.
3. Check the boxes beside the people you want to suggest and select
“Suggest Reviewers(s)”. 4. Suggested reviewers will appear in a table on the Reviewers page as
‘suggested’.
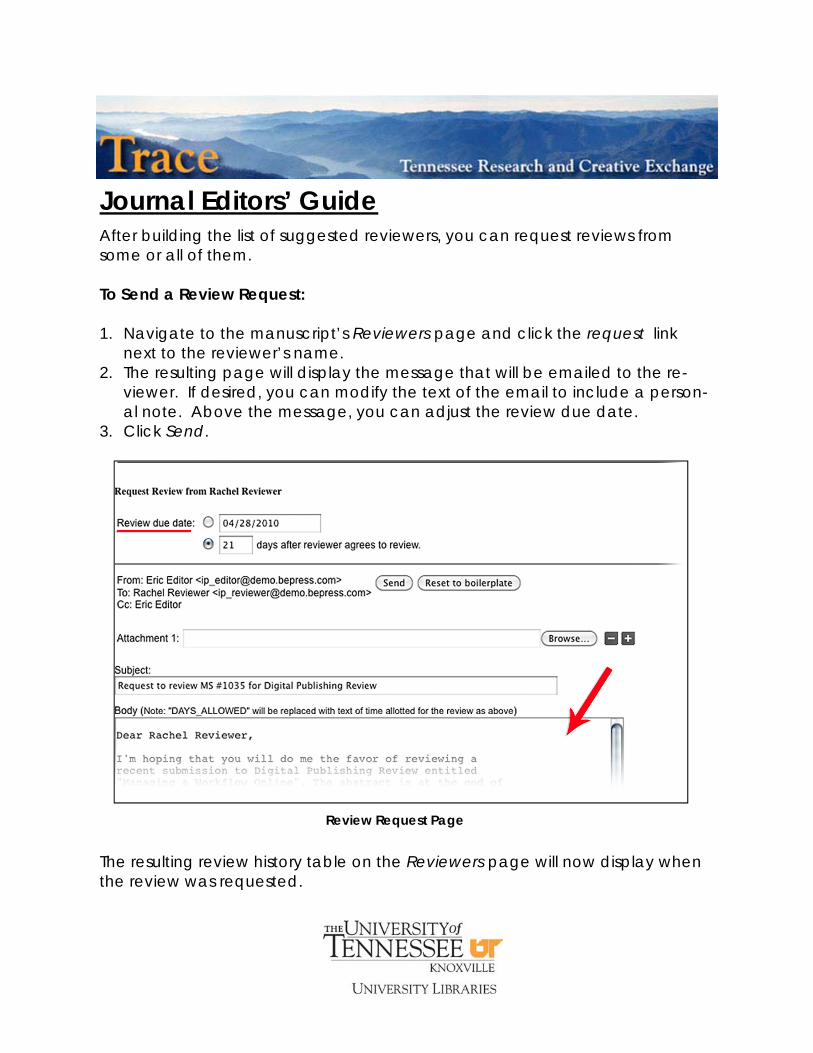
Journal Editors’ Guide After building the list of suggested reviewers, you can request reviews from some or all of them. To Send a Review Request: 1. Navigate to the manuscript’s Reviewers page and click the request link
next to the reviewer’s name. 2. The resulting page will display the message that will be emailed to the re-
viewer. If desired, you can modify the text of the email to include a person-al note. Above the message, you can adjust the review due date.
3. Click Send.
The resulting review history table on the Reviewers page will now display when the review was requested.
Review Request Page
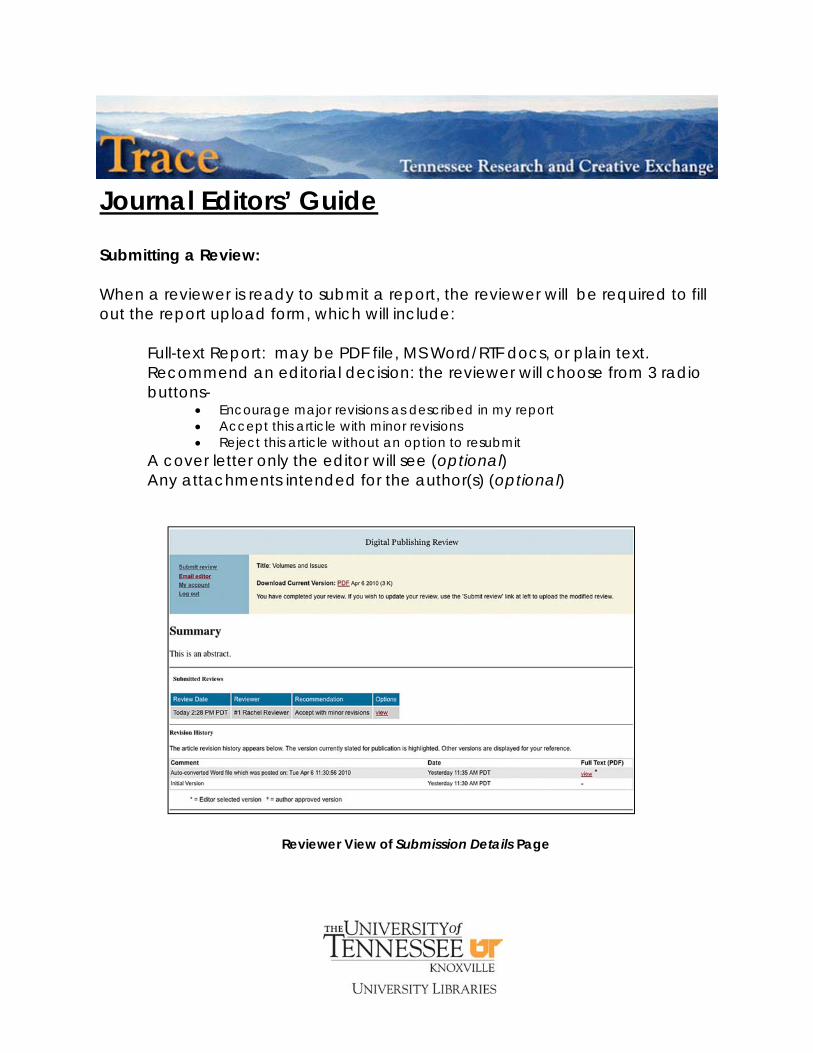
Journal Editors’ Guide Submitting a Review: When a reviewer is ready to submit a report, the reviewer will be required to fill out the report upload form, which will include:
Full-text Report: may be PDF file, MS Word/RTF docs, or plain text. Recommend an editorial decision: the reviewer will choose from 3 radio buttons-
Encourage major revisions as described in my report Accept this article with minor revisions Reject this article without an option to resubmit
A cover letter only the editor will see (optional) Any attachments intended for the author(s) (optional)
Reviewer View of Submission Details Page
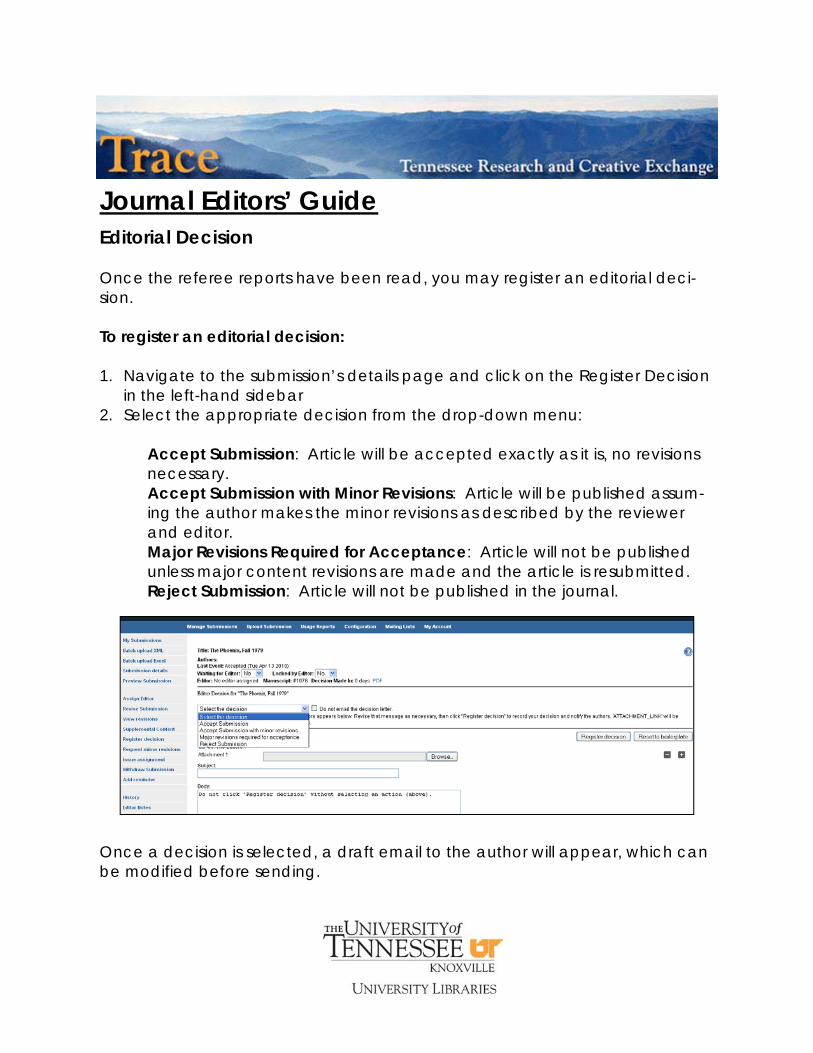
Journal Editors’ Guide Editorial Decision Once the referee reports have been read, you may register an editorial deci-sion. To register an editorial decision: 1. Navigate to the submission’s details page and click on the Register Decision
in the left-hand sidebar 2. Select the appropriate decision from the drop-down menu:
Accept Submission: Article will be accepted exactly as it is, no revisions necessary. Accept Submission with Minor Revisions: Article will be published assum-ing the author makes the minor revisions as described by the reviewer and editor. Major Revisions Required for Acceptance: Article will not be published unless major content revisions are made and the article is resubmitted. Reject Submission: Article will not be published in the journal.
Once a decision is selected, a draft email to the author will appear, which can be modified before sending.
Journal Editors’ Guide 3. Modify the decision letter, including important information regarding the ref-
eree reports and the suggested/required revisions. 4. You then have the option to attach additional files. Click Browse to locate
and select the desired file(s). 5. Click the Register Decision button to send the letter and formally register
your editorial decision. Publishing Accepted Manuscripts Before publishing an accepted submission, it is customary to first request the author’s approval. When a manuscript is accepted, a Request Approval link appears in the left-hand menu. Clicking this will generate an email to the au-thor in which a link to preview the article as it will be published. The author may then choose to Give Approval or not. Publishing Incrementally or by Issue You can publish incrementally, or publish each article as soon as it is ready, or by closing issues, which is waiting for every article in the issue to be ready and publishing them all at once. This decision can be made using the “Publishing Articles” setting on the Configuration page. To Publish a Manuscript Incrementally: 1. Navigate to the Submission Details page. 2. Click Publish in the left-hand menu. 3. Select a location from the list of available issues and click Continue 4. The manuscript will be assigned to this issue. Once published, the article
cannot be moved to another issue. 5. Click Update site in the left-hand menu to make the article visible in the
journal
Journal Editors’ Guide
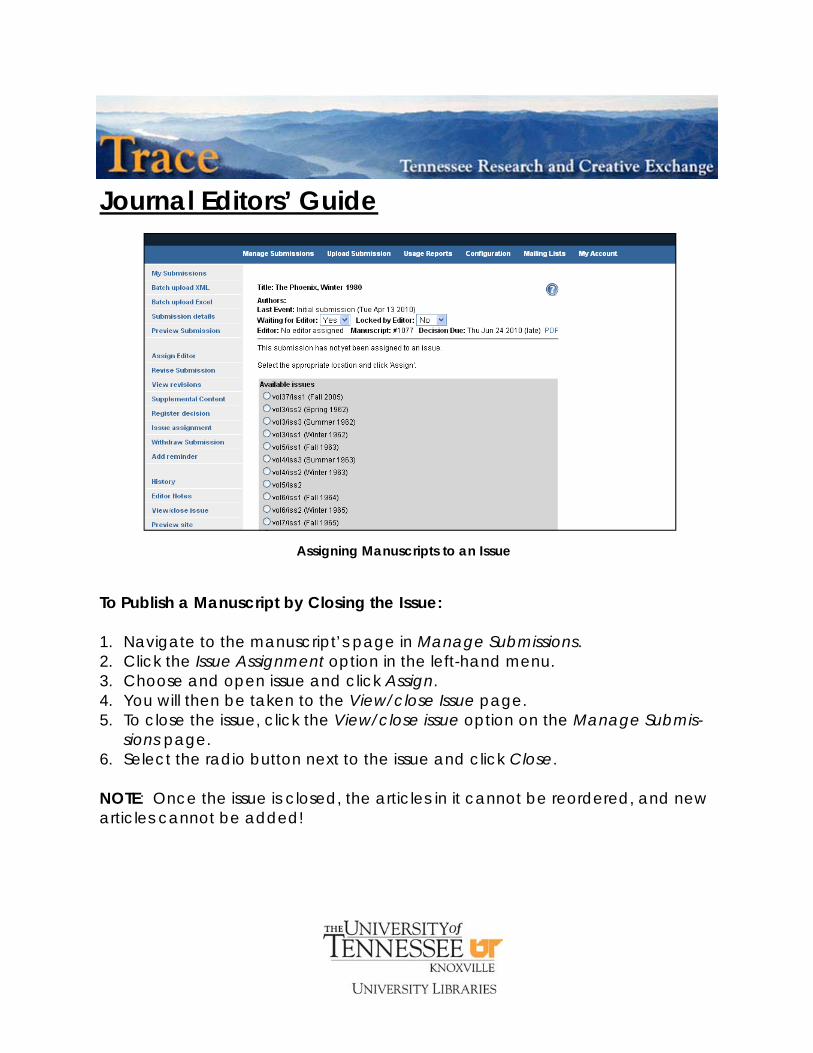
To Publish a Manuscript by Closing the Issue: 1. Navigate to the manuscript’s page in Manage Submissions. 2. Click the Issue Assignment option in the left-hand menu. 3. Choose and open issue and click Assign. 4. You will then be taken to the View/close Issue page. 5. To close the issue, click the View/close issue option on the Manage Submis-
sions page. 6. Select the radio button next to the issue and click Close. NOTE: Once the issue is closed, the articles in it cannot be reordered, and new articles cannot be added!
Assigning Manuscripts to an Issue
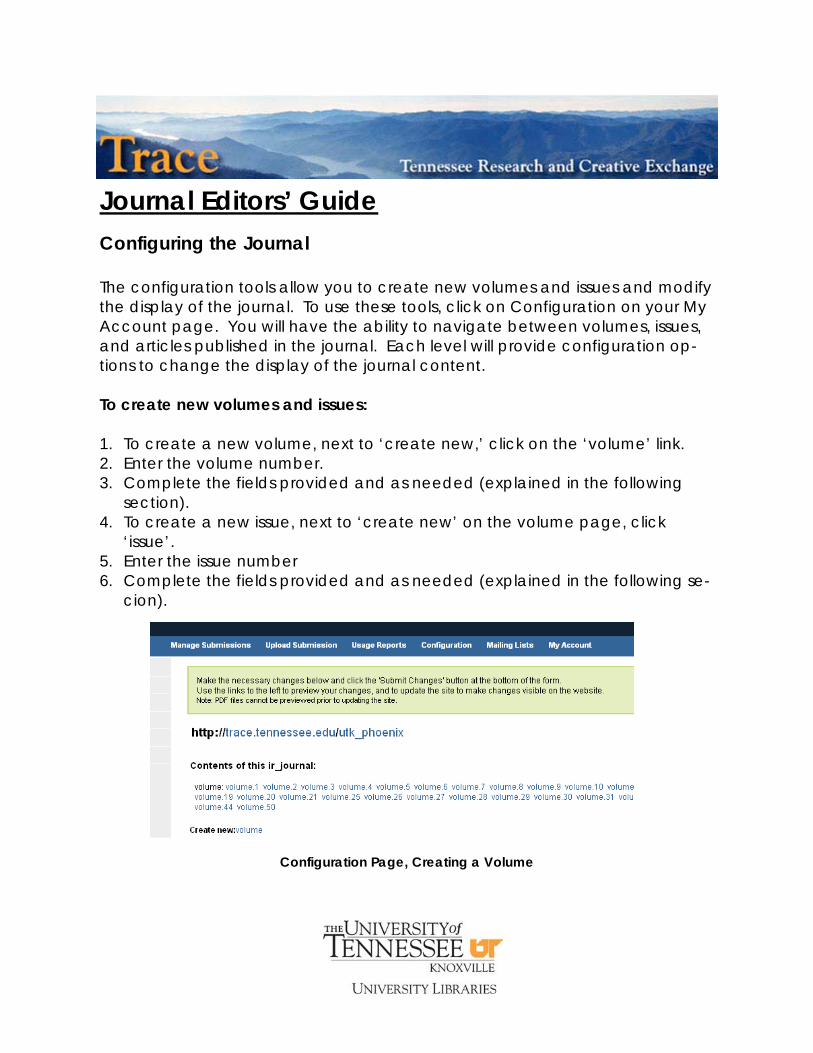
Journal Editors’ Guide Configuring the Journal The configuration tools allow you to create new volumes and issues and modify the display of the journal. To use these tools, click on Configuration on your My Account page. You will have the ability to navigate between volumes, issues, and articles published in the journal. Each level will provide configuration op-tions to change the display of the journal content. To create new volumes and issues: 1. To create a new volume, next to ‘create new,’ click on the ‘volume’ link. 2. Enter the volume number. 3. Complete the fields provided and as needed (explained in the following
section). 4. To create a new issue, next to ‘create new’ on the volume page, click
‘issue’. 5. Enter the issue number 6. Complete the fields provided and as needed (explained in the following se-
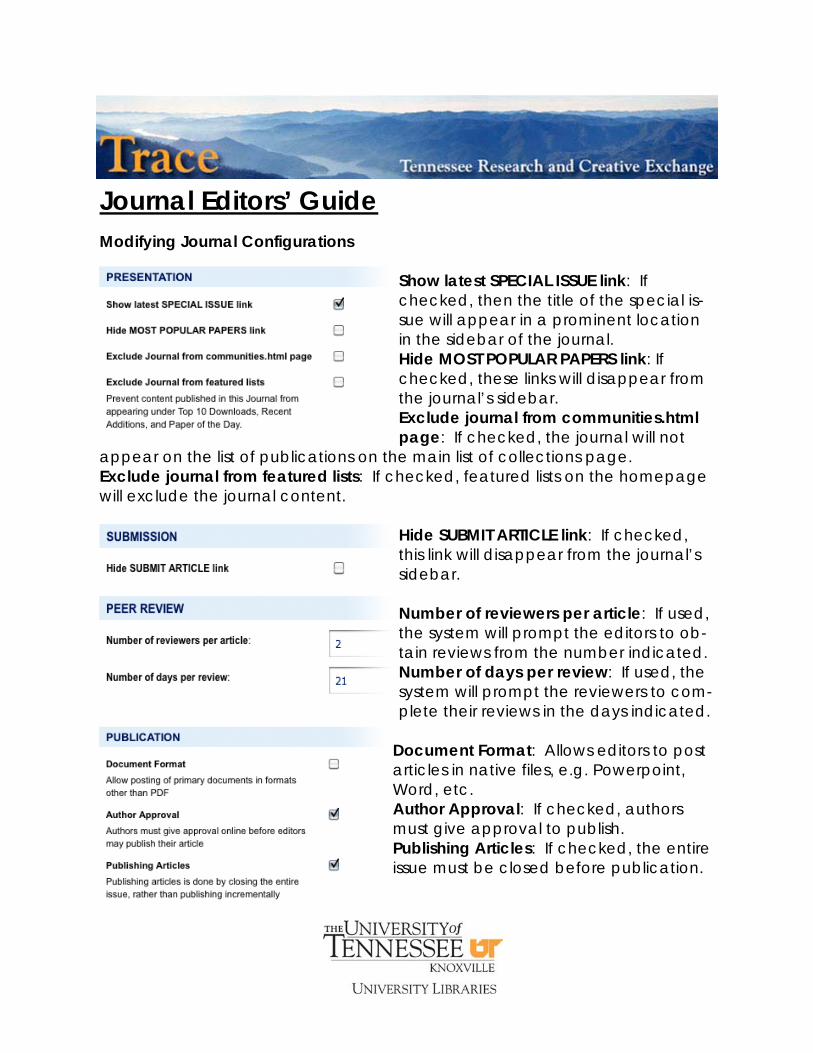
Show latest SPECIAL ISSUE link: If checked, then the title of the special is-sue will appear in a prominent location in the sidebar of the journal. Hide MOST POPULAR PAPERS link: If checked, these links will disappear from the journal’s sidebar. Exclude journal from communities.html page: If checked, the journal will not
appear on the list of publications on the main list of collections page. Exclude journal from featured lists: If checked, featured lists on the homepage will exclude the journal content.
Hide SUBMIT ARTICLE link: If checked, this link will disappear from the journal’s sidebar. Number of reviewers per article: If used, the system will prompt the editors to ob-tain reviews from the number indicated. Number of days per review: If used, the system will prompt the reviewers to com-plete their reviews in the days indicated.
Document Format: Allows editors to post articles in native files, e.g. Powerpoint, Word, etc. Author Approval: If checked, authors must give approval to publish. Publishing Articles: If checked, the entire issue must be closed before publication.
Journal Editors’ Guide
Contacts: Trace—[email protected] Trace Administrator– Seth Jordan, [email protected] Associate Dean for Scholarly Communication & Research Services - Holly Mercer, [email protected] For further information on a particular topic, you may contact the appropriate librarian liaison from the following page: Subject Liaison Librarian