100
KSR516 Manual KSR516 Manual KSR516 Manual Korea Digital Communication Co., Ltd.

KSR516 ManualKSR516 ManualKSR516 Manual
Korea Digital Communication Co., Ltd.
KSR516 ManualKSR516 Manual
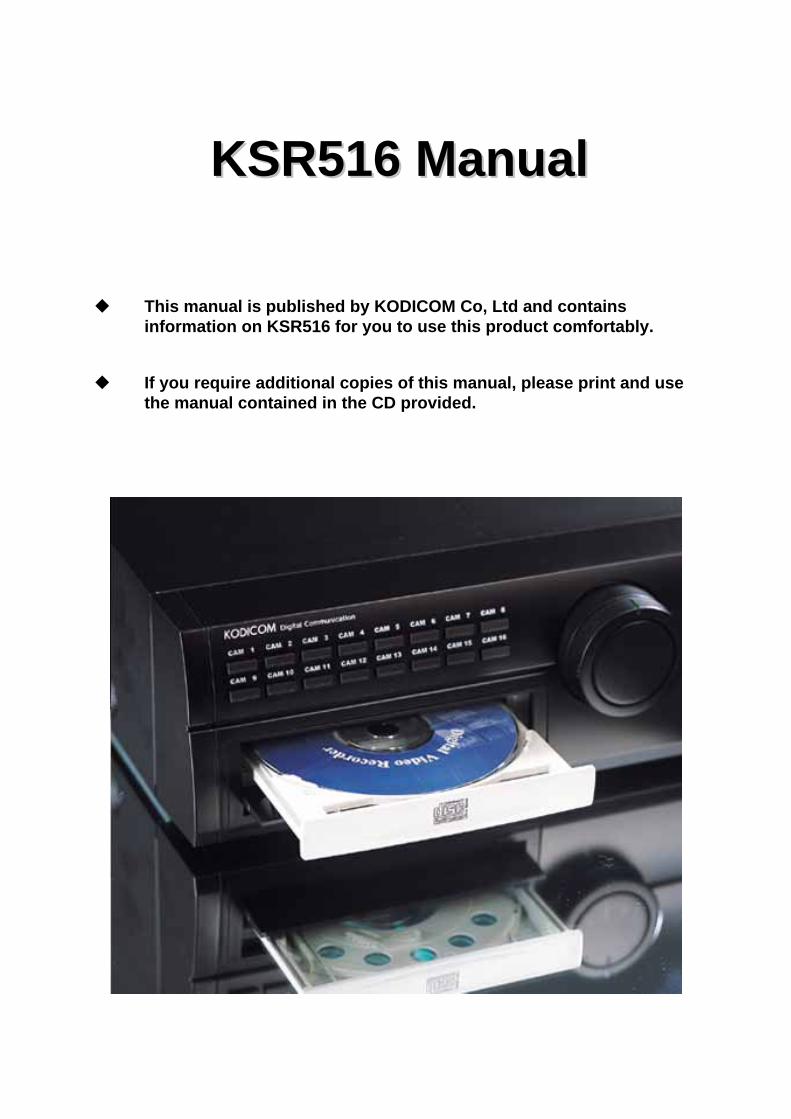
This manual is published by KODICOM Co, Ltd and contains information on KSR516 for you to use this product comfortably.
If you require additional copies of this manual, please print and use the manual contained in the CD provided.

33 KODICOM KSR516 ManualKODICOM KSR516 Manual
IntroductionIntroductionIntroduction
Thank you for purchasing KODICOM KSR516.
This DVR is produced by the most advanced technology developed by KODICOM and its quality is guaranteed by strict reliability and compatibility tests.
This KSR516 manual provides necessary information I order to use this product to its maximum capacity and also contains useful tip.
Please read this manual thoroughly before using KSR516 in order to prevent any breakdown due to mishandling.
IntroductionIntroduction
KODICOM KSR516 Manual KODICOM KSR516 Manual 44
This manual applies to KSR516 DVR only.
This manual describes external features of KSR516 DVR, part names, correct connection methods for Pan/Tilt control, Control devices, peripheral devices, and the system setting method.
• KODICOM is not held responsible if the DVR is damaged due to non-compatible devices being used with the product.
• KODICOM is not held responsible if the DVR is damaged due to the product being disassembled or modified by the user without permission.
• If you wish to open the system to modify, repair, or upgrade, it is recommended that you ask for KODICOM engineer’s assistance by contacting your dealer or by contacting KODICOM head office.
• DigiNet and KSR516 are registered trademarks of Korea Digital Communication (KODICOM).
• This product is qualified for both domestic and industrial use. This product has qualified the Radio Equipment Requirements of Korea and acquired international certificates including CE (Europe) and FCC (USA).
NoticeNoticeNotice
Notice

55 KODICOM KSR516 ManualKODICOM KSR516 Manual
All copyrights of this manual are reserved by KODICOM CO., Ltd.
Copyright© 2003
It is prohibited to copy or republish this manual for commercial reasons.
It is prohibited to transfer this manual via online media such as, but not limited to, Internet. It is also prohibited to post, distribute, or translate this manual without given permission.
KODICOM is not held responsible if the DVR is damaged either accidentally or intentionally due to the system being handled inappropriately by a user who is not aware of how to operate this product, or by a user who did not refer to this manual before operating the product.
KODICOM reserves the right to change the contents of this manual for specific groups or individuals without notice.
KODICOM reserves all copyrights of registered trademark in this manual.
CopyrightsCopyrightsCopyrights
Copyrights
Copyrights
KODICOM KSR516 Manual KODICOM KSR516 Manual 66
CautionCautionCaution
Caution
Caution
Please beware of the following precautions before installing the DVR.
• Avoid any place with moisture, dust, or soot.
• Avoid any place with direct sunlight or heating appliances.
• Keep the product away from electric shock or magnetic substances.
• Avoid high or low temperature (recommended operation temperature is between
0°C and ~40°C).
• Do not place any conductive material through the ventilation.
• Turn off the system before installation.
• Ensure enough space for cable connections.
• Place the system on a solid surface with sufficient air ventilation. Avoid any
surface that vibrates.
• Placing the system near electronic devices such as radio or TV may cause
breakdown to the product.
• Do not disassemble the product without an assistance from KODICOM.
• Do not place any heavy object on the system.
77 KODICOM KSR516 ManualKODICOM KSR516 Manual
The following are warnings and cautions for the safety of the users and for the prevention of any property damage. Please read below thoroughly.
Warning and Caution signs
If you are not aware of this caution, you may be injured or cause property loss.
If you are not aware of this warning, you may be seriouslyinjured or be killed.
Warning Caution
Safety Warnings and CautionsSafety Warnings and CautionsSafety Warnings and Cautions
Safety Warnings and C
autionsSafety W
arnings and Cautions
Turn off the system before installing the system. Do not plug in several electric devices to the same outlet.
This may cause heating, fire, or electric shock.
Do not place any liquid container on the system, such as water, coffee, or beverage.
• If liquid is poured onto the system, it can cause a system breakdown or cause fire.
Prevent power cable from being severely bent or pressed by a heavy object.
• This may cause fire.
Clean the dust around the system on regular basis. When cleaning the system, always use dry cloth. Do not use wet cloth or other organic solvents.
• This may damage the surface of the system and can cause system breakdown or electric shock.
Avoid any place with moisture, dust, or soot.
• This can cause fire or electric shock.
When pulling the power cable from the plug, do so gently. Do not touch the plug with wet hands and avoid using the plug if the holes on the outlet are too loose.
• This may cause fire or electric shock.
Warning
KODICOM KSR516 Manual KODICOM KSR516 Manual 88
Safety Warnings and C
autionsSafety W
arnings and Cautions
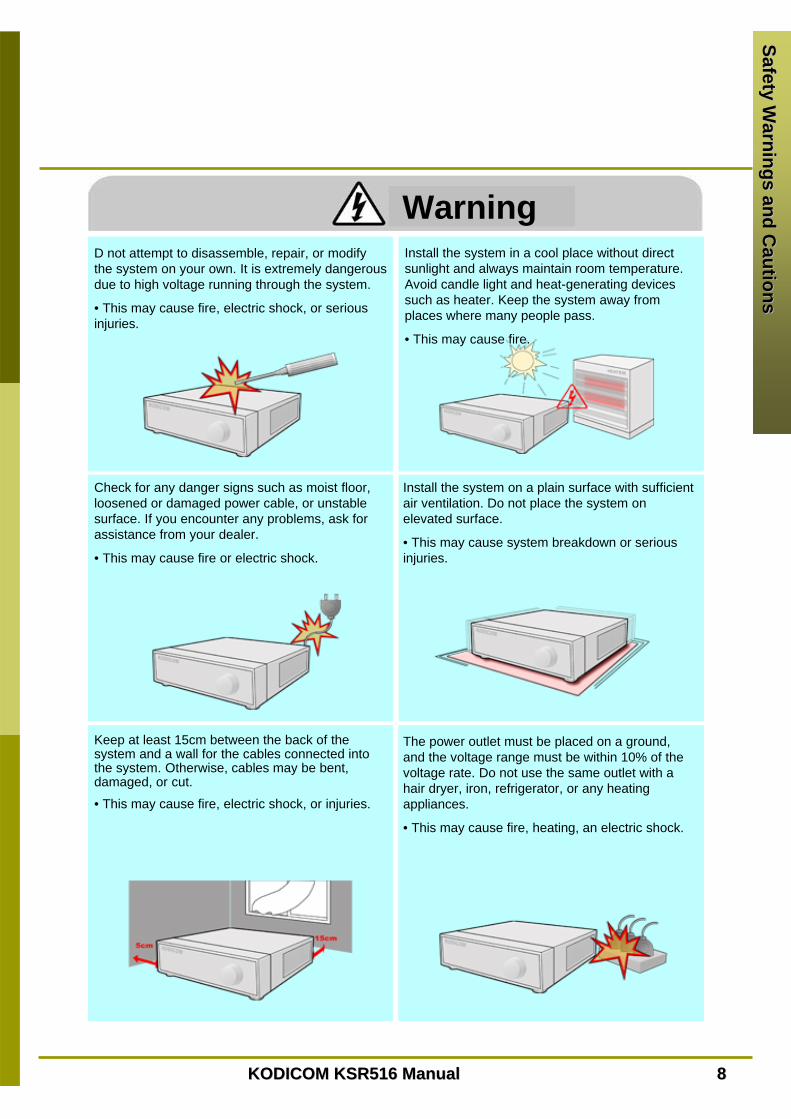
D not attempt to disassemble, repair, or modify the system on your own. It is extremely dangerous due to high voltage running through the system.
• This may cause fire, electric shock, or serious injuries.
Install the system in a cool place without direct sunlight and always maintain room temperature. Avoid candle light and heat-generating devices such as heater. Keep the system away from places where many people pass.
• This may cause fire.
Check for any danger signs such as moist floor, loosened or damaged power cable, or unstable surface. If you encounter any problems, ask for assistance from your dealer.
• This may cause fire or electric shock.
Install the system on a plain surface with sufficient air ventilation. Do not place the system on elevated surface.
• This may cause system breakdown or serious injuries.
Keep at least 15cm between the back of the system and a wall for the cables connected into the system. Otherwise, cables may be bent, damaged, or cut.
• This may cause fire, electric shock, or injuries.
The power outlet must be placed on a ground, and the voltage range must be within 10% of the voltage rate. Do not use the same outlet with a hair dryer, iron, refrigerator, or any heating appliances.
• This may cause fire, heating, an electric shock.
Warning
99 KODICOM KSR516 ManualKODICOM KSR516 Manual
Safety Warnings and C
autionsSafety W
arnings and Cautions
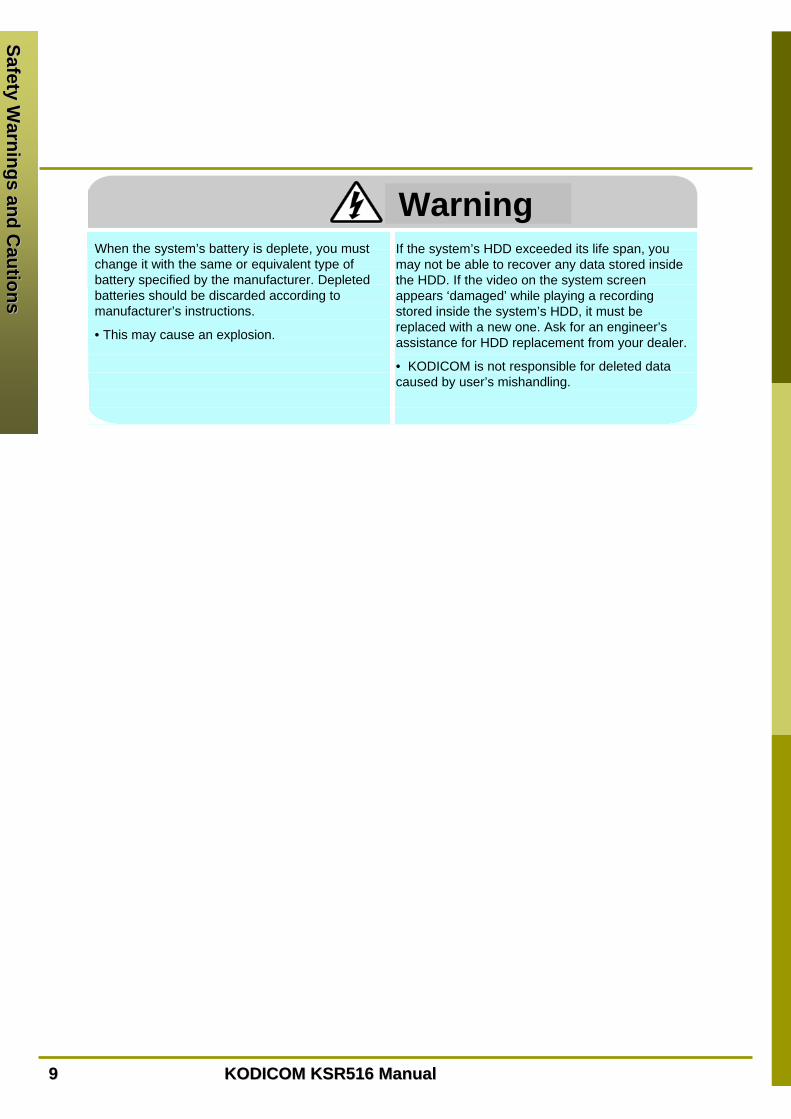
When the system’s battery is deplete, you must change it with the same or equivalent type of battery specified by the manufacturer. Depleted batteries should be discarded according to manufacturer’s instructions.
• This may cause an explosion.
If the system’s HDD exceeded its life span, you may not be able to recover any data stored inside the HDD. If the video on the system screen appears ‘damaged’ while playing a recording stored inside the system’s HDD, it must be replaced with a new one. Ask for an engineer’s assistance for HDD replacement from your dealer.
• KODICOM is not responsible for deleted data caused by user’s mishandling.
Warning

KODICOM KSR516 Manual KODICOM KSR516 Manual 1010
Safety Warnings and C
autionsSafety W
arnings and Cautions
Do not install the system in a place with high magnetic, electric wave, or wireless devices such as radio or TV.
• Install the system in a place without magnetic objects, electric frequencies, or vibration.
Install the system in a place with appropriate moisture and temperature level.
• Avoid installing the system with high (over 40℃) or low (under 0℃) temperature.
Prevent any substances from being inserted into the system.
• This may cause system breakdown.
Do not place any heavy object on the system.
• This may cause system breakdown.
Install the system in a place with sufficient air ventilation.
• Keep at least 15cm distance between the back of the system and a wall, and at least 5cm distance between the side of the system and a wall.
Install the system on a stable and leveled surface..
• The system may not operate properly.
Caution
1111 KODICOM KSR516 ManualKODICOM KSR516 Manual
Safety Warnings and C
autionsSafety W
arnings and Cautions
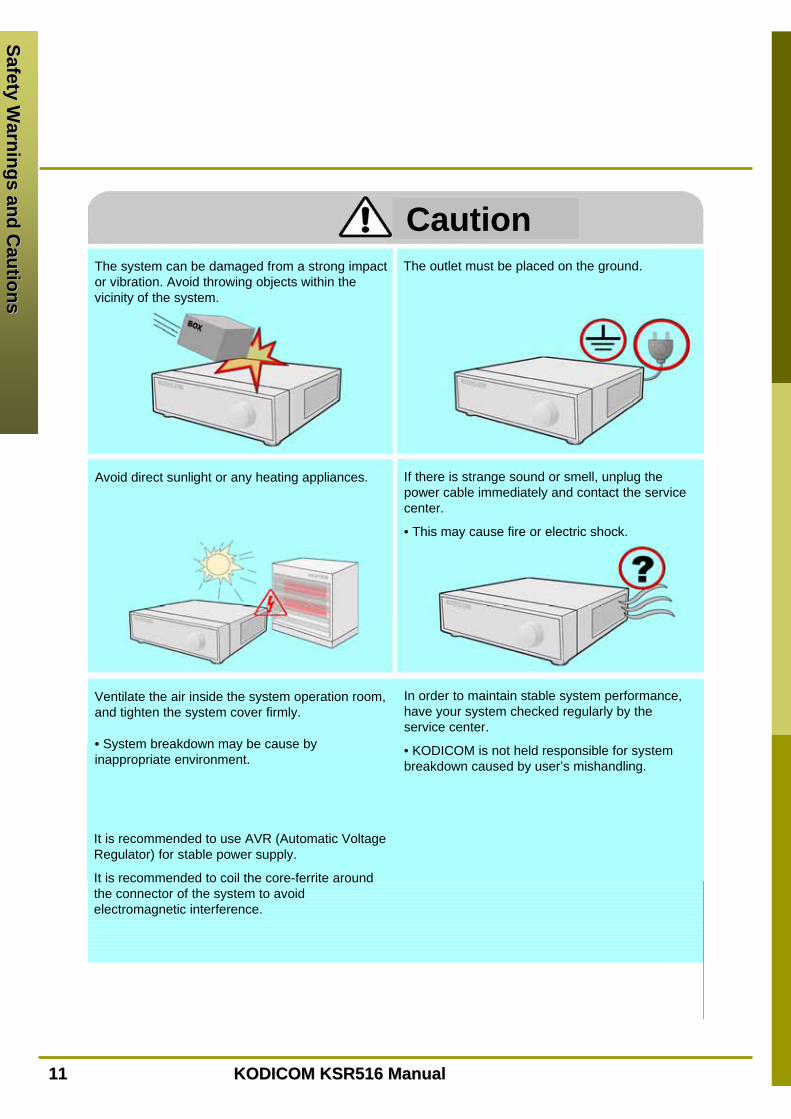
The system can be damaged from a strong impact or vibration. Avoid throwing objects within the vicinity of the system.
The outlet must be placed on the ground.
Avoid direct sunlight or any heating appliances. If there is strange sound or smell, unplug the power cable immediately and contact the service center.
• This may cause fire or electric shock.
Ventilate the air inside the system operation room, and tighten the system cover firmly.
• System breakdown may be cause by inappropriate environment.
In order to maintain stable system performance, have your system checked regularly by the service center.
• KODICOM is not held responsible for system breakdown caused by user’s mishandling.
It is recommended to use AVR (Automatic Voltage Regulator) for stable power supply.
It is recommended to coil the core-ferrite around the connector of the system to avoid electromagnetic interference.
Caution

1212 KODICOM KSR516 ManualKODICOM KSR516 Manual
Safety Warnings and C
autionsSafety W
arnings and Cautions
CautionDo not overturn the product under use. Power Set up
Connect with AC115V if ACselector is as left picture.
Connect with AC230V if ACselector is as left picture.

KODICOM KSR516 Manual KODICOM KSR516 Manual 1313
EquipmentEquipmentEquipment
Power Cable
Manual (Site/Center)
Please check to make sure the following equipment are included when you purchased KSR516. If any items are missing, contact your dealer.
(Optional items: Monitor; External Modem)
Monitor (Option)
Equipment
Equipment
BNC cable (3M)
CD (Manual / Remote S/W)
Mouse

1414 KODICOM KSR516 ManualKODICOM KSR516 Manual
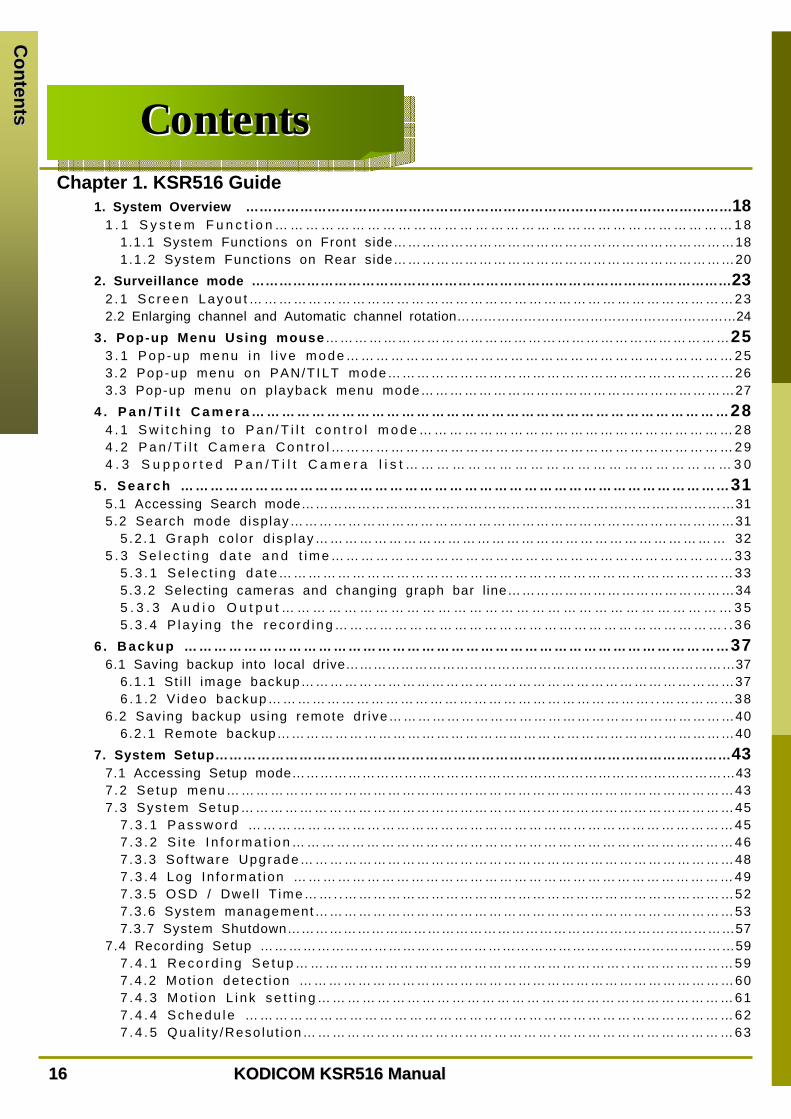
1. System Overview ………………………………………………………………………………………………181 . 1 S y s t e m F u n c t i o n … … … … … … … … … … … … … … … … … … … … … … … … … … … … … … 1 8
1.1.1 System Functions on Front side………………………………………………………………181.1.2 System Functions on Rear side………………………………………………………………20
2. Surveillance mode ……………………………………………………………………………………………232 . 1 S c r e en Lay ou t … ……………………………………………………………………………………232.2 Enlarging channel and Automatic channel rotation………………………………………………………24
3 . Pop-up Menu Using mouse…………………………………………………………………………253 . 1 P o p - u p m e n u i n l i v e m o d e … … … … … … … … … … … … … … … … … … … … … … … … … … 2 53.2 Pop-up menu on PAN/T ILT mode………………………………………………………………263.3 Pop-up menu on playback menu mode…………………………………………………………27
4 . P a n / T i l t C a m e r a … … … … … … … … … … … … … … … … … … … … … … … … … … … … … … … …284 . 1 S w i t c h i n g t o P a n / T i l t c o n t r o l m o d e … … … … … … … … … … … … … … … … … … … … … 2 84 . 2 P a n / T i l t C a m e r a C o n t r o l … … … … … … … … … … … … … … … … … … … … … … … … … … … 2 94 . 3 S u p p o r t e d P a n / T i l t C a m e r a l i s t … … … … … … … … … … … … … … … … … … … … … 3 0
5 . S e a r c h … … … … … … … … … … … … … … … … … … … … … … … … … ………………………………315.1 Accessing Search mode…………………………………………………………………………………315.2 Search mode display…………………………………………………………………………………31
5.2 .1 Graph co lo r d isp lay………………………………………………………………………… 325 . 3 S e l e c t i n g d a t e a n d t i m e … … … … … … … … … … … … … … … … … … … … … … … … … … … 3 3
5 . 3 . 1 Se lec t i ng da t e…………………………………………………………………………………335.3.2 Select ing cameras and changing graph bar l ine…………………………………………345 . 3 . 3 A u d i o O u t p u t … … … … … … … … … … … … … … … … … … … … … … … … … … … … … 3 55 . 3 . 4 P l a y i n g t h e r e c o r d i n g … … … … … … … … … … … … … … … … … … … … … … … … … … . . 3 6
6 . B a c k u p … … … … … … … … … … ………………………………………………………………………376.1 Saving backup into local drive…………………………………………………………….……………37
6.1.1 St i l l image backup………………………………………………………………………………376 . 1 .2 V ideo backup……………………………………………………………………..……………38
6.2 Saving backup using remote dr ive………………………………………………………………406.2.1 Remote backup……………………………………………………………………..……………40
7. System Setup…………………………………………………………………………………………………437.1 Accessing Setup mode……………………………………………………………………………………437.2 Se tup menu……………………………………………………………………………………………437.3 Sys tem Se tup…………………………………………………………………………………………45
7 . 3 . 1 Pas s wo r d … … … … … … ………………………………………………………………………457 . 3 . 2 S i t e I n f o r m a t i on … … … … … … … ……………………………………………………………467.3 .3 Sof tware Upgrade………………………………………………………………………………487 . 3 . 4 Log In fo rmat ion ………………………………………………………………………………497.3 .5 OSD / Dwel l T ime……..………………………………………………………………………527.3.6 System management……………………………………………………………………………537.3.7 System Shutdown……………………………………………………………………………………57
7.4 Recording Setup ……………………………………………………………………..…………………597 . 4 . 1 Rec o r d i ng Se t up… … … … … … … … … …………………………………..…………………597.4 .2 Mot ion de tec t ion ………………………………………………………………………………607 . 4 . 3 M o t i o n L i n k s e t t i n g … … … … … … … … … … … … … … … … … … … … … … … ……………617 . 4 . 4 S c h e d u l e … … … … … … … … … … … … … … … … … … … ……………………………………627 . 4 . 5 Q ua l i t y /Reso lu t ion…………………………………………….………………………………63
Contents
Contents
ContentsContentsContents
Chapter 1. KSR516 Guide
1515 KODICOM KSR516 ManualKODICOM KSR516 Manual
Chapter 2. KSR516 DVR Installation
1. Viewer for KDB data………………………………………………………………………………………….922. Specifications …………………………………………………………………………………………………953. FAQ………………………………………………………………………………………………………………97
Appendix
1. Pan/Tilt Connection………………………………………………………………………………………822. Connecting LAN/PSTN Communication Lines……………………………………………………………83
2.1 LAN, ISDN (with the Router), and Dedicated Line Connection……………………………………832.2 PSTN (telephone line) Connection (optional)………………………………………………………84
3. RX Receiver (KRE-302) Connection Diagram (optional)………………………………………………853.1 Name of Each Part and Descript ion…………………………………………………………86
4. External Sensor Connection (Input)………………………………………………………………………875. Control Port Connection (Output)…………………………………………………………………………886. Adding HDD……………………………………………………...…………………….……………89
6.1 Ins ta l l i ng new HDD…………………………………………………………………..………896.2 Checking HDD Database…………………………………………………….……………………90
7.5 Camera Setup……………………………………………………………………………….………………647.5 .1 Camera name…………………………………………………………………….………………657 . 5 . 2 Sens o r s e t t i ng … … … … … … … … … … … … … … … … … … … … … … ……………………667 . 5 . 3 S e n s o r / C o n t r o l l i n k … … … … … … … … … … … … … … … … … … … … … … … … … … … … 6 77.5 .4 Sensor /Camera l ink……………………………………………………………………………68
7.6 Network Setup………………………………………………………………………………………………697.7 Backup Schedule ………………………………………………………………………..………………73
7.7.1 Adding Backup schedule………………………………………………………..…………………747.7.2 Deleting a Backup schedule…………………………………………………………………………79
8. Controls - Manual Control…………………………………………………………………………………808.1 Switching to Control Mode…………………………………………………………………………………80
Contents
Contents
1616 KODICOM KSR516 ManualKODICOM KSR516 Manual
Contents
Contents
ContentsContentsContentsChapter 1. KSR516 Guide
1. System Overview ………………………………………………………………………………………………181 . 1 S y s t e m F u n c t i o n … … … … … … … … … … … … … … … … … … … … … … … … … … … … … … 1 8
1.1.1 System Functions on Front side………………………………………………………………181.1.2 System Functions on Rear side………………………………………………………………20
2. Surveillance mode ……………………………………………………………………………………………232 . 1 S c r e en Lay ou t … ……………………………………………………………………………………232.2 Enlarging channel and Automatic channel rotation………………………………………………………24
3 . Pop-up Menu Using mouse…………………………………………………………………………253 . 1 P o p - u p m e n u i n l i v e m o d e … … … … … … … … … … … … … … … … … … … … … … … … … … 2 53.2 Pop-up menu on PAN/T ILT mode………………………………………………………………263.3 Pop-up menu on playback menu mode…………………………………………………………27
4 . P a n / T i l t C a m e r a … … … … … … … … … … … … … … … … … … … … … … … … … … … … … … … …284 . 1 S w i t c h i n g t o P a n / T i l t c o n t r o l m o d e … … … … … … … … … … … … … … … … … … … … … 2 84 . 2 P a n / T i l t C a m e r a C o n t r o l … … … … … … … … … … … … … … … … … … … … … … … … … … … 2 94 . 3 S u p p o r t e d P a n / T i l t C a m e r a l i s t … … … … … … … … … … … … … … … … … … … … … 3 0
5 . S e a r c h … … … … … … … … … … … … … … … … … … … … … … … … … ………………………………315.1 Accessing Search mode…………………………………………………………………………………315.2 Search mode display…………………………………………………………………………………31
5.2 .1 Graph co lo r d isp lay………………………………………………………………………… 325 . 3 S e l e c t i n g d a t e a n d t i m e … … … … … … … … … … … … … … … … … … … … … … … … … … … 3 3
5 . 3 . 1 Se lec t i ng da t e…………………………………………………………………………………335.3.2 Select ing cameras and changing graph bar l ine…………………………………………345 . 3 . 3 A u d i o O u t p u t … … … … … … … … … … … … … … … … … … … … … … … … … … … … … 3 55 . 3 . 4 P l a y i n g t h e r e c o r d i n g … … … … … … … … … … … … … … … … … … … … … … … … … … . . 3 6
6 . B a c k u p … … … … … … … … … … ………………………………………………………………………376.1 Saving backup into local drive…………………………………………………………….……………37
6.1.1 St i l l image backup………………………………………………………………………………376 . 1 .2 V ideo backup……………………………………………………………………..……………38
6.2 Saving backup using remote dr ive………………………………………………………………406.2.1 Remote backup……………………………………………………………………..……………40
7. System Setup…………………………………………………………………………………………………437.1 Accessing Setup mode……………………………………………………………………………………437.2 Se tup menu……………………………………………………………………………………………437.3 Sys tem Se tup…………………………………………………………………………………………45
7 . 3 . 1 Pas s wo r d … … … … … … ………………………………………………………………………457 . 3 . 2 S i t e I n f o r m a t i on … … … … … … … ……………………………………………………………467.3 .3 Sof tware Upgrade………………………………………………………………………………487 . 3 . 4 Log In fo rmat ion ………………………………………………………………………………497.3 .5 OSD / Dwel l T ime……..………………………………………………………………………527.3.6 System management……………………………………………………………………………537.3.7 System Shutdown……………………………………………………………………………………57
7.4 Recording Setup ……………………………………………………………………..…………………597 . 4 . 1 Rec o r d i ng Se t up… … … … … … … … … …………………………………..…………………597.4 .2 Mot ion de tec t ion ………………………………………………………………………………607 . 4 . 3 M o t i o n L i n k s e t t i n g … … … … … … … … … … … … … … … … … … … … … … … ……………617 . 4 . 4 S c h e d u l e … … … … … … … … … … … … … … … … … … … ……………………………………627 . 4 . 5 Q ua l i t y /Reso lu t ion…………………………………………….………………………………63

1717 KODICOM KSR516 ManualKODICOM KSR516 Manual
7.5 Camera Setup……………………………………………………………………………………………647.5 .1 Camera name……………………………………………………………………………………657 . 5 . 2 Sens o r s e t t i ng … … … … … … … … … … … … … … … … … … … … … … ……………………667 . 5 . 3 S e n s o r / C o n t r o l l i n k … … … … … … … … … … … … … … … … … … … … … … … … … … … … 6 77.5 .4 Sensor /Camera l ink……………………………………………………………………………68
7.6 Network Setup………………………………………………………………………………………………697.7 Backup Schedule ………………………………………………………………………………………73
7.7.1 Adding Backup schedule…………………………………………………………………………747.7.2 Deleting a Backup schedule…………………………………………………………………………79
8. Controls - Manual Control……………………………………………………………………………………808.1 Switching to Control Mode…………………………………………………………………………………80
Contents
Contents

KODICOM KSR516 Manual KODICOM KSR516 Manual 1818
1. System Overview1. System Overview
1.1 System Functions
1.1.1 System functions on Front Side
The following describes keys and ports on the front part of the system and their functions:
[Directional Keys]
• Use to move options in Setup mode or in Search mode.
• When controlling P/T/Z camera, press the directional keys to move the camera.
[Enter Key]
• Use to select options in Setup mode or in Search mode.
[Jog]
• Rotate to view the recording one frame at a time in Search mode.
• Rotate to change the value of options one unit at a time in Setup mode.
• When controlling P/T/Z camera, rotate to shift camera lens focus.
[Shuttle]
• Rotate to play the recording forward or backwards in Search mode.
• Rotate to change the value of options continuously in Setup mode.
• When controlling P/T/Z camera, rotate to zoom in or out.
1
2
[Figure 1-1. System front view]
System O
verviewSystem
Overview
3
4
3
5 9 10
11
121 2
47 8
6 13

1919 KODICOM KSR516 ManualKODICOM KSR516 Manual
[CD-ROM Open button]
Press to open CD-ROM.
[Camera/Number keys]
• In Surveillance mode, press to enlarge a camera channel.
• In Search mode, press to enlarge a camera channel during playback.
• Press the keys to enter correct password when accessing Setup mode or Search mode.
[Auto]
• Press to begin automatic channel rotation to view all channels one at a time.
[Split screen buttons]
• In Surveillance mode or Search mode, press to select 4-splitscreen , 9-splitscreen , or 16-splitscreen .
[Menu]
• Press to access Setup mode.
[Search]
• Press to access Search mode.
[Search mode control Keys]
• In Search mode, use these keys to view the recording from the very beginning/end, to play the recording forward/backward, or to pause.
[USB Port]
• You can connect a portable disk drive to USB port to save backup of your recorded video.
• You can update your system with an upgrade package through the USB port.
5
6
7
8
9
10
11
12
System O
verviewSystem
Overview
[POWER LED]
• When power switch is on, the LED gives green light.
13
Ver 1.1TranscendTRANSCEND JF A 128M5
Ver 1.1KMITUnidrive2
Ver 1.1SHELLGINOSHELLGINO N44
3
1
No.
Ver 1.1JUNGSOFTNexdrive
Ver 1.1AL-techAnyDrive
USB VersionCompanyName
*Removable Disk support
[Note] Removable Disk
The table below shows the compatible USB disk. Other USB disk might now
work properly.
☞☞

KODICOM KSR516 Manual KODICOM KSR516 Manual 2020
1.1.2 System Functions on the Rear Side
The following describes keys and ports on the rear part of the system and their functions:
[Figure 1-2. System rearview]
[Power Connector]
• Power cable input for system’s main power supply.
• 110V ~ 220V power can be connected to the system.
1
2
3
[Caution]
• Due to possible electrocution, please read [Safety Warnings and Cautions] on Page 8.
[Camera Video Input BNC]
• Camera inputs for channels 1~16.
• The system supports both NTSC and PAL.
[Loop Through Output]
• Video input ports for connecting cameras in order to loop the recording through to another monitor.
• The system supports both NTSC and PAL.
[Caution]
• According to the grounding status of the power, electric current that can cause an electric shock may flow in the video line (coaxial cable). Therefore turn off the system first before connecting the video line to the BNC port.
System O
verviewSystem
Overview
7 6 4 5 18
142 3
9 10 11 12 1315 16
2121 KODICOM KSR516 ManualKODICOM KSR516 Manual
[Sensor Input Port]
• External sensor inputs for channels 1~4.
• The system supports NC and NO sensor types.
[Control Output Port]
• Control output for connecting control devices for channels 1~4.
4
5
6
7
8
9
10
11
[Caution]
• Since control devices use output in a contact point format without a polarity at the control output port, do not connect AC 110V ~ 220V of the power cable or supply DC power. Otherwise, you may cause a fire.
• When controlling DC power, it is recommended that you cut the (-ve) line.
[RS-422 Output Port for P/T/Z Control]
• RS-422/RS-485 output for controlling P/T/Z cameras.
[Video Output Port]
• Video output for connecting with TV monitor.
Supports both NTSC and PAL video format depending on the input.
[VGA Output Port]
• VGA output for connecting with PC monitor.
[S-Video Output Port]
• S-Video output for connecting with TV.
• Supports both NTSC and PAL video format depending on the input.
[Audio In]
• Audio input for recording sound.
[Audio Out]
• Audio output for hearing the recorded sound.
[External Modem Terminal]
• Provide a connection to the external modem for a remote access.
[LAN]
• Ethernet 10/100 connection port for connecting the system through network.
12
13
System O
verviewSystem
Overview
KODICOM KSR516 Manual KODICOM KSR516 Manual 2222
System O
verviewSystem
Overview
[Cooling Fan]
• Cooling fan for allowing hot air to ventilate the system.
[MOUSE]
• Mouse input for using a mouse with the system.
• If the mouse has a mouse wheel, the wheel can be used as system’s shuttle dial.
14
15
16
*Applicable Wheel Mouse List
CHIC TECH/ChinaYESSMP2000WXSAMSUNG5
Remarks
ChinaNOSWU-23USBA4TECH2
DONGGUAN COMXUN ELECTRONICS Co, LTD ChinaNOE-C0110-02-3179
Kntcorporation
4
Logitech(China)YESM-S48aTriGem6
3
1
No.
ChinaYESSWW-35A4TECH
ChinaNOSWW-21A4TECH
Place of ManufactureSupport wheel feature
Model Name or Type
Mouse Name
[Image Input/Output Switch]
Image Input/Output terminal options
•NTSC,PAL : Default settings for input video format.
•CVBS, VGA : Image output types; when CVBS is selected, the image will be displayed on the external monitors; when VGA is selected, the image will be displayed on the computer monitors.
(but, when VGA is selected, the surveillance image will not be separated on the monitor while rebooting)
[Note] Support for Mouse Wheel
The wheel mouse types supported by the system are listed in the table below.
The wheel mouse types other than listed below may not be supported by the system.
☞☞

2323 KODICOM KSR516 ManualKODICOM KSR516 Manual
2. Surveillance Mode2. Surveillance Mode
Surveillance ScreenSurveillance Screen
2.1 Screen Layout
[Camera Number]
Displays camera number.
[Camera Name]
Displays camera name.
[Audio Recording Status]
Displays audio recording status.
1
2
[Recording Status]
• Displays camera recording mode.
[P/T/Z Status]
• Displays Pan/Tilt camera status.
3
4
[Table 2-1. Available Recording Modes and Screen Display]
[Figure 2-1. Main Surveillance Mode]
5
1 2
3
45
• C: Continuous Recording
• M: Motion Recording
• S: Sensor Recording
• P: Pre-alarm Recording
• No recording
Available Recording Modes and Screen DisplayRecording Mode
No Display
Red REC
Orange REC
• Continuous Recording
• Motion Recording • Sensor Recording
• Motion & Sensor Recording • Motion & Pre-alarm Recording
• Sensor & Pre-alarm Recording
• Motion & Sensor & Pre-alarm Recording

KODICOM KSR516 Manual KODICOM KSR516 Manual 2424
2.2 Enlarging channel and Automatic channel rotation
[Figure 2-2. 16-splitscreen mode]
[Enlarging a channel]
• Press any 1~16 keys on the system to enlarge the camera channel and view the channel in fullscreen.
[Selecting 4-splitscreen]
• Press the splitscreen button to select 4-splitscreen.
[Selecting 9-splitscreen]
• Press the splitscreen button to select 9-splitscreen.
[Selecting 16-splitscreen]
• Press the splitscreen button to select 16-splitscreen.
[Automatic channel rotation]
• When one channel is enlarged, press the Auto key on the system to view all camera channels in rotation (see page 52 – OSD/Dwell Time for details on changing Auto option).
Surveillance ScreenSurveillance Screen
[Figure 2-3. 9-splitscreen mode]
[Figure 2-4. Fullscreen mode]

KODICOM KSR516 Manual KODICOM KSR516 Manual 2525
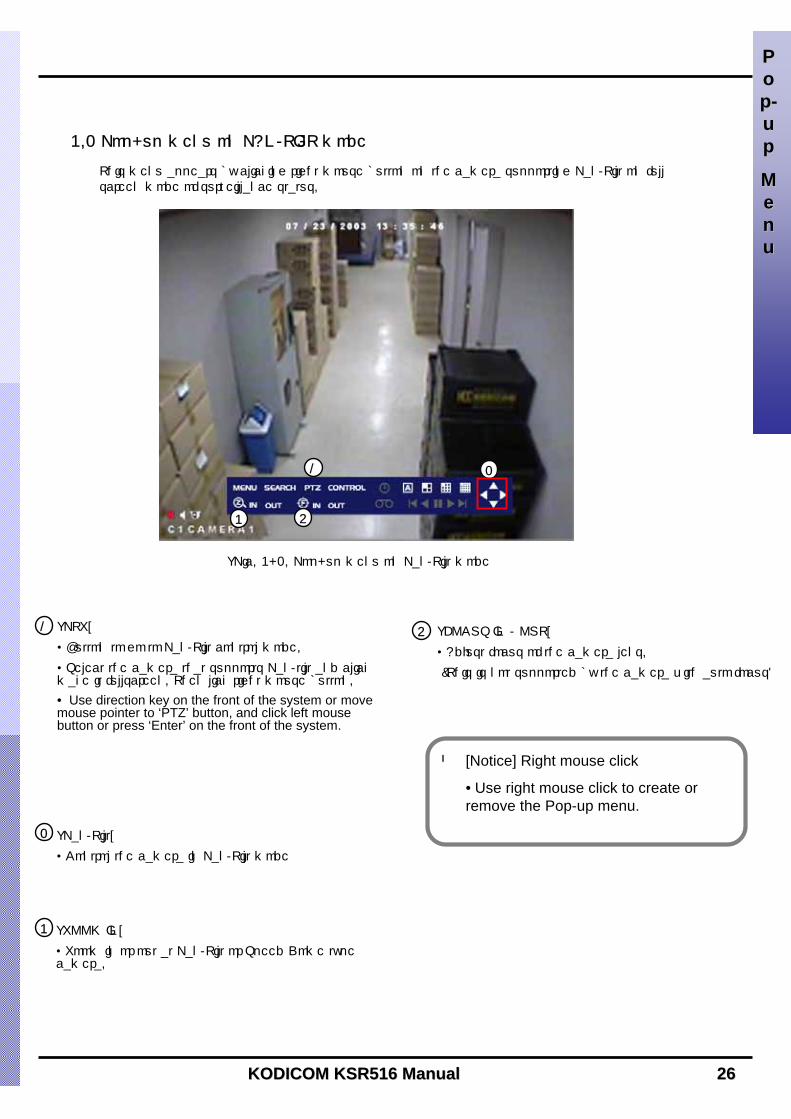
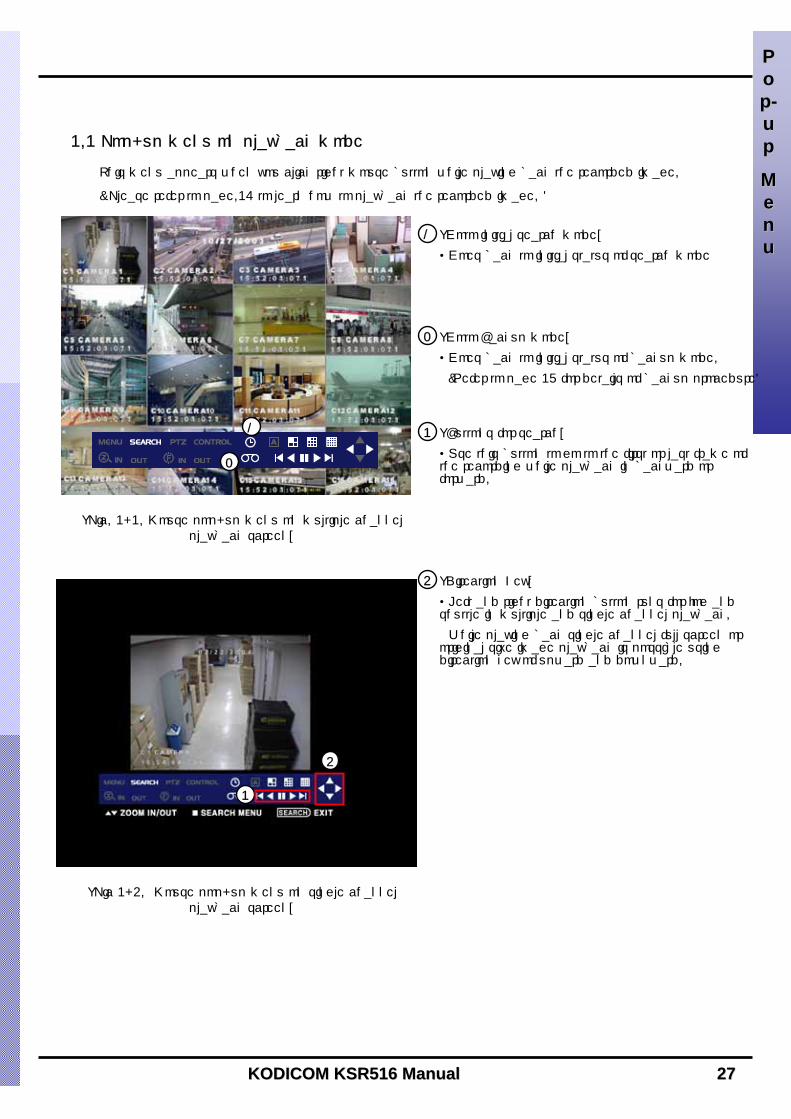
3.1 Pop-up menu in live mode
[picture 3-1. Pop-up menu using mouse on surveillance mode]
3. Pop3. Pop--up menu using mouseup menu using mouse
PPoopp--uupp
MMeennuu
1
2
3
4
5
Pop-up menu will appear when you click right mouse button on surveillance mode, search mode or Pan / Tilt mode.
[MENU]• Main menu for system setup • Click left mouse button over the ‘Menu’ icon or press ‘Enter’ on the front of the system.
[SEARCH]• Menu to go to Search mode• Use direction key on the front of the system or move mouse pointer to ‘Search’ button, and click left mouse button or press ‘Enter’ on the front of the system.
[AUTO]• Click this menu to see the live image by single, quad, 9ch, and 16 channel mode.
[Multi Screen]• Click this menu to toggle between 4 [ ]
9 [ ] and 16 [ ] screen surveillance mode.• Use direction key on the front of the system or move mouse pointer to ‘Control’ button, and click left mouse button or press ‘Enter’ on the front of the system.
[CONTROL]• Menu to go to Control menu.• Use direction key on the front of the system or move mouse pointer to ‘Control’ button, and click left mouse button or press ‘Enter’ on the front of the system.
[Notice] Right mouse click
• Click right mouse button to activate or deactivate pop-up menu in the surveillance mode.
• Right mouse click in the setup mode will bring previous screen.
☞☞
1 2 3 4 5
KODICOM KSR516 Manual KODICOM KSR516 Manual 2626
3.2 Pop-up menu on PAN/TILT mode
This menu appears by clicking right mouse button on the camera supporting Pan/Tilt on full screen mode of surveillance status.
[Pic. 3-2. Pop-up menu on Pan/Tilt mode
[PTZ]
• Button to go to Pan/Tilt control mode.• Select the camera that supports Pan/tilt and click make it fullscreen. Then lick right mouse button.
• Use direction key on the front of the system or move mouse pointer to ‘PTZ’ button, and click left mouse button or press ‘Enter’ on the front of the system.
[Pan/Tilt]
• Control the camera in Pan/Tilt mode
[ZOOM IN]
• Zoom in or out at Pan/Tilt or Speed Dome type camera.
[FOCUS IN / OUT]
• Adjust focus of the camera lens.(This is not supported by the camera with auto focus)
1
2
3
4
[Notice] Right mouse click
• Use right mouse click to create or remove the Pop-up menu.
☞☞
PPoopp--uupp
MMeennuu
1 2
3 4
KODICOM KSR516 Manual KODICOM KSR516 Manual 2727
3.3 Pop-up menu on playback mode
This menu appears when you click right mouse button while playing back the recorded image.
( Please refer to page.36 to learn how to playback the recorded image. )
[Pic. 3-3. Mouse pop-up menu on multiple channel playback screen]
[Pic 3-4. Mouse pop-up menu on single channel playback screen]
[Goto initial search mode]
• Goes back to initial status of search mode
3
4
1
[Goto Backup mode]
• Goes back to initial status of backup mode.(Refer to page 37 for details of backup procedure)
2
[Buttons for search]
• Use this button to go to the first or last frame of the recording while playback in backward or forward.
3
[Direction Key]
• Left and right direction button runs for jog and shuttle in multiple and single channel playback.
• While playing back single channel full screen or original size image playback is possible using direction key of upward and downward.
4
PPoopp--uupp
MMeennuu
1
2

2828 KODICOM KSR516 ManualKODICOM KSR516 Manual
4.1 Switching to Pan/Tilt control mode
[Figure 4-1. Enlarged P/T/Z channel]
[Pan/Tilt Camera Control]
• Select the camera channel connected to the P/T/Z camera by using the camera numberkeys on the system. This will enlarge the channel.
• Once the channel is enlarged, press Enter to access [P/T/Z control mode]. Pan/Tilt controls may differ depending on the connected camera model.
[Figure 4-2. P/T/Z control mode]
[Exiting P/T/Z control mode]
• Press [OK] button to return to Surveillance mode.
4. Pan/Tilt Camera4. Pan/Tilt Camera
Pan/Tilt Cam
eraPan/Tilt C
amera

KODICOM KSR516 Manual KODICOM KSR516 Manual 2929
In P/T/Z menu, you can switch the P/T/Z camera controls to manual control, as well as changing Zoom, Focus, and Auto Pan settings.
[Figure 4-3. P/T/Z menu]
12
345
6
4.2 Pan/Tilt Camera Control
[P/T/Z Model]
Displays the P/T/Z camera model.
[P/T/Z function buttons]
You can enable or disable P/T/Z camera functions by selecting the options you wish to use by using the mouse or the directional keys and Enter key.
Some functions may differ depending on the P/T/Z camera model you are using.
[P/T Speed]
• Use the directional keys on the system to set the speed of the movement of the Speed Dome camera when controlling it manually.
• P/T Speed only applies if you are using a Speed Dome camera.
1
2
[Z/F Speed]
• Use the jog/shuttle on the system to set the camera zoom/focus rate.
• Z/F Speed only applies if you are using a Speed Dome camera.
[Preset]
• When you have the Speed Dome camera positioned with a Preset button, pressing that button will move the camera to its preset position (see [Mode Select]).
• Preset only applies if you are using a Speed Dome camera.
[Mode Select]
• Mode button is used to set the position of the Speed Dome camera to its Preset position.
• Select the [Cursor Mode] button using the directional keys, then press Enter to change it to [P/T Mode].
• To set the position of the Speed Dome camera to Preset buttons, change the [Cursor Mode] to [P/T Mode], then move the camera position using the directional keys. Once the camera is in the position you wish to set, change the [P/T Mode] back into [Cursor Mode].
3
4
5
6
Pan/Tilt Cam
eraPan/Tilt C
amera

3030 KODICOM KSR516 ManualKODICOM KSR516 Manual
4.3 Supported Pan/Tilt Camera List
Pan/Tilt Cam
eraPan/Tilt C
amera
NoYesYesNoYesYesYesYesSCC-641SAMSUNG6
Note
NoNoYesYesYesYesYesYesLTC SDPHILIPS13
NoYesYesYesYesYesYesYesC-CC554 SDTOA (CBC)14
NoNoNoNoYesYesNoYesKRX-3200 RXUNIMO2
NoYesYesNoYesYesYesYesC1489M-D SDPELCO11
NoYesNoNoYesYesNoYesCCR-20G RXSUNG-JIN9
NoYesYesNoYesYesYesYesPELCO-D SDPELCO10
NoYesYesYesYesYesYesYesWV-CS854PANASONIC7
NoYesNoNoYesYesNoYesDRX-501ADONG-YANG8
NoYesYesNoYesYesYesYesNK-97 SDNIKO4
NoYesYesYesYesYesYesYesSPD-1600 SDSAMSUNG5
12
3
1
No.
NoYesNoNoYesYesNoYesKRX-2101 RXUNIMO
NoNoYesYesYesYesNoNoGC-755HONEYWELL
Yes
Focus
No
P/TSpeed
NoYesNoNoYesYesKRE-301 RXKODICOM
IRISManual Control
and other functions
PresetZ/FSpeed
ZoomP/TModel NameManufacturer
[Table 4-1. Supported Pan/Tilt camera list]
KODICOM KSR516 Manual KODICOM KSR516 Manual 3131
5. Search5. Search
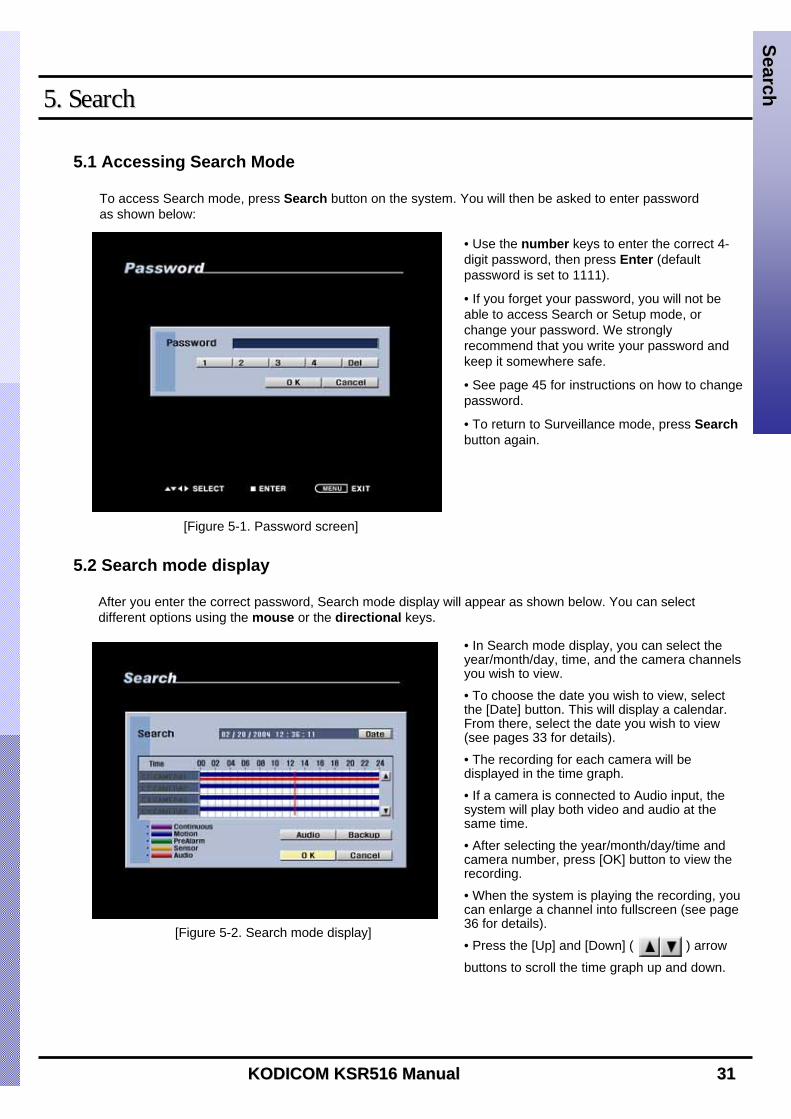
5.1 Accessing Search Mode
To access Search mode, press Search button on the system. You will then be asked to enter password as shown below:
• Use the number keys to enter the correct 4-digit password, then press Enter (default password is set to 1111).
• If you forget your password, you will not be able to access Search or Setup mode, or change your password. We strongly recommend that you write your password and keep it somewhere safe.
• See page 45 for instructions on how to change password.
• To return to Surveillance mode, press Searchbutton again.
[Figure 5-1. Password screen]
5.2 Search mode display
After you enter the correct password, Search mode display will appear as shown below. You can select different options using the mouse or the directional keys.
• In Search mode display, you can select the year/month/day, time, and the camera channels you wish to view.
• To choose the date you wish to view, select the [Date] button. This will display a calendar. From there, select the date you wish to view (see pages 33 for details).
• The recording for each camera will be displayed in the time graph.
• If a camera is connected to Audio input, the system will play both video and audio at the same time.
• After selecting the year/month/day/time and camera number, press [OK] button to view the recording.
• When the system is playing the recording, you can enlarge a channel into fullscreen (see page 36 for details).
• Press the [Up] and [Down] ( ) arrow
buttons to scroll the time graph up and down.
[Figure 5-2. Search mode display]
SearchSearch

KODICOM KSR516 Manual KODICOM KSR516 Manual 3232
SearchSearch
[Table 5-1. Graph color description]
• Recorded data shown on the time graph will be displayed in different color depending on the recording type (see table 5-1).
DescriptionColor
• Purple
• Blue
• Green
• Orange
• Red
Continuous Recording
Display
5.2.1 Graph color display
[Figure 5-3. Graph color display]
Motion-detection Recording
Pre-alarm RecordingSensor Recording
Audio Recording

3333 KODICOM KSR516 ManualKODICOM KSR516 Manual
[Changing Year/Month]
• Press the arrow buttons ( ) above the calendar to change year/month.
[Selecting Date]
• Use the directional keys to select the date and press Enter.
• Dates containing recorded data is displayed in orange color (see table 5-2 for color descriptions).
[Selecting Hour/Minute/Second]
• Use the shuttle on the system or the mouse wheel to change hour/minute/second.
5.3 Selecting date and time
SearchSearch
• To select the date you wish to view, use the directional keys to select [Date] button, then press Enter. This will display a calendar (refer to page 18 for information on system keys).
5.3.1 Selecting date
[Figure 5-4. Selecting [Date] button]
[Figure 5-5. Calendar display]
1
2
3
[Note] Jog and Shuttle Keys
• Jog Key: Changes hour/minute/second or any other setup value one unit at a time.
• Shuttle Key: Changes hour/minute/second or any other setup value quickly.
☞☞
1
2
3
KODICOM KSR516 Manual KODICOM KSR516 Manual 3434
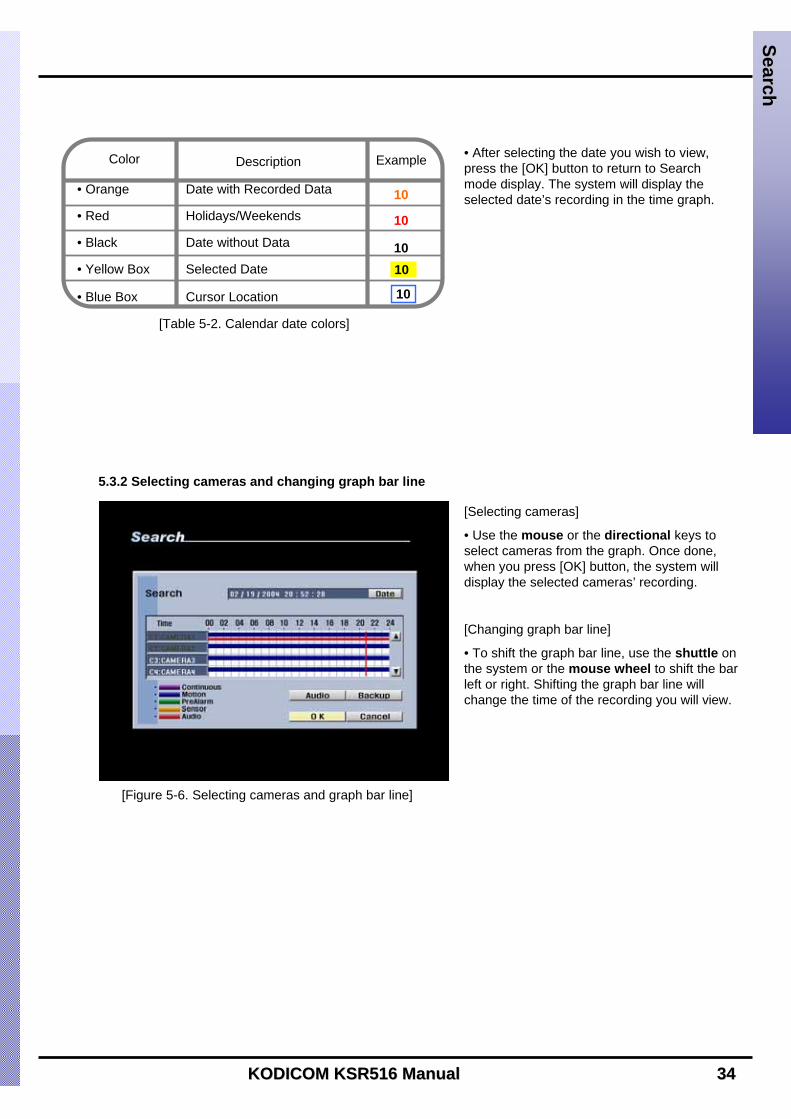
[Selecting cameras]
• Use the mouse or the directional keys to select cameras from the graph. Once done, when you press [OK] button, the system will display the selected cameras’ recording.
[Changing graph bar line]
• To shift the graph bar line, use the shuttle on the system or the mouse wheel to shift the bar left or right. Shifting the graph bar line will change the time of the recording you will view.
5.3.2 Selecting cameras and changing graph bar line
[Figure 5-6. Selecting cameras and graph bar line]
SearchSearch
[Table 5-2. Calendar date colors]
• After selecting the date you wish to view, press the [OK] button to return to Search mode display. The system will display the selected date’s recording in the time graph.
Date with Recorded Data
Holidays/Weekends
Date without Data
Selected Date
Cursor Location
DescriptionColor
• Orange
• Red
• Black
• Yellow Box
• Blue Box
10
10
10
Example
10
10
3535 KODICOM KSR516 ManualKODICOM KSR516 Manual
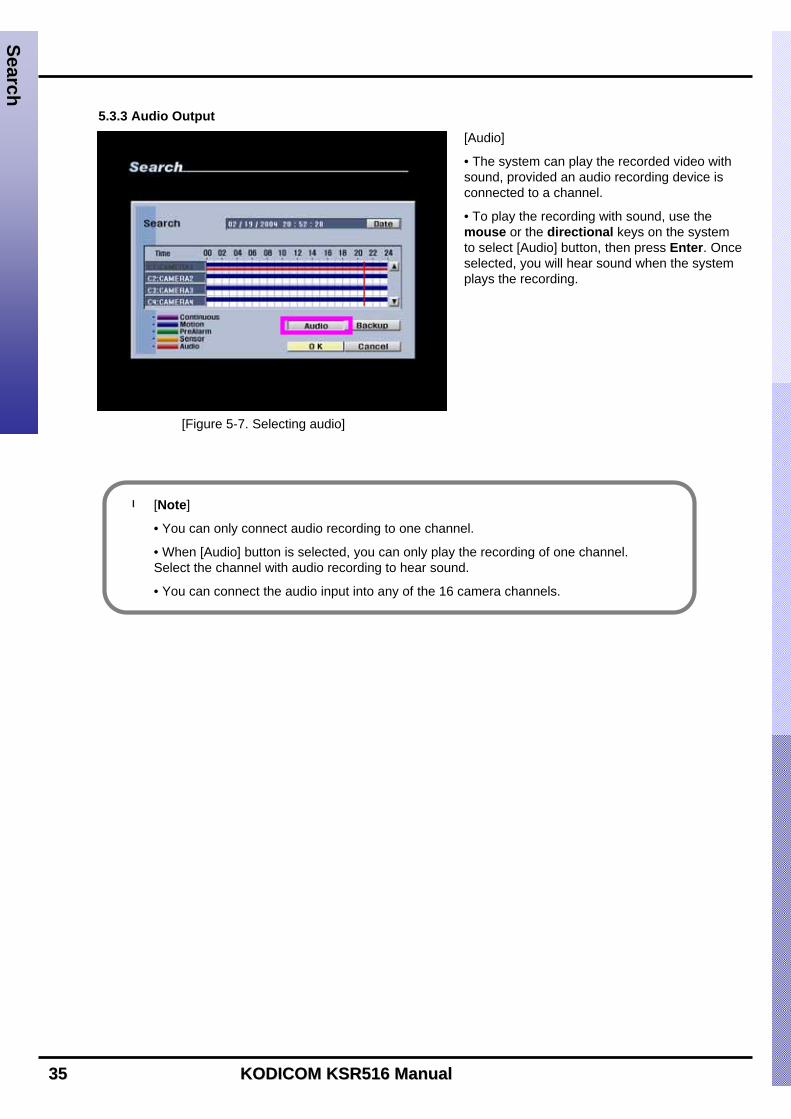
5.3.3 Audio Output[Audio]
• The system can play the recorded video with sound, provided an audio recording device is connected to a channel.
• To play the recording with sound, use the mouse or the directional keys on the system to select [Audio] button, then press Enter. Once selected, you will hear sound when the system plays the recording.
[Figure 5-7. Selecting audio]
[Note]
• You can only connect audio recording to one channel.
• When [Audio] button is selected, you can only play the recording of one channel. Select the channel with audio recording to hear sound.
• You can connect the audio input into any of the 16 camera channels.
☞☞
SearchSearch
KODICOM KSR516 Manual KODICOM KSR516 Manual 3636
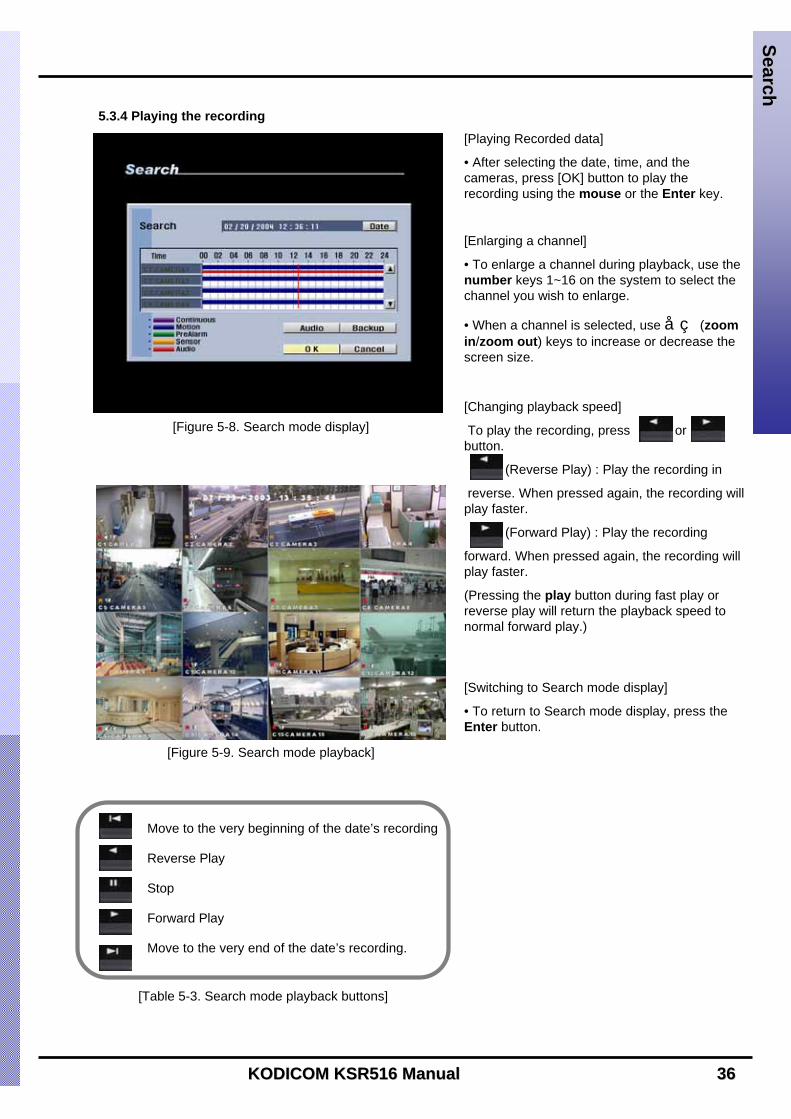
5.3.4 Playing the recording[Playing Recorded data]
• After selecting the date, time, and the cameras, press [OK] button to play the recording using the mouse or the Enter key.
[Enlarging a channel]
• To enlarge a channel during playback, use the number keys 1~16 on the system to select the channel you wish to enlarge.
• When a channel is selected, use ▲▼ (zoom in/zoom out) keys to increase or decrease the screen size.
[Switching to Search mode display]
• To return to Search mode display, press the Enter button.
[Figure 5-8. Search mode display]
[Figure 5-9. Search mode playback]
SearchSearch
Move to the very beginning of the date’s recording
Reverse Play
Stop
Forward Play
Move to the very end of the date’s recording.
[Table 5-3. Search mode playback buttons]
[Changing playback speed]
To play the recording, press or button.
(Reverse Play) : Play the recording in
reverse. When pressed again, the recording will play faster.
(Forward Play) : Play the recording
forward. When pressed again, the recording will play faster.
(Pressing the play button during fast play or reverse play will return the playback speed to normal forward play.)

KODICOM KSR516 Manual KODICOM KSR516 Manual 3737
6. 6. BackupBackup
6.1 Saving backup into local drive
[Figure 6-1. Selecting [Backup] button]
• When the system is playing the recording, press Pause to select the frame you wish to save, then press Enter (see page 36 for playback controls).
• As shown in Figure 6-1, press [Backup] button to view backup options display (Figure 6-2).
• From Search screen display, select [Backup] button to save a backup copy of the recording using the system’s CD-RW, USB HDD, or a portable hard drive such as USB memory stick. The backup files can be saved as AVI, BMP, JPEG, or KDB (KODICOM data format) formats.
6.1.1 Still Image backup
[Backup mode – Still Image]
• To select BMP or JPEG backup mode, use the mouse wheel or the directional keys to highlight [Backup Mode] then use the shuttle to change the option.
[Figure 6-2. Backup options display]
1
2 [Start Time] and [End Time]
• Select the starting time and ending time of the recording you wish to save.
• When Still Image mode is selected, [Start Time] and [End Time] will indicate the time the selected frame is recorded. [Input] button will be disabled.
[Select Media]
• Select the media used for saving backup.
• When Still Image mode is selected, you can only choose Local USB drive.
3
[Camera]
• Select the camera number that contains the recording you wish to save.
• When Still Image mode is selected, you can only choose cameras that were selected in Search mode display. Camera channels that does not contain any data will also be disabled.
4
1
2
4
3
Backup
Backup

KODICOM KSR516 Manual KODICOM KSR516 Manual 3838
6.1.2 Video backup
• Press [OK] button to begin backup. You will see the backup progress through the progress bar.
• When no USB drive is connected, the system will return to Search mode display.
• Once backup is complete, the system will return to Search mode display.
[Figure 6-3. Backup progress bar]
[Figure 6-4. Backup options display]
[Backup mode – Video]
• To select KDB (KODICOM data format) or AVI backup mode, use the mouse or the directional keys on the system to highlight [Backup mode], then use the mouse wheel or the jog/shuttle to change the option.
1
[Start Time] and [End Time]
• Select the starting time and ending time of the recording you wish to save.
• To change the [Start Time] and [End Time], use the mouse or the directional buttons to highlight [Input] button, then click left mouse button or press Enter(see page 39 for details).
2
[Select Media]
• Select the media used for saving backup.
• Press the [Select] button to choose different media types (see page 39 for details on selecting Local Drive backup).
3
[Camera]
• Select the camera number that contains the recording you wish to save.
• When saving backup in KDB format, you can select multiple camera channels.
• When saving backup in AVI format, you can only select one camera channel.
• When saving backup in Video mode, you will see
displayed on the corresponding camera channels in Surveillance mode.
4
[Note]
• To play a backup file saved in AVI format, the latest DivX Codec must be installed to the PC you are using. If you do not have DivX Codec installed, please use the Internet resources to download the required Codec.
• KDB(Kodicom Data Base) backup enables to backup the video with audio data. However, the other types of backup such as AVI, BMP, JPG do not include audio.
• When the is archived to CD-RW in KDB format the viewer will be copied together automatically. (For more information on the viewer program please refer to page 92.)
☞☞
1
2
4
3
Backup
Backup

KODICOM KSR516 Manual KODICOM KSR516 Manual 3939
[Start Time] and [End Time] setup
To select [Start Time] and [End Time], use the mouse or the directional keys to select the year/month/day and hour/minute/second, then use the mouse wheel or the shuttle to select the time the recording you wish to save was recorded.
Select [OK] button to apply the select time.
[Figure 6-5. Start Time] [Figure 6-6. End Time]
[Figure 6-7. Selecting Local Drive]
[Selecting Media – Local USB, Local CD-RW]
• Use the mouse wheel or the jog/shuttle to select Local USB, Local CD-RW, or Remote Drive.
• To save backup using a local drive, select Local USB or Local CD-RW (see page 40 for remote backup).
• Memory devices you can connect through the USB port include USB Hard Disk Drive and USB memory stick. When saving backup using Local USB, the system will automatically scan for the connected USB drive.
[Note] Supported USB versions
KSR516 support USB 1.1 and USB 2.0 device is also supported in USB 1.1 speed.
Recommended USB portable Hard Disk Drives include Iomega and Noble.
☞☞
Backup
Backup

KODICOM KSR516 Manual KODICOM KSR516 Manual 4040
6.2 Saving backup using remote drive
[Figure 6-8. Selecting [Backup] button]
6.2.1 Remote backup
[Backup mode – Video]
• To select KDB (KODICOM data format) or AVI backup mode, use the mouse or the directional keys on the system to highlight [Backup mode], then use the mouse wheel or the jog/shuttle to change the option.
• You can only select Video mode when saving backup using a remote drive.
[Figure 6-9. Backup options display]
1
2 [Start Time] and [End Time]
• Select the starting time and ending time of the recording you wish to save.
• To change the [Start Time] and [End Time], use the mouse or the directional buttons to highlight [Input] button, then click left mouse button or press Enter (see page 41 for details).
[Select Media]
• Select the media used for saving backup.
• Press the [Select] button to choose different media types (see page 41 for details on selecting Remote Drive backup).
3
[Camera]
• Select the camera number that contains the recording you wish to save.
• When saving backup in KDB format, you can select multiple camera channels.
When saving backup in AVI format, you can only select one camera channel.
When saving backup in Video mode, you will see
displayed on the corresponding camera
channels in Surveillance mode.
4
[Note]
• When saving a backup in Still Image mode, you cannot select Remote Drive backup.
☞☞
12
43
Backup
Backup
• From Search screen display, select [Backup] button to save a backup copy of the recording using a remote drive. The backup files can be saved as AVI, BMP, JPEG, or KDB (KODICOM data format) formats.

KODICOM KSR516 Manual KODICOM KSR516 Manual 4141
[Figure 6-10. Start Time] [Figure 6-11. End Time]
[Figure 6-12. Remote Drive setup]
[Select Media – Remote Drive]
• Use the mouse wheel or the jog/shuttle to select Local USB, Local CD-RW, or Remote Drive.
• If the system is connected through LAN or Internet line, you can save a remote drive backup by entering the correct IP address.
• When saving a remote drive backup, the receiving PC or fileserver must have Center Program installed with Backup Server Program running.
• To save a remote drive backup, you will need the IP address and the password of the receiving PC or fileserver.
• To enter IP address and password, use the directional keys to highlight [Input] button, then press Enter.
[Start Time] and [End Time] setup
To select [Start Time] and [End Time], use the mouse or the directional keys to select the year/month/day and hour/minute/second, then use the mouse wheel or the shuttle to select the time the recording you wish to save was recorded.
Select [OK] button to apply the select time.
Backup
Backup

KODICOM KSR516 Manual KODICOM KSR516 Manual 4242
[Network Drive IP] and [Network Password]
• To enter the Network Drive IP address and Network password, use the mouse or the directional keys and Enter button to select the numbers and letters. Press [OK] button to apply the selected IP address and password.
[Figure 6-13. Entering IP] [Figure 6-14. Entering password]
[Connecting]
• Press the [Connect] button to connect the system to the receiving PC or fileserver in order to save a remote drive backup. Once connected, you will be able to select Network Drive path.
• Depending on the connection status, the system will display either “Connect”, “Disconnect”, or “Connect fail” message.
[Figure 6-15. Remote drive setup]
Backup
Backup
4343 KODICOM KSR516 ManualKODICOM KSR516 Manual
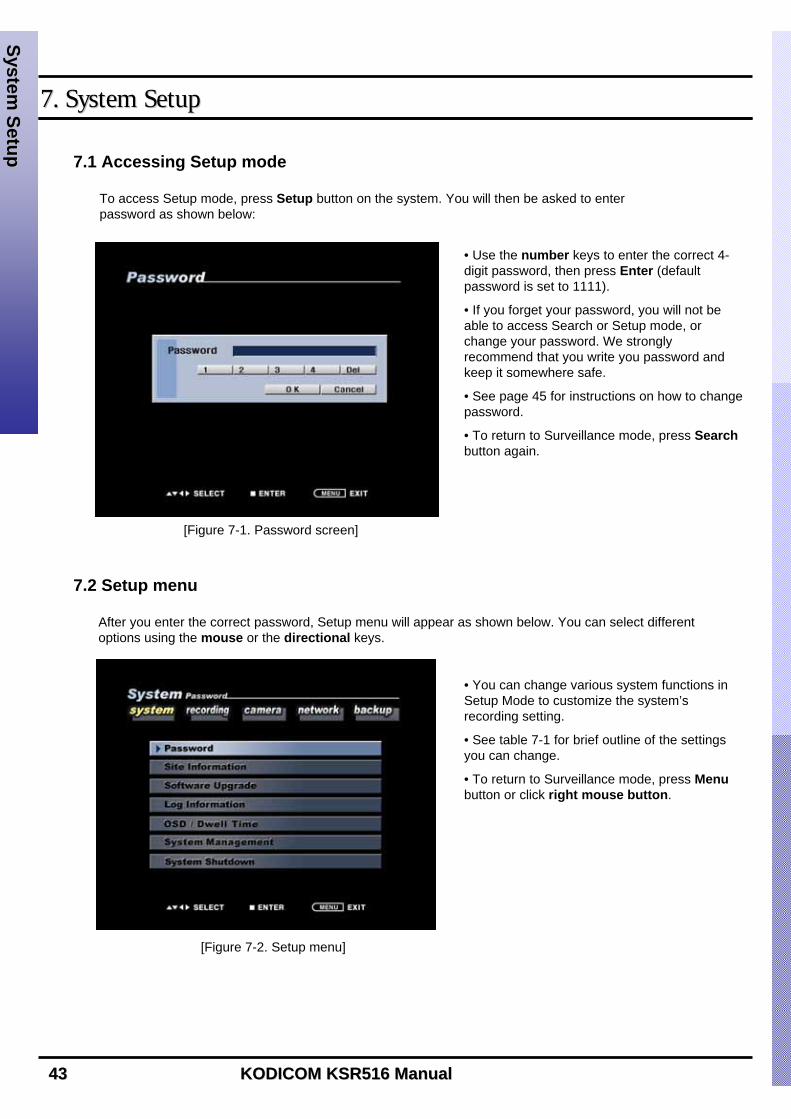
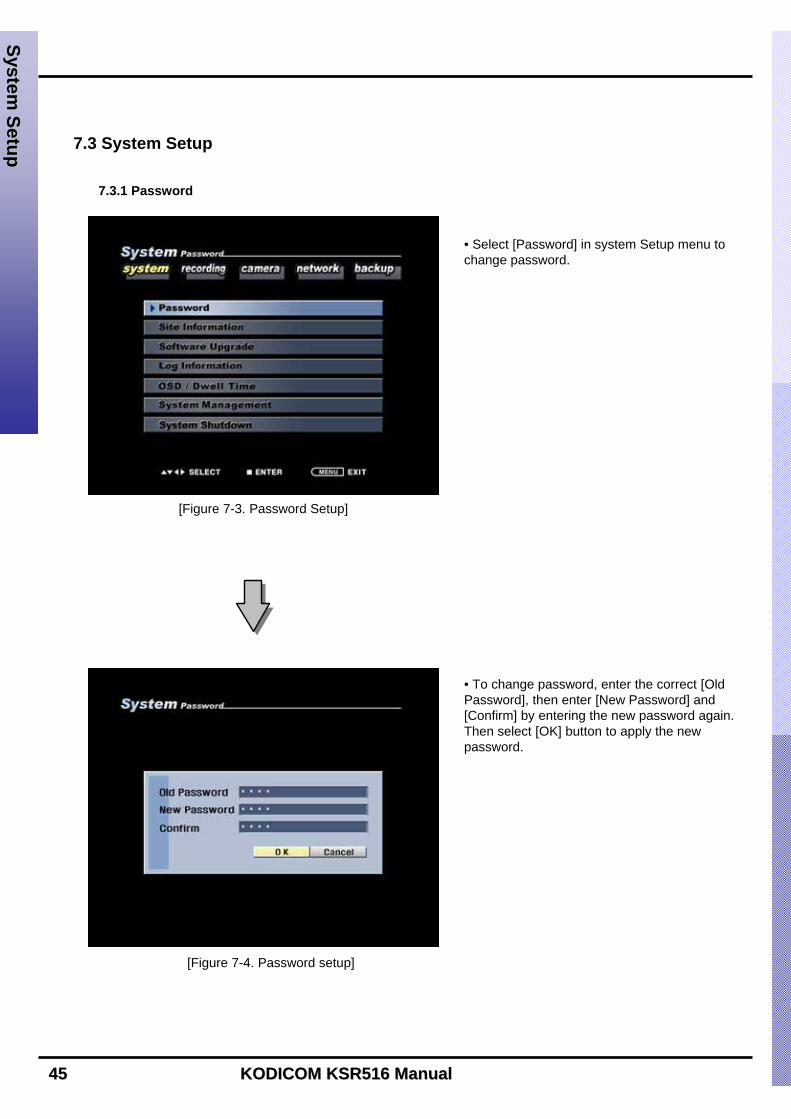
7. System Setup7. System Setup
7.1 Accessing Setup mode
To access Setup mode, press Setup button on the system. You will then be asked to enter password as shown below:
[Figure 7-1. Password screen]
7.2 Setup menu
After you enter the correct password, Setup menu will appear as shown below. You can select different options using the mouse or the directional keys.
• You can change various system functions in Setup Mode to customize the system’s recording setting.
• See table 7-1 for brief outline of the settings you can change.
• To return to Surveillance mode, press Menubutton or click right mouse button.
[Figure 7-2. Setup menu]
System Setup
System Setup
• Use the number keys to enter the correct 4-digit password, then press Enter (default password is set to 1111).
• If you forget your password, you will not be able to access Search or Setup mode, or change your password. We strongly recommend that you write you password and keep it somewhere safe.
• See page 45 for instructions on how to change password.
• To return to Surveillance mode, press Searchbutton again.

KODICOM KSR516 Manual KODICOM KSR516 Manual 4444
[Table 7-1. Setup menu options]
System Setup
System Setup
• System
Setup
Setting OptionsMain Menu
Password
Site Information
Software Upgrade
Log Information
OSD/Dwell Time
System management
System Shutdown
Description
Recording setup
Motion Detection
Recording Schedule
Quality / Resolution
Camera Name
P/T/Z Model
Sensor Setting
Sensor/Control link
Sensor/Camera link
Network
ID/PASSWORD
Site IP
Subnet Mask
Gateway
Center IP
Center Telephone Number
Transfer Time
Alarm Sensor
• Recording
Setup
• Backup Setup
• Camera
Setup
• Communication
Setup
Change and set system password.
Change site code, date display type, and time.
Update system program
Show recorded log information
Turn OSD on/off, and set automatic channel rotation setting
Change system hardware settings
Shutdown or restart the system
Set brightness, frame rate, and audio recording.
Set motion detection area and beep sound of each camera.
Select recording mode and set camera schedule.
Set the recording channel size and resolution.
Change camera name.
Select Pan/Tilt camera model.
Set sensor connection to the system.
Change sensor and control connection and options.
Change sensor and camera connection and options.
Select network type.
Logging in ADSL, DHCP require ID/PASSWORD.
Enter IP address of the system.
Enter subnet mask address of the system.
Enter gateway address of the system.
Enter IP address of the Center PC.
Enter telephone number of the Center PC.
Change the time the system transfers data when alarm sensors
are triggered.
Select the alarm sensors.
Backup Schedule Setup automatic backup schedule
4545 KODICOM KSR516 ManualKODICOM KSR516 Manual
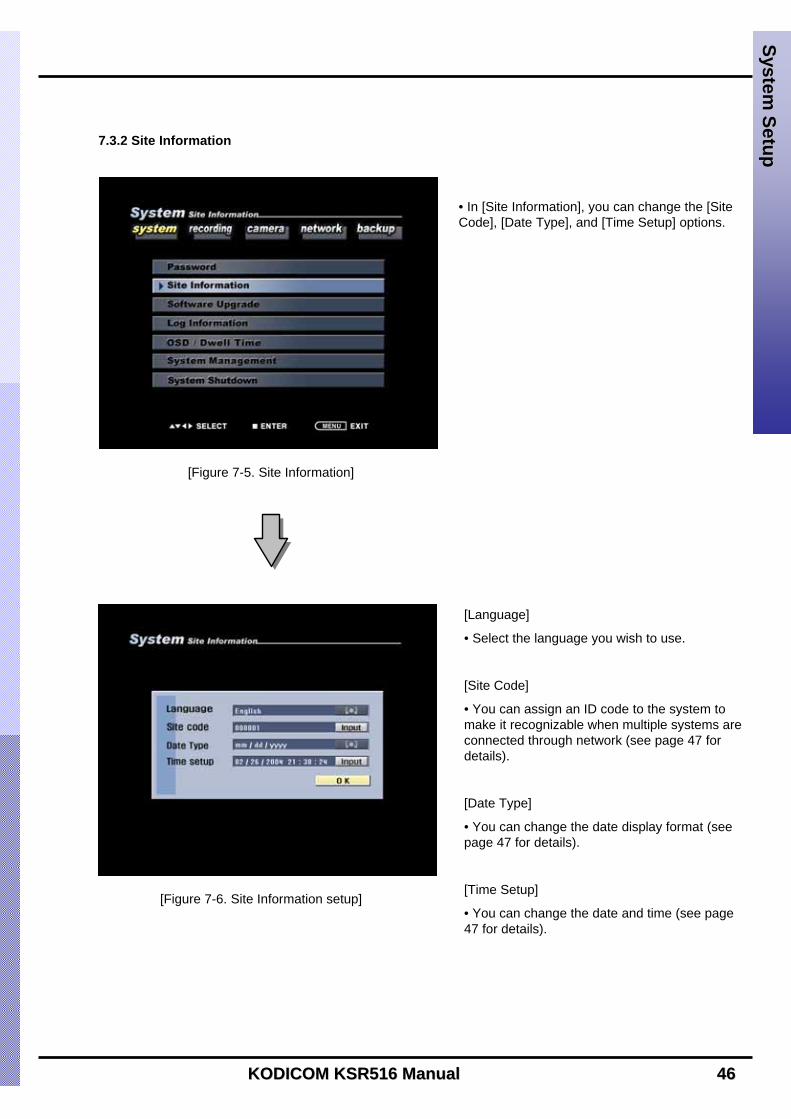
7.3 System Setup
• Select [Password] in system Setup menu to change password.
• To change password, enter the correct [Old Password], then enter [New Password] and [Confirm] by entering the new password again. Then select [OK] button to apply the new password.
7.3.1 Password
System Setup
System Setup
[Figure 7-3. Password Setup]
[Figure 7-4. Password setup]
KODICOM KSR516 Manual KODICOM KSR516 Manual 4646
• In [Site Information], you can change the [Site Code], [Date Type], and [Time Setup] options.
[Language]
• Select the language you wish to use.
[Site Code]
• You can assign an ID code to the system to make it recognizable when multiple systems are connected through network (see page 47 for details).
[Date Type]
• You can change the date display format (see page 47 for details).
[Time Setup]
• You can change the date and time (see page 47 for details).
7.3.2 Site Information
System Setup
System Setup
[Figure 7-5. Site Information]
[Figure 7-6. Site Information setup]
4747 KODICOM KSR516 ManualKODICOM KSR516 Manual
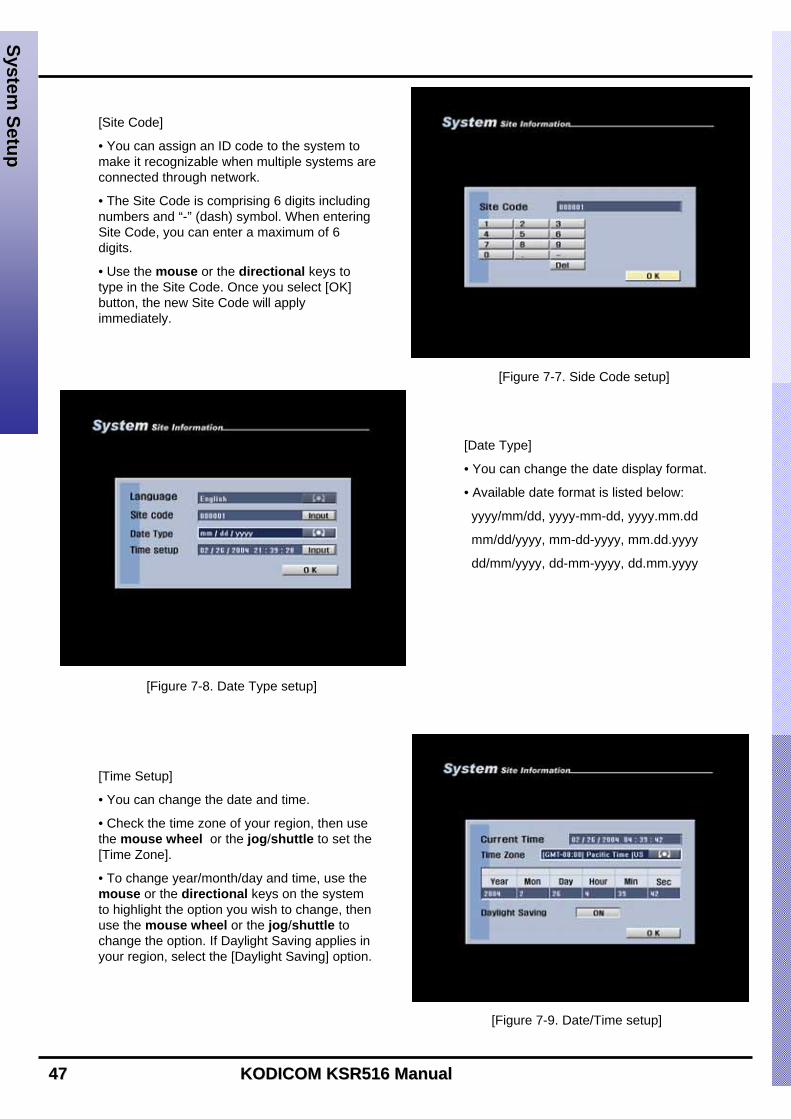
[Site Code]
• You can assign an ID code to the system to make it recognizable when multiple systems are connected through network.
• The Site Code is comprising 6 digits including numbers and “-” (dash) symbol. When entering Site Code, you can enter a maximum of 6 digits.
• Use the mouse or the directional keys to type in the Site Code. Once you select [OK] button, the new Site Code will apply immediately.
[Date Type]
• You can change the date display format.
• Available date format is listed below:
yyyy/mm/dd, yyyy-mm-dd, yyyy.mm.dd
mm/dd/yyyy, mm-dd-yyyy, mm.dd.yyyy
dd/mm/yyyy, dd-mm-yyyy, dd.mm.yyyy
[Time Setup]
• You can change the date and time.
• Check the time zone of your region, then use the mouse wheel or the jog/shuttle to set the [Time Zone].
• To change year/month/day and time, use the mouse or the directional keys on the system to highlight the option you wish to change, then use the mouse wheel or the jog/shuttle to change the option. If Daylight Saving applies in your region, select the [Daylight Saving] option.
System Setup
System Setup
[Figure 7-8. Date Type setup]
[Figure 7-7. Side Code setup]
[Figure 7-9. Date/Time setup]
4848 KODICOM KSR516 ManualKODICOM KSR516 Manual
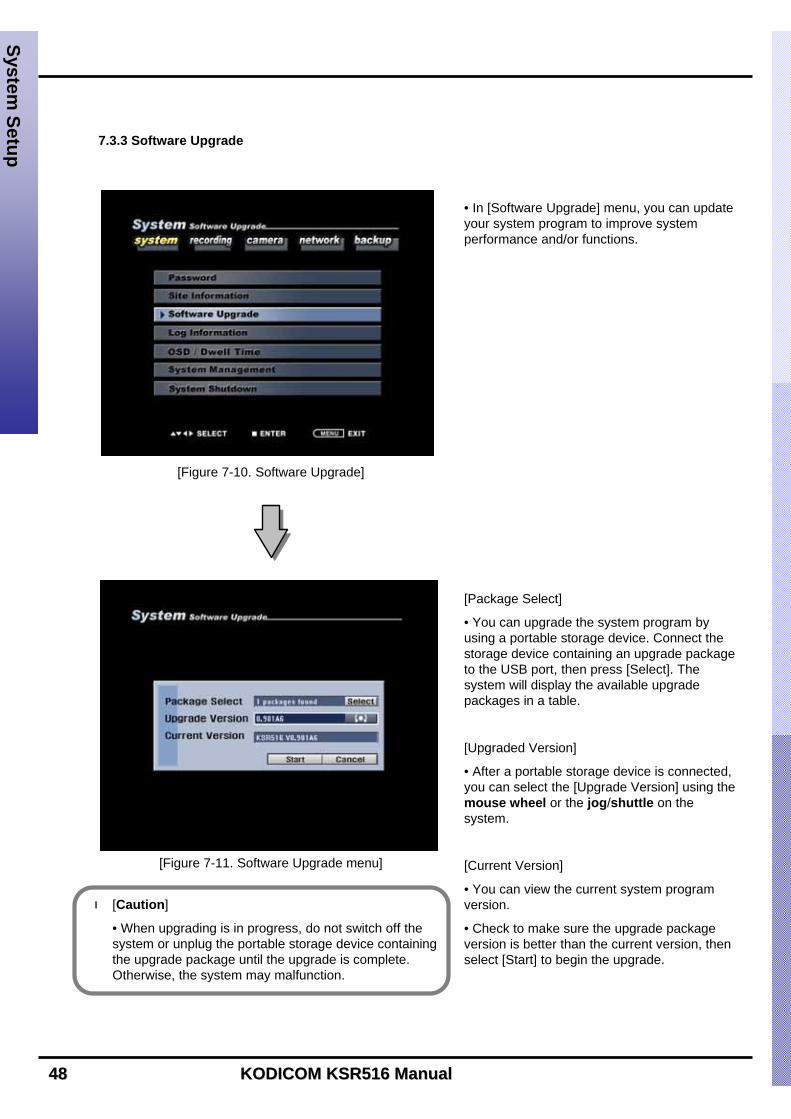
• In [Software Upgrade] menu, you can update your system program to improve system performance and/or functions.
[Package Select]
• You can upgrade the system program by using a portable storage device. Connect the storage device containing an upgrade package to the USB port, then press [Select]. The system will display the available upgrade packages in a table.
[Upgraded Version]
• After a portable storage device is connected, you can select the [Upgrade Version] using the mouse wheel or the jog/shuttle on the system.
[Current Version]
• You can view the current system program version.
• Check to make sure the upgrade package version is better than the current version, then select [Start] to begin the upgrade.
7.3.3 Software Upgrade
System Setup
System Setup
[Figure 7-11. Software Upgrade menu]
[Figure 7-10. Software Upgrade]
[Caution]
• When upgrading is in progress, do not switch off the system or unplug the portable storage device containing the upgrade package until the upgrade is complete. Otherwise, the system may malfunction.
☞☞
KODICOM KSR516 Manual KODICOM KSR516 Manual 4949
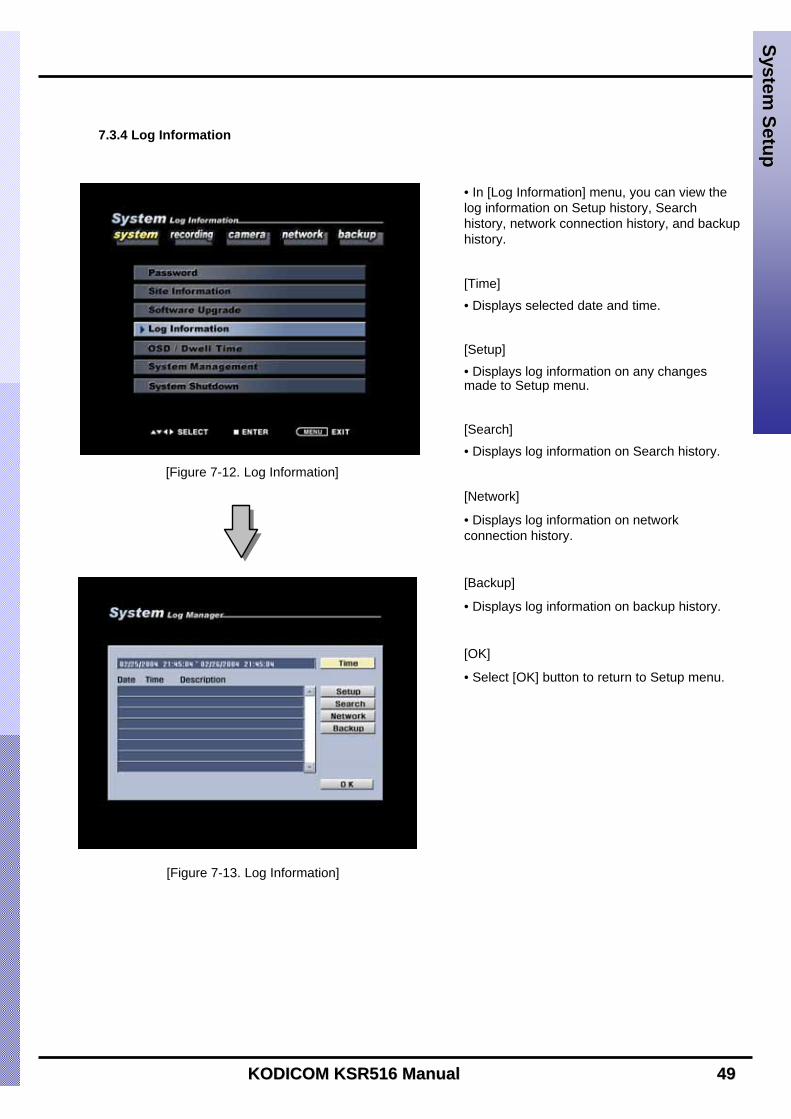
• In [Log Information] menu, you can view the log information on Setup history, Search history, network connection history, and backup history.
[Time]
• Displays selected date and time.
[Setup]
• Displays log information on any changes made to Setup menu.
[Search]
• Displays log information on Search history.
[Network]
• Displays log information on network connection history.
[Backup]
• Displays log information on backup history.
[OK]
• Select [OK] button to return to Setup menu.
7.3.4 Log Information
System Setup
System Setup
[Figure 7-13. Log Information]
[Figure 7-12. Log Information]

5050 KODICOM KSR516 ManualKODICOM KSR516 Manual
[Time]
• Select [Time] to change time to view log information recorded on different date/time.
• Change [Start Time] and [End Time] using the mouse and mouse wheel or the directionalkeys and the jog/shuttle, then press [OK] button. The system will display the log information recorded during this period.
[Setup]
• The system records the date and time Setup mode is accessed whenever changes are made to the system Setup.
• Select [Setup] button to view the log information on Setup mode history. You will see “SETUP START” when Setup mode was accessed and “SETUP END” when Setup mode was exited.
System Setup
System Setup
[Figure 7-14. Selecting Time]
[Figure 7-15. Log Information – Setup history]
[Search]
• The system records the date and time whenever Search mode is accessed for viewing the recording.
• Select [Search] button to view the log information on Search mode history. You will see “SEARCH IN” when Search mode was accessed and “SEARCH OUT” when Search mode was exited.
[Figure 7-16. Log Information – Search history]

KODICOM KSR516 Manual KODICOM KSR516 Manual 5151
System Setup
System Setup
[Network]
• Whenever the system is connected through network by remote Center program, the system will record the IP address and the date and time the connection is made.
[Figure 7-17. Log Information – Network connection history]
[Figure 7-18. Log Information – Backup history]
[Backup]
• Whenever the system saves a backup, it records the date, time, and the location of the backup saved.
[Figure 7-19. Exiting Log Information menu]
[OK]
• Select [OK] button to return to Setup menu.

5252 KODICOM KSR516 ManualKODICOM KSR516 Manual
• You can change the options on OSD – On Screen Display – and Automatic channel rotation.
• You can turn the display settings in Surveillance mode on or off, such as [Camera Name], [Recording], [Audio], [P/T/Z], and [Date/Time] displays.
• Select [OSD All] to turn all screen displays on or off.
• You can set the Automatic channel rotation time from 1 second to 60 seconds by changing the value of [Dwell Time] by using the mouse wheel or the jog/shuttle.
System Setup
System Setup
7.3.5 OSD/Dwell Time
[Figure 7-20. OSD/Dwell Time]
[Figure 7-21. OSD/Dwell Time setup]

KODICOM KSR516 Manual KODICOM KSR516 Manual 5353
• System Management allows you to check network connection status, certify Dynamic DNS (DDNS), change Video input Type, and format HDD.
7.3.6 System Management
[Figure 7-22. System management]
[Figure 7-23. Selecting Network Management]
• Use the mouse wheel or the jog/shuttle to select [Network Management], [ DDNS Authentication], [Video-In Type], and [HDD Format] options.
• After selecting the option you wish choose, press [OK] button.
System Setup
System Setup

KODICOM KSR516 Manual KODICOM KSR516 Manual 5454
[Assigned IP]
• Assigned IP displays the system’s IP address used for remote backup and remote monitoring.
[Connection Status]
• Connection Status indicates whether the current assigned IP address can be used to connect to the Internet. If it is possible, the system will display “OK” in the progress bar. Otherwise, the system will display “Failed”.
[DDNS Restart]
• Receive a new DDNS authentication
[Figure 7-24. Network Management]
[Figure 7-25. DDNS Authentication]
[Figure 7-26. Video Input Type]
[Video-In Type]
• Displays supported Video input types. The system supports both NTSC and PAL.
• DDNS authentication allows you to use Internet using the IP address (ADSL, DHCP).
[Authentication Number]
• Enter the DDNS authentication number.
[ID]
• Enter DDNS ID.
[Password]
• Enter DDNS password.
System Setup
System Setup

KODICOM KSR516 Manual KODICOM KSR516 Manual 5555
• You can format the system’s built-in HDD to erase all recordings stored in your Hard Disk Drive. Use the mouse wheel or the jog/shuttle to select [HDD Format], then select [OK] button.
• As shown in Figure 7-27, the system will display the installed HDD in a table.
[Figure 7-27. HDD Format]
[Figure 7-28. HDD table]
[Figure 7-29. Confirmation message ]
• The table shows the system’s built-in HDDs and their information. You can install up to 4 HDDs into the system.
• From the table, you can select the HDD you wish to format, then select [OK] button. The system will display a confirmation message shown in Figure 7-28.
• Select [Cancel] button to return to Setup mode.
• The system will display a warning message. To confirm and proceed with formatting the selected HDD, press [OK] button. To cancel format and return to HDD table, select [Cancel] button.
System Setup
System Setup
KODICOM KSR516 Manual KODICOM KSR516 Manual 5656
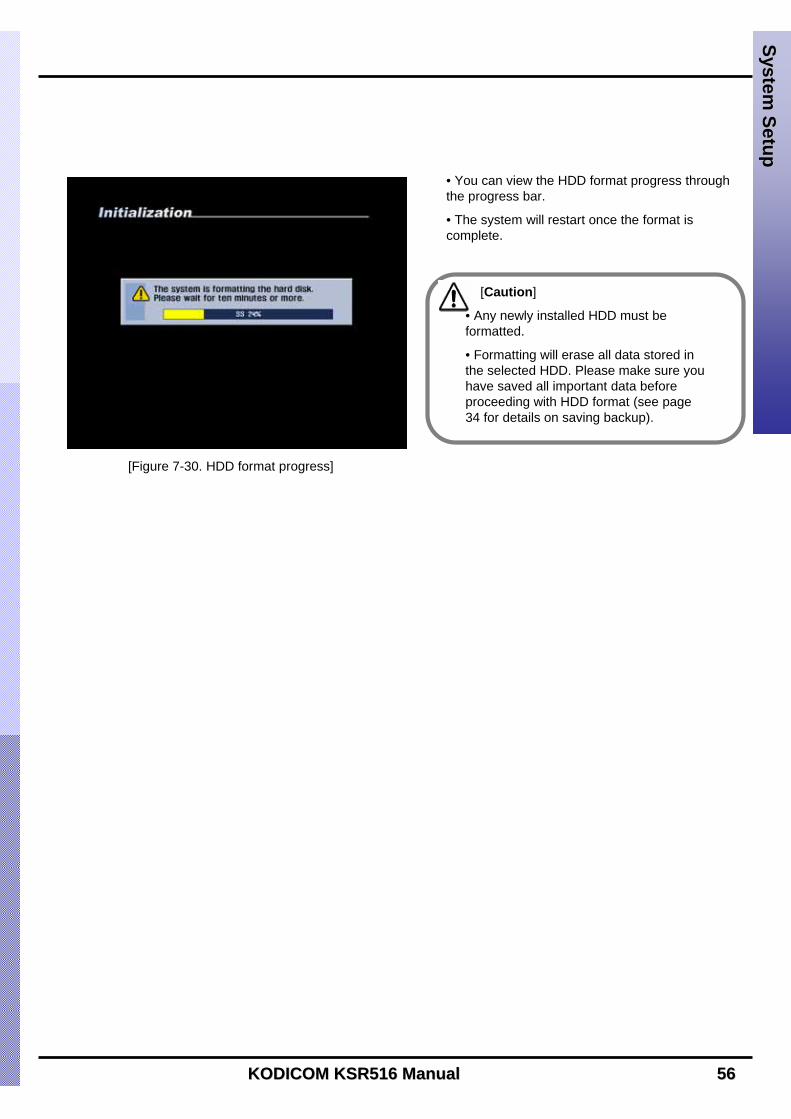
[Figure 7-30. HDD format progress]
• You can view the HDD format progress through the progress bar.
• The system will restart once the format is complete.
[Caution]
• Any newly installed HDD must be formatted.
• Formatting will erase all data stored in the selected HDD. Please make sure you have saved all important data before proceeding with HDD format (see page 34 for details on saving backup).
System Setup
System Setup

KODICOM KSR516 Manual KODICOM KSR516 Manual 5757
• In [System Shutdown] menu, you can safely shutdown, restart, or add reboot schedule to KSR516.
• Use mouse wheel or the jog/shuttle to select [Shutdown], [Restart], or [Add Schedule], then press [OK] button.
7.3.7 System Shutdown
[Figure 7-30. System Shutdown]
[Figure 7-31. System Shutdown menu]
[Shut down]
• Shut down the system.
[Restart]
• Restart the system.
[Add schedule]
• Add automatic reboot schedule (see page 55 for details).
System Setup
System Setup
[Caution]
• Press ENTER for 3 seconds to restart
the system which was turned off.

KODICOM KSR516 Manual KODICOM KSR516 Manual 5858
[Figure 7-32. System restart schedule]
[Add schedule]
• You can set the time and the system will automatically restart.
• Use the mouse wheel or the jog/shuttle to select [System Restart Period]. You can assign the system to automatically restart [One time only], [Daily], [Every 2 days], [Every 3 days], [Weekly], [Every 2 weeks], [Every 3 weeks], or [Monthly].
• Restarting the system on regular basis may help to stabilize the system performance.
System Setup
System Setup

5959 KODICOM KSR516 ManualKODICOM KSR516 Manual
7.4 Recording Setup
• In [Recording] setup menu, you can change the color, brightness, contrast, and the frame rate for each cameras as well as setting audio recording.
[Color/Brightness/Contrast]
• You can set the color, brightness, and contrast of the selected camera.
• Use the mouse wheel or the jog/shuttle to set the value of each option between 0~255.
[Default]
• Select [Default] button to set the color, brightness, and contrast to their default value (128).
[Frame]
• You can set the number of recording frame rate between 1~30 fps for each camera (total of 120 frames) by using the jog/shuttle on the system.
[Audio]
• To record sound with the selected camera, switch the [Audio] option to “ON” using the jog/shuttle on the system.
• Audio recording is supported for one camera channel only. Setting the [Audio] option to “ON”will automatically switch all other channels to “OFF”.
[Camera]
• Use the jog/shuttle on the system to select the camera for changing its options.
7.4.1 Recording Setup
System Setup
System Setup
[Figure 7-33. Recording setup]
[Figure 7-34. Recording setup][Caution]
• Recording frame rate might vary depending on
the number of installed camera or system load.
KODICOM KSR516 Manual KODICOM KSR516 Manual 6060
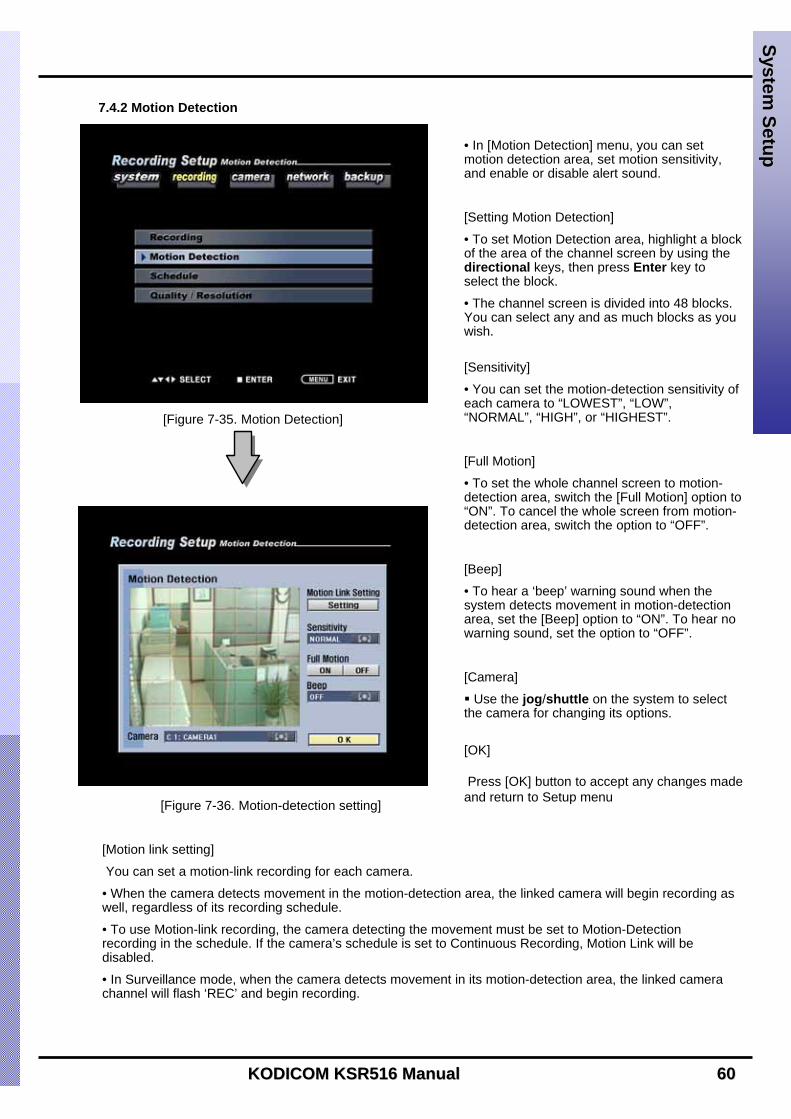
• In [Motion Detection] menu, you can set motion detection area, set motion sensitivity, and enable or disable alert sound.
[Setting Motion Detection]
• To set Motion Detection area, highlight a block of the area of the channel screen by using the directional keys, then press Enter key to select the block.
• The channel screen is divided into 48 blocks. You can select any and as much blocks as you wish.
[Sensitivity]
• You can set the motion-detection sensitivity of each camera to “LOWEST”, “LOW”, “NORMAL”, “HIGH”, or “HIGHEST”.
[Full Motion]
• To set the whole channel screen to motion-detection area, switch the [Full Motion] option to “ON”. To cancel the whole screen from motion-detection area, switch the option to “OFF”.
[Beep]
• To hear a ‘beep’ warning sound when the system detects movement in motion-detection area, set the [Beep] option to “ON”. To hear no warning sound, set the option to “OFF”.
[Camera]
Use the jog/shuttle on the system to select the camera for changing its options.
[OK]
Press [OK] button to accept any changes made and return to Setup menu
7.4.2 Motion Detection
System Setup
System Setup
[Figure 7-36. Motion-detection setting]
[Figure 7-35. Motion Detection]
[Motion link setting]
You can set a motion-link recording for each camera.
• When the camera detects movement in the motion-detection area, the linked camera will begin recording as well, regardless of its recording schedule.
• To use Motion-link recording, the camera detecting the movement must be set to Motion-Detection recording in the schedule. If the camera’s schedule is set to Continuous Recording, Motion Link will be disabled.
• In Surveillance mode, when the camera detects movement in its motion-detection area, the linked camera channel will flash ‘REC’ and begin recording.

KODICOM KSR516 Manual KODICOM KSR516 Manual 6161
7.4.3 Motion Link setting
To access Motion Link setting, use the mouse or the directional keys to select [Setting]. The system will display Motion link setup as shown in Figure 7-38.
[Motion Camera]
• Select the camera that will detect the movement in its motion-detection area by using the mouse wheel or the jog/shuttle on the system.
[Link Camera]
• Select the cameras that will be linked to the [Motion Camera] by using the mouse or the directional keys. You can link multiple cameras to the [Motion Camera].
System Setup
System Setup
[Figure 7-37. Motion Link setting]
[Figure 7-38. Motion Connection Setup Screen]

6262 KODICOM KSR516 ManualKODICOM KSR516 Manual
• In [Schedule] menu, you can set automatic schedule for each camera and their recording mode.
[Camera]
• Use the mouse wheel or the jog/shuttle to select the camera to change its schedule.
[Recording Mode]
• You can select a recording mode for the selected camera by using the mouse or the direction keys to highlight the time you wish to set, then use the mouse wheel or the jog/shuttle to change the recording mode.
• The 7 available recording modes are listed on the table below. You can also set a camera to cease recording during certain time.
7.4.4 Schedule
[Table 7-2. Recording modes]
• C: Continuous Recording
• M: Motion Recording
• S: Sensor Recording
• P: Pre-alarm Recording
• No Recording
• Continuous Recording
• Motion Recording
• Sensor Recording
• Motion & Sensor Recording
• Motion & Pre-alarm Recording
• Sensor & Pre-alarm Recording
• Motion & Sensor & Pre-alarm Recording
Available Recording ModesRecording Mode
None
Red REC
Orange REC
Channel DisplaySchedule Setup Display
None
C
M
S
M: S
M: P
S: P
M: S: P
System Setup
System Setup
[Figure 7-39. Schedule]
[Figure 7-40. Schedule Setup]

KODICOM KSR516 Manual KODICOM KSR516 Manual 6363
• In [Quality/Resolution] menu, you can change the video quality and resolution by using the mouse wheel or the jog/shuttle.
• Any changes made to quality and resolution will apply to all cameras.
[Quality]
• You can change the video quality to “LOWEST”, “LOW”, “NORMAL”, “HIGH”, and “BEST’.
[Resolution]
• You can change the video resolution to 352 X 240 or 740 X 240 (PAL : 352 X 288, 704 X 288)
[OK]
• Select [OK] button to accept any changes made and return to Setup menu.
7.4.5 Quality/Resolution
System Setup
System Setup
[Figure 7-41. Quality/Resolution]
[Figure 7-42. Quality/Resolution setup]

KODICOM KSR516 Manual KODICOM KSR516 Manual 6464
7.5 Camera Setup
[Selecting channel]• Select a camera to change its options on P/T/Z model type, sensor settings, sensor/control link settings, and sensor/camera link settings.• Use the mouse wheel or the jog/shuttle on the system to select a camera channel.
[Camera Name]• You can enter a name for the selected camera (see page 65 for details).
[P/T/Z Model]• You can select a P/T/Z model for a camera, provided the camera supports P/T/Z function.• Use the mouse wheel or the jog/shuttle on the system to select a Speed Dome or an RX-Receiver model name.
[Sensor setting]• You can change the settings for the camera channel linked to the sensors (see page 66 for details).
• In [Camera] setup menu, you can setup Pan/Tilt mode and change the connection setting between sensors and controls.
[Sensor/Control Link]• You can link the control devices to a sensor (see page 67 for details).
[Sensor/Camera Link]• You can link the camera channels to a sensor (see page 68 for details).
[Figure 7-43. Camera setup menu]
System Setup
System Setup
KODICOM KSR516 Manual KODICOM KSR516 Manual 6565
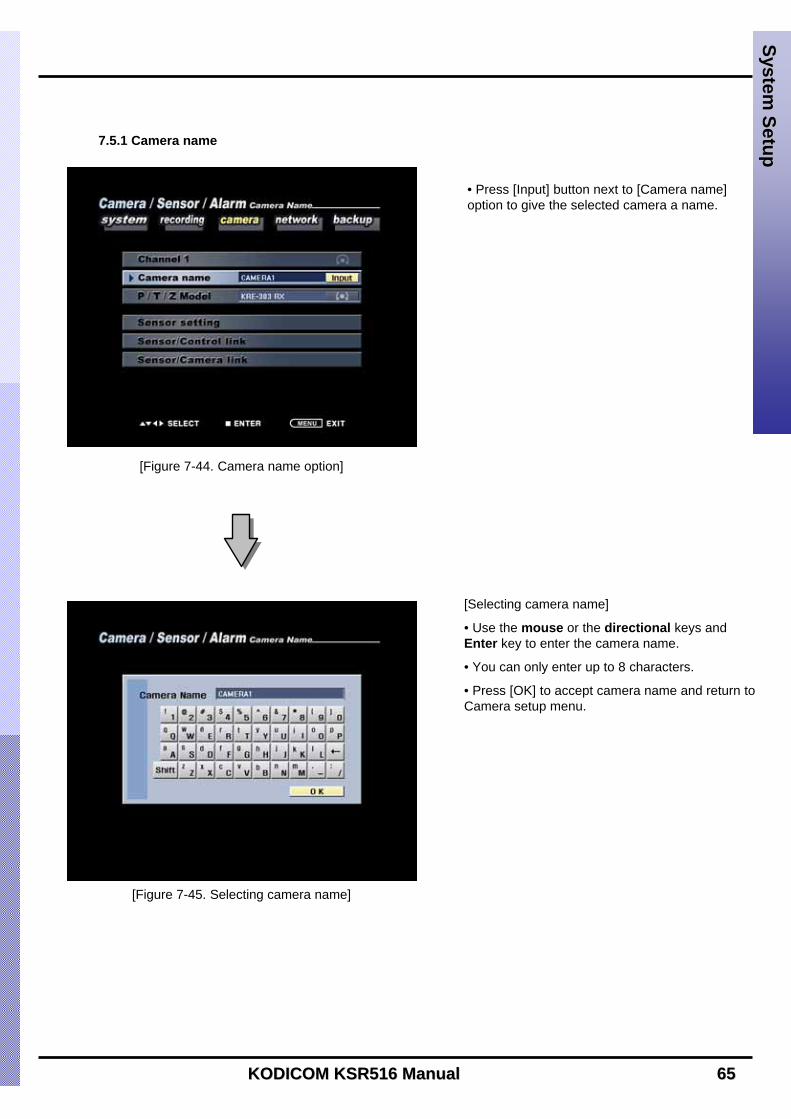
• Press [Input] button next to [Camera name] option to give the selected camera a name.
[Selecting camera name]
• Use the mouse or the directional keys and Enter key to enter the camera name.
• You can only enter up to 8 characters.
• Press [OK] to accept camera name and return to Camera setup menu.
7.5.1 Camera name
[Figure 7-44. Camera name option]
[Figure 7-45. Selecting camera name]
System Setup
System Setup
KODICOM KSR516 Manual KODICOM KSR516 Manual 6666
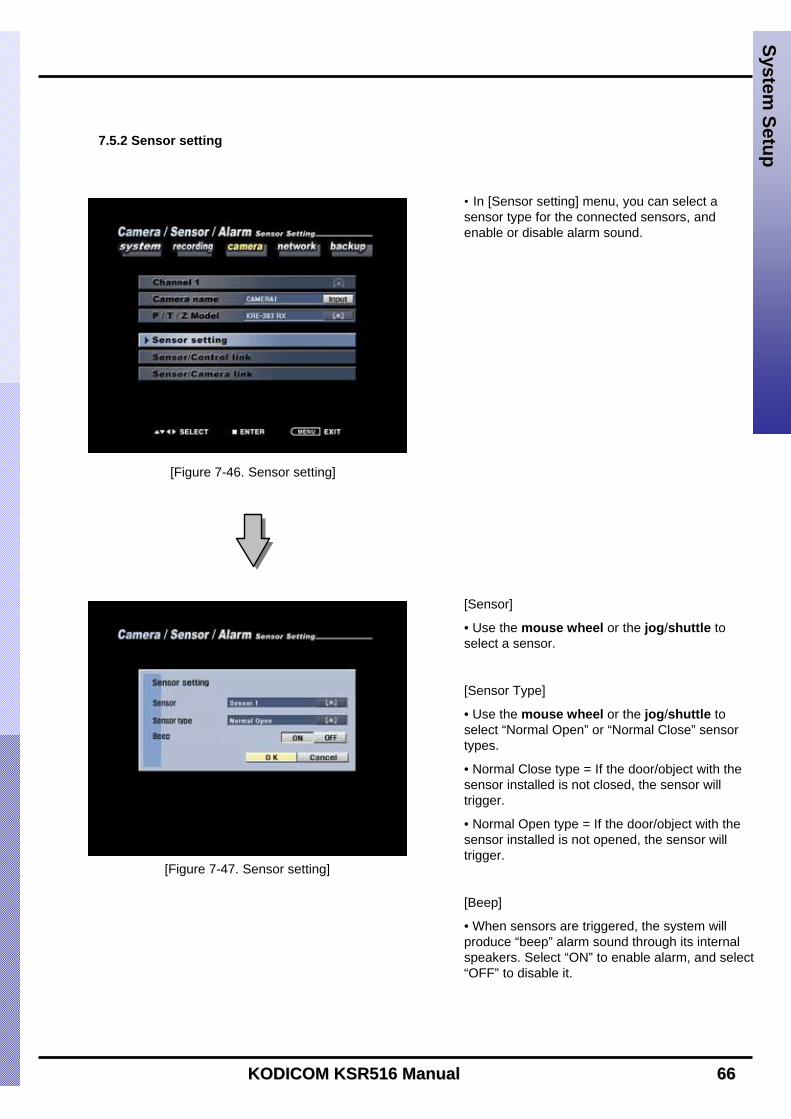
• In [Sensor setting] menu, you can select a sensor type for the connected sensors, and enable or disable alarm sound.
[Sensor]
• Use the mouse wheel or the jog/shuttle to select a sensor.
[Sensor Type]
• Use the mouse wheel or the jog/shuttle to select “Normal Open” or “Normal Close” sensor types.
• Normal Close type = If the door/object with the sensor installed is not closed, the sensor will trigger.
• Normal Open type = If the door/object with the sensor installed is not opened, the sensor will trigger.
[Beep]
• When sensors are triggered, the system will produce “beep” alarm sound through its internal speakers. Select “ON” to enable alarm, and select “OFF” to disable it.
7.5.2 Sensor setting
[Figure 7-46. Sensor setting]
[Figure 7-47. Sensor setting]
System Setup
System Setup

KODICOM KSR516 Manual KODICOM KSR516 Manual 6767
• In [Sensor/Control link] menu, you can link a sensor with controls and set control time.
[Sensor]
• Use the mouse wheel or the jog/shuttle to select a sensor.
[Control]
• You can link a sensor with control devices. When a sensor is triggered, the linked control device(s) will automatically activate.
[Control Time]
• You can set how long the control devices will stay activated. The value can be changed in 10 seconds basis up to maximum of 300 seconds.
• Use the mouse wheel or the jog/shuttle to change [Control Time].
7.5.3 Sensor/Control link
[Figure 7-48. Sensor/Control link]
[Figure 7-49. Sensor/Control link setup]
System Setup
System Setup

KODICOM KSR516 Manual KODICOM KSR516 Manual 6868
• In [Sensor/Camera Link] menu, you can link cameras to Sensors.
[Sensor]
• Select the sensor you wish to link by using the mouse wheel or the jog/shuttle.
[Camera]
• Select the cameras you wish to link with the selected sensor by using the mouse or the directional keys and Enter key.
• When the sensor is triggered, its linked camera(s) will automatically begin recording.
7.5.4 Sensor/Camera Link
[Figure 7-50. Sensor/Camera Link]
[Figure 7-51. Sensor/camera link setup]
[Note]
• To have the cameras automatically record when a sensor is triggered, the schedule for the linked cameras must be set to “S”, “S:P”, “M:S”, or “M:S:P” (see page 59 for details on schedule setup).
☞☞
System Setup
System Setup

KODICOM KSR516 Manual KODICOM KSR516 Manual 6969
7.6 Network Setup
System Setup
System Setup
• In [Network] setup menu, you can set the system’s IP address in order to connect to the Center Program, as well as setting up Center IP address and telephone number, recording transfer time, and alarm sensor transfer.
[Network]
• The system supports network connection through LAN using IP address, as well as DHCP, ADSL, and modem.
• Select the network option you wish to use by using mouse or the jog/shuttle.
• LAN is the standard network connection for KSR516. Modem is optional and an external modem must be installed to use model network.
[ID/PASSWORD]
•Logging in ADSL, DHCP require ID/PASSWORD.
[Site IP]
You can enter the system’s IP address for connecting KSR516 to a remote Center via LAN (see page 67 for details).
[Subnet Mask]
• You can enter the system’s subnet mask in order to communicate with the Center program when connected through LAN (see page 71 for details).
[Gateway]
• You can enter the system’s gateway address in order to communicate with the Center using LAN.
[Center IP]
• You can enter the IP address of the computer with the Center installed in order to transfer the recording to Center through LAN (see page 71 for details).
[Center Tel Number]
• You can enter the telephone number of the computer with the Center Program installed in order to transfer the recording to Center through modem (see page 69 for details).
[Transfer Time]
• Transfer Time determines how long the system will transfer the recording to the computer with the Center installed that is connected through LAN or modem. You can set the [Transfer Time] in 30 seconds basis up to maximum of 150 seconds by using the mouse wheel or the jog/shuttle.
[Alarm Sensor]
• You can designate any sensors connected to KSR516 into Alarm sensors by selecting the sensor numbers on [Alarm Sensor] option.
• When an Alarm sensor is triggered, the system will automatically transfer the recording data to the remote Center connected to the system through network.
[Figure 7-52. Network Setup Screen]

KODICOM KSR516 Manual KODICOM KSR516 Manual 7070
[Site IP address setup]
• When using LAN, you must enter the system’s IP address or domain address.
• Use the mouse or the directional keys and Enter key to enter the IP address.
System Setup
System Setup
[Figure 7-53. ID/Password setup]
[Figure 7-54. Site IP Address setup]
[ID/Password setup]
• When using ADSL or VDSL network, you must enter the ID and password of remote back up
server.
• Use the mouse or the directional keys and Enter key to enter the ID and password.

7171 KODICOM KSR516 ManualKODICOM KSR516 Manual
[Center IP address setup]
• When using LAN, you must enter the IP address of the computer installed with the Center Program.
• Use the mouse or the directional keys and Enter key to enter the IP address.
System Setup
System Setup
[Figure 7-55. Subnet Mask/Gateway setup]
[Figure 7-56. Center IP address setup]
[Subnet mask/Gateway setup]
• To use Subnet mask or Gateway, you must enter the IP address.
• Use the mouse or the directional keys and Enter key to enter IP address.

7272 KODICOM KSR516 ManualKODICOM KSR516 Manual
[Center Tel No. setup]
• When using modem, you must enter the telephone number of the computer installed with the Center Program.
Use the mouse or the directional keys and Enter key to enter the telephone number.
System Setup
System Setup
[Figure 7-57. Center Tel No. setup]

KODICOM KSR516 Manual KODICOM KSR516 Manual 7373
7.7 Backup Schedule
• In [Backup Schedule] menu, you can set up system backup schedule to have the system automatically save backup copies of its recording.
• Backup Schedule programs the system to save a backup copy of the recorded data to a designated storage device set on the schedule.
• You can only schedule the system to save a backup copy of the recording that will be recorded in the future, and you cannot schedule the system to save a backup that has been recorded before the present date. To do this, you must access the Search mode (see page 37 for saving backup).
System Setup
System Setup
[Figure 7-59 Backup Schedule]
[Figure 7-60. Backup schedule setup]

7474 KODICOM KSR516 ManualKODICOM KSR516 Manual
7.7.1 Adding Backup schedule
• To add a backup schedule to the list, select [Add] button.
• To add a backup schedule, you must set the [Start Time] and [End Time], [Target Drive], and [Rotate] options.
System Setup
System Setup
[Figure 7-61. Adding backup schedule]
[Figure 7-62. Adding backup schedule]
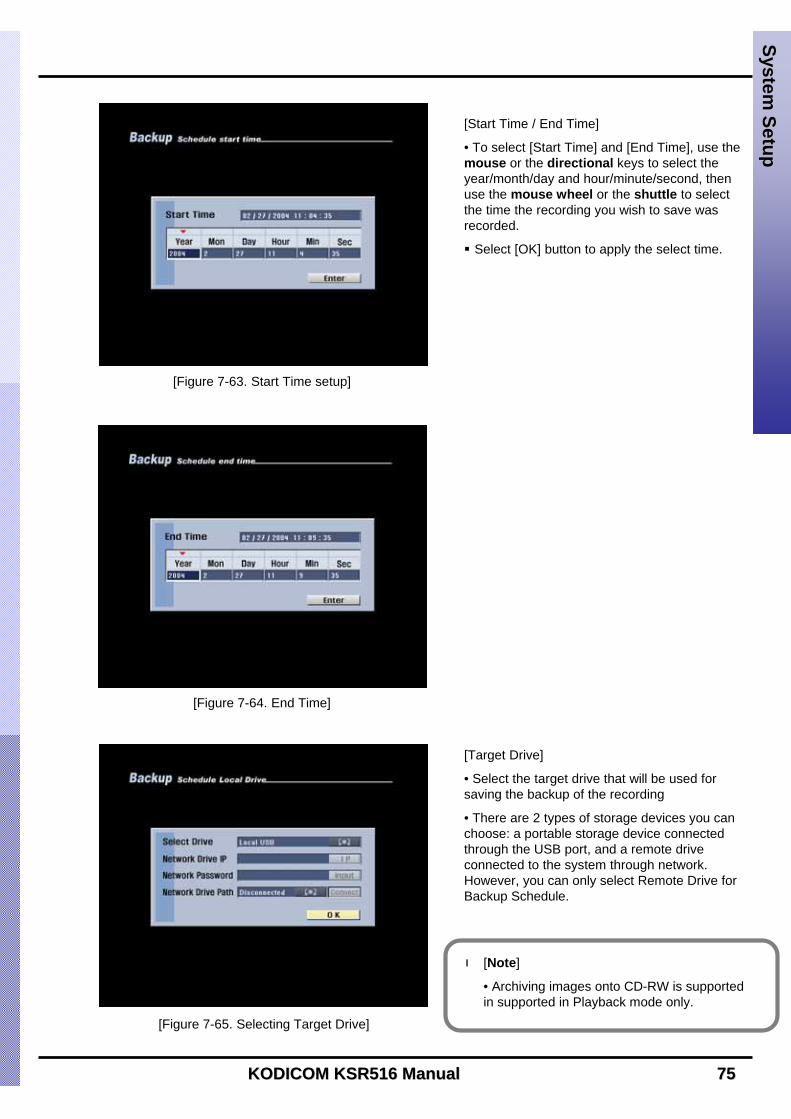
KODICOM KSR516 Manual KODICOM KSR516 Manual 7575
System Setup
System Setup
[Start Time / End Time]
• To select [Start Time] and [End Time], use the mouse or the directional keys to select the year/month/day and hour/minute/second, then use the mouse wheel or the shuttle to select the time the recording you wish to save was recorded.
Select [OK] button to apply the select time.
[Figure 7-63. Start Time setup]
[Figure 7-64. End Time]
[Figure 7-65. Selecting Target Drive]
[Target Drive]
• Select the target drive that will be used for saving the backup of the recording
• There are 2 types of storage devices you can choose: a portable storage device connected through the USB port, and a remote drive connected to the system through network. However, you can only select Remote Drive for Backup Schedule.
[Note]
• Archiving images onto CD-RW is supported in supported in Playback mode only.
☞☞

7676 KODICOM KSR516 ManualKODICOM KSR516 Manual
[Target Drive – Remote Drive]
Use the mouse wheel or the jog/shuttle to select Local USB, or Remote Drive.
• If the system is connected through LAN or Internet line, you can save a remote drive backup by entering the correct IP address.
• When saving a remote drive backup, the receiving PC or fileserver must have the Center Program installed with Backup Server Program running.
• To save a remote drive backup, you will need the IP address and the password of the receiving PC or fileserver.
• To enter IP address and password, use the directional keys to highlight [Input] button, then press Enter.
[Figure 7-66. Remote Drive setup]
[Figure 7-67. Remote Drive IP Address]
[Figure 7-68. Remote Drive Password]
[Saving Point – Remote Drive IP]
• To set the [Remote Drive], enter the IP address of the remote place that is connected to the network where the center program and the remote backup server are installed.
• Enter the IP address of the remote place by pressing direction keys and Enter key on the front part of the system
[Network Drive IP] and [Network Password]
• To enter the Network Drive IP address and Network password, use the mouse or the directional keys and Enter button to select the numbers and letters. Press [OK] button to apply the selected IP address and password.
System Setup
System Setup

KODICOM KSR516 Manual KODICOM KSR516 Manual 7777
System Setup
System Setup
[Connecting]
• Press the [Connect] button to connect the system to the receiving PC or fileserver in order to save a remote drive backup. Once connected, you will be able to select Network Drive path.
• Depending on the connection status, the system will display either “Connect”, “Disconnect”, or “Connect fail” message.
[OK]
• Once you have entered the [Network Drive IP], [Network Password], and [Network Drive Path], select [OK] button to return to Backup Schedule list.[Figure 7-69. Remote Drive setup]
[Figure 7-70. Remote Drive Setup]
[Figure 7-71. Remote Drive setup]
[Rotate]
• You can schedule the system to save backup of the selected time in daily, weekly, monthly, or yearly basis. To do so, use the mouse wheelor the jog/shuttle to select a rotation cycle.
[OK]
• Once you have selected the [Start Time], [End Time], [Target Drive], and [Rotate], press [OK] button to add it to backup schedule list.

7878 KODICOM KSR516 ManualKODICOM KSR516 Manual
[Backup Schedule List]
• You will see the added schedule on the Backup Schedule list. Select [OK] button to accept the schedule and return to Setup menu.
[Figure 7-72. Backup Schedule list]
System Setup
System Setup

KODICOM KSR516 Manual KODICOM KSR516 Manual 7979
7.7.2 Deleting Backup Schedule
System Setup
System Setup
• To delete a schedule from the list, select the schedule you wish to delete by using the directional keys and Enter key. Then select [Del] button to delete the schedule.
• Select [OK] button to accept the schedule and return to Setup menu.
[Figure 7-73. Deleting backup schedule]
[Figure 7-74. Deleting backup schedule]

8080 KODICOM KSR516 ManualKODICOM KSR516 Manual
8. Controls 8. Controls –– Manual ControlManual Control
8.1 Switching to Control Mode
If you wish to use the control devices manually, select the 16-splitscreen mode in Surveillance mode, then press Enter key. You will then be able to select the control devices you wish to use manually.
[Figure 8-1. 16-splitscreen mode]
[Control]
• Use the mouse or the directional keys and Enter key to select the control device numbers you wish to control manually.
[Exiting Control mode]
• Press [OK] button to return to Surveillance mode.
Control
Control
[Figure 8-2. Control Mode]
[Figure 8-2. Controll Screen]

KODICOM KSR516 Manual KODICOM KSR516 Manual 8181
1. Pan/Tilt Connection………………………………………………………………………………………822. Connecting LAN/PSTN Communication Lines……………………………………………………………83
2.1 LAN, ISDN (with the Router), and Dedicated Line Connection……………………………………832.2 PSTN (telephone line) Connection (optional)………………………………………………………84
3. RX Receiver (KRE-302) Connection Diagram (optional)………………………………………………853.1 Name of Each Part and Description………………………………………………………………86
4. External Sensor Connection (Input)……………………………………...……………………………………875. External Control Port Connection (Output)…………………………..……………………………………886. Adding HDD………………………………………………………………………………………89
6.1 Installing new HDD…………………………………………………….…………………………………896.2 Checking HDD Database………………………………………………………………………………90
Chapter 2. KSR516 DVR InstallationChapter 2. KSR516 DVR Installation
ContentsContentsContents
Contents
Contents
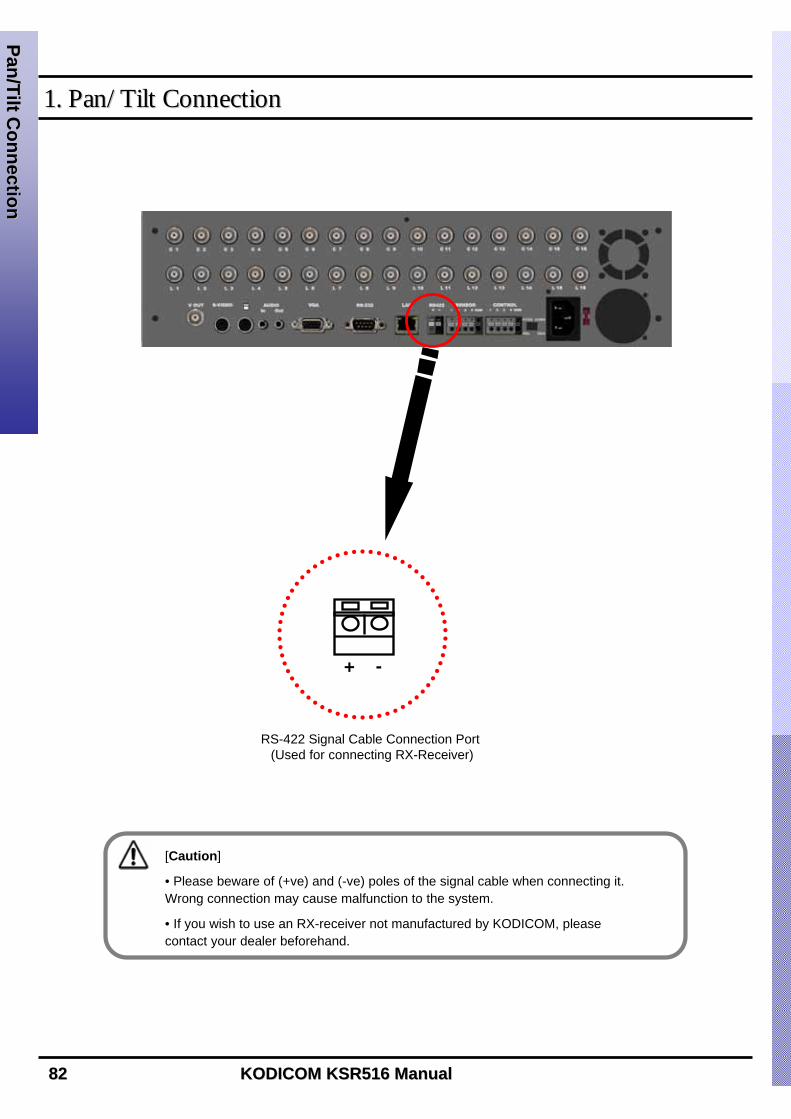
8282 KODICOM KSR516 ManualKODICOM KSR516 Manual
1. Pan/Tilt Connection1. Pan/Tilt Connection
Pan/Tilt Connection
Pan/Tilt Connection
RS-422 Signal Cable Connection Port(Used for connecting RX-Receiver)
[Caution]
• Please beware of (+ve) and (-ve) poles of the signal cable when connecting it. Wrong connection may cause malfunction to the system.
• If you wish to use an RX-receiver not manufactured by KODICOM, please contact your dealer beforehand.
+ -
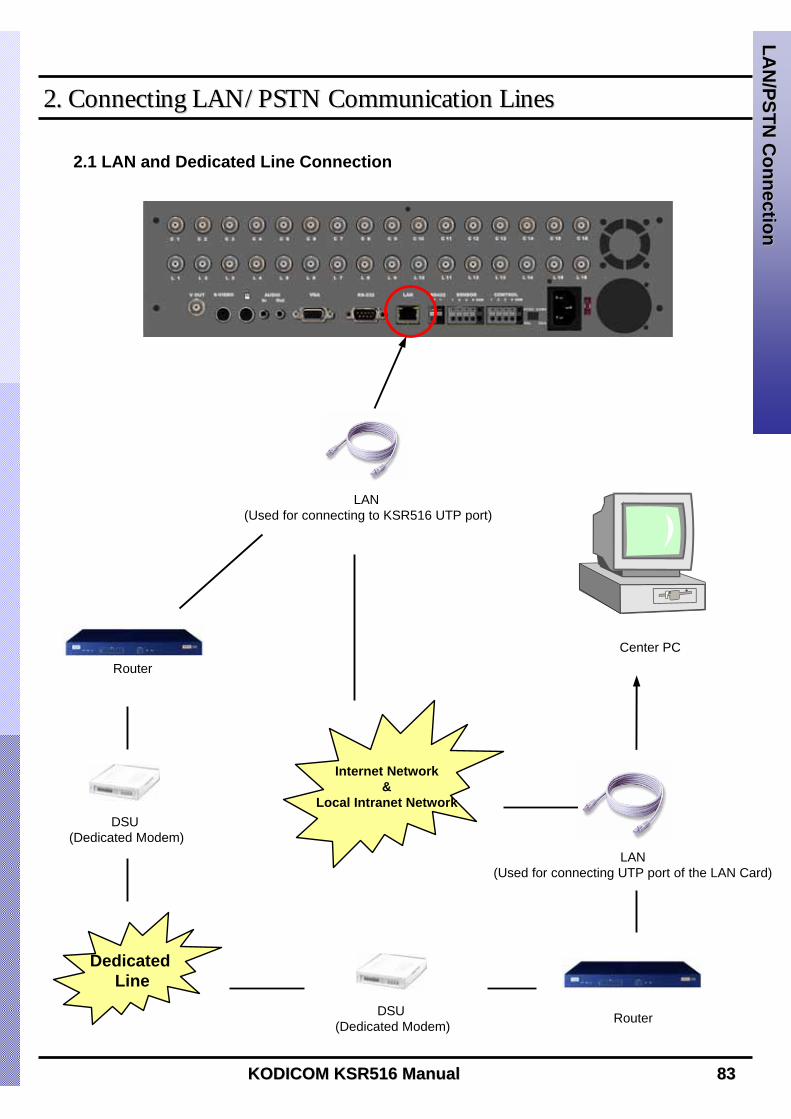
KODICOM KSR516 Manual KODICOM KSR516 Manual 8383
DSU(Dedicated Modem)
Dedicated Line
Center PCRouter
Router
Internet Network&
Local Intranet Network
DSU(Dedicated Modem)
2. Connecting LAN/PSTN Communication Lines2. Connecting LAN/PSTN Communication Lines
2.1 LAN and Dedicated Line Connection
LAN
/PSTN C
onnectionLA
N/PSTN
Connection
LAN(Used for connecting to KSR516 UTP port)
LAN(Used for connecting UTP port of the LAN Card)

KODICOM KSR516 Manual KODICOM KSR516 Manual 8484
2.2 PSTN (telephone line) Connection (options)
MODEM(KSR516 RS-232 connection)
CENTER PC
MODEM
LAN
/PSTN C
onnectionLA
N/PSTN
Connection

KODICOM KSR516 Manual KODICOM KSR516 Manual 8585
3. RX Receiver (KRE3. RX Receiver (KRE--303) Connection Diagram (optional)303) Connection Diagram (optional)
RX R
eceiver Connection D
iagramR
X Receiver C
onnection Diagram
[CAUTION]
The voltage of the light controlling output port is the same as the AC input voltage.
The operating voltage of the camera lens is fixed to DC 12V.
RX-RECEIVER Internal View
1 5
11
14
15
16
17 18 19 20 21 22 23
2 3 4
12
6 7 8 9 10
13

8686 KODICOM KSR516 ManualKODICOM KSR516 Manual
3.1 Part Name and Description
RX R
eceiver Connection D
iagramR
X Receiver C
onnection Diagram
1
2
3
4
5
6
7
8
9
10
11
12
13
14
15
16
17
18
19
20
21
22
23
Turns “ON” when polarity of data lines connected correctly.
Used for ON-OFF of the cross resistance according to the international standard, EIA-485.
DC±6V when it is LOW, DC±12V when it is HIGH.
Used for reversing the polarity of ZOOM/FOCUS control output.
Used along side with MATRIX CARD, else it is "0"
Turns “ON” when summoned camera number from DVR or TX match.
Created from the left in order of “100/10/1”
Output of EXT is adjustable from DVR depending on the condition at site.
P/T control voltage output is classified into AC24V and input voltage. The default is AC24V.
Input voltage selection switch for AC 110V/220V. The default is AC220V.
High end commercial usage only, PIC 16F74
Can be replaced with National N75176-Japan or Maxim MAX485 IC-USA.
Used to check the condition of PAN/TILT and ON-OFF output.
Used to check the condition of MOTORIZED ZOOM LENS output.
Input power is 250V/10A when AC 110V is selected, and is 250V/5A when AC220V is selected.
Main power switch capable of ON-OFF on 2 lines at the same time.
Data input terminal capable of receiving RS-485EIA signal; be cautious of polarity.
3 lines per output, in order of ZOOM(1)/FOCUS(2)/COMMON(3)
Arranged in order of UP/DOWN/LEFT/RIGHT/AUTO PAN/COMMON (4,5,6,7,8,9 consecutive)
Power output related to camera and its housing; AC voltage output.
LIGHT/AUX 1,2/AUDIO – Maximum of 1KW of AC voltage output
AC power source used for installation/repair, usable by connecting to wall outlet.
Used in main power input terminal of AC 110V, or alternate power of 220V.

KODICOM KSR516 Manual KODICOM KSR516 Manual 8787
1 2 3 4 COM
Sensor
Connect one (of two) signal lines of sensor (infrared sensor, magnetic) to COM port, and connect the other signal line to the desired sensor number.
(Set the sensor “NC, NO” type in “Set Camera” menu See Page 66 for details on Sensor type setting)
[Caution]
Use a separate adapter to supply power to each sensor.
4. External Sensor Connection (Input)4. External Sensor Connection (Input)
External Sensor Connection
External Sensor Connection

8888 KODICOM KSR516 ManualKODICOM KSR516 Manual
1 2 3 4 COM
Control
5. Control Port Connection (Output)5. Control Port Connection (Output)
External Power ( DC12V )
(-)(+)
Alarm Light, Amplification Siren, External Relay, Etc.
[Caution]
• The operating voltage should be maximum 12V, 300mA.
• When controlling lights and other devices operated by AC power, use a separate external relay.
• During automatic controlling of an external sensor, the control output port is interworked (the value set in “Set Camera” menu) and “COM” port is connected.
• In normal occasions, the control output is kept in “NO” status.
• When control is triggered, the control output changes to “NC” status.
Control Port C
onnectionC
ontrol Port Connection

8989 KODICOM KSR516 ManualKODICOM KSR516 Manual
6. Adding HDD6. Adding HDD
6.1 Installing new HDD
[Figure 6-1. HDD Format]
• Turn the system off and install the new HDD into the system.
• Turn the system back on and wait for the HDD format message.
• The message will ask you to confirm HDD format. HDD format is a necessary procedure before using the newly installed HDD.
• Press [Yes] button to being formatting the new HDD. Pressing [No] button will cancel HDD format and shutdown the system.
[Figure 6-2. HDD Format progress]
• Once the system begins formatting the HDD, you can view the progress through the progress bar.
• Once HDD is complete, the system will restart.
[Note]
• Before attaching a new HDD to the system, please refer to both the original HDD and the new HDD interface jumper and set the MATER and SLAVE.
• Any newly installed HDD must be formatted
• Formatting will erase all data stored in the selected HDD. Please make sure you have saved all important data before proceeding with HDD format (see page 37 for details on saving backup).
☞☞A
dding new H
DD
Adding new
HD
D
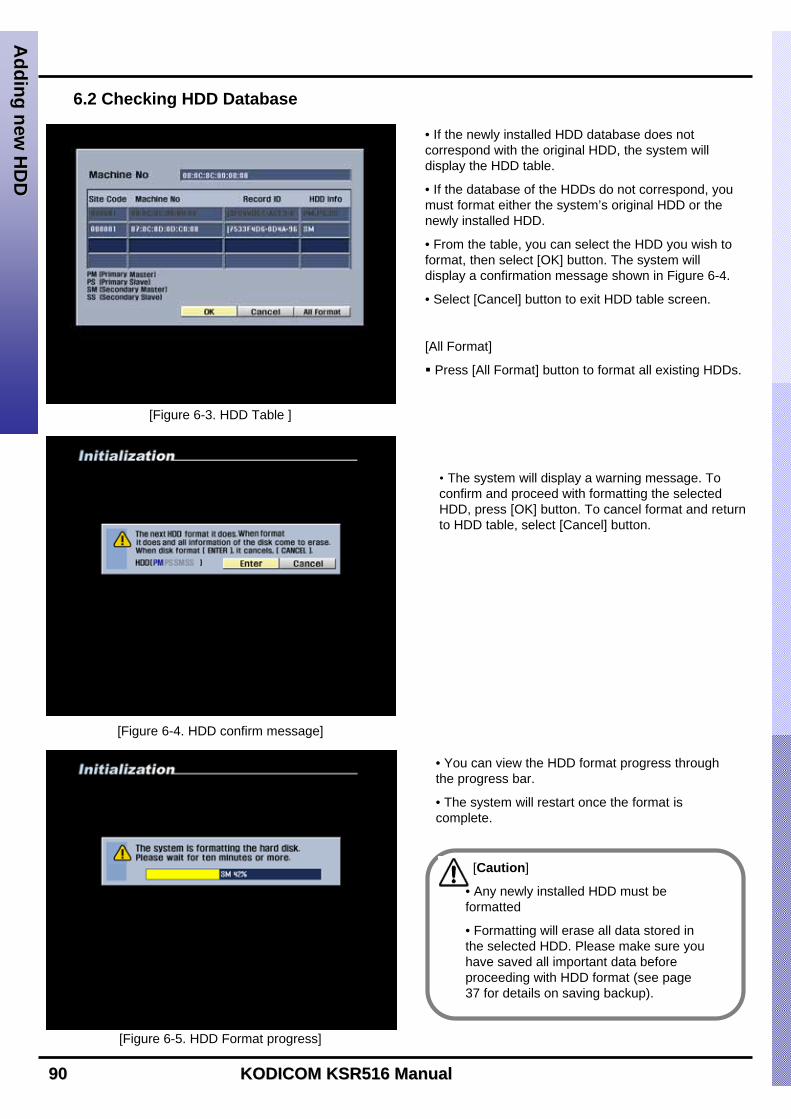
9090 KODICOM KSR516 ManualKODICOM KSR516 Manual
6.2 Checking HDD Database
[Figure 6-3. HDD Table ]
[Figure 6-4. HDD confirm message]
• If the newly installed HDD database does not correspond with the original HDD, the system will display the HDD table.
• If the database of the HDDs do not correspond, you must format either the system’s original HDD or the newly installed HDD.
• From the table, you can select the HDD you wish to format, then select [OK] button. The system will display a confirmation message shown in Figure 6-4.
• Select [Cancel] button to exit HDD table screen.
[All Format]
Press [All Format] button to format all existing HDDs.
• The system will display a warning message. To confirm and proceed with formatting the selected HDD, press [OK] button. To cancel format and return to HDD table, select [Cancel] button.
[Figure 6-5. HDD Format progress]
• You can view the HDD format progress through the progress bar.
• The system will restart once the format is complete.
Adding new
HD
DA
dding new H
DD
[Caution]
• Any newly installed HDD must be formatted
• Formatting will erase all data stored in the selected HDD. Please make sure you have saved all important data before proceeding with HDD format (see page 37 for details on saving backup).
KODICOM KSR516 Manual KODICOM KSR516 Manual 9191
AppendixAppendix
AppendixAppendixAppendix
Appendix
Appendix
1. Viewer for KDB data…………………………………………………………………………………………922. Specifications …………………………………………………………………………………………………953. FAQ………………………………………………………………………………………………………………97

9292 KODICOM KSR516 ManualKODICOM KSR516 Manual
1.1. Viewer for KDB dataViewer for KDB data
VV
II
EE
WW
EE
RR
1.1 How to run Viewer
When you insert the CD containing KDB type (Kodicom Data Base) data burned on built-in CD-RW you can see below screen by entering the folder that contains Viewer. Then, double click Viewer folder.
Viewer will work when you double-click Viewer.exe
1
2
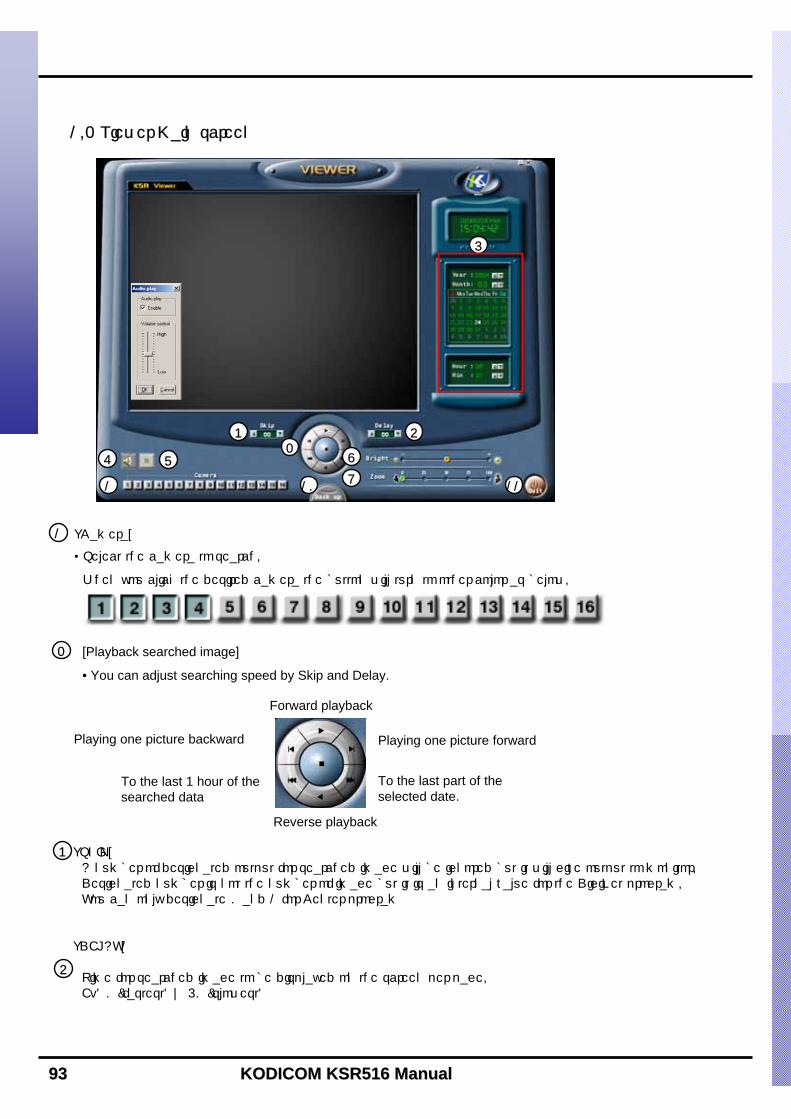
9393 KODICOM KSR516 ManualKODICOM KSR516 Manual
1.2 Viewer Main screen
[Camera]
• Select the camera to search.
When you click the desired camera the button will turn to other color as below.
[SKIP]A number of designated output for searched image will be ignored but it will give output to monitor. Designated number is not the number of image but it is an internal value for the DigiNet program. You can only designate 0 and 1 for Center program
[DELAY]
Time for searched image to be displayed on the screen per page. Ex) 0 (fastest) ~ 50 (slowest)
1
2
4
1
3
23 4
5
76 8
910 11
Reverse playback
Forward playback
Playing one picture backward Playing one picture forward
To the last part of the selected date.
To the last 1 hour of the searched data
[Playback searched image]
• You can adjust searching speed by Skip and Delay.
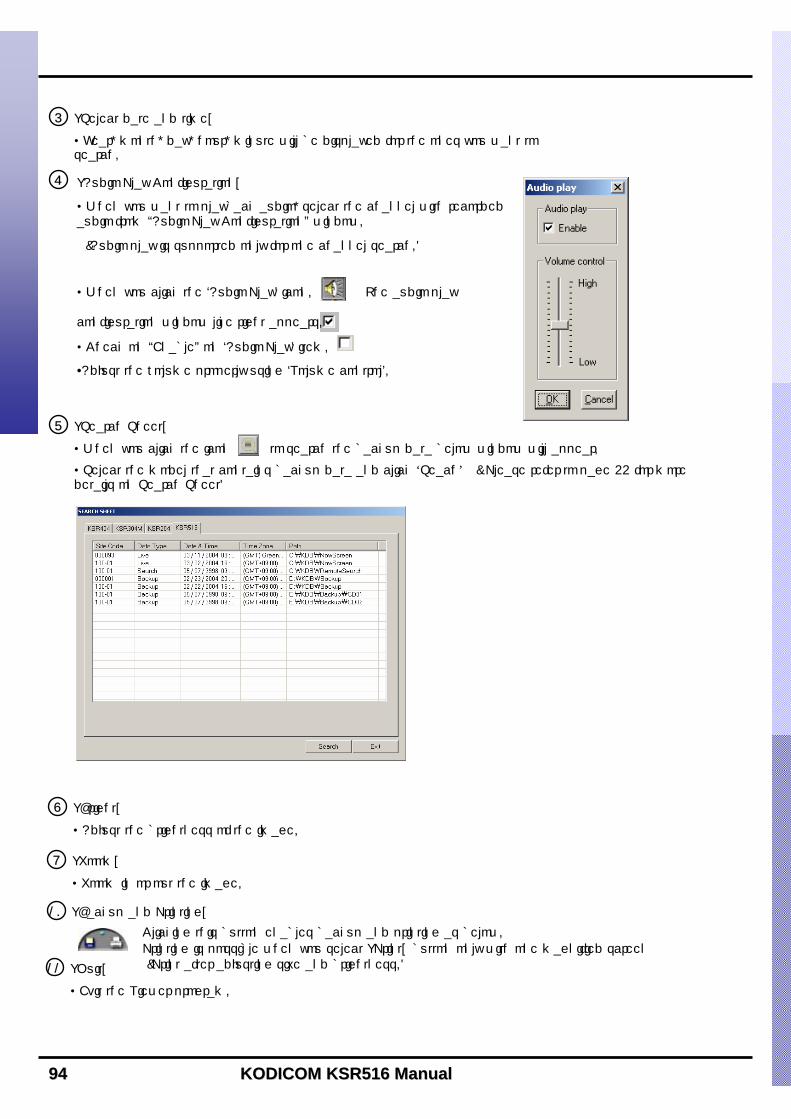
9494 KODICOM KSR516 ManualKODICOM KSR516 Manual
[Select date and time]
• Year, month, day, hour, minute will be displayed for the ones you want to search.
5
[Audio Play Configuration]
• When you want to playback audio, select the channel with recorded audio from “Audio Play Configuration” window.
(Audio play is supported only for one channel search.)
• When you click the ‘Audio Play’ icon. The audio play
configuration window like right appears.
• Check on “Enable” on ‘Audio Play’ item.
•Adjust the volume properly using ‘Volume control’.
6
[Search Sheet]
• When you click the icon to search the backup data below window will appear.
• Select the model that contains backup data and click ‘Seach’ ( Please refer to page 44 for more details on Search Sheet)
7
[Bright]
• Adjust the brightness of the image.
8
[Zoom]
• Zoom in or out the image.
9
10 [Backup and Printing]
Clicking this button enables backup and printing as below.Printing is possible when you select [Print] button only with one magnified screen (Print after adjusting size and brightness.)[Quit]
• Exit the Viewer program.
11
9595 KODICOM KSR516 ManualKODICOM KSR516 Manual
1. Specifications1. Specifications
System Specifications
• HDD : Max. HDD x 4
• O/S : Embedded Linux
• LAN : Ethernet 10/100 MB
• Modem : 56Kbps. External-type modem is supported. (Optional)
Video Input
• 16Ch Composite Video (NTSC/PAL)
Video Output
• General Monitor Spot Output (BNC)
• S-Video Output Port
• VGA Output Port
• Video Loop Through Port for Each Video Input
Recording Frame• NTSC : Max 112 Frame/Sec
• PAL : Max 96 Frame/Sec
Compression MethodEngine-X
Display Mode
• x1, x4, x9, and x16 Screen Division – NTSC : 480 Frames/sec, 16Ch Multi-media Monitoring
PAL : 400 Frames/sec, 16Ch Multi-media Monitoring
Auto Switching
• Automatic channel rotation in order of x1, x4, x9, and x16 Screen Division
Playback Display Mode
• Playing in splitscreen mode up to16-splitscreen is possible
• Enlarging an image to fullscreen is possible
Sensor Input
• 4 sensor input
Alarm Output
• 4 alarm output
SpecificationsSpecifications
Audio Recording
• 1Channel Audio Support
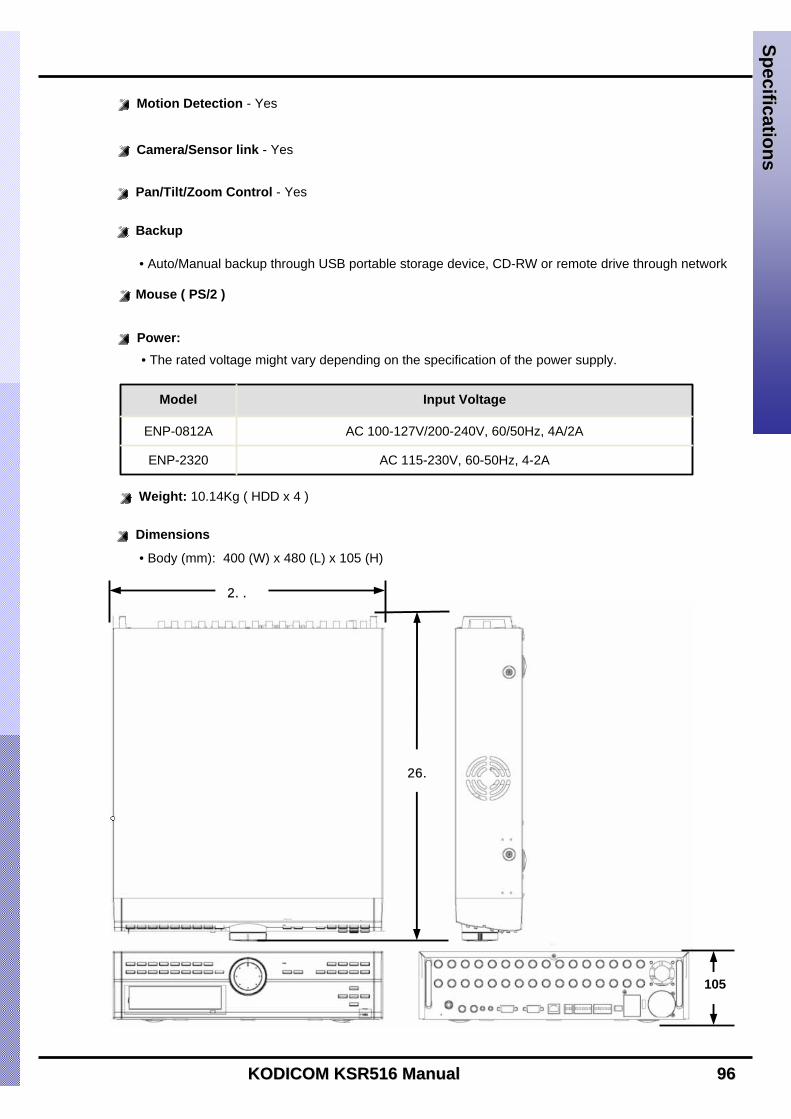
KODICOM KSR516 Manual KODICOM KSR516 Manual 9696
Backup
• Auto/Manual backup through USB portable storage device, CD-RW or remote drive through network
Dimensions
• Body (mm): 400 (W) x 480 (L) x 105 (H)
Power:
Weight: 10.14Kg ( HDD x 4 )
Motion Detection - Yes
Camera/Sensor link - Yes
Pan/Tilt/Zoom Control - Yes
SpecificationsSpecifications
105
Mouse ( PS/2 )
480
400
AC 115-230V, 60-50Hz, 4-2AENP-2320
AC 100-127V/200-240V, 60/50Hz, 4A/2AENP-0812A
Input VoltageModel
• The rated voltage might vary depending on the specification of the power supply.

9797 KODICOM KSR516 ManualKODICOM KSR516 Manual
2. FAQ2. FAQ
☞ Check if the power cable is connected correctly.
☞ Check if the input voltage is correct.
☞ If the system power does not turn on when the power cable is connected correctly, please contact the service center.
1 The system power does not turn on.
☞ Check if the monitor power cable is connected properly
☞ Check to make sure the monitor is turned on.
☞ Check if the video output cable of KSR516 DVR is properly connected to the monitor.
☞ Unplug the power cable and plug in again..
2 The system power is turned on, but no video data is displayed on the monitor.
3 The camera numbers are displayed on the screen, but camera images are not displayed.
4 The camera video is shown on the screen, but the system doesn’t record video.
☞ Check if there is a recorded video data at the time that you are trying to search on the table.
☞ If there is no recorded video data, check to make sure the recording mode in the recording setting mode is not set to “NONE”.
5 It is impossible to search through the recorded video.
☞ Check if the camera video output is connected to KSR516 DVR system correctly.
☞ Check if the power cable on the camera is connected correctly.
☞ Check if the video cable connecting the camera to KSR516 DVR system has a problem.
☞ This problem can occur because of weak video signal if the video data is transferred by the video data distributor when the video is connected to multiple systems. Connect the camera directly to KSR516 DVR.
☞ Turn off KSR516 system and turn it on again.
☞ Check to make sure the recording mode in the recording setting mode is not set to “NONE”.
☞ Turn off the KSR516 DVR and turn it on again.
6 Audio data recorded with video data is not playing.
☞ Check if the audio recording option is correctly set to the camera you wish to record audio.
☞ Check if the audio play option in the Searching mode is selected.
☞ Check if the microphone and speaker port on the rear of KSR516 system are connected correctly.
☞ Check if the connected microphone is working properly.
☞ Check if the connected speaker is working properly.
FAQ
FAQ

KODICOM KSR516 Manual KODICOM KSR516 Manual 9898
The connected sensor is not operating.
The connected control device is not operating.
Color of some camera videos are strange or videos are shown abnormally.
☞ Check if the camera connected to the system has a problem. Check to make sure the camera is not damaged by trying another camera into a working video output.
☞ Check if the video system setting is the same with your camera system. Depending on your region, the camera system can support either PAL, or NTSC. Depending on the camera system, the video process can differ greatly, therefore it can be difficult to recognize the video data if the video system setting is different from the camera system.
☞ Check if the type of sensor in camera setting is the same with the connected sensor.
☞ Check if the system is set to use the sensor in recording schedule window in the recording setting menu.
☞ Check if the power cable of the sensor is properly connected.
☞ Check if the signal cable of the sensor is properly connected.
☞ The system can restart itself due to watchdog function when any problem occurs to KSR516 DVR.
9 Sometimes the system restarts itself.
☞ Check if the system is set to use the control device in the camera setting menu.
☞ Check if the power cable of the controller is properly connected.
☞ Check if the signal cable of the controller is properly connected.
11
12
7
There are a lot of (screen) noise on the image.8
☞ Check if the video signal output from the camera has a problem.Check to make sure the camera is not damaged by trying another camera into a working video output.
☞ Check if the video cable connecting the camera and KSR516 DVR is cut, cross-wired, or shorted.
☞ Check if there is a high voltage wire around the video cable connecting the camera to KSR516 DVR system. It can cause the noise problem to decrease video quality.
☞ Check if the video cable connecting the camera to KSR516 DVR system is the correct video cable. When a normal power-supplying cable is used instead of the video cable, screen noise can be generated.
10
QQ&&AA

KODICOM KSR516 Manual KODICOM KSR516 Manual 9999
If the product is damaged despite following the instructions provided in the manual, this warranty will be in effect, provided the product is damaged within 1 year of purchase.
Service fee and replacement parts will be charged in below cases:1. Damaged the user’s carelessness.
2. Damaged due to a natural disaster.
3. Damaged due to the user not following the instructions and cautions written in the user’s guide.
4. Damaged due to incorrect power voltage, and/or frequency being used.
5. If the Product Warranty sheet is expired.
6. Damaged due to an engineer not employed by KODICOM modifying the system.
If your system is damaged after the warranty period, free repair service will not be available. If you wish the system to be repaired, service fee and replacement parts will be charged.
The Product Warranty Sheet will not be issued again.The Product Warranty Sheet must be filled on the same day of the product’s purchase.It will be requested to show this warranty to receive free repair service.
Warranty InformationWarranty Information
Address
NameCustomer
1 year from the purchasing date.Warranty Period
Purchasing Date
Purchasing Dealer
Serial Number
Product/ Model Name
Product Warranty
The quality of this product is guaranteed by strict quality control process and tests.
If the product is damaged despite following the instructions provided in the manual, this warranty will be in effect, provided the product is damaged within 1 year of purchase.
Warranty Information
Check the Product Warranty Sheet to make sure it is still in effect.
Check the problem again and contact your dealer you purchased from.
About product repair, exchange, or refund, we follow the “compensation regulation for
customer’s loss” announced by “the Economic Planning Board”.
Warranty

Korea Digital Communication Co., Ltd.Korea Digital Communication Co., Ltd.
KODICOMAddress: 5th Floor A dong SK Twin Tower, Kasan-dong 345-9,
Geumcheon-gu, Seoul, South Korea
Tel : +82 2 529-5768 (Representative)
Fax : +82 2 579 8419
Web Site: www.kodicom.com
E-mail : [email protected]


![arranged by tom wallace percussion by tony mccutchen 11 a a 10 aaa > e] aa aaa 6 aaa aaa aaa aaa aaa aaa 13 > 19 — 18 15 a a aa 16 a a 12 20 23 a > 24 aaa > 25 a > 26 aaa > 27 gÆ4k](https://static.documents.pub/doc/80x56/5e6c4dfc8bd84b079d5a5076/arranged-by-tom-wallace-percussion-by-tony-mccutchen-11-a-a-10-aaa-e-aa-aaa.jpg)


