18
Laserfiche Security Training Manual - 1 - Laserfiche Security Training Manual

Laserfiche Security Training Manual - 1 -
Laserfiche Security Training Manual
Laserfiche Security Training Manual - 2 -
Laserfiche Security General Overview:
One of the responsibilities of a Unit Administrator as it pertains to the Laserfiche Document Management System is controlling access to various file areas for which you are responsible. Access in Laserfiche is controlled through the granting/restricting of Entry Access Rights. This document will serve as a refresher to the Unit Administrator training. The TA&M Agriculture repository has a file structure that allows for consistent filing of similar documents by all units utilizing the Document Management System. Each of the units has corresponding areas where those similar documents will be filed. As a Unit Administrator, there are certain areas within the file structure that you will have complete control over, including the granting of varying levels of access to those files. The complete file plan with that access indicated can be located at: http://agdocsinfo.tamu.edu/resources/File-plan-access-annotated.pdf .
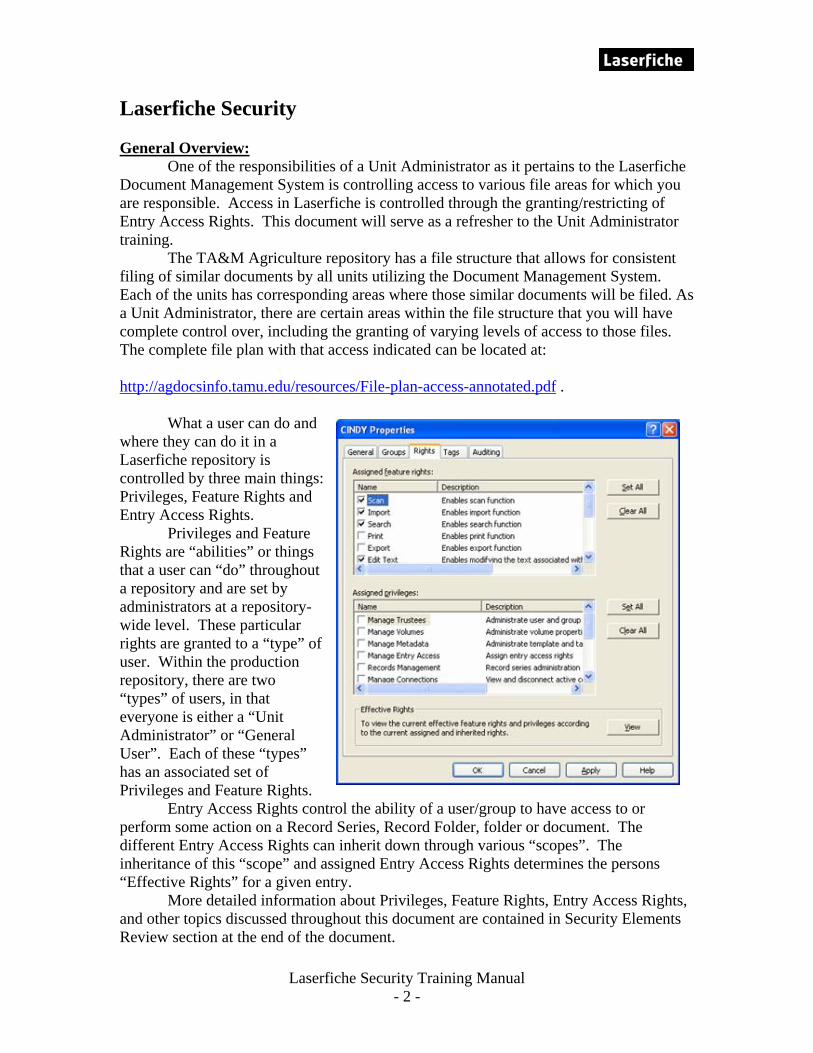
What a user can do and where they can do it in a Laserfiche repository is controlled by three main things: Privileges, Feature Rights and Entry Access Rights.
Privileges and Feature Rights are “abilities” or things that a user can “do” throughout a repository and are set by administrators at a repository-wide level. These particular rights are granted to a “type” of user. Within the production repository, there are two “types” of users, in that everyone is either a “Unit Administrator” or “General User”. Each of these “types” has an associated set of Privileges and Feature Rights.
Entry Access Rights control the ability of a user/group to have access to or perform some action on a Record Series, Record Folder, folder or document. The different Entry Access Rights can inherit down through various “scopes”. The inheritance of this “scope” and assigned Entry Access Rights determines the persons “Effective Rights” for a given entry.
More detailed information about Privileges, Feature Rights, Entry Access Rights, and other topics discussed throughout this document are contained in Security Elements Review section at the end of the document.

Laserfiche Security Training Manual - 3 -
Laserfiche Security Demonstration: The following demonstration of assigning Entry Access Rights is a review of the
security training session that is a part of the full day Unit Administrator training session. It will contain step-by-step instructions for assigning access rights based on a scenario that attempts to reflect some real-world application. It is not possible to address every Entry Access Right situation, and is only meant to serve as a generalization of the concepts and techniques that are used to assign/control access to areas under your control as Unit Administrators. Scenario: As a Unit Administrator, you will be responsible for controlling access to certain Record Series, Record Folders, folders and documents. How you choose to control that access will be based on the needs of your particular unit, personnel and business processes. In the scenario from the Unit Administrator training session and in this demonstration, you will have the following “folders” under your control as seen below:
In this scenario, we will be working particularly within the folder area that is expanded, the “3.0 Human Resources/Employee Records” folder. This includes the following sub-folders: 3.1 Hiring Files 3.2 Personnel Files 3.3 Payroll 3.4 Personnel Administration 3.5 Time & Leave Records 3.6 Career Ladders and Related Information
Laserfiche Security Training Manual - 4 -
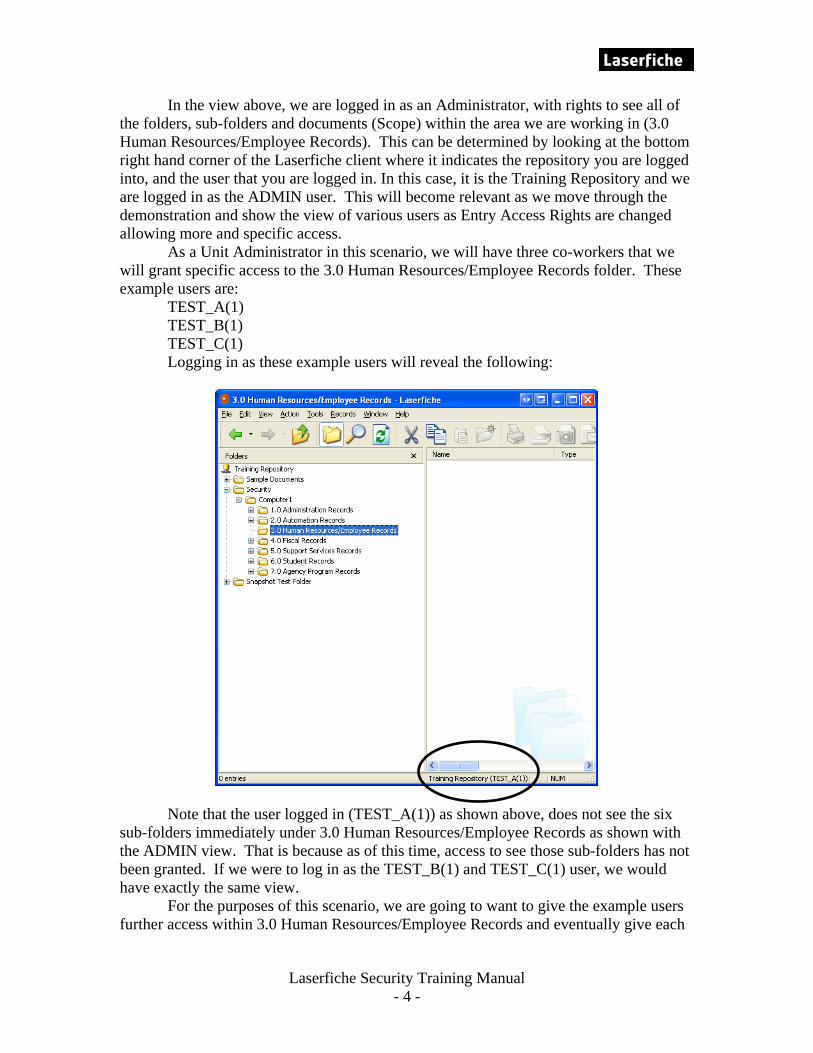
In the view above, we are logged in as an Administrator, with rights to see all of the folders, sub-folders and documents (Scope) within the area we are working in (3.0 Human Resources/Employee Records). This can be determined by looking at the bottom right hand corner of the Laserfiche client where it indicates the repository you are logged into, and the user that you are logged in. In this case, it is the Training Repository and we are logged in as the ADMIN user. This will become relevant as we move through the demonstration and show the view of various users as Entry Access Rights are changed allowing more and specific access. As a Unit Administrator in this scenario, we will have three co-workers that we will grant specific access to the 3.0 Human Resources/Employee Records folder. These example users are: TEST_A(1) TEST_B(1) TEST_C(1)
Logging in as these example users will reveal the following:
Note that the user logged in (TEST_A(1)) as shown above, does not see the six sub-folders immediately under 3.0 Human Resources/Employee Records as shown with the ADMIN view. That is because as of this time, access to see those sub-folders has not been granted. If we were to log in as the TEST_B(1) and TEST_C(1) user, we would have exactly the same view. For the purposes of this scenario, we are going to want to give the example users further access within 3.0 Human Resources/Employee Records and eventually give each
Laserfiche Security Training Manual - 5 -
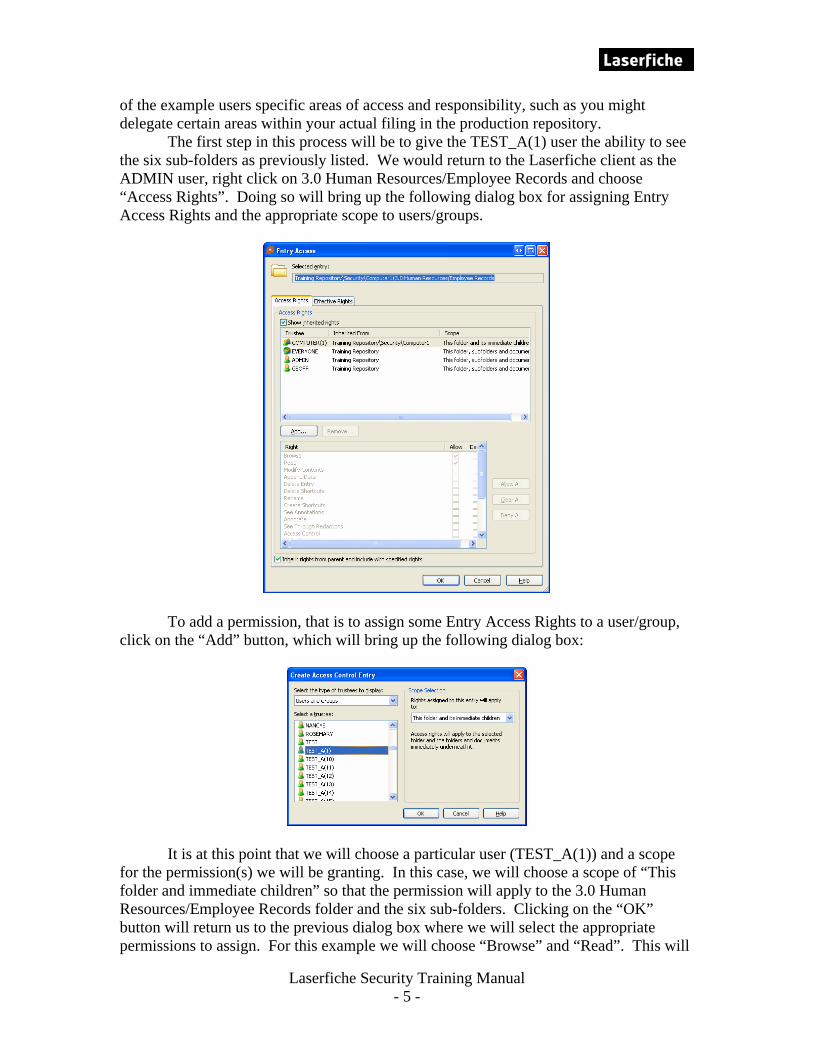
of the example users specific areas of access and responsibility, such as you might delegate certain areas within your actual filing in the production repository. The first step in this process will be to give the TEST_A(1) user the ability to see the six sub-folders as previously listed. We would return to the Laserfiche client as the ADMIN user, right click on 3.0 Human Resources/Employee Records and choose “Access Rights”. Doing so will bring up the following dialog box for assigning Entry Access Rights and the appropriate scope to users/groups.
To add a permission, that is to assign some Entry Access Rights to a user/group, click on the “Add” button, which will bring up the following dialog box:
It is at this point that we will choose a particular user (TEST_A(1)) and a scope for the permission(s) we will be granting. In this case, we will choose a scope of “This folder and immediate children” so that the permission will apply to the 3.0 Human Resources/Employee Records folder and the six sub-folders. Clicking on the “OK” button will return us to the previous dialog box where we will select the appropriate permissions to assign. For this example we will choose “Browse” and “Read”. This will

Laserfiche Security Training Manual - 6 -
allow the TEST_A(1) user to be able to see the sub-folders, but not their contents or be able to manipulate them in anyway. Clicking “OK” will finalize the permission assignment.
By returning to the view of the TEST_A(1) user, we can see that they are now able to see the sub-folders as desired.
Laserfiche Security Training Manual - 7 -
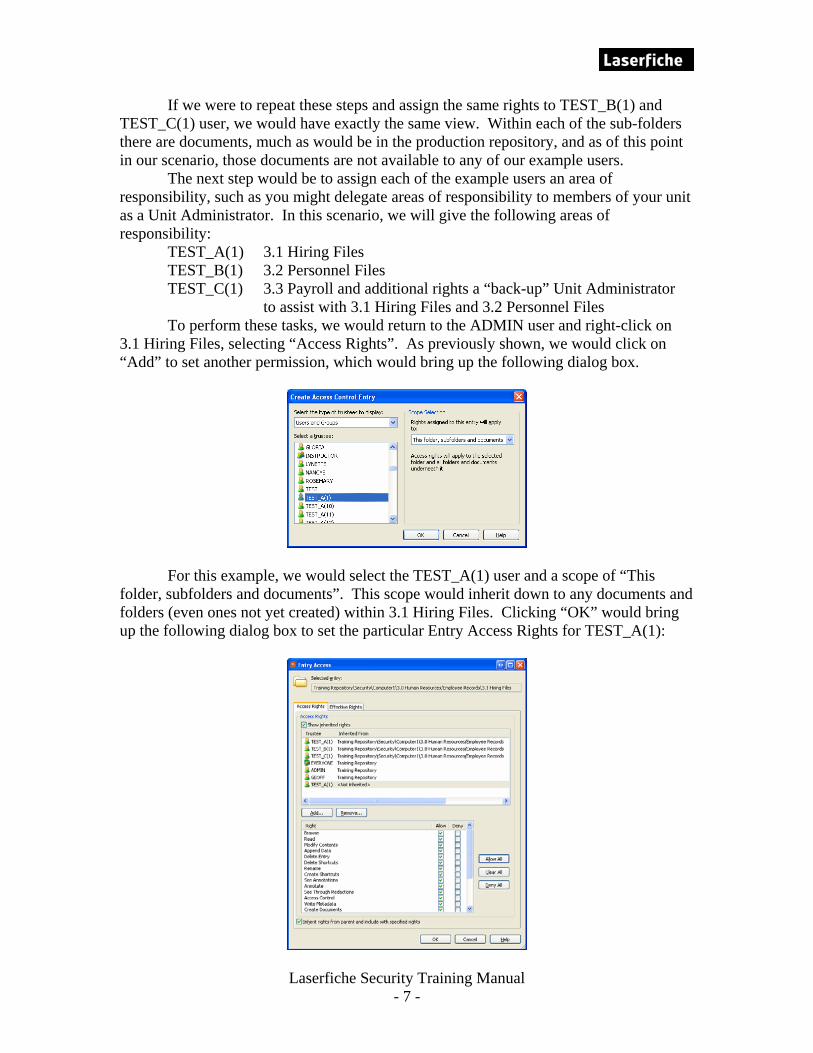
If we were to repeat these steps and assign the same rights to TEST_B(1) and TEST_C(1) user, we would have exactly the same view. Within each of the sub-folders there are documents, much as would be in the production repository, and as of this point in our scenario, those documents are not available to any of our example users. The next step would be to assign each of the example users an area of responsibility, such as you might delegate areas of responsibility to members of your unit as a Unit Administrator. In this scenario, we will give the following areas of responsibility: TEST_A(1) 3.1 Hiring Files TEST_B(1) 3.2 Personnel Files TEST_C(1) 3.3 Payroll and additional rights a “back-up” Unit Administrator to assist with 3.1 Hiring Files and 3.2 Personnel Files To perform these tasks, we would return to the ADMIN user and right-click on 3.1 Hiring Files, selecting “Access Rights”. As previously shown, we would click on “Add” to set another permission, which would bring up the following dialog box.
For this example, we would select the TEST_A(1) user and a scope of “This folder, subfolders and documents”. This scope would inherit down to any documents and folders (even ones not yet created) within 3.1 Hiring Files. Clicking “OK” would bring up the following dialog box to set the particular Entry Access Rights for TEST_A(1):
Laserfiche Security Training Manual - 8 -
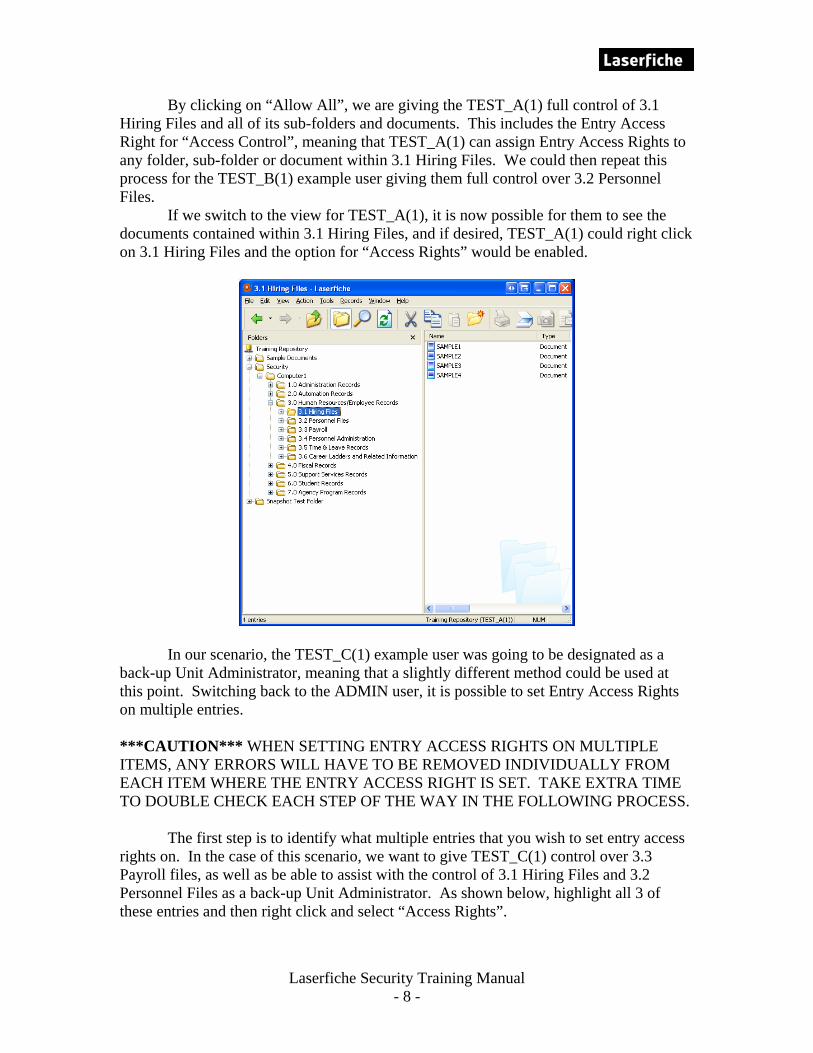
By clicking on “Allow All”, we are giving the TEST_A(1) full control of 3.1 Hiring Files and all of its sub-folders and documents. This includes the Entry Access Right for “Access Control”, meaning that TEST_A(1) can assign Entry Access Rights to any folder, sub-folder or document within 3.1 Hiring Files. We could then repeat this process for the TEST_B(1) example user giving them full control over 3.2 Personnel Files.
If we switch to the view for TEST_A(1), it is now possible for them to see the documents contained within 3.1 Hiring Files, and if desired, TEST_A(1) could right click on 3.1 Hiring Files and the option for “Access Rights” would be enabled.
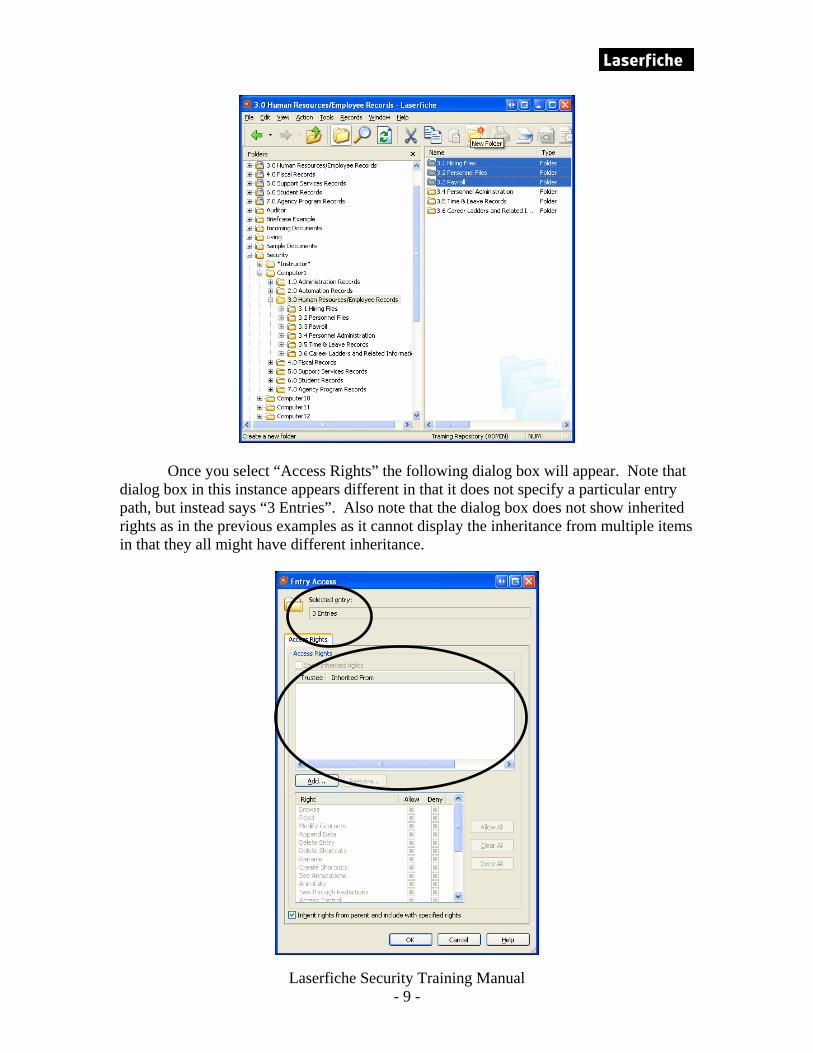
In our scenario, the TEST_C(1) example user was going to be designated as a back-up Unit Administrator, meaning that a slightly different method could be used at this point. Switching back to the ADMIN user, it is possible to set Entry Access Rights on multiple entries. ***CAUTION*** WHEN SETTING ENTRY ACCESS RIGHTS ON MULTIPLE ITEMS, ANY ERRORS WILL HAVE TO BE REMOVED INDIVIDUALLY FROM EACH ITEM WHERE THE ENTRY ACCESS RIGHT IS SET. TAKE EXTRA TIME TO DOUBLE CHECK EACH STEP OF THE WAY IN THE FOLLOWING PROCESS. The first step is to identify what multiple entries that you wish to set entry access rights on. In the case of this scenario, we want to give TEST_C(1) control over 3.3 Payroll files, as well as be able to assist with the control of 3.1 Hiring Files and 3.2 Personnel Files as a back-up Unit Administrator. As shown below, highlight all 3 of these entries and then right click and select “Access Rights”.
Laserfiche Security Training Manual - 9 -
Once you select “Access Rights” the following dialog box will appear. Note that dialog box in this instance appears different in that it does not specify a particular entry path, but instead says “3 Entries”. Also note that the dialog box does not show inherited rights as in the previous examples as it cannot display the inheritance from multiple items in that they all might have different inheritance.
Laserfiche Security Training Manual - 10 -
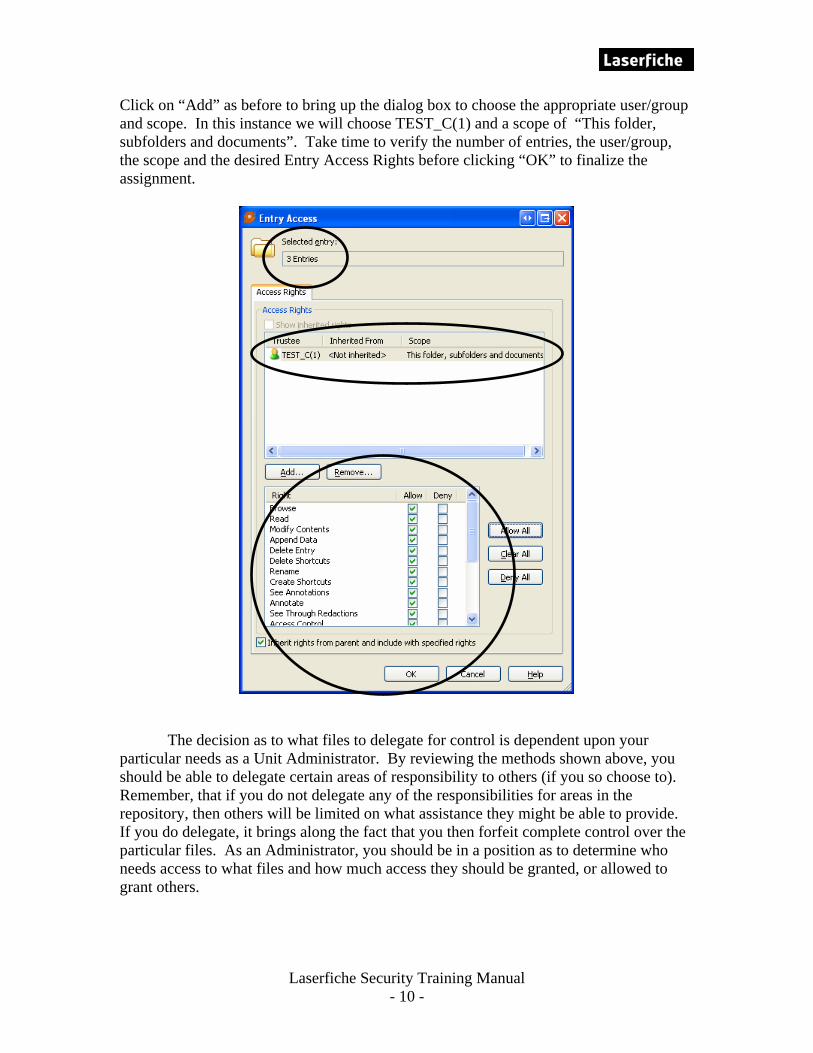
Click on “Add” as before to bring up the dialog box to choose the appropriate user/group and scope. In this instance we will choose TEST_C(1) and a scope of “This folder, subfolders and documents”. Take time to verify the number of entries, the user/group, the scope and the desired Entry Access Rights before clicking “OK” to finalize the assignment.
The decision as to what files to delegate for control is dependent upon your particular needs as a Unit Administrator. By reviewing the methods shown above, you should be able to delegate certain areas of responsibility to others (if you so choose to). Remember, that if you do not delegate any of the responsibilities for areas in the repository, then others will be limited on what assistance they might be able to provide. If you do delegate, it brings along the fact that you then forfeit complete control over the particular files. As an Administrator, you should be in a position as to determine who needs access to what files and how much access they should be granted, or allowed to grant others.
Laserfiche Security Training Manual - 11 -
Working Within Security Restrictions-Shortcuts: There are times when you will need to work in Laserfiche and previously existing Entry Access rights prevent desired document access. Using the information in the previous scenario, we could envision the following situation that occurs frequently within Laserfiche when certain areas are restricted from other users. As stated previously, our example TEST_B(1) user is in charge of the 3.2 Personnel Files and all of its contents. Our example TEST_A(1) user is in charge of the 3.1 Hiring Files and all of its contents. What if for example, TEST_B(1) needs to have access to a particular hiring file document (or folder as the principals shown here will apply to all Laserfiche records) that is in the 3.1 Hiring Files controlled by TEST_A(1). If that is the case, we have several options which we will list and explain the negative impact of each of them:
1. Rework security to allow TEST_B(1) access to the 3.1 Hiring Files controlled by TEST_A(1). a. Could give TEST_B(1) access to document(s) that you do not want to. b. Would require rework of security each time any document(s) are needed. c. Would require removal of that security each time the access is no longer
needed.
2. Move the appropriate document(s) to the 3.2 Personnel Files. a. TEST_A(1) would not have the document under their control as was
desired in the original scenario. b. TEST_B(1) would have full control over the document and might act in a
way that was not desired for the particular document(s).
3. Make a copy of the appropriate document(s) and provide them to TEST_B(1). a. Multiple copies of the same document would use up more storage space
on the server. b. Multiple copies of the same document could have different actions
performed on them raising question as to which is the “original”.
A way to work around the problems presented by the “solutions” listed above is the use of shortcuts. Shortcuts are a way to make document(s) and folders available by “tunneling” through existing layers of security. It burrows through intervening folders, and by accessing the shortcut, a direct line to that document/folder is opened up on the users computer. To work with shortcuts, there are just a few simple steps and the access granted by the shortcut can be just as easily removed.
1. Grant access to the document(s) or folder(s) for the desired user at the desired level.
2. Copy the desired documents(s) or folder(s). 3. Paste a “shortcut” into a location that is able to accessed by the
desired user. 4. Once access is no longer needed, the access granted in step 1 can
be removed, and the user no longer has access to the document.

Laserfiche Security Training Manual - 12 -
For this example, we will start by having the TEST_A(1) provide access to a document titled “Shortcut Document” in the 3.1 Hiring Files allowing TEST_B(1) to Browse/Read the document with a scope of “This Entry Only” (which is the only option with a document). This is necessary, as the “shortcut” actually opens the document from its original location, which is in an area that TEST_B(1) normally cannot see. Granting access of Browse/Read allows TEST_B(1) to open and view the document, but not modify, annotate, etc. This will keep the document “original” as far as TEST_A(1) is concerned and any modifications that TEST_A(1) makes will be reflected each time TEST_B(1) opens it. TEST_A(1) will assign access to TEST_B(1) as shown in the previous examples. Right clicking on the “Shortcut Document” and choosing “Access Rights” will bring up the following dialog box and a permission will be made by clicking on “Add”.
You will then choose the TEST_B(1) user and the scope of “This Entry Only” is the only option available. Click on “OK” to proceed.

Laserfiche Security Training Manual - 13 -
The following screen will appear and the rights of “Browse/Read” can be added. Click on “OK” to finalize the granting of permissions.
As of now, TEST_B(1) has access to the document, but cannot see it because it is contained in the 3.1 Hiring Files controlled by TEST_A(1). TEST_A(1) will need some assistance in placing the shortcut in the 3.2 Personnel Files as they do not have access to create documents in 3.2 Personnel Files. The ADMIN or TEST_C(1) (as they were given back-up Unit Administrator rights for 3.1 Hiring Files and 3.2 Personnel Files) can assist at this point. To do so, right click on the “Shortcut Document” and choose “Copy”. Then either the ADMIN or TEST_C(1) can go to the 3.2 Personnel Files and then choose “Paste Shortcut” in the folder. Confirm by clicking “Yes”.
At this point in the process, the TEST_B(1) user now will have a shortcut icon for “Shortcut Document” appear in their 3.2 Personnel File as shown below.
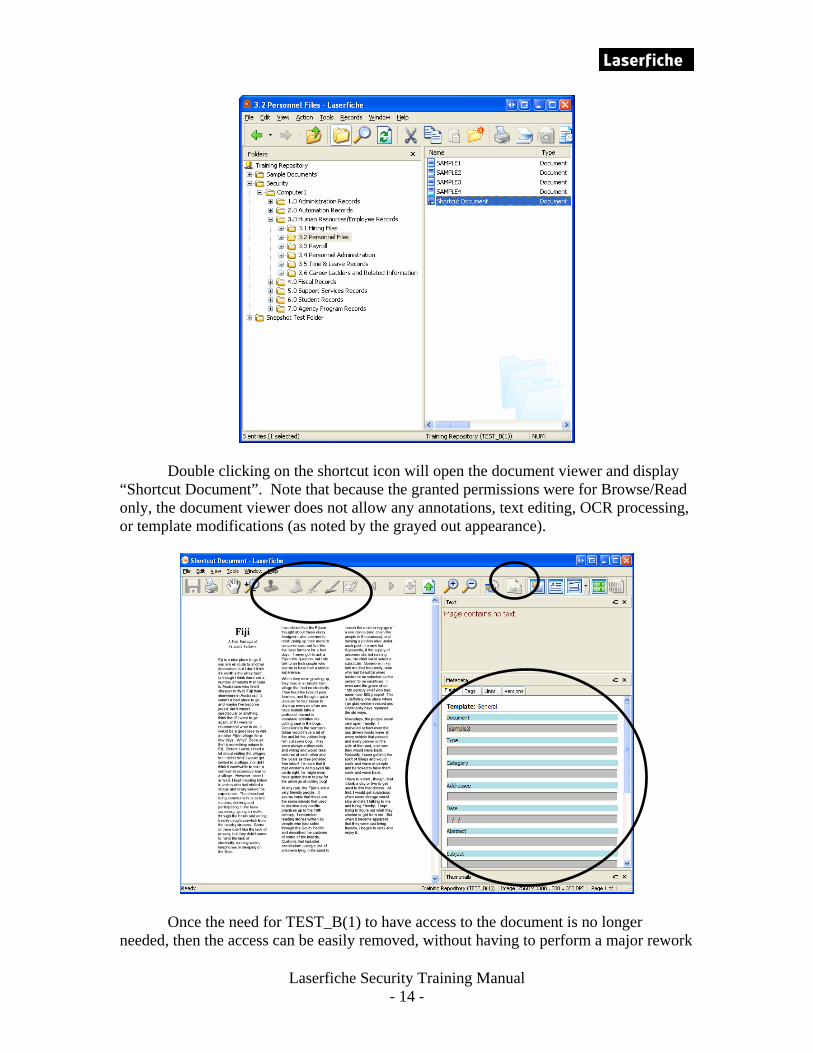
Laserfiche Security Training Manual - 14 -
Double clicking on the shortcut icon will open the document viewer and display “Shortcut Document”. Note that because the granted permissions were for Browse/Read only, the document viewer does not allow any annotations, text editing, OCR processing, or template modifications (as noted by the grayed out appearance).
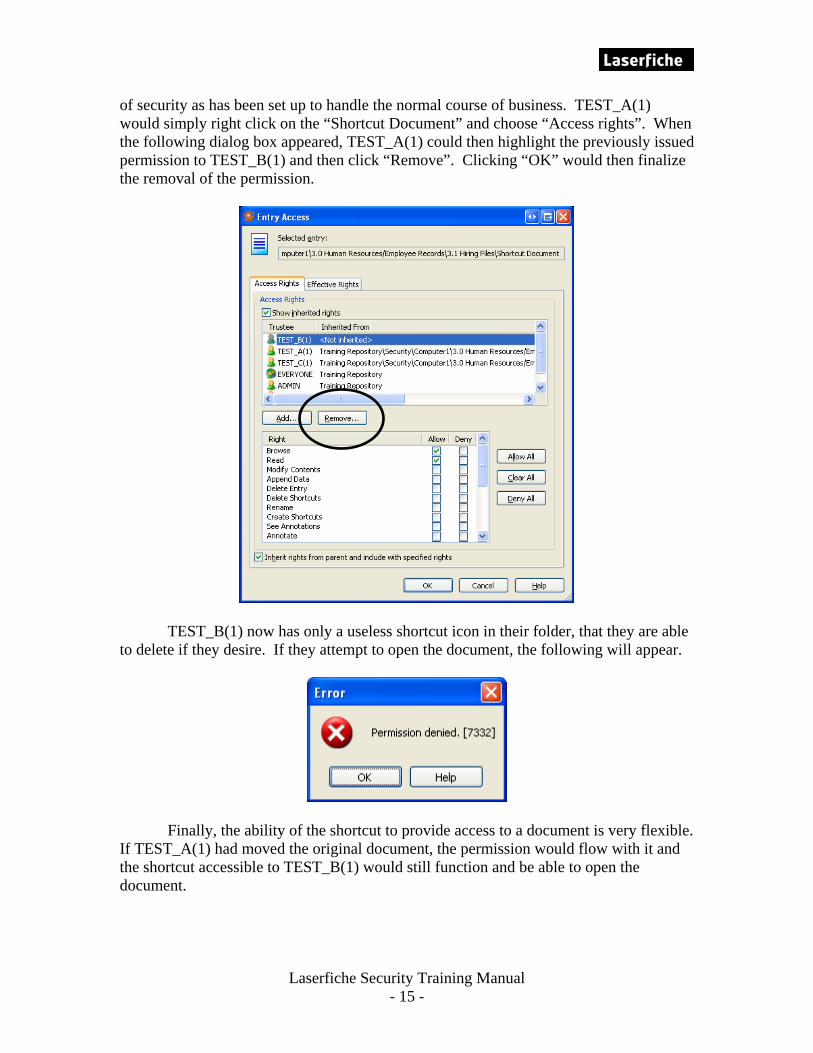
Once the need for TEST_B(1) to have access to the document is no longer needed, then the access can be easily removed, without having to perform a major rework
Laserfiche Security Training Manual - 15 -
of security as has been set up to handle the normal course of business. TEST_A(1) would simply right click on the “Shortcut Document” and choose “Access rights”. When the following dialog box appeared, TEST_A(1) could then highlight the previously issued permission to TEST_B(1) and then click “Remove”. Clicking “OK” would then finalize the removal of the permission.
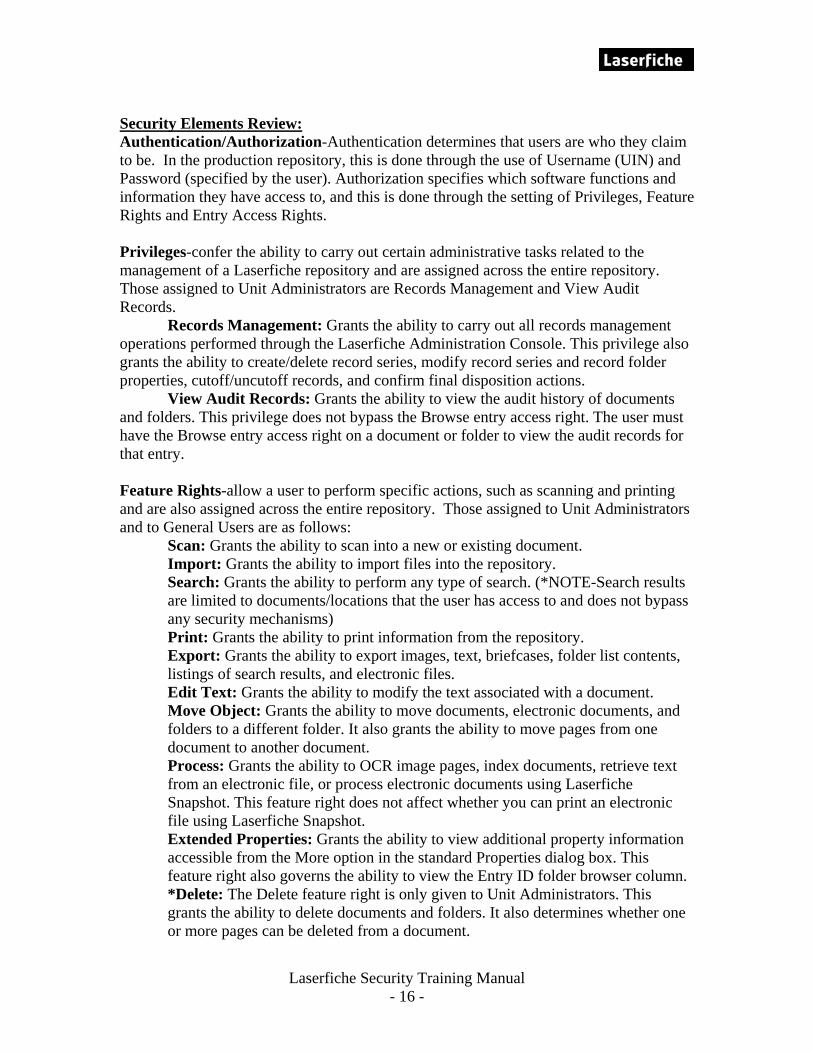
TEST_B(1) now has only a useless shortcut icon in their folder, that they are able to delete if they desire. If they attempt to open the document, the following will appear.
Finally, the ability of the shortcut to provide access to a document is very flexible. If TEST_A(1) had moved the original document, the permission would flow with it and the shortcut accessible to TEST_B(1) would still function and be able to open the document.
Laserfiche Security Training Manual - 16 -
Security Elements Review: Authentication/Authorization-Authentication determines that users are who they claim to be. In the production repository, this is done through the use of Username (UIN) and Password (specified by the user). Authorization specifies which software functions and information they have access to, and this is done through the setting of Privileges, Feature Rights and Entry Access Rights. Privileges-confer the ability to carry out certain administrative tasks related to the management of a Laserfiche repository and are assigned across the entire repository. Those assigned to Unit Administrators are Records Management and View Audit Records. Records Management: Grants the ability to carry out all records management operations performed through the Laserfiche Administration Console. This privilege also grants the ability to create/delete record series, modify record series and record folder properties, cutoff/uncutoff records, and confirm final disposition actions. View Audit Records: Grants the ability to view the audit history of documents and folders. This privilege does not bypass the Browse entry access right. The user must have the Browse entry access right on a document or folder to view the audit records for that entry. Feature Rights-allow a user to perform specific actions, such as scanning and printing and are also assigned across the entire repository. Those assigned to Unit Administrators and to General Users are as follows: Scan: Grants the ability to scan into a new or existing document. Import: Grants the ability to import files into the repository.
Search: Grants the ability to perform any type of search. (*NOTE-Search results are limited to documents/locations that the user has access to and does not bypass any security mechanisms) Print: Grants the ability to print information from the repository. Export: Grants the ability to export images, text, briefcases, folder list contents, listings of search results, and electronic files. Edit Text: Grants the ability to modify the text associated with a document. Move Object: Grants the ability to move documents, electronic documents, and folders to a different folder. It also grants the ability to move pages from one document to another document. Process: Grants the ability to OCR image pages, index documents, retrieve text from an electronic file, or process electronic documents using Laserfiche Snapshot. This feature right does not affect whether you can print an electronic file using Laserfiche Snapshot. Extended Properties: Grants the ability to view additional property information accessible from the More option in the standard Properties dialog box. This feature right also governs the ability to view the Entry ID folder browser column. *Delete: The Delete feature right is only given to Unit Administrators. This grants the ability to delete documents and folders. It also determines whether one or more pages can be deleted from a document.
Laserfiche Security Training Manual - 17 -
Note: The ability to delete pages requires the Modify Contents entry access right on the desired document, the Modify/Delete volume access right on the volume associated with that document, and the Delete feature right.
Entry Access Rights-the primary mode of access control. Each operation on a document or folder has a set of required entry access rights. If the user attempting the action does not have the necessary rights, the user is denied the operation. The setting and maintaining of appropriate Entry Access Rights for areas of the repository under control of a Unit Administrator will be the majority of the time spent dealing with security. The following are the various Entry Access Rights and a brief explanation of them: Browse: Grants the ability to see whether a document, folder, or shortcut exists.
Read: Grants the ability to open a folder, open a document, view field values, search for a document, view all metadata, and view all properties. Modify Contents: Grants the ability to modify the contents of a document. This includes generating or replacing text via OCR. This right allows the user to add pages, move pages, delete pages, rotate images, and move documents and folders to other folders. Append Data: Grants the ability to add pages to the end of a document. If a document has not already been assigned text, then this right grants the ability to generate the text of a document via OCR. Delete Entry: Grants the ability to delete a document or folder. When deleting a folder, the user must also have the necessary rights to delete all entries that reside in the folder. This right does not allow a user to delete pages or text from a document. Delete Shortcuts: Grants the ability to delete shortcuts to an entry. Rename: Grants the ability to rename an entry. Create Shortcuts: Grants the ability to create a shortcut to an entry. See Annotations: Grants the ability to see all annotations (i.e. sticky notes, stamps, highlights, and redactions). However, this right doesn't grant the ability to see through redactions. Annotate: Grants the ability to add, modify, or remove annotations to a document. However, adding, modifying, or removing redactions also requires the See Through Redactions right. See Through Redactions: Grants the ability to see through redactions. This right does not grant the ability to see other types of annotations. This right implicitly grants the See Annotations and Read entry access rights. Access Control: Grants the ability to assign access rights on an entry. Write Metadata: Grants the ability to manage the metadata assigned to an entry. This right implicitly grants the Read entry access right. This right allows a user to assign a template and field data to a document. Create Documents: Grants the ability to create documents in a folder. Create Folders: Grants the ability to create folders. Set Last Review Date*: Grants the ability to set or reset a review date for a document. Freeze*: Grants the ability to freeze a record folder. Unfreeze*: Grants the ability to unfreeze a record folder.
Laserfiche Security Training Manual - 18 -
Set Event Time*: Grants the ability to set, reset, or clear an event date for a time or event and time disposition record folder. Close/Reopen Folder*: Grants the ability to close a record folder for filing as well as reopen a closed record folder. Note: An asterisk (*) indicates access rights that only apply to Records Management. (For more complete description of these Entry Access Rights, please access through the Laserfiche Help menu option)
Scope-determines which entries can be affected by the entry access rights assigned to a folder/record series. This controls the flow of access rights as it inherits "down" through the folder structure based on the designated scope. 9 different levels of “scope”:
This folder, subfolders and documents This folder and subfolders This folder and its immediate children Subfolders and documents only Subfolders only Documents only Immediate children only Documents that are immediate children only This entry only
Effective Rights-a user's effective entry access rights for a document or folder are calculated from the entry access rights that were assigned to that user, assigned to a group to which that user belongs, and/or inherited from a parent folder of the desired document or folder. In the course of calculating a user's effective entry access rights, there may be conflicting rights assignments. If conflict is at different levels, then the lowest folder will take precedence. If at the same level, Laserfiche will defer to the most secure option.


