57
webdev@rgu Layout with css
| Date post: | 07-Jan-2017 |
| Category: |
Software |
| Upload: | mike-crabb |
| View: | 901 times |
| Download: | 0 times |

webdev@rguLayout with css

overviewThe Box Model Positioning Elements Making A horizontal Menu Making a 3 column web page

page layout

• LAYOUT OF MAJOR ELEMENTS OF A PAGE IS CONTROLLED USING CSS
• HEADER, NAVIGATION BARS, SIDEBARS, CONTENT AND FOOTERS
page layout

• LAYOUT OF MAJOR ELEMENTS OF A PAGE IS CONTROLLED USING CSS
• HEADER, NAVIGATION BARS, SIDEBARS, CONTENT AND FOOTERS
page layout

• LAYOUT OF MAJOR ELEMENTS OF A PAGE IS CONTROLLED USING CSS
• HEADER, NAVIGATION BARS, SIDEBARS, CONTENT AND FOOTERS
• <TABLE> WAS PREVIOUSLY USED FOR LAYOUT • PAINFUL FOR COMPLEX LAYOUT • TABLES ARE MEANT FOR CONTENT, NOT
LAYOUT
page layout

• LAYOUT OF MAJOR ELEMENTS OF A PAGE IS CONTROLLED USING CSS
• HEADER, NAVIGATION BARS, SIDEBARS, CONTENT AND FOOTERS
• <TABLE> WAS PREVIOUSLY USED FOR LAYOUT • PAINFUL FOR COMPLEX LAYOUT • TABLES ARE MEANT FOR CONTENT, NOT
LAYOUT
page layout

• LAYOUT OF MAJOR ELEMENTS OF A PAGE IS CONTROLLED USING CSS
• HEADER, NAVIGATION BARS, SIDEBARS, CONTENT AND FOOTERS
• <TABLE> WAS PREVIOUSLY USED FOR LAYOUT • PAINFUL FOR COMPLEX LAYOUT • TABLES ARE MEANT FOR CONTENT, NOT
LAYOUT
• THE PREFERRED SOLUTION IS TO DIVIDE A PAGE INTO A COLLECTION OF <DIV> OR <SECTION> ELEMENTS
• <DIV ID=“HEADER”> … </DIV> • <HEADER> … </HEADER>
page layout

The box model

• CSS USES WHAT IS CALLED A BOX MODEL FOR SURROUNDING CONTENT.
• MADE UP OF 3 PARTS • (CONTENT) THIS ISN’T REALLY A PART OF THE MODEL • PADDING • BORDER • MARGIN
the box model
contentpadding
bordermargin

CONTENT PADDING BORDER MARGIN
the box model
THE CONTENT OF THE BOX, WHERE TEXT AND IMAGES
APPEAR

CONTENT PADDING BORDER MARGIN
the box model
CLEARS AN AREA AROUND THE CONTENT. THE PADDING
IS TRANSPARENT

CONTENT PADDING BORDER MARGIN
the box model
A BORDER THAT GOES AROUND THE PADDING AND
CONTENT

CONTENT PADDING BORDER MARGIN
the box model
CLEARS AN AREA OUTSIDE THE BORDER. THE MARGIN IS
TRANSPARENT

box model properties
width
height

<!DOCTYPE html> <html lang="en"> <head> <meta charset="UTF-8"> <title>Home Page</title> <link type="text/css" rel="stylesheet" href="assets/css/style.css"/> </head> <body>
<header> <h1>My First Website</h1>
<nav> <ul> <li><a href="index.html">Home Page</a></li> <li><a href="login.html">Login</a></li> <li><a href="signup.html">Signup</a></li> </ul> </nav> </header>
<main> <h2>Home Page</h2>
<p>Lorem ipsum dolor sit amet, consectetur adipiscing elit, sed do eiusmod tempor incididunt ut labore et dolore magna aliqua. Ut enim ad minim veniam, quis nostrud exercitation ullamco laboris nisi ut aliquip ex ea commodo consequat. Duis aute irure dolor in reprehenderit in voluptate velit esse cillum dolore eu fugiat nulla pariatur. Excepteur sint occaecat cupidatat non proident, sunt in culpa qui officia deserunt mollit anim id est laborum.</p>
</main>
<footer> <p>webDev@RGU</p> </footer>
</body> </html>
Box model in practice
we are going to style this part

header { }

header{ /* Colourings */background-color: cornflowerblue;}

header { /* Colourings */ background-color: cornflowerblue; /* Content */ height: 200px; width: 300px; }

header { /* Colourings */ background-color: cornflowerblue; /* Content */ height: 200px; width: 300px; /* Padding */ padding-left: 30px; padding-top: 10px; }

header { /* Colourings */ background-color: cornflowerblue; /* Content */ height: 200px; width: 300px; /* Padding */ padding-left: 30px; padding-top: 10px; /* Border */ border-color: darkorchid; border-style: solid; border-width: 5px;}

header { /* Colourings */ background-color: cornflowerblue; /* Content */ height: 200px; width: 300px; /* Padding */ padding-left: 30px; padding-top: 10px; /* Border */ border-color: darkorchid; border-style: solid; border-width: 5px; /* Padding */ margin-top: 30px; margin-bottom: 10px;}

header { /* Colourings */ background-color: cornflowerblue; /* Content */ height: 200px; width: 300px; /* Padding */ padding-left: 30px; padding-top: 10px; /* Border */ border-color: darkorchid; border-style: solid; border-width: 5px; /* Padding */ margin-top: 30px; margin-bottom: 10px; margin-left: auto; margin-right: auto;}

box model properties
width
height
border-bottompadding-bottom
border-left
padding-left
border-right
padding-right
border-toppadding-top

box model properties
width
height
border-bottompadding-bottom
border-left
padding-left
border-right
padding-right
border-toppadding-top
margin-bottom
margin-top
margin-rightmargin-left

Positioning elements

• 4 DIFFERENT WAYS THAT WE CAN POSITION AN ELEMENT • STATIC POSITIONING • RELATIVE POSITIONING • FIXED POSITIONING • ABSOLUTE POSITIONING
Positioning elements
margin

2 paragraphs on the page
<p id=“hasMaxWidth”>Lorem….</p> <p id=“noMaxWidth”>Lorem….</p>
#noMaxWidth{ width: 1000px; background-color: burlywood;}#hasMaxWidth { max-width: 1000px; background-color: burlywood;}
Max Width

2 paragraphs on the page
<p id=“standardText”>Lorem….</p> <p id=“positionedText”>Lorem….</p>
#standardText{ background-color: aqua; }#positionedText { background-color: yellowgreen;}
Positioning

2 paragraphs on the page
<p id=“standardText”>Lorem….</p> <p id=“positionedText”>Lorem….</p>
#standardText{ background-color: aqua;}#positionedText { background-color: yellowgreen; position: static;}
static positioningPOSITIONED STATIC BY DEFAULT
NOT SHOWN IN ANY SPECIAL WAY

2 paragraphs on the page
<p id=“standardText”>Lorem….</p> <p id=“positionedText”>Lorem….</p>
#standardText{ background-color: aqua;}#positionedText { background-color: yellowgreen; position: relative; left: 50px; }
relative positioningPOSITIONED RELATIVE TO ITS NORMAL POSITIONING
SETTING LEFT RIGHT TOP AND BOTTOM CHANGES ITS POSITION

2 paragraphs on the page
<p id=“standardText”>Lorem….</p> <p id=“positionedText”>Lorem….</p>
#standardText{ background-color: aqua;}#positionedText { background-color: yellowgreen; position: fixed; top: 100px; left: 50px; }
fixed positioningFIXED POSITION IN THE WINDOW
CAN BE GOOD FOR HAVING A MENU AT THE TOP ALL THE TIME

2 paragraphs on the page
<p id=“standardText”>Lorem….</p> <p id=“positionedText”>Lorem….</p>
#standardText{ background-color: aqua;}#positionedText { background-color: yellowgreen; position: absolute; top: 100px; left: 50px; }
absolute positioningFIXED IN THE CONTAINER THAT IT IS CURRENTLY IN

absolute positioning
fixed Positioning

absolute positioning
fixed Positioning

2 paragraphs on the page
<p id=“hasMaxWidth”>Lorem….</p> <p id=“noMaxWidth”>Lorem….</p>
#noMaxWidth{ width: 1000px; background-color: burlywood;}#hasMaxWidth { max-width: 1000px; background-color: burlywood;}
Max Width

horizontal menu

• SOMETIMES YOU WILL WANT YOUR CONTENT TO FLOAT AROUND THE PAGE • GETTING TEXT TO APPEAR BESIDE AN IMAGE PROPERLY. • HORIZONTAL MENUS!!!
HERE IS WHERE FLOAT COMES INT
floating elements
margin

2 paragraphs on the page 1 image contained div in-between them <div id=imageContainer></div>
#imageContainer { width: 100px; height: 100px; background-color: gold;}

2 paragraphs on the page 1 image contained div in-between them <div id=imageContainer></div>
#imageContainer { width: 200px; height: 200px; background-color: gold; float: right;}

What about the navigation bar!? <nav> <ul> <li><a href="index.html">Home Page</a></li> <li><a href="login.html">Login</a></li> <li><a href="signup.html">Signup</a></li> </ul></nav>

What about the navigation bar!? ul { list-style-type: none; margin: 0; padding: 0; }

What about the navigation bar!? ul { list-style-type: none; margin: 0; padding: 0;}li { float: left;}
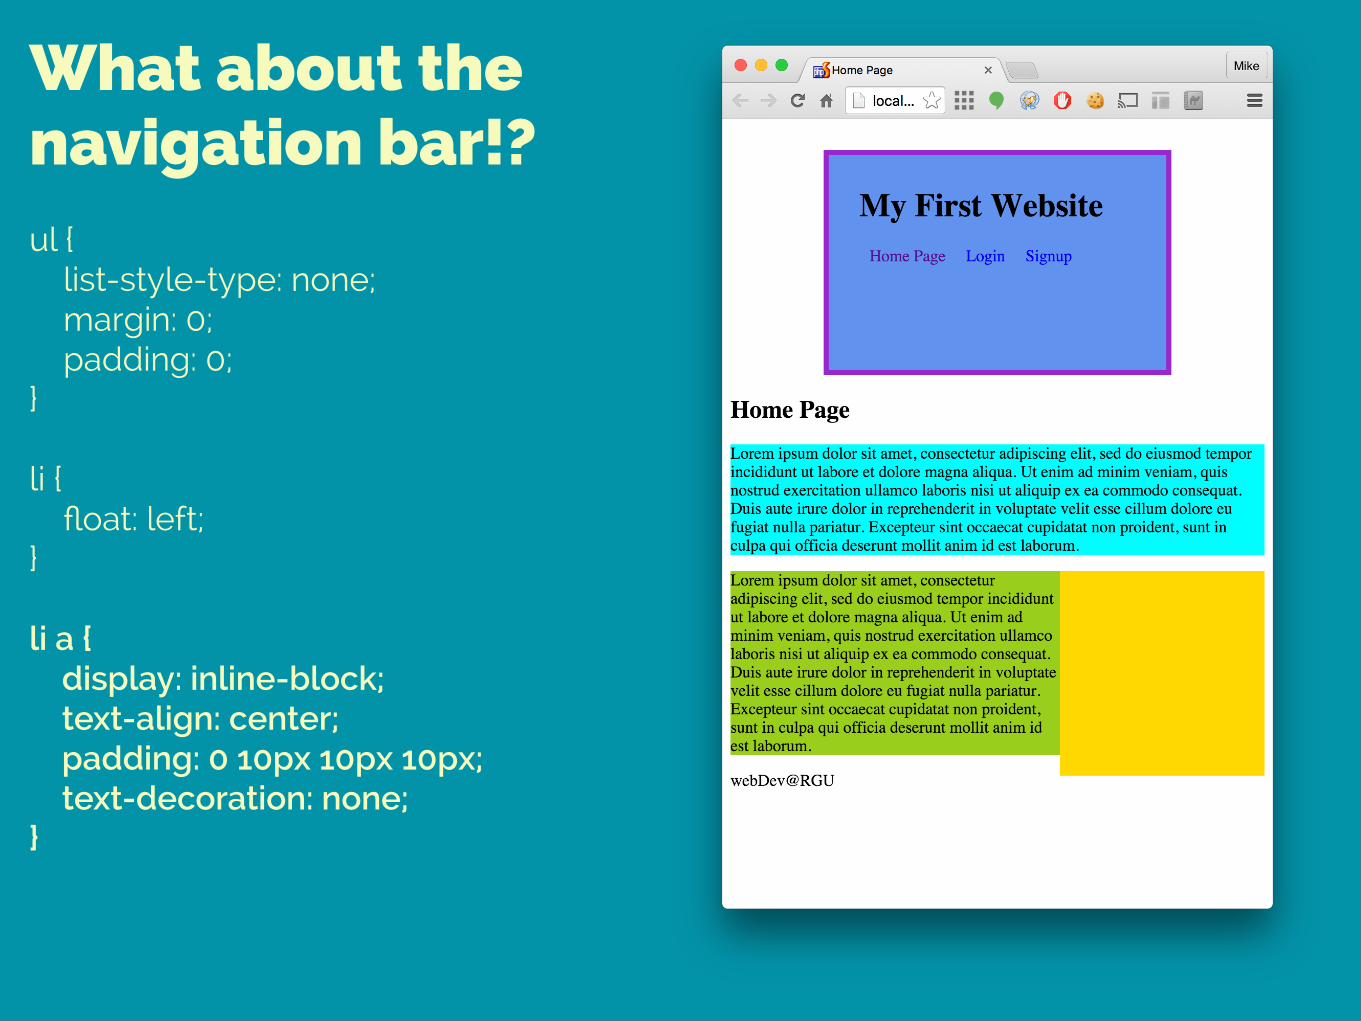
What about the navigation bar!? ul { list-style-type: none; margin: 0; padding: 0;}li { float: left;}li a { display: inline-block; text-align: center; padding: 0 10px 10px 10px; text-decoration: none;}

3 column web page

• THIS TAKES A LOT OF THE THINGS THAT WE HAVE ALREADY LOOKED AT AND PUTS THEM INTO PRACTICE
3 column webpage
margin

<main> <h2>Home Page</h2> <section id="col1"> <p>Lorem .…</p> </section> <section id="col2"> <p>Lorem.…</p> </section> <section id="col3"> <p>Lorem…</p> </section> </main>
html

#col1{ background-color: green; }#col2{ background-color: red;}#col3{ background-color: blue;}
css

#col1{ background-color: green; width:33%}#col2{ background-color: red; width:33%}#col3{ background-color: blue; width:33%}
css - set the width

#col1{ background-color: green; width:33%; float: left;}#col2{ background-color: red; width:33%;}#col3{ background-color: blue; width:33%;}
float col1 to the left

#col1{ background-color: green; width:33%; float: left;}#col2{ background-color: red; width:33%;}#col3{ background-color: blue; width:33%; float: right;}
float col3 to the right

#col1{ background-color: green; width:33%; float: left;}#col2{ background-color: red; width:33%; display: inline-block;}#col3{ background-color: blue; width:33%; float: right;}
display col2 as inline-block

#col1{ background-color: green; width:31%; float: left; margin: 1%; }#col2{ background-color: red; width:31%; display: inline-block; margin: 1%; }#col3{ background-color: blue; width:31%; float: right; margin: 1%; }
adding a margin for pretty-ness

#col1{ background-color: green; width:29%; float: left; margin: 1%; padding: 1%; }#col2{ background-color: red; width:30%; display: inline-block; margin: 1%; padding: 1%; }#col3{ background-color: blue; width:29%; float: right; margin: 1%; padding: 1%; }footer{ clear: both; } and some padding

STOPthis is getting complicated…there
must be an easier way to do layouts!?

next time we are going to look at using some tools that can help us a
lot in making layouts
(and also making our life a lot easier!)

recappurpose of css syntax of css benefits of css APPLYING CSS
USING CSS WITH HTML ID AND CLASS SELECTORS PAGE LAYOUT BOX MODEL


