88
Linux command line for you and me Documentation Release 0.1 Kushal Das Dec 13, 2019

Linux command line for you and meDocumentation
Release 0.1
Kushal Das
Dec 13, 2019


Contents:
1 Shell commands 11.1 Terminal emulators . . . . . . . . . . . . . . . . . . . . . . . . . . . . . . . . . . . . . . . . . . . . 11.2 date command . . . . . . . . . . . . . . . . . . . . . . . . . . . . . . . . . . . . . . . . . . . . . . 11.3 cal command . . . . . . . . . . . . . . . . . . . . . . . . . . . . . . . . . . . . . . . . . . . . . . . 21.4 whoami command . . . . . . . . . . . . . . . . . . . . . . . . . . . . . . . . . . . . . . . . . . . . 31.5 id command . . . . . . . . . . . . . . . . . . . . . . . . . . . . . . . . . . . . . . . . . . . . . . . 31.6 pwd command . . . . . . . . . . . . . . . . . . . . . . . . . . . . . . . . . . . . . . . . . . . . . . 31.7 cd command . . . . . . . . . . . . . . . . . . . . . . . . . . . . . . . . . . . . . . . . . . . . . . . 31.8 . directory and .. directory . . . . . . . . . . . . . . . . . . . . . . . . . . . . . . . . . . . . . . . . 31.9 ls command . . . . . . . . . . . . . . . . . . . . . . . . . . . . . . . . . . . . . . . . . . . . . . . . 41.10 mkdir command . . . . . . . . . . . . . . . . . . . . . . . . . . . . . . . . . . . . . . . . . . . . . 41.11 rm command . . . . . . . . . . . . . . . . . . . . . . . . . . . . . . . . . . . . . . . . . . . . . . . 41.12 Copying a file using cp command . . . . . . . . . . . . . . . . . . . . . . . . . . . . . . . . . . . . 51.13 Renaming or moving a file . . . . . . . . . . . . . . . . . . . . . . . . . . . . . . . . . . . . . . . . 51.14 tree command . . . . . . . . . . . . . . . . . . . . . . . . . . . . . . . . . . . . . . . . . . . . . . 51.15 wc command . . . . . . . . . . . . . . . . . . . . . . . . . . . . . . . . . . . . . . . . . . . . . . . 61.16 echo command . . . . . . . . . . . . . . . . . . . . . . . . . . . . . . . . . . . . . . . . . . . . . . 61.17 Redirecting the command output . . . . . . . . . . . . . . . . . . . . . . . . . . . . . . . . . . . . . 61.18 Using > to redirect output to a file . . . . . . . . . . . . . . . . . . . . . . . . . . . . . . . . . . . . 61.19 Moving around in the command line . . . . . . . . . . . . . . . . . . . . . . . . . . . . . . . . . . . 81.20 man pages . . . . . . . . . . . . . . . . . . . . . . . . . . . . . . . . . . . . . . . . . . . . . . . . 8
2 File system 92.1 FHS . . . . . . . . . . . . . . . . . . . . . . . . . . . . . . . . . . . . . . . . . . . . . . . . . . . . 9
3 Useful commands 113.1 Creating soft link to a file . . . . . . . . . . . . . . . . . . . . . . . . . . . . . . . . . . . . . . . . 113.2 Creating hard links . . . . . . . . . . . . . . . . . . . . . . . . . . . . . . . . . . . . . . . . . . . . 113.3 Extracting a tar file . . . . . . . . . . . . . . . . . . . . . . . . . . . . . . . . . . . . . . . . . . . . 123.4 Creating a tar file . . . . . . . . . . . . . . . . . . . . . . . . . . . . . . . . . . . . . . . . . . . . . 123.5 Vim editor . . . . . . . . . . . . . . . . . . . . . . . . . . . . . . . . . . . . . . . . . . . . . . . . 133.6 :q to exit vim . . . . . . . . . . . . . . . . . . . . . . . . . . . . . . . . . . . . . . . . . . . . . . . 133.7 Open a new file or edit an existing file . . . . . . . . . . . . . . . . . . . . . . . . . . . . . . . . . . 133.8 Different modes of vim . . . . . . . . . . . . . . . . . . . . . . . . . . . . . . . . . . . . . . . . . . 133.9 :w to save a file . . . . . . . . . . . . . . . . . . . . . . . . . . . . . . . . . . . . . . . . . . . . . . 153.10 :q! to quit without saving . . . . . . . . . . . . . . . . . . . . . . . . . . . . . . . . . . . . . . . . 153.11 Becoming root user . . . . . . . . . . . . . . . . . . . . . . . . . . . . . . . . . . . . . . . . . . . . 15
i

3.12 Using sudo command . . . . . . . . . . . . . . . . . . . . . . . . . . . . . . . . . . . . . . . . . . 153.13 Environment variables . . . . . . . . . . . . . . . . . . . . . . . . . . . . . . . . . . . . . . . . . . 153.14 Setting up environment variable values . . . . . . . . . . . . . . . . . . . . . . . . . . . . . . . . . 163.15 locate command . . . . . . . . . . . . . . . . . . . . . . . . . . . . . . . . . . . . . . . . . . . . . 163.16 Finding date/time in different timezones . . . . . . . . . . . . . . . . . . . . . . . . . . . . . . . . . 163.17 Bash history . . . . . . . . . . . . . . . . . . . . . . . . . . . . . . . . . . . . . . . . . . . . . . . 17
4 Users and Groups 194.1 Finding the owner of file . . . . . . . . . . . . . . . . . . . . . . . . . . . . . . . . . . . . . . . . . 194.2 /etc/passwd file . . . . . . . . . . . . . . . . . . . . . . . . . . . . . . . . . . . . . . . . . . . . . . 194.3 Details about groups . . . . . . . . . . . . . . . . . . . . . . . . . . . . . . . . . . . . . . . . . . . 214.4 wheel group . . . . . . . . . . . . . . . . . . . . . . . . . . . . . . . . . . . . . . . . . . . . . . . 214.5 Becoming superuser . . . . . . . . . . . . . . . . . . . . . . . . . . . . . . . . . . . . . . . . . . . 214.6 Adding a new user . . . . . . . . . . . . . . . . . . . . . . . . . . . . . . . . . . . . . . . . . . . . 214.7 Changing user passwords . . . . . . . . . . . . . . . . . . . . . . . . . . . . . . . . . . . . . . . . 224.8 Modifying existing user details . . . . . . . . . . . . . . . . . . . . . . . . . . . . . . . . . . . . . 224.9 Deleting a user . . . . . . . . . . . . . . . . . . . . . . . . . . . . . . . . . . . . . . . . . . . . . . 224.10 Adding a new group . . . . . . . . . . . . . . . . . . . . . . . . . . . . . . . . . . . . . . . . . . . 224.11 Adding new group to an user . . . . . . . . . . . . . . . . . . . . . . . . . . . . . . . . . . . . . . . 22
5 File permissions 235.1 chmod command . . . . . . . . . . . . . . . . . . . . . . . . . . . . . . . . . . . . . . . . . . . . . 235.2 PATH variable . . . . . . . . . . . . . . . . . . . . . . . . . . . . . . . . . . . . . . . . . . . . . . 245.3 .bashrc file . . . . . . . . . . . . . . . . . . . . . . . . . . . . . . . . . . . . . . . . . . . . . . . . 245.4 which command . . . . . . . . . . . . . . . . . . . . . . . . . . . . . . . . . . . . . . . . . . . . . 255.5 she-bang or sha-bang in executable files . . . . . . . . . . . . . . . . . . . . . . . . . . . . . . . . . 25
6 Processes in Linux 276.1 How to view all running processes? . . . . . . . . . . . . . . . . . . . . . . . . . . . . . . . . . . . 276.2 How to find a particular process? . . . . . . . . . . . . . . . . . . . . . . . . . . . . . . . . . . . . 276.3 How to kill/stop a particular process? . . . . . . . . . . . . . . . . . . . . . . . . . . . . . . . . . . 286.4 Finding out list of open files . . . . . . . . . . . . . . . . . . . . . . . . . . . . . . . . . . . . . . . 286.5 Signals . . . . . . . . . . . . . . . . . . . . . . . . . . . . . . . . . . . . . . . . . . . . . . . . . . 286.6 top command . . . . . . . . . . . . . . . . . . . . . . . . . . . . . . . . . . . . . . . . . . . . . . . 296.7 Load average . . . . . . . . . . . . . . . . . . . . . . . . . . . . . . . . . . . . . . . . . . . . . . . 296.8 htop tool . . . . . . . . . . . . . . . . . . . . . . . . . . . . . . . . . . . . . . . . . . . . . . . . . 296.9 More about Linux processes . . . . . . . . . . . . . . . . . . . . . . . . . . . . . . . . . . . . . . . 306.10 /proc directory . . . . . . . . . . . . . . . . . . . . . . . . . . . . . . . . . . . . . . . . . . . . . . 306.11 /proc/cpuinfo . . . . . . . . . . . . . . . . . . . . . . . . . . . . . . . . . . . . . . . . . . . . . . . 316.12 /proc/cmdline . . . . . . . . . . . . . . . . . . . . . . . . . . . . . . . . . . . . . . . . . . . . . . . 316.13 /proc/meminfo . . . . . . . . . . . . . . . . . . . . . . . . . . . . . . . . . . . . . . . . . . . . . . 316.14 /proc/uptime . . . . . . . . . . . . . . . . . . . . . . . . . . . . . . . . . . . . . . . . . . . . . . . 326.15 /proc/sys/ & sysctl command . . . . . . . . . . . . . . . . . . . . . . . . . . . . . . . . . . . . . . . 326.16 Enabling IP forward with sysctl . . . . . . . . . . . . . . . . . . . . . . . . . . . . . . . . . . . . . 32
7 Linux Services 357.1 What is a service? . . . . . . . . . . . . . . . . . . . . . . . . . . . . . . . . . . . . . . . . . . . . 357.2 What is a daemon? . . . . . . . . . . . . . . . . . . . . . . . . . . . . . . . . . . . . . . . . . . . . 357.3 What is the init system? . . . . . . . . . . . . . . . . . . . . . . . . . . . . . . . . . . . . . . . . . 357.4 Units in systemd . . . . . . . . . . . . . . . . . . . . . . . . . . . . . . . . . . . . . . . . . . . . . 357.5 .service units in systemd . . . . . . . . . . . . . . . . . . . . . . . . . . . . . . . . . . . . . . . . . 367.6 How to find all the systemd units in the system? . . . . . . . . . . . . . . . . . . . . . . . . . . . . 367.7 Working with a particular service . . . . . . . . . . . . . . . . . . . . . . . . . . . . . . . . . . . . 367.8 Enabling or disabling a service . . . . . . . . . . . . . . . . . . . . . . . . . . . . . . . . . . . . . . 377.9 Shutdown or reboot the system using systemctl . . . . . . . . . . . . . . . . . . . . . . . . . . . . . 38
ii

7.10 Finding the logs of a service . . . . . . . . . . . . . . . . . . . . . . . . . . . . . . . . . . . . . . . 387.11 Continuous stream of logs . . . . . . . . . . . . . . . . . . . . . . . . . . . . . . . . . . . . . . . . 387.12 Listing of previous boots . . . . . . . . . . . . . . . . . . . . . . . . . . . . . . . . . . . . . . . . . 397.13 Time-based log viewing . . . . . . . . . . . . . . . . . . . . . . . . . . . . . . . . . . . . . . . . . 39
8 Package management 418.1 dnf command . . . . . . . . . . . . . . . . . . . . . . . . . . . . . . . . . . . . . . . . . . . . . . . 418.2 Searching for a package . . . . . . . . . . . . . . . . . . . . . . . . . . . . . . . . . . . . . . . . . 418.3 Finding more information about a package . . . . . . . . . . . . . . . . . . . . . . . . . . . . . . . 428.4 Installing a package . . . . . . . . . . . . . . . . . . . . . . . . . . . . . . . . . . . . . . . . . . . 428.5 apt command . . . . . . . . . . . . . . . . . . . . . . . . . . . . . . . . . . . . . . . . . . . . . . . 438.6 apt-get update . . . . . . . . . . . . . . . . . . . . . . . . . . . . . . . . . . . . . . . . . . . . . . 438.7 apt-get install . . . . . . . . . . . . . . . . . . . . . . . . . . . . . . . . . . . . . . . . . . . . . . . 43
9 File system mounting 459.1 Connecting USB drives to your system . . . . . . . . . . . . . . . . . . . . . . . . . . . . . . . . . 469.2 Mounting a device . . . . . . . . . . . . . . . . . . . . . . . . . . . . . . . . . . . . . . . . . . . . 469.3 Unmounting . . . . . . . . . . . . . . . . . . . . . . . . . . . . . . . . . . . . . . . . . . . . . . . 469.4 Encrypting drives with LUKS (for only Linux) . . . . . . . . . . . . . . . . . . . . . . . . . . . . . 469.5 Encrypting drives for any OS using Veracrypt . . . . . . . . . . . . . . . . . . . . . . . . . . . . . . 47
10 Networking commands 4910.1 Finding the IP address . . . . . . . . . . . . . . . . . . . . . . . . . . . . . . . . . . . . . . . . . . 4910.2 ping command . . . . . . . . . . . . . . . . . . . . . . . . . . . . . . . . . . . . . . . . . . . . . . 4910.3 Short note about DNS . . . . . . . . . . . . . . . . . . . . . . . . . . . . . . . . . . . . . . . . . . 5010.4 /etc/resolv.conf . . . . . . . . . . . . . . . . . . . . . . . . . . . . . . . . . . . . . . . . . . . . . . 5010.5 host command . . . . . . . . . . . . . . . . . . . . . . . . . . . . . . . . . . . . . . . . . . . . . . 5010.6 dig command . . . . . . . . . . . . . . . . . . . . . . . . . . . . . . . . . . . . . . . . . . . . . . . 5010.7 ss command . . . . . . . . . . . . . . . . . . . . . . . . . . . . . . . . . . . . . . . . . . . . . . . 5110.8 traceroute command . . . . . . . . . . . . . . . . . . . . . . . . . . . . . . . . . . . . . . . . . . . 5210.9 tracepath command . . . . . . . . . . . . . . . . . . . . . . . . . . . . . . . . . . . . . . . . . . . . 5210.10 Remote login to a computer using ssh tool . . . . . . . . . . . . . . . . . . . . . . . . . . . . . . . 5310.11 ssh key generation . . . . . . . . . . . . . . . . . . . . . . . . . . . . . . . . . . . . . . . . . . . . 5310.12 ssh-copy-id . . . . . . . . . . . . . . . . . . . . . . . . . . . . . . . . . . . . . . . . . . . . . . . . 5410.13 Stop and disable the sshd service . . . . . . . . . . . . . . . . . . . . . . . . . . . . . . . . . . . . 5410.14 Disable password based login for ssh . . . . . . . . . . . . . . . . . . . . . . . . . . . . . . . . . . 5410.15 How to find active (open) network connections from your computer? . . . . . . . . . . . . . . . . . 55
11 Linux Firewall 5711.1 Installation . . . . . . . . . . . . . . . . . . . . . . . . . . . . . . . . . . . . . . . . . . . . . . . . 5711.2 Tables, chains and rules . . . . . . . . . . . . . . . . . . . . . . . . . . . . . . . . . . . . . . . . . 5711.3 filter table . . . . . . . . . . . . . . . . . . . . . . . . . . . . . . . . . . . . . . . . . . . . . . . . . 5811.4 nat table . . . . . . . . . . . . . . . . . . . . . . . . . . . . . . . . . . . . . . . . . . . . . . . . . 5811.5 iptables command . . . . . . . . . . . . . . . . . . . . . . . . . . . . . . . . . . . . . . . . . . . . 5811.6 View the existing rules . . . . . . . . . . . . . . . . . . . . . . . . . . . . . . . . . . . . . . . . . . 5911.7 Appending rules to INPUT chain . . . . . . . . . . . . . . . . . . . . . . . . . . . . . . . . . . . . 5911.8 Flushing all rules . . . . . . . . . . . . . . . . . . . . . . . . . . . . . . . . . . . . . . . . . . . . . 6011.9 Example of a series of rules . . . . . . . . . . . . . . . . . . . . . . . . . . . . . . . . . . . . . . . 6011.10 Delete a rule based on rule number . . . . . . . . . . . . . . . . . . . . . . . . . . . . . . . . . . . 6111.11 Delete a rule directly . . . . . . . . . . . . . . . . . . . . . . . . . . . . . . . . . . . . . . . . . . . 6111.12 Saving the rules . . . . . . . . . . . . . . . . . . . . . . . . . . . . . . . . . . . . . . . . . . . . . 6111.13 A blog post from Major Hayden . . . . . . . . . . . . . . . . . . . . . . . . . . . . . . . . . . . . . 6211.14 Debugging firewall rules . . . . . . . . . . . . . . . . . . . . . . . . . . . . . . . . . . . . . . . . . 62
12 Random things 63
iii
12.1 w command . . . . . . . . . . . . . . . . . . . . . . . . . . . . . . . . . . . . . . . . . . . . . . . 6312.2 How long is the system running? . . . . . . . . . . . . . . . . . . . . . . . . . . . . . . . . . . . . 6312.3 Finding CPU time of a command . . . . . . . . . . . . . . . . . . . . . . . . . . . . . . . . . . . . 6312.4 dmesg command . . . . . . . . . . . . . . . . . . . . . . . . . . . . . . . . . . . . . . . . . . . . . 6412.5 Setting up cron jobs . . . . . . . . . . . . . . . . . . . . . . . . . . . . . . . . . . . . . . . . . . . 6412.6 Finding out details about previous logins or system reboots . . . . . . . . . . . . . . . . . . . . . . . 65
13 Whats next? 67
14 Workbook 6914.1 How to install the workbook? . . . . . . . . . . . . . . . . . . . . . . . . . . . . . . . . . . . . . . 6914.2 copy paste . . . . . . . . . . . . . . . . . . . . . . . . . . . . . . . . . . . . . . . . . . . . . . . . 6914.3 Find your user id . . . . . . . . . . . . . . . . . . . . . . . . . . . . . . . . . . . . . . . . . . . . . 7014.4 Creating softlinks . . . . . . . . . . . . . . . . . . . . . . . . . . . . . . . . . . . . . . . . . . . . . 7014.5 Basic vim usage . . . . . . . . . . . . . . . . . . . . . . . . . . . . . . . . . . . . . . . . . . . . . 7014.6 Adding a new user . . . . . . . . . . . . . . . . . . . . . . . . . . . . . . . . . . . . . . . . . . . . 7014.7 Deleing an user . . . . . . . . . . . . . . . . . . . . . . . . . . . . . . . . . . . . . . . . . . . . . . 7114.8 Finding the IP address of dgplug.org . . . . . . . . . . . . . . . . . . . . . . . . . . . . . . . . . . . 7114.9 Change the local timezone of the system . . . . . . . . . . . . . . . . . . . . . . . . . . . . . . . . 7114.10 Add sudo access to an user . . . . . . . . . . . . . . . . . . . . . . . . . . . . . . . . . . . . . . . . 71
15 Advanced section 73
16 Containers 75
17 Team 77
18 Indices and tables 79
Index 81
iv

CHAPTER 1
Shell commands
In Linux the shell (or terminal) is the lifeline of the developer, and of any power user. Things which can be done onthe GUI (by clicking on different buttons), can be done much more efficiently on the terminal by using commands.Maybe one can not remember all the commands, but with regular usage one can easily remember the most useful ones.
The following guide will introduce you to a minimal set of basic commands required to use your Linux computerefficiently.
1.1 Terminal emulators
The above is the screenshot of the Gnome terminal application. As you can see the command prompt contains thefollowing information:
[username@hostname directoryname]
In our case the username is babai, hostname is kdas-laptop, and directory is mentioned as ~. This ~ is a specialcharacter in our case. It means the home directory of the user. In our case the home directory path is /home/babai/.
The Gnome terminal is one of many implementations of terminal emulators. Different Linux environments may comepre-installed with different terminals.
Read the articles on Wikipedia to learn about computer teriminals, terminal emulators and shell.
1.2 date command
date command prints the current date time.
$ dateSun Jun 25 10:13:44 IST 2017
In case you want to know the current date/time in UTC, use the following command. (I added this in 2018, so pleasedo not get confused at the date).
1

Linux command line for you and me Documentation, Release 0.1
$ date -uMon May 21 01:43:47 UTC 2018
1.3 cal command
cal command is used to display a calendar in your shell, by default it will display the current month
$ calJune 2017
Su Mo Tu We Th Fr Sa1 2 3
4 5 6 7 8 9 1011 12 13 14 15 16 1718 19 20 21 22 23 2425 26 27 28 29 30
$ cal 07 2017July 2017
Su Mo Tu We Th Fr Sa1
2 3 4 5 6 7 89 10 11 12 13 14 1516 17 18 19 20 21 2223 24 25 26 27 28 2930 31
2 Chapter 1. Shell commands

Linux command line for you and me Documentation, Release 0.1
1.4 whoami command
whoami command will tell you which user account you are using in this system.
$ whoamifedora
1.5 id command
id prints real user id, and various other details related to the account.
$ iduid=1000(fedora) gid=1000(fedora) groups=1000(fedora),4(adm),10(wheel),190(systemd-→˓journal) context=unconfined_u:unconfined_r:unconfined_t:s0-s0:c0.c1023
1.6 pwd command
pwd command, short for print working directory, will help you to find out the absolute path of the current directory.Let us see an example below:
[babai@kdas-laptop ~]$ pwd/home/babai
1.7 cd command
The next command we will learn is cd, short for change directory. This command will help you to change your currentdirectory. We will move to /tmp directory in our example.:
[babai@kdas-laptop ~]$ cd /tmp[babai@kdas-laptop tmp]$ pwd/tmp[babai@kdas-laptop tmp]$ cd ~[babai@kdas-laptop ~]$ pwd/home/babai
Here you can see that first we moved to /tmp directory, and then we moved back to the home directory by using ~character.
1.8 . directory and .. directory
. and .. has special meaning in the Linux. . means the current directory and .. means the parent directory. We can usethese in various situations for daily activities.
$ cd ..
The above command changes the current directory to the parent directory.
1.4. whoami command 3

Linux command line for you and me Documentation, Release 0.1
1.9 ls command
We use ls command to list the files and directories inside any given directory. If you use ls command without anyargument, then it will work on the current directory. We will see few examples of the command below.:
[babai@kdas-laptop ~]$ lsDesktop Documents Downloads Music Pictures Public Templates Videos[babai@kdas-laptop ~]$ ls /tmp/cpython systemd-private-759094c89c594c07a90156139ec4b969-colord.service-→˓hwU1hRhogsuspend systemd-private-759094c89c594c07a90156139ec4b969-rtkit-daemon.→˓service-AwylGahsperfdata_babai tracker-extract-files.1000plugtmp tracker-extract-files.1002[babai@kdas-laptop ~]$ ls /bin cpython etc lib lost+found mnt proc run srv sysroot usrboot dev home lib64 media opt root sbin sys tmp var
In the last two commands we provided a path as the argument to the ls command. / is a special directory, whichrepresents root directory in Linux filesystem. You will learn more about that in the next chapter.
1.10 mkdir command
We can create new directories using mkdir command. For our example we will create a code directory inside our homedirectory.:
[babai@kdas-laptop ~]$ lsDesktop Documents Downloads Music Pictures Public Templates Videos[babai@kdas-laptop ~]$ mkdir code[babai@kdas-laptop ~]$ lscode Desktop Documents Downloads Music Pictures Public Templates Videos
We can also create nested directories in a single command using the -p option.:
[babai@kdas-laptop ~]$ mkdir -p dir1/dir2/dir3[babai@kdas-laptop ~]$ ls dir1/ dir1/dir2/dir1/:dir2
dir1/dir2/:dir3
1.11 rm command
rm command is used to remove a file, or directory. The -r option is being used to remove in a recursive way. With -fyou force the removal, ignoring errors and never prompt. You can chain the flags, so instead of rm -r -f you can aswell type rm -rf. But, always double check before you use rm -rf command, if you by mistake give this command inyour home directory, or any other important directory, it will not ask to confirm, but it will delete everything there. So,please be careful and read twice before pressing enter key.
4 Chapter 1. Shell commands

Linux command line for you and me Documentation, Release 0.1
[babai@kdas-laptop ~]$ rm -rf dir1/dir2/dir3[babai@kdas-laptop ~]$ ls dir1/ dir1/dir2/dir1/:dir2
dir1/dir2/:
1.12 Copying a file using cp command
We use the cp command to copy a file in the Linux shell. To copy a folder with its contents recursively use the cpcommand with the -r flag. We use the cp file_to_copy new_location format. In the example below, we are copying thehello.txt to hello2.txt.
$ cp hello.txt hello2.txt$ ls -l-rw-rw-r--. 1 fedora fedora 75 Jun 25 04:47 hello2.txt-rw-rw-r--. 1 fedora fedora 75 Jun 25 04:33 hello.txt
In another example, I will copy the file passwordauthno.png from the Pictures directory in my home directory to thecurrent directory.
$ cp ~/Pictures/passwordauthno.png .
In the following example, I will be copying the images directory (and everything inside it) from the Downloadsdirectory under home to the /tmp/ directory.
$ cp -r ~/Downloads/images /tmp/
1.13 Renaming or moving a file
The mv command is used to rename or move a file or directory. In the following example, the file hello.txt is re-named to nothello.txt
$ mv hello.txt nothello.txt$ ls -l-rw-rw-r--. 1 fedora fedora 75 Jun 25 04:33 nothello.txt
1.14 tree command
tree command prints the directory structure in a nice visual tree design way.
[babai@kdas-laptop ~]$ tree.
codeDesktopdir1
dir2DocumentsDownloads
(continues on next page)
1.12. Copying a file using cp command 5

Linux command line for you and me Documentation, Release 0.1
(continued from previous page)
MusicPictures
terminal1.pngPublicTemplatesVideos
1.15 wc command
wc, short for word count, is an useful command which can help us to count newlines, words and bytes of a file.
$ cat hello.txtHI that is a file.This is the second line.And we also have a third line.$ wc -l hello.txt3 hello.txt$ wc -w hello.txt17 hello.txt
The -l flag finds the number of lines in a file, -w counts the number of words in the file.
1.16 echo command
echo command echoes any given string to the display.
$ echo "Hello"Hello
1.17 Redirecting the command output
In Linux shells, we can redirect the command output to a file, or as input to another command. The pipe operator | isthe most common way to do so. Using this we can now count the number of directories in the root (/ ) directory veryeasily.
$ ls /bin boot dev etc home lib lib64 lost+found media mnt opt proc root run→˓sbin srv sys tmp usr var$ ls / | wc -w20
The | is known as pipe. To know more about this, watch this video.
1.18 Using > to redirect output to a file
We can use > to redirect the output of one command to a file, if the file exists this will remove the old content and onlykeep the input. We can use >> to append to a file, means it will keep all the old content, and it will add the new inputto the end of the file.
6 Chapter 1. Shell commands

Linux command line for you and me Documentation, Release 0.1
$ ls / > details.txt$ cat details.txtbinbootdevetchomeliblib64lost+foundmediamntoptprocrootrunsbinsrvsystmpusrvar$ ls /usr/ > details.txt$ cat details.txtbingamesincludeliblib64libexeclocalsbinsharesrctmp$ ls -l /tmp/ >> details.txt$ cat details.txtbingamesincludeliblib64libexeclocalsbinsharesrctmptotal 776-rwxrwxr-x. 1 fedora fedora 34 Jun 24 07:56 helol.py-rw-------. 1 fedora fedora 784756 Jun 23 10:49 tmp3lDEho
1.18. Using > to redirect output to a file 7

Linux command line for you and me Documentation, Release 0.1
1.19 Moving around in the command line
There are key shortcuts available in Bash which will help you to move around faster. They are by the way very similarto the standard emacs keybindings, a number of key combinations that you will discover in many places and thereforeare very handy to memorize and internalize. The following table is a good starting point.
Key combination ActionCtrl + A Move to the beginning of the lineCtrl + E Move to the end of the lineAlt + B Move to the previous wordAlt + F Move to the next wordCtrl + U Erase to the beginning of the lineCtrl + K Erase to the end of the lineCtrl + W Erase the previous wordCtrl + P Browse previously entered commandsCtrl + R Reverse search for previously entered commands
1.20 man pages
man shows the system’s manual pages. This is the command we use to view the help document (manual page) forany command. The man pages are organized based on sections, and if the same command is found in many differentsections, only the first one is shown.
The general syntax is man section command. Example man 7 signal.
You can know about different sections below. Press q to quit the program.
1 Executable programs or shell commands2 System calls (functions provided by the kernel)3 Library calls (functions within program libraries)4 Special files (usually found in /dev)5 File formats and conventions eg /etc/passwd6 Games7 Miscellaneous (including macro packages and conventions), e.g. man(7), groff(7)8 System administration commands (usually only for root)9 Kernel routines [Non standard]
8 Chapter 1. Shell commands

CHAPTER 2
File system
Now you know a few really basic, Linux commands. Before we can learn anything else, we should look into how filesand directories are structured inside a Linux system.
2.1 FHS
$ ls /bin boot dev etc home lib lib64 lost+found mc media mnt opt output proc→˓root run sbin srv sys tmp usr var
/ is the root directory of your file system. It’s under this directory, that all the other files and directories reside. There’s aFilesystem Hierarchy Standard(FHS), which talks about these different directories, and what kinds of files are locatedin which directory.
9

Linux command line for you and me Documentation, Release 0.1
10 Chapter 2. File system

CHAPTER 3
Useful commands
In this chapter, we will learn about a few more commands which we may have to use in daily life.
3.1 Creating soft link to a file
Soft link or symbolic links are a special kind of file, which actually point to some other file using either related orabsolute paths. We can create soft links using ln -s command.
$ ln -s /etc/hostname name$ ls -ltotal 12-rw-rw-r--. 1 fedora fedora 13 Jun 23 11:14 hello.txtlrwxrwxrwx. 1 fedora fedora 13 Jun 23 12:32 name -> /etc/hostname$ cat namekushal-test.novalocal
In the above example, we created a soft link called name to the /etc/hostname file. You can see details about the softlink files by using the ls -l command. You can create links to any directory in the same way.
If you remove the original file the soft link is pointing to, then the soft link will become useless, because it’ll point toa file that does not exist. Soft links can also point to file which is in a different file system.
3.2 Creating hard links
$ echo "Hello World!" > hello.txt$ ln hello.txt bye.txt$ ls -ltotal 16-rw-rw-r--. 2 fedora fedora 13 Jun 23 11:14 bye.txt-rw-rw-r--. 2 fedora fedora 13 Jun 23 11:14 hello.txtlrwxrwxrwx. 1 fedora fedora 13 Jun 23 12:32 name -> /etc/hostname
(continues on next page)
11

Linux command line for you and me Documentation, Release 0.1
(continued from previous page)
$ cat hello.txtHello World!$ cat bye.txtHello World!$ echo "1234" > hello.txt$ cat bye.txt1234$ cat hello.txt1234$ rm hello.txt$ cat bye.txt1234$ ls -ltotal 12-rw-rw-r--. 1 fedora fedora 5 Jun 23 12:39 bye.txtlrwxrwxrwx. 1 fedora fedora 13 Jun 23 12:32 name -> /etc/hostname
If you look carefully, at the above example, we’ve created a hard link using the ln command. When we made a changeto the original hello.txt file, that is also reflected in the bye.txt file.
But, because bye.txt is a hard link, even if I delete the hello.txt, the hard link still exists, and also has the originalcontent.
3.3 Extracting a tar file
tar is a tool to create and extract archive files. Many times we will have to download and then extract tar files inour regular day to day work.
$ tar -xzvf files.tar.gzhello.cbye.txt
files.tar.gz file is compressed with gzip, if the file name ends with .tar.bz2, then it is compressed wth bzip2.
$ tar -xjvf files.tar.bz2hello.cbye.txt
3.4 Creating a tar file
We can use the same tar command to create a tar file.
$ tar -czvf files.tar.gz hello.c bye.txthello.cbye.txt$ lsbye.txt files.tar.gz hello.c
12 Chapter 3. Useful commands

Linux command line for you and me Documentation, Release 0.1
3.5 Vim editor
Text editors are tools to edit files. This could be a configuration file, or source code, or an email, or any other kind oftext file. Which editor to use, is generally a personal choice, and a lot of good energy has been wasted in the tellingof which one, is the one, truem best editor. In this book we will just learn about Vim editor. It’s also known as viimproved editor. In the Fedora Linux distribution, the vi command is actually an alias to vim itself.
If we just type vim, and press enter, we will see the following screen.
3.6 :q to exit vim
Press Escape and then type :q to exit vim.
3.7 Open a new file or edit an existing file
vim filename is the command to open an existing file. If the file does not exist, it will open a new, empty file for editing.
3.8 Different modes of vim
Vim editor starts off in command mode. Every time you open a file, this is the default mode of the editor. You canpress the Escape key in any other mode to come back to command mode.
You press i to go into insert mode; we edit documents in the insert mode. If you press Escape, you will return tocommand mode.
3.5. Vim editor 13

Linux command line for you and me Documentation, Release 0.1
14 Chapter 3. Useful commands

Linux command line for you and me Documentation, Release 0.1
3.9 :w to save a file
In command mode, typing :w saves a file. If you want to save and quit the editor, then type either :wq or :x.
3.10 :q! to quit without saving
Typing :q!, when you are in command mode, will allow us quit without saving the current file.
Vim is a powerful editor, and we learned only a few, really basic steps in it. It will take a complete book, to explaindifferent features of vim. But, the steps above are sufficient for our book’s scope.
One major thing to remember about any text file, is keeping the newline character as the last line of the file. Becausethat is how the ‘ POSIX <https://en.wikipedia.org/wiki/POSIX>‘_ standard defines a line.
3.11 Becoming root user
root is the superuser. root has the power to make changes in various parts of a Linux system. That also means if youmake any dangerous change (say deleting your user account) as root (by mistake), that can easily cause real damage.
The general rule is, when you need superuser power, use the sudo command to get work done, and use your normaluser account for everything else. The su - command will helps you become the root user; use this extremely carefully.
$ su -Password:#
Notice how the command prompt changed to # from $, # shows that you are using the root — another visible indicationto think about every command you give as root. Press Ctrl+d to log out of the root account. (or any account, for thatmatter)
3.12 Using sudo command
Add the sudo command in front of any other command to execute them as root. For example:
$ less /var/log/secure/var/log/secure: Permission denied$ sudo less /var/log/secure[sudo] password for fedora:... long output
3.13 Environment variables
Environment variables are a way to pass data on to applications. We can set values of different variables, whichany application can then access. There are various variables which decide how the shell will behave. To see all thevariables, use the printenv command.
$ printenv... long output
3.9. :w to save a file 15

Linux command line for you and me Documentation, Release 0.1
You can execute the same command once as normal user, and once as root, and then check for the differences betweenthe output. You will mostly see they are same, with some (or more) unique ones. That’s because, variables are userspecific.
3.14 Setting up environment variable values
We can use the export command to create a new environment variable or change an existing one. We use the echocommand to print a particular environment variable’s value.
$ export NAME="Kushal Das"$ echo $NAMEKushal Das$ export NAME="Babai Das"$ echo $NAMEBabai Das
In our example we first created a new variable called name, and then we changed the value of the variable.
3.15 locate command
locate is a very useful tool to find files in the system. It’s part of the mlocate package. For example, the followingcommand will search all the files with firewalld in the name.
$ locate firewalld/etc/firewalld/etc/sysconfig/firewalld/etc/systemd/system/basic.target.wants/firewalld.service/home/kdas/.local/share/Zeal/Zeal/docsets/Ansible.docset/Contents/Resources/Documents/→˓docs.ansible.com/ansible/firewalld_module.html/home/kdas/Downloads/ansible-devel/lib/ansible/modules/system/firewalld.py/home/kdas/Downloads/ansible-fail-on-github-zipfile/lib/ansible/modules/system/→˓firewalld.py/home/kdas/code/git/ansible/lib/ansible/modules/system/firewalld.py... long output
You can update the search database by using updatedb command as root.
$ sudo updatedb
This may take some time as it will index all the files in your computer.
3.16 Finding date/time in different timezones
The /usr/share/zoneinfo directory contains all the different timezone files. We can use these file names to get cur-rent date/time in any timezone. For example, the following command will show the current date/time in US/Pacifictimezone.
$ TZ=US/Pacific dateSun May 20 18:45:54 PDT 2018
16 Chapter 3. Useful commands

Linux command line for you and me Documentation, Release 0.1
3.17 Bash history
Using history command you can check for any command you previously used in the shell, this output will not showyou the commands from the current running shells. Only after you exit your shell, those commands will be writteninto ~/.bash_history file, and history command tells us the details from there.
The environment variable HISTFILESIZE determines the number of commands stored in the file. By default, thehistory command does not show timestamps. You can have another environment variable to set the timestamp of everycommand. All commands from before setting the timestamp will show the same time for execution.
echo 'export HISTTIMEFORMAT="%d/%m/%y %T "' > ~/.bashrcsource ~/.bashrc......history
3.17. Bash history 17

Linux command line for you and me Documentation, Release 0.1
18 Chapter 3. Useful commands

CHAPTER 4
Users and Groups
In this chapter we’ll learn about user and group management on your system, and also about basic access control.
In Linux everything is associated to an user and a group. Based on these values, the system figures out, who can accesswhat part of the system. That includes files, directories, network ports etc.
4.1 Finding the owner of file
We use the ls -l command to find the owner, and group of a file or directory.
In the above example, fedora is the name of the owner and group both. The first value talks about who can access thisfile (we will learn about this in a while.)
4.2 /etc/passwd file
/etc/passwd contains all the users available in the system. This is a plain text file (this means you can view theinformation by using cat command.)
$ cat /etc/passwdroot:x:0:0:root:/root:/bin/bashbin:x:1:1:bin:/bin:/sbin/nologin
(continues on next page)
19

Linux command line for you and me Documentation, Release 0.1
(continued from previous page)
daemon:x:2:2:daemon:/sbin:/sbin/nologinadm:x:3:4:adm:/var/adm:/sbin/nologinlp:x:4:7:lp:/var/spool/lpd:/sbin/nologinsync:x:5:0:sync:/sbin:/bin/syncshutdown:x:6:0:shutdown:/sbin:/sbin/shutdownhalt:x:7:0:halt:/sbin:/sbin/haltmail:x:8:12:mail:/var/spool/mail:/sbin/nologinoperator:x:11:0:operator:/root:/sbin/nologingames:x:12:100:games:/usr/games:/sbin/nologinftp:x:14:50:FTP User:/var/ftp:/sbin/nologinnobody:x:99:99:Nobody:/:/sbin/nologinsystemd-timesync:x:999:998:systemd Time Synchronization:/:/sbin/nologinsystemd-network:x:192:192:systemd Network Management:/:/sbin/nologinsystemd-resolve:x:193:193:systemd Resolver:/:/sbin/nologindbus:x:81:81:System message bus:/:/sbin/nologinsshd:x:74:74:Privilege-separated SSH:/var/empty/sshd:/sbin/nologinchrony:x:998:995::/var/lib/chrony:/sbin/nologinsystemd-coredump:x:994:994:systemd Core Dumper:/:/sbin/nologinfedora:x:1000:1000:Fedora:/home/fedora:/bin/bashpolkitd:x:993:993:User for polkitd:/:/sbin/nologintss:x:59:59:Account used by the trousers package to sandbox the tcsd daemon:/dev/→˓null:/sbin/nologin
Each line has seven entries separated by :.
username:password:uid:gid:gecos:/home/dirname:shell
FIELD MEANINGusername the usernamepassword the password of the useruid Numeric user idgid Numeric group id of usergecos arbitary field/home/dirname Home directory of the usershell | Which shell to use for the user
You’ll see accounts with /sbin/nologin as their shell. These are generally accounts for various services, which are notsupposed to be used by a normal human user; (which is why, no shell is needed.)
The actual user passwords are stored in an encrypted form in /etc/shadow file, with only the root user having access tothis file.
$ ls -l /etc/shadow----------. 1 root root 2213 Jun 22 15:20 /etc/shadow
If you want to know more about the current user, use the id command.
20 Chapter 4. Users and Groups

Linux command line for you and me Documentation, Release 0.1
$ iduid=1000(vagrant) gid=1000(vagrant) groups=1000(vagrant) context=unconfined_→˓u:unconfined_r:unconfined_t:s0-s0:c0.c1023
4.3 Details about groups
Group details are stored inside the /etc/group file. Each user has one primary group, and zero or more supplementarygroups.
4.4 wheel group
If your user is part of the wheel group, then it has sudo access. If you remember the Fedora Installer, it actually givesyou the option to mark a new user to be part of the wheel group during installation.
4.5 Becoming superuser
Have you noticed the silent command sudo in front of many commands in the lab before? We use that sudo commandto become root user temporarily. The root user is also known as the superuser of the system, it has all the access powerto change anything on the system. It is the administrator account of any Linux system.
Try the following command.
$ sudo id
Now, you will find the id* command worked as root instead of your regular user.
If you want to become root user for more than one command, then use the following command, and provide the rootpassword to the input.
$ su -
Important: To be able to use sudo command, you must have your user mentioned in the /etc/sudoers file. The bestway to edit the file is to use visudo command as root user.
Important: Read the man pages of su and sudo command.
4.6 Adding a new user
The useradd command adds a new user to the system. As you can well guess, this command has to execute as root,otherwise anyone can add random user accounts in the system. The following command adds a new user babai to thesystem.
$ sudo useradd babai
In Fedora, the initial user you create gets the uid 1000.
4.3. Details about groups 21

Linux command line for you and me Documentation, Release 0.1
4.7 Changing user passwords
The passwd command helps to change any user password.
$ sudo passwd babaiChanging password for user babai.New password:Retype new password:passwd: all authentication tokens updated successfully.
4.8 Modifying existing user details
The usermod command can help to modify an existing user. You can use the same command to lock user account inthe system.
$ sudo usermod -L babai$ su - babaiPassword:su: Authentication failure$ sudo usermod -U babai
The last command in the above example unlocks the user account.
4.9 Deleting a user
We use the userdel command to delete a user from the system.
4.10 Adding a new group
The groupadd command adds a new group. You can also pass the group id as an option. In the following example weare adding a new group called firejumpers.
$ sudo groupadd -g 4001 firejumpers
4.11 Adding new group to an user
We can use usermod command to add any extra group to any of our system user. In the following example, we areadding firejumpers group to our vagrant user.
$ sudo usermod -aG firejumpers vagrant
Important: Remember to use -a flag, or else it will delete all groups for the user and have only the new group youhave mentioned in the command.
22 Chapter 4. Users and Groups

CHAPTER 5
File permissions
Linux follows long Unix history, and has the same kinds of permission and ownership of files and directories. In thischapter, we will learn in detail about the same.
Let us look at the output of ls -l command.
$ ls -ltotal 24drwxrwxr-x. 2 fedora fedora 4096 Jun 24 08:00 dir1-rw-rw-r--. 1 fedora fedora 174 Jun 23 13:26 files.tar.bz2-rw-rw-r--. 1 fedora fedora 164 Jun 23 13:20 files.tar.gz-rw-rw-r--. 1 fedora fedora 19 Jun 23 14:14 hello.txtlrwxrwxrwx. 1 fedora fedora 13 Jun 23 12:32 name -> /etc/hostname
The first column contains the permission details of each file and directory. The permissions are displayed using groupsof three values, r for read access, w for write access, and x for execute access. These 3 values are mentioned for owner,group, and other user accounts. The first - can be d for directories or l for links.
There’s another way to calculate the same file permissions, using numbers.
Read 4Write 2Execute 1
This means, if you want to give read and write access only to the owner and group, you mention it like this “660”,where the first digit is for the owner, second digit is for the group, and the third digit is for the other users. We can usethis format along with the chmod command to change permissions of any file or directory.
5.1 chmod command
chmod is the command which changes the file mode bits. Through chmod command one can alter the access permis-sions (i.e to permissions to read, write and execute) to file system objects (i.e files and directories). If we look at thecommand closely chmod is the abbreviation of change mode. A few examples are given below.
23

Linux command line for you and me Documentation, Release 0.1
$ echo "hello" > myfile.txt$ cat myfile.txthello$ ls -l myfile.txt-rw-rw-r--. 1 fedora fedora 6 Jun 25 03:42 myfile.txt$ chmod 000 myfile.txt$ ls -l myfile.txt----------. 1 fedora fedora 6 Jun 25 03:42 myfile.txt$ cat myfile.txtcat: myfile.txt: Permission denied$ chmod 600 myfile.txt$ ls -l myfile.txt-rw-------. 1 fedora fedora 6 Jun 25 03:42 myfile.txt$ cat myfile.txthello
In the first line, we created a new file called myfile.txt using the echo command (we redirected the output of echo intothe file). Using the chmod 000 myfile.txt command, we removed the read/write permissions of the file, and as you cansee in the next line, even the owner of the file cannot read it. Setting the mode to 600 brings back read/write capabilityto the owner of that particular file.
The executable permission bit is required for directory access, and also for any file you want to execute.
5.2 PATH variable
The PATH variable is a special variable. When we type a command in the bash shell, it searches for the command inthe directories mentioned, in the PATH variable. We can see the current PATH value using the echo command.
$ echo $PATH/usr/local/bin:/usr/bin:/usr/local/sbin:/usr/sbin:/home/fedora/.local/bin:/home/→˓fedora/bin
The different directories are separated by `:`. You can see the /home/fedora/bin directory is mentioned in the path.This means if we have that directory, and an executable file is in there, we can use it as a normal command in our shell.We will see an example of this, later in the book.
5.3 .bashrc file
The ~/.bashrc is a special configuration file for your bash terminal. You can define or delete or update environmentvariables and many things more.
For example, if want to add a new directory path to the PATH variable, then we can add the following line at the endof the ~/.bashrc file.
export PATH=/mnt/myproject/bin:$PATH
Remember to logout and login again to see the change.
Important: To know more, read the man page of bash command.
24 Chapter 5. File permissions

Linux command line for you and me Documentation, Release 0.1
5.4 which command
We use the which command, to find the exact path of the executable being used by a command in our shell.
$ which chmod/usr/bin/chmod$ which tree/usr/bin/which: no tree in (/usr/local/bin:/usr/bin:/usr/local/sbin:/usr/sbin:/home/→˓fedora/.local/bin:/home/fedora/bin)
The second example shows the output in case the which command cannot find the executable mentioned.
5.5 she-bang or sha-bang in executable files
she-bang or sha-bang is the first line in scripts; which starts with #! and then the path of the interpreter to be used forthe rest of the file. We will create a simple bash hello world script using the same, and then execute it.
$ vim hello.sh$ chmod +x hello.sh$ ./hello.shHello World!
5.4. which command 25

Linux command line for you and me Documentation, Release 0.1
26 Chapter 5. File permissions
CHAPTER 6
Processes in Linux
A process is a program (think about any Linux application) in a running state. It contains various details, like thememory space the program needs, a process id, the files opened by the process, etc.
6.1 How to view all running processes?
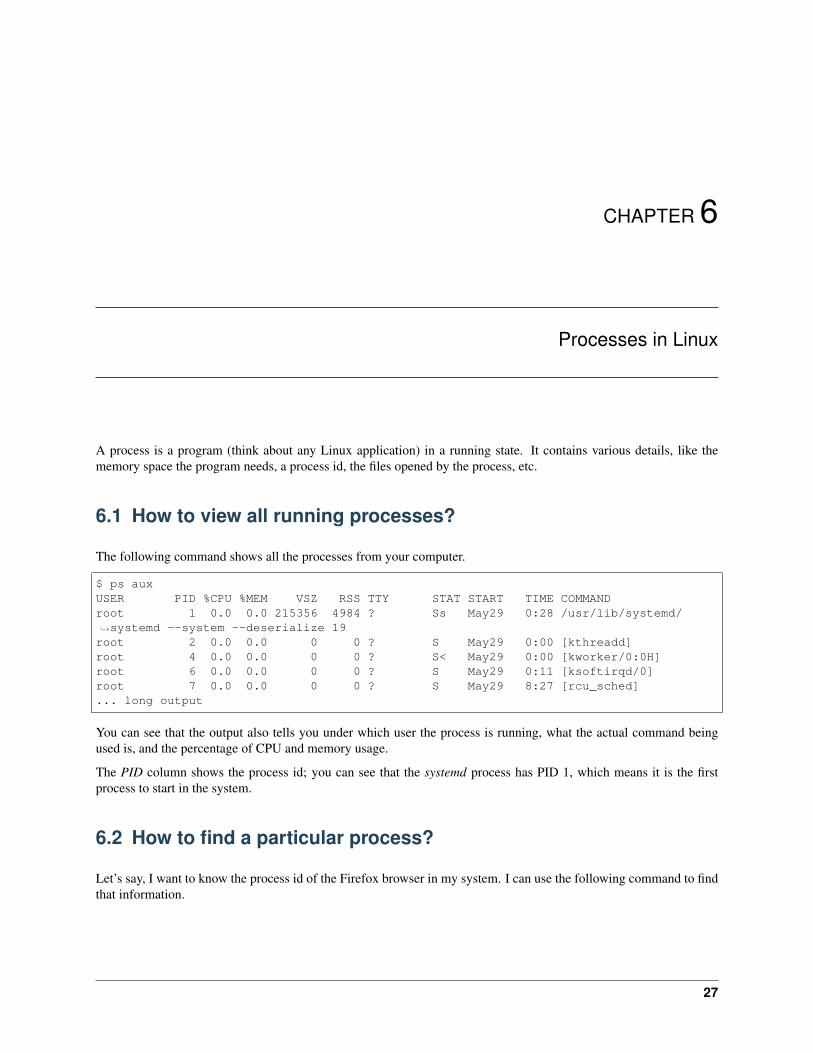
The following command shows all the processes from your computer.
$ ps auxUSER PID %CPU %MEM VSZ RSS TTY STAT START TIME COMMANDroot 1 0.0 0.0 215356 4984 ? Ss May29 0:28 /usr/lib/systemd/→˓systemd --system --deserialize 19root 2 0.0 0.0 0 0 ? S May29 0:00 [kthreadd]root 4 0.0 0.0 0 0 ? S< May29 0:00 [kworker/0:0H]root 6 0.0 0.0 0 0 ? S May29 0:11 [ksoftirqd/0]root 7 0.0 0.0 0 0 ? S May29 8:27 [rcu_sched]... long output
You can see that the output also tells you under which user the process is running, what the actual command beingused is, and the percentage of CPU and memory usage.
The PID column shows the process id; you can see that the systemd process has PID 1, which means it is the firstprocess to start in the system.
6.2 How to find a particular process?
Let’s say, I want to know the process id of the Firefox browser in my system. I can use the following command to findthat information.
27

Linux command line for you and me Documentation, Release 0.1
$ ps aux | grep firefoxkdas 26752 96.1 9.7 2770724 763436 ? Sl 16:16 0:35 /usr/lib64/firefox/→˓firefoxkdas 26919 0.0 0.0 118520 980 pts/3 S+ 16:17 0:00 grep --color=auto→˓firefox
Here, we are first running the ps command, and then passing the output of that to the next command using the |character. In this case, as you see, grep is that second command. We can find and look for text using the grep tool. Wewill learn more about grep in the future.
6.3 How to kill/stop a particular process?
We can kill/stop any process using the kill command. We found out, in the last example, that the id of the Firefoxprocess in my computer is 26752, we can use that id to kill it.
$ kill 26752
If there is no error message, you’ll find that Firefox has disappeared.
6.4 Finding out list of open files
lsof command will show list of all open files. The man page has more details about the different command line optionsavailable.
6.5 Signals
Signals are a limited way to communicate to a process. You can think about them as notifications to a process,and depending on the signal handler in the code, the process does something with that signal. The kill commandactually sends a signal to the given process id, the default signal is TERM, which says to terminate the process. Todirectly/forcibly kill a process, you can send the KILL signal.
$ kill -9 26752
Here 9 is number representation of the KILL signal. To know more about Linux signals, read the man page.
$ man 7 signal
kill command also has a -l flag, which prints all of the signal names, and numbers on the screen.
$ kill -l1) SIGHUP 2) SIGINT 3) SIGQUIT 4) SIGILL 5) SIGTRAP6) SIGABRT 7) SIGBUS 8) SIGFPE 9) SIGKILL 10) SIGUSR111) SIGSEGV 12) SIGUSR2 13) SIGPIPE 14) SIGALRM 15) SIGTERM16) SIGSTKFLT 17) SIGCHLD 18) SIGCONT 19) SIGSTOP 20) SIGTSTP21) SIGTTIN 22) SIGTTOU 23) SIGURG 24) SIGXCPU 25) SIGXFSZ26) SIGVTALRM 27) SIGPROF 28) SIGWINCH 29) SIGIO 30) SIGPWR31) SIGSYS 34) SIGRTMIN 35) SIGRTMIN+1 36) SIGRTMIN+2 37) SIGRTMIN+338) SIGRTMIN+4 39) SIGRTMIN+5 40) SIGRTMIN+6 41) SIGRTMIN+7 42) SIGRTMIN+843) SIGRTMIN+9 44) SIGRTMIN+10 45) SIGRTMIN+11 46) SIGRTMIN+12 47) SIGRTMIN+1348) SIGRTMIN+14 49) SIGRTMIN+15 50) SIGRTMAX-14 51) SIGRTMAX-13 52) SIGRTMAX-12
(continues on next page)
28 Chapter 6. Processes in Linux

Linux command line for you and me Documentation, Release 0.1
(continued from previous page)
53) SIGRTMAX-11 54) SIGRTMAX-10 55) SIGRTMAX-9 56) SIGRTMAX-8 57) SIGRTMAX-758) SIGRTMAX-6 59) SIGRTMAX-5 60) SIGRTMAX-4 61) SIGRTMAX-3 62) SIGRTMAX-263) SIGRTMAX-1 64) SIGRTMAX
6.6 top command
top is a very useful command while using a Linux system. It’s a quick way to know about all the running processes inthe system, and their related status about CPU and memory usage in general. To get out of top, press the key q.
top - 17:37:28 up 24 days, 11:52, 2 users, load average: 0.57, 0.73, 0.75Tasks: 372 total, 2 running, 370 sleeping, 0 stopped, 0 zombie%Cpu(s): 11.6 us, 2.6 sy, 0.0 ni, 84.9 id, 0.1 wa, 0.3 hi, 0.5 si, 0.0 stKiB Mem : 7858752 total, 1701052 free, 4444136 used, 1713564 buff/cacheKiB Swap: 3268604 total, 1558396 free, 1710208 used. 2431656 avail Mem
PID USER PR NI VIRT RES SHR S %CPU %MEM TIME+ COMMAND28300 kdas 20 0 1502016 287340 44396 R 25.0 3.7 290:56.60 chrome2668 kdas 9 -11 2067292 9756 7164 S 6.2 0.1 166:06.48 pulseaudio15122 kdas 20 0 771844 33104 11352 S 6.2 0.4 39:24.60 gnome-terminal-24760 kdas 20 0 1945840 209128 76952 S 6.2 2.7 1:41.15 code27526 kdas 20 0 156076 4268 3516 R 6.2 0.1 0:00.01 top
1 root 20 0 215356 4880 3108 S 0.0 0.1 0:28.25 systemd2 root 20 0 0 0 0 S 0.0 0.0 0:00.66 kthreadd4 root 0 -20 0 0 0 S 0.0 0.0 0:00.00 kworker/0:0H6 root 20 0 0 0 0 S 0.0 0.0 0:11.79 ksoftirqd/07 root 20 0 0 0 0 S 0.0 0.0 8:28.06 rcu_sched
... long output
By the way, feel free to press 1 and see if anything changes in the top command output.
6.7 Load average
If you look at the top output carefully, you will find load average mentioned. Actually, there are 3 numbers provided;these are the load averages of the system in the last one minute, 5 minutes ago, and 15 minutes ago.
load average: 0.57, 0.73, 0.75
In simple words, load average means the average time any process has to wait to get access to the CPU (or otherresources), in idle state the load average is 0. This information is a quick way to learn about the system, if the systemis slow to respond, just looking at the load-average, and then the rest of the top output should be a good starting point.
6.8 htop tool
htop is a modern version of the top tool. It has many more features, interactiveness being the biggest amongst them.htop does not come by default in most of the Linux installations, which means you will have to install it using thesystem’s package management tool.
These are the ways to install it in Fedora and in Debian/Ubuntu
6.6. top command 29

Linux command line for you and me Documentation, Release 0.1
$ sudo dnf install htop -y
$ sudo apt-get install htop
To know more about htop, please read the man page.
$ man htop
6.9 More about Linux processes
You can learn more about Linux processes in the glibc manual. Use the info command to find out more.
$ info libc process
6.10 /proc directory
/proc is a special directory in our filesystem. This is a virtual filesystem which contains information about all therunning processes, and information about the hardware present in the system. You will find that the files in the virtualfilesystem are 0 in size.
Now we’ll learn about a few files inside this directory.
30 Chapter 6. Processes in Linux

Linux command line for you and me Documentation, Release 0.1
6.11 /proc/cpuinfo
/proc/cpuinfo file has information about the CPU in your system. It includes the model number, and also the variousflags available in that particular CPU model.
6.12 /proc/cmdline
/proc/cmdline file has all the parameters passed to the kernel at the bootup time. The following is a cloud-based virtualmachine.
$ cat /proc/cmdlineBOOT_IMAGE=/boot/vmlinuz-4.8.6-300.fc25.x86_64 root=UUID=9be70055-35f2-4a57-b120-→˓5a003dfdb504 ro no_timer_check console=tty1 console=ttyS0,115200n8 rhgb quiet→˓console=ttyS1 LANG=en_US.UTF-8 initrd=/boot/initramfs-4.8.6-300.fc25.x86_64.img
6.13 /proc/meminfo
/proc/meminfo contains information related to the memory in the system. You can see the total amount RAM, theavailable memory and other values there.
$ cat /proc/meminfoMemTotal: 4046820 kBMemFree: 2960568 kBMemAvailable: 3696216 kBBuffers: 53756 kBCached: 830052 kBSwapCached: 0 kBActive: 347216 kBInactive: 575692 kBActive(anon): 39388 kBInactive(anon): 196 kBActive(file): 307828 kBInactive(file): 575496 kBUnevictable: 0 kBMlocked: 0 kBSwapTotal: 0 kBSwapFree: 0 kBDirty: 4 kBWriteback: 0 kBAnonPages: 39120 kBMapped: 42032 kBShmem: 488 kBSlab: 141692 kBSReclaimable: 114996 kBSUnreclaim: 26696 kBKernelStack: 1360 kBPageTables: 2700 kBNFS_Unstable: 0 kBBounce: 0 kBWritebackTmp: 0 kBCommitLimit: 2023408 kBCommitted_AS: 127752 kB
(continues on next page)
6.11. /proc/cpuinfo 31

Linux command line for you and me Documentation, Release 0.1
(continued from previous page)
VmallocTotal: 34359738367 kBVmallocUsed: 0 kBVmallocChunk: 0 kBHardwareCorrupted: 0 kBAnonHugePages: 0 kBShmemHugePages: 0 kBShmemPmdMapped: 0 kBCmaTotal: 0 kBCmaFree: 0 kBHugePages_Total: 0HugePages_Free: 0HugePages_Rsvd: 0HugePages_Surp: 0Hugepagesize: 2048 kBDirectMap4k: 61296 kBDirectMap2M: 4132864 kBDirectMap1G: 2097152 kB
6.14 /proc/uptime
$ cat /proc/uptime52820.32 104802.84
The first value in this file shows the number of seconds the system is up. The second value is the total number of idleseconds for each CPU, so for the modern systems, this value can be more than the first value.
6.15 /proc/sys/ & sysctl command
This directory is a special one for system administrators. This not only provides information, but also allows you toquickly change (enable/disable) different kernel features.
We use the sysctl command to view or edit the values for /proc/sys/. If you want to see all the different settings, usethe following command.
$ sudo sysctl -a[sudo] password for kdas:abi.vsyscall32 = 1crypto.fips_enabled = 0debug.exception-trace = 1debug.kprobes-optimization = 1dev.cdrom.autoclose = 1dev.cdrom.autoeject = 0dev.cdrom.check_media = 0dev.cdrom.debug = 0dev.cdrom.info = CD-ROM information, Id: cdrom.c 3.20 2003/12/17... long output
6.16 Enabling IP forward with sysctl
To enable IP forwarding to the VM(s), use the following command.
32 Chapter 6. Processes in Linux

Linux command line for you and me Documentation, Release 0.1
$ sudo sysctl -w net.ipv4.ip_forward=1
To check the current value, use the following command.
$ sysctl net.ipv4.ip_forward
You can see the same value in the /proc/sys/net/ipv4/ip_forward file too.
$ cat /proc/sys/net/ipv4/ip_forward1
To make the change permanent, write the following in the /etc/sysctl.conf file.
net.ipv4.ip_forward = 1
Then, enable the changes using the following command.
$ sudo sysctl -p /etc/sysctl.conf
6.16. Enabling IP forward with sysctl 33

Linux command line for you and me Documentation, Release 0.1
34 Chapter 6. Processes in Linux

CHAPTER 7
Linux Services
This is also a chapter related to the systemd tool.
7.1 What is a service?
A service is a process or application which is running in the background, either doing some predefined task or waitingfor some event. If you remember our process chapter, we learned about systemd for the first time there. It is the firstprocess to run in our system; it then starts all the required processes and services. To know about how the system bootsup, read the bootup man page. Click here to read it online.
$ man bootup
7.2 What is a daemon?
Daemon is the actual term for those long-running background processes. A service actually consists of one or moredaemons.
7.3 What is the init system?
If you look at Unix/Linux history, you will find the first process which starts up, is also known as init process. Thisprocess used to start other processes by using the rc files from /etc/rc.d directory. In the modern Linux systems,systemd has replaced the init system.
7.4 Units in systemd
Units are a standardized way for the systemd to manage various parts of a system. There are different kinds of units,.service is for system services, .path for path based ones. There is also .socket which are socket based systemd units.
35

Linux command line for you and me Documentation, Release 0.1
There are various other types, we can learn about those later.
7.5 .service units in systemd
These are service units, which explains how to manage a particular service in the system. In our daily life, we generallyonly have to work with these unit files.
7.6 How to find all the systemd units in the system?
$ systemctl... long output
-.mount loaded active→˓mounted /boot.mount loaded active
→˓mounted /bootdev-hugepages.mount loaded active
→˓mounted Huge Pages File Systemdev-mqueue.mount loaded active
→˓mounted POSIX Message Queue File Systemhome.mount loaded active
→˓mounted /homeproc-fs-nfsd.mount loaded active
→˓mounted NFSD configuration filesystemrun-user-1000-doc.mount loaded active
→˓mounted /run/user/1000/docrun-user-1000-gvfs.mount loaded active
→˓mounted /run/user/1000/gvfsrun-user-1000.mount loaded active
→˓mounted /run/user/1000run-user-42.mount loaded active
→˓mounted /run/user/42... long output
In the output of the systemctl command, you should be able to see all the different kinds of units in the system. If youwant to see only the service units, then use the following command.
$ systemctl --type=service
7.7 Working with a particular service
Let us take the sshd.service as an example. The service controls the sshd daemon, which allows us to remotely loginto a system using the ssh command.
To know the current status of the service, I execute the following command.
$ sudo systemctl status sshdsshd.service - OpenSSH server daemonLoaded: loaded (/usr/lib/systemd/system/sshd.service; disabled; vendor preset:
→˓enabled)Active: inactive (dead)Docs: man:sshd(8)
(continues on next page)
36 Chapter 7. Linux Services

Linux command line for you and me Documentation, Release 0.1
(continued from previous page)
man:sshd_config(5)
Jun 19 12:07:29 kdas-laptop sshd[19533]: Accepted password for kdas from 192.168.1.→˓101 port 61361 ssh2Jun 20 17:57:53 kdas-laptop sshd[30291]: Connection closed by 192.168.1.101 port→˓63345 [preauth]Jun 20 17:58:02 kdas-laptop sshd[30293]: Accepted password for kdas from 192.168.1.→˓101 port 63351 ssh2Jun 20 18:32:11 kdas-laptop sshd[31990]: Connection closed by 192.168.1.101 port→˓64352 [preauth]Jun 20 18:32:17 kdas-laptop sshd[32039]: Accepted password for kdas from 192.168.1.→˓101 port 64355 ssh2Jun 20 18:45:57 kdas-laptop sshd[32700]: Accepted password for kdas from 192.168.1.→˓101 port 64824 ssh2Jun 21 08:44:39 kdas-laptop sshd[15733]: Accepted password for kdas from 192.168.1.→˓101 port 51574 ssh2Jun 22 18:17:24 kdas-laptop systemd[1]: Stopping OpenSSH server daemon...Jun 22 18:17:24 kdas-laptop sshd[20932]: Received signal 15; terminating.Jun 22 18:17:24 kdas-laptop systemd[1]: Stopped OpenSSH server daemon.
To start the service, I’ll use the following command, and then I can use the status argument to the systemctl to checkthe service status once again.
$ sudo systemctl start sshd$ sudo systemctl status sshdsshd.service - OpenSSH server daemonLoaded: loaded (/usr/lib/systemd/system/sshd.service; disabled; vendor preset:
→˓enabled)Active: active (running) since Thu 2017-06-22 18:19:28 IST; 1s agoDocs: man:sshd(8)
man:sshd_config(5)Main PID: 3673 (sshd)
Tasks: 1 (limit: 4915)CGroup: /system.slice/sshd.service
3673 /usr/sbin/sshd -D
Jun 22 18:19:28 kdas-laptop systemd[1]: Starting OpenSSH server daemon...Jun 22 18:19:28 kdas-laptop sshd[3673]: Server listening on 0.0.0.0 port 22.Jun 22 18:19:28 kdas-laptop sshd[3673]: Server listening on :: port 22.Jun 22 18:19:28 kdas-laptop systemd[1]: Started OpenSSH server daemon.
In the same way, we can use either the stop or restart arguments to the systemctl command.
7.8 Enabling or disabling a service
Even if you start a service, you’ll find that after you reboot the computer, the service did not start at the time of bootup. To do so, you will have to enable the service, or to stop a service from starting at boot, you will have to disable theservice.
$ sudo systemctl enable sshd.serviceCreated symlink /etc/systemd/system/multi-user.target.wants/sshd.service → /usr/lib/→˓systemd/system/sshd.service.$ sudo systemctl disable sshd.serviceRemoved /etc/systemd/system/multi-user.target.wants/sshd.service.
7.8. Enabling or disabling a service 37

Linux command line for you and me Documentation, Release 0.1
7.9 Shutdown or reboot the system using systemctl
We can also reboot or shutdown the system using the systemctl command.
$ sudo systemctl reboot$ sudo systemctl shutdown
7.10 Finding the logs of a service
We can use the journalctl command to find the log of a given service. The general format is journalctl -u service-name”. Like below is the log for *sshd service.
$ sudo journalctl -u sshd-- Logs begin at Thu 2017-06-22 14:16:45 UTC, end at Fri 2017-06-23 05:21:29 UTC. --Jun 22 14:17:39 kushal-test.novalocal systemd[1]: Starting OpenSSH server daemon...Jun 22 14:17:39 kushal-test.novalocal systemd[1]: sshd.service: PID file /var/run/→˓sshd.pid not readable (yet?) after start: No such file or directoryJun 22 14:17:39 kushal-test.novalocal sshd[827]: Server listening on 0.0.0.0 port 22.Jun 22 14:17:39 kushal-test.novalocal sshd[827]: Server listening on :: port 22.Jun 22 14:17:39 kushal-test.novalocal systemd[1]: Started OpenSSH server daemon.Jun 22 14:22:08 kushal-test.novalocal sshd[863]: Accepted publickey for fedora from→˓103.249.881.17 port 56124 ssh2: RSA SHA256:lvn4rIszmfB14PBQwh4k9CJun 22 14:29:24 kushal-test.novalocal systemd[1]: Stopping OpenSSH server daemon...Jun 22 14:29:24 kushal-test.novalocal sshd[827]: Received signal 15; terminating.Jun 22 14:29:24 kushal-test.novalocal systemd[1]: Stopped OpenSSH server daemon.Jun 22 14:29:24 kushal-test.novalocal systemd[1]: Starting OpenSSH server daemon...Jun 22 14:29:24 kushal-test.novalocal sshd[2164]: Server listening on 0.0.0.0 port 22.Jun 22 14:29:24 kushal-test.novalocal sshd[2164]: Server listening on :: port 22.Jun 22 14:29:24 kushal-test.novalocal systemd[1]: Started OpenSSH server daemon.Jun 22 14:54:26 kushal-test.novalocal sshd[13522]: Invalid user from 139.162.122.110→˓port 51012Jun 22 14:54:26 kushal-test.novalocal sshd[13522]: input_userauth_request: invalid→˓user [preauth]Jun 22 14:54:26 kushal-test.novalocal sshd[13522]: Failed none for invalid user from→˓139.162.122.110 port 51012 ssh2Jun 22 14:54:26 kushal-test.novalocal sshd[13522]: Connection closed by 139.162.122.→˓110 port 51012 [preauth]Jun 22 15:15:29 kushal-test.novalocal sshd[13541]: Did not receive identification→˓string from 5.153.62.226 port 48677
7.11 Continuous stream of logs
In case you want to monitor the logs of any service, that is keep reading the logs in real time, you can use -f flag withthe journalctl command.
$ sudo journalctl -f -u sshd-- Logs begin at Thu 2017-06-22 14:16:45 UTC. --Jun 23 03:39:09 kushal-test.novalocal sshd[14095]: Did not receive identification→˓string from 158.85.81.118 port 10000Jun 23 04:13:32 kushal-test.novalocal sshd[14109]: Received disconnect from 221.194.→˓47.242 port 55028:11: [preauth]Jun 23 04:13:32 kushal-test.novalocal sshd[14109]: Disconnected from 221.194.47.242→˓port 55028 [preauth] (continues on next page)
38 Chapter 7. Linux Services

Linux command line for you and me Documentation, Release 0.1
(continued from previous page)
Jun 23 04:33:59 kushal-test.novalocal sshd[14115]: Received disconnect from 59.45.175.→˓64 port 36248:11: [preauth]Jun 23 04:36:53 kushal-test.novalocal sshd[14121]: Did not receive identification→˓string from 82.193.122.22 port 58769Jun 23 04:42:01 kushal-test.novalocal sshd[14123]: Received disconnect from 221.194.→˓47.233 port 51797:11: [preauth]Jun 23 04:42:01 kushal-test.novalocal sshd[14123]: Disconnected from 221.194.47.233→˓port 51797 [preauth]Jun 23 04:51:46 kushal-test.novalocal sshd[14130]: Did not receive identification→˓string from 191.253.13.227 port 4668Jun 23 05:05:16 kushal-test.novalocal sshd[14189]: Received disconnect from 59.45.175.→˓88 port 33737:11: [preauth]Jun 23 05:05:16 kushal-test.novalocal sshd[14189]: Disconnected from 59.45.175.88→˓port 33737 [preauth]
I can see that someone was trying to break into this VM by trying random ports :)
7.12 Listing of previous boots
In systems like Fedora, journalctl by default keeps history from past boots. To know about all available boot history,type the following command.
$ sudo journalctl --list-boots[sudo] password for fedora:-112 7a88e13a76434a1199f82ad90441ae7f Tue 2014-12-09 03:41:08 IST--Tue 2014-12-09→˓03:41:08 IST-111 b86086ed59b84b228e74f91ab08a66b3 Sun 2015-06-28 23:54:26 IST--Sun 2015-07-12→˓07:27:48 IST-110 71d3f6024f514653bfd2574243d096d1 Sun 2016-06-05 01:51:05 IST--Sun 2016-06-05→˓01:51:16 IST-109 b7721878a5144d009418cf269b5eea71 Fri 2016-08-19 19:47:57 IST--Sat 2016-08-20→˓01:16:07 IST-108 6102102fc7804379b888d83cea66838b Sat 2016-08-20 01:21:36 IST--Sun 2016-08-21→˓00:05:38 IST... long output
To know about any particular boot log, you can use the hash along with -b flag to the journalctl command.
$ sudo journalctl -b 7a88e13a76434a1199f82ad90441ae7f-- Logs begin at Tue 2014-12-09 03:41:08 IST, end at Sat 2017-06-24 13:40:49 IST. --Dec 09 03:41:08 localhost.localdomain systemd[1344]: Stopping Default.Dec 09 03:41:08 localhost.localdomain systemd[1344]: Stopped target Default.Dec 09 03:41:08 localhost.localdomain systemd[1344]: Starting Shutdown.Dec 09 03:41:08 localhost.localdomain systemd[1344]: Reached target Shutdown.Dec 09 03:41:08 localhost.localdomain systemd[1344]: Starting Exit the Session..
7.13 Time-based log viewing
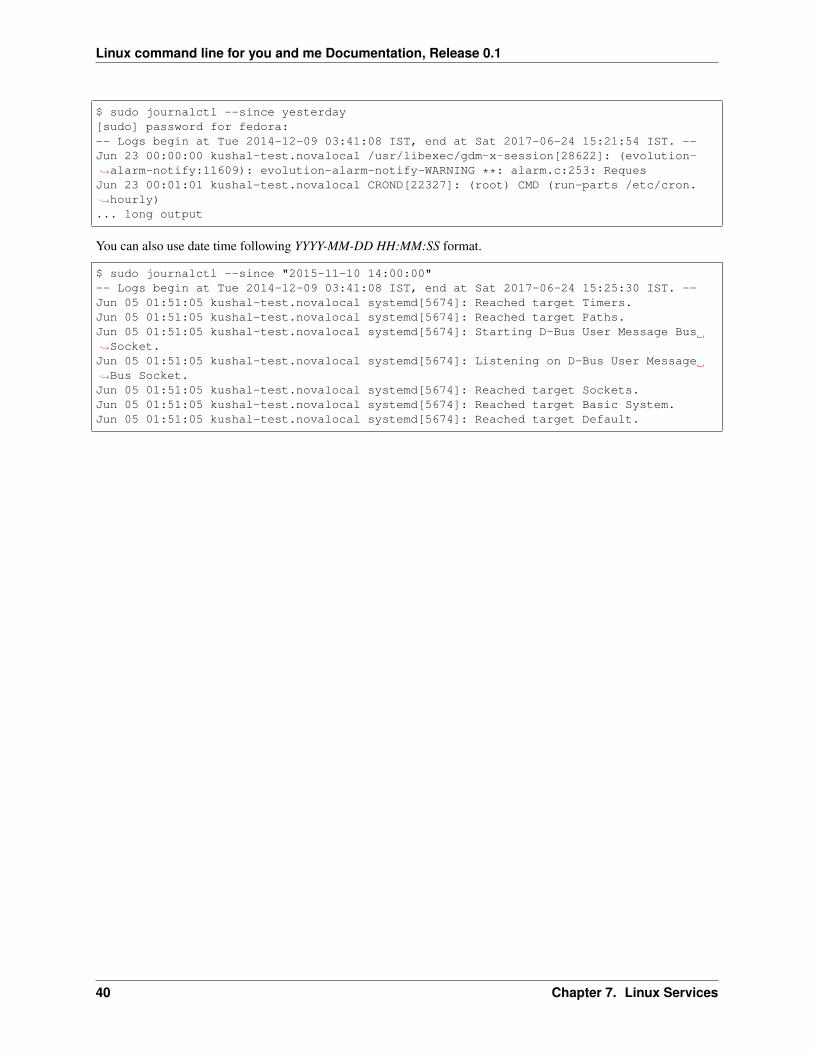
We can also use journalctl to view logs for a certain time period. For example, if we want to see all the logs sinceyesterday, we can use the following command.
7.12. Listing of previous boots 39
Linux command line for you and me Documentation, Release 0.1
$ sudo journalctl --since yesterday[sudo] password for fedora:-- Logs begin at Tue 2014-12-09 03:41:08 IST, end at Sat 2017-06-24 15:21:54 IST. --Jun 23 00:00:00 kushal-test.novalocal /usr/libexec/gdm-x-session[28622]: (evolution-→˓alarm-notify:11609): evolution-alarm-notify-WARNING **: alarm.c:253: RequesJun 23 00:01:01 kushal-test.novalocal CROND[22327]: (root) CMD (run-parts /etc/cron.→˓hourly)... long output
You can also use date time following YYYY-MM-DD HH:MM:SS format.
$ sudo journalctl --since "2015-11-10 14:00:00"-- Logs begin at Tue 2014-12-09 03:41:08 IST, end at Sat 2017-06-24 15:25:30 IST. --Jun 05 01:51:05 kushal-test.novalocal systemd[5674]: Reached target Timers.Jun 05 01:51:05 kushal-test.novalocal systemd[5674]: Reached target Paths.Jun 05 01:51:05 kushal-test.novalocal systemd[5674]: Starting D-Bus User Message Bus→˓Socket.Jun 05 01:51:05 kushal-test.novalocal systemd[5674]: Listening on D-Bus User Message→˓Bus Socket.Jun 05 01:51:05 kushal-test.novalocal systemd[5674]: Reached target Sockets.Jun 05 01:51:05 kushal-test.novalocal systemd[5674]: Reached target Basic System.Jun 05 01:51:05 kushal-test.novalocal systemd[5674]: Reached target Default.
40 Chapter 7. Linux Services

CHAPTER 8
Package management
In the Free and Open Source Software world, most software is released in source code format by developers. Thismeans that generally, if you want to install a piece of software, you will find the source code on the website of theproject. As a user, you will have to find and install all the other bits of software, that this particular piece depends on(the dependencies) and then install the software. To solve this painful issue, all Linux distributions have somethingcalled a package management system. Volunteers (mostly) all across the world help make binary software packagesout of source code released by the developers, in such a way that users of the Linux distribution can easily install,update or remove that software.
It’s generally recommended, we use the package management system that comes with the distribution, to installsoftware for the users. If you are really sure about what you’re doing in the system, you can install from the sourcefiles too; but that can be dangerous.
8.1 dnf command
dnf is the package management system in Fedora. The actual packages come in the rpm format. dnf helps you search,install or uninstall any package from the Fedora package repositories. You can also use the same command to updatepackages in your system.
8.2 Searching for a package
$ dnf search pssFedora 25 - x86_64 34 MB/s |→˓50 MB 00:01Fedora 25 - x86_64 - Updates 41 MB/s |→˓23 MB 00:00Last metadata expiration check: 0:00:07 ago on Sun Jun 25 04:14:22 2017.=========================================== N/S Matched: pss→˓============================================pss.noarch : A power-tool for searching inside source code filespssh.noarch : Parallel SSH tools
41

Linux command line for you and me Documentation, Release 0.1
First the tool, downloads all the latest package information from the repository, and then gives us the result.
8.3 Finding more information about a package
dnf info gives us more information about any given package.
$ dnf info pssLast metadata expiration check: 0:04:59 ago on Sun Jun 25 04:14:22 2017.Available PackagesName : pssArch : noarchEpoch : 0Version : 1.40Release : 6.fc25Size : 58 kRepo : fedoraSummary : A power-tool for searching inside source code filesURL : https://github.com/eliben/pssLicense : Public DomainDescription : pss is a power-tool for searching inside source code files.
: pss searches recursively within a directory tree, knows which: extensions and file names to search and which to ignore, automatically: skips directories you wouldn't want to search in (for example .svn or .
→˓git),: colors its output in a helpful way, and does much more.
8.4 Installing a package
The dnf install command helps us install any given package. We can pass more than one package name as the argument.
$ sudo dnf install pss wgetLast metadata expiration check: 0:37:13 ago on Sun Jun 25 03:44:07 2017.Package wget-1.18-3.fc25.x86_64 is already installed, skipping.Dependencies resolved.=====================================================================================================================================================Package Arch Version→˓ Repository Size=====================================================================================================================================================Installing:pss noarch 1.40-6.fc25→˓ fedora 58 k
Transaction Summary=====================================================================================================================================================Install 1 Package
Total download size: 58 kInstalled size: 196 kIs this ok [y/N]: yDownloading Packages:pss-1.40-6.fc25.noarch.rpm→˓ 969 kB/s | 58 kB 00:00--------------------------------------------------------------------------------------→˓---------------------------------------------------------------
(continues on next page)
42 Chapter 8. Package management

Linux command line for you and me Documentation, Release 0.1
(continued from previous page)
Total→˓ 118 kB/s | 58 kB 00:00Running transaction checkTransaction check succeeded.Running transaction testTransaction test succeeded.Running transaction
Installing : pss-1.40-6.fc25.noarch→˓ 1/1Verifying : pss-1.40-6.fc25.noarch
→˓ 1/1
Installed:pss.noarch 1.40-6.fc25
Complete!
8.5 apt command
apt is the package management system for the Debian Linux distribution. As Ubuntu is downstream of the Debiandistribution, it also uses the same package management system.
8.6 apt-get update
$ apt-get update... long output
The apt-get update command is used to update all the package information for the Debian repositories.
8.7 apt-get install
sudo apt-get install is the command used to install any given package from the repository.
8.5. apt command 43

Linux command line for you and me Documentation, Release 0.1
44 Chapter 8. Package management

CHAPTER 9
File system mounting
In this chapter, we’ll learn how to mount file systems. If you type mount in the shell, it will tell you about various filesystems, and how are they mounted (as a directory) in the system.
$ mountsysfs on /sys type sysfs (rw,nosuid,nodev,noexec,relatime,seclabel)proc on /proc type proc (rw,nosuid,nodev,noexec,relatime)devtmpfs on /dev type devtmpfs (rw,nosuid,seclabel,size=2012852k,nr_inodes=503213,→˓mode=755)securityfs on /sys/kernel/security type securityfs (rw,nosuid,nodev,noexec,relatime)tmpfs on /dev/shm type tmpfs (rw,nosuid,nodev,seclabel)devpts on /dev/pts type devpts (rw,nosuid,noexec,relatime,seclabel,gid=5,mode=620,→˓ptmxmode=000)tmpfs on /run type tmpfs (rw,nosuid,nodev,seclabel,mode=755)tmpfs on /sys/fs/cgroup type tmpfs (ro,nosuid,nodev,noexec,seclabel,mode=755)cgroup on /sys/fs/cgroup/systemd type cgroup (rw,nosuid,nodev,noexec,relatime,xattr,→˓release_agent=/usr/lib/systemd/systemd-cgroups-agent,name=systemd)pstore on /sys/fs/pstore type pstore (rw,nosuid,nodev,noexec,relatime,seclabel)cgroup on /sys/fs/cgroup/devices type cgroup (rw,nosuid,nodev,noexec,relatime,devices)cgroup on /sys/fs/cgroup/perf_event type cgroup (rw,nosuid,nodev,noexec,relatime,perf_→˓event)cgroup on /sys/fs/cgroup/freezer type cgroup (rw,nosuid,nodev,noexec,relatime,freezer)cgroup on /sys/fs/cgroup/blkio type cgroup (rw,nosuid,nodev,noexec,relatime,blkio)cgroup on /sys/fs/cgroup/cpu,cpuacct type cgroup (rw,nosuid,nodev,noexec,relatime,cpu,→˓cpuacct)cgroup on /sys/fs/cgroup/net_cls,net_prio type cgroup (rw,nosuid,nodev,noexec,→˓relatime,net_cls,net_prio)cgroup on /sys/fs/cgroup/pids type cgroup (rw,nosuid,nodev,noexec,relatime,pids)cgroup on /sys/fs/cgroup/memory type cgroup (rw,nosuid,nodev,noexec,relatime,memory)cgroup on /sys/fs/cgroup/cpuset type cgroup (rw,nosuid,nodev,noexec,relatime,cpuset)cgroup on /sys/fs/cgroup/hugetlb type cgroup (rw,nosuid,nodev,noexec,relatime,hugetlb)configfs on /sys/kernel/config type configfs (rw,relatime)/dev/vda1 on / type ext4 (rw,relatime,seclabel,data=ordered)selinuxfs on /sys/fs/selinux type selinuxfs (rw,relatime)systemd-1 on /proc/sys/fs/binfmt_misc type autofs (rw,relatime,fd=23,pgrp=1,timeout=0,→˓minproto=5,maxproto=5,direct,pipe_ino=11175)
(continues on next page)
45
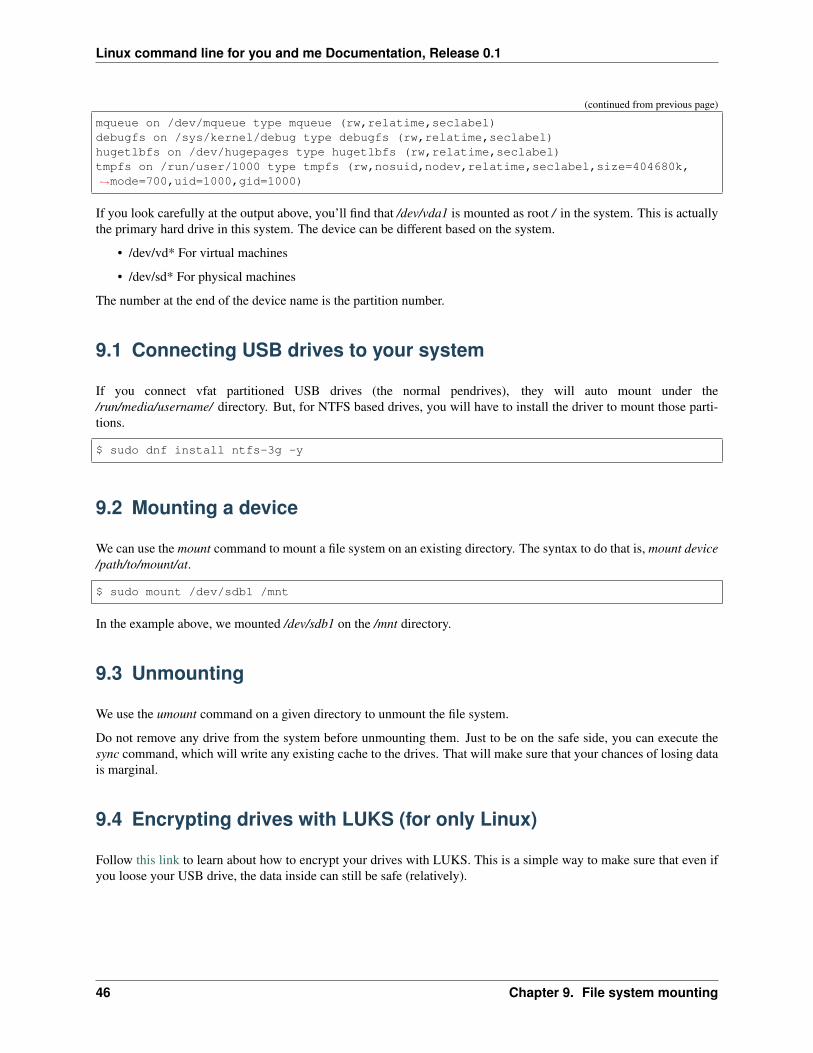
Linux command line for you and me Documentation, Release 0.1
(continued from previous page)
mqueue on /dev/mqueue type mqueue (rw,relatime,seclabel)debugfs on /sys/kernel/debug type debugfs (rw,relatime,seclabel)hugetlbfs on /dev/hugepages type hugetlbfs (rw,relatime,seclabel)tmpfs on /run/user/1000 type tmpfs (rw,nosuid,nodev,relatime,seclabel,size=404680k,→˓mode=700,uid=1000,gid=1000)
If you look carefully at the output above, you’ll find that /dev/vda1 is mounted as root / in the system. This is actuallythe primary hard drive in this system. The device can be different based on the system.
• /dev/vd* For virtual machines
• /dev/sd* For physical machines
The number at the end of the device name is the partition number.
9.1 Connecting USB drives to your system
If you connect vfat partitioned USB drives (the normal pendrives), they will auto mount under the/run/media/username/ directory. But, for NTFS based drives, you will have to install the driver to mount those parti-tions.
$ sudo dnf install ntfs-3g -y
9.2 Mounting a device
We can use the mount command to mount a file system on an existing directory. The syntax to do that is, mount device/path/to/mount/at.
$ sudo mount /dev/sdb1 /mnt
In the example above, we mounted /dev/sdb1 on the /mnt directory.
9.3 Unmounting
We use the umount command on a given directory to unmount the file system.
Do not remove any drive from the system before unmounting them. Just to be on the safe side, you can execute thesync command, which will write any existing cache to the drives. That will make sure that your chances of losing datais marginal.
9.4 Encrypting drives with LUKS (for only Linux)
Follow this link to learn about how to encrypt your drives with LUKS. This is a simple way to make sure that even ifyou loose your USB drive, the data inside can still be safe (relatively).
46 Chapter 9. File system mounting
Linux command line for you and me Documentation, Release 0.1
9.5 Encrypting drives for any OS using Veracrypt
VeraCrypt is an open source volume management tool compatible with macOS, Windows, and Linux systems.
Here is an excellent guide from Freedom of the Press Foundation on how to use it.
9.5. Encrypting drives for any OS using Veracrypt 47

Linux command line for you and me Documentation, Release 0.1
48 Chapter 9. File system mounting

CHAPTER 10
Networking commands
In this chapter, we will learn about a few basic networking commands, which will help us in our daily Linux usage.
10.1 Finding the IP address
The ip command can be used to find the IP address of the system.
$ ip addr show1: lo: <LOOPBACK,UP,LOWER_UP> mtu 65536 qdisc noqueue state UNKNOWN group default→˓qlen 1
link/loopback 00:00:00:00:00:00 brd 00:00:00:00:00:00inet 127.0.0.1/8 scope host lovalid_lft forever preferred_lft foreverinet6 ::1/128 scope hostvalid_lft forever preferred_lft forever
2: eth0: <BROADCAST,MULTICAST,UP,LOWER_UP> mtu 1454 qdisc fq_codel state UP group→˓default qlen 1000
link/ether fa:16:3e:3c:ed:27 brd ff:ff:ff:ff:ff:ffinet 172.10.95.253/20 brd 172.10.111.255 scope global dynamic eth0valid_lft 57021sec preferred_lft 57021secinet6 fe80::f816:3eff:fe3c:ed27/64 scope linkvalid_lft forever preferred_lft forever
Here lo is a special device which points to the same system (also known as localhost). The IP 127.0.0.1 always pointsto the the localhost. eth0 is our ethernet device which connects to the network.
10.2 ping command
ping is simple way to find if you are connected to Internet or not. We can also ping any particular computer to find ifthe computer is connected to the network or not. Press Ctrl+c to stop the loop.
49

Linux command line for you and me Documentation, Release 0.1
$ ping google.com PING google.com (216.58.201.142) 56(84) bytes of data. 64 bytes from mad06s25-in-f142.1e100.net (216.58.201.142): icmp_seq=1 ttl=44 time=157 ms 64 bytes from mad06s25-in-f142.1e100.net (216.58.201.142): icmp_seq=2 ttl=44 time=156 ms 64 bytes from mad06s25-in-f142.1e100.net (216.58.201.142): icmp_seq=3 ttl=44 time=156 ms ^C — google.com ping statis-tics — 3 packets transmitted, 3 received, 0% packet loss, time 2000ms rtt min/avg/max/mdev =156.373/156.811/157.566/0.704 ms
10.3 Short note about DNS
DNS or Domain Name System is a decentralized naming system for systems which are connected to Internet (canbe for private networks too). This is the way a computer knows, which other computer to connect to, when we typegoogle.com in our browser, or in the ping command. There are servers known as dns servers, and for every domainname it needs to find, the client system generally connects to these dns servers, and finds out the IP address of thecomputer at that domain name.
10.4 /etc/resolv.conf
/etc/resolv.conf is the configuration file for DNS. It contains the DNS server address to use for DNS queries.
$ cat /etc/resolv.conf# Generated by NetworkManagernameserver 1.1.1.1nameserver 8.8.8.8
The 1.1.1.1 is the DNS server from Cloudflare, and 8.8.8.8 is the DNS server hosted by Google.
10.5 host command
The host command will show you the IP address of any given hostname.
$ host www.example.comwww.example.com has address 93.184.216.34www.example.com has IPv6 address 2606:2800:220:1:248:1893:25c8:1946
10.6 dig command
dig command can tell us DNS records, MX details (used to send emails) and other information for a given domainname.
$ dig kushaldas.in
; <<>> DiG 9.10.4-P8-RedHat-9.10.4-5.P8.fc25 <<>> kushaldas.in;; global options: +cmd;; Got answer:;; ->>HEADER<<- opcode: QUERY, status: NOERROR, id: 50750;; flags: qr rd ra; QUERY: 1, ANSWER: 1, AUTHORITY: 0, ADDITIONAL: 1
;; OPT PSEUDOSECTION:
(continues on next page)
50 Chapter 10. Networking commands

Linux command line for you and me Documentation, Release 0.1
(continued from previous page)
; EDNS: version: 0, flags:; udp: 512;; QUESTION SECTION:;kushaldas.in. IN A
;; ANSWER SECTION:kushaldas.in. 5528 IN A 208.113.152.208
;; Query time: 66 msec;; SERVER: 8.8.8.8#53(8.8.8.8);; WHEN: Sun Jun 25 11:37:00 IST 2017;; MSG SIZE rcvd: 57
If you want to specify a DNS server to use, you can do that with the address specified at the end of the command alongwith a @ sign.
$ dig rtnpro.com @208.67.222.222
; <<>> DiG 9.10.4-P8-RedHat-9.10.4-5.P8.fc25 <<>> rtnpro.com @208.67.222.222;; global options: +cmd;; Got answer:;; ->>HEADER<<- opcode: QUERY, status: NOERROR, id: 27312;; flags: qr rd ra; QUERY: 1, ANSWER: 0, AUTHORITY: 1, ADDITIONAL: 1
;; OPT PSEUDOSECTION:; EDNS: version: 0, flags:; udp: 4096;; QUESTION SECTION:;rtnpro.com. IN A
;; AUTHORITY SECTION:rtnpro.com. 3600 IN SOA dns1.bigrock.in. rtnpro.gmail.com.→˓2017021401 7200 7200 172800 38400
;; Query time: 899 msec;; SERVER: 208.67.222.222#53(208.67.222.222);; WHEN: Sun Jun 25 11:40:01 IST 2017;; MSG SIZE rcvd: 106
10.7 ss command
ss command shows us socket statistics from the system. This command replaces the older netstat command. Read theman page of the command to know more about the different arguments we can pass at the command line.
$ ss -putnNetid State Recv-Q Send-Q Local Address:Port→˓ Peer Address:Porttcp ESTAB 0 0 192.168.1.101:51496→˓ 162.125.34.129:443 users:(("dropbox",→˓pid=28797,fd=80))tcp ESTAB 0 0 192.168.1.101:47864→˓ 74.125.200.189:443 users:(("chrome",→˓pid=22112,fd=385))tcp ESTAB 0 0 192.168.1.101:59524→˓ 209.12.123.55:22 users:(("ssh",→˓pid=26621,fd=3))
(continues on next page)
10.7. ss command 51

Linux command line for you and me Documentation, Release 0.1
(continued from previous page)
... long output
10.8 traceroute command
The traceroute command is used to show the full route of a network packet from the system to any given host.
$ traceroute www.rtnpro.comtraceroute to www.rtnpro.com (146.185.181.157), 30 hops max, 60 byte packets1 gateway (192.168.1.1) 1.434 ms 1.920 ms 1.891 ms2 45.113.248.3 (45.113.248.3) 7.478 ms 10.335 ms 10.343 ms3 45.113.248.1 (45.113.248.1) 10.319 ms 10.293 ms 10.274 ms4 121.244.26.1.static-pune.vsnl.net.in (121.244.26.1) 26.938 ms 26.608 ms 27.165→˓ms5 172.31.183.162 (172.31.183.162) 9.883 ms 10.133 ms 10.122 ms6 172.31.19.201 (172.31.19.201) 10.591 ms 172.29.250.33 (172.29.250.33) 6.894 ms→˓172.31.19.201 (172.31.19.201) 8.203 ms7 ix-ae-0-4.tcore1.MLV-Mumbai.as6453.net (180.87.38.5) 9.378 ms 8.886 ms 9.240 ms8 if-ae-9-5.tcore1.WYN-Marseille.as6453.net (80.231.217.77) 159.550 ms if-ae-5-2.→˓tcore1.WYN-Marseille.as6453.net (180.87.38.126) 159.614 ms if-ae-9-5.tcore1.WYN-→˓Marseille.as6453.net (80.231.217.77) 159.506 ms9 if-ae-8-1600.tcore1.PYE-Paris.as6453.net (80.231.217.6) 159.392 ms 159.474 ms→˓159.405 ms10 if-ae-15-2.tcore1.AV2-Amsterdam.as6453.net (195.219.194.145) 159.327 ms 158.355→˓ms 122.520 ms11 195.219.194.26 (195.219.194.26) 133.216 ms 134.168 ms 134.683 ms12 138.197.250.29 (138.197.250.29) 192.236 ms 192.125 ms 138.197.250.23 (138.197.→˓250.23) 192.083 ms13 * 146.185.181.157 (146.185.181.157) 191.831 ms 191.861 ms
10.9 tracepath command
The tracepath command traces a path to a network host discovering MTU along the path. This is a modern replace-ment of the traceroute command, and also does not need superuser privileges to execute.
$ tracepath www.rtnpro.com1?: [LOCALHOST] pmtu 15001: gateway 0.950ms1: gateway 0.715ms2: gateway 0.689ms pmtu 14922: 45.113.248.3 3.564ms3: 45.113.248.1 4.639ms4: 121.244.26.1.static-pune.vsnl.net.in 4.132ms5: 172.31.183.162 4.733ms asymm 76: 172.29.250.33 12.524ms asymm 77: ix-ae-0-4.tcore1.MLV-Mumbai.as6453.net 7.208ms asymm 88: if-ae-5-2.tcore1.WYN-Marseille.as6453.net 125.727ms asymm 129: if-ae-8-1600.tcore1.PYE-Paris.as6453.net 128.893ms asymm 1110: if-ae-15-2.tcore1.AV2-Amsterdam.as6453.net 126.019ms asymm 911: 195.219.194.26 136.373ms asymm 1012: 138.197.250.27 130.198ms13: 146.185.181.157 131.040ms reached
Resume: pmtu 1492 hops 13 back 13
52 Chapter 10. Networking commands
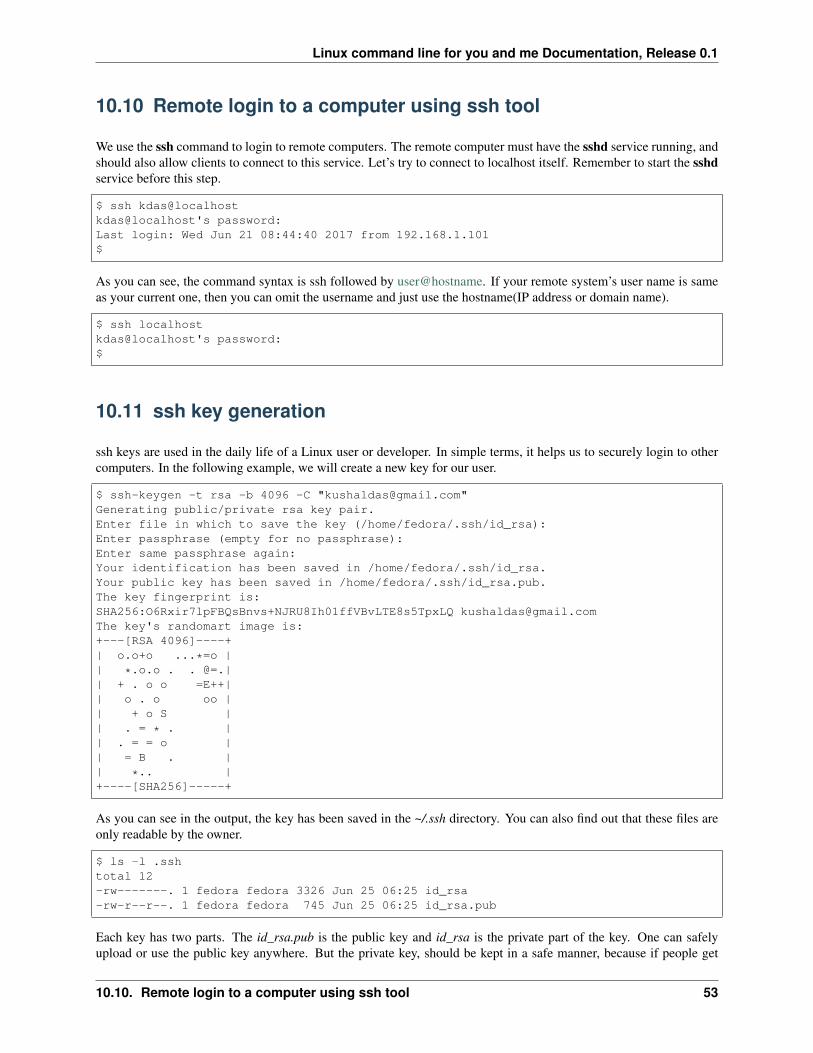
Linux command line for you and me Documentation, Release 0.1
10.10 Remote login to a computer using ssh tool
We use the ssh command to login to remote computers. The remote computer must have the sshd service running, andshould also allow clients to connect to this service. Let’s try to connect to localhost itself. Remember to start the sshdservice before this step.
$ ssh kdas@localhostkdas@localhost's password:Last login: Wed Jun 21 08:44:40 2017 from 192.168.1.101$
As you can see, the command syntax is ssh followed by user@hostname. If your remote system’s user name is sameas your current one, then you can omit the username and just use the hostname(IP address or domain name).
$ ssh localhostkdas@localhost's password:$
10.11 ssh key generation
ssh keys are used in the daily life of a Linux user or developer. In simple terms, it helps us to securely login to othercomputers. In the following example, we will create a new key for our user.
$ ssh-keygen -t rsa -b 4096 -C "[email protected]"Generating public/private rsa key pair.Enter file in which to save the key (/home/fedora/.ssh/id_rsa):Enter passphrase (empty for no passphrase):Enter same passphrase again:Your identification has been saved in /home/fedora/.ssh/id_rsa.Your public key has been saved in /home/fedora/.ssh/id_rsa.pub.The key fingerprint is:SHA256:O6Rxir7lpFBQsBnvs+NJRU8Ih01ffVBvLTE8s5TpxLQ [email protected] key's randomart image is:+---[RSA 4096]----+| o.o+o ...*=o || *.o.o . . @=.|| + . o o =E++|| o . o oo || + o S || . = * . || . = = o || = B . || *.. |+----[SHA256]-----+
As you can see in the output, the key has been saved in the ~/.ssh directory. You can also find out that these files areonly readable by the owner.
$ ls -l .sshtotal 12-rw-------. 1 fedora fedora 3326 Jun 25 06:25 id_rsa-rw-r--r--. 1 fedora fedora 745 Jun 25 06:25 id_rsa.pub
Each key has two parts. The id_rsa.pub is the public key and id_rsa is the private part of the key. One can safelyupload or use the public key anywhere. But the private key, should be kept in a safe manner, because if people get
10.10. Remote login to a computer using ssh tool 53

Linux command line for you and me Documentation, Release 0.1
access to your private key, they can also access all of your information from any system using that key.
In other words, do not give the private key to anyone, or do not randomly copy the .ssh directory to a USB drive andthen forget about it.
10.12 ssh-copy-id
ssh-copy-id command copies the keys to a given remote system. After this step we can use the ssh key to login to thebox directly, instead of the usual username / password method.
$ ssh-copy-id [email protected]/usr/bin/ssh-copy-id: INFO: attempting to log in with the new key(s), to filter out→˓any that are already installed/usr/bin/ssh-copy-id: INFO: 2 key(s) remain to be installed -- if you are prompted→˓now it is to install the new keys
[email protected]'s password:
Number of key(s) added: 2
Now try logging into the machine, with: "ssh '[email protected]'"and check to make sure that only the key(s) you wanted were added.
10.13 Stop and disable the sshd service
If you don’t need ssh access to your computer (say, your laptop), you should always stop and disable the sshd servicein the computer.
10.14 Disable password based login for ssh
Remember, this step can be dangerous. Unless you’re really, really sure that you can access a computer by eitherlogging in physically or using your ssh key (and you have a backup of the key somewhere), you should not do thisstep.
By disabling password based login in the sshd service, you make sure that only people with the right private key canlogin to the computer. This helps greatly when people try to break into the system by guessing the password. This isalso really helpful in case your computer is connected to some network, and you still need to access it over ssh.
We will use vim to open the /etc/ssh/sshd_config file, which is the configuration file for sshd service.
$ sudo vim /etc/ssh/sshd_config
Search for the term PasswordAuthentication, and change the value to no. Below I have added a new line to do thesame. You can also understand, that the lines starting with # are comments in this configuration file. This configurationwill disable password based authentication for the sshd service. You should remember to restart the sshd service afterthis step for the change to take place.
54 Chapter 10. Networking commands

Linux command line for you and me Documentation, Release 0.1
10.15 How to find active (open) network connections from your com-puter?
$ sudo lsof -i -n -P
The lsof command shows open files, using -i we are asking to list of all Internet and x.25 (HP-UX) network files. Toknow more, read the man page of the lsof command.
10.15. How to find active (open) network connections from your computer? 55

Linux command line for you and me Documentation, Release 0.1
56 Chapter 10. Networking commands

CHAPTER 11
Linux Firewall
Note: This chapter is an ongoing work.
A firewall is a network security system, which can monitor and control network packets coming in and going out froma system based on pre-defined rules.
In this chapter, we will learn about iptables command and how can we use the same to create and manage the system’sfirewall. The netfilter subsystem in Linux Kernel handles the actual packet filtering in the network level.
11.1 Installation
On CentOS
yum install iptables-services
On Debian systems
apt install iptables-persistent
11.2 Tables, chains and rules
There is a table based system which in turn uses chains of rules for the firewall. Each table has a defined set of chains,and the rules get into the get chain one after another.
57

Linux command line for you and me Documentation, Release 0.1
When a network packet reaches the related table, and the related chain inside of the table, the rules gets matched fromtop to bottom. If the packet matches then the target of the rule gets executed. Each chain also has a default policy, ifno rule matches, then, the default poilicy gets applied on the packet. We will learn more about these in details.
iptables has 5 built in chains.
• INPUT for all packets incoming to the system
• OUTPUT for all packets going out from the system
• FORWARD for the routed packets, this is when the system works as a router
• PREROUTING for port forwarding
• POSTROUTING for Source Network Address Translation (SNAT), this applies to all packets leaving the sys-tem
11.3 filter table
filter is the default table of iptables. It has 3 default chains.
• INPUT
• OUTPUT
• FORWARD
11.4 nat table
nat table is a special table for SNAT and DNAT (port forwarding). It has the following chains.
• PREROUTING
• POSTROUTING
• OUTPUT
There are two other different tables, mangle and raw.
11.5 iptables command
The following table will be helpful in remembering different arguments to iptables command.
+------------------+--------------+---------------------+------------------------+----→˓---------+| Table | Command | Chain | Matches |→˓Target/Jump |+------------------+--------------+---------------------+------------------------+----→˓---------+| filter (default) | -A (append) | INPUT | -p protocol |→˓ACCEPT || nat | -I (insert) | OUTPUT | -s source_ip |→˓DROP || mangle | -D (delete) | FORWARD | -d destination_ip |→˓LOG || raw | -R (replace) | PREROUTING | --sport source_port |→˓REJECT | (continues on next page)
58 Chapter 11. Linux Firewall
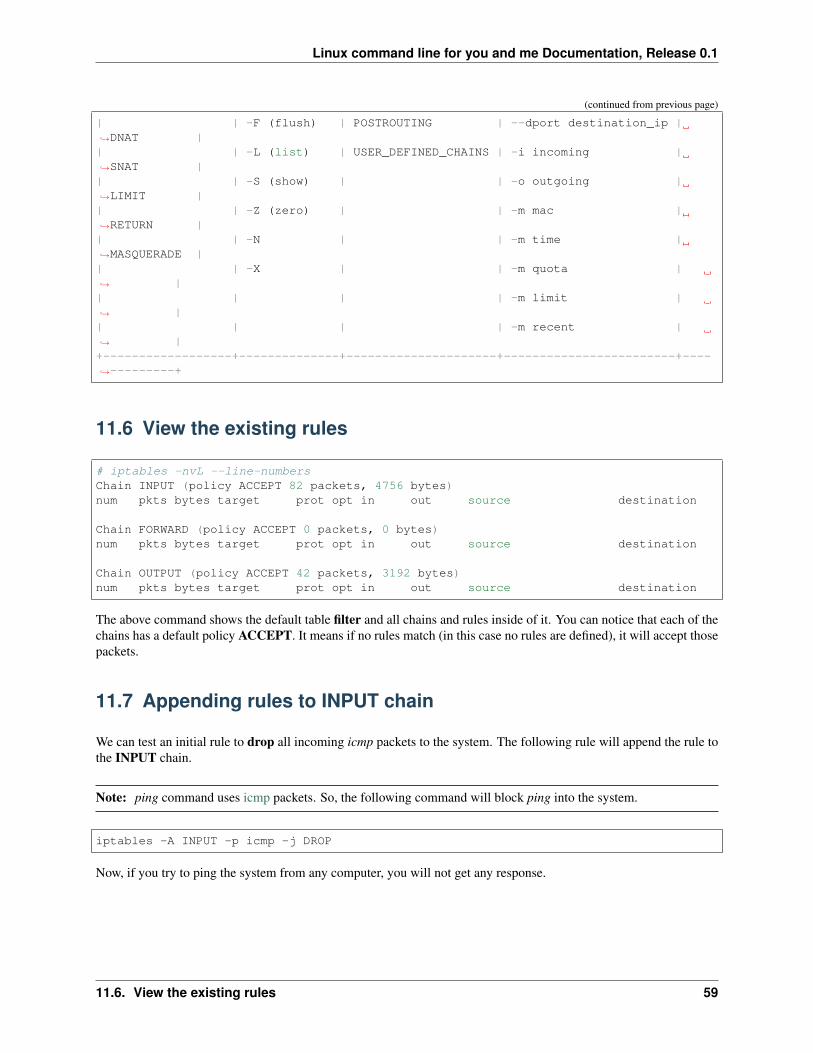
Linux command line for you and me Documentation, Release 0.1
(continued from previous page)
| | -F (flush) | POSTROUTING | --dport destination_ip |→˓DNAT || | -L (list) | USER_DEFINED_CHAINS | -i incoming |→˓SNAT || | -S (show) | | -o outgoing |→˓LIMIT || | -Z (zero) | | -m mac |→˓RETURN || | -N | | -m time |→˓MASQUERADE || | -X | | -m quota |→˓ || | | | -m limit |→˓ || | | | -m recent |→˓ |+------------------+--------------+---------------------+------------------------+----→˓---------+
11.6 View the existing rules
# iptables -nvL --line-numbersChain INPUT (policy ACCEPT 82 packets, 4756 bytes)num pkts bytes target prot opt in out source destination
Chain FORWARD (policy ACCEPT 0 packets, 0 bytes)num pkts bytes target prot opt in out source destination
Chain OUTPUT (policy ACCEPT 42 packets, 3192 bytes)num pkts bytes target prot opt in out source destination
The above command shows the default table filter and all chains and rules inside of it. You can notice that each of thechains has a default policy ACCEPT. It means if no rules match (in this case no rules are defined), it will accept thosepackets.
11.7 Appending rules to INPUT chain
We can test an initial rule to drop all incoming icmp packets to the system. The following rule will append the rule tothe INPUT chain.
Note: ping command uses icmp packets. So, the following command will block ping into the system.
iptables -A INPUT -p icmp -j DROP
Now, if you try to ping the system from any computer, you will not get any response.
11.6. View the existing rules 59
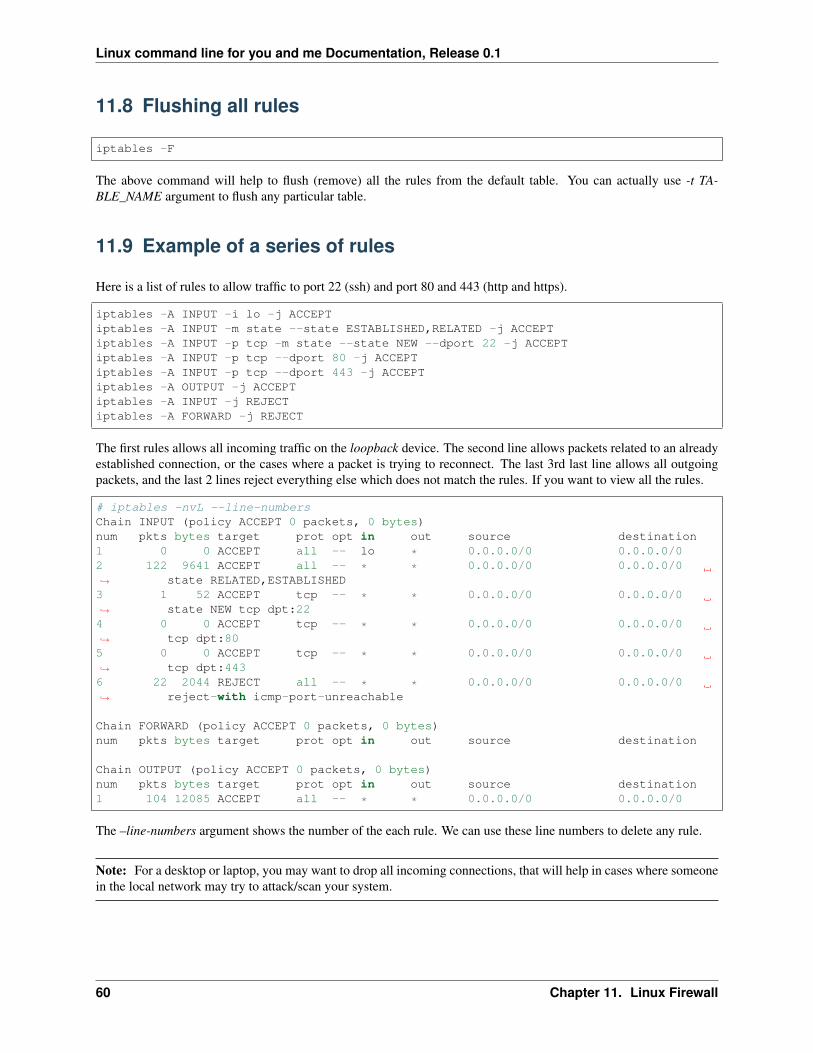
Linux command line for you and me Documentation, Release 0.1
11.8 Flushing all rules
iptables -F
The above command will help to flush (remove) all the rules from the default table. You can actually use -t TA-BLE_NAME argument to flush any particular table.
11.9 Example of a series of rules
Here is a list of rules to allow traffic to port 22 (ssh) and port 80 and 443 (http and https).
iptables -A INPUT -i lo -j ACCEPTiptables -A INPUT -m state --state ESTABLISHED,RELATED -j ACCEPTiptables -A INPUT -p tcp -m state --state NEW --dport 22 -j ACCEPTiptables -A INPUT -p tcp --dport 80 -j ACCEPTiptables -A INPUT -p tcp --dport 443 -j ACCEPTiptables -A OUTPUT -j ACCEPTiptables -A INPUT -j REJECTiptables -A FORWARD -j REJECT
The first rules allows all incoming traffic on the loopback device. The second line allows packets related to an alreadyestablished connection, or the cases where a packet is trying to reconnect. The last 3rd last line allows all outgoingpackets, and the last 2 lines reject everything else which does not match the rules. If you want to view all the rules.
# iptables -nvL --line-numbersChain INPUT (policy ACCEPT 0 packets, 0 bytes)num pkts bytes target prot opt in out source destination1 0 0 ACCEPT all -- lo * 0.0.0.0/0 0.0.0.0/02 122 9641 ACCEPT all -- * * 0.0.0.0/0 0.0.0.0/0→˓ state RELATED,ESTABLISHED3 1 52 ACCEPT tcp -- * * 0.0.0.0/0 0.0.0.0/0→˓ state NEW tcp dpt:224 0 0 ACCEPT tcp -- * * 0.0.0.0/0 0.0.0.0/0→˓ tcp dpt:805 0 0 ACCEPT tcp -- * * 0.0.0.0/0 0.0.0.0/0→˓ tcp dpt:4436 22 2044 REJECT all -- * * 0.0.0.0/0 0.0.0.0/0→˓ reject-with icmp-port-unreachable
Chain FORWARD (policy ACCEPT 0 packets, 0 bytes)num pkts bytes target prot opt in out source destination
Chain OUTPUT (policy ACCEPT 0 packets, 0 bytes)num pkts bytes target prot opt in out source destination1 104 12085 ACCEPT all -- * * 0.0.0.0/0 0.0.0.0/0
The –line-numbers argument shows the number of the each rule. We can use these line numbers to delete any rule.
Note: For a desktop or laptop, you may want to drop all incoming connections, that will help in cases where someonein the local network may try to attack/scan your system.
60 Chapter 11. Linux Firewall

Linux command line for you and me Documentation, Release 0.1
11.10 Delete a rule based on rule number
Let us delete the rule number 4, which allows traffic to port 80.
# iptables -D INPUT 4# iptables -nvL --line-numbersChain INPUT (policy ACCEPT 0 packets, 0 bytes)num pkts bytes target prot opt in out source destination1 4 376 ACCEPT all -- lo * 0.0.0.0/0 0.0.0.0/02 221 15445 ACCEPT all -- * * 0.0.0.0/0 0.0.0.0/0→˓ state RELATED,ESTABLISHED3 1 52 ACCEPT tcp -- * * 0.0.0.0/0 0.0.0.0/0→˓ state NEW tcp dpt:224 0 0 ACCEPT tcp -- * * 0.0.0.0/0 0.0.0.0/0→˓ tcp dpt:4435 22 2044 REJECT all -- * * 0.0.0.0/0 0.0.0.0/0→˓ reject-with icmp-port-unreachable
Chain FORWARD (policy ACCEPT 0 packets, 0 bytes)num pkts bytes target prot opt in out source destination
Chain OUTPUT (policy ACCEPT 0 packets, 0 bytes)num pkts bytes target prot opt in out source destination1 166 17248 ACCEPT all -- * * 0.0.0.0/0 0.0.0.0/0
11.11 Delete a rule directly
If you know the rule properly, you can also delete it based on the rule directly.
# iptables -D INPUT -p tcp --dport 443 -j ACCEPT# iptables -nvL --line-numbersChain INPUT (policy ACCEPT 0 packets, 0 bytes)num pkts bytes target prot opt in out source destination1 4 376 ACCEPT all -- lo * 0.0.0.0/0 0.0.0.0/02 344 22417 ACCEPT all -- * * 0.0.0.0/0 0.0.0.0/0→˓ state RELATED,ESTABLISHED3 1 52 ACCEPT tcp -- * * 0.0.0.0/0 0.0.0.0/0→˓ state NEW tcp dpt:224 22 2044 REJECT all -- * * 0.0.0.0/0 0.0.0.0/0→˓ reject-with icmp-port-unreachable
Chain FORWARD (policy ACCEPT 0 packets, 0 bytes)num pkts bytes target prot opt in out source destination
Chain OUTPUT (policy ACCEPT 0 packets, 0 bytes)num pkts bytes target prot opt in out source destination1 234 22564 ACCEPT all -- * * 0.0.0.0/0 0.0.0.0/0
11.12 Saving the rules
Any change made via iptables command stays on memory. To save it (so that it autoreloads in reboot), use thefollowing command.
11.10. Delete a rule based on rule number 61

Linux command line for you and me Documentation, Release 0.1
For Debian.
# netfilter-persistent save
For CentOS 7+
# systemctl stop firewalld && systemctl disable firewalld# iptables-save > /etc/sysconfig/iptables# systemctl enable iptablesCreated symlink from /etc/systemd/system/basic.target.wants/iptables.service to /usr/→˓lib/systemd/system/iptables.service.# systemctl start iptables
The first line stops and then disables the firewalld service, it is a newer type of frontend for the same netfilter subsystemof the kernel.
11.13 A blog post from Major Hayden
Now, you should read the following blog post from Major Hayden best practices.
11.14 Debugging firewall rules
In case you want to debug the rules, and wan to see which packet matches which rule in the chain, you can add thesetwo following rules. After that, do tail -f /var/log/kern.log to see the messages. Remember to use the proper IPaddress and port number.
# iptables -t raw -A PREROUTING -p tcp --destination YOUR_IP/24 --dport PORT_NUMBER -→˓j TRACE# iptables -t raw -A OUTPUT -p tcp --destination YOUR_IP/24 --dport PORT_NUMBER -j→˓TRACE
62 Chapter 11. Linux Firewall
CHAPTER 12
Random things
I have yet to figure out where to put this information, which is why they are here, in the random chapter. These willbe moved to different chapters in the future.
12.1 w command
The w command shows all the users, logged in to the computer. If you pass the -f flag, it toggles information aboutwhere each user is logged in from.
$ w17:22:41 up 24 days, 11:37, 2 users, load average: 0.56, 0.50, 0.59USER TTY LOGIN@ IDLE JCPU PCPU WHATkdas tty2 31May17 22days 3:07m 3:16 i3 -a --restart /run/user/1000/i3/→˓restart-state.28641
12.2 How long is the system running?
We have the uptime command which gives us information about how long the system is running. You can figure outthe last time the system turned off or rebooted at a glance. For my laptop, it was 24 days ago.
$ uptime17:31:30 up 24 days, 11:46, 2 users, load average: 0.76, 0.98, 0.81
12.3 Finding CPU time of a command
The time command will help you to find the CPU time spent for any command. The following example will tell ushow much time `du -sh took to calculate the disk usage.
63
Linux command line for you and me Documentation, Release 0.1
$ time du -sh5.5G .
real 0m1.026suser 0m0.235ssys 0m0.783s
12.4 dmesg command
The dmesg command prints out messages from the kernel buffer. Using this tool we can learn about the messages andinformation from the kernel drivers during and after the boot up process. This can be very handy when troubleshooting;for e.g. when the machine fails to boot or a certain piece of hardware does not function correctly.
12.5 Setting up cron jobs
One can schedule tasks using cron jobs. You can mention a certain time when a given task will be executed. In latestFedora/CentOS, we use cronie package, in other systems we have cron or anacron package.
To view any existing jobs
crontab -l
To add a new cronjob or edit a provious one, use the command
crontab -e.
Format of a crontab file
* * * * * /path/to/command+ + + + +| | | | || | | | || | | | || | | | || | | | || | | | +------> Day of the week (0-7)| | | || | | +--------> Month of the year (1-12)| | || | +----------> Day of the month (1-31)| || +------------> Hour (0-23)|+--------------> Minute (0,59)
Say we want to execute a shell script everyday at midnight.
0 0 * * * /usr/bin/myscript.sh
Another example can be executing the same script in every 15 minutes in every hour.
0,15,30,45 * * * * /usr/bin/myscript.sh
64 Chapter 12. Random things

Linux command line for you and me Documentation, Release 0.1
12.6 Finding out details about previous logins or system reboots
last command will give you the details about all the previous logins and shutdown/reboots. This command actuallychecks /var/tmp/wtmp file for the logs.
The /var/log/btmp file stores all the bad login details, and /var/log/utmp file stores the details of the currently loggedin users (who command reads this file).
You can read the btmp file using last command.
last -f /var/log/btmp
To know more, you can read the man page of wmtp.
12.6. Finding out details about previous logins or system reboots 65

Linux command line for you and me Documentation, Release 0.1
66 Chapter 12. Random things

CHAPTER 13
Whats next?
After you are familiar with the commands in this book, we would suggest you to learn shell scripting.
Start from https://www.shellscript.sh and then you can read the beginners bash guide.
67

Linux command line for you and me Documentation, Release 0.1
68 Chapter 13. Whats next?

CHAPTER 14
Workbook
The Lym Workbook is an effort to create a small lab environment for the students to learn various commands frombook. We will slowly add more problems to it.
14.1 How to install the workbook?
You will need latest Vagrant for this. Install Vagrant following the steps from the website. We suggest you to use thelibvirt provider along with it.
Then checkout latest workbook code from github.
git clone https://github.com/kushaldas/lymworkbookcd lymworkbookvagrant upvagrant ssh workbook
The vagrant up command will create two vms.
14.2 copy paste
To setup the problem environment
sudo lymsetup copypaste
Create a directory called work in your home directory, and copy the file from /tmp/problem1/work/files/hello.txt intothe newly created diretory. Remember to remove the /tmp/problem1/work/files/hello.txt file afterwards. Create a filecalled /tmp/chapter1/allusers and add all of the directory names under your home directory into that file.
To verify
sudo lymverify copypaste
69
Linux command line for you and me Documentation, Release 0.1
14.3 Find your user id
To setup the problem environment
sudo lymsetup findid
Find your user id and write it down in a file /tmp/myuserid.txt.
To verify
sudo lymverify findid
14.4 Creating softlinks
To setup the problem environment
sudo lymsetup softlinks
Create a softlink called docs in your home directory which will point to /usr/share/doc/ directory. Also create anothersoftlink called memory to the /proc/meminfo file.
To verify
sudo lymverify softlinks
14.5 Basic vim usage
To setup the problem environment
sudo lymsetup basicvim
Read the file at /etc/os-release and write the value of ID_LIKE (without the double quotes) in a file at /tmp/id_like.txt.
To verify
sudo lymverify basicvim
14.6 Adding a new user
To setup the problem environment
sudo lymsetup newuser
Add a new user called fatima to the system.
To verify
sudo lymverify newuser
70 Chapter 14. Workbook

Linux command line for you and me Documentation, Release 0.1
14.7 Deleing an user
To setup the problem environment, remember to add the user first from the previous problem.
sudo lymsetup deleteuser
Remove the fatima user from the system
To verify
sudo lymverify deleteuser
14.8 Finding the IP address of dgplug.org
Find the IP address of dgplug.org and save it to /tmp/ip_dgplug.txt file.
To verify:
sudo lymverify findip
14.9 Change the local timezone of the system
Change the timezone of the system to the same of San Francisco, USA.
To verify:
sudo lymverify timezonechange
14.10 Add sudo access to an user
Grant administrative(sudo) privileges to an existing normal user account “lym”. Remeber to create the user first.
To verify:
sudo lymverify assignsudo
14.7. Deleing an user 71

Linux command line for you and me Documentation, Release 0.1
72 Chapter 14. Workbook

CHAPTER 15
Advanced section
From this chapter onwards, we will learn more about different tools which people use for various. Most of these canbe used for both personal use cases and also inside of big companies (depending on the situation).
To start, watch this talk on failure.
73

Linux command line for you and me Documentation, Release 0.1
74 Chapter 15. Advanced section

CHAPTER 16
Containers
For now, just watch this talk from amazing Alice Goldfuss.
75

Linux command line for you and me Documentation, Release 0.1
76 Chapter 16. Containers

CHAPTER 17
Team
• Jason Braganza (Editor in command)
• Kushal Das (Adds typos in every form)
77

Linux command line for you and me Documentation, Release 0.1
78 Chapter 17. Team

CHAPTER 18
Indices and tables
• genindex
• search
79

Linux command line for you and me Documentation, Release 0.1
80 Chapter 18. Indices and tables

Index
Aapt, 43
Bbashrc, 24bootup, 35
Cchmod, 23cmdline, 31cpuinfo, 30
Ddaemon, 35dig, 50dmesg, 64dnf, 41dnf install, 42dns, 50
EEnvironment variable, 15export, 16
Ffhs, 9File permission, 23
Ggroupadd, 22
Hhost, 50
Iid, 20ip, 49iptables, 58
Jjournalctl, 38
Kkill, 28
Llast, 64load average, 29locate, 16lsof, 28
Mmeminfo, 31mount, 45, 46
NNTFS, 46
Ppasswd, 21PATH, 24ping, 49proc filesystem, 30ps, 27
Sservices, 36signal, 28ss, 51ssh, 52ssh-copy-id, 54su, 15sudo, 15, 21sysctl, 32systemctl, 36
Ttar, 12
81

Linux command line for you and me Documentation, Release 0.1
time, 63timezones, 16top, 29tracepath, 52traceroute, 52
Uumount, 46updatedb, 16uptime, 63useradd, 21userdel, 22usermod, 22
Vvim, 12
Ww, 63which, 24
82 Index


