13
If you have any questions or require additional support, email [email protected]. LMS ACCOUNT SETUP GUIDE FOR ADMINISTRATORS

If you have any questions or require additional support,
email [email protected].
LMS ACCOUNT SETUP GUIDE
FOR ADMINISTRATORS

Page | 1
If you have any questions or require additional support,
email [email protected].
Add Users
Before you can assign courses, users must be registered in the LMS. To add users to the
LMS, you can either do a bulk import, or add users one at a time. When adding users into the
LMS, you will send a welcome email which instructs them to set their password and login.

If you have any questions or require additional support,
email [email protected].
Add Users
OPTION 1: BULK IMPORT USERS
To add multiple users at a time and send welcome emails to multiple users at a time, follow the
process below for bulk importing users.
1. From the main login screen, click System Administration on the right. This will bring
you to the Companies tab.
2. Click Details in the Actions column on the right of your company name.
3. This will bring you to the Company Information screen. Click Import Contacts on the
upper right corner of the screen.
Page | 1
If you have any questions or require additional support,
email [email protected].
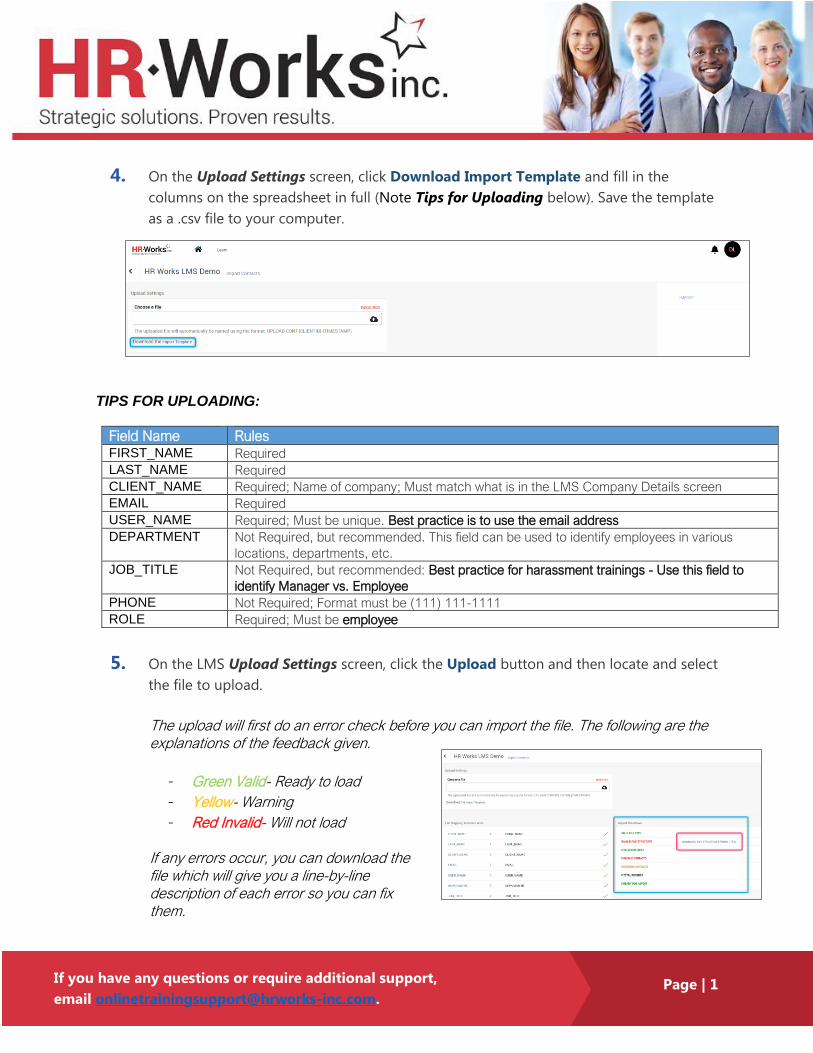
4. On the Upload Settings screen, click Download Import Template and fill in the
columns on the spreadsheet in full (Note Tips for Uploading below). Save the template
as a .csv file to your computer.
TIPS FOR UPLOADING:
Field Name Rules FIRST_NAME Required
LAST_NAME Required
CLIENT_NAME Required; Name of company; Must match what is in the LMS Company Details screen
EMAIL Required
USER_NAME Required; Must be unique. Best practice is to use the email address
DEPARTMENT Not Required, but recommended. This field can be used to identify employees in various
locations, departments, etc.
JOB_TITLE Not Required, but recommended: Best practice for harassment trainings - Use this field to
identify Manager vs. Employee
PHONE Not Required; Format must be (111) 111-1111
ROLE Required; Must be employee
5. On the LMS Upload Settings screen, click the Upload button and then locate and select
the file to upload.
The upload will first do an error check before you can import the file. The following are the explanations of the feedback given.
- Green Valid- Ready to load
- Yellow- Warning
- Red Invalid- Will not load If any errors occur, you can download the file which will give you a line-by-line description of each error so you can fix them.
Page | 2
If you have any questions or require additional support,
email [email protected].
6. Resolve any yellow or red errors that were identified by the system.
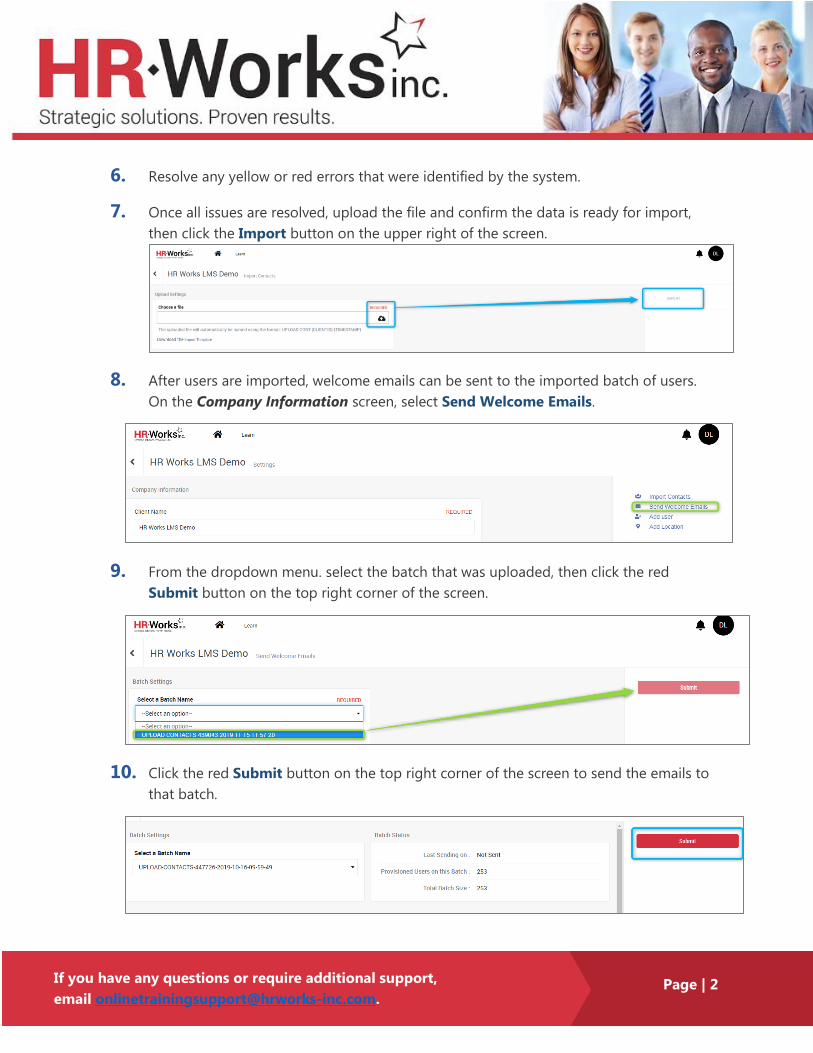
7. Once all issues are resolved, upload the file and confirm the data is ready for import,
then click the Import button on the upper right of the screen.
8. After users are imported, welcome emails can be sent to the imported batch of users.
On the Company Information screen, select Send Welcome Emails.
9. From the dropdown menu. select the batch that was uploaded, then click the red
Submit button on the top right corner of the screen.
10. Click the red Submit button on the top right corner of the screen to send the emails to
that batch.

Page | 3
If you have any questions or require additional support,
email [email protected].
OPTION 2: ADD INDIVIDUAL USERS
To add a single user and send welcome emails one at a time, follow the process below for
adding individual users.
1. From the main login screen, click System Administration on the right. Then, click the
Users tab.
2. Click the red Create button on the top right corner of the screen, then click New User.
3. On the next screen, click Continue To Create User under the Actions column to the
right.
4. Fill in the required fields for the employee. Note best practices for the fields below:
a. Username: Use the employee’s email address.
b. Job Title: Use Manager or Employee in this field.
c. Department: If there are employees in multiple states, use this field to indicate
which state the employee is in.
d. Role: Select the only option, Employee.
5. Select Send Welcome Email checkbox at the bottom of the screen.
6. Click the red Save Settings button on the top right corner of the screen when finished.
The employee will immediately receive the welcome email upon saving.
7. Immediately proceed to the next steps for assigning the user to a course.

Page | 4
If you have any questions or require additional support,
email [email protected].
Assign Courses
Course assignments are managed with tracks. A track is used to assign courses to individual
users or groups of users. There are three parts to a track. The first part of a track is the track
settings, which includes the track name, deadline, and course. The second is the users
assigned to the track. The third is track notification settings.

Page | 1
If you have any questions or require additional support,
email [email protected].
Assigning Users to a Course
Click Learn in the menu at the top of the screen, then click Dashboard below the main menu.
The Dashboard gives you access to key administrator features inside Learn.
CREATING A TRACK
A track is used to assign courses to individual users or groups of users.
1. From the Track Dashboard screen, click the red Actions button on the top right corner
of the screen.
2. Click Create New Track. This will bring you to the Track Settings screen.
3. Set a Completion Date for the track, which is the deadline for users to complete their
training by.
4. Name the track. Ie: 2019 NY Harassment Training – Supervisors
5. Select the course users win the track will be assigned.
a. Select the category, then the subcategory, then the course name.
Page | 2
If you have any questions or require additional support,
email [email protected].
6. Click Continue to assign users, or Save & Exit if you wish to complete your track
assignment at a later time.
a. If you select Continue, the Assign Track Users screen will appear.
b. If you select Save & Exit, you will be brought back to the Track Dashboard
screen. To go back in and assign users to a track, click the icon with the little
people to the right of the track name.
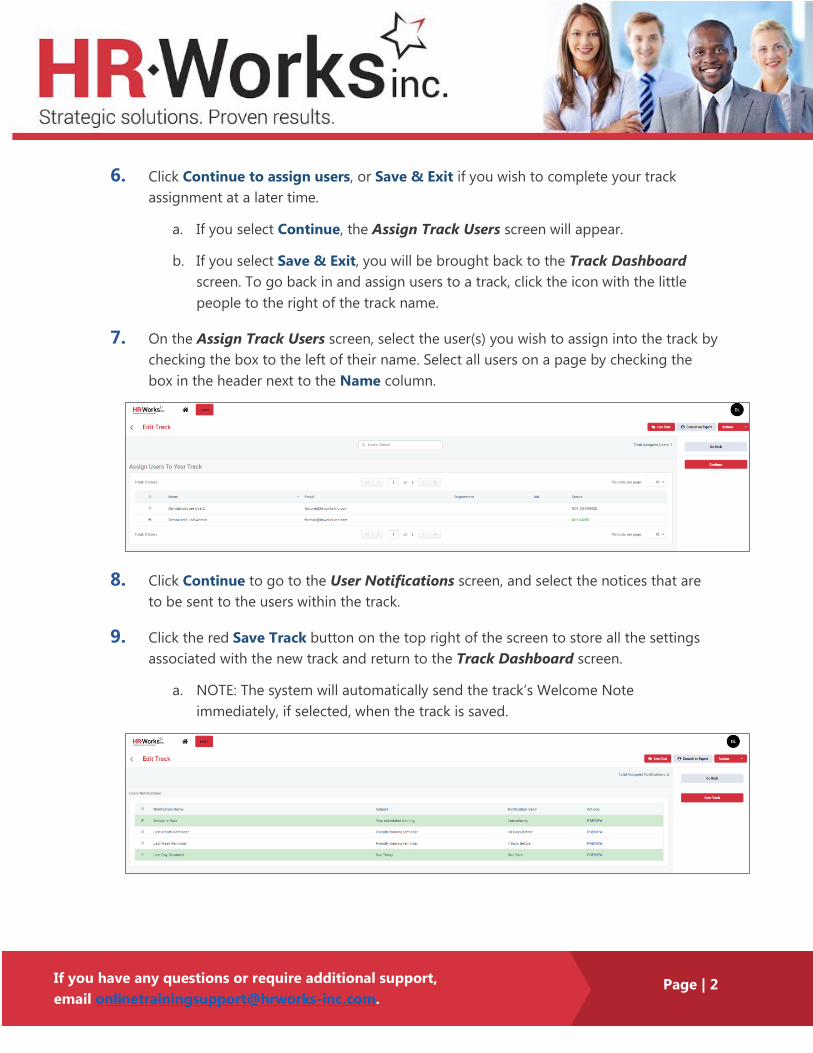
7. On the Assign Track Users screen, select the user(s) you wish to assign into the track by
checking the box to the left of their name. Select all users on a page by checking the
box in the header next to the Name column.
8. Click Continue to go to the User Notifications screen, and select the notices that are
to be sent to the users within the track.
9. Click the red Save Track button on the top right of the screen to store all the settings
associated with the new track and return to the Track Dashboard screen.
a. NOTE: The system will automatically send the track’s Welcome Note
immediately, if selected, when the track is saved.

Page | 3
If you have any questions or require additional support,
email [email protected].
ADDING USERS TO EXISTING TRACKS
If a track is already created and you need to add users to it, you can do this from the Track
Dashboard screen.
1. Click on the Learn tab at the top of the LMS screen, then click Dashboard.
2. Locate the track you need to add the user to, then click the icon with the little people to
the right of the track name.
3. Select the users to be added to the track.
4. Click Continue, then Save Track.

Page | 4
If you have any questions or require additional support,
email [email protected].
Reports
Reports can be used to identify track completions, individual user progress, and overdue
trainings.
Different reports include:
• Track Report
• User Activity Report

Page | 5
If you have any questions or require additional support,
email [email protected].
Reports
USER ACTIVITY REPORT
On this report, you can search for and view users and their course status. You can also download
the report via Excel by clicking Generate Report.
1. Click the red Actions button at the top right corner of the screen, then select User
Activity Report.
2. Choose a Date Range or select Include all History.
3. Select your company and click Submit.
4. To view the report in excel format, click the Generate Report button in the top right
corner of the screen.
5. To download a user’s certificate, click on Passed in the status column for that user.

Page | 6
If you have any questions or require additional support,
email [email protected].
TRACK REPORT
This report will provide a detailed breakdown of all users within the existing tracks.
1. Click Actions, then select Download Track Report.
2. The report will download to your computer in excel format. You can sort and filter this
report as needed.


