LSC503,LSC505, LSC508 Operating & Assembly Instructions For Mighty Mac Leaf Shredder-Chipper This manual contains information concerning proper and improper operating procedures, warnings, maintenance, trouble shooting, assem- bly, tips. Everyone who operates this machine should read these instructions and be thoroughly familiar with them. THIS MACHINE" IS CAPABLE OF INFLICTING SERIOUS INJURY IF OPERATED IMPROPERLY - READ WARNING & CAUTION LABELS (215) 495-7181 • MacKISSIC, INC .• P.O. BOX 111, PARKER FORD, PA 19457 • FAX (215) 495-5951 Form LSC692
Transcript
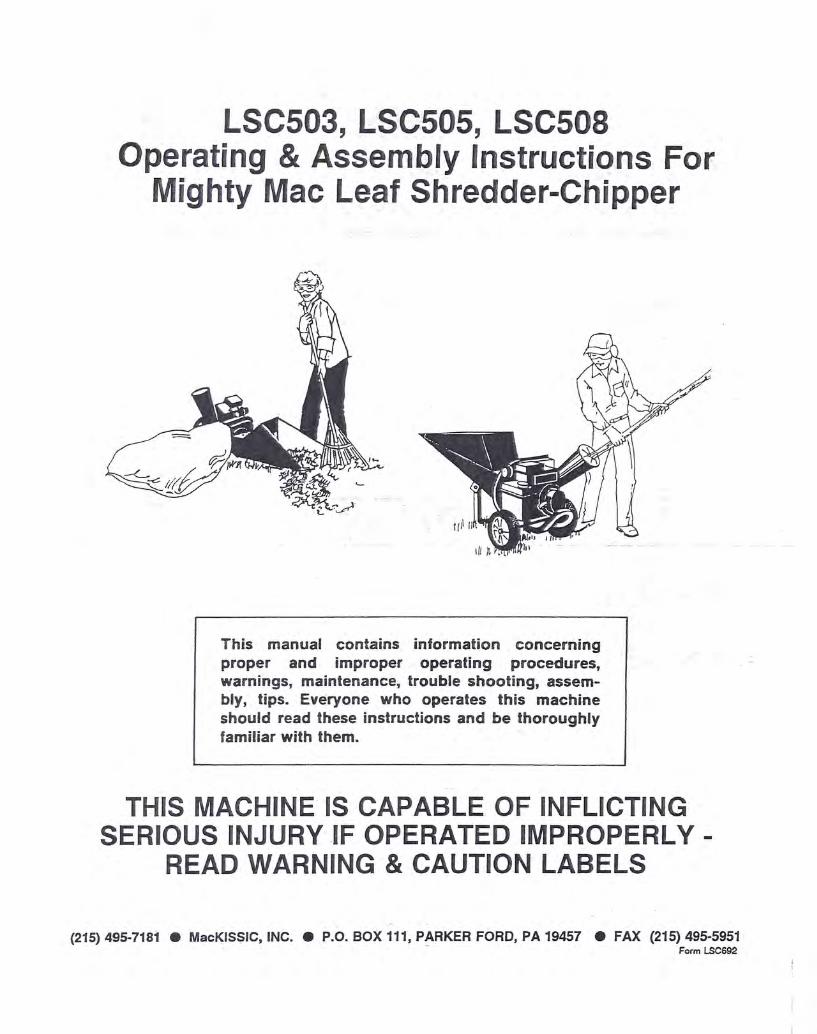
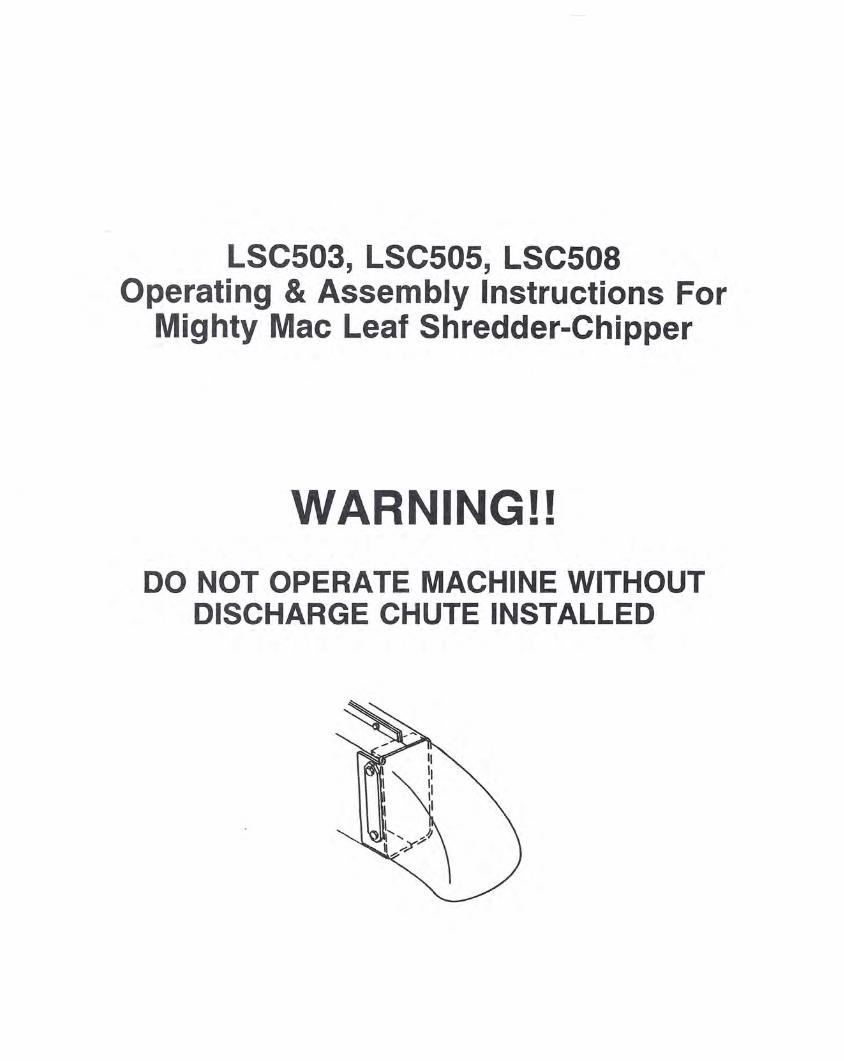
LSC503,LSC505, LSC508Operating & Assembly Instructions For
Mighty Mac Leaf Shredder-Chipper
This manual contains information concerningproper and improper operating procedures,warnings, maintenance, trouble shooting, assem-bly, tips. Everyone who operates this machineshould read these instructions and be thoroughlyfamiliar with them.
THIS MACHINE" IS CAPABLE OF INFLICTINGSERIOUS INJURY IF OPERATED IMPROPERLY -
THIS MACHINE IS CAPABLE OF INFLICTING SERIOUS INJURY IFOPERATED IMPROPERLY - READ WARNINGS & CAUTION.
TRAINING AND PREPARATION
Before operating this leaf shredder-chipper, read and understand this manual completely. Become familiar withit for your own safety. Failure to do so may cause serious injury. Do not allow anyone to operate your machinewho has not read this manual.
INTENDED USE
Never use your leaf shredder-chipper for any other purpose than shredding and chipping yard gardening products.It is designed for this use only and any other use may cause injury.
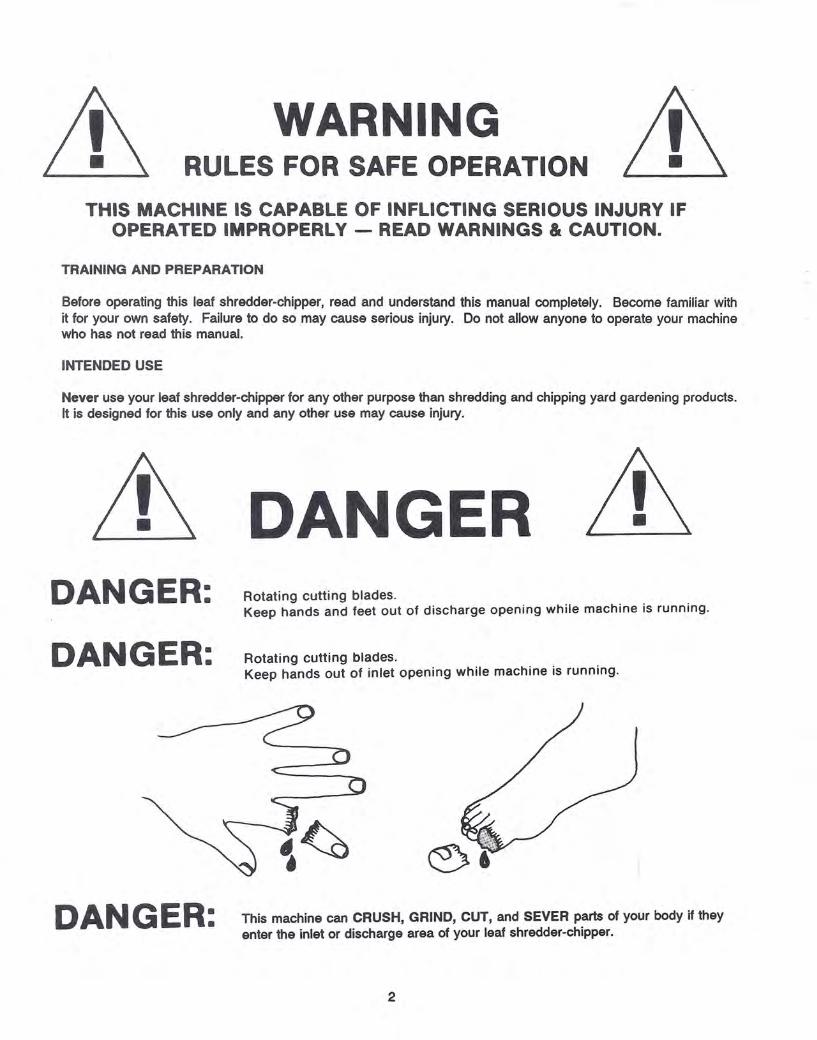
DANGERDANGER: Rotating cutting blades.
Keep hands and feet out of discharge opening while machine is running.
DANGER: Rotating cutting blades.Keep hands out of inlet opening while machine is running.
DANGER: This machine can CRUSH, GRIND, CUT, and SEVER parts of your body if theyenter the inlet or discharge area of your leaf shredder-chipper.
2
SAFETY RULES
WARNING: TO REDUCE THE POTENTIAL FOR ANY INJURY, COMPLY WITH THE FOLLOWINGSAFETY INSTRUCTIONS. FAILURE TO COMPLY WITH THE INSTRUCTIONS MAY RESULT INPERSONAL INJURY.
TRAINING
Read this owner's manual carefully in its entirety before attempting to assemble or operate this machine. Be completely familiarwith the controls and the proper use of this machine before operating it. Keep this manual in a safe place for future and regularreference and for ordering replacement parts.
OPERATOR'S RESPONSIBILITY
Never allow children to operate your leaf shredder-chipper, nor adults lacking the proper instructions. Keep children, pets, andbystanders a minimum of 20 feet away from your work area. Flying chips can be hazardous.Never run this machine in an enclosed area since the exhaust from the engine contains carbon monoxide which is an odorless,tasteless, and deadly poisonous gas.Never run this machine on cement or blacktop. This machine should be operated ONLY on a level earthen surface.Never put your hands, feet, face, or any other part of your body in the feed hopper .ordischarge area.Never remove the plastic shield attached to the shredding hopper. This device prevents flybackand must be intactat all times.This is a protective guard.Never operate your leaf shredder-chipper while under the influence ot.alcohol, drugs, or medication. A clear mind is essentialfor safety.Never allow a person who is .tired .or otherwise not alert to operate this machine.
SAFETY WEAR
Never wear loose clothing or jewelry that can be caught by moving parts of your leaf Shredder-chipper and pull you into it. Keepall clothing away from moving parts. Wear proper head gear to keep hair away from moving parts.Always wear safety-glasses provided-with your-unlt-and-work-qloves-at-all times wl"lile-operating-your-leaf-shredder-chippeLA chip could fly out and hit you in the eye. Be sure your glasses fit properly and your gloves do not have loose cuffs or drawstrings.Always wear ear protectors at all times while operating your leaf shredder-chipper. The noise of this machine could result inhearing loss.
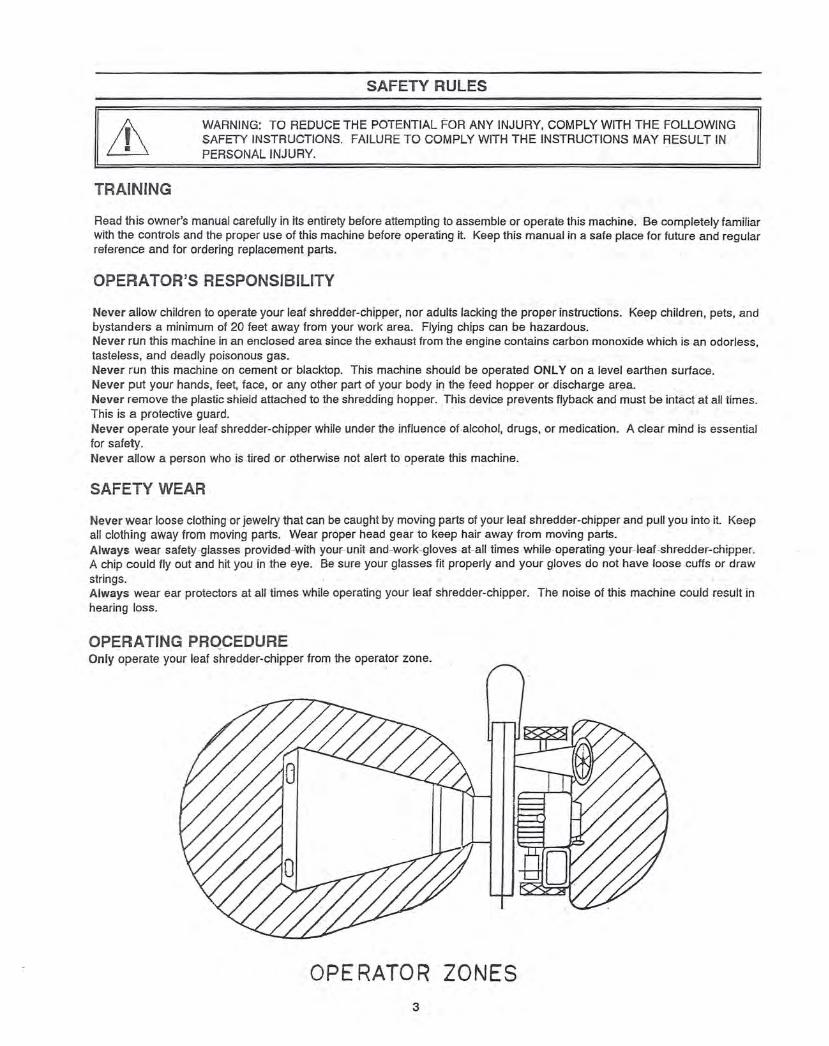
OPERATING PRQCEDUREOnly operate your leaf shredder-chipper from the operator zone.
OPERATOR ZONES3
Know how to turn the unit off.
Never clear discharge area with hands, feet, or any other part of your body.
Never clear discharge area while unit is running. After leaf shredder-chipper is shut off, then use a longhandle tool to clear area.
Never move your leaf shredder-chipper or leave it unattended with the engine running.
OPERATE IN SAFE ENVIRONMENT
Never operate your leaf shredder-chipper on slippery, wet, muddy, or icy surfaces. Safe footing isessential in preventing accidents.
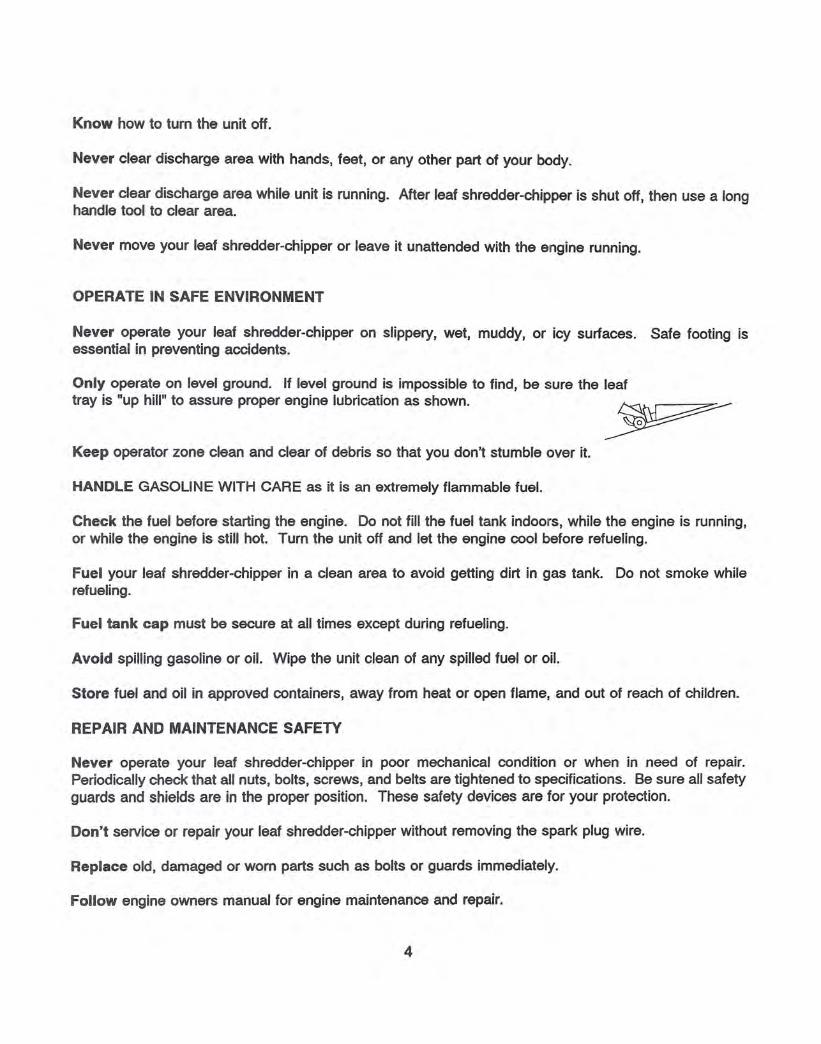
Only operate on level ground. If level ground is impossible to find, be sure the leaftray is "up hill" to assure proper engine lubrication as shown.
Keep operator zone clean and clear of debris so that you don't stumble over it.
HANDLE GASOLINE WITH CARE as it is an extremely flammable fuel.
Check the fuel before starting the engine. Do not fill the fuel tank indoors, while the engine is running,or while the engine is still hot. Turn the unit off and let the engine cool before refueling.
Fuel your leaf shredder-chipper in a clean area to avoid getting dirt in gas tank. Do not smoke whilerefueling.
Fuel tank cap must be secure at all times except during refueling.
Avoid spilling gasoline or oil. Wipe the unit clean of any spilled fuel or oil.
Store fuel and oil in approved containers, away from heat or open flame, and out of reach of children.
REPAIR AND MAINTENANCE SAFETY
Never operate your leaf shredder-chipper in poor mechanical condition or when in need of repair.Periodically check that all nuts, bolts, screws, and belts are tightened to specifications. Be sure all safetyguards and shields are in the proper position. These safety devices are for your protection.
Don't service or repair your leaf shredder-chipper without removing the spark plug wire.
Replace old, damaged or worn parts such as bolts or guards immediately.
Follow engine owners manual for engine maintenance and repair.
4
If it is necessary for any reason to inspect or repair the feed hopper or any part of the machine wherea moving part can come in contact with your body or clothing, stop the machine, allow it to cool,disconnect the spark plug wire from the spark plug and move it away from the spark plug beforeattempting such inspection or repair.
OPERATION
Whenever you operate your leaf shredder-chipper, wearing gloves and safety glasses is required. Ifnecessary to push material into shredding chamber, use a wood stick, never hands or steel implements.At the end of this section we offer additional cautions. Read and observe them.
The operation of any leaf shredder-chipper can result in foreign objectsbeing thrown into the eyes, which can result in -severe eye damage. Alwayswear the safety glasses provided with the leaf shredder-chipper or eyeshields before chipping or shredding, or while performing any adjustmentsor repairs.
Branches are fed into the chipper chute for chipping ... one at a time if they are thicker than 1"; severaltogether if of smaller diameter. Since the throat opening is 2" for the LSC503; and 3" for the LSC505and LSC508, some side shoots or side branches may have to be trimmed from the main stalk beforechipping. Short stubs of branches may be pushed through the chipper section with the next branch.Never assume you know where the blade is and try to push short branches in by hand. You don't knowwhere it is. Be safe, keep your hands away from the chipping blade.
(1) When feeding material into this equipment be careful that pieces of metal, glass, rocks, cans orother non-organic or foreign objects are not included.
(2) When shredding newspaper-only-shred one sheet ata time. Putting entire sections in coulddamage the rotor.
(3) Do not allow an accumulation of processed material to build up under the discharge of the leafshredder-chipper as this can prevent following shredded material to discharge and will result inclogging. Use a long handled stick or spade to remove processed material build-up. DO NOTUSE YOUR HAND OR FOOT. Always shut the unit off before clearing build-up.
(4) Never allow your hands or any part of your body or clothing inside the feed hopper or dischargearea of the leaf shredder-chipper .. Use a wooden stick to push material down the hopper.
(5) Keep all protective guards on the machine in place and in good working condition.
(6) Always stand clear of the discharge areawhen.the shredder is running.
(7) Keep your face and body away from the feed hopper to avoid being struck by any material thatmay bounce back. Do not overreach, keep proper balance and footing.
(8) Do not transport the shredder while the engine is running.
(9) Do not refuel the engine while it is hot, warm, or running: •
(10) Do not cover the machine while the muffler is still hot.
(11) The engine must be kept clear of debris and other accumulations.
5
WARNING: This unit is equipped with an internal combustion engine and should not be used on or nearany unimproved forest-covered, brush-covered or grass-covered land unless the engine's exhaust systemis equipped with a spark arrester meeting applicable local or state laws (if any). If a spark arrester isused, it should be maintained in effective working order by the operator.
In the State of California, the above is required by law (Section 4442 of the California Public ResourcesCode). Other states may have similar laws. Federal laws apply on federal lands. A spark arrester forthe muffler is available through your Briggs & Stratton, or Tecumseh servicing dealer.
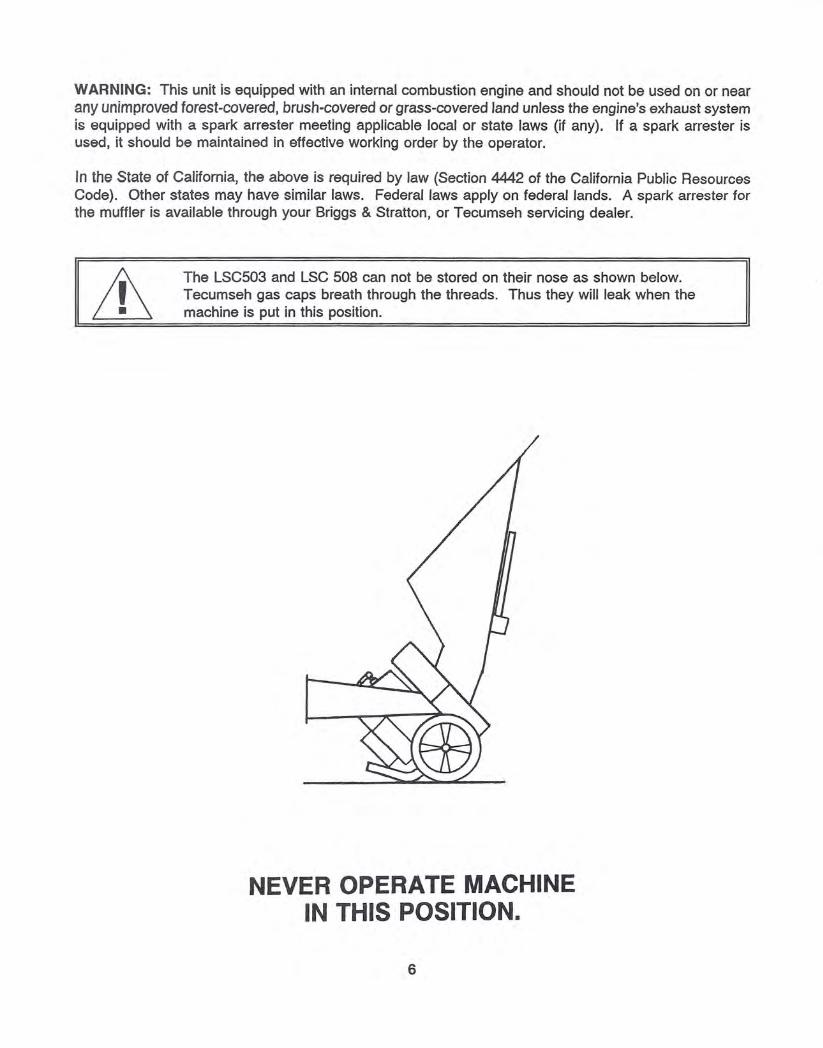
The LSC503 and LSC 508 can not be stored on their nose as shown below.Tecumseh gas caps breath through the threads. Thus they will leak when themachine is put in this position.
NEVER OPERATE MACHINEIN THIS POSITION.
6
ASSEMBl Y INSTRUCTIONS MODEL lSC505
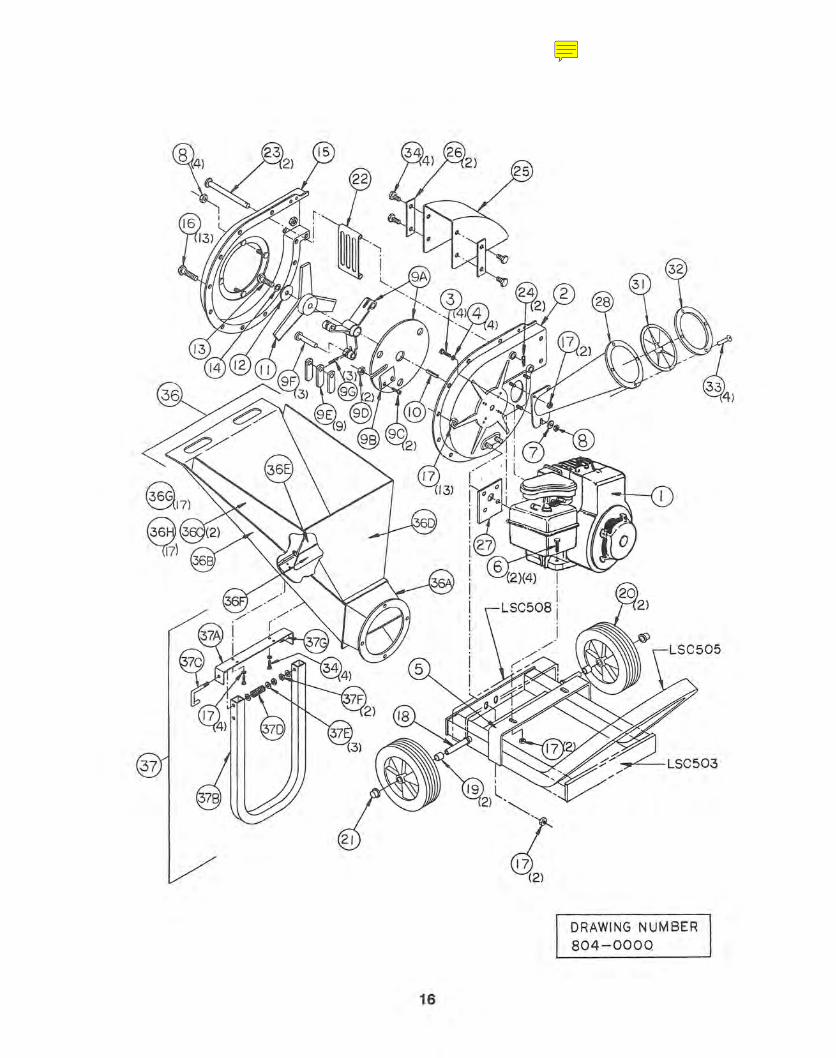
Your leaf shredder-chipperhas been shipped with the basic unit completely assembled, leaving only thedischarge cover and feed hopper assembly. Before beginning assembly, make sure all parts have beenreceived and are in good condition. If there are shortages or damages, file a claim with the deliverycompany immediately.. . .(NOTE: In the foHowing instructions, the "item"number refers to the part number on page 16. Also notefor exact hardware sizes, check the parts list on page 17. Drawing number 804-0000 will help preventany incorrect use of hardware in assembly.
HOW TO SET UP YOUR LEAF SHREDDER-CHIPPER
MAKE CERTAIN THE SPARKPLUG WIRE IS DISCONNECTED AND MOVEDAWAY FROM THE SPARK PLUG BEFORE ASSEMBLING THE LEAFSH REDDER-CH IPPER.
Figure 1
HopperAssembly
Attaching the Feed Hopper Assembly
(1)(2)(3)
,..
Remove the basic unit;' hopper assembly anddischarqecover from, the carton.Tilt basic unit up onto front bumper. . .. .' .., 'Place feed hopper assembly onto the four threaded studs and secure in place with four lock nutsprovided. Tighten securely. Be careful not to over-tighten. Over-tightening wi" break off the stud.
" ,
Attaching the Discharge Cover STRAP-"""""
Figure 29r6"':18X~'HEX_
HD CAP SCREW
(1) Lower kick stand and put entire unit into upriqht position.(2) Install one side of discharge cover at a time by inserting a 5/16"-18 x 3/4" hex head screw
through the black metal strap and through the rubber cover and tighten. Be sure the grooved. side of rubber discharge is to the inside.
(3) Repeat step 2 with bottom screw.(4) Push top tab of rubber discharge cover inside metal housing.(5) Continue to wrap discharge cover around and line up two remaining holes. Insert hex head
screws through black metal strap and rubber discharge cover and tighten securely.7
ATTACHING THE CATCHER BAG
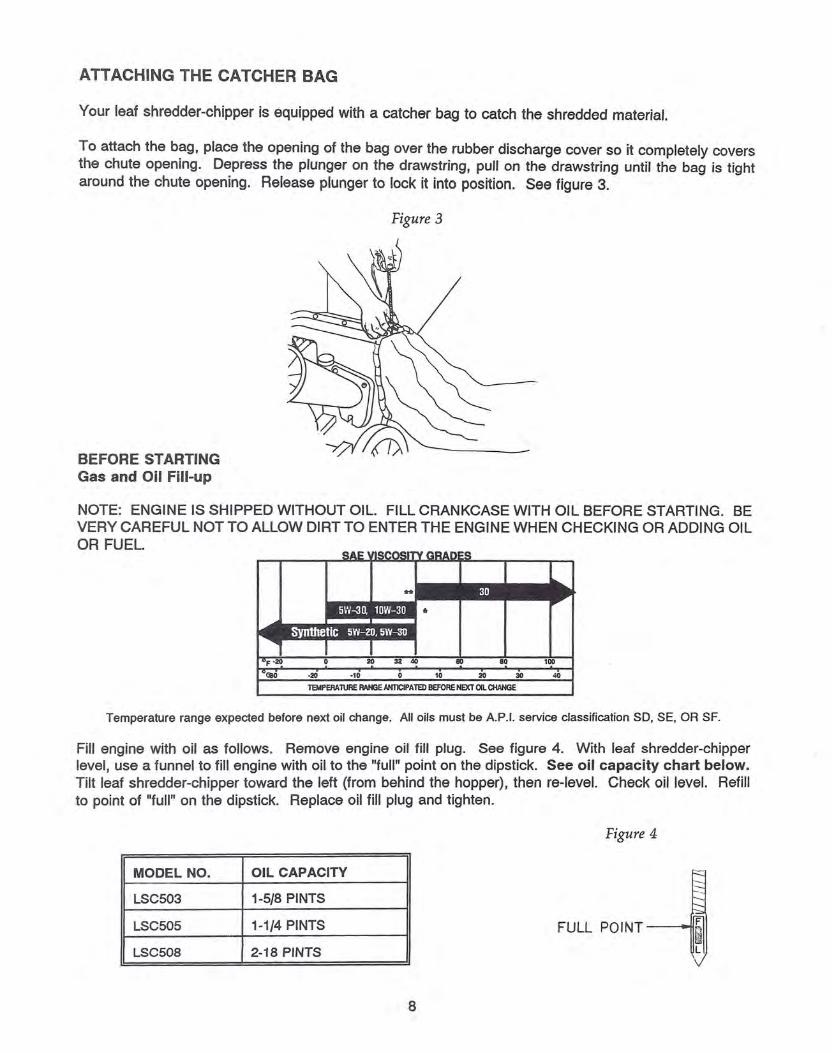
Your leaf shredder-chipper is equipped with a catcher bag to catch the shredded material.
To attach the bag, place the opening of the bag over the rubber discharge cover so it completely coversthe chute opening. Depress the plunger on the drawstring, pull on the drawstring until the bag is tightaround the chute opening. Release plunger to lock it into position. See figure 3.
Figure 3
BEFORE STARTINGGas and Oil Fill-up
NOTE: ENGINE IS SHIPPED WITHOUT OIL. FILL CRANKCASE WITH OIL BEFORE STARTING. BEVERY CAREFUL NOT TO ALLOW DIRT TO ENTER THE ENGINE WHEN CHECKING OR ADDING OILOR FUEL.
32 40 110 80 100
·20 ·10 0 10 20 30 40
lBoIPERAlURE RANGE ANTlCIPA TED BEFORE NEXT OIl CHANGE
Temperature range expected before next oil change. All oils must be A.P.1. service classification SO, SE, OR SF.
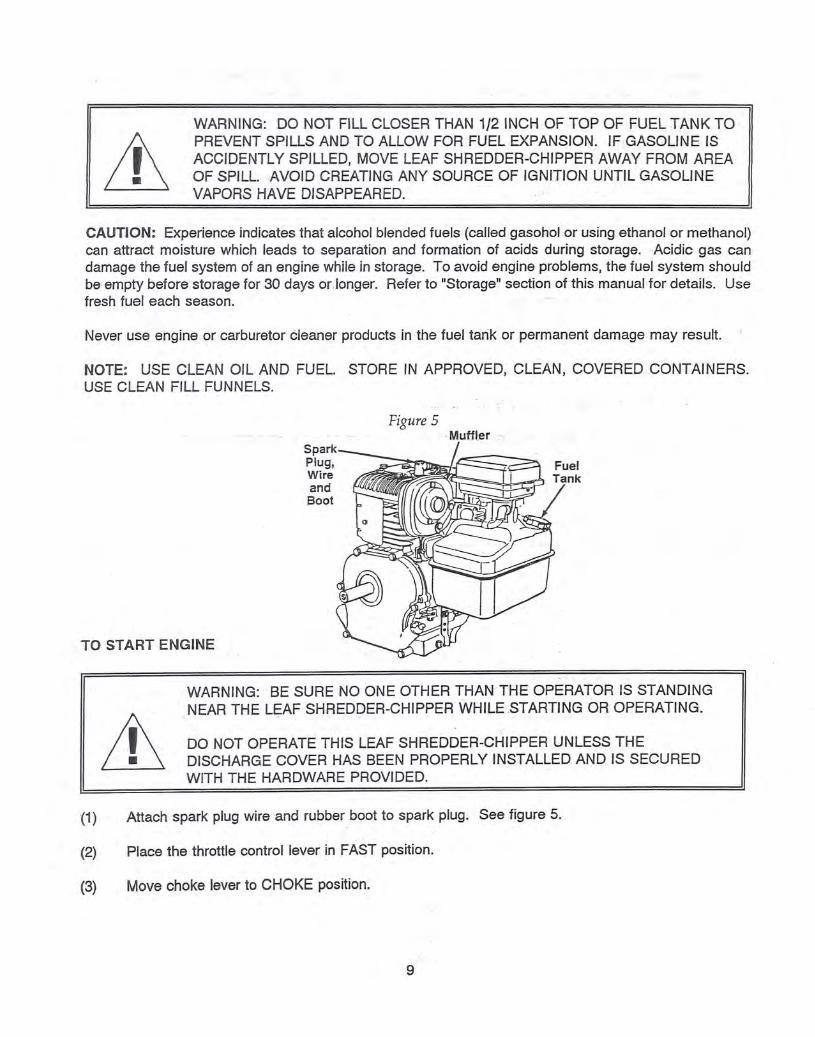
Fill engine with oil as follows. Remove engine oil fill plug. See figure 4. With leaf shredder-chipperlevel, use a funnel to fill engine with oil to the "full" point on the dipstick. See oil capacity chart below.Tilt leaf shredder-chipper toward the left (from behind the hopper), then re-level. Check oil level. Refillto point of "full" on the dipstick. Replace oil fill plug and tighten.
Figure 4
MODEL NO. Oil CAPACITY
LSC503 1-5/8 PINTS
LSC505 . 1-1/4 PINTS
LSC508 2-18 PINTS
FULL POINT-----'l
8
WARNING: DO NOT FILL CLOSER THAN 1/2 INCH OF TOP OF FUEL TANK TOPREVENT SPILLS AND TO ALLOW FOR FUEL EXPANSION. IFGASOLINE ISACCIDENTLY SPILLED, MOVE LEAF SHREDDER-CHIPPER AWAY FROM AREAOF SPILL. AVOID CREATING ANY SOURCE OF IGNITION UNTIL GASOLINEVAPORS HAVE DISAPPEARED.
CAUTION: Experience indicates that alcohol blended fuels (called gasohol or using ethanol or methanol)can attract moisture which leads to separation and formation of acids during storage. -Acidic gas candamage the fuel system of an engine while in storage. To avoid engine problems, the fuel system shouldbe-empty before storage for 30 days or.lonqer, Refer to "Storage" section of this manual for details. Usefresh fuel each season.
Never use engine or carburetor Cleaner products in the fuel tank or permanent damage may result.
NOTE: USE CLEAN OIL AND FUEL. STORE IN APPROVED, CLEAN, COVERED CONTAINERS.USE CLEAN FILL FUNNELS.
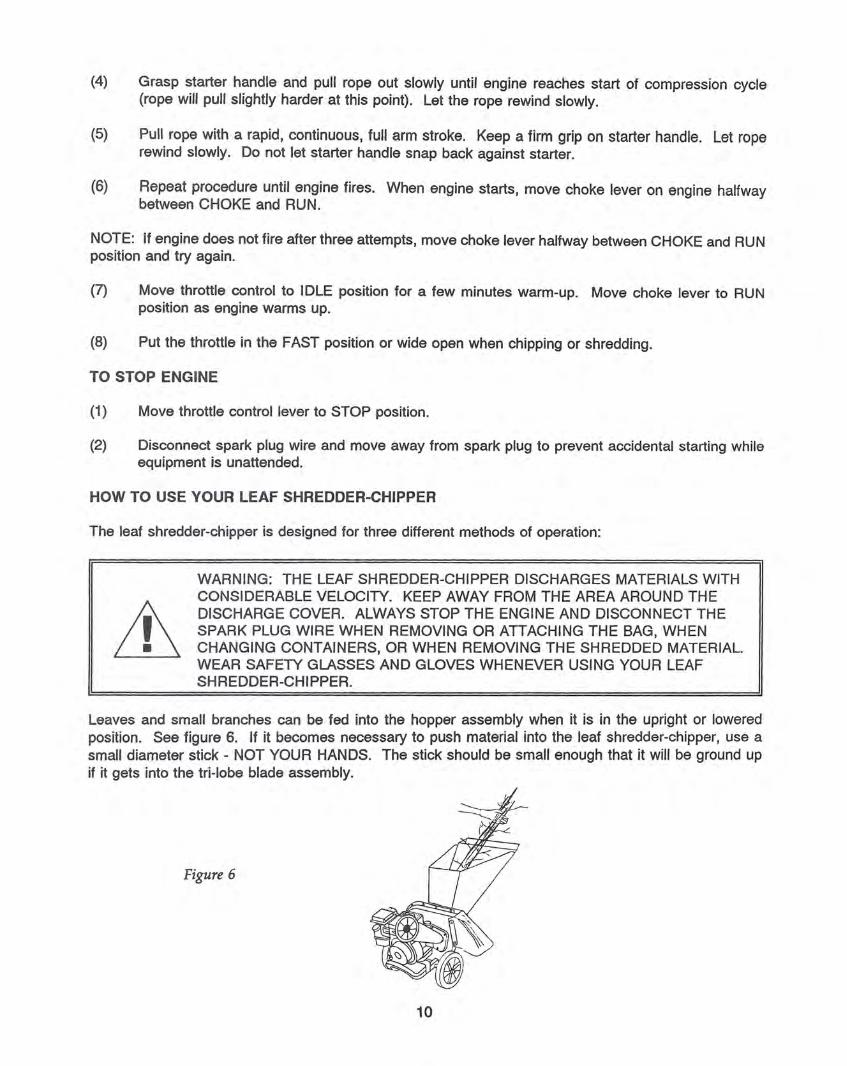
Figure 5Muffler
SparkPlug,WireandBoot
TO START ENGINE
WARNING: BE SURE NO ONE OTHER THAN THE OPERATOR IS STANDINGNEAR THE U~AF SHREDDER-CHIPPER WHILE STARTING OR OPERATING.
DO NOT OPERATE THIS LEAF SHREDDER-CHIPPER UNLESS THEDISCHARGE COVER HAS BEEN PROPERLY INSTALLED AND IS SECUREDWITH THE HARDWARE PROVIDED.
(1) Attach spark plug wire and rubber boot to spark plug. See figure 5.
(2) Place the throttle control lever in FAST position.
(3) Move choke lever to CHOKE position.
9
(4) Grasp starter handle and pull rope out slowly until engine reaches start of compression cycle(rope will pull slightly harder at this point). Let the rope rewind slowly.
(5) Pull rope with a rapid, continuous, full arm stroke. Keep a firm grip on starter handle. Let roperewind slowly. Do not let starter handle snap back against starter.
(6) Repeat procedure until engine fires. When engine starts, move choke lever on engine halfwaybetween CHOKE and RUN.
NOTE: If engine does not fire after three attempts, move choke lever halfway between CHOKE and RUNposition and try again.
(7) Move throttle control to IDLE position for a few minutes warm-up. Move choke lever to RUNposition as engine warms up.
(8) Put the throttle in the FAST position or wide open when chipping or shredding.
TO STOP ENGINE
(1) Move throttle control lever to STOP position.
(2) Disconnect spark plug wire and move away from spark plug to prevent accidental starting whileequipment is unattended.
HOW TO USE YOUR LEAF SHREDDER-CHIPPER
The leaf shredder-chipper is designed for three different methods of operation:
LhWARNING: THE LEAF SHREDDER-CHIPPER DISCHARGES MATERIALS WITHCONSIDERABLE VELOCITY. KEEP AWAY FROM THE AREA AROUND THEDISCHARGE COVER. ALWAYS STOP THE ENGINE AND DISCONNECT THESPARK PLUG WIRE WHEN REMOVING OR ATTACHING THE BAG, WHENCHANGING CONTAINERS, OR WHEN REMOVING THE SHREDDED MATERIAL.WEAR SAFETY GLASSES AND GLOVES WHENEVER USING YOUR LEAFSHREDDER-CHI PPER.
Leaves and small branches can be fed into the hopper assembly when it is in the upright or loweredposition. See figure 6. If it becomes necessary to push material into the leaf shredder-chipper, use asmall diameter stick - NOT YOUR HANDS. The stick should be small enough that it will be ground upif it gets into the tri-Iobe blade assembly.
Figure 6
10
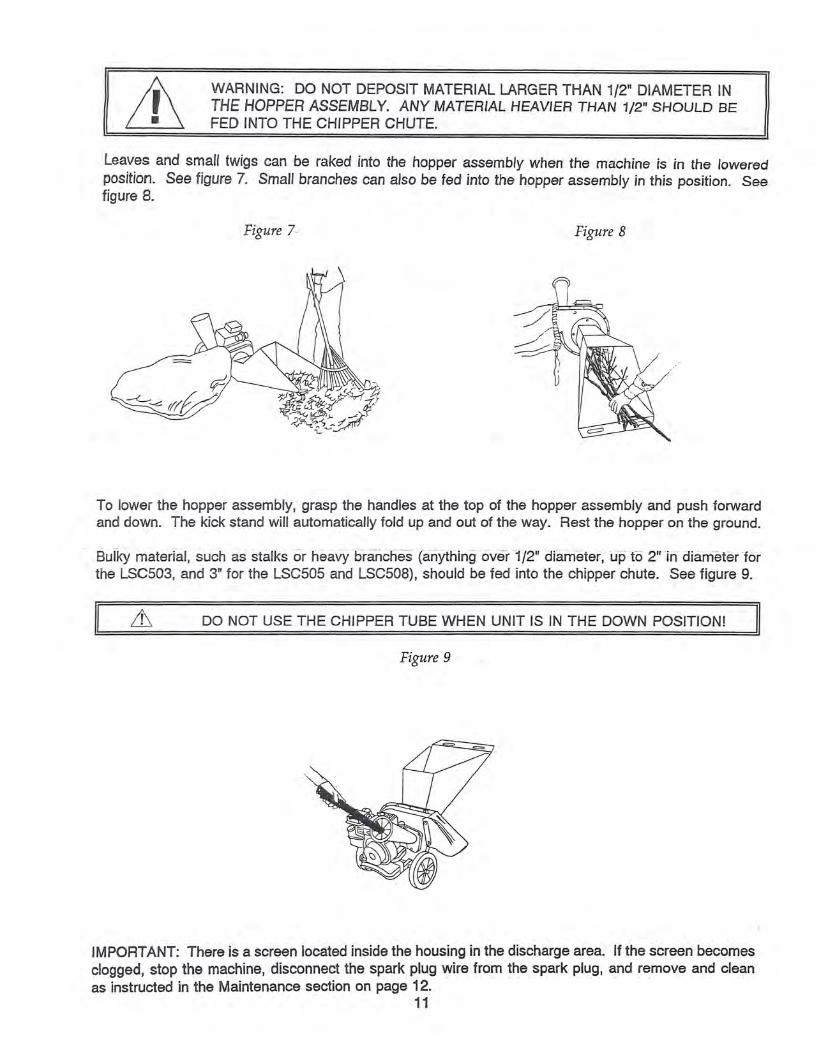
WARNING: DO NOT DEPOSIT MATERIAL LARGER THAN 1/2" DIAMETER INTHE HOPPER ASSEMBLY. ANY MATERIAL HEAVIER THAN 1/2" SHOULD BEFED INTO THE CHIPPER CHUTE.
Leaves and small twigs can be raked into the hopper assembly when the machine is in the loweredposition. See figure 7. Small branches can also be fed into the hopper assembly in this position. Seefigure 8.
Figure 7~ Figure 8
To lower the hopper assembly, grasp the handles at the top of the hopper assembly and push forwardand down. The kick stand will automatically fold up and out of the way. Rest the hopper on the ground.
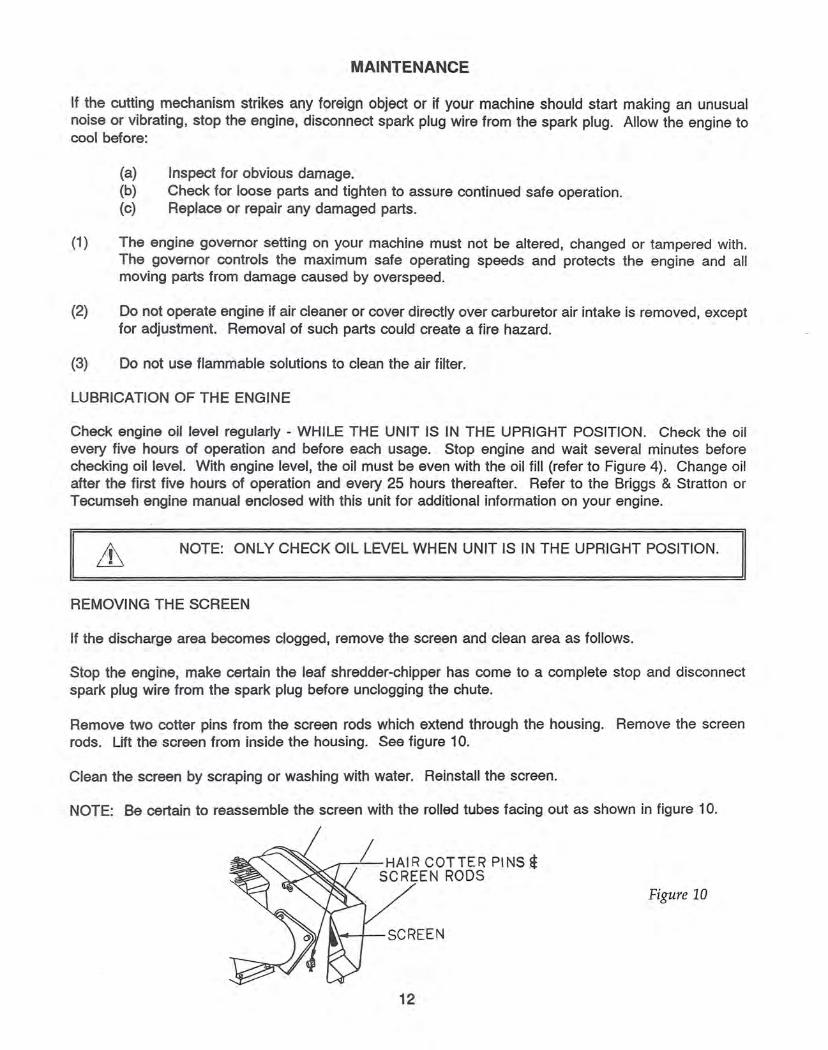
Bulky material, such asstalks or heavy branches (i:iriYthin~fover-1/2" diameter, upto 2"-indianieter-forthe LSC503, and 3" for the LSC505 and LSC508), should be fed into the chipper chute. See figure 9.
DO NOT USE THE CHIPPER TUBE WHEN UNIT IS IN THE DOWN POSITION!
Figure 9
IMPORTANT: There is a screen located inside the housing in the discharge area. If the screen becomesclogged, stop the machine, disconnect the spark plug wire from the spark plug, and remove and cleanas instructed in the Maintenance section on page 12.
11
MAINTENANCE
If the cutting mechanism strikes any foreign object or if your machine should start making an unusualnoise or vibrating, stop the engine, disconnect spark plug wire from the spark plug. Allow the engine tocool before:
(a) Inspect for obvious damage.(b) Check for loose parts and tighten to assure continued safe operation.(c) Replace or repair any damaged parts.
(1) The engine governor setting on your machine must not be altered, changed or tampered with.The governor controls the maximum safe operating speeds and protects the engine and allmoving parts from damage caused by overspeed.
(2) Do not operate engine if air cleaner or cover directly over carburetor air intake is removed, exceptfor adjustment. Removal of such parts could create a fire hazard.
(3) Do not use flammable solutions to clean the air filter.
LUBRICATION OF THE ENGINE
Check engine oil level regularly - WHILE THE UNIT IS IN THE UPRIGHT POSITION. Check the oilevery five hours of operation and before each usage. Stop engine and wait several minutes beforechecking oil level. With engine level, the oil must be even with the oil fill (refer to Figure 4). Change oilafter the first five hours of operation and every 25 hours thereafter. Refer to the Briggs & Stratton orTecumseh engine manual enclosed with this unit for additional information on your engine.
NOTE: ONLY CHECK OIL LEVEL WHEN UNIT IS IN THE UPRIGHT POSITION.
REMOVING THE SCREEN
If the discharge area becomes clogged, remove the screen and clean area as follows.
Stop the engine, make certain the leaf shredder-chipper has come to a complete stop and disconnectspark plug wire from the spark plug before unclogging the chute.
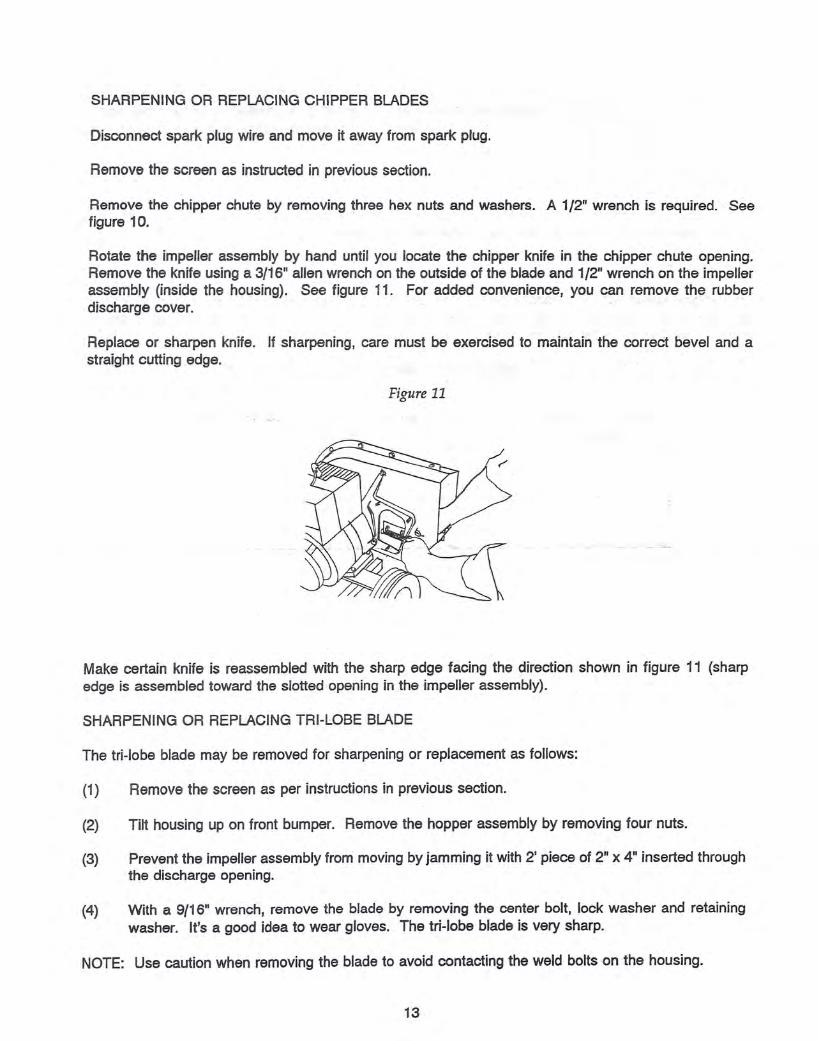
Remove two cotter pins from the screen rods which extend through the housing. Remove the screenrods. Lift the screen from inside the housing. See figure 10.
Clean the screen by scraping or washing with water. Reinstall the screen.
NOTE: Be certain to reassemble the screen with the rolled tubes facing out as shown in figure 10.
__-,I-HAIR COTTER PINS~SCREEN RODS
Figure 10
1l\4--+--SCREEN
12
SHARPENING OR REPLACING CHIPPER BLADES
Disconnect spark plug wire and move it away from spark plug.
Remove the screen as instructed in previous section.
Remove the chipper chute by removing three hex nuts and washers. A 1/2" wrench is required. Seefigure 10.
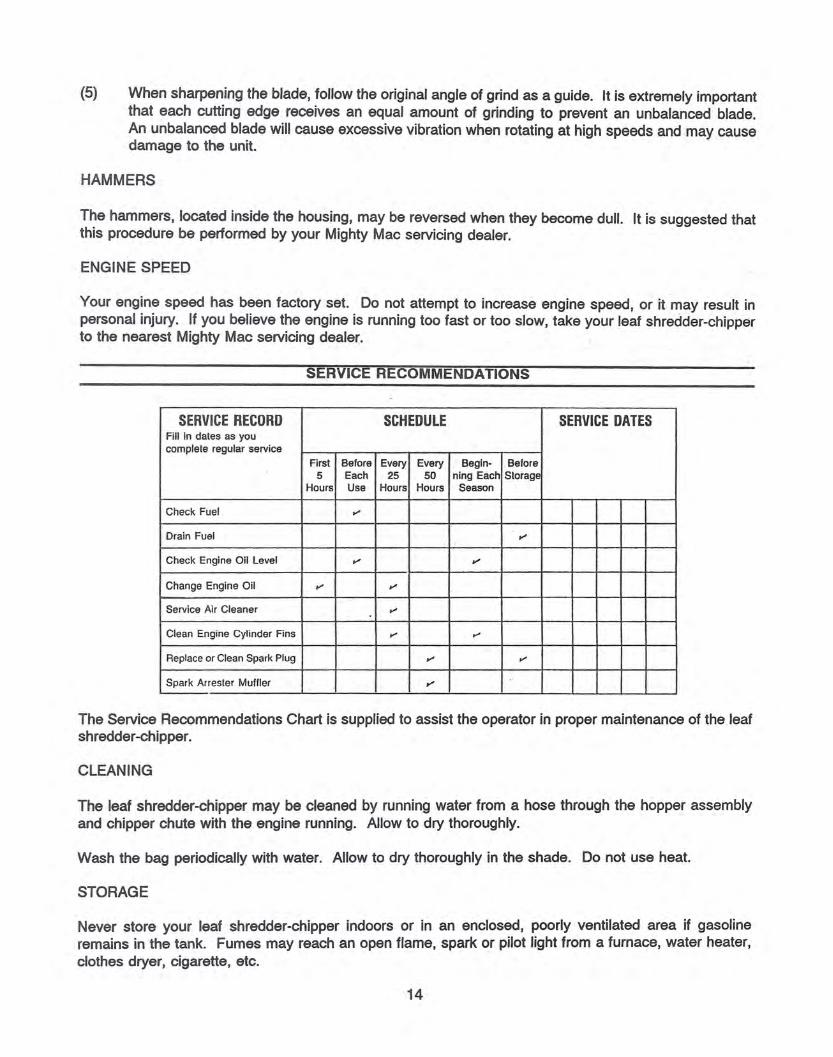
Rotate the impeller assembly by hand until you locate the chipper knife in the chipper chute opening.Remove the knife using a 3/16" allen wrench on the outside of the blade and 1/2" wrench on the impellerassembly (inside the housing). See figure 11. For added convenience, you can remove the rubberdischarge cover. . .
Replace or sharpen knife. If sharpening, care must be exercised to maintain the correct bevel and astraight cutting edge.
Figure 11
Make certain knife is reassembled with the sharp edge facing the direction shown in figure 11 (sharpedge is assembled toward the slotted opening in the impeller assembly).
SHARPENING OR REPLACING TRI-LOBE BLADE
The tri-Iobe blade may be removed for sharpening or replacement as follows:
(1) Remove the screen as per instructions in previous section.
(2) Tilt housing up on front bumper. Remove the hopper assembly by removing four nuts.
(3) Prevent the impeller assembly frorri moving by jamming it with 2' piece of 2" x 4" inserted throughthe discharge opening.
(4) With a 9/16" wrench, remove the blade by removing the center bolt, lock washer and retainingwasher. It's a good idea to wear gloves. The tri-Iobe blade is very sharp.
NOTE: Use caution when removing the blade to avoid contacting the weld bolts on the housing.
13
(5) When sharpening the blade, follow the original angle of grind as a guide. It is extremely importantthat each cutting edge receives an equal amount of grinding to prevent an unbalanced blade.An unbalanced blade will cause excessive vibration when rotating at high speeds and may causedamage to the unit.
HAMMERS
The hammers, located inside the housing, may be reversed when they become dull. It is suggested thatthis procedure be performed by your Mighty Mac servicing dealer.
ENGINE SPEED
Your engine speed has been factory set. Do not attempt to increase engine speed, or it may result inpersonal injury. If you believe the engine is running too fast or too slow, take your leaf shredder-chipperto the nearest Mighty Mac servicing dealer.
SERVICE RECOMMENDATIONS
SERVICE RECORD SCHEDULE SERVICE DATESFill in dates as youcomplete regular service
First Before Every Every Begin· Before5 Each 25 50 ning Each Storage
Hours Use Hours Hours Season
Check Fuel ~
Drain Fuel ~
Check Engine Oil Level ~ ~
Change Engine Oil ~ ~
Service Air Cleaner ~
Clean Engine Cylinder Fins ~ ~
Replace or Clean Spark Plug ~ ~
Spark Arrester Muffler Y'
The Service Recommendations Chart is supplied to assist the operator in proper maintenance of the leafshredder-chipper.
CLEANING
The leaf shredder-chipper may be cleaned by running water from a hose through the hopper assemblyand chipper chute with the engine running. Allow to dry thoroughly.
Wash the bag periodically with water. Allow to dry thoroughly in the shade. Do not use heat.
STORAGE
Never store your leaf shredder-chipper indoors or in an enclosed, poorly ventilated area if gasolineremains in the tank. Fumes may reach an open flame, spark or pilot light from a furnace, water heater,clothes dryer, cigarette, etc.
14
When not in use, your leaf shredder-chipper should be stored out of reach of children with the spark plugwire removed. For long periods of storage (over winter), gasoline stabilizer (Le. STABIL) should beadded to fuel tank and engine should be run for a short time to circulate additive through carburetor.Fuel should then be drained from the fuel tank. Always allow the engine to cool before storing orcovering.
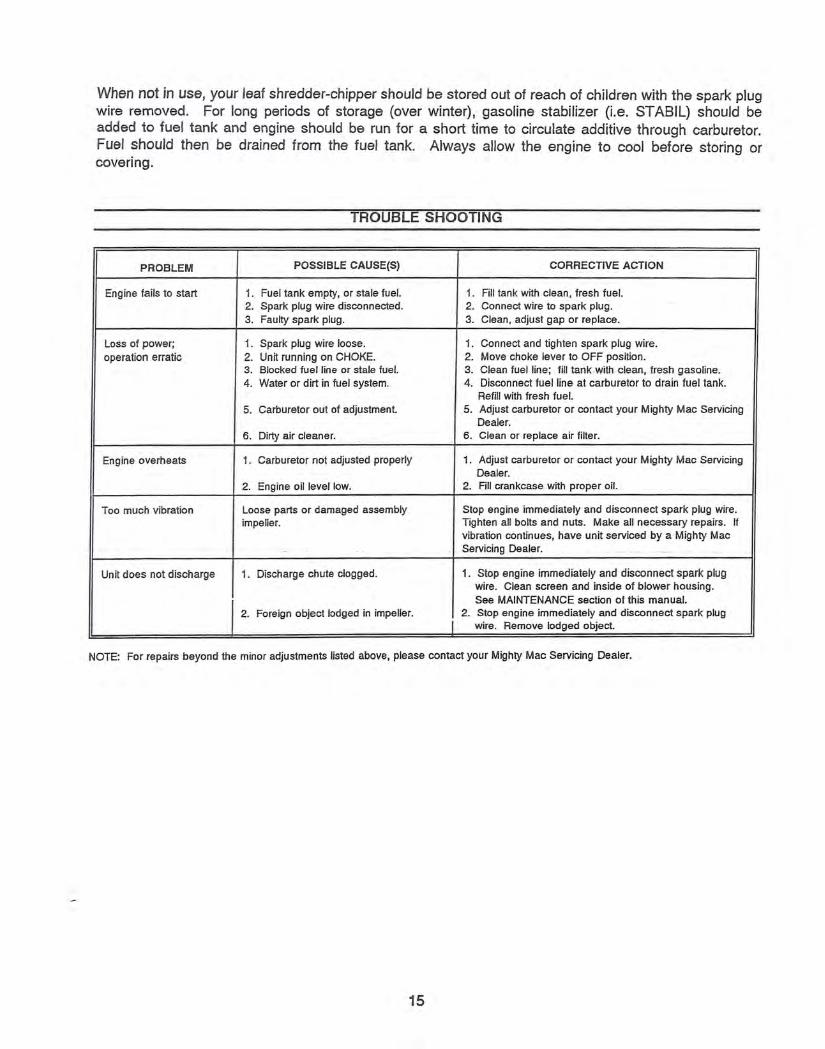
TROUBLE SHOOTING
PROBLEM POSSIBLE CAUSE(S) CORRECTIVE ACTION
Engine fails to start 1. Fuel tank empty, or stale fuel. 1. Fill tank with clean, fresh fuel.2. Spark plug wire disconnected. 2. Connect wire to spark plug.3. Faulty spark plug. 3. Clean, adjust gap or replace.
Loss of power; 1. Spark plug wire loose. 1. Connect and tighten spark plug wire.operation erratic 2. Unit running on CHOKE. 2. Move choke lever to OFF position.
3. Blocked fuel line or stale fuel. 3. Clean fuel line; fill tank. with clean, fresh gasoline.4. Water or dirt in fuel system. 4. Disconnect fuel line at carburetor to drain fuel tank.
Refill with fresh fuel.5. Carburetor out of adjustment. 5. Adjust carburetor or contact your Mighty Mac Servicing
Dealer.6. Dirty air cleaner. 6. Clean or replace air filter.
Engine overheats 1. Carburetor not adjusted properly 1. Adjust carburetor or contact your Mighty Mac ServicingDealer.
2. Engine oil level low. 2. Fill crankcase with proper oil.
Too much vibration Loose parts or damaged assembly Stop engine immediately and disconnect spark plug wire.impeller. Tighten all bolts and nuts. Make all necessary repairs. If
vibration continues, have unit serviced by a Mighty Mac.- Servicing Dealer. ". ---- --
Unit does not discharge 1. Discharge chute clogged. 1. Stop engine immediately and disconnect spark plugwire. Clean screen and inside of blower housing.See MAINTENANCE section of this manual.
2. Foreign object lodged in impeller. 2. Stop engine immediately and disconnect spark plugwire. Remove lodged object.
NOTE: For repairs beyond the minor adjustments listed above, please contact your Mighty Mac Servicing Dealer.
15
37
25
LSC505
-",""-LSC503
21
DRAWING NUMBER804-0000
16
sales3
Note
DB First manufactured in 1992, in 1996 design changes were made, some parts may be N/A
13 5/16-18 x S/8" HHCS, GRS, Pltd.23 5/16-18 Whiz Lock Nut, Pltd.1 Axle (LSCS03 and LSCSOS)2 Axle Spacer (LSCS03 and LSC505)2 Axle Spacer (LSCS08)2 Wheels 10" Dia. x 1-3/4" Wide (L-Sc:;~Q9 a.OdLSCSO~)2 Wheels 4.10" x 3.S0" x 4" (LSCS08)2 Push Nut Cap S/8" Dia. Shaft1 Shredder Screen2 Screen Rod2 Hair Cotter Pin1 Discharge Cover2 Strap1 Engine to Housing Spacer (LSC508)1 Chipper Chute Weldment1 Chipper Chute Cover1 Mounting Flange4 3/16" x .402 Alum Pop Rivet8 S/16-18 x 3/4" HHCS1 Hopper Assembly (includes 36A through 36H)1 Hopper Nose Weldment1 Hopper Base2 Hopper Sides1 Hopper Front1 Hopper Baffle Weldment1 Hopper Blowback Shield
17 1/4-20 x 1/2" HHCS, Blk.17 1/4-20 Whiz Lock Nut1 Kick Stand Assembly (includes 37A through 37G)1 Bracket1 Leg Stand1 J-Bolt1 Spring3 3/8" Flatwasher, Pltd.2 3/8"-16 Nylon Insert Locknut•.Pltd.1 3/8-16 x 2" HHCS, GRS, Pltd.1 Nylon Knit Bag
17
LIMITED WARRANTY
Any Mighty Mac product manufactured by MacKissic, Inc. and found, in the judgment of MacKissic, Inc. tobe defective in material or workmanship, will be repaired or replaced by an Authorized Mighty Mac Service Dealerwithout charge for parts and labor.
The Mighty Mac product including any. defective part must be returned to an Authorized Service Dealerwithin the warranty period. The expense of delivering the product to the dealer for warranty work and the expenseof returning it back to the owner after repair or replacement will be borne by the owner. MacKissic's responsibilityis limited to making the required repairs or replacements only. No claim of breach of warranty shall be cause forcancellation or rescission of the sales contract of any Mighty Mac product. Proof of purchase will be required bythe dealer to substantiate any warranty claim. All warranty work must be performed by an Authorized ServiceDealer.
This warranty is limited to five years from the date of original retail purchase for any Mighty Mac productthat is used for consumer purposes or 90 days for commercial and rental use.
This warranty does not cover any product that has been subject to misuse, abuse, neglect, negligence, oraccident, or that has been operated in any way contrary to or inconsistent with the operating instructions asspecined in the owner's manual. The warranty does not apply to any damage to the product that is the result ofimproper maintenance, or to any product or parts that have not been assembled or installed as specified in theowner's manual.
The warranty does not cover any product that has been altered or modified. In addition, the warranty doesnot extend to repairs made necessary by normal wear, or by the use of parts or accessories which, in the judqmentof MacKissic, Inc. are either incompatible with Mighty Mac products or adversely affect its operation, performanceor durability. This warranty does not cover engines, electric starters, batteries, and tires which are warrantedseparately by their manufacturer and for a different period of time.
MacKissic, Inc. reserves the right to change the design of any product without assuming any obligation tomodify any product previously manufactured.
THE DURATION OF THE LIMITED WARRANTY IS FIVE YEARS CONSUMER, 90 DAYS COMMERCIALAND RENTAL USE. REPAIR OR REPLACEMENT AS PROVIDED UNDER THIS LIMITED WARRANTY IS THEEXCLUSIVE REMEDY OF THE PURCHASER. MACKISSIC, INC. SHALL NOT BE LIABLE FOR ANYINCIDENTAL OR CONSEQUENTIAL DAMAGES, EXCEPT THE LIMITED WARRANTY DESCRIBED ABOVE, ALLIMPLIED WARRANTIES (MERCHANTABILITY AND FITNESS FOR A PARTICULAR PURPOSE) ARESPECIFICALLY DISCLAIMED. .
MACKISSIC, INC. ASSUMES NO RESPONSIBILITY FOR INCIDENTAL, CONSEQUENTIAL OR OTHERDAMAGES INCLUDING, BUT NOT LIMITED TO, EXPENSE FOR GASOLINE, OIL, EXPENSE OF DELIVERINGTHE PRODUCT TO AN AUTHORIZED SERVICE DEALER AND EXPENSE OF RETURNING IT BACK TO THEOWNER, MECHANIC'S TRAVEL TIME, TELEPHONE OR TELEGRAM CHARGES, RENTALOF A LIKE PRODUCTDURING THE TIME WARRANTY REPAIRS ARE BEING PERFORMED, TRAVEL, LOSS OR DAMAGE TOPERSONAL PROPERTY, LOSS OF REVENUE, LOSS OF USE OF THE PRODUCT, LOSS OF TIME ORINCONVENIENCE.
This warranty gives you specific legal rights, and you may also have other rights which vary from state tostate.
18
LSC503, LSC505, LSC508Operating & Assembly Instructions For