Important: You will need the M4000-PRO’s unique MAC Address and Challenge Key (provided on the 2 labels attached to the cover of the Quick Start Guide which is included in the M4000-PRO packaging). One label is permanently adhered to the Quick Start Guide and the other is removable for your convenience. 1 2 3 WIRING FAULT UNSAFE VOLTAGE BlueBOLT M4000-PRO ENABLED Power Management with Control System Interactive Functionality. • 15 Amp Capacity M4000-PRO • 7 Rear Panel Outlets and One Front Panel Convenience Outlet in 3 Controlable banks • Fully Programmable • BlueBOLT ® Enabled • Linear Filtration with 3 Isolated LiFT Filter Banks, -18.7dB@10kHz, -50.5dB@100kHz, -43.9@1MHz • Rear Panel Circuit Breaker • Removable Front Rack Ears • 12 Volt Input Triggering • Detachable 8 ft. Power Cord • AVM & Protect-or-Disconnect Circuitry M4000-PRO Instructions 10002793-A 1/27/15 B LT Blue ™
Transcript
Important: You will need the M4000-PRO’s unique MAC Address and Challenge Key (provided on the 2 labels attached to the cover of the Quick Start Guide which is included in the M4000-PRO packaging). One label is permanently adhered to the Quick Start Guide and the other is removable for your convenience.
1 2 3
WIRING FAULT
UNSAFE VOLTAGE
BlueBOLTM4000-PRO
ENABLED
Power Management with Control System Interactive Functionality.
• 15 Amp Capacity M4000-PRO • 7 Rear Panel Outlets and One Front Panel Convenience Outlet in 3 Controlable banks
• Fully Programmable
• BlueBOLT® Enabled
• Linear Filtration with 3 Isolated LiFT Filter Banks, -18.7dB@10kHz, -50.5dB@100kHz, -43.9@1MHz
• Rear Panel Circuit Breaker
• Removable Front Rack Ears
• 12 Volt Input Triggering
• Detachable 8 ft. Power Cord
• AVM & Protect-or-Disconnect Circuitry
M4000-PRO Instructions
10002793-A 1/27/15
B LTBlue ™
�
Thank you for purchasing a Panamax M4000-PRO Power Management with control system interactive functionality, and congratulations on your choice.
The M4000-PRO features Panamax’s revolutionary AVM (Automatic Voltage Monitoring) circuit, and our exclusive Linear Filtering Technology (LiFT). To-
gether, these technologies comprise precisely what our customers have come to expect from Panamax: uncompromised AC protection and purification.
Outlet: Rear panel outlets are controlled in three power filtered banks. They are grouped into three (3) switched banks. BlueBOLT™ is included, providing
secure, hosted IP system control and monitoring for the M4000-PRO.
Important Safety Instructions, Front Panel Features Overview..............................................................................................................................pg. 2
Rear Panel Features Overview, Bubble of Protection.......................................................................................................................................... pg. 3
Outlet Sequencing and M4000-PRO Specifications...............................................................................................................................................pg. 5
Diagram to Identify Connected Equipment, Additional Notes................................................................................................................................pg. 6
Advanced Operation, Communication and Messaging Protocol .......................................................................................................................pgs. 7- 13
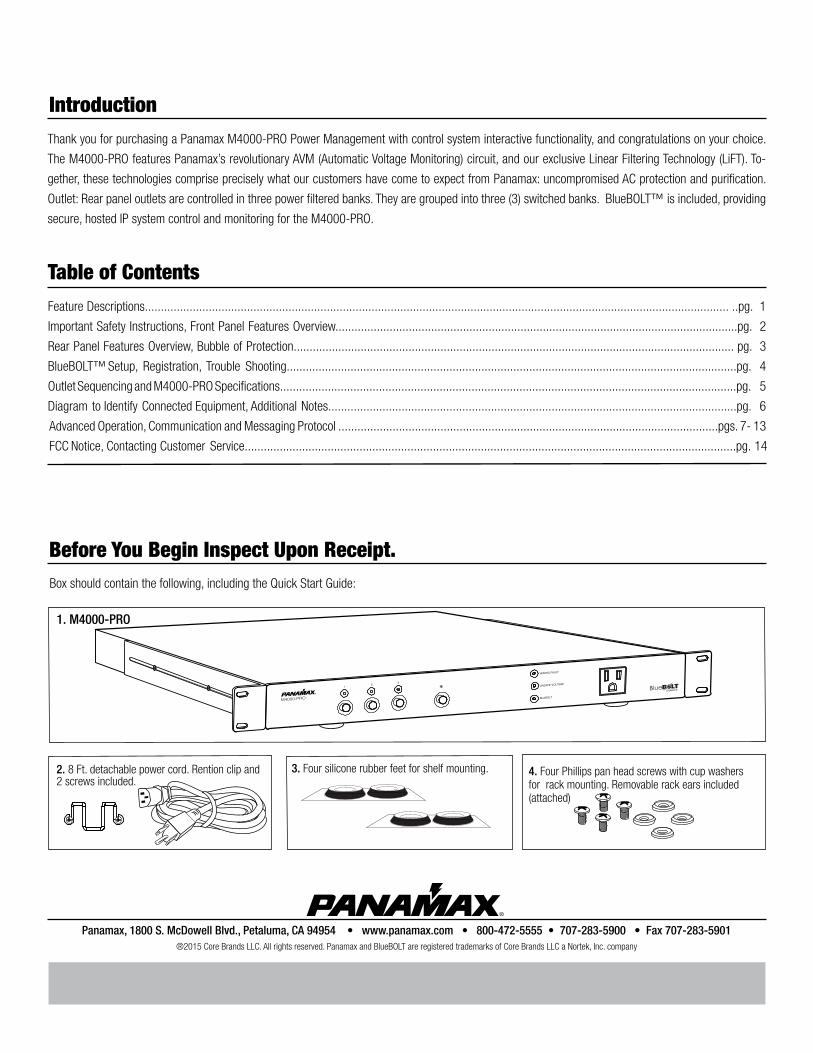
Box should contain the following, including the Quick Start Guide:
Before You Begin Inspect Upon Receipt.
1. M4000-PRO
3. Four silicone rubber feet for shelf mounting.
Panamax, 1800 S. McDowell Blvd., Petaluma, CA 94954 • www.panamax.com • 800-472-5555 • 707-283-5900 • Fax 707-283-5901 ®2015 Core Brands LLC. All rights reserved. Panamax and BlueBOLT are registered trademarks of Core Brands LLC a Nortek, Inc. company
4. Four Phillips pan head screws with cup washers for rack mounting. Removable rack ears included (attached)
Table of Contents
2. 8 Ft. detachable power cord. Rention clip and 2 screws included.
Features Descriptions
1
BlueBOLT™:Remote Power Management technology provides secure, hosted IP (Internet Protocol) system control. With BlueBOLT™, custom electronics installers, integrators and end-users can remotely monitor and control power to home theater equipment by accessing power management components from anywhere in the world. From simple system reboots to comprehensive monitoring of power status, BlueBOLT™ provides the power to control complex A/V systems from their most fundamental level: their power source (M4000-PRO).
LiFT Technology EMI/RFI Noise Filtration :Your audio/video components are constantly being bombarded by electromag-netic interference (EMI) and radio frequency interference (RFI) through their AC power source. This contaminated power can affect audio/video equipment and will degrade the overall performance of your entire system. Common symptoms of contaminated power include loss of picture detail, dull colors, pops, hisses, hums and visual artifacts.
Protect-or-Disconnect:In the event of a catastrophic power surge, such as a direct lightning hit, the Panamax unit will disconnect AC power to connected equipment.
Automatic Over & Under Voltage Protection (AVM):Panamax’s patented power monitoring circuitry constantly monitors the AC line voltage for unsafe voltage conditions such as momentary spikes or prolonged over-voltages and under-voltages (brownouts). These unsafe conditions pose a very dangerous threat to all electronic equipment within the home. If the M4000-PRO senses an unsafe power condition, it will automatically disconnect your equipment from the power to protect equipment from damage. Once the voltage returns to a safe level, the M4000-PRO will automatically reconnect the power.
• When subjected to a 6,000V (open circuit voltage) / 3,000A (short circuit cur-rent) surge, the M4000-PRO limits its voltage output to less than 330V peak, UL’s lowest rating.
• If the magnitude of the surge is greater than the capacity of the surge pro-tection components, the M4000-PRO’s Protect or Disconnect Circuitry will dis-connect your equipment in order to protect it. The M4000-PRO will need to be repaired or replaced by Panamax if this occurs within the product’s 3 year warranty.
Sequential Startup/Shutdown:Complex audio/video systems may be susceptible to voltage transients gener-ated internally at start-up/shutdown if all of the equipment is powered on or off at the same time. This can cause speaker “thumps”, which are not only annoying, but can also damage the speakers and/or trip product circuit break-ers. The M4000-PRO is designed to eliminate these transients by providing a “start-up” delay for the Bank 3 outlets and a “shut-down” delay for the other-Outlet Banks. This minimizes inrush current issues by allowing the components plugged into the Switched Outlet Banks to power-up and stabilize before any amplifiers and powered subwoofers are turned on. This sequence is reversed during shut-down. The amplifiers and powered subwoofers turn off, their power supplies drain, and then the equipment plugged into the Switched Outlet Banks are turned off. Additionally, the start-up and shut-down delays can be adjusted for custom applications.
Voltage Sense Trigger: The M4000-PRO voltage sense trigger input uses a standard 3.5mm (1/8”) mini-mono plug. This feature provides an ON/OFF trigger for the M4000-PRO using a Direct Current (DC) voltage signal. Many components such as pre-am-plifiers and receivers have a DC trigger built in, and will transmit a constant power signal when turned on and in use. The presence of this power signal will turn on the M4000-PRO’s switched outlets. When the source component is turned off, the voltage trigger signal is also turned off, and the M4000-PRO’s shutdown sequence is initiated. An AC Adapter of the appropriate voltage (5-24 VDC) plugged into a switched outlet may also be used if a DC trigger is not built in.
Cable/Satellite/Antenna TV signal protection:Coaxial protection circuits achieve optimum signal quality from our new coaxial protectors that have the smallest signal loss on the market - less than 0.5 db of attenuation from 0 Hz to 2.2 GHz. Our upgraded coaxial protection has been specifically designed to virtually eliminate signal loss. The clamping level of 75V will meet the demands of both cable and satellite voltage while minimizing ex-posure to damaging spikes and surges.
Telephone Line Protection:Digital video recorders and satellite TV receivers require a telephone line con-nection for TV show scheduling and/or Pay-Per-View services. The M4000-PRO also provides surge protection for this line. One pair of RJ-11 telephone jacks is provided for this. The circuitry utilizes auto-resetting PTCRs and solid state SIDACtors® for reliability and unsurpassed protection. The clamping level of the M4000-PRO’s telephone protector is 260 volts. This will allow typical ring voltage (90-130VAC) and operating battery voltage (-48DC) to pass through the circuit and still protect the modem in your satellite receiver from damage. Incoming tel line must be plugged into the IN Jack. Patch cord to the equipment must be plugged into OUT.
LAN Protection:Protection circuits for 10/100/1000 baseT Ethernet lines. 8 wire protection, 60V clamping.
® Littlefuse, Inc.
2
PLEASE NOTE: The lights’ status is obvious when the outlet is just plain “ON” or just plain “OFF”. However, there are transition states that cause the lights to blink. The lights will blink when performing a triggered cycle, but when a server initiated cycle command occurs, it just goes “OFF”, delays, then “ON”.
1 2 3 WIRING FAULT
UNSAFE VOLTAGE
BlueBOLT
M4000-PRO
ENABLED
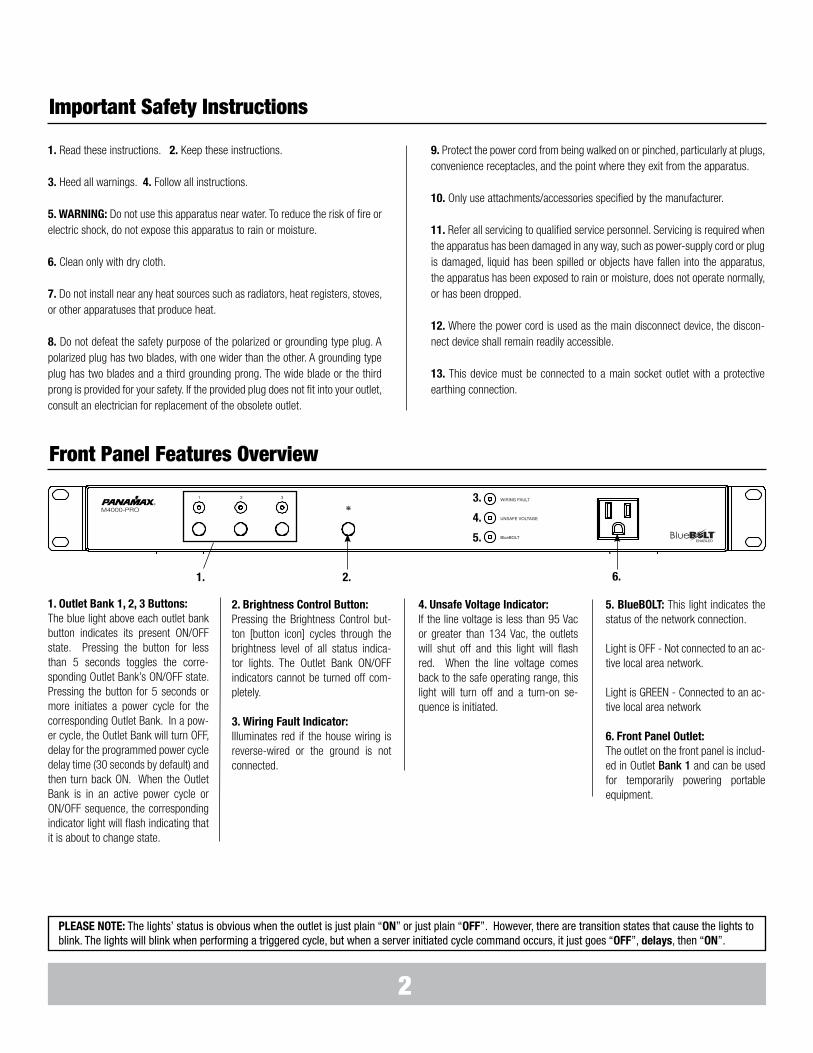
1. Read these instructions. 2. Keep these instructions.
3. Heed all warnings. 4. Follow all instructions.
5. WARNING: Do not use this apparatus near water. To reduce the risk of fire or electric shock, do not expose this apparatus to rain or moisture.
6. Clean only with dry cloth.
7. Do not install near any heat sources such as radiators, heat registers, stoves, or other apparatuses that produce heat.
8. Do not defeat the safety purpose of the polarized or grounding type plug. A polarized plug has two blades, with one wider than the other. A grounding type plug has two blades and a third grounding prong. The wide blade or the third prong is provided for your safety. If the provided plug does not fit into your outlet, consult an electrician for replacement of the obsolete outlet.
Important Safety Instructions
9. Protect the power cord from being walked on or pinched, particularly at plugs, convenience receptacles, and the point where they exit from the apparatus.
10. Only use attachments/accessories specified by the manufacturer.
11. Refer all servicing to qualified service personnel. Servicing is required when the apparatus has been damaged in any way, such as power-supply cord or plug is damaged, liquid has been spilled or objects have fallen into the apparatus, the apparatus has been exposed to rain or moisture, does not operate normally, or has been dropped.
12. Where the power cord is used as the main disconnect device, the discon-nect device shall remain readily accessible.
13. This device must be connected to a main socket outlet with a protective earthing connection.
Front Panel Features Overview
1. Outlet Bank 1, 2, 3 Buttons: The blue light above each outlet bank button indicates its present ON/OFF state. Pressing the button for less than 5 seconds toggles the corre-sponding Outlet Bank’s ON/OFF state. Pressing the button for 5 seconds or more initiates a power cycle for the corresponding Outlet Bank. In a pow-er cycle, the Outlet Bank will turn OFF, delay for the programmed power cycle delay time (30 seconds by default) and then turn back ON. When the Outlet Bank is in an active power cycle or ON/OFF sequence, the corresponding indicator light will flash indicating that it is about to change state.
5. BlueBOLT: This light indicates the status of the network connection.
Light is OFF - Not connected to an ac-tive local area network.
Light is GREEN - Connected to an ac-tive local area network
6. Front Panel Outlet: The outlet on the front panel is includ-ed in Outlet Bank 1 and can be used for temporarily powering portable equipment.
2. Brightness Control Button: Pressing the Brightness Control but-ton [button icon] cycles through the brightness level of all status indica-tor lights. The Outlet Bank ON/OFF indicators cannot be turned off com-pletely.
3. Wiring Fault Indicator: Illuminates red if the house wiring is reverse-wired or the ground is not connected.
4. Unsafe Voltage Indicator: If the line voltage is less than 95 Vac or greater than 134 Vac, the outlets will shut off and this light will flash red. When the line voltage comes back to the safe operating range, this light will turn off and a turn-on se-quence is initiated.
1. 2.
3.
4.
5.
6.
IN LAN OUTCATV / SAT 1
MAIN POWER
120 VAC/15A
IN
OUT
15A
GND
BANK 1BANK 2BANK 3
12VBlueBOLT
IN PHONE OUT
BANK 1BANK 3
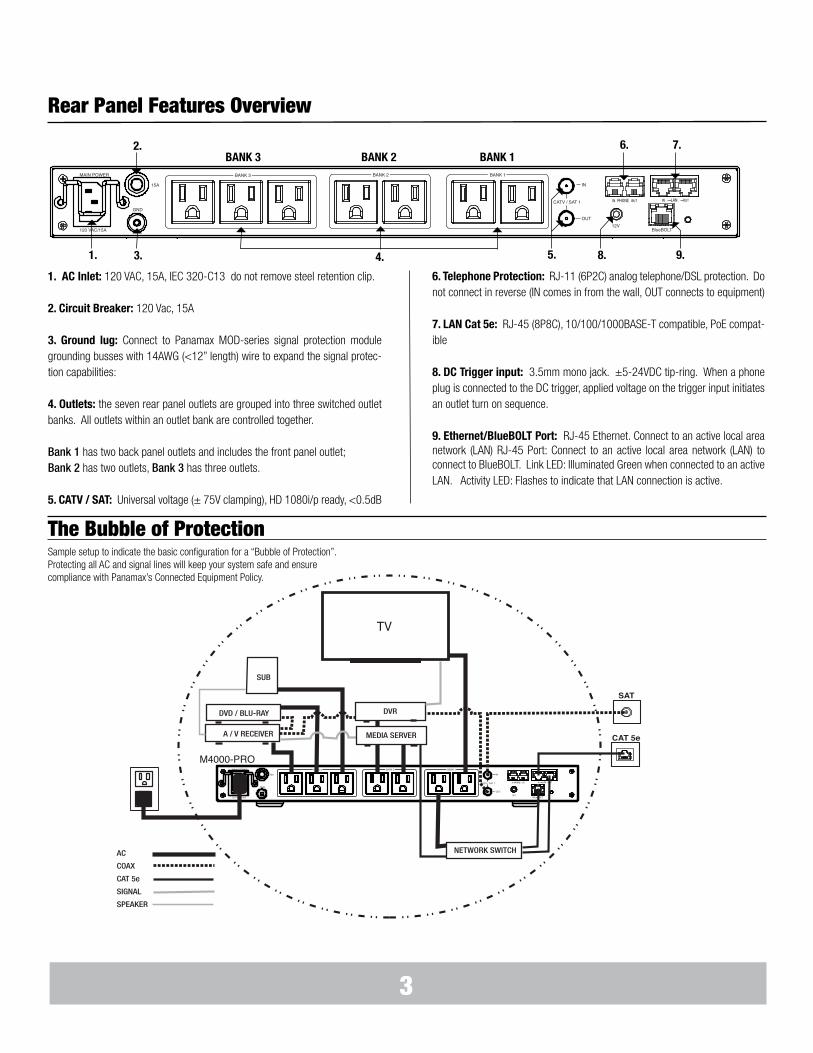
1. AC Inlet: 120 VAC, 15A, IEC 320-C13 do not remove steel retention clip.
2. Circuit Breaker: 120 Vac, 15A
3. Ground lug: Connect to Panamax MOD-series signal protection module grounding busses with 14AWG (<12” length) wire to expand the signal protec-tion capabilities:
4. Outlets: the seven rear panel outlets are grouped into three switched outlet banks. All outlets within an outlet bank are controlled together.
Bank 1 has two back panel outlets and includes the front panel outlet; Bank 2 has two outlets, Bank 3 has three outlets.
5. CATV / SAT: Universal voltage (± 75V clamping), HD 1080i/p ready, <0.5dB
6. Telephone Protection: RJ-11 (6P2C) analog telephone/DSL protection. Do not connect in reverse (IN comes in from the wall, OUT connects to equipment)
7. LAN Cat 5e: RJ-45 (8P8C), 10/100/1000BASE-T compatible, PoE compat-ible
8. DC Trigger input: 3.5mm mono jack. ±5-24VDC tip-ring. When a phone plug is connected to the DC trigger, applied voltage on the trigger input initiates an outlet turn on sequence.
9. Ethernet/BlueBOLT Port: RJ-45 Ethernet. Connect to an active local area network (LAN) RJ-45 Port: Connect to an active local area network (LAN) to connect to BlueBOLT. Link LED: Illuminated Green when connected to an active LAN. Activity LED: Flashes to indicate that LAN connection is active.
1. 3. 5. 8.
7.6.
9.4.
2. BANK 3 BANK 2 BANK 1
The Bubble of ProtectionSample setup to indicate the basic configuration for a “Bubble of Protection”.Protecting all AC and signal lines will keep your system safe and ensure compliance with Panamax’s Connected Equipment Policy.
IN LAN OUTCATV / SAT 1
MAIN POWER
120 VAC/15A
IN
OUT
15A
GND
BANK 1BANK 2BANK 3
12VBlueBOLT
IN PHONE OUT
BANK 1BANK 3
M4000-PRO
TV
SAT
CAT 5e
DVD / BLU-RAY
A / V RECEIVER
DVR
SUB
AC
COAX
CAT 5e
SIGNAL
SPEAKER
NETWORK SWITCH
MEDIA SERVER
Rear Panel Features Overview
3
GETTING SETUP For BlueBOLT™
BlueBOLT Online RegistrationNote: Make sure to complete system setup #1 or # 2 before registering.
Step 1. Log into http://www.mybluebolt.com for online registration.
Your BlueBOLT® enabled M4000-PRO Power Management Component is com-pletely plug-and-play and does not require any software installation or network configuration (including configuring of network ports).The online BlueBOLT® control interface is operated through your web browser. Step 2. Using any Internet connected computer go to www.mybluebolt.com in your standard Internet browser. Please make sure your browser is up to date with the latest software for best BlueBOLT interface performance.
Step 3. Follow the on screen instructions to create an account and/or take control of your BlueBOLT enabled product.
4
Note: You will need the M4000-PRO’s unique MAC ADDRESS and CHALLENGEKEY (duplicate labels provided in packaging on cover of Quick Start Guide as well as on the underside of the unit itself) in order to register the BlueBOLT™ device
Go to page 7 for details on the messaging protocol.
TroubleshootingQ. Is your Power Management Component receiving power? A. Check the power cable and confirm the unit’s breaker has not been tripped.
Q. Is your Internet connection functioning? Q. Can you access a general web page?Q. Is your M4000-PRO connected to your internet router or modem? A. Check the Ethernet cable and confirm that the unit is connected to an active Internet connection, and make sure those connected devices are receiving power.
If you have answered “Yes” to all of these questions and are still unable to connect your M4000-PRO component, please contact Panamax customer service at 1-800-472-5555.
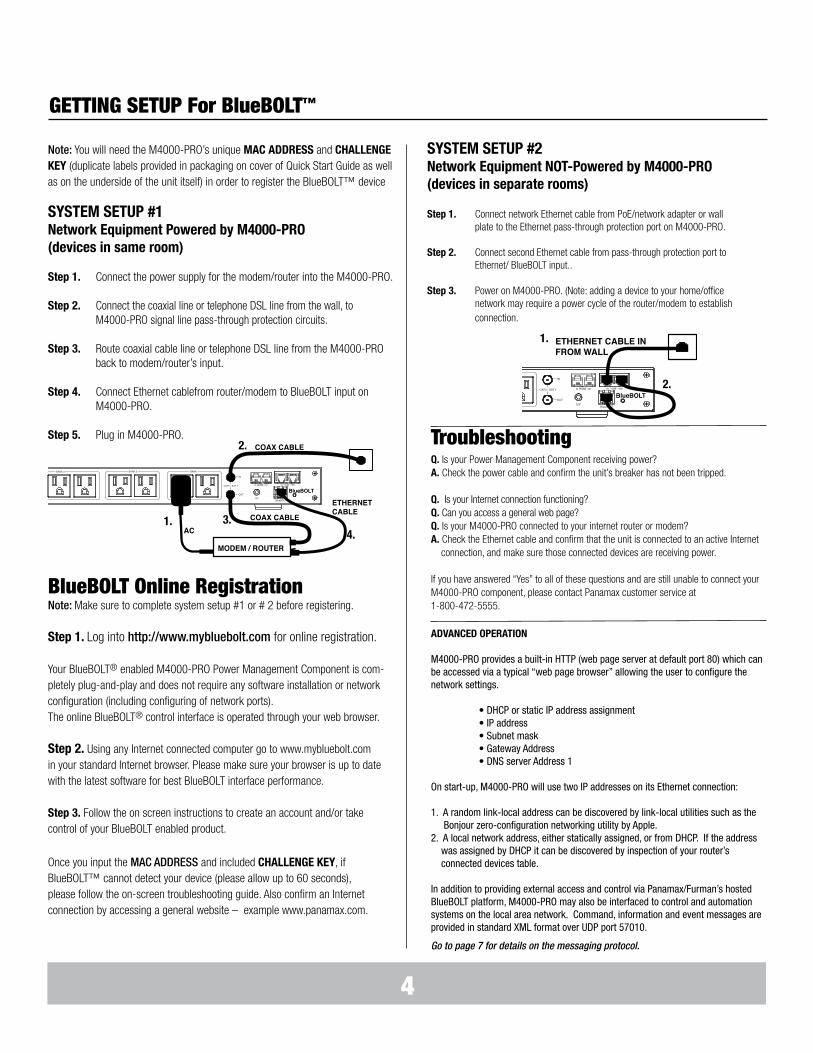
SYSTEM SETUP #1 Network Equipment Powered by M4000-PRO (devices in same room)
Step 1. Connect the power supply for the modem/router into the M4000-PRO.
Step 2. Connect the coaxial line or telephone DSL line from the wall, to M4000-PRO signal line pass-through protection circuits.
Step 3. Route coaxial cable line or telephone DSL line from the M4000-PRO back to modem/router’s input. Step 4. Connect Ethernet cablefrom router/modem to BlueBOLT input on M4000-PRO.
Step 5. Plug in M4000-PRO.
SYSTEM SETUP #2 Network Equipment NOT-Powered by M4000-PRO (devices in separate rooms)
Step 1. Connect network Ethernet cable from PoE/network adapter or wall plate to the Ethernet pass-through protection port on M4000-PRO. Step 2. Connect second Ethernet cable from pass-through protection port to Ethernet/ BlueBOLT input..
Step 3. Power on M4000-PRO. (Note: adding a device to your home/office network may require a power cycle of the router/modem to establish connection.
Once you input the MAC ADDRESS and included CHALLENGE KEY, if BlueBOLT™ cannot detect your device (please allow up to 60 seconds), please follow the on-screen troubleshooting guide. Also confirm an Internet connection by accessing a general website – example www.panamax.com.
IN LAN OUTCATV / SAT 1
MAIN POWER
120 VAC/15A
IN
OUT
15A
GND
BANK 1BANK 2BANK 3
12VBlueBOLT
IN PHONE OUT
BANK 1BANK 3
COAX CABLE
MODEM / ROUTER
BlueBOLT
AC
ETHERNET CABLE
COAX CABLE
ETHERNET CABLE IN FROM WALL
IN LAN OUTCATV / SAT 1
MAIN POWER
120 VAC/15A
IN
OUT
15A
GND
BANK 1BANK 2BANK 3
12VBlueBOLT
IN PHONE OUT
BANK 1BANK 3
BlueBOLT
ADVANCED OPERATION
M4000-PRO provides a built-in HTTP (web page server at default port 80) which can be accessed via a typical “web page browser” allowing the user to configure the network settings.
• DHCP or static IP address assignment • IP address • Subnet mask • Gateway Address • DNS server Address 1
On start-up, M4000-PRO will use two IP addresses on its Ethernet connection:
1. A random link-local address can be discovered by link-local utilities such as the Bonjour zero-configuration networking utility by Apple. 2. A local network address, either statically assigned, or from DHCP. If the address was assigned by DHCP it can be discovered by inspection of your router’s connected devices table.
In addition to providing external access and control via Panamax/Furman’s hosted BlueBOLT platform, M4000-PRO may also be interfaced to control and automation systems on the local area network. Command, information and event messages are provided in standard XML format over UDP port 57010.
1.
2.
3.4.
1.
2.
5
POWER CYCLE AND OUTLET SEQUENCINGThe outlet banks of the M4000-PRO are configured to turn on and off in a programmed sequence where each outlet bank has a set of programmed delay times.
Outlet Bank Power Cycle Delay Turn On Delay Turn Off Delay Trigger Enable
1 30 seconds 0 seconds 10 seconds Enabled
2 30 seconds 0 seconds 10 seconds Enabled
3 30 seconds 10 seconds 0 seconds Enabled
Power Cycle Delay: When a Power Cycle is initiated, the outlet bank will immediately turn off and then turn back on after the Power Cycle Delay time
Turn On Delay: When a Turn On Sequence is initiated, the outlet bank will turn ON after the Turn On Delay time.
Turn Off Delay: When a Turn Off Sequence is initiated, the outlet bank will turn OFF after the Turn Off Delay time.
The delay times are pre-programmed but may be changed on the BlueBOLT web site or by issuing the <set> command to the Ethernet port (see the Advanced Operation section for details). The default configuration is:
Trigger Enable: When enabled, the outlet bank will switch ON or OFF during a sequence initiated by the DC trigger or a <sequence> command received on the Ethernet port. During a turn on sequence following power-up or recovery from a fault condition, the outlets will return to their pre-fault power state re-gardless of the DC trigger status. A turn-on sequence is initiated upon power-up, recovery from a fault condition, the DC trigger input going from 0V to 5-24VDC or by the <sequence> com-mand received on the Ethernet port.
When the M4000-PRO is powered-up, recovering from an over-voltage shutoff or recovering from an under-voltage shutoff, the outlet banks will return to their pre-fault ON/OFF state after the programmed Turn On Delay time.
When the DC trigger input goes from 0V to 5-24VDC or the <sequence> com-mand is received on the Ethernet port, the outlet banks that are trigger-enabled turn on after the programmed Turn On Delay time.
A turn-off sequence is initiated by the DC trigger input going from 5-24VDC to OV or by the <sequence> command received on the Ethernet port.
M4000-PRO Specifications
Specifications subject to change due to product upgrades and improvements.
AC POWER
Operating Voltage 120 Vac / 60Hz
Current Capacity 15 A
UL 1449 Voltage Protection Rating 330V L-N, 400V L-G, 400V N-G
UL 1449 Nominal Discharge Current 3,000A
Initial Clamping Level 200V
Energy Dissipation 1,575 Joules (8/20µs)
Overvoltage shutoff 134 Vac ± 2 Vac
Undervoltage shutoff 95 Vac ± 2 Vac
EMI / RFI Noise Filtration -18.7dB @ 10kHz
-50.5dB @ 100kHz
-43.9dB @ 1MHz
LAN PROTECTION
Connectors RJ-45 Cat 5e
Wires protected 8-wires
Compatibility 10/100BASE-T
Clamping Level 60V
TELEPHONE PROTECTION
Connectors RJ-11
Suppression Modes Metallic & Longitudinal
Fuseless / Auto-resetting Yes
Clamping Level 260V
UNIVERSAL COAX PROTECTION
Connectors Female “F”, Gold-plated
Insertion loss <0.5dB
Frequency Range 0 MHz – 2.2GHz
Clamping Level 75V
DC Trigger Input
Voltage and Polarity 5 – 24VDC, bidirectional
Jacks 3.5mm (1/8”) mono mini-plug
IN LAN OUTCATV / SAT 1
MAIN POWER
120 VAC/15A
IN
OUT
15A
GND
BANK 1BANK 2BANK 3
12VBlueBOLT
IN PHONE OUT
BANK 1BANK 3
1 2 3 WIRING FAULT
UNSAFE VOLTAGE
BlueBOLT
M4000-PRO
ENABLED
6
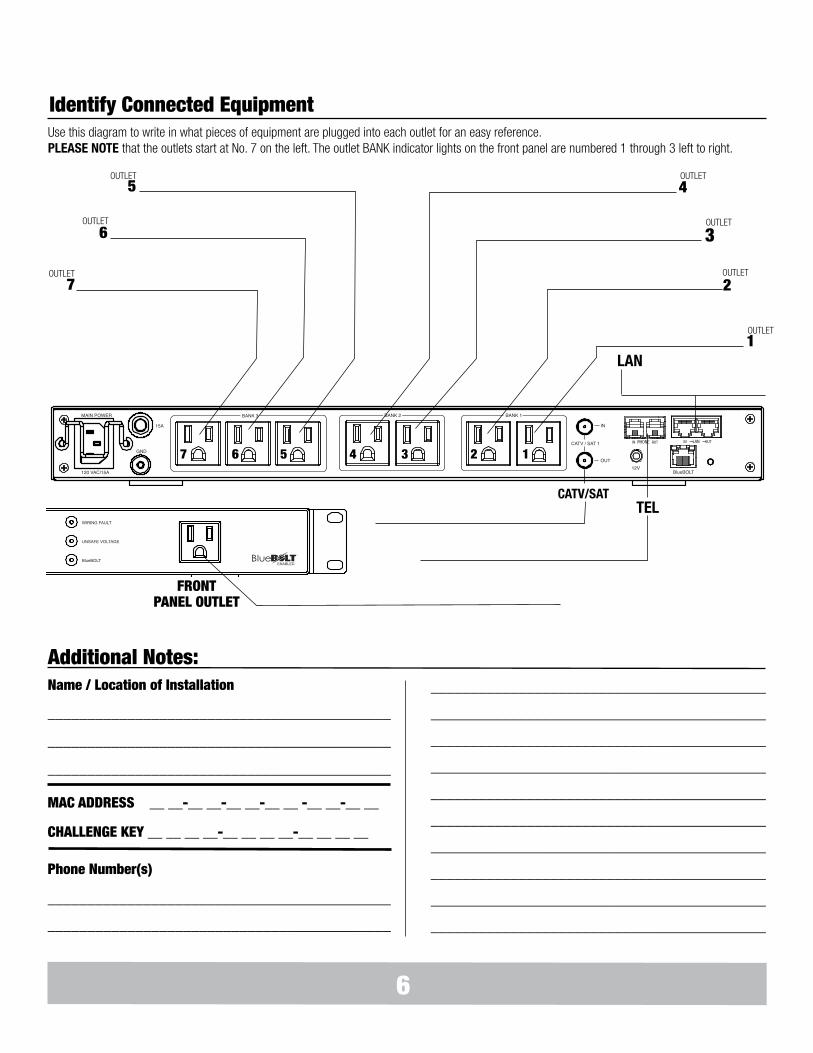
Identify Connected Equipment Use this diagram to write in what pieces of equipment are plugged into each outlet for an easy reference. PLEASE NOTE that the outlets start at No. 7 on the left. The outlet BANK indicator lights on the front panel are numbered 1 through 3 left to right.
All messages are encapsulated in standard XML format. As per XML standard, It is required that the XML version declaration be included at the start of each mes-sage. Messages that do not conform to the standard will be ignored. In addition to the XML version declaration, every message must also specify the type of de-vice (model) and its unique MAC ID (mac) in its root element using the <device> tag. For M4000-PRO, device class is “m4000” and the MAC is expressed with no formatting. An example message would thus look like:
The following sections document the possible message content and it should be assumed that the contents are always enclosed by the “envelope” and that the “enve-lope” text will not be repeated, unless needed for clarity.
Action and QueriesCommand messages are sent to the M4000-PRO to have it perform a task. The task can be to perform a physical action such as switching an outlet bank and is referred to as an action. When the task is to transmit data such as device status it is referred to as a query. Whether the task is an action or query, the message is classified as a command.
General Query Element StructureAll query command messages are contained within a <command> element. The M4000-PRO responds to the query with a set of elements enclosed in the <info>, <status> or <settings> element depending on the type of query. Every query contains a timestamp attribute “time”. The timestamp is in standard UNIX time, up to 10 decimal digit characters and represents the number of seconds that have passed since January 1st 1970 GMT.
A sample query and response: Query Response<command><sendinfo/></command> <info time=”1403729752”> <sernum>12345678</sernum> <fwver>1.0</fwver> <bootcodever>1.0</bootcodever> <ipaddr>3194548209</ipaddr> </info>
If the command is for an action such as switching an outlet bank, the M4000-PRO will not necessarily provide a response message. If it is desired to receive an acknowl-edgement of receiving the command, the optional “xid” attribute may be included in the <command> element. Command messages with the “xid” attribute expressed will return an acknowledgement enclosed in an <ack> element. For example, when the message<?xml version=”1.0” ?><device class=”m4000” id=”1065a3030000”><command xid=”123”><outlet id=”1”>0</outlet></command></device>
Is received by the M4000-PRO, it will respond with<?xml version=”1.0” ?><device class=”m4000” id=”1065a3030000”><ack xid=”123”></device>
Query <sendstatus/>
Response<status time=”timestamp”… Time stamp of the data, provided in UNIX time<voltage>volts Measured RMS line voltage, 1 Vac precision<amperage>amps Measured total load current, 0.1 Ampere precision<wattage>watts Measured total power consumption, 1 Watt precision<pwrva>voltamps Measured volt-ampere consumption, 1 VA precision<pwrfact>powerfactor Measured load power factor, 0.01 precision<voltpeak time = “timestamp”>peakvoltage Measured peak voltage, 1 Vac precision, occurred at time “timestamp”<seq>sequencetype Outlet sequencing status: 0 = no sequence, 1 = sequencing ON, 2 = sequencing OFF<pwrcond>powercondition Power Condition: 0 = normal, 1 = fault recovery, 2 = under voltage, 3 = over voltage<wiringfault>wiringfault Outlet wiring fault: 0 = no fault, 1 = reverse wiring or open ground fault<triggersense>triggersense DC trigger input usage: 0 = no signal cable connected, 1 = signal cable connected<trigger>triggerstatus DC trigger input status: 0 = DC trigger voltage not sensed; triggerstatus = 1 indicates DC trigger voltage sensed<outlet id=”outlet”>state Outlet bank state. Attribute “outlet” represents the outlet bank; 0 = outlet bank OFF, 1 = outlet bank ON<tfilestate> For Core Brands use only
Query <sendsettings/>
Response<settings Time stamp of the data, provided in UNIX timetime=”timestamp”… <delay id=”bank” Delay for outlet bank “bank” act=”action”> Action: 0 = turn off delay, 1 = turn on delay, 2 = power cycle delay delaytime Delay time, in seconds <triggerena id = “bank”> Trigger enable for outlet bank “bank” trigenable Trigger enable: 0 = DC trigger disabled, 1 = DC trigger enabled <brightness>brightlevel Brightness level, brightlevel out of 5 levels
8
Send Information QueryThe Send Information query is used to retrieve the following system-level information from the M4000-PRO. Information elements are enclosed in the <info> element.
Send Status QueryThe Send Status query is used to retrieve the following outlet status and electrical measurement information from the M4000-PRO. Status elements are enclosed in the <status> element.
Query <sendinfo/>
Response<info time=”timestamp” Time stamp of the data, provided in UNIX time <sernum>serialnumber Serial number<fwver>firmwareversion Firmware version<bootcodever>bootcode Boot loader firmware version<ipaddr>ipaddress IP address, provided as a 32-bit (base-10) decimal value
Send Settings QueryThe Send Settings query is used to retrieve the device settings from the M4000-PRO such as outlet bank delays & trigger enable and display brightness level. Settings elements are enclosed in the <settings> element.
9
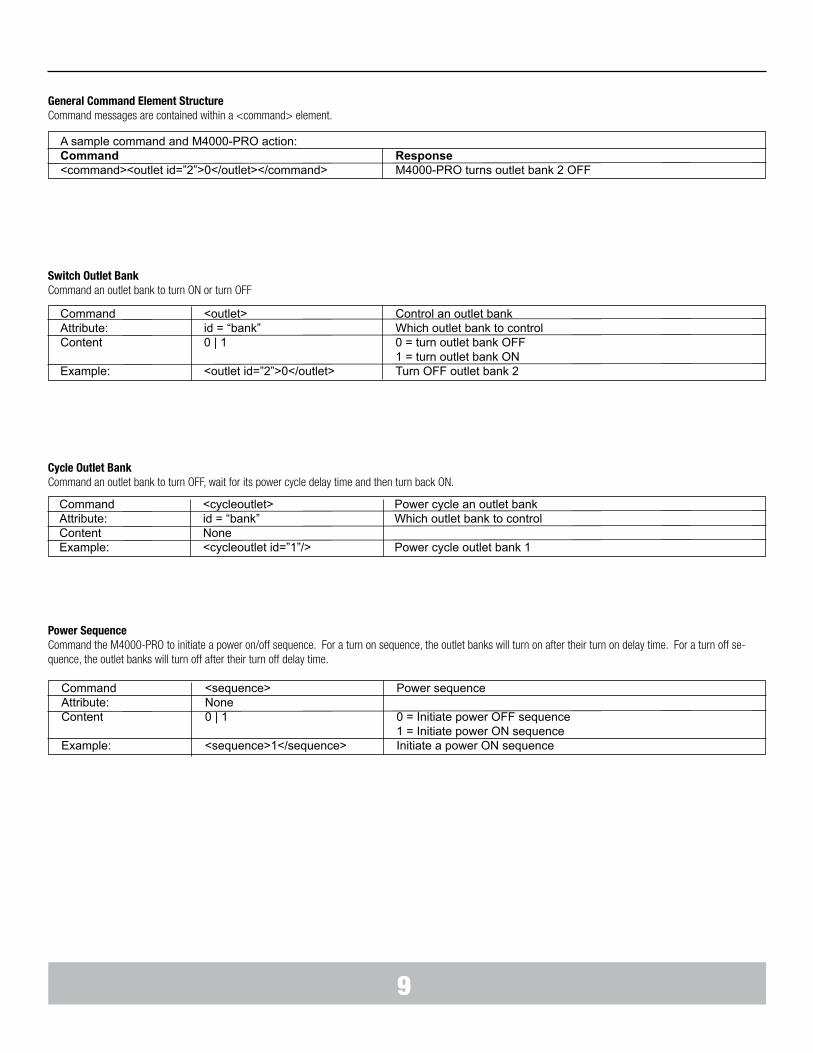
General Command Element StructureCommand messages are contained within a <command> element.
A sample command and M4000-PRO action: Command Response<command><outlet id=”2”>0</outlet></command> M4000-PRO turns outlet bank 2 OFF
Switch Outlet BankCommand an outlet bank to turn ON or turn OFF
Command <outlet> Control an outlet bankAttribute: id = “bank” Which outlet bank to controlContent 0 | 1 0 = turn outlet bank OFF 1 = turn outlet bank ONExample: <outlet id=”2”>0</outlet> Turn OFF outlet bank 2
Cycle Outlet BankCommand an outlet bank to turn OFF, wait for its power cycle delay time and then turn back ON.
Command <cycleoutlet> Power cycle an outlet bankAttribute: id = “bank” Which outlet bank to controlContent None Example: <cycleoutlet id=”1”/> Power cycle outlet bank 1
Power SequenceCommand the M4000-PRO to initiate a power on/off sequence. For a turn on sequence, the outlet banks will turn on after their turn on delay time. For a turn off se-quence, the outlet banks will turn off after their turn off delay time.
Command <sequence> Power sequenceAttribute: None Content 0 | 1 0 = Initiate power OFF sequence 1 = Initiate power ON sequenceExample: <sequence>1</sequence> Initiate a power ON sequence
10
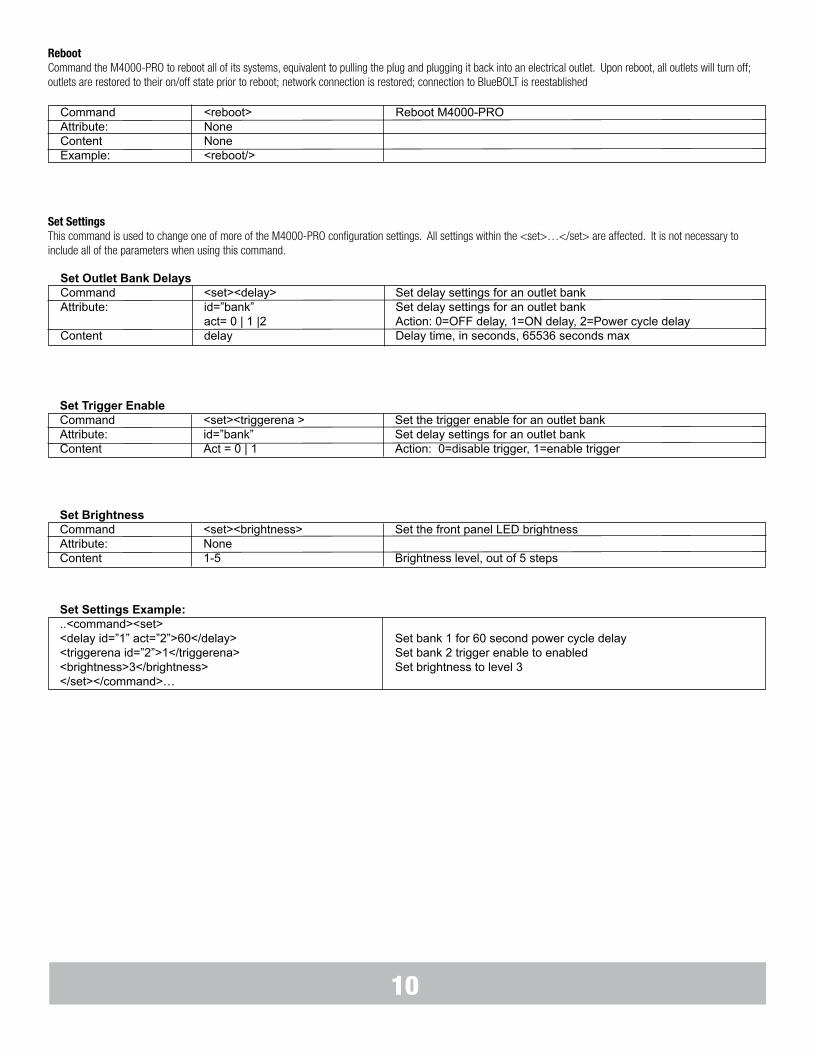
RebootCommand the M4000-PRO to reboot all of its systems, equivalent to pulling the plug and plugging it back into an electrical outlet. Upon reboot, all outlets will turn off; outlets are restored to their on/off state prior to reboot; network connection is restored; connection to BlueBOLT is reestablished
Set SettingsThis command is used to change one of more of the M4000-PRO configuration settings. All settings within the <set>…</set> are affected. It is not necessary to include all of the parameters when using this command.
Set Outlet Bank DelaysCommand <set><delay> Set delay settings for an outlet bankAttribute: id=”bank” Set delay settings for an outlet bank act= 0 | 1 |2 Action: 0=OFF delay, 1=ON delay, 2=Power cycle delayContent delay Delay time, in seconds, 65536 seconds max
Set Trigger EnableCommand <set><triggerena > Set the trigger enable for an outlet bankAttribute: id=”bank” Set delay settings for an outlet bankContent Act = 0 | 1 Action: 0=disable trigger, 1=enable trigger
Set BrightnessCommand <set><brightness> Set the front panel LED brightnessAttribute: None Content 1-5 Brightness level, out of 5 steps
Set Settings Example:..<command><set><delay id=”1” act=”2”>60</delay> Set bank 1 for 60 second power cycle delay<triggerena id=”2”>1</triggerena> Set bank 2 trigger enable to enabled<brightness>3</brightness> Set brightness to level 3</set></command>…
11
Element Tag: <outlet> Attribute: id = “bank” “bank” is the affected outlet bank numberContent 0 | 1 0 = outlet bank is OFF 1 = outlet bank is ONExample: <outlet id=”1”>0</outlet> Outlet bank 1 is OFF
EVENTSEvent messages are sent autonomously from M4000-PRO when some change occurs within the device – they are not replies to a query.
Subscribing to Event MessagesAfter start-up, M4000-PRO will not send any event messages. To receive event messages a command to “subscribe” to events must be sent.
The event subscription command is enclosed within the XML declaration and <device> element and is as follows:
IPADDR is the IP address and port number where the event messages should be sent. It may be a different IP address than the control system which sent the request.
PORT is the UDP port number.
Only one IP address / port event subscription is allowed.
For example, to have event messages sent from a M4000-PRO with MAC address 10-65-A3-03-FF-FF to a control system at IP address 192.168.0.127 listening on port 1726:
General Event Element StructureAll event messages are contained within an <event> element, which will contain a timestamp attribute, “time”, and an event ID attribute, “evtid”. The time attribute is a UNIX timestamp, up to 10 decimal digit characters and represents the number of seconds that have passed since January 1st 1970 GMT. The evtid attribute is the numeric ID value of the event message, starting from 0 after each device start-up.
A sample event element: <event time=”1234567890” evtid=”123” subsid=”1”>…</event>
Event Messages:
Outlet State ChangeAn Outlet State Change event is posted when any of the outlet banks turn ON->OFF or OFF->ON.
Element Tag: <seq> Attribute: None Content 0 | 1 | 2 0 = sequence done/finished/complete 1 = turn on sequence initiated 2 = turn off sequence initiatedExample: <seq>0</seq> Sequence has completed
Sequence StatusA Sequence Status event is posted when a power on or power off sequence is initiated or completed.
A subscriber ID, “subsid” is assigned to each event subscription.
A sample event message for outlet bank 2 switching ON: …<event time=”1234567890” evtid=”123” subsid=”1”><outlet id=”2”>1</outlet></event></device>
Event messages will be repeated until an acknowledgement message is sent back to M4000-PRO, or after a timeout period of approximately 20 minutes. The acknowl-edgement message must contain the same evtid and subsid as the event message.
The acknowledgement message syntax is:…<command><eventmgr><ack evtid=”123” subsid=”1”></eventmgr></command></device>
12
Element Tag: <triggersense> Attribute: None Content 0 | 1 0 = Trigger input was disconnected 1 = Trigger input was connectedExample: <triggersense>1</triggersense> Sensed that a connector was plugged into the DC trigger input
DC Trigger Jack SensedA DC Trigger Jack Sensed event is posted when a connecter is inserted into or removed from the DC trigger input jack.
Element Tag: <trigger> Attribute: None Content 0 | 1 0 = Trigger voltage sensed ON->OFF 1 = Trigger voltage sensed OFF->ONExample: <trigger>1</trigger> Trigger voltage sensed OFF->ON
DC Trigger StatusA DC Trigger Status event is posted when the DC trigger input signal changes.
Element Tag: <set> Attribute: None Content <delay>…</delay> See Settings Event section for details <triggerena>…</triggerena> <brightness>…</brightness> Example: <set> <delay id=”1” act=”2”>12</delay> Outlet bank 1-power cycle delay=12 sec <triggerena id=”1”</triggerena> Outlet bank 1-trigger enabled <brightness>2</brightness> Brightness level 2 (out of 5 max) </set>
Settings Changed A Settings Changed event is posted when the device settings such as outlet bank delays, outlet bank trigger enable and display brightness is changed. Information for all settings is transmitted, not just for the individual settings that changed.
Wiring FaultA Wiring Fault event is posted when a change to the outlet wiring condition is detected.
Element Tag: <powercond> Attribute: None Content 0 | 1 | 2 | 3 0 = power normal 1 = fault recovery 2 = under voltage 3 = over voltageExample: <powercond>3</powercond> Overvoltage condition
Power ConditionA Power Condition event is posted when the unit enters or recovers from over-voltage or under-voltage shutdown mode.
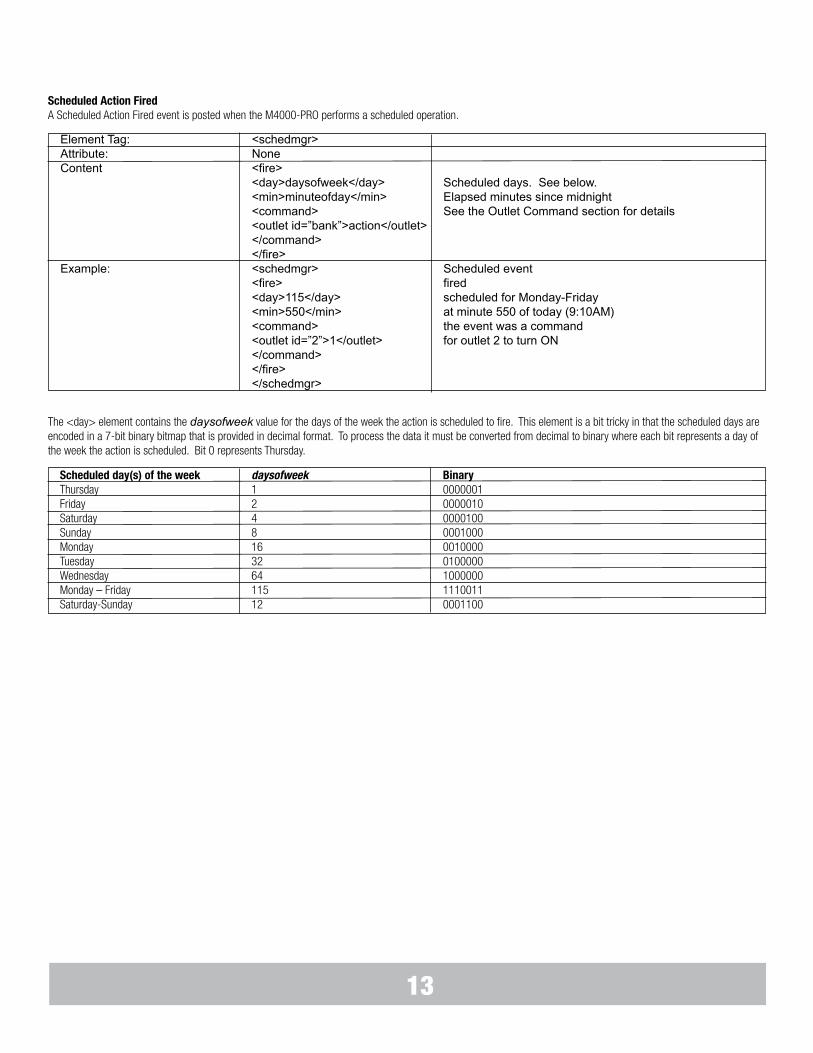
Element Tag: <schedmgr>Attribute: NoneContent <fire> <day>daysofweek</day> Scheduled days. See below. <min>minuteofday</min> Elapsed minutes since midnight <command> See the Outlet Command section for details <outlet id=”bank”>action</outlet> </command> </fire>Example: <schedmgr> Scheduled event <fire> fired <day>115</day> scheduled for Monday-Friday <min>550</min> at minute 550 of today (9:10AM) <command> the event was a command <outlet id=”2”>1</outlet> for outlet 2 to turn ON </command> </fire> </schedmgr>
Scheduled Action Fired A Scheduled Action Fired event is posted when the M4000-PRO performs a scheduled operation.
13
The <day> element contains the daysofweek value for the days of the week the action is scheduled to fire. This element is a bit tricky in that the scheduled days are encoded in a 7-bit binary bitmap that is provided in decimal format. To process the data it must be converted from decimal to binary where each bit represents a day of the week the action is scheduled. Bit 0 represents Thursday.
Panamax, 1800 S. McDowell Blvd., Petaluma, CA 94954 • www.panamax.com • 800-472-5555® 2015 Core Brands LLC, Panamax and BlueBOLT are registered trademarks of Core Brands, LLC a Nortek company.
FCC NoticeThis equipment has been tested and found to comply with the limits for a Class B Digital Device, pursuant to Part 15 of the FCC Rules. These limits are designed to provide reasonable protection against harmful interference in residential instal-lation. This equipment generates, uses, and can radiate radio frequency energy and, if not installed and used in accordance with the instructions, may cause harmful interference to radio communications. However, there is no guarantee that interference will not occur in a particular installation. If this equipment does cause harmful interference to radio or television reception, which can be de-termined by turning the equipment off and on, the user is encouraged to try to correct the interference by one or more of the following measures:
(1) Reorient or relocate the receiving antenna.
(2) Increase the separation between the equipment and receiver.
(3) Connect the equipment into an outlet on a circuit different from that to which the receiver is connected.
(4) Consult the dealer or an experienced radio/TV technician for help. Any special accessories needed for compliance must be specified in the instruction.
If you require technical support or equipment service, please contact Panamax Tech Support at 800-472-5555. You may also email [email protected]. All equipment being returned for repair must have a Return Authorization (RA) number. To get an RA number, please call Panamax Tech Support.
Before returning any equipment for repair, please be sure that it is adequately packed and cushioned against damage in shipment, and that it is insured. We suggest that you save the original packaging and use it to ship the product for servicing. Also, please enclose a note giving your name, address, phone number and a description of the problem.
Contacting Tech Support
CAUTION: A shielded-type power cord is required in order to meet FCC emission limits and also to prevent interference to the nearby radio and television recep-tion. It is essential that only the supplied power cord be used. Use only shielded cables to connect RS-232 devices to this equipment.
CAUTION: Any changes or modifications not expressly approved by the guar-antee of this device could void the user’s authority to operate the equipment.