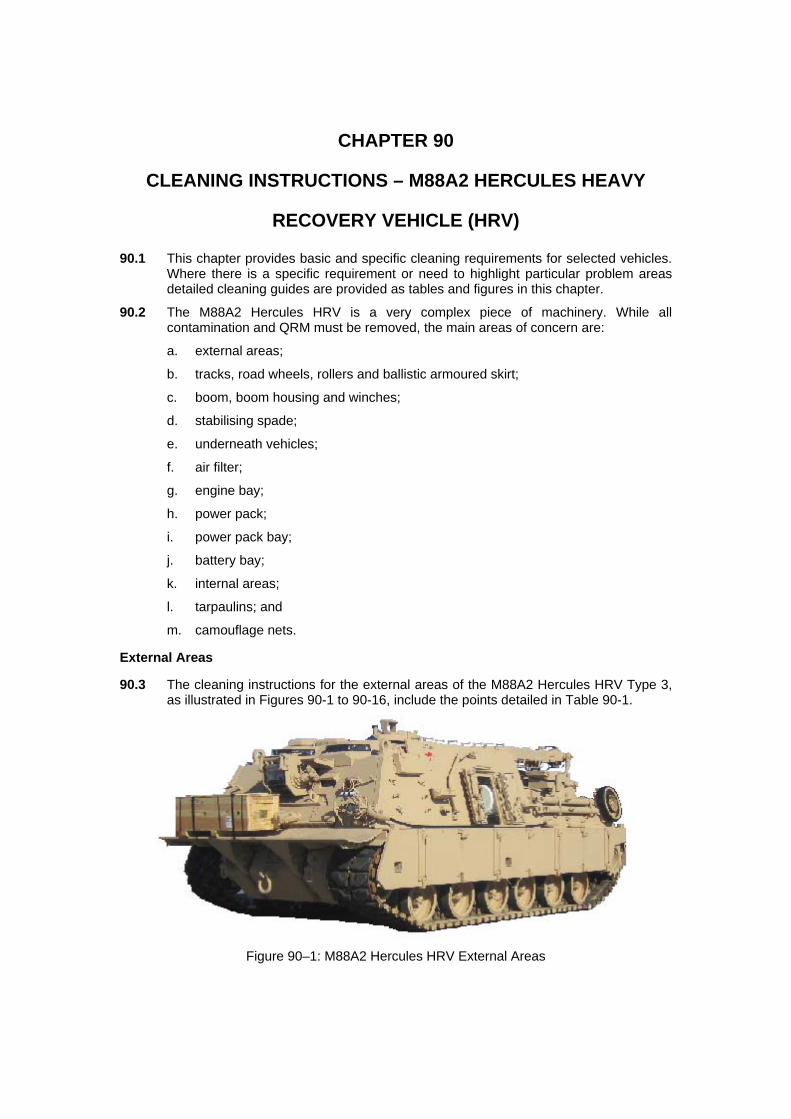
CHAPTER 90 CLEANING INSTRUCTIONS – M88A2 HERCULES HEAVY RECOVERY VEHICLE (HRV) 90.1 This chapter provides basic and specific cleaning requirements for selected vehicles. Where there is a specific requirement or need to highlight particular problem areas detailed cleaning guides are provided as tables and figures in this chapter. 90.2 The M88A2 Hercules HRV is a very complex piece of machinery. While all contamination and QRM must be removed, the main areas of concern are: a. external areas; b. tracks, road wheels, rollers and ballistic armoured skirt; c. boom, boom housing and winches; d. stabilising spade; e. underneath vehicles; f. air filter; g. engine bay; h. power pack; i. power pack bay; j. battery bay; k. internal areas; l. tarpaulins; and m. camouflage nets. External Areas 90.3 The cleaning instructions for the external areas of the M88A2 Hercules HRV Type 3, as illustrated in Figures 90-1 to 90-16, include the points detailed in Table 90-1. Figure 90–1: M88A2 Hercules HRV External Areas
Transcript
CHAPTER 90
CLEANING INSTRUCTIONS – M88A2 HERCULES HEAVY
RECOVERY VEHICLE (HRV)
90.1 This chapter provides basic and specific cleaning requirements for selected vehicles. Where there is a specific requirement or need to highlight particular problem areas detailed cleaning guides are provided as tables and figures in this chapter.
90.2 The M88A2 Hercules HRV is a very complex piece of machinery. While all contamination and QRM must be removed, the main areas of concern are:
a. external areas;
b. tracks, road wheels, rollers and ballistic armoured skirt;
c. boom, boom housing and winches;
d. stabilising spade;
e. underneath vehicles;
f. air filter;
g. engine bay;
h. power pack;
i. power pack bay;
j. battery bay;
k. internal areas;
l. tarpaulins; and
m. camouflage nets.
External Areas
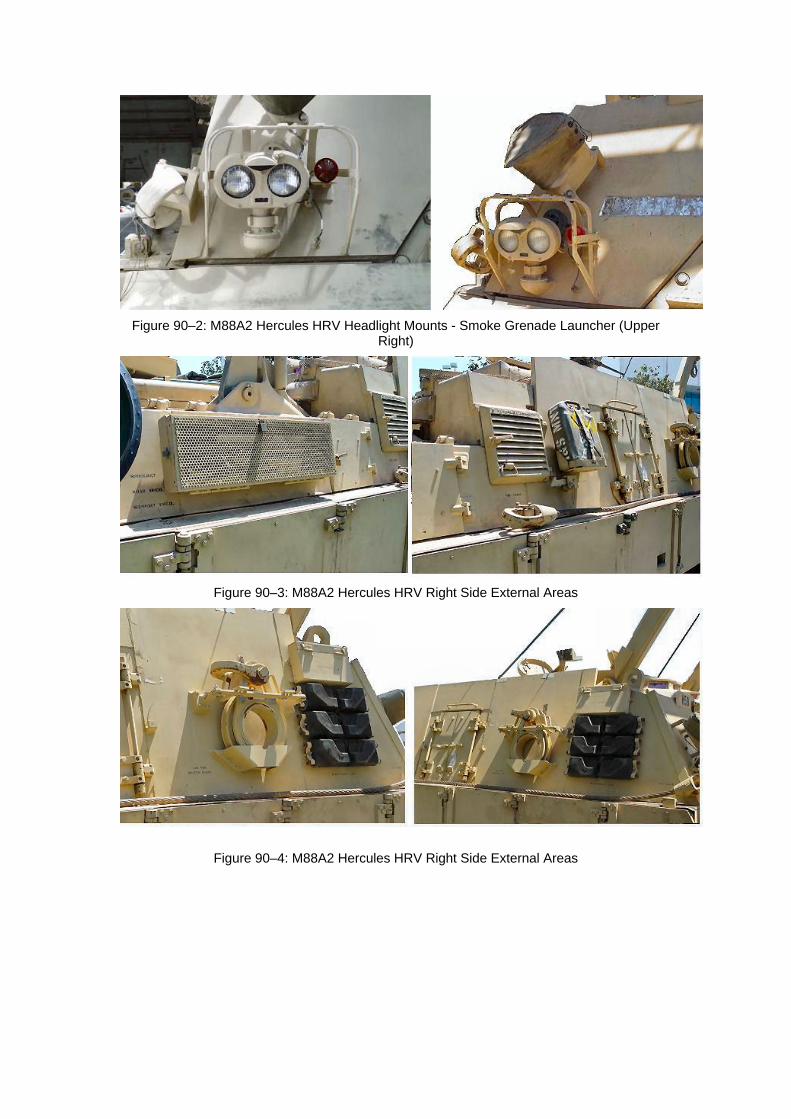
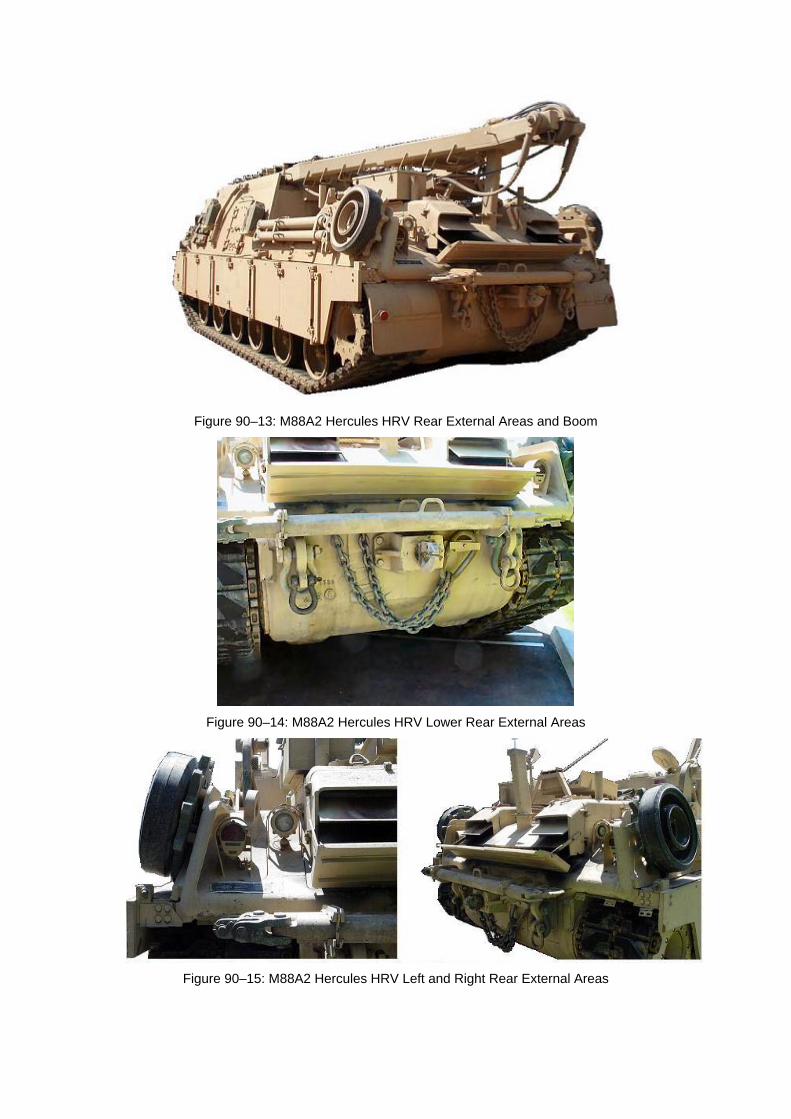
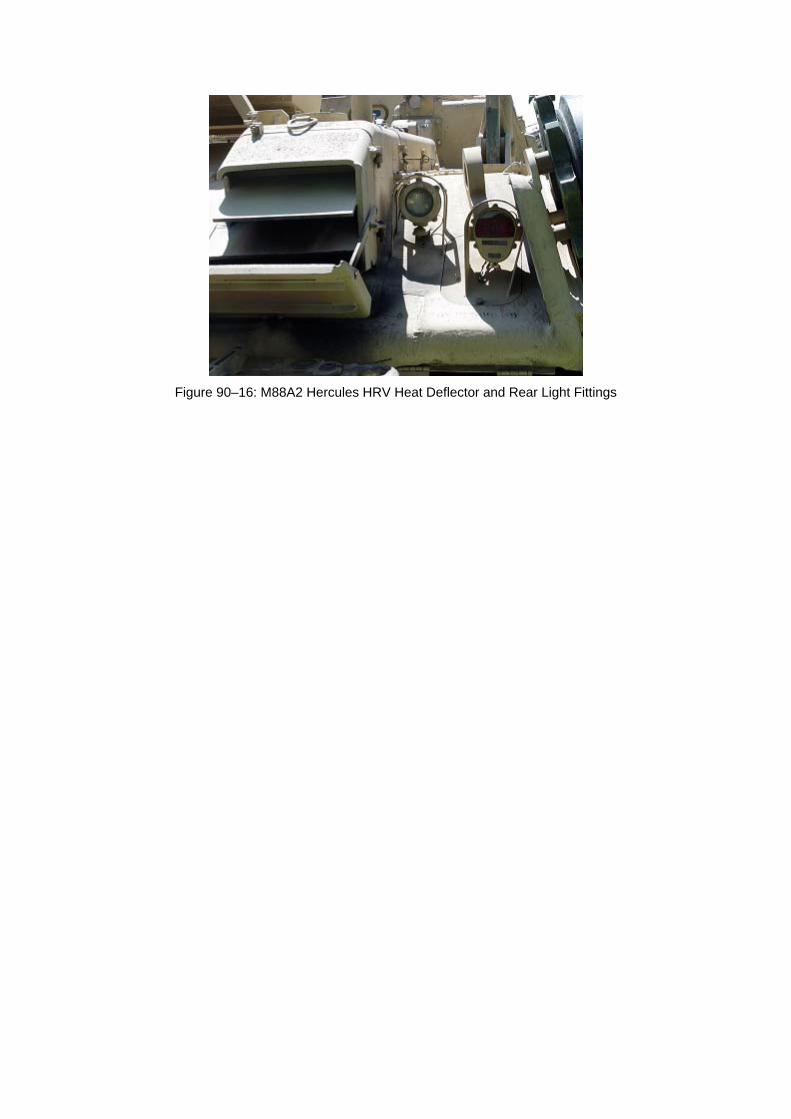
90.3 The cleaning instructions for the external areas of the M88A2 Hercules HRV Type 3, as illustrated in Figures 90-1 to 90-16, include the points detailed in Table 90-1.
Table 90–1: Cleaning Instructions for the Vehicle’s External Areas
Serial Comments or Tasks Technical Time (hours)
1 All CES are to be removed and cleaned. All toolboxes and attachment points are to be cleaned of all soil, plant and insect matter. It may be necessary to remove the attachment points to ensure no soil is trapped underneath (refer Figures 90-1 to 90-8 and 90-11).
2 Pressure-wash the exterior of the vehicle to remove all dust and dirt.
3 The chassis is to be cleaned using flexible nozzle high-pressure water cleaning equipment. Particular attention is to be paid to small apertures which may act as reservoirs for soil, insect, snails and plant material. Additionally, check that no animals are hiding or nesting within the chassis.
4 Lights and mirrors are to be cleaned of all soil, plant and insect debris. Damaged lights and mirrors are to be removed to facilitate cleaning behind them to ensure there is no soil, plant and insect matter (see Figures 90-2 and 90-13).
5 Fuel and water Jerry cans are to be removed and holders are to be cleaned. Jerry cans to be emptied of water (see Figure 90-3).
6 Mounting points are to be disconnected, if necessary, to facilitate cleaning.
7 All swivel pins and lock pins are to be cleaned of all grease and soil debris.
8 Remove spare track pads and clean both the pads and the mounts/brackets (see Figures 90-4 and 90-5).
9 EXTREME CAUTION - Ballistic Skirt - There are 2 doors per hinge. Ensure only one door is open per hinge at any one time. Two open doors can snap the hinge resulting in the extremely heavy ballistic skirt falling
10 Side ballistic skirts (refer to Figure 90-5) – refer to “Tracks, Road Wheels, Rollers and Ballistic Armoured Skirts” below.
11 Remove spare road wheels and clean both the wheels and the mounts/brackets (see Figure 90-7).
12 Remove the A-frame/tow bar and cable attachments and clean both the items and their mounts/brackets (see Figure 90-8).
13 The mounted vice is to be cleaned of grease to ensure freedom of QRM. Reapply after inspection by AQIS and cover with a protective sheet e.g. plastic (refer Figure 90-8).
14 All toolboxes and attachment points are to be cleaned of all soil, plant and insect matter. It may be necessary to remove the attachment points to ensure no soil is trapped underneath (see Figure 90-11).
EXTREME CAUTION Ballistic Skirt
There are 2 doors per hinge. Ensure only one door is open per hinge at any one time. Two open doors can snap the hinge resulting in the
extremely heavy ballistic skirt falling
Serial Comments or Tasks Technical Time (hours)
15 Wooden tools are to be wiped down and inspected for insect infestation. Any item that has termite infestation is to be destroyed. Items that have borer infestation are subject to AQIS scrutiny and fumigation before return to Australia.
16 Metal tools are to be wiped clean of all soil, plant and insect matter. Degrease items as required to remove all grime and dirt, lightly oil and leave out for inspection. Tools may be re-oiled after inspection in consultation with the AQIS inspector.
17 Ensure the six-barrel smoke grenade launchers on each side of the turret are cleaned and free of QRM (see Figure 90-12). Care is to be taken during cleaning because the launchers contain electrical contacts.
18 Canvas smoke grenade launchers covers are to be turned inside out and checked for burrs, seeds and insects;
19 Cleaning guides for the boom can be found in “boom, boom housing and winches” below (refer Figure 90-13).
20 Cleaning guides for the spade can be found in “Stabilising Spade” below (refer Figure 90-14).
21 Cleaning guides for the exhaust and heat deflectors can be found in “Engine Bay” below (refer Figures 90-15 and 90-16).
Tracks, Road Wheels, Rollers and Ballistic Armoured Skirt
90.4 The cleaning instructions for the M88A2 Hercules HRV tracks, road wheels, rollers and track ballistic armoured skirt, as illustrated in Figures 90–17 to 90–23, include the points detailed in Table 90–2.
Figure 90–22: M88A2 Hercules HRV Track Front (Left) and Rear (Right)
EXTREME CAUTION Ballistic Armoured Skirt
There are 2 doors per hinge. Ensure only one door is open per hinge at any one time. Two doors can snap the hinge resulting in the falling
of the extremely heavy ballistic armoured skirt
Table 90–2: Cleaning Instructions for the M88A2 Hercules HRV Tracks, Road Wheels, Rollers and Ballistic Armoured Skirt
Serial Comments or Tasks Technical Time (hours)
1 EXTREME CAUTION - Ballistic Armoured Skirt - There are 2 skirt doors per hinge. Ensure only one door is open per hinge at any one time. Two doors can snap the hinge resulting in the falling of the extremely heavy ballistic armoured skirt.
2 Open ballistic armoured skirts to allow access to the wheel and track compartments (refer Figure 90–18).
3 Remove all other non-affixed panels to allow cleaning and inspection.
4 Clean all road wheels ensuring they are free of QRM (refer Figures 90–17 to 90–19).
5 Road wheel support arms accumulate soil and areas behind require cleaning (refer Figure 90–19).
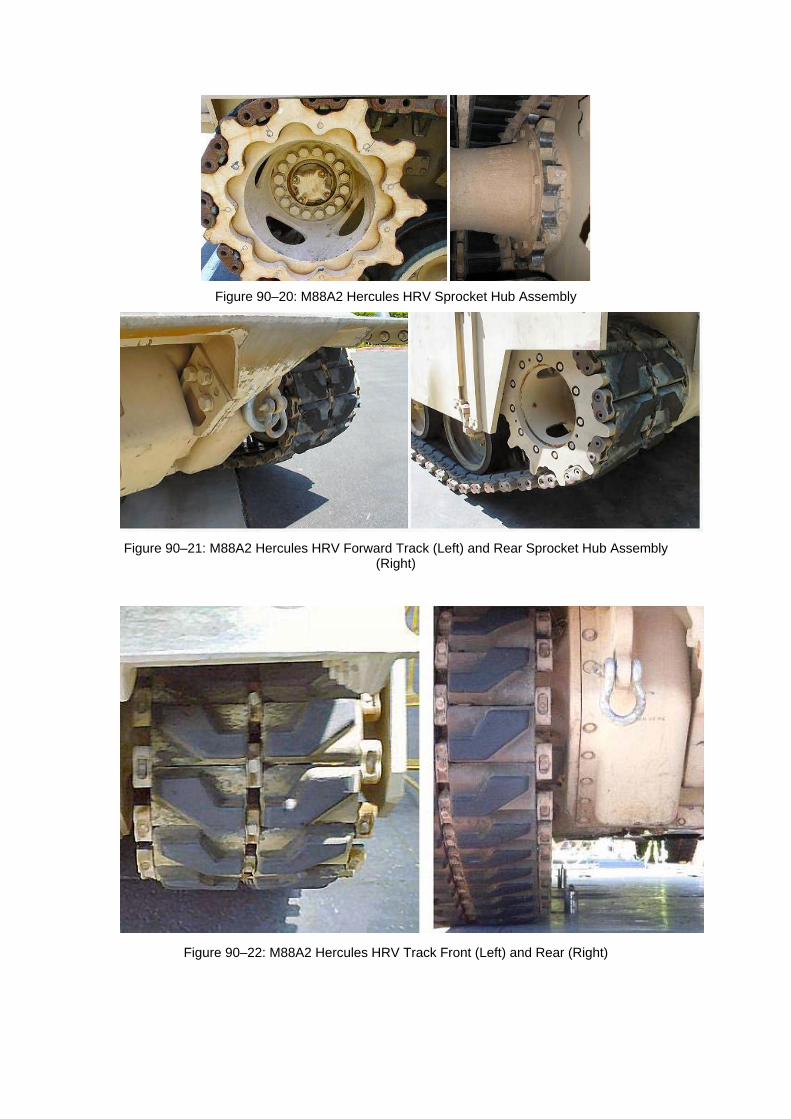
6 Clean all sprocket hub assemblies ensuring there are free of QRM (refer Figures 90–20 and 90-21).
7 Clean all tracks ensuring there are free of QRM.
8 Roll tracks – one revolution required to check cleanliness of each track pad & countersunk bolts on rollers and idler wheels
9 Clean all internal ledges and hollow cavities inside track frames.
10 All pads must be inspected to ensure they are free of QRM. Pads that cannot be cleaned are to be replaced (refer Figure 90–22).
11 Rollers – each roller must be individually cleaned. Note: Rollers have rubber rims.
Hydraulic and Electrical Cables
90.5 The cleaning instructions for the M88A2 Hercules HRV hydraulic and electrical cables include the point detailed in Table 90-3.
Table90–3: Cleaning Instructions for the a M88A2 Hercules HRV Hydraulic and Electrical Cables
Serial Comments or Tasks Technical Time (hours)
1 All electrical and hydraulic lines are to be separated and all grease and soil debris cleaned from in between them.
2.0
Boom, Boom Housing and Winches
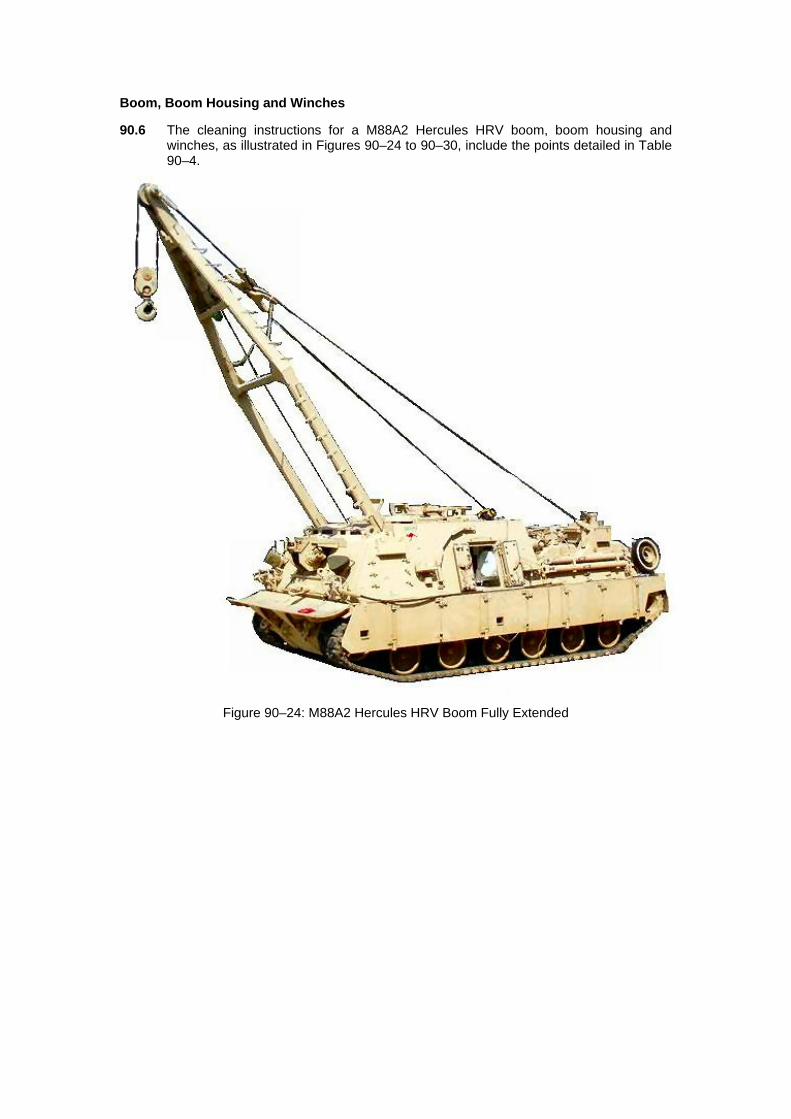
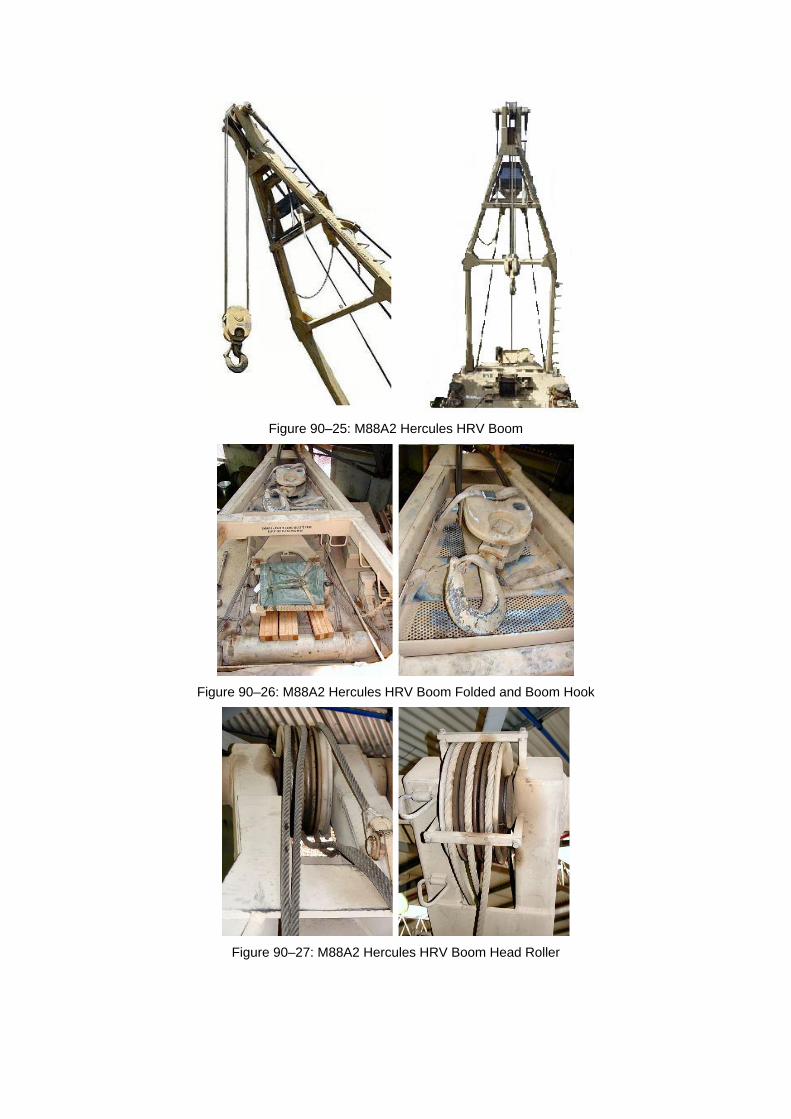
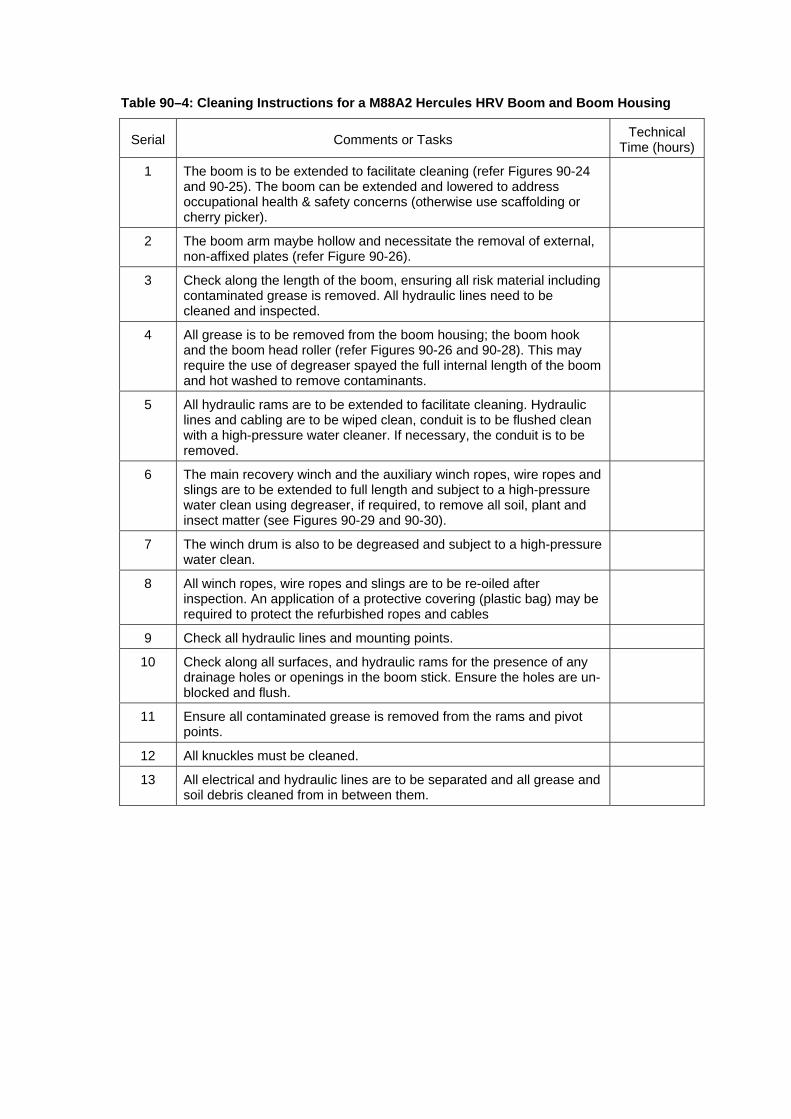
90.6 The cleaning instructions for a M88A2 Hercules HRV boom, boom housing and winches, as illustrated in Figures 90–24 to 90–30, include the points detailed in Table 90–4.
Table 90–4: Cleaning Instructions for a M88A2 Hercules HRV Boom and Boom Housing
Serial Comments or Tasks Technical Time (hours)
1 The boom is to be extended to facilitate cleaning (refer Figures 90-24 and 90-25). The boom can be extended and lowered to address occupational health & safety concerns (otherwise use scaffolding or cherry picker).
2 The boom arm maybe hollow and necessitate the removal of external, non-affixed plates (refer Figure 90-26).
3 Check along the length of the boom, ensuring all risk material including contaminated grease is removed. All hydraulic lines need to be cleaned and inspected.
4 All grease is to be removed from the boom housing; the boom hook and the boom head roller (refer Figures 90-26 and 90-28). This may require the use of degreaser spayed the full internal length of the boom and hot washed to remove contaminants.
5 All hydraulic rams are to be extended to facilitate cleaning. Hydraulic lines and cabling are to be wiped clean, conduit is to be flushed clean with a high-pressure water cleaner. If necessary, the conduit is to be removed.
6 The main recovery winch and the auxiliary winch ropes, wire ropes and slings are to be extended to full length and subject to a high-pressure water clean using degreaser, if required, to remove all soil, plant and insect matter (see Figures 90-29 and 90-30).
7 The winch drum is also to be degreased and subject to a high-pressure water clean.
8 All winch ropes, wire ropes and slings are to be re-oiled after inspection. An application of a protective covering (plastic bag) may be required to protect the refurbished ropes and cables
9 Check all hydraulic lines and mounting points.
10 Check along all surfaces, and hydraulic rams for the presence of any drainage holes or openings in the boom stick. Ensure the holes are un-blocked and flush.
11 Ensure all contaminated grease is removed from the rams and pivot points.
12 All knuckles must be cleaned.
13 All electrical and hydraulic lines are to be separated and all grease and soil debris cleaned from in between them.
Stabilising Spade
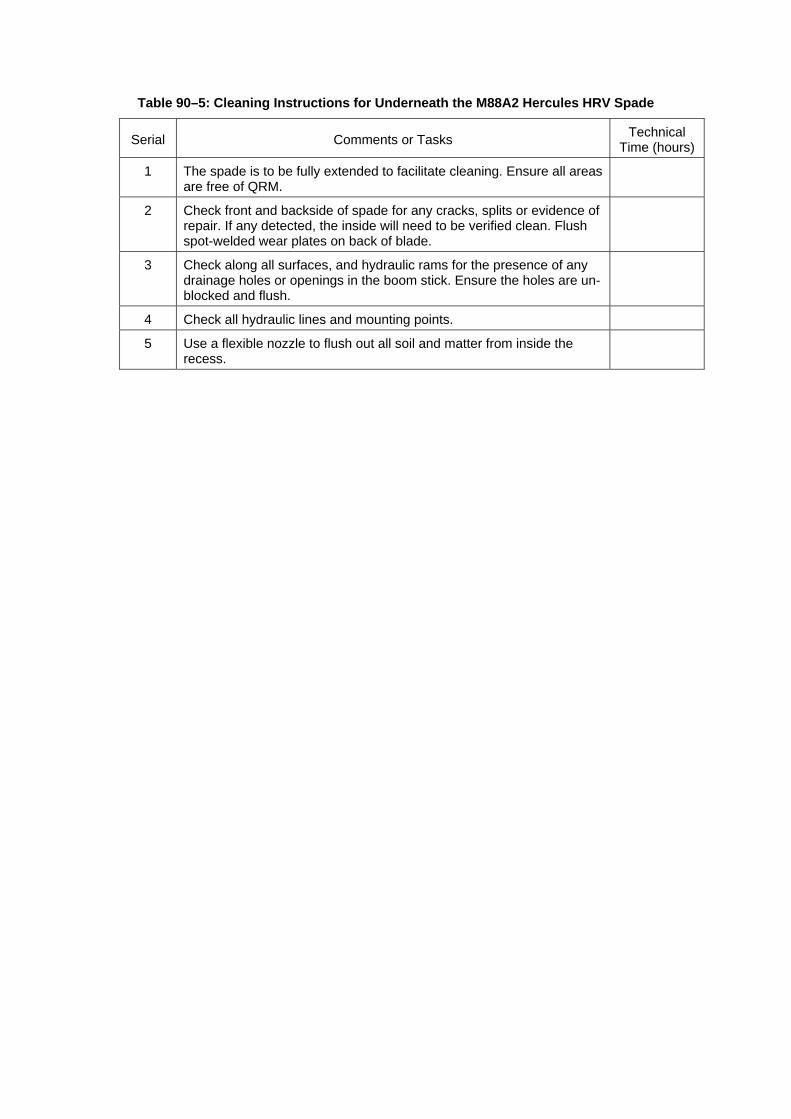
90.7 The cleaning instructions for the underneath the M88A2 Hercules HRV spade, as illustrated in Figures 90-31 and 90-32, includes the points detailed in Table 90-5.
Figure 90–31: Underneath the M88A2 Hercules HRV Spade Fully Extended
Figure 90–32: Underneath the M88A2 Hercules HRV Underside of Spade
Table 90–5: Cleaning Instructions for Underneath the M88A2 Hercules HRV Spade
Serial Comments or Tasks Technical Time (hours)
1 The spade is to be fully extended to facilitate cleaning. Ensure all areas are free of QRM.
2 Check front and backside of spade for any cracks, splits or evidence of repair. If any detected, the inside will need to be verified clean. Flush spot-welded wear plates on back of blade.
3 Check along all surfaces, and hydraulic rams for the presence of any drainage holes or openings in the boom stick. Ensure the holes are un-blocked and flush.
4 Check all hydraulic lines and mounting points.
5 Use a flexible nozzle to flush out all soil and matter from inside the recess.
Underneath Vehicle
90.8 The cleaning instructions for the underneath the M88A2 Hercules HRV, as illustrated in Figure 90-33, includes the points detailed in Table 90-6.
Figure 90–33: Underneath the M88A2 Hercules HRV
Table 90–6: Cleaning Instructions for Underneath the M88A2 Hercules HRV
Serial Comments or Tasks Technical Time (hours)
1 Remove all soil and matter from all surfaces, including the inside of the roadwheels and support arms. (see Figure 90-19).
2 Remove all grease that is contaminated with soil, plant and insect matter.
3 Use a flexible nozzle to flush out all soil and matter from the access cover recess.
Air Filter
90.9 The cleaning instructions for the M88A2 Hercules HRV air filter include the points detailed in Table 90-7.
Table 90–7: Cleaning Instructions for the M88A2 Hercules HRV Air Filter
Serial Comments or Tasks Technical Time (hours)
1 Remove the filter to facilitate cleaning. The filter housing is to be blown clean with high-pressure air.
2 Removal of the filter is required as small plant seeds (for example, Siam weed) can contaminate and cannot be removed effectively.
3 All soil, plant and insect matter should be removed from the pre-cleaner tray.
4 All soil, plant and insect matter should be removed from the filter cyclonic tubes. If water is used, ensure the opening into the turbo compressor housing is sealed and taped to prevent the ingress of water.
Engine Bay
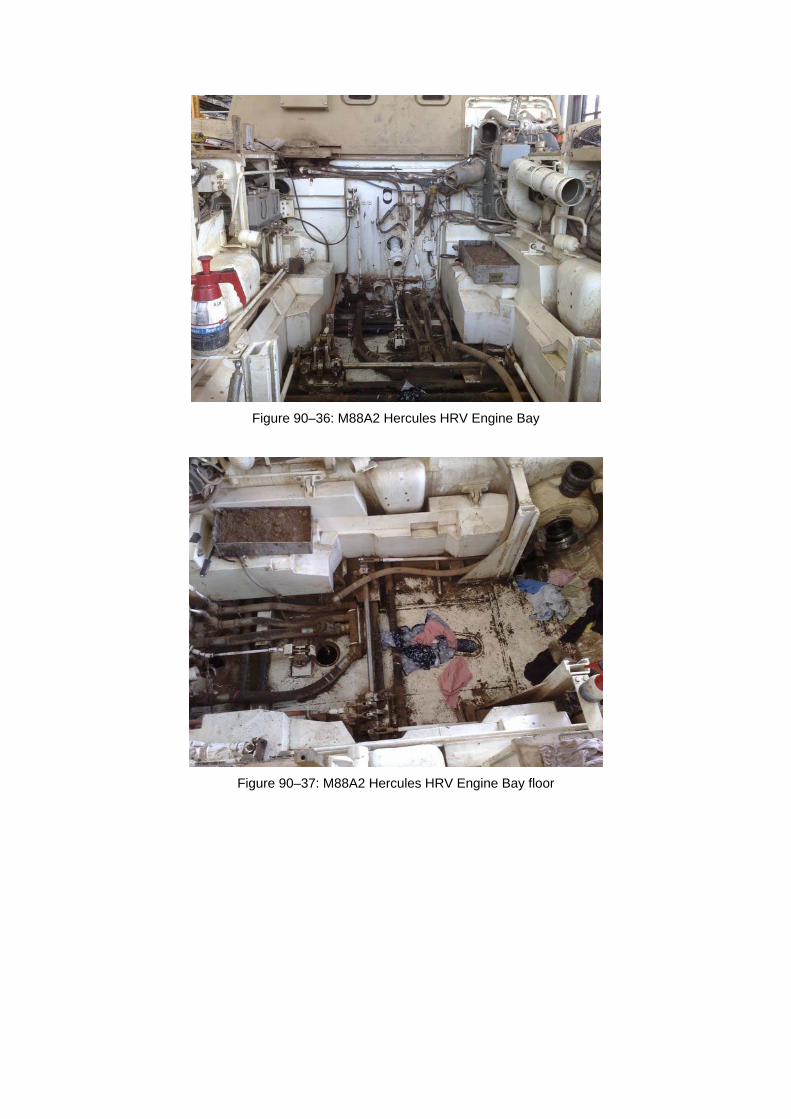
90.10 The cleaning instructions for the M88A2 Hercules HRV engine bay, as illustrated in Figures 90-34 to 90-39, include the points detailed in Table 90-8.
Figure 90–34: M88A2 Hercules HRV Engine Bay with armoured cover removed
Figure 90–35: M88A2 Hercules HRV Armoured Engine Bay Cover
Figure 90–36: M88A2 Hercules HRV Engine Bay
Figure 90–37: M88A2 Hercules HRV Engine Bay floor
Figure 90–38: M88A2 Hercules HRV Engine Bay and Exhaust Heat Deflectors
Figure 90–39: M88A2 Hercules HRV Engine Bay and Exhaust Heat Deflectors
Table 90–8: Cleaning Instructions for the M88A2 Hercules HRV Engine Bay
Serial Comments or Tasks Technical Time (hours)
1 The armoured engine bay cover is to be removed and cleaned with particular attention paid to the vice, toolboxes and underside of the cover.
2 The rear exhaust heat deflectors are to be opened and grilles are to be cleaned and free of QRM (refer Figures 90-34 and 90-35).
3 The power pack is to be removed to facilitate cleaning of the engine bay.
10.0
4 Ensure that any hull openings/breathers, hose connections and that the exhausts are taped prior to cleaning to stop ingress of water prior to commencing cleaning.
5 Do not direct high-pressure water jets at any of the hull openings/breathers, or at any of the electrical/electronic components.
6 With the power pack removed, strip any acoustic and heat reflective insulation from the walls of the power pack compartment and dispose of in accordance with AQIS directions.
7 A flexible nozzle should be used to flush out all QRM from inside the recesses and around the components in the engine bay.
8 Use a flexible nozzle to flush out all grease that is contaminated with QRM from around cavities, cables, hoses and hydraulic lines.
Power Pack
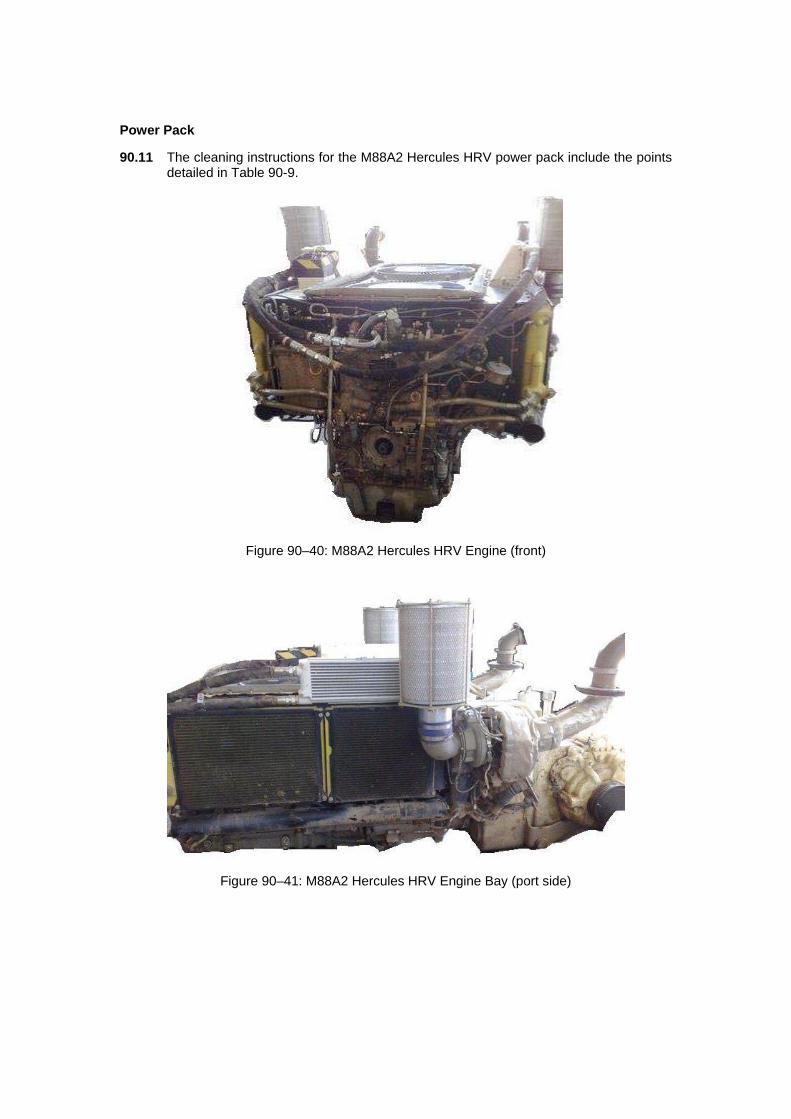
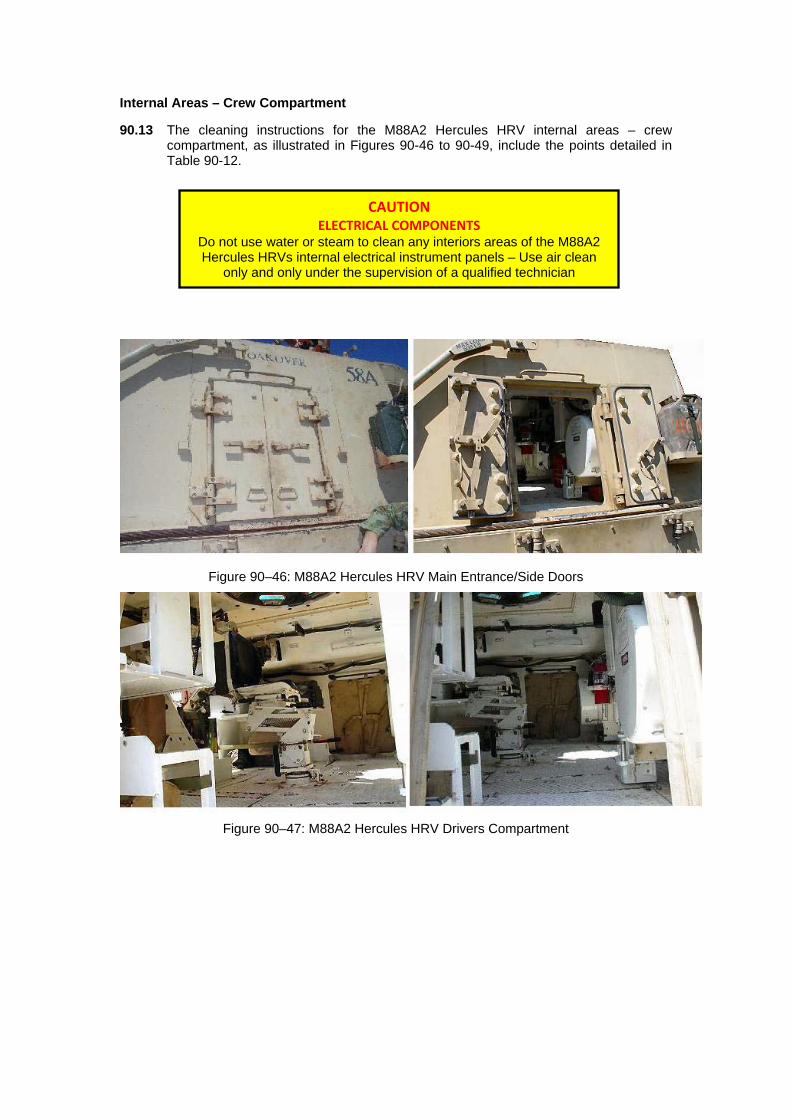
90.11 The cleaning instructions for the M88A2 Hercules HRV power pack include the points detailed in Table 90-9.
Figure 90–40: M88A2 Hercules HRV Engine (front)
Figure 90–41: M88A2 Hercules HRV Engine Bay (port side)
Figure 90–42: M88A2 Hercules HRV Engine (rear)
Figure 90–43: M88A2 Hercules HRV Engine Bay (starboard side)
Table 90–9: Cleaning Instructions for the M88A2 Hercules HRV Power Pack
Serial Comments or Tasks Technical Time (hours)
1 During the power pack removal, the air-conditioning condensers, tube and fin fuel cooler and radiator should be checked for contamination by plant and insect material. This may require disassembly of the cooling tower coolers, condensers, and radiator to access the contaminants.
6.0
2 Ensure that any engine openings/breathers/etc are taped or plugged to stop ingress of water prior to commencing cleaning.
3 Do not direct high-pressure water jets at any of the engine openings/breathers, or at any of the electrical/electronic components.
Battery Bay
90.12 The cleaning instructions for the M88A2 Hercules HRV’s battery bay, as illustrated in Figures 90–44 and 90–45, include the points detailed in Table 90–11.
Figure 90–44: M88A2 Hercules HRV’s Battery Bay Hatches.
Figure 90–45: M88A2 Hercules HRV’s Battery Bay
Table 90–11: Cleaning Instructions for the M88A2 Hercules HRV’s Battery Bay
Serial Comments or Tasks Technical Time (hours)
1 Remove the batteries from the compartment and clean (refer Figure 90–49).
2 Clean the battery boxes and cradles and ensure they are free of dirt, dust, plant and insect material.
3 Re-fit batteries only after inspected by AQIS.
Internal Areas – Crew Compartment
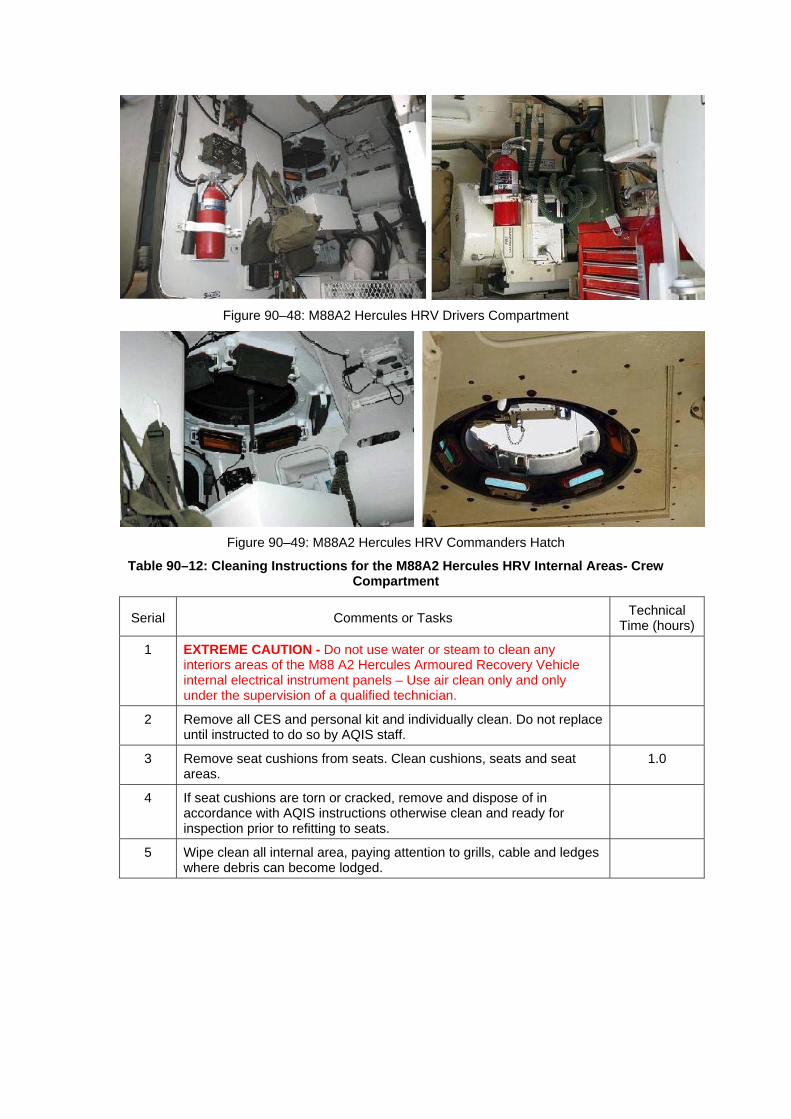
90.13 The cleaning instructions for the M88A2 Hercules HRV internal areas – crew compartment, as illustrated in Figures 90-46 to 90-49, include the points detailed in Table 90-12.
CAUTION ELECTRICAL COMPONENTS
Do not use water or steam to clean any interiors areas of the M88A2 Hercules HRVs internal electrical instrument panels – Use air clean
only and only under the supervision of a qualified technician
Figure 90–46: M88A2 Hercules HRV Main Entrance/Side Doors
Table 90–12: Cleaning Instructions for the M88A2 Hercules HRV Internal Areas- Crew Compartment
Serial Comments or Tasks Technical Time (hours)
1 EXTREME CAUTION - Do not use water or steam to clean any interiors areas of the M88 A2 Hercules Armoured Recovery Vehicle internal electrical instrument panels – Use air clean only and only under the supervision of a qualified technician.
2 Remove all CES and personal kit and individually clean. Do not replace until instructed to do so by AQIS staff.
3 Remove seat cushions from seats. Clean cushions, seats and seat areas.
1.0
4 If seat cushions are torn or cracked, remove and dispose of in accordance with AQIS instructions otherwise clean and ready for inspection prior to refitting to seats.
5 Wipe clean all internal area, paying attention to grills, cable and ledges where debris can become lodged.
Tarpaulins
90.14 The cleaning instructions for the tarpaulins include the points detailed in Table 90-13.
Table 90–13: Cleaning Instructions for Tarpaulins
Serial Comments or Tasks Technical Time (hours)
1 All tarpaulins are to be given a brush down, brush scrubbing and hose cleaning, paying particular attention to the seam areas and then hung so as not to contact the ground for drying.
2 All ropes and universal dispatch straps are to be extended to their full length and wiped or washed clean of all soil, plant and insect matter. Attention to attachment points and fixtures and tension devices is required. Personnel are to inspect and remove all twigs, foliage, and so on that has become embedded in the rope fibres.
3 Velcro panels and seams (where fitted) are to be brushed and washed to ensure all seed, plant and soil material is removed.
4 Canvas bags are to be turned inside out and checked for burrs, seeds and insects;
5 Where fitted, poles, knuckles and pegs are to be subject to a high-pressure water clean to remove all soil, plant and insect matter (ants, spiders and mud wasps are of particular concern).
6 If tarpaulins have not been used during the entire deployment, then the requirement is for all tarpaulins to be unrolled, brushed and swept clean to ensure no vermin or insect infestation and then subject to an AQIS inspection.
Camouflage Nets
90.15 The cleaning instructions for camouflage nets include the points detailed in Table 90-14.
90–14: Cleaning Instructions for Camouflage Nets
Serial Comments or Tasks Technical Time (hours)
1 Removal of grass and debris may be achieved by use of a petrol powered blower/vacuum in the first instance, use of water should be avoided.
2 Heavily soiled camouflage nets may require further scrubbing and a dip in an approved detergent/disinfectant (one in 20 solution). This has been achieved in the past by using trailers with required additive.
3 Depending on the degree of contamination and diligence in the cleaning process, camouflage nets may require three or more trailer dips to achieve the required AQIS clearance.
4 Drying is to be achieved by hanging the camouflage net so that it does not come into contact with the ground.
5 Nets are to be inspected to ensure that all plant material is removed.
6 Camouflage poles are to be brushed or swept clean; and metal joiners are to be removed cleaned and inspected by AQIS officers.