6.0(05.03.05) 2005.03.09 Rev. Description Date By Revlewed Design P.M. Supervisor Approved Manual (ENG+ES) FOR USA 1/61 1:1 6.1 2005.04.09 HAN HUA OPTICS LIMITED COMPANY Model: Part No: Part: Remark: Scale: Date: Pages: Edition: DVR 1600 P.C.C. G.M. Penny Penny File Internal External 40-015-405400 (0503C) F F Change MANUAL DVR 1600 ENG+ES Ver. A (2005.04.09) 6.0(05.03.05) 2005.03.09 Penny (0503C) G G Change macrovision 3
Transcript
6.0(05.03.05) 2005.03.09
Rev.DescriptionDate By
Revlewed Design P.M.SupervisorApproved
Manual (ENG+ES)FOR USA
1/611:16.1
2005.04.09
HAN HUA OPTICS LIMITED COMPANYModel: Part No:Part:
Remark:Scale:
Date:Pages:Edition:DVR 1600
P.C.C.G.M.
Penny
Penny
File Internal External
40-015-405400
(0503C)F F Change
MANUALDVR 1600 ENG+ES
Ver. A (2005.04.09)
6.0(05.03.05) 2005.03.09 Penny(0503C)G G Change macrovision3
Progressive Scan Video Playback
000:00:00VIDEO
DVD R W
RECORD STAND BY
L AUDIO R VIDEO IN 2DV IN
DVR 1600 DVD RECORDER WITH PROGRESSIVE SCAN PLAYBACK
TM
DVD Recorder & Player
DVR 1600W
ith
Operation GuideOperation Guide
EN
GE
S
TMTM JPGJPG
1. WHAT DOES THIS WARRANTY COVER? This warranty covers any defectsor malfunctions in your new CyberHome DVD player / recorder / writer oraccessories.
2. HOW LONG IS THE PERIOD OF COVERAGE? This warranty is valid forservice as follows: Three (3) months no charge for labor and up to one (1) yearfor parts from the date of purchase.
3. WHAT WILL CYBERHOME DO?
LABOR: If the product is determined to be defective within three (3)months of the date of purchase, CyberHome will repair or replace it at no charge.After the three (3) months has expired, you will be responsible for any laborcharges.
PARTS: If service is being performed by a CyberHome technician, the costof parts is covered for up to one (1) year from the date of purchase. CyberHomewill not repair or replace defective parts unless the work is performed by aCyberHome technician.
Proof of purchase that is evidence in the form of a bill of sale or a receiptedinvoice must be provided at the time service is requested in order to receivewarranty service.
4. WHAT DOES THIS WARRANTY NOT COVER? Any damage or problem thatresults from misuse, abuse, or an act of God (such as flood) are not covered.This warranty does not permit recovery of consequential or incidental damages.Some states do not allow the exclusion or limitation of incidental orconsequential damages, so the above limitation may not apply to you.
5. HOW DO YOU GET SERVICE? You must be issued a Return MerchandiseAuthorization (RMA) number by CyberHome's Customer Service Center. Toreceive an RMA, contact customer service at 1-888-302-2727 or email customerservice at [email protected]. Upon receipt of an RMA number, you mustsend the product back, postage prepaid to:
CyberHome Service Center48350 Fremont Blvd.Fremont, CA 94538RMA #
The RMA# must be visible on the outside of the package in order for CyberHometo accept delivery of the returned product.
6. HOW DOES STATE LAW APPLY? This warranty gives you specific legalrights, and you may also have other rights which vary from state to state.
CYBERHOME DOES NOT OFFER REFUNDS.
WARRANTY IS INVALID IF PRODUCT IS MODIFIED, ALTERED OR OPENED.
CYBERHOME RECOMMENDS PUTTING UNIT IN A WELL VENTILATED AREA.
Periodic changes are made to our warranty. Please contact customer service orvisit our website at: www.cyberhome.com for the latest information regardingyour product or warranty.
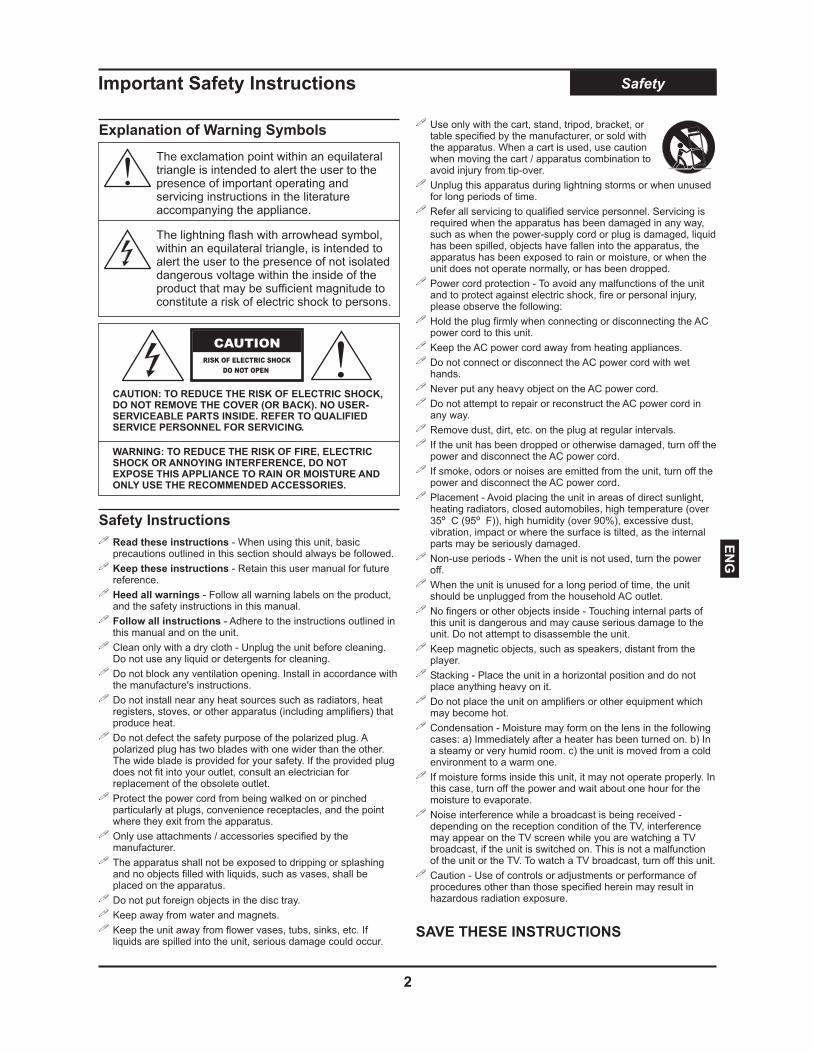
CAUTION
RISK OF ELECTRIC SHOCK
DO NOT OPEN !
!The exclamation point within an equilateraltriangle is intended to alert the user to thepresence of important operating andservicing instructions in the literatureaccompanying the appliance.
The lightning flash with arrowhead symbol,within an equilateral triangle, is intended toalert the user to the presence of not isolateddangerous voltage within the inside of theproduct that may be sufficient magnitude toconstitute a risk of electric shock to persons.
WARNING: TO REDUCE THE RISK OF FIRE, ELECTRICSHOCK OR ANNOYING INTERFERENCE, DO NOTEXPOSE THIS APPLIANCE TO RAIN OR MOISTURE ANDONLY USE THE RECOMMENDED ACCESSORIES.
CAUTION: TO REDUCE THE RISK OF ELECTRIC SHOCK,DO NOT REMOVE THE COVER (OR BACK). NO USER-SERVICEABLE PARTS INSIDE. REFER TO QUALIFIEDSERVICE PERSONNEL FOR SERVICING.
2
!
!
!
!
!
!
!
!
!
!
!
!
Read these instructions
Keep these instructions
Heed all warnings
Follow all instructions
- When using this unit, basicprecautions outlined in this section should always be followed.
- Retain this user manual for futurereference.
- Follow all warning labels on the product,and the safety instructions in this manual.
- Adhere to the instructions outlined inthis manual and on the unit.
Clean only with a dry cloth - Unplug the unit before cleaning.Do not use any liquid or detergents for cleaning.
Do not block any ventilation opening. Install in accordance withthe manufacture's instructions.
Do not install near any heat sources such as radiators, heatregisters, stoves, or other apparatus (including amplifiers) thatproduce heat.
Do not defect the safety purpose of the polarized plug. Apolarized plug has two blades with one wider than the other.The wide blade is provided for your safety. If the provided plugdoes not fit into your outlet, consult an electrician forreplacement of the obsolete outlet.
Protect the power cord from being walked on or pinchedparticularly at plugs, convenience receptacles, and the pointwhere they exit from the apparatus.
Only use attachments / accessories specified by themanufacturer.
The apparatus shall not be exposed to dripping or splashingand no objects filled with liquids, such as vases, shall beplaced on the apparatus.
Do not put foreign objects in the disc tray.
Keep away from water and magnets.
Keep the unit away from flower vases, tubs, sinks, etc. Ifliquids are spilled into the unit, serious damage could occur.
!
!
Important Safety Instructions Safety
!
!
!
!
!
!
!
!
!
!
!
!
!
!
!
!
!
!
!
Use only with the cart, stand, tripod, bracket, ortable specified by the manufacturer, or sold withthe apparatus. When a cart is used, use cautionwhen moving the cart / apparatus combination toavoid injury from tip-over.
Unplug this apparatus during lightning storms or when unusedfor long periods of time.
Refer all servicing to qualified service personnel. Servicing isrequired when the apparatus has been damaged in any way,such as when the power-supply cord or plug is damaged, liquidhas been spilled, objects have fallen into the apparatus, theapparatus has been exposed to rain or moisture, or when theunit does not operate normally, or has been dropped.
Power cord protection - To avoid any malfunctions of the unitand to protect against electric shock, fire or personal injury,please observe the following:
Hold the plug firmly when connecting or disconnecting the ACpower cord to this unit.
!
!
!
!
Keep the AC power cord away from heating appliances.
Do not connect or disconnect the AC power cord with wethands.
Never put any heavy object on the AC power cord.
Do not attempt to repair or reconstruct the AC power cord inany way.
Remove dust, dirt, etc. on the plug at regular intervals.
If the unit has been dropped or otherwise damaged, turn off thepower and disconnect the AC power cord.
If smoke, odors or noises are emitted from the unit, turn off thepower and disconnect the AC power cord.
Placement - Avoid placing the unit in areas of direct sunlight,heating radiators, closed automobiles, high temperature (over35 C (95 F)), high humidity (over 90%), excessive dust,vibration, impact or where the surface is tilted, as the internalparts may be seriously damaged.
Non-use periods - When the unit is not used, turn the poweroff.
When the unit is unused for a long period of time, the unitshould be unplugged from the household AC outlet.
No fingers or other objects inside - Touching internal parts ofthis unit is dangerous and may cause serious damage to theunit. Do not attempt to disassemble the unit.
Keep magnetic objects, such as speakers, distant from theplayer.
Stacking - Place the unit in a horizontal position and do notplace anything heavy on it.
Do not place the unit on amplifiers or other equipment whichmay become hot.
Condensation - Moisture may form on the lens in the followingcases: a) Immediately after a heater has been turned on. b) Ina steamy or very humid room. c) the unit is moved from a coldenvironment to a warm one.
If moisture forms inside this unit, it may not operate properly. Inthis case, turn off the power and wait about one hour for themoisture to evaporate.
Noise interference while a broadcast is being received -depending on the reception condition of the TV, interferencemay appear on the TV screen while you are watching a TVbroadcast, if the unit is switched on. This is not a malfunctionof the unit or the TV. To watch a TV broadcast, turn off this unit.
Caution - Use of controls or adjustments or performance ofprocedures other than those specified herein may result inhazardous radiation exposure.
º º
SAVE THESE INSTRUCTIONS
Explanation of Warning Symbols
Safety Instructions
EN
G
Legal Notices RegardingMacrovision’s Property Rights
“ This product incorporates copyright protectiontechnology that is protected by U.S. Patents andother intellectual property rights. Use of thiscopyright protection technology must be authorizedby Macrovision, and is intended for home and otherlimited viewing uses only unless otherwiseauthorized by Macrovision. Reverse engineering ordisassembly is prohibited.”
“U.S. Patent Nos. 4,631,603; 4,819,098; 4,907,093;5,315,448; and 6,516,132.”
Consumers should note that not all high definitiontelevision sets are fully compatible with this productand may cause artifacts to be displayed in thepicture. In case of 525 progressive scan pictureproblems, it is recommended that the user switchthe connection to the 'Standard Definition' output. Ifthere are questions regarding our TV setcompatibility with this model 525p DVD player,please contact our customer service center.
On-Screen Disc Title Navigator gives you quick, easyaccess to your Recordings.
Built-In TV Tuner.
Front and Rear A/V Inputs.
DV Input and Camcorder control.
Delete/Rename Titles.
Auto-Insert Chapter Markers.
Your recordings are playable on most DVD Players.
!
!
!
!
!
!
!
!
Plays DVD, SVCD/VCD, MPG, JPG, Audio CDFormats.
Fast Forward / Reverse.
Slow Motion Playback, Frame-by-Frame Stepping.
Repeat Playback (Chapter/Title/Disc & A-B).
Restrict playback by Ratings, User DefinedPassword, Password Change.
MP3 Player
JPG Slideshows with Thumbnail preview.
Zoom to x4 with Panning.
Features Introduction
The DVR 1600 DVD Recorder with Progressive Scan Video Out
Recording Features Playback Features
3
Checking the Package ContentsIn addition to the DVD Recorder, your package shouldcontain the following accessories. Check the contents ofthe package carefully, as some items may be locatedunder the packing foam.
3
4
5
1
2
Remote control with battery
A/V cable (Video, Stereo Audio)
Power cord
RF Cable for TV
This operation manual and warrantyinformation
Accessories
1
4 53
2
Notes on Copyright Copyrights
Progressive Scan Video Playback
000:00:00VIDEO
DVD R W
RECORD STAND BY
L AUDIO R VIDEO IN 2DV IN
DVR 1600 DVD RECORDER WITH PROGRESSIVE SCAN PLAYBACK
DVD Video: This unit plays DVDs recorded for aparticular region. The region mark on the back of theplayer must correspond to that on any DVD discs youwish to play. Units sold in North America are codedfor Region 1, and are compatible with discs markedaccordingly.
DVD-R/RW: These discs can be played back whenrecorded in standard DVD Video format.
DVD-Audio: This unit will playback only the 5.1CHsound track on DVD-Audio discs.
Video CD (VCD/SVCD): On VCD/SVCD discs,advanced features such as PBC (Playback Control)are available.
CD-R/RW: This unit features an on-screen navigatorfor easy access to playable files stored on CD-R/RWdiscs, such as JPG images and MP3 music.
CD-Audio: An on-screen navigator is provided toselect and play tracks when using CD-Audio discs.
JPG
!
!
!
!
!
Finger prints or stains on the surface of the disc maycause signal loss.
Use a soft cloth and wipe in a radiating manner fromthe center of the disc to the outer rims when cleaningthe disc surface.
Never add labels or adhesive tapes on the discs andbe careful not to scratch or damage the disc surface.
To prevent discs from becoming bent or deformed,they should be vertically kept in the disc storage case.To prevent damage, avoid leaving discs in your car,where they may be subject to direct sunlight and hightemperature.
Do not use any disc accessory to improve the audioquality, disc protective solutions or lens cleaner.These products may damage the disc surface.
!Hold a disc by the rim or with an index finger in thecentral hole. Never touch the signal surface.
Labels
Tapes
Labeling Side
Surface
Disc Compatibility & Care Discs
Discs Suitable for Playback
Caring for Optical Discs
5
DVD+R: These discs can only be written to once.Existing recordings can be hidden but not deleted.So, any disc space already used by a recordingcannot be regained. DVD+R discs are required to be"Finalized" before they will be compatible withstandard DVD Players. Once a disc is finalized, nofurther recordings can be made.
DVD+RW: DVD+RW discs can be written to anderased multiple times. Existing recordings can bedeleted and disc space regained. These discs do notrequire a finalization procedure. As soon as arecording is made, the disc will be compatible withstandard DVD Players.
Discs Suitable for Recording
DVD+RW
DVD+R
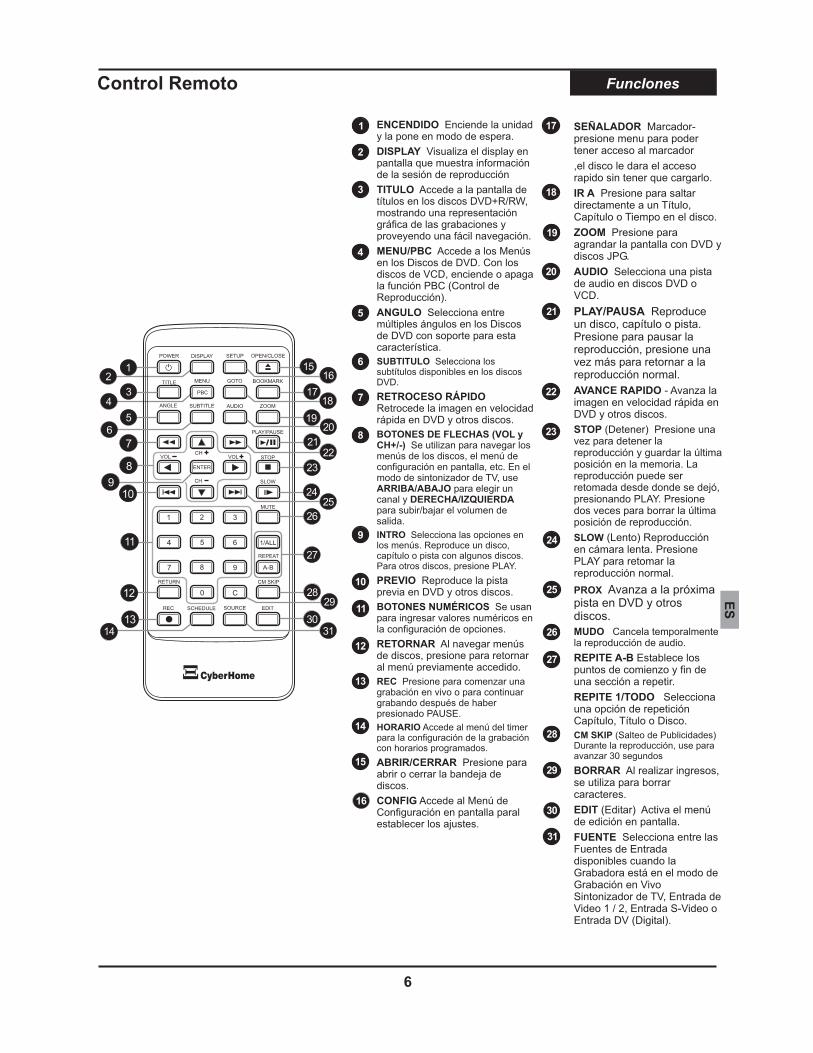
POWER
MENU / PBC
- Turns the unit onand sends the unit to Standbymode.
- AccessesMenus on DVD Discs. WithVCD discs, turns the PBCfunction On/Off.
DISPLAY
TITLE
ANGLE
SUBTITLE
FAST REVERSE
ARROW KEYS (VOL andCH+/-)
ENTER
PREVIOUS
NUMBER KEYS
RETURN
REC
SCHEDULE
OPEN/CLOSE
SETUP
- Brings up the on-screen display showinginformation for the playbacksession.
- Accesses the titlescreen on DVD+R/RW discs,displaying a graphicalrepresentation of therecordings and providingeasy navigation.
- Selects betweenmultiple angles with DVDDiscs that support thisfeature.
- Selects availablesubtitles on DVD discs.
- Scan infast reverse on DVD andother discs.
- Use to navigate discmenus, on-screen setupmenu, etc. In TV tuner mode,use UP/DOWN to select achannel andincrease/decrease thevolume output level.
- Selects options inmenus. Plays a disc, chapteror track with some discs. Forother discs, press PLAY.
- Plays previoustrack on DVD and other disc.
- Use toenter numeric values whilesetting options.
- When navigatingdisc menus, press to return tothe previous menu accessed.
- Press to begin a liverecording or resumerecording from PAUSE.
- Accesses thetimer menu for scheduledrecording setup.
- Press toopen or close the disc tray.
- Accesses the on-screen Setup Menu forsettings adjustment.
7
8
12
10
11
14
16
3
4
5
1
2
6
9
13
15
17
18
Remote Control Functions
BOOKMARK
GOTO
ZOOM
PLAY/PAUSE
FAST FORWARD
STOP
SLOW
NEXT
A-B REPEAT
REPEAT 1/ALL
CM SKIP
EDIT
SOURCE
- Press toaccess the Bookmarkmenu, a current point on thedisc can be accessedquickly without searching.
Press to jump to aTitle, Chapter or Time onthe disc.
- Press to magnifythe screen with DVD andJPG discs.
- Plays adisc, chapter or track. Pressto pause playback, pressone more time to return tonormal playback.
- Scan infast forward on DVD andother discs.
- Press once to stopplayback and hold the lastposition in memory.Playback can be resumedwhere it was left off bypressing PLAY. Press twiceto clear the last playbackposition.
- Slow motionplayback mode. PressPLAY to resume normalplayback.
- Advanced to thenext track on DVD andother disc.
- Sets thebeginning and end points ofa section to repeat.
- Selects arepeat option - Chapter,Title or Disc.
- During playback,use to advance 30 seconds.
- Enables the on-screen edit menu.
- Selects betweenavailable Input Sourceswhen the Recorder is inLive Record mode - TVTuner, VIDEO IN 1 / 2, S-VIDEO IN or DV IN.
AUDIO
MUTE
CLEAR
- Selects an audiotrack on DVD or VCD discs.
- Temporarilycancels audio playback.
- When enteringinput, use to deletecharacters.
19
21
20
22
24
27
25
28
26
29
30
31
23
6
4
2
POWER
0 C
9
654
3
ENTER
PBC
DISPLAY
87
GOTO
21
A-B
1/ALL
REPEAT
RETURN
REC SCHEDULE
ZOOM
SLOW
CM SKIP
EDIT
CHSTOP
PLAY/PAUSE
MUTE
AUDIOSUBTITLEANGLE
VOL VOL
BOOKMARKMENU
OPEN/CLOSESETUP
1516
SOURCE
CH
1TITLE
8
3
56
7
12
910
1314
11
2019
1817
2122
23
2425
26
27
30
28
3130
3029
EN
G
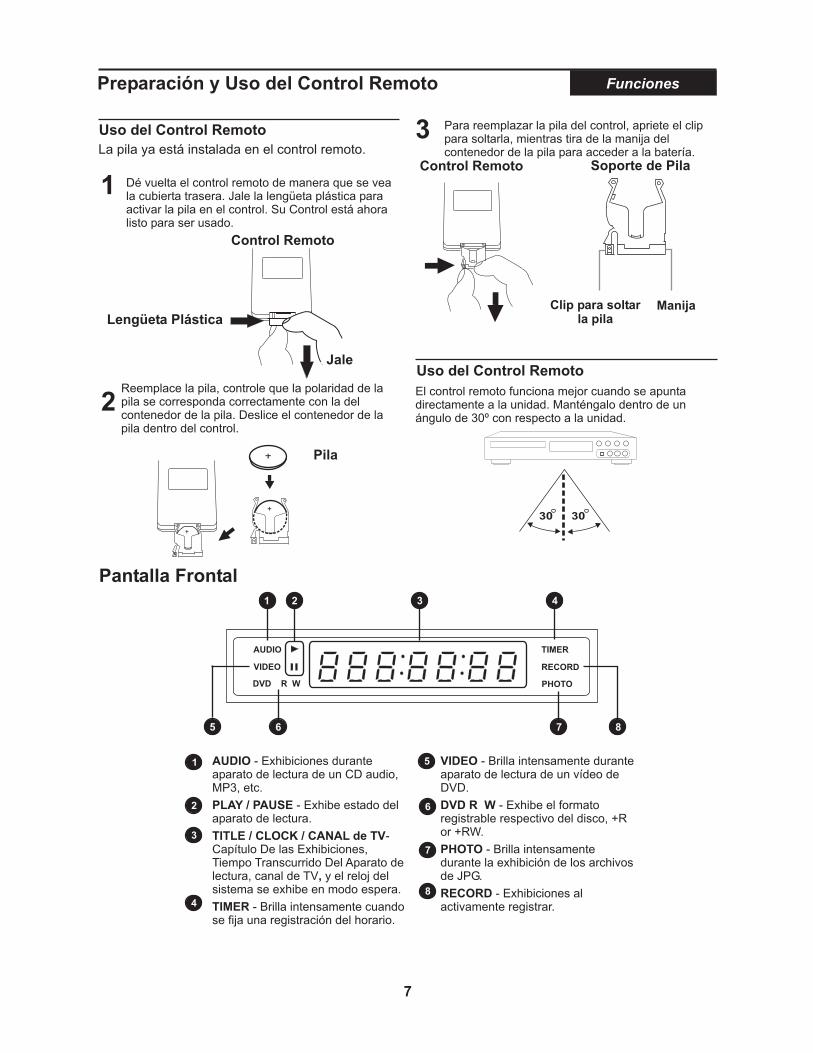
The battery is already installed into the remotecontrol.
Turn over the remote to the back cover. Pull theplastic tab to enable the battery in the remote. Yourremote is now ready for use.
1
2
To replace the battery in the remote, depress therelease clip while pulling the handle of the batteryholder to access the battery.
30 30
The remote control works best when pointed directly atthe unit. Stay within 30 angle of the unit.0
Remote Control Preparation & Use
Remote Control Use
Using the Remote Control
7
Remote Control
Plastic Tab
Pull
6
Remote Control Battery Holder
HandleRelease Clip
Battery
+
+
Replace the battery, check for the correct polarity ofthe battery in the battery holder. Slide the batteryholder back into the remote.
3
15
Functions
Front Display
AUDIO
1 2 3 4
5 6 8
VIDEO
DVD R W
TIMER
RECORD
PHOTO
7
AUDIO VIDEO
DVD R W
PHOTO
- Displays during playbackof an Audio CD, MP3, etc.
- Glows during playback of aDVD Video.
- Displays the respectiverecordable disc format, +R or +RW.
- Glows during display ofJPG files.
PLAY / PAUSE
TITLE / CLOCK / TV Channel
TIMER
RECORD
- Displays playbackstatus.
-Displays Chapter, Elapsed PlaybackTime, System Clock, and TVChannel.
- Glows when a schedulerecording is set.
- Displays when activelyrecording .
7
8
3
4
51
2 6
8
DISC TRAY
FRONT DISPLAY
PLAY/PAUSE
ON / STANDBY
DV IN
LEFT/RIGHT AUDIO IN 2
COMPOSITE VIDEO IN 2
- Loads DVD+R/RW, DVD, CD-R/RW,VCD/SVCD, MP3, JPG and other optical discs.
- The front Vacuum FlourescentDisplay shows information about the unit'soperation, such as current chapter and elapsedtime during playback.
- Begins playback of a disc, chapteror track. Press again during playback to pause,and again to resume playback.
- Turns the unit on and sends the
unit to standby mode. In standby mode, the unitwill use a minute amount of power to enablepower-on by the remote control.
- Front DV Input for recording. To select,use the SOURCE key and select DV IN.
- Front Stereo AudioInputs for recording. These inputs are shared withthe VIDEO IN 2 input.
- Front CompositeVideo Input for recording. To select, use theSOURCE key and select VIDEO IN 2. AV Inputs.
OPEN/CLOSE
RECORD
- Press to open or close the disctray.
- Begins a Live Recording.
7
83
4
5
1
2
6
9
Front Panel Functions
5 6
8 9
1 2 3 4
7
VIDEO IN 2L RAUDIO INDV IN
STANDBY/ONRECORD/
DVR 1600 DVD RECORDER WITH PROGRESSIVE SCAN PLAYBACK
POWER CORD SOCKET
ANTENNA IN / OUT
VIDEO INPUT 1
STEREO AUDIO OUTPUT
COMPOSITE VIDEO OUTPUT
S-VIDEO INPUT
STEREO AUDIO INPUTS
COAXIAL DIGITAL AUDIO OUTPUT
S-VIDEO OUTPUT
COMPONENT/PROGRESSIVE SCAN VIDEOOUTPUT
- Plug the matching endof the power cord into the unit before connectingthe other end to the wall socket.
- For Antenna or Cable TVconnection. Passthrough connection to TV doesnot transfer the output signal from the DVDRecorder.
- Composite Video input forrecording. To select this input, use the SOURCEbutton and choose VIDEO IN 1.
- Connect to TVs orother audio equipment supporting Stereo Audio in.
- Standard VideoOutput supported by most TVs.
- S-VIDEO input for recording. Toselect this input, press SOURCE and choose S-VIDEO IN.
- Use with S-VIDEO IN1 or VIDEO IN 1 for recording.
- Use aspecial Coaxial Digital Cable to send the rawcoded digital signal to devices supporting digitaldecoding.
- Connect to TVs with S-VIDEO in for better picture quality than standardcomposite video.
- Use this output with TVs supportingComponent Video or Progressive Scan input forbest video quality. Select the PROGRESSIVESCAN MODE in the Recorder's SETUP MENU forP-SCAN TVs.
7
8
10
3
4
5
1
2
6
9
Back Panel
~100-230VAC IN
1 2 3 4 5
6 9 10117 8
Pr CrAUDIO
VIDEO OUTPUTINPUT 1
OUT
IN
AUDIO
AUDIO OUTPUT
EN
G
Your new recorder comes with composite video (A/V) cable for connection to TVs with a standard video input asshown below. On most TVs, this connector is colored yellow, and is normally accompanied by stereo audio inputs,colored red and white for stereo channels right and left, respectively.
First, use the supplied A/V cable to connect tothe composite video input on your TV. This isnormally a yellow-colored connector thatmatches the Video output on the back of thisunit. To hear sound through the TV, connect thered and white stereo audio connections as well.
1
Turn on the DVD Recorder. Presson the remote control or front panel.
STANDBY/ON2
Your TV must be equipped with AV inputs like those pictured to the rightin order to connect this unit. If your TV does not have AV inputs, you willneed a RF Modulator to connect the recorder to your TV'santenna/cable input as shown below. RF Modulators are available atmajor electronics retailers.
RF Modulator
Older TV withcoaxial
antenna/cableconnector
DVD RecorderComposite Video Out
VIDEO R - AUDIO - L
Typical Connection to TV Connections
9
On your TV, select the video input. This isnormally done by selecting "Video 1" or "VideoInput" with the remote control. On some TVs, thisis done by selecting a particular channel.
3
BACK OF YOUR TV SET
TO TV
WHITE
RED
YELLOW
WHITE
RED
YELLOW
AN
AL
OG
AV
CA
BL E
FROM AERIAL ANTENNA orCABLE SERVICE
EN
G
1
2
You can enjoy high quality picture reproduction byusing the component video output instead of S-Videoor Composite video output. Connect the cables perthe illustration.
Change the Setup Menu/A/VOutput/Scan Mode to Progressive ifyour TV supports P-SCAN orInterlace if it supports component.
S-VIDEO is a higher quality connection than standard composite video, and requires a special S-Video cable (notincluded). The S-Video connector is distinguishable by its 4 pins, as shown below. If your TV has an S-Video input,it's recommended that you use this type of connection for better picture quality.
First, obtain a special S-Video cable. Connect theS-Video output from the unit to the correspondinginput on your TV.
1
On your TV, select the S-Video input. This isnormally done by selecting "Video 2" or "AV2" withthe remote control. On some TVs, this is done byselecting a particular channel.
On your TV, select the component orprogressive scan input. This isnormally done by selecting "Video 2"or "AV2" with the remote control. Onsome TVs, this is done by selecting aparticular channel.
2
S-Video & Component Video Connections Connections
10
COMPONENT VIDEO CABLE( NOT INCLUDED )
GREENBLUE
RED
GREENBLUE
RED
S-VIDEO CABLE( NOT INCLUDED )
The Recorder
The Recorder
3
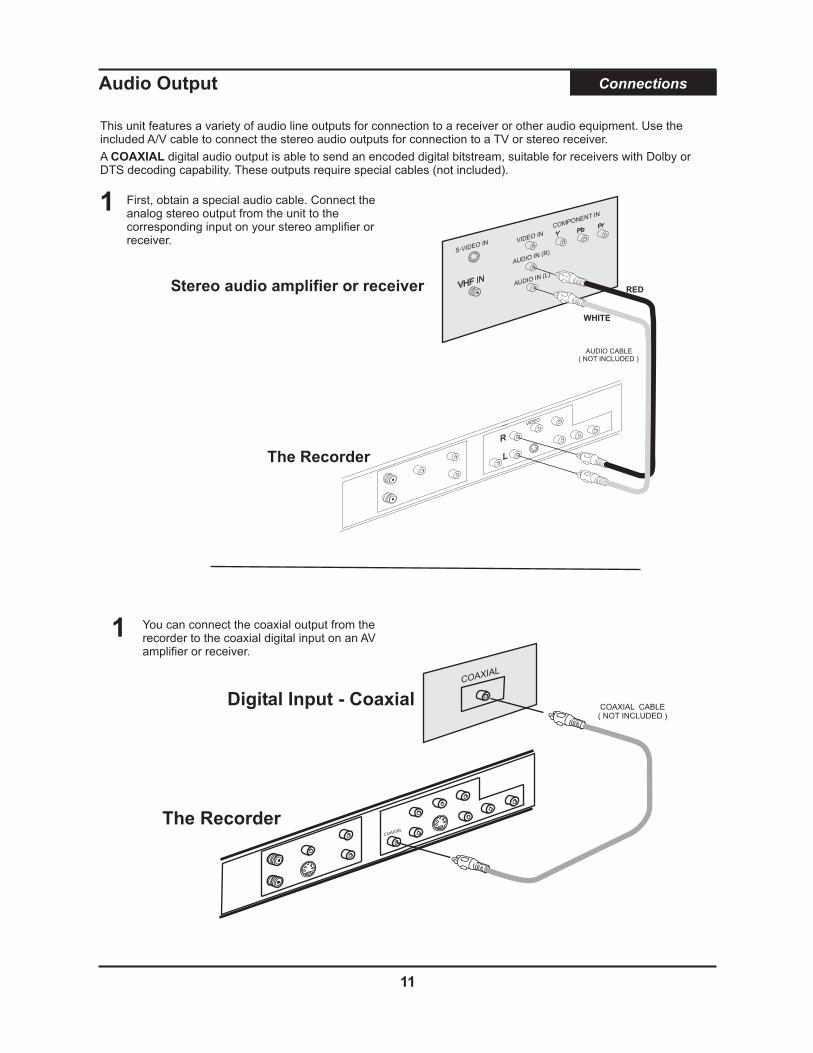
This unit features a variety of audio line outputs for connection to a receiver or other audio equipment. Use theincluded A/V cable to connect the stereo audio outputs for connection to a TV or stereo receiver.
A digital audio output is able to send an encoded digital bitstream, suitable for receivers with Dolby orDTS decoding capability. These outputs require special cables (not included).
COAXIAL
Audio Output Connections
11
The Recorder
Stereo audio amplifier or receiver
AUDIO CABLE( NOT INCLUDED )
1 You can connect the coaxial output from therecorder to the coaxial digital input on an AVamplifier or receiver.
First, obtain a special audio cable. Connect theanalog stereo output from the unit to thecorresponding input on your stereo amplifier orreceiver.
1
WHITE
RED
Digital Input - Coaxial
The Recorder
COAXIAL CABLE( NOT INCLUDED )
When the DVD player's splash screen appears onyour TV, you're ready to go!
Plug the DVD player's electrical plug into a wallsocket or power strip.1Press the STANDBY / ON button on the front panel,or the POWER button on the remote control to turnthe DVD recorder on.
3
2
TM
Powering Up Quick Start Guide+
Plugging In and Power On
12
Quick Start Guide
Use the / keys to select GENERAL, pressENTER. Use the CLOCK,press ENTER.
5 6
5 6/ keys to select2To edit a field, press .ENTER3Use the / keys to increase or decrease thevalue of the field.
5 64To exit a field, press .ENTER
The recorder uses the Time and Date values todetermine when to begin and end ScheduledRecordings.
5Press to exit the CLOCK SETTINGSMENU.
RETURN
Time and Date Settings
1 Press to enter the SETUP MENU.SETUP
6Select the CLOCK menu and press . TheCLOCK SETTING screen appears with thefollowing options.
ENTER
!
!
!
Clock Settings
Date Settings
Time Format
- Set the time. This setting willshow AM or PM if the Hour Mode is set to 12HR.
- Set the date. Use 2-digit yearformat.
- 12HR or 24HR. 12HR mode isthe normal time system used in the USA, relyingon the use of AM /PM to indicate night or day. In24HR mode, the AM/PM designation is not used,with 12:00 indicating noon time and 24:00indicating midnight.
Channel Setup
Once your Antenna or Cable TV input is connected tothe connector on the back of the unit, you can setup therecorder's built-in TV Tuner by auto-scanning foravailable channels and then adding or deleting thechannels you choose.
2 You can press repeatedly to exit theSETUP MENU at any time.
RETURN
Press to enter the SETUP MENU.
Select the TV CHANNEL menu with the / keysand press .
SETUP
ENTER5 6
1
Restore Defaults
Auto Scanning ChannelsThis is the easiest way to fill your channel list with thosechannels available in your area. The unit scans forchannels automatically. When complete, press SETUPto return to the TUNER SETUP menu.
Press to bring up the menu to select yourconnection type (Antenna or Cable), use the
keys to select and press .
ENTER
ARROW ENTER
1
The unit scans for channels automatically. Whencomplete, press to exit the TUNERSETUP menu.
RETURN2
This is the easiest way to fill your channel list with thosechannels available in your area. The unit scans forchannels automatically. When complete, press SETUPto return to the TUNER SETUP menu.
Choose this option to clear the channel list of all yourprevious changes.
Once you have configured your channels, you can beginusing the recorder's built-in TV TUNER for Recording orsimply watching your favorite programs.
When the unit is first turned on, the DVDPLAYBACK mode is selected by default. Press
and use the and keys toswitch to TV TUNER mode.SOURCE ARROW ENTER
1
Use the / keys to change channels whilewatching TV. Alternatively, you can enter a channelnumber directly with keys, and press
.
To return to DVD Playback mode, press thekey at any time.
5 6
NUMBERENTER
SOURCE
2
Switching to TV Mode
EN
G
Press the button on the remote orfront panel to open the disc tray.
OPEN/CLOSE
2
1Insert the disc, being careful not to touch theplaying surface. Hold the disc by the sides and withyour fore finger through the hold in the middle andinsert gently into the tray.
Close the disc tray by pressing onthe remote or front panel.
OPEN / CLOSE3Use the / and / keys on the remote controlto navigate the menu to make a selection.
5 6 3 4
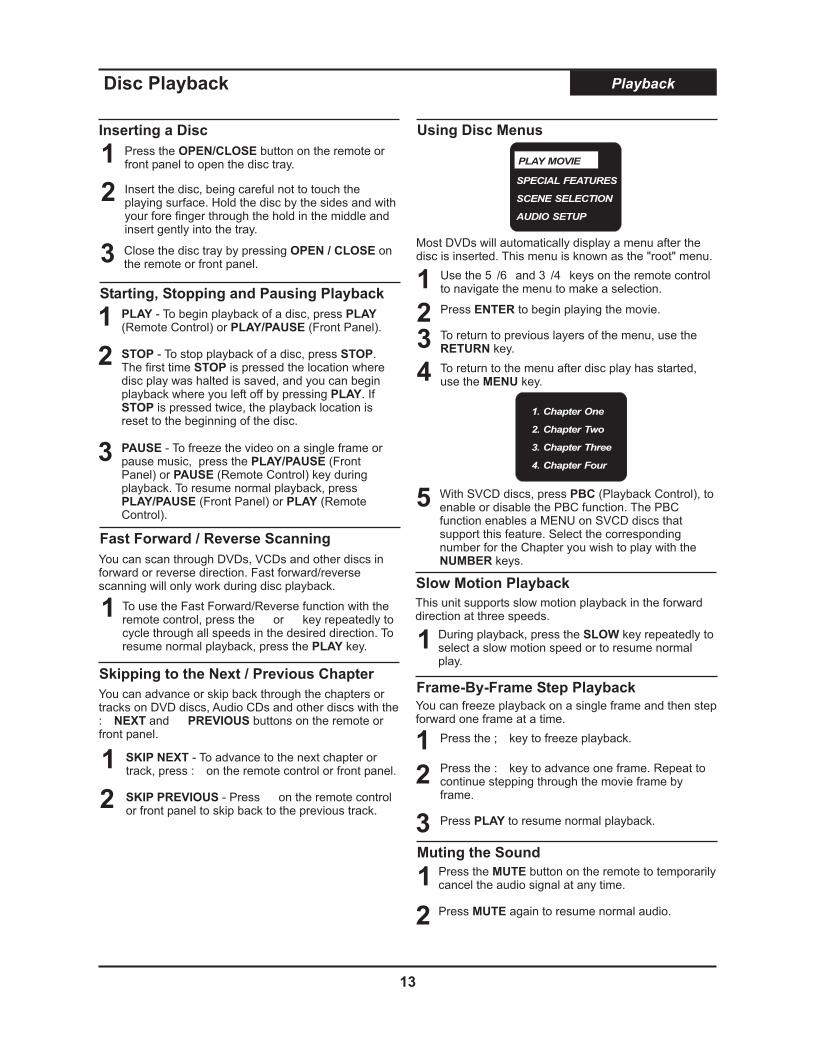
Press to begin playing the movie.ENTER
PLAY MOVIE
SPECIAL FEATURES
SCENE SELECTION
AUDIO SETUP
Most DVDs will automatically display a menu after thedisc is inserted. This menu is known as the "root" menu.
To return to the menu after disc play has started,use the key.MENU
PLAY PLAYPLAY/PAUSE
- To begin playback of a disc, press(Remote Control) or (Front Panel).
STOP STOPSTOP
PLAYSTOP
- To stop playback of a disc, press .The first time is pressed the location wheredisc play was halted is saved, and you can beginplayback where you left off by pressing . If
is pressed twice, the playback location isreset to the beginning of the disc.
1
2
PAUSEPLAY/PAUSE
PAUSE
PLAY/PAUSE PLAY
- To freeze the video on a single frame orpause music, press the (FrontPanel) or (Remote Control) key duringplayback. To resume normal playback, press
(Front Panel) or (RemoteControl).
3
Disc Playback Playback
Inserting a Disc Using Disc Menus
21
4
Starting, Stopping and Pausing Playback
13
PLAY MOVIE1. Chapter One
2. Chapter Two
3. Chapter Three
4. Chapter Four
With SVCD discs, press (Playback Control), toenable or disable the PBC function. The PBCfunction enables a MENU on SVCD discs thatsupport this feature. Select the correspondingnumber for the Chapter you wish to play with the
keys.
PBC
NUMBER
5Fast Forward / Reverse Scanning
To use the Fast Forward/Reverse function with theremote control, press the or key repeatedly tocycle through all speeds in the desired direction. Toresume normal playback, press the key.PLAY
1
You can scan through DVDs, VCDs and other discs inforward or reverse direction. Fast forward/reversescanning will only work during disc playback.
SKIP NEXT - To advance to the next chapter ortrack, press on the remote control or front panel.:
1
2
You can advance or skip back through the chapters ortracks on DVD discs, Audio CDs and other discs with the
and buttons on the remote orfront panel.: NEXT PREVIOUS
SKIP PREVIOUS - Press on the remote controlor front panel to skip back to the previous track.
Skipping to the Next / Previous Chapter
To return to previous layers of the menu, use thekey.RETURN3
This unit supports slow motion playback in the forwarddirection at three speeds.
Slow Motion Playback
During playback, press the key repeatedly toselect a slow motion speed or to resume normalplay.
SLOW1
Frame-By-Frame Step Playback
Press the key to freeze playback.;1
You can freeze playback on a single frame and then stepforward one frame at a time.
Press the key to advance one frame. Repeat tocontinue stepping through the movie frame byframe.
:2
Press to resume normal playback.PLAY3
Press the button on the remote to temporarilycancel the audio signal at any time.
MUTE1
2 Press again to resume normal audio.MUTE
Muting the Sound
Advanced Playback Functions Playback
14
Press the key repeatedly to choose amagnification level.
ZOOM
Use the ZOOM function to magnify or shrink the imageon screen during playback or when paused.
When the ZOOM function is first activated,directional arrows will appear on screen. During thistime, you can use the / and / keys on theremote control to move around the image in order toview the area that is currently off screen. When thearrows disappear from the screen, this function willno longer work.
5 6 3 4
Press the key repeatedly to choose ZOOMOFF to return to normal viewing.
ZOOM
ZOOM Playback
12
3
During playback, press the key to “jump”forward at 30 second intervals.
CM SKIP-1
The key lets you “jump” forward at 30-secondintervals.
CM SKIP
CM (Commercial) Skip
Most discs with multi-angle will display an indicator,or angle mark, that alerts the viewer that multipleangles are available for the current scene. Whenthis mark appears on-screen, press thebutton to select an angle to view.
ANGLE
1
Some DVD discs are recorded with multiple viewingangles for certain scenes. When you are viewing a discthat supports this feature, you can choose among theavailable angles on the disc with the key.ANGLE
Multi-Angle Function
During playback, press the button to accessthe AUDIO MENU.
AUDIO1
2 Use the / keys to select an audio track andpress to confirm.
5 6
ENTER
AudioDolby 6CH Eng
Dolby 2CH Eng
Dolby 2CH Span
AudioDolby 6CH Eng
Dolby 2CH Eng
Dolby 2CH Span
Most DVD discs are recorded with multiple audio tracks.These can contain multiple languages and differentaudio formats, such as 5.1Channel, 2 Channel and otherlanguages.
3 Press to exit the AUDIO MENU.AUDIO
Changing the Audio Track
During playback, press thebutton to access the
SUBTITLE MENU.SUBTITLE1
2
Most DVD discs include at least one subtitle track in onelanguage. Subtitles are useful viewing movies in aforeign language or for hearing-impaired viewers.
SubtitleEnglish
FrenchSpanish
Off
SubtitleEnglish
French
OffSpanish
SubtitleEnglish
FrenchSpanish
Off
Use the / keys to select anavailable language and press
. In this example, we havechosen Spanish subtitles.
5 6
ENTER
3 To turn off Subtitles, press thekey to access the
Subtitle Menu. Use the key toselect OFF, then press .
SUBTITLE
ENTER6
Subtitles
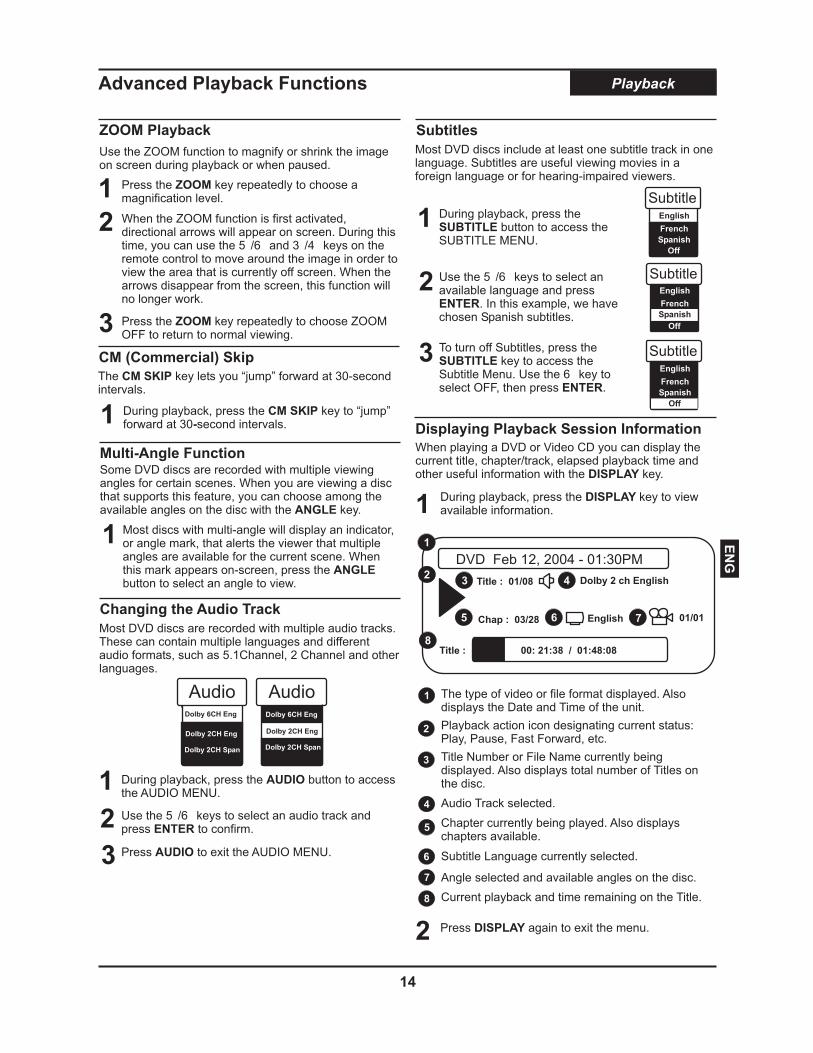
When playing a DVD or Video CD you can display thecurrent title, chapter/track, elapsed playback time andother useful information with the key.DISPLAY
During playback, press the key to viewavailable information.
DISPLAY1
Press again to exit the menu.DISPLAY2
8
7
6
5
4
DVD Feb 12, 2004 - 01:30PM
Chap : 03/28
Title : 01/08 Dolby 2 ch English
English 01/01
Title : 00: 21:38 / 01:48:08
5
4
1
2 3
76
8
1 The type of video or file format displayed. Alsodisplays the Date and Time of the unit.
2 Playback action icon designating current status:Play, Pause, Fast Forward, etc.
3 Title Number or File Name currently beingdisplayed. Also displays total number of Titles onthe disc.
Audio Track selected.
Chapter currently being played. Also displayschapters available.
Subtitle Language currently selected.
Angle selected and available angles on the disc.
Current playback and time remaining on the Title.
Displaying Playback Session Information
EN
G
During playback, press the key to bring upthe GOTO MENU.
GOTO1
The GOTO function provides a convenient way tonavigate DVD, Audio CD and other discs by allowing youto select the Title, Chapter/Track or Time to jump to.
Use the / keys to choose Titles or Chapters.Use the / or the keys to select aChapter or Title to jump to. Use “ ” key to clear anyunwanted inputs. Press the key to confirm.
3 4
5 6 NUMBERC
ENTER
Press the PAUSE key to pause playback point inwhich you wish to add a bookmark beforeaccessing the Bookmark Menu.
2
2
To jump to a time on the disc, press to select theTime field. Use the / or keys to enterthe time. Use the / keys to move between toeach desired time fields, then press toconfirm your selection.
4
3 4
5 6
NUMBER
ENTER
3
Titles Chapters Time
01 09 /33/23
00 :17:48
Titles Chapters Time
Titles Chapters Time
01 09 /33/23
Jumping to a Chapter or Time Point
Jumping, Repeat Playback and Bookmark Playback
Press during disc playback to setthe Repeat Mode.
REPEAT 1/ALL12
To repeat a segment of a disc, use the Lkey. On DVDs, you can repeat a Title or Chapter. OnVCDs, chapter and disc repeat is supported, but PBCmust be disabled first (Press the key). Audio CDsalso allow repeat of tracks or the entire disc.
REPEAT 1/AL
PBC
To return to normal playback, pressuntil the icon appears on-
screen signifying that repeat play is cancelled.
REPEAT1/ALL REPEAT OFF
Repeating a Disc, Title or Chapter
During playback, when you reach the start of thesegment you want to repeat, press the
button. An icon, , is displayed on-screen, letting you know that the segment startpoint has been saved.
REPEAT A-B REPEAT A
1
2
3
The key lets you define your ownsegments to repeat.
REPEAT A-B
Repeating a Segment You Define
15
When you reach the end of the segment you wantto repeat, press the button again. The
icon is now displayed on-screen. Thesegment will now begin repeating.
REPEAT A-BREPEAT A-B
To cancel repeat and resume normal playback,press again. The repeat icon on-screen changes to .
REPEAT A-BREPEAT OFF
When there is no activity or disc playback remainspaused for a period of about 5 minutes, the ScreenSaver will load, protecting the television from “screenburn”, which could occur if an unusually bright imageis displayed on-screen for an extended period of time.
¤ About the Screen Saver
TM
Bookmark
Press the key to create a Bookmarklocation. This location is created by a time stamp.To create another
ENTER
BOOKMARK,
ENTER
use the / keysto navigate to the next available BOOKMARKlocation and press the key again.
5 6
1
The BOOKMARK feature is used to mark a point on thedisc to come back to later.
More controls can be accessed by using thekeys to navigate the menu. Select toremove all saved bookmarks. Use the keyto begin playback of your selection.
5 6/
Use the “ ” keyto clear any unwanted individual bookmarks.
CLEAR ALLENTER
C
3
Bookmark
0 : 8 : 18_ : _ : __ : _ : __ : _ : __ : _ : _
Clear AllENTER - Add/Play
C - Clear
EN
G
4
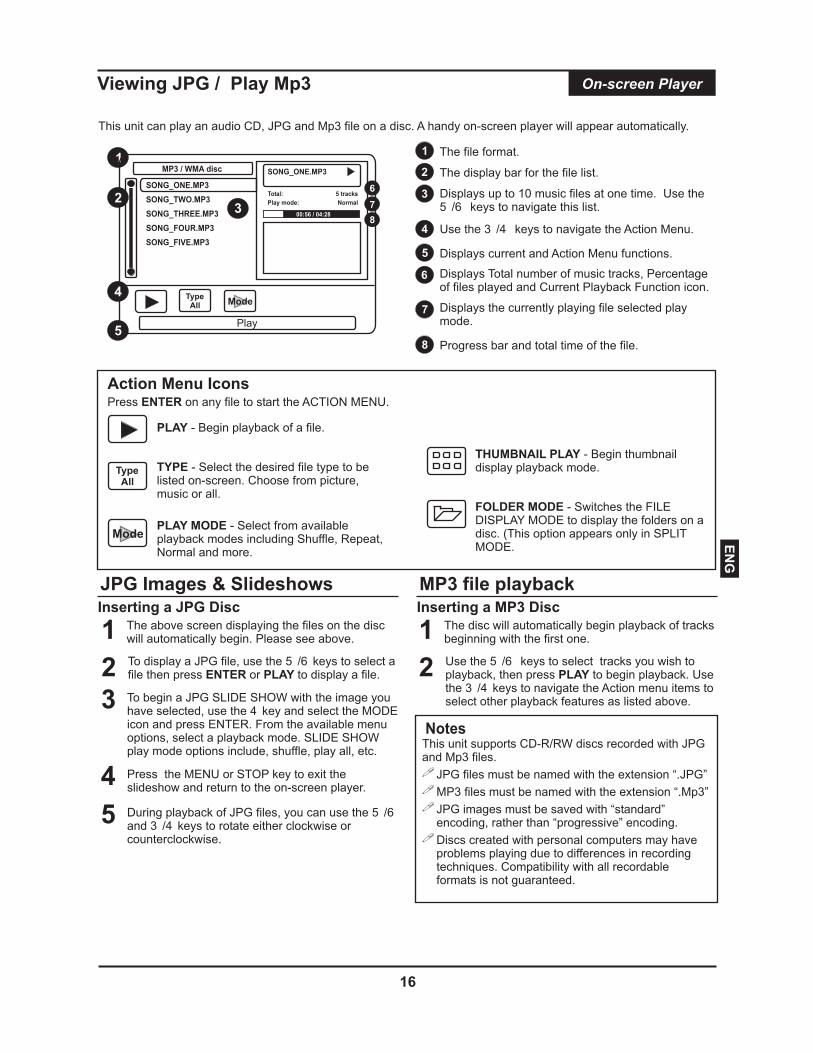
1 The file format.
2 The display bar for the file list.
3 Displays up to 10 music files at one time. Use the/ keys to navigate this list.5 6
Use the the Action Menu./ keys to navigate3 4
PLAY - Begin playback of a file.
ModePLAY MODE - Select from availableplayback modes including Shuffle, Repeat,Normal and more.
8
7
6
5 Displays current and Action Menu functions.
Progress bar and total time of the file.
Action Menu Icons
Viewing JPG / Play Mp3 On-screen Player
Press on any file to start the ACTION MENU.ENTER
THUMBNAIL PLAY - Begin thumbnaildisplay playback mode.TYPE - Select the desired file type to be
listed on-screen. Choose from picture,music or all.
TypeAll
1
3
ModeTypeAll
MP3 / WMA disc SONG_ONE.MP3
Total:Play mode:
00:56 / 04:28
SONG_ONE.MP3
SONG_TWO.MP3
SONG_THREE.MP3
SONG_FOUR.MP3
SONG_FIVE.MP3
5 tracksNormal
This unit can play an audio CD, JPG and Mp3 file on a disc. A handy on-screen player will appear automatically.
JPG Images & Slideshows
To display a JPG file, use the keys to select afile then press or to display a file.
5 6/ENTER PLAY
1 The above screen displaying the files on the discwill automatically begin. Please see above.
2
Inserting a JPG Disc
2
5
4
FOLDER MODE - Switches the FILEDISPLAY MODE to display the folders on adisc. (This option appears only in SPLITMODE.
To begin a JPG SLIDE SHOW with the image youhave selected, use the key and select the MODEicon and press ENTER. From the available menuoptions, select a playback mode. SLIDE SHOWplay mode options include, shuffle, play all, etc.
4
Press the MENU or STOP key to exit theslideshow and return to the on-screen player.4
3
MP3 file playbackInserting a MP3 Disc
Use the
keys to navigate the Action menu items toselect other playback features as listed above.
5 6
3 4
/ keys to select tracks you wish toplayback, then press to begin playback. Usethe /
PLAY
1 The disc will automatically begin playback of tracksbeginning with the first one.
2
This unit supports CD-R/RW discs recorded with JPGand Mp3 files.
JPG files must be named with the extension “.JPG”
JPG images must be saved with “standard”encoding, rather than “progressive” encoding.
Discs created with personal computers may haveproblems playing due to differences in recordingtechniques. Compatibility with all recordableformats is not guaranteed.
!
!
!
!MP3 files must be named with the extension “.Mp3”
Notes
16
During playback of JPG files, you can use theo rotate either clockwise or
counterclockwise.
5 6
3 4
/and / keys t5
Play
Displays the currently playing file selected playmode.
Displays Total number of music tracks, Percentageof files played and Current Playback Function icon.
6
7
8
With DVD+R/RW recording, you can create your own DVDs from your home movies, favorite TV shows or from othervideo sources.
DVD+RW DVD+RThink of DVD+RW (DVD+ReWritable) discs as thedigital equivalent of your old VHS tapes. Like video tape,DVD+RW discs can be recorded to, erased and re-used.But unlike video tape, DVD+RW discs will retain theircrystal-clear digital quality even after being erased andre-recorded over 1000 times! And, this superior qualitywill not degrade with the passage of time like VHStapes.
A lower-cost alternative to DVD+RW, these "Recordable"discs cannot be erased. Once a recording is made to aDVD+R disc, the disc space used by that recording cannever be reclaimed. DVD+R discs must be Finalizedbefore they can be played back on standard DVDPlayers, and once this process is complete, no morerecordings can be added. This is an important differencebetween DVD+R and DVD+RW Discs.
Recording Recording
Recording to DVD Discs
Recording- Rear Input ConnectionsREAR RECORDING INPUTS - There are (2) recording source inputs on the back panel, (1) S-VIDEO (referred to as"S-VIDEO 1") and (1) Composite Video (referred to as "VIDEO 1"). Note that both of these video inputs share thesame stereo audio input.
Audio/Video source such asDVD player or VCR with
S- Video Out
You can easily select the AV input on this unit.
Selecting an Input Source
1 Connect the desired AV input source.
2 Press and use theSOURCE 3 4/ keys to selectyour desired input source. Press .ENTER
You can now view the content from the AV sourceyou connected to the unit.3Insert a recordableDVD +R or DVR+RW disc andpress to beginrecording.
REC
4
You may choose from the following inputsources:
- The DVD Recorder's built-in TVTuner allows you to record yourfavorite TV programs.
- The Composite VideoInput located at the back of the unit.Used for any video device withComposite Video Out.
- Located on the backpanel, S-VIDEO provides a betterpicture than standard CompositeVideo. Use this input for camcorders orother video devices when possible.
- The Composite VideoInput on the Front Panel.
- The DV Input on the FrontPanel.
!
!
!
!
!
TV
VIDEO IN 1
S-VIDEO IN
VIDEO IN 2
DV IN
Audio/Video source such ascamcorder supportingComposite Video Out
The Recorder
S-VIDEO
YELLOW
RED
WHITE
S-VIDEO IN
S-VIDEO OUT
VIDEO OUT
R
L
L
R
VIDEO IN
17
Recording
18
Recording- Front Input Connections
VIDEO IN 2L RAUDIO INDV IN
STANDBY/ONRECORD/
VL R
DV OUT
L R V
VIDEOOUT
L R
AUDIOOUT
1 Connect the camcorder to the DV INPUT using aDigital Video (also called 1394 or Firewire) Cable.
You can use this unit's remote to control mostcamcorders that support the DV interface.
2 Press and use theSOURCE 3 4/ keys to selectDV IN. Press .ENTER
3 You can now control the DV camcorder with thisunit's remote. Available functions are: , ,
and .PLAY STOP
FF/FR PAUSE
Controlling a DV Camcorder
You can easily record from your TV.
2 Insert a recordable DVD disc.
Making a RecordingRecording TV programs
1 Press the key on the remote control to turnon the unit.
POWER
3 Press the SOURCE key on the remote control andselect the input.TUNER
4 Press the or keys to select the channelyou wish to record.
CH+ CH-
5 Press the RECORD key to start recording.Recording continues until you press or whenthe disc is full.
STOPThe RECORDING icon appears on-
screen, indicating the recording has begun.
1 Press to end a recording. The STOPRECORDING icon appears on screen.
STOP
2 After a few seconds, as the new Title you justrecorded is closed, the RECORD SUCCESS iconappears on screen.
Stopping a RecordingWhen you stop a recording, a new Title is created.
You can pause the recorder during a Live Recording.
1 Simply press to temporarily halt recording.The PAUSE RECORDING icon appears on screen.
PAUSE
2 Press to resume recording session.REC
Pausing (CM SKIP) and Resume Recording
At this point, recording has started with no specific endtime, so you'll have to press the key to manuallyend the recording. Alternatively, you can specify thelength of the recording in 30 minute intervals by pressingthe key repeatedly.
STOP
REC
Specifying the Recording Time
1 Press repeatedly to set the length of therecording in 30-minute intervals. ChooseTIMEDREC OFF if you don't want to specify arecording length.
REC
3 Another option is to press the key whichwill pause the recording for 30 seconds andautomatically resume recording afterwards.
CM SKIP
Upon completion of recording to a disc, you mustthe disc to be able to playback on other players.FINISH
1 With the completed recorded disc inside, press theOPEN/CLOSE key on the remote control or frontpanel when finished recording.
2 A Notification window will appear.
Finished Recording?
3 Select ENTER to FINISH the disc, or press theOPEN/CLOSE key again to eject the disc.
4
3
6
5
1 Press while recording. The DISPLAYMENU appears as shown.
DISPLAY
Disc Type
Date and Time
Title
Audio Mode
Chapter
Input Source
Record Mode
Title
- Disc format: DVD+R or DVD+RW
- The system date and time.
- Displays Current Title, and Total Titles.
- Type of audio track being recorded.
- Displays the Current and Total Chapters.
- Displays selected input source.
- Displays recording quality setting.
- Displays the length of the Title currentlybeing recorded and time remaining on the disc.
View useful information using DISPLAY.
1
2
DVD+RW Feb 18, 2004 - 06:19PM
01/01Title:
03/03Chap:
Dolby 2CH
TV HQ
Title: 00:17:44 / 00.48.43
4
1
2
3
8
765
Using DISPLAY to View Recording Options
7
8
EN
G
When you insert a DVD+RW or DVD+R disc, the TitleScreen will appear. The Title Screen displays thumbnailand information for each Title (recording) on the disc. Inthe Title Screen, you can perform the following functionswith your Recordings:!
!
!
!
Play Titles or Chapters.
Delete a Title of your recordings.
Rename Titles and Disc Label.
Erase a DVD+RW disc.
Playing and Editing Your Recordings Recording
The Title Screen
19
4 To return to the Title Screen, press .MENU
10
1 DVD disc [My Party]4 titles34 minutes left
1 2
00:10:24 / 00:20:332
3
49999
3
4
6 7 85 9
Rename
T01-Thu 03/11
T01-Fri 03/12
T01-Fri 03/12
T01-Sat 03/13
1 If the Title Screen is not displayed on screen, pressto bring it back.MENU
2 Use the / keys to select the title you wish to playand press
5 6
PLAY.
Playing a Title
Thumbnail Images
Disc Information
Progress Bar
Title Preview
Play Title
Chapter Viewer
Delete Title
- Displays an image of the title.
- Shows the Disc Label name,total number of titles on the disc and recording timeremaining.
- Shows the current playback pointand total length of the current title.
- The current title is played in thiswindow.
- Begins playback of selected title.
- See Chapter Previews and PlayChapters.
- Delete the current title.
Rename Title
Erase Disc
Rename Disc Label
- Rename the Title with the On-Screen Keyboard.
- Erase a DVD+RW disc.
- Rename the Disc Label.
4
1
2
3
6
5
8
7
9
3 The Action Menu also can be used to playback atitle. Use the / keys to select the icon andthen press .
3 4 PLAYENTER
Rename
10
12
Enter the Title Menu. Use the / keys to selectthe title you wish to erase.
5 6
1
2
Enter the Title Menu. Use the / keys to selectthe title that contains the chapter you wish to play.
5 6
4
Use the / keys to select the chapter you wish toplay and press
5 6
PLAY.3
Use the / keys to select the CHAPTER VIEWERicon and then press .
3 4
ENTER
5
Or use the / keys to select the icon andthen press .
3 4 PLAYENTER
To return to the Title Screen, press .MENU
Playing a Chapter
Delete a Title
Use the / keys to select the DELETE TITLE iconand then press .
3 4
ENTER
12
Enter the Title Menu. Use the / keys to selectthe Title you wish to rename.
5 6
Use the / keys to select the RENAME TITLEicon and then press . Use the on-screenkeyboard to rename the title.
3 4
ENTER
Renaming a Title
Rename
Rename
Rename
Rename
1Erase a Disc
Enter the Title Menu. Use the / keys to selectthe ERASE DISC icon and then press .
3 4
ENTER
1Rename Disc Label
Enter the Title Menu.
Use the on-screen keyboard to rename thetitle.
Use the / keys to selectthe RENAME DISC LABEL icon and then press
.
3 4
ENTER
Rename
Title: 01 Total Time: 20mMode: SP Source: CVBS
Editing
20
There are two methods you can use to enter characterswith the virtual keyboard:
Use the HOT KEYS
ENTER
7
- Each character in the Lettersand Signs keyboards shows a hot key above it thatcorresponds to one on the remote control. Press thiskey repeatedly until the character you wish to enteris highlighted and then press .
For example, to enter the letter "S", press the keyfour (4) times. Notice that the first letter isautomatically capitalized.
Use the / and / keys
ENTER
5 6 3 4 - Simply use thedirectional arrow keys to move to the character youwish to insert and then press .
To save your changes, select DONE by pressingor using the / and / keys to select
DONE and then pressing .DISPLAY
ENTER5 6 3 4
Using the On-Screen Keyboard
1
2
1
p q r7
Hot Key
s
p q r7
s
Saving Your Changes
Press the key or use the / and / keys tomove to BACK and press .
CENTER5 6 3 41
Deleting Characters
On-Screen Keyboard & Scheduled Recordings
The On-Screen Keyboard makes it easy to enter Text,Numbers and Various Symbols with your remote control.
About the On-Screen Keyboard
p q r s w x y zt u v
g h i m n oj k l
d e fa b c1 2 3 Clear
4 5 6
7 8 9
Display Display
ReturnExit Clear all
Back<< >>
< > ( - #
DoneDone
Letters
Numbers
Signs
Space bar CapsCM Skip0
1 To select LETTERS, press the key to move to theTABS on the left of the virtual keyboard.
3
2 Use the / keys to select other keyboards.5 6
3 Press the key to move to the virtual keyboard ofyour choice.
4
Timer Recordings are designed for unattendedoperation, and will work when the recorder is in StandbyMode.
1 To Begin programming a scheduled recording, pressthe button on the remote control Thiswill access the recorder's Schedule Screen.
SCHEDULE
Scheduled Recordings
Scheduling a Recording
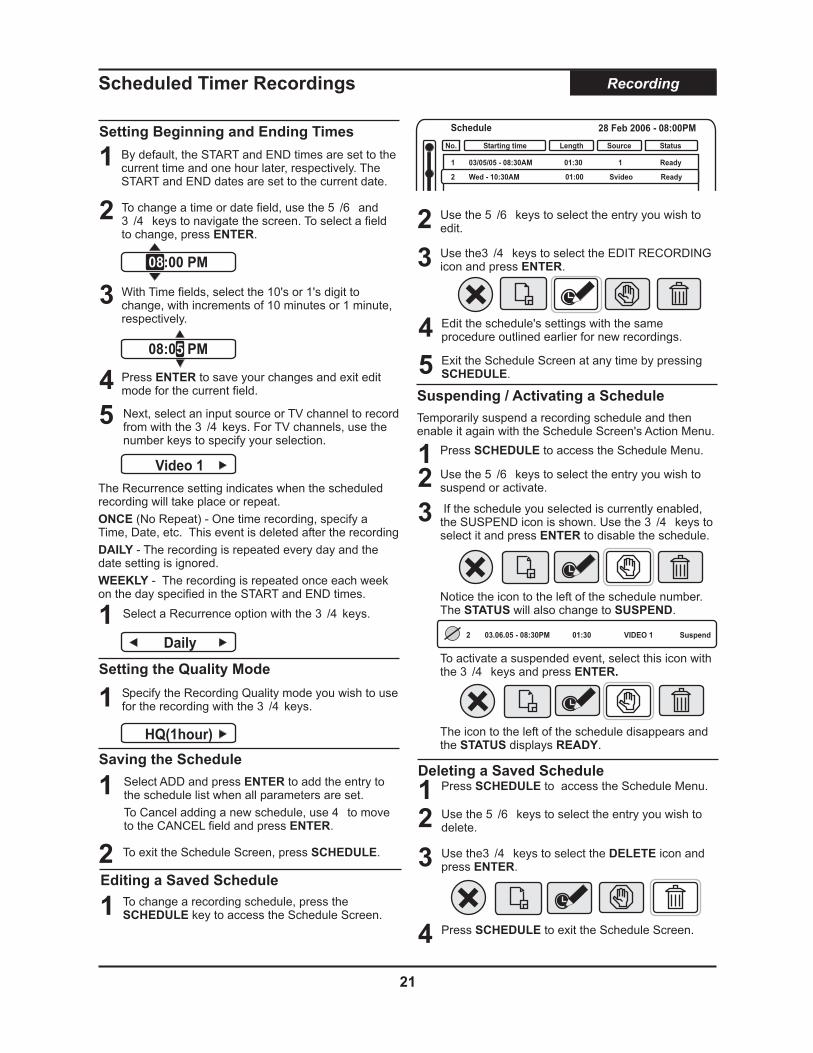
Schedule
No.
1
4 5 63
Starting time Length Source Status
Feb 12, 2005 - 08:00PM
2 03.06.05 - 08:30PM 01:30 VIDEO 1 Ready
7
Letters
Numbers
Signs
Current Time
Events
Close Screen
Edit Schedule
Suspend/Ready*
Delete
- Current time of the clock.
- Total scheduled recording event(s).
- To close the Schedule Screen.
- Choose to Edit the Schedule.
- Change the status of theschedule - Ready or Suspended.
- Delete the current schedule.
Add New Schedule Recording - Choose to Add aNew event to the Schedule.
4
1
2
3
6
5
7
1 03.05.05 - 06:30AM 01:00 VIDEO 1 Ready2
2 Before any schedules have been entered, the NEWSCHEDULE RECORDING screen will appear bydefault.
New Scheduled Recording
Start Time:
End Time:
Source:
Recurrence:
Quality:
08:00 PM
09:00 PM
Tuner
Once
SP(2 Hours)
Add Cancel
03/05/05
03/05/05
36
EN
G
1 By default, the START and END times are set to thecurrent time and one hour later, respectively. TheSTART and END dates are set to the current date.
2 To change a time or date field, use the / and/ keys to navigate the screen. To select a field
to change, press .
5 6
3 4
ENTER
3 With Time fields, select the 10's or 1's digit tochange, with increments of 10 minutes or 1 minute,respectively.
4 Press to save your changes and exit editmode for the current field.
ENTER
5 Next, select an input source or TV channel to recordfrom with the . For TV channels, use thenumber keys to specify your selection.
3 4/ keys
Scheduled Timer Recordings Recording
Setting Beginning and Ending Times
21
Specify the Recording Quality mode you wish to usefor the recording with the / keys.3 4
Setting the Quality Mode
The Recurrence setting indicates when the scheduledrecording will take place or repeat.
(No Repeat) - One time recording, specify aTime, Date, etc. This event is deleted after the recording
- The recording is repeated every day and thedate setting is ignored.
- The recording is repeated once each weekon the day specified in the START and END times.
ONCE
DAILY
WEEKLY
1 Select a Recurrence option with the .3 4/ keys
1
Select ADD and press to add the entry tothe schedule list when all parameters are set.
To Cancel adding a new schedule, use to moveto the CANCEL field and press .
ENTER
ENTER4
To exit the Schedule Screen, press .SCHEDULE
Saving the Schedule
1
2
1 To change a recording schedule, press thekey to access the Schedule Screen.SCHEDULE
Editing a Saved Schedule
Schedule
No. Starting time Length Source Status
28 Feb 2006 - 08:00PM
1 03/05/05 - 08:30AM 01:30 1 Ready
2 Wed - 10:30AM 01:00 Svideo Ready
2 Use the / keys to select the entry you wish toedit.
5 6
3 Use the / keys to select the EDIT RECORDINGicon and press .
3 4
ENTER
4 Edit the schedule's settings with the sameprocedure outlined earlier for new recordings.
5 Exit the Schedule Screen at any time by pressing.SCHEDULE
1 Press to access the Schedule Menu.SCHEDULE
2 Use the / keys to select the entry you wish tosuspend or activate.
5 6
3 If the schedule you selected is currently enabled,the SUSPEND icon is shown. Use the / keys toselect it and press to disable the schedule.
3 4
ENTER
Temporarily suspend a recording schedule and thenenable it again with the Schedule Screen's Action Menu.
Suspending / Activating a Schedule
Notice the icon to the left of the schedule number.The will also change to .STATUS SUSPEND
To activate a suspended event, select this icon withthe 3 4/ keys and press ENTER.
The icon to the left of the schedule disappears andthe displays .STATUS READY
2 03.06.05 - 08:30PM 01:30 VIDEO 1 Suspend
1 Press to access the Schedule Menu.SCHEDULE
2 Use the / keys to select the entry you wish todelete.
5 6
Deleting a Saved Schedule
3 Use the / keys to select the icon andpress .
3 4 DELETEENTER
4 Press to exit the Schedule Screen.SCHEDULE
Video 1
HQ(1hour)
08:00 PM
08:0 PM5
Daily
The DVD Recorder's SETUP MENU is where varioussettings are configured, including setting the Clock,Recording Options, Playback Options, Languages,Parental Control Settings and more.
Changing Setup Options Setup Menu
About the SETUP MENU
Using the SETUP MENUIt's easy to change the recorder's settings with theSETUP MENU. To demonstrate, let's change the TVSHAPE setting to 16:9, as you would if you were usingthe recorder with a WIDESCREEN TV.
Use the keys and press on thedesired feature. A sub-menu appears. (At this point,you could return to the main menu with the key.)
ENTER5 6
3
/
4 To change or select features, use the andkeys to select an option. Press the key to
return to a previous level and the key to exitaltogether.
5 6
3 4 3
//
SETUP
3 Select the desired sub features with the keysand use the
5 6
4
/to navigate.
OSD
Default DVD Audio English
Press RETURN to exit
Language
Default DVD Menu English
English
1 Press to enter the SETUP MENU.SETUP
22
TV Channel
Schedule
Help
A/V Output
General
?
TV Channel
Schedule
Help
A/V Output
General
?
2
¤Depending upon the disc, some Setup Menuselections are not available.
Note
The DVD Recorder's language setup options includingOSD, menu, audio and subtitles.
Default DVD Audio
Default DVD Subtitle Off
Version
Restore
Recording
Language
Rating
Clock
Default setting:
Sets the language used by the SETUP MENU and ON-SCREEN DISPLAY. (Default) andare supported.
ENGLISH
ENGLISH SPANISH
Default setting:
Sets the default language used by DVD Menus. As anexample, if a DVD disc contains multiple menulanguages, such as Spanish and English, and thissetting is set to SPANISH, then the Spanish menu will beused. The DVD must support multiple menu languagesfor this setting to work. Choices are: ,
and .
ENGLISH
ENGLISHSPANISH FRENCH
Default DVD AUDIO
ENGLISH
ENGLISHSPANISH FRENCH
Default setting:
Sets the default audio track used by DVDs. Forexample, if a DVD disc contains multiple audio tracks,such as Spanish and English, and this setting is set toSPANISH, then the Spanish audio track will play as thedefault. The DVD must support multiple menu languagesfor this setting to work. Choices are: ,
and .
OSD
Default DVD Menu
Default DVD Audio
SUBTITLES
OFF
SPANISH
ENGLISH SPANISH FRENCH OFF
Default setting:
Sets the default subtitle language used by DVDs. Forexample, if a DVD disc supports multiple subtitlelanguages, such as Spanish and English, and thissetting is set to , then Spanish subtitles will bedisplayed by default. The DVD must support thelanguage selected for this setting to work. Choices are:
, , and .
Default DVD Subtitles
General - Language Settings
EN
G
TM
TM
8. Adult Adult themes, language and nudity.
Rating Description
1. Kid Safe Suitable for all audiences.
2. G Suitable for general audiences.
3. PG Parental guidance suggested.
4. PG-13 Parental guidance suggested,unsuitable for children under 13.
5. PG-R Parental Guidance Recommended- implications or very brief discreetlanguage or situations.
6. R Restricted, violence, adultlanguage and situation unsuitablefor young viewers.
7. NC-17 Adult theme or content, not suitablefor children under 17.
1 First, you must enter a valid password. If you havedefined your own user password, enter that value.Otherwise, use the factory password: .3351
2 Move to the Rating field with the key.6
3 Use the keys to select a Rating Level.3 4/
4 Use the key to move to OK and press .6 ENTER
Setup Menu
Default setting:
Your DVD Player features a Parental Control option. Bydefault, this option is set to the level, which willallow play of all discs. Available options include:
8. ADULT
ADULT
Parental Options
Changing the Parental Setting
1 The first time you define a user password, enter thefactory password, , in the OLD PASSWORDfield - the factory password is not changed. Afteryou have defined a user password, you would enterthat value in this field. *If you forget the value ofyour user password later, you can always use thefactory password to change the value.
3351
2 Move to the NEW PASSWORD with the key.6
3 Use the keys to enter your new userpassword using a maximum of 4 digits.
NUMBER
6 Use the key to move to OK and press .6 ENTER
You can setup your own USER PASSWORD to use inaddition to the built-in FACTORY PASSWORD, and thenchange this value at any time. This is useful to giveanother party temporary access to the parental controlsettings.
Remember to keep in mind that since the MASTERPASSWORD is listed above, your player may not besecure if this manual is accessible by your children.
Security Note
Defining and Changing the Password
23
General - Rating
The time and Date values to determine when to beginand end Scheduled Recordings.
Clock Settings
Time Format:
06:55 PM
12 HR
Clock
Date Settings 03.02.05
Press RETURN to exit
General - Clock
8. Adult
Password :
Press RETURN to exit
Parental Rating
Level :
Change Password :
8. Adult
Password :
Press RETURN to exit
Parental Rating
Level :
Change Password :
Change Password
Old password: * * * *
New password:
Ok Cancel
Confirm password:
5 Use the keys to enter your new userpassword using a maximum of 4 digits.
NUMBER
4 Move to the CONFIRM PASSWORD with thekey.
6
1 Use the / and / keys to select a time ordate field to change.
5 6 3 4
2 To edit a field, press .ENTER
3 Use the / keys to increase or decrease thevalue of the field.
5 6
4 To exit a field, press .ENTER
5 Press to exit the CLOCK SETTINGSMENU.
SETUP
1 Use the / to select the Hour Mode field.5 6
2 To edit a field, press .ENTER
3 Use the / keys to select an option.3 4
4 Press to exit the CLOCK SETTINGSMENU.
SETUP
Select either 12HR (normal civilian time) or 24HR(military time) time mode.
Setup Menu
Time and Date Settings
Time Format
24
Quality SP(2 Hours)
Recording
Auto CH mark
Recording volume 100
5 min
Press RETURN to exit
1
2
Use the / keys to select the QUALITY settingyou wish to use.
3 4
Default setting:
The Quality setting determines the quality of yourrecordings as well as the maximum amount of video youcan record on a disc. Not surprisingly, the higher thequality, the less video can be recorded.
HQ (High Quality)
Press to exit the RECORDING MENU.SETUP
Recording Quality Mode
HQ (High Quality) Highest
Excellent
Very Good
Better than VHS
Equal to VHS
Lower than VHS
SP
LP
EP
EP+
SLP
(Standard Play)
(Long Play)
(Extended Play)
(Extended Play+)
(Super-Long Play)
1 HR
2 HRs
3 HRs
4 HRs
7 HRs
8 Hrs
Mode Quality Max Time
12
Use the / keys to select an option.3 4
Default setting:
Control whether or not Chapter Markers areautomatically inserted during your recordings. You canselect the interval from , or minutes, or turn thisfeature .
5 min
5 10 15OFF
Press to exit the RECORDING MENU.SETUP
12
Use the / keys to decrease/increase the audiovolume.
3 4
Default setting:
Use this setting to adjust the volume of the audio foryour recordings. The default setting of 100 sends 100%of the signal from your input to the recording. You candecrease this value if you wish, all the way to whichwill result in no sound on the recording.
100
0
Press to exit the RECORDING MENU.SETUP
Chapter Mark
Recording Audio Volume
General - Recording
Displays various versions of the unit.
This action will restorethe factory defaults.
you sure you wantcontinue ?
Areto
Press RETURN to exit
Restore
!Yes No
General - Version
General - Restore
Selecting Yes will restore factory defaults to your unit.
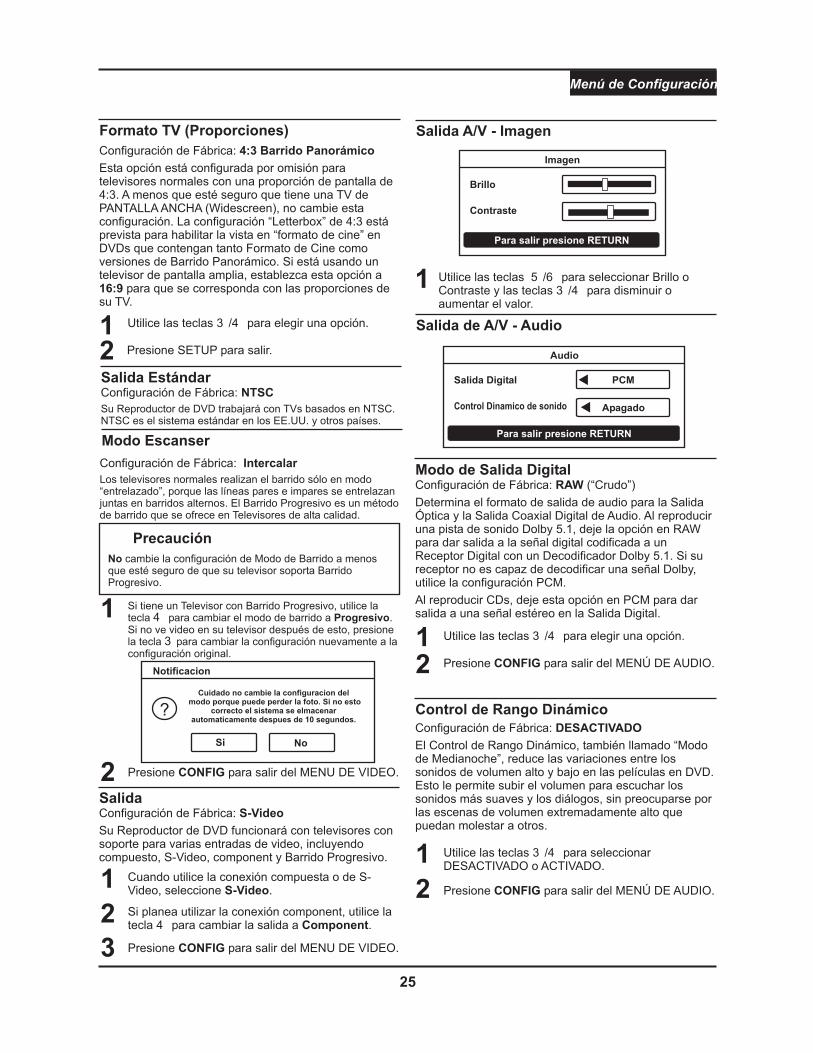
A/V Output - Video
NTSC
TV Shape
Press RETURN to exit
Video
Standard Output
4:3 Pan Scan
InterlaceScan Mode
Output S-Video
EN
G
Setup Menu
12
Use the / keys to select an option.3 4
Default setting:
By default, this option is set for normal TVs with 4:3aspect ratio. Unless you're sure you have aWIDESCREEN TV, do not change this setting. The 4:3Letter Box setting is meant to enable the “Letterbox”view on DVDs that contain both Letterbox and Pan/Scanversions.If you are using a wide screen TV, set thisoption to to match the aspect ratio of your TV.
4:3 Pan Scan
16:9
Press to exit.SETUP
Default setting:
Your DVD Player will work with TVs based on the NTSC.NTSC is the standard TV system in the USA and others.
NTSC
TV Shape (Aspect Ratio)
Standard Output
Default setting:
Normal TVs scan only in "interlaced" mode, because theodd and even lines are interlaced together in alternatescans. Progressive Scan is a scanning method offeredon high-end Tvs.
Interlace
Caution
Scan Mode
Do not change the Scan Mode setting unless you aresure that your TV supports Progressive Scan.
1 If you have a P-SCAN TV, use the key to changethe scan mode to . A notification willappear, if you do not have P-SCAN TV, the picturewill be restored to your previous setting.
4
Progressive
1 Use the / keys to select Brightness or Contrastand the / keys to decrease or increase thevalue.
5 6
3 4
A/V Output - Picture
Brightness
Press RETURN to exit
Picture
Contrast
2 Press to exit the VIDEO MENU.SETUP
Default setting:
Your DVD Player will work with televisions supportingvarious video inputs including composite, S-Video,component and Progressive Scan.
S-Video
Output
2 If you plan to use the component connection, usethe key to change the output to .4 Component
3 Press to exit the VIDEO MENU.SETUP
1 When using the composite or S-Video connection,select .S-Video
A/V Output - Audio
12
Use the / keys to select an option.3 4
Default setting:
Determines the audio format output by the Optical andCoaxial Digital Audio Output. When playing a Dolby 5.1soundtrack, leave the setting on to output theencoded digital signal to a Digital Receiver with a Dolby5.1 Decoder. If your receiver is not capable of decodinga Dolby signal, use the setting.
When playing CDs, leave this setting at to output astereo signal on the Digital Output.
RAW
RAW
PCM
PCM
Press to exit the AUDIO MENU.SETUP
12
Use the / keys to select OFF or ON.3 4
Default setting:
Dynamic Range Control, also called “Midnight Mode”reduces the variations between loud and soft sounds inDVD movies. This lets you turn the volume up to hearsofter sounds and dialog, and not worry about extremelyloud scenes disturbing others.
OFF
Press to exit the AUDIO MENU.SETUP
Digital Output Mode
Dynamic Range Control
Digital output mode PCM
Press RETURN to exit
Audio
Dynamic range control OFF
25
?Changing the scan mode can result in
loss of picture. If the picture is notcorrect the setting will be restored
automatically after 10 seconds.
Notification
Yes No
Setup Menu
26
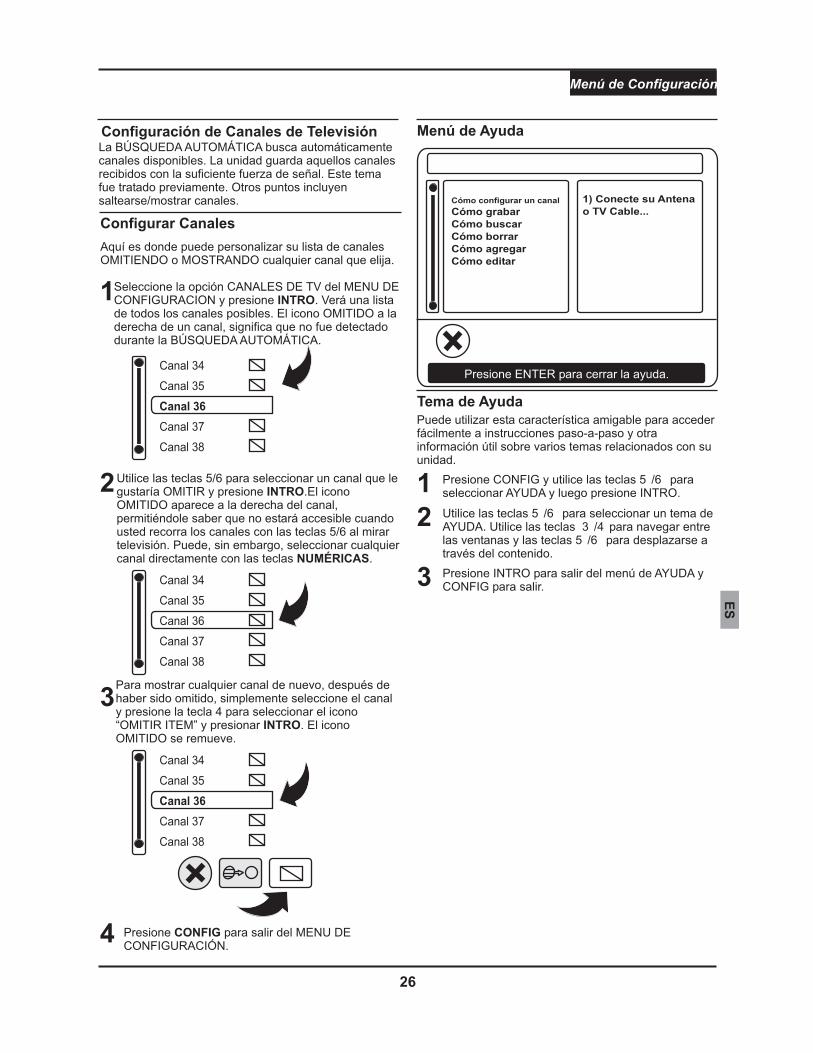
Here is where you can customize your channel list bySKIPPING or SHOWING any channel you choose.
Use the / keys to select a channel you wish toSKIP and press . The SKIPPED iconappears to the right of the channel, letting you knowthat it will no longer be accessible when you scanthrough the channels with the / keys whilewatching TV. You can, however, select any channeldirectly with the keys.
5 6
5 6
ENTER
NUMBER
2
To show any channel again after it has beenskipped, simply select the channel and press thekey to select the “SKIP ITEM” icon and press
. The SKIPPED icon is removed.
4
ENTER
3
TV Channel Setup
Set Channels
Select the TV CHANNEL option from the SETUPMENU and press . You will see a list of allpossible channels. The SKIPPED icon to the right ofa channel means it was not detected during theAUTO SCAN.
ENTER1
Channel 34
Channel 35
Channel 37
Channel 38
Channel 36
Channel 34
Channel 35
Channel 36
Channel 37
Channel 38
Channel 34
Channel 35
Channel 37
Channel 38
Channel 36
Press to exit the SETUP MENU.SETUP4
AUTO SCAN automatically scans for available channels.The unit saves those channels received at sufficientsignal strength. This subject was discussed earlier.Further topics include skipping/showing channels.
HELP Menu
1) Connect yourAntenna or Cable TV ...
How to setup channelHow to recordHow to scanHow to deleteHow to addHow to edit
1 Press , and use theSETUP 5 6/ keys to selectand pressHELP ENTER.
2 Use the keys to select a HELP topic. Use theand
the keys to scroll through content.
5 6
3 4
5 6
// keys to navigate between the windows
/
You can use this friendly feature to easily access step-by-step instructions and other helpful information onvarious subjects related to your unit.
Help Topic
3 Press to exit the HELP menu andto exit.
ENTER SETUP
EN
G
Use channel up/down to select different keyboard
The DVD Recorder DoesNot Power On
!
!
!
The AC Power cord may be loose or not plugged in. Make sure the power cord issecure in the AC socket and the connector on the back of the player.
The unit may be in Standby Mode. Turn the player on with the remote POWERbutton, or if you are using a power strip, make sure the switch is switched ON.
There must be a pause between powering the unit down and back on of a fewseconds.
A Specific Disc Does NotPlay
!
!
!
The disc may be dirty. Try cleaning the disc.
Make sure the disc is not in upside-down
The REGION CODE of the disc may not match that of the player. In this case, thedisc cannot be used.
The Remote ControlDoes Not Function
!
!
!
!
Make sure you're aiming the remote directly at the player's remote sensor, located inthe front display.
Make sure there are no obstacles between the remote and the player.
The batteries may be drained. Try changing the batteries in the remote.
You could be using the remote too far away. Try within 4 meters of the player.
There is No Picture onthe TV Screen
!
!
!
Make sure the connections from the player to the TV are secure.
Verify that the TV's channel is set to match the video input you're using. Refer to theTV's documentation. On most TVs the "Aux In", "Video In" or "A/V In" channel shouldmatch the video input connector.
If you're using the S-Video connector, the TV may have a separate input channel forthis type.
The Picture AppearsStretched or Squeezed
!
!
The Video Aspect Ratio may be set wrong for your Television type.
Enter the SETUP MENU and select the A/V OUTPUT VIDEO menu. Try changingthe TV SHAPE setting to 4:3 PanScan (Pan & Scan) if you are using a standard TV,or 16:9 Wide if your TV is a widescreen type.
4
Common Problems and Solutions Troubleshooting
Live Recording Will NotStart
!
!
!
!
The Video Input Source may be protected with MacroVision Copy Protection.
The disc may already contain recordings of a different TV System type - PAL orNTSC. If the disc already contains a PAL recording, you cannot record from an NTSCsource, and vice versa.
The maximum number of titles or chapters may have been reached.
If the disc is a DVD+R, it may already be FINALIZED.
The Disc Cannot beErased
!
!
The disc is not a DVD+RW disc.
The disc may be dirty. Try cleaning the disc.
Recordings Do Not Playon Other DVD Players
!
!
If the disc is a DVD+R, make sure it has been FINALIZED.
The DVD Player may not support DVD+R/RW discs.
Timer Recording DoesNot Begin as Scheduled
!
!
!
!
The Time/Date is invalid or conflicts with another schedule.
The Time/Date settings of the Recorder are incorrect. Set the Time/Date in SETUP.
The specified Video Input Source is unavailable.
The disc is out of space.
The Disc Doesn't Eject ! If the player is in Standby Mode with the glowing LED to the left of the disc tray, thedisc will not eject. Turn the player on with the Remote Control and then eject thedisc.
Distorted Picture whenConnected to a VCR orVCR/Combo TV
! This DVD Recorder is built with Macrovision copy-protection. This will distort thesignal when used with VCRs. Connect the player directly to the TV. Some VCR/TVcombos may be incompatible with DVD players.
48kHz Sampling - 4Hz to 22kHz / 96kHz Sampling - 4Hz to 44kHzDVD Linear Sound
4Hz to 20kHzAudio CD
Signal to Noise Ratio >90dB
Audio Dynamic Range >90dB
Harmonic Distortion < 0.001% (W.PEAK)
AudioPerformance
Component Video Y - 1.0Vp-p (75 Ohm), Negative Sync / Pb/Pr - .7Vp-p (75 Ohm)
Mini DIN 4-Pin (75 Ohm)S-Video
One Pin Jack, 1Vp-p (75 Ohm)Composite Video
Coaxial Digital One Pin Jack, .5Vp-p (75 Ohm)
Analog Audio (Stereo) 2.0VRMS (470 Ohm)
InputConnections
OutputConnections
Physical
Mini DIN 4-Pin (75 Ohm) (Rear)S-Video
One Pin Jack, 1Vp-p (75 Ohm) (Front/Rear)Composite Video
Analog Audio (Stereo)
DV (Digital Video)
2.0VRMS (470 Ohm) x2 (Front/Rear)
DV IN 1394 Standard Connector (Front)
Operating Conditions 5 C to 35 Cº º
AC 100V~230V, 50/60HzPower Supply
Dimensions 45mm x 350mm x 230mm (H x L x D)
Weight 4lb 9 oz / 2.07kg
650nm
Specifications are subject to change without notice. While due caution has been exercised in the production of this document, inadvertent technical inaccuraciesor typographical errors are possible and unintentional. While all efforts have been made to ensure accuracy, CyberHome Entertainment will not be held liable forany inaccuracies or errors in the information contained herein. Part# DVR 1600 G - ENGLISH
28
EN
G
1. ¿QUÉ CUBRE ESTA GARANTÍA? Esta garantía cubre cualquier defecto o malfuncionamiento en su nueva grabadora de DVD CyberHome.
2. ¿CUÁNTO DURA EL PERÍODO DE COBERTURA? Esta garantía es válida parareparaciones de la siguiente manera: Tres (3) meses sin cargo, por mano de obra, y hasta un(1) año desde la fecha de compra, por los componentes.
3. ¿QUÉ HARÁ CYBERHOME?MANO DE OBRA: Si se determina que el producto es defectuoso dentro de tres (3)
meses de la fecha de compra, CyberHome lo reparará o reemplazará sin cargo. Una vezpasado el período de tree (3) meses, Ud. será responsable por cualquier costo de manode obra.
COMPONENTES: Si la reparación es realizada por un técnico de CyberHome, secubre el costo de los componentes hasta un (1) año desde la fecha de compra.CyberHome no reparará ni reemplazará componentes defectuosos a menos que el trabajosea realizado por un técnico de CyberHome.
Se deberá proveer una prueba de compra, verificada con una boleta de venta o unrecibo, en el momento en que se requiera el servicio de reparaciones de la garantía.
4. ¿QUE CUBRE ESTA GARANTÍA? Cualquier daño o problema que resulte de lamala utilización, el abuso o sucesos de fuerza mayor (como inundación) no estáncubiertos. Esta garantía no permite recuperos por daños fortuitos o consecuentes.Algunos estados no admiten la exclusión o limitación de los daños fortuitos oconsecuentes, por lo tanto la limitación precedente puede no aplicarse en su caso.
5. ¿CÓMO DEBE TRAMITAR UNA REPARACIÓN? Se le debe entregar un número deAutorización de Devolución de Mercadería (ADM en español, “RMA” en inglés) de partedel Centro de Atención al Cliente de CyberHome. Para recibir un ADM, contacte elservicio al cliente al 1-888-302-2727 o por correo electrónico a [email protected] el recibo de un número ADM, usted debe enviar el producto, con el correoprepago a:
CyberHome Service Center48350 Fremont Blvd.Fremont, CA 94538RMA #
El número de ADM (RMA#) debe ser visible en el exterior del paquete, de manera queCyberHome acepte el envío del producto devuelto.
6. ¿CÓMO SE APLICA LA LEY ESTATAL? Esta garantía le otorga derechos legalesespecíficos, y puede también tener otros, los cuales varían según el estado.
CYBERHOME NO OFRECE REEMBOLSOS.
LA GARANTÍA RESULTA INVÁLIDA SI EL PRODUCTO ES MODIFICADO, ALTERADO OABIERTO.
CYBERHOME RECOMIENDA COLOCAR LA UNIDAD EN UN ÁREA BIEN VENTILADA.
Se realizan cambios periódicos a nuestra garantía. Por favor, contacte nuestro servicio alcliente o visite nuestro sitio web en: www.cyberhome.com para obtener la informaciónmás reciente con respecto a su producto o garantía.
NO
Garantía Limitada
PRECAUCIÓN
RIESGO DE DESCARGA ELÉCTRICA
NO ABRIR !
!El signo de admiración dentro de un triánguloequilátero tiene como propósito alertar al usuariosobre la presencia de instrucciones importantesde operación y mantenimiento en la literatura queacompaña al artefacto.
El símbolo del rayo con punta de flecha dentro deun triángulo equilátero tiene como propósitoalertar al usuario sobre la presencia de voltajepeligroso sin aislar dentro del producto, cuyamagnitud puede ser suficiente para constituir unriesgo de descarga eléctrica a personas.
ADVERTENCIA: PARA REDUCIR EL RIESGO DEINCENDIO, DESCARGA ELÉCTRICA O INTERFERENCIASMOLESTAS, NO EXPONER ESTE ARTEFACTO A LALLUVIA O LA HUMEDAD, Y UTILIZAR SÓLO LOSACCESORIOS RECOMENDADOS.
PRECAUCIÓN: PARA REDUCIR EL RIESGO DEDESCARGA ELÉCTRICA, NO REMOVER LA TAPA (O LATAPA TRASERA). NO HAY PARTES EN EL INTERIOR QUEPUEDAN SER REPARADAS POR EL USUARIO.
2
� Lea estas instrucciones
Conserve estas instrucciones
Siga todas las advertencias
Siga todas las instrucciones
- Al usar esta unidad, se deberíanseguir siempre las precauciones básicas esbozadas en estasección.
- Guarde el manual del usuariopara referencia futura.
- Obedezca todas las etiquetas deadvertencia en el producto, y las instrucciones de seguridad eneste manual.
- Apéguese a las instruccionesesbozadas en este manual y en la unidad.
Limpie sólo con un paño seco - Desenchufe la unidad antes delimpiar. No utilice ningún líquido o detergente para la limpieza.
No obstruya ninguna abertura de ventilación. Instalar de acuerdo alas instrucciones del fabricante.
No instalar cerca de ninguna fuente de calor como radiadores,placas térmicas, estufas u otros aparatos (incluyendoamplificadores) que produzcan calor.
No deje de lado el fin de seguridad que tiene el enchufepolarizado. Un enchufe polarizado tiene dos patas con una másancha que la otra. Se provee esta pata más ancha por suseguridad. Si el enchufe provisto no encaja en su tomacorriente,consulte un electricista para reemplazar el tomacorriente obsoleto.
Proteja el cable de alimentación para que no sea pisoteado omordido, especialmente en los enchufes, receptáculos, y el puntoen el cual salen del aparato.
Utilice sólo aditamentos/accesorios especificados por elfabricante.
El aparato no deberá ser expuesto a goteo o salpicaduras, yningún objeto lleno con líquido, como jarrones, deberá sercolocados sobre el aparato.
�
�
�
�
�
�
�
�
�
�
� No ponga objetos extraños en la bandeja de disco.
Mantener lejos de agua e imanes.
Mantenga la unidad lejos de floreros, tinas, lavabos, etc. Si sederraman líquidos dentro de la unidad, podrían ocurrir seriosdaños.
�
�
Instrucciones de Seguridad Importantes Seguridad
� Use sólo con el carro, la base, el trípode, el soporte ola mesa especificada por el fabricante, o vendida conel aparato. Cuando se utilice un carro, tengaprecaución al mover la combinación carro/aparatopara evitar daños por vuelco.
Desenchufe este aparato durante tormentas eléctricas o cuandono se use por períodos prolongados.
Consulte toda reparación con personal especializado. Serequieren reparaciones cuando el aparato ha sido dañado decualquier manera, como cuando se daña el cable de alimentacióno el enchufe, se ha derramado líquido, han caído objetos dentrodel aparato, el aparato ha sido expuesto a la lluvia o humedad, ocuando la unidad no opera normalmente, o se ha caído.
Protección del cable de alimentación Para evitar cualquier malfuncionamiento de la unidad y para protegerla contra descargaseléctricas, incendio o daños a personas, por favor siga estasinstrucciones:
Asegure firmemente el enchufe al conectar o desconectar a estaunidad el cable de alimentación AC (corriente alterna).
�
�
�
�
�
�
�
�
�
�
�
�
�
�
�
�
�
�
�
�
�
�
Mantenga el cable de alimentación AC apartado de artefactos decalefacción.
No conecte ni desconecte el cable de alimentación AC con lasmanos mojadas.
Nunca ponga ningún objeto pesado sobre el cable dealimentación AC.
No intente reparar o reconstruir de ninguna forma el cable dealimentación AC.
Quite el polvo, la suciedad, etc. del enchufe regularmente.
Si la unidad se ha caído o dañado de algún otro modo, apáguela ydesconecte el cable de alimentación AC.
Si la unidad emana humo, olores o emite ruidos, apáguela ydesconecte el cable de alimentación AC.
Ubicación - Evite ubicar la unidad en zonas expuestasdirectamente a la luz solar, radiadores de calor, automóvilescerrados, altas temperaturas (más de 35º C (95º F)), humedadalta (más del 90%), polvo excesivo, vibraciones, impactos odonde la superficie esté inclinada, pues los componentes internospueden resultar severamente dañados.
Períodos de desuso Cuando la unidad no sea utilizada, apáguela.
Cuando la unidad se mantenga en desuso por un largo período,debe ser desenchufada del tomacorriente AC hogareño.
No introducir dedos u otros objetos Tocar los componentesinternos de esta unidad es peligroso y puede causar serios dañosa la unidad. No intente desarmar la unidad.
Mantenga objetos magnéticos tales como parlantes distantes delreproductor.
Apilado Ubique la unidad en posición horizontal y no coloquenada pesado sobre ella.
No ubique la unidad sobre amplificadores u otros equipos quepuedan calentarse.
Condensación Puede formarse humedad en los lentes en lossiguientes casos: a) Inmediatamente después de que uncalentador ha sido encendido; b) En una habitación con muchovapor o muy húmeda; c) La unidad es trasladada de un ambientefrío a otro cálido.
Si se forma humedad dentro de esta unidad, puede no funcionarcorrectamente. En este caso, apáguela y espere alrededor de unahora para que se evapore la humedad.
Interferencia de ruido cuando se recibe una transmisióndependiendo de las condiciones de recepción del televisor, puedeaparecer interferencia en la pantalla del mismo mientras estáviendo una transmisión televisiva, si la unidad está encendida.Este no es un mal funcionamiento de la unidad o del televisor.Para mirar una transmisión televisiva, apague esta unidad.
Precaución La realización de controles o ajustes, o la ejecuciónde procedimientos diferentes a los aquí especificados puederesultar en exposición peligrosa a la radiación.
GUARDE ESTAS INSTRUCCIONES
Explicación de los Símbolos de Advertencia
Instrucciones de Seguridad
ES
Avisos Legales sobre los Derechos de Propiedadde Macrovision
“Patente de los EE.UU. números 4.631.603;4.819.098; 4.907.093; 5.315.448 y 6.516.132”
“Este producto incorpora tecnología de proteccióndel copyright protegida por Patentes de los EE.UU. yotros derechos de propiedad intelectual. El uso deesta tecnología de protección del copyright debe serautorizado por Macrovision, y sólo está previsto suuso hogareño y otros usos limitados de exhibición,salvo que Macrovision lo autorice de otra manera. Seprohíbe la ingeniería inversa o el desensamblado.”
Los consumidores deberían advertir que no todoslos equipos de televisión de alta definición sontotalmente compatibles con este producto, y puedencausar problemas en la imagen. En el caso deproblemas de imagen del barrido progresivo 525, serecomienda que el usuario cambie la conexión a lasalida “Definición Estándar”. Si hay preguntas conrespecto a nuestra compatibilidad de equipos detelevisión con este modelo 525p de reproductor deDVD, por favor contacte nuestro centro de atenciónal cliente.
�
�
�
�
�
�
�
�
�
�
Funciones de Grabación en Vivo y con Timer.
Modos Múltiples de Grabación, HQ, SP, LP, EP, EP+, SLP.
Más de 8 Horas de Grabación en un Disco DVD+R/RW.
El Navegador de Títulos de Discos en Pantalla le Otorgaun Rápido y Fácil Acceso a sus Grabaciones.
Sintonizador de TV Incorporado.
Entradas de Audio y Video Frontales y Traseras.
Entrada de Video Digital DV y Control de Cámara.
Borra/Renombra Títulos.
Inserción Automática de Marcadores de Capítulos.
Sus grabaciones pueden reproducirse en la mayoría delos Reproductores de DVD.
�Reproduce los formatos DVD, SVCD/VCD, MPG, JPG yCD de Audio.
Avance y Retroceso Rápido
Reproduce en Cámara Lenta, Avance Cuadro porCuadro.
Repite la Reproducción (Capítulo/Título/Disco y A-B).
Restringe la reproducción por Calificaciones, ContraseñaDefinida por el Usuario, Cambio de Contraseña.
Reproductor de MP3 con lista de reproducciónpersonalizable y modos de repetición y reproducciónaleatoria.
Muestra JPG como diapositivas con vista previa.
Zoom de hasta 4X con Paneo.
�
�
�
�
�
�
�
Características Introducción
El Grabador de DVD DVR 1600 con Salida de Video con Barrido Progresivo
Características de Grabación Características de Reproducción
3
Controlando los Contenidos del Paquete
Además de la Grabadora de DVD, su paquete debecontener los siguientes accesorios. Controlecuidadosamente los contenidos del paquete, puesalgunos ítems pueden encontrarse bajo la gomaespuma de empaque.
3
4
5
1
2
Control remoto con pila
Cable A/V (Video, Audio Estéreo)
Cable de Alimentación
Cable RF para TV
Este manual de instrucciones e informaciónde la garantía
Accesorios
1
4 53
2
Notas sobre el Copyright Copyrights
Progressive Scan Video Playback
000:00:00VIDEO
DVD R W
RECORD STAND BY
L AUDIO R VIDEO IN 2DV IN
DVR 1600 DVD RECORDER WITH PROGRESSIVE SCAN PLAYBACK
POWER
0 C
9
654
3
ENTER
PBC
DISPLAY
87
GOTO
21
A-B
1/ALL
REPEAT
RETURN
REC SCHEDULE
ZOOM
SLOW
CM SKIP
EDIT
CHSTOP
PLAY/PAUSE
MUTE
AUDIOSUBTITLEANGLE
VOL VOL
BOOKMARKMENU
OPEN/CLOSESETUP
SOURCE
CH
TITLE
Operation Guide
TM
DVD Recorder & Player
DVR 1600
QuickStartupGuide
Page 1
With
TMTM JPG
Instrucciones de Seguridad Importantes . . . . . . . . . . . 2
Grabar a Discos de DVD . . . . . . . . . . . . . . . . . . . . . . 17Conexiones de Grabación . . . . . . . . . . . . . . . . . . . . . 17Controlar una Cámara DV . . . . . . . . . . . . . . . . . . . . . 18Grabar Programas de TV . . . . . . . . . . . . . . . . . . . . . 18Lo Básico de Grabación Detener/Pausar/Continuar. 18Características de Grabación Con Salteo dePublicidades/Con Control de Tiempo. . . . . . . . . . . . . 18Grabación Finalizar un Disco Grabado. . . . . . . . . . . 18Display de Grabación. . . . . . . . . . . . . . . . . . . . . . . . . 18Menú de Títulos Reproducción de Título/Capítulo . . 19Menú de Títulos Edición del Nombre . . . . . . . . . . . . 19Menú de Títulos Borrar el Título . . . . . . . . . . . . . . . . 19Menú de Títulos Borrar el Disco . . . . . . . . . . . . . . . . 19Menú de Títulos Renombre el Etiqueta del Disco. . . 19Usar el Teclado en Pantalla . . . . . . . . . . . . . . . . . . . . 20Grabaciones con Horarios Programados con Timer . 20Guardar y Editar Horarios Programados . . . . . . . . . . 21
Grabación
ES
TM TM
TM TMTM TM
TM TM
1 ALL
DVD Video: Esta unidad reproduce DVDs grabados para unaregión particular. La marca de la región en la parte trasera delreproductor debe corresponder a la que se encuentre encualquier disco de DVD que quiera reproducir. Las unidadesvendidas en América del Norte están codificadas para laRegión 1, y son compatibles con los discoscorrespondientemente marcados.
DVD-R/RW: Estos discos pueden ser reproducidoscuando han sido grabados en formato estándar deDVD Video.
DVD-Audio: Esta unidad reproducirá sólo la pista desonido 5.1CH en los discos de DVD-Audio.
Video CD (VCD/SVCD): Con discos VCD/SVCD,están disponibles características avanzadas talescomo PBC (Control de Reproducción).
CD-R/RW: Esta unidad posee un navegador enpantalla para acceder a los archivos reproduciblesgrabados en discos CD-R/RW, tales como imágenesJPG y música en MP3.
CD-Audio: Se provee un navegador en pantalla paraseleccionar y reproducir pistas cuando se utilicendiscos de CD-Audio.
�
�
�
�
�
Las impresiones digitales o manchas en la superficiedel disco pueden causar pérdida de señal.
Use un paño suave y pase en forma radial cuandolimpie la superficie del disco, desde el centro deldisco hacia los bordes exteriores.
Nunca agregue etiquetas o cintas adhesivas sobrelos discos, y tenga cuidado de no rayar o dañar lasuperficie del disco.
Para evitar que los discos se doblen o deformen,deberían ser guardados verticalmente en sus cajas.Para prevenir daños, evite dejar los discos en suautomóvil, donde pueden sufrir exposición directa a laluz solar y a alta temperatura.
No use ningún disco accesorio para mejorar lacalidad de audio, soluciones protectoras de discos olimpiador de lentes. Estos productos pueden dañar lasuperficie del disco.
�Sostenga los discos por el borde o introduciendo eldedo índice en el orificio central. Nunca toque lasuperficie de señal.
Etiquetas
Cintas
Cara de la Etiqueta
Superficie
Compatibilidad y Cuidado de los Discos Discos
Discos Aptos para Reproducción
Cuidado de los Discos Ópticos
5
DVD+R: Estos discos pueden escribirse sólo una vez. Lasgrabaciones existentes pueden ocultarse pero no borrarse.Por lo tanto, cualquier espacio en disco ya utilizado por unagrabación no puede recuperarse. Los discos DVD+Rrequieren que sean “Finalizados” antes de que puedan sercompatibles con los Reproductores de DVD estándar. Unavez que un disco ha sido finalizado, no se pueden realizarmás grabaciones sobre el mismo.
DVD+RW: Los discos DVD+RW pueden ser escritos yborrados múltiples veces. Las grabaciones existentespueden ser borradas y el espacio en disco recuperado.Estos discos no requieren un procedimiento de finalización.Tan pronto como la grabación se realice, el disco serácompatible con Reproductores de DVD estándar.
Discos Aptos para Grabación
DVD+RW
DVD+R
JPG
ES
ENCENDIDO
DISPLAY
TITULO
MENU/PBC
ANGULO
RETROCESO RÁPIDO
PREVIO
RETORNAR
ABRIR/CERRAR
CONFIG
Enciende la unidady la pone en modo de espera.
Visualiza el display enpantalla que muestra informaciónde la sesión de reproducción
Accede a la pantalla detítulos en los discos DVD+R/RW,mostrando una representacióngráfica de las grabaciones yproveyendo una fácil navegación.
Accede a los Menúsen los Discos de DVD. Con losdiscos de VCD, enciende o apagala función PBC (Control deReproducción).
Selecciona entremúltiples ángulos en los Discosde DVD con soporte para estacaracterística.
Retrocede la imagen en velocidadrápida en DVD y otros discos.
Reproduce la pistaprevia en DVD y otros discos.
Al navegar menúsde discos, presione para retornaral menú previamente accedido.
Presione paraabrir o cerrar la bandeja dediscos.
Accede al Menú deConfiguración en pantalla paralestablecer los ajustes.
SUBTITULO
INTRO
HORARIO
Selecciona lossubtítulos disponibles en los discosDVD.
Selecciona las opciones enlos menús. Reproduce un disco,capítulo o pista con algunos discos.Para otros discos, presione PLAY.
Accede al menú del timerpara la configuración de la grabacióncon horarios programados.
BOTONES DE FLECHAS (VOL yCH+/-)
ARRIBA/ABAJODERECHA/IZQUIERDA
Se utilizan para navegar losmenús de los discos, el menú deconfiguración en pantalla, etc. En elmodo de sintonizador de TV, use
para elegir uncanal ypara subir/bajar el volumen desalida.
BOTONES NUMÉRICOS Se usanpara ingresar valores numéricos enla configuración de opciones.
REC Presione para comenzar unagrabación en vivo o para continuargrabando después de haberpresionado PAUSE.
7
8
12
10
11
14
16
3
4
5
1
2
6
9
13
15
17
18
Control Remoto FuncIones
SEÑALADOR
IR A
ZOOM
AUDIO
AVANCE RAPIDO
REPITE A-B
REPITE 1/TODO
BORRAR
EDIT
FUENTE
Marcador-presione menu para podertener acceso al marcador
,el disco le dara el accesorapido sin tener que cargarlo.
Presione para saltardirectamente a un Título,Capítulo o Tiempo en el disco.
Presione paraagrandar la pantalla con DVD ydiscos JPG.
Selecciona una pistade audio en discos DVD oVCD.
- Avanza laimagen en velocidad rápida enDVD y otros discos.
Establece lospuntos de comienzo y fin deuna sección a repetir.
Seleccionauna opción de repeticiónCapítulo, Título o Disco.
Al realizar ingresos,se utiliza para borrarcaracteres.
(Editar) Activa el menúde edición en pantalla.
Selecciona entre lasFuentes de Entradadisponibles cuando laGrabadora está en el modo deGrabación en VivoSintonizador de TV, Entrada deVideo 1 / 2, Entrada S-Video oEntrada DV (Digital).
PLAY/PAUSA Reproduceun disco, capítulo o pista.Presione para pausar lareproducción, presione unavez más para retornar a lareproducción normal.
STOP (Detener) Presione unavez para detener lareproducción y guardar la últimaposición en la memoria. Lareproducción puede serretomada desde donde se dejó,presionando PLAY. Presionedos veces para borrar la últimaposición de reproducción.
PROX
MUDO
Avanza a la próximapista en DVD y otrosdiscos.
Cancela temporalmentela reproducción de audio.
CM SKIP (Salteo de Publicidades)Durante la reproducción, use paraavanzar 30 segundos
SLOW (Lento) Reproducciónen cámara lenta. PresionePLAY para retomar lareproducción normal.
19
21
20
22
24
27
25
28
26
29
30
31
23
6
4
2
POWER
0 C
9
654
3
ENTER
PBC
DISPLAY
87
GOTO
21
A-B
1/ALL
REPEAT
RETURN
REC SCHEDULE
ZOOM
SLOW
CM SKIP
EDIT
CHSTOP
PLAY/PAUSE
MUTE
AUDIOSUBTITLEANGLE
VOL VOL
BOOKMARKMENU
OPEN/CLOSESETUP
1516
SOURCE
CH
1TITLE
8
3
56
7
12
910
1314
11
2019
1817
2122
23
2425
26
27
30
28
3130
3029
AUDIO VIDEO
DVD R W
PHOTO
- Exhibiciones duranteaparato de lectura de un CD audio,MP3, etc.
- Brilla intensamente duranteaparato de lectura de un vídeo deDVD.
- Exhibe el formatoregistrable respectivo del disco, +Ror +RW.
- Brilla intensamentedurante la exhibición de los archivosde JPG.
PLAY / PAUSE
TITLE / CLOCK / CANAL de TV
,
TIMERRECORD
- Exhibe estado delaparato de lectura.
-Capítulo De las Exhibiciones,Tiempo Transcurrido Del Aparato delectura, canal de TV y el reloj delsistema se exhibe en modo espera.
- Brilla intensamente cuandose fija una registración del horario.
- Exhibiciones alactivamente registrar.
7
8
3
4
51
2 6
La pila ya está instalada en el control remoto.
Dé vuelta el control remoto de manera que se veala cubierta trasera. Jale la lengüeta plástica paraactivar la pila en el control. Su Control está ahoralisto para ser usado.
1
2
Para reemplazar la pila del control, apriete el clippara soltarla, mientras tira de la manija delcontenedor de la pila para acceder a la batería.
30 30
El control remoto funciona mejor cuando se apuntadirectamente a la unidad. Manténgalo dentro de unángulo de 30º con respecto a la unidad.
Preparación y Uso del Control Remoto
Uso del Control Remoto
Uso del Control Remoto
7
Control Remoto
Lengüeta Plástica
Jale6
Control Remoto Soporte de Pila
ManijaClip para soltarla pila
Pila
+
+
Reemplace la pila, controle que la polaridad de lapila se corresponda correctamente con la delcontenedor de la pila. Deslice el contenedor de lapila dentro del control.
3
15
Funciones
Pantalla Frontal
AUDIO
1 2 3 4
5 6 8
VIDEO
DVD R W
TIMER
RECORD
PHOTO
7
ES
8
BANDEJA DE DISCO
PANTALLA FRONTAL
ABRIR/CERRAR
REPRODUCCIÓN/PAUSA
GRABAR
ENCENDIDO/EN ESPERA
ENTRADA DV
ENTRADA DE AUDIO IZQUIERDA/DERECHA 2
ENTRADA DE VIDEO COMPUESTA 2
Carga discos de DVD+R/RW,DVD, CD-R/RW, VCD/SVCD, MP3, JPG y otrosdiscos ópticos.
La Pantalla Fluorescente alVacío frontal muestra sobre el funcionamiento de launidad, como el capítulo en reproducción, el tiempotranscurrido durante la reproducción y el estado de labandeja de disco.
Presione para abrir o cerrar labandeja de disco.
Comienza lareproducción de un disco, capítulo o pista. Presionenuevamente durante la reproducción para pausar, ynuevamente para retomar la reproducción.
Comienza una Grabación en Vivo.
Enciende la unidad y laenvía a modo de espera. En modo de espera, launidad utilizará una cantidad mínima de energía parapermitir el encendido a través del control remoto.
(Digital) Entrada DV frontal paragrabación. Para seleccionar, utilizar el botónFUENTE y elija Entrada DV.
Entradas Frontales de Audio Estéreo para grabación.Estas entradas son compartidas con la entrada deVIDEO 2.
EntradaFrontal Compuesta de Video para grabación. Paraseleccionar, utilice el botón FUENTE y elijaENTRADA DE VIDEO 2. Entradas de AV.
7
83
4
5
1
2
6
9
Panel Frontal Funciones
TOMA DE CABLE DE ALIMENTACIÓN
ENTRADA/SALIDA DE ANTENA
ENTRADA DE VIDEO 1
SALIDA DE AUDIO ESTÉREO
SALIDA DE VIDEO COMPUESTA
ENTRADA S-VIDEO
ENTRADAS DE AUDIO ESTÉREO
SALIDA COAXIAL DE AUDIO DIGITAL
S-VIDEO SALIDA
SALIDA DE BARRIDOPROGRESIVO/COMPONENTE DE VIDEO
Enchufe elextremo correspondiente del cable de alimentaciónen la unidad antes de conectar el otro extremo a latoma de la pared.
Para conexión deAntena o TV por Cable. La conexión hacia eltelevisor no transmite la señal de salida desde elGrabador de DVD.
Entrada Compuesta deVideo para grabación. Para seleccionar esta entrada,utilice el botón FUENTE y elija ENTRADA DE VIDEO1.
Conecta atelevisores u otros equipos de audio con soportepara entrada de Audio Estéreo.
Salida de VideoEstándar soportada por la mayoría de los televisores.
Entrada S-VIDEO paragrabación. Para seleccionar esta entrada, presione
FUENTE y elija ENTRADA DE S-VIDEO.
Utilícese conENTRADA DE S-VIDEO 1 o ENTRADA DE VIDEO 1para grabación.
Utilice unCable Coaxial Digital especial para enviar la señaldigital codificada “en crudo” a dispositivos consoporte para decodificación digital.
Conecte a los televisores con S-VIDEO para una mejor calidad de imagen que la delvideo compuesto estándar.
Utiliceesta salida con televisores con soporte para entradade Componente de Video o Barrido Progresivo, paramejor calidad de video. Elija el MODO DE BARRIDOPROGRESIVO en el MENÚ DE CONFIGURACIÓNde la Grabadora para televisores con P-SCAN(Barrido Progresivo).
7
8
10
3
4
5
1
2
6
9
Panel Trasero
~100-230VAC IN
1 2 3 4 5
6 9 10117 8
Pr CrAUDIO
VIDEO OUTPUTINPUT 1
OUT
IN
AUDIO
AUDIO OUTPUT
5 6
8 9
1 2 3 4
7
VIDEO IN 2L RAUDIO INDV IN
STANDBY/ONRECORD/
DVR 1600 DVD RECORDER WITH PROGRESSIVE SCAN PLAYBACK
Su nueva grabadora viene con un cable de video compuesto (A/V) para conexión con televisores con una entradade video estándar, como se muestra debajo. En la mayoría de los televisores, este conector es de color amarillo yva normalmente acompañado por entradas de audio estéreo, de colores rojo y blanco para los canales estéreoderecho e izquierdo, respectivamente.
Primero, utilice el cable A/V provisto paraconectar a la entrada de video compuesta de sutelevisor. Ésta consiste normalmente en unconector amarillo que concuerda con la salidade Video en la parte trasera de esta unidad.Para escuchar el sonido a través del televisor,conecte también las terminales de audio roja yblanca.
1
Encienda la Grabadora de DVD. Ppresioneen el control
remoto o el panel frontal.MODO DE ESPERA/ENCENDIDO2
Su televisor debe estar equipado con entradas AV como las que semuestran en la imagen a la derecha, para poder conectar esta unidad.Si su televisor no tiene entradas AV, necesitará un Modulador RF paraconectar la grabadora a la entrada de antena/cable de su televisor,como se muestra debajo. Los Moduladores RF están disponibles enlas principales casas de electrónica.
Modulator RF
TV Antiguocon
conector coaxialde antena/cable
Grabador de DVDSalida Compuesta de Video
VIDEO R - AUDIO - L
Conexión Típica al Televisor Conexiones
9
En su televisor, elija la entrada de video. Esto serealiza normalmente seleccionando “Video 1” o“Entrada de Video” con el control remoto. Enalgunos televisores, se realiza seleccionando uncanal particular.
3
PARTE TRASERA DE SUTELEVISOR
AL TELEVISOR
BLANCO
ROJO
AMARILLO
BLANCO
ROJO
AMARILLO
CABLE AV ANALÓGICO
DE LA ANTENA AÉREAO SERVICIO DE CABLE
ES
Puedes tener alta calidad delareproduction de la foto usando eloutput video en lugar de S-Video orcomposite output. Conecta loscables basandote en las fotos.
El S-VIDEO es una conexión de calidad superior al video compuesto estándar, y requiere un cable S-Video especial(no incluido). El conector S-Video se distingue por sus 4 pines, como se muestra debajo. Si su televisor tiene unaentrada S-Video, se recomienda que use este tipo de conexión para una mejor calidad de imagen.
Primero, obtenga un cable especial de S-Video.Conecte la salida S-Video de la unidad a laentrada correspondiente en su televisor.
1
En su televisor, seleccione la entrada S-Video. Estose realiza normalmente eligiendo “Video 2” o “AV2”con el control remoto. En algunos televisores, estose hace seleccionando un canal particular.
2
Conexiones S-Video y Componente de Video Conexiones
10
CABLE S-VIDEO( NO INCLUIDO )
La Grabadora
La Grabadora
CABLE DE COMPONENT VIDEO( NO INCLUIDO )
VERDEAZUL
ROJO
1
2 En tu TV, seleciona el componente orprogressive scan input. Estonormalmente termina Selecionando“Video 2” o “AV2” con tu controlremoto. En algunas televisiones estotermina selecioando un canalparticular.
Cambia el Menu/A/V/Output/ScanMode to progressive si tu Televisiontiene P-scan o Interlace si funcionacan el componente.
3
Esta unidad dispone de una variedad de salidas de línea de audio para conectar a un receptor u otro equipo deaudio. Utilice el cable de A/V incluido para conectar las salidas de audio estéreo para conectar a un televisor o unreceptor estéreo.
Una salida digital de audio COAXIAL puede enviar un flujo de bits digital codificado, apto para receptores concapacidad de decodificación de Dolby o DTS. Estas salidas requieren cables especiales (no incluidos).
Salida de Audio Conexiones
11
La Grabadora
Amplificador o receptor de audio estéreo
CABLE DE AUDIO( NO INCLUIDO)
1 Puede conectar la salida coaxial de lagrabadora a la entrada coaxial digital en unamplificador o receptor AV.
Primero, obtenga un cable especial de audio.Conecte la salida estéreo analógica de la unidad ala entrada correspondiente en su amplificador oreceptor estéreo.
1
BLANCO
ROJO
Entrada DigitalCoaxial
La Grabadora
CABLE COAXIL( NO INCLUIDO )
Una vez que la pantalla de inicio del DVD apareceen su televisión, ¡Está listo para comenzar!
Enchufe el conector de toma eléctrica delreproductor de DVD a un tomacorriente de pared oa un prolongador.
1
Presione el botón MODO DEESPERA/ENCENDIDO en el panel frontal, o elbotón ENCENDIDO en el control remoto paraencender el DVD.
3
2
TM
Encendiendo Guía de Inicio Rápido+
Enchufe y Encendido
12
La grabadora usa los valores de Fecha y Hora paradeterminar cuándo comienza y termina las Grabacionescon Horario Programado.
Configuración de Fecha y Hora
1 Presione para ingresar al MENÚ DECONFIGURACIÓN.
CONFIG
Usa la tecla para selecionarGENERAL,presiona ENTER. Usa la tecla paraselecionar CLOCK, presiona ENTER.
5 6 3 4/ y /2Para editar un campo, presione .INTRO3Use las teclas para aumentar o disminuir elvalor del campo.
5 6/4Para salir de un campo, presione .INTRO5Presione para salir del MENU DECONFIGURACIÓN DEL RELOJ.
RETORNAR6Seleccioné el menú RELOJ y presione INTRO. Lapantalla de CONFIGURACIÓN DE RELOJ aparececon las siguientes opciones.�
�
�
Configuración de Reloj
Configuración de Fecha
Formato de Horario - 12HR ó 24HR.
Establece la hora. Estaconfiguración mostrará AM o PM si el ModoHorario está puesto en 12HR.
Establece la fecha.Usa 2 dígitos para el formato de año.
El modo12HR es la hora normalmente utilizada en losEE.UU., utilizando AM/PM para indicar día onoche. En el modo 24HR, no se utiliza ladesignación AM/PM; la hora 12:00 indica elmediodía y la hora 24:00 la medianoche.
Configuración de Canales
Una vez que su entrada de Antena o Cable estáconectada al conector en la parte trasera de la unidad,puede configurar el Sintonizador de TV incorporado dela grabadora buscando automáticamente los canalesdisponibles y luego agregando o borrando los canalesque usted elija.
Select the TV CHANNEL menu with the Presionepara ingresar al MENÚ DE
CONFIGURACIÓN. Seleccione el menú CANALESDE TV con las teclas / y presione INTRO.
CONFIG
5 6
1
2 Puede presionar repetidamente parasalir del MENÚ DE CONFIGURACIÓN en cualquiermomento.
RETORNAR
Búsqueda Automática de CanalesÉsta es la manera más fácil de completar su lista decanales con aquellos canales disponibles en su zona.La unidad busca canales automáticamente. Una vezfinalizado, presione CONFIG para retornar al menúCONFIGURACIÓN DE SINTONIZADOR.
Presione INTRO para mostrar el menú que permitaseleccionar su tipo de conexión (Antena o Cable),utilice las teclas de FLECHAS para seleccionar ypresione INTRO.
1
La unidad busca canales automáticamente. Unavez completado, presione RETORNAR para salirdel menú Configuración de Sintonizador.
2
Restaurar Configuración Original
Elija esta opción para borrar todos los cambios previosde la lista de canales.
Una vez que ha configurado sus canales, puedecomenzar a usar el SINTONIZADOR DE TV incorporadopara grabar o simplemente mirar sus programasfavoritos.
Cuando la unidad se enciende por primera vez, elmodo REPRODUCCIÓN DE DVD está elegidoautomáticamente. Presione y utilice lasteclas de e para cambiar almodo de SINTONIZADOR DE TV.
FUENTEFLECHAS INTRO
1
Use las teclas para cambiar de canal mientrasmire televisión. Como alternativa, puede ingresarun número de canal directamente con las teclasNUMÉRICAS, y presionar INTRO.
Para retornar al modo de Reproducción de DVD,presione la tecla FUENTE en cualquier momento.
5 6/2
Cambiar a Modo TV
ES
REPROD PELICULA
CARACT. ESPECIAL
SELECC. ESCENAS
CONFIG. DE AUDIO
Presione el botón en el controlremote o en el panel frontal para abrir la bandejade disco.
ABRIR/CERRAR
2
1
Inserte el disco, siendo cuidadoso de no tocar lasuperficie de reproducción. Sostenga el disco porlos lados y con su dedo índice a través del orificioen el medio, e insértelo suavemente en la bandeja.
Cierre la bandeja de disco presionandoABRIR/CERRAR en el control remoto o el panelfrontal.
3Use las teclas del control remoto paranavegar el menú y realizar una selección.
5 6 3 4/ o /
Presione para comenzar a reproducir una película.INTRO
La mayoría de los DVD mostrarán automáticamente unmenú después de que se inserta el disco. Este menú seconoce como el menú “raíz”.
Para retornar al menú después de que la reproducción deldisco ha comenzado, utilice la tecla .MENÚ
REPRODUCIRPLAY
PLAY/PAUSA
Para iniciar la reproducción de undisco, presione (Control Remoto) o
(Panel Frontal).
DETENERSTOPSTOP
PLAYSTOP
Para detener la reproducción de undisco, presione (Detener). La primera vezque se presiona , el lugar donde se detuvo eldisco se guarda, y puede comenzar la reproduccióndesde donde la dejó presionando . Si sepresiona dos veces, el lugar de reproducciónretorna al principio del disco.
1
2
PAUSAR
PLAY/PAUS PAUSA
PLAY/PAUSAPLAY
Para congelar el video en un solo cuadroo pausar la música, presione las teclas
A (Panel Frontal) o (ControlRemoto), durante la reproducción. Para retomar lareproducción normal, presione(Panel Frontal) o (Control Remoto).
3
Comenzar a Reproducir Discos Reproducción
Insertar un Disco Utilizar Menús de Discos
21
4
Iniciar, Detener o Pausar la Reproducción
13
PLAY MOVIE1. Capítulo Uno
2.
3.
4.
Capítulo Dos
Capítulo Tres
Capítulo Cuatro
Con los discos SVCD, presione (Control deReproducción) para habilitar o deshabilitar lafunción de PBC. La función de PBC habilita unMENÚ en discos SVCD con soporte para estacaracterística. Seleccione el númerocorrespondiente al Capítulo que desee reproducircon las teclas .
PBC
NUMÉRICAS
5
Avance/Retroceso Rápido
Para usar la función de Avance/Retroceso Rápidocon el control remoto, presione la tecla orepetidamente para alternar todas las velocidadesen la dirección deseada. Para retomar lareproducción normal, presione la tecla PLAY.
1
Usted puede realizar una reproducción rápida enavance o en retroceso con DVDs, VCDs y otros discos.El Avance/Retroceso Rápido funcionará sólo durante lareproducción del disco.
PROXIMO Para avanzar hacia el capítulo o pistasiguiente, presione en el control remoto o panelfrontal.
: :1
2
Puede avanzar o retroceder a través de los capítulos opistas en los discos de DVD, CDs de Audio y otrosdiscos con los botones and
en el control remoto o el panel frontal.: (PROXIMO)
(ANTERIOR):
ANTERIOR Presione en el control remoto o elpanel frontal para volver a la pista anterior.
Saltear al Capítulo Siguiente/Anterior
Para retornar a capas anteriores del menú, utilice latecla .RETORNAR3
Esta unidad puede reproducir en cámara lenta haciadelante en tres velocidades.
Reproducción en Cámara Lenta
Durante la reproducción, presione la teclarepetidas veces para seleccionar una velocidad decámara lenta o para retomar la reproducción normal.
SLOW1
Reproducción Cuadro por Cuadro
Presione la tecla para congelar la reproducción.;;1
Puede congelar la reproducción en un solo cuadro yluego avanzar un cuadro por vez.
Presione la tecla para avanzar un cuadro.Repita para continuar avanzando cuadro por cuadroa través de la película.
::2Presione PLAY para retomar la reproducciónnormal.3
Presione el botón MUDO en el control remoto paracancelar temporalmente la señal de audio encualquier momento.
1
2 Presione nuevamente para retomar el audionormal.
MUDO
Silenciar el Sonido
Funciones Avanzadasde Reproducción
Reproducción
14
Presione la tecla de repetidamente paraelegir un nivel de acercamiento.
ZOOM
Utilice la función de ZOOM para agrandar o encoger laimagen en la pantalla durante la reproducción o duranteuna pausa.
Cuando la función de se activa por primeravez, las flechas direccionales aparecerán en lapantalla. Durante este lapso, puede usar las teclas
/ y / en el control remoto para moverse porla imagen para ver el área que por el momento seencuentra fuera de la pantalla. Cuando las flechasdesaparezcan de la pantalla, esta función no podráutilizarse.
ZOOM
5 6 3 4
Presione el botón de repetidamente paraelegir ZOOM DESACTIVADO para retornar a lavisión normal.
ZOOM
Reproducción en ZOOM
12
3
Durante la reproducción, presione la teclapara “saltar adelante en intervalos de 30 segundos.
CM SKIP1
El Salteo de Publicidades (CM SKIP) le permite “saltar”adelante en intervalos de 30 segundos.
Salteo de Publicidades
La mayoría de los discos con multi-ángulo mostraránun indicador o marca de ángulo que alerta alespectador acerca de la disponibilidad de múltiplesángulos para la escena en reproducción. Cuandoaparezca esta marca en la pantalla, presione el botón
para seleccionar un ángulo de visión.ANGULO
1
Algunos discos de DVD se graban con múltiples ángulosde visión para algunas escenas. Cuando vea un discocon soporte para esta característica, podrá elegir entrelos ángulos disponibles en el disco con la tecla
.ANGULO
Función Multi-Ángulo
Durante la reproducción, presione el botónpara acceder al MENÚ DE AUDIO.
AUDIO1
2 Utilice las teclas / para seleccionar una pista deaudio y presione la tecla INTRO para confirmar.
5 6
AudioDolby 6CH Ing
Dolby 2CH Ing
Dolby 2CH Esp
AudioDolby 6CH Ing
Dolby 2CH Ing
Dolby 2CH Esp
La mayoría de los discos de DVD se graban con pistasde audio múltiples. Éstas pueden contener múltipleslenguajes y diferentes formatos de audio tales como5.1Channel, 2 Channel y otros lenguajes.
3 Presione para salir del Menú de Audio.AUDIO
Cambiar la Pista de Audio
Durante la reproducción, presione elbotón para acceder alMENÚ DE SUBTÍTULOS.
SUBTITULOS1
2
La mayoría de los discos de DVD incluyen al menos unapista de subtítulos en un lenguaje. Los subtítulos sonútiles al ver películas en un lenguaje extranjero o para elpúblico con dificultades auditivas.
SubtítuloInglés
FrenchEspañol
Desactivado
SubtítuloInglés
French
DesactivadoEspañol
SubtítuloInglés
FrancésEspañol
Desactivado
Utilice las teclas para seleccionarun lenguaje disponible y presione
. En este ejemplo, hemos elegidosubtítulos en español.
5 6/
INTRO
3 Para desactivar los Subtítulos, presionela tecla para acceder alMenú de Subtítulos. Utilice la teclapara seleccionar DESACTIVADO, luegopresione .
SUBTITULOS
INTRO
6
Subtítulos
Al reproducir un DVD o Video CD puede mostrar el título enreproducción, el capítulo/pista, el tiempo de reproduccióntranscurrido y otra información útil con la tecla .DISPLAY
Durante la reproducción, presione la teclapara ver la información disponible.
DISPLAY1
Presione nuevamente para salir delmenú.
DISPLAY2
8
7
6
5
4
1 El tipo de video o formato de archivo mostrado.También muestra la Fecha y Hora de la unidad.
2 Icono de acción de Reproducción que designa elestado actual: Reproduciendo, Pausado, AvanceRápido, etc.
3 Número de Título o Nombre de Archivo mostradoen el momento. También muestra el número totalde Títulos en el disco.
Pista de Audio elegida.
Capítulo en reproducción. También muestra loscapítulos disponibles.
Idioma de Subtítulos actualmente escogido.
Ángulo escogido y ángulos disponibles en el disco.
Reproducción en curso y tiempo restante en elTítulo.
Mostrar Información de la Sesión de Reproducción
DVD Enero 12, 2006 - 01:30PM
Capit : 03/28
Titulo: 01/08 Dolby 2 ch Ingles
Ingles 01/01
Prog : 00: 21:38 / 01:48:08
5
4
1
2 3
76
8
ES
Señalador
0 : 8 : 18_ : _ : __ : _ : __ : _ : __ : _ : _
Borrar TodoINTRO - Añadir/Encender
C - Claro
La función IR A provee un modo conveniente de navegarDVDs, CDs de Audio y otros discos permitiéndole seleccionarel Título, Capítulo/Pista o Tiempo al cual saltar la reproducción.
Presiona el boton para hacer pausa en dondequieras añadir el marcador antes de tener acceso alMenú de Señalador.
2
Saltar a un Capítulo o Punto de Tiempo
Saltos, Repetición de la Reproducción y Señaladores Reproducción
Presione durante la reproduccióndel disco para cargar el Modo de Repetición.
REPITE 1/TODO12
Para repetir un segmento de un disco, utilice la tecla. En DVDs, puede repetir Título o Capítulo. En VCDs,
funciona la repetición de capítulos y discos, pero primero debedeshabilitarse (Presionando la tecla PBC). Los CDs deAudio también permiten repetir la repetición de pistas o deldisco completo.
REPITE1/TODO
PBC
Para retornar a la reproducción normal, presionehasta que el ícono de
aparezca en la pantalla, significando quela repetición de la reproducción se ha cancelado.
REPITE1/ALL REPETICIÓNDESACTIVADA
Repetir un Disco, Título o Capítulo
Durante la reproducción, al alcanzar el comienzo delsegmento que quiera repetir, presione el botón
. Un icono, , se mostrará en lapantalla, permitiéndole saber que el punto de iniciodel segmento ha sido guardado.
REPITE A-B REPITE A
1
2
3
La tecla le permite definir su propiosegmento para repetir.
REPITE A-B
Repetir un Segmento que Ud. Defina
15
Cuando llegue al final del segmento que quierarepetir, presione el botón nuevamente.El icono ahora se muestra en lapantalla. El segmento comenzará ahora a repetirse.
REPITE A-BREPITE A-B
Para cancelar la repetición y retomar la reproducciónnormal, presione nuevamente. El icono derepetición en la pantalla cambiará a
.
REPITE A-BREPITE
DESACTIVADO
Cuando no hay actividad o la reproducción del discopermanece pausada por un período de alrededor de 5minutos, se cargará el Salvapantallas, protegiendo altelevisor del “quemado de pantalla” que podría ocurrirsi una imagen inusualmente brillante se muestra en lapantalla por un período extendido de tiempo.
Sobre el Salvapantallas
Señaladores
Mas controles pueden tener acesso unando de/ llaves para navegar en el sistema. Selione
CLEAR ALL para remover todo el .Use el boton the ENTER para regresar a tuselecion. Use el boton “C” para quitar cualquiermarcador que no quiera.
5 6
SEÑALADOR
1
The BOOKMARK feature is used to mark a point on thedisc to come back to later.
3
Durante la reproducción, presione la tecla paramostrar el MENÚ IR A.
IR A1
Utilice las teclas para elegir Títulos o Capítulos.
Utilice las teclas o las teclas paraseleccionar un Capítulo o Título al cual saltar. Utilice la tecla“C” para borrar cualquier entrada no deseada. Presione latecla para confirmar.
3 4
5 6
/
/ NUMÉRICAS
INTRO
2
Para saltar hacia un tiempo en el disco, presione paraseleccionar el campo de Tiempo. Utilice las teclas olas teclas NUMÉRICAS para ingresar el tiempo. Utilice lasteclas para moverse entre cada campo de tiempodeseado, luego presione INTRO para confirmar suselección.
4
3 4
5 6
/
/
3
Titulos Capitulos Reloj
01 09 /33/23
00 :17:48
Titulos Capitulos Reloj
Titulos Capitulos Reloj
01 09 /33/23
Presiona enter para crear la locacion del. Esta locaion esta creada por sierto
tiempo. Para crear otro , use el /clave para navegar en el proximo ,arcador ypresoina ENTER otra vez.
SEÑALADORSEÑALADOR 5 6
TM
¤
ES
Iconos del Menú de Acción
Reproducción de Imágenes y Música Reproductor en pantalla
Presione sobre cualquier archivo para iniciar el MENÚ DE ACCIÓN.INTRO
Esta unidad puede reproducir un CD de Audio y archivos JPG y MP3 que se encuentren en un disco. Un prácticoreproductor aparecerá automáticamente en la pantalla.
Imágenes JPG & Diapositivas
Para ver el archive JPG, use de / botones paraseliconar el file y presione ENTER or PLAY paraver el archivo.
5 6
1 La pantalla siguente demuestra los archivos en eldisco que automaticamente empiezan. Por favorvea arriba.
2
Insertar un Disco JPG
Para ver a JPG SILDE SHOW con la imagen queselecionaste, usa el boton y seleciona el cuadroMODE y periona ENTER. De el menu disponibleseleciona regresar. SLIDE SHOW encer el modode opcines incluye, revolver, encender todos etc.
3
4
3
Reproducción de Archivos Mp3Insertar un Disco Mp3
Cundo regresas el JPG archive, puedes usarthe botones para girar ya sea en elsentido de el reloj o viseversa.
5 6 3 4/ y /
1 El disco comenzará automáticamente lareproducción de pistas, comenzando por laprimera.
2
5
Esta unidad es compatible con discos CD-R/RWgrabados con archivos JPG Y MP3.
Los nombres de los archivos JPG deben tener laextensión “.JPG”.
Las imágenes JPG deben estar guardadas concodificación “Standard”, en lugar de codificación“progresiva”.
Los discos creados con computadoras personalespueden tener problemas de reproducción debido alas diferencias en las técnicas de grabación.
�
�
�
� Los nombres de los archivos MP3 deben tener laextensión “.Mp3”.
Notas
16
Presiona el Menu or STOP para salir dely regresar a la pantalla.
SILDESHOW
Usa las para seleconar las pistasque deseas regresar, y periona PLAY para emezara regresar. Usa de botones para navegar enel numero de cosa para selecionar otro regreso dela lista de arriba.
5 6
3 4
/ botones
/
1
3
ModeTypeAll
MP3 / WMA disc SONG_ONE.MP3
Total:Play mode:
00:56 / 04:28
SONG_ONE.MP3
SONG_TWO.MP3
SONG_THREE.MP3
SONG_FOUR.MP3
SONG_FIVE.MP3
5 tracksNormal2
5
4
Mode
PLAY - Comienza la reproducción de unarchivo.
TIPO - Elige el archivo deseado paracolocarlo en la lista de la pantalla. Escogeentre imágenes, música o todos.
REPRODUCCIÓN VISTA PREVIA -.
Inicia elmodo de reproducción de vista previa
MODO PLAY - Elige entre los modos dereproducción disponibles, incluyendoReproducción Aleatoria, Repetición, Normal ymás.
TypeAll
MODO CARPETAS - Cambia el MODO DEVISUALIZACIÓN DE ARCHIVOS paramostrar las carpetas en un disco. (Estaopción aparece sólo en el modo SEPARAR).
4
1 El formato del archivo.
2 La barra de visualización para la lista de archivos.
3 Muestra hasta 10 archivos de música a la vez.Utilice las teclas para navegar esta lista.5 6/
Presione las teclas / para navegar esta elMenú de
3 4
Acción.
7
5 Muestra las funciones actuales y del Menú deAcción.
6
Muestra el modo de reproducción del archivoactual.
Muestra el número total de pistas de música, elporcentaje de archivos reproducidos y el icono conla Función de Reproducción Actual.
8 Barra de progreso y tiempo total del archivo.
6
7
8
Reproducir
Con la grabación de DVD+R/RW, puede crear sus propios DVDs de sus películas hogareñas, programas detelevisión favoritos o de otras fuentes de video.
DVD+RW DVD+RPiense en los discos DVD+RW (DVD+Regrabable)como el equivalente digital a sus viejas cintas VHS.Como las cintas de video, los discos DVD+RW puedenser grabados, borrados y re usados. Pero, a diferenciade las cintas de video, los discos DVD+RW retendrán sucalidad digital cristalina incluso después de ser borradosy regrabados más de 1000 veces. Y, esta calidadsuperior no se degradará con el pasaje del tiempo comolas cintas VHS.
Una alternativa de menor costo al DVD+RW, estosdiscos “Grabables” no pueden borrarse. Una vez que seha realizado una grabación sobre un disco DVD+R, elespacio en disco utilizado por esa grabación no puedeser vuelto a utilizar. Los discos DVD+R deben serFinalizados antes de que puedan ser reproducidos enReproductores DVD estándar, y una vez que esteproceso se ha completado, no se pueden agregar másgrabaciones. Ésta es una diferencia importante entre losdiscos DVD+R y DVD+RW.
Grabación Grabación
Grabación en Discos de DVD
Grabación - Conexiones Traseras de EntradaCONEXIONES TRASERAS DE ENTRADA - Hay (2) entradas de fuentes de grabación en el panel trasero, (1) deS-VIDEO (llamada “S-VIDEO 1”) y (1) de Video Compuesto (llamada “VIDEO 1”). Nótese que ambas de estasentradas de video comparten la misma entrada de audio estéreo.
Fuente de Audio/Videocomo un reproductor de DVD
o VCR con Salida S-Video
Puede elegir fácilmente la entrada AV en esta unidad.
Eligiendo una Fuente de Entrada
1 Conecte la fuente de entrada AV deseada.
2 Presione FUENTE y utilice las teclas / para elegirsu fuente de entrada deseada. Presione INTRO.
3 4
Ahora puede ver los contenidos de la fuente de AVque conectó a la unidad.3Inserte un discograbable DVD+R oDVR+RW ypresione REC paracomenzar.
4
Puede elegir de las siguientes fuentes deentrada::
El Sintonizador de TV incorporado alReproductor de DVD le permite grabarsus programas favoritos de TV.
La Entrada deVideo Compuesto situada en la partetrasera de la unidad. Usada por cualquierdispositivo de video con Salida de VideoCompuesto.
Situada en elpanel trasero, el S-VIDEO provee unamejor imagen que el Video Compuestoestándar. Use esta entrada para cámarasu otros dispositivos de video cuando seaposible.
La Entrada deVideo Compuesto situada en el PanelFrontal.
La Entrada DV delPanel Frontal.
�
�
�
�
�
TV -
Entrada de Video 1 -
Entrada de S-VIDEO -
Entrada de Video 2 -
Entrada DV (Digital) -
Fuente de Audio/Videocomo una cámara con soporte
para Salida de Video Compuesta
La Grabadora
S-VIDEO
AMARILLO
ROJO
BLANCO
S-VIDEO IN
S-VIDEO OUT
VIDEO OUT
R
L
L
R
VIDEO IN
17
Grabación
18
Grabación - Conexiones Frontales de Entrada
VIDEO IN 2L RAUDIO INDV IN
STANDBY/ONRECORD/
VL R
DV OUT
L R V
VIDEOOUT
L R
AUDIOOUT
1 Conecte la cámara a la ENTRADA DV utilizando unCable de Video Digital (también llamado 1394 oFirewire).
Puede usar el control remoto de esta unidad paracontrolar la mayoría de las cámaras con soporte para lainterfaz DV.
2 Presione y utilice las teclasFUENTE 3 4/ paraseleccionar la ENTRADA DV. Presione .INTRO
3 Ahora puede controlar la cámara DV con el controlremoto de esta unidad. Las funciones disponiblesson:
y .REPRODUCIR, DETENER,
AVANCE/RETROCESO RÁPIDO PAUSA
Controlar una Cámara DV
Puede grabar fácilmente desde su televisor.
2 Inserte un disco DVD grabable.
Realizando una GrabaciónGrabando programas de televisión
1 Presione la tecla ENCENDIDO en su control remotopara encender la unidad.
3 Presione la tecla en el control remoto yseleccione la entrada SINTONIZADOR.
FUENTE
4 Presione las teclas o para seleccionar elcanal que desea grabar.
CH+ CH-
5 Presione la tecla GRABAR para comenzar lagrabación. La grabación continúa hasta quepresiona o el disco está lleno. El icono deGRABACION aparece en la pantalla, indicando quela grabación ha comenzado.
STOP
1 Presione para finalizar una grabación. Elicono de PARAR GRABACIÓN aparece en lapantalla.
STOP
2 Tras unos segundos, al cerrarse el nuevo Título queacaba de grabar, el icono de GRABACIÓNEXITOSA aparece en la pantalla.
Deteniendo una GrabaciónCuando detiene una grabación, se crea un nuevo Título.
Puede pausar la grabadora durante una Grabación en Vivo.
1 Simplemente presione para parartemporalmente la grabación. El icono de PAUSARGRABACIÓN aparece en la pantalla.
PAUSA
2 Presione para retomar la sesión de grabación.REC
Pausar (Salteo de Publicidades) y Retomar Grabación
En este punto, la grabación ha comenzado sin un tiempoespecífico de finalización, por lo que tendrá que presionar latecla para finalizar manualmente la grabación. Comoalternativa, puede especificar la duración de la grabación enintervalos de 30 minutos presionando la teclarepetidamente.
STOP
REC
Especificando el Tiempo de Grabación
1 Presione repetidamente para establecer lalongitud de la grabación en intervalos de 30minutos. Elija TIMEDREC OFF si no quiereespecificar una longitud de grabación.
REC
3 Otra opción es presionar la tecla , la cualpausará automáticamente la grabación durante 30segundos y tras ello retomará automáticamente lagrabación.
CM SKIP
Tras la concreción de la grabación de un disco, debe eldisco para poder reproducirlo en otros reproductores.
FINALIZAR
1 Con el disco grabado completo en el interior, presionela tecla ABRIR/CERRAR en el control remoto o elpanel frontal cuando haya finalizado la grabación.
2 Una ventana de Notificación aparecerá.
¿Finalizó la Grabación?
3 Seleccione INTRO para FINALIZAR el disco, o presione latecla ABRIR/CERRAR nuevamente para expulsar el disco.
1 Presione mientras graba. El MENÚ DEDISPLAY aparece como sigue.
DISPLAY
Tipo de Disco - Formato de disco:
Fecha y Hora -
Título -
Modo de Audio
Capítulo -
Fuente de Entrada -
Modo de Grabación -
Título -
DVD+R o DVD+RW
La fecha y hora del sistema.
Muestra el Título Actual y los Títulos Totales.
- Tipo de pista de audio en grabación.
Muestra los Capítulos Actual y Totales.
Muestra la fuente de entradaseleccionada.
Muestra la configuración decalidad de grabación.
Muestra la longitud del Título que está siendograbado y el tiempo restante en el disco.
Vea información útil utilizando DISPLAY
Utilizar DISPLAY para Ver Opciones de Grabación
DVD+RW Enero 18, 2006 - 06:19PM
01/01Titulo:
03/03Capit:
Dolby 2CH
TV HQ
Prog: 00:17:44 / 00.48.43
4
1
2
3
8
765
ES
4
3
6
5
1
2
7
8
Cuando inserta un disco DVD+RW o DVD+R, laPantalla de Títulos aparecerá. La Pantalla de Títulosmuestra vistas previas e información para cada Título(grabación) en el disco. En la Pantalla de Títulos, puederealizar las siguientes funciones con sus Grabaciones:
Reproducir Títulos o Capítulos.
· Borrar título de sus grabaciones.
· Renombrar Títulos y Etiqueta del Disco.
· Borrar un disco DVD+RW.
Reproducir y Editar sus Grabaciones Grabación
La Pantalla de Títulos
19
Rename
1DVD disc [My Party]4 titles34 minutes left
1 2
00:10:24 / 00:20:332
3
49999
3
4
T01-Thu 03/11
T01-Fri 03/12
T01-Fri 03/12
T01-Sat 03/13
106 7 85 9
Rename
1 Si la Pantalla de Título no se muestra en la pantalla,presione para hacerla aparecer.MENÚ
2 Utilice las teclas 5 6/ para seleccionar el título quedesea reproducir y presione .PLAY
3 El Menú de Acción también puede ser utilizado parareproducir un título. Utilice las teclas paraseleccionar el icono y luego presione .
3 4/PLAY INTRO
Reproducir un Título
Vista Previa de Imágenes
Información del Disco
Barra de Progreso
Previsualización de Título
Reproducir Título
Acción de Capítulo
Renombrar Título
Borrar Título
Borrar Disco
Renombrar Etiqueta del Disco
– Muestra un imagende el título.
– Muestra el nombre de laEtiqueta del Disco, el número total de títulos en eldisco y el tiempo de grabación restante.
– Muestra el punto actual dereproducción y la longitud total del título actual.
– El título actual semuestra en esta pantalla.
– Comienza la reproducción deltítulo seleccionado.
– Muestra las Vistas Previasde Capítulo y Reproduce Capítulos.
– Renombra el título con elTeclado en Pantalla.
– Borra el título actual.
– Borra un disco DVD+RW.
- Renombrar laEtiqueta del Disco.
4
1
2
3
6
5
8
7
9
10
12
Entrar el Menu de Titulos. Utilice las teclas 5 6/para seleccionar el Título que desee borrar.
4 Para regresar a la Pantalla de Títulos, presione .MENU
1
2
Entrar el Menu de Titulos. Utilice las teclaspara seleccionar el título que contiene el capítuloque quiera reproducir.
5 6/
4
Utilice las teclas / para seleccionar el capítuloque desee reproducir y presione .
5 6
PLAY3
Utilice las teclas 3 4/ para seleccionar el iconoy luego presione .ACCIÓN DE CAPÍTULO INTRO
5
O utilice las teclas 3 4/ para seleccionar el iconoy luego presionePLAY INTRO.
Para regresar a la Pantalla de Títulos, presione .MENU
Reproducir un Capítulo
Borrar un Título
Utilice las teclas 3 4/ para seleccionar el icono dey luego presione .BORRAR TITULO INTRO
12
Entrar el Menu de Titulos. Utilice las teclaspara seleccionar el Título que desee renombrar.
5 6/Renombrar un Título
Rename
Rename
Rename
Rename
1Borrar un disco
Entrar el Menu de Titulos. Utilice las teclas 3 4/para seleccionar el icono de yluego presione .
BORRAR DISCOINTRO
Utilice las teclas para seleccionar el dey luego presione .
Utilice el teclado en pantalla para renombrar el título.
3 4/ iconoACCIÓN DE RENOMBRAR INTRO
Rename
1 Entrar el Menu de Titulos. Utilice las teclas paraseleccionar el icono de yluego presione . Utilice el teclado en pantallapara renombrar el etiqueta del Disco.
3 4/ACCIÓN DE RENOMBRAR
INTRO
Renombrar Etiqueta del Disco
Titulo: 01 Tiempo Total:20mModo: SP Fuente:CVBS
ESEdición
20
Hay dos métodos que puede usar para ingresarcaracteres con el teclado virtual:
Utilice las “ ” – Cada caracter en losteclados de Letras y Signos muestra una “hot key”sobre él que corresponde a una en el controlremoto. Presione esta tecla repetidamente hastaque el carácter que desee ingresar esté iluminado yluego presione .
Por ejemplo, para ingresar la letra “S”, presione latecla 7 cuatro (4) veces. Note que la primera letra esautomáticamente mayúscula.
HOT KEYS
INTRO
Utilice las teclas / y /
INTRO
5 6 3 4 - Simplemente utilice lasteclas direccionales de flechas para mover elcarácter que desee insertar y luego presione
.
Para guardar sus cambios, elija presionandoo utilizando las teclas para
seleccionar y luego presionar .
HECHODISPLAY
HECHO INTRO5 6 3 4/ y /
Utilizando el teclado en pantalla
1
2
1
p q r7
Hot Key
s
p q r7
s
Guardar cambios
Press the key or use the / y / keys tomove to BACK and press .
CENTER5 6 3 41
Borrar caracteres
Teclado en Pantalla y Grabaciones Programadas
El Teclado En Pantalla facilita la introducción de Texto,Números y Símbolos Varios con su control remoto.
Sobre el teclado en pantalla
1 Para seleccionar LETRAS, presione la tecla paramoverse hacia las a la izquierda en elteclado virtual.
3
LENGÜETAS
2 Use las teclas 5 6/ para seleccionar otrosteclados.
3 Presione la tecla 4 para moverse hacia el tecladovirtual de su elección.
Las Grabaciones con Temporizador están diseñadaspara la operación sin supervisión, y funcionarán con lagrabadora en el Modo en Espera.
1 Para Comenzar a programar el horario de una grabación,presione el botón en el control remoto.Accederá a la Pantalla de Horario de la grabadora.
HORARIO
Grabaciones programadas
Programar una grabación
Letras
Números
Signos
Hora Actual
Eventos
Cerrar Pantalla
Agregar Nuevo Horario de Grabación
Editar Horario
Suspender/Listo
Borrar
– Hora actual del reloj.
– Totalidad de los eventos de grabaciónagendados.
– EligeAgregar un Nuevo evento al Horario.
– Elige Editar el Horario.
– Cambia el estado del horario –Listo o Suspendido.
– Borra el horario actual.
– Para cerrar la pantalla delhorario.
4
1
2
3
6
5
7
2 Antes de que se haya ingresado ningún horario, lapantalla deaparecerá automáticamente.
NUEVO HORARIO DE GRABACIÓN
p q r s w x y zt u v
g h i m n oj k l
d e fa b c1 2 3 Borrar
4 5 6
7 8 9
Pantalla Display
Exit Borrar Todo
Retroceder<< >>
< > ( - #
DoneDone
Letras
Números
Símbolos
Barra Espaciadora MayusCM Skip0
Volver
Comienzo:
Fin:
Origen:
Recurrencia:
Calidad:
08:00 PM
09:00 PM
TV
Una Vez
Anadir Cancelar
03/05/04
03/05/04
36
Nueva grabacion programada
Programacion
Nro
1
4 5 63
Horario de Inicio Longitud Fuente Estado
Enero 12, 2006 - 08:00PM
2 03.06.05 - 08:30PM 01:30 VIDEO 1 Ready
7
1 03.05.05 - 06:30AM 01:00 VIDEO 1 Ready
2
3
HQ(1 hora) 4
4
1 Por omisión, los horarios de yestán configurados para ser la hora
actual y una hora después, respectivamente. Lasfechas de y están configuradas para serla fecha actual.
INICIOFINALIZACIÓN
INICIO FIN
2 Para cambiar un campo de fecha u hora, utilice lasteclas para navegar la pantalla. Paraelegir un campo a cambiar, presione .
5 6 3 4/ y /INTRO
3 Con los campos de Hora, elija los dígitos de decena ounidad para cambiar, con incrementos de 10 minutos o1 minuto, respectivamente.
4 Presione para grabar los cambios y salir delmodo de edición hacia la siguiente pantalla.
ENTER
5 Luego, seleccione una fuente de entrada o canal deTV desde el cual grabar con las teclas / Paralos canales de TV, utilice las teclas numéricas paraespecificar su selección.
3 4
Grabaciones programadas Grabación
Configurando la Hora de Inicio y Finalización
21
Especifique el modo de Calidad de Grabación que deseautilizar para la grabación con las teclas .3 4/
Estableciendo el modo de calidad
La configuración de Recurrencia indica cuándo tomará lugar ose repetirá el horario programado.
(No Repetir) – Grabación por única vez,especificando una Hora, Fecha, etc. Este evento se borradespués de la grabación.
– La grabación se repite todos los días y laconfiguración de fecha se ignora.
– La grabación se repite una vez porsemana.
UNA VEZ
DIARIAMENTE
SEMANALMENTE
1 Seleccione una opción de Recurrencia con lasteclas / .3 4
1
Seleccione y presione para agregar la entradaa la lista de horarios cuando todos los parámetros esténconfigurados.
Para Cancelar agregando un nuevo horario, use para moverseal campo de y presionar .
AGREGAR INTRO
CANCELAR INTRO4
Para salir de la Pantalla de Horarios, presione .HORARIO
Guardando el horario
1
2
1 Para cambiar un horario de grabación, presione latecla para acceder a la Pantalla deHorario.
HORARIO
Editar un horario guardado
2 Use las teclas 5 6/ para seleccionar la entradaque quiera editar.
3 Use las teclas para seleccionar el icono dey presione .
3 4/EDITAR GRABACION INTRO
4 Edita la configuración de horarios con el mismoprocedimiento descrito atrás para nuevas grabaciones.
5 Salga de la Pantalla de Horario en cualquiermomento presionando .HORARIO
1 Presione para acceder al Menú de Horario.HORARIO
2 Use las teclas 5 6/ para seleccionar la entradaque quiera suspender o activar.
3 Si el horario que seleccionó está actualmenteactivado, el icono se muestra. Utilicelas teclas / para seleccionarlo y presione
para desactivar el horario.
SUSPENDER
INTRO3 4
Suspenda temporalmente un horario de grabación y habilíteloluego con el Menú de Acción de la Pantalla de Horario.
Suspender / Activar un horario
Note el icono a la izquierda del número de horario. Eltambién cambiará a .ESTADO SUSPENDIDO
Para activar un evento suspendido, seleccione esteicono con las teclas 3 4/ y presione .ENTER
El icono a la izquierda del horario desaparece y elmuestra .ESTADO LISTO
2 03.06.05 - 08:30PM 01:30 VIDEO 1 Suspend
1 Presione para acceder al Menú de Horario.HORARIO
2 Use las teclas 5 6/ para seleccionar la entrada quedesee borrar.
Borrar un horario grabado
3 Use las teclas 3 4/ para seleccionar el iconoy luego presioneBORRAR INTRO.
4 Presione para salir de la Pantalla deHorario.
HORARIO
Programacion
Num. Comienzo Duracion Origen Estado
Enero 4, 2006 - 08:00PM
2 03.05.04 - 06:30PM 01:00 VIDEO 1 Suspend
1 03.05.04 - 08:30AM 01:30 VIDEO 2 Suspend
08:00 PM
08:0 PM5
Video1
Una Vez
HQ(1hora)
El Menú de Configuración de la Grabadora de DVD esdonde se configuran varias opciones, incluyendo laconfiguración del Reloj, Opciones de Grabación,Opciones de Reproducción, Idiomas, Opciones deSupervisión Parental y más.
Cambiar Opciones de Configuración Menú de Configuración
Acerca del MENÚ DE CONFIGURACIÓN
Utilizar el MENÚ DE CONFIGURACIÓNEs fácil cambiar la configuración de la grabadora con elMENÚ DE CONFIGURACIÓN. Para demostrarlo,cambiemos la configuración FORMA DE TELEVISIÓNa 16:9, como si estuviera utilizando la grabadora conuna TV de Pantalla Ancha (Widescreen).
Use las teclas keys y presione sobre lacaracterística deseada.
INTRO5 6
3
/Aparecerá un sub menú. (En
este punto, puede retornar al menú principal con latecla ).
4 Para cambiar o seleccionar características, utilicelas teclas / y / para seleccionar una opción.Presione la tecla para regresar un nivel atrás y latecla para salir completamente.
5 6 3 4
3
CONFIG
3 Selección las sub características deseadas con lasteclas y utilice la5 6 4/ para navegar.
1 Presione para entrar al MENU DECONFIGURACIÓN.
CONFIG
22
¤Dependiendo del disco, algunas selecciones delMenú de Configuración no están disponibles.
Nota
Las opciones de configuración de idioma de laGrabadora de DVD, incluyendo OSD, menú, audio ysubtítulos.
Configuración de fábrica:
Establece el idioma utilizado por el MENU DECONFIGURACIÓN Y EL DISPLAY EN PANTALLA.Soporta (por omisión) y .
INGLES
Inglés Español
Configuración de Fábrica:
Establece el idioma utilizado por omisión por los Menúsde DVD. Por ejemplo, si un disco DVD contiene menúsen múltiples idiomas, tales como español e inglés, yesta opción está configurada en ESPAÑOL, entonces seusará el menú en español. El DVD debe tener soportepara menú en múltiples idiomas para que estaconfiguración funcione. Las opciones son: ,
y .
INGLÉS
INGLÉSESPAÑOL FRANCÉS
Menú de AUDIO de DVD por Omisión
INGLÉS
INGLÉS ESPAÑOL FRANCÉS
Configuración de Fábrica:
Establece la pista de audio utilizada por omisión por losDVDs. Por ejemplo, si un disco de DVD contiene pistasmúltiples de audio, tales como en español e inglés, yesta configuración está establecida en ESPAÑOL,entonces la pista de audio en español se reproducirápor omisión. El DVD debe tener soporte para menú enmúltiples idiomas para que esta configuración funcione.Las opciones son: , y .
OSD
Menú de DVD por Omisión
Menú de Audio de DVD por Omisión
SUBTÍTULOS
DESACTIVADOS
ESPAÑOL
INGLÉS ESPAÑOLFRANCÉS DESACTIVADO
Configuración de Fábrica:
Establece el idioma de subtítulo utilizado por omisiónpor los DVDs. Por ejemplo, si un disco de DVD tienesoporte para subtítulos en múltiples idiomas, tales comoEspañol e Inglés, y esta configuración está establecidaa , entonces los subtítulos en español seránmostrados por omisión. El DVD debe tener soporte paramenú en múltiples idiomas para que esta configuraciónfuncione. Las opciones son: , ,
y .
Subtítulos de DVD por Omisión
General - Configuración de Idiomas
Canal TV
Programacion
Salida A/V
General
?
2
Canal TV
Programacion
Salida A/V
General
?
OSD
Ingles
Para salir presione RETURN
Idioma
Default DVD Menu Ingles
Ingles
Default DVD Audio
Default DVD Subtitles Apagado
ES
TM
TM
Grabando
Version
Restaurar
Idioma
Categoria
Reloj
Ayuda
Ayuda
8. Adulto Temas y lenguaje adultos,desnudez.
Calificación Descripción
1. Niños OK Apta para todas las audiencias.
2. G Apta para audiencias en general.
3. PG Se sugiere guía de los padres.
4. PG-13 Se sugiere guía de los padres, noapto para niños menores de 13años.
5. PG-R Se recomienda guía de los padresimplicaciones, lenguajes osituaciones discretas muy breves.
6. R Restringida, violencia, lenguajeadulto y situación no apta paraespectadores jóvenes.
7. NC-17 Tema o contenido adulto, no aptopara menores de 17 años.
1 Primero, debe ingresar una contraseña válida. Si hadefinido su propia contraseña de usuario, ingreseese valor. De lo contrario, utilice la contraseña defábrica: .3351
2 Muévase al campo de Calificación con la tecla .6
3 Utilice las teclas para moverse hacia OK ypresionar INTRO.
3 4/
4 Use the key to move to OK and press .ENTER6
Menú de Configuración
Configuración de fábrica:
Su Reproductor de DVD posee una opción de SupervisiónParental. Esta opción está configurada en nivelpor omisión, lo cual permitirá la reproducción de todos losdiscos. Las opciones disponibles incluyen:
8. ADULTO
ADULTO
Restricciones Parentales
Cambiar las restricciones parentales
1 La primera vez que defina una contraseña de usuario,ingrese la contraseña de fábrica, , en el campoCONTRASEÑA VIEJA la contraseña de fábrica no secambia. Después de que has definido una contraseña deusuario, debería ingresar un valor en este campo. Si seolvida el valor de su contraseña de usuario luego, siemprepuede usar la contraseña de fábrica para cambiar el valor.
3351
2 Muévase a NUEVA CONTRASEÑA con la tecla .6
3 Utilice las teclas para ingresar sunueva contraseña de usuario utilizando un máximode 4 dígitos.
NUMÉRICAS
6 Utilice la tecla para moverse a OK y presionar .INTRO6
Puede establecer su propia CONTRASEÑA DE USUARIO parausarla adicionalmente a la CONTRASEÑA DE FÁBRICAincorporada, y luego cambiar este valor en cualquier momento.Esto es útil para dar a otra persona acceso temporal a laconfiguración del control paterno.
Definir y Cambiar la Contraseña
23
General - Rating
Los valores de fecha y hora para determinar cuándocomenzar y finalizar las Grabaciones con HorarioProgramado.
Ajustar Reloj:
Formato de Horario:
06:55 PM
12 HR
Reloj
Ajustar Fecha: 03/02/05
Para salir presione RETURN
General - Reloj
8. Adulto
Clave :
Para salir presione RETURN
Categoria para padres
Nivel :
Cambiar Clave :
Cambio Contraseña :
Clave Actual: * * * *
Clave N a:uev
Aceptar Cancelar
Confirmar Clave Nueva:
5 Utilice las teclas para ingresar sunueva contraseña de usuario utilizando un máximode 4 dígitos.
NUMÉRICAS
4 Muévase a CONFIRMAR CONTRASEÑA con la tecla .6
8. Adulto
Clave :
Para salir presione RETURN
Categoria para padres
Nivel :
Cambiar Clave :
Tenga en mente que, como la CONTRASEÑAMAESTRA está escrita arriba, su reproductor puedeno ser seguro si este manual es accesible para susniños.
Nota De Seguridad
1 Use las teclas para seleccionar uncampo de fecha u hora a cambiar.
5 6 3 4/ y /
2 Para editar un campo, presione .INTRO
3 Use las teclas para incrementar o disminuir elvalor del campo.
5 6/
4 Para salir de un campo, presione .INTRO
5 Presione para salir del MENÚ DECONFIGURACIONES DEL RELOJ.
CONFIG
1 Utilice la para seleccionar el campo de ModoHorario.
5 6/
2 Para editar un campo, presione .INTRO
3 Utilice las teclas para seleccionar una opción.3 4/
4 Presione para salir del MENÚ DECONFIGURACIÓN DE RELOJ.
CONFIG
Seleccione ya sea el formato de 12HR (hora normal decivil) o el de 24HR (hora militar).
Menú de Configuración
Configuración de Fecha y Hora
Ajustar Horario
24
12
Use las teclas para seleccionar laconfiguración de CALIDAD que desee utilizar.
3 4/
Configuración de fábrica:
La configuración de Calidad determina la calidad de susgrabaciones así como la máxima cantidad de video quepuede grabar en un disco. De manera pocosorprendente, cuanta más alta es la calidad, menoscantidad de video puede grabarse.
HQ (Calidad Alta)
Presione para salir del MENÚ DEGRABACIÓN.
CONFIG
Modo de Calidad de Grabación
HQ (Calidad Alta)
SP (Estándar)
LP (Larga Duración)
EP
EP+
SLP
Máxima
Excelente
Muy Buena
Mejor que VHS
Igual al VHS
Menor que VHS
1 HR
2 HRs
3 HRs
4 HRs
7 HRs
8 Hrs
(Duración Extendida)
(Duración Extendida +)
(Súper Larga Duración)
Modo Calidad Tiempo Máx
12
Use las teclas para seleccionar una opción.3 4/
Configuración de Fábrica:
Controla si los Marcadores de Capítulos son insertadosautomáticamente durante las grabaciones o no. Puedeelegir el intervalo entre , ó minutos, o
esta característica.
5 min
5 10 15DESACTIVAR
Presione para salir del MENÚ DEGRABACIÓN.
CONFIG
12
Utilice las teclas para aumentar/disminuir elvolumen de audio.
3 4/
Configuración de Fábrica:
Utilice esta configuración para ajustar el volumen delaudio para sus grabaciones. La configuración poromisión de 100 envía el 100% de la señal desde suentrada a la grabación. Puede disminuir este valor si lodesea, incluso hasta lo que resultará en una grabaciónsin sonido.
100
0,
Presione para salir del MENÚ DEGRABACIÓN.
CONFIG
Marcación Automática de Capítulo
Grabación de Volumen de Audio
General - Grabando
Muestra varias versiones de la unidad.
General - Versión
General - Restaurar
Elegir “Sí” restaurará los valores de configuración defábrica de su unidad.
Salida A/V - Video
Calidad SP (2horas)
Grabando
Marca automatica
Grabando Volumen 100
5 min
Para salir presione RETURN
NTSC
Forma TV
Para salir presione RETURN
Video
Salida Estandar
4:3 Pan Scan
IntercalarModo Excaner
Salida Componente
ES
Esta accion restauraralos valores originales.Esta seguro que
desea continuar?
Para salir presione RETURN
Restaurar
!Si No
Menú de Configuración
12
Utilice las teclas para elegir una opción.3 4/
Configuración de Fábrica:
Esta opción está configurada por omisión paratelevisores normales con una proporción de pantalla de4:3. A menos que esté seguro que tiene una TV dePANTALLA ANCHA (Widescreen), no cambie estaconfiguración. La configuración “Letterbox” de 4:3 estáprevista para habilitar la vista en “formato de cine” enDVDs que contengan tanto Formato de Cine comoversiones de Barrido Panorámico. Si está usando untelevisor de pantalla amplia, establezca esta opción a
para que se corresponda con las proporciones desu TV.
4:3 Barrido Panorámico
16:9
Presione SETUP para salir.
Configuración de Fábrica: NTSCSu Reproductor de DVD trabajará con TVs basados en NTSC.NTSC es el sistema estándar en los EE.UU. y otros países.
Formato TV (Proporciones)
Salida Estándar
Configuración de Fábrica: IntercalarLos televisores normales realizan el barrido sólo en modo“entrelazado”, porque las líneas pares e impares se entrelazanjuntas en barridos alternos. El Barrido Progresivo es un métodode barrido que se ofrece en Televisores de alta calidad.
Modo Escanser
1 Si tiene un Televisor con Barrido Progresivo, utilice latecla para cambiar el modo de barrido a .Si no ve video en su televisor después de esto, presionela tecla para cambiar la configuración nuevamente a laconfiguración original.
4
3
Progresivo
2 Presione para salir del MENU DE VIDEO.CONFIG
1 Utilice las teclas para seleccionar Brillo oContraste y las teclas para disminuir oaumentar el valor.
5 6
3 4
//
Salida A/V - Imagen
Configuración de Fábrica:
Su Reproductor de DVD funcionará con televisores consoporte para varias entradas de video, incluyendocompuesto, S-Video, component y Barrido Progresivo.
S-VideoSalida
2 Si planea utilizar la conexión component, utilice latecla para cambiar la salida a .4 Component
3 Presione para salir del MENU DE VIDEO.CONFIG
1 Cuando utilice la conexión compuesta o de S-Video, seleccione .S-Video
Salida de A/V - Audio
12
Utilice las teclas para elegir una opción.3 4/
Configuración de Fábrica: (“Crudo”)
Determina el formato de salida de audio para la SalidaÓptica y la Salida Coaxial Digital de Audio. Al reproduciruna pista de sonido Dolby 5.1, deje la opción en RAWpara dar salida a la señal digital codificada a unReceptor Digital con un Decodificador Dolby 5.1. Si sureceptor no es capaz de decodificar una señal Dolby,utilice la configuración PCM.
Al reproducir CDs, deje esta opción en PCM para darsalida a una señal estéreo en la Salida Digital.
RAW
Presione para salir del MENÚ DE AUDIO.CONFIG
12
Utilice las teclas para seleccionarDESACTIVADO o ACTIVADO.
3 4/
Configuración de Fábrica:
El Control de Rango Dinámico, también llamado “Modode Medianoche”, reduce las variaciones entre lossonidos de volumen alto y bajo en las películas en DVD.Esto le permite subir el volumen para escuchar lossonidos más suaves y los diálogos, sin preocuparse porlas escenas de volumen extremadamente alto quepuedan molestar a otros.
DESACTIVADO
Presione para salir del MENÚ DE AUDIO.CONFIG
Modo de Salida Digital
Control de Rango Dinámico
25
Brillo
Para salir presione RETURN
Imagen
Contraste
Salida Digital PCM
Para salir presione RETURN
Audio
Control Dinamico de sonido Apagado
?Cuidado no cambie la configuracion del
modo porque puede perder la foto. Si no estocorrecto el sistema se elmacenar
automaticamente despues de 10 segundos.
Notificacion
Si No
PrecauciónNo cambie la configuración de Modo de Barrido a menosque esté seguro de que su televisor soporta BarridoProgresivo.
Menú de Configuración
26
Aquí es donde puede personalizar su lista de canalesOMITIENDO o MOSTRANDO cualquier canal que elija.
Utilice las teclas / para seleccionar un canal que legustaría OMITIR y presione .El iconoOMITIDO aparece a la derecha del canal,permitiéndole saber que no estará accesible cuandousted recorra los canales con las teclas / al mirartelevisión. Puede, sin embargo, seleccionar cualquiercanal directamente con las teclas .
5 6
5 6
INTRO
NUMÉRICAS
2
Para mostrar cualquier canal de nuevo, después dehaber sido omitido, simplemente seleccione el canaly presione la tecla para seleccionar el icono“OMITIR ITEM” y presionar . El iconoOMITIDO se remueve.
4
INTRO
3
Configuración de Canales de Televisión
Configurar Canales
Seleccione la opción CANALES DE TV del MENU DECONFIGURACION y presione . Verá una listade todos los canales posibles. El icono OMITIDO a laderecha de un canal, significa que no fue detectadodurante la BÚSQUEDA AUTOMÁTICA.
INTRO1
Canal 34
35
37
38
Canal
Canal
Canal
Canal 36
Canal 34
35
36
37
38
Canal
Canal
Canal
Canal
Canal 34
35
37
38
Canal
Canal
Canal
Canal 36
Presione para salir del MENU DECONFIGURACIÓN.
CONFIG4
La BÚSQUEDA AUTOMÁTICA busca automáticamentecanales disponibles. La unidad guarda aquellos canalesrecibidos con la suficiente fuerza de señal. Este temafue tratado previamente. Otros puntos incluyensaltearse/mostrar canales.
1 Presione CONFIG y utilice las teclas 5 6/ paraseleccionar AYUDA y luego presione INTRO.
2 Utilice las teclas para seleccionar un tema deAYUDA. Utilice las teclas
para desplazarse através del contenido.
5 6
3 4
5 6
// para navegar entre
las ventanas y las teclas /
Puede utilizar esta característica amigable para accederfácilmente a instrucciones paso-a-paso y otrainformación útil sobre varios temas relacionados con suunidad.
Tema de Ayuda
3 Presione INTRO para salir del menú de AYUDA yCONFIG para salir.
ES
Presione ENTER para cerrar la ayuda.
La Grabadora de DVD NoSe Enciende
�
�
�
El Cable de Alimentación AC puede estar suelto o no enchufado. Asegúrese de queel cable de alimentación está asegurado en la toma AC y el conector en la partetrasera del reproductor.
La unidad puede estar en Modo de Espera. Encienda el reproductor con el botónENCENDIDO del control remoto, o si está usando un prolongador, asegúrese de queel interruptor del mismo esté encendido.
Debe haber una pausa de unos segundos entre el apagado de la unidad y sureencendido.
Un Disco Específico NoSe Reproduce
�
�
�
El disco puede estar sucio. Pruebe limpiando el disco.
Asegúrese de que el disco no esté al revés.
Puede que el CÓDIGO DE REGIÓN del disco no corresponda al del reproductor. Enese caso, el disco no puede usarse.
El Control Remoto NoFunciona
�
�
�
�
Asegúrese de que está apuntando el control remoto directamente al sensor delreproductor, localizado en la pantalla frontal.
Asegúrese de que no hay obstáculos entre el control remoto y el reproductor.
Las pilas pueden estar agotadas. Pruebe cambiándolas.
Podría estar utilizando el control remoto desde muy lejos. Pruebe a una distanciamenor a 4 metros desde el reproductor.
No Hay Imagen En LaPantalla del Televisor
�
�
Asegúrese de que las conexiones desde el reproductor al televisor están aseguradas.
Verifique que el canal del televisor esté dispuesto con la entrada de videocorrespondiente. Consulte la documentación del televisor. En la mayoría de lostelevisores el canal “Aux In”, “Video In” o “A/V” debería corresponderse con el conector deentrada de video.
La Imagen ApareceAchatada o Estirada
�
�
La Proporción de Video puede estar mal configurada para su tipo de televisor.
Ingrese al MENÚ DE CONFIGURACIÓN y seleccione el menú SALIDA A/V >VIDEO. Pruebe cambiando la opción FORMA DE TV a 4:3 PanScan (BarridoPanorámico) si está utilizando un televisor estándar, o 16:9 Amplio si su televisor esdel tipo Pantalla Ancha (widescreen).
Problemas Comunes y Soluciones Solución de Problemas
La Grabación en Vivo NoComienza
�
�
�
�
La fuente de entrada de video puede estar protegida con Protección anti-copia deMacrovision.
El disco puede contener ya grabaciones de un sistema diferente de televisión PAL oNTSC. Si el disco ya contiene una grabación PAL, no puede grabar desde una fuenteNTSC, y viceversa.
Puede haberse alcanzado el número máximo de títulos o capítulos.
Si el disco es un DVD+R, puede estar ya FINALIZADO.
El Disco No PuedeBorrarse
�
�
Puede que el disco no sea un disco DVD+RW
El disco puede estar sucio. Pruebe limpiándolo.
Las Grabaciones No seEjecutan en OtrosReproductores de DVD
�
�
Si el disco es un DVD+R, asegúrese de que haya sido FINALIZADO.
El Reproductor de DVD puede no ser compatible con discos DVD+R/RW
La Grabación con TimerNo Comienza de Acuerdo
�
�
�
�
La Fecha u Hora es inválida o entra en conflicto con otro horario.
La configuración de Fecha u Hora del Grabador es incorrecta. Configure la Fecha y Horaen CONFIGURACION.
La Fuente de Entrada de Video especificada no está disponible.
El disco no tiene espacio.
El Disco No Sale � Si el reproductor está en Modo de Espera con el LED encendido a la izquierda de labandeja de disco, el disco no saldrá. Encienda el reproductor con el Control Remotoy luego expulse el disco.
Imagen Distorsionada alConectar a un VCR o a unTV VCR/Combo
� Esta Grabadora de DVD está construida con la protección anti-copia deMacrovision. Esto distorsionará la señal cuando se use con VCRs. Conecte elreproductor directamente al televisor. Algunos combos VCR/TV pueden serincompatibles con los reproductores de DVD.
Pausado de Grabación, Inserción Automática de Capítulos, Navegador dePantalla Índice, Múltiples Modos de Calidad
Características deEdición
Borra Discos, Finaliza DVD+R, Borra Títulos, Edita Etiquetas de Volumen, RenombraTítulosAvance/Retroceso Rápido, Reproducción en Cámara Lenta, Repetición deReproducción (Capítulo/Título/Disco & A-B)Reproducción
de DVD
Modos deReproducción
Imágenes y Música Reproductor MP3 con lista de reproducción personalizable,modos de repetición y reproducción aleatoria. Diapositivas JPG con vista previa.
Imágenes y Música
720x480 NTSCResolución
PerformanceDe Video
Conversor DA / AD 10-bit / 9-bit
Compuesto, S-Video, Component (Y, Pb, Pr)Salidas de Video
Láser
Conversor DA/AD 24-bit / 24-bit
Sampleo de 48kHz - Sampleo de 4Hz a 22kHz / 96kHz - 4Hz a 44kHzSonido Lineal DVD
4Hz a 20kHzCD de Audio
Proporción Señal/Ruido >90dB
Rango Dinámico de Audio >90dB
Distorsión Armónica < 0.001% (PICO W.)
PerformanceDe Audio
Component Video Y 1.0Vp-p (75 Ohm), Sincronía Negativa/Pb/Pr - .7Vp-p (75 Ohm)
Mini DIN de 4 Pines (75 Ohm)S-Video
Jack de Un Pin, 1Vp-p (75 Ohm)Composite Video
Coaxial Digital Jack de Un Pin, .5Vp-p (75 Ohm)
Audio Analógico (Estéreo) 2.0VRMS (470 Ohm)
Conexiones deEntrada
Conexiones deSalida
CaracterísticasFísicas
Mini DIN 4-Pin (75 Ohm) (Trasero)S-Video
Jack de un pin, 1Vp-p (75 Ohm) (Delantero/Trasero)Video Compuesto
Audio Analógico (Estéreo)
DV (Video Digital)
2.0VRMS (470 Ohm) x2 (Delantero/Trasero)
Conector Estándar de Entrada DV 1394 (Frontal)
Condiciones de de 5º C a 35º C
AC 100V~230V, 50/60HzAlimentación
Dimensiones 45 mm x 350 mm x 230 mm (Alto x Largo x Profundidad)
Peso 4lb 9 oz / 2.07kg
650nm
Las especificaciones están sujetas a cambios sin aviso. Aunque se ha tenido la debida precaución en la producción de este documento, la comisión deimprecisiones técnicas inadvertidas o de errores tipográficos es posible e involuntaria. En tanto se han realizado todos los esfuerzos para asegurar la precisión,CyberHome Entertainment no será responsable por cualquier imprecisión o error en la información aquí contenida. Part# DVR 1600 G - SPANISH