MARKETO INTEGRATION USER GUIDE CONTENTS 2 Overview 2 Connecting Marketo to Attend 3 Obtaining the Marketo Host Name 4 Obtaining Client ID and Client Secret 8 Setting up Marketo for an Event 11 Setting up the Program in Attend 13 Attend to Marketo Export 13 Other Things to Keep in Mind Version 1.1
Transcript
MARKETO INTEGRATION USER GUIDE
CONTENTS
2 Overview2 Connecting Marketo to Attend3 Obtaining the Marketo Host Name4 Obtaining Client ID and Client Secret8 Setting up Marketo for an Event 11 Setting up the Program in Attend13 Attend to Marketo Export13 Other Things to Keep in Mind
Version 1.1
OVERVIEW
This document provides an overview of Attend’s Marketo integration. In this guide, we will walk you through the step-by-step setup to make sure you’ve got everything you need to start syncing Marketo Programs with Attend.
CONNECTING MARKETO TO ATTEND
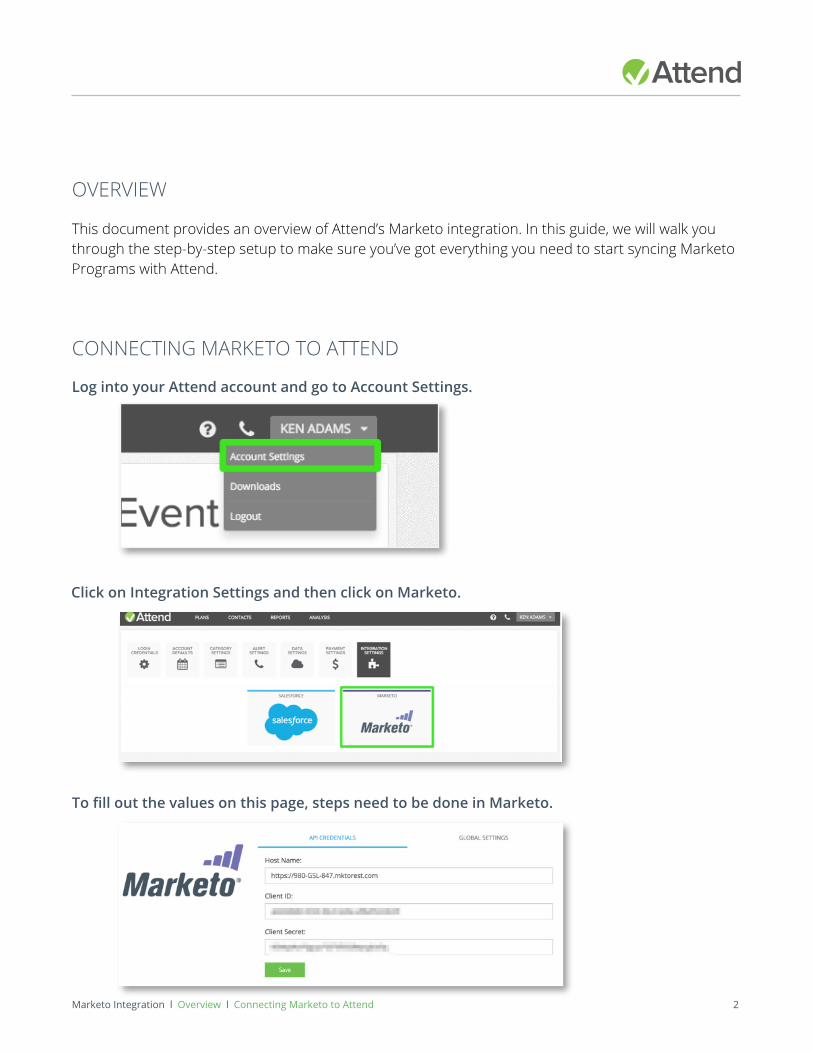
Log into your Attend account and go to Account Settings.
Click on Integration Settings and then click on Marketo.
2Marketo Integration l Overview l Connecting Marketo to Attend
To fill out the values on this page, steps need to be done in Marketo.
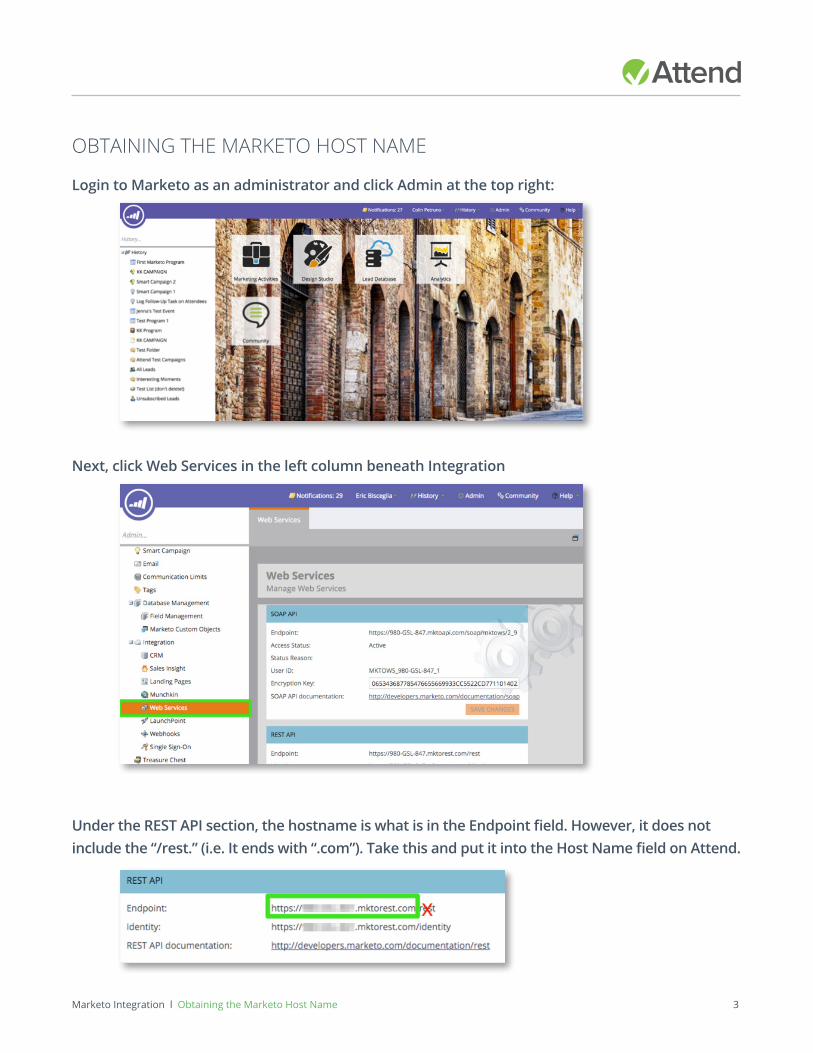
Login to Marketo as an administrator and click Admin at the top right:
Next, click Web Services in the left column beneath Integration
Under the REST API section, the hostname is what is in the Endpoint field. However, it does not include the “/rest.” (i.e. It ends with “.com”). Take this and put it into the Host Name field on Attend.
3Marketo Integration l Obtaining the Marketo Host Name
OBTAINING THE MARKETO HOST NAME
4Marketo Integration l Obtaining Client ID and Client Secret
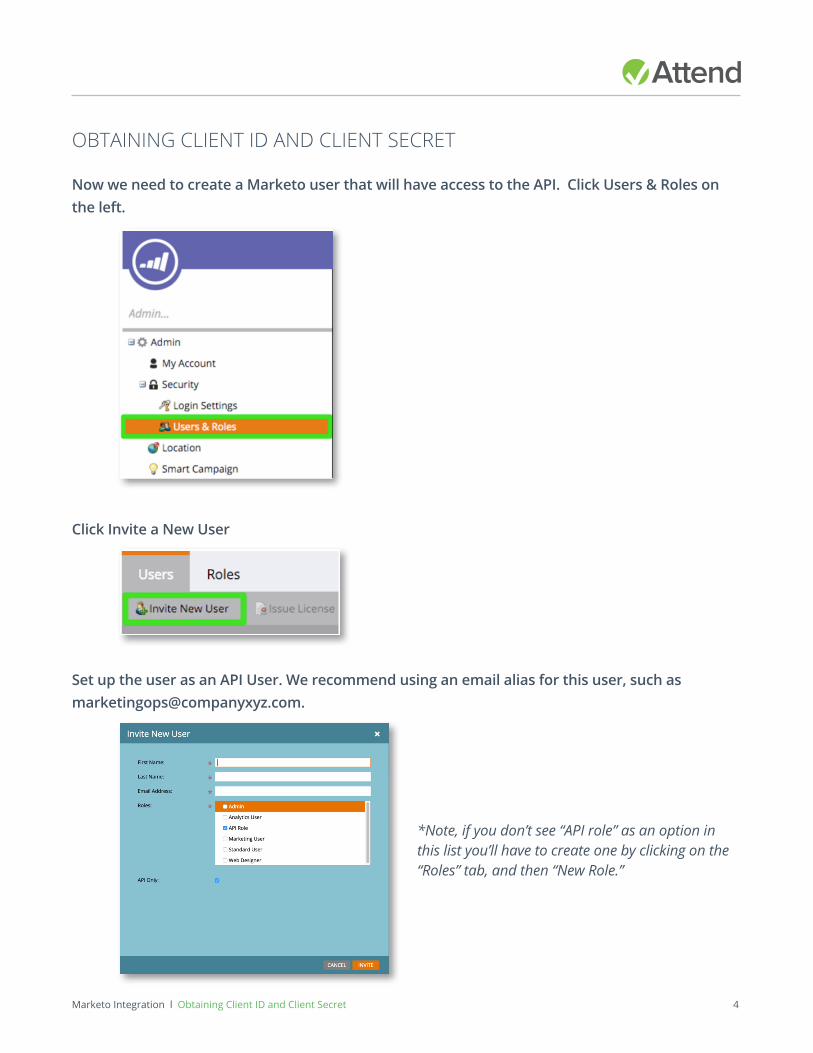
Now we need to create a Marketo user that will have access to the API. Click Users & Roles on the left.
Click Invite a New User
Set up the user as an API User. We recommend using an email alias for this user, such as [email protected].
*Note, if you don’t see “API role” as an option in this list you’ll have to create one by clicking on the “Roles” tab, and then “New Role.”
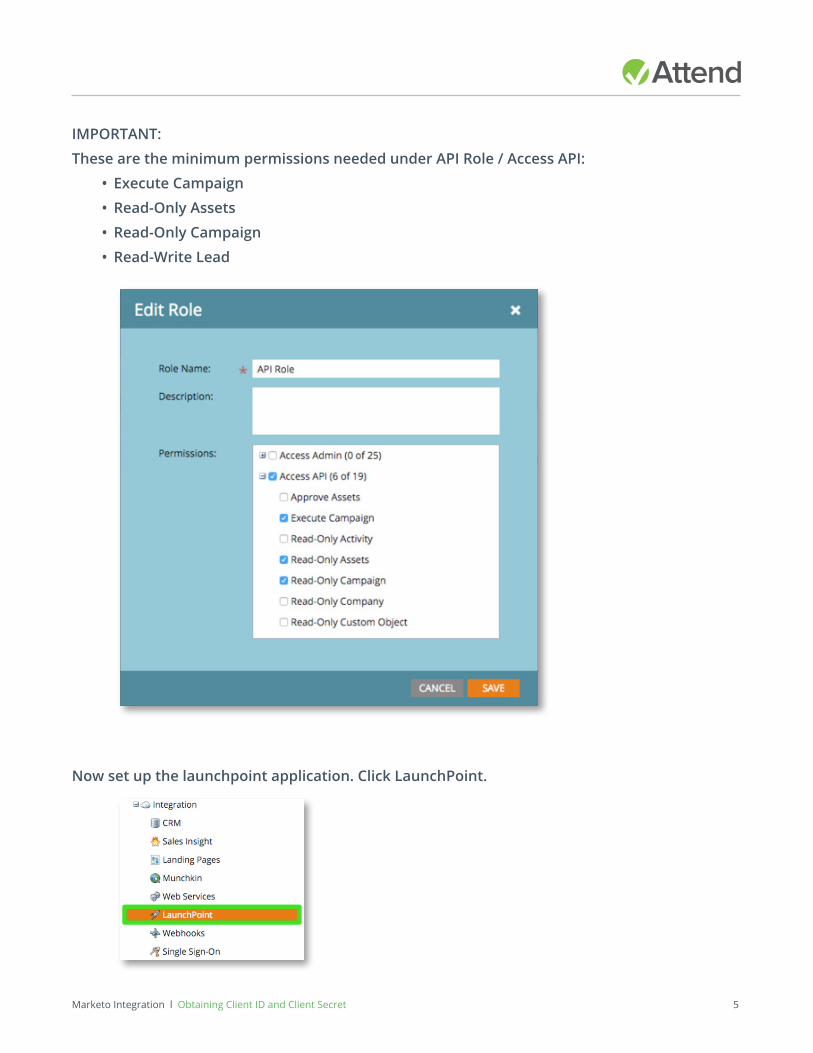
OBTAINING CLIENT ID AND CLIENT SECRET
IMPORTANT:
These are the minimum permissions needed under API Role / Access API:
• Execute Campaign
• Read-Only Assets
• Read-Only Campaign
• Read-Write Lead
5Marketo Integration l Obtaining Client ID and Client Secret
Now set up the launchpoint application. Click LaunchPoint.
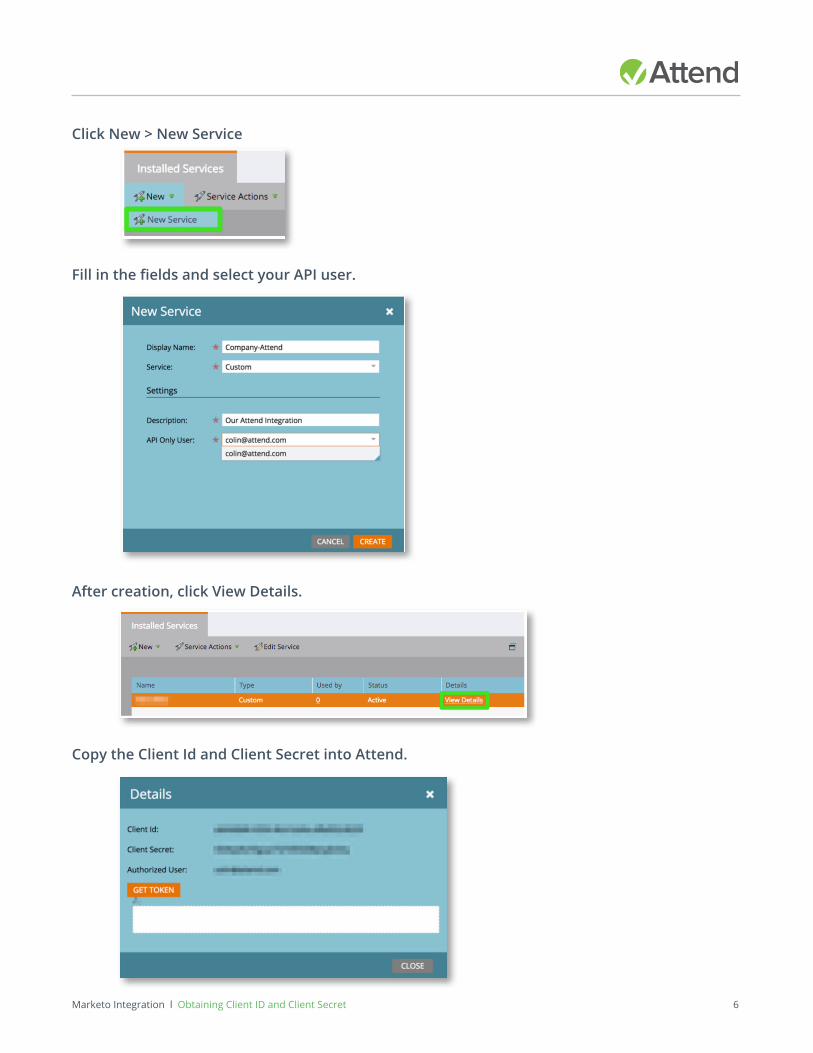
Click New > New Service
Fill in the fields and select your API user.
After creation, click View Details.
6Marketo Integration l Obtaining Client ID and Client Secret
Copy the Client Id and Client Secret into Attend.
7Marketo Integration l Obtaining Client ID and Client Secret
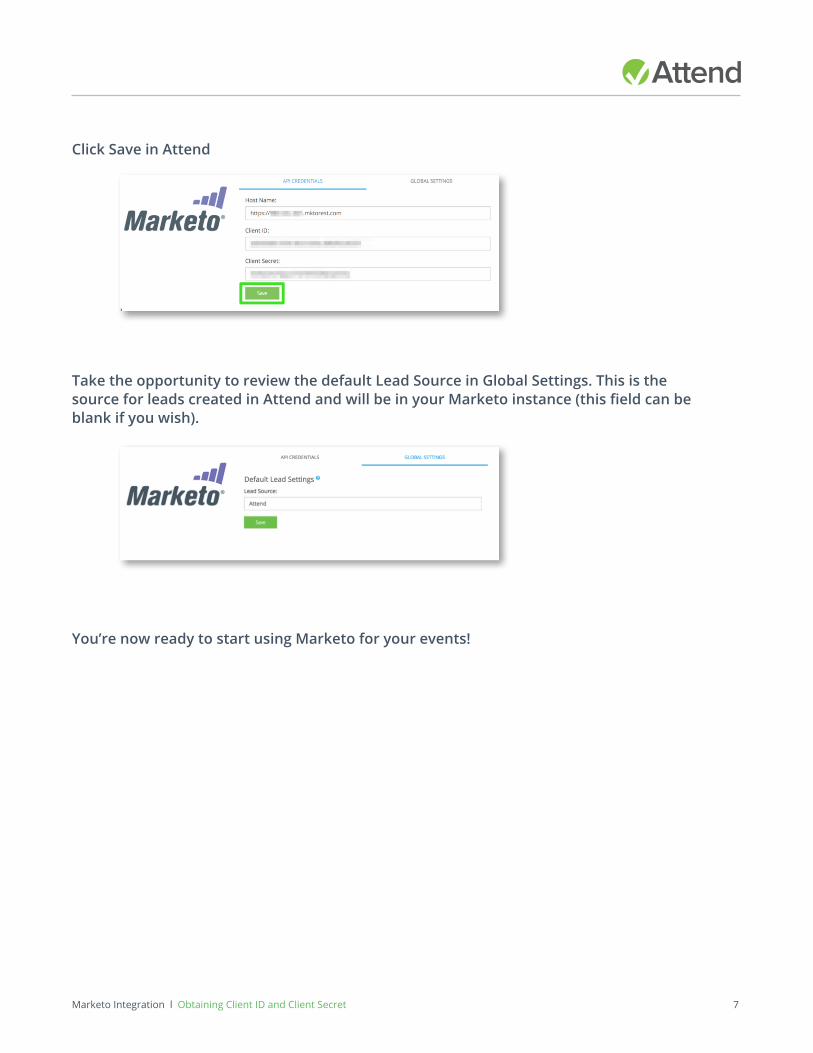
Click Save in Attend
Take the opportunity to review the default Lead Source in Global Settings. This is the source for leads created in Attend and will be in your Marketo instance (this field can be blank if you wish).
You’re now ready to start using Marketo for your events!
8Marketo Integration l Setting Up Marketo for an Event
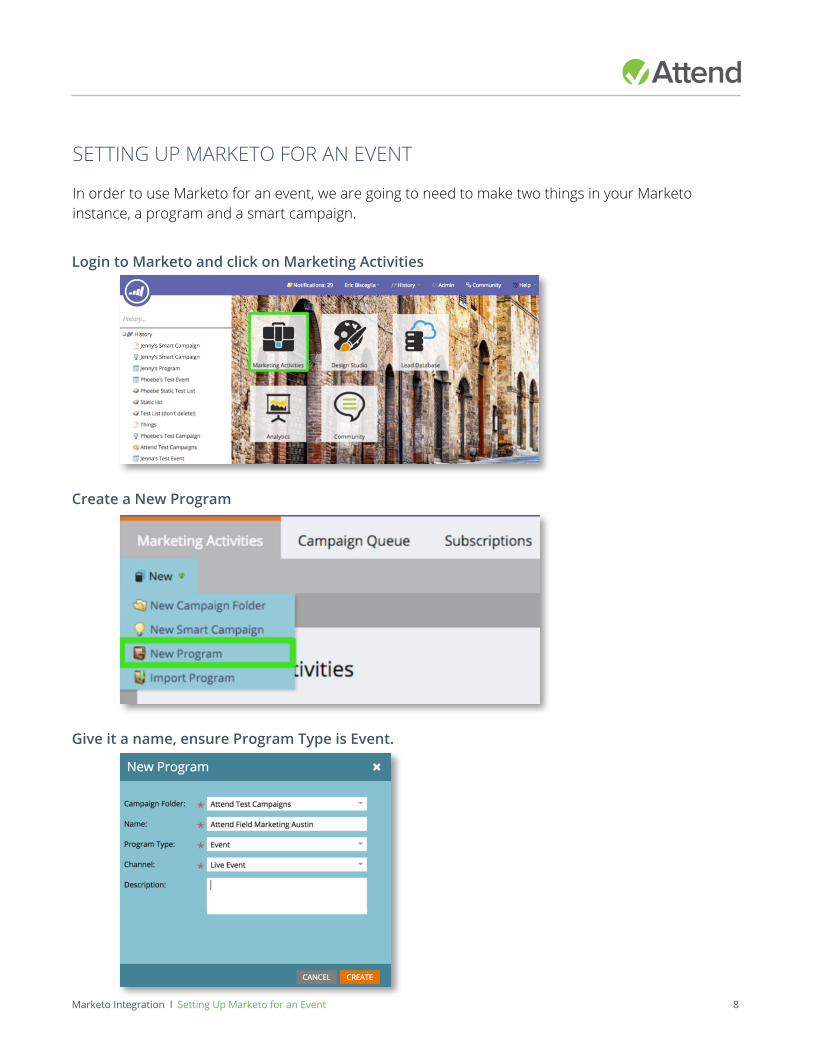
SETTING UP MARKETO FOR AN EVENT
In order to use Marketo for an event, we are going to need to make two things in your Marketo instance, a program and a smart campaign.
Login to Marketo and click on Marketing Activities
Create a New Program
Give it a name, ensure Program Type is Event.
9Marketo Integration l Setting Up Marketo for an Event
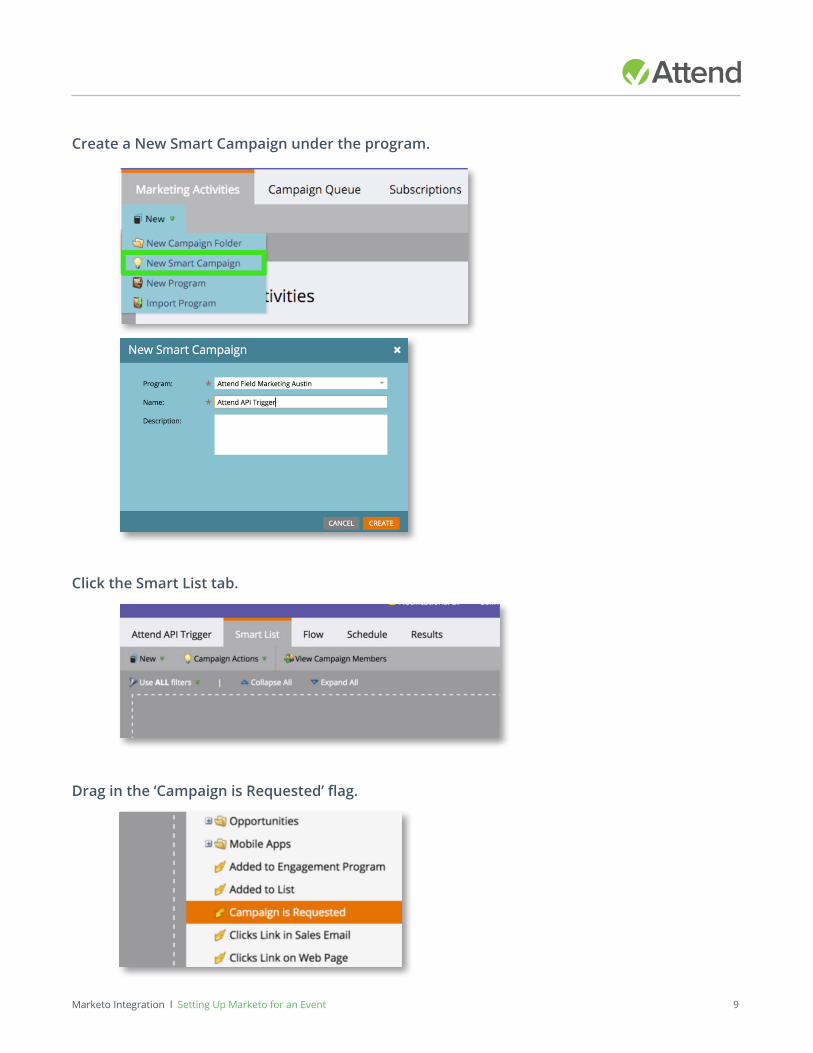
Create a New Smart Campaign under the program.
Click the Smart List tab.
Drag in the ‘Campaign is Requested’ flag.
10Marketo Integration l Setting Up Marketo for an Event
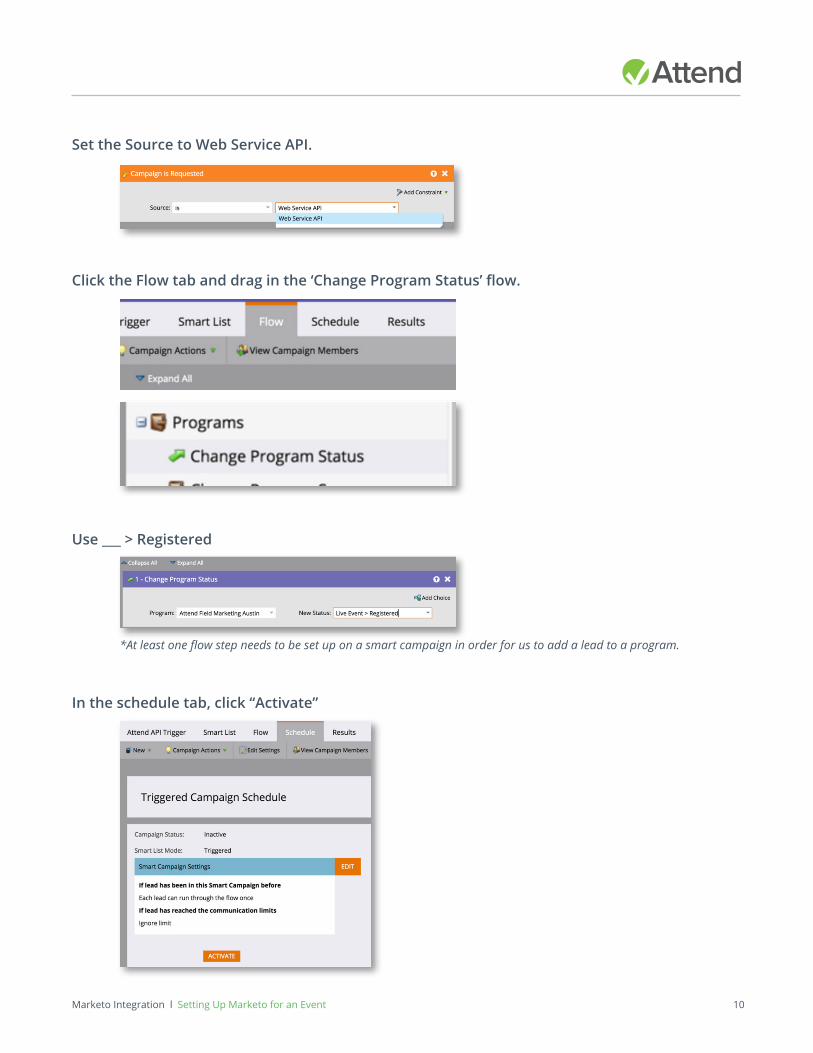
Set the Source to Web Service API.
Click the Flow tab and drag in the ‘Change Program Status’ flow.
Use ___ > Registered
In the schedule tab, click “Activate”
*At least one flow step needs to be set up on a smart campaign in order for us to add a lead to a program.
11Marketo Integration l Setting Up Marketing in Attend
SETTING UP THE PROGRAM IN ATTEND
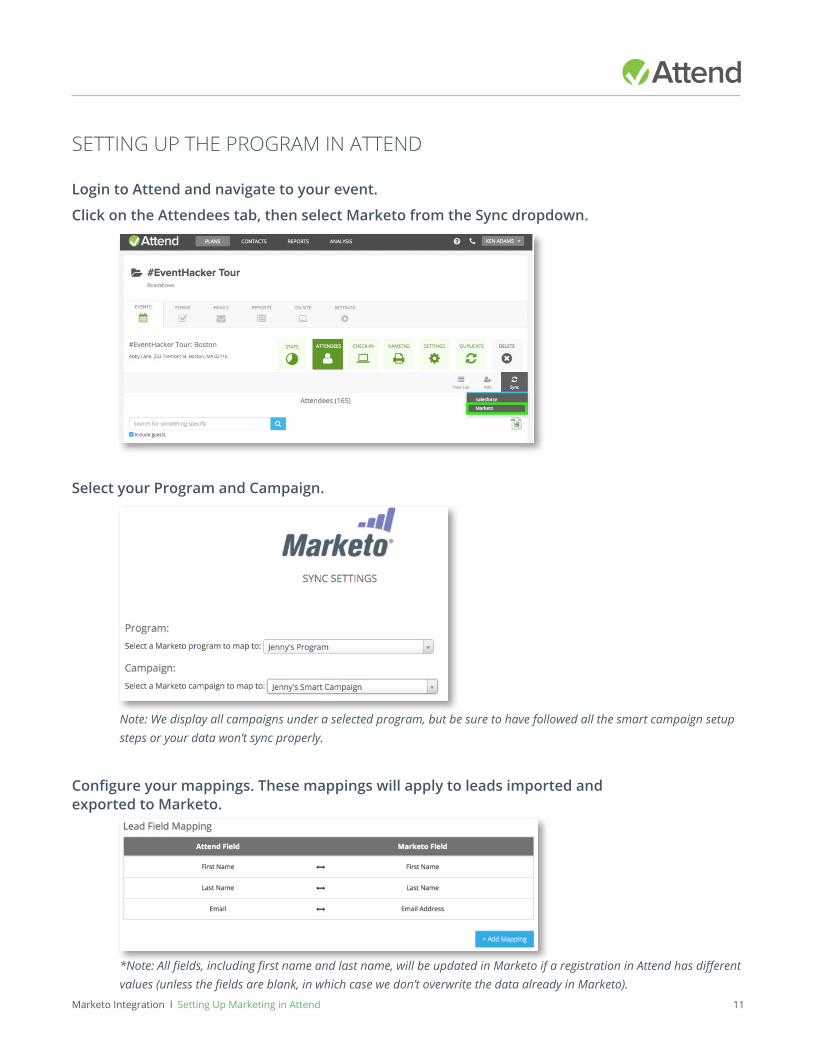
Login to Attend and navigate to your event.
Click on the Attendees tab, then select Marketo from the Sync dropdown.
Select your Program and Campaign.
Configure your mappings. These mappings will apply to leads imported and exported to Marketo.
Note: We display all campaigns under a selected program, but be sure to have followed all the smart campaign setup steps or your data won’t sync properly.
*Note: All fields, including first name and last name, will be updated in Marketo if a registration in Attend has different values (unless the fields are blank, in which case we don’t overwrite the data already in Marketo).
12Marketo Integration l Setting Up Marketing in Attend
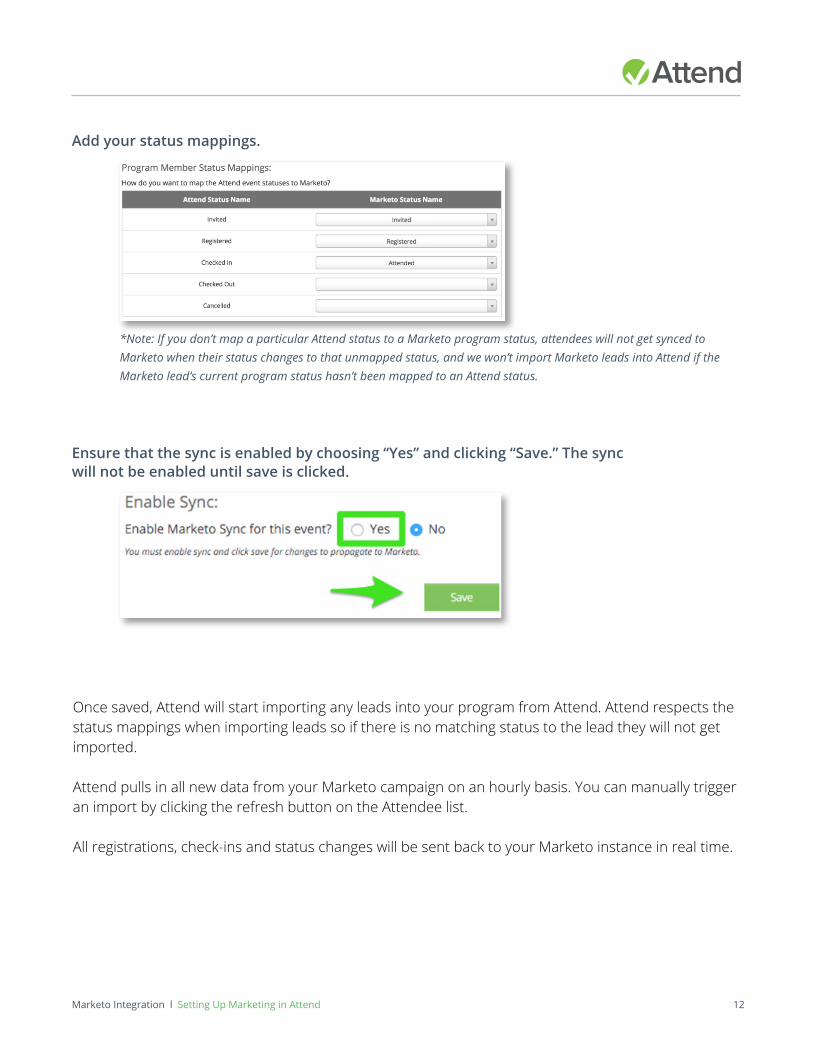
Add your status mappings.
Ensure that the sync is enabled by choosing “Yes” and clicking “Save.” The sync will not be enabled until save is clicked.
*Note: If you don’t map a particular Attend status to a Marketo program status, attendees will not get synced to Marketo when their status changes to that unmapped status, and we won’t import Marketo leads into Attend if the Marketo lead’s current program status hasn’t been mapped to an Attend status.
Once saved, Attend will start importing any leads into your program from Attend. Attend respects the status mappings when importing leads so if there is no matching status to the lead they will not get imported.
Attend pulls in all new data from your Marketo campaign on an hourly basis. You can manually trigger an import by clicking the refresh button on the Attendee list.
All registrations, check-ins and status changes will be sent back to your Marketo instance in real time.
13Marketo Integration l Attend to Marketo Export l Other Things to Keep in Mind
ATTEND TO MARKETO EXPORT:
When someone registers for your event, if a lead with a matching email already exists in Marketo, we’ll take that lead and insert them into your specified program, if they’re not already there. We’ll then change the lead’s program status to whatever the registration’s current status is (for example, if a person checks into your event and you’ve mapped Attend’s “checked in” status to Marketo’s “Attended” status, their Marketo program status will be updated to Attended).
If a lead with a matching email does not yet exist in Marketo, we’ll create a lead and set their source to “Attend,” or whatever you’ve set as your Lead Source in your Marketo account settings in Attend. We’ll then insert them into your specified program and update their status.
OTHER THINGS TO KEEP IN MIND:
• Lead partitions are not supported at this time.
• We only pull in First Name, Last Name, Email, and program status from Marketo on import. On export, we send Marketo the values for these four fields plus the values for any custom fields they’ve mapped in their Marketo event settings.
• Because Marketo requires emails for leads, if email isn’t required for an event (and therefore an Attend contact can’t be generated for an attendee), that attendee won’t be synced to Marketo.
• If you don’t map a particular Attend status to a Marketo program status, attendees will not get synced to Marketo when their status changes to that unmapped status, and we won’t import Marketo leads into Attend if the Marketo lead’s current program status hasn’t been mapped to an Attend status.
• When an attendee’s status changes, if the matching lead’s current status in Marketo has a greater step number value than the new status, Marketo will not allow that lead’s status to be updated. You can see your program statuses and their step number values in Marketo in Admin > Tags > Channel > Live Event.
• The “Not In Program” status option that displays as an option on the Marketo event settings page in Attend will remove a lead from a program if they already exist in it. For example, if you map Attend’s “Cancelled” status to Marketo’s “Not In Program” status, when an attendee’s registration is cancelled, they’ll be removed from your program.
• If a Marketo lead has a blank first or last name, an Attend contact will be created for them with whatever information was in Marketo, but the registration (the row in the Attendees table) will have an asterisk in place of the blank first / last name.