HR305 Configuration of Master Data mySAP ERP Human Capital Management Date Training Center Instructors Education Website Participant Handbook Course Version: 2006 Q2 Course Duration: 5 Day(s) Material Number: 50079281 An SAP course - use it to learn, reference it for work
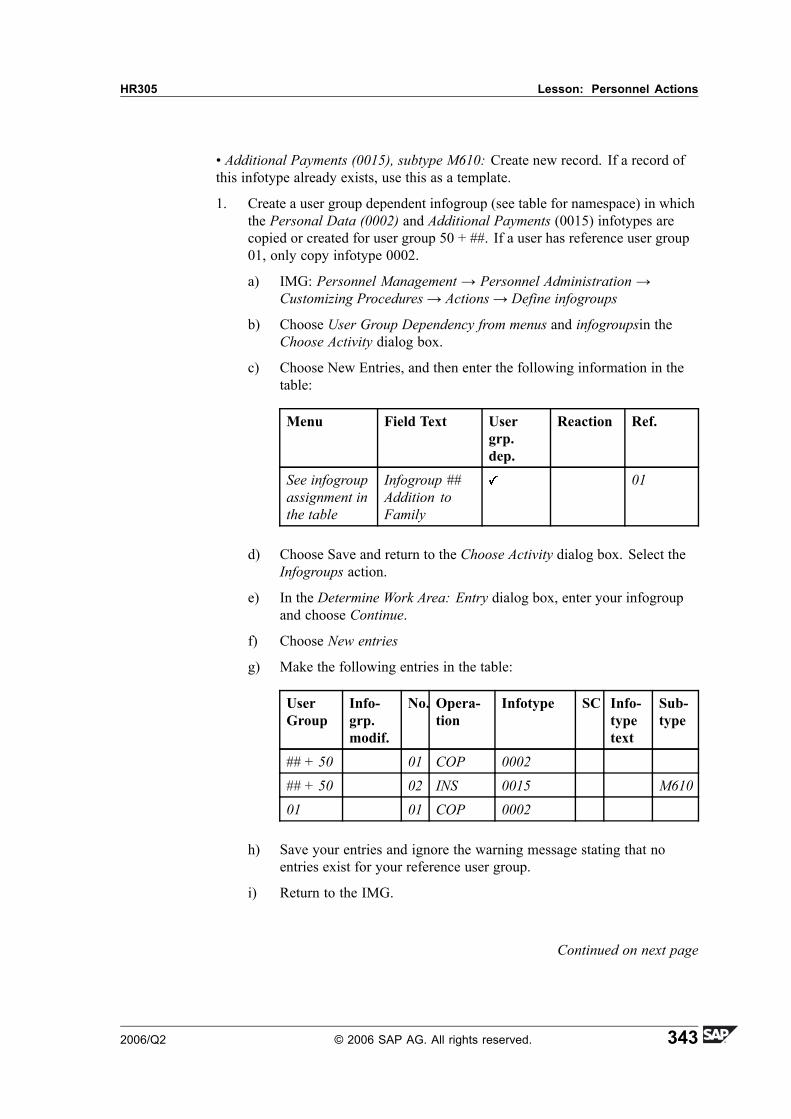
No part of this publication may be reproduced or transmitted in any form or for any purposewithout the express permission of SAP AG. The information contained herein may be changedwithout prior notice.
Some software products marketed by SAP AG and its distributors contain proprietary softwarecomponents of other software vendors.
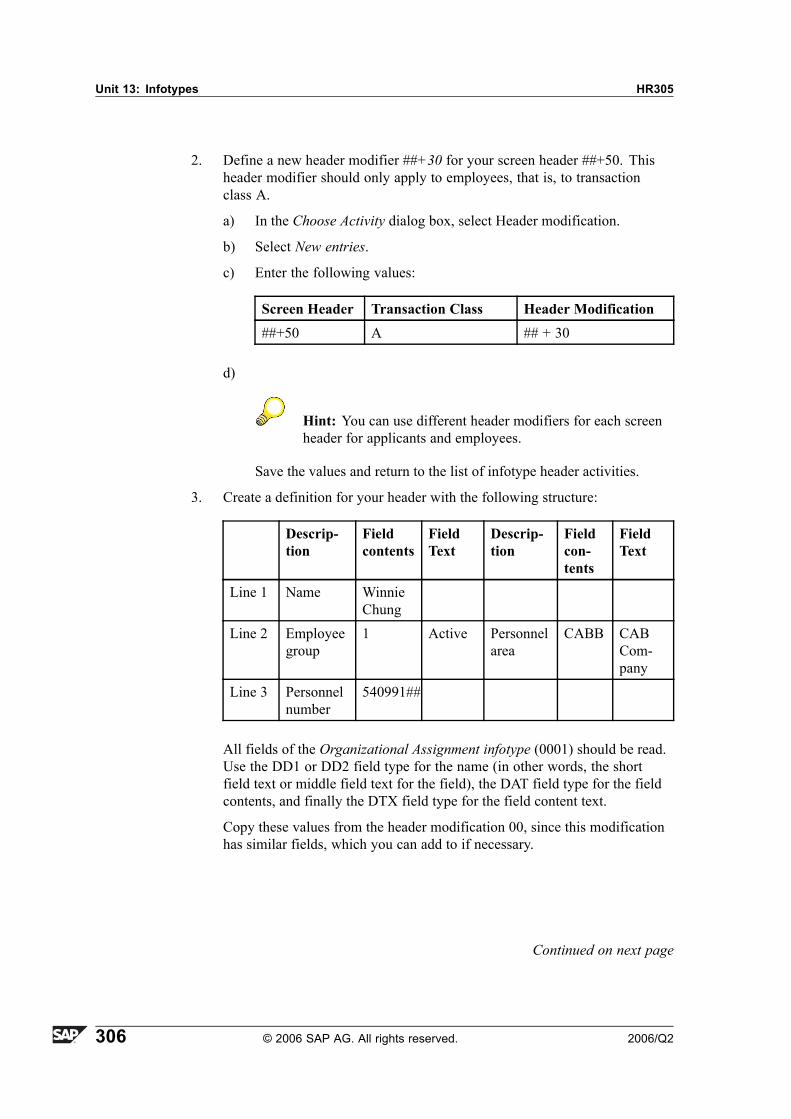
Trademarks
� Microsoft®, WINDOWS®, NT®, EXCEL®, Word®, PowerPoint® and SQL Server® areregistered trademarks of Microsoft Corporation.
� IBM®, DB2®, OS/2®, DB2/6000®, Parallel Sysplex®, MVS/ESA®, RS/6000®, AIX®,S/390®, AS/400®, OS/390®, and OS/400® are registered trademarks of IBM Corporation.
� ORACLE® is a registered trademark of ORACLE Corporation.� INFORMIX®-OnLine for SAP and INFORMIX® Dynamic ServerTM are registered
trademarks of Informix Software Incorporated.� UNIX®, X/Open®, OSF/1®, and Motif® are registered trademarks of the Open Group.� Citrix®, the Citrix logo, ICA®, Program Neighborhood®, MetaFrame®, WinFrame®,
VideoFrame®, MultiWin® and other Citrix product names referenced herein are trademarksof Citrix Systems, Inc.
� HTML, DHTML, XML, XHTML are trademarks or registered trademarks of W3C®, WorldWide Web Consortium, Massachusetts Institute of Technology.
� JAVA® is a registered trademark of Sun Microsystems, Inc.� JAVASCRIPT® is a registered trademark of Sun Microsystems, Inc., used under license for
technology invented and implemented by Netscape.� SAP, SAP Logo, R/2, RIVA, R/3, SAP ArchiveLink, SAP Business Workflow, WebFlow, SAP
EarlyWatch, BAPI, SAPPHIRE, Management Cockpit, mySAP.com Logo and mySAP.comare trademarks or registered trademarks of SAP AG in Germany and in several other countriesall over the world. All other products mentioned are trademarks or registered trademarks oftheir respective companies.
Disclaimer
THESE MATERIALS ARE PROVIDED BY SAP ON AN "AS IS" BASIS, AND SAP EXPRESSLYDISCLAIMS ANY AND ALL WARRANTIES, EXPRESS OR APPLIED, INCLUDINGWITHOUT LIMITATION WARRANTIES OF MERCHANTABILITY AND FITNESS FOR APARTICULAR PURPOSE, WITH RESPECT TO THESE MATERIALS AND THE SERVICE,INFORMATION, TEXT, GRAPHICS, LINKS, OR ANY OTHER MATERIALS AND PRODUCTSCONTAINED HEREIN. IN NO EVENT SHALL SAP BE LIABLE FOR ANY DIRECT,INDIRECT, SPECIAL, INCIDENTAL, CONSEQUENTIAL, OR PUNITIVE DAMAGES OF ANYKIND WHATSOEVER, INCLUDING WITHOUT LIMITATION LOST REVENUES OR LOSTPROFITS, WHICH MAY RESULT FROM THE USE OF THESE MATERIALS OR INCLUDEDSOFTWARE COMPONENTS.
About This HandbookThis handbook is intended to complement the instructor-led presentation of thiscourse, and serve as a source of reference. It is not suitable for self-study.
Typographic ConventionsAmerican English is the standard used in this handbook. The followingtypographic conventions are also used.
Type Style Description
Example text Words or characters that appear on the screen. Theseinclude field names, screen titles, pushbuttons as wellas menu names, paths, and options.
Also used for cross-references to other documentationboth internal (in this documentation) and external (inother locations, such as SAPNet).
Example text Emphasized words or phrases in body text, titles ofgraphics, and tables
EXAMPLE TEXT Names of elements in the system. These includereport names, program names, transaction codes, tablenames, and individual key words of a programminglanguage, when surrounded by body text, for exampleSELECT and INCLUDE.
Example text Screen output. This includes file and directory namesand their paths, messages, names of variables andparameters, and passages of the source text of aprogram.
Example text Exact user entry. These are words and characters thatyou enter in the system exactly as they appear in thedocumentation.
<Example text> Variable user entry. Pointed brackets indicate that youreplace these words and characters with appropriateentries.
Unit OverviewThis section is an introduction to the course. The most important goals of theentire course are also given here.
Unit ObjectivesAfter completing this unit, you will be able to:
� Explain the goals and objectives of this course� Understand the roles and the portals� Describe the main business scenario� Set up favorites and user profiles
Lesson OverviewThis lesson serves as an introduction to the course.
Lesson ObjectivesAfter completing this lesson, you will be able to:
� Explain the goals and objectives of this course� Understand the roles and the portals� Describe the main business scenario� Set up favorites and user profiles
Business ExampleYou work for an enterprise that sells bicycles and equipment. You are a memberof the project team responsible for implementing mySAP HR.
You work in close cooperation with your colleagues in the HR department, as wellas with colleagues from other departments. Your tasks include setting up theSAP system in accordance with your enterprise's requirements and supporting theHR department in their day-to-day activities. Additional tasks include activelycooperating and working with the HR department in all activities that arise dailyor periodically.
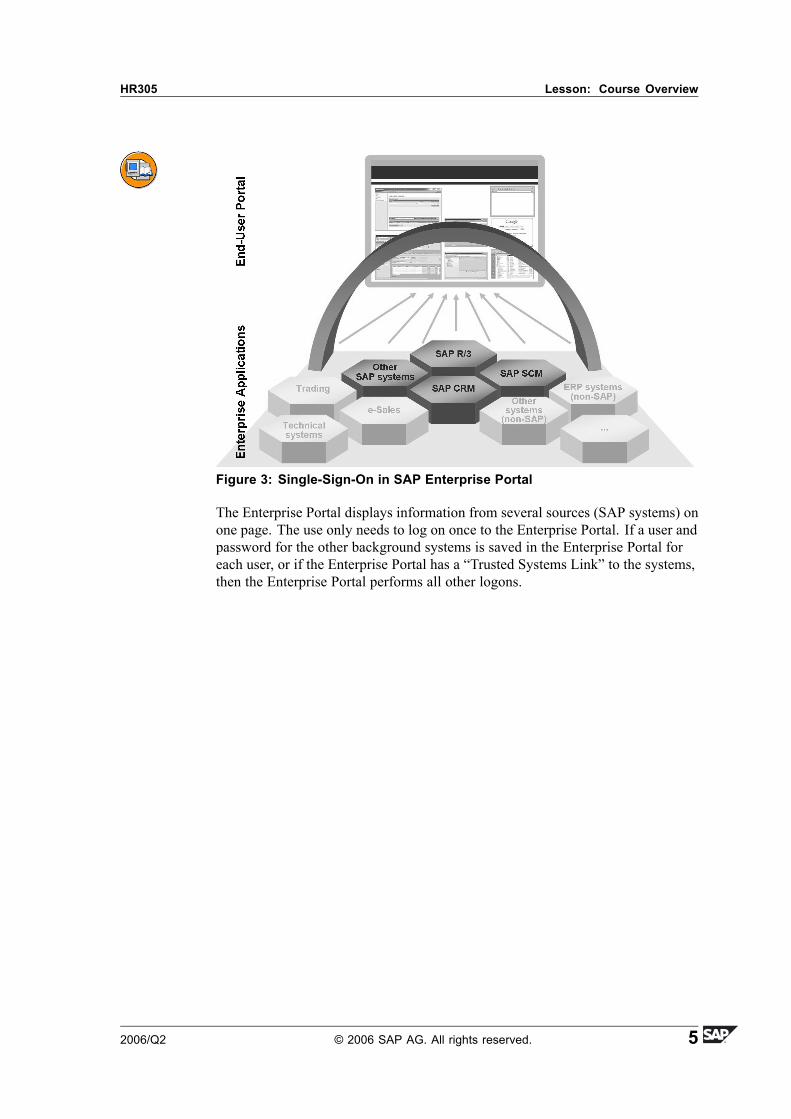
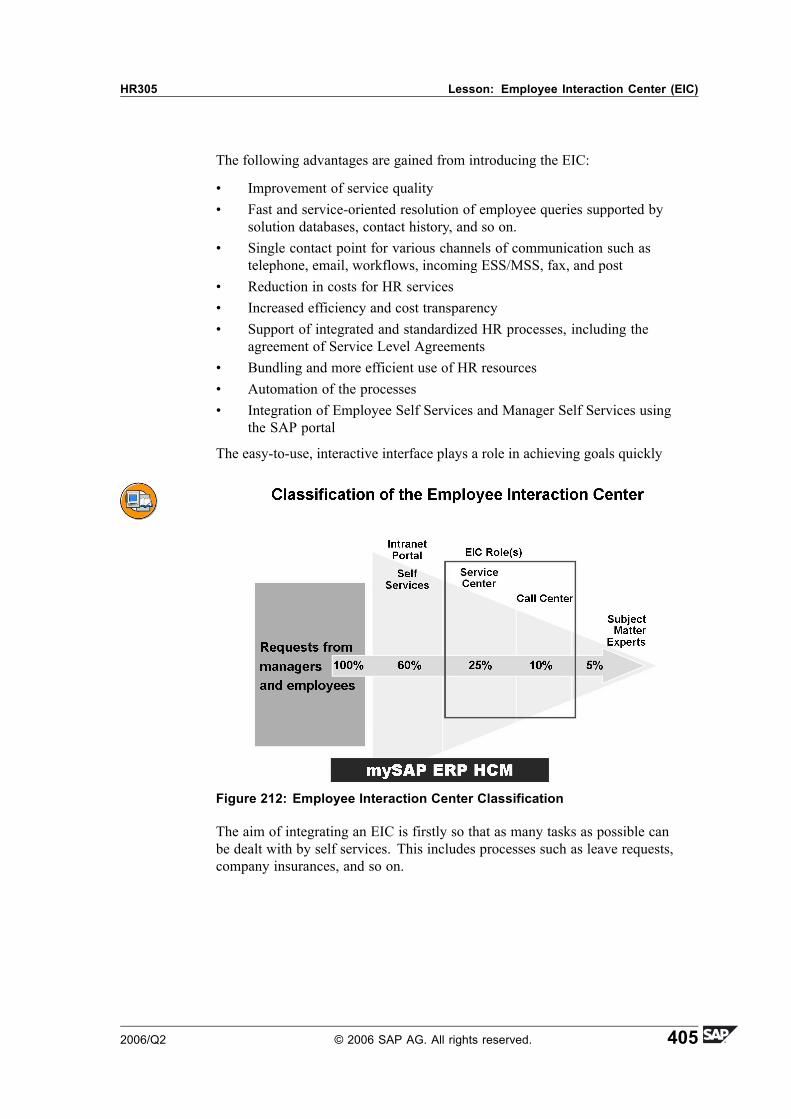
Figure 2: Enterprise Portal: Challenge - Too Many End-User Interfaces
� The e-Business era has often resulted in companies having very complex ITlandscaspes. These include different applications, services, and information.
� Users need access to the various services to perform their tasks. Access isusually through special programs on the desktop and diverse logons.
� In many companies today, the end user is thus confronted with a rangeof different interfaces for various applications, each of which operatesdifferently.
� The SAP Enterprise Portal masters this challenge by integrating thesevarious interfaces to just one interface.
� The target group is not limited to the employees of a company - with anexternal portal you can also reach business partners, customers, or anyinterested parties.
The Enterprise Portal displays information from several sources (SAP systems) onone page. The use only needs to log on once to the Enterprise Portal. If a user andpassword for the other background systems is saved in the Enterprise Portal foreach user, or if the Enterprise Portal has a �Trusted Systems Link� to the systems,then the Enterprise Portal performs all other logons.
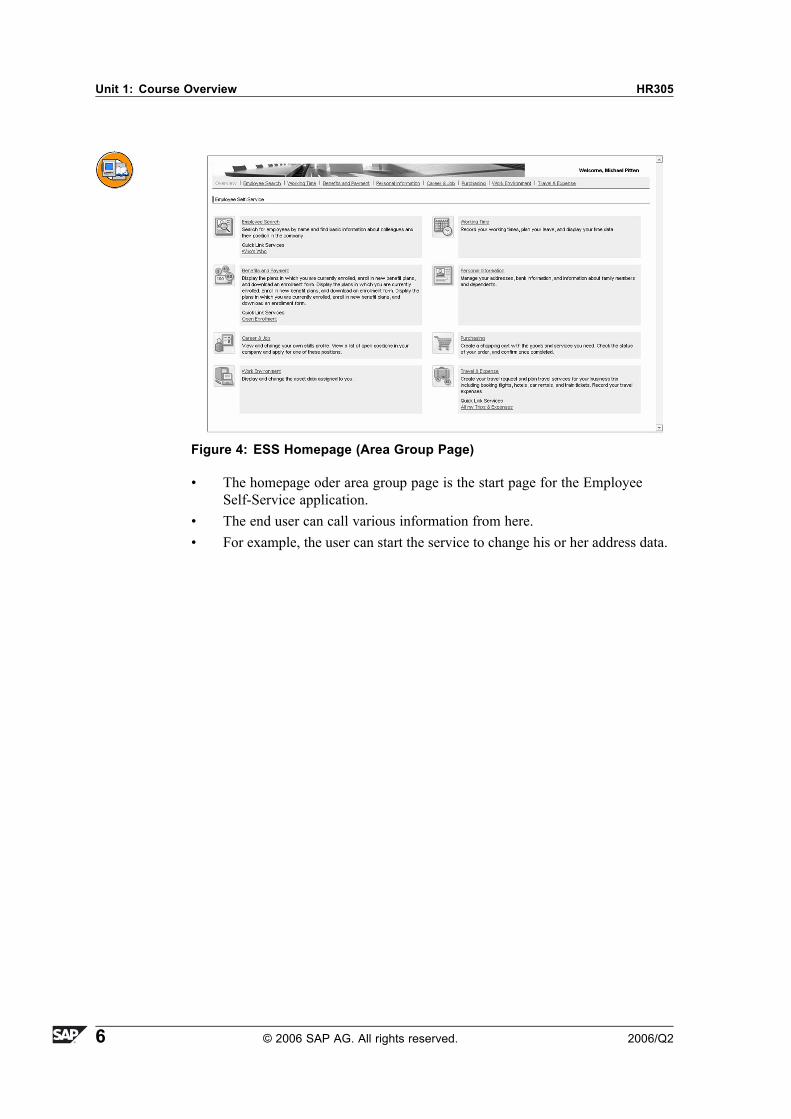
Figure 5: ESS Service: Personal Data - Change Address
� Example: An employee would like to change his or her address.� The employee is guided through the individual steps of a roadmap.� The fields to be maintained are displayed in screens that are easy to
comprehend.� When the employee saves the changes, the changes also take effect in
the connected mySAP ERP system. During processing, the employee'spersonnel number is locked in the mySAP ERP system. The system message�Data has been saved� also refers to the data in the SAP system.
By setting up user profiles, values such as the personnel country grouping can bepredefined in Customizing. You can also have a differentiated program controlif you enter a user group (see the units on infotypes and actions). By setting upfavorites, you can access frequently used transactions quickly.
Exercise ObjectivesAfter completing this exercise, you will be able to:� Set user parameters and roles
Business ExampleYou want to store information in your HR305-## user to make your day-to-daywork with the system a lot easier, and assign yourself a role that contains only thetransactions relevant for you.
Task 1:Check if the following user parameters are set:
Note that ## corresponds to your group number, in this case ______.
1. Country grouping (MOL) = 99
2. User group (UGR) = ##+50
This means, for example, for Group 01 UGR=51, for Group 02 UGR=52,and so on.
Task 2:
1. Assign your user the T_HR305 role.
Task 3:
1. Which path do you follow in the Easy Access Menu to call master datamaintenance?
You should now be able to:� Explain the goals and objectives of this course� Understand the roles and the portals� Describe the main business scenario� Set up favorites and user profiles
Unit SummaryYou should now be able to:� Explain the goals and objectives of this course� Understand the roles and the portals� Describe the main business scenario� Set up favorites and user profiles
Lesson OverviewHiring an employee in our company with the help of a personnel action.
Lesson ObjectivesAfter completing this lesson, you will be able to:
� Discuss the special features of Human Resources in your company anddescribe the enterprise structure
� Hire a new employee
Business ExampleYou are an administrator in your company. The company has implemented avariety of SAP products. You are responsible for the Personnel Managementcomponent.
Until now, you have been more involved in the application side of the products.In the future, you want to be more involved in the implementation of the HumanCapital Management system.
General Structure of Your Company
Figure 7: You Are a Personnel Administrator in Your Company
Your company sells bicycles and accessories. Head office, Sales, and Purchasingare located on the same site.
A year ago, the company decided to restructure the existing IT systems. Thecompany chose to replace the old systems with the mySAP ERP system. Allcomponents were implemented at the same time.
You have been employed as a personnel administrator at your company for severalyears. You are responsible for all tasks in the HR department. Until now, you havenot been involved to a large extent in the implementation of the system. Youwant to rectify this in the coming days.
Figure 8: Enterprise Structure of Sales Company
The graphic shows the enterprise structure of your company.
Figure 9: Employee List
The graphic shows the enterprise structure of your company.
Your company replaced the old system one year ago, implementing the mySAPERP 2004 system as a replacement. The implementation took place with thesupport of consultants.
Figure 11: Human Resources Data
In the Human Resources area, your company is using the following components:Master Data, Time Management, Payroll, and Organizational Management.
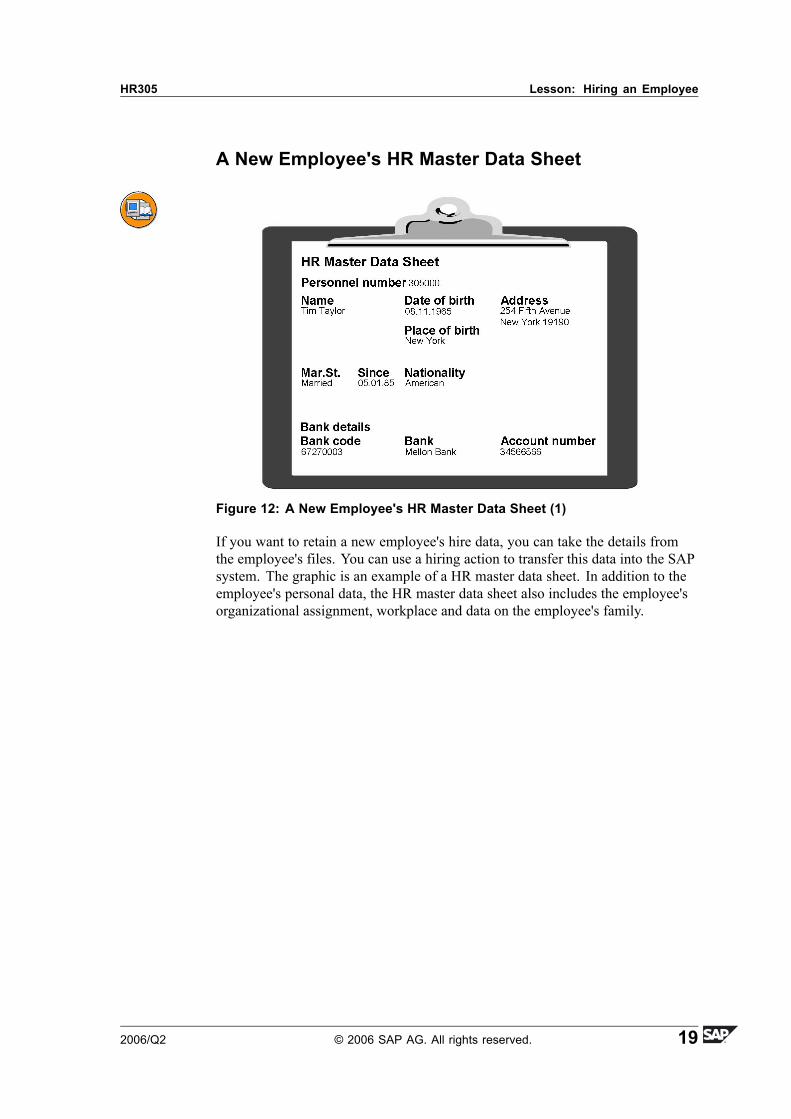
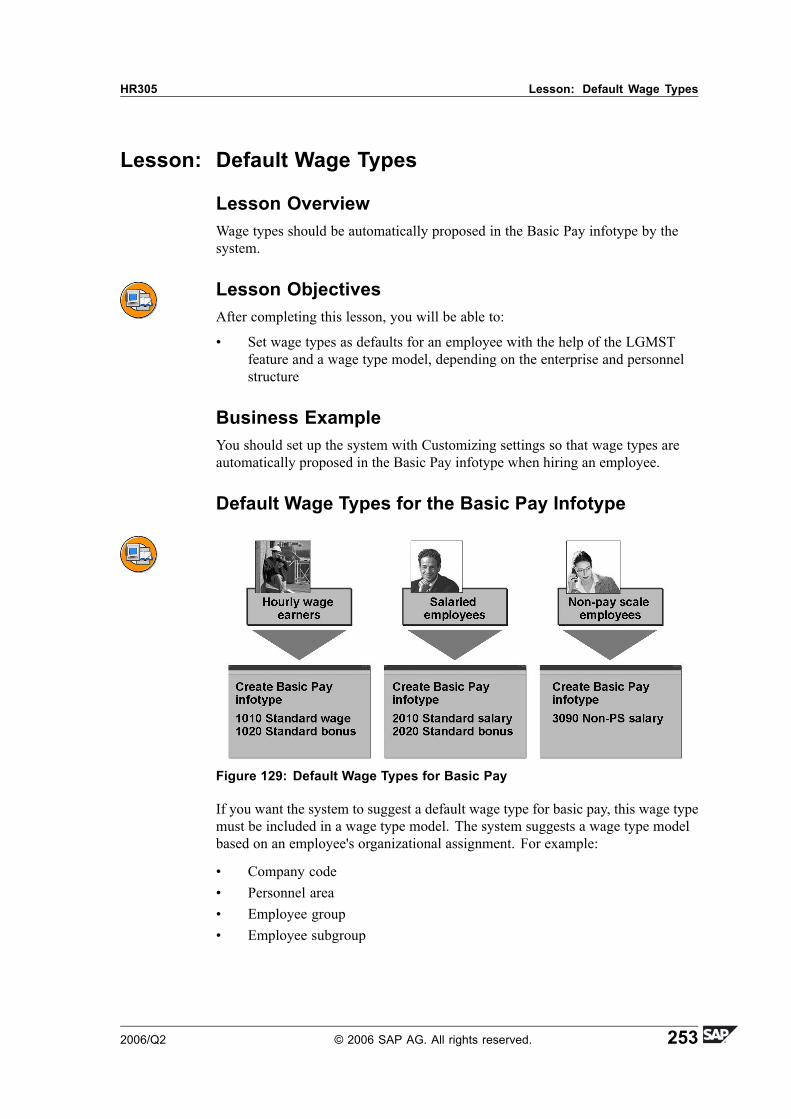
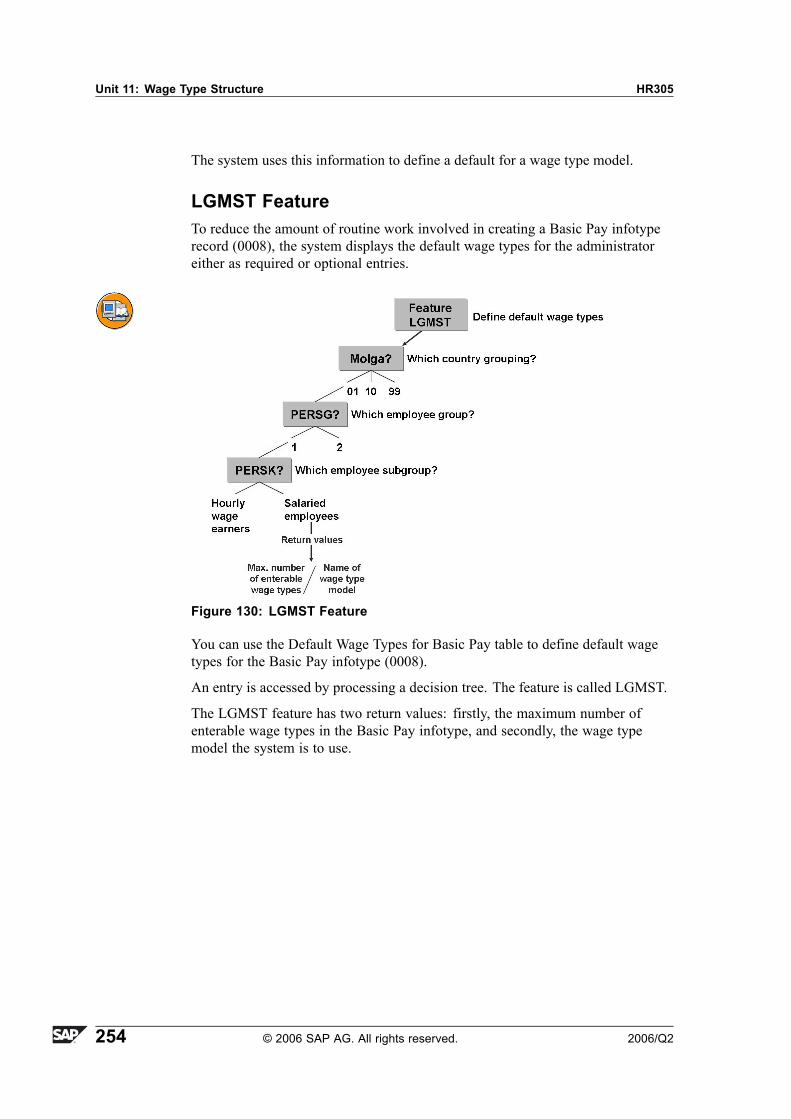
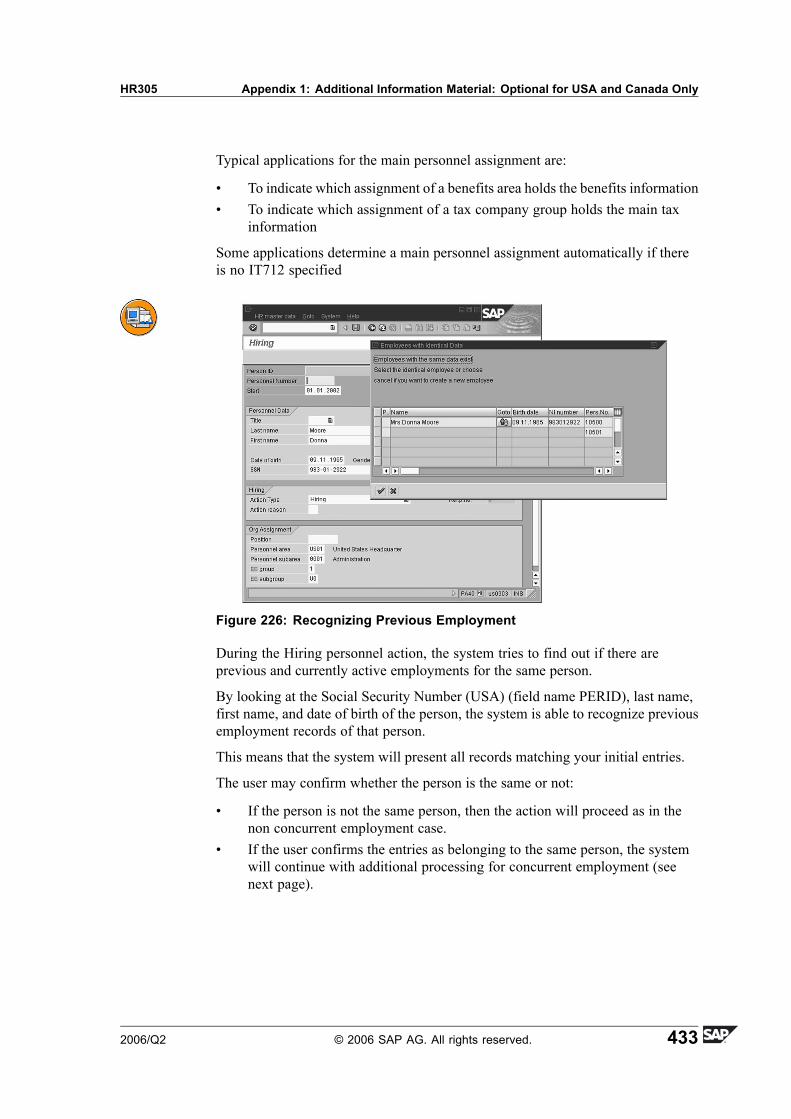
Figure 12: A New Employee's HR Master Data Sheet (1)
If you want to retain a new employee's hire data, you can take the details fromthe employee's files. You can use a hiring action to transfer this data into the SAPsystem. The graphic is an example of a HR master data sheet. In addition to theemployee's personal data, the HR master data sheet also includes the employee'sorganizational assignment, workplace and data on the employee's family.
You use a personnel action to transfer the employee's data into the SAP system. Torun an action, access the personnel actions through the Personnel Administrationmenu. Access the Hiring action, and enter the new employee's data. This functionautomatically takes you through all the infotypes you need to hire an employee.Once you have entered all the relevant data for that particular infotype and savedyour entries, the system automatically takes you to the next infotype record. Whenyou complete the hiring action, the system takes you back to the initial personnelaction screen.
Figure 15: Entry Screens for Hiring
This graphic includes the most important infotypes for a hiring action. On theleft are the international entry screens.
In addition to these, there are a number of country-specific infotypes, for example,tax data.
Exercise ObjectivesAfter completing this exercise, you will be able to:� Hiring new sales employees at Caliber �A� Bicycle Company
Business ExampleThe Caliber 'A' Bicycle Company is famous for its quality products. The demandfor its products is so great that you have to hire a new sales representative forSales Department 1.
Task:Use the Hiring HR305 personnel action to hire the new sales employee.
1. On the Personnel Actions screen, use the personnel number 305991## (##= your group number) for your new employee, and enter the first of themonth as the start date.
Select the Hiring HR305 action type, and hire your employee to work inthe personnel area CABB (Caliber A Bicycle Company). Assign the newemployee to the employee group Active (1), and to the employee subgroupSalaried employees (X0).
2. On the Create Actions (infotype 0000) screen, use the structure search tosearch for the ## Sales Representative position for the employee. You findthis under the following path: Org. Units HR Training Group→ TrainingInternational→ Sales Total→ Sales Department 1.
The entries for personnel area (CABB), employee group (active) andemployee subgroup (salaried employees) should correspond to the entriesyou made on the Personnel Actions screen. You fill the fields for personaldata at a later point.
Save the data for this infotype.
3. Check the data proposed on the Create Organizational Assignment (infotype0001) screen, select the entry 0001 (Sales) in the subarea, and save theinfotypes.
Hint: If the system prompts you to do so, delimit the vacancy forthe position to the default date.
4. Enter fictional data for all the required fields on the Create Personal Data(infotype 0002) screen and save the data.
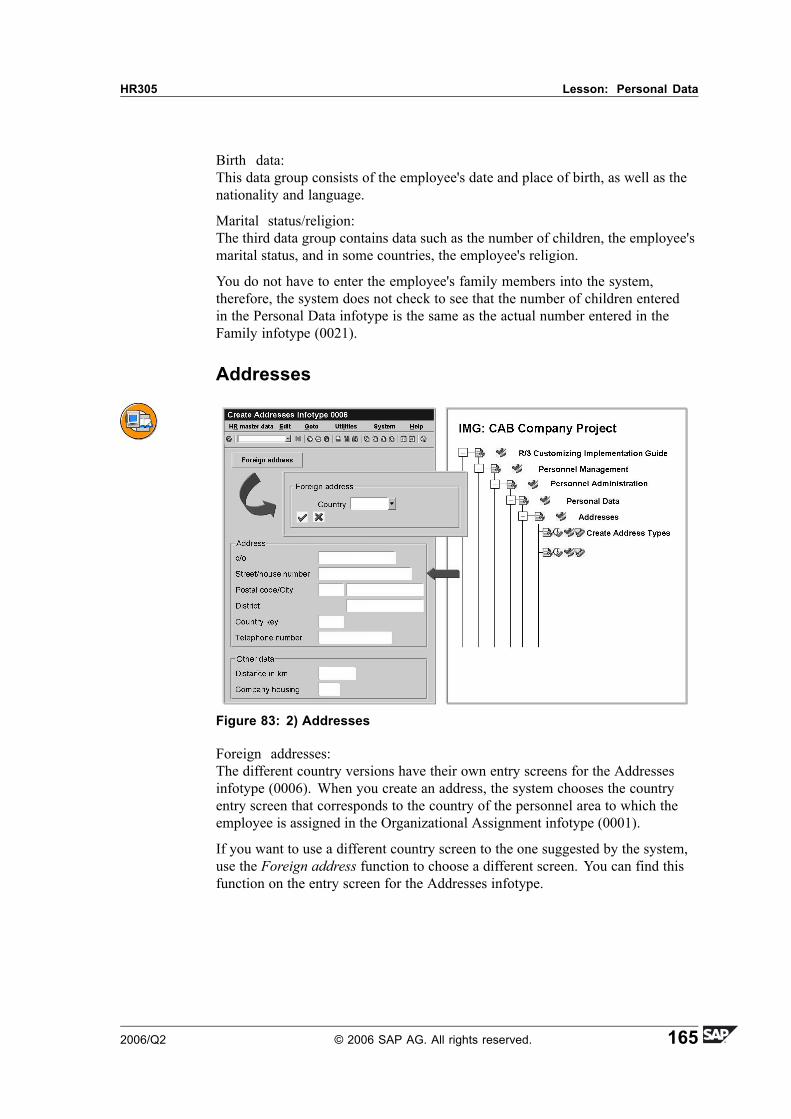
5. Enter fictional data for all the required fields on the Create Addresses(infotype 0006) screen and save the data.
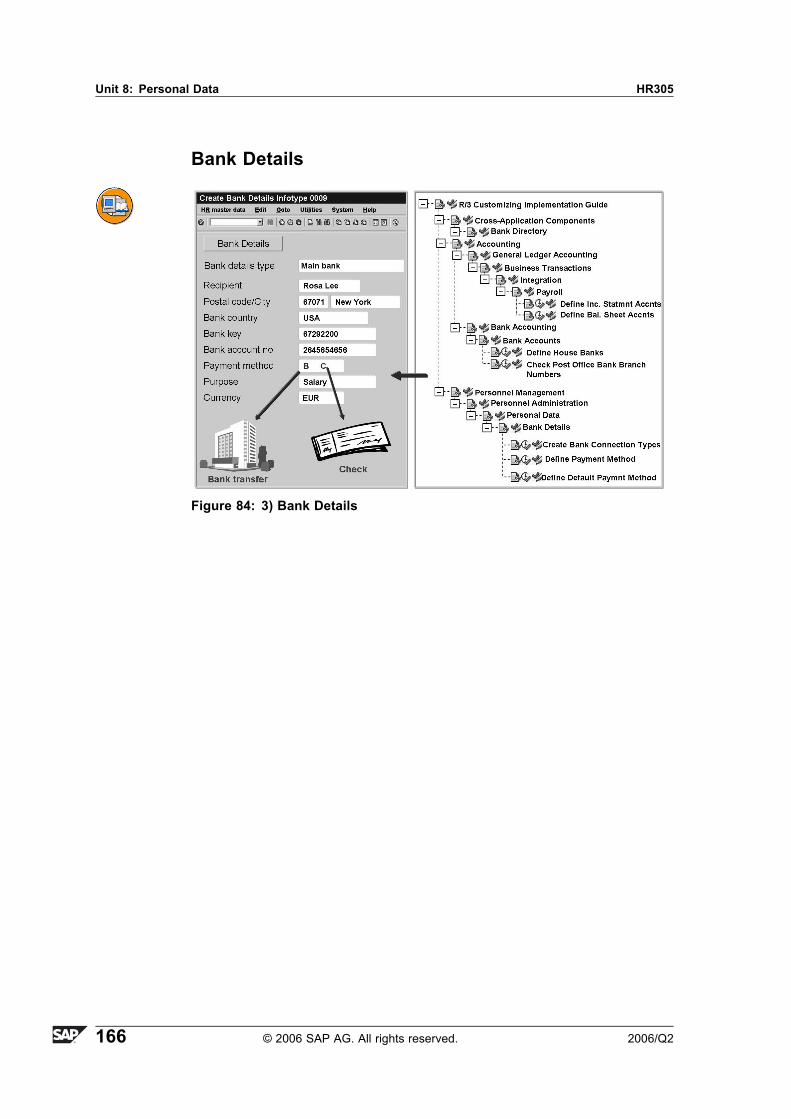
6. Enter fictional data for all the required fields on the Create Bank Details(infotype 0009) screen and save the data. If you choose Bank transfer (B)as the method of payment, you must also enter the bank details. This is notnecessary for payment by Check (C). Save the data.
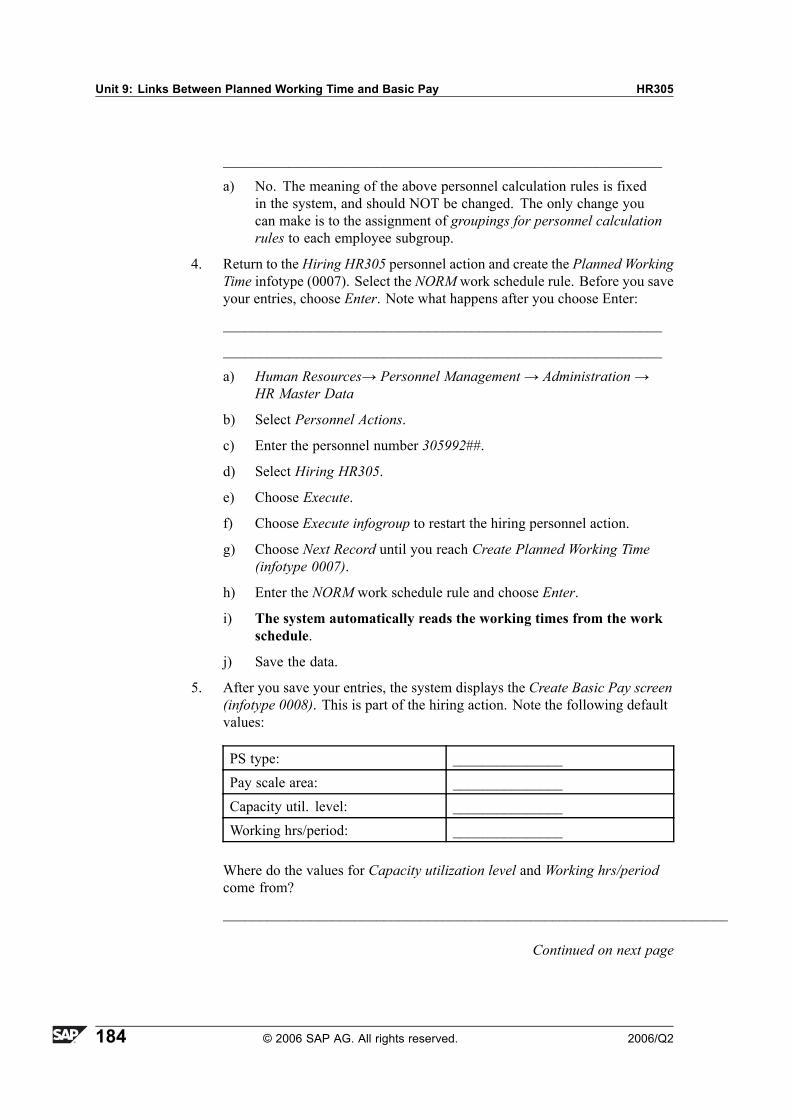
7. Select the work schedule rule NORM on the Create Planned Working Time(infotype 0007) screen, choose Enter, and save the data.
8. Select the pay scale group E01 and the level 01 on the Create Basic Pay(infotype 0008) screen, choose Enter, and save the data.
Solution 2: Hiring an EmployeeTask:Use the Hiring HR305 personnel action to hire the new sales employee.
1. On the Personnel Actions screen, use the personnel number 305991## (##= your group number) for your new employee, and enter the first of themonth as the start date.
Select the Hiring HR305 action type, and hire your employee to work inthe personnel area CABB (Caliber A Bicycle Company). Assign the newemployee to the employee group Active (1), and to the employee subgroupSalaried employees (X0).
a) PersAdmin→ Personnel Management→ Administration→ HRMaster
b) Choose Personnel Actions.
c) Select the Hiring HR305 personnel action.
d) Before you execute the Hiring HR305 personnel action, make thefollowing entries on the Personnel Actions screen:
2. On the Create Actions (infotype 0000) screen, use the structure search tosearch for the ## Sales Representative position for the employee. You findthis under the following path: Org. Units HR Training Group→ TrainingInternational→ Sales Total→ Sales Department 1.
The entries for personnel area (CABB), employee group (active) andemployee subgroup (salaried employees) should correspond to the entriesyou made on the Personnel Actions screen. You fill the fields for personaldata at a later point.
Save the data for this infotype.
a) Use the Structure Search to find the ## Sales Executive positionin the Org. Units HR Training Group in the Sales Department 1organizational unit.
3. Check the data proposed on the Create Organizational Assignment (infotype0001) screen, select the entry 0001 (Sales) in the subarea, and save theinfotypes.
Hint: If the system prompts you to do so, delimit the vacancy forthe position to the default date.
a) Check the data proposed on the Create Organizational Assignment(infotype 0001) screen and save the infotypes.
Hint: If the system prompts you to do so, delimit the vacancyfor the position to the default date.
4. Enter fictional data for all the required fields on the Create Personal Data(infotype 0002) screen and save the data.
a) Enter fictional data for all the required fields on the Create PersonalData (infotype 0002) screen and save the data.
Hint: If you enter data on partners or children, a dynamicaction may require you to enter additional data in the system.If this is the case, select the corresponding entries and continuewith the Hiring action.
5. Enter fictional data for all the required fields on the Create Addresses(infotype 0006) screen and save the data.
a) Enter fictional data for all the required fields on the Create Addresses(infotype 0006) screen and save the data.
6. Enter fictional data for all the required fields on the Create Bank Details(infotype 0009) screen and save the data. If you choose Bank transfer (B)as the method of payment, you must also enter the bank details. This is notnecessary for payment by Check (C). Save the data.
a) Enter fictional data for all the required fields on the Create BankDetails (infotype 0009) screen and save the data. If you choose Banktransfer (B) as the method of payment, you must also enter the bankdetails. This is not necessary for payment by Check (C). Save the data.
7. Select the work schedule rule NORM on the Create Planned Working Time(infotype 0007) screen, choose Enter, and save the data.
Unit OverviewThis section deals with making system settings using the options provided by SAP.One of the main focuses is creating and using a project IMG.
Unit ObjectivesAfter completing this unit, you will be able to:
� Understand the different forms of the Implementation Guide and itsadvantages
� Create a new Project IMG� Carry out evaluations in the IMG� Maintain IMG entries� Explain effects of changes in the IMG table on the application
Lesson OverviewOptions are displayed in this lesson using the IMG system settings.
Lesson ObjectivesAfter completing this lesson, you will be able to:
� Understand the different forms of the Implementation Guide and itsadvantages
� Create a new Project IMG
Business ExampleYour company has bought a manufacturing company.
You must now map the new company structure and all the changes for the HumanResources area in the system.
SAP provides the tool that will help you map the new company requirementswhen working through the project steps: a project IMG.
The New Situation in Your Company
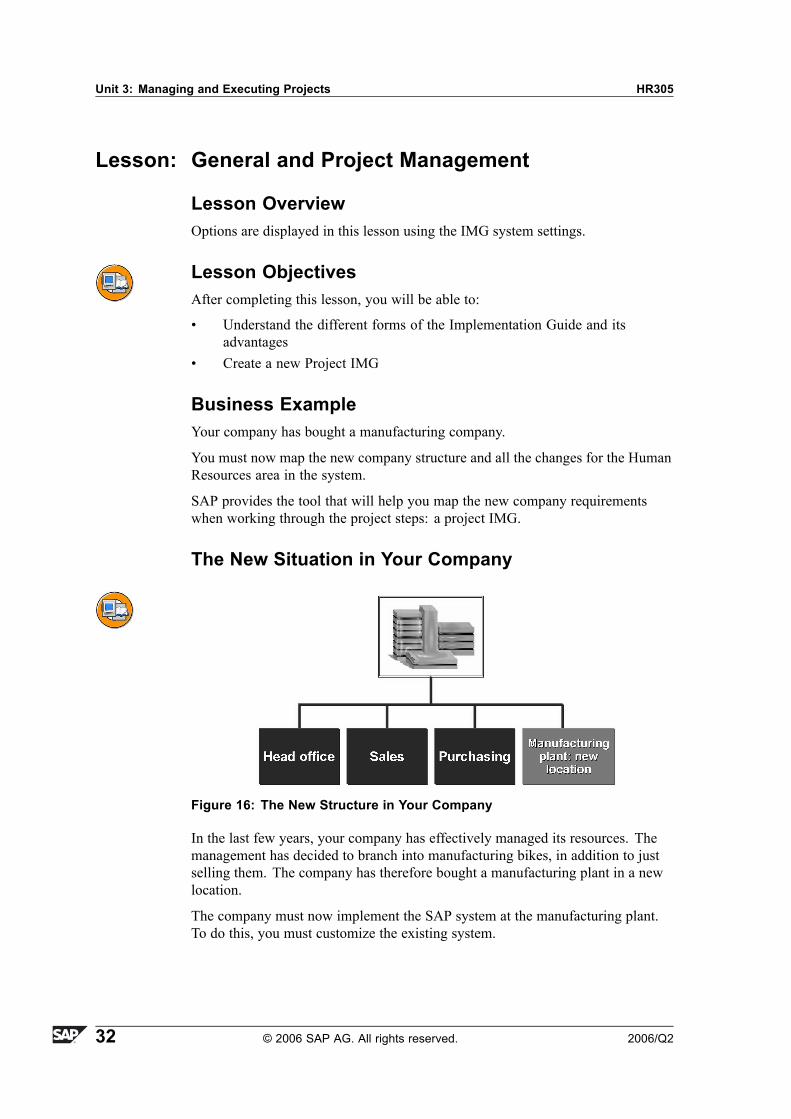
Figure 16: The New Structure in Your Company
In the last few years, your company has effectively managed its resources. Themanagement has decided to branch into manufacturing bikes, in addition to justselling them. The company has therefore bought a manufacturing plant in a newlocation.
The company must now implement the SAP system at the manufacturing plant.To do this, you must customize the existing system.
Project Steps Needed to Map the New EnterpriseStructure in the SAP System
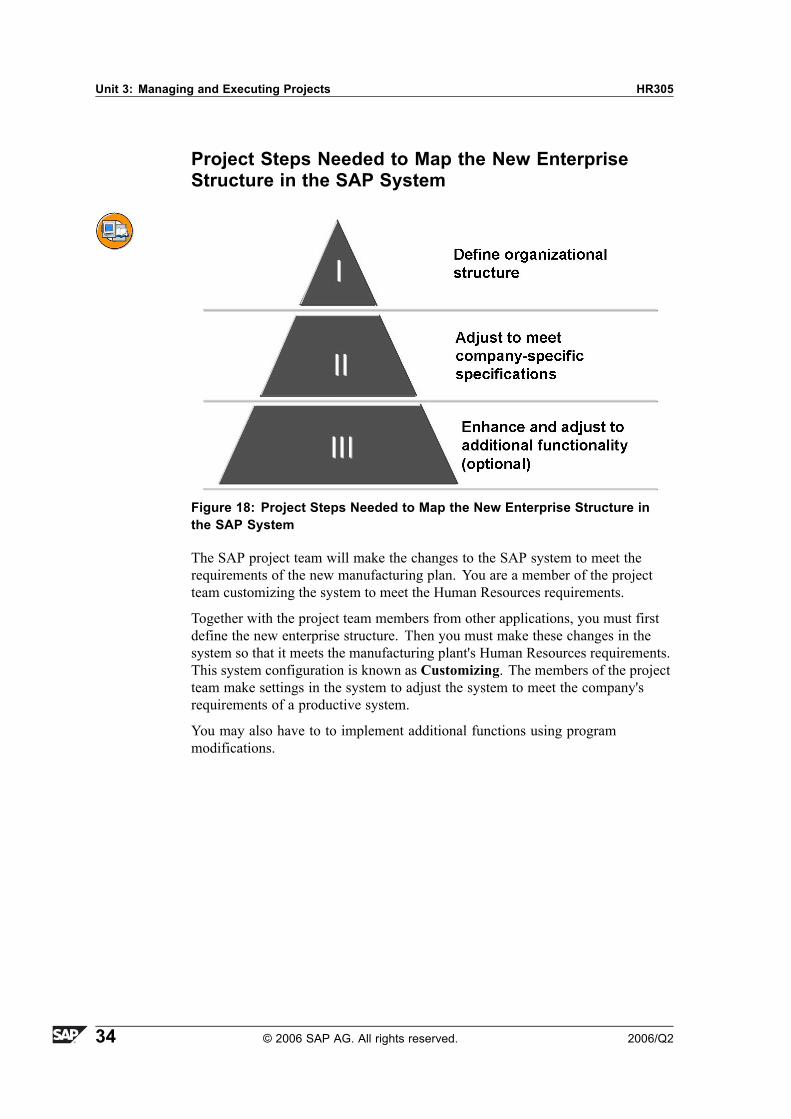
Figure 18: Project Steps Needed to Map the New Enterprise Structure inthe SAP System
The SAP project team will make the changes to the SAP system to meet therequirements of the new manufacturing plan. You are a member of the projectteam customizing the system to meet the Human Resources requirements.
Together with the project team members from other applications, you must firstdefine the new enterprise structure. Then you must make these changes in thesystem so that it meets the manufacturing plant's Human Resources requirements.This system configuration is known as Customizing. The members of the projectteam make settings in the system to adjust the system to meet the company'srequirements of a productive system.
You may also have to to implement additional functions using programmodifications.
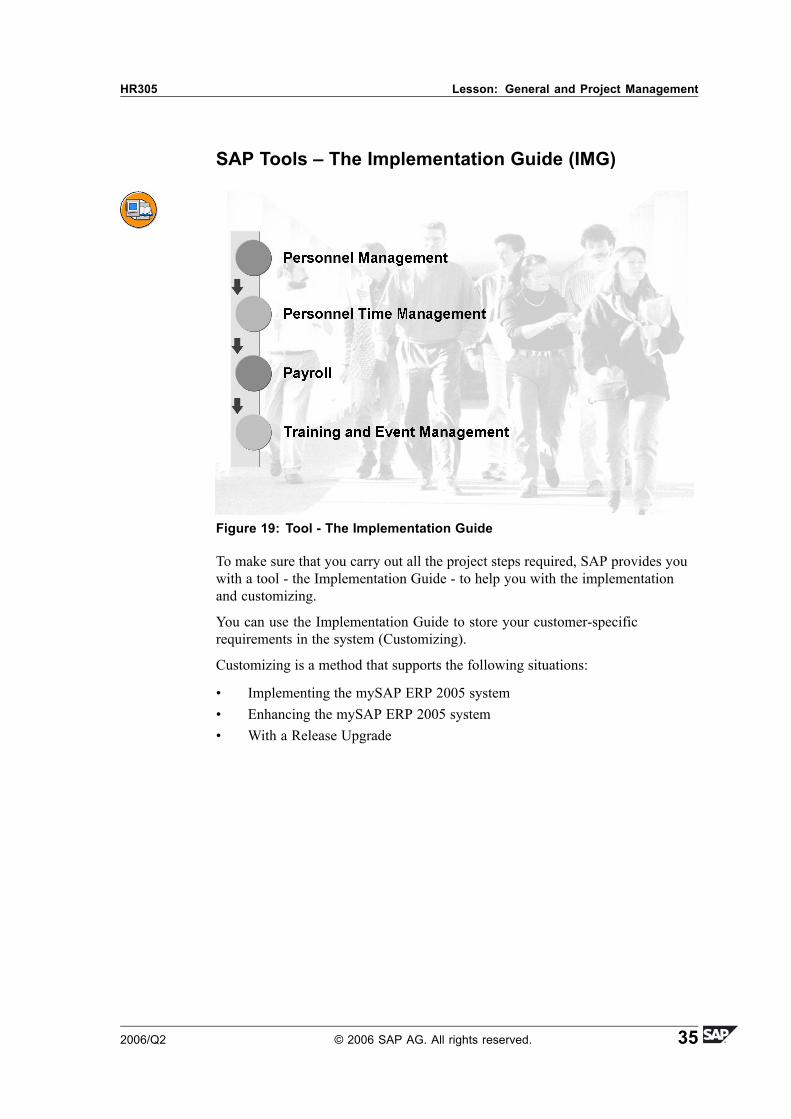
To make sure that you carry out all the project steps required, SAP provides youwith a tool - the Implementation Guide - to help you with the implementationand customizing.
You can use the Implementation Guide to store your customer-specificrequirements in the system (Customizing).
Customizing is a method that supports the following situations:
� Implementing the mySAP ERP 2005 system� Enhancing the mySAP ERP 2005 system� With a Release Upgrade
The Difference Between Managing and ExecutingProjects
Figure 20: The Difference Between Managing and Executing Projects
You create new projects in project management. Here, you also change thestructure of existing Project IMGs (scope, planning data of project, and so on).
If you want to use an existing Project IMG or the SAP Reference IMG to makeCustomizing settings, you use project execution.
In your delivery system, you will find an SAP Reference IMG. This IMG containsall the customizing settings for all mySAP ERP 2005 components for all countries.
You create the Project IMG by selecting countries and application componentsbased on the SAP Reference IMG. You can use the project IMG to processCustomizing steps, project documentation, and project information.
To make the project IMG even easier to use, you can create projectviews. You can also use project views to process Customizing steps,project documentation, and project information. You can use the attributesmandatory/optional/critical/non-critical as a basis for the views, or you can defineyour own views. By using views you can reduce the number of Customizing steps.
Exercise 3: General and ProjectManagement (Optional)
Exercise ObjectivesAfter completing this exercise, you will be able to:� Create a Project IMG
Business ExampleYour company has recently purchased several manufacturing plants. These newplants will have an effect on Human Resources, and must be mapped in thesystem. Your task is to create a tool to enter and document system settings. Thistool is the Project IMG.
Task:Enter Project Managment to create a project IMG. Give your project IMG theproject name HR305_GR## (## = your group number).
1. Create a name (description) for your project. Include your group number inthe description.
2. Enter your name as the project manager (under Person Responsible).
3. Enter today's date as the start date and the date in four weeks time as theend date of the project.
4. On the tab pages, you must assign the following data:
Assign project members:
Enter your user ID, select six other users from the course, and enter theminto the list.
Assign status values: In process, completed, quality check done, reviewplanned, and not relevant.
Assign key words: HR - Human Resources
5. On the Documentation Types tab page, choose documentation type Y1 Logs,Decisions.
6. On the Cross-Ref. tab page, switch off the where-used list.
7. On the Project Views tab page, enter details on a view for your project IMG,which should contain both critical and non-critical mandatory activities.Choose Save, without generating the view.
Solution 3: General and ProjectManagement (Optional)Task:Enter Project Managment to create a project IMG. Give your project IMG theproject name HR305_GR## (## = your group number).
1. Create a name (description) for your project. Include your group number inthe description.
a) Tools→ Customizing→ IMG. Select the Project management button.
b) Choose Create Project, and enter HR305_GR## as the project name.
2. Enter your name as the project manager (under Person Responsible).
a) ...
3. Enter today's date as the start date and the date in four weeks time as theend date of the project.
a) ...
4. On the tab pages, you must assign the following data:
Assign project members:
Enter your user ID, select six other users from the course, and enter theminto the list.
Assign status values: In process, completed, quality check done, reviewplanned, and not relevant.
Assign key words: HR - Human Resources
a) Enter your user HR305-##.
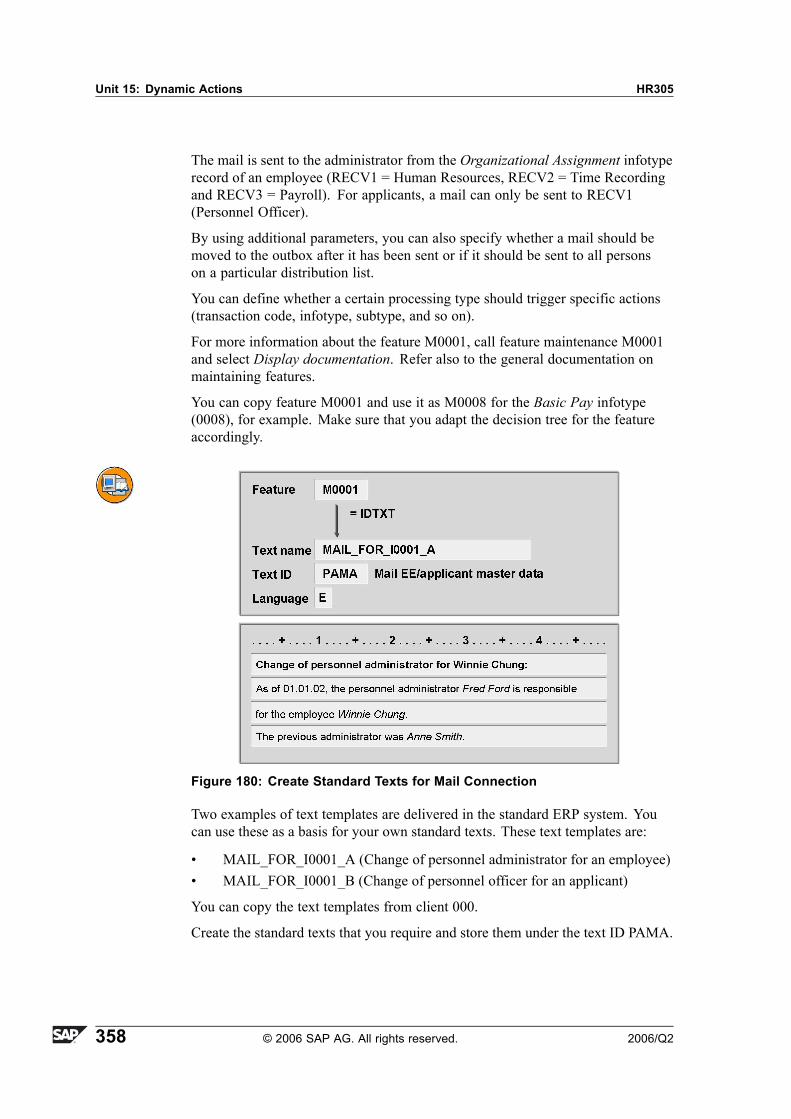
b) Assign other project members.
c) Assign status values: 01 � In process, 02 � completed, 03 � qualitycheck done, 04 � review planned, 05 � not relevant.
d) Assign key words: HR - Human Resources
5. On the Documentation Types tab page, choose documentation type Y1 Logs,Decisions.
a) ...
6. On the Cross-Ref. tab page, switch off the where-used list.
7. On the Project Views tab page, enter details on a view for your project IMG,which should contain both critical and non-critical mandatory activities.Choose Save, without generating the view.
a) Choose the Project Views tab page. Now choose Create project view.Enter a name for your view, and choose Activity necessity. ChooseContinue.
b) Under Activity necessity, select critical and non-critical mandatoryactivities, and then choose Save, but do not generate the view at thispoint.
8. On the Scope tab page, choose Specify project scope by choosing applicationcomponents and countries.
Select the country according to the country in which the course is being held.
Select the following HCM components in the application components:
� In the Personnel Management node:- Personnel Administration (for your country)- Personnel Administration for General Parts
� The complete Organizational Structure node� In the Time Management node:
- Work schedule- Time Data Recording and Administration
� In the Payroll node:- Payroll for your country
a) Choose Select countries to include in project scope, and select yourcountry.
b) Choose Change selection and under Personnel Management, selectthe following components: Personnel Administration (for yourcountry), and Organizational Structure. Under Time Management,select the components Work schedule and Time Data Recording andAdministration, and under Payroll, select Payroll for your country.
9. Save your data, and choose Generate Project IMG.
Do not generate the IMG in the background, and confirm that you wishto generate the view.
a) Choose Save, and then Generate Project IMG. In the subsequent dialogbox, deselect the Generate in background indicator, but leave theGenerate project views indicator selected. Choose Continue, and waituntil your project IMG has been generated.
The Implementation Guide enables you to set up the system. You can usethe Implementation Guide to implement all mySAP ERP 2005 applicationcomponents.
SAP has divided the Implementation Guide into application areas. TheImplementation Guide lists the activities in the order that you are to execute themwithin these application areas.
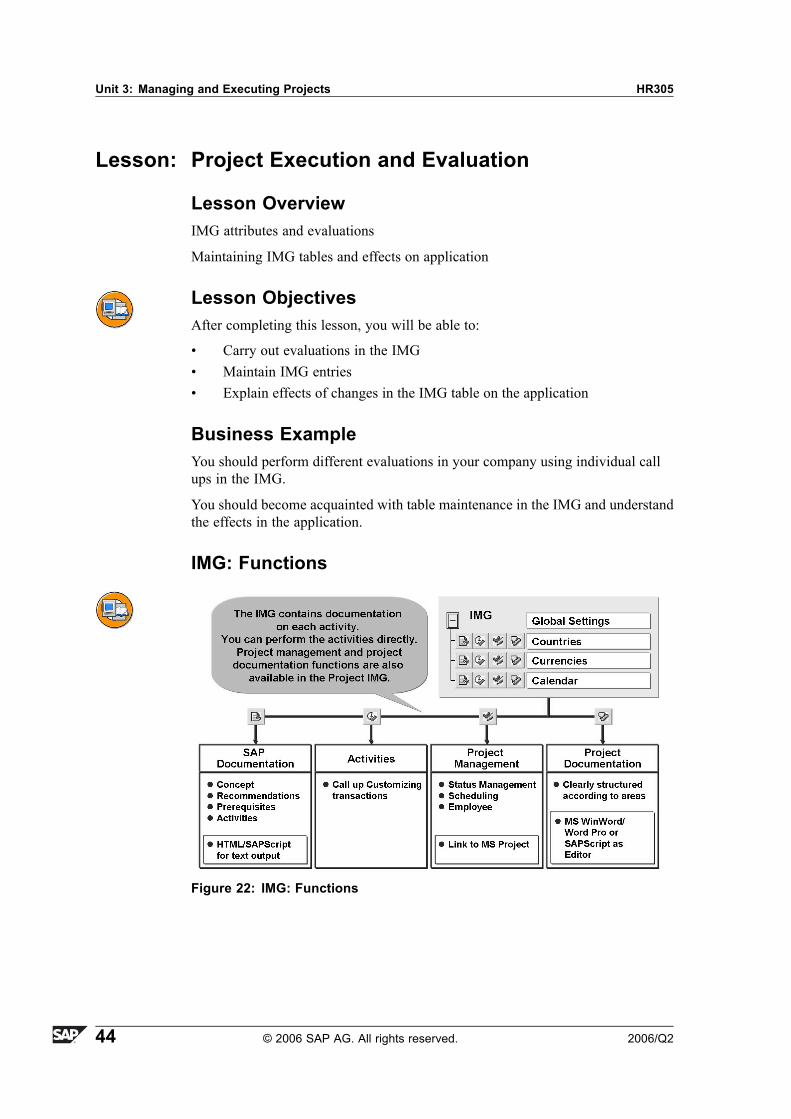
SAP created the Implementation Guide using a hierarchical structure. On thelowest level, you can perform the following functions using icons:
� Calling Up SAP Documentation
You can find the information you need to help you customize the systemsettings.
� Calling up the Customizing transaction
using a selection of icons for the system settings
� Calling Up Project Management (only in project IMG)
You can call up project management for every customizing step. You canenter the status, tasks, degree of processing, and resources.
� Calling Up Project Documentation (only in project IMG)
You can enter your project documentation for each customizing step. You canstore your documentation either as project-specific or project-independentdocumentation.
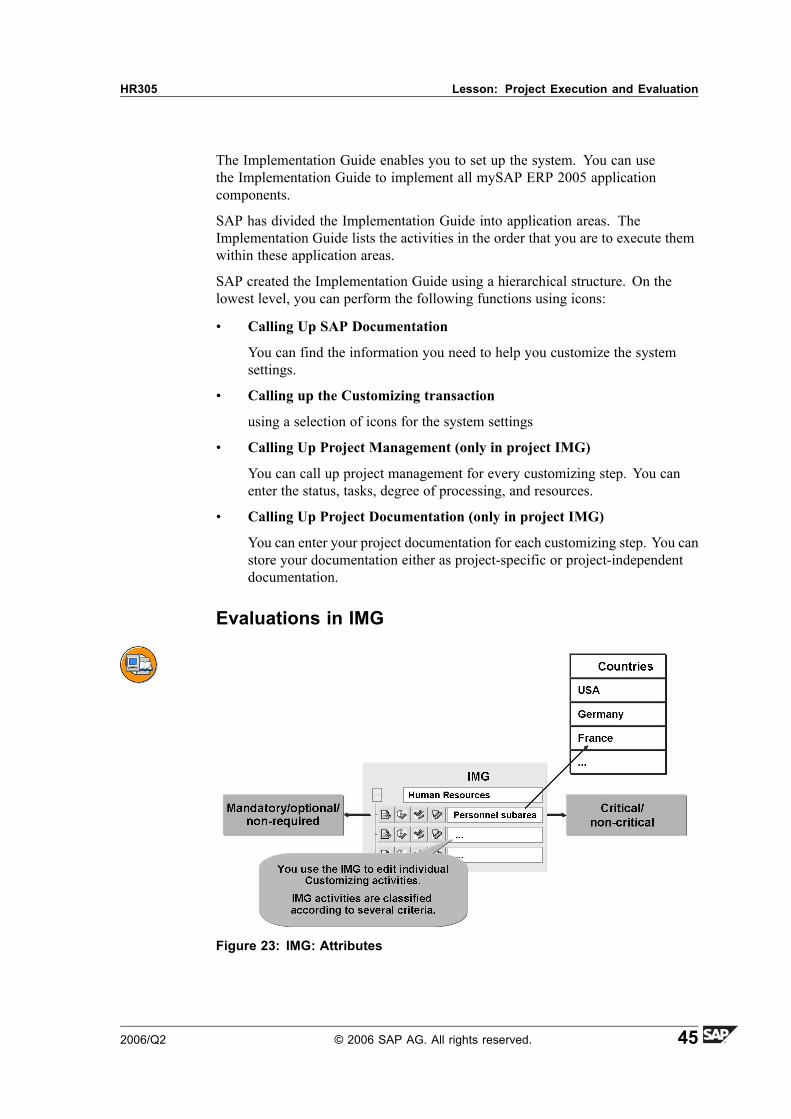
SAP gives each customizing step specific attributes. Attributes are grouped asfollows:
� Mandatory Activities
These are activities for which SAP cannot deliver complete default settings(for example, enterprise structure). You must store your customer-specificrequirements for activities classified as mandatory.
� Optional Activities
SAP delivers default settings for these activities. You can use these settingsif they meet your requirements.
� Non-Required Activities
SAP delivers complete default settings for these activities. Only inexceptional cases do you need to adapt these settings (for example, if youneed country-specific settings).
In addition, Customizing steps have the following attributes:
� Critical Activities
You must proceed with great care when performing critical activities as anyerrors made here can have far-reaching consequences.
� Non-Critical Activities
You must also proceed with care when you carry out these activities, but theconsequences of any errors are less far-reaching.
You can also determine for each Customizing step the countries for which theactivity is necessary.
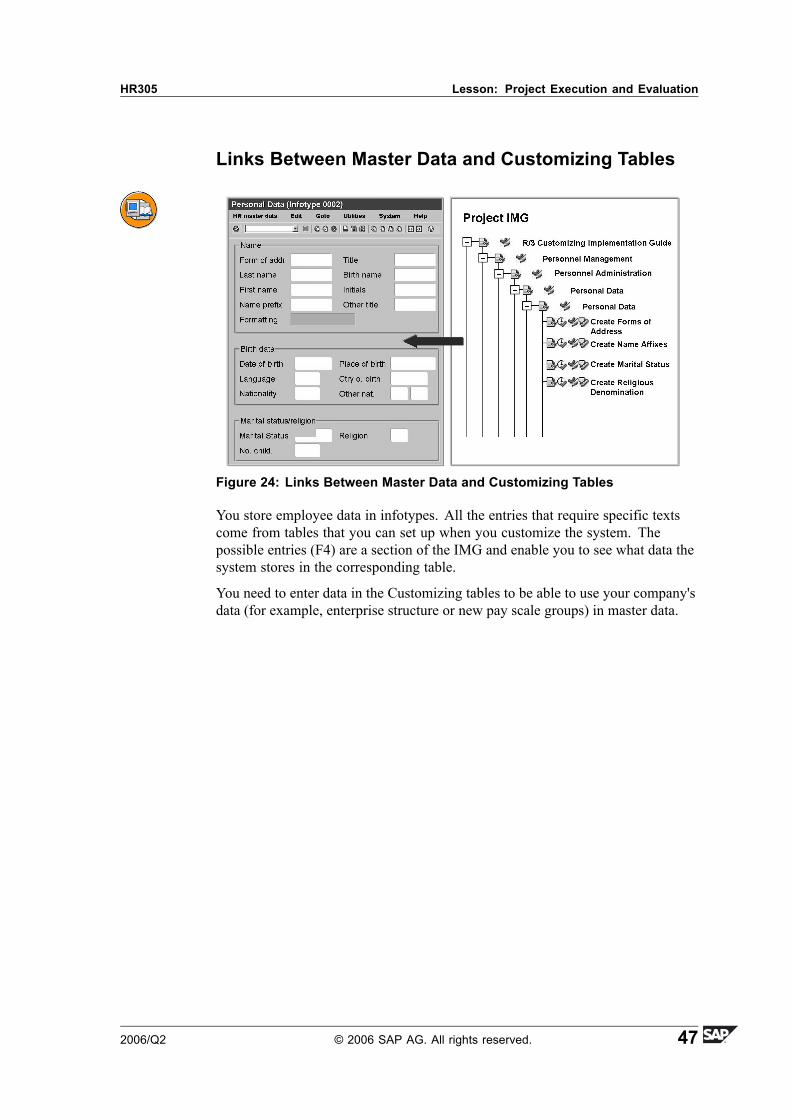
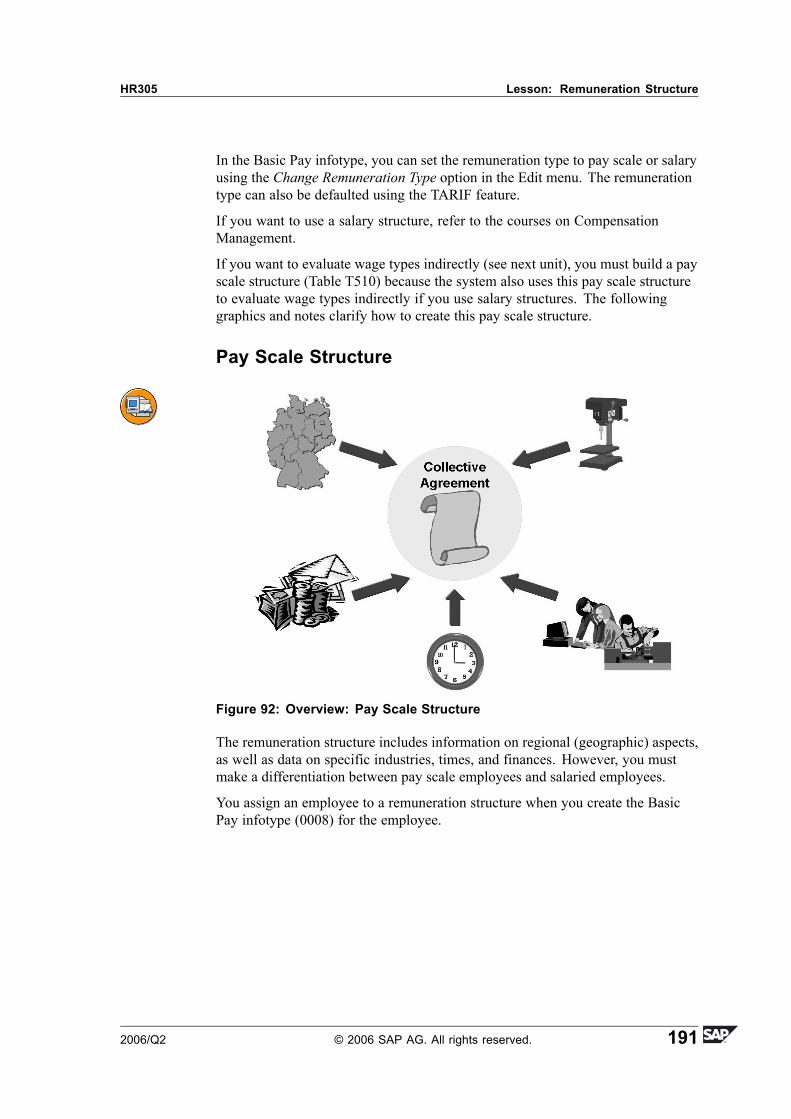
Figure 24: Links Between Master Data and Customizing Tables
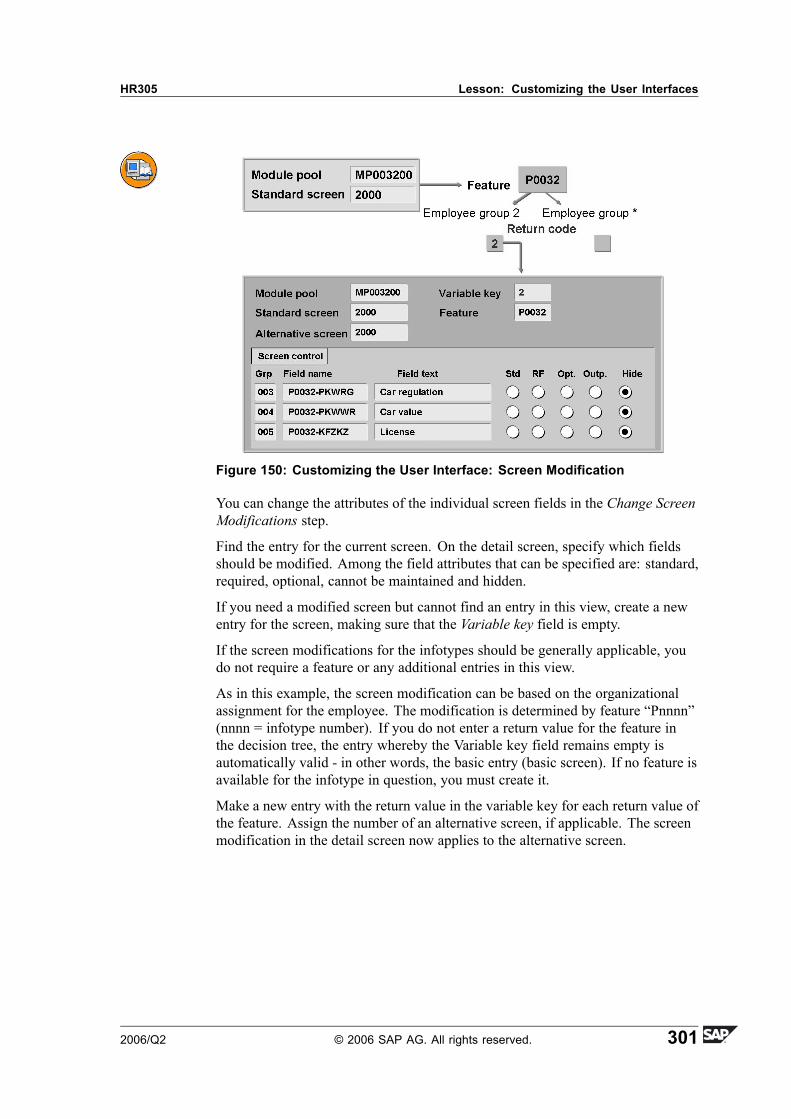
You store employee data in infotypes. All the entries that require specific textscome from tables that you can set up when you customize the system. Thepossible entries (F4) are a section of the IMG and enable you to see what data thesystem stores in the corresponding table.
You need to enter data in the Customizing tables to be able to use your company'sdata (for example, enterprise structure or new pay scale groups) in master data.
If an entry is no longer valid as of a certain date, choose �Delimit� and enter thedelimitation date. The system automatically creates a new record and you canoverwrite the function fields. The old table entry is kept for the history.
In time-dependent tables, the system displays the record currently valid. Use the�Expand-Collapse� function to display the other records.
Figure 29: Customizing Settings from the Application (1)
If there are no entries for a field in master data, the appropriate dialog box appears.You can then go directly to the relevant IMG step from this dialog box. You canthen maintain the necessary entries.
This functionality is not active in the production system.
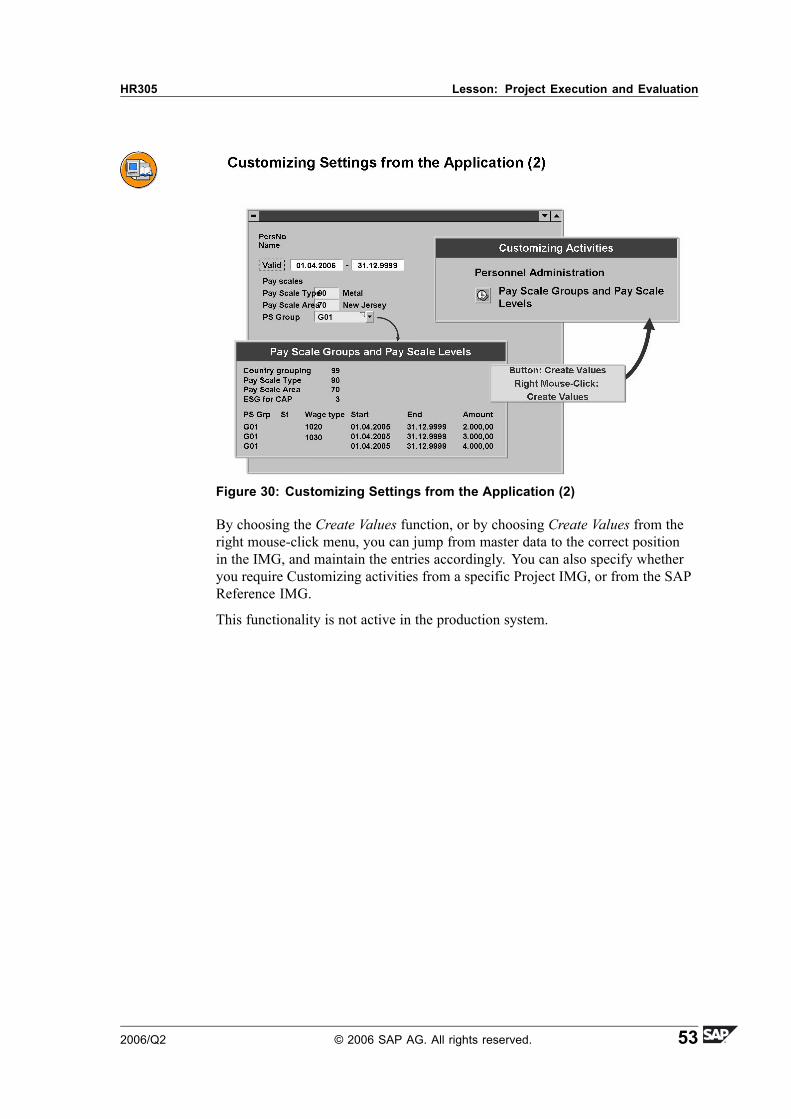
Figure 30: Customizing Settings from the Application (2)
By choosing the Create Values function, or by choosing Create Values from theright mouse-click menu, you can jump from master data to the correct positionin the IMG, and maintain the entries accordingly. You can also specify whetheryou require Customizing activities from a specific Project IMG, or from the SAPReference IMG.
This functionality is not active in the production system.
Exercise ObjectivesAfter completing this exercise, you will be able to:� Working with a Project IMG
Business ExampleYour company has recently purchased several manufacturing plants. These newplants will have an effect on Human Capital Management, and must be mappedin the system. Use a project IMG to create system settings. You now wish tofamiliarize yourself with the implementation of a project IMG.
Task 1:
1. Enter the Execute Project mode.
First, you must enter the Project IMG HR305 in your worklist for you to beable to work with it. Define this project IMG as a standard project.
Task 2:
1. In the user-specific settings, adjust the display of the project IMG to meetyour own requirements (we recommend not using a split screen).
Task 3:Enter your own project IMG, and expand some nodes. Now answer the followingquestions:
1. On each of the lowest levels, you will find the individual IMG steps withfour different icons. Now answer the following questions:
Which icon displays information on what this IMG step does?
2. Use the Find... function to search for the Create Marial Status IMG step.Alternatively, use the menu option Edit - Find. What is the name of the tablethat you need to edit for this IMG step?
3. Assign the status Completed to any activity, and display this status in thestructure of the project IMG.
4. In the IMG, display all of the different categories for the importance of theactivities. Name these categories.
2. Go into the Maintain HR Master Data transaction for the employee youhired (personnel number 305991##) and call the Personal Data infotypein change mode.
In the Title field, open the selection list using the F4 help. Among others,you can see the entry you just created.
Exit the infotype without saving it.
Task 5:Deleting Entries
1. Go back into Execute Project, and navigate to the Personal Data node. Fromthere, call the IMG activity Create name affixes again.
What steps do you have to perform to delete both your entries again?
2. During collective agreement negotiations, a decision was made to increasethe value of the entry you have just created by 5%. Why can you not simplyoverwrite the old value using the change function?
a) In your Customizing worklist, select your HR305 project, and chooseDisplay project in the bottom left of the screen.
b) First icon: If you choose this icon, you branch into the SAPdocumentation for this activity.
c) If you double-click the name of a step, you also branch into the SAPdocumentation.
d) Third icon: If you choose this icon, you branch into statusmaintenance
e) Fourth icon: If you choose this icon, you branch into notemaintenance or the status information
f) Second icon: Node has an executable function. If you choose thisicon, you run the IMG activity.
2. Use the Find... function to search for the Create Marial Status IMG step.Alternatively, use the menu option Edit - Find. What is the name of the tablethat you need to edit for this IMG step?
a) Choose Find..., or use the menu option Edit - Find. Enter the nameof the Customizing activity, and choose Continue. If more than oneactivity exists, the system displays a hitlist. If only one activity isfound, the system jumps directly to the activity in the list.
b) Choose the executable function. In other words, choose the second iconalongside the Define Countries activity.
c) Position the cursor on a table entry.
d) Choose Help (or F1).
e) When the Performance Assistant appears, choose Technicalinformation.
f) In the Field data screen section, you will find the name of the table, orthe views for table V_T502T under Generated views.
a) SAP Easy Access menu:Tools→ Customizing→ IMG→ ProjectAnalysis
b) In the IMG: Personnel Management→ Personnel Administration→Personal Data→ Personal Data→ Create Marital Status
c) Create: You have to enter all new entries
d) Copy: You only need to change the entries in the copy template thatare suitable
2. Go into the Maintain HR Master Data transaction for the employee youhired (personnel number 305991##) and call the Personal Data infotypein change mode.
In the Title field, open the selection list using the F4 help. Among others,you can see the entry you just created.
Exit the infotype without saving it.
a) SAP Easy Access menu:Human Resources→ Personnel Management→ Administration→ HR Master Data→ Maintain
b) Personnel number: 305991##
c) Select the Personal Data infotype and choose Change.
d) Choose Back and confirm the dialog box with Yes.
a) IMG: Personnel Management→ Personnal Administration→ PayrollData→ Basic Pay→ Revise Pay Scale Groups and Levels
b) Choose New Entries or Copy As and then Copy.
2. During collective agreement negotiations, a decision was made to increasethe value of the entry you have just created by 5%. Why can you not simplyoverwrite the old value using the change function?
Unit SummaryYou should now be able to:� Understand the different forms of the Implementation Guide and its
advantages� Create a new Project IMG� Carry out evaluations in the IMG� Maintain IMG entries� Explain effects of changes in the IMG table on the application
Unit OverviewThe company and personnel structure is modified in this section. The entity copieris thereby illustrated.
Unit ObjectivesAfter completing this unit, you will be able to:
� Describe the meaning and elements of the enterprise structure� Modify the enterprise structure using the entity copier� Describe the meaning and elements of the personnel structure� Understand the modification of the personnel structure using the entity copier� Check the assignments
Lesson OverviewThe elements of Enterprise Structure are described in this lesson.
The Enterprise Structure is modified using the entity copier.
Lesson ObjectivesAfter completing this lesson, you will be able to:
� Describe the meaning and elements of the enterprise structure� Modify the enterprise structure using the entity copier
Business ExampleSince a new manufacturing plant was bought, it is necessary to map the newenterprise structure in the SAP system.
Overview - Enterprise Structure
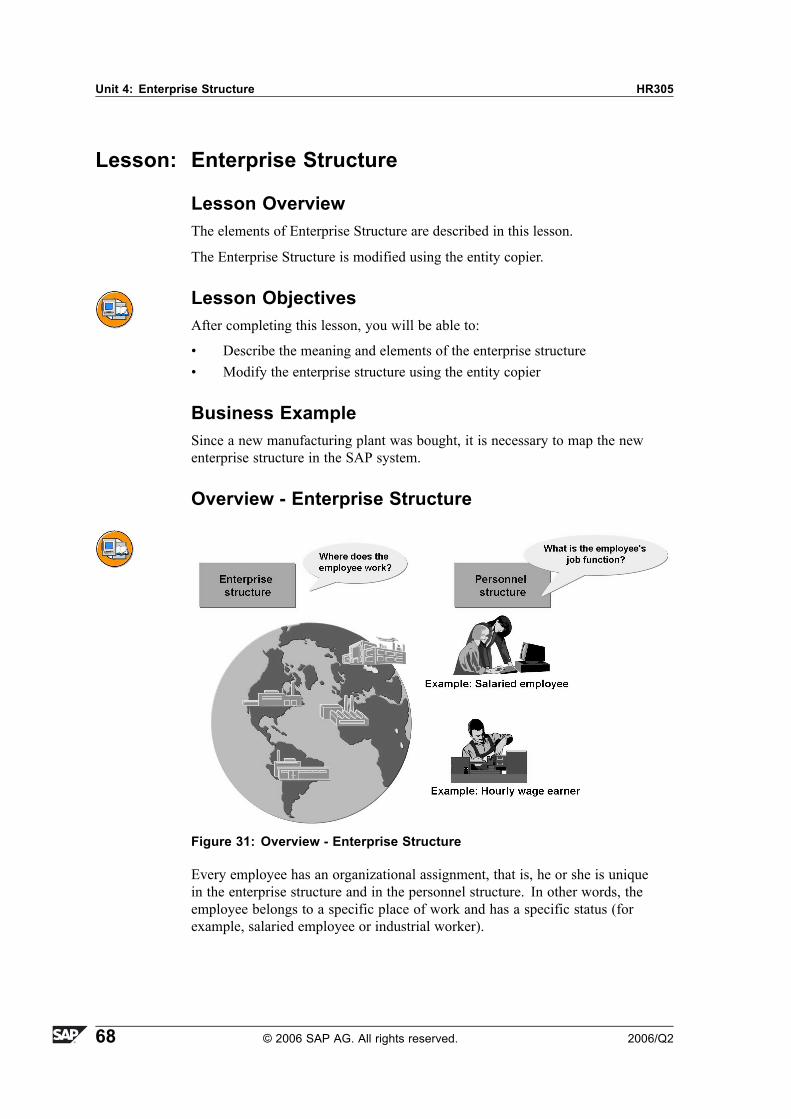
Figure 31: Overview - Enterprise Structure
Every employee has an organizational assignment, that is, he or she is uniquein the enterprise structure and in the personnel structure. In other words, theemployee belongs to a specific place of work and has a specific status (forexample, salaried employee or industrial worker).
You assign an employee to the enterprise structure in master data by means of the�Organizational Assignment� infotype (0001).
In the SAP system, the company's structure consists of the enterprise structure andthe personnel structure.
You set up the enterprise and personnel structure using the Customizing functions.
Depicting Company Structure in the SAP System
Figure 32: Depicting Company Structure in the SAP System
As the structure of your company has changed, you need to modify the structurecurrently in the system. You must depict the purchase of the production plant inthe enterprise structure.
In addition to these changes, the manufacturing plant contains employees that donot exist in the company, for example, hourly-paid employees.
You must add the organizational units, jobs and positions to the organizationalstructure.
An overview of the necessary Customizing steps appears on the right.
The following elements define the SAP enterprise structure for PersonnelAdministration:
� Client� Company code� Personnel area� Personnel subarea
A client can either be valid for a company code at the smallest level, or the entirecorporate group. The company code is defined in financial accounting. Thebalance sheet and profit and loss statements are drawn up at the company codelevel. The personnel area, which is only used in Personnel Administration, isunique in each client. You must assign each personnel area to a company code.You also use the personnel subarea only in Personnel Administration and it is thesmallest element of the enterprise structure. You link the groupings that define theentries to be used for employees of a particular company code/personnel area tothe personnel subarea.
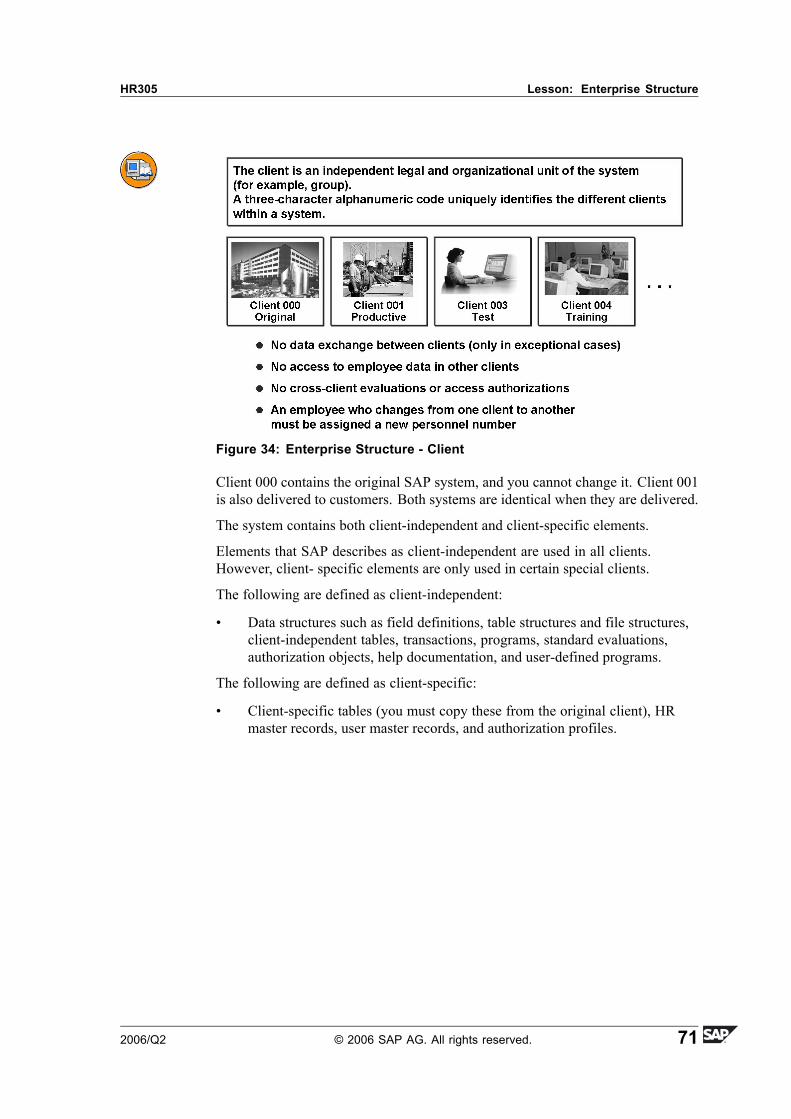
Client 000 contains the original SAP system, and you cannot change it. Client 001is also delivered to customers. Both systems are identical when they are delivered.
The system contains both client-independent and client-specific elements.
Elements that SAP describes as client-independent are used in all clients.However, client- specific elements are only used in certain special clients.
The following are defined as client-independent:
� Data structures such as field definitions, table structures and file structures,client-independent tables, transactions, programs, standard evaluations,authorization objects, help documentation, and user-defined programs.
The following are defined as client-specific:
� Client-specific tables (you must copy these from the original client), HRmaster records, user master records, and authorization profiles.
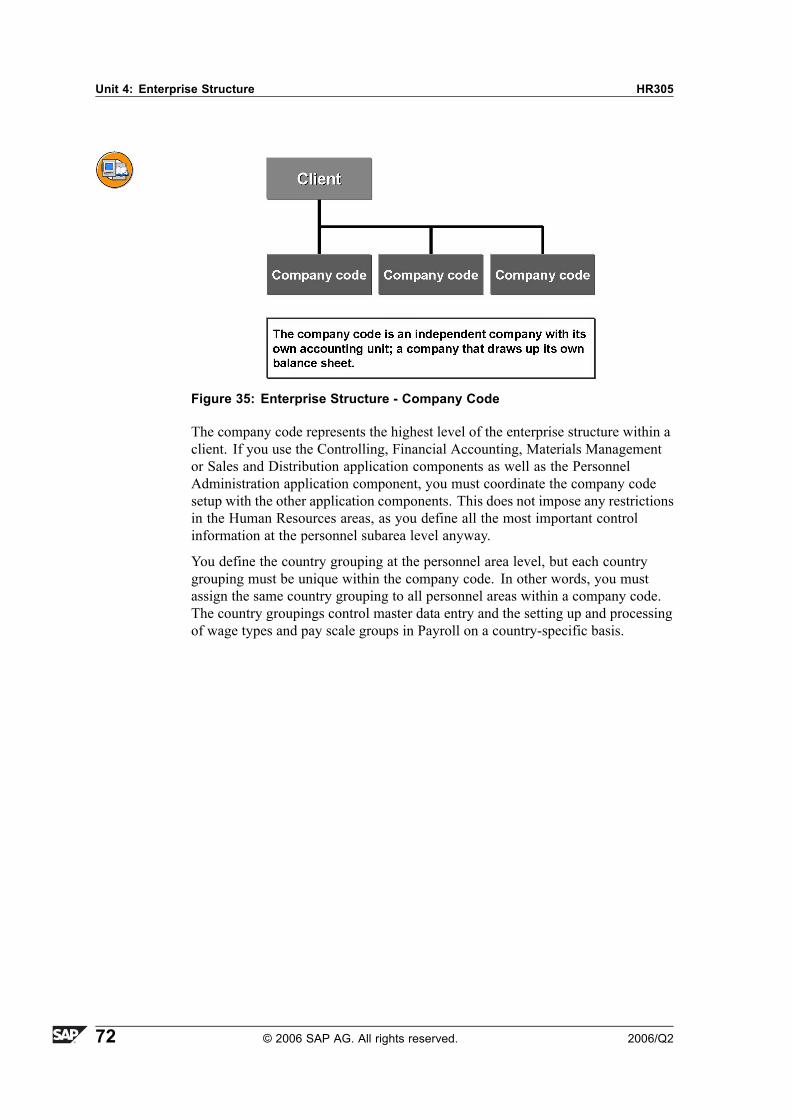
The company code represents the highest level of the enterprise structure within aclient. If you use the Controlling, Financial Accounting, Materials Managementor Sales and Distribution application components as well as the PersonnelAdministration application component, you must coordinate the company codesetup with the other application components. This does not impose any restrictionsin the Human Resources areas, as you define all the most important controlinformation at the personnel subarea level anyway.
You define the country grouping at the personnel area level, but each countrygrouping must be unique within the company code. In other words, you mustassign the same country grouping to all personnel areas within a company code.The country groupings control master data entry and the setting up and processingof wage types and pay scale groups in Payroll on a country-specific basis.
� The personnel area is a selection criterion for evaluations.� The personnel area is an entity for authorization checks.� You must uniquely assign personnel areas to company codes.� You can use the personnel area to generate default values for data entry, for
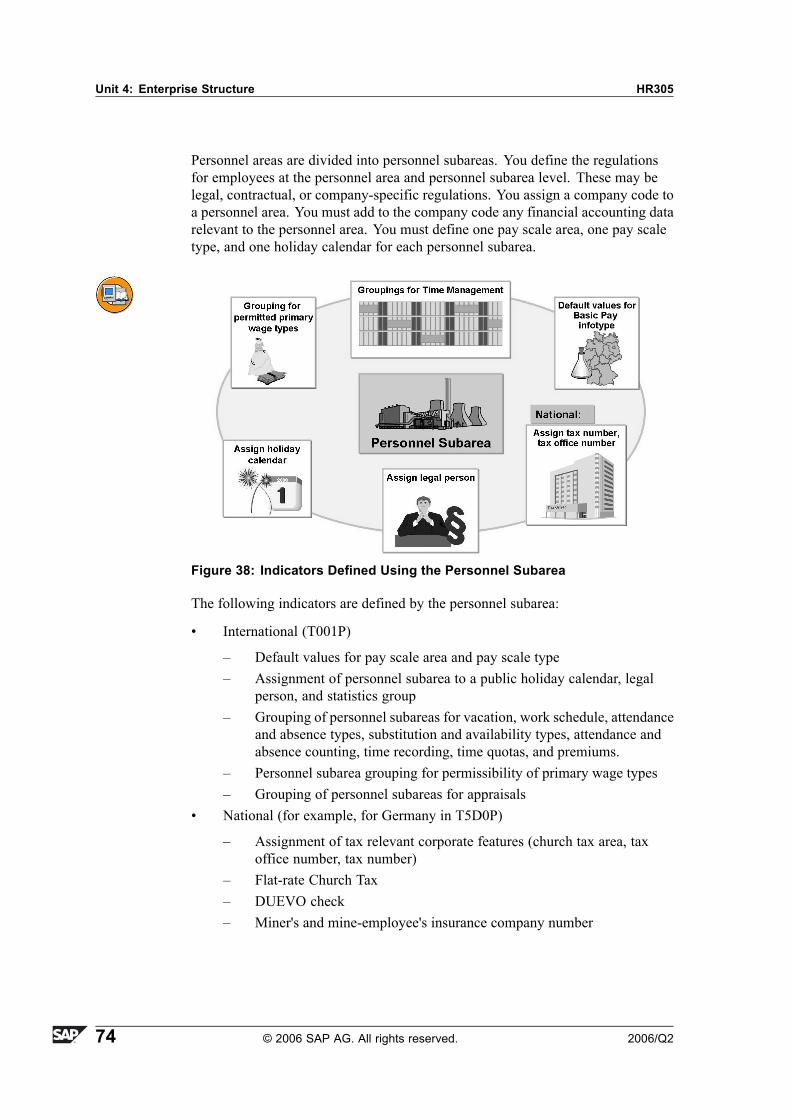
Personnel areas are divided into personnel subareas. You define the regulationsfor employees at the personnel area and personnel subarea level. These may belegal, contractual, or company-specific regulations. You assign a company code toa personnel area. You must add to the company code any financial accounting datarelevant to the personnel area. You must define one pay scale area, one pay scaletype, and one holiday calendar for each personnel subarea.
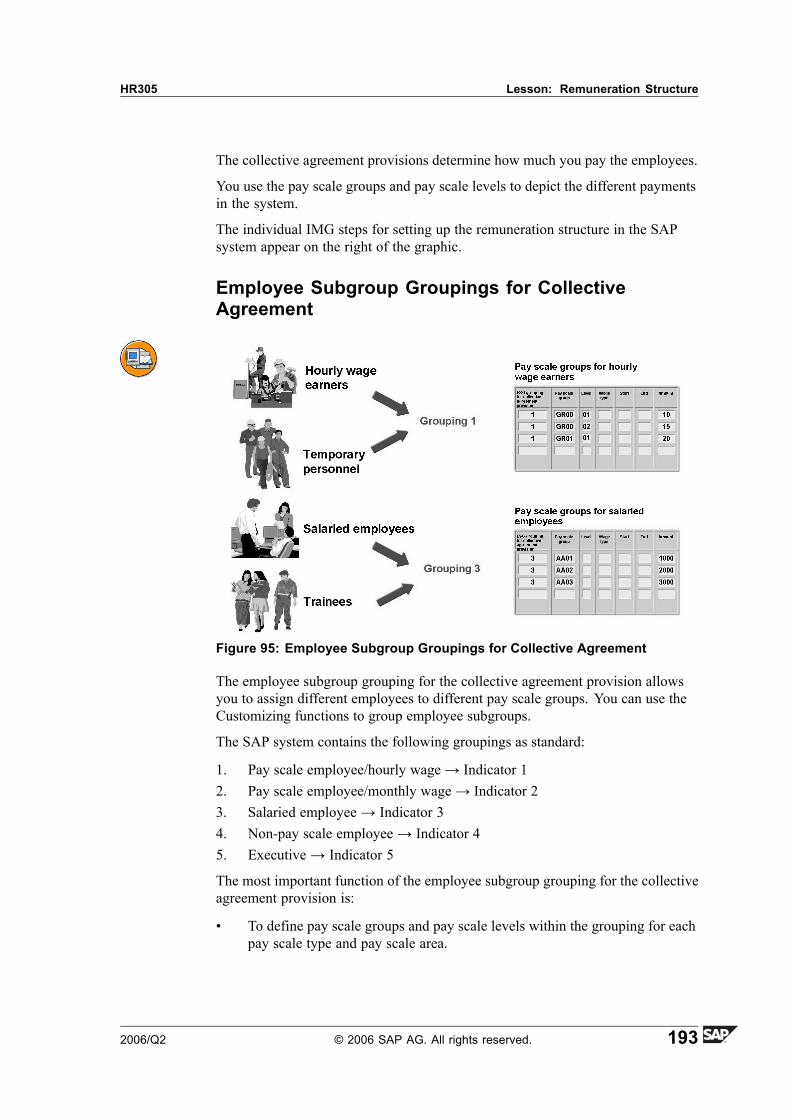
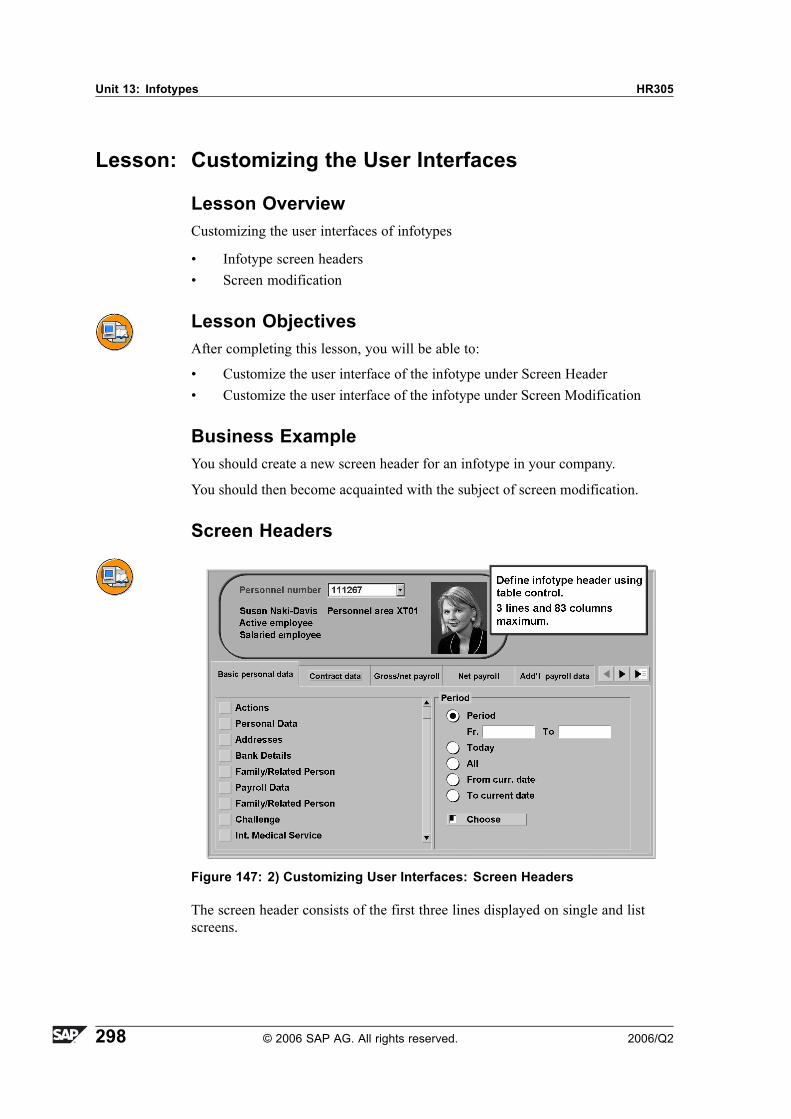
Figure 38: Indicators Defined Using the Personnel Subarea
The following indicators are defined by the personnel subarea:
� International (T001P)
� Default values for pay scale area and pay scale type� Assignment of personnel subarea to a public holiday calendar, legal
person, and statistics group� Grouping of personnel subareas for vacation, work schedule, attendance
and absence types, substitution and availability types, attendance andabsence counting, time recording, time quotas, and premiums.
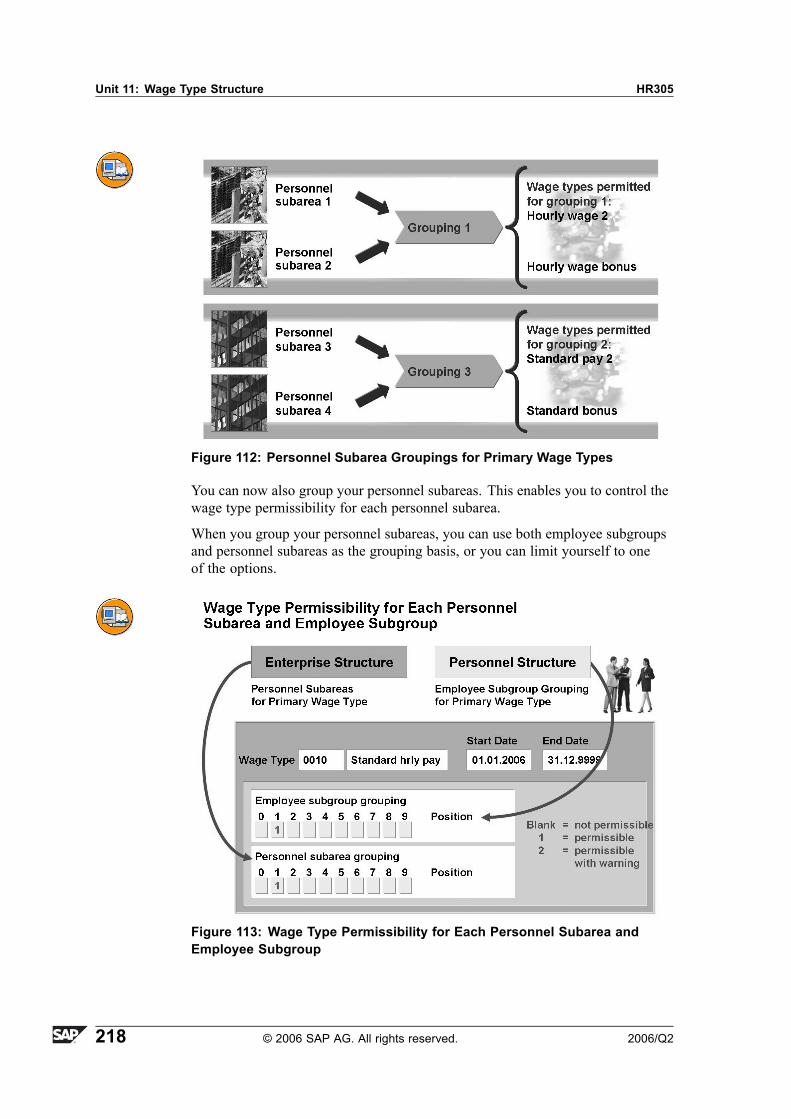
� Personnel subarea grouping for permissibility of primary wage types� Grouping of personnel subareas for appraisals
� National (for example, for Germany in T5D0P)
� Assignment of tax relevant corporate features (church tax area, taxoffice number, tax number)
� Flat-rate Church Tax� DUEVO check� Miner's and mine-employee's insurance company number
You must depict the structure of your company in the SAP system. The graphicshows the enterprise structure of your company, which is an example of how todepict an enterprise structure in the SAP system.
To create a new personnel (sub)area, SAP recommends that you copy an existingpersonnel (sub)area using an entity copier.
Enterprise Structure Copy Function
Figure 40: Enterprise Structure: Copy Function (1)
You can use the copy function to create new elements of the enterprise structurequickly and easily, so that you do not have to call up the subsequent tablesindividually.
You can use the copy function for company codes, personnel areas, personnelsubareas, and employee subgroups. You can:
� Copy� Delete� Check� Create and edit project IMG views
A number of control indicators are connected to elements of the companystructure. You can then access them on subsequent screens.
Figure 41: Enterprise Structure: Copy Function (2)
Copy
Use this function if you want to create a new organizational entity and use theexisting settings as a template.
If you have already carried out the system settings for the organizational unit thatyou have just created, you can still use the copy function. In this case, the systemonly duplicates the entries that are missing. Existing entries remain unchanged.The result of this copy action is a project IMG view that contains all the objectschanged by the copy action. This means that you can post-process the entries thatthe system has copied.
Use this function if you want to delete an existing organizational unit and all ofits dependent entries.
Check
Use this function to check the settings of existing organizational units.
The check is carried out in two steps:
In the first step, the system checks to see whether there is an entry in all the tablesin which the organizational entity specified is entered as a table key.
In the second step, the system checks to see whether there is an entry in thedependent tables validated against the table key.
Exercise ObjectivesAfter completing this exercise, you will be able to:� Create a personnel area and a personnel subarea.
Business ExampleThe recently purchased production plant must be created as a personnel area of thelocal company. In this personnel area, there will be a head office, a purchasingdepartment, and a production department.
Task 1:For the following exercises, use the project IMG HR305.
Create the new personnel area PA##, (## = your group number) and give it thename Gr##, which should be a copy of personnel area CABB Caliber A BicycleCompany.
1. In the Personnel Areas IMG activity, use the Copy function to create yournew personnel area.
2. Use the Create Personnel Areas action to change the name of your newlycreated personnel area.
Task 2:Create the new personnel subarea 0004, and name it Production ##. Thispersonnel subarea should be a subunit of your personnel area PA##.
1. Use the Copy function in the IMG activity Personnel Subareas to create yournew personnel subarea based on the subarea Sales (0001) in the personnelarea PA##.
2. Use the Create Personnel Subareas action to change the name of your newlycreated personnel subarea.
Solution 5: Enterprise StructureTask 1:For the following exercises, use the project IMG HR305.
Create the new personnel area PA##, (## = your group number) and give it thename Gr##, which should be a copy of personnel area CABB Caliber A BicycleCompany.
1. In the Personnel Areas IMG activity, use the Copy function to create yournew personnel area.
a) SAP Menu: Tools→ Customizing→ IMG→ Execute Project.
b) Select the project IMG HR305 from your worklist (double click), or godirectly into your IMG if you have defined it as a standard project.
c) Enterprise Structure→ Definition→ Human Resources→ PersonnelAreas
d) Select the action: Copy, Delete, Check Personnel Area.
e) Choose Copy org.object.
f) Enter CABB in the From personnel area field. Enter PA## in the Topersonnel area field.
g) Choose Enter.
h) Note the system message Note the list of affected features in thestatistics.
i) Note the system message Personnel area CABB was copied to PA##.
j) Return to the Choose Activity dialog box.
2. Use the Create Personnel Areas action to change the name of your newlycreated personnel area.
a) Select the Personnel Areas action.
b) Select your own personnel area and choose Details.
c) Assign it a name that contains your group number and, if required,a new address.
Task 2:Create the new personnel subarea 0004, and name it Production ##. Thispersonnel subarea should be a subunit of your personnel area PA##.
1. Use the Copy function in the IMG activity Personnel Subareas to create yournew personnel subarea based on the subarea Sales (0001) in the personnelarea PA##.
a) Enterprise Structure→ Definition→ Human Resources→ PersonnelSubareas
b) Select the action: Copy, Delete, Check Personnel Subarea.
c) Choose Copy org.object.
d) In the From personnel subarea field, enter the value 0001 (Sales) ofpersonnel area PA## from the list of possible entries. Enter 0004 inthe To personnel subarea field.
e) Choose Continue.
f) Note the system message: Data already exists for organizational object0004. Do you want to complete this organizational object? Select Yes.
g) Note the system message Note the list of affected features in thestatistics.
h) When the system requests the personnel area, enter PA##.
i) Note the system message Personnel subarea 0001 was copied to 0004.
j) Return to the Choose Activity dialog box.
2. Use the Create Personnel Subareas action to change the name of your newlycreated personnel subarea.
a) Select the Create Personnel Subareas action.
b) Enter the personnel area PA##.
c) Change the name of personnel subarea 0004 to Production ##.
Lesson OverviewThe elements of Personnel Structure are explained in this lesson and modifiedusing the entity copier.
The options for checking the modified structure are explained.
Lesson ObjectivesAfter completing this lesson, you will be able to:
� Describe the meaning and elements of the personnel structure� Understand the modification of the personnel structure using the entity copier� Check the assignments
Business ExampleSince a new manufacturing plant was bought, it is necessary to map the newpersonnel structure in the SAP system.
Overview of Personnel Structure
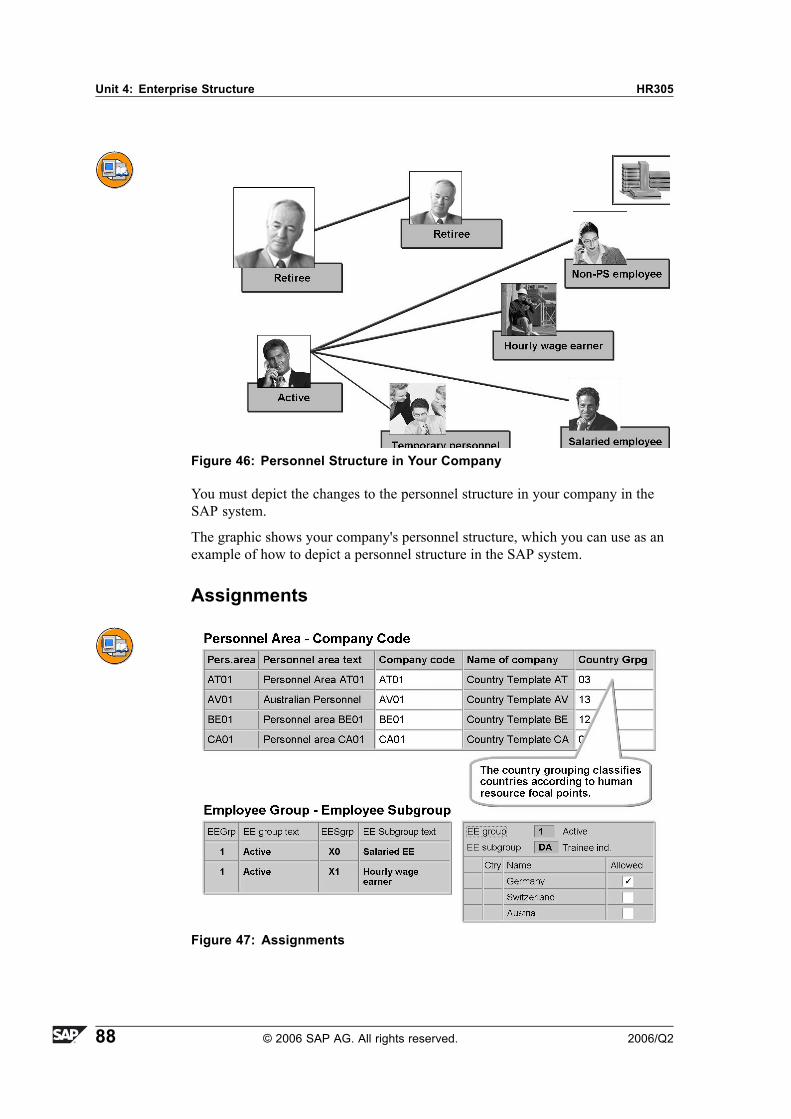
Figure 42: Overview: Personnel Structure
The personnel structure displays the position of individual people in the enterpriseas a whole.
The employee group has the following important organizational functions:
� You can use it to generate default values for data entry, for example, for thepayroll accounting area or an employee's basic pay.
� You can use it as a selection criterion for reporting.� You can use it as an entity for authorization checks.� As a rule, you can use the standard entries in the system for setting up
employee groups. If necessary, you can also add to these entries so thatthey meet your requirements.
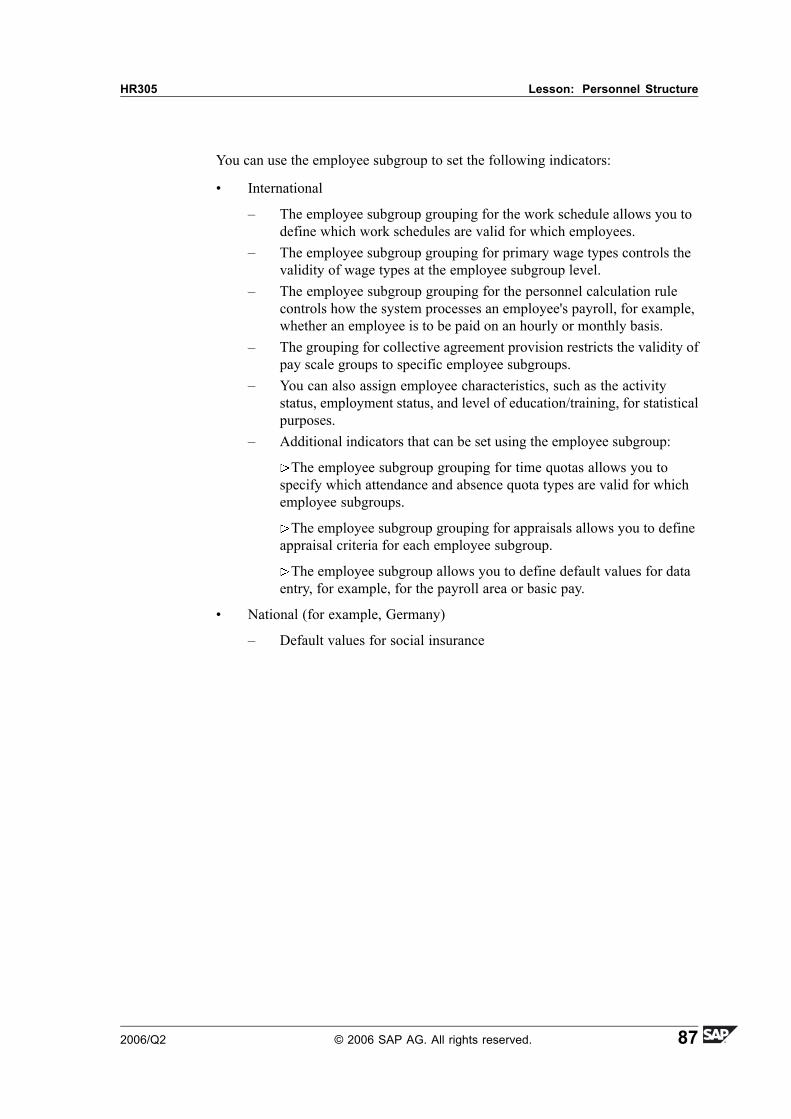
You can use the employee subgroup to set the following indicators:
� International
� The employee subgroup grouping for the work schedule allows you todefine which work schedules are valid for which employees.
� The employee subgroup grouping for primary wage types controls thevalidity of wage types at the employee subgroup level.
� The employee subgroup grouping for the personnel calculation rulecontrols how the system processes an employee's payroll, for example,whether an employee is to be paid on an hourly or monthly basis.
� The grouping for collective agreement provision restricts the validity ofpay scale groups to specific employee subgroups.
� You can also assign employee characteristics, such as the activitystatus, employment status, and level of education/training, for statisticalpurposes.
� Additional indicators that can be set using the employee subgroup:
The employee subgroup grouping for time quotas allows you tospecify which attendance and absence quota types are valid for whichemployee subgroups.
The employee subgroup grouping for appraisals allows you to defineappraisal criteria for each employee subgroup.
The employee subgroup allows you to define default values for dataentry, for example, for the payroll area or basic pay.
You define the relationship between organizational entities here.
� Your personnel area is assigned to a company code. When you create apersonnel number, the system assigns a relevant company code in theOrganizational Assignment infotype (0001) depending on which enterprisestructure you have assigned the employee. In addition, you assign thecountry grouping to a personnel area in this table. Make sure that you assignall personnel areas in one company code to the same country grouping.
� Assign your employee subgroups to the relevant employee groups. You canalso define permissible employee group/employee subgroup combinationsfor your country groupings. For example, you should assign the employeesubgroup Trainee to the employee group Active and not to the employeegroup Retiree.
Solution 6: Personnel StructureTask 1:Create a new employee subgroup for the production plant. Use your group number(##) as a new employee subgroup number.
1. In the Employee Subgroups IMG activity, use the Copy function to copyyour new employee subgroup (##) from employee subgroup X1 Hourlywage earners.
a) Enterprise Structure→ Definition→ Human Resources Management→ Employee Subgroups. Select the Edit employee subgroupenvironment action.
b) Choose Copy org.object.
c) In the From employee subgroup field, enter the employee subgroup X1Hourly wage earner, and in the To employee subgroup field, enteryour group number.
d) Note the system message Please note the list of affected features inthe statistics.
e) Select Continue.
f) Note the system message Employee subgroup X1 was copied to ##.
g) Return to the Choose Activity dialog box.
2. Use the Define Employee Subgroup action to change the name of your newemployee subgroup. The new name should contain your group number.
a) Select the action Define Employee Subgroup.
b) Select Position to find your employee subgroup (##).
c) Change the employee description for the employee subgroup to Hourlywage earner ##.
Task 2:Take a look at the steps in your project IMG that are linked to your new enterprisestructure, and answer the following questions:
1. To which company code is your new personnel area PA## assigned? Whyhas the system already made this assignment?
Answer: CABBTo find this information, proceed as follows in the IMG:Enterprise Structure→ Assignment→ Human Resources Management→Assignment of Personnel Area to Company CodeSearch for the personnel area PA## using Position.Look at the entry in the Company code field: CABB.The system made the assignment automatically when you copied thepersonnel area in the preceding exercise. The copy template (personnelarea CABB) is also assigned to company code CABB.
2. Which country grouping is assigned to this company code?
Answer: Country grouping 99 (other countries)To find this out, proceed as follows in the IMG:Enterprise Structure→ Assignment→ Human Resources Management→Assignment of Personnel Area to Company CodeSearch for the company code CABB using Position.Look at the entry in the Country grouping field: 99.
3. Why are country groupings essential to HCM components?
Answer: Within the HR component, country groupings serve to differentiatebetween countries according to human resources criteria.Technically, the country grouping is a key field in tables that allows you tocreate data, such as wage types and pay scale tables, for specific countries.This, for example, allows you to run payroll for several countries.
4. Describe, in your own words, the basic difference between an assignmentand a grouping.
Answer: For an assignment, you link a personnel subarea or employeesubgroup directly with another subject.For a grouping, you first group together personnel subareas or employeesubgroups that share certain attributes. Then you allocate this grouping toanother subject in a second Customizing step.
Take a look at the steps in your project IMG that are linked to your new employeesubgroup, and answer the following questions:
1. Is your new employee subgroup (##) assigned to employee group 1 Activeand country grouping 99 (other countries)?
Answer: IMG: Enterprise Structure→ Assignment→ Human ResourcesManagement→ Assign Employee Subgroup to Employee GroupSelect Position to find your employee subgroup. Check whether youremployee subgroup (##) is assigned to the employee group Active (1). Ifyou double click this line for your employee subgroup, or if you chooseDetails, the system displays the country grouping assigned to your employeesubgroup.Note: The system made this assignment automatically when you copied theemployee subgroup in the previous exercise.Return to the IMG.
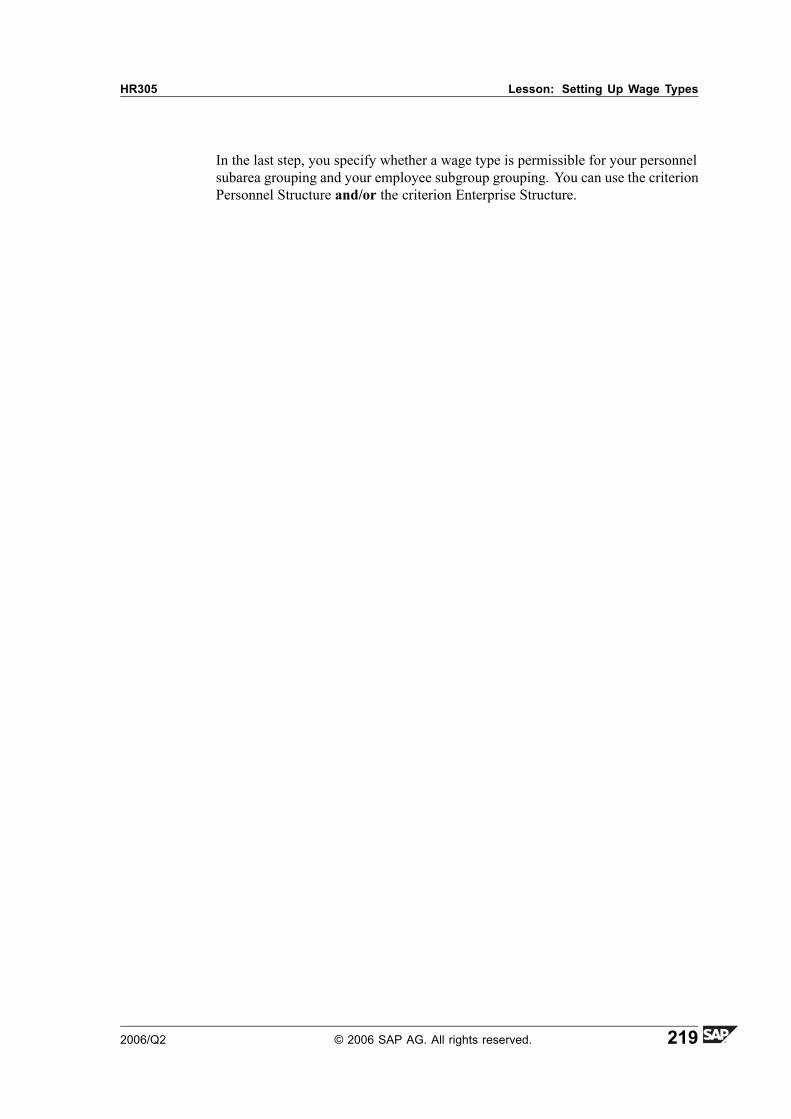
2. What do you set up with the Customizing step Employee Subgroups forPrimary Wage Type?
Answer: IMG: Personnel Management→ Personnel Administration→Payroll Data→ Basic Pay→ Wage Types→ Employee Subgroups forPrimary Wage TypeYou can group together your employee subgroups. In other words, allemployee subgroups that are identical in terms of the permissibility ofprimary wage types.Your employee subgroups ## may have grouping 1 (because copy templateX1 Hourly wage earners also has this grouping). In a further Customizingstep, you can specify which wage types can be used for this employeesubgroup grouping. This also means these wage types would be used for allemployee subgroups with grouping 1. There is more information on this ina later unit.
You should now be able to:� Describe the meaning and elements of the personnel structure� Understand the modification of the personnel structure using the entity copier� Check the assignments
Unit SummaryYou should now be able to:� Describe the meaning and elements of the enterprise structure� Modify the enterprise structure using the entity copier� Describe the meaning and elements of the personnel structure� Understand the modification of the personnel structure using the entity copier� Check the assignments
Unit OverviewThis section explains the most important elements of an organizational structureand how they relate to each other. In Organizational Management, you storedefault values for a position that then appear in Personnel Administration in therelevant fields when you hire a new employee. In Customizing, you can see therelevant part in the IMG where you can switch integration on and off.
Unit ObjectivesAfter completing this unit, you will be able to:
� Map the organizational structure of your company in the SAP system� Set up the link between the Organizational Structure and the Enterprise
The organizational plan depicts the organizational structure. A company uses anorganizational plan to represent the relationships between individual departmentsand work groups. The SAP system uses organizational units for this.
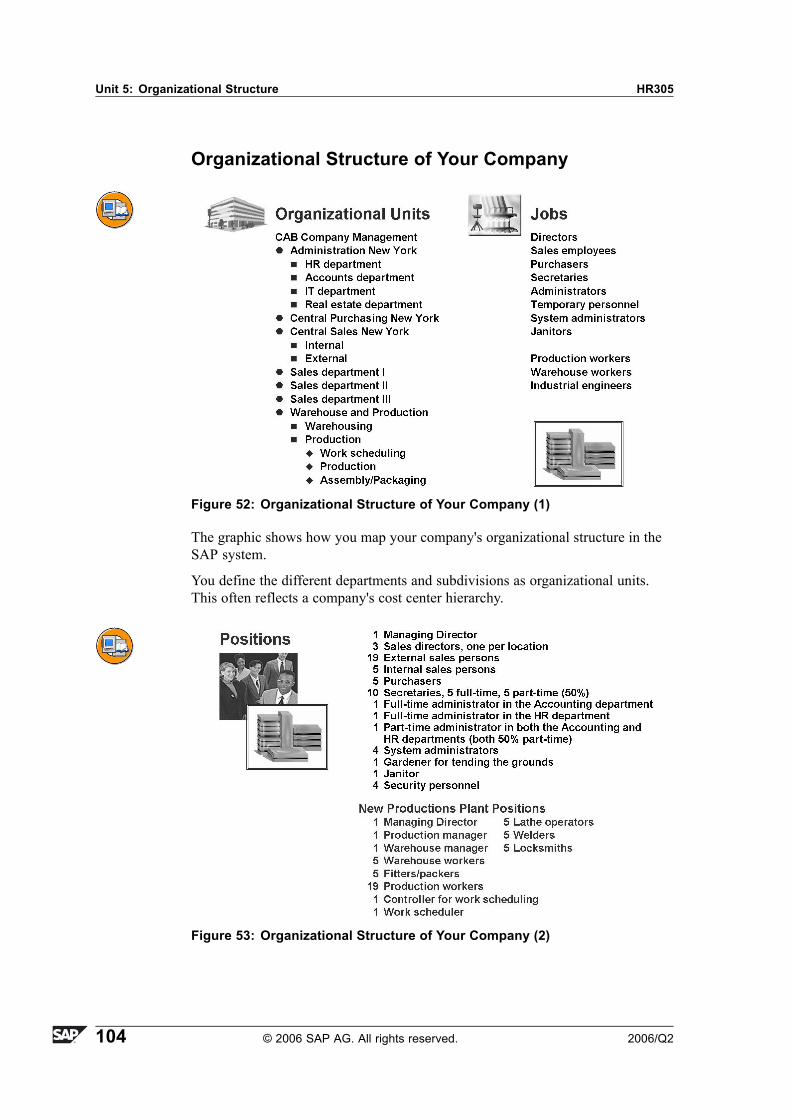
The �Purchasing� department, or organizational unit, employs one secretary, onemanager, and 10 purchasers. The department has 12 positions.
Persons or employees carry out activities. Persons are a fundamental part ofthe organizational structure.
You can divide organizational units generally (according to regional aspects) ormore precisely (according to project group). This depends on the company-specificrequirements.
Organizational units could be departments, teams, groups, and so on.
Positions describe concrete areas in an enterprise that need to be covered byavailable personnel (such as European Manager). Jobs, however, are a generalclassification of tasks within the enterprise (such as Manager). You can furtherdefine these jobs by assigning characteristics. In this way, you create jobdescriptions valid for several positions with similar tasks and characteristics.
When you create a new position (such as European Manager), you can link itto an existing job (such as Administrator). This ensures that the new positionautomatically inherits the tasks and characteristics assigned to the job.
Figure 51: Positions
You assign the employees in your company to positions. This ensures that theemployees are included in the organizational structure. By using additional datacreated in the system, such as links, you can also map the reporting structureof your company.
You can also link pay to positions, for example. You maintain the data forvaluating a position in the Wage Type Structure unit in the �Basic Pay� section.This applies if you have employees whose pay is based on the value of a position.
Example: you have employees who you assigned to a position in theOrganizational Assignment infotype (0001). The pay for this position is x EURO.The employee is to be remunerated with the value for this position (ARBPLmodule. For more information on this, refer to the the Wage Type Structure unit).
The graphic shows your company's organizational structure, which you can use asan example of how to depict an organizational structure in the SAP system.
Employees occupy the individual positions.
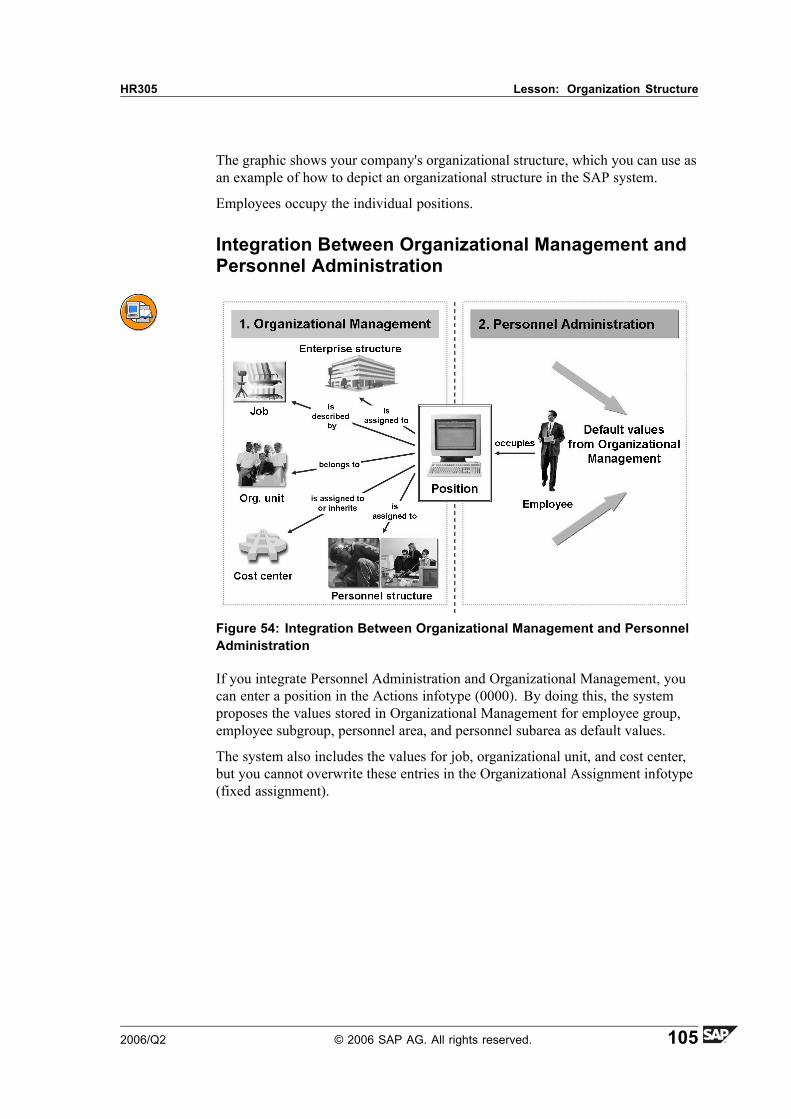
Integration Between Organizational Management andPersonnel Administration
Figure 54: Integration Between Organizational Management and PersonnelAdministration
If you integrate Personnel Administration and Organizational Management, youcan enter a position in the Actions infotype (0000). By doing this, the systemproposes the values stored in Organizational Management for employee group,employee subgroup, personnel area, and personnel subarea as default values.
The system also includes the values for job, organizational unit, and cost center,but you cannot overwrite these entries in the Organizational Assignment infotype(fixed assignment).
Figure 55: Change Organization and Staffing screen layout
Figure 56: Maintain Positions: Account Assignment
You can set up the following using the Account Assignment tab page:
� The graphic shows you how the system stores the relationships between thepositions and the enterprise structure.
� To depict your enterprise's Cost Center hierarchy in the system, you linkthe cost centers to the relevant organizational units. You can also link thecost centers to jobs and positions.
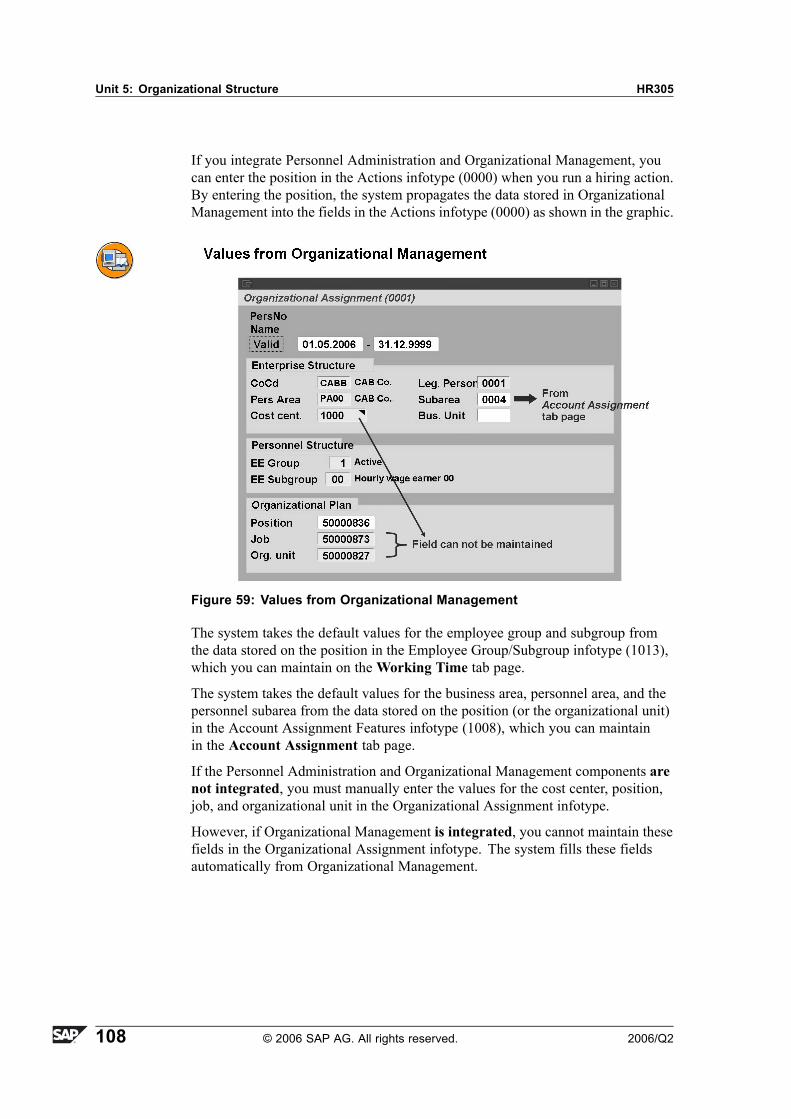
If you integrate Personnel Administration and Organizational Management, youcan enter the position in the Actions infotype (0000) when you run a hiring action.By entering the position, the system propagates the data stored in OrganizationalManagement into the fields in the Actions infotype (0000) as shown in the graphic.
Figure 59: Values from Organizational Management
The system takes the default values for the employee group and subgroup fromthe data stored on the position in the Employee Group/Subgroup infotype (1013),which you can maintain on theWorking Time tab page.
The system takes the default values for the business area, personnel area, and thepersonnel subarea from the data stored on the position (or the organizational unit)in the Account Assignment Features infotype (1008), which you can maintainin the Account Assignment tab page.
If the Personnel Administration and Organizational Management components arenot integrated, you must manually enter the values for the cost center, position,job, and organizational unit in the Organizational Assignment infotype.
However, if Organizational Management is integrated, you cannot maintain thesefields in the Organizational Assignment infotype. The system fills these fieldsautomatically from Organizational Management.
Figure 60: Setting Up Integration between Personnel Administration andOrganizational Management
The system stores the relationship between Personnel Administration andOrganizational Management in Customizing: Personnel Management→Organizational Management→ Integration→ Integration with PersonnelAdministration→ Set up Integration with Personnel Administration: BasicSettings.
Use the PLOGI ORGA switch to determine whether integration with theOrganizational Assignment infotype (0001) takes place.
You can use the PLOGI feature in conjunction with the organizational assignment(employee subgroup, personnel area, and so on) to specify which groups ofemployees can participate in integration. There are several ways to activateintegration. This depends on the system you use in the company.
� You have implemented Personnel Administration and would like tore-customize Organizational Management. In this instance, the systemconverts the entries in the relevant Personnel Administration tables for thepersonnel planning objects.
� You have implemented Organizational Management and would like tore-customize Personnel Administration. You can automatically copy andtransfer the existing entries from the Organizational Assignment infotype(0001).
� You want to implement both components again. You do not have to manuallyenter the data in Personnel Administration as the data that was enteredwhen the systems were previously integrated will be maintained in theOrganizational Management component.
Exercise ObjectivesAfter completing this exercise, you will be able to:� Store a link between a position and the enterprise and personnel structure
Business ExampleAn organizational structure has already been created with several productionworker positions. You now need to create the link between a position and yournew structure elements. This ensures that any new employees who you hirefor this position are automatically included in your company�s organizationalstructure. You will complete the hiring process for these employees in later units.
Task 1:Go into Organizational Management, and into the change mode for Organizationand Staffing, and search for the organizational unit CABB. In the TrainingInternational area is the Production organizational unit, which contains theCentral Production organizational unit, which in turn contains the ## ProductionWorker positions.
Select the position for your group number by double-clicking it, and edit thedetails for your position. Make sure that the start date under Date and PreviewPeriod is set to the first of this month. You should also use this date as the hiringdate for the second employee you hire.
1. Edit the Account assignment tab page to assign your production workerposition (## Production Worker) to the company code CABB, the personnelarea PA##, and your personnel subarea Production (0004). Leave theremaining fields blank.
2. Edit the Working Time tab page to assign your production worker positions(## Production Worker) to the employee group Active, and to your newemployee subgroup (##).
Task 2:Use the personnel action Hiring HR305 to hire the new production worker towork in your personnel subarea.
1. Use the personnel number 305992## (## = your group number), and the firstof the current month as the hiring date. On the Personnel Actions screen,leave the fields Personnel area, Employee group, and Employee subgroupempty.
2. Use the structure search on the Create Actions screen (IT 0000) to search forthe ## Production Worker position. See the path: Org. Units HR TrainingGroup→ Training International→ Production→ Central Production.
3. Choose Enter, before you save the Actions infotype. What happens?
Hint: After you have maintained and saved the entries in infotypes0000 and 0001, STOP the hiring personnel action by selecting�Exit�. When the system prompts you to do so, delimit the vacancyto the default date.
Task 3:
1. What IMG path do you follow to call the activity for integratingOrganizational Management with Personnel Administration?
Solution 7: Organizational StructureTask 1:Go into Organizational Management, and into the change mode for Organizationand Staffing, and search for the organizational unit CABB. In the TrainingInternational area is the Production organizational unit, which contains theCentral Production organizational unit, which in turn contains the ## ProductionWorker positions.
Select the position for your group number by double-clicking it, and edit thedetails for your position. Make sure that the start date under Date and PreviewPeriod is set to the first of this month. You should also use this date as the hiringdate for the second employee you hire.
1. Edit the Account assignment tab page to assign your production workerposition (## Production Worker) to the company code CABB, the personnelarea PA##, and your personnel subarea Production (0004). Leave theremaining fields blank.
a) SAP Menu: Human Resources→ Organizational Management→Organizational Structure→ Organization and Staffing→ Change
b) In the upper-left screen section, the Search area, search for theorganizational unit CABB.
c) The search result, the organizational unit CABB Training International,is displayed in the lower-left screen section, the Selection area. Bydouble clicking the result, the structure of the Training Internationaldepartment is displayed in the upper-right screen section, the Overviewarea.
d) Here you can use the Date and Preview Period button to change thestart date to the first of the current month. Now choose Execute.
e) Search for your position ## Production Worker using the followingpath:
Training International→ Production→ Central Production
Hint: Note that you are working in the Staffing Plan(Structure) view. (Choose Goto in the overview area in theupper-left section of the screen to change views).
f) Double click your ## Production Worker position, which you can findin the subunit Production, to edit the details in the lower-right screensection, the Detail area.
g) Enter the following on the Account Assignment tab page:
h) Company code CABB and personnel area PA##. Select Enter. Now youcan enter personnel subarea 0004.
i) Save the data.
2. Edit the Working Time tab page to assign your production worker positions(## Production Worker) to the employee group Active, and to your newemployee subgroup (##).
a) Choose the Work schedule tab page, and enter the following:
b) Employee group Active and employee subgroup ##.
c) Save your data and return to the initial screen.
Task 2:Use the personnel action Hiring HR305 to hire the new production worker towork in your personnel subarea.
1. Use the personnel number 305992## (## = your group number), and the firstof the current month as the hiring date. On the Personnel Actions screen,leave the fields Personnel area, Employee group, and Employee subgroupempty.
a) Human Resources→ Personnel Management→ Administration→HR Master Data
b) Select Personnel Actions.
c) Select the Hiring HR305 personnel action.
d) Enter personnel number 305992## and the first of the month as thestart date.
e) Choose Execute.
2. Use the structure search on the Create Actions screen (IT 0000) to search forthe ## Production Worker position. See the path: Org. Units HR TrainingGroup→ Training International→ Production→ Central Production.
a) Use the value help function for the Position field, and select thestructure search as search help. The ## - Production Worker positioncan be found in the production unit in the Organizational UnitsTraining Group.
3. Choose Enter, before you save the Actions infotype. What happens?
Hint: After you have maintained and saved the entries in infotypes0000 and 0001, STOP the hiring personnel action by selecting�Exit�. When the system prompts you to do so, delimit the vacancyto the default date.
a) Choose Save. The next infotype appears in which following valuesare defaulted:
b) Subarea 0004 (added to position)
c) The contents of the other fields that are filled, such as Payroll area,Administrator group, or Organizational key, are controlled by features.This will be dealt with in subsequent units.
d) Save the data in this infotype and choose Exit.
Task 3:
1. What IMG path do you follow to call the activity for integratingOrganizational Management with Personnel Administration?
Hint: Do not make any changes to the settings in Customizing.
a) IMG: Personnel Management→ Organizational Management→Integration→ Integration with Personnel Administration→ Set UpIntegration with Personnel Administration
You should now be able to:� Map the organizational structure of your company in the SAP system� Set up the link between the Organizational Structure and the Enterprise
Unit SummaryYou should now be able to:� Map the organizational structure of your company in the SAP system� Set up the link between the Organizational Structure and the Enterprise
Unit OverviewThe important fields from the Organizational Assignment infotype are discussedin this section. The meaning of fields and possible Customizing settings are alsodiscussed here.
Unit ObjectivesAfter completing this unit, you will be able to:
� Explain the meaning of payroll area and payroll control record� Name important additional prerequisites for payroll� Define the structure of the organizational key� Store administrator responsible� Save statistical information about the employees within a company
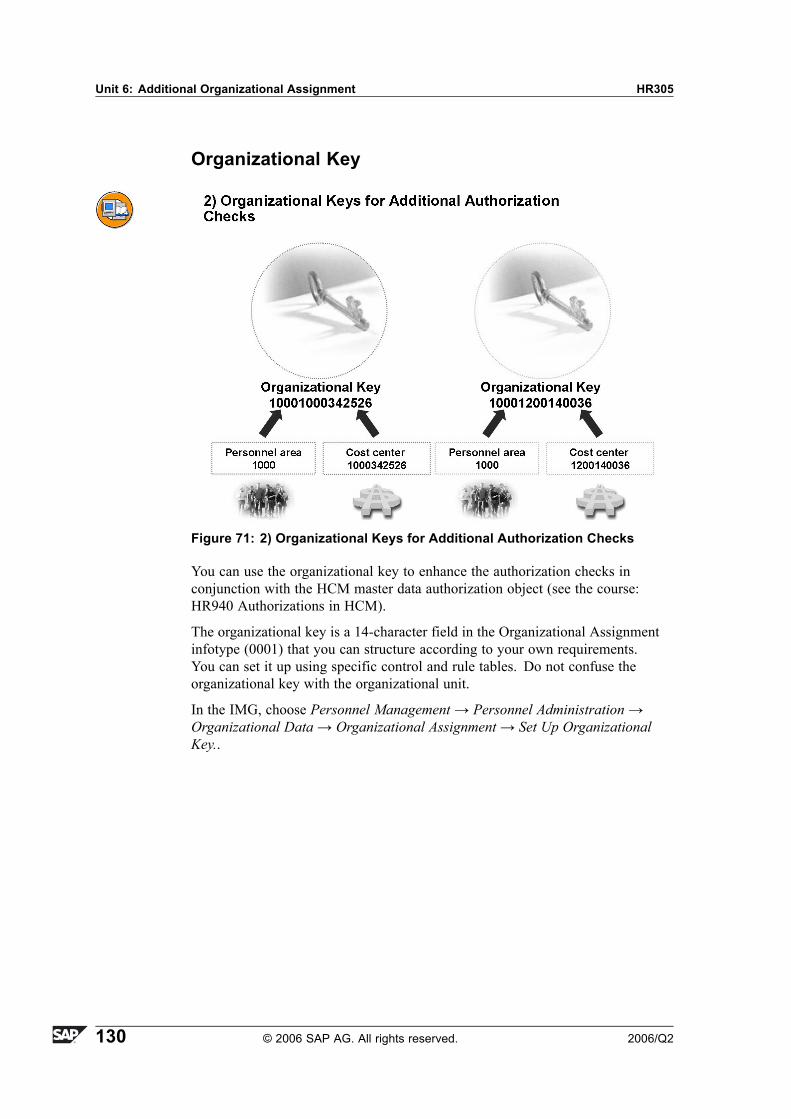
Unit 6: Additional Organizational Assignment HR305
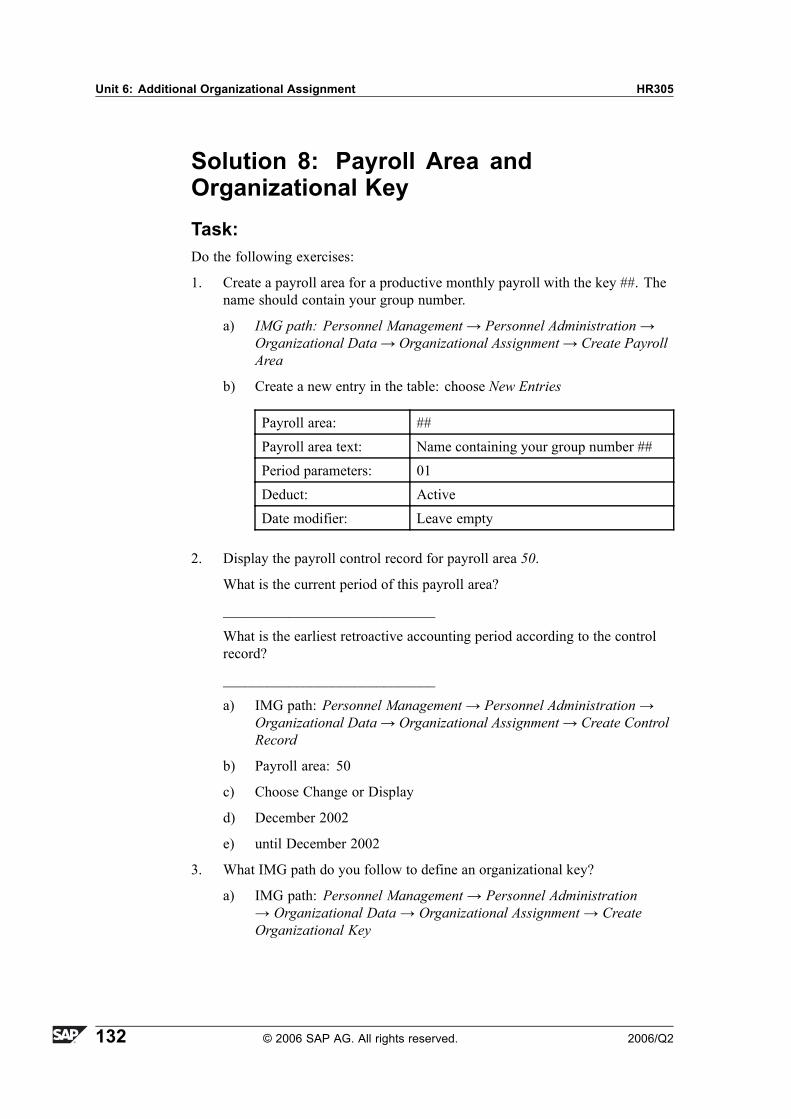
Lesson: Payroll Area and Organizational Key
Lesson OverviewThe terms Payroll Area and Organizational Key are discussed in this lesson.
Lesson ObjectivesAfter completing this lesson, you will be able to:
� Explain the meaning of payroll area and payroll control record� Name important additional prerequisites for payroll� Define the structure of the organizational key
Business ExampleThe structure of payroll areas and organizational keys should be reconsidered.
Additional Organizational Assignment of an Employee
Figure 61: Additional Organizational Assignment of an Employee
You already know most of the indicators in the Organizational Assignmentinfotype (0001). This unit discusses the remaining indicators, such as theindicators for authorization checks and those that control payroll.
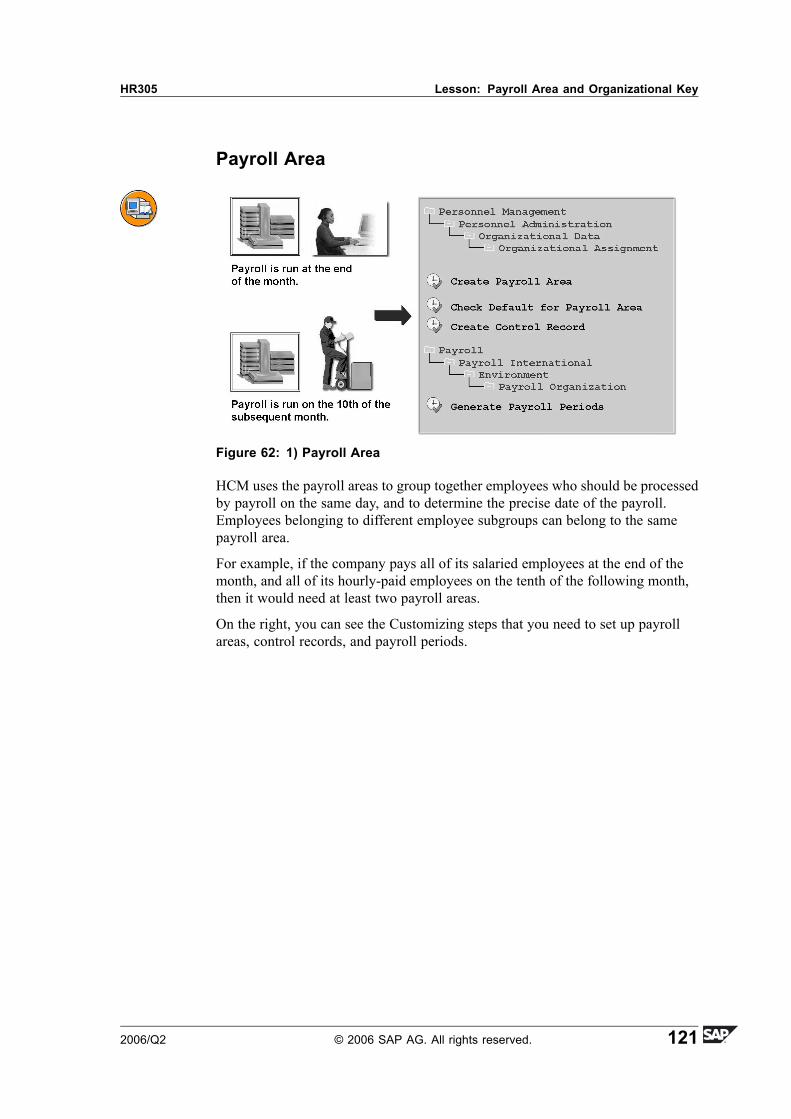
HCM uses the payroll areas to group together employees who should be processedby payroll on the same day, and to determine the precise date of the payroll.Employees belonging to different employee subgroups can belong to the samepayroll area.
For example, if the company pays all of its salaried employees at the end of themonth, and all of its hourly-paid employees on the tenth of the following month,then it would need at least two payroll areas.
On the right, you can see the Customizing steps that you need to set up payrollareas, control records, and payroll periods.
Unit 6: Additional Organizational Assignment HR305
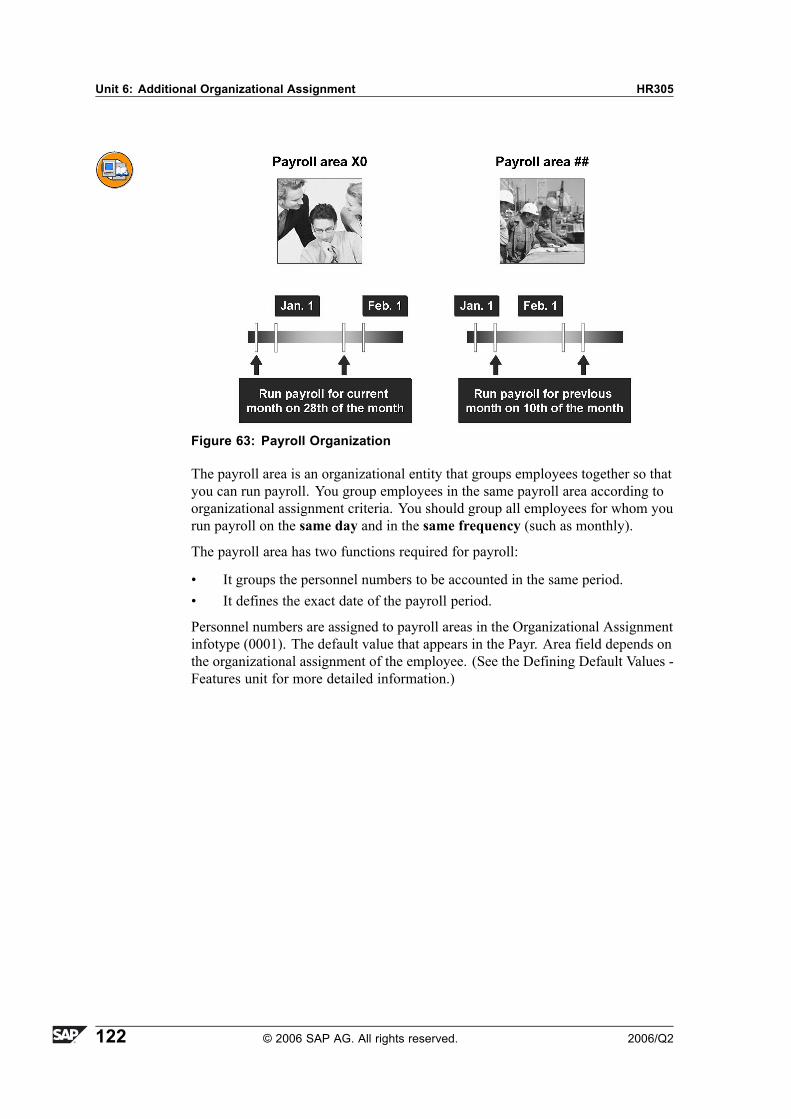
Figure 63: Payroll Organization
The payroll area is an organizational entity that groups employees together so thatyou can run payroll. You group employees in the same payroll area according toorganizational assignment criteria. You should group all employees for whom yourun payroll on the same day and in the same frequency (such as monthly).
The payroll area has two functions required for payroll:
� It groups the personnel numbers to be accounted in the same period.� It defines the exact date of the payroll period.
Personnel numbers are assigned to payroll areas in the Organizational Assignmentinfotype (0001). The default value that appears in the Payr. Area field depends onthe organizational assignment of the employee. (See the Defining Default Values -Features unit for more detailed information.)
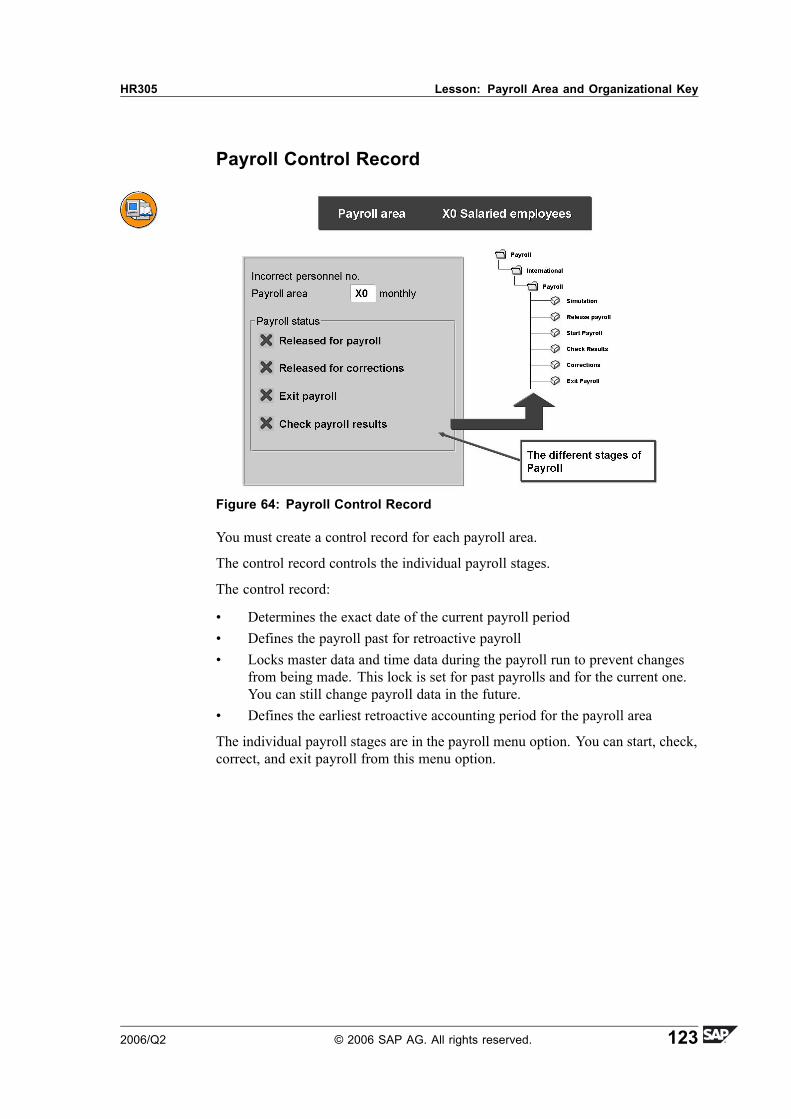
You must create a control record for each payroll area.
The control record controls the individual payroll stages.
The control record:
� Determines the exact date of the current payroll period� Defines the payroll past for retroactive payroll� Locks master data and time data during the payroll run to prevent changes
from being made. This lock is set for past payrolls and for the current one.You can still change payroll data in the future.
� Defines the earliest retroactive accounting period for the payroll area
The individual payroll stages are in the payroll menu option. You can start, check,correct, and exit payroll from this menu option.
Unit 6: Additional Organizational Assignment HR305
Overview: Payroll Organization
Figure 65: Overview - Payroll Organization
To be able to run payroll in the SAP system, you need to make certain basicCustomizing settings:
� Each payroll area is assigned a period parameter and a date modifier.The date modifier is only relevant in some countries. The period parameterspecifies whether payroll is run monthly, bimonthly, weekly, or every somany weeks. For this, each period parameter used is assigned to a timeunit. The values for the time units are fixed (monthly, bimonthly, weekly,fortnightly, every four weeks, annually).
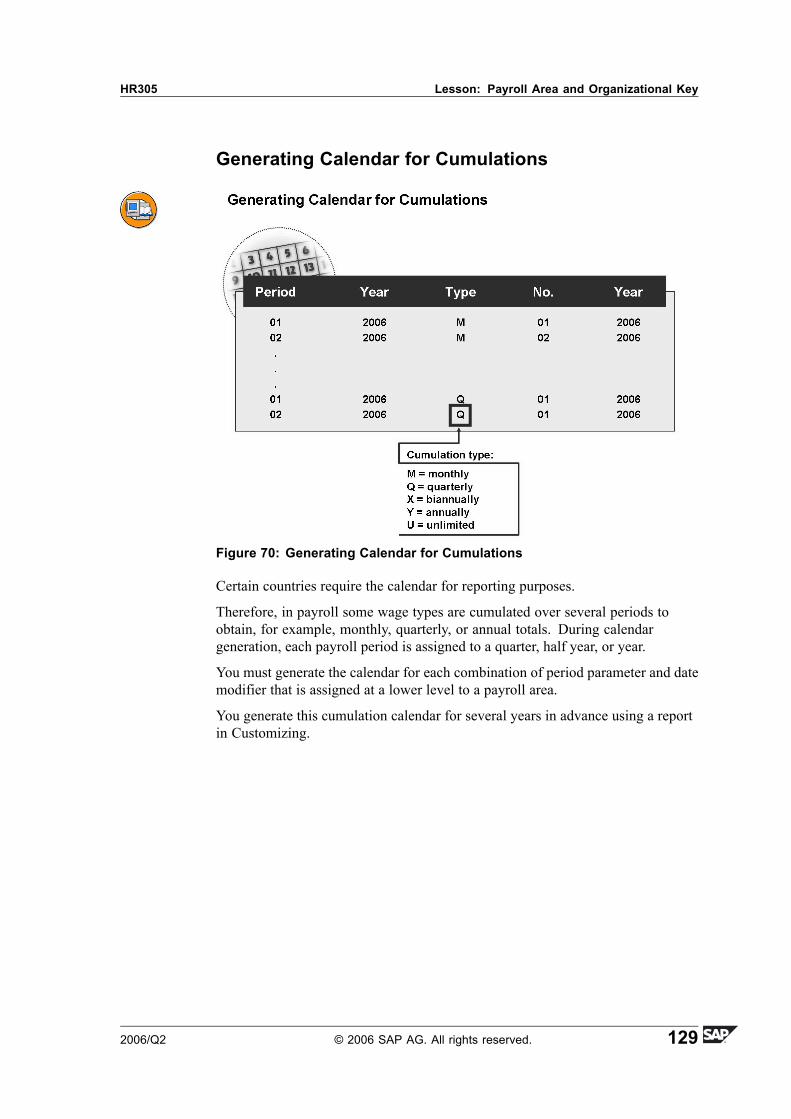
� You must generate payroll periods for each combination of period parameterand date modifier assigned to a payroll area. Depending on the periodparameter, all periods in the time interval specified are determined. Thesystem determines the start date and end date of each period and calculatesthe payday using a rule that is also to be specified as a parameter. Payrollyear and payroll period define the specific payroll dates.
� You must create a control record for each payroll area. The control recordcontrols the individual stages of payroll.
The following section explains the administrative elements necessary for payrollsuch as payroll area, payroll period, payroll control record, and the payroll statusof employees. The IMG steps can be found in Customizing Payroll for yourappropriate country under Basic Settings→ Payroll Organization
Unit 6: Additional Organizational Assignment HR305
Payroll Periods
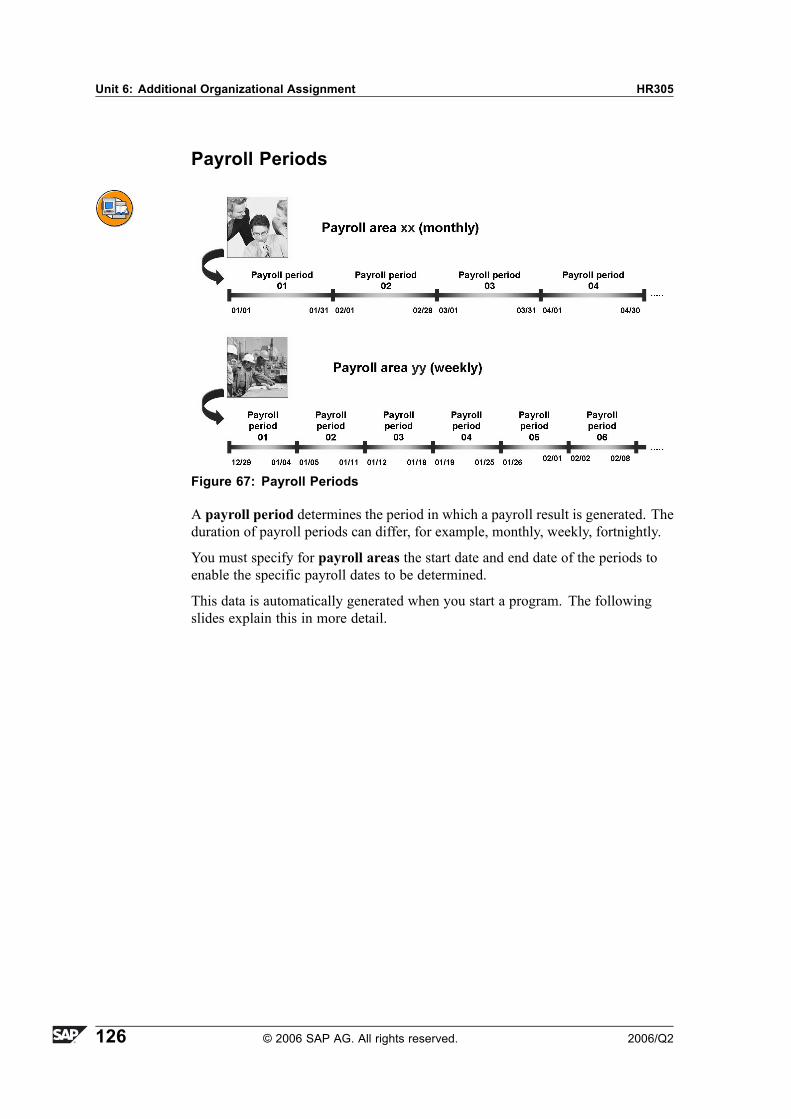
Figure 67: Payroll Periods
A payroll period determines the period in which a payroll result is generated. Theduration of payroll periods can differ, for example, monthly, weekly, fortnightly.
You must specify for payroll areas the start date and end date of the periods toenable the specific payroll dates to be determined.
This data is automatically generated when you start a program. The followingslides explain this in more detail.
You link payroll periods to time units that are appended to the corresponding periodmodifier in the IMG activity Generate Payroll Periods. Here, you also specifyhow paydays are defined. Likewise, you can identify the start of the fiscal year.
In addition to the start date and end date of a period and of the payday, you candefine a date modifier as an additional payroll-relevant date. This is a modifieryou use to link additional date types to a payroll calendar. Besides the datespecifications defined for the standard payroll interval, you can generate otherdate specifications for each period in the payroll calendar. You can use the otherdate specifications to store the payday, for example.
The example in the graphic shows how you generate payroll periods for a monthlyperiod modifier. Here, the start date and end date of a period coincide with thestart date and end date of a calendar month. You use these settings to generatepayroll periods for 60 months (start date until end of final year).
Caution: The input screen of the report changes dynamically accordingto country grouping.
Unit 6: Additional Organizational Assignment HR305
Figure 69: Generation of Payroll Periods (2)
Payday rule/Number of days: These fields determine how the payday of theperiod is calculated. The following values are possible for the payday rule:
1. The number of days is added to the start date of the period to calculate thepayday
2. The number of days is deducted from the end date of the period3. The number of days is added to the end date of the period4. Valid for monthly payroll periods only: The number of days is used as the
exact date.
Determine period number: In this field, you define the date of the payroll periodthe system uses to determine the period number. The system uses the periodnumber in the payroll control record to continually project the payroll periods ofa year. When counting the period numbers, the system starts again at one at thebeginning of each fiscal year.
In the example in the graphic, you pay the employee for the previous week's workevery Thursday (start date July 1, 2002: Sunday-Saturday period). The reason forthis is that payday rule 3 specifies that the number of days (5) is added to theend date of the period.
Certain countries require the calendar for reporting purposes.
Therefore, in payroll some wage types are cumulated over several periods toobtain, for example, monthly, quarterly, or annual totals. During calendargeneration, each payroll period is assigned to a quarter, half year, or year.
You must generate the calendar for each combination of period parameter and datemodifier that is assigned at a lower level to a payroll area.
You generate this cumulation calendar for several years in advance using a reportin Customizing.
Unit 6: Additional Organizational Assignment HR305
Organizational Key
Figure 71: 2) Organizational Keys for Additional Authorization Checks
You can use the organizational key to enhance the authorization checks inconjunction with the HCM master data authorization object (see the course:HR940 Authorizations in HCM).
The organizational key is a 14-character field in the Organizational Assignmentinfotype (0001) that you can structure according to your own requirements.You can set it up using specific control and rule tables. Do not confuse theorganizational key with the organizational unit.
In the IMG, choose Personnel Management→ Personnel Administration→Organizational Data→ Organizational Assignment→ Set Up OrganizationalKey..
Exercise ObjectivesAfter completing this exercise, you will be able to:� Create payroll areas and display a payroll control record
Business ExampleSince your company has various payroll dates, you should create a payroll area. Inaddition, you want to find out about the status of a payroll control record.
Task:Do the following exercises:
1. Create a payroll area for a productive monthly payroll with the key ##. Thename should contain your group number.
2. Display the payroll control record for payroll area 50.
What is the current period of this payroll area?
_____________________________
What is the earliest retroactive accounting period according to the controlrecord?
_____________________________
3. What IMG path do you follow to define an organizational key?
You should now be able to:� Explain the meaning of payroll area and payroll control record� Name important additional prerequisites for payroll� Define the structure of the organizational key
Unit 6: Additional Organizational Assignment HR305
Lesson: Administrator Responsible and EmployeeAttributes
Lesson OverviewThe administrators responsible are assigned to certain administrator groups inCustomizing and then stored in the Organizational Assignment infotype for theemployee.
Additional data is recorded for an employee for statistical reasons.
Lesson ObjectivesAfter completing this lesson, you will be able to:
� Store administrator responsible� Save statistical information about the employees within a company
Business ExampleNew administrator groups should be created with new administrators in yourcompany.
You should become acquainted with the options for saving statistical informationfor your employees.
HR305 Lesson: Administrator Responsible and Employee Attributes
Administrator Responsible in PersonnelAdministration
Figure 72: 3) Administrator Responsible for Personnel Administration
In the Organizational Assignment infotype (0001), you can enter three differentadministrators: personnel administrator, time administrator, and payrolladministrator. Examples of use:
� The administrator (in this instance, the �time administrator�) can usestandard SAP reports as a selection criterion. This would ensure that the timeadministrator only creates a list of his or her employees.
� You can print the administrator on the remuneration statement so thatemployees know who to contact in case of queries.
You can call the relevant Customizing step to create administrator groups andadministrators under Personnel Management→ Personnel Administration→Organizational Data→ Organizational Assignment→ Define administrator.With the call Define Administrator Groups, you call the characteristic PINCH thatdetermines the administrator group in the infotype Organizational Assignment (seethe chapter Define Default Values - Characteristics).
Unit 6: Additional Organizational Assignment HR305
Figure 73: Administrator Assignment
During Customizing, you enter the administrator for each administrator group.These are the administrators that you want to enter in the OrganizationalAssignment infotype.
The administrator table stores the administrator's name, form of address, andtelephone number centrally. In addition, you can enter the SAP names (that is,the administrator's SAP user). You can use this name to trigger an automaticmessage (e-mail) that is sent to the administrator responsible when users makechanges to infotype records.
HR305 Lesson: Administrator Responsible and Employee Attributes
Employee Attributes
Figure 74: 4) Employee Attributes
You have defined your employee groups and subgroups in your personnel structure.You must now assign a status value to the employee subgroups. This can be anactivity status, an employment status, or a training status. In several countries,this information is sent from the State Statistics Office. You store this informationin the Customizing step Personnel Management→ Personnel Administration→Organizational Data→ Organizational Assignment→ Employee Attributes.
� The possible entries for activity status, are:
� 1 = Active� 2.=Retiree� 3 = Early retiree� 9 = Other
� Possible entries for the employment status, are:
Unit 6: Additional Organizational Assignment HR305
If necessary, you can specify additional differentiation in the employee statuses ofyour employees so they are not dependent on the employee subgroup assignments,but are created in the Terms of Employment field of the→OrganizationalAssignment→ infotype. To do so, choose the following in the IMG: PersonnelManagement → Personnel Administration → Organizational Data →Organizational Assignment→ Define Terms of Employment.
National and international evaluations use these statuses to select and summarizepersonal data, or to represent national features.
Exercise ObjectivesAfter completing this exercise, you will be able to:� Create administrators to assign to your employees
Business ExampleThe relevant administrator must be informed of employee changes in yourcompany. You are an administrator and must be informed about changes toemployee data.
Task 1:Do the following exercises:
1. Define an administrator for your administrator group (PA##). Use the correctIMG step under Organizational Assignment:
Use your personnel area abbreviation PA## as the name for youradministrator group, and use A## as the three-character administrator ID. Inthe SAP Name field, enter your logon ID. This ensures that you receive ane-mail if changes are made to the administrator data.
2. Update the master records for the employee who you have already started tohire (personnel number 305992##):
Enter the administrator for personnel A## in the Organizational Assignmentinfotype. Save the data in this infotype and end the hiring action (the otherinfotypes are processed in the following units).
3. Check the e-mail informing you of a change in your mail inbox. This mailwas sent to you as you are entered as the administrator.
Task 2:The following exercises are OPTIONAL:
1. Call the table for maintaining employee attributes. Which employeecharacteristics are assigned to your employee subgroup ##? Use the F1 helpto find out the meaning of the entries:
HR305 Lesson: Administrator Responsible and Employee Attributes
Solution 9: Administrator Responsibleand Employee AttributesTask 1:Do the following exercises:
1. Define an administrator for your administrator group (PA##). Use the correctIMG step under Organizational Assignment:
Use your personnel area abbreviation PA## as the name for youradministrator group, and use A## as the three-character administrator ID. Inthe SAP Name field, enter your logon ID. This ensures that you receive ane-mail if changes are made to the administrator data.
c) Enter the group PA##, administrator A##, administrator's name:Admin.group ##, a form of address and telephone number of yourchoice, and your SAP name HR305-##.
d) Save your data and return to the IMG.
2. Update the master records for the employee who you have already started tohire (personnel number 305992##):
Unit 6: Additional Organizational Assignment HR305
Enter the administrator for personnel A## in the Organizational Assignmentinfotype. Save the data in this infotype and end the hiring action (the otherinfotypes are processed in the following units).
a) Human Resources→ Personnel Management→ Administration→HR Master Data
b) Select Personnel Actions.
c) Enter the personnel number 305992##.
d) Select Hiring HR305.
e) Choose Execute.
f) Choose Execute infogroup to restart the hiring action.
g) Select Next record until you get to the Change OrganizationalAssignment (infotype 0001) screen.
h) Enter A## in the PersAdmin field.
i) Save the data and leave the hiring personnel action by choosing Exitor Cancel.
j) Return to the SAP Easy Access menu.
3. Check the e-mail informing you of a change in your mail inbox. This mailwas sent to you as you are entered as the administrator.
a) Office→ Work place→ Inbox
b) Select Unread Documents.
c) Check the document Change to Personnel Administrator for ...
d) �Personnel administrator PA## A## is responsible for employee305992## from DD.MM.YYYY. Previously this was the responsibilityof the personnel administrator ....�
e) Return to the SAP Easy Access menu.
Task 2:The following exercises are OPTIONAL:
1. Call the table for maintaining employee attributes. Which employeecharacteristics are assigned to your employee subgroup ##? Use the F1 helpto find out the meaning of the entries:
Unit SummaryYou should now be able to:� Explain the meaning of payroll area and payroll control record� Name important additional prerequisites for payroll� Define the structure of the organizational key� Store administrator responsible� Save statistical information about the employees within a company
Unit OverviewTo begin with, the meaning and functions of the features are discussed. Exercisesare then solved using examples whereby the ABKRS, PINCH and NUMKRfeatures have to be changed.
Unit ObjectivesAfter completing this unit, you will be able to:
� Control the default values using features in the system.
Lesson OverviewFunction and Advantages of Features
Maintaining features, which define default values for:
1. Payroll area2. Administrator group3. Number range intervals
Lesson ObjectivesAfter completing this lesson, you will be able to:
� Control the default values using features in the system.
Business ExampleTp prevent personnel administrators having to enter all the master data manually,you can define default values that are then automatically proposed by the system.
Default Values
Figure 75: Default Values
The system often uses features to determine default values. The system suggeststhese values when you maintain infotypes that affect employee master data.
For example, the ABKRS feature determines default values for the payroll area.It does this using the data found in the employee's Organizational Assignmentinfotype record. Another example is the LGMST feature. This feature defaultsthe wage types permitted for an employee in the Basic Pay infotype. This featureis discussed in the unit on the wage type structure.
Maintaining Features
Figure 76: Maintaining Features (1)
There are two ways to maintain features:
� You can access the feature decision tree from the Payroll or TimeManagement IMG (implementation guide) and then make your changes. Thesystem always displays the feature assigned to the IMG module.
� You can also use the feature maintenance transaction, PE03. The "Features:Initial Screen" appears.
Decision trees can be simple or very complex. This depends on their function andon the number of fields, operations, and decision criteria they contain.
Features are objects that query different personnel or data structure fields todetermine a certain return code or result. The system uses this value to definedefaults and to control certain system processes. Features can therefore enhancesystem flexibility.
You can use features for different purposes. The most important applications are:
� Features that define default values
The system often uses features to determine default values. The systemsuggests these values when you maintain infotypes that affect employeemaster data. The feature either delivers a default value directly - this is thenwritten to the relevant infotype field (for example, the ABKRS feature ->Organizational Assignment (infotype 0001)), or the feature delivers a keyentry as a return code, which the system can use to read one or more tables.The system takes the stored default values from these tables and entersthem in the relevant infotype, for example, Feature LGMST -> Basic Pay(infotype 0008).
Hint: The system always reads these default values when youcreate an infotype.
� Features that control system processes
The feature Pnnnn (nnnn stands for the infotype number) controls thesequence in which the system displays country-specific screens when youmaintain or display master data infotypes.
� Features that automatically generate mail messages
Some features automatically generate mail messages when you changecertain master data fields, for example, the various administrators in infotypeOrganizational Assignment (0001). Example: feature M0001.
Here, you can define default values for payroll areas for your employees. Thesystem defaults the payroll area when you maintain the master data in theOrganizational Assignment infotype (0001).
In the standard SAP system, the payroll area depends on the country grouping,the employee group, and the employee subgroup. The system stores this datacombination as a feature. This feature depicts a rule in a decision tree.
The system arranges the decision rule in the feature according to the followingorganizational data:
� Transaction class for data storage (TCLAS)
A = Administration
B = Recruitment
� Country grouping (MOLGA)� Employee subgroup (PERSK)
For example, the feature would suggest payroll area 99 for employee subgroupDZ. This applies to the country grouping 01 (Germany). The system suggests thisvalue as a default value in infotype 0001.
The value assignment in the table view appears as &Feature=Return code.
The PINCH feature determines an administrator group that is stored in theOrganizational Assignment infotype.
You can assign administrators to an administrator group as follows:
� Store the return code of the feature in the Group field.� Assign a three-character ID to each administrator.� Determine your administrator's name, form of address, telephone number
and user name (mail system).
If the return value of the PINCH feature is four asterisks (****), the systemuses the name of the personnel area to which the employee is assigned in the�Organizational Assignment infotype (0001)� as the name of the administratorgroup.
You can select the administrators stored in the system that belong to the defaultadministrator group. To do so, choose the F4 help in the relevant field in theOrganizational Assignment infotype.
You can also use a feature (NUMKR) to assign personnel numbers. This is alsobased on the organizational assignment.
There are two ways to assign a number range:
� Internal number assignment: In this instance, the SAP system assigns thepersonnel numbers.
� External number assignment: In this instance, the user assigns the personnelnumbers.
SAP recommends that you use the internal number assignment function.Matchcodes can use any criteria to search HR master records, and for this reasonyou do not need �meaningful� personnel numbers. This is also advantageouswhen you transfer or promote employees as it means that any �meaning� you mayhave assigned to a personnel number cannot be lost.
Exercise ObjectivesAfter completing this exercise, you will be able to:� Reduce data entry in master data by using features to define default values
Business ExamplePreviously, an administrator group for each personnel area was sufficient.However, your company is now growing so quickly that you need differentadministrator groups for individual employee subareas.
1. Return to IMG step Define Administrator, and copy the entry you made inthe last exercise (with administrator group PA##). Use this entry to create anadministrator group with the identification SG##.
Task 2:In the IMG, find the step Define Administrator Groups, in which you will findthe PINCH feature.
Open the �otherwise transaction class� and the query for personnel area.
1. First consider, using the logic for personnel area PA31, which entries youwould have to make to achieve the following:If an employee works in production, administrator group SG31 should bedefaulted. For all other employees, administrator group PA31 should bedefaulted.What entries do you have to make?Then compare your solution with the solution that is already defined inyour personnel area PA##.
2. Also create the solution you found for your own personnel area PA## forpersonnel area PA31.
1. Return to IMG step Define Administrator, and copy the entry you made inthe last exercise (with administrator group PA##). Use this entry to create anadministrator group with the identification SG##.
Answer: IMG path: Personnel Management→ Personnel Administration→ Organizational Data→ Organizational Assignment→ DetermineAdministratorSelect the entry with administrator group �PA##�, administrator �A##�, andyour SAP user name �HR305-##�.Choose Copy as. Overwrite the group �PA##� with �SG##�, and then chooseCopy and Save.Save your data and return to the IMG.
Task 2:In the IMG, find the step Define Administrator Groups, in which you will findthe PINCH feature.
Open the �otherwise transaction class� and the query for personnel area.
1. First consider, using the logic for personnel area PA31, which entries youwould have to make to achieve the following:
If an employee works in production, administrator group SG31 should bedefaulted. For all other employees, administrator group PA31 should bedefaulted.
What entries do you have to make?
Then compare your solution with the solution that is already defined inyour personnel area PA##.
� A new query after the personnel subarea� If the personnel subarea = 0004, the return value should be SG31� Otherwise, the return value should be �PA31� or �****�.
2. Also create the solution you found for your own personnel area PA## forpersonnel area PA31.
a) To change the �PINCH� feature, proceed as follows:
b) Search for personnel area (WERKS) PA31 under transaction class(TCLAS) �otherwise�.
c) Position your cursor on PA31 on the return value �****�, and chooseDelete. Confirm the Delete node/sub-tree dialog box by choosing�Yes�.
d) Position the cursor on the PA31 node and select the function Createnodes. The Otherwise: Choose node type for new nodes dialog boxappears. Set the Field for decision operation indicator and confirmby choosing Enter.
e) In the Field selection for decision operation dialog box, select theBTRTL Personnel subarea field, and confirm with Transfer.
f) Position your cursor on the newly created BTRTL node and performthe Create function.
g) The Personnel subarea dialog box appears. Here, select Personnelsubarea 0004 in personnel area PA31, and confirm with Enter.
h) Position your cursor on the 0004 node and choose Create. In thesubsequent dialog box that appears, confirm the Return value defaultsetting with Enter.
i) The system displays the Return value for field value 0004 dialog box.Here, enter the value �SG31�, and choose Transfer.
j) Position your cursor on the otherwise node and choose Create. In thesubsequent dialog box that appears, confirm the Return value defaultsetting with Enter.
k) The system displays the Return value for field value otherwise dialogbox. Here, enter the value �****�, and choose Transfer. This ensuresthat administrator group PA31 is the default for all other personnelsubareas of personnel area PA31.
l) After you have changed the �PINCH� feature, choose the Check featurefunction. The system should display the message �Decision tree iserror-free�.
Task 3:Call the Organizational Assignment infotype (0001) again for your employeewithin the HR305 hiring action. Make a note of the default values:
1. Defaulted administrator group: __________
Personnel administrator: __________
Save the infotype and end the hiring action.
Answer: SG##A##Proceed as follows:Human Resources→ Personnel Management→ Administration→ HRMaster DataChoose Personnel Actions. Enter the personnel number �305992##�.Select the Hiring HR305 personnel action.Choose Execute.Choose Execute infogroup to restart the hiring action.Choose Next record until you reach the Organizational Assignment infotype(0001).Use the possible entries function for the Personnel, Time Recording, andPayroll administrator fields.Save the infotype and end the hiring action.Choose Save and leave the hiring personnel action by selecting Exit.Return to the SAP Easy Access menu.
Task 4:
1. What is the central transaction for calling feature maintenance?
Answer: PE03
Task 5:
1. What is the feature that defaults the payroll area in infotype 1 called?
Answer: ABKRS
2. What is the feature called that defaults the number range for the personnelnumber assignment?
Unit OverviewThe Personal Data, Addresses, and Bank Details infotypes are discussed in thissection. This occurs within the context of a hiring action, whereby the mostimportant Customizing settings are also discussed.
Unit ObjectivesAfter completing this unit, you will be able to:
Lesson ObjectivesAfter completing this lesson, you will be able to:
� Review personal data of an employee.
Business ExampleAn employee's personal data is stored in pre-defined infotypes.
Company-specific modifications may also be necessary in Customizing.
Personal Data
Figure 82: 1) Personal Data
In the first data group, enter all the data regarding the employee's name. Thisincludes the form of address, the last and first name, any second names or birthnames, as well as the title, and the initials. You should also enter details of anyacademic titles, prefixes, and affixes that the employee may have.
Birth data:This data group consists of the employee's date and place of birth, as well as thenationality and language.
Marital status/religion:The third data group contains data such as the number of children, the employee'smarital status, and in some countries, the employee's religion.
You do not have to enter the employee's family members into the system,therefore, the system does not check to see that the number of children enteredin the Personal Data infotype is the same as the actual number entered in theFamily infotype (0021).
Addresses
Figure 83: 2) Addresses
Foreign addresses:The different country versions have their own entry screens for the Addressesinfotype (0006). When you create an address, the system chooses the countryentry screen that corresponds to the country of the personnel area to which theemployee is assigned in the Organizational Assignment infotype (0001).
If you want to use a different country screen to the one suggested by the system,use the Foreign address function to choose a different screen. You can find thisfunction on the entry screen for the Addresses infotype.
Exercise ObjectivesAfter completing this exercise, you will be able to:� Maintain personal data of your employee
Business ExampleEfficient personnel administration requires a range of maintainable employeepersonal data. You have already checked your Customizing settings and now wantto update the data for your new employee accordingly.
Task 1:
1. Return to the Hiring HR305 action and fill the Personal Data (0002),Addresses (0006) and Bank Details (0009) infotypes for employee 305992##(## = group number) with entries of your choice.
Hint: If you enter details on a spouse, or children, a dynamic actionin the system may require additional data. In this case, make therelevant entries, save the data in the infotypes, and continue withthe hiring action.
After you have maintained and saved the entries in these infotypes, STOPthe hiring personnel action by selecting �Exit�.
Task 2:
1. Use your project IMG to answer the following question:
What is the IMG path for modifying the marital status?
1. Return to the Hiring HR305 action and fill the Personal Data (0002),Addresses (0006) and Bank Details (0009) infotypes for employee 305992##(## = group number) with entries of your choice.
Hint: If you enter details on a spouse, or children, a dynamic actionin the system may require additional data. In this case, make therelevant entries, save the data in the infotypes, and continue withthe hiring action.
After you have maintained and saved the entries in these infotypes, STOPthe hiring personnel action by selecting �Exit�.
a) Human Resources→ Personnel Management→ Administration→HR Master Data
b) Select Personnel Actions.
c) Enter the personnel number 305992##.
d) Select the Hiring HR305 personnel action. Choose Execute.
e) Choose Execute infogroup to restart the hiring action.
f) Choose Next record until you reach the Create Personal Data (Infotype0002) screen.
g) Make entries of your choice in the required fields and save your data.
h) Choose Next record until you reach the Create Addresses (infotype0006) screen.
i) Make entries of your choice in the required fields and save your data.
j) Choose Next record until you reach the Create Bank Details (infotype0006) screen.
k) Make entries of your choice in the required fields and save your data.
l) Choose Exit and return to the SAP Easy Access menu.
Task 2:
1. Use your project IMG to answer the following question:
Unit OverviewThe Planned Working Time and Basic Pay infotypes and how they are linkedis discussed in this section. Data inheritance is discussed within the context ofthe hiring action.
Unit ObjectivesAfter completing this unit, you will be able to:
� Describe how the working time stored in the Planned Working Time infotype(0007) is related to the payroll-relevant data stored in the Basic Pay infotype(0008).
� Explain the relevance of this information for payroll
Unit ContentsLesson: Links Between Planned Working Time and Basic Pay ... . . . . . . .174
Exercise 12: Links Between Planned Working Time and Basic Pay 181
Unit 9: Links Between Planned Working Time and Basic Pay HR305
Lesson: Links Between Planned Working Time andBasic Pay
Lesson OverviewContents:
� Infotype 0007: Planned Working Time� Relationship between the Planned Working Time and Basic Pay infotypes� Consequences for Payroll
Lesson ObjectivesAfter completing this lesson, you will be able to:
� Describe how the working time stored in the Planned Working Time infotype(0007) is related to the payroll-relevant data stored in the Basic Pay infotype(0008).
� Explain the relevance of this information for payroll
Business ExampleThe employees in your company have specific working times. Attendances andabsences can be calculated using these as a basis.
Working times also play an important role in an employee's pay. Here we makethe distinction between payment on an hourly basis, and payment for a specifiedperiod (for example, a month).
HR305 Lesson: Links Between Planned Working Time and Basic Pay
Employee Working Time
Figure 85: Employee Working Time
You assign each employee to a work schedule. The working time stored forthis work schedule is important for the employee's pay, as well as for countingattendances and absences.
In the first step, record the working time information in the Planned WorkingTime and Basic Pay infotypes.
In the second step, attendance/absence calculation and payroll accesses thisinformation.
Unit 9: Links Between Planned Working Time and Basic Pay HR305
Planned Working Time
Figure 86: Planned Working Time
The system stores an employee's working time as a work schedule rule in thePlanned Working Time infotype (0007). The system also stores the averageworking hours here. The Monthly working hours field contains the total plannedworking time for the current month.
HR305 Lesson: Links Between Planned Working Time and Basic Pay
Links Between Planned Working Time and Basic Pay
Figure 87: Links Between Planned Working Time and Basic Pay
The system takes the employment percentage and the average number of workinghours from infotype 0007 and suggests them as default values for the capacityutilization level and the working hours per period in infotype 0008.
Employee Subgroup Grouping for PersonnelCalculation Rule
Figure 88: Employee Subgroup Grouping for Personnel Calculation Rule
Unit 9: Links Between Planned Working Time and Basic Pay HR305
The distinction is made between employees that are paid on an hourly basis andemployees whose pay is based on the number of hours they work per period (forexample, salaried).
To realize this difference in the system, you can set up employee subgroupgroupings for personnel calculation rules and as a result, the system treatsemployees differently in payroll. The meaning of the groupings is fixed andcannot be deleted (for example, hourly wage earners: 1, salaried employees: 3).
Figure 89: Calculation Example 1: Calculating Overtime Rate for a SalariedEmployee
This is an example of how a personnel calculation rule works for a salariedemployee.
HR305 Lesson: Links Between Planned Working Time and Basic Pay
Figure 90: Calculation Example 2: Calculating Overtime Rate for an HourlyWage Earner
The system uses the same personnel calculation rule to determine an overtime ratefor an hourly wage earner. However, as a result of the employee subgroup groupingfor the personnel calculation rule (for an hourly wage earner, 1), the personnelcalculation rule �knows� that the working hours may not be divided per period.
HR305 Lesson: Links Between Planned Working Time and Basic Pay
Exercise 12: Links Between PlannedWorking Time and Basic Pay
Exercise ObjectivesAfter completing this exercise, you will be able to:� Explain the meaning of the grouping of employee subgroups and the
relationship between planned working time and basic pay
Business ExampleOur enterprise now has several different employee subgroups, which should betreated similarly for payroll purposes. This means that you have to group togetheryour employee subgroups for personnel calculation rules. You will also have anoverview of the links between planned working time and basic pay.
Task:Do the following exercises:
1. In the IMG under Basic Pay, check that the correct grouping for personnelcalculation rules has been assigned to your employee subgroup.
2. What are the possible entries for the grouping for personnel calculationrules? Has the correct grouping been assigned to your employee subgroup?
4. Return to the Hiring HR305 personnel action and create the Planned WorkingTime infotype (0007). Select the NORM work schedule rule. Before you saveyour entries, choose Enter. Note what happens after you choose Enter:
5. After you save your entries, the system displays the Create Basic Pay screen(infotype 0008). This is part of the hiring action. Note the following defaultvalues:
a) A distinction is made between employees who are paid on an hourlybasis, and those paid on the basis of their average working time perperiod. The possible entries for the personnel calculation rule are asfollows:
1 = Hourly wage earners
2 = Employees with periodic payment (such as monthly wage earners)
3 = Salaried employees
4 = Special payment group - for German public sector only
b) Check to see whether the following entry exists: Employee group 1,Employee subgroup ##, and PCR grouping 1.
c) Note: This entry was created when you copied your employeesubgroup.
3. Should you change the meaning of the groupings, so that 1 is used forsalaried employees, and 3 for industrial employees, for example?
a) No. The meaning of the above personnel calculation rules is fixedin the system, and should NOT be changed. The only change youcan make is to the assignment of groupings for personnel calculationrules to each employee subgroup.
4. Return to the Hiring HR305 personnel action and create the Planned WorkingTime infotype (0007). Select the NORM work schedule rule. Before you saveyour entries, choose Enter. Note what happens after you choose Enter:
a) Human Resources→ Personnel Management→ Administration→HR Master Data
b) Select Personnel Actions.
c) Enter the personnel number 305992##.
d) Select Hiring HR305.
e) Choose Execute.
f) Choose Execute infogroup to restart the hiring personnel action.
g) Choose Next Record until you reach Create Planned Working Time(infotype 0007).
h) Enter the NORM work schedule rule and choose Enter.
i) The system automatically reads the working times from the workschedule.
j) Save the data.
5. After you save your entries, the system displays the Create Basic Pay screen(infotype 0008). This is part of the hiring action. Note the following defaultvalues:
The values for the capacity utilization level and the working timeper period originate from the values for employment percentage andmonthly working hours from the Planned Working Time infotype.
Unit OverviewTo begin with, parts of the remuneration structure are examined. The options forautomatically defining default pay scale type and pay scale area are discussed inthis section.
Unit ObjectivesAfter completing this unit, you will be able to:
� Create the regional, industry-specific, financial, and time-related aspects ofthe remuneration structure.
� Define the control parameters depending on the employee subgroup andpersonnel subarea.
In the Basic Pay infotype, you can set the remuneration type to pay scale or salaryusing the Change Remuneration Type option in the Edit menu. The remunerationtype can also be defaulted using the TARIF feature.
If you want to use a salary structure, refer to the courses on CompensationManagement.
If you want to evaluate wage types indirectly (see next unit), you must build a payscale structure (Table T510) because the system also uses this pay scale structureto evaluate wage types indirectly if you use salary structures. The followinggraphics and notes clarify how to create this pay scale structure.
Pay Scale Structure
Figure 92: Overview: Pay Scale Structure
The remuneration structure includes information on regional (geographic) aspects,as well as data on specific industries, times, and finances. However, you mustmake a differentiation between pay scale employees and salaried employees.
You assign an employee to a remuneration structure when you create the BasicPay infotype (0008) for the employee.
You store an employee's pay scale data in the Basic Pay infotype (0008).
Even if you do not have collective agreement provisions at your company andemployees negotiate their pay when you hire them, you must still define a payscale type and pay scale area, an employee grouping for collective agreementprovision, and a pay scale group. You must make an entry in these fields ininfotype 0008 and there must be at least one entry in the relevant tables.
Figure 94: Depicting Pay Scale Data in the SAP System
At your company, employees' pay is regulated by a number of collective agreementprovisions. The differences are based on location (pay scale areas).
The collective agreement provisions determine how much you pay the employees.
You use the pay scale groups and pay scale levels to depict the different paymentsin the system.
The individual IMG steps for setting up the remuneration structure in the SAPsystem appear on the right of the graphic.
Employee Subgroup Groupings for CollectiveAgreement
Figure 95: Employee Subgroup Groupings for Collective Agreement
The employee subgroup grouping for the collective agreement provision allowsyou to assign different employees to different pay scale groups. You can use theCustomizing functions to group employee subgroups.
The SAP system contains the following groupings as standard:
Figure 96: Defining Pay Scale Type and Pay Scale Area
Pay Scale Type
In the SAP system, pay scale types are two-character keys defined for each region.You must maintain the pay scale types when you set up your system.
Pay Scale Area
The pay scale area represents the geographical region to which a pay scale orcollective agreement applies. In the SAP system, pay scale areas are two-characterkeys that are defined for each region. You maintain pay scale areas when youset up your system.
Default Values for Pay Scale Type and Pay Scale Area
Figure 97: Assigning Pay Scale Type/Pay Scale Area to Personnel Subarea
You can assign the pay scale type and the pay scale area to the various personnelsubareas using the IMG table �Check Assignment of Pay Scale Structure toEnterprise Structure�.
Figure 98: Default Pay Scale Data Using Feature TARIF
You can define default values using the pay scale type and pay scale area assignedto the personnel subarea, or with a decision rule.
You can define default values for different pay scale types and pay scale areasin the Basic Pay infotype (0008) for employees with different organizationalassignment data.
You must enter the return value in the following format: xx/yy/z, where xx isthe pay scale type, yy is the pay scale area, and z describes the type of plannedremuneration (Organizational Management infotype (1005)). By specifyingthe type of planned remuneration, you can record information on salary andremuneration structures. In this way, the system can propose data for the payscale type and pay scale area depending on the position currently occupied bythe employee.
Pay Scale Table
Figure 99: Pay Scale Groups and Pay Scale Levels
The enterprise and personnel structure determine which pay scale group and payscale level view appears in infotype 0008.
You define pay scale groups and pay scale levels for each country grouping,pay scale type, pay scale area, and employee subgroup grouping for collectiveagreement provision.
Pay scale groups are used for scheduling job evaluations and indirect valuations.
Pay scale groups are divided into pay scale levels.
Exercise ObjectivesAfter completing this exercise, you will be able to:� Depict the pay scale structures to be used for production employees.
Business ExampleProduction employees in pay scale level 01 receive an hourly wage of EUR 15, aswell as bonuses of EUR 2, EUR 3, and EUR 4 in each subsequent level.
Task 1:Do the following exercises:
1. In the IMG (under Basic Pay), check the grouping for collective agreementprovision for your employee subgroup ##. Your grouping is:
Task 2:You want to assign a pay scale type and pay scale area to your productionemployee in personnel area PA## and personnel subarea Production 0004.
1. Check the list of pay scale types. You want to use pay scale type 90 CABCompany for your employee. You do not need to create a new pay scale type.
2. Create a pay scale area to be used exclusively for your own personnelsubarea. Create pay scale area 70+## (for example, 71 for group 01), andname it Production area ##. Your pay scale area is called:
3. In the appropriate Customizing table, assign the pay scale type and pay scalearea to your personnel subarea in personnel area PA##.
4. Create a pay scale table. Use the data from the business scenario (see above)and the grouping for collective agreement provision to which your employeesubgroup ## is assigned (refer to exercise 1):
Grpg PS group Lv. Start date End date AmountGR## 01 01.01.2005 31.12.9999 15,00GR## 02 01.01.2005 31.12.9999 17,00GR## 03 01.01.2005 31.12.9999 18,00GR## 04 01.01.2005 31.12.9999 19,00
1. If you now create the Basic Pay infotype for your employee 305992##, youwill see that the values for pay scale type and pay scale area are defaultedfrom the table Check Assignment of Pay Scale Structure to EnterpriseStructure.
This is because the TARIF feature is deactivated. Call the TARIF feature.How can you recognize that the feature is deactivated?
What entries would you have to make to have the system propose pay scaletype 90 and your pay scale area 70+## as default values for your employeeaccording to employee subgroup?
Do not activate or save the feature.
Task 4:Do the following exercises:
1. Go to master data maintenance to create a new record for the Basic Payinfotype. Check the default values for the pay scale type and pay scale area.Select GR##, Level 01 as the pay scale group and pay scale level. Finally,choose Exit to leave the Basic Pay infotype (0008) WITHOUT saving yourentries.
Solution 13: Remuneration StructureTask 1:Do the following exercises:
1. In the IMG (under Basic Pay), check the grouping for collective agreementprovision for your employee subgroup ##. Your grouping is:
a) IMG: Personnel Management→ Personnel Administration→ PayrollData→ Basic Pay→ Define EE Subgroup Grouping for PCR andColl.Agmt.Prov.
b) In the Determine Work Area: Entry dialog box, make sure that countrygrouping 99 is displayed.
c) Check to see whether the following entry exists: Employee group 1,employee subgroup ##, and ESG for PCR 1.
Task 2:You want to assign a pay scale type and pay scale area to your productionemployee in personnel area PA## and personnel subarea Production 0004.
1. Check the list of pay scale types. You want to use pay scale type 90 CABCompany for your employee. You do not need to create a new pay scale type.
a) IMG: Personnel Management→ Personnel Administration→ PayrollData→ Basic Pay→ Check Pay Scale Type
b) Pay scale type: 90, Pay scale type text: CAB Company
2. Create a pay scale area to be used exclusively for your own personnelsubarea. Create pay scale area 70+## (for example, 71 for group 01), andname it Production area ##. Your pay scale area is called:
a) IMG: Personnel Management→ Personnel Administration→ PayrollData→ Basic Pay→ Check Pay Scale Type
b) Select New entries.
c) Enter 70+## for the pay scale area, and Production area ## for thepay scale area text.
3. In the appropriate Customizing table, assign the pay scale type and pay scalearea to your personnel subarea in personnel area PA##.
a) IMG: Personnel Management→ Personnel Administration→ PayrollData→ Basic Pay→ Check Assignment of Pay Scale Structure toEnterprise Structure
b) Change your entry as follows:
c) Pers.area: PA##, Personnel subarea: 0004, P.Scale Area 70+##, P.scaletype 90
d) Save your data and return to the IMG.
4. Create a pay scale table. Use the data from the business scenario (see above)and the grouping for collective agreement provision to which your employeesubgroup ## is assigned (refer to exercise 1):
Grpg PS group Lv. Start date End date AmountGR## 01 01.01.2005 31.12.9999 15,00GR## 02 01.01.2005 31.12.9999 17,00GR## 03 01.01.2005 31.12.9999 18,00GR## 04 01.01.2005 31.12.9999 19,00
a) IMG: Personnel Management→ Personnel Administration→ PayrollData→ Basic Pay→ Revise Pay Scale Groups and Levels
b) In the Determine Work Area: Entry dialog box, enter 99 for the Countrygrouping, 90 for the Pay scale type, and 70+## for the pay scale area.
c) Select New entries.
d) Create the following entries:
Grpg PS group Lv. Start date End date Amount1 GR## 01 01.01.2005 31.12.9999 15,001 GR## 02 01.01.2005 31.12.9999 17,001 GR## 03 01.01.2005 31.12.9999 18,001 GR## 04 01.01.2005 31.12.9999 19,00
1. If you now create the Basic Pay infotype for your employee 305992##, youwill see that the values for pay scale type and pay scale area are defaultedfrom the table Check Assignment of Pay Scale Structure to EnterpriseStructure.
This is because the TARIF feature is deactivated. Call the TARIF feature.How can you recognize that the feature is deactivated?
What entries would you have to make to have the system propose pay scaletype 90 and your pay scale area 70+## as default values for your employeeaccording to employee subgroup?
a) IMG: Personnel Management→ Personnel Administration→ PayrollData→ Basic Pay→ Determine Default for Pay Scale Data
b) The Process feature TARIF: Decision tree screen appears
c) To change the TARIF feature in tree maintenance, you would have tocomplete the following processing steps:
d) Position the cursor on the PERSK node in employee group Active, andselect the Create nodes function. In the Values for PERSK screen, enter## (## is your new employee subgroup). Then select Transfer.
e) Position the cursor on the new node and select Create nodes.
f) Accept the Return value default setting in the following screen andconfirm by choosing Enter. In the Return value for field value ##screen that appears, enter 90/70+## (for example, 90/71 for group01) and select Transfer.
Do not activate or save the feature.
Hint: (USA and Canada) If your payroll period is not monthly,you will need to set up the pay scale rule Pay Scale Assignment→ Periods for the Payroll Period.
IMG: Personnel Management→ Personnel Administration→ Payroll Data→ Basic Pay→ Set up payroll period forcollective agreement provision
Hint: (USA and Canada) If you do not use an annual salarycalculation, you must define a salary area for each pay scalegroup and pay scale level.
1. Go to master data maintenance to create a new record for the Basic Payinfotype. Check the default values for the pay scale type and pay scale area.Select GR##, Level 01 as the pay scale group and pay scale level. Finally,choose Exit to leave the Basic Pay infotype (0008) WITHOUT saving yourentries.
a) Human Resources→ Personnel Management→ Administration→HR Master Data
b) Choose Maintain.
c) Enter the personnel number 305992##.
d) Select the Basic Pay infotype, and choose Create.
e) The default for pay scale type/pay scale area should be: 90 / 70+##
f) Enter GR## for the pay scale group, and 01 for the pay scale level.
g) Leave the Basic Pay (0008) infotype WITHOUT saving your entries(choose Exit) and return to the main menu.
Unit OverviewSelected wage types are copied using the wage type copier. These wage types aremade permissable using certain Customizing settings for certain infotypes andemployees. The dialog characteristics of wage types and the indirect valuationof wage types is also discussed in this section. Finally, the necessary steps aredescribed that are necessary for the system to automatically propose wage types.
Unit ObjectivesAfter completing this unit, you will be able to:
� Explain the meaning of wage types in SAP� Copy wage types and know what one must pay attention to when copying
wage types� Identify the control indicators that are used to determine to whom the wage
type can be assigned, when it can be assigned, and how often.� Specify the dialog characteristics of the wage types� Know how wage types can be valuated indirectly by the system� Set wage types as defaults for an employee with the help of the LGMST
feature and a wage type model, depending on the enterprise and personnelstructure
Lesson OverviewCopy wage typesPermissibility of wage types for:
� Certain infotypes� Certain employee subgroups and/or personnel subareas
Lesson ObjectivesAfter completing this lesson, you will be able to:
� Explain the meaning of wage types in SAP� Copy wage types and know what one must pay attention to when copying
wage types� Identify the control indicators that are used to determine to whom the wage
type can be assigned, when it can be assigned, and how often.
Business ExampleNew wage types must be created in your company.
You should become familiar with wage types and customize the copied wagetypes so that they are only allowed in the Basic Pay infotype for certain employeesubgroups.
Wage types are the key element in the wage type structure. Wage type is themost important concept in Human Resources. You use wage types to assignpayments and deductions, as well as to control the Payroll program. You use wagecharacteristics to distinguish the individual wage types.
You must assign all wage types to a wage type group. This is also true foruser-defined wage types. You have to assign wage types to wage type groups sothat you can work with the Implementation Guide (IMG). In the ImplementationGuide, you only perform wage type maintenance for the wage types required inthat particular section of the IMG. You select these wage types according to wagetype group. This means that you can only use the IMG to maintain wage types thathave been assigned to wage type groups.
If the wage types have not been assigned to a wage type group, they do not appearin the wage type maintenance in the IMG.
Dialog Characteristics
Figure 103: Dialog Characteristics of the Payment Structure in the SAPSystem
To ensure that the employees in your company receive the correct payment, youneed to define different wage types.
The IMG steps that you must perform to define dialog wage types appear on theright, using the steps required for basic pay as an example.
You must create wage types before an employee's pay can be calculated.
Wage types have the following functions:
� Permissibility check for wage and salary types
� For each personnel area and personnel subarea� For each employee group and employee subgroup� For each infotype: if an infotype has a subtype that is a wage type, the
time constraint determines how often a wage type can be available atany one time.
The operation indicator controls whether a wage type is a payment or a deduction.
The input combination controls which of the fields must be filled when you entera wage type � amount, number, unit of time/measurement.
A wage type can be valuated indirectly if you enter a module name, modulevariant and a rounding indicator. The system then automatically reads the amountfrom the corresponding tables and you do not need to enter and store it in theBasic Pay infotype (0008).
The SAP system contains sample wage types. These sample wage types meetsome of your company's requirements. You can use the wage type copier to copythe SAP sample wage types. You then use these copies as your wage types andcan modify them so that they meet your specific requirements.
All model wage types start with a letter. Your own wage types, in other words thecopies of model wage types, must start with a number.
When you copy the wage types, make sure that you copy the model wage typecharacteristics that determine how the wage types behave in dialog, as well as thecharacteristics that determine how the wage types behave in payroll.
You can check and modify the characteristics relevant for payroll when you carryout the payroll Customizing activities.
The wage types that you create via the copy method are included in all of the wagetype groups and tables as the original wage type from which you copied. You canuse the log to check what was copied.
Figure 107: Checking the Individual Steps of the Copy Procedure
You have now copied the wage types. You now need to check the individual tablesto which the customer wage types were copied.
You can check and modify the dialog characteristics in the subsequent customizingsteps.
Permissibility of Wage Types in Infotypes
Figure 108: Defining Wage Type Permissibility for Infotypes
In the IMG, you can determine which wage types can be entered in the differentinfotypes. You can make settings in Customizing so only certain wage types arepermissible for infotypes. If you could select all wage types in all infotypes, thiswould result in incorrect input data and mean that you are constantly searching forthe correct wage type.
If you copy a wage type for an infotype using �Create wage type catalog�, thesystem copies all the characteristics belonging to the wage type you are copying.This also applies to the wage type permissibility for an infotype.
Figure 109: Wage Type Permissibility for Several Infotypes
If you want to use a wage type in several infotypes, then you must enter it in thepermissibility tables of the respective infotypes.
Figure 110: Input Frequency for Wage Types in Infotypes
When you simply configure a wage type, you can determine whether it can beentered once or more than once per payroll period.
Permissibility of Wage Types for Certain EmployeeSubgroups / Personnel Subareas
Figure 111: Employee Subgroup Grouping for Primary Wage Type
You can use personnel subarea groupings for primary wage types to define wagetype permissibility for a specific enterprise structure, or employee subgroupgroupings for primary wage types to define wage type permissibility for apersonnel structure.
� Defining employee subgroups for primary wage types means that you groupyour employee subgroups.
� You can use these groups to determine which wage types can be enteredfor which employees.
Figure 112: Personnel Subarea Groupings for Primary Wage Types
You can now also group your personnel subareas. This enables you to control thewage type permissibility for each personnel subarea.
When you group your personnel subareas, you can use both employee subgroupsand personnel subareas as the grouping basis, or you can limit yourself to oneof the options.
Figure 113: Wage Type Permissibility for Each Personnel Subarea andEmployee Subgroup
In the last step, you specify whether a wage type is permissible for your personnelsubarea grouping and your employee subgroup grouping. You can use the criterionPersonnel Structure and/or the criterion Enterprise Structure.
Exercise ObjectivesAfter completing this exercise, you will be able to:� Set up customer wage types
Business ExampleThe SAP system contains a number of model wage types. You must copy thesewage types, as productive systems can only use customer-specific wage types. Inthe following exercises, you will set up three wage types, which you will use foryour employees in the Basic Pay infotype (0008).
Task 1:
1. Process the wage type catalog in the IMG: Copy the Standard hourly pay(MM10), the Standard Bonus (MM20), and the Performance Bonus (%)(MM30) to create customer wage types that start with your group number(##10, ##20, and ##30). Enter a text for the new wage types that includesyour group number.
When you create a copy, the system displays all tables that are affected.Record these:
________________________ _______________________
________________________ _______________________
________________________ _______________________
________________________ _______________________
________________________ _______________________
2. Check the wage type group for Basic Pay to ensure that it contains yournew wage types. Check the wage type text too, so you can make changesto it if necessary.
3. Check the entry permissibility of your wage types for the Basic Pay infotype.Why are your wage types already permitted for this infotype?
5. Make sure that no grouping for primary wage types is assigned to yourpersonnel subarea 0004 in personnel area PA##.
6. Ensure that the permissibility of each wage type for each personnel subareaand employee subgroup has been set up correctly for your copied wage types.These wage types should be permitted for the employee assigned to personnelsubarea 0004 in personnel area PA##, and to employee subgroup ##.
Task 2:The following exercises are optional
1. Create 5 copies of wage type MM10. Use the option of copying wagetypes to do so.
Your wage types should have the following numbers: ##60, ##62, ##64,##66 and ##68. Choose a name of your choice that contains your groupnumber. Then exit the wage type copier.
2. You later realize that there is a typing error in the name of wage type ##62.You need to correct this error.
1. Process the wage type catalog in the IMG: Copy the Standard hourly pay(MM10), the Standard Bonus (MM20), and the Performance Bonus (%)(MM30) to create customer wage types that start with your group number(##10, ##20, and ##30). Enter a text for the new wage types that includesyour group number.
When you create a copy, the system displays all tables that are affected.Record these:
2. Check the wage type group for Basic Pay to ensure that it contains yournew wage types. Check the wage type text too, so you can make changesto it if necessary.
a) IMG: Personnel Management→ Personnel Administration→ PayrollData→ Basic Pay→ Wage Types→ Check Wage Type Group 'BasicPay'.
b) Check the entries for your wage types ##10, ##20, ##30.
c) IMG: Personnel Management→ Personnel Administration→ PayrollData→ Basic Pay→ Wage Types→ Check Wage Type Catalog→Check Wage Type Text
d) Here, you can still make changes to the wage type text.
e) Return to the IMG.
3. Check the entry permissibility of your wage types for the Basic Pay infotype.Why are your wage types already permitted for this infotype?
5. Make sure that no grouping for primary wage types is assigned to yourpersonnel subarea 0004 in personnel area PA##.
a) IMG: Personnel Management→ Personnel Administration→ PayrollData→ Basic Pay→Wage Types→ Employee Subgroups for PrimaryWage Type
b) Check the data and return to the IMG.
6. Ensure that the permissibility of each wage type for each personnel subareaand employee subgroup has been set up correctly for your copied wage types.These wage types should be permitted for the employee assigned to personnelsubarea 0004 in personnel area PA##, and to employee subgroup ##.
a) IMG: Personnel Management→ Personnel Administration→ PayrollData→ Basic Pay→ Wage Types→ Check Wage Type Catalog→Determine Wage Type Permissibility for each PS and ESG
b) Select wage types ##10, ##20, and ##30, and choose Details. Foreach of your wage types, use Next entry to check that 1 is valid for theemployee subgroup grouping. In other words, check that each wagetype has the number 1 assigned to it.
c) Return to the IMG.
Task 2:The following exercises are optional
1. Create 5 copies of wage type MM10. Use the option of copying wagetypes to do so.
Your wage types should have the following numbers: ##60, ##62, ##64,##66 and ##68. Choose a name of your choice that contains your groupnumber. Then exit the wage type copier.
a) IMG: Personnel Management→ Personnel Administration→ PayrollData→ Basic Pay→ Wage Types→ Create Wage Type Catalog.
b) In the Wage Type Maintenance dialog box, select the Copy function.
c) Select Continue.
d) Select wage type MM10 and choose Copy 1 WT.
e) Your wage types should have the following numbers: ##60, ##62,##64, ##66, and ##68.
f) In the dialog box that appears, enter the value ##60 in the Wage typestarts at field, the value 5 in the Number of wage types field, and thevalue 2 in the Increase each step field.
g) Choose a name of your choice that contains your group number.Correct the names in the tables shown.
h) Deactivate the Test run option and choose Copy
i) Then exit the wage type copier.
2. You later realize that there is a typing error in the name of wage type ##62.You need to correct this error.
a) IMG: Personnel Management→ Personnel Administration→ PayrollData→ Basic Pay→ Wage Types→ Check Wage Type Catalog→Check Wage Type Text
You can define the following wage type characteristics:
� Validity period� Operation indicator� Minimum and maximum wage type amount, if applicable� Whether or not the wage type amount should be included in the basic pay
total� Default units of time/measurement, minimum and maximum number� Input combinations for number and amount� Indirect valuation and its characteristics
If you intend to implement the HCM Personnel Time Management component,you must also define the wage type as a bonus or a basic hourly pay wage type.
Indirect Valuation of Wage Types
Figure 115: Valuation of Wage Types
Direct valuation:
� The amount that is to be used to valuate the wage type, is entered in theinfotype manually.
� The system automatically calculates the wage type amount and enters itin the infotype. In this case, the system imports and calculates the wagetype amount from the table and you do not have to enter it manually. If thevaluation table changes, the system automatically changes the HR masterdata record in accordance with the start or end date. This avoids mass datachanges.
� The system can perform indirect valuation for the following infotypes:
Figure 117: Module for Wage Type Characteristics (Indirect Valuation)
Different modules read different valuation tables. Explanation of the individualmodules:
As of Release 4.6C, you can
� Adapt SAP standard modules to meet your enterprise-specific requirements� Create your own modules with specific calculation guidelines
You can use the following tools:
� Indirect Valuation Modules table (T511V_M)� Here, you can define your own customer-specific module� Business Add-In (BAdI) HR: Indirect Valuation of Wage Types
(HR_INDVAL).� This BAdI creates or changes the calculation guideline for an indirect
valuation module.
You can find further information in the Implementation Guide (IMG) forPersonnel Administration under
The module TARIF has four variants (A - D), which have the following meaning:
� A Valuation is based on the pay scale group and level� B Valuation is based on pay scale group/level and specific wage type� C Valuation does not depend on pay scale level� D Valuation does not depend on pay scale group or level
Figure 120: TARIF Module in �Recurring Payments/Deductions� Infotype
You can use modules for indirect valuation in other infotypes.
The example in the graphic shows how indirect valuation in the �RecurringPayments/Deductions� infotype helps determine how much vacation allowancean employee should receive.
The system calculates certain wage types as a percentage of other wage types.
You can use two modules for indirect valuation. Both of these modules are basedon how you set up the Base Wage Type Valuation table.
In the IMG structure, choose:Personnel Management → Personnel Administration →Payroll Data→ Basic Pay→ Wage Types→ Define valuation of base wage types
In the above example, either one of the following applies:
� SUMMEThe amount for wage type 4 should consist of 20% of wage type 1, 30% ofwage type 2, and 20% of wage type 3.
� PRZNTThe amount for wage type 4 should now consist of 20% of wage type 1, 30%of wage type 2, and 20% of wage type 3. In addition, the systemshould also multiply this amount by a percentage you enter in theBasic Pay infotype, in this case, 10%.
In Define Valuation of Base Wage Types, you must specify which wage types thesystem is to use to calculate the percentage bonus (PRZNT). A distinction is madebetween direct and indirect variants.
� In the direct variant, you must enter the wage types the system is to use as avaluation basis in the infotype, otherwise, the system does not consider them.Furthermore, the amount of the wage type to be valuated is dependent onhow high the amounts of the base wage type in the Basic Pay infotype are.This is because you can also overwrite the default amounts for indirectlyvaluated base wage types.
� Ín the indirect variant, the relevant wage types must not be in the infotype.The system determines the value internally, and uses it as the basis foradditional calculations. This means that the base wage types must bevaluated indirectly so that the system can read amounts from a pay scaletable, for example.
Figure 124: Indirect Valuation Using the SUMME Module
When making an indirect valuation using the SUMMER module, you mustdefine which wage types the system is to use to calculate the percentage bonus(SUMME). A distinction is also made between direct and indirect variants.
In the direct variant, you must enter the wage types the system is to use as avaluation basis in the infotype, otherwise, the system does not consider them.
In the indirect variant, the relevant wage types must not be in the infotype.
Unlike the PRZNT module, you enter the percentage value in the SUMME modulein the table as a fixed value, and it is therefore linked to the wage type.
Figure 125: SUMME Module in �Recurring Payments/Deductions� Infotype
You can use the �SUMME� module for indirect valuation in other infotypes.
The example in the graphic shows how indirect valuation in the �RecurringPayments/Deductions� infotype helps determine how much vacation allowancean employee should receive. In this case, you use the SUMME module andmodule variant B.
You must also store the type of calculation in the �Basic Wage Type Valuation�table.
This is how the individual modules are implemented for the basis of our exercise:
� Wage types ##10 and ##20 are both coded with feature TARIF in the wagetype characteristics. This allows the system to access the pay scale table,from where it reads these wage types with the data already assigned to theemployee.
� You assign this data in the following Customizing steps:
� Enterprise Structure→ Assignment→ Human Resources Management→ Assignment of Personnel Area to Company Code
� Personnel Management→ Personnel Administration→ Payroll Data→ Basic Pay→ Determine default for Pay Scale Area or CheckAssignment of Pay Scale Structure to Company Structure
� Personnel Management→ Personnel Administration→ PayrollData→ Basic Pay→ Define EE Subgroup Grouping for PCR andColl.Agrmt.Prov.
The system reads each of these wage types differently. Wage type ##10 is encodedwith variant A, while wage type ##20 is encoded with variant B. This meansthat the system will look in the pay scale table for the entry for wage type ##10that does not have a maintained wage type. On the other hand, it will also lookin the same table for the entry for wage type ##20 that has this wage type in theWage type column.
Wage type ##30 should consist of base wage types ##10 and ##20. The BaseWage Type Valuation table determines the percentage rates of the two base wagetypes used to make up wage type ##30. The amounts depend on the variant used:For variant I (indirect), the base wage types must be valuated indirectly. In otherwords, the system reads the amounts from the pay scale table, for example. Forvariant D (direct), however, the system reads the amounts for base wage typesfrom the Basic Pay infotype. In other words, the amount for wage type ##30 isdependent on any amounts that have been recorded for base wage types in thisinfotype.
ARBPL Module
Figure 127: c) ARBPL Module
The indirect valuation module ARBPL uses the object type and the positionnumber entered in infotype 0001 to calculate the wage type amount.
If module ARBPL is used with variant S (position) to valuate, the system bases itscalculations on the position entered in the Organizational Assignment infotype(0001) and the country grouping in the �Position� table. You can enter a paymentfor the position in this table.
To access the position catalog, use the menu path described below in the IMGstructure:
In addition to the module name and defining module variants, you can enteradditional attributes. For example:
Reduction method:: The values are defined as follows:
Blank or 1: No reduction
2: Reduction using the capacity utilization level (%) stored in infotype 0008
3: Reduction in accordance with the relationship between the individual weeklyworking time, and the standard weekly working time
4: Reduction based on the relationship between the individual hours per weektaken from infotype 0007 and the standard weekly working time
5: Reduction in accordance with the relationship between the individual weeklyworking time minus the standard weekly working time, and the standard weeklyworking time
6: Reduction based on the relationship between the hours per week taken frominfotype 0007 minus the standard weekly working time, and the standard weeklyworking time
Rounding type: A = amount is rounded down, B = amount is rounded up/down,C = amount is rounded up
Rounding divisor: Values 0 - 999999. For example, 100 means that the amountshould be rounded up to a whole euro, dollar, and so on.
Overwrite indicator: Determines whether you can overwrite the wage typeamount in the infotype.
Exercise ObjectivesAfter completing this exercise, you will be able to:� Defining wage type characteristics
Business ExampleYou must now define your wage type characteristics. For each of your wage types,you must define the correct module name, the correct module variant, and thereduction method for indirect valuation.
Task 1:
1. What is the difference between the TARIF module and the PRZNT module?
2. What do the module variants do?
3. Wage type ##10 should be valuated so that the wage type amount is readfrom the pay scale table (module ). The system should readthe entry that has no entry in the Wage type column (variant ). Make theappropriate entries in the wage type characteristics in the system.Fill in the blanks to complete the sentence.
4. Wage type ##20 should be valuated so that the wage type amount is readfrom the pay scale table ( module). The entry that is createdfor this wage type in the pay scale table should be read (variant ). Makethe appropriate entries in the wage type characteristics in the system.Fill in the blanks to complete the sentence.
5. In the pay scale table, create entries for your new bonus wage type (##20) foreach of your pay scale levels in pay scale group GR##.
6. Wage type ##30 should be valuated so that the amount is calculated as apercentage from base wage types ##10 and ##20. In addition, the amount inthis wage type should be multiplied again by a percentage rate when enteredin the Basic Pay infotype (module _______________).
The wage type amount should be kept separate from the actual base wagetype amounts in the Basic Pay infotype. In other words, the system shouldread the amounts from the pay scale table (variant ____________).
The wage type amount should also be rounded up or down to the nearestwhole figure (EURO).
Make the appropriate entries in the wage type characteristics in the system.
7. Define the base wage type valuation for the Performance Bonus (##30)wage type. This valuation should consist of 50% of base wage type ##10,and 100% of base wage type ##20.
Task 2:Optional exercises:
1. When you enter the amount for wage type ##30 in the Basic Pay infotype,it should be calculated as follows:
� 20% of wage type amount ##10 and� 70% of wage type amount ##20.
You want the amount in the Basic Pay infotype not to be influenced by theentry of a percentage.
The wage type amount should be calculated independently of the percentagestored (if any) for the base wage types.
As a precaution, create the Basic Pay infotype one more time. Enter yourwage types again, and leave the infotype WITHOUT saving.
2. When you enter the amount of wage type 40## for your employee 305991##in the Recurring Payments/Deductions infotype, it is taken from the payscale table. In this process, the amount for which the wage type is not filledshould be taken into account.
Create a record for the Recurring Payments/Deductions infotype and assignwage type 40##. What happens when you choose Enter?
1. What is the difference between the TARIF module and the PRZNT module?
Answer: For all wage types valuated with the TARIF module, the systemreads the amount from the pay scale table depending on the pay scale groupand level.For all wage types valuated with the PRZNT module, the system calculatesthe amount from the amounts of the base wage types. The calculated amountis multiplied by a percentage, which is entered in dialog while maintainingthe Basic Pay infotype.
2. What do the module variants do?
Answer: The module variant specifies the module for indirect valuation andcontrols how the read access should be assigned for a table.
3. Wage type ##10 should be valuated so that the wage type amount is readfrom the pay scale table (module TARIF). The system should read the entrythat has no entry in the Wage type column (variant A). Make the appropriateentries in the wage type characteristics in the system.
Answer: TARIF, A
IMG: Personnel Management→ Personnel Administration→ Payroll Data→ Basic Pay→ Wage Types→ Check Wage Type Catalog→ Check WageType CharacteristicsSelect the wage type ##10.Choose Details.Make the following entries:
4. Wage type ##20 should be valuated so that the wage type amount is readfrom the pay scale table (TARIF module). The entry that is created forthis wage type in the pay scale table should be read (variant B).Make theappropriate entries in the wage type characteristics in the system.
Answer: TARIF, B,
IMG: Personnel Management→ Personnel Administration→ Payroll Data→ Basic Pay→ Wage Types→ Check Wage Type Catalog→ Check WageType CharacteristicsSelect the wage type ##20.Choose Details.Make the following entries:
In the Choose activity dialog box, select the action Relevantwage types for annual salary valuation.
Val.WT
No. Start date End date BaseWT
Per-cent
ANSAL ##+10 01.01.1990 31.12.9999 ##10 100,00
6. Wage type ##30 should be valuated so that the amount is calculated as apercentage from base wage types ##10 and ##20. In addition, the amount inthis wage type should be multiplied again by a percentage rate when enteredin the Basic Pay infotype (module _______________).
The wage type amount should be kept separate from the actual base wagetype amounts in the Basic Pay infotype. In other words, the system shouldread the amounts from the pay scale table (variant ____________).
The wage type amount should also be rounded up or down to the nearestwhole figure (EURO).
Make the appropriate entries in the wage type characteristics in the system.
a) PRZNT module
b) Variant I (indirect)
c) IMG: Personnel Management→ Personnel Administration→ PayrollData→ Basic Pay→ Wage Types→ Check Wage Type Catalog→Check Wage Type Characteristics
7. Define the base wage type valuation for the Performance Bonus (##30)wage type. This valuation should consist of 50% of base wage type ##10,and 100% of base wage type ##20.
a) IMG: Personnel Management→ Personnel Administration→ PayrollData→ Basic Pay→ Wage Types→ Define valuation of base wagetypes
i) Create a new Basic Pay infotype record, and assign your three wagetypes to it. Do not save this infotype yet.
2. When you enter the amount of wage type 40## for your employee 305991##in the Recurring Payments/Deductions infotype, it is taken from the payscale table. In this process, the amount for which the wage type is not filledshould be taken into account.
Create a record for the Recurring Payments/Deductions infotype and assignwage type 40##. What happens when you choose Enter?
a) When you enter the amount of wage type 40## in the RecurringPayments/Deductions infotype, it is taken from the pay scale table. Inthis process, the amount for which the wage type is not filled should betaken into account.
b) Wage type characteristics:
IMG: Personnel Management→ Personnel Administration→ PayrollData→ Recurring Payments/Deductions→ Wage Types→ CheckWage Type Catalog→ Check Wage Type Characteristics
c) Select wage type 40##
d) Choose Details
e) Make the following entries:
� Amount: -� Number/Unit: -� Time unit/meas: Leave blank� Indirect valuation module: TARIF� Module variant: A
f) Save the data.
g) Create a record for the Recurring Payments/Deductions infotype andassign wage type 40##. What happens when you choose Enter?
h) Easy Access Menu:
Human Resources→ Personnel Management→ Administration→HR Master Data
i) Choose Maintain.
j) Enter the personnel number 305991#.
k) Select the Recurring Payments/Deductions infotype and select Create
l) Choose 1st of this month in the Valid field
m) Enter 40## in the Wage Type field
n) Select Enter.
o) The relevant value is taken from the pay scale table.
Lesson OverviewWage types should be automatically proposed in the Basic Pay infotype by thesystem.
Lesson ObjectivesAfter completing this lesson, you will be able to:
� Set wage types as defaults for an employee with the help of the LGMSTfeature and a wage type model, depending on the enterprise and personnelstructure
Business ExampleYou should set up the system with Customizing settings so that wage types areautomatically proposed in the Basic Pay infotype when hiring an employee.
Default Wage Types for the Basic Pay Infotype
Figure 129: Default Wage Types for Basic Pay
If you want the system to suggest a default wage type for basic pay, this wage typemust be included in a wage type model. The system suggests a wage type modelbased on an employee's organizational assignment. For example:
� Company code� Personnel area� Employee group� Employee subgroup
The system uses this information to define a default for a wage type model.
LGMST FeatureTo reduce the amount of routine work involved in creating a Basic Pay infotyperecord (0008), the system displays the default wage types for the administratoreither as required or optional entries.
Figure 130: LGMST Feature
You can use the Default Wage Types for Basic Pay table to define default wagetypes for the Basic Pay infotype (0008).
An entry is accessed by processing a decision tree. The feature is called LGMST.
The LGMST feature has two return values: firstly, the maximum number ofenterable wage types in the Basic Pay infotype, and secondly, the wage typemodel the system is to use.
Exercise ObjectivesAfter completing this exercise, you will be able to:� Defining default wage types
Business ExampleFinally, you want the system to propose wage types independently of theemployee�s organizational assignment. This would mean that you no longer haveto enter wage types manually in the Basic Pay infotype.
Task 1:
1. Define a wage type model with the naming convention HRLY##. Thisshould contain your three new customer wage types. The system shouldpropose the wage types so that they can be removed from the Basic Payinfotype at any point in the future.
Task 2:
1. Check the LGMST feature in the IMG step: Enterprise Structure for WageType Model. What entry does the trainer have to make to ensure that yourwage type model (HRLY##) is defaulted for your employee subgroup? Atotal of 5 wage types should be entered in the Basic Pay infotype.
Hint: You do not need to make any changes in the LGMST feature.
2. Create a new Basic Pay (0008) infotype record for the personnel number305992##. The system will now default your wage types.
Enter your pay scale group and level, and choose Enter. The system willnow calculate the amounts for your wage types too. You have now set up theinfotype as required, and you can now save your entries.
1. Use the personnel file to check which infotypes have been created using thispersonnel action for employee 305992##.
Task 4:(optional)
So far, you have set up the Basic Pay infotype. However, you require maximumcontrol over the wage types in the Basic Pay infotype for your employee withpersonnel number 305992##:
1. The amounts for the wage types should be valuated indirectly, and shouldnot be able to be overwritten.
2. The wage types should be defaulted permanently. In other words, these wagetypes cannot be changed or deleted.
3. The system should default three wage types only (##10, ##20, and ##30).You also should not be able to enter other wage types manually.
4. To check the Basic Pay infotype again, you must create a new record oncemore (as of the hiring date of your employee 305992##). This involvesoverwriting the infotypes you have already created.
1. Define a wage type model with the naming convention HRLY##. Thisshould contain your three new customer wage types. The system shouldpropose the wage types so that they can be removed from the Basic Payinfotype at any point in the future.
HRLY## 01.01.2006 31.12.9999 1 O ##10HRLY## 01.01.2006 31.12.9999 2 O ##20HRLY## 01.01.2006 31.12.9999 3 O ##30
Save your data and return to the IMG.
Task 2:
1. Check the LGMST feature in the IMG step: Enterprise Structure for WageType Model. What entry does the trainer have to make to ensure that yourwage type model (HRLY##) is defaulted for your employee subgroup? Atotal of 5 wage types should be entered in the Basic Pay infotype.
Hint: You do not need to make any changes in the LGMST feature.
a) IMG: Personnel Management→ Personnel Administration→ PayrollData→ Basic Pay→ Wage Types→ Enterprise structure for wagetype model. The system displays the Process feature LGMST: decisiontree screen
b) The system displays the Process feature LGMST: Decision tree screen.
c) If you want to change the LGMST feature in tree maintenance, youmust perform the following processing activities:
d) In country grouping 99, search for the node PERSK and the employeegroup ACTIVE. Position the cursor on the PERSK node and select thefunction Create nodes. On the Values for PERSK screen, enter ## (## isyour new employee subgroup). Then select Transfer.
e) Position the cursor on the new node (##) and select Create nodes.Accept the Return value default setting on the following screen andconfirm by choosing Enter. Enter 05/HRLY## on the screen that thenappears (Return value for field value ##), and choose Copy.
f) After you have changed the LGMST feature, check the feature for errors.
g) The trainer will save and activate the feature for you.
2. Create a new Basic Pay (0008) infotype record for the personnel number305992##. The system will now default your wage types.
Enter your pay scale group and level, and choose Enter. The system willnow calculate the amounts for your wage types too. You have now set up theinfotype as required, and you can now save your entries.
a) Human Resources→ Personnel Management→ Administration→HR Master Data
b) Choose Maintain.
c) Enter the personnel number 305992##.
d) Enter infotype 0008 and use the start of this month as the start date.
e) Choose Create.
f) Maintain the pay scale group and level.
g) Choose Enter. The amounts are entered in the fields.
h) Save your entries and return to the SAP Easy Access menu.
1. Use the personnel file to check which infotypes have been created using thispersonnel action for employee 305992##.
a) Human Resources→ Personnel Management→ Administration→ HRMaster Data→ Personnel File
b) Enter the personnel number 305992##.
c) Choose Display.
d) Check the infotypes using the Next record function.
e) Return to the SAP Easy Access menu.
Task 4:(optional)
So far, you have set up the Basic Pay infotype. However, you require maximumcontrol over the wage types in the Basic Pay infotype for your employee withpersonnel number 305992##:
1. The amounts for the wage types should be valuated indirectly, and shouldnot be able to be overwritten.
a) IMG: Personnel Management→ Personnel Administration→ PayrollData→ Basic Pay→ Wage Types→ Check Wage Type Catalog→Check Wage Type Characteristics
b) Select the wage type ##10.
c) Choose Details.
d) Make the following entries:
� Rewritable indicator: Remove the indicator
e) Complete the steps above for wage types ##20 and ##30 too.
4. To check the Basic Pay infotype again, you must create a new record oncemore (as of the hiring date of your employee 305992##). This involvesoverwriting the infotypes you have already created.
a) Human Resources→ Personnel Management→ Administration→HR Master Data
b) Choose Maintain.
c) Enter the personnel number 305992##.
d) Enter infotype 0008 and use the start of this month as the start date.
e) Choose Create. The wage types are now fixed defaults, and you arenow unable to add any additional lines.
f) Maintain the pay scale group and level.
g) Choose Enter. The amounts are entered in the fields, and cannot bechanged.
h) Save your entries (overwrite the infotype record you have alreadycreated), and return to the SAP Easy Access menu.
Unit SummaryYou should now be able to:� Explain the meaning of wage types in SAP� Copy wage types and know what one must pay attention to when copying
wage types� Identify the control indicators that are used to determine to whom the wage
type can be assigned, when it can be assigned, and how often.� Specify the dialog characteristics of the wage types� Know how wage types can be valuated indirectly by the system� Set wage types as defaults for an employee with the help of the LGMST
feature and a wage type model, depending on the enterprise and personnelstructure
Unit OverviewThe options for performing standard pay increases and pay scale reclassificationsusing reports and Customizing settings are presented in this section.
Unit ObjectivesAfter completing this unit, you will be able to:
� Set up and perform standard pay increases� Set up rules for and perform automatic pay scale reclassification.
The system allows you to automatically increase an employee's standard pay.
You can use this function for employees whose basic pay is determined on thebasis of the pay scale structure to which they are assigned during Customizing.
Which of the two different procedures is used to determine the pay increasedepends on whether the system should increase the amounts in the Customizingsystem by a certain amount or by a percentage, or whether the system shouldupdate the pay history in the Basic Pay infotype (0008).
Note:
� Simple standard pay increase: A change is made to a Customizingtable (T510). This means that retroactive accounting is not automaticallytriggered. This may be necessary, for example, if you have retroactiveincreases that relate to the payroll past. In addition, simple standard payincreases do not create a new infotype record.
� Extended standard pay increase: If you run this pay increase, the systemrecognizes it as relevant for retroactive accounting and creates a newinfotype record.
Figure 133: Performing a Simple Standard Pay Increase
When increasing an employee's pay, you must first run report RPU51000 tochange the pay scale groups and levels on the key date.
The system reads the actual monetary value from the relevant table whenperforming indirect valuation.
Unit 12: Reports for Changes to Remuneration HR305
If you enter a date in the �Indirect valuation� field in the Basic Pay infotype(0008), the system displays the currently valid amounts.
To facilitate processing, the activities for changing Customizing settings andmaster data are kept separate.
If you want to create a basic pay history (0008), run report RPITRF00 to delimitthe basic pay records on the key date specified.
Figure 134: Performing an Enhanced Standard Pay Increase
Payroll processes the Basic Pay infotype (0008), as well as pay scale groups andlevels for a specific period.
When you increase amounts by changing the settings in Customizing, the systemupdates the Basic Pay infotype history (0008) for indirectly valuated wage types.
You can use the RPITRF00 report to generate a basic pay history for a specificperiod of time.
Mass data changes that are triggered by reports are normally made using a batchinput session and not immediately. The changes are not made to the master datauntil the batch input session has been processed.
To access the batch input system, choose: System→ Services→ Batch Input→Sessions. You can then select a session using any combination of the followingcriteria:
� Session name� Creation date (according to session overview)� Session status
Choose Overview to display the session overview. You can use the sessionoverview to start, analyze or delete sessions. Choose Log to display the sessionlog.
When each session is processed, a log is automatically created. You can use thelist of session logs to carry out additional actions, for example, to analyze sessions.
You can choose from three types of processing:
� Process online: You can correct transactions interactively and runtransactions that you have not yet executed in phases.
� Only display errors: This processing type is similar to processing online,the only difference is that you cannot process transactions that are free oferrors and have not been executed interactively. The system displays thescreen on which the error occurs.
� Background: This processing type schedules a session to be processedimmediately in the background.
Unit 12: Reports for Changes to Remuneration HR305
Pay Scale Reclassification
Figure 136: 2) Pay Scale Reclassification
Pay scale reclassification allows you to update the information on the pay scalegroups and levels in the Basic Pay infotype (0008) for each employee. The systemupdates this information automatically when a situation meriting reclassificationarises.
In addition to the Next Increase field in the Basic Pay infotype (0008) and the KeyDate field on the report selection screen, you can define other limit values forreclassification criteria in the SAP system.
1. The age of the employee when the system is to perform a pay scalereclassification.
2. Pay scale group or level. When an employee reaches this group or level,he or she is due for reclassification.
3. The limit value for the time worked by the employee (in hours).
You can use the following reports to perform pay scale reclassification:
1. Pay scale reclassification based on master data: Pay Scale Reclassificationacc. to Age or Pay Scale Membership Period (RPITUM00 report).
2. Pay scale reclassification based on hours worked: Pay Scale Reclassification(RPITIG00 report).
Figure 137: 2a) Pay Scale Reclassification On Basis of Master Data
Pay scale reclassification means the transfer of an employee from one pay scalegroup and/or pay scale level to another. The employee is then paid accordingto the new group/level.
Automatic pay scale reclassification depends on the employee's age and timespent in a pay scale group/level.
Figure 138: Performing a Pay Scale Reclassification Based on Master Data
Unit 12: Reports for Changes to Remuneration HR305
If you want to transfer an employee to a different pay scale group/level before theset date, you can enter the new date in the �Next increase� field of the Basic Payinfotype (0008).
If you want to transfer an employee to a different group or level on the basisof age, you can enter a natural or technical date of birth to vary the time ofreclassification.
The RPLTRF00 report (Time Spent in Each Pay Scale Area/Type/Group/Level)generates a list of employees, including their pay scale structure and additionalinformation.
You usually perform pay scale reclassifications before the payroll run for eachpayroll period. You must perform pay scale reclassifications before a standardpay increase.
Figure 139: 2b) Pay Scale Reclassification Based on Working Time
You can only use this function if you use the Time Evaluation component.
Before you can use this function, you must define limit values for the hoursworked by your employees, as well as the next pay scale group and level in thePay Scale Reclassification table.
The Pay Scale Reclassification report, RPIPSR00, compares the limit values forhours worked with the working time that has already been cumulated (RPTIME00).If the limit values are exceeded, this report creates a new Basic Pay record (0008).
The PRVAR feature uses additional organizational and employee-related criteriato define a three-character alphanumeric return code as a variable key. The systemuses this key to read the pay scale reclassification table.
Exercise ObjectivesAfter completing this exercise, you will be able to:� Perform standard pay increases and pay scale reclassifications
Business ExampleAll production employees are to receive a standard pay increase of 5%, effectiveimmediately. In addition, when the employees have been in a pay scale level for ayear, they are eligible for reclassification to the next level.
Task 1:Perform a standard pay increase:
1. After you have made sure that you have saved a Basic Pay infotype withindirectly valuated wage types for your Production Employee 305992##, usereport RPU51000 to increase the standard pay by 5% for pay scale type 90and pay scale area 70+## as of today. This will increase the amounts in thepay scale table.
2. Use report RPITRF00 for your employee subgroup ## and for the currentdate. Ensure that the country grouping is set to 99 (Other countries). Set theindicator for the batch input session, and then process the session.
This will create a new infotype record as of today (date of standard payincrease) for employee 305992##. Take a look at the Basic Pay infotyperecord for your employee.
Task 2:Perform a pay scale reclassification (optional):
1. Use the IMG step Define Pay Scale Reclassification Based on Master Datato define the general rules for reclassification in your company. After oneyear, employees in your pay scale group GR## should be moved into thenext level.
Note: In certain circumstances, you can only find this step in the SAPReference IMG.
2. A year has now passed, and your production worker (personnel number305992##) is to be assigned to the next pay scale level. Use the reportRPIPSR0 to automatically generate this change. Set the indicator for thebatch input session, and then process the session.
Solution 17: Reports for Changes toRemunerationTask 1:Perform a standard pay increase:
1. After you have made sure that you have saved a Basic Pay infotype withindirectly valuated wage types for your Production Employee 305992##, usereport RPU51000 to increase the standard pay by 5% for pay scale type 90and pay scale area 70+## as of today. This will increase the amounts in thepay scale table.
a) Simple standard pay increase: Use report RPU51000 to increase thestandard pay by 5% for pay scale type 90 and pay scale area 70+## asof today. This will increase the amounts in the pay scale table.
b) In the System menu, choose Services→ Reporting
c) Enter report RPU51000. Choose Execute.
d) Enter country grouping 99, pay scale type 90, pay scale area 70+##,EESGGrpg for Coll.Agrmt.Prov. 1, the percentage rate 5% and thecurrent date as the validity begin date.
e) Choose Execute.
f) To check your entries, choose View of old pay scales and View of newpay scales. Now choose Save new pay scales.
g) Return to the SAP Easy Access menu.
2. Use report RPITRF00 for your employee subgroup ## and for the currentdate. Ensure that the country grouping is set to 99 (Other countries). Set theindicator for the batch input session, and then process the session.
Unit 12: Reports for Changes to Remuneration HR305
This will create a new infotype record as of today (date of standard payincrease) for employee 305992##. Take a look at the Basic Pay infotyperecord for your employee.
a) Enhanced Standard Pay Increase: Use report RPITRF00 for youremployee subgroup ## and for the current date. Ensure that thecountry grouping is set to 99 (Other countries). Set the indicator forthe batch input session, and then process the session.
b) In the System menu, choose Services→ Reporting
c) Enter report RPITRF00.
d) Choose Execute.
e) Enter your employee subgroup (##) and the current date as the datefor the increase. Enter 99 Other countries as the country grouping. Setthe indicator for batch input.
f) Choose Execute.
g) To run the session, choose System→ Services→ Batch input→Sessions.
h) On the General Overview tab page, select the batch input session nextto your logon ID (HR305-##), and choose Process. On the next screen,select Process online. Confirm each individual step with Enter.
i) Check the change in your employee�s master data. The system hascreated an additional infotype record, valid from today.
j) Return to the SAP Easy Access menu.
Task 2:Perform a pay scale reclassification (optional):
1. Use the IMG step Define Pay Scale Reclassification Based on Master Datato define the general rules for reclassification in your company. After oneyear, employees in your pay scale group GR## should be moved into thenext level.
b) Choose New entries, and create the following entries:
c) Pay Scale Type 90, Pay Scale Area 70+##, Pay Scale Group 1, PayScale Group GR##, Level 01, Start Beginning of current month, End31.12.9999 (high date), Time spent in a pay scale group 12, Next PayScale Group GR##, Next Pay Scale Level 02.
d) Pay Scale Type 90, Pay Scale Area 70+##, Pay Scale Group 1, PayScale Group GR##, Level 02, Start Beginning of current month, End31.12.9999 (high date), Time spent in a pay scale group 12, Next PayScale Group GR##, Next Pay Scale Level 03.
e) Pay Scale Type 90, Pay Scale Area 70+##, Pay Scale Group 1, PayScale Group GR##, Level 03, Start Beginning of current month, End31.12.9999 (high date), Time spent in a pay scale group 12, Next PayScale Group GR##, Next Pay Scale Level 04.
2. A year has now passed, and your production worker (personnel number305992##) is to be assigned to the next pay scale level. Use the reportRPIPSR0 to automatically generate this change. Set the indicator for thebatch input session, and then process the session.
a) In the System menu, choose Services→ Reporting
b) Enter report RPIPSR00, and choose Execute. Select Other period, andenter the first and last day of the current month next year, as well asyour personnel number (305992##). On the Generation Type tab page,select the Batch Input Session option.
c) Choose Execute.
d) To run the session, choose System→ Services→ Batch input→Sessions.
e) On the General Overview tab page, select the batch input session nextto your logon ID (HR305-##), and choose Process. On the next screen,choose Process online, and deselect the indicator for Standard screensize. Confirm each individual step with Enter.
Unit OverviewTo begin with, the general methods of controlling infotypes are demonstratedin this section. The ways of modifying the screen header and screen are thenexplored. Finally, the option of calling the infotype using the infotype menu isexamined.
Unit ObjectivesAfter completing this unit, you will be able to:
� Describe what controls are available through infotype configuration� Define fields relevant for retroactive accounting� Explain what controls are available for the country infotype views� Customize the user interface of the infotype under Screen Header� Customize the user interface of the infotype under Screen Modification� Create new infotype menus and process existing infotype menus� Provide infotype menus as a tab page in the personnel master data
� Time constraint� Fields relevant for retroactive accounting� Country-specific infotypes
Lesson ObjectivesAfter completing this lesson, you will be able to:
� Describe what controls are available through infotype configuration� Define fields relevant for retroactive accounting� Explain what controls are available for the country infotype views
Business ExampleYou want to find out about the possibilites of configuring infotype attributes.
� The first level of control of the Controlling View is what the user sees onthe screen and menus, and what information is readily and easily availablefor the user to view. Additionally, there are controls for what informationmay be appropriate for data entry for certain employees, for example,country-specific infotypes.
� A second level of control is authorizations (Controlling Access) - what theuser can access (see the HR940 course).
� And finally, the third level of control, Track Changes, involves trackingwhat changes are made (or what reports are run) (see appendix).
Figure 141: 1) Infotype Attributes
Infotype: A set of data grouped together into areas with similar content, forexample, personal data, planned working time, organizational assignment, basicpay.
From a technical point of view, the structure of infotypes reflects a data groupingand can be identified by a four-digit key. Infotypes are also carriers of systemcontrol features, for example, time constraints, retroactive accounting relevance,and so on.
Screen view: The users see infotypes as input templates with which they canmaintain the infotype records. A screen (or DYNamic PROgram) consists of ascreen and the accompanying flow logic. The main elements of a screen are:
� Attributes (for example, screen number, following screen)� Layout (the arrangement of texts, fields, and other elements)� Field attributes (definition of the properties of individual fields)� Flow logic (calls the relevant ABAP modules)
In the mySAP ERP 2005 system, a specific screen may consist of data from one,two, or several infotypes.
Figure 142: Configuring Infotypes
Data fields containing HR master data, time management data, and applicant dataare grouped together for creating infotypes.
Infotypes are subject to the following naming conventions:
� Infotypes 0000 to 0999 for HR master data and certain applicant data� Infotypes 1000 to 1999 for HCM planning data� Infotypes 2000 to 2999 for time management data� Infotypes 4000 to 4999 for applicant-only data� Infotypes 9000 to 9999 are reserved for customers.
You can assign the system response for each individual infotype.
Information on dialog control, sort sequence, header layout, and so on can bespecified for each infotype.
The SAP standard system contains all infotypes and their default settings.This system is fully executable. If you adapt the system to meet your specificrequirements, you must make a distinction between customer parts that you maycustomize and SAP parts that you may not change under any circumstances.
Figure 144: Defining Fields Relevant for Retroactive Accounting
You can define the retroactive accounting relevance of infotypes for Payroll andTime Management. Relevant infotypes are defined for retroactive accounting forpayroll and time management in the customizing step Define Fields Relevant forRetroactive Accounting in the following ways:
� You can make the settings for Payroll and Time Management entirelyindependent of one another. If you set an infotype as relevant forfield-dependent retroactive accounting, you must list the fields of theinfotype in the Field-Dependent Retroactive Accounting Recognition view.An infotype can be defined in terms of a field as relevant for retroactiveaccounting with the Field-Specific Retroactive Accounting Attributes.
Figure 145: Retroactive Accounting Infotype and Field Triggers
You can indicate infotypes or infotype fields as being relevant for retroactiveaccounting. Fields (T) can be indicated as being relevant for retroactiveaccounting.
Fields relevant for retroactive accounting - if the relevance for retroactiveaccounting for the payroll field was set to T (field-dependent), you must listthe fields which trigger the retroactive run for payroll in the Field-DependentRetroactive Accounting Recognition view.
Enter the value 1 for these fields in the Type field. If the Retroactive accountingrelevance for PDC time evaluation field is set to T (field-dependent), you mustlist the fields which trigger retroactive accounting of time data in the V_T588Gview. Enter the value 2 for these fields in the Type field. You can choose thesetting Cannot be changed in the payroll past for certain fields. Such a settingcould, for example, be used for transfer data, since a retroactive change for suchdata would not make any sense.
Figure 146: Country-Specific Infotypes and Subtypes
You can specify the permissibility of infotypes for countries. If thecountry-dependent subtypes indicator is set for the infotype, you can also specifythe permissibility of subtypes for an infotype for countries.
Currently, this indicator can only be reported for infotypes whose subtypes aredefined in the Info-subtype attributes view.
In the Display Personnel Master Data (PA20) and Maintain Personnel MasterData (PA30) transactions, the infotypes with a country grouping of personnelnumbers are checked. This means that only the infotypes and subtypeswhich are approved for the country groupings are displayed in the Infotypes -Country-Specific Settings view.
Example:The infotype 0224 stands for the Canadian Taxation infotype and is distinguishedas being exclusively valid for Canada in the configuration. If an existingpersonnel number is entered in the personnel number field in the Maintain MasterData view, the system determines whether the employee belongs to a Canadiancompany code (based on record IT0001). If the employee does not belong to aCanadian Company code, infotype 0224 cannot be maintained and will not bevisible in the pull-down selection for infotypes.
Exercise ObjectivesAfter completing this exercise, you will be able to:� Describe what controls are available through infotype configuration.� Define fields relevant for retroactive accounting.
Business ExampleYou want to familiarize yourself with infotype attributes.
Use the infotype assigned to your group on the data sheet to find informationregarding the fields used to configure infotype characteristics. Note that answersare dependent on your infotype and specific answers can be achieved using F1Help.
Answer the following questions about your infotype's attributes:
1. What time constraint does your infotype have?
2. What are the default start and end dates when this infotype record is created?
3. Is this infotype also used for applicants? Yes / No?
Task 2:Do the following exercises:
Answer these Retroactive Accounting questions regarding your infotype.
1. Is Retroactive Payroll Accounting triggered by changes to this infotype?Yes / No?
Use the infotype assigned to your group on the data sheet to find informationregarding the fields used to configure infotype characteristics. Note that answersare dependent on your infotype and specific answers can be achieved using F1Help.
Answer the following questions about your infotype's attributes:
1. What time constraint does your infotype have?
Answer: IMG: Personnel Management→ Personnel Administration→Customizing Procedures→ Infotypes→ InfotypesIn the Choose Activity screen, select the Infotype option. Select the infotypeassigned to your group by double clicking it or highlighting the infotype andselecting the Details icon.
1:An infotype record must be available at all times. This record may haveno time gaps. You may not delete the record last stored on the databasebecause all records of this infotype would otherwise be deleted.
2:Only one record may be available at one time, but time gaps arepermitted.
3:Any number of records may be valid at one time, and time gaps arepermitted.
AOnly one record may ever exist for this infotype. It is valid fromJanuary 1, 1800 to December 31, 9999. Splitting is not permitted.Infotypes with the time constraint A may not be deleted.
BOnly one record may ever exist for this infotype. It is valid fromJanuary 1, 1800 to December 31, 9999. Splitting is not permitted.Infotypes with the time constraint B may be deleted.
T:The time constraint varies depending on the subtype (see Table 591A).Go to table maintenance (transaction SM30) and enter the tableV_T591A. Alternatively, you can choose transaction PM01 (Copyinfotype) to call the 591A table. In this case, enter the infotype number,then follow the menu path Goto→ Subtype characteristics.
Z:Refers to time management infotypes. The time constraint for theseinfotypes depends on the time constraint class defined in viewV_T554S_I .
2. What are the default start and end dates when this infotype record is created?
Answer:See field: Create w/o strtSee field: Create w/o end
3. Is this infotype also used for applicants? Yes / No?
Answer: See field: Applicant DBTabThere is a value in this field if the infotype is used in Recruitment.
Answer these Retroactive Accounting questions regarding your infotype.
1. Is Retroactive Payroll Accounting triggered by changes to this infotype?Yes / No?
Answer: IMG: Personnel Management→ Personnel Administration→Customizing Procedures→ Infotypes→ InfotypesIn the Choose Activity screen, select the Infotype option. Select the infotypeassigned to your group by double clicking it or highlighting the infotype andselecting the Details icon.See field: Retr. acct. payr. has the value blank, R or T.
2. Is Retroactive Time Accounting triggered by changes to this infotype? Yes /No?
Answer: See field: Retr. acct. PDC has the value blank, R or T.
You should now be able to:� Describe what controls are available through infotype configuration� Define fields relevant for retroactive accounting� Explain what controls are available for the country infotype views
In the standard ERP system, a screen header is already assigned to each infotype.The system also contains information about whether the data about the systemdate or the start date of the Organizational Assignment infotype is valid. Eachscreen header is assigned a modifier which depends on the transaction class (A =Personnel Administration, B = Recruitment).
You can change the screen header, that is, you can customize the first threelines. Up to and including Release 4.0, you can display data from the followinginfotypes: Organizational Assignment (0001), Personal Data (0002), PlannedWorking Time (0007), and Basic Pay (0008). As of Release 4.5, you can displaydata from any infotype, including customer infotypes.
Passport Photos � In addition to any infotype fields you can also include passportphotos of your employees in the Infotype Header Definition view. Determine thedocument type in the system table (T77S0) with which you want to create passportphotographs in the visual archive.
Figure 148: Customizing the User Interface: Defining Headers
In the Header Structure for Each Infotype view, a header is already assigned toeach infotype. With the Choose Data indicator, you define the selection timefor the selection of data from the different infotypes used in the creation of theinfotype header. If you set the Choose Data indicator, the valid data on the startdate of the infotype record that is currently being processed or displayed is used tocreate the infotype headers. If you do not set the Choose Data indicator, the datavalid for the system date is used for creating the infotype headers.
Depending on the transaction class (�A� = Personnel Administration, �B� =Recruitment) and the country grouping, a header modifier is assigned to thisinfotype header in the Header Modification view (V_T588I).
In the Infotype Header Definition view, specify the name and positions for thefield contents to be displayed in the header. The field type controls how the fieldsare formatted when used in the infotype headers.
Save the table entries. The /1PAPAXX/HDR_mmmnnc reports are now generated,where 'mmm' is the client, 'nn' is the header modifier, and �c�is the transactionclass.
Screen Modifier
Figure 149: Customizing the User Interface: Screen View
Different entry screens are delivered for some infotypes. These alternative screensare already predefined by SAP using the transaction class and country grouping.A different screen can be used for different transaction classes (�A� for employee,�B� for applicant) or country groupings. You can also modify the attributes of theindividual fields within a screen. For example, you can define fields as mandatoryfields or hide all unnecessary fields. You may want to suppress field attributes inaccordance with certain employee control data.
The screen modification procedure is the same for both employees and applicants.
In order to define the screen view, you need to know the name of the infotypemodule pool and the screen number. To display this information, call up theinfotype maintenance transaction and choose System→ Status.
Figure 150: Customizing the User Interface: Screen Modification
You can change the attributes of the individual screen fields in the Change ScreenModifications step.
Find the entry for the current screen. On the detail screen, specify which fieldsshould be modified. Among the field attributes that can be specified are: standard,required, optional, cannot be maintained and hidden.
If you need a modified screen but cannot find an entry in this view, create a newentry for the screen, making sure that the Variable key field is empty.
If the screen modifications for the infotypes should be generally applicable, youdo not require a feature or any additional entries in this view.
As in this example, the screen modification can be based on the organizationalassignment for the employee. The modification is determined by feature �Pnnnn�(nnnn = infotype number). If you do not enter a return value for the feature inthe decision tree, the entry whereby the Variable key field remains empty isautomatically valid - in other words, the basic entry (basic screen). If no feature isavailable for the infotype in question, you must create it.
Make a new entry with the return value in the variable key for each return value ofthe feature. Assign the number of an alternative screen, if applicable. The screenmodification in the detail screen now applies to the alternative screen.
Exercise 19: Customizing User Interfaces� Screen Headers
Exercise ObjectivesAfter completing this exercise, you will be able to:� define an infotype header
Business ExampleYour company wants a specific header on your infotype. This header should havethe following information: Personnel Number, Employee Name, Personnel Area,Employee Group and Employee Subgroup.
Task 1:Create a new header for your infotype (see table).
Hint: Before you start the exercise, create a record for your employee540991##, Winnie Chung, for your infotype.
In the Personnel number field, enter employee number 540991## (WinnieChung), and in the Infotype field, enter your infotype number. ChooseCreate. Depending on the infotype you are editing, you may also haveto select a subtype.
Note the sequence of fields in the header.
Choose Cancel (you do not have to save the infotype).
1. Assign your infotype a new screen header. Assign the number ## +50 to yourscreen header (so group 01 will be 51 and group 12 will be 62). Use the datavalid at the start date of the infotype to build the header.
2. Define a new header modifier ##+30 for your screen header ##+50. Thisheader modifier should only apply to employees, that is, to transactionclass A.
3. Create a definition for your header with the following structure:
All fields of the Organizational Assignment infotype (0001) should be read.Use the DD1 or DD2 field type for the name (in other words, the shortfield text or middle field text for the field), the DAT field type for the fieldcontents, and finally the DTX field type for the field content text.
Copy these values from the header modification 00, since this modificationhas similar fields, which you can add to if necessary.
You can save these entries, but do not generate.
4. Try to create a new infotype for your employee 540991## for today (you donot have to save the infotype) and note the changed header.
Task 2:Do the following task: (optional)
1. How would you hide a field of your choice in the screen area for allemployees?
Hint: For this, you must first determine the program (screen) andthe screen number of your infotype.
Then, you must make the changes in Customizing. Do not actuallymake these changes.
In the Personnel number field, enter employee number 540991## (WinnieChung), and in the Infotype field, enter your infotype number. ChooseCreate. Depending on the infotype you are editing, you may also haveto select a subtype.
Note the sequence of fields in the header.
Choose Cancel (you do not have to save the infotype).
1. Assign your infotype a new screen header. Assign the number ## +50 to yourscreen header (so group 01 will be 51 and group 12 will be 62). Use the datavalid at the start date of the infotype to build the header.
a) IMG: Personnel Management→ Personnel Administration →Customizing User Interfaces→ Change Screen Headers
b) Choose Header Structure for Each Infotype.
c) In the line for your infotype, enter the value ##+50 in the Screen headerfield. Check that the Choose data indicator is set. This ensures thatthe values valid on the start date of the infotype record are displayedin the header.
d) Choose Back to return to the list of infotype header activities.
2. Define a new header modifier ##+30 for your screen header ##+50. Thisheader modifier should only apply to employees, that is, to transactionclass A.
a) In the Choose Activity dialog box, select Header modification.
b) Select New entries.
c) Enter the following values:
Screen Header Transaction Class Header Modification##+50 A ## + 30
d)
Hint: You can use different header modifiers for each screenheader for applicants and employees.
Save the values and return to the list of infotype header activities.
3. Create a definition for your header with the following structure:
Descrip-tion
Fieldcontents
FieldText
Descrip-tion
Fieldcon-tents
FieldText
Line 1 Name WinnieChung
Line 2 Employeegroup
1 Active Personnelarea
CABB CABCom-pany
Line 3 Personnelnumber
540991##
All fields of the Organizational Assignment infotype (0001) should be read.Use the DD1 or DD2 field type for the name (in other words, the shortfield text or middle field text for the field), the DAT field type for the fieldcontents, and finally the DTX field type for the field content text.
Copy these values from the header modification 00, since this modificationhas similar fields, which you can add to if necessary.
c) With the cursor, select suitable lines in the table for the headermodification 00.
d) Choose Copy.
e) In the Header modification field in each line to be copied, enter yourheader modification value ## +30 (where ## is your group number).Choose Enter and Save.
f) If necessary, select New Entries to add missing lines.
g) Save the entries you have made.
Caution: Do not generate any headers yourself. You maydestroy or damage the data of other course participants.
You should now be able to:� Customize the user interface of the infotype under Screen Header� Customize the user interface of the infotype under Screen Modification
Infotype Menus: You can select the required infotype for acertain personnel number from an infotype list and process it.You can change the menu sequence as follows:
� Defining user group-specific menus� Changing the menu structure� Inserting new menu options
Figure 152: Changing Infotype Menus
The Infotype Menu customizing step guides you through the steps necessary toconfigure the information shown on each of the menu tabs.
The activities involved in configuring the choices on a menu tab include:
� Defining whether the menu is to be dependent on the user group� If necessary, assigning the system response for the case where the user has
not maintained the user group or where there are no entries in the menu� Assigning a reference user group that can be used to set up the menu, if
necessary
Infotypes in the Infotype Menu
� Select the menu category �I� and the infotype menu.� Copy the infotypes into the menu for the user group.
You can use the menu control function to store different menus and personnelactions for different user groups (user parameter UGR). This means that you canadapt the system so that it meets the requirements of the individual users.
If your menu is distinguished as user group dependent, enter a reference usergroup as well, with which the menu is to be created if an administrator has notmaintained the user group in his or her user master data. On this screen, you alsospecify the infotype sequence for the different user groups.
If you do not define your menu as user group dependent, you can only maintainthe infotype sequence for the user group 00. This is valid for all users that selectthis menu.
Figure 154: Hierarchy When Building Infotype Menus
� Up to this point, the infotype menu area has been described. In addition, youmust also determine which infotype menus are displayed in the HR masterdata maintenance and display transaction.
� HR master data is processed in this step. You can determine - accordingto the various user groups - which infotype menus are displayed and thesequential order in which they are displayed. The relevant IMG activity is"Determine choice of infotype menus".
Figure 155: Defining the Selection of Infotype Menus
Here you define the structure of the menu that appears when the HR master datais maintained and displayed. This selection can also be defined using the usergroups (user parameter �UGR�).
If no entry exists in the table for the user's user group, or if the user has notmaintained his or her user group, the menu structure is determined using thereference user group.
User group dependence for infotype menu selection:
1. Select the menu type �S� and �01 HR master data� menu for infotype menuselection.
2. Determine the user group dependence and the system response if the user hasnot maintained the user group or there are no entries in the menu.
3. Assign a reference user group with which the menu can be created.
Infotype menus for infotype menu selection:
1. Choose the menu type �S� and �01 HR master data� menu for infotypemenu selection.
2. Extend the �01 HR master data� selection menu by accepting the newlycreated infotype menus for the respective user group.
For fast entry menus, you can assign an entry screen, a default value screen and aselection report to a fast entry menu option.
Prerequisites
� If you want to change the infotype text, select the �Infotypes� customizingstep, then the �Further Infotype Texts� activity, and enter a screen type foreach infotype. This text can be accessed in the infotype menus.
� Set up the infotype menus for fast entry in the �Infotype Menu� step. Thefollowing infotype menus are predefined as standard settings for fast entry:
� 07 Master Data Fast Entry (Dependent on the user group)� 09 Time Data Fast Entry (Dependent on the user group)
� Enter the corresponding screen type for your infotype (screen control field),so that the corresponding text is used.
In the �Set Up Infotype Menu for Fast Data Entry� step, you find the followingactivities:
� Activities - Selection reports for fast entry. If you use your own reports forpersonnel number selection in fast entry, you must ensure that these reportsare allowed for all infotypes.
� Screen types for fast entry: For each infotype and screen type (screencontrol) you must define the screen number for creating records with defaultvalues, the screen number for fast entry of several personnel numbers, andthe reports for personnel number selection.
Exercise ObjectivesAfter completing this exercise, you will be able to:� Create customer-specific infotype menus that are dependent on user groups.� Include your own infotype menu in the menu selection.
Business ExampleThe personnel administrators need their own infotype menu for the followinginfotypes that are not included in the standard menu:
� 0028 Internal Medical Service� 0057 Membership Fees� 0082 Additional Absence Data
This infotype menu should be available ONLY to users in your user group ##+50in addition to several infotype menus that have already been set up.
Task 1:Do the following exercises:
1. Create a new menu with the number ##+50 (## = group number) and thename My Menu Gr.##.
2. The menu should be dependent on the user group. The reference user groupshould be 01.
3. Include the infotypes listed above in the required sequence in your menu forthe user group ##+50 (## = group number). Only infotype 0028 should bedisplayed for reference user group 01.
Task 2:Do the following exercises:
1. Modify the HR master data. User group 50 + ## should be able to see allinfotype menus that are displayed in user group 01. User group 50 + ##should also contain infotype menu 50 + ##.
1. To ensure that your newly set up infotype menu appears only for users inyour user group, check that the UGR user parameter is set to ##+50 in youruser profile.
Task 4:Do the following exercises:
1. Go to Personnel Administration and check to see whether your infotypemenu appears in the Other Menu selection.
3. Include the infotypes listed above in the required sequence in your menu forthe user group ##+50 (## = group number). Only infotype 0028 should bedisplayed for reference user group 01.
a) In the Choose Activity dialog box, select the Infotype menu optionand then select Choose.
b) In the Determine Work Area: Entry dialog box, enter your menunumber (##+50) and choose Continue.
c) Choose New entries and enter the following information in the table:
User Group No. Infotype ScreenControl
InfotypeText
##+50 01 0028##+50 02 0057
##+50 03 008201 01 0028
d) Save (confirm the information message with Enter) and return to theIMG.
1. Modify the HR master data. User group 50 + ## should be able to see allinfotype menus that are displayed in user group 01. User group 50 + ##should also contain infotype menu 50 + ##.
b) In the dialog box, enter �01� as the menu (for HR master data), sincethe menu should be available in master data, and choose Continue.
c) Select the entries for user group 01 and choose Copy as....
d) Change the user group for the copied rows of data from 01 to ## +50and then choose Enter. A table should appear that is similar to thetable shown below:
User Group No. Menu Field Text## + 50 01 01 Basic personal data## + 50 02 02 Contractdata## + 50 03 03 Gross/Net payroll## + 50 04 04 Net payroll## + 50 05 05 Payroll supplements## + 50 06 06 Planning data## + 50 07 ZZ Time Mgmt. trans. data
e) Choose New entries and enter the following information in the table:
User Group No. Menu Field Text## + 50 10 ## + 50 My Menu Group ##
f) Save and return to Structure Display in the IMG.
1. To ensure that your newly set up infotype menu appears only for users inyour user group, check that the UGR user parameter is set to ##+50 in youruser profile.
a) Easy Access Menu: System→User Profile→ Own Data.
b) Select the Parameters tab page.
Set the UGR user parameter to ##+50:
Parame-ters
Value Field Text
UGR ##+50 User Group (HR Master Data)
c) Save your entries.
Task 4:Do the following exercises:
1. Go to Personnel Administration and check to see whether your infotypemenu appears in the Other Menu selection.
a) To check your changes, choose the following path in the SAP EasyAccess menu:
b) Human Resources→ Personnel Management→ Administration→ HRMaster Data→ Maintain.
c) Use the scrollbar to locate your new menu (## +50).
Hint: Your new menu should contain the following infotypes:
You should now be able to:� Create new infotype menus and process existing infotype menus� Provide infotype menus as a tab page in the personnel master data
Unit SummaryYou should now be able to:� Describe what controls are available through infotype configuration� Define fields relevant for retroactive accounting� Explain what controls are available for the country infotype views� Customize the user interface of the infotype under Screen Header� Customize the user interface of the infotype under Screen Modification� Create new infotype menus and process existing infotype menus� Provide infotype menus as a tab page in the personnel master data
Unit OverviewThe participant learns how a personnel action is created with the help of anexample in this section. The meaning of the Additional Actions infotype is alsodiscussed and some actions are carried out as examples.
Unit ObjectivesAfter completing this unit, you will be able to:
� Configure personnel actions� Give examples of personnel actions
Lesson Overview� Configuration of actions� Examples of personnel actions
Lesson ObjectivesAfter completing this lesson, you will be able to:
� Configure personnel actions� Give examples of personnel actions
Business ExampleIn your company, your employees receive a payment of EUR 200 when they havea child. You want to set up a personnel action containing the relevant infotypesfor this.
General Information about Personnel Actions
Figure 157: Overview: Personnel Actions
Actions facilitate the processing of complex personnel processes. The systemdisplays all relevant infotypes in a sequence that has already been defined, so thatyou can maintain the necessary data.
This feature controls the determination of field values when you copy a record.Default values are usually copied from the previous record. However, in somecases, values should be redetermined using the Customizing settings. For example,this is possible for the following infotypes:
� Organizational Assignment (0001) - Default value for payroll area� Planned Working Time (0007) - Default value for work schedule rule
(SCHKZ)� Basic Pay (0008) - Default values for pay scale type and area; also default
values for capacity utilization level and working hours per period frominfotype 0007
User-group dependency on infogroups: In this step, you define theinfogroups processed when actions are executed. This is preparationfor the next activity. You must determine the worklist for eachpersonnel action that is to be completed, namely the infogroup.The infogroups can be defined depending on the user group (user parameter �UGR�).
You can also specify that the infogroup is dependent on an employee'sorganizational data, for example, the company code, personnel area, personnelsubarea, employee group, and employee subgroup, by maintaining the IGMODfeature (Infogroup modifier activity).
In the Operation field, you can specify which operation is executed with theinfotype. When you perform an action and create infotype records, the systemchecks to see whether an infotype record already exists. In this case, the systemswitches from Create to Change. Therefore, it generally only makes sense to usethe operation Create (INS) for a hiring action. For all other actions, you shoulduse the Copy (COP) function code. When you copy infotype records, the systemsuggests the start date of the action for the existing records. If no records exist forthe infotype, the system switches to Create.
If a new record is to be created independently of existing records, choose theoperation Create for Actions (INSS). In this case, the system will not switch tothe Change operation (MOD).
� Assign a unique number and define a name for your personnel action.� Use a function character to distinguish hiring actions from all other actions.
Choose the function character 1 for an initial hiring, 7 for an initial hiringwith data transfer from Recruitment and 0 for all other actions.
� You can maintain the customer-specific, employment, and special paymentstatuses using the status indicator.
� You can only use certain actions to change the organizational assignmentof an employee. In this case, you can set the indicators for the position,personnel area, employee group, and employee subgroup to represent theseas ready for input in the Personnel Actions initial screen.
� You can use the Date field to define whether the date entered on the initialscreen of the personnel action should be the start date of new records or theend date of old records � this is particularly useful for leaving actions.
� Specify whether your new action should create a new Actions infotyperecord (0000).
� Use the indicator U0302 to determine whether the personnel actions arestored in the Additional Actions (0302) infotype.
Figure 162: Change Personnel Actions Status Indicator
The status indicators in the Actions infotype are automatically maintained by thesystem if you execute an action. The status indicators have the following meaning:
� Customer-specific status - you can determine your own specific employeestatus with this indicator
� Employment status
� Value 0 - The employee has left the company and should no longer beincluded in the payroll run. An individual retroactive run is permittedfor him or her in the system.
� Value 1 - The employee belongs to the company, but is granted leavefor military service, maternity leave, or other absence reasons. Inreality, most inactive contracts are not entered in the system as statuschanges but as absences. Payroll is run for inactive employees, but theirpay can be reduced according to special factoring rules.
� Value 2 - The employee is retired. If this person is entitled to a companypension, the system still includes this employee in the payroll run. Ifnot, the system assigns specification 0 to this employee.
� Value 3 - The employee belongs to the company and is active.� Special payment status - for wage type decisions
Figure 163: Checking Status Indicators When Executing Actions
When you execute a new action, the system checks whether the attributes of thenew action match those of the previous action.
This check is controlled by the following features
� MSN20 for leaving� MSN21 for hiring� MSN32 for early retirement/retirement
These features check the old actions against the new, proposed action. This takesplace, for example, if you want to execute an action to retire an employee. Theaction checks feature MSN32.
If the old action has:
� STAT2=0→ There is an error because the employee has already left thecompany
� STAT2=2→ There is an error because the employee has already retired� STAT2=3→ The processing continues because the employee is active
Figure 164: 3) Defining Reasons for Personnel Action Types
The action reason indicates why the action was triggered.
You can use this information to evaluate why employees leave or why they aretransferred.
You must always enter at least one reason for each action, even if the entry isjust a blank space.
You need to include the personnel action that you have just defined in thePersonnel Actions menu. You can also define this menu so that it is dependenton a user group (user parameter UGR).
If there is no entry in the table for your user's user group or if you have notmaintained your user group, the system displays the menu for the reference usergroup.
User-group dependency of actions menu: Specify whether menu �01� for thepersonnel actions should be dependent on the user group. Specify how the systemresponds if the user has not maintained the user group, and a reference user groupso that the menu can be created.
Actions in the Actions menu: Enter the new action for the user group and definewhere the action will appear in the menu (field no.).
The Additional Actions (0302) infotype allows you to log all personnel actions thatyou execute for an employee on the same day. The log records all the action typesand the corresponding action reasons run for the employee according to a key date.
All programs that interpret an employee's status, evaluate the Actions infotype(0000) exclusively. This has the time constraint 1, which means that only onevalid Actions infotype record can exist in the system at any one time for theemployee's activity in the company.
Figure 167: Displaying Additional Actions in Actions Infotype
Ensure that only one personnel action is saved in the Actions infotype (0000) perday. In Customizing, you can specify which action type should be stored, that is,which should be kept, for an employee per day if more than one personnel actionwas run for the employee on the same day. Usually, you should choose personnelactions whose status is changing, such as the Leaving personnel action, whichcauses a status change from active to left. The other action(s) are stored in IT0302.
Only action types and action reasons are saved in the Additional Actions infotype(0302).
Hint: You can not execute two different status-changing personnel actionsfor one employee on the same day. For example, you cannot run a leavingaction and an early retirement/retirement action on the same day. In thiscase, one action would overwrite the other.
If you want to use the Additional Actions infotype (0302), use report RPUEVSUPto make the necessary entries:
When an employee leaves the company, you cannot change certain infotypesbecause the system needs them to create a history. However, you must delimitsome infotype records when an employee leaves the company.
When an employee leaves the company, his or her personnel number cannot bedeleted.
When an employee leaves the company, a new Actions infotype record (0000)is created for the leaving action. This infotype record stores the leaving dateand the reason for leaving. You must enter the reason for leaving for statisticsand reporting purposes. When an employee leaves the company, the systemautomatically changes the employment status accordingly. Upon leaving thecompany, the employee has employment status 0. Payroll recognizes this status,and does not select this employee for inclusion in the subsequent payroll period.The system also does not select employees with status 0 for several otherevaluations. You must leave organizational data, personal data, addresses, andbasic payroll data in the system. You cannot delimit the data records, as theemployee may still receive payments (for overtime or leave compensation, forexample), or may still have to be contacted after the last payroll has been run. Inaddition to this, this data is also used for reporting purposes.
You cannot delimit the Basic Pay infotype (0008). If you delimit this infotype,the system cannot perform retroactive accounting correctly. If you do want tocompensate an employee once he or she has left, then you can use either ofthe following infotypes: Recurring Payments/Deductions (0014) or AdditionalPayments (0015).
The SAP system uses the term Reentry to mean an employee who has left thecompany and then re-enters the same company. The system uses the previouspersonnel number for such a personnel action. The system sets the employmentstatus to 3 (for active) in the Actions infotype (0000) when you run the personnelreentry action. The system creates new infotype records for all infotypes delimitedwhen the employee originally left the company. In the new records, the systemuses the re-entry date as the start date.
If one of your active employees retires or goes into early retirement, you need torun the relevant personnel action. The system automatically sets the status field inthe Actions infotype to 2 for retiree. You must assign the employees to employeegroup Retiree, and to employee subgroup Retiree. To pay the pension, simplyenter the corresponding wage type in the Basic Pay infotype.
If an employee who left the company years ago is now entitled to a companypension, you must first run a reentry action, followed by the retirement action.
Figure 171: Retiree Working as a Night Shift Security Guard
If an employee entitled to a company pension works as a night shift security guardin your company, for example, you must hire him or her with a new personnelnumber. This ensures the employee receives employment status 3 (active) withthe second personnel number, and that the system assigns the employee to theemployee group 'Active' and the employee subgroup 'Night shift security guard'.
To refer to the previous personnel number, use the Reference personnel numberfield in the Organizational Assignment infotype. This field is available whenyou perform a hiring action.
You need to create a second personnel number because the money earned as anight shift security guard is taxed according to different tax guidelines.
Exercise ObjectivesAfter completing this exercise, you will be able to:� Set up personnel actions and define them for different user groups
Business ExampleThe personnel administrators need a personnel action that groups together all thenecessary infotypes that need to be maintained when an employee has a child.Since your company gives employees a one-off payment of EUR 200 for the birthof a child, you should also incorporate this in the personnel action.
In addition, this personnel action should appear for users in the ##+50 user grouponly.
Create a new Addition to Family Gr.## action to include the following infotypes:
� Personal Data (0002): Copy
� Family/Related Person (0021), subtype Child: Call using dynamic action
� Additional Payments (0015), subtype M610: Create new record. If a record ofthis infotype already exists, use this as a template.
1. Create a user group dependent infogroup (see table for namespace) in whichthe Personal Data (0002) and Additional Payments (0015) infotypes arecopied or created for user group 50 + ##. If a user has reference user group01, only copy infotype 0002.
2. Create a new personnel action (see table for namespace of action type) inwhich users can access the infogroup just created. This personnel actionshould have the following characteristics:
Since the data on organizational assignment should not change, these fieldsare not ready for input in the initial screen of the personnel action.
Store in Additional Actions (0302) infotype only (not in the Actions (0000)infotype).
3. Enter at least two reasons for your new action (of your choice, for example,Birth of a child or Adoption of a Child).
4. Include the personnel actions Early retirement/Retirement, Leaving, Reentryinto Company, Hiring HR305, and the personnel action you have just created,Addition to Family GR.##, in your user group ##+50.
Task 2:Do the following exercises:
1. On the first day of this month, your employee Winnie Chung (540991##)had a baby. Perform your newly created Addition to Family GR.## personnelaction for Winnie and also assign her the bonus payment of EUR 200.
Task 3:Do the following tasks: (optional)
You want to execute different additional personnel actions for the sales executiveyou hired on the first day of the course (pers. no. 305991##):
1. Employee 305991## is laid off on the first day of this week. Use thepersonnel action Leaving to execute this action.
2. Re-hire employee 305991## as of tomorrow. Use the Reentry into companypersonnel action to execute this action.
3. Your employee 305991## will retire next Monday. Use the Early retirementpersonnel action to process this employee�s retirement.
� Additional Payments (0015), subtype M610: Create new record. If a record ofthis infotype already exists, use this as a template.
1. Create a user group dependent infogroup (see table for namespace) in whichthe Personal Data (0002) and Additional Payments (0015) infotypes arecopied or created for user group 50 + ##. If a user has reference user group01, only copy infotype 0002.
2. Create a new personnel action (see table for namespace of action type) inwhich users can access the infogroup just created. This personnel actionshould have the following characteristics:
Since the data on organizational assignment should not change, these fieldsare not ready for input in the initial screen of the personnel action.
Store in Additional Actions (0302) infotype only (not in the Actions (0000)infotype).
a) To create the action, choose the following IMG menu path:
b) IMG: Personnel Management→ Personnel Administration→Customizing Procedures→ Actions→ Set up personnel action types
c) In the Choose Activity dialog box, select Personnel Action types.
d) Choose New entries and enter the following information in the table:
Figure 172: Data Table:
e) Save and return to the main IMG.
3. Enter at least two reasons for your new action (of your choice, for example,Birth of a child or Adoption of a Child).
a) IMG: Personnel Management→ Personnel Administration→Customizing Procedures→ Actions→ Create reasons for personnelactions
b) Create the following two new entries:
Action type Name of ActionType
ActionReason
Name
Your actiontype
Addition to FamilyGr ##
01 Birth of child
Your actiontype
Addition to FamilyGr ##
02 Adoption of a child
c) Choose Enter, save your entries, and return to the IMG.
4. Include the personnel actions Early retirement/Retirement, Leaving, Reentryinto Company, Hiring HR305, and the personnel action you have just created,Addition to Family GR.##, in your user group ##+50.
a) Personnel Management→ Personnel Administration→ CustomizingProcedures→ Actions→ Change action menu
b) Choose User Group Dependency from menus and infogroupsin theChoose Activity dialog box.
c) Ensure that the User group dependency indicator for the actions menu01 is set.
d) Return to the Choose Activity dialog box.
e) In the Choose Activity dialog box, select Personnel Action menu.
f) In the dialog box, enter 01 in the Menu field and then choose Continue.
g) You can copy existing entries of user group 00 to make data entry easier.
h) To do so, select the actions used in the exercises for the 00 user groupand choose Copy as ...
i) Change the user group 00 to your user group (##+50).
j) Choose Enter and Save. To create the new entry shown in the tablebelow, choose New Entries:
1. On the first day of this month, your employee Winnie Chung (540991##)had a baby. Perform your newly created Addition to Family GR.## personnelaction for Winnie and also assign her the bonus payment of EUR 200.
a) Easy Access Menu: Human Resources→ Personnel Management→Administration→ HR Master Data→ Personnel Actions.
b) In the Personnel number field, enter 540991## and then in the Fromfield, enter the first day of the month.
c) Locate your new action (Addition to Family GR. ##), select it, andthen choose Execute.
d) In the Actions infotype (0000), enter one of the reasons you created inCustomizing for the personnel action and choose Save.
e) In the No. child. field of the Personal Data infotype (0002), enter thevalue 1 and also maintain the Family/Related Person infotype (0021),which is called using the dynamic action, with entries of your choice.Confirm any warning messages.
f) If additional infotypes, such as Create Child Allowance, are called bythe dynamic action, skip these by choosing Cancel until the AdditionalPayments infotype (0015) appears.
g) Assign EUR 200 as the amount of the bonus payment. Finally, savethis last infotype, Additional Payments (0015), of the personnel actionand return to the initial screen.
Unit OverviewIn this section, it is demonstrated how the automatic calling of additional infotypesor the sending of a mail is triggered by a certain event.
Unit ObjectivesAfter completing this unit, you will be able to:
� Initiate different actions using a dynamic action: � Maintaining an additionalinfotype record � Sending a mail
Lesson OverviewDynamic actions can trigger the following actions:
� Maintaining additional infotypes� Sending a mail
Lesson ObjectivesAfter completing this lesson, you will be able to:
� Initiate different actions using a dynamic action:� Maintaining an additional infotype record� Sending a mail
Business ExampleYour HR department would like three automatic actions to occur in the system:
� When an employee�s marital status changes from single to married, the�Family/Related Person� infotype should appear automatically.
� When an administrator�s area of responsibility changes, he or she should beinformed automatically by mySAP ERP 2004 office mail.
� The HR administrators would like to be reminded to ask an employee whohas borrowed a laptop to return it one month before the employee shouldreturn it
So that a certain action can be executed by the system, you must determine whenthis is to be done and whether the action is initiated using Change (02), Insert(04), and/or Delete (08) of the infotype record. The system can also be set up sothat it recognizes AND/OR situations. The values for Change, Create, or Deletecan be added. The value of maintenance operation 06 thus means that an actionis performed if the current record is changed or if it is expanded (02 change+ 04 create).
In the function part (of the table), you can enter plausibility checks for actions, forexample, old and new field values. Finally, you can formulate standard values fora record that has been added.
Hint: If you also use Recruitment, you must make sure that the systemcalls up the dynamic actions for the correct application. To ensure this,you must first ask for the transaction class:
� PSPAR-TCLAS=�A� for Personnel Administration� PSPAR-TCLAS=�B� for Recruitment
You can use dynamic actions to control that actions are called when maintainingan infotype record. This can be the maintenance of an additional infotype record,sending mail using SAPoffice or performing a routine.
Figure 176: 2) Dynamic Actions � Mail Connection for Infotype Changes
When you have changed an infotype record, you can use the dynamic action mailfunction in SAPoffice to automatically inform others of this change.
Example:You have changed an employee's Organizational Assignment infotype(0001). Certain system users, for example, the administrator or head ofdepartment, need to be informed of these changes.
Before you can use the dynamic action function, you must fulfill severalpreconditions. To begin with, you must enter in the Organizational Assignmentinfotype the name of the administrator who is responsible for maintaining theinfotype records of this employee. You must also assign an SAP user nameto this administrator. This user name is accessed by a feature and the user thenautomatically receives a mail informing him or her of the changes.
Figure 177: Define Administrators and Administrator Groups
You have three different input options as the personnel administrator in theOrganizational Assignment infotype:
� PersAdmin� Time Evaluation� Payroll
A link to these administrators can be created in the dynamic actions so that theyautomatically receive an email through SAPoffice if certain changes are made inthe employee records of an administrator.
The standard mySAP ERP 2004 system has a dynamic action, whereby if anadministrator changes in the IT0001 record of an employee, both the old and thenew administrators are informed of this through SAPoffice mail.
Hint: This is not one of the workflow's functions, since no action must beexecuted. It solely notifies the administrator that a change has occured inan employee record.
When determining the conditions, including whether a message is triggered whenprocessing an infotype record, you can specify for which processing type (Insert,Change, or Delete) or for which combinations of processing types a mail is sent.
The action �M� signals the system to Send Mail and establishes the link to thecorresponding feature.
You must also define the feature (for example, M0001).
Figure 179: Define Mail Attributes
You can use the feature to control who receives the mail, the text to be used in themessage and the types of processing that should be possible in the mail function.The feature can be used for all master data infotypes for employees (TCLAS=A)and applicants (TCLAS=B).
In the feature you define the standard text (=IDTXT). You can create and/orchange this text in the next step.
The mail is sent to the administrator from the Organizational Assignment infotyperecord of an employee (RECV1 = Human Resources, RECV2 = Time Recordingand RECV3 = Payroll). For applicants, a mail can only be sent to RECV1(Personnel Officer).
By using additional parameters, you can also specify whether a mail should bemoved to the outbox after it has been sent or if it should be sent to all personson a particular distribution list.
You can define whether a certain processing type should trigger specific actions(transaction code, infotype, subtype, and so on).
For more information about the feature M0001, call feature maintenance M0001and select Display documentation. Refer also to the general documentation onmaintaining features.
You can copy feature M0001 and use it as M0008 for the Basic Pay infotype(0008), for example. Make sure that you adapt the decision tree for the featureaccordingly.
Figure 180: Create Standard Texts for Mail Connection
Two examples of text templates are delivered in the standard ERP system. Youcan use these as a basis for your own standard texts. These text templates are:
� MAIL_FOR_I0001_A (Change of personnel administrator for an employee)� MAIL_FOR_I0001_B (Change of personnel officer for an applicant)
You can copy the text templates from client 000.
Create the standard texts that you require and store them under the text ID PAMA.
Each mail consists of a header and the actual message. Write the mail header inthe first line of the standard text and then the message starting in the second line.
� You can use the fields of infotypes 0001 and 0002 to initiate sending themail. If the infotype that triggers the mail is the Organizational Assignmentinfotype (0001), you can use the fields contained in the structures *P0001(data before changes) and P0001 (data after changes).
The standard settings for style and layout are used in the mails.
Exercise ObjectivesAfter completing this exercise, you will be able to:� Set up a dynamic action
Business ExampleThe personnel administrators require a dynamic action that will remind themone month before the loan period is up on the laptop lent to an employee for acertain period. For this purpose, you should dynamically create the Monitoringof Tasks infotype.
Task:Create a new dynamic action to monitor the loan of laptop computers to employees.
1. Create a separate subtype for the Objects on Loan infotype (0040). Use 90##for the subtype ID and Laptop ## for the name of the subtype.
2. Set up a dynamic action so that each time the Objects on Loan infotype(0040) with subtype 90## is changed or created, the Monitoring of Tasksinfotype (0019) is created for the task type, that is, for the subtype 60Expiry of probation. The task in this infotype (P0019-TERMN field) shouldbe derived from the end date of the Objects on Loan infotype (0040)(P0040-ENDDA field), that is, the end of the loan period.
3. The employee Winnie Chung, personnel number 540991##, borrows acompany laptop for six months from today. Create a new record for theObjects on Loan infotype (0040) with subtype 90## for this employee. Thesystem should automatically create a Monitoring of Tasks (0019) infotyperecord for the task type 60 Expiry of probation where the task date is thesame as the end date of the Objects on Loan infotype record.
Solution 22: Optional: Dynamic ActionsTask:Create a new dynamic action to monitor the loan of laptop computers to employees.
1. Create a separate subtype for the Objects on Loan infotype (0040). Use 90##for the subtype ID and Laptop ## for the name of the subtype.
a) IMG: Personnel Management→ Personnel Administration→Contractual and Corporate Agreements→ Objects on Loan→ Defineobjects on loan
b) Choose New entries and enter 90## for the subtype and Laptop ## asthe name of the subtype.
c) Save your data and return to the IMG.
2. Set up a dynamic action so that each time the Objects on Loan infotype(0040) with subtype 90## is changed or created, the Monitoring of Tasksinfotype (0019) is created for the task type, that is, for the subtype 60
Expiry of probation. The task in this infotype (P0019-TERMN field) shouldbe derived from the end date of the Objects on Loan infotype (0040)(P0040-ENDDA field), that is, the end of the loan period.
a) IMG: Personnel Management→ Personnel Administration→Customizing Procedures→ Dynamic Actions
b) Select New entries.
c) Enter the following data as your new table entries (see below forexplanation):
Info-type
Sub-type
F FC No. ActionVariable Function Part
0040 90## 06 01 I INS,0019,600040 90## 06 02 W P0019-
TERMN=P0040-ENDDA
d) Explanation of the first line: If you change or create (function code06) infotype 0040 and subtype 90##, an infotype record should bemaintained (action I). The variable function part gives more detailedinformation: The Monitoring of Tasks infotype (0019) with subtype 60Expiry of probation should be created (INS).
e) Explanation of the second line: The following specification for thevalues of the new record (action W) should apply: in the Task field(P0019-TERMN) the date should be determined from the end date ofthe Objects on Loan (0040) infotype record (P0040-ENDDA).
3. The employee Winnie Chung, personnel number 540991##, borrows acompany laptop for six months from today. Create a new record for theObjects on Loan infotype (0040) with subtype 90## for this employee. The
system should automatically create a Monitoring of Tasks (0019) infotyperecord for the task type 60 Expiry of probation where the task date is thesame as the end date of the Objects on Loan infotype record.
a) Test the dynamic action.
b) In the SAP Easy Access menu, choose
c) Human Resources→ Personnel Management→ Administration→ HRMaster Data→ Maintain.
d) Enter the personnel number of employee Winnie Chung (540991##)
e) Choose the Objects on Loan infotype (0040) and subtype 90## Laptop##.
f) Choose Create to create the data record. Specify today�s date as thestart date and the date in six month�s time as the end date, that is, theend of the loan period.
g) Save the new infotype record.
h) This will automatically create the Monitoring of Tasks infotype (0019)based on the dynamic action that was created in the previous exercise.
i) Select Enter. The new infotype will have the following defaultinformation:
� Task type: 60 Expiry of probation Laptop� Task: the end date of the loan (derived from the end date of the
Objects on Loan infotype (0040)).� Reminder date: one month before the end of the loan period.
Lesson OverviewYou can maintain an action very quickly for an employee using Fast Entry ofActions.
Lesson ObjectivesAfter completing this lesson, you will be able to:
� Describe how to carry out a fast entry action� Describe Customizing for a fast entry action
Business ExampleThe HR department in your company would like to optimize the time it spends ontasks that need to be performed repeatedly.
Using Fast Entry of Actions
Figure 181: Using Fast Entry of Actions
You use fast entry of actions to speedily maintain the most important fields ofseveral infotypes in the system for an employee. In this process, the system putsthe fields of the various infotypes together on one screen for you to maintain.If you want to maintain one infotype only (for example, overtime for an entiredepartment), you can also use fast entry.
Hiring multiple employees is an example of a fast entry action.
To permit fast entry for an action, you must first specify this in the action menu.
You can call an existing fast entry action in the IMG activity �Change Fast Entryof Actions�, and then modify the arrangement of the fields and the fields used forfast entry in this action.
In the IMG activity Change Action Menu, the User Group Dependencyoptionallows you to specify whether the menu for fast entry of actions should be usergroup dependent or user group independent. You can also specify whether areference user group exists.
In the Action Menu activity, you can provide the user with various actions for fastentry depending on user group.
Figure 184: 2) Changing Fast Entry of Actions
In the IMG activity Change Fast Entry of Actions, you specify which fields fromwhich infotypes you want to provide the user with for fast entry.
The user can then adjust the fast entry screen to his or her requirements usingthe Screen Painter.
Unit OverviewAn employee being sent to another country is discussed in this section. Theparticipant should become acquainted with the individual phases of the globalassignment.
Unit ObjectivesAfter completing this unit, you will be able to:
� Name the terms related to Global Employment� Specify support in the �Planning a Global Assignment� phase� Specify support in the �Preparation for Relocation� phase� Specify support in the �Transfer� phase� Specify support in the �Duration of Global Assignment� phase� Specify support in the �Repatriation� phase
� Terms related to Global Employment� Planning a Global Assignment� Preparation for Relocation� Transfer� Duration of Global Assignment� Repatriation� Payroll for Global Employees
Lesson ObjectivesAfter completing this lesson, you will be able to:
� Name the terms related to Global Employment� Specify support in the �Planning a Global Assignment� phase� Specify support in the �Preparation for Relocation� phase� Specify support in the �Transfer� phase� Specify support in the �Duration of Global Assignment� phase� Specify support in the �Repatriation� phase
Business ExampleYou should familiarize yourself with the individual phases of Global EmployeeManagement.
The following components come under the superordinate term GlobalEmployment:
An employee has various personnel assignments in different countries inManagement of Global Employees.
The payroll solution for Global Employment is called Payroll for GlobalEmployees
There is also the additional component Concurrent Employment for when anemployee has several personnel assignments in one country. The person IDconcept is the same as for Management of Global Employees. ConcurrentEmployment is only released for some countries.
The Concurrent Employment Model in mySAP HR shows the relationshipbetween employee and employer. The most important concepts in the managementof global employees are as follows:
� Each employee can have several personnel assignments, each in a differentcountry.
� Each personnel assignment is linked to the person.
A personnel assignment outlines the activities that the person is to perform, thecountry of the global assignment, and additional features. Therefore a uniquepersonnel number is assigned to each personnel assignment in mySAP HR.
Figure 188: Concurrent Employment Model
With the person ID, you can track the global employee throughout his or her timeof employment period in the entire company. The person ID can be assignedalphanumerically.
The person ID is stored in the �Person ID� infotype (0709). This infotype canbe maintained just like all other infotypes. We recommend however, that theperson ID may only be changed by end users in exceptional cases. Since theinfotype exclusively contains the person ID, the authorization for this infotypeshould be controlled.
Of course after productivity has begun, no changes should be made to the creationrule for person IDs.
Before the person ID is activated, you must ensure that the �Person ID� infotype(0079) is valid for all personnel assignments in the system. You can do this byrunning the report �HR_CE_GENERATE_PERSONID_EXT�.
Before Global Employment is activated, SAP makes sure that implementing itwould be useful. To this end, customers request a questionnaire from SAP andsend it back when they have completed it. SAP then provides specific adviceabout what should be taken into account (Notes 540451 and 662136).
The central switches for setting up Global Employment can be set in table T77S0.The following switches are particularly important:
� CCURE GLEMP: You can activate Management for Global Employeeswith the switch CCURE GLEMP. This switches on the new infotypeframework and activates the infotype 0709 "Person ID".
� CCURE GLOPY: You can activate Payroll for Global Employees withthis switch. When the switch CCURE GLOPY is switched on, SAP R/3automatically sets the switch CCURE PAUIX.
� CCURE MAINS: Activates the enhanced functions for ConcurrentEmployment. Activating this switch usually requires further activities andfrequently also table conversions.
� CCURE PAUIX: The following functions are activated or deactivated usingthe switch CCURE PAUIX:
� List box display for the contract information on the PersonnelAdministration initial screens and on the list screens
� Employee recognition for hiring action� CCURE PIDGN: Controls the generation rule for the structure of the
external person ID (4 different options)� CCURE PIDSL: To use the person ID for entry to the maintenance of
employee data, the switch CCURE PIDSL has the specification 'X'. All usersare able to deactivate the use of the person ID on the initial screen by settingthe parameter HR_CCURE_PIDSL in their user profiles to '-' (minus).
Figure 191: Phases in the Management of Global Employees
� Planning a Global Assignment� Preparation for Relocation� Transfer� Duration of Global Assignment� Repatriation
Instead of the previous personnel number, there is a person ID number whenusing Global Employment, under which employees have multiple employmentassignments.
Global Employment does not support selecting employees who are particularlysuited to a global assignment.
Figure 192: Planning a Global Assignment
Depending on the foreign assignment policy in your company, you can record allimportant data and create a global assignment:
� Type, Duration and Status of the Assignment� Information regarding family� Information regarding salary and compensation plan
An offer is created.
All those involved (manager in home country, employee, manager in thesubsidiary abroad) have access to the same information.
The planning process for a global assignment can be modified according to theforeign assignment policy of your company.
When a suitable employee has been found for a global assignment, the action�Planning Global Assignment� must be carried out for him or her. This action isalready planned in the system, but must be included when needed in the ActionMenu (see the unit Personnel Actions).
Follow the steps below to plan a global assignment:
1. Enter the personnel number. Depending on the settings, this can be manuallyentered or proposed by the system. The number is the number of the globalassignment.
2. �Valid� refers to the planned start date of the global assignment3. Choose Foreign Service Preparation as the action type.4. The personnel reference number has nothing to do with and is not used in the
Management of Global Employees.5. The action has the status �withdrawn�, which means that the system
recognizes this action as a �planned� action.6. You can enter the planned organizational assignment for the global employee
1. The header shows that this infotype is saved under the country groupingGermany (the country to which the employee is being sent). Ensure that thepersonnel assignment is configured to display this action as inactive. Althoughcountry-specific infotypes cannot be used in other countries, the "internationalpart" of the infotype is defaulted from the infotype that already exists for theemployee in the home country.
However, it is possible that in the infotype �Personal Data� other country-specificdata must also be entered.
Depending on the information required by that country, additonal data may haveto be entered.
Additional infotypes:
The main characteristics of the global assignment are determined in the infotype0710. The information displayed here depends on your Customizing settings,which should reflect the foreign assignment policy of your company.
You can control the decison process in terms of the planned assignment usingthe Preparation of Global Assignment infotype. You can set the status requiredand change it according to the decision.
The most important decision to make regarding a global assignment concerns thecompensation package.
The compensation package is created using the Compensation Package Offerinfotype (0706), which has two subtypes, one each for the home and host country.However, the system takes both into account as a large information package.
If an item is changed in the host country subtype, this can influence the valuesof several items in the home country subtype, depending on the Customizingsettings. The Customizing settings should reflect the foreign assignment policyof your company.
A new infotype package is created if one of the two infotypes is changed duringthe negotiations.
Figure 197: Example of a calculation of a compensation packet
If you wish, you can use the system to help calculate how high the basic salaryshould be for the employee in the country. For this, country-specifics such as taxdeductions, cost signs and so on have to be taken into account.
After a suitable employee has been chosen, an offer letter based on a Wordtemplate can be produced.
Figure 199: 2) Preparation for Relocation
Making flight reservations, applying for work and residency permits for theemployee and his or her family, booking language courses, and so on.
The progress of this process can be monitored using the check list.
All those involved can display information applicable to them in the formatdesired using the different views of this check list to monitor the process.
The international administrator can only process the check list for the globalemployees assigned to him or her.
The information is stored in the Check List Items infotype (0705).
Depending on your Customizing settings, you can set the items so that they areexecuted in the home country, host country, or in the international department. Foreach item, you must determine whether it is a prerequisite for the transfer, that is,whether it must be �completed� before the transfer.
The decision was made for the global assignment to go ahead.
The assignment is activated in the home and host country.
Additional data is created or changed depending on the conditions agreed in thefinal offer.
The Basic Pay (0008), Recurring Payments and Deductions (0014), and AdditionalPayments (0015) infotypes are transferred from the Compensation Packageinfotype.
Technically, this is mapped through the two actions �Glob.Employ.Act.HostCoun-try� und �Glob.Employ.Act.HomeCountry�.
Payroll for the employee runs during the period abroad.
Figure 203: Payroll in Global Employment area
Payroll
Payroll can take place either in the host country or in the home country only, orin both. The latter may be necessary when, for example, an employee makespension contributions in Germany despite working in another country. In this case,so-called shadow income from the Basic Pay infotype is used.
Among other things, you must consider that payroll periods and currencies maybe different in different countries, and wage types may be customized in such away that they are only valid in one or other country.
Moreover, registering the residency types can determine how much time wasactually spent in the host country (this is important for establishing in whichcountry taxation must take place).
Figure 204: 5) Repatriation
A new global assignment must be assigned to the global employee beforecompletion of the global assignment.
The global employee can either return to his or her home country or start a newglobal assignment.
The relocation process starts again from the beginning.
You should now be able to:� Name the terms related to Global Employment� Specify support in the �Planning a Global Assignment� phase� Specify support in the �Preparation for Relocation� phase� Specify support in the �Transfer� phase� Specify support in the �Duration of Global Assignment� phase� Specify support in the �Repatriation� phase
Related Information
� Through a URL or cross-reference tag, point out additional informationthat the participants may find useful, such as Web sites or white papers.Delete it if not applicable.
Unit SummaryYou should now be able to:� Name the terms related to Global Employment� Specify support in the �Planning a Global Assignment� phase� Specify support in the �Preparation for Relocation� phase� Specify support in the �Transfer� phase� Specify support in the �Duration of Global Assignment� phase� Specify support in the �Repatriation� phase
Figure 206: HR Administrator � Display and maintain master data
Alongside the original goal of HR Administrator to display employee data likein the traditional SAP system and maintain it using infotypes and actions, themain focus is on processes and reporting.
Many examples that turn up particularly frequently in practice are deliveredby SAP as project templates. In addition, you can create and define your ownprocesses with any amount of steps and any role assignment.
Unit 18: HR Administrator and Employee Interaction Center HR305
As part of HR Administrative Services, the universal worklist makes the currentwork items available which the system has generated in the course of processing aprocess within HCM Processes and Forms.
Figure 208: HR Administrator � Ex. Process �Transfer of an Employee�Without Participation of a Manager
If HR Administrators trigger the process themselves (Process Without a Manager)they proceed in the following way:
� Searching the employee� Searching the process� Maintaining data� Storing data
Figure 209: HR Administrator � Ex. Process �Transfer of an Employee� WithParticipation of Several Managers I
In the process described above, the transfer of an employee is shown. The processTransfer supports the organisational change of an employee to a new position thatfalls outside the area of responsibility of the current manager. After carrying outthe process, the master data of the employee concerned is updated. The businessroles Sending Manager, Receiving Manager, Superior of Sending Manager andHR Administrator play an active part in carrying out the process. The employeeconcerned is informed of the process by email.
The process Transfer accelerates and optimizes the processing of a transfer,because the cross-role system integration guarantees the fastest possibleforwarding of work items and communication without gaps between all partiesconcerned.
Unit 18: HR Administrator and Employee Interaction Center HR305
Lesson: Employee Interaction Center (EIC)
Lesson Overview[Give a short overview of lesson.]
Lesson ObjectivesAfter completing this lesson, you will be able to:
� Describe Employee Interaction Center
Business Example[Explain to participants about the practical use of this lesson for a company usinga business example.]
Figure 211: Employee Interaction Center (EIC) Requirements
The Employee Interaction Center allows you to harmonize the above mentionedrequirements with your actual business processes. The goal of this is to minimizethe effort involved by standardizing and automating processes and their centralprocessing without any subsequent loss of quality.
The following advantages are gained from introducing the EIC:
� Improvement of service quality� Fast and service-oriented resolution of employee queries supported by
solution databases, contact history, and so on.� Single contact point for various channels of communication such as
telephone, email, workflows, incoming ESS/MSS, fax, and post� Reduction in costs for HR services� Increased efficiency and cost transparency� Support of integrated and standardized HR processes, including the
agreement of Service Level Agreements� Bundling and more efficient use of HR resources� Automation of the processes� Integration of Employee Self Services and Manager Self Services using
the SAP portal
The easy-to-use, interactive interface plays a role in achieving goals quickly
Figure 212: Employee Interaction Center Classification
The aim of integrating an EIC is firstly so that as many tasks as possible canbe dealt with by self services. This includes processes such as leave requests,company insurances, and so on.
Unit 18: HR Administrator and Employee Interaction Center HR305
If this is not possible, perhaps because the employee has further queries, or anactivity has to be revised again (for example, travel request), the EIC is used. Thiscan happen, for example for activities such as organizational change, transfer toanother country, and so on. In the EIC, the service center represents a first levelsupport that carries out most tasks.
The EIC can continue to process the activity whilst physically separate from thetrigger.
Complicated special tasks are forwarded to the advice center (second levelsupport).
Only if the task cannot be dealt with in the EIC do subject matter experts, or HRstrategists in the last instance, intervene.
Figure 213: Employee Interaction Center
Employees can contact the EIC in a variety of ways including telephoning directly.
Within the EIS, work flows are supported through the option of forwarding tasksfrom the service center to the advice center.
The personal advisor can use a contact history to obtain precise information aboutthe employee's previous contacts and issues.
To perform certain tasks, they can use the standard functions of my SAP ERP,such as master data maintenance. For this they go from the EIS to the relevanttransactions in HCM and back again. Data is also exchanged from the EIC (minidata master) with data from HCM via ALE in real time or at regular intervals.
The graphic shows a typical screen that is available to the HR advisor in theEIC. After the employee has been selected (above left), historical data about theemployee is shown (bottom left).
After this, a new activitiy for example can be recorded (bottom right).
Lesson OverviewThe detailed exercise in the case study enables you to put the most importantconcepts of this course into practice once more.
Lesson ObjectivesAfter completing this lesson, you will be able to:
� Understand better the content of this course by completing the exercises
Business ExampleDifferent problems occur within your company that you have to solve
Hint: This case study is divided into individual exercises. The individualexercises are self-contained. All exercises are optional, except for thefirst exercise. If you find that you do not have enough time to completeall the exercises, concentrate on those exercises that are most relevantto your business practice.
You are not provided with a perfect solution to the case study since theaim of the case study is to test your own knowledge. First try to completethe exercises without any additional help. If you have any difficulties,refer to the notes at the end of the relevant exercise. Should you still havedifficulties, your instructor is, of course, at your disposal.
Business scenario:
Your company has bought another company. This new subsidiary (located onanother site) manufactures and sells mopeds.
Exercise 1: Your company structure has changed through the purchase of thissubsidiary: You need to create a new personnel area MP## under the CABBcompany code. This personnel area should have a similar structure to personnelarea PA00, but without its own head office.
Note: For notes on completing this exercise, see the unit on �EnterpriseStructure�.
Exercise 2: * You need to hire a new employee for your part of the company fromthe first of this month. Use the hiring action HR305 with the following basic data:
You can make entries of your choice for any data that has not been specifiedexplicitly.
Note: For notes on completing this exercise, see the unit on �Hiring anEmployee�.
Exercise 3: * Your company has decided to adjust certain default values andselection options especially for the new production plant.
1. In Organizational Management, store the following data in the �##Production� organizational unit for the �## Production Worker B� positionas of the first of this month:
EE group: Active
EE subgroup: ##
Company code: CABB
Personnel area: MP##
Personnel subarea: Production
Hint: You find the �## Production� organizational unit underthe following path: Training International→ Production→ ##Production
For notes on completing this exercise, see the unit on �OrganizationalStructure�.
2. The new production plant should have a new pay scale type. You need tocreate this new pay scale type. The key of the new pay scale type shouldbe 50 + ##.
Note: For notes on completing this exercise, see the unit on�Remuneration Structure�.
3. In the relevant table (NOT in the feature), enter the following values asdefault values for an employee in personnel area MP## and personnelsubarea Production: 50 + ## for pay scale type and 70 + ## for pay scale area.
Note: For notes on completing this exercise, see the unit on�Remuneration Structure�.
4. In the pay scale table, enter meaningful entries for hourly wage earnersbetween 8 and 20 euro for pay scale type 50 + ## and pay scale area 70 + ##.Use the pay scale group E01 and pay scale levels 01 to 04.
Note: For notes on completing this exercise, see the unit on�Remuneration Structure�.
5. The payroll should be run for all the employees in your new production planttogether, separate from all other employees. Create a new payroll area withthe key 60 + ##. The payroll should be run monthly.
Note: For notes on completing this exercise, see the unit on�Additional Organizational Assignment�.
6. A new administrator group should be responsible for the employees in thenew production plant. Create a new administrator group called MP## anda new administrator M##.
Note: For notes on completing this exercise, see the unit on�Additional Organizational Assignment�.
7. In your new company, you want to record whether an employee is acraftsman or a master craftsman. In the appropriate Customizing table, makethe entries Moped Craftsman ## and Moped Master ##.
Note: For notes on completing this exercise, see the unit on�Additional Organizational Assignment�.
8. Set up a new wage type Hourly Wage Moped ## with the ID ##50. You canuse wage type MM10 as a template.
Customize the wage type so that the value is taken from the pay scale table.It should be possible to overwrite the amount, provided the administratordoes not enter any amounts under 8 euro or over 25 euro.
9. Set up a new wage type �Hourly Wage Bonus Moped ##� with the key ##60.You can use wage type MM30 as a template.
Customize the wage type so that the value is calculated from 10% of wagetype ##50. The amount in the infotype should be relevant. Round up thewage type to the nearest euro.
Note: For notes on completing this exercise, see the unit on �WageType Structure�.
10. Hire another employee with the following basic data as of today using thehiring action HR305:
Personnel number: 305996##
Position: ## Production Worker B in organizational unit ## Production
Work schedule rule: Norm
Pay scale group: E01
Pay scale level: 01
Wage type: ##50
You can make entries of your choice for any data that has not been specifiedexplicitly.
Check whether the settings you made in exercise 3 have the expected effect:
� Is the data for the enterprise or personnel structure pulled fromOrganizational Management?
� Are the correct entries for pay scale type and pay scale area defaulted?� Can you select payroll area 60 + ##?� Can you select the administrator you created from the MP##
administrator group?� Can you specify whether an employee is a Moped Craftsman ## or a
Moped Master ##?� Is the corresponding entry pulled from the pay scale table when you
enter wage type ##50? What is the range in which you can changethe amount?
� Is wage type ##60 calculated and rounded as you expected?
Exercise 4: * In your company, you have to check and change, if necessary, theattributes and interfaces of an infotype.
1. As there are now a lot of employees working in your company, you wouldlike to see the employee subgroup to which an employee belongs in theheader of the relevant infotype. Include this information in the screen header.
For this, enter the following basic data:
Your infotype has screen header number ## + 50 and your headermodification number is ## + 30.
2. In the bottom screen area, hide a field of your choice and then show it again.3. Include your infotype on your tab page �My Group ## �(key 50 + ##).4. Check the effect your settings have by creating a new record of your infotype
for an employee of your choice.
Note: For notes on completing this exercise, see the unit on�Infotypes�.
Exercise 5: * You need to create your own action in case the employmentpercentage in the Planned Working Time infotype (0007) changes. Use thefollowing entry as the ID:
Appendix 1Additional Information Material: Optional for
USA and Canada Only
� This section contains supplementary material for reference purposes.� This material is not part of the standard course.� Consequently, the instructor might not cover this during the course
presentation.
Content:
� mySAP Human Resources Concurrent Employment
Objectives:
� Define Concurrent Employment� Describe benefit implications such as seniority calculations for concurrent
employment� View work schedules for concurrent assignments� Discuss payroll processing considerations such as Overtime and Garnishment� Determine payroll posting options� Name new logical database required for concurrent employment
Business Scenario:
� A company has multiple facilities in the same city. Employees can holdpositions concurrently in these facilities. Service should be combined andpayroll considerations such as overtime calculations need to be available.Data entry clerks want to easily see all personnel assignments.
Appendix 1: Additional Information Material: Optional for USA and Canada Only HR305
Figure 215: Examples of Concurrent Employment Situations
Concurrent employments allow one employee to hold multiple positionssimultaneously and link those positions together through sync points foremployment consideration such as time, payroll and benefit processing.
Figure 216: Concurrent Employment Definition
To accomplish this, new additions such as infotypes, header structures, time andpayroll schemas, and a benefit workbench have been added to the Enterpriserelease to accommodate employment tracking and processing.
HR305 Appendix 1: Additional Information Material: Optional for USA and Canada Only
Figure 217: Concurrent Employment Solution at a Glance
The Infotype Framework allows you to have the user interface separated from thebusiness logic, so that it becomes easier to build new transactions at infotypelevel, for example, similar to the transaction PA30, without having to deal with thedynpro logic. It supports the creation of new web applications, for example. Theprinciple of data sharing is supported, thanks to the new infotype framework.
A new logical database (PNPCE) enables reporting based on the person or on thepersonnel assignment.
The concurrent employment model is a conceptual solution for CE using theavailable tools on HCM.
For the R/3 Enterprise release, the components Personnel Administration,Benefits, Time Management & Evaluation, and Payroll have been enhancedto support concurrent employment capabilities. This components have beenlocalized for the US and Canada only.
Appendix 1: Additional Information Material: Optional for USA and Canada Only HR305
Figure 218: Concurrent Employment Solution at a Glance
Some highlights for each of the components. For example, for PersonnelAdministration the Person ID concept has been realized. Decisions are madeduring configuration as to which infotypes should be shared during additionalassignment processing. New prompts have been added to alert data input clerks ofa second assignment.
Under Benefits there is a new workbench to combine service from multiplepositions for benefit eligibility. Time and Payroll schemas have been enhanced tosync up positions for processing and calculations such as overtime limits.
HR305 Appendix 1: Additional Information Material: Optional for USA and Canada Only
A example of an employment situation that requires concurrent employmentcapabilities.
Figure 220: Concurrent Employment Model
Here we see three key parts of the concurrent employment model. The first isthe person. The different personnel assignments are linked by the Person ID.Information about the person such as name, date of birth, address, and so onshould be shared between the positions so that no duplicate data entry is required.
The Personnel Assignment identifies the characteristics of the assignments such asremuneration, work schedule, and country assignment.
The Position describes the function that the employee will perform during theassignment.
Handling Multiple Assignments
� The Person ID is used to track the individual within the entire enterprise forthe life time of the employee.
� All previous employments of a person are automatically recognized.� If all previous personnel assignments are currently inactive, this person
is a rehire.� Security is in place to guarantee that multiple users access information about
the person according to their authorization level only.
In �Customizing�, it is defined which Infotypes and Subtypes should have �datasharing� of Person, Personnel Assignment and Employer.
Appendix 1: Additional Information Material: Optional for USA and Canada Only HR305
If a person is identified as already holding a personnel assignment, the systemlinks the new personnel assignment to the person and data sharing is established.
This enables the end user to maintain data that remains the same for one or morepersonnel assignments.
New Ways of Viewing and Accessing Person Information
� New features enable you to easily navigate from one personnel assignmentto another of the same person.
� A new overview option enables you to have a list of all personnelassignments of a person.
� A summarization screen allows you to have in one screen an overview of allactive personnel assignments of a person.
Once the appropriate configuration is made, you can easily see the personnelassignments on transactions such as PA20, PA30, and PA61.
Grouping of Personnel Assignments
� Personnel assignments can be grouped together for time and payrollprocessing as well as for reporting purposes.
� For example, a person can join a certain benefit plan if by combining his/herpersonnel assignments heor she meets the enrollment requirements.
� mySAP ERP 2005 comes with predefined rules to build groups of personnelassignments for common processing, but users can build their own rules.
There are valid reasons to group an employee's personnel assignments. Based oncompany policies and government regulations, there may be times when you wantto add together hours from the concurrent assignments. Conversely, there maybe times when this is not necessary. This decision is made in the grouping rulescreated during configuration. The grouping rules can vary. For instance, you cangroup for benefits differently than for time calculations.
HR305 Appendix 1: Additional Information Material: Optional for USA and Canada Only
Figure 221: Grouping Examples
It is common practice and often company policy to group personnel assignmentsfor different processes, such as payment, overtime calculation, benefitsadministration, and so on.
To group personnel assignments based on various criteria, you can use theGrouping Editor.
The examples shown in the graphic already indicate that the grouping of personnelassignments may differ from application to application or even within a certaintopic so that the Grouping Editor needs to reflect different grouping scenariosfor each application. It is customizable and relies on organizational data duringthe grouping process.
Appendix 1: Additional Information Material: Optional for USA and Canada Only HR305
Figure 222: Grouping Reason
Typical grouping reasons are:
� All assignments of a person should be grouped together, for example, forstoring the person ID.
� All assignments with the same country grouping should be grouped together,for example, for storing resident tax area data.
� All assignments with the same employer should be grouped together, forexample, for tax reasons or for garnishments.
The settings are maintained in table �Grouping Reasons for PersonnelAssignments� (T7CCE_GPREASON) in the IMG: Personnel Management→Personnel Administration→ Basic Settings→ Basic Settings for ConcurrentEmployment→ Editor for Personnel Assignment Groupings→ Change GroupingReasons
Grouping contexts are used by some transactions in order to provide additionaldata to the grouping rules. That is, to provide some �context�. If the transactiondoes not provide the context, the rule will not be able to evaluate it even if itis maintained in this table. This is the reason why you should not change theassigned grouping contexts for the standard reasons.
It is expected that no changes to this table are required.
The �Changeability of Grouping Reason Assignment� indicator controls whetherthe assignment of grouping rules may be changed.
HR305 Appendix 1: Additional Information Material: Optional for USA and Canada Only
Figure 223: Grouping Rules
The settings are maintained in table �Grouping Reasons for PersonnelAssignments� (T7CCE_GPREASON) in the IMG: Personnel Management→Personnel Administration→ Basic Settings→ Basic Settings for ConcurrentEmployment→ Editor for Personnel Assignment Groupings→ Change GroupingRules for Personnel Assignments
Figure 224: Linking Grouping Reason to Grouping Rule
Appendix 1: Additional Information Material: Optional for USA and Canada Only HR305
The �Assignment of Grouping Rule to Grouping Reasons� tables (T7CCE_GPASGand T7CCE_GPASGM) are evaluated to determine a Grouping Rule for a givenGrouping Reason.
� Table T7CCE_GPASG contains country-specific entries. One of the keyfields is MOLGA.
� Table T7CCE_GPASGM contains international entries.� Both tables have the key field Status to distinguish SAP entries from
customer entries.�
Hint: Note: Any customer entry in this table will always beevaluated before the SAP entry. Country-specific entries have higherpriority than international entries. Therefore, the evaluation order is:
� Country-specific customer entry� International customer entry� Country-specific SAP entry� International SAP entry
The settings are maintained in the IMG at: Personnel Management→ PersonnelAdministration→ Basic Settings→ Basic Settings for Concurrent Employment→Editor for Personnel Assignment Groupings→ Change Assignment of GroupingRules to Grouping Reasons
HR305 Appendix 1: Additional Information Material: Optional for USA and Canada Only
Typical applications for the main personnel assignment are:
� To indicate which assignment of a benefits area holds the benefits information� To indicate which assignment of a tax company group holds the main tax
information
Some applications determine a main personnel assignment automatically if thereis no IT712 specified
Figure 226: Recognizing Previous Employment
During the Hiring personnel action, the system tries to find out if there areprevious and currently active employments for the same person.
By looking at the Social Security Number (USA) (field name PERID), last name,first name, and date of birth of the person, the system is able to recognize previousemployment records of that person.
This means that the system will present all records matching your initial entries.
The user may confirm whether the person is the same or not:
� If the person is not the same person, then the action will proceed as in thenon concurrent employment case.
� If the user confirms the entries as belonging to the same person, the systemwill continue with additional processing for concurrent employment (seenext page).
Appendix 1: Additional Information Material: Optional for USA and Canada Only HR305
Figure 227: Rehire or New Assignment
In the �Employees with Identical Data� dialog box, the user needs to select anassignment from the list or cancel if he or she wants to hire a new employee.
Since a person may have several assignments that might be terminated and activeat the same time, it is important to know what kind of personnel action the userwants to perform:
� To create a new assignment for the person� To rehire the person
If the user wants to create a new assignment for a person, he or she can select anyassignment from the list. However, by choosing an active assignment, the �NewWork Relationship� dialog box will not appear.
After you enter the appropriate entries, the system will continue with the desiredpersonnel action (new assignment or rehire). Which infogroup will be presentedfor each personnel actions depends on the settings made in Customizing.
The personnel actions, �new assignment� and �rehire�, are stored with the logicalkeys ADDITIONAL_ASSIGNMENT and REHIRE.
HR305 Appendix 1: Additional Information Material: Optional for USA and Canada Only
Figure 228: Country Change
The logical keys for the �Country Change� and the �Termination� personnelactions are HIRE_COUNTRYCHANGE and TERMINATION.
Figure 229: Customization Steps
With the help of the �Actions � Default Values for Recognition� feature (ACTCE),you determine how the system should react during hiring actions for employeesfor whom a personnel assignment already exists.
Appendix 1: Additional Information Material: Optional for USA and Canada Only HR305
Customization for feature �Actions � Default Values for Recognition� (ACTCE)is maintained in the IMG: Personnel Management→ Personnel Administration→ Customizing Procedures→ Settings for Concurrent Employment→ Actionsfor Concurrent Employment
The logical keys are predefined. The first 4 logical keys (ADDITIONAL_AS-SIGNMENT, REHIRE, TERMINATION, HIRE_COUNTRYCHANGE) havealready been explained here.
The other logical keys correspond to the Management of Global Employeessolution, which is handled in a separate workshop.
Figure 230: Data Sharing Principle
When you create a new personnel assignment for a person, data stored in aprevious personnel assignment may be required for the new one.
To simplify data maintenance across all personnel assignments for end users, thesystem uses the data sharing mechanism.
Data is stored in infotypes, which always contain information specific to oneassignment. If data needs to be specific for a group of assignments, the datasharing mechanism is applied.
There are different ways to share data:
� Among active personnel assignments only (see the Person ID example)� Among all personnel assignments in one company (see the Tax Data
HR305 Appendix 1: Additional Information Material: Optional for USA and Canada Only
Figure 231: Data Sharing: Person ID Example
In this example, the records of the Person ID infotype (0709) should be same forall assignments. Technically, we want to group all assignments of the same personand then share the data in the infotype 0709 within the group.
Grouping all assignments together is achieved using the grouping reason �XALL�.
Customization is maintained for �Infotype / Subtype Assignment � GroupingReason� (V_T582G) in the IMG:
Appendix 1: Additional Information Material: Optional for USA and Canada Only HR305
Figure 232: Data Sharing: Tax Data Example
Grouping assignments with the same (tax) company together is achieved using thegrouping reason �USIT� (US-specifc).
The entry in the last column indicates that no data should be shared before anassignment starts. If the entry is changed to indicate that the system should groupbefore the assignment starts, the following happens:
� The grouping rule cannot determine a valid company before the start of theassignment since there is no infotype 0001 data present at this time. Hencethe rule will deliver no grouping value. Since the system needs a valueanyway, it uses the earliest value it can determine and assumes that thisis the correct value.
If the grouping rule identifies a grouping value before the assignments starts, thenthe system uses this value. This is the case in the Person ID example.
Benefits Administration & Workbench for CE
Benefits
� Administration Personnel Assignments are grouped together based on theBenefit Area stored in the �General Benefits Information� Infotype.
� Personnel Assignments having the same Benefit Area are grouped togetherfor further processing.
� Only one Personnel Assignment per Group can carry and process BenefitPlan information, the Main Personnel.
HR305 Appendix 1: Additional Information Material: Optional for USA and Canada Only
Benefits Workbench for Concurrent Employment
� Facilitates the administration of benefits� Is the single point of entry for Benefits Administration� Supports the adjustment reasons at person level
The additional Personnel Assignments of the same group are the�SecondaryPersonnel Assignments�.
They can contribute with parameters such as:
� Work hours� Salary� Seniority information
In this way, they influence the processing of the Benefits under the Main PersonnelAssignment.
To be able to differentiate between Main Personnel Assignment and SecondaryPersonnel Assignments, the �General Benefits Information� infotype will beenhanced.
Figure 233: Main Personnel Assignment for Benefits
Usually, each personnel assignment is assigned to one benefit area. Personnelassignments sharing the same benefit area are grouped together for benefitscalculation. For each benefit area, an assignment is defined as the main personnelassignment.
Appendix 1: Additional Information Material: Optional for USA and Canada Only HR305
The employee can have a set of benefit plans for each benefit area. These plansare held by the main personnel assignment.
Hint: Personnel assignments can belong to the same benefit area only ifthey belong to the same payroll area.
Figure 234: Grouping for Benefits: Consequences
Personnel assignments belonging to the same benefit area are grouped together forbenefits. This means that the benefits of two personnel assignments are calculatedtaking into account data coming from both personnel assignments. Numerical dataare summed together and organizational data are taken from the main personnelassignment.
Example:
� For the �Corporate� benefit area, an employee is eligible for a pension planonly if he or she works more than 25 hours a week. The working hours of allpersonal assignments belonging to the �Corporate� benefit area will be thensummed together to determine if the employee is eligible for this plan.
� For the �Corporate� benefit area, only hourly employees are eligible for agiven dental plan. If the main personnel assignment for this benefits area is asalaried employee, then the employee will not be eligible for this plan.
Appendix 1: Additional Information Material: Optional for USA and Canada Only HR305
Figure 236: Concurrent Employment Workbench II
With this workbench you can assign multiple personnel assignments to a benefitarea. For each benefit area you have to decide which assignment is the main one.
You can display the list of benefits plans for a main personnel assignment.
The workbench allows you to jump to the main benefit transactions.
All changes are made as of the key date. Information before the key date isretained but is delimited.
Example: An employee gets a new assignment. As a consequence of this, theemployee should be allowed to change his or her benefits contributions. Forthis, you select the main personnel assignment and create an adjustment reason.Once the adjustment reason has been created, you can run the enrollment or theparticipation monitor to perform the necessary adjustments.
HR305 Appendix 1: Additional Information Material: Optional for USA and Canada Only
Figure 237: Implementing Your Own Groupings for Benefits
For the benefits processing, personnel assignments belonging to the same benefitarea are grouped together. This is the case for eligibility where working hours ofpersonnel assignments belonging to the �Corporate� benefit area are summedtogether. However, you can deviate from this rule.
For eligibility you might want to consider the working hours of all personnelassignments instead of the working hours of the personnel assignments of thesame benefit area.
Example: An employee needs to work at least 30 hours in order to enroll into aDental plan of the �Corporate� benefit area. In this case, if you do not replacethe default grouping for Eligibility, only the working hours of the personnelassignments belonging to the �Corporate� benefit area are included, that is,15+10 = 25 hours, which is not sufficient to enroll in the plan. If you set up theEligibility grouping so that all personnel assignments are selected, the Workinghours that will be considered will be: 15 + 10 +15 = 40 hours, which is enoughto enroll into the Dental plan.
Planned Working Time � Managed at the Personnel Assignment level
� One work schedule (planned working times) at Personnel Assignment level� Collisions of planned working times can be visualized through Time
Manager�s Workplace
Time Evaluation � Time evaluation rules can be processed for one personnelassignment or for groups of personnel assignments
� Overtime calculation� Working time directives can be checked at Person level� Absence quotas can be generated across multiple personnel assignments� Verification of maximum leave entitlement across personnel assignments� Time Evaluation is fully integrated to Payroll processing
With mySAP HCM Time Management in concurrent employment situations, it ispossible for the time administrator at the healthcare institution to view Donna�swork schedule in one simple report. Additionally, HR personnel at both thePediatric Clinic and Memorial Hospital can monitor her work independently.
In addition, mySAP ERP 2005 Time Management in concurrent employmentsituations allows the combining of work schedules under different views. Thisallows time management administrators to catch any scheduling conflicts andprevent overstaffing. This information empowers administrators to make the rightstaffing decisions on a case-by-case basis.
HR305 Appendix 1: Additional Information Material: Optional for USA and Canada Only
Figure 238: Overtime Rule Applied to Multiple Personnel Assignments
Additionally, mySAP ERP 2005 Time Evaluation is completely integrated withmySAP ERP 2005 Payroll, which considerably simplifies the process of payingemployees with multiple personnel assignments.
Figure 239: Example: Weekly Overtime Regulation II
Appendix 1: Additional Information Material: Optional for USA and Canada Only HR305
Donna�s personnel assignments with the Healthcare Institution are analyzedjointly to determine the applicable weekly working time. mySAP ERP 2005 totalsthe times she worked on these two personnel assignments and compares the totalwith the joint value limit. The working week must be the same for both personnelassignments.
The wage type resulting from the hours of overtime is distributed over the twopersonnel assignments she has with the Healthcare Institution. You can usedistribution methods to determine how you want it to be distributed.
Figure 240: Concurrent Employment with mySAP ERP 2005 TimeManagement
Time management regulations can be processed over multiple personnelassignments in Time Evaluation only.
HR305 Appendix 1: Additional Information Material: Optional for USA and Canada Only
Figure 241: Time Data Administration Using the Time Manager�s Workplace
There are currently no functions especially for recording the working times ofconcurrently employed persons in the Time Manager�s Workplace.
You can, however, use the Multi-Person View and the Temporarily insertemployees function to call up all of an employee�s personnel assignments andprocess the time data jointly.
We recommend you to use the Time Manager�s Workplace to administer timedata for concurrently- employed persons. The Multi-Person View displays allinformation relevant to the various work schedules of the concurrently-employedperson. This means that you can avoid collisions between work schedules andwith the time data in the employee�s other personnel assignments.
It is especially useful for identifying irregularities, for example, if an employeehas reported sick for one personnel assignment to be able to work overtime for theother personnel assignment.
Appendix 1: Additional Information Material: Optional for USA and Canada Only HR305
Figure 242: Time Data Administration Using the Maintain Time DataTransaction (PA61)
If you use the Maintain Time Data function, the Pers.Assgn field and the listboxfor navigating between personnel assignments show an overview of all of theemployee�s personnel assignments.
Hint: TheMaintain Time Data transaction (PA61) is not being developedfurther. You are therefore advised to use the Time Manager�s Workplace,which has a considerably more comprehensive range of functions.
Payroll Processing
New payroll process architecture
� Enables you to run payroll for multiple personnel assignments� Identifies person-related processes� Includes synchronization mechanism� Contains a new payroll log
Payroll results and reporting
� New ways to visualize payroll results, at person level or at personnelassignment level
� New logical database enables you to report on the Person or on the personnelassignment
HR305 Appendix 1: Additional Information Material: Optional for USA and Canada Only
Payroll payment and posting to accounting
� Build a group of personnel assignments for the payroll payment� Posting on person level or personnel assignment level
Figure 243: Payroll Process Architecture
In a CE Environment it is often necessary to run payroll simultaneously for eachpersonnel assignment. This is now possible thanks to a new payroll architecture
The parts of the payroll process that are person-related are processed together in asynchronization point. For example, in the chart above, the Tax, Net Calculation,Retroactive Accounting Calculation, and Payment Calculation processes areperformed simultaneously at synchronization points
Appendix 1: Additional Information Material: Optional for USA and Canada Only HR305
Figure 244: Payroll Results
The calculation of payroll results for concurrently employed persons dependsupon the totals of the individual assignments. To avoid erroneous or redundantpayroll results, mySAP ERP 2005 distinguishes among payroll results as shownin the diagram above.
Figure 245: Payment Group and Posting to Accounting
HR305 Appendix 1: Additional Information Material: Optional for USA and Canada Only
The payroll results contain information that is relevant to the accountingdepartment. For this reason, these results must be forwarded to accounting. Theinterface between payroll and accounting helps to:
� Group together relevant posting information from the payroll results� Create summaries of important documents� Perform the relevant postings in the accounting components, such as the
general ledger accounting and cost accounting components
The posting capabilities of mySAP ERP 2005 Payroll can also post expenses andliabilities assigned during payroll to either a personnel assignment or a groupof personnel assignments. In the latter case, a main personnel assignment mustbe defined. This will help to:
� Define the cost assignment for expense postings� Assign the company code and business area of postings to clearing accounts,
both for the payroll and the payment posting� Derive the paying company code� Determine the house bank and house bank account used for the payment
along with the paying company code
Figure 246: Summary: Concurrent Employment Solution at a Glance
FeedbackSAP AG has made every effort in the preparation of this course to ensure theaccuracy and completeness of the materials. If you have any corrections orsuggestions for improvement, please record them in the appropriate place in thecourse evaluation.