Page 1
Microsoft Dynamics AX
Implement a
payment
connector and
a payment
device This document explains how to implement a
payment connector, a payment accepting
web app, and a payment device to handle
various payment processing scenarios.
White paper
Version 7.0.1.4
September 2019
Send feedback.
www.microsoft.com/dynamics/ax
Page 2
Implement a payment connector and a payment device 2
Contents
Part 1: Implementing a payment connector 5
Payment scenarios 6
Set up a merchant account 6
Process a call center order (Dynamics AX) 6
Process an online order (E-Commerce) 7
Process a POS cash-and-carry transaction by using an accepting page 7
Process a POS cash-and-carry return by using an accepting page 7
Process a POS customer order by using an accepting page 8
Process a POS cash-and-carry transaction by using Microsoft Dynamics AX Retail Hardware Station 9
Process a POS cash-and-carry return by using Hardware Station 9
Process a POS customer order by using Hardware Station 10
Connector setup 10
Connector validation 11
GenerateCardToken method 12
Authorization method 14
Payment properties that are required for Level 2 16
Tax detail properties 18
Miscellaneous charge properties 18
Payment properties that are required for Level 3 19
Capture method 21
Void method 22
Refund method 23
GetPaymentAcceptPoint method 24
RetrievePaymentAcceptResult method 26
Unsupported methods 27
Enumeration types 27
Part 2: Implementing a payment accepting web app 28
The roles 28
The scenario 29
How to build and run the sample projects 30
Requirements of a payment accepting application 33
Requirement 1 34
Page 3
Implement a payment connector and a payment device 3
Requirement 2 34
Requirement 3 35
Cross-domain messaging 36
The sample implementation 39
Main components 39
Styling 40
Localization 43
Right-to-left 45
Messages 45
Data access 45
Payment processing 46
Card input modes 46
Error handling 46
Data encryption 47
Data purge 47
Scalability 47
Refunds 47
What isn’t included 47
Part 3: Implementing a payment device 48
Methods 48
Task OpenAsync(string peripheralName, SettingsInfo terminalSettings, IDictionary<string, string> deviceConfig) 48
Task CloseAsync() 48
Task BeginTransactionAsync(PaymentProperty[] merchantProperties, string connectorName, string invoiceNumber,
bool isTestMode) 48
Task EndTransactionAsync() 49
Task UpdateLineItems(string totalAmount, string taxAmount, string discountAmount, string subTotalAmount,
IEnumerable<ItemInfo> items) 49
Task<PaymentInfo> AuthorizePaymentAsync(decimal amount, string currency, string voiceAuthorization, bool
isManualEntry) 49
Task<PaymentInfo> CapturePaymentAsync(decimal amount, string currency, PaymentProperty[]
paymentProperties) 49
Task<PaymentInfo> VoidPaymentAsync(decimal amount, string currency, PaymentProperty[] paymentProperties)
49
Task<PaymentInfo> RefundPaymentAsync(decimal amount, string currency, bool isManualEntry) 50
Task<PaymentInfo> FetchTokenAsync() 50
Task CancelOperationAsync() 50
Extensibility in Dynamics AX 50
Processing the payment by using a payment connector 50
Exception handling 50
Page 4
Implement a payment connector and a payment device 4
Summary 51
Change history 51
Page 5
Implement a payment connector and a payment device 5
Implement a payment connector and a payment device
Part 1: Implementing a payment connector
Currently, the payment connector is built as a portable class library by using C# profile 111. Therefore, the connector
can work on the following platforms: the Microsoft .NET Framework version 4.5, Windows 8, Windows Phone
Silverlight 8, Windows Phone 8.1, Xamarin.iOS, and Xamarin.Android. The same connector supports the following
channels:
● Microsoft Dynamics AX (Direct marketing)
● Microsoft SharePoint with the Microsoft Dynamics plug-in (E-Commerce)
● Mobile & Desktop POS (Retail)
Originally, the payment software development kit (SDK) encrypted each payment property individually, depending
on the SecurityLevel setting. However, this functionality is being phased out, and all merchant data will now be
encrypted at rest by the clients.
Each call to the payment connector application programming interface (API) follows the same request and response
pattern. The request holds the required locale for any messages and the payment property array of data to carry out
the operation. The request payment properties are grouped by four main namespaces: MerchantAccount,
TransactionData, PaymentCard, and Connector. The response holds the locale of the messages and the payment
property array of data that is produced by carrying out the operation. It can also hold an array of errors that occurred
while the operation was being processed. The response payment properties are grouped by three main namespaces:
MerchantAccount, *Response (where * = Authorize, Capture, Void, Refund, and so on), and Connector.
The *Response namespace is held as a PaymentProperty property that contains an array of PaymentProperty
properties. Therefore, it’s much easier to generate any dependent requests, such as a capture request from an
authorization response.
Many operations require data from the previous response. Therefore, all clients copy the response property bag and
combine it with the next dependent request call. This functionality lets each payment connector developer save data
that is required for subsequent calls.
Make sure that any exceptions that occur in the payment connector are mapped to the response errors, because
exceptions aren’t allowed to bubble up to the calling client. Instead, the payment SDK logs them by using NetTracer.
A sample project has been created as a template for creating new payment connectors to link to different payment
providers. Use this document and the sample to create your connector.
Page 6
Implement a payment connector and a payment device 6
Payment scenarios
Before we get into the details of payment APIs, this section presents the basic payment scenarios. Each scenario
consists of a list of steps. Some steps invoke payment APIs. These steps will help you understand how payment
connector APIs (in this part of the document) and payment device APIs (in part 3) are used in those scenarios.
Note: This section doesn’t present a complete list of the scenarios.
Set up a merchant account
You can set up a merchant account in Accounts receivable in Dynamics AX (used by the call center), in a hardware
profile (used by the point of sale [POS] in stores), and in an online channel (used by the E-Commerce website).
1 Add a new merchant account.
Method invoked: IPaymentProcessor.GetMerchantAccountPropertyMetadata
2 Fill in the merchant information.
3 Validate the merchant account.
Method invoked: IPaymentProcessor.ValidateMerchantAccount
4 Save the merchant account.
Process a call center order (Dynamics AX)
1 Create a new call center order.
2 Add a customer, add products, and so on.
3 Click New credit card.
Method invoked: IPaymentProcessor.GetPaymentAcceptPoint (The inputs are the transaction type, merchant,
industry type, and so on.)
4 Fill in the card information and amount, and then click OK.
Methods invoked:
● IPaymentProcessor.GenerateCardToken (This method is called from the accepting page.)
● IPaymentProcessor.RetrievePaymentAcceptResult (The result is a card token.)
5 Submit payment.
Method invoked: IPaymentProcessor.Authorize (The token is used.)
6 Place the order.
7 Ship and invoice the order.
Method invoked: IPaymentProcessor.Capture (The authorization response is used.)
Page 7
Implement a payment connector and a payment device 7
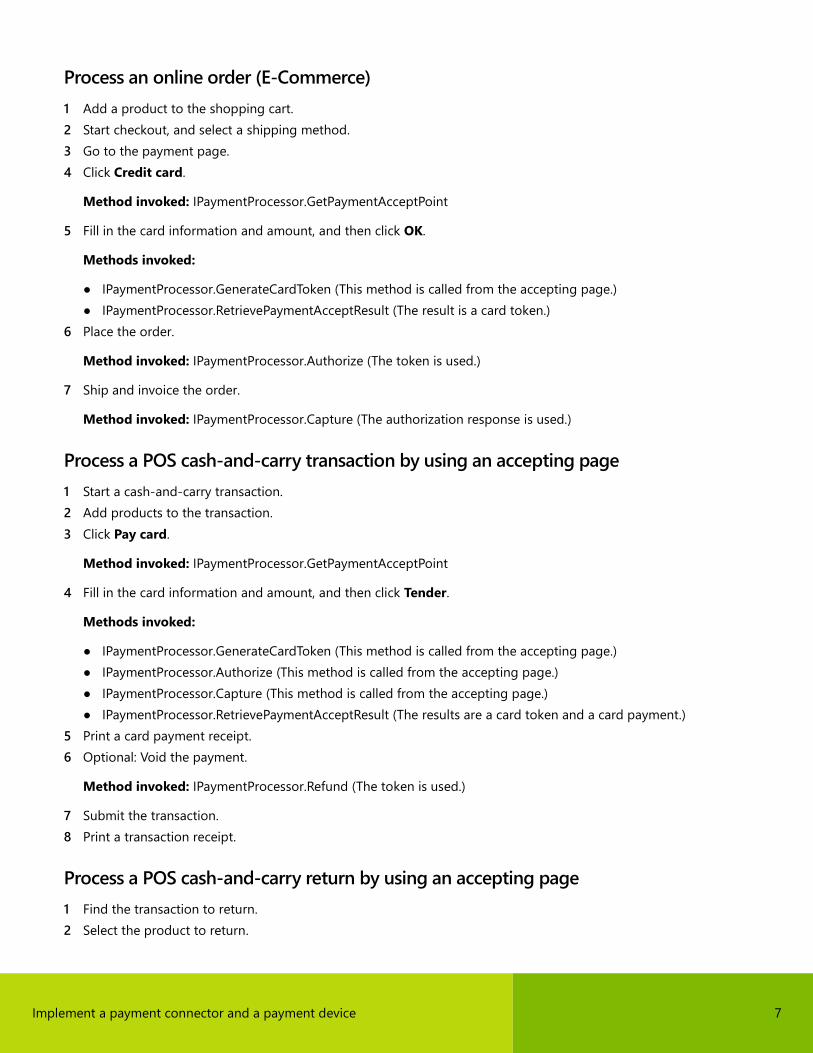
Process an online order (E-Commerce)
1 Add a product to the shopping cart.
2 Start checkout, and select a shipping method.
3 Go to the payment page.
4 Click Credit card.
Method invoked: IPaymentProcessor.GetPaymentAcceptPoint
5 Fill in the card information and amount, and then click OK.
Methods invoked:
● IPaymentProcessor.GenerateCardToken (This method is called from the accepting page.)
● IPaymentProcessor.RetrievePaymentAcceptResult (The result is a card token.)
6 Place the order.
Method invoked: IPaymentProcessor.Authorize (The token is used.)
7 Ship and invoice the order.
Method invoked: IPaymentProcessor.Capture (The authorization response is used.)
Process a POS cash-and-carry transaction by using an accepting page
1 Start a cash-and-carry transaction.
2 Add products to the transaction.
3 Click Pay card.
Method invoked: IPaymentProcessor.GetPaymentAcceptPoint
4 Fill in the card information and amount, and then click Tender.
Methods invoked:
● IPaymentProcessor.GenerateCardToken (This method is called from the accepting page.)
● IPaymentProcessor.Authorize (This method is called from the accepting page.)
● IPaymentProcessor.Capture (This method is called from the accepting page.)
● IPaymentProcessor.RetrievePaymentAcceptResult (The results are a card token and a card payment.)
5 Print a card payment receipt.
6 Optional: Void the payment.
Method invoked: IPaymentProcessor.Refund (The token is used.)
7 Submit the transaction.
8 Print a transaction receipt.
Process a POS cash-and-carry return by using an accepting page
1 Find the transaction to return.
2 Select the product to return.
Page 8
Implement a payment connector and a payment device 8
3 Click Pay card.
Method invoked: IPaymentProcessor.GetPaymentAcceptPoint
4 Fill in the card information and amount, and then click Tender.
Methods invoked:
● IPaymentProcessor.GenerateCardToken (This method is called from the accepting page.)
● IPaymentProcessor.RetrievePaymentAcceptResult (The result is a card token.)
● IPaymentProcessor.Refund (The token is used.)
5 Print a card payment receipt.
6 Submit the transaction.
7 Print a transaction receipt.
Process a POS customer order by using an accepting page
1 Start a customer order.
2 Add a customer, add products, and select a delivery method, such as shipping all.
3 Click Pay card for deposit.
Method invoked: IPaymentProcessor.GetPaymentAcceptPoint
4 Fill in the card information and amount, and then click Tender.
Methods invoked:
● IPaymentProcessor.GenerateCardToken (This method is called from the accepting page.)
● IPaymentProcessor.Authorize (This method is called from the accepting page.)
● IPaymentProcessor.Capture (This method is called from the accepting page.)
● IPaymentProcessor.RetrievePaymentAcceptPoint (The results are a card token and a card payment.)
5 Enter a card for the remaining amount.
Method invoked: IPaymentProcessor.GetPaymentAcceptPoint
6 Fill in the card information and amount, and then click OK.
Methods invoked:
● IPaymentProcessor.GenerateCardToken (This method is called from the accepting page.)
● IPaymentProcessor.RetrievePaymentAcceptPoint (The result is a card token.)
7 Submit the order.
Method invoked: IPaymentProcessor.Authorize (The token is used.)
8 Fulfill and invoice the order.
Method invoked: IPaymentProcessor.Capture
9 Print a receipt.
Page 9
Implement a payment connector and a payment device 9
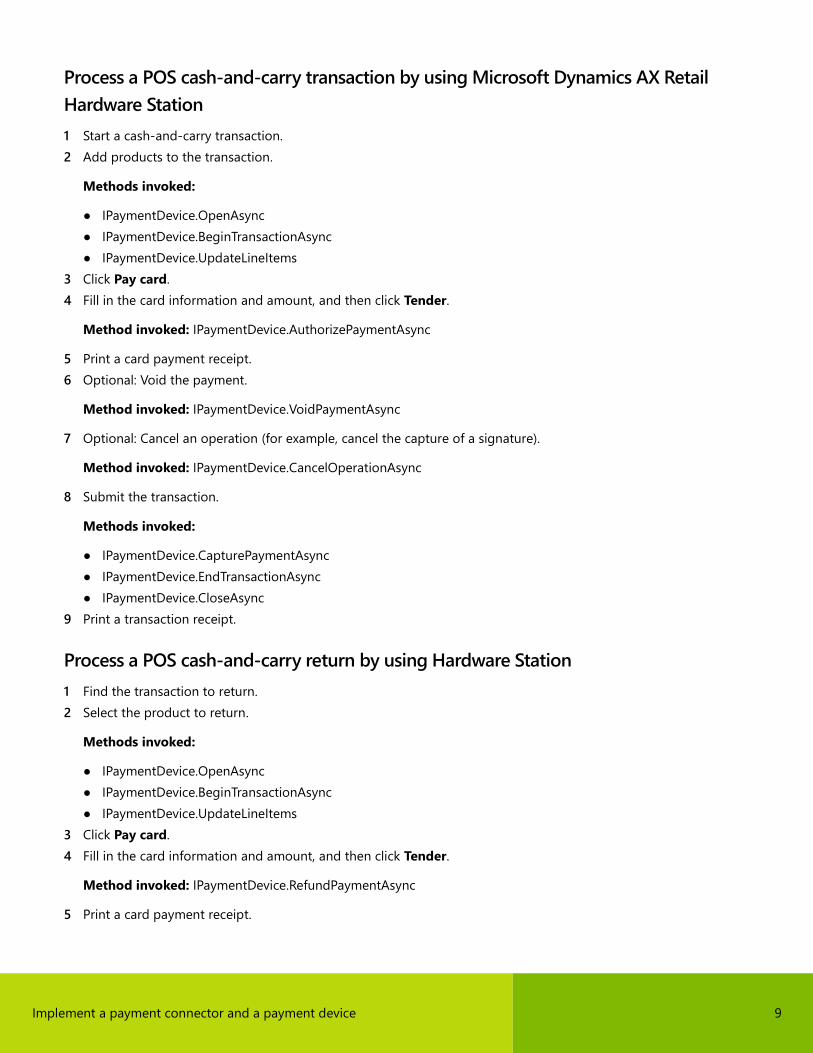
Process a POS cash-and-carry transaction by using Microsoft Dynamics AX Retail
Hardware Station
1 Start a cash-and-carry transaction.
2 Add products to the transaction.
Methods invoked:
● IPaymentDevice.OpenAsync
● IPaymentDevice.BeginTransactionAsync
● IPaymentDevice.UpdateLineItems
3 Click Pay card.
4 Fill in the card information and amount, and then click Tender.
Method invoked: IPaymentDevice.AuthorizePaymentAsync
5 Print a card payment receipt.
6 Optional: Void the payment.
Method invoked: IPaymentDevice.VoidPaymentAsync
7 Optional: Cancel an operation (for example, cancel the capture of a signature).
Method invoked: IPaymentDevice.CancelOperationAsync
8 Submit the transaction.
Methods invoked:
● IPaymentDevice.CapturePaymentAsync
● IPaymentDevice.EndTransactionAsync
● IPaymentDevice.CloseAsync
9 Print a transaction receipt.
Process a POS cash-and-carry return by using Hardware Station
1 Find the transaction to return.
2 Select the product to return.
Methods invoked:
● IPaymentDevice.OpenAsync
● IPaymentDevice.BeginTransactionAsync
● IPaymentDevice.UpdateLineItems
3 Click Pay card.
4 Fill in the card information and amount, and then click Tender.
Method invoked: IPaymentDevice.RefundPaymentAsync
5 Print a card payment receipt.
Page 10
Implement a payment connector and a payment device 10
6 Submit the transaction.
Methods invoked:
● IPaymentDevice.EndTransactionAsync
● IPaymentDevice.CloseAsync
7 Print a transaction receipt.
Process a POS customer order by using Hardware Station
1 Start a customer order.
2 Add a customer.
3 Add products.
Methods invoked:
● IPaymentDevice.OpenAsync
● IPaymentDevice.BeginTransactionAsync
● IPaymentDevice.UpdateLineItems
4 Select a delivery method, such as shipping all.
5 Click Pay card for deposit.
6 Fill in the card information and amount, and then click Tender.
Method invoked: IPaymentDevice.AuthorizePaymentAsync
7 Print a card payment receipt.
8 Enter a card for the remaining amount.
9 Fill in the card information and amount, and then click OK.
Method invoked: IPaymentDevice.FetchTokenAsync
10 Submit the order.
Method invoked: IPaymentProcessor.Authorize (The token is used.)
11 Fulfill and invoice the order.
Method invoked: IPaymentProcessor.Capture
12 Print an order receipt.
Connector setup
Payment connectors are configured in Dynamics AX by opening the Channel configuration page, which dynamically
loads all the connectors that implement the IPaymentProcessor interface in the connector directory. When the
customer selects a connector, the page calls the GetMerchantAccountPropertyMetadata() method, which returns
the metadata that is required in order to configure the connector. The following code shows the required properties.
Note: The text should be translated for the requested locale.
Page 11
Implement a payment connector and a payment device 11
property = new PaymentProperty(
GenericNamespace.MerchantAccount,
MerchantAccountProperties.PortableAssemblyName,
this.GetAssemblyName(),
SecurityLevel.None);
property.SetMetadata("Portable assembly name:", "The portable assembly name of the test provider",
false, true, 0);
property = new PaymentProperty(
GenericNamespace.MerchantAccount,
MerchantAccountProperties.ServiceAccountId,
Guid.NewGuid().ToString(),
SecurityLevel.None);
property.SetMetadata("Service account ID:", "The organization subscription ID for Dynamics Online
Payment service", false, false, 2);
property = new PaymentProperty(
GenericNamespace.MerchantAccount,
MerchantAccountProperties.SupportedCurrencies,
SupportedCurrencies,
SecurityLevel.None);
property.SetMetadata("Supported currencies:", "The supported currencies (ISO 4217) for Dynamics Online
Payment service", false, false, 8);
property = new PaymentProperty(
GenericNamespace.MerchantAccount,
MerchantAccountProperties.SupportedTenderTypes,
SupportedTenderTypes,
SecurityLevel.None);
property.SetMetadata("Supported payment methods:", "The supported payment methods for Dynamics Online
Payment service", false, false, 9);
The SetMetadata() method sets the displayed text, tooltip, isPassword property, isReadOnly property, and display
sort order. You can also change the height of the text box by setting property.DisplayHeight to 3 (to make it three
text lines high) or even hide properties from the customer by setting property.IsHidden to true.
The merchant data namespace is used to store data that the connector always uses for every type of payment
operation. This data includes endpoints, credentials, and merchant identifiers. Every request to the payment
connector will include the full set of merchant properties. However, the response will include only the service account
ID from the MerchantAccount namespace.
Connector validation
Before the Dynamics AX configuration page is saved, a call is made to the payment connector to validate the settings
that the customer entered. The ValidateMerchantAccount() method is used. This method typically calls the
endpoint by using the supplied credentials, and it validates that the settings are correct. If they aren’t correct, the
error that is returned is mapped to the closest generic error in the payment SDK PaymentError enumeration. For
example, this generic error might be ApplicationError, LocaleNotSupported, or InvalidRequest.
Page 12
Implement a payment connector and a payment device 12
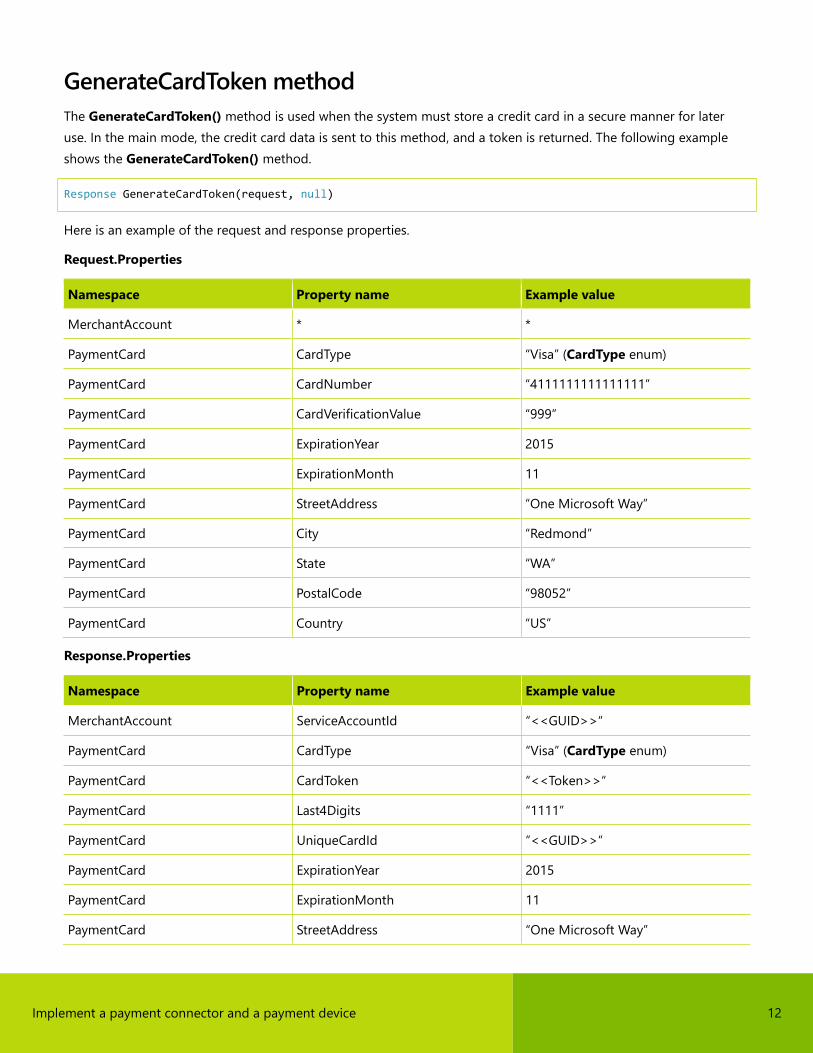
GenerateCardToken method
The GenerateCardToken() method is used when the system must store a credit card in a secure manner for later
use. In the main mode, the credit card data is sent to this method, and a token is returned. The following example
shows the GenerateCardToken() method.
Response GenerateCardToken(request, null)
Here is an example of the request and response properties.
Request.Properties
Namespace Property name Example value
MerchantAccount * *
PaymentCard CardType “Visa” (CardType enum)
PaymentCard CardNumber “4111111111111111”
PaymentCard CardVerificationValue “999”
PaymentCard ExpirationYear 2015
PaymentCard ExpirationMonth 11
PaymentCard StreetAddress “One Microsoft Way”
PaymentCard City “Redmond”
PaymentCard State “WA”
PaymentCard PostalCode “98052”
PaymentCard Country “US”
Response.Properties
Namespace Property name Example value
MerchantAccount ServiceAccountId “<<GUID>>“
PaymentCard CardType “Visa” (CardType enum)
PaymentCard CardToken “<<Token>>“
PaymentCard Last4Digits “1111”
PaymentCard UniqueCardId “<<GUID>>“
PaymentCard ExpirationYear 2015
PaymentCard ExpirationMonth 11
PaymentCard StreetAddress “One Microsoft Way”
Page 13
Implement a payment connector and a payment device 13
Namespace Property name Example value
PaymentCard City “Redmond”
PaymentCard State “WA”
PaymentCard PostalCode “98052”
PaymentCard Country “US”
PaymentCard BankIdentificationNumberStart “400000”
Connector ConnectorName “<<Connector name>>“
The BankIdentificationNumberStart property is optional. It contains the starting number of the card’s BIN (Bank
Identification Number). For example, the starting number for VISA is 400000, and the starting number for MasterCard
is 510000. The property value helps the caller identify the card type.
Note: The caller might not understand the CardType property, because it’s just a string that is determined by the
payment connector. In these cases, the BankIdentificationNumberStart property helps identify the card type.
Currently, this property is used only in payment accepting scenarios, when the payment accepting page doesn’t send
the card prefix.
In Dynamics AX, the client calls Response GenerateCardToken(request, requiredInteractionProperties), where a
Win32 dialog is displayed and the client enters the required details. This method is called only from Dynamics AX
instances that run on the client’s desktop.
Request.Properties
Namespace Property name Example value
MerchantAccount * *
requiredInteractionProperties
Namespace Property name Example value
PaymentCard CardType “<<CardType enum>>“
PaymentCard CardNumber ““
PaymentCard CardVerificationValue ““
PaymentCard ExpirationYear <<Default year>>
PaymentCard ExpirationMonth <<Default month>>
PaymentCard StreetAddress ““
PaymentCard City ““
PaymentCard State ““
PaymentCard PostalCode ““
Page 14
Implement a payment connector and a payment device 14
Namespace Property name Example value
PaymentCard Country “<<Default country/region>>“
Response.Properties
Namespace Property name Example value
MerchantAccount ServiceAccountId “<<GUID>>“
PaymentCard CardType “Visa” (CardType enum)
PaymentCard CardToken “<<Token>>“
PaymentCard Last4Digits “1111”
PaymentCard UniqueCardId “<<GUID>>“
PaymentCard ExpirationYear 2015
PaymentCard ExpirationMonth 11
PaymentCard StreetAddress “One Microsoft Way”
PaymentCard City “Redmond”
PaymentCard State “WA”
PaymentCard PostalCode “98052”
PaymentCard Country “US”
Connector ConnectorName “<<Connector name>>“
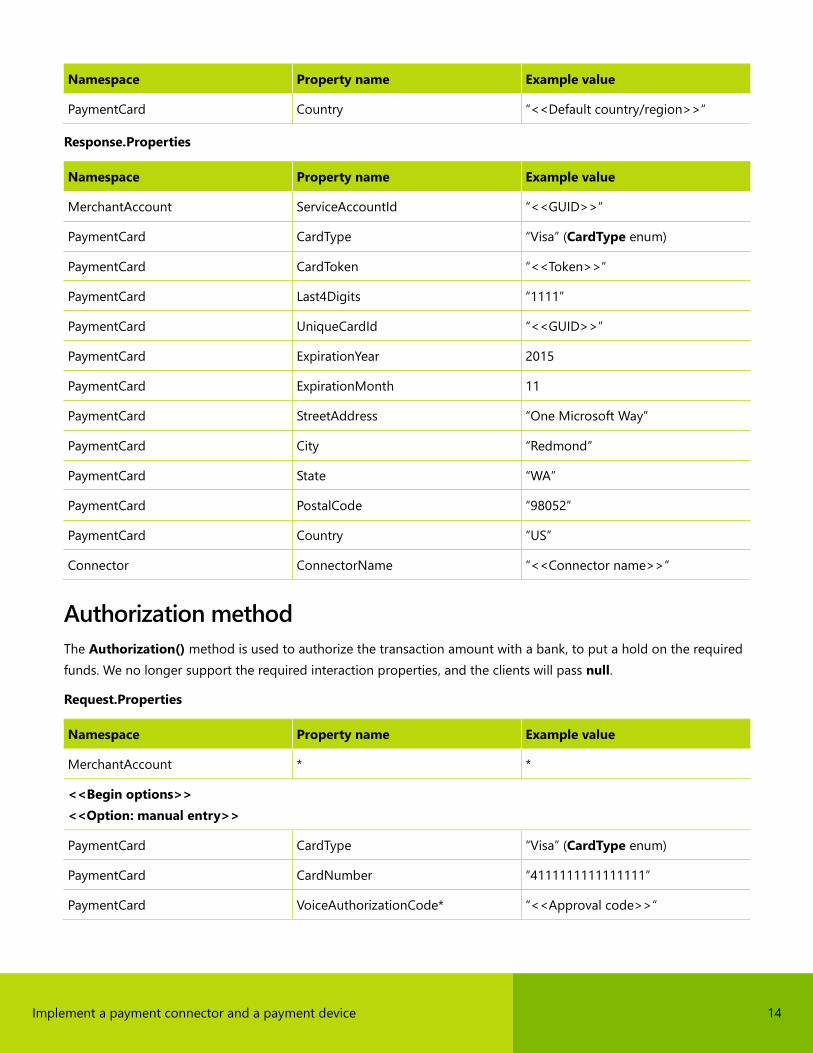
Authorization method
The Authorization() method is used to authorize the transaction amount with a bank, to put a hold on the required
funds. We no longer support the required interaction properties, and the clients will pass null.
Request.Properties
Namespace Property name Example value
MerchantAccount * *
<<Begin options>>
<<Option: manual entry>>
PaymentCard CardType “Visa” (CardType enum)
PaymentCard CardNumber “4111111111111111”
PaymentCard VoiceAuthorizationCode* “<<Approval code>>“
Page 15
Implement a payment connector and a payment device 15
Namespace Property name Example value
PaymentCard CardVerificationValue “999”
PaymentCard ExpirationYear 2015
PaymentCard ExpirationMonth 11
PaymentCard StreetAddress “One Microsoft Way”
PaymentCard City “Redmond”
PaymentCard State “WA”
PaymentCard PostalCode “98052”
PaymentCard Country “US”
<<Option: tokenized credit card>>
PaymentCard CardType “Visa” (CardType enum)
PaymentCard CardToken “<<Token>>“
PaymentCard Last4Digits “1111”
PaymentCard UniqueCardId “<<GUID>>“
PaymentCard ExpirationYear 2015
PaymentCard ExpirationMonth 11
PaymentCard StreetAddress “One Microsoft Way”
PaymentCard City “Redmond”
PaymentCard State “WA”
PaymentCard PostalCode “98052”
<<Option: swipe credit card>>
PaymentCard CardType “Visa” (CardType enum)
PaymentCard CardNumber “4111111111111111”
PaymentCard Track1* “<<Track 1>>“
PaymentCard Track2* “<<Track 2>>“
<<Option: swipe debit card>>
PaymentCard CardType “Debit” (CardType enum)
PaymentCard CardNumber “9111111111111111”
PaymentCard Track2 “<<Track 2>>“
Page 16
Implement a payment connector and a payment device 16
Namespace Property name Example value
PaymentCard CashBackAmount* <<Cash back amount>
PaymentCard EncryptedPin <<Encrypted PIN>>
PaymentCard AdditionalSecurityData <<Additional data>>
PaymentCard AccountType <<AccountType enum>>
<<End options>>
TransactionData IsTestMode* “true”
TransactionData IndustryType <<IndustryType enum>>
TransactionData PurchaseLevel <<PurchaseLevel enum>>
TransactionData AllowPartialAuthorization “true”
TransactionData SupportCardTokenization “true”
TransactionData Amount <<Amount>>
TransactionData CurrencyCode “USD”
TransactionData TerminalId* “<<Terminal ID>>“
PurchaseLevelData L2Data* <<PaymentProperty[]>>
PurchaseLevelData L3Data* <<PaymentProperty[]>>
* If available and required
Payment properties that are required for Level 2
Namespace Property name Example value
L2Data OrderDateTime “<<Date/time>>“
L2Data OrderNumber “<<Order number>>“
L2Data InvoiceDateTime “<<Date/time>>“
L2Data InvoiceNumber “<<Invoice number>>“
L2Data OrderDescription “<<Order description>>“
L2Data SummaryCommodityCode “<<Commodity code>>“
L2Data MerchantContact “<<Merchant contact>>“
L2Data MerchantTaxId “<<Merchant tax ID>>“
L2Data MerchantType “<<Merchant type>>“
Page 17
Implement a payment connector and a payment device 17
Namespace Property name Example value
L2Data PurchaserId “<<Purchaser ID>>“
L2Data PurchaserTaxId “<<Purchaser tax ID>>“
L2Data ShipToCity “<<Ship-to city>>“
L2Data ShipToCounty “<<Ship-to county>>“
L2Data ShipToState_ProvinceCode “<<Ship-to state>>“
L2Data ShipToPostalCode “<<Ship-to ZIP/postal code>>“
L2Data ShipToCountryCode “<<Ship-to country/region>>“
L2Data ShipFromCity “<<Ship-from city>>“
L2Data ShipFromCounty “<<Ship-from county>>“
L2Data ShipFromState_ProvinceCode “<<Ship-from state>>“
L2Data ShipFromPostalCode “<<Ship-from ZIP/postal code>>“
L2Data ShipFromCountryCode “<<Ship-from country/region>>“
L2Data DiscountAmount <<Discount amount>>
L2Data MiscCharge <<Miscellaneous charge>>
L2Data DutyAmount <<Duty amount>>
L2Data FreightAmount <<Freight amount>>
L2Data HandlingCharge <<Handling charge>>
L2Data IsTaxable “true“
L2Data TotalTaxAmount <<Total tax amount>>
L2Data TotalTaxRate <<Total tax rate>>
L2Data MerchantName “<<Merchant name>>“
L2Data MerchantCity “<<Merchant city>>“
L2Data MerchantState “<<Merchant state>>“
L2Data MerchantCounty “<<Merchant county>>“
L2Data MerchantCountryCode “<<Merchant country/region>>“
L2Data MerchantZip “<<Merchant ZIP/postal code>>“
L2Data TaxRate <<Tax rate>>
L2Data TaxAmount <<Tax amount>>
Page 18
Implement a payment connector and a payment device 18
Namespace Property name Example value
L2Data TaxDescription “<<Tax description>>“
L2Data TaxTypeIdentifier “<<TaxIdentifierType enum>>“
L2Data RequesterName “<<Requester name>>“
L2Data TotalAmount <<Total amount>>
L2Data PurchaseCardType “<<PurchaseCardType enum>>“
L2Data AmexLegacyDescription1 “<<Description 1>>“
L2Data AmexLegacyDescription2 “<<Description 2>>“
L2Data AmexLegacyDescription3 “<<Description 3>>“
L2Data AmexLegacyDescription4 “<<Description 4>>“
L2Data TaxDetails <<PaymentProperty[]>>
L2Data MiscellaneousCharges <<PaymentProperty[]>>
Tax detail properties
TaxDetails
Namespace Property name Example value
<<Contains an array of tax details>>
TaxDetails TaxDetail <<PaymentProperty[]>>
<<Contains an array of tax details>>
TaxDetail TaxRate <<Tax rate>>
TaxDetail TaxDescription “<<Tax description>>“
TaxDetail TaxAmount <<Tax amount>>
TaxDetail TaxTypeIdentifier “<<TaxIdentifierType enum>>“
Miscellaneous charge properties
MiscellaneousCharges
Namespace Property name Example value
<<Contains an array of miscellaneous charges>>
MiscellaneousCharges MiscellaneousCharge <<PaymentProperty[]>>
Page 19
Implement a payment connector and a payment device 19
Namespace Property name Example value
<<Contains an array of miscellaneous charges>>
MiscellaneousCharge ChargeType <<Charge type>>
MiscellaneousCharge ChargeAmount “<<Charge amount>>“
Payment properties that are required for Level 3
Namespace Property name Example value
<<Contains an array of L3DataItems>>
PurchaseLevelData L3DataItems <<PaymentProperty[]>>
<<Contains an array of L3Data>>
L3Data SequenceNumber “<<Sequence number>>“
L3Data CommodityCode “<<Commodity code>>“
L3Data ProductCode “<<Product code>>“
L3Data ProductName “<<Product name>>“
L3Data ProductSKU “<<Product SKU>>“
L3Data Descriptor “<<Descriptor>>“
L3Data UnitOfMeasure “<<Unit of measure>>“
L3Data UnitPrice <<Unit price>>
L3Data Discount <<Discount>>
L3Data DiscountRate <<Discount rate>>
L3Data Quantity <<Quantity>>
L3Data MiscCharge <<Miscellaneous charge>>
L3Data NetTotal <<Net total>>
L3Data TaxAmount <<Tax amount>>
L3Data TaxRate <<Tax rate>>
L3Data TotalAmount <<Total amount>>
L3Data CostCenter “<<Cost center>>“
L3Data FreightAmount <<Freight amount>>
L3Data HandlingAmount <<Handling amount>>
Page 20
Implement a payment connector and a payment device 20
Namespace Property name Example value
L3Data CarrierTrackingNumber “<<Tracking number>>“
L3Data MerchantTaxID “<<Merchant tax ID>>“
L3Data MerchantCatalogNumber “<<Catalog number>>“
L3Data TaxCategoryApplied “<<Category applied>>“
L3Data PickupAddress “<<Pickup address>>“
L3Data PickupCity “<<Pickup city>>“
L3Data PickupState “<<Pickup state>>“
L3Data PickupCounty “<<Pickup county>>“
L3Data PickupZip “<<Pickup ZIP/postal code>>“
L3Data PickupCountry “<<Pickup country/region>>“
L3Data PickupDateTime “<<Pickup date/time>>“
L3Data PickupRecordNumber “<<Record number>>“
L3Data CarrierShipmentNumber “<<Shipment number>>“
L3Data UNSPSCCode “<<UNSPSC code>>“
L3Data TaxDetails <<PaymentProperty[]>>
L3Data MiscellaneousCharges <<PaymentProperty[]>>
Level 3 also requires tax detail properties and miscellaneous charge properties on each line.
Here are the response properties from the payment connector that the client uses.
Response.Properties
Namespace Property name Example value
MerchantAccount ServiceAccountId <<GUID>>
AuthorizationResponse Properties <<PaymentProperty[]>>
Connector ConnectorName “<<Connector name>>“
<<Authorization response properties>>
AuthorizationResponse AuthorizationResult “<<AuthorizationResult enum>>“
(for example, “Success” or
“PartialAuthorization”)
AuthorizationResponse ApprovedAmount <<Approved amount>>
Page 21
Implement a payment connector and a payment device 21
Namespace Property name Example value
AuthorizationResponse CashBackAmount <<Cash back amount>>
AuthorizationResponse AvailableBalance <<Balance>>
AuthorizationResponse UniqueCardId* “<<Unique card ID>>“
AuthorizationResponse Last4Digits “<<Last four digits>>“
AuthorizationResponse CardType “<<CardType enum>>“
AuthorizationResponse ApprovalCode “<<Approval code>>“
AuthorizationResponse ProviderTransactionId “<<Provider transaction ID>>“
AuthorizationResponse AVSResult “<<AVSResult enum>>“
AuthorizationResponse AVSDetail “<<AVSDetail enum>>“
AuthorizationResponse CVV2Result “<<CVV2Result enum>>“
AuthorizationResponse TransactionType “<<TransactionType enum>>“
* Returned only if a token was sent in the request
Capture method
The Capture() method is used to settle the authorization transaction and move the funds at the bank.
Request.Properties
Namespace Property name Example value
MerchantAccount * *
PaymentCard CardNumber* “4111111111111111”
TransactionData Amount <<Amount>>
TransactionData CurrencyCode “USD”
TransactionData IsTestMode* “true”
TransactionData SupportCardTokenization “true”
TransactionData PurchaseLevel <<PurchaseLevel enum>>
AuthorizationResponse Properties <<PaymentProperty[]>>
PurchaseLevelData L2Data* <<PaymentProperty[]>>
PurchaseLevelData L3Data* <<PaymentProperty[]>>
* If available and required
Page 22
Implement a payment connector and a payment device 22
Here are the response properties from the payment connector that the client uses.
Response.Properties
Namespace Property name Example value
MerchantAccount ServiceAccountId <<GUID>>
CaptureResponse Properties <<PaymentProperty[]>>
Connector ConnectorName “<<Connector name>>“
<<Capture response properties>>
CaptureResponse CaptureResult “<<CaptureResult enum>>“
(for example, “Success”)
CaptureResponse UniqueCardId* “<<Unique card ID>>“
CaptureResponse Last4Digits “<<Last four digits>>“
CaptureResponse CardType “<<CardType enum>>“
CaptureResponse TransactionType “<<TransactionType enum>>“
* Returned only if a token was sent in the request
Void method
The Void() method is used to void/reverse the authorization transaction and unlock the funds at the bank.
Request.Properties
Namespace Property name Example value
MerchantAccount * *
PaymentCard CardNumber* “4111111111111111”
TransactionData Amount <<Amount>>
TransactionData CurrencyCode “USD”
TransactionData IsTestMode* “true”
TransactionData SupportCardTokenization “true”
AuthorizationResponse Properties <<PaymentProperty[]>>
* If available and required
Here are the response properties from the payment connector that the client uses.
Page 23
Implement a payment connector and a payment device 23
Response.Properties
Namespace Property name Example value
MerchantAccount ServiceAccountId <<GUID>>
VoidResponse Properties <<PaymentProperty[]>>
Connector ConnectorName “<<Connector name>>“
<<Void response properties>>
VoidResponse VoidResult “<<VoidResult enum>>”
(for example, “Success”)
* Returned only if a token was sent in the request
Refund method
The Refund() method is used to refund a payment transaction and return funds to the customer’s bank. This method
has the same request as the Authorization() method. The only difference is that sometime a linked refund is
required when the Capture response is also part of the request message. We no longer support the required
interaction properties, and the clients will pass null.
Here are the response properties from the payment connector that the client uses.
Response.Properties
Namespace Property name Example value
MerchantAccount ServiceAccountId <<GUID>>
RefundResponse Properties <<PaymentProperty[]>>
Connector ConnectorName “<<Connector name>>“
<<Refund response properties>>
RefundResponse RefundResult “<<RefundResult enum>>“
(for example, “Success”)
RefundResponse ApprovalCode “<<Approval code>>“
RefundResponse UniqueCardId* “<<Unique card ID>>“
RefundResponse Last4Digits “<<Last four digits>>“
RefundResponse CardType “<<CardType enum>>“
RefundResponse TransactionType “<<TransactionType enum>>“
* Returned only if a token was sent in the request
Page 24
Implement a payment connector and a payment device 24
GetPaymentAcceptPoint method
The GetPaymentAcceptPoint() method and the next method, RetrievePaymentAcceptResult(), form a pair.
Together, they enable the client to make a payment by using the payment accepting page. We will discuss the
payment accepting web app in detail in part 2 of this document.
The GetPaymentAcceptPoint() method is used to get the URL of the payment accepting page. The caller provides
the merchant credentials, the default card data, and the transaction data in the request. The method returns the
response that contains the URL that points to the payment page.
Request.Properties
Namespace Property name Example value
MerchantAccount * *
PaymentCard CardType “Visa,MasterCard,Amex,Discover”
(CardType enum)
PaymentCard Name “John Doe”
PaymentCard StreetAddress “One Microsoft Way”
PaymentCard City “Redmond”
PaymentCard State “WA”
PaymentCard PostalCode “98052”
PaymentCard Country “US”
PaymentCard ShowSameAsShippingAddress “true”, “false”
TransactionData TransactionType “<<TransactionType enum>>“
(for example, “None”, “Authorize”, or
“Capture”)
TransactionData SupportCardSwipe “true”, “false”
TransactionData SupportCardTokenization “true”, “false”
TransactionData HostPageOrigin “https://www.contoso.com”
TransactionData PaymentAcceptAdaptorPath “https://www.contoso.com/connector”
TransactionData HideBillingAddress “true”, “false”
<<Authorization properties>>
TransactionData IsTestMode* “true”, “false”
TransactionData IndustryType <<IndustryType enum>>
TransactionData PurchaseLevel <<PurchaseLevel enum>>
Page 25
Implement a payment connector and a payment device 25
Namespace Property name Example value
TransactionData AllowPartialAuthorization “true”, “false”
TransactionData AllowVoiceAuthorization “true”, “false”
TransactionData CurrencyCode “USD”
TransactionData TerminalId* “<<Terminal ID>>“
* If available and required
Billing address properties, such as StreetAddress and City, are optional. They contain the default values of the
payment card that will appear on the payment accepting page. The user can accept the default values or provide
new values.
The ShowSameAsShippingAddress property contains a Boolean value that indicates whether the payment
accepting page should show the Same as shipping address option.
The TransactionType property in the request contains a value from the TransactonType enum. However, in this
method, the value can be only “None”, “Authorize”, or “Capture”. For more information, see part 2 of this
document.
The HostPageOrigin property represents the page that will host (embed) the payment accepting page. Its value
contains the protocol, domain, and port of the host page URL.
The PaymentAcceptAdaptorPath property is optional. When the payment accepting page doesn’t support cross-
domain messaging, a few adaptor files (HTML, CSS, JavaScript) must be dropped into the host page server. This
property contains the server path where those adaptor files are dropped.
New in 10.0.5. The HideBillingAddress optional property can be used to skip billing address entry in the payment
accepting page. When this is enabled, the e-commerce website must implement the billing address acceptance flow
outside of the payment iFrame and include the billing address when sending the checkout request.
The authorization properties in the request are required only when the TransactionType property is set to
“Authorize” or “Capture”.
Response.Properties
Namespace Property name Example value
MerchantAccount ServiceAccountId <<GUID>>
Connector ConnectorName “<<Connector name>>“
TransactionData PaymentAcceptUrl “https://www.paymentaccept.com/Ca
rdPage.aspx?tqi=2EC80BD0-8FEF-
4ACC-BB4B-D460337A7F6A”
TransactionData PaymentAcceptMessageOrigin “https://www.paymentaccept.com/Ca
rdPage.aspx”
Page 26
Implement a payment connector and a payment device 26
Namespace Property name Example value
TransactionData PaymentAcceptSubmitUrl “https://www.paymentaccept.com/Ca
rdPage.aspx?tqi=2EC80BD0-8FEF-
4ACC-BB4B-D460337A7F6A#submit”
The PaymentAcceptUrl property contains the URL that points to the payment accepting page. The client will open
the page for submitting a payment.
The PaymentAcceptMessageOrigin property contains the origin of the page that communicates with the host page
by using cross-domain messaging. Usually, this page is the same page that is specified by PaymentAcceptUrl. In this
case, PaymentAcceptMessageOrigin contains the first part of the PaymentAcceptUrl value. However, the page can
also be a different page that has a different origin.
Note: The page origin is the beginning of a page URL, and includes the protocol, double slashes, and domain.
The PaymentAcceptSubmitUrl property is optional. When cross-domain messaging isn’t supported, this property
provides another way to trigger the payment accepting page to submit the payment.
RetrievePaymentAcceptResult method
After the payment is submitted from the payment accepting page, the client receives a result access code. The
RetrievePaymentAcceptResult() method is used to retrieve the payment accepting result by using the access code.
Depending on the transaction type, the payment accepting result might contain a card token, an authorization
response, a capture response, or all three.
Request.Properties
Namespace Property name Example value
MerchantAccount * *
TransactionData PaymentAcceptResultAccessCode “<<GUID>>“ or any string
TransactionData TerminalId* “<<Terminal ID>>“
* If available and required
Response.Properties
Namespace Property name Example value
MerchantAccount ServiceAccountId <<GUID>>
Connector ConnectorName “<<Connector name>>“
PaymentCard CardType “Visa” (CardType enum)
PaymentCard CardToken “<<Token>>“
PaymentCard Last4Digits “1111”
Page 27
Implement a payment connector and a payment device 27
Namespace Property name Example value
PaymentCard UniqueCardId “<<GUID>>“
PaymentCard ExpirationYear 2015
PaymentCard ExpirationMonth 11
PaymentCard Name “John Doe”
PaymentCard StreetAddress “One Microsoft Way”
PaymentCard City “Redmond”
PaymentCard State “WA”
PaymentCard PostalCode “98052”
PaymentCard Country “US”
AuthorizationResponse Properties <<PaymentProperty[]>>
CaptureResponse Properties <<PaymentProperty[]>>
VoidResponse Properties <<PaymentProperty[]>>
For the properties inside AuthorizationResponse, see the Authorization method section.
For the properties inside CaptureResponse, see the Capture method section.
For the properties inside VoidResponse, see the Void method section.
Unsupported methods
The following methods are no longer called or aren’t currently supported by the clients:
● ImmediateCapture() – This functionality is now internally handled by the payment connector. Some payment
gateways support only a single call for authorization and capture, instead of a call for authorization only and then
a call for capture only. Basically, the connector sets the TransactionType property to ImmediateCapture and
implements “No Operation” in the capture call.
● Reversal()
● Reauthorize()
● ActivateGiftCard()
● LoadGiftCard()
● BalanceOnGiftCard()
Enumeration types
Some of the payment properties that were listed earlier have predefined string values. The payment SDK provides
the enumeration types for their possible values. For example, when the payment card is American Express, the value
of the CardType property should be “Amex”, not “American Express” or “AmericanExpress”.
Page 28
Implement a payment connector and a payment device 28
It’s very important that you use these enum values, so that the payment connector and its caller can understand each
other.
If you require a new value for one of the payment properties, such as a new EBT card type, you can set the property
value directly (for example, as “EBT”). You don’t have to add a new enum value to the enum type (in fact, you can’t).
After all, those payment properties just require a string value. You can set any value that you want, provided that the
payment connector understands and can handle the new value.
Enumeration type Enumeration values
AccountType Checking, Deposit
AuthorizationResult None, Success, Failure, Referral, PartialAuthorization, ImmediateCaptureFailed
AVSDetail None, AccountholderName, BillingAddress, BillingPostalCode, BillingAndPostalCode
AVSResult None, Returned, NotReturned, VerificationNotSupported, SystemUnavailable
CaptureResult None, Success, Failure
CardType Unknown, Debit, Visa, MasterCard, Discover, Amex
CVV2Result Unknown, Success, Failure, IssuerNotRegistered, NotProcessed
IndustryType Retail, DirectMarketing, Ecommerce
PurchaseCardType U (Unknown), P (Purchase Card), C (Corporate Card), B (Business Card)
PurchaseLevel Level1, Level2, Level3
RefundResult None, Success, Failure
TaxIdentifierType AlternateTax, NationalTax, LocalTax, VATTax
TransactionType None, Authorize, Reauthorize, Capture, ImmediateCapture, Void, Reversal, Refund
VoidResult None, Success, Failure
Part 2: Implementing a payment accepting web app
This part of the document explains how to create a web application to tokenize a credit card or process a card
payment in a secure manner.
The roles
Accepting a payment mainly involves three roles:
● End user – The person who uses a retail application to enter credit card information. This person can be a
consumer who uses the online storefront to buy a product or a sales representative at the call center who uses an
internal enterprise resource planning (ERP) system to help a consumer buy a product.
Page 29
Implement a payment connector and a payment device 29
● Merchant application – The retail web application that is hosted by a merchant or its vendor. This application
can be the online storefront or the internal ERP system. The end user mainly interacts with the merchant
application to complete a sales transaction.
● Payment accepting application – The front-end web application that is hosted by a payment provider. This
application provides payment accepting functionality to the merchant application behind the scenes. The
payment accepting application is integrated into the merchant application to serve the end user.
Note: We can’t use the merchant application directly to tokenize a credit card, because we don’t want the primary
account number (PAN) of the credit card to enter the merchant application. Therefore, we must have a separate
payment accepting application to take the credit card number and process the payment. For more information about
how the payment accepting application works, see the next section.
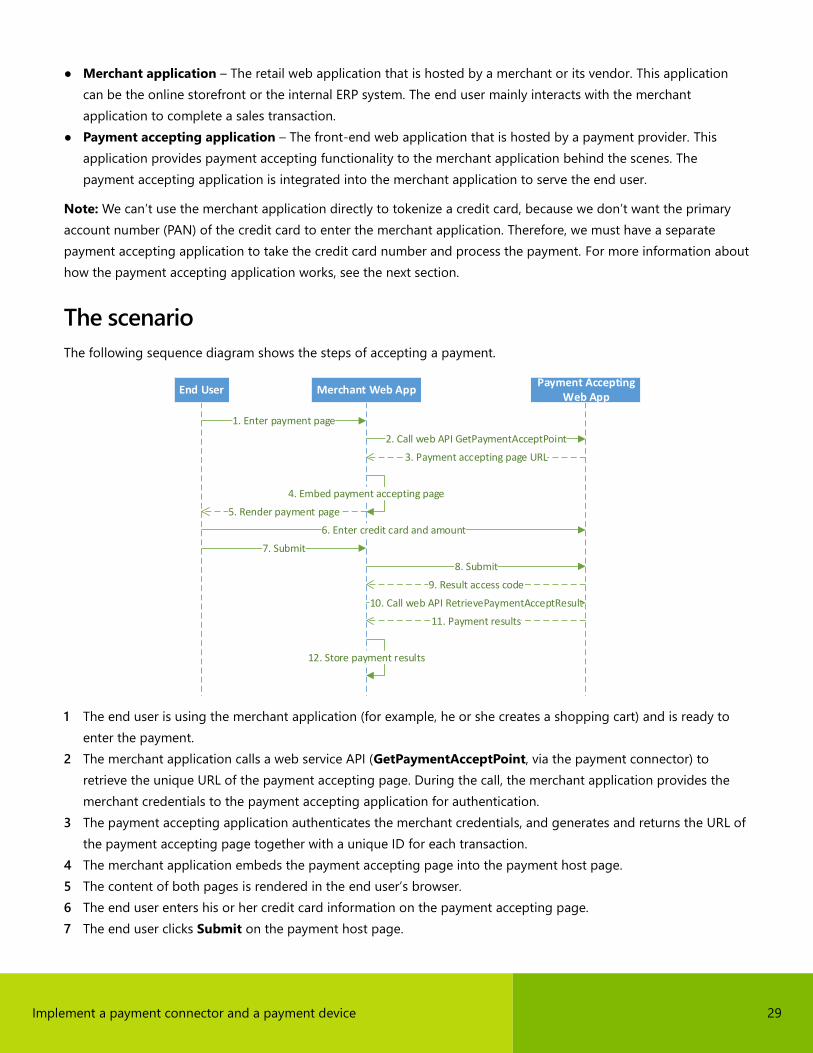
The scenario
The following sequence diagram shows the steps of accepting a payment.
End User Merchant Web AppPayment Accepting
Web App
1. Enter payment page
2. Call web API GetPaymentAcceptPoint
3. Payment accepting page URL
5. Render payment page
6. Enter credit card and amount
4. Embed payment accepting page
7. Submit
8. Submit
9. Result access code
10. Call web API RetrievePaymentAcceptResult
11. Payment results
12. Store payment results
1 The end user is using the merchant application (for example, he or she creates a shopping cart) and is ready to
enter the payment.
2 The merchant application calls a web service API (GetPaymentAcceptPoint, via the payment connector) to
retrieve the unique URL of the payment accepting page. During the call, the merchant application provides the
merchant credentials to the payment accepting application for authentication.
3 The payment accepting application authenticates the merchant credentials, and generates and returns the URL of
the payment accepting page together with a unique ID for each transaction.
4 The merchant application embeds the payment accepting page into the payment host page.
5 The content of both pages is rendered in the end user’s browser.
6 The end user enters his or her credit card information on the payment accepting page.
7 The end user clicks Submit on the payment host page.
Page 30
Implement a payment connector and a payment device 30
8 The Submit button on the payment host page triggers the posting of the payment accepting page.
9 The payment accepting application takes the credit card information, together with the information that was
received in step 2, processes the payment, generates a unique result access code, and sends the result access
code to the merchant application.
10 The merchant application calls a second web service API (RetrievePaymentAcceptResult) and provides the result
access code.
11 The payment accepting application validates the result access code and, in exchange, returns the payment results.
12 The merchant application stores the payment results as a record or for later use.
Note: In step 9, the result access code technically isn’t sent directly from the payment accepting application to the
merchant application. Instead, it’s sent via cross-domain messaging in the user’s browser. For more information, see
the Cross-domain messaging section.
How to build and run the sample projects
To demonstrate how the scenario can be implemented, we built two sample projects as part of the sample code
solution.
When you download the sample code and open the solution in Microsoft Visual Studio, you will find the following
projects:
● PaymentSdk.Connector.Sample – This project contains the portable version of Sample Connector.
● PaymentSdk.Connector.Sample.Desktop – This project contains the non-portable version of Sample Connector.
It references the portable version to reuse its business logic.
● PaymentSdk.Connector.Sample.PaymentAcceptWeb – This project is a sample implementation of the payment
accepting application. The payment connector developer must follow the sample, and must create his or her own
application.
● PaymentSdk.Connector.Sample.MerchantWeb – This project is a sample implementation of the merchant
application. The sample contains only the minimal code to demonstrate how MerchantWeb interacts with
PaymentAcceptWeb. It doesn’t contain other parts of the merchant application. The payment connector
developer does not have to implement the merchant application.
● PaymentSdk.Connector.FunctionalTests – This project contains the automated tests for Sample Connector.
Here are the steps to build and run the sample projects.
1 In Visual Studio, under the App_Data folder, expand the PaymentAcceptWeb project, and run the following SQL
files one at a time to create a database that is named CardPaymentAccept:
● Tables.sql creates a database and configures the database to encrypt all its tables. You must update the
encryption password before you run this file.
● Sprocs/*.sql contains all the stored procedures.
● Seed/Seed.sql creates the country/region data. You must update the data file path before you run this file.
● Jobs.sql creates a SQL job to purge history data.
2 Open the web.config file of both PaymentAcceptWeb and MerchantWeb, find the compilation node, and change
the debug attribute to true.
3 Right-click the solution, and then click Build Solution.
Page 31
Implement a payment connector and a payment device 31
4 Right-click the solution, and then click Properties. Under Start Project, select Multiple startup projects, and
then set both PaymentAcceptWeb and MerchantWeb to Start. Click OK.
5 Click Start to open both projects in Internet Information Services (IIS) Express.
Two browser windows should be opened:
● One window opens http://localhost:3973/, which is the URL of PaymentAcceptWeb. Expect an HTTP error
because, by design, a default page isn’t specified for PaymentAcceptWeb.
Page 32
Implement a payment connector and a payment device 32
● The other window opens http://localhost:7657/, which is the URL of MerchantWeb. The page should resemble
the following screen shot.
6 You can specify the industry type, the transaction type, and other options. Then click Next.
Page 33
Implement a payment connector and a payment device 33
7 The next page simulates the payment page of the merchant application, where the consumer enters his or her
credit card information and the amount. It’s very important to understand that this page contains a parent page
and a child page. The parent page (payment host page) is provided by the merchant application and is the
content outside the red rectangle in the following screen shot. The child page (payment accepting page) is
provided by the payment accepting application is the content inside the red rectangle. The child page is
embedded in the parent page as an inline frame (iframe).
8 You can enter some test credit card information, an amount, and then click Place order. You will see a result page
that resembles the following screen shot.
Requirements of a payment accepting application
In the previous section, we looked at a sample implementation of the payment accepting application. However, there
are other ways to implement this type of application. It’s important to distinguish the feature requirements from the
implementation choices. As a payment connector developer, you must satisfy the feature requirements to guarantee
a smooth integration. However, for your implementation, you can make choices that differ from choices that were
made for the sample implementation.
Page 34
Implement a payment connector and a payment device 34
Requirement 1
The payment connector must implement the GetPaymentAcceptPoint API. This API is part of the
IPaymentProcessor interface. It retrieves the URL of the payment accepting page from the payment provider.
When the merchant application is ready to take a credit card, it calls GetPaymentAcceptPoint on the payment
connector, and uses input such as the merchant credentials, default information for the card (for example, the default
billing address), and transaction data (for authorization and/or capture). The payment connector passes the
information to the payment accepting application by calling the corresponding web service.
The payment accepting application must first validate the merchant credentials. The request information is then
temporarily stored as a payment entry for later use. Next, the payment accepting application generates the URL of
the payment accepting page. The URL must contain a single-use request ID that is linked to the previous payment
entry. This URL is returned to the caller.
Requirement 2
The payment provider must host a payment accepting page on its server (CardPage.aspx in PaymentAcceptWeb). The
URL that was retrieved earlier will be used to open this page.
The payment accepting page must contain all the credit card fields that are required for the industry type and the
transaction type. The following table shows which fields are required for each industry.
Field Retail Direct marketing E-Commerce
Card input (for example,
Swipe card, Enter
manually, and Voice
authorization)
Yes, when more than one
option is available
No No
Card holder name No Yes Yes
Card type No Yes Yes
Card number Yes Yes Yes
Expiration month and year Yes Yes Yes
Security code Yes, when TransactionType
isn’t set to None
Yes, when TransactionType
isn’t set to None
Yes, when TransactionType
isn’t set to None
Voice authorization code Yes, when
AllowVoiceAuthorization
is set to true
Yes, when
AllowVoiceAuthorization
is set to true
No
Same as shipping address Yes, when
ShowSameAsShippingAd
dress is set to true
Yes, when
ShowSameAsShippingAd
dress is set to true
Yes, when
ShowSameAsShippingAd
dress is set to true
Country/region No Yes Yes
Page 35
Implement a payment connector and a payment device 35
Field Retail Direct marketing E-Commerce
Address No Yes Yes
City No Yes Yes
State/province No Yes Yes
ZIP code Yes (in the first column) Yes (in the second column) Yes (in the second column)
1 column or 2 Only 1 1 or 2 1 or 2
Note: For the retail industry, the payment accepting page has only one column and only a few fields, to help achieve
faster payment processing.
The payment accepting page must support three transaction types:
● Tokenization – When TransactionType is set to None and SupportCardTokenization is set to true, the page
only tokenizes the card.
● Authorization – When TransactionType is set to Authorize, the page authorizes the payment but doesn’t
capture it. The authorization might also return a card token, depending on the value of the
SupportCardTokenization property.
● Authorization and Capture – When TransactionType is set to Capture, the page authorizes the payment and
then captures it. If authorization succeeds but capture fails, the page must void the authorization before it returns
the error.
The payment accepting page must meet all the following conditions:
● It must find the payment entry, based on the request ID, and enter the default values.
● It must display texts in the desired language, based on the request locale.
● It must follow the look and feel that are provided in the sample project.
● It must validate the card information before it tokenizes the card and/or processes the payment.
● It must generate a result access code after payment is processed and must send this access code to the parent
page (the payment host page). The result access code must be a unique string to retrieve the payment results.
● It must use secure cross-domain messaging to communicate with the parent page (the payment host page) – for
example, by sending a result access code to the parent page. For more information about cross-domain
messaging, see the Cross-domain messaging section.
Requirement 3
The payment connector must implement the RetrievePaymentAcceptResult API. This API is also part of the
IPaymentProcessor interface. It exchanges the token access code for the real card token.
After the merchant application receives a result access code, it calls RetrievePaymentAcceptResult and sends the
merchant credentials and the result access code. In exchange, it receives the real payment results.
The API must validate the merchant credentials.
Page 36
Implement a payment connector and a payment device 36
If the payment contains SupportCardTokenization = true, the API must return a response that contains the
following information:
● Card token
● Masked card number (for example, the last four digits)
● Card holder name
● Card type
● Expiration month and year
● Card billing address, if the consumer provided this information
The API must never return the following information:
● Card number
● Card track data
● Security code (card verification value [CVV])
If the payment contains TransactionType = Authorize or Capture, the API must return a response that contains
authorization response properties.
If the payment contains TransactionType = Capture, the API must return a response that contains capture response
properties. If capture fails, the response must also contain void response properties.
The implementation of RetrievePaymentAccessResult can vary, depending on the way that payment results are
stored and the result access code is generated:
● The result access code can be a formatted string that contains the card token and payment information. In this
case, RetrievePaymentAccessResult just parses the string and returns the information as a response.
● The result access code can contain the card token and payment information, but can also include encryption. In
this case, RetrievePaymentAccessResult first decrypts the string. It then parses the string and returns the
information.
● (Recommended) The result access code can be just a unique code that is linked to a payment. Only the payment
provider can convert the access code to the real payment result. In this case, RetrievePaymentAccessResult
internally maps the result access code to the payment result. The sample implementation used this approach.
Cross-domain messaging
In previous sections, we have briefly mentioned that cross-domain message can be used for communication between
the payment host page and the payment accepting page. In this section, we will explore the details.
The payment host page and the payment accepting page are two webpages from two different applications that are
hosted in two different domains. To make these two pages work together, we must define “a contract” between
them.
The messaging between the two pages is bidirectional.
The payment accepting page (the child page) tells the payment host page (the parent page) five things:
● The height of the child page
● The first six digits of the card number
Page 37
Implement a payment connector and a payment device 37
● The approved amount for partial authorization
● Any input error on the child page
● The result access code
The payment host page (parent) tells the tokenization page (child) four things:
● The card swipe data that contains the track data
● A value that indicates whether the user accepts the partial authorization
● The payment amount (required only when the transaction type is Authorize or Capture)
● When to submit the payment (for example, when the consumer clicks the Place order button on the payment
host page)
Cross-domain messaging is achieved through JavaScript. The receiving page adds a message listener by adding
some code that resembles this.
window.addEventListener("message", receiveMessage);
In this code, receiveMessage is a JavaScript function that you create to handle the received message. Before you
handle the message, it’s very important that you validate the origin of the message.
The sending page sends a message by adding some code that resembles this.
window.postMessage(message, targetOrigin);
In this code, message is the string that you want to send, and targetOrigin is the URL of the receiving page (for
example, https://example.com). It’s very important that you specify targetOrigin, so that only the expected receiving
page will catch this message.
For a detailed example that shows how to use these APIs to securely send messages, see the sample projects.
Finally, we predefined the format of the messages, so that both parties understand each other. Each message is a
serialized JavaScript Object Notation (JSON) object that uses JSON.stringify(), and that contains a type (string) and
a value (string or object).
Page 38
Implement a payment connector and a payment device 38
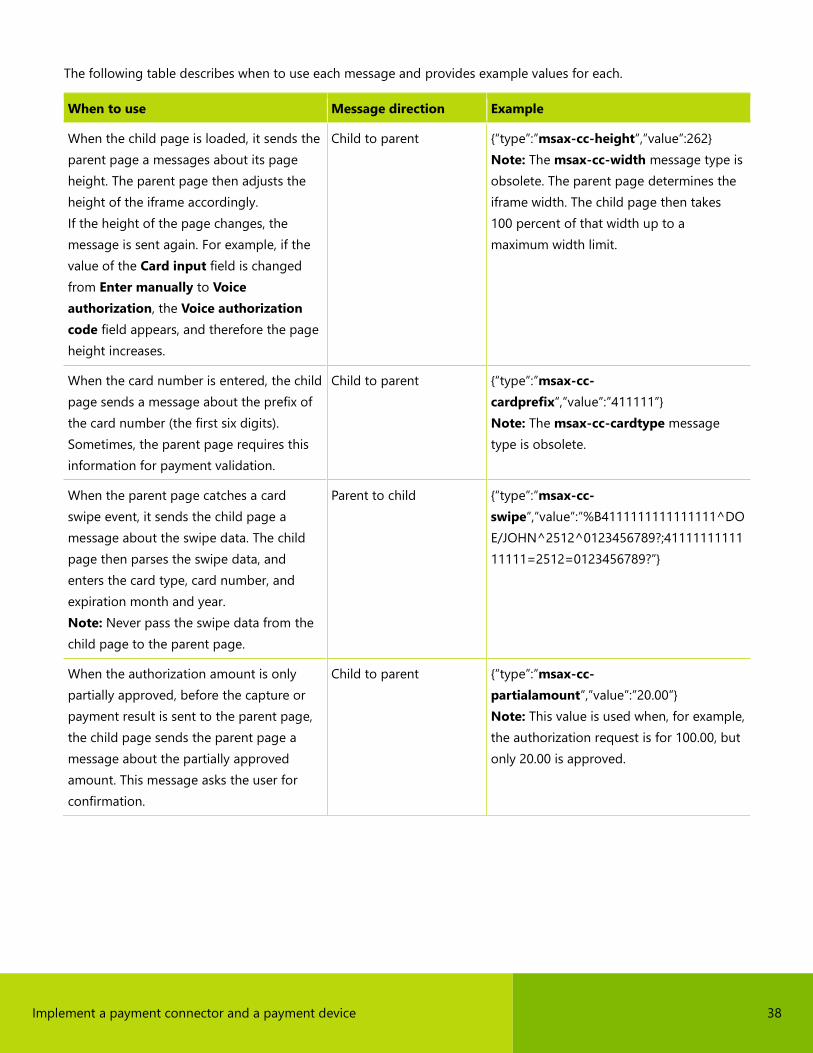
The following table describes when to use each message and provides example values for each.
When to use Message direction Example
When the child page is loaded, it sends the
parent page a messages about its page
height. The parent page then adjusts the
height of the iframe accordingly.
If the height of the page changes, the
message is sent again. For example, if the
value of the Card input field is changed
from Enter manually to Voice
authorization, the Voice authorization
code field appears, and therefore the page
height increases.
Child to parent {“type”:”msax-cc-height”,”value”:262}
Note: The msax-cc-width message type is
obsolete. The parent page determines the
iframe width. The child page then takes
100 percent of that width up to a
maximum width limit.
When the card number is entered, the child
page sends a message about the prefix of
the card number (the first six digits).
Sometimes, the parent page requires this
information for payment validation.
Child to parent {“type”:”msax-cc-
cardprefix”,”value”:”411111”}
Note: The msax-cc-cardtype message
type is obsolete.
When the parent page catches a card
swipe event, it sends the child page a
message about the swipe data. The child
page then parses the swipe data, and
enters the card type, card number, and
expiration month and year.
Note: Never pass the swipe data from the
child page to the parent page.
Parent to child {“type”:”msax-cc-
swipe”,”value”:”%B4111111111111111^DO
E/JOHN^2512^0123456789?;41111111111
11111=2512=0123456789?”}
When the authorization amount is only
partially approved, before the capture or
payment result is sent to the parent page,
the child page sends the parent page a
message about the partially approved
amount. This message asks the user for
confirmation.
Child to parent {“type”:”msax-cc-
partialamount”,”value”:”20.00”}
Note: This value is used when, for example,
the authorization request is for 100.00, but
only 20.00 is approved.
Page 39
Implement a payment connector and a payment device 39
When to use Message direction Example
When the parent page receives the
preceding message, it asks the user
whether he or she accepts the approved
amount (YES or NO). After the user makes
a choice, the parent page sends the child
page a message about the user’s choice.
Parent to child {“type”:”msax-cc-partialok”,”value”:”true”}
Note: If the value is true, partial
authorization is accepted and processing
continues. If the value is false, partial
authorization is rejected, the authorization
is voided, and the result is returned.
When the parent page is ready for the child
page to submit itself, it sends the child
page two messages about the payment
amount and the submit action. The child
page records the amount and then submits
itself to start the payment process.
Parent to child {“type”:”msax-cc-amount”,”value”:”10.00”}
{“type”:”msax-cc-submit”,”value”:”true”}
If the child page finds any input errors, it
sends the parent page a message about
the errors. The parent page then displays
the error messages.
Child to parent {“type”:”msax-cc-
error”,”value”:[{“Code”:22061,
“Message”:”Card type is missing.
“},{“Code”:22058, “Message”:”Card number
is missing. “}]}
When the child page has a result access
code ready, it sends the parent page a
message. The parent page then uses the
result access code to retrieve the payment
results.
Child to parent {“type”:”msax-cc-
result”,”value”:”87c3109e-73f9-28e6-ba64-
82010d96827f”}
The sample implementation
Now it’s time to look at the sample code and see how it implements the requirements. We will focus on the
PaymentAcceptWeb project, because this is the project that the payment provider or its partner must implement.
Main components
The PaymentAcceptWeb project is implemented by using ASP.NET. However, you can choose any web technology.
The sample demonstrates the four components that your implementation should have:
● A CardPaymentAccept database – This database stores the payment entries and the payment results. You can
find the scheme of the sample database in the App_Data folder.
● A payment accepting page – This webpage is the only visible UI of the payment accepting application. It
contains the fields for entering credit card information. You can find the page as CardPage.aspx.
● A GetPaymentAcceptPoint web API – The payment connector calls this web API in the
IPaymentProcessor.GetPaymentAcceptPoint() method. Because this web API is only used internally by the
payment connector, the developer can choose the signature for it. The web API implements the business logic
Page 40
Implement a payment connector and a payment device 40
that is described in the Requirement 1 section. You can find the web API in the Controllers folder, in the
PaymentsController class.
● A RetrievePaymentAcceptResult web API – The payment connector calls this web API in the
IPaymentProcessor.RetrievePaymentAcceptResult() method. Because this web API is only used internally by
the payment connector, the developer can choose the signature for it. The web API implements the business logic
that is described in the Requirement 3 section. When the result access code contains the payment results directly,
this web API isn’t required. However, it’s still recommended. You can also find the web API in the Controllers
folder, in the PaymentsController class.
Styling
The payment accepting page must not have any margin or any padding. In this way, the page can be embedded and
positioned at the exact location where it must appear.
The default look and feel of the payment accepting page are defined by a Cascading Style Sheets (CSS) file at CSS >
CardPage.css. The style sheet follows the look and feel of the E-Commerce storefront of Microsoft Dynamics AX for
Retail.
However, we have also enabled custom styling on the payment accepting page. The following table describes the
custom styles that are supported. Because all these style have default values, they are optional. The merchant
application can provide new values for some or all of the styles by adding extra query parameters to the URL of the
payment accepting page.
Style type and query
parameter name
Purpose Default value Examples of possible
values
FontSize The font size of text, and
also the size of controls
and margins
12px
FontFamily The font family of all text “Segoe UI” “Segoe UI”, Georgia
Note: Use quotation marks
when the name of the font
family has more than one
word. You can specify a list
of font families that are
separated by commas.
LabelColor The text color of labels black #000000
rgb(0,0,0)
TextBackgroundColor The background color of
text boxes that are
available
white #FFFFFF
rgb(255,255,255)
Page 41
Implement a payment connector and a payment device 41
Style type and query
parameter name
Purpose Default value Examples of possible
values
TextColor The text color of text
boxes
black #000000
rgb(0,0,0)
DisabledTextBackgroundColor The background color of
text boxes that aren’t
available
#E4E4E4 lightgray
rgb(228,228,228)
ColumnNumber The number of columns of
fields on the page (1 to 2)
Retail: 1
Other: 2
Note: The following query parameters are obsolete:
● PageWidth – The parent page determines the iframe width. The child page then takes 100 percent of that width
up to a maximum width limit.
● PageBackgroundColor – The body and the form of the child page should be transparent, so that the
background of the parent page is visible, even when the background is an image.
Page 42
Implement a payment connector and a payment device 42
You can test the style parameter by using the sample MerchantWeb project.
Note: When the industry type is Retail, the payment accepting page always has one column, because there are
fewer display fields. When the industry type is Direct Marketing or Ecommerce, the page can have two columns (for
desktop computers) or one column (for mobile devices).
Page 43
Implement a payment connector and a payment device 43
The following screen shot shows the page when IFrame width is set to 400px and ColumnNumber is set to 1.
Make sure that you use the same CSS file when you develop your credit card page. Additionally, make sure that you
support the custom styles that are mentioned in this section.
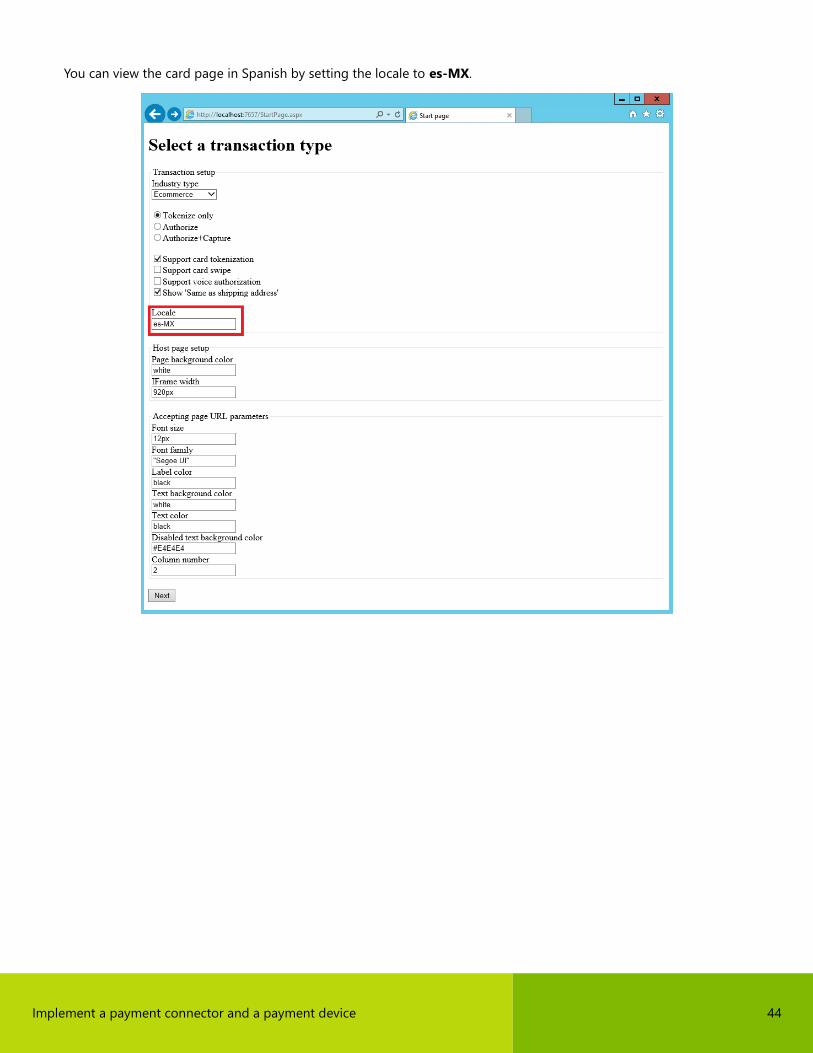
Localization
As part of the tokenization request, RequestLocale is provided to tell the card page which language to appear in.
In the PaymentAcceptWeb project, all texts were localized in English in the resource file at App_GlobalResources >
WebResources.resx. A Spanish resource file was also added, WebResources.es.resx. Currently, only one label is
translated into Spanish (and even this label isn’t really translated but is a text holder).
Page 44
Implement a payment connector and a payment device 44
You can view the card page in Spanish by setting the locale to es-MX.
Page 45
Implement a payment connector and a payment device 45
After you change the locale, you will see that the label of the Card holder name is slightly different. It’s now prefixed
with (es). Other texts that aren’t translated will use the default language, English.
Once again, this section just provides an example. You can choose any localization techniques that are available in
your choice of web technology.
Right-to-left
In some languages, such as Arabic, texts start on the right side of the page and continue to the left. The payment
accept page must enable right-to-left (RTL) texts when it’s displayed in those languages.
The sample PaymentAcceptWeb project enables this feature by setting the TextDirection property of the page,
based on current UI culture. See the Page_Load method of the CardPage class.
Messages
Message classes are used as the signature of the web APIs. In PaymentAcceptWeb, we reuse the Request and
Response classes from PaymentSdk. You can find these classes used in the PaymentsController class. This reuse of
the class from PaymentSdk is just an implementation choice for the sample.
Data access
To facilitate data operations, data model classes are defined under the Models folder, and data manager classes are
defined under the Data folder. These classes are only internal implementation samples. You can choose how to
implement the data access layer.
In the sample, we host the web application and the database on the same computer. However, you can put them on
different servers and expose the data however you want (for example, by using data access services).
Page 46
Implement a payment connector and a payment device 46
Payment processing
When the card data is ready for payment processing, you can call the front-end payment service directly.
Alternatively, you can call methods on the payment connector. The payment connector will then call the front-end
payment service. The sample uses the second approach in the ProcessPayment method of CardPage class. If you
use the same approach, you must include your payment connector in your payment accepting application.
Card input modes
The payment accepting page supports three modes for entering a credit card:
● Swipe card – This mode is available only when the SupportCardSwipe payment property is set to true. In this
mode, the page listens to fast-track data entry and parses it into card data, such as a card number. When the card
input mode isn’t Swipe card, any card swipe data should be ignored.
● Enter manually – This mode is always available. In this mode, fields such the card number are enabled for manual
input.
● Voice authorization – This mode is available only when the AllowVoiceAuthorization payment property is set
to true. This mode is similar to Enter manually mode, but it has an extra field, Voice authorization code.
Error handling
When the payment accepting page is triggered to submit a payment, five types of errors can occur. We handle each
type of error differently.
● Input validation errors – For example, the card number is missing. Any input errors should be sent via cross-
domain messaging (by using the msax-cc-error message type), so that the parent page displays the errors for
the end user.
● Card tokenization errors – When the SupportCardTokenization payment property is set to true, the page first
tokenizes the credit card. Any errors or failures during card tokenization should also be sent via cross-domain
messaging (by using the msax-cc-error message type).
● Payment authorization errors – When the transaction type is Authorize or Capture, the page authorizes a
credit card payment. Any errors or failures during card tokenization should also be sent via cross-domain
messaging (by using the msax-cc-error message type).
● Capture errors – When the transaction type is Capture, after the page authorizes a credit card payment, it
captures that payment. If capture fails, you must first void the authorization. Additionally, you must produce a
payment result and send the parent page the result access code (by using the msax-cc-result message type). We
handle capture errors differently, because a payment has already been authorized before capture. That
authorization must be voided, and all the payment information must be sent to the merchant application, so that
the credit card holder can be notified.
● Other system errors – Any other unhandled errors or exceptions forward the page to a generic error page
(GenericErrorPage.html). The application should not typically reach that page, unless the system is down or there
is a bug in the application.
Page 47
Implement a payment connector and a payment device 47
Data encryption
If the PaymentAcceptWeb application temporarily stores merchant credentials and credit card data, as the sample
does, that data must be encrypted in the database.
In the sample, see App_Data/Tables.sql, where we enabled Transparent Data Encryption (TDE) for Microsoft SQL
Server. This feature encrypts all data in the CardPaymentAccept database.
Data purge
You might want to consider deleting a payment entry and payment result pair after the payment result is retrieved.
Additionally, you should clean data periodically, because some payment entries might never be used, and some
payment results might never be retrieved.
In the sample, see Jobs.sql, where we schedule a job that the SQLServerAgent service runs to purge the payment
history once a day.
Scalability
In the sample, all payment-related tables (CARDPAYMENTENTRY and CARDPAYMENTRESULT) contain the
SERVICEACCOUNTID field, which holds an identifier for the merchant. By partitioning the data by the
SERVICEACCOUNTID field, you can scale out to multiple databases.
You can also scale out the web application, depending on the implementation technology that you choose.
Refunds
The payment accepting page must not support payment refunds. We have deliberately left out refund functionality.
Instead, when you must refund payments, the merchant app first tokenizes a card by using the payment accepting
page and then refunds the payment by using the card token.
What isn’t included
The sample PaymentAcceptWeb project is only a sample to show you how to implement the payment accepting
application. For the sake of simplicity, we didn’t address the following issues in the sample. However, you should
address these issues in your final product:
● (Required) The web app must disable HTTP and allow only HTTPS.
● (Required) The sample app isn’t certified by the payment card industry (PCI). You must follow appropriate PCI
standards and become certified before you launch the app in production.
● (Optional) The card page and web APIs can be hosted separately.
● (Optional) Logging and tracing.
● (Optional) Auditing.
Page 48
Implement a payment connector and a payment device 48
● (Optional) Denial of service attacks prevention. To address this issue, you might have to implement the necessary
throttling feature, an error notification feature, and other prevention measures on the host server.
● (Optional) Server authentication. When a client calls a service, such as GetPaymentAcceptPoint, the client is
authenticated based on the merchant credentials. However, for this example, the service server isn’t
authenticated.
This list isn’t exhaustive. You’re welcome to contact us to discuss other issues that you should address.
Part 3: Implementing a payment device
Hardware Station uses the payment device mainly to communicate with the payment terminal and call the payment
connector to make payments. We have created sample payment device implementations for each of the following
payment terminals:
● Hypercom L5300
● VeriFone Mx925 (Forms)
● SampleDevice (Template)
Methods
This section describes each method in the interface and explains its purpose.
Task OpenAsync(string peripheralName, SettingsInfo terminalSettings,
IDictionary<string, string> deviceConfig)
This method initializes the payment terminal so that it’s ready to begin a transaction. The deviceConfig parameter
enables the client to send configuration settings that aren’t available in Dynamics AX, but that are required in order
to load the payment terminal. In the following example for the VeriFone Mx925, TCP/IP is used for communication.
{ "Transport", "TCP" }, { "IPAddress", "10.125.226.147" }, { "Port", "5015" }, {"AccessCode", "7654" }
Task CloseAsync()
This method closes the connection to the payment terminal.
Task BeginTransactionAsync(PaymentProperty[] merchantProperties, string
connectorName, string invoiceNumber, bool isTestMode)
This method begins the payment terminal transaction. The following information is passed to the method:
● The payment provider merchant properties that are required for the payment connector
● The payment connector name that has been set up in Dynamics AX, so that this channel can make payments
Page 49
Implement a payment connector and a payment device 49
● The invoice number that is associated with the transaction
● A flag that indicates whether payments should be made to a test environment instead of a production
environment
The method also defines payment terminals settings, such as upper and lower limits, cashback amounts, and
signature approval limits. The limits are defined in Dynamics AX, but some payment terminals can be set up only by
the terminal supplier.
Task EndTransactionAsync()
This method ends the payment terminal transaction.
Task UpdateLineItems(string totalAmount, string taxAmount, string discountAmount,
string subTotalAmount, IEnumerable<ItemInfo> items)
This method displays items and totals to the payment terminal screen, if this feature is supported. This method is
called every time that an item is added to or removed from the POS cart.
Task<PaymentInfo> AuthorizePaymentAsync(decimal amount, string currency, string
voiceAuthorization, bool isManualEntry)
This method performs the following tasks:
● Fetch the tender to authorize the payment.
● Get the tender type (debit or credit).
● If the tender type is debit, get the personal identification number (PIN) entry.
● Get the signature approval, if this type of approval is required.
● Make the authorization call to the payment gateway.
● If the payment terminal supplies receipt data as XML, add it to the ExternalReceipt property in
AuthorizationResponse. In this case, standard Dynamics AX receipts won’t be printed. Instead, this XML data will
be used to print the receipt.
Task<PaymentInfo> CapturePaymentAsync(decimal amount, string currency,
PaymentProperty[] paymentProperties)
This method settles the authorization with the payment gateway. The payment processing state is persisted in the
AuthorizationResponse payment properties that are passed into this method.
Task<PaymentInfo> VoidPaymentAsync(decimal amount, string currency,
PaymentProperty[] paymentProperties)
This method calls the Void/Reversal method on the payment gateway. Once again, the payment processing state is
persisted in the AuthorizationResponse payment properties that are passed into this method.
Page 50
Implement a payment connector and a payment device 50
Task<PaymentInfo> RefundPaymentAsync(decimal amount, string currency, bool
isManualEntry)
This method is very similar to the Authorize method, but it refunds funds to the customer’s account.
Task<PaymentInfo> FetchTokenAsync()
This method fetches the tender and then creates a token of the credit card number. Typically, a token is generated by
a payment gateway and stored by a client for future use.
Task CancelOperationAsync()
This method tries to cancel any operation that the terminal is processing.
Extensibility in Dynamics AX
In the current version of Dynamics AX, a new extensionTransactionProperties parameter of the
ExtensionTransaction class was added to AuthorizePaymentAsync(), CapturePaymentAsync(),
VoidPaymentAsync(), and RefundPaymentAsync(). This parameter lets partners and customer pass in an array of
key-value pairs to the payment device.
Additionally, a new method that is named ExecuteTaskAsync(string task, ExtensionTransaction
transactionProperty) was added to let partners and customers call their own tasks on the payment device. These
tasks include displaying an email dialog box, displaying a customer message, and displaying a donation message.
These extensions let customers and partners customize the Retail Modern POS (MPOS) system to meet the
requirements of different industries and countries/regions.
Processing the payment by using a payment connector
If the payment device doesn’t handle the payment processing for the transaction, you must call
CardPaymentManager.Chained*Call() (where * = Authorize, Refund, Void, or Capture). For examples that show
what to pass to this method, and how, see the samples (SampleL5300 and SampleMx925). We have added the new
chained payment processors to enable different payment connectors to handle different payments. For example, the
device returns a gift card that the first payment connector can’t handle. This gift card is then passed to the second
payment connector, which processes the payment.
Exception handling
The client expects only the following types of exceptions:
● PeripheralException
● PaymentException
● CardPaymentException
Page 51
Implement a payment connector and a payment device 51
The error resource identifier should be one of the constant strings on the class, such as PeripheralException.
PaymentTerminalError.
If the device handles the payment processing, you must throw the following exception if the authorization is
declined, and so on:
CardPaymentManager.VerifyErrors(“AuthorizePaymentAsync”, result.PaymentErrors,
PaymentErrors.UnableToAuthorizePayment);
Summary
The payment connector instance is passed to the payment device to make payments. However, the payment device
implementation determines whether it will make its own payments by using the payment terminal hardware or
whether it will call the payment connector. Helper classes have been supplied in the peripherals assembly to convert
to and from payment SDK request and response objects for each payment transaction type.
The external receipt must be in the following format.
<ReceiptData>
<Receipt Type='Customer'>
<Line> Line 1 of receipt </Line>
<Line> Line 2 of receipt </Line>
...
</Receipt>
<Receipt Type='Merchant'>
<Line> Line 1 of receipt </Line>
<Line> Line 2 of receipt </Line>
...
</Receipt>
</ReceiptData>
Change history
Date Version number Changes
September 4, 2015 7.0.1.0 First version that has a version number and change history
September 21, 2015 7.0.1.1 ● Enumeration types: Add a new section to list all enum
types.
● Cross-domain messaging: Add two new messages, msax-
cc-partialamount and msax-cc-partialok, for the partial
authorization scenario. Add one new message, msax-cc-
swipe, for passing the track data.
October 23, 2015 7.0.1.2 Minor correction
Page 52
Implement a payment connector and a payment device 52
Date Version number Changes
November 19, 2015 7.0.1.3 ● Add the PaymentAcceptAdaptorPath,
PaymentAcceptMessageOrigin,
PaymentAcceptSubmitUrl, and
BankIdentificationNumberStart properties.
● Mark a few parameters on the payment accepting page
as “will be deprecated.”
December 7, 2015 7.0.1.4 ● Starting with dev build 7.0.1201.0, the following items are
obsolete:
● The msax-cc-width message
● The msax-cc-cardtype message
● The PageWidth query parameter
● The PagebackgroundColor query parameter
● Update all screenshots of the merchant web app and the
payment accepting web app.
Page 53
Send feedback.
Microsoft Dynamics is a line of integrated, adaptable business
management solutions that enables you and your people to make
business decisions with greater confidence. Microsoft Dynamics works
like and with familiar Microsoft software, automating and streamlining
financial, customer relationship, and supply chain processes in a way
that helps you drive business success.
United States and Canada toll-free: (888) 477-7989
Worldwide: (1) (701) 281-6500
www.microsoft.com/dynamics
CONFIDENTIAL. Internal Use Only.
Microsoft makes no warranties, express
or implied.
© 2019 Microsoft Corporation. All rights
reserved.
This document is provided “as-is.”
Information and views expressed in this
document, including URL and other
Internet Web site references, may
change without notice. You bear the risk
of using it.
Some examples are for illustration only
and are fictitious. No real association is
intended or inferred.
This document does not provide you
with any legal rights to any intellectual
property in any Microsoft product. You
may copy and use this document for
your internal, reference purposes.