54
1 Migrate to Microsoft Online Services White Paper Published: March 2009 For the latest information, please visit Microsoft Online Services. Formatted: Justified
| Date post: | 26-Oct-2014 |
| Category: |
Documents |
| Upload: | francis-finan |
| View: | 52 times |
| Download: | 2 times |
1
Migrate to Microsoft Online Services White Paper
Published: March 2009
For the latest information, please visit Microsoft Online Services.
Formatted: Justified

2
Information in this document, including URL and other Internet Web site references, is subject to change without notice. Unless otherwise noted, the companies, organizations, products, domain names, e-mail addresses, logos, people, places, and events depicted in examples herein are fictitious. No association with any real company, organization, product, domain name, e-mail address, logo, person, place, or event is intended or should be inferred. Complying with all applicable copyright laws is the responsibility of the user. Without limiting the rights under copyright, no part of this document may be reproduced, stored in or introduced into a retrieval system, or transmitted in any form or by any means (electronic, mechanical, photocopying, recording, or otherwise), or for any purpose, without the express written permission of Microsoft Corporation.
Microsoft may have patents, patent applications, trademarks, copyrights, or other intellectual property rights covering subject matter in this document. Except as expressly provided in any written license agreement from Microsoft, the furnishing of this document does not give you any license to these patents, trademarks, copyrights, or other intellectual property.
© 2009 Microsoft Corporation. All rights reserved.
Microsoft, Active Directory, Excel, Hotmail, Outlook, Windows, Windows PowerShell, Windows Server, and Windows Vista are trademarks of the Microsoft group of companies.
All other trademarks are property of their respective owners.

3
Migrate to Microsoft Online Services
Contents
Introduction ............................................................................................................................................................. 5
Understand Migration ............................................................................................................................................ 5
Simple Microsoft Online Services .................................................................................................................... 5
Microsoft Online Services Using Your E-Mail Domain ................................................................................... 5
E-Mail Coexistence ........................................................................................................................................... 6
Directory Synchronization ................................................................................................................................. 6
Mailbox Migration .............................................................................................................................................. 6
Migration Tools .................................................................................................................................................. 7
Plan Your Migration ............................................................................................................................................... 7
Migration and Synchronization Computer Security ........................................................................................ 8
Type of E-Mail Environment ............................................................................................................................. 8
Installation Prerequisites ................................................................................................................................... 8
Mailbox Information ........................................................................................................................................... 8
E-Mail Client Software....................................................................................................................................... 9
E-Mail–Enabled Applications ............................................................................................................................ 9
Number of Objects to Be Synchronized .......................................................................................................... 9
Network Bandwidth ........................................................................................................................................... 9
Help Desk Resources ..................................................................................................................................... 10
Required Permissions ..................................................................................................................................... 10
Complex Environments ................................................................................................................................... 10
Prepare For Migration ......................................................................................................................................... 13
Establish E-Mail Coexistence ............................................................................................................................. 13
Add Your Organization’s Domain to Microsoft Online Services .................................................................. 14
Enable Transport Layer Security (TLS) ......................................................................................................... 16
Verify Your E-Mail Traffic Flow ....................................................................................................................... 18
Enable Directory Synchronization .................................................................................................................. 18
Install and Configure the Microsoft Online Services Directory Synchronization Tool ............................... 18
Verify Directory Synchronization .................................................................................................................... 20
Migrate Your Mailboxes ...................................................................................................................................... 21
Install the Microsoft Online Services Migration Tools ..............................................................................2122
Migrate Local Exchange Server Mailboxes...............................................................................................2223
Migrate POP3 and IMAP4 Mailboxes ............................................................................................................ 24
Complete Your Migration ................................................................................................................................2829
Delete Mailboxes .........................................................................................................................................2829
4
Reroute Incoming Mail ................................................................................................................................2930
Decommission Your Local Exchange Server Environment .....................................................................3031
Other Migration Considerations .................................................................................................................3031
Advanced Topics .............................................................................................................................................3031
E-Mail Coexistence and E-Mail Migration .................................................................................................3031
Directory Synchronization ...........................................................................................................................3233
E-Mail Migration ...........................................................................................................................................3536
Migration CmdLet Reference .....................................................................................................................3738
Appendix A: Sample Planning Documents ...................................................................................................5455
Appendix B: Other Sources of Information ....................................................................................................5455

5
Introduction
Microsoft® Online Services supports migration of the contents of local Microsoft Exchange Server mailboxes as well as the contents of POP3 and IMAP4 mailboxes from your current environment to Microsoft Exchange Online. Migration can be done as quickly or as slowly as you want. Small organizations may be able to migrate to Microsoft Online Services overnight or over a weekend. Larger or more complex organizations typically prefer to establish e-mail and directory coexistence for a longer period of time and perform a controlled migration in logical stages.
To successfully migrate from your current environment to Microsoft Online Services, you must consider the following steps:
Understand migration
Plan your migration
Prepare for migration
Establish e-mail coexistence
Migrate your mailboxes
Complete your migration
The size and complexity of your current environment, your organization’s existing Internet connectivity, the type of e-mail system you are using, whether or not you are using the Active Directory® directory service—all of these factors will help determine your migration goals. In some cases, you may be able to skip or minimize some of these steps. Follow the links above to the sections of this document that describe each of these steps.
Understand Migration
You must understand the following concepts when discussing migration to Microsoft Online Services:
Simple Microsoft Online Services
Microsoft Online Services with your e-mail domain
E-mail coexistence
Directory synchronization
Mailbox migration
Migration tools
Simple Microsoft Online Services
When you register with Microsoft Online Services, you are assigned a domain name similar to example.microsoftonline.com. You can use this domain name and Microsoft Online Services with no attempts to make it work with your existing e-mail environment. This is referred to as simple Microsoft Online Services.
Microsoft Online Services Using Your E-Mail Domain
Many organizations have a registered Internet domain name that they use when sending and receiving e-mail. Microsoft Online Services supports adding your domain name to your Exchange Online service. If you want to use your e-mail domain without migrating from an existing e-mail environment, see the Microsoft TechNet article About Using Your Domain with Microsoft Online Services.

6
E-Mail Coexistence
If you have an existing local Exchange Server e-mail environment, you can continue to use that environment while evaluating Microsoft Online Services. You can establish one-way synchronization from your local Active Directory directory service to Microsoft Online Services and migrate groups of users and their mailbox contents from your local Exchange Server environment to Exchange Online. During this phase, some of your organization’s mailboxes will be hosted on your local Exchange Server environment, and others will be hosted in Exchange Online. This is referred to as e-mail coexistence.
Directory Synchronization
Establishing e-mail coexistence between your local Exchange Server environment and your Exchange Online environment requires directory synchronization. The Microsoft Online Services Directory Synchronization Tool provides one-way synchronization from your local Active Directory directory service to Microsoft Online Services.
When you first run the Microsoft Online Services Directory Synchronization Tool, it writes a copy of each user account and all e-mail–enabled contacts and groups to your organization’s Microsoft Online Services directory. Directory synchronization can also provide Global Address List synchronization between your local Exchange Server environment and Exchange Online.
When user accounts are first synchronized with your Microsoft Online Services directory they are marked as disabled. They cannot send or receive e-mail and they do not consume licenses. When you are ready to assign Exchange Online mailboxes to specific users, you must select and activate these users.
Important:
When your organization is using the Microsoft Online Services Directory Synchronization Tool to synchronize your local directory with Microsoft Online Services, you must edit all synchronized objects (user accounts and e-mail enabled contacts and groups) in your local Active Directory using the Active Directory Users and Computers Microsoft Management Console snap-in. It is possible to edit synchronized contacts and groups in Microsoft Online Services, but any changes that you make in Microsoft Online Services will be overwritten the next time directory synchronization runs.
Mailbox Migration
Microsoft Online Services provides tools to help you migrate the contents of your local Exchange Server mailboxes to Exchange Online. You can also migrate the contents of POP3 and IMAP4 mailboxes to Exchange Online. The migration tools include the Microsoft Online Services Migration Console, which should handle most of your migration needs. The tools also include several Windows PowerShell™ cmdlets that you can use to script your migration.
When migrating local Exchange Server mailboxes to Exchange Online, we recommend that you first establish e-mail coexistence between your local Exchange Server environment and Exchange Online. However, you can also choose to migrate the contents of your organization’s mailboxes to Exchange Online without establishing e-mail coexistence. This is usually done by small organizations with simple e-mail environments or by organizations without an existing local Exchange Server e-mail environment.
There are two basic types of mailbox migration:
Exchange Server mailbox migration
POP3 or IMAP4 mailbox migration
Your choice is determined by which e-mail system is currently in place at your organization.

7
Exchange Mailbox Migration
Microsoft Online Services supports the migration of Exchange Server 2000, Exchange Server 2003, and Exchange Server 2007 mailboxes. Migration of Exchange Server mailboxes can be done in stages by establishing e-mail coexistence and directory synchronization between your local Exchange Server environment and Exchange Online. You can then migrate the mailbox contents in logical groups of users. When all mailboxes have been migrated, you delete the local Exchange Server mailboxes and perform the DNS administration task of switching your MX records to deliver all of your organization’s e-mail to your Exchange Online service. For more information about switching your MX records, see “Reroute Incoming Mail” later in this paper.
If you have a small organization with a simple e-mail environment, you might be able to migrate to Microsoft Online Services overnight, or over a weekend. Larger organizations with more complex e-mail environments should plan their migration over a longer period to minimize the disruption for their users. For more information, see “Plan Your Migration” later in this document.
POP3 or IMAP4 Mailbox Migration
Microsoft Online Services does not support coexistence with POP3 and IMAP4 mailboxes. When migrating from POP3 and IMAP4 mailboxes, you can use the migration tools to copy the contents of the POP3 or IMAP4 mailboxes directly to Exchange Online mailboxes.
Migration Tools
Microsoft Online Services provides two tools to help your organization establish e-mail coexistence and migrate from your current e-mail environment to Microsoft Exchange Online. Those tools are:
Microsoft Online Services Directory Synchronization Tool
Microsoft Online Services Mailbox Migration Tools
Microsoft Online Services Directory Synchronization Tool
The Microsoft Online Services Directory Synchronization Tool is required to establish e-mail coexistence. If your company uses the Active Directory directory service, you can use this tool to provide regular one-way synchronization of user accounts, e-mail–enabled contacts, and e-mail–enabled groups from your local Active Directory to Microsoft Online Services.
Microsoft Online Services Migration Tools
The Microsoft Online Services Migration Tools help you migrate mailbox content from your local Exchange Server environment or your POP3 and IMAP4 servers to Exchange Online. They are also used during e-mail coexistence to establish e-mail forwarding from your local Exchange Server mailboxes to Exchange Online.
Plan Your Migration
The key to a successful migration is thorough planning. The first part of the planning process is to understand your current environment. At a minimum, you must consider the following:
Migration and synchronization computer security
Type of e-mail environment
Installation prerequisites
Mailbox information
E-mail client software
E-mail–enabled applications
Number of objects to be synchronized
Network bandwidth
Help desk resources
Required permissions
8
Complex environments
If you are not comfortable with the questions and the terminology used in this section, you may choose to work with a Microsoft Certified company. To find a Microsoft Certified company, use the Find it Fast feature of the Microsoft Pinpoint Web site at http://pinpoint.microsoft.com.
Migration and Synchronization Computer Security
You should control access to the computers on which you install the Microsoft Online Services Migration Tools and the Microsoft Online Services Directory Synchronization tools as tightly as you control access to your Active Directory domain controllers and other sensitive network components. You should only allow people with Domain Admin permissions or greater to access these computers.
Type of E-Mail Environment
Determine what type of e-mail environment your organization is currently using. Microsoft Online Services supports mailbox content migration from local Exchange Server environments and from POP3 and IMAP4 servers. If you have a local Exchange Server environment running Exchange Server 2000, Exchange Server 2003, or Exchange Server 2007 you can establish e-mail coexistence and directory synchronization and then migrate your organization’s mailbox contents over time.
Installation Prerequisites
The computers on which you install the Microsoft Online Services Migration Tools and the Microsoft Online Services Directory Synchronization tool must meet specific requirements.
Migration Tool Prerequisites
The Microsoft Online Services Migration Tools are available in both 32-bit and 64-bit versions. They can be installed on computers that meet the following prerequisites:
Windows PowerShell is installed.
Microsoft Management Console (MMC) version 3 is installed.
Windows Vista® operating system, Windows Server® 2000, Windows Server 2003, or Microsoft Windows® XP with Service Pack 2 is installed. The Migration Tools can be installed on an Active Directory domain controller.
Directory Synchronization Tool Prerequisites
The Directory Synchronization tool can be installed on computers that meet the following prerequisites:
Joined to a domain in the Active Directory forest that you plan to synchronize with Microsoft Online Services. Installation on Active Directory domain controllers is not supported.
Able to communicate with all of the other domain controllers for all of the domains in your Active Directory forest.
Running 32-bit Windows Server 2003 or Windows Server 2008 with the latest service packs installed. Installation on 64-bit computers is not supported.
Running Microsoft .NET Framework version 2.0. Click here for information about installing the .NET Framework.
Running Windows PowerShell. Click here to install Windows PowerShell.
Mailbox Information
Determine the number of mailboxes, mailbox size, and the rate of mailbox size growth. This information will help you evaluate the impact of migration traffic on your network. You should take this into consideration when you schedule your migration.
Does your organization enforce maximum mailbox size limits? This information is very important when you define your organization’s Exchange Online storage capacities. At a minimum, the new environment should let all users store the same amount of data or more in their Exchange Online mailboxes. It may be
9
necessary for users with extra-large mailboxes to move some of that content from their mailboxes to some form of offline storage, such as a Microsoft Outlook® .PST file.
E-Mail Client Software
What e-mail client applications are your users currently using? Exchange Online requires Microsoft Office Outlook 2007 or Outlook Web Access (OWA). If your users are not familiar with Office Outlook or OWA, you may want to schedule user training.
E-Mail–Enabled Applications
Does your organization have any e-mail–enabled applications? Some examples of e-mail–enabled applications are:
An auto-reply to incoming e-mail addressed to a specific e-mail address.
A report automatically generated by a line-of-business application that is e-mailed to an e-mail address or a distribution group.
If your organization has any e-mail–enabled applications, you must determine whether they can be modified to work with Microsoft Online Services. In some cases, it may be necessary to keep your existing e-mail environment, in order to support your e-mail–enabled applications until you can make the necessary modifications.
Number of Objects to Be Synchronized
If you are planning to establish one-way directory synchronization between your on-premises Active Directory and Microsoft Online Services, how many objects will be synchronized? The Microsoft Online Services Directory Synchronization Tool synchronizes all user accounts, as well as e-mail–enabled contacts and groups. If your organization has more than 20,000 objects, please contact Microsoft Online Services Support for a special migration process.
The initial synchronization copies all user accounts and e-mail–enabled contacts and groups from your local Active Directory to Microsoft Online Services. Depending on the number of objects and your available network bandwidth, you may want to schedule this first synchronization for an off-peak time. Subsequent (regular) synchronizations copy only the changes to the individual objects, which generally does not take significant bandwidth.
Network Bandwidth
What is your available network bandwidth? What type of connection does your organization have to the Internet? Using Microsoft Online Services will significantly increase your Internet traffic. E-mail coexistence and directory synchronization will have the most impact, but you will notice a general increase in Internet traffic after migrating your users to Microsoft Online Services.
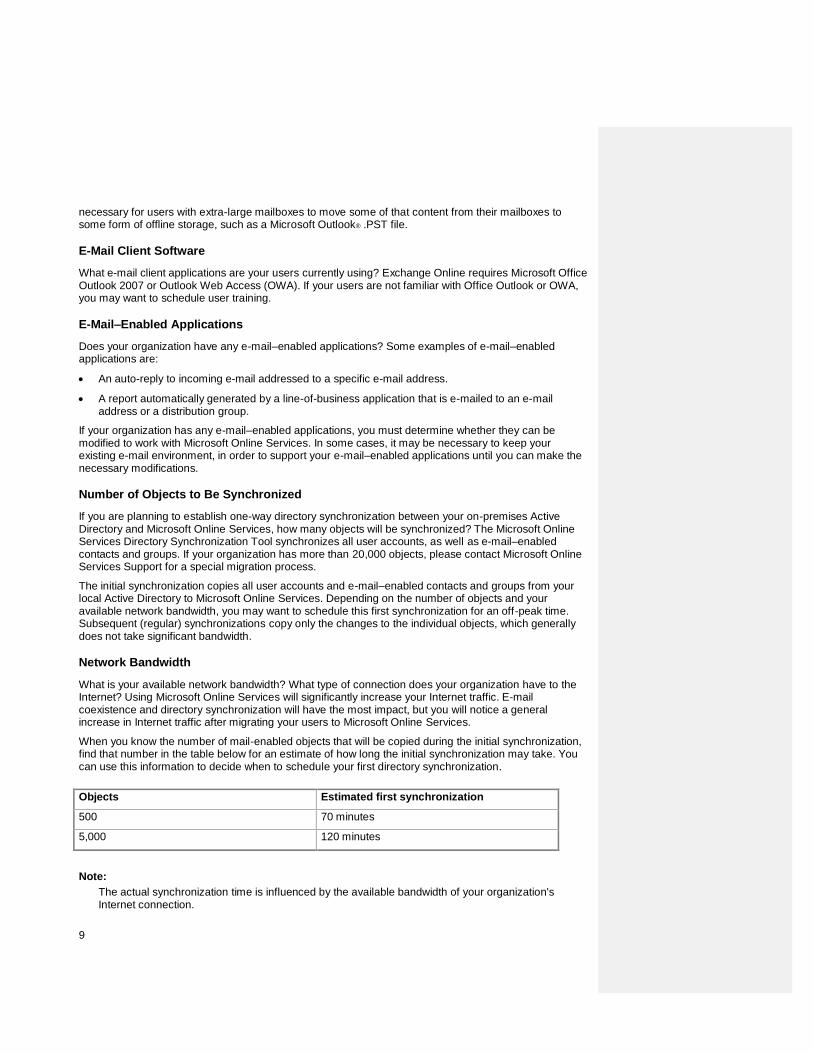
When you know the number of mail-enabled objects that will be copied during the initial synchronization, find that number in the table below for an estimate of how long the initial synchronization may take. You can use this information to decide when to schedule your first directory synchronization.
Objects Estimated first synchronization
500 70 minutes
5,000 120 minutes
Note:
The actual synchronization time is influenced by the available bandwidth of your organization's Internet connection.
10
Help Desk Resources
You may want to consider temporarily increasing your help desk resources. There are bound to be questions as your users become familiar with Microsoft Online Services, particularly during the e-mail coexistence and migration phases.
Required Permissions
Migrating to Microsoft Online Services requires high-level permissions in your existing Exchange Server and Active Directory environment. See “Install and Configure the Microsoft Online Services Directory Synchronization Tool” and “Install the Microsoft Online Services Migration Tools” later in this paper for the permissions required.
Complex Environments
Those organizations with larger or more complex network and e-mail environments should gather the information listed above, and also consider the following, more detailed information:
E-mail system information
Network information
Client computer information
User information
Backup and restore procedures
Additional questions
If your organization does not already have detailed diagrams of your current environment, consider preparing a set. The thorough understanding that this process yields, and your ability to communicate complex concepts quickly with these diagrams, will help you plan your migration and communicate with any consultants or Microsoft Online Services Support personnel.
E-Mail System Information
Whether your organization’s e-mail system is a local, on-premises e-mail environment, or is provided by an Internet e-mail provider, you can strengthen your migration plan by gaining as much information as possible about your system.
If your organization currently has an on-premises e-mail environment, you should gather the following information to help you plan your migration to Microsoft Online Services:
Number of on-premises e-mail servers
E-mail server software and versions
E-mail server locations
E-mail server roles
E-mail server names
Your organization’s e-mail domain names
Documentation of registered ownership of your e-mail domain names
E-mail domain hosting organization
Designated administrator contact information
If your organization currently uses an Internet e-mail provider, gather the following information:
Number of e-mail users
Type of e-mail service (Hosted Exchange Server, POP3, IMAP4, others)
Type of administrative access (if any)
11
E-mail hosting company
Your organization’s e-mail domain names
Documentation of registered ownership of your e-mail domain names
E-mail domain hosting company
Designated administrator and support contact information
Network Information
You need to understand how your network traffic flows within your organization and between your organization and the Internet. If they don’t already exist, you should create diagrams of your topology to make it easier to determine where potential problems may arise. Information collected should include:
Local-area network (LAN) configurations
Wide-area network (WAN) configuration
Internet connectivity details (such as type of connection and available bandwidth)
Low-bandwidth, high-latency, and intermittent links
Gateway servers between e-mail domains
Internet gateways (Simple Mail Transfer Protocol [SMTP] in and out)
E-mail and network traffic statistics (if available)
Other messaging add-ons, such as fax, pager, or BlackBerry
Active Directory and Exchange Server replication schedules and exclusions/formulae
Firewalls and their restrictions
Routers and their configurations
Foreign domains
Foreign SMTP domains
Designated network and e-mail administrator and support contact information
Client Computer Information
Microsoft Online Services has specific operating system and application compatibility requirements. To make sure that your client computers are compatible with Microsoft Online Services, gather the following information about your organization’s client computers and compare this information to the “System Requirements” Help topic.
Client computer locations
Organization computer configuration standards and any known deviations from those standards
Client hardware — for example, x86, x64, other
Operating system version, service pack level, and hotfixes or patches
Internet browser versions and service pack level
E-mail clients
Mobile device operating system and version
User Information
User data such as the following can be useful, especially when determining risk:
List of users by domain or server
Any e-mail quotas in force
Designated help desk contact information
Backup and Restore Procedures
Your ability to restore production systems in the event of a migration issue will minimize disruptions in your environment. In order to perform proper backup and restore procedures, you must:

12
Identify current backup schedule and validation policies for individual servers.
Specify storage location of backup media.
Specify storage location of product media.
Verify that backups can be successfully restored.
Additional Questions
You may also want to answer the following questions to help you with your migration efforts.
Are there any known problems in the current infrastructure that might adversely affect the implementation? Beware of overtaxing the existing connections, transmission problems caused by inadequate software components, and inefficient or incorrect message routing. For example:
Bottlenecks or malfunctioning connectors are the likely cause when messages are queued on a bridgehead server.
Non-delivery reports (NDRs) are signs of incorrect message routing.
Message loops are created if messages are routed multiple times through the same bridgehead.
What servers must remain? It may be necessary to retain some of your existing e-mail environment after migrating your users to Exchange Online.
Does the organization have workflow dependencies or mail-in database functionality that requires that certain e-mail servers must remain?
Have you identified and are you familiar with every application that is involved in sending e-mail? Understanding what applications send mail is critical to minimizing e-mail transmission problems. Although administrators may be familiar with the Exchange Server e-mail system and other systems that are part of the overall message flow, what applications are sending e-mail and where they’re sending are generally not well documented.
When you start retiring servers, or if you are trying to resolve odd e-mail addressing problems, you may discover an issue with a rogue application that is sending messages in a non-standard way.
Do users require training on Microsoft Office Outlook? Users who are familiar with Outlook will find the migration to Exchange Online straightforward. However, novice users might face a learning curve because Outlook offers a comprehensive set of messaging features. You can ease this situation by providing appropriate user training.
Is the help desk prepared for an increased workload related to the implementation? A properly prepared help desk can be a key factor in the success of your organization’s migration.
The implementation phase can put pressure on help desk personnel because the support call volume increases when users start using their new messaging clients. Depending on the size of your organization, it may be necessary for you to dedicate a help desk specialist to Outlook-related questions and to provide this person with special training.
To maintain productivity in larger organizations, the help desk’s Outlook task force may consist of a number of experts. You might want to temporarily increase the number of people in the help desk department. It is reasonable to assume that the call level will return to normal within a few months after migration is completed.
How will you keep management, IT administrators, help desk personnel, and users updated about the implementation progress? If you decide to establish coexistence and then migrate over time, it is important to keep everyone in your organization fully informed about the migration progress. For example, the users must know when they are scheduled for Outlook training and the IT administrators, help desk personnel, and management need
13
information about project progress. We recommend that you create a detailed communication plan. Many organizations implement a dedicated intranet site to facilitate communication about the migration. For more information about the communication plan, see the Microsoft Online Services Migration and Coexistence forum.
Prepare For Migration
After gathering the information above, you can now develop the right migration plan for your organization. Your plan should include the following:
Documentation of your existing environment
Plan for any required client computer changes
Plan for any required client software changes
Plan for training associated with the above changes
Plan to establish e-mail coexistence (if desired)
Plan for dealing with legacy e-mail applications
Plan to migrate your organization’s mailbox contents
What size of Exchange Online mailboxes will your users need?
How many mailboxes to migrate in one session?
How many sessions will be needed?
How to group users to be migrated?
How long will the overall migration take?
Plan for supporting your users during the migration
Administrative and troubleshooting responsibilities
See the “Sample Planning Documents” appendix for some examples of planning documents.
Establish E-Mail Coexistence
If your organization is running Exchange Server 2000, Exchange Server 2003, or Exchange Server 2007, you can establish e-mail coexistence between your local Exchange Server environment and Microsoft Exchange Online. E-mail coexistence provides a unified e-mail experience during trial and migration to Microsoft Online Services. E-mail coexistence enables users with mailboxes in your local Exchange Server environment and users with Exchange Online mailboxes to find each other in your Global Address List (GAL), and to send, receive, and reply to e-mail regardless of which system is hosting their mailbox.
Note:
Implementation of e-mail coexistence requires directory synchronization. For more information, see “Install and Configure Directory Synchronization” later in this paper.
Establishing e-mail coexistence between your local Exchange Server environment and Exchange Online includes the following steps:
Add your organization’s domain to Microsoft Online Services.
Enable Transport Layer Security (TLS).
Verify your e-mail traffic flow.
Enable directory synchronization.
Install and configure the Microsoft Online Directory Synchronization Tool.
Verify directory synchronization.

14
Many of the steps required to enable e-mail coexistence are performed on the E-Mail Coexistence page of
the Migration tab in the Microsoft Online Administration Center.
Add Your Organization’s Domain to Microsoft Online Services
If your organization has a registered Internet domain and you want to send and receive e-mail addressed to that domain in Exchange Online, you must:
Add your domain to Microsoft Online Services.
Verify ownership of your domain.
Add Your Domain to Microsoft Online Services
If you have a registered Internet domain, you can register this domain with Microsoft Online Services. If you want to establish e-mail coexistence between your local Exchange Server environment and Microsoft Online Services, and your local Exchange Server environment is already sending and receiving e-mail addressed to this domain, adding your domain to Microsoft Online Services will enable Exchange Online to send e-mail from your domain.
To add your domain to Microsoft Online
Sign in to the Microsoft Online Services Administration Center using your administrator user name and password.
1. If you have not created a new domain entry for your company in Microsoft Online Services, click
Setup primary domain to enable e-mail in the Tasks I Need To Do pane of the Administration
Center home page.
OR
Navigate to the Domains page of the Users tab, and then click New in the title bar of the
Domains pane.
2. In the Name field of the New Domain Wizard, type the name of your company's domain (for
example, contoso.com).
3. In the Type area, select External Relay if you have an existing e-mail environment that uses this
domain name.
OR
Select Authoritative if your Microsoft Online Services e-mail service is the only e-mail
environment that uses this domain name.
4. Click Create, and then on the Confirmation page, verify the domain name and type that you
provided.
Note:
You must verify ownership of your company’s domain before you can add users or send and receive e-mail. For information about verifying a domain, see the next section, “Verify Ownership of Your Domain”.
Verify Ownership of Your Domain
Microsoft Online Services offers domain verification procedures that are specific to some of the most popular domain registrars. You can go to the Microsoft Online Services Forum or contact Microsoft Online Services Support to see if there is a procedure for your domain registrar. However, the procedure in this
section can be used with any domain registrar.
You only need to add and verify a domain once. If someone else in your company has already added and verified the same domain, you will receive a message noting this.

15
Note:
Step 3a of the verification process presented in this section requires you to access your domain account with your domain registrar. Contact your domain registrar if you need help accessing your domain account.
To verify ownership of your domain
1. If you are not already signed in to the Microsoft Online Services Administration Center, sign in
using your administrator user name and password.
2. Navigate to the Users tab, click Domains, and then, in the Status column next to the appropriate
domain in the Domains pane, click Verify now.
3. In the Verify Domain Wizard, create a new alias:
a. On the Verification details page, carefully read and follow the instructions.
b. Open a new Web browser window or tab, navigate to your domain registrar's Web portal, and
sign in to your domain account. (Contact your domain registrar if you need help accessing
your domain account.)
c. Copy the part of your Microsoft Online Services CNAME information before the first dot
(similar to C9D882D-8A55-4700-9B0B-4C9C0F10AB12), and then enter this information into
the appropriate alias (CNAME) location in your domain account.
d. Copy your Microsoft Online Services fully qualified domain name (FQDN) information (similar
to mail.contoso.com), and then enter this information into the appropriate FQDN or “points-to”
location in your domain account.
4. Save your changes in your domain account, and then sign out of your domain registrar’s Web
portal.
5. Close the Verify Domain Wizard and sign out of the Microsoft Online Services Administration
Center. Wait at least 15 minutes.
Note:
It takes between 15 minutes and 72 hours for the new alias you created on your domain account to propagate through the Internet. The domain verification process will fail until the propagation is complete.
6. After at least 15 minutes, sign in to the Microsoft Online Services Administration Center again,
using your Administrator user name and password.
7. On the Users tab, click Domains, and then in the Status column next to the appropriate domain
in the Domains pane, click Verify now.
8. In the Verify Domain Wizard, on the Verification details page, click Verify.
9. In the Confirmation page of the Verify Domain Wizard, make a test connection to your domain,
and confirm that the verification was successful.
Note:
If your verification fails, it is likely due to the fact that the changes you made to your domain account need more time to propagate throughout the Internet. Cancel the Verify Domain Wizard and come back to verify the domain later. If it has been more than 72 hours since you made the changes to your domain account, log on to your domain account, and verify that you entered the CNAME information correctly. If the information was entered incorrectly, you must remove the incorrect alias and create a new one with the correct information, by repeating the steps above.

16
10. After successfully verifying your domain ownership, click Close to exit the Verify Domain
Wizard. Your domain should now be listed as Verified in the Domains pane of the Exchange
Online page.
Important
If the domain you are adding was previously owned by another Microsoft Online Services customer, you must wait 24 hours after verifying the domain before adding users, contacts, or distribution lists to your new domain. This prevents possible access to this information by the previous domain owners.
Enable Transport Layer Security (TLS)
As part of establishing e-mail coexistence between your local Exchange Server environment and Exchange Online, we recommend that you implement Transport Layer Security (TLS) send and receive capability in your local Exchange Server environment. This is recommended because, during coexistence with Exchange Online, e-mail that was previously sent and received within your organization will now be transmitted over the Internet, so you’ll want an extra measure of security in such an open environment.
This paper describes how to secure e-mail traffic on Exchange Server 2000 and Exchange Server 2003. If your local Exchange Server environment is using Exchange Server 2007, refer to your Exchange Server documentation. For more information about TLS, see the Microsoft TechNet article What is TLS/SSL?
Note:
Securing your e-mail traffic with TLS requires a certificate granted by a recognized certification authority (CA).
The steps involved in implementing TLS in your local Exchange Server environment include:
Identify the Exchange Server on which to install the certificate.
Generate a certificate request.
Acquire the certificate.
Install the certificate.
Create a Simple Mail Transfer Protocol (SMTP) connector.
Configure TLS.
Identify the Exchange Server on Which to Install the Certificate
TLS should be enabled on the bridgehead server of your local Exchange Server environment. That is the Exchange Server computer that directs your organization's e-mail to and from the Internet. For more information about bridgehead servers and Exchange Server message routing, see the Microsoft TechNet article Exchange Server 2003 Message Routing Topology.
If you have separate bridgehead servers for sending and receiving e-mail via the Internet, you will need to acquire and install a certificate on each SMTP server that is running Exchange Server; however, you will need to set up a connector and enable TLS only on the server that is used for sending e-mail to the Internet.
Important:
If your Exchange Server environment relies on an external relay server to send and receive e-mail to and from the Internet, you will need to contact the administrator of the external relay service about their TLS support. When TLS has been enabled on the external service, secure e-mail will flow between their relay server and Microsoft Online Services.
If you have third-party bridgehead software or service, refer to that product’s documentation to see how you can configure TLS.
17
If you have a local Exchange Server bridgehead server running the standard SMTP virtual server, continue with this process.
Generate a Certificate Request
Use Exchange System Manager to generate a certificate request on your bridgehead server. You will need to provide the fully qualified domain name (FQDN) of the bridgehead server. For more information, see the Microsoft TechNet article Creating a Certificate or Certificate Request for TLS.
Acquire the Certificate
Locate a recognized certification authority (CA), such as VeriSign, Comodo, and GoDaddy. Submit the certificate request file that you generated in the previous section. The CA will provide you with a certificate (.CER) file containing the certificate for your server.
Important:
You must use a certificate from a recognized certificate authority. You cannot configure TLS with a self-signed certificate.
Install the Certificate
Use Exchange System Manager to install the certificate file. You will need to provide the path to the certificate file that you received from the CA. Consult your Exchange Server documentation for instructions.
Create an SMTP Connector to Microsoft Online Services
In this step, you will create the SMTP connector that will be used to send e-mail to Microsoft Online Services. For more information about creating SMTP connectors, see the Microsoft Help and Support article How to Configure the SMTP Connector in Exchange 200x.
To create an SMTP connector
1. In Exchange System Manager, right-click Connectors, and then select New SMTP Connector.
2. Type a name for the connector (for example, MicrosoftOnlineServices).
3. On the General tab, select Forward all e-mail through this connector to the following smart
host, and then type mail.global.frontbridge.com.
4. Under Local Bridgeheads, click Add, and then select your bridgehead Exchange Server server.
5. On the Address Space tab, click Add, and then type your organization's Microsoft Online
Services e-mail routing domain (for example, contoso1.microsoftonline.com).
Note:
To determine your organization's Microsoft Online Services e-mail routing domain, sign in to the Microsoft Online Administration Center, select the Migration tab, and then click E-Mail Coexistence. The domain is listed on the right side of the page.
Configure TLS
After you install the certificate, your server will be able to receive TLS e-mail. However, it cannot send TLS e-mail until you configure TLS.
To configure TLS
1. In Exchange System Manager, expand Connectors and locate the MicrosoftOnlineServices
connector that you created in the previous section, “Create an SMTP Connector to Microsoft
Online Services.”
2. Right-click the connector, and then click Properties.
3. On the Advanced tab, click Outbound Security, and then select TLS Encryption.
18
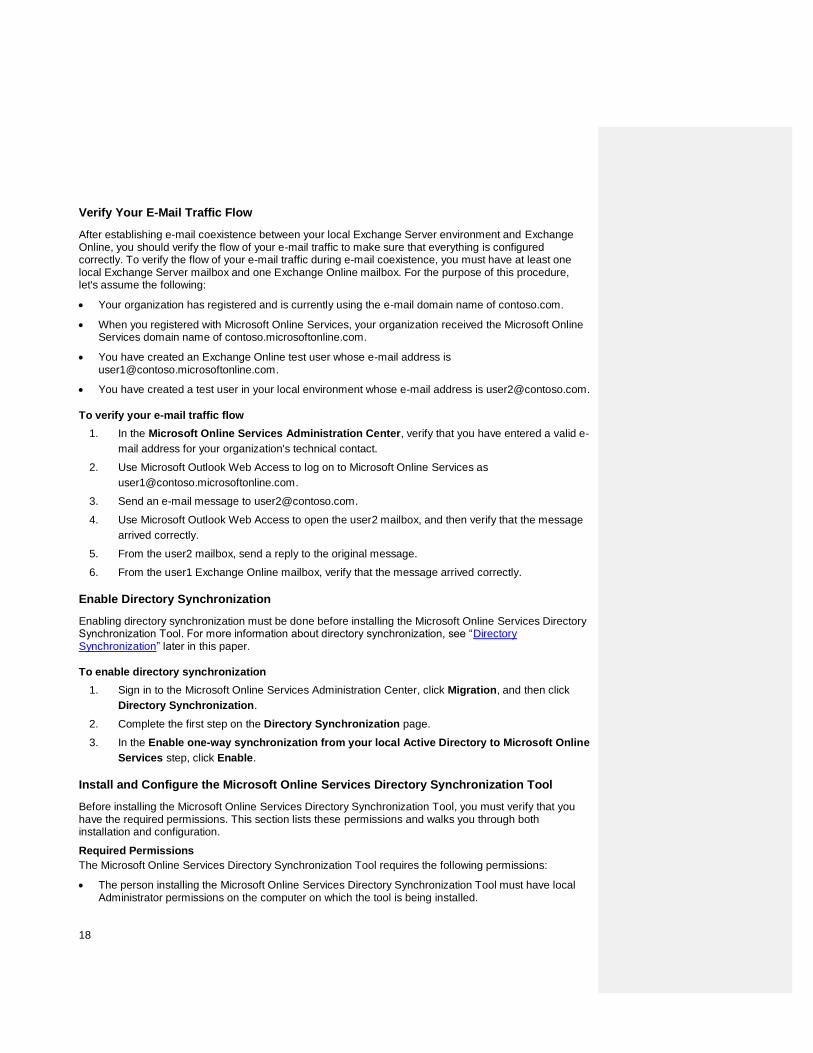
Verify Your E-Mail Traffic Flow
After establishing e-mail coexistence between your local Exchange Server environment and Exchange Online, you should verify the flow of your e-mail traffic to make sure that everything is configured correctly. To verify the flow of your e-mail traffic during e-mail coexistence, you must have at least one local Exchange Server mailbox and one Exchange Online mailbox. For the purpose of this procedure, let's assume the following:
Your organization has registered and is currently using the e-mail domain name of contoso.com.
When you registered with Microsoft Online Services, your organization received the Microsoft Online Services domain name of contoso.microsoftonline.com.
You have created an Exchange Online test user whose e-mail address is [email protected].
You have created a test user in your local environment whose e-mail address is [email protected].
To verify your e-mail traffic flow
1. In the Microsoft Online Services Administration Center, verify that you have entered a valid e-
mail address for your organization's technical contact.
2. Use Microsoft Outlook Web Access to log on to Microsoft Online Services as
3. Send an e-mail message to [email protected].
4. Use Microsoft Outlook Web Access to open the user2 mailbox, and then verify that the message
arrived correctly.
5. From the user2 mailbox, send a reply to the original message.
6. From the user1 Exchange Online mailbox, verify that the message arrived correctly.
Enable Directory Synchronization
Enabling directory synchronization must be done before installing the Microsoft Online Services Directory Synchronization Tool. For more information about directory synchronization, see “Directory Synchronization” later in this paper.
To enable directory synchronization
1. Sign in to the Microsoft Online Services Administration Center, click Migration, and then click
Directory Synchronization.
2. Complete the first step on the Directory Synchronization page.
3. In the Enable one-way synchronization from your local Active Directory to Microsoft Online
Services step, click Enable.
Install and Configure the Microsoft Online Services Directory Synchronization Tool
Before installing the Microsoft Online Services Directory Synchronization Tool, you must verify that you have the required permissions. This section lists these permissions and walks you through both installation and configuration.
Required Permissions
The Microsoft Online Services Directory Synchronization Tool requires the following permissions:
The person installing the Microsoft Online Services Directory Synchronization Tool must have local Administrator permissions on the computer on which the tool is being installed.

19
When configuring directory synchronization, you must provide the user name and password of an account with Administrator permissions on your Microsoft Online Services company.
You must provide the user name and password of an account with Enterprise Admin permissions on your local Active Directory directory service.
You must have Exchange Administrator permissions to implement TLS in your Exchange Server environment.
Installation
Before beginning the installation process, refer to your migration plan and verify that you have met the computer requirements and that you have the necessary permissions.
To install the Microsoft Online Services Directory Synchronization Tool
1. Sign in to the Microsoft Online Services Administration Center, click Migration, and then click
Directory Synchronization.
2. On the Directory Synchronization page, complete steps 1 and 2, click Download, and then
follow the instructions to save the installation file on your computer.
3. If necessary, copy the installation file to the computer on which it will be installed, and then run
the installation program.
Note:
You must successfully complete the Microsoft Online Services Directory Synchronization Tool Configuration Wizard before synchronization will begin. You can run the configuration wizard immediately after installation by selecting Start Configuration Wizard now on the Finish page of the Microsoft Online Services Directory Synchronization Tool Installation Wizard.
To configure the Microsoft Online Services Directory Synchronization Tool
1. If you are working through the Microsoft Online Services Directory Synchronization Tool
Installation Wizard, on the Finish page, select Start Configuration Wizard now, and then click
Finish.
OR
Click Start, click All Programs, click Microsoft Directory Sync, and then click Directory Sync
Configuration.
2. On the Microsoft Online Services Credentials page of the Microsoft Online Services
Directory Synchronization Configuration Wizard, provide the user name and password for a
user account with Administrator permissions in your Microsoft Online Services company.
3. On the Active Directory Credentials page of the Microsoft Online Services Directory
Synchronization Configuration Wizard, provide the user name and password for an account
with Enterprise Admin permissions on your local Active Directory directory service.
4. On the Finish page, select Synchronize directories now, and then click Finish.
Important:
The Microsoft Online Services credentials that you provided are used to synchronize information from your local Active Directory to your Microsoft Online Services directory service. If you change the password associated with this account, you must rerun the configuration wizard and provide the updated credentials.

20
The Enterprise Admin credentials that you provided are not saved. They are used to create the MSOL_AD_Sync directory synchronization service account. This service account is used to read the changes from your local Active Directory.
Verify Directory Synchronization
Verifying one-way directory synchronization from your local Active Directory to Microsoft Online Services requires testing both forced (manual) synchronization and automatic synchronization. Because the Microsoft Online Services Directory Synchronization Tool performs an automatic one-way synchronization between your local Active Directory and your Microsoft Online Services directory once every three hours, completion of this procedure may take up to three hours. You can also force directory synchronization at any time.
The Microsoft Online Services Directory Synchronization Tool writes entries to an event log. These entries indicate the start and end of a synchronization session. When you review the event log, look for entries whose source is "Directory Synchronization". An entry that is designated Event 4 and that has the description "The export has completed" indicates that the directory synchronization is complete. Directory synchronization errors are also sent via e-mail to your organization's designated technical contact.
When directory synchronization is installed, the local Active Directory is the master for all changes to the synchronized e-mail–enabled objects in Microsoft Online Services. As part of both forced and automatic verification procedures, you will make changes to mail-enabled objects in your local Active Directory and verify that those changes are synchronized with Microsoft Online Services.
Forced Directory Synchronization
You may occasionally need to force an immediate directory synchronization. The procedure in this section verifies this process. For more information about forcing directory synchronization, see “Force Directory Synchronization” later in this paper.
To verify forced directory synchronization
1. Sign in to Microsoft Online Services with Administrator credentials.
2. Ensure that your organization's Technical Contact information contains a valid e-mail address
that is monitored by your technical contact.
3. Verify the address properties of a user account that is being synchronized from your local Active
Directory to the Microsoft Online Services Administration Center.
4. Verify that you cannot edit the address properties of that user account in the Microsoft Online
Services Administration Center.
5. Open Active Directory Users and Computers and target your local Active Directory with
permissions to edit user accounts, contacts, and distribution groups.
6. Make a simple but obvious change to one of the address properties of the user account that you
verified in step 2.
7. Open the Microsoft Online Services Directory Synchronization Configuration Wizard,
provide the information requested on the wizard pages, and on the Finish page, select
Synchronize directories now, and then click Finish.
8. When the synchronization is complete, view the address properties of the user in your Microsoft
Online Services Administration Center and verify that the changes you made in your local Active
Directory have been synchronized to Microsoft Online Services.
Automatic Directory Synchronization
The Microsoft Online Services Directory Synchronization Tool synchronizes changes to user accounts and mail-enabled contacts and groups from your local Active Directory to your Microsoft Online Services directory service every three hours, beginning at the time of your initial synchronization.

21
To verify automatic directory synchronization
1. Sign in to Microsoft Online Services with Administrator credentials.
2. Ensure that your organization's Technical Contact information contains a valid e-mail address
that is monitored by your technical contact.
3. In the Microsoft Online Services Administration Center, verify the address properties of a specific
user account, contact, and distribution group that are being synchronized from your local Active
Directory to your Microsoft Online Services organization.
4. In Microsoft Online Services, modify the properties of the contact and distribution group that you
verified in step 3.
5. Open Active Directory Users and Computers and target your local Active Directory with
permissions to edit user accounts, contacts, and distribution groups.
6. In your local Active Directory, make a simple but obvious change to one of the address properties
of the user account that you verified in step 3.
7. In your local Active Directory, make simple but obvious changes to the contact and the
distribution group that you modified in step 4.
8. Check the directory synchronization event log to determine when directory synchronization is
complete. This may take up to three hours.
9. When synchronization is complete, view the properties of the user, contact, and distribution list in
your Microsoft Online Services Administration Center and verify that the changes you made in
your local Active Directory now appear in Microsoft Online Services.
Note:
In this procedure, the changes you made to the contact and distribution group in Microsoft Online Services have been overwritten by the changes you made to the same contact and distribution group in your local Active Directory.
Migrate Your Mailboxes
If you are migrating from a local Exchange Server 2000, Exchange Server 2003, or Exchange Server 2007 environment, we recommend that you establish e-mail coexistence between your local Exchange Server environment and Exchange Online. You can migrate directly from a local Exchange Server environment, but this type of migration is usually done only by organizations with very few user accounts.
You can also migrate directly from POP3 or IMAP4 mailboxes. If those mailboxes are hosted by an Internet e-mail hosting company, you can select individual mailboxes to migrate and then migrate their mailbox content to Exchange Online. If you have POP3 or IMAP mailboxes hosted on local Exchange Server 2000, Exchange Server 2003, or Exchange Server 2007, you may be able to establish e-mail coexistence and then migrate the contents of those mailboxes to Exchange Online.
Install the Microsoft Online Services Migration Tools
Before installing the Microsoft Online Services Migration Tools, verify that you have the required permissions. This section lists these permissions and walks you through the installation process.
Required Permissions
The Microsoft Online Services Migration Tools require the following permissions:
The person installing the Microsoft Online Services Migration Tools must use a user account with local Administrator permissions on the computer on which the tools are being installed.
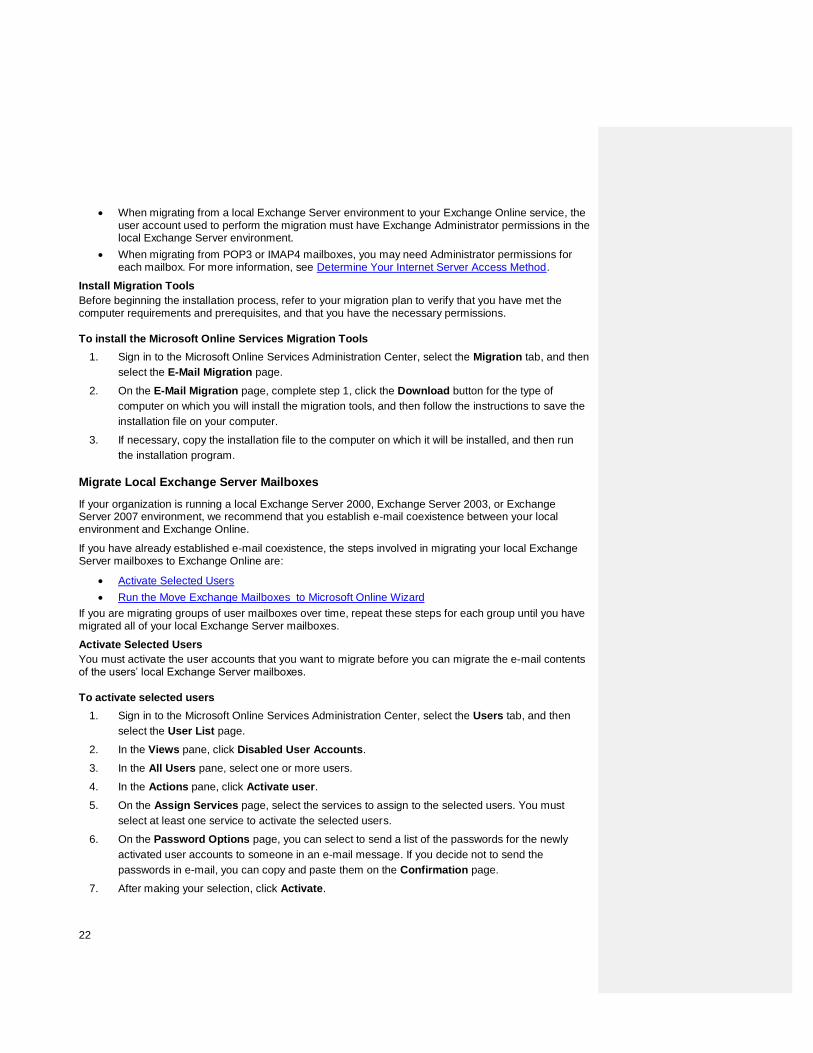
22
When migrating from a local Exchange Server environment to your Exchange Online service, the user account used to perform the migration must have Exchange Administrator permissions in the local Exchange Server environment.
When migrating from POP3 or IMAP4 mailboxes, you may need Administrator permissions for each mailbox. For more information, see Determine Your Internet Server Access Method.
Install Migration Tools
Before beginning the installation process, refer to your migration plan to verify that you have met the computer requirements and prerequisites, and that you have the necessary permissions.
To install the Microsoft Online Services Migration Tools
1. Sign in to the Microsoft Online Services Administration Center, select the Migration tab, and then
select the E-Mail Migration page.
2. On the E-Mail Migration page, complete step 1, click the Download button for the type of
computer on which you will install the migration tools, and then follow the instructions to save the
installation file on your computer.
3. If necessary, copy the installation file to the computer on which it will be installed, and then run
the installation program.
Migrate Local Exchange Server Mailboxes
If your organization is running a local Exchange Server 2000, Exchange Server 2003, or Exchange Server 2007 environment, we recommend that you establish e-mail coexistence between your local environment and Exchange Online.
If you have already established e-mail coexistence, the steps involved in migrating your local Exchange Server mailboxes to Exchange Online are:
Activate Selected Users
Run the Move Exchange Mailboxes to Microsoft Online Wizard
If you are migrating groups of user mailboxes over time, repeat these steps for each group until you have migrated all of your local Exchange Server mailboxes.
Activate Selected Users
You must activate the user accounts that you want to migrate before you can migrate the e-mail contents of the users’ local Exchange Server mailboxes.
To activate selected users
1. Sign in to the Microsoft Online Services Administration Center, select the Users tab, and then
select the User List page.
2. In the Views pane, click Disabled User Accounts.
3. In the All Users pane, select one or more users.
4. In the Actions pane, click Activate user.
5. On the Assign Services page, select the services to assign to the selected users. You must
select at least one service to activate the selected users.
6. On the Password Options page, you can select to send a list of the passwords for the newly
activated user accounts to someone in an e-mail message. If you decide not to send the
passwords in e-mail, you can copy and paste them on the Confirmation page.
7. After making your selection, click Activate.
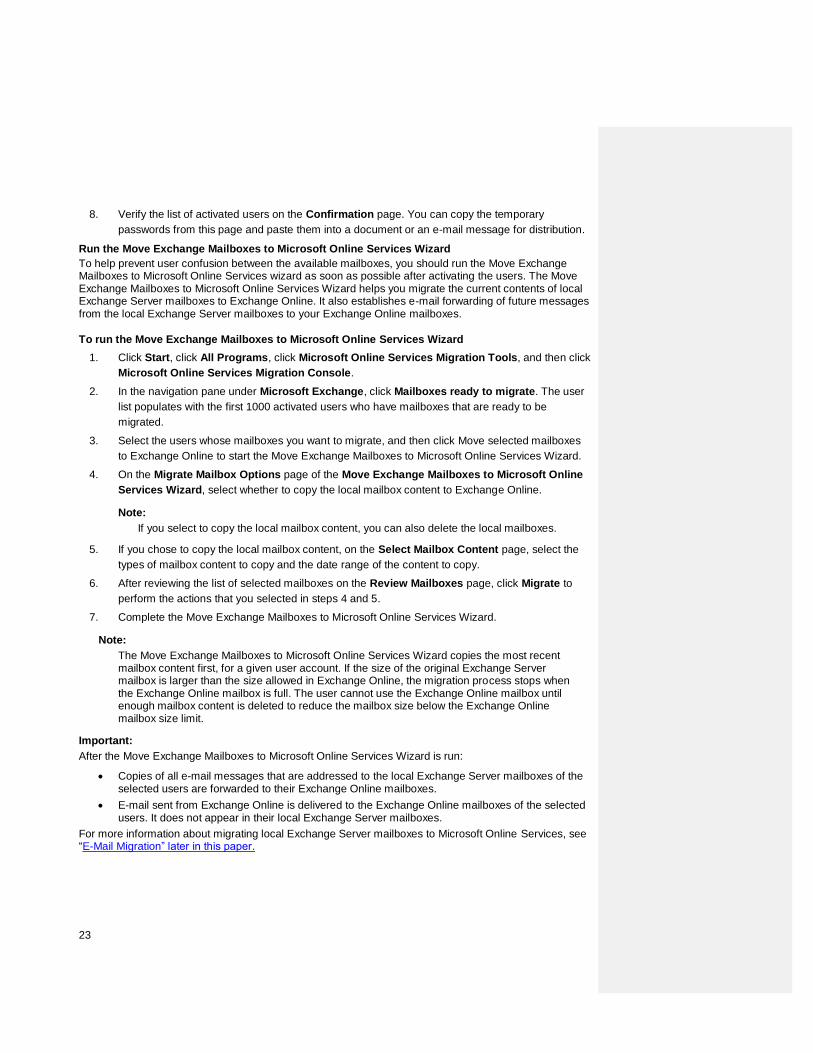
23
8. Verify the list of activated users on the Confirmation page. You can copy the temporary
passwords from this page and paste them into a document or an e-mail message for distribution.
Run the Move Exchange Mailboxes to Microsoft Online Services Wizard
To help prevent user confusion between the available mailboxes, you should run the Move Exchange Mailboxes to Microsoft Online Services wizard as soon as possible after activating the users. The Move Exchange Mailboxes to Microsoft Online Services Wizard helps you migrate the current contents of local Exchange Server mailboxes to Exchange Online. It also establishes e-mail forwarding of future messages from the local Exchange Server mailboxes to your Exchange Online mailboxes.
To run the Move Exchange Mailboxes to Microsoft Online Services Wizard
1. Click Start, click All Programs, click Microsoft Online Services Migration Tools, and then click
Microsoft Online Services Migration Console.
2. In the navigation pane under Microsoft Exchange, click Mailboxes ready to migrate. The user
list populates with the first 1000 activated users who have mailboxes that are ready to be
migrated.
3. Select the users whose mailboxes you want to migrate, and then click Move selected mailboxes
to Exchange Online to start the Move Exchange Mailboxes to Microsoft Online Services Wizard.
4. On the Migrate Mailbox Options page of the Move Exchange Mailboxes to Microsoft Online
Services Wizard, select whether to copy the local mailbox content to Exchange Online.
Note:
If you select to copy the local mailbox content, you can also delete the local mailboxes.
5. If you chose to copy the local mailbox content, on the Select Mailbox Content page, select the
types of mailbox content to copy and the date range of the content to copy.
6. After reviewing the list of selected mailboxes on the Review Mailboxes page, click Migrate to
perform the actions that you selected in steps 4 and 5.
7. Complete the Move Exchange Mailboxes to Microsoft Online Services Wizard.
Note:
The Move Exchange Mailboxes to Microsoft Online Services Wizard copies the most recent mailbox content first, for a given user account. If the size of the original Exchange Server mailbox is larger than the size allowed in Exchange Online, the migration process stops when the Exchange Online mailbox is full. The user cannot use the Exchange Online mailbox until enough mailbox content is deleted to reduce the mailbox size below the Exchange Online mailbox size limit.
Important:
After the Move Exchange Mailboxes to Microsoft Online Services Wizard is run:
Copies of all e-mail messages that are addressed to the local Exchange Server mailboxes of the selected users are forwarded to their Exchange Online mailboxes.
E-mail sent from Exchange Online is delivered to the Exchange Online mailboxes of the selected users. It does not appear in their local Exchange Server mailboxes.
For more information about migrating local Exchange Server mailboxes to Microsoft Online Services, see “E-Mail Migration” later in this paper.
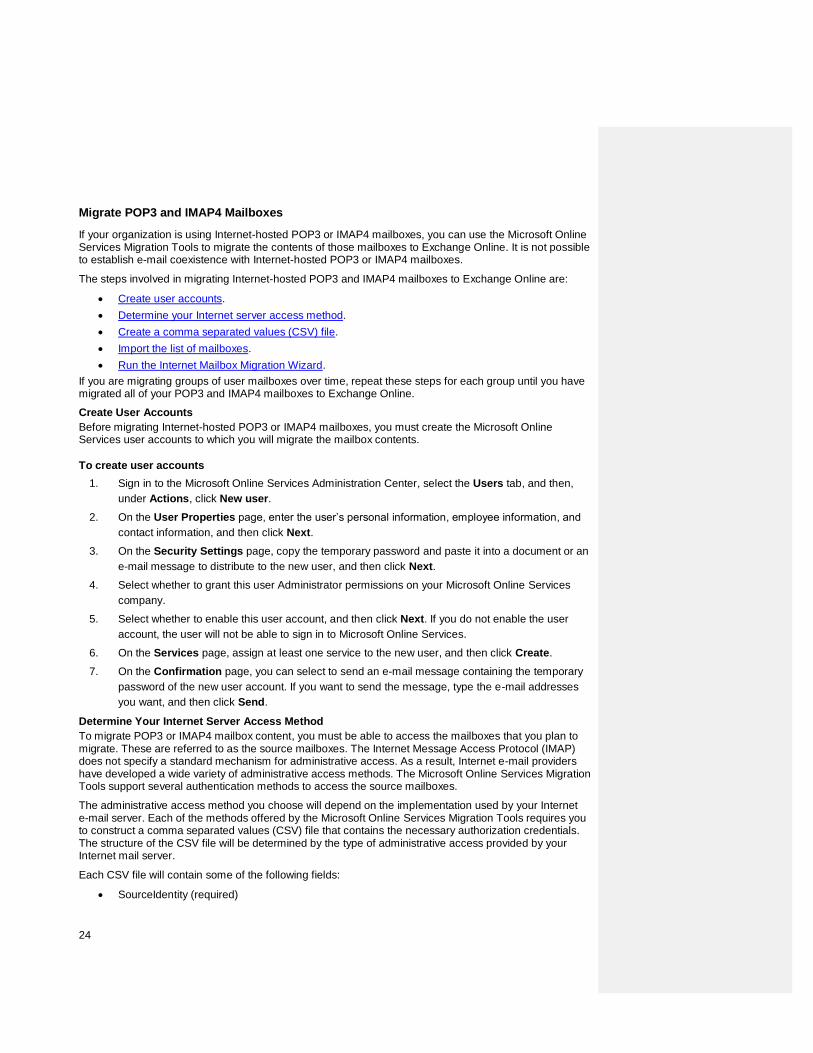
24
Migrate POP3 and IMAP4 Mailboxes
If your organization is using Internet-hosted POP3 or IMAP4 mailboxes, you can use the Microsoft Online Services Migration Tools to migrate the contents of those mailboxes to Exchange Online. It is not possible to establish e-mail coexistence with Internet-hosted POP3 or IMAP4 mailboxes.
The steps involved in migrating Internet-hosted POP3 and IMAP4 mailboxes to Exchange Online are:
Create user accounts.
Determine your Internet server access method.
Create a comma separated values (CSV) file.
Import the list of mailboxes.
Run the Internet Mailbox Migration Wizard.
If you are migrating groups of user mailboxes over time, repeat these steps for each group until you have migrated all of your POP3 and IMAP4 mailboxes to Exchange Online.
Create User Accounts
Before migrating Internet-hosted POP3 or IMAP4 mailboxes, you must create the Microsoft Online Services user accounts to which you will migrate the mailbox contents.
To create user accounts
1. Sign in to the Microsoft Online Services Administration Center, select the Users tab, and then,
under Actions, click New user.
2. On the User Properties page, enter the user’s personal information, employee information, and
contact information, and then click Next.
3. On the Security Settings page, copy the temporary password and paste it into a document or an
e-mail message to distribute to the new user, and then click Next.
4. Select whether to grant this user Administrator permissions on your Microsoft Online Services
company.
5. Select whether to enable this user account, and then click Next. If you do not enable the user
account, the user will not be able to sign in to Microsoft Online Services.
6. On the Services page, assign at least one service to the new user, and then click Create.
7. On the Confirmation page, you can select to send an e-mail message containing the temporary
password of the new user account. If you want to send the message, type the e-mail addresses
you want, and then click Send.
Determine Your Internet Server Access Method
To migrate POP3 or IMAP4 mailbox content, you must be able to access the mailboxes that you plan to migrate. These are referred to as the source mailboxes. The Internet Message Access Protocol (IMAP) does not specify a standard mechanism for administrative access. As a result, Internet e-mail providers have developed a wide variety of administrative access methods. The Microsoft Online Services Migration Tools support several authentication methods to access the source mailboxes.
The administrative access method you choose will depend on the implementation used by your Internet e-mail server. Each of the methods offered by the Microsoft Online Services Migration Tools requires you to construct a comma separated values (CSV) file that contains the necessary authorization credentials. The structure of the CSV file will be determined by the type of administrative access provided by your Internet mail server.
Each CSV file will contain some of the following fields:
SourceIdentity (required)
25
SourceServer (required)
SourceLoginID (required)
SourcePassword (optional)
TargetIdentity (optional)
SourceRootFolder (optional)
The following sections give examples of the CSV structures for each of the supported IMAP mail server administrative access methods:
Combined Administrator/User ID Login
Manually combined UserID and Administrator ID login
Source root folder
Individual mailbox credentials
Consult your Internet e-mail provider’s documentation to determine which option to select.
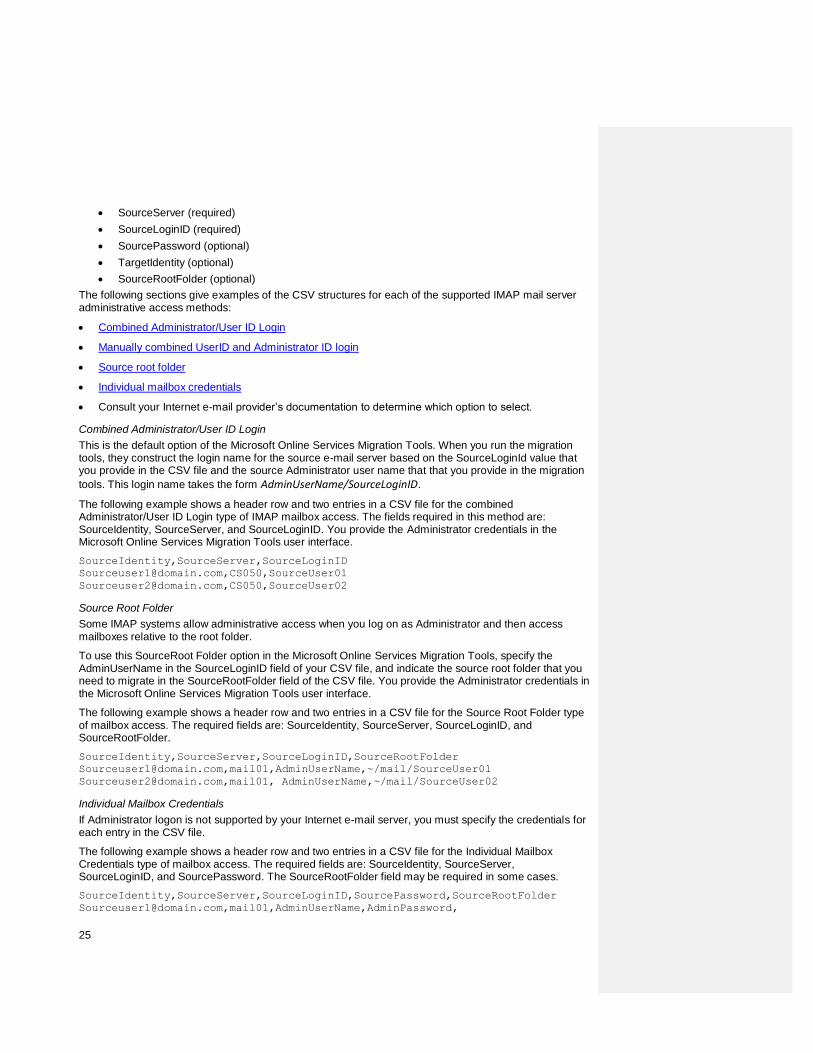
Combined Administrator/User ID Login
This is the default option of the Microsoft Online Services Migration Tools. When you run the migration tools, they construct the login name for the source e-mail server based on the SourceLoginId value that you provide in the CSV file and the source Administrator user name that that you provide in the migration
tools. This login name takes the form AdminUserName/SourceLoginID.
The following example shows a header row and two entries in a CSV file for the combined Administrator/User ID Login type of IMAP mailbox access. The fields required in this method are: SourceIdentity, SourceServer, and SourceLoginID. You provide the Administrator credentials in the Microsoft Online Services Migration Tools user interface.
SourceIdentity,SourceServer,SourceLoginID
[email protected],CS050,SourceUser01
[email protected],CS050,SourceUser02
Source Root Folder
Some IMAP systems allow administrative access when you log on as Administrator and then access mailboxes relative to the root folder.
To use this SourceRoot Folder option in the Microsoft Online Services Migration Tools, specify the AdminUserName in the SourceLoginID field of your CSV file, and indicate the source root folder that you need to migrate in the SourceRootFolder field of the CSV file. You provide the Administrator credentials in the Microsoft Online Services Migration Tools user interface.
The following example shows a header row and two entries in a CSV file for the Source Root Folder type of mailbox access. The required fields are: SourceIdentity, SourceServer, SourceLoginID, and SourceRootFolder.
SourceIdentity,SourceServer,SourceLoginID,SourceRootFolder
[email protected],mail01,AdminUserName,~/mail/SourceUser01
[email protected],mail01, AdminUserName,~/mail/SourceUser02
Individual Mailbox Credentials
If Administrator logon is not supported by your Internet e-mail server, you must specify the credentials for each entry in the CSV file.
The following example shows a header row and two entries in a CSV file for the Individual Mailbox Credentials type of mailbox access. The required fields are: SourceIdentity, SourceServer, SourceLoginID, and SourcePassword. The SourceRootFolder field may be required in some cases.
SourceIdentity,SourceServer,SourceLoginID,SourcePassword,SourceRootFolder
[email protected],mail01,AdminUserName,AdminPassword,

26
~/mail/SourceUser01
[email protected],mail01,
AdminUserName,AdminPassword,~/mail/SourceUser02
In this case, select Use individual account credentials in the Microsoft Online Services Migration Tools, because both the admin user name (SourceLoginID) and the password (SourcePassword) are contained in the CSV file.
Manually Combined User ID and Administrator ID Login
Some servers support the combination of SourceUser*AdminUserName in the CSV file. This entire string must be included in the SourceLoginID entries. You must also provide the Administrator password in the CSV file instead of providing this information in the Microsoft Online Services Migration Tools user interface as is done in the Combined Administrator/User ID Login method.
The following example shows a header row and two entries in a CSV file for this type of IMAP mailbox access. The required fields are SourceIdentity, SourceServer, SourceLoginID, and SourcePassword.
SourceIdentity,SourceServer,SourceLoginID,SourcePassword
[email protected],mail01,SourceUser01*AdminUserName,AdminPassword
[email protected],mail01,SourceUser02*AdminUserName,AdminPassword
In this case, when you run the Microsoft Online Services Migration Tools you must select Use individual account credentials because both the admin user name (SourceLoginID) and the password (SourcePassword) are contained in the CSV file.
Create a Comma Separated Values (CSV) File
After determining the Internet server access method for your Internet mailboxes, you must create a CSV file with a header row containing appropriate columns and a row for each mailbox to be migrated. You can use Microsoft Office Excel® to create the CSV file.
To create a CSV file
1. Open a blank Excel worksheet. In the worksheet, create a header row with the following values:
SourceIdentity (required)
SourceServer (required)
SourceLoginID (required)
SourcePassword (optional)
TargetIdentity (optional)
SourceRootFolder (optional)
2. Add a row with the appropriate account information in each column for each mailbox to be
migrated.
The following table shows you a sample section of a mailbox list.
SourceIdentity SourceServer SourceLoginID SourcePassword TargetIdentity
[email protected] e045 testuser001 Password!1 [email protected]
[email protected] e045 testuser002 Password!2 [email protected]
3. After you have entered the account information for each mailbox to be migrated, on the File
menu, click Save As, provide a file name, select CSV (Comma delimited) from the Save as
type drop-down list, and then click Save.
4. After you save the worksheet as a CSV file, each value in the mailbox list will be separated by a
comma, as shown in the following example:
27
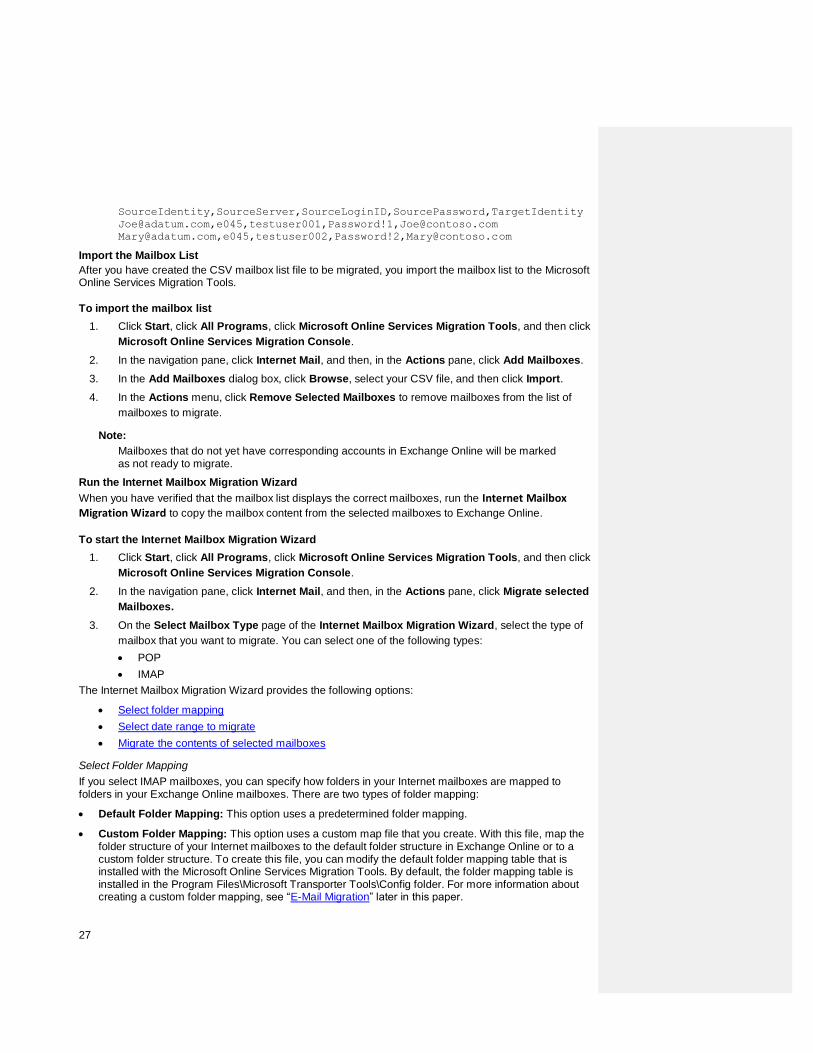
SourceIdentity,SourceServer,SourceLoginID,SourcePassword,TargetIdentity
[email protected],e045,testuser001,Password!1,[email protected]
[email protected],e045,testuser002,Password!2,[email protected]
Import the Mailbox List
After you have created the CSV mailbox list file to be migrated, you import the mailbox list to the Microsoft Online Services Migration Tools.
To import the mailbox list
1. Click Start, click All Programs, click Microsoft Online Services Migration Tools, and then click
Microsoft Online Services Migration Console.
2. In the navigation pane, click Internet Mail, and then, in the Actions pane, click Add Mailboxes.
3. In the Add Mailboxes dialog box, click Browse, select your CSV file, and then click Import.
4. In the Actions menu, click Remove Selected Mailboxes to remove mailboxes from the list of
mailboxes to migrate.
Note:
Mailboxes that do not yet have corresponding accounts in Exchange Online will be marked as not ready to migrate.
Run the Internet Mailbox Migration Wizard
When you have verified that the mailbox list displays the correct mailboxes, run the Internet Mailbox Migration Wizard to copy the mailbox content from the selected mailboxes to Exchange Online.
To start the Internet Mailbox Migration Wizard
1. Click Start, click All Programs, click Microsoft Online Services Migration Tools, and then click
Microsoft Online Services Migration Console.
2. In the navigation pane, click Internet Mail, and then, in the Actions pane, click Migrate selected
Mailboxes.
3. On the Select Mailbox Type page of the Internet Mailbox Migration Wizard, select the type of
mailbox that you want to migrate. You can select one of the following types:
POP
IMAP
The Internet Mailbox Migration Wizard provides the following options:
Select folder mapping
Select date range to migrate
Migrate the contents of selected mailboxes
Select Folder Mapping
If you select IMAP mailboxes, you can specify how folders in your Internet mailboxes are mapped to folders in your Exchange Online mailboxes. There are two types of folder mapping:
Default Folder Mapping: This option uses a predetermined folder mapping.
Custom Folder Mapping: This option uses a custom map file that you create. With this file, map the folder structure of your Internet mailboxes to the default folder structure in Exchange Online or to a custom folder structure. To create this file, you can modify the default folder mapping table that is installed with the Microsoft Online Services Migration Tools. By default, the folder mapping table is installed in the Program Files\Microsoft Transporter Tools\Config folder. For more information about creating a custom folder mapping, see “E-Mail Migration” later in this paper.
28
To select folder mapping
On the IMAP Folder Mapping page of the Internet Mailbox Migration Wizard, select Use the default folder mapping.
OR
Select Use a custom folder mapping, and then click Browse to select your custom folder mapping file.
Select Date Range to Migrate
When migrating Internet mailbox content, you can select the date range of mailbox content to migrate.
To select the date range
On the Select Date Range page of the Internet Mailbox Migration Wizard, select Date range and then click the calendar buttons to specify a start date and an end date.
OR
Select All e-mail to migrate all e-mail in the Internet mailbox.
Migrate the Contents of Selected Mailboxes
To migrate the contents of selected mailboxes
After reviewing the selected mailboxes on the Review Selected Mailboxes page, click Migrate to begin copying mailbox content from your Internet mailboxes to Exchange Online.
Note:
The Internet Mailbox Migration Wizard copies the most recent mailbox content first. If the size of the Internet mailbox is larger than the size allowed in Exchange Online, the migration process stops when the Exchange Online mailbox is full. The user cannot use the Exchange Online mailbox until enough mailbox content is deleted to reduce the mailbox size below the Exchange Online mailbox size limit.
For more information about migrating local POP3 and IMPA4 mailbox content to Microsoft Online Services, see “E-Mail Migration” later in this paper.
Complete Your Migration
After migrating all of your mailboxes to Microsoft Exchange Online, you should be ready to complete your migration. The three remaining steps are:
Delete mailboxes.
Reroute incoming mail.
Decommission your local Exchange Server environment.
Delete Mailboxes
To prevent confusion and to simplify supporting your e-mail users, we recommend that you delete your organization’s old mailboxes as soon as possible after migrating the mailbox content.
If you are migrating from Internet-hosted POP3 or IMAP mailboxes, you can contact your Internet mailbox hosting company and have those mailboxes deleted any time after you have migrated their contents to Exchange Online. Check with your Internet mailbox hosting company to see if it has any mailbox retention policy.
If you are migrating from local Exchange Server mailboxes to Exchange Online, you can use the Delete Mailbox Wizard in the Microsoft Online Services Migration Tools to delete selected local Exchange Server mailboxes.
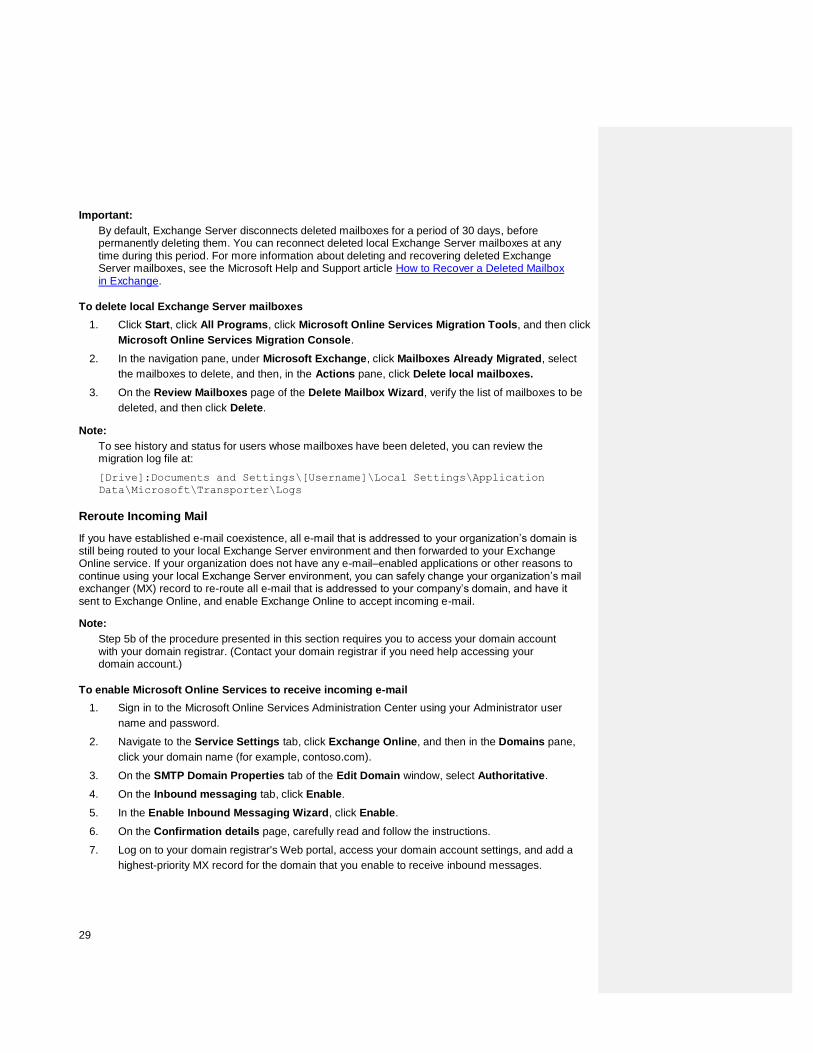
29
Important:
By default, Exchange Server disconnects deleted mailboxes for a period of 30 days, before permanently deleting them. You can reconnect deleted local Exchange Server mailboxes at any time during this period. For more information about deleting and recovering deleted Exchange Server mailboxes, see the Microsoft Help and Support article How to Recover a Deleted Mailbox in Exchange.
To delete local Exchange Server mailboxes
1. Click Start, click All Programs, click Microsoft Online Services Migration Tools, and then click
Microsoft Online Services Migration Console.
2. In the navigation pane, under Microsoft Exchange, click Mailboxes Already Migrated, select
the mailboxes to delete, and then, in the Actions pane, click Delete local mailboxes.
3. On the Review Mailboxes page of the Delete Mailbox Wizard, verify the list of mailboxes to be
deleted, and then click Delete.
Note:
To see history and status for users whose mailboxes have been deleted, you can review the migration log file at:
[Drive]:Documents and Settings\[Username]\Local Settings\Application
Data\Microsoft\Transporter\Logs
Reroute Incoming Mail
If you have established e-mail coexistence, all e-mail that is addressed to your organization’s domain is still being routed to your local Exchange Server environment and then forwarded to your Exchange Online service. If your organization does not have any e-mail–enabled applications or other reasons to continue using your local Exchange Server environment, you can safely change your organization’s mail exchanger (MX) record to re-route all e-mail that is addressed to your company’s domain, and have it sent to Exchange Online, and enable Exchange Online to accept incoming e-mail.
Note:
Step 5b of the procedure presented in this section requires you to access your domain account with your domain registrar. (Contact your domain registrar if you need help accessing your domain account.)
To enable Microsoft Online Services to receive incoming e-mail
1. Sign in to the Microsoft Online Services Administration Center using your Administrator user
name and password.
2. Navigate to the Service Settings tab, click Exchange Online, and then in the Domains pane,
click your domain name (for example, contoso.com).
3. On the SMTP Domain Properties tab of the Edit Domain window, select Authoritative.
4. On the Inbound messaging tab, click Enable.
5. In the Enable Inbound Messaging Wizard, click Enable.
6. On the Confirmation details page, carefully read and follow the instructions.
7. Log on to your domain registrar's Web portal, access your domain account settings, and add a
highest-priority MX record for the domain that you enable to receive inbound messages.

30
8. Copy your Microsoft Online Services MX record information (similar to
mail.global.frontbridge.com), and then enter this information into the appropriate MX record
location in your domain account.
9. Save the changes to your MX records and log off your domain registrar account.
10. Close the Enable Inbound Messaging Wizard.
Note:
You can have more than one MX record, but the one pointing to your Microsoft Online Services account must be the highest-priority MX record.
11. To confirm that enabling inbound messaging was successful, send e-mail messages from an
account on another service, such as Microsoft Hotmail®, to e-mail addresses in your Microsoft
Online Services account. When you start receiving these test messages, your other users should
expect their e-mail messages to arrive at their Microsoft Online Services accounts as well.
12. Wait up to 72 hours to receive the test messages.
Note:
When you change your MX record to direct incoming e-mail to your Microsoft Online Services mailboxes, a “change of address” notice is sent out to the Internet. It can take up to 72 hours before all systems become aware of the change and start routing e-mail to your Exchange Online service. If you do not receive e-mail messages at your Microsoft Online Services account after 72 hours, log on to your domain registrar's Web portal, access your domain account settings, and verify that you have entered the MX record information correctly. MX lookup tools can help you determine when your MX records are updated. These tools can be found by searching the Web for "MX lookup".
Decommission Your Local Exchange Server Environment
After deleting your local mailboxes and rerouting incoming mail, if your organization does not have any e-mail–enabled applications or other legacy applications that require you to maintain your local Exchange Server environment, you can safely decommission your local Exchange Server environment.
Other Migration Considerations
If your organization has established e-mail coexistence between your local Exchange Server environment and Exchange Online and established directory synchronization of user accounts and e-mail enabled contacts and groups from your local Active Directory to Microsoft Online Services, you may want to continue using Active Directory authentication to control access to local printers, file shares, and other network resources.
In this situation, leave directory synchronization running and continue to synchronize user accounts and e-mail enabled contacts and groups from your local Active Directory to Microsoft Online Services. Continue to edit the properties of these objects in your local Active Directory.
Advanced Topics
E-Mail Coexistence and E-Mail Migration
This section provides a deeper look at how e-mail coexistence and e-mail migration work. Microsoft Online Services can establish e-mail coexistence between your local Exchange Server environment and Exchange Online. A key part of e-mail coexistence is establishing one-way directory synchronization of all user accounts and e-mail enabled contacts and groups from your local Active Directory directory service to Microsoft Online Services.

31
The stages of e-mail coexistence and migration are:
Add and validate SMTP domains to Exchange Online.
Install and configure directory synchronization.
Activate directory synchronized users.
Migrate mailbox content.
Delete local Exchange Server mailboxes.
Throughout this section, we will assume that you are working for an organization named Contoso and that it has registered the Internet domain name of contoso.com. We’ll be discussing a single member of that organization, whose SMTP e-mail address is [email protected].
Add and Validate SMTP Domains to Exchange Online
When you register with Microsoft Online Services, you are provided with a domain that looks similar to company.microsoftonline.com. You can use this domain as long as you want, but most organizations prefer to use domains that more clearly represent them. In most cases, these organizations already have a registered domain name that they use as part of their SMTP e-mail addresses.
You can add your registered domain to Microsoft Online Services. After you have verified that you own the domain, you can begin to use this domain with Microsoft Online Services. For information about adding your domain to Microsoft Online Services, see the Microsoft TechNet article About Using Your Domain with Microsoft Online Services.
Install and Configure Directory Synchronization
The first time that the Microsoft Online Services Directory Synchronization Tool runs, it creates disabled accounts in Microsoft Online Services for all user accounts and mail-enabled contacts and groups in your local Active Directory. These accounts do not yet have Microsoft Online Services mailboxes.
The user account in the local Exchange Server environment has an SMTP email address similar to [email protected]. Directory synchronization creates a disabled Microsoft Online Services account for that user. There are two SMTP addresses assigned to this user: [email protected] and [email protected]. The target address is [email protected].
Directory synchronization creates a synchronized Global Address List (GAL) and establishes mail forwarding from Microsoft Online Services to your local Exchange Server mailboxes using the target addresses assigned to the disabled accounts. This enables the full GAL experience for Microsoft Online Services users.
Your company’s MX records still resolve to your local Exchange Server environment. All e-mail addressed to your domain will be routed to your local Exchange Server computers.
Activate Directory Synchronized Users
Before you can migrate mailbox content to Exchange Online, you must activate the users whose mailbox content you want to migrate. Activating users assigns them an Exchange Online mailbox and removes the target address from their Microsoft Online Services account.
The user’s SMTP address in the local Exchange Server environment remains unchanged. After activation, the target address has been removed from the user’s Microsoft Online Services account,
and activated users will have two valid mailboxes: one on the local Exchange Server environment and the other in Exchange Online. All external mail and mail sent from your local Exchange Server environment to the activated users will be delivered to their local Exchange Server mailboxes and all mail from any Microsoft Online Services account will be delivered to their Exchange Online mailboxes.
Note:
To minimize confusion and support costs, Microsoft Online Services recommends migrating and deleting the local Exchange Server mailboxes of activated users as quickly as possible.

32
Migrate Mailbox Content
You can use the Microsoft Online Services Migration Tools to migrate the mailbox contents of selected users. During this process, the Microsoft Online Migration Tools retrieve the Microsoft Online SMTP addresses of these users and create contacts as alternate recipients in the local Active Directory. All e-mail addressed to these users will be forwarded to these alternate recipients and a copy of each e-mail will be left in their local Exchange Server mailboxes.
The Microsoft Online Services Migration Tools add a contact with the target address of [email protected] to the local Exchange Server environment as an alternate recipient for e-mail addressed to the user. All e-mail addressed to the user that arrives at the local Exchange Mailbox will be forwarded to the Exchange Online mailbox.
The Microsoft Online Services Migration Tools extract the rich Exchange Server mailbox content (such as e-mail, calendar, contacts, tasks, notes, and journal entries) from the local Exchange Server mailboxes and copy this content to the Exchange Online mailboxes. This content is compressed to optimize bandwidth usage. It is transmitted from the computer running the migration tools to Microsoft Online Services over SSL/TLS.
During the transfer process, the Microsoft Online Services Migration Tools resolve message header addresses to SMTP addresses and rewrite the addresses to preserve users’ ability to reply to existing messages, even after the content has been migrated to new mailboxes.
Delete Local Exchange Server Mailboxes
At this stage, your users still have two mailboxes. In this configuration, it is easy for them to lose or miss e-mail. After their local Exchange Server mailbox content has been migrated, we recommend deleting their local Exchange Server mailboxes as soon as you are comfortable with Exchange Online.
You can use the Delete Mailbox Wizard in the Microsoft Online Services Migration Tools to help you remove the local Exchange Server mailboxes. This wizard deletes the local alternate recipient and disconnects the mailbox. For each user, it adds the user’s Exchange Online target address as a forwarder on the local Active Directory account, so all mail addressed to the user will continue to be forwarded to Exchange Online.
The migration tools remove the user’s alternate recipient contact from the local Active Directory. They add [email protected] as the target address for e-mail addressed to the user. Therefore, even though the user no longer has a local Exchange Server mailbox, all e-mail addressed to user @contoso.com will be forwarded to the Exchange Online mailbox.
Because Exchange Server disconnects deleted mailboxes but does not delete them immediately, you can reconnect deleted Exchange Server mailboxes and fall back from your Exchange Online deployment if you choose.
By default, Microsoft Exchange disconnects deleted mailboxes for a period of 30 days before permanently deleting them. You can reconnect deleted local Exchange Server mailboxes any time during this period. Before relying on the ability to reconnect deleted mailboxes, make sure you know what the mailbox retention period is in your local Exchange Server environment. For more information about deleting and recovering deleted Exchange Server mailboxes, see the Microsoft TechNet article How to Recover a Deleted Mailbox in Exchange.
You should repeat the steps covered in “Activate Directory Synchronized Users,” “Migrate Mailbox Content,” and “Delete Local Exchange Server Mailboxes” until you have activated all of your users and migrated the contents of all of your local Exchange Server mailboxes. At this point, if you don’t have any e-mail–enabled applications or other legacy applications that require a local Exchange Server environment, you can change your MX records to direct all e-mail to your Exchange Online service, and eventually decommission your local Exchange Server environment.
Directory Synchronization
This section provides deeper information about directory synchronization.

33
How Directory Synchronization Uses the Microsoft Online Services Credentials
When configuring the Microsoft Online Services Directory Synchronization Tool, you are asked to provide the credentials for an account that has Administrator permissions on your organization's Microsoft Online Services company. These credentials must be provided in the following format:
You can provide credentials for any valid Administrator account in the Microsoft Online Services Administration Center, or you may create a special account dedicated to this use.
Important:
All Microsoft Online Services accounts require periodic password changes. When you change the password associated with this Administrator account, you must run the Microsoft Online Services Directory Synchronization Tool Configuration Wizard again and provide the new password.
When the directory synchronization service runs, it reads from your local Active Directory and writes the changes to the synchronization database. The directory synchronization service writes the contents of the synchronization database to Microsoft Online Services using the Microsoft Online Services Administrator credentials that you provided.
How Directory Synchronization Uses the Active Directory Credentials
When configuring the Microsoft Online Services Directory Synchronization Tool, you are asked to provide the credentials for an account that has Enterprise Admin permissions on your organization's local Active Directory directory service. It accepts credentials in either of the following forms:
Example\someone
These Enterprise Administrator credentials are not saved. They are erased from the computer's memory after the service account is created.
How the Active Directory Credentials Are Used
The Microsoft Online Services Directory Synchronization Tool Configuration Wizard uses the Enterprise Admin credentials to create the directory synchronization service account, MSOL_AD_Sync. This service account is created as a domain account with directory replication permissions on your local Active Directory and with a randomly generated complex password that never expires.
Note:
Changing the password associated with the service account is not recommended.
How the Service Account Is Used
When the directory synchronization service runs, it uses the service account credentials to read from your local Active Directory and write to the synchronization database. The contents of the synchronization database are written to Microsoft Online Services using the Microsoft Online Services credentials requested on the Microsoft Online Services Credentials page of the Microsoft Online Services Directory Synchronization Tool Configuration Wizard.
Note:
If you add a domain to your Active Directory forest, you must run the Microsoft Online Services Directory Synchronization Tool Configuration Wizard again to add the new domain to the list of domains to be synchronized.
Force Directory Synchronization
There may be times when you don't want to wait up to three hours for directory synchronization to copy changes from your local Active Directory user accounts and e-mail enabled contacts, and groups to the Microsoft Online Services directory. For example, if you terminate an employee's employment, you may want to immediately disable or delete their Active Directory account to prevent continued access to your e-mail system and network resources. In this situation, you may want to force immediate directory

34
synchronization. You can do this by running the Microsoft Online Services Directory Synchronization Tool Configuration Wizard.
To force directory synchronization
1. Click Start, click All Programs, click Microsoft Directory Sync, and then click Directory Sync
Configuration.
2. Follow the instructions in the wizard, and provide the requested credentials.
3. On the Finish page of the wizard, select Start directory synchronization now, and then click
Finish.
Known Issues with Synchronization
This section contains some common issues that customers have experienced with Directory Synchronization, as well as some suggested workarounds for these issues.
Directory Synchronization Does Not Migrate Passwords
When an account is migrated from your on-premises Active Directory, the account password is not migrated with the account. When the administrator activates the migrated account, a new password is assigned to that account.
If the password associated with an on-premises Active Directory account is changed, that new password is not migrated. Users must change their Microsoft Online Services passwords manually.
You Must Create Conference Rooms Before Establishing Directory Synchronization
If you have conference rooms in your local Exchange environment, you must create matching conference rooms in Microsoft Exchange Online before synchronization or the conference rooms from your local environment may be synchronized with Exchange Online as disabled users.
Workaround If you run directory synchronization before creating conference rooms in Exchange Online, you will need to delete the conference rooms that were synchronized into Exchange Online, create new ones in Exchange Online as described in the following section, and synchronize them again.
If your company is using Exchange Server 2007: You must create conference rooms in Exchange Online before installing and enabling directory synchronization. Each conference room that you create in Exchange Online must have an e-mail address that matches at least one of the proxy addresses of the corresponding conference room in your local Exchange environment. When directory synchronization begins, it will synchronize the conference rooms from your local Exchange Server environment and correctly associate them with the conference rooms that you created in Exchange Online.
If your company is using Exchange 2000 Server or Exchange Server 2003: You must create the conference rooms manually in Exchange Online because the conference rooms in your local Exchange environment will not be synchronized with Microsoft Online Services.
Synchronized Objects May Take up to 24 Hours to Appear in the Offline Address Book (OAB)
Objects that have been synchronized from your on-premises Active Directory directory service will appear immediately in your global address list (GAL), but it may take up to 24 hours before they appear in the OAB.
Directory Synchronization Fails with “Maximum Request Length Exceeded” Message
When synchronizing companies with large Active Directories or with very large distribution groups, you may see the “Maximum Request Length Exceeded” error message. The maximum batch size for objects being migrated is 4 megabytes (MB). The default number of objects to include in one batch is 20. When you are migrating groups, the batch must contain all objects in a particular group. If your groups have

35
many members, there may not be room in a particular batch for all 20 objects. By reducing the number of objects in a batch, you can optimize synchronization for your situation.
Workaround The maximum number of objects in a batch is controlled by a registry key. To change this registry key:
1. Run RegEdit.exe and navigate to HKEY LOCAL MACHINE\Software\Microsoft\MSOLCoexistence.
2. Add a new DWORD value named “ExportBatchSize.” 3. Set the value to less than 20 and test synchronization again. 4. Continue reducing the value until synchronization succeeds.
E-Mail Migration
Exchange Online supports two types of e-mail migration:
Migration from Internet-hosted POP3 or IMAP4 mailboxes
Migration from local Exchange Server mailboxes
Migration from Internet-Hosted POP3 and IMAP4 Mailboxes
This section provides deeper information about migrating mailbox content from POP3 and IMAP4 mailboxes. <This section is not complete in this preliminary version.>
Internet Mailbox Folder Mapping
Default folders use special handling and are created automatically when a mailbox is created. The following default folders are supported in Exchange Online:
Inbox
Outbox
Sent Items
Drafts
Deleted Items
Junk E-mail
Journal
Notes
Calendar
Custom folders are folders that are created by users after a mailbox is created. The Microsoft Online Services Migration Tools support mapping to default and to custom folders.
Map to Default Folders The Foldermap.xml file contains the default folder mapping. The following example shows that Internet mailbox Spam folders will be mapped to the Exchange Online Junk E-mail folder.
<Folder path="Spam">
<Property SpecialFolder="Junk E-mail" />
</Folder>
You can modify the Foldermap.xml file to control how you Internet mailbox folders will be mapped to Exchange Online folders. For example, if the junk e-mail folder in your Internet mailbox is named Junk, you can edit the Foldermap.xml file to reflect the folder name on the source server, as shown in the following example:

36
<Folder path="Junk">
<Property SpecialFolder="Junk E-mail" />
</Folder>
Note:
You can add multiple Folder entries to map several Internet mailbox folders to the same default folder.
Map to Custom Folders To create a custom mapping folder, modify the default folder mapping table that is installed with the Microsoft Online Services Migration Tools. By default, the folder mapping table is installed in the Program Files\Microsoft Transporter Tools\Config folder.
Before you create a custom folder map, identify the folder names that are used on your Internet mailboxes.
To create a custom folder map
1. Locate the default folder mapping table file, Foldermap.xml.
2. Copy the file and save it with a different file name.
3. Use a text editor or an XML editor to open the new file, and edit the names of the Internet mailbox
folders that correspond to the Exchange Online default folders.
4. Save the file.
The following example shows you how to map an Internet mailbox folder named Important Mail to a custom Exchange Online folder named Important. This custom folder will be created in the Inbox folder.
<Folder path="Important Mail">
<Property Name="Inbox/Important" />
</Folder>
Migration From Local Exchange Server Mailboxes
This section provides deeper information about migrating mailbox content from local Exchange Server mailboxes. <This section is not complete in this preliminary version.>
Remove Forwarding
If, after establishing e-mail coexistence and migrating some of your local Exchange Server mailboxes, you decide to roll back your migration and return to your local Exchange Server environment, you can use the Remove Forwarding Wizard in the Microsoft Online Services Migration Tools to help remove the forwarding that was established on mailboxes that you migrated to Exchange Online.
To remove forwarding
1. Click Start, click All Programs, click Microsoft Online Services Migration Tools, and then click
Microsoft Online Services Migration Console.
2. In the navigation pane under Microsoft Exchange, click Mailboxes Already Migrated, select
the mailboxes to remove forwarding from, and then, in the Actions pane, click Remove
forwarding.
3. On the Review Mailboxes page of the Remove Forwarding Wizard, verify the list of mailboxes
from which to remove forwarding, and then click Remove.
Known Issues with E-Mail Migration
This section contains some common issues that customers have experienced with e-mail migration and suggested workarounds for these issues.

37
AutoArchive Does Not Work As Expected After Migration
The Outlook AutoArchive feature can be configured to regularly move old mailbox items to an archive folder. When mailbox items are migrated from your on premises Exchange Server to Exchange Online, they lose their original received date. The received date becomes the date that the mailbox item was migrated, so older mailbox items won’t be archived until they have been in the Exchange Online mailbox for the full archive period.
Migration of Calendar Items to a Non-Calendar Folder Is Not Supported
When migrating mailbox items from a POP or IMAP mailbox, migration will fail when trying to migrate calendar items to a folder that is not a Calendar folder. For example, if you have deleted calendar items in your deleted items folder, the Migration Tools will attempt to migrate those deleted calendar items to the deleted items folder. Migration of the deleted calendar items will fail.
Migration CmdLet Reference
The Microsoft Online Services Migration Tools user interface installs the Migration Cmdlets. The Migration Tool interface calls these cmdlets when migrating mailbox contents. The user interface will perform most migration tasks, but if you want to script your migration or perform more advanced migration tasks, you can use the Windows PowerShell cmdlets. are This section of the Microsoft Online Services Migration Tools documentation describes the PowerShell cmdlets.
The Microsoft Online Services Migration Tools include the following cmdlets:
Add-XsExchangeForwardingAddress
Add-XsExchangeOnlineItem
Add-MicrosoftOnlineExchangeItem
Get-ImapMailbox
Get-ImapMailboxData
Get-InternetMailbox
Get-PopMailbox
Get-PopMailboxData
Get-XsActiveDirectoryUser
Get-XsExchangeMailboxData
Move-XsExchangeMailboxToExchangeOnline
Move-XsImapMailboxToExchangeOnline
Move-XsPopMailboxToExchangeOnline
Remove-XsExchangeForwardingAddress
Search-XsMicrosoftOnlineDirectory
Export-TransporterBinary
Import-TransporterBinary
Add-XsExchangeForwardingAddress
Establishes mail forwarding from an on-premises Microsoft Exchange Server account to the corresponding mailbox in Microsoft Exchange Online. The cmdlet cleans up local mailboxes.
E-mail forwarding is performed by setting up an alternate recipient, or through the target address on a mail-enabled user. This task uses a directory object or a mailbox meta object as input. It then matches with an existing account in Exchange Online service, and establishes a mail forward to that account.
Syntax
Add-XsExchangeForwardingAddress [-TransporterObject
<Microsoft.Exchange.Transporter.IAlienDataObject>] [[-TargetIdentity]

38
<String>] [-Confirm] [-DisconnectMailbox] [-ForwardOnly] [-TargetCredential
<PSCredential>] [-Quiet] [-WhatIf] [-GlobalCatalog <String>.
Parameters
Parameter Required Type Description
Confirm No System.Management.Automation.SwitchParameter
This is a switch parameter. If /Confirm is specified, then the cmdlet prompts the user for confirmation before executing the task. The confirmation is received through the following choices: [Y] Yes [A] Yes to All [N] No [L] No to All [S] Suspend [?] Help (default is "Y").
DisconnectMailbox No System.Management.Automation.SwitchParameter
Disconnect the local mailbox prior to creating a forward.
ForwardOnly No System.Management.Automation.SwitchParameter
Do not leave a copy of mail in the local mailbox.
GlobalCatalog No System.String Specific Microsoft Active Directory server to query for user information.
Quiet No System.Management.Automation.SwitchParameter
Suppresses feedback during task actions.
SourceCredential No System.Management.Automation.PSCredential
Specific credentials used to access the local Active Directory.
SourceIdentity yes System.String Identity of Active Directory user object that will have the mail forwarder.
TargetCredential No System.Management.Automation.PSCredential
Specific credentials used to access Exchange Online.
TargetIdentity No System.String Identify of the Exchange Online mailbox where mail will be forwarded to.
TransporterObject No Microsoft.Exchange.Transporter.IAlienDataObject
Used to pass in Transporter objects through the Windows PowerShell pipeline.
WhatIf No SwitchParameter If specified, then the cmdlet does not actually perform the action, but only emits the criteria.
Example
This deletes the current mailbox and sets up a mail-enabled user with a mail forward set to Exchange Online.
Add-XsExchangeMailForwarder -SourceIdentity [email protected] -
DisconnectMailbox -TargetCredential $Creds

39
Comments
Mailbox cleanup is an option in this cmdlet instead of a separate cmdlet because there are no scenarios where a mailbox cleanup would not be performed without also establishing a mail forward to Exchange Online.
Add-XsExchangeOnlineItem
Injects mailbox data items into Microsoft Exchange Online.
Syntax
Add-XsExchangeOnlineItem -TransporterObject
<Microsoft.Exchange.Transporter.IAlienDataObject> [-Quiet] [-MaxThreadCount
<UInt32>] -Identity <String> -Credential <PSCredential>
Parameters
Parameter Required Type Description
Credential Yes System.Management.Automation.PSCredential
The credential object that contains a user name and password.
Identity Yes System.String Identity of Active Directory user object.
MaxThreadCount No System.UInt32 The maximum number of threads to allocate to this task.
Quiet No System.Management.Automation.SwitchParameter
Suppresses feedback during task actions.
TargetClientAccessServer
No System.String The target client access server in Exchange Online.
TargetMapping No System.String NA
TransporterObject No Microsoft.Exchange.Transporter.IAlienDataObject
Used to pass in Transporter objects through the Windows PowerShell pipeline.
Example
$TargetCreds = Get-Credential # provide target credentials
$Mail = Get-XsImapMailboxData -SourceIdentity [email protected] -SourceServer
Server1.com -SourceLoginId user1 -SourcePassword Migration!1 -TargetIdentity
$Mail | Add-XsExchangeOnlineItem –TargetCredential $TargetCreds
Add-MicrosoftOnlineExchangeItem
Injects mailbox data items into Microsoft Exchange Online.
Syntax
Add-MicrosoftExchangeOnlineItem -TransporterObject
<Microsoft.Exchange.Transporter.IAlienDataObject> [-Quiet] [-MaxThreadCount
<UInt32>] -Identity <String> -Credential <PSCredential>
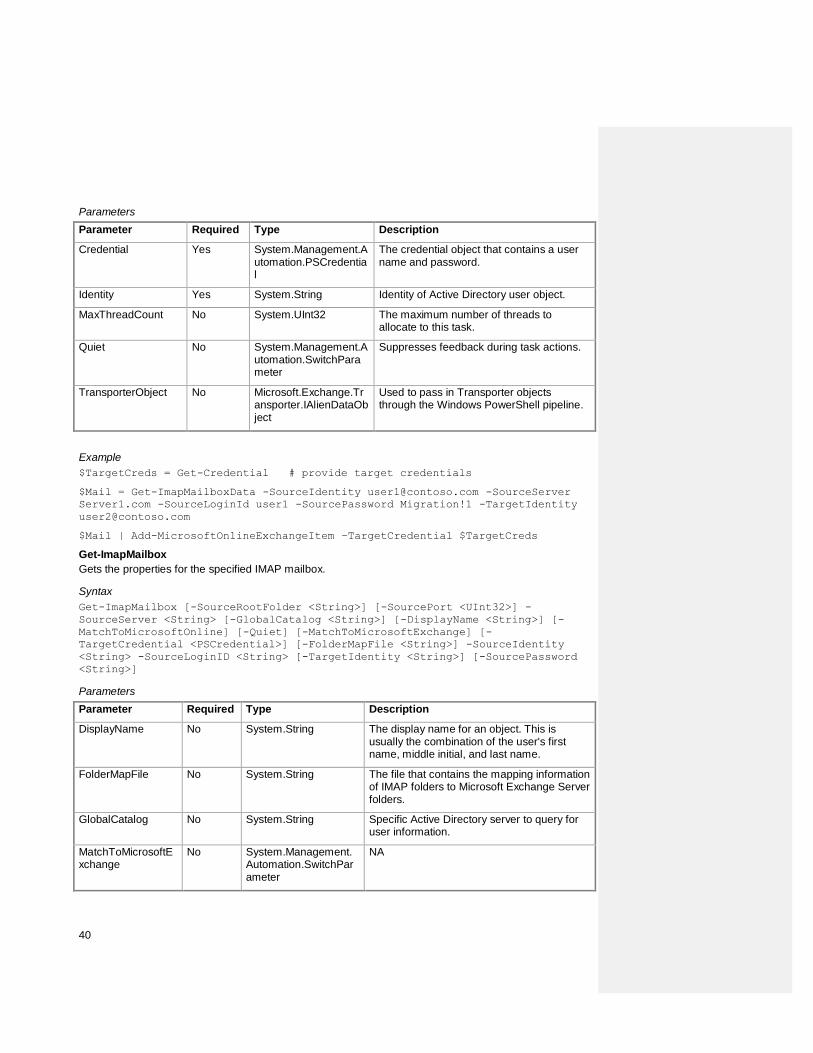
40
Parameters
Parameter Required Type Description
Credential Yes System.Management.Automation.PSCredential
The credential object that contains a user name and password.
Identity Yes System.String Identity of Active Directory user object.
MaxThreadCount No System.UInt32 The maximum number of threads to allocate to this task.
Quiet No System.Management.Automation.SwitchParameter
Suppresses feedback during task actions.
TransporterObject No Microsoft.Exchange.Transporter.IAlienDataObject
Used to pass in Transporter objects through the Windows PowerShell pipeline.
Example
$TargetCreds = Get-Credential # provide target credentials
$Mail = Get-ImapMailboxData -SourceIdentity [email protected] -SourceServer
Server1.com -SourceLoginId user1 -SourcePassword Migration!1 -TargetIdentity
$Mail | Add-MicrosoftOnlineExchangeItem –TargetCredential $TargetCreds
Get-ImapMailbox
Gets the properties for the specified IMAP mailbox.
Syntax
Get-ImapMailbox [-SourceRootFolder <String>] [-SourcePort <UInt32>] -
SourceServer <String> [-GlobalCatalog <String>] [-DisplayName <String>] [-
MatchToMicrosoftOnline] [-Quiet] [-MatchToMicrosoftExchange] [-
TargetCredential <PSCredential>] [-FolderMapFile <String>] -SourceIdentity
<String> -SourceLoginID <String> [-TargetIdentity <String>] [-SourcePassword
<String>]
Parameters
Parameter Required Type Description
DisplayName No System.String The display name for an object. This is usually the combination of the user's first name, middle initial, and last name.
FolderMapFile No System.String The file that contains the mapping information of IMAP folders to Microsoft Exchange Server folders.
GlobalCatalog No System.String Specific Active Directory server to query for user information.
MatchToMicrosoftExchange
No System.Management.Automation.SwitchParameter
NA
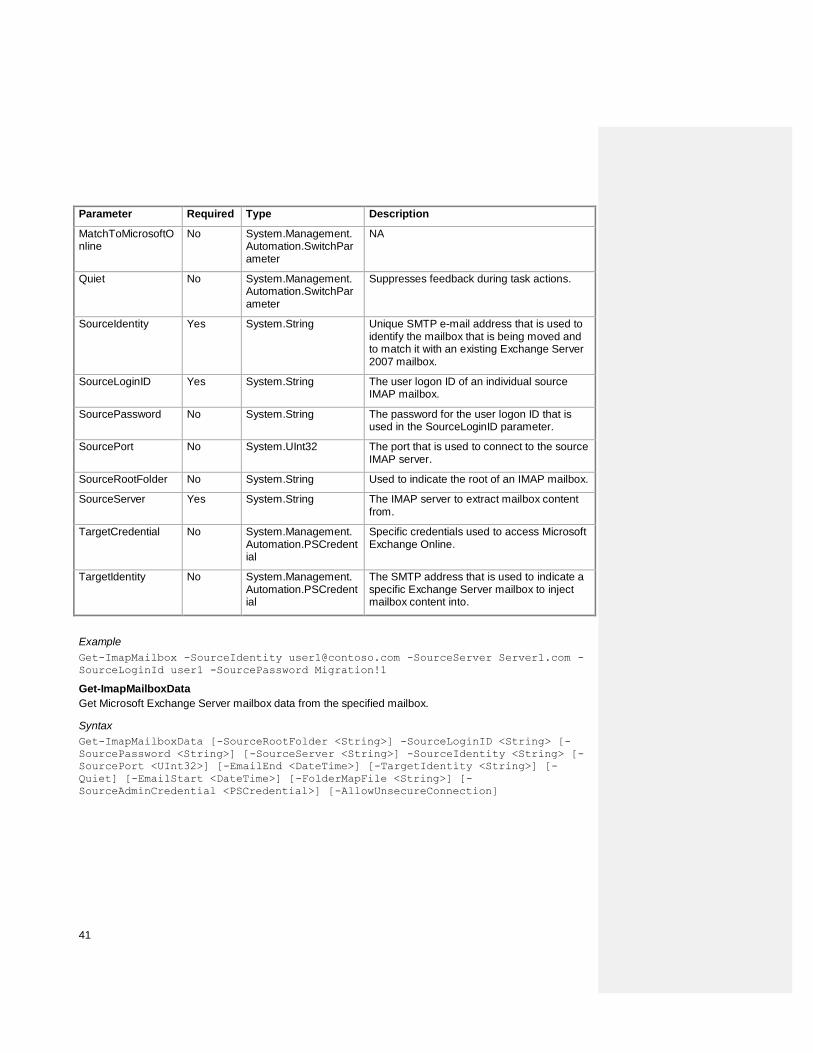
41
Parameter Required Type Description
MatchToMicrosoftOnline
No System.Management.Automation.SwitchParameter
NA
Quiet No System.Management.Automation.SwitchParameter
Suppresses feedback during task actions.
SourceIdentity Yes System.String Unique SMTP e-mail address that is used to identify the mailbox that is being moved and to match it with an existing Exchange Server 2007 mailbox.
SourceLoginID Yes System.String The user logon ID of an individual source IMAP mailbox.
SourcePassword No System.String The password for the user logon ID that is used in the SourceLoginID parameter.
SourcePort No System.UInt32 The port that is used to connect to the source IMAP server.
SourceRootFolder No System.String Used to indicate the root of an IMAP mailbox.
SourceServer Yes System.String The IMAP server to extract mailbox content from.
TargetCredential No System.Management.Automation.PSCredential
Specific credentials used to access Microsoft Exchange Online.
TargetIdentity No System.Management.Automation.PSCredential
The SMTP address that is used to indicate a specific Exchange Server mailbox to inject mailbox content into.
Example
Get-ImapMailbox -SourceIdentity [email protected] -SourceServer Server1.com -
SourceLoginId user1 -SourcePassword Migration!1
Get-ImapMailboxData
Get Microsoft Exchange Server mailbox data from the specified mailbox.
Syntax
Get-ImapMailboxData [-SourceRootFolder <String>] -SourceLoginID <String> [-
SourcePassword <String>] [-SourceServer <String>] -SourceIdentity <String> [-
SourcePort <UInt32>] [-EmailEnd <DateTime>] [-TargetIdentity <String>] [-
Quiet] [-EmailStart <DateTime>] [-FolderMapFile <String>] [-
SourceAdminCredential <PSCredential>] [-AllowUnsecureConnection]

42
Parameters
Parameter Required Type Description
AllowUnsecureConnection No System.Management.Automation.SwitchParameter
Allows the task to connect to the source server over a non-Secure Sockets Layer (SSL) port to extract mail from an IMAP mailbox.
EmailEnd No System.DateTime Used to specify the end date in a date range to filter mailbox content based on date.
EmailStart No System.DateTime Used to specify the start date in a date range to filter mailbox content based on date.
FolderMapFile No System.String The file that contains the mapping information of IMAP folders to Exchange folders.
Quiet No System.Management.Automation.SwitchParameter
Suppresses feedback during task actions.
SourceAdminCredential No System.Management.Automation.PSCredential
The credential object that contains a user name and password.
SourceIdentity Yes System.String Unique SMTP e-mail address that is used to identify the mailbox that is being moved and to match it with an existing Exchange Server 2007 mailbox.
SourceLoginID Yes System.String The user logon ID of an individual source IMAP mailbox.
SourcePassword No System.String The password for the user logon ID that is used in the SourceLoginID parameter.
SourcePort No System.UInt32 The port that is used to connect to the source IMAP server.
SourceRootFolder No System.String Used to indicate the root of an IMAP mailbox.
SourceServer No System.String The IMAP server to extract mailbox content from.
TargetIdentity No System.String The SMTP address that is used to indicate a specific Exchange Server mailbox to inject mailbox content

43
Parameter Required Type Description
AllowUnsecureConnection No System.Management.Automation.SwitchParameter
Allows the task to connect to the source server over a non-Secure Sockets Layer (SSL) port to extract mail from an IMAP mailbox.
into.
TransporterObject True Microsoft.Exchange.Transporter.IAlienDataObject
Used to pass in Transporter objects from the Get-ImapMailbox task through the Windows PowerShell pipeline.
Example
$Mail = Get-ImapMailboxData -SourceIdentity [email protected] -SourceServer
Server1.com -SourceLoginId user1 -SourcePassword Migration!1 -TargetIdentity
Comment
Retrieves mailbox data for the mailbox associated with the target user.
Get-InternetMailbox
Get data describing an Internet mailbox.
Syntax
Get-InternetMailbox [-SourceRootFolder <String>] [-SourcePort <UInt32>] -
SourceServer <String> [-GlobalCatalog <String>] [-DisplayName <String>] [-
MatchToMicrosoftOnline] [-Quiet] [-MatchToMicrosoftExchange] [-TargetIdentity
<String>] [-FolderMapFile <String>] -SourceIdentity <String> [-
TargetCredential <PSCredential>] [-SourcePassword <String>] -SourceLoginID
<String>
Parameters
Parameter Required Type Description
DisplayName No System.String NA
FolderMapFile No System.String NA
GlobalCatalog No System.String Specific Active Directory server to query for user information.
MatchToMicrosoftExchange
No System.Management.Automation.SwitchParameter
NA
MatchToMicrosoftOnline
No System.Management.Automation.SwitchParameter
NA
Quiet No System.Management.Automation.SwitchParameter
Suppresses feedback during task actions.
SourceAdminCredential
No System.Management.Automation.PSCredential
The credential object that contains a user name and password.
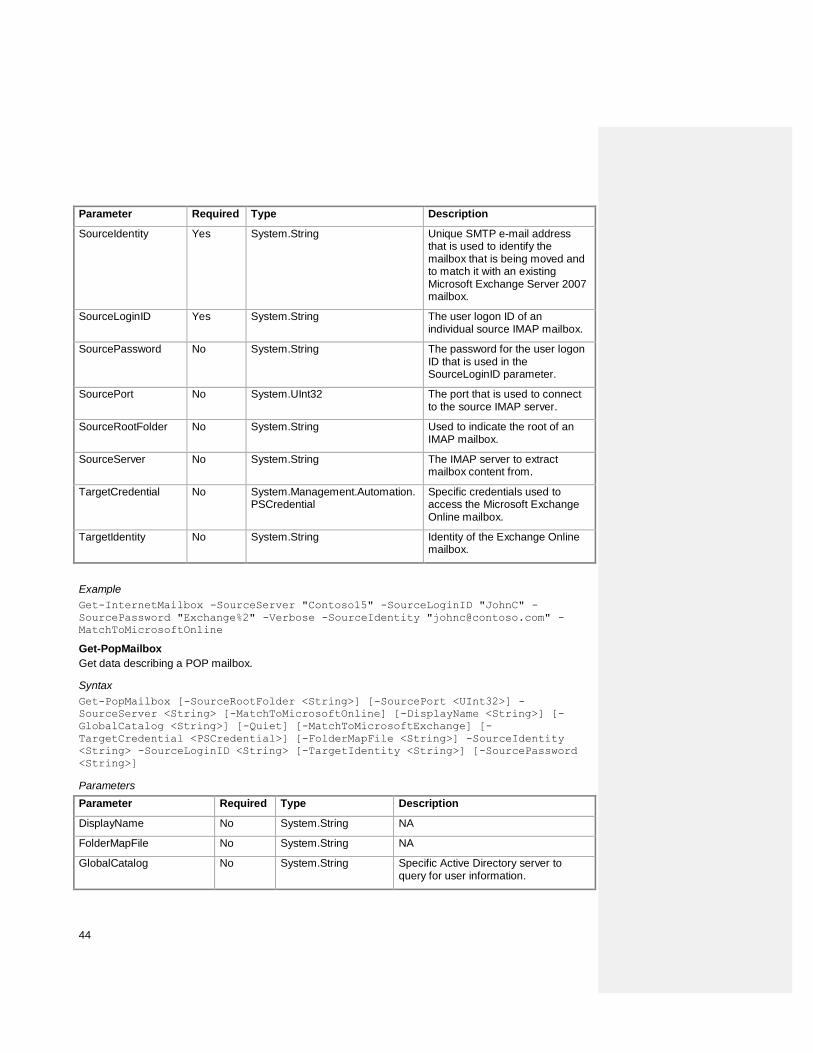
44
Parameter Required Type Description
SourceIdentity Yes System.String Unique SMTP e-mail address that is used to identify the mailbox that is being moved and to match it with an existing Microsoft Exchange Server 2007 mailbox.
SourceLoginID Yes System.String The user logon ID of an individual source IMAP mailbox.
SourcePassword No System.String The password for the user logon ID that is used in the SourceLoginID parameter.
SourcePort No System.UInt32 The port that is used to connect to the source IMAP server.
SourceRootFolder No System.String Used to indicate the root of an IMAP mailbox.
SourceServer No System.String The IMAP server to extract mailbox content from.
TargetCredential No System.Management.Automation.PSCredential
Specific credentials used to access the Microsoft Exchange Online mailbox.
TargetIdentity No System.String Identity of the Exchange Online mailbox.
Example
Get-InternetMailbox -SourceServer "Contoso15" -SourceLoginID "JohnC" -
SourcePassword "Exchange%2" -Verbose -SourceIdentity "[email protected]" -
MatchToMicrosoftOnline
Get-PopMailbox
Get data describing a POP mailbox.
Syntax
Get-PopMailbox [-SourceRootFolder <String>] [-SourcePort <UInt32>] -
SourceServer <String> [-MatchToMicrosoftOnline] [-DisplayName <String>] [-
GlobalCatalog <String>] [-Quiet] [-MatchToMicrosoftExchange] [-
TargetCredential <PSCredential>] [-FolderMapFile <String>] -SourceIdentity
<String> -SourceLoginID <String> [-TargetIdentity <String>] [-SourcePassword
<String>]
Parameters
Parameter Required Type Description
DisplayName No System.String NA
FolderMapFile No System.String NA
GlobalCatalog No System.String Specific Active Directory server to query for user information.

45
Parameter Required Type Description
MatchToMicrosoftExchange
No System.Management.Automation.SwitchParameter
NA
MatchToMicrosoftOnline No System.Management.Automation.SwitchParameter
NA
Quiet No System.Management.Automation.SwitchParameter
Suppresses feedback during task actions.
SourceAdminCredential No System.Management.Automation.PSCredential
The credential object that contains a user name and password.
SourceIdentity Yes System.String Unique SMTP e-mail address that is used to identify the mailbox that is being moved and to match it with an existing Microsoft Exchange Server 2007 mailbox.
SourceLoginID Yes System.String The user logon ID of an individual source IMAP mailbox.
SourcePassword No System.String The password for the user logon ID that is used in the SourceLoginID parameter.
SourcePort No System.UInt32 The port that is used to connect to the source IMAP server.
SourceRootFolder No System.String Used to indicate the root of an IMAP mailbox.
SourceServer No System.String The IMAP server to extract mailbox content from.
TargetCredential No System.Management.Automation.PSCredential
Specific credentials used to access the Microsoft Exchange Online mailbox.
TargetIdentity No System.String Identify of the Exchange Online mailbox.
Example
Get-PopMailbox -SourceIdentity [email protected] -SourceServer Server1.com -
SourceLoginId user1 -SourcePassword Migration!1
Get-PopMailboxData
Get POP mailbox data from the specified mailbox.
Syntax
Get-PopMailboxData -TransporterObject
<Microsoft.Exchange.Transporter.IAlienDataObject> [-SourceServer <String>] [-
EmailEnd <DateTime>] [-TargetIdentity <String>] [-Quiet] [-EmailStart
<DateTime>] [-FolderMapFile <String>] [-SourceAdminCredential <PSCredential>]
[-AllowUnsecureConnection]
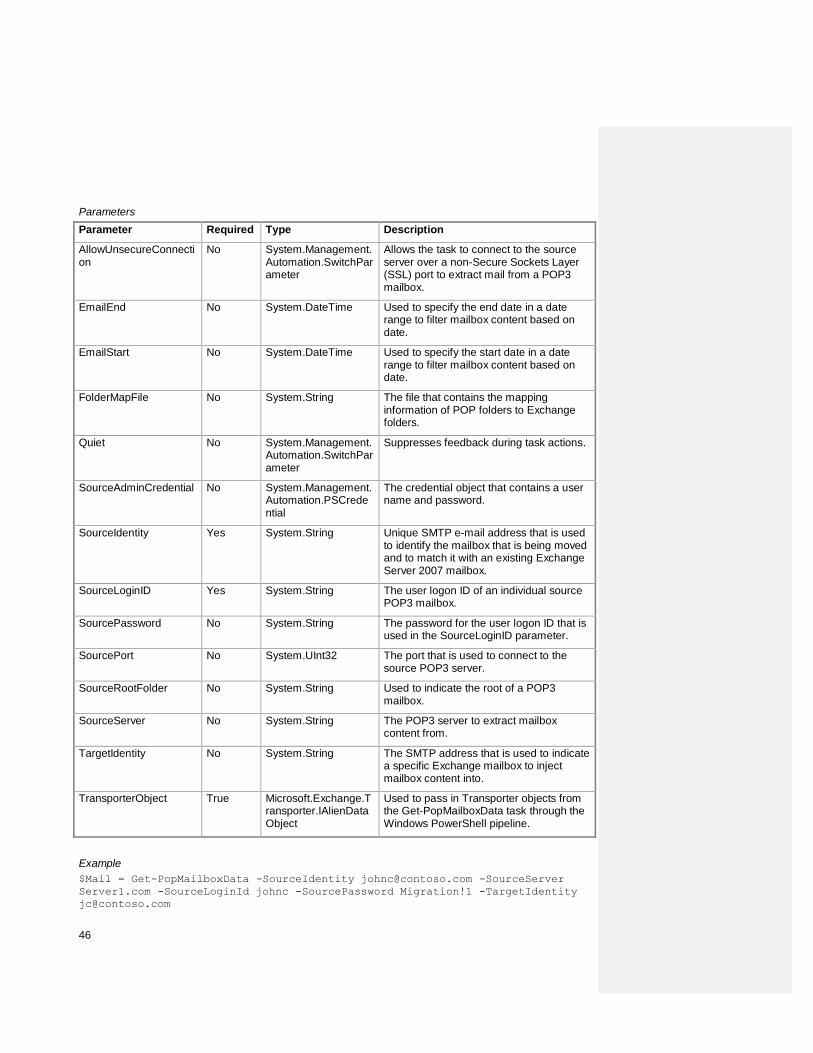
46
Parameters
Parameter Required Type Description
AllowUnsecureConnection
No System.Management.Automation.SwitchParameter
Allows the task to connect to the source server over a non-Secure Sockets Layer (SSL) port to extract mail from a POP3 mailbox.
EmailEnd No System.DateTime Used to specify the end date in a date range to filter mailbox content based on date.
EmailStart No System.DateTime Used to specify the start date in a date range to filter mailbox content based on date.
FolderMapFile No System.String The file that contains the mapping information of POP folders to Exchange folders.
Quiet No System.Management.Automation.SwitchParameter
Suppresses feedback during task actions.
SourceAdminCredential No System.Management.Automation.PSCredential
The credential object that contains a user name and password.
SourceIdentity Yes System.String Unique SMTP e-mail address that is used to identify the mailbox that is being moved and to match it with an existing Exchange Server 2007 mailbox.
SourceLoginID Yes System.String The user logon ID of an individual source POP3 mailbox.
SourcePassword No System.String The password for the user logon ID that is used in the SourceLoginID parameter.
SourcePort No System.UInt32 The port that is used to connect to the source POP3 server.
SourceRootFolder No System.String Used to indicate the root of a POP3 mailbox.
SourceServer No System.String The POP3 server to extract mailbox content from.
TargetIdentity No System.String The SMTP address that is used to indicate a specific Exchange mailbox to inject mailbox content into.
TransporterObject True Microsoft.Exchange.Transporter.IAlienDataObject
Used to pass in Transporter objects from the Get-PopMailboxData task through the Windows PowerShell pipeline.
Example
$Mail = Get-PopMailboxData -SourceIdentity [email protected] -SourceServer
Server1.com -SourceLoginId johnc -SourcePassword Migration!1 -TargetIdentity
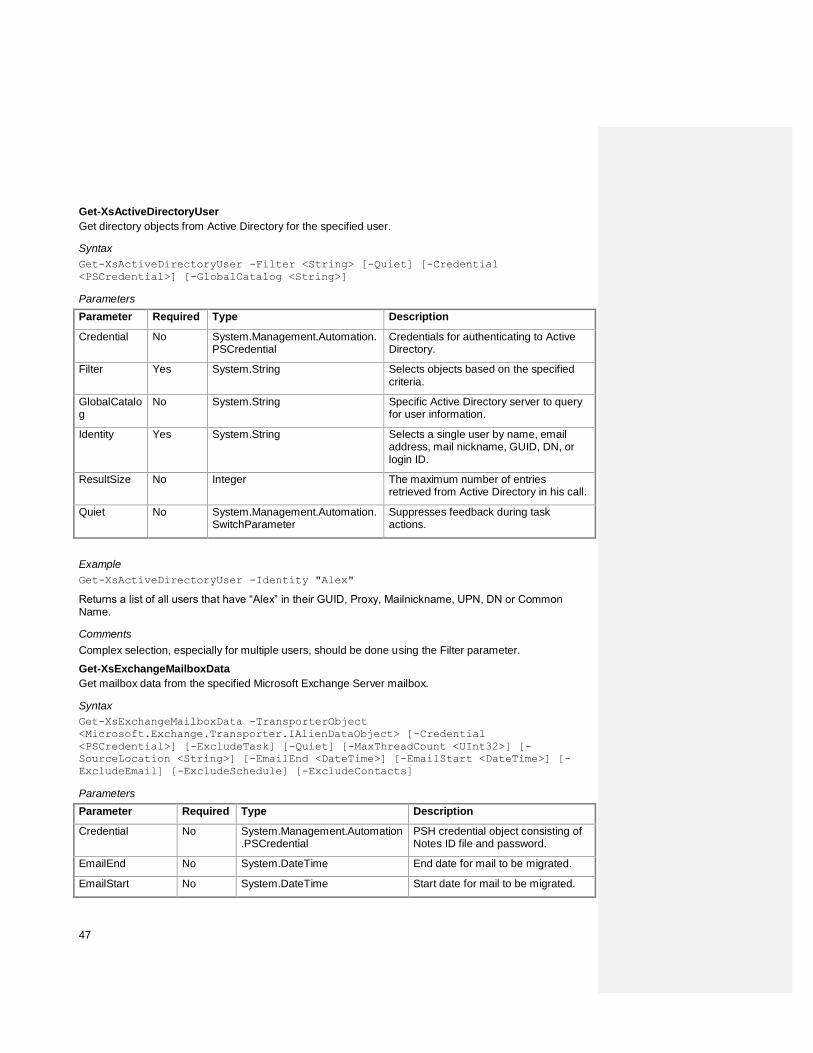
47
Get-XsActiveDirectoryUser
Get directory objects from Active Directory for the specified user.
Syntax
Get-XsActiveDirectoryUser -Filter <String> [-Quiet] [-Credential
<PSCredential>] [-GlobalCatalog <String>]
Parameters
Parameter Required Type Description
Credential No System.Management.Automation.PSCredential
Credentials for authenticating to Active Directory.
Filter Yes System.String Selects objects based on the specified criteria.
GlobalCatalog
No System.String Specific Active Directory server to query for user information.
Identity Yes System.String Selects a single user by name, email address, mail nickname, GUID, DN, or login ID.
ResultSize No Integer The maximum number of entries retrieved from Active Directory in his call.
Quiet No System.Management.Automation.SwitchParameter
Suppresses feedback during task actions.
Example
Get-XsActiveDirectoryUser -Identity "Alex"
Returns a list of all users that have “Alex” in their GUID, Proxy, Mailnickname, UPN, DN or Common Name.
Comments
Complex selection, especially for multiple users, should be done using the Filter parameter.
Get-XsExchangeMailboxData
Get mailbox data from the specified Microsoft Exchange Server mailbox.
Syntax
Get-XsExchangeMailboxData -TransporterObject
<Microsoft.Exchange.Transporter.IAlienDataObject> [-Credential
<PSCredential>] [-ExcludeTask] [-Quiet] [-MaxThreadCount <UInt32>] [-
SourceLocation <String>] [-EmailEnd <DateTime>] [-EmailStart <DateTime>] [-
ExcludeEmail] [-ExcludeSchedule] [-ExcludeContacts]
Parameters
Parameter Required Type Description
Credential No System.Management.Automation.PSCredential
PSH credential object consisting of Notes ID file and password.
EmailEnd No System.DateTime End date for mail to be migrated.
EmailStart No System.DateTime Start date for mail to be migrated.
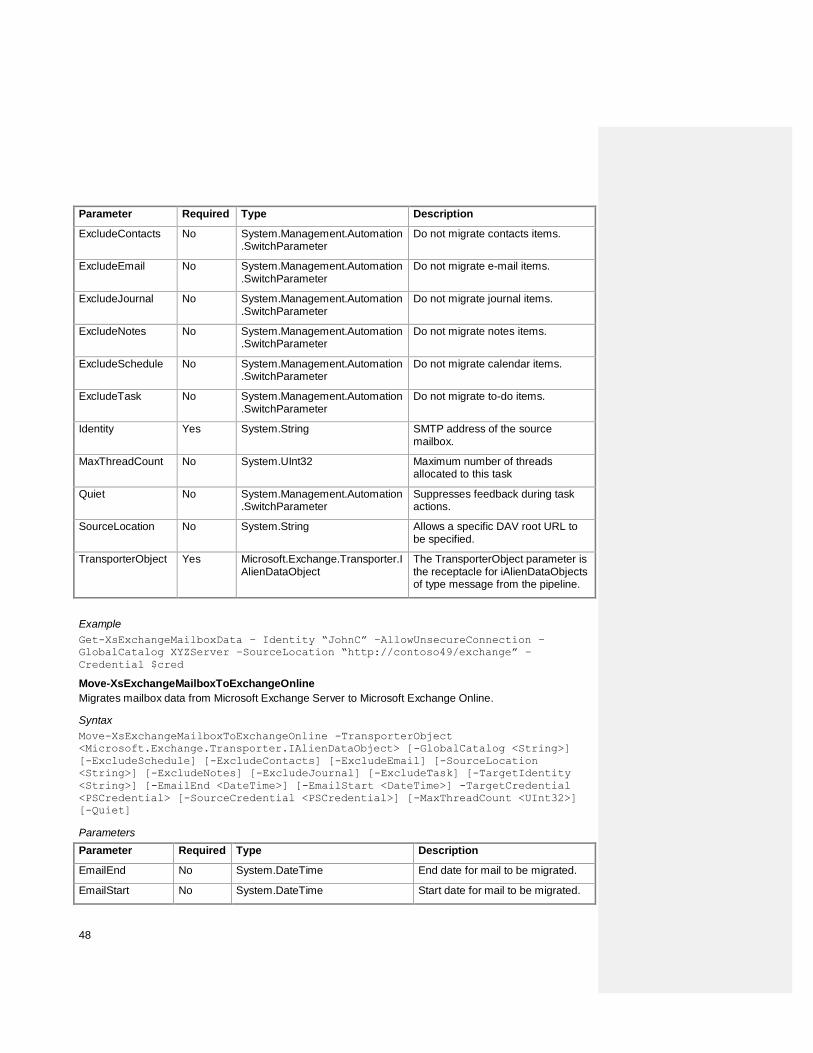
48
Parameter Required Type Description
ExcludeContacts No System.Management.Automation.SwitchParameter
Do not migrate contacts items.
ExcludeEmail No System.Management.Automation.SwitchParameter
Do not migrate e-mail items.
ExcludeJournal No System.Management.Automation.SwitchParameter
Do not migrate journal items.
ExcludeNotes No System.Management.Automation.SwitchParameter
Do not migrate notes items.
ExcludeSchedule No System.Management.Automation.SwitchParameter
Do not migrate calendar items.
ExcludeTask No System.Management.Automation.SwitchParameter
Do not migrate to-do items.
Identity Yes System.String SMTP address of the source mailbox.
MaxThreadCount No System.UInt32 Maximum number of threads allocated to this task
Quiet No System.Management.Automation.SwitchParameter
Suppresses feedback during task actions.
SourceLocation No System.String Allows a specific DAV root URL to be specified.
TransporterObject Yes Microsoft.Exchange.Transporter.IAlienDataObject
The TransporterObject parameter is the receptacle for iAlienDataObjects of type message from the pipeline.
Example
Get-XsExchangeMailboxData – Identity “JohnC” –AllowUnsecureConnection –
GlobalCatalog XYZServer –SourceLocation “http://contoso49/exchange” –
Credential $cred
Move-XsExchangeMailboxToExchangeOnline
Migrates mailbox data from Microsoft Exchange Server to Microsoft Exchange Online.
Syntax
Move-XsExchangeMailboxToExchangeOnline -TransporterObject
<Microsoft.Exchange.Transporter.IAlienDataObject> [-GlobalCatalog <String>]
[-ExcludeSchedule] [-ExcludeContacts] [-ExcludeEmail] [-SourceLocation
<String>] [-ExcludeNotes] [-ExcludeJournal] [-ExcludeTask] [-TargetIdentity
<String>] [-EmailEnd <DateTime>] [-EmailStart <DateTime>] -TargetCredential
<PSCredential> [-SourceCredential <PSCredential>] [-MaxThreadCount <UInt32>]
[-Quiet]
Parameters
Parameter Required Type Description
EmailEnd No System.DateTime End date for mail to be migrated.
EmailStart No System.DateTime Start date for mail to be migrated.

49
Parameter Required Type Description
ExcludeContacts No System.Management.Automation.SwitchParameter
Do not migrate contacts items.
ExcludeEmail No System.Management.Automation.SwitchParameter
Do not migrate e-mail items.
ExcludeJournal No System.Management.Automation.SwitchParameter
Do not migrate journal items.
ExcludeNotes No System.Management.Automation.SwitchParameter
Do not migrate notes items.
ExcludeSchedule No System.Management.Automation.SwitchParameter
Do not migrate calendar items.
ExcludeTask No System.Management.Automation.SwitchParameter
Do not migrate to-do items.
GlobalCatalog No System.String Identifies the Active Directory server.
MaxThreadCount No System.UInt32 Maximum number of threads allocated to this task.
Quiet No System.Management.Automation.SwitchParameter
Suppresses feedback during task actions.
SourceCredential No System.Management.Automation.PSCredential
The credential object that contains a user name and password.
SourceIdentity Yes System.String SMTP address of the mailbox to migrate.
SourceLocation No System.String Specifies root URL for the source mailbox.
TargetCredential Yes System.Management.Automation.PSCredential
Specific credentials used to access Exchange Online mailbox.
TargetIdentity No System.String Identify of the Exchange Online mailbox.
TransporterObject Yes Microsoft.Exchange.Transporter.IAlienDataObject
Used to pass in Transporter objects through the Windows PowerShell pipeline.
Example
Move-XsExchangeMailboxToExchangeOnline – SourceIdentity “JohnC” –
AllowUnsecureConnection – GlobalCatalog XYZServer –SourceLocation
“http://Contoso49/exchange” –TargetCredential $tcred -SourceCredential $scred
Comment
Passing mailbox data objects will cause this task to behave like Add-XsExchangeOnlineItem.
Move-XsImapMailboxToExchangeOnline
Migrates mailbox data from an IMAP server to Microsoft Exchange Online.

50
Syntax
Move-XsIMAPMailboxToExchangeOnline -TransporterObject
<Microsoft.Exchange.Transporter.IAlienDataObject> [-TargetMapping <String>]
[-TargetCredential <PSCredential>] [-TargetIdentity <String>] [-
MaxThreadCount <UInt32>] [-Quiet] [-TargetMode <String>] [-
AllowUnsecureConnection] [-SourceAdminCredential <PSCredential>] [-
FolderMapFile <String>] [-TargetClientAccessServer <String>] [-EmailEnd
<DateTime>] [-EmailStart <DateTime>]
Parameters
Parameter Required Type Description
AllowUnsecureConnection No System.Management.Automation.SwitchParameter
NA
EmailEnd No System.DateTime End date for mail to be migrated.
EmailStart No System.DateTime Start date for mail to be migrated.
FolderMapFile No System.String NA.
MaxThreadCount No System.UInt32 Maximum number of threads allocated to this task
Quiet No System.Management.Automation.SwitchParameter
Suppresses feedback during task actions.
SourceAdminCredential No System.Management.Automation.PSCredential
The credential object that contains a user name and password.
SourceIdentity Yes System.String SMTP address of the mailbox to migrate.
SourceLoginID No System.String The user logon ID of an individual source IMAP mailbox.
SourcePassword No System.String Password for source mailbox.
SourcePassword No System.String Password for source mailbox.
SourcePort No System.UInt32 Port on source server.
SourceRootFolder No System.String Root folder for source mailbox.
SourceServer Yes System.String Source mailbox server.
TargetClientAccessServer No System.String Target Exchange Client Access server.
TargetCredential No System.Management.Automation.PSCredential
Specific credentials used to access the Exchange Online mailbox.
TargetIdentity No System.String Identity of the Exchange Online mailbox.
TargetMapping No System.String NA.
TargetMode No System.String NA.
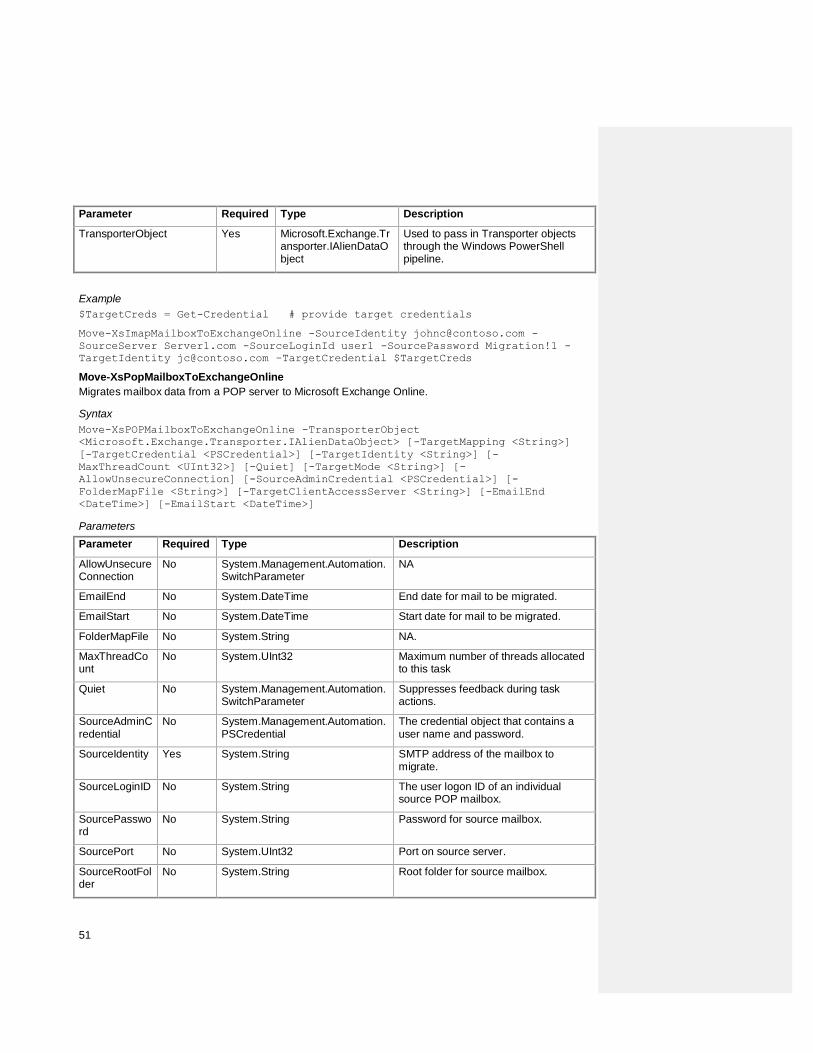
51
Parameter Required Type Description
TransporterObject Yes Microsoft.Exchange.Transporter.IAlienDataObject
Used to pass in Transporter objects through the Windows PowerShell pipeline.
Example
$TargetCreds = Get-Credential # provide target credentials
Move-XsImapMailboxToExchangeOnline -SourceIdentity [email protected] -
SourceServer Server1.com -SourceLoginId user1 -SourcePassword Migration!1 -
TargetIdentity [email protected] –TargetCredential $TargetCreds
Move-XsPopMailboxToExchangeOnline
Migrates mailbox data from a POP server to Microsoft Exchange Online.
Syntax
Move-XsPOPMailboxToExchangeOnline -TransporterObject
<Microsoft.Exchange.Transporter.IAlienDataObject> [-TargetMapping <String>]
[-TargetCredential <PSCredential>] [-TargetIdentity <String>] [-
MaxThreadCount <UInt32>] [-Quiet] [-TargetMode <String>] [-
AllowUnsecureConnection] [-SourceAdminCredential <PSCredential>] [-
FolderMapFile <String>] [-TargetClientAccessServer <String>] [-EmailEnd
<DateTime>] [-EmailStart <DateTime>]
Parameters
Parameter Required Type Description
AllowUnsecureConnection
No System.Management.Automation.SwitchParameter
NA
EmailEnd No System.DateTime End date for mail to be migrated.
EmailStart No System.DateTime Start date for mail to be migrated.
FolderMapFile No System.String NA.
MaxThreadCount
No System.UInt32 Maximum number of threads allocated to this task
Quiet No System.Management.Automation.SwitchParameter
Suppresses feedback during task actions.
SourceAdminCredential
No System.Management.Automation.PSCredential
The credential object that contains a user name and password.
SourceIdentity Yes System.String SMTP address of the mailbox to migrate.
SourceLoginID No System.String The user logon ID of an individual source POP mailbox.
SourcePassword
No System.String Password for source mailbox.
SourcePort No System.UInt32 Port on source server.
SourceRootFolder
No System.String Root folder for source mailbox.

52
Parameter Required Type Description
SourceServer Yes System.String Source mailbox server.
TargetClientAccessServer
No System.String Target Exchange Client Access server.
TargetCredential
No System.Management.Automation.PSCredential
Target mailbox credentials.
TargetIdentity No System.String Identity of the Exchange Online mailbox.
TargetMapping No System.String NA.
TargetMode No System.String NA.
TransporterObject
Yes Microsoft.Exchange.Transporter.IAlienDataObject
Used to pass in Transporter objects through the Windows PowerShell pipeline.
Example
$TargetCreds = Get-Credential # provide target credentials
Move-XsPopMailboxToExchangeOnline -SourceIdentity [email protected] -
SourceServer Server1.com -SourceLoginId user1 -SourcePassword Migration!1 -
TargetIdentity [email protected] –TargetCredential $TargetCreds
Comments
Moves mailbox from the specified POP server to Exchange Online, using the source and target identities.
Remove-XsExchangeForwardingAddress
Removes any mail forwarders that may exist on users that have mail-forwarding enabled to Microsoft Exchange Online. See the Add-XsExchangeMailForwarder cmdlet for how to add a mail forwarder to Exchange Online.
Syntax
Remove-XsExchangeForwardingAddress -TransporterObject
<Microsoft.Exchange.Transporter.IAlienDataObject> [-Confirm] [-WhatIf] [-
Credential <PSCredential>] [-Quiet] [-GlobalCatalog <String>]
Parameters
Parameter Required Type Description
Confirm No System.Management.Automation.SwitchParameter
This is a switch parameter. If /Confirm is specified, then the cmdlet prompts the user for confirmation before executing the task. The confirmation is received through the following choices: [Y] Yes [A] Yes to All [N] No [L] No to All [S] Suspend [?] Help (default is "Y").
Credential No System.Management.Automation.PSCredential
Specific credentials used to access the local Active Directory.

53
Parameter Required Type Description
GlobalCatalog No System.String The global catalog used to find and update user objects. If not supplied, the task will find the nearest global catalog in the same domain as the object that is being updated.
Identity Yes System.String Identity of the user object that will be updated.
Quiet No System.Management.Automation.SwitchParameter
Suppresses feedback during task actions.
TransporterObject Yes Microsoft.Exchange.Transporter.IAlienDataObject
Used to pass in Transporter objects through the Windows PowerShell pipeline.
WhatIf No SwitchParameter If specified, then the cmdlet does not actually perform the action, but only emits the criteria.
Example
Remove-XsExchangeForwardingAddress
Search-XsMicrosoftOnlineDirectory
Searches the Microsoft Online directory.
Syntax
Search-XsMicrosoftOnlineDirectory -TransporterObject
<Microsoft.Exchange.Transporter.IAlienDataObject> [-Quiet] -Credential
<PSCredential>
Parameters
Parameter Required Type Description
Credential Yes System.Management.Automation.PSCredential
Specific credentials used to access Microsoft Exchange Online.
Quiet No System.Management.Automation.SwitchParameter
Suppresses feedback during task actions.
TransporterObject Yes Microsoft.Exchange.Transporter.IAlienDataObject
Used to pass in Transporter objects through the Windows PowerShell pipeline.
Example
Search-XsMicrosoftOnlineDirectoryCONC
Export-TransporterBinary
Use the Export-TransporterBinary cmdlet for writing Transporter objects to a file with the .tbin extension.
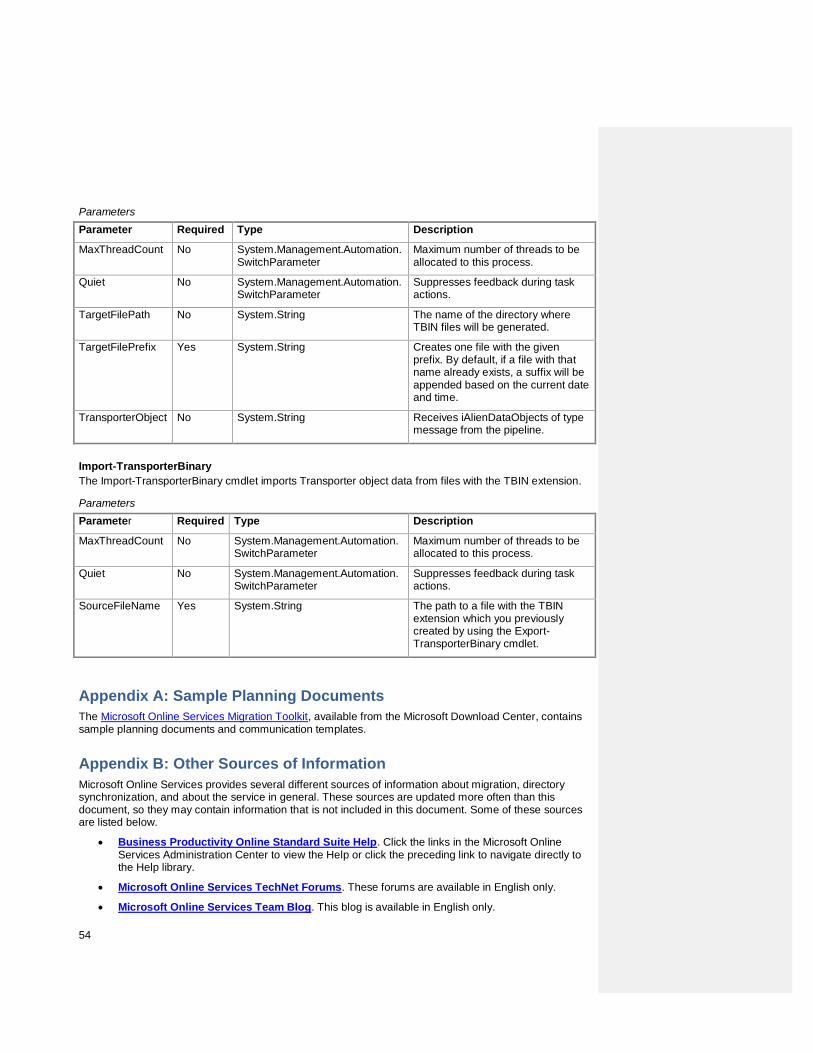
54
Parameters
Parameter Required Type Description
MaxThreadCount No System.Management.Automation.SwitchParameter
Maximum number of threads to be allocated to this process.
Quiet No System.Management.Automation.SwitchParameter
Suppresses feedback during task actions.
TargetFilePath No System.String The name of the directory where TBIN files will be generated.
TargetFilePrefix Yes System.String Creates one file with the given prefix. By default, if a file with that name already exists, a suffix will be appended based on the current date and time.
TransporterObject No System.String Receives iAlienDataObjects of type message from the pipeline.
Import-TransporterBinary
The Import-TransporterBinary cmdlet imports Transporter object data from files with the TBIN extension.
Parameters
Parameter Required Type Description
MaxThreadCount No System.Management.Automation.SwitchParameter
Maximum number of threads to be allocated to this process.
Quiet No System.Management.Automation.SwitchParameter
Suppresses feedback during task actions.
SourceFileName Yes System.String The path to a file with the TBIN extension which you previously created by using the Export-TransporterBinary cmdlet.
Appendix A: Sample Planning Documents
The Microsoft Online Services Migration Toolkit, available from the Microsoft Download Center, contains sample planning documents and communication templates.
Appendix B: Other Sources of Information
Microsoft Online Services provides several different sources of information about migration, directory synchronization, and about the service in general. These sources are updated more often than this document, so they may contain information that is not included in this document. Some of these sources are listed below.
Business Productivity Online Standard Suite Help. Click the links in the Microsoft Online Services Administration Center to view the Help or click the preceding link to navigate directly to the Help library.
Microsoft Online Services TechNet Forums. These forums are available in English only.
Microsoft Online Services Team Blog. This blog is available in English only.


