1 DEPARTMENT OF AGRICULTURE, FISHERIES AND FORESTRY Edmund Barton Building Barton ACT GPO Box 858 Canberra ACT 2601 ph +61 2 6272 3933 www.aqis.gov.au ABN 24 113 085 695 MINI TRACTORS DISCLAIMER The information provided in this guide merely aims to assist machinery importers meeting the Import Permit Conditions (Clean as New). Importers should note that this guide is not exhaustive and AQIS makes no warranties or representations with respect to the accuracy or completeness of that information and will bear no liability with respect to that information. Importers must satisfy all quarantine concerns and comply with quarantine conditions applicable at the time of entry. The Commonwealth through AQIS is not liable for any costs arising from or associated with decisions of importers to import based on conditions presented here which are not current at the time of importation. It is the importer’s responsibility to verify the accuracy and completeness of the information at the time of importation. Compiled by: Matt Howard AQIS Brisbane The following cleaning/inspection guide has been segmented to facilitate the process. The segmentation is as follows: 1. Engine Block, Sump & Housing 2. Rear Wheel Arches 3. Radiators, Batteries & Harmonic Balancers 4. Rear End, Linkage & PTO (Power Transfer Outlet) 5. Rear Axles 6. Inside Rear Hubs 7. Instrument Panels, Fuel Cells & Gears 8. Front Axles & Rims 9. Sidesteps 10. Underbelly 11. Push Arms 12. Rotary Hoes 13. General
Transcript
1D E P A R T M E N T O F A G R I C U L T U R E , F I S H E R I E S A N D F O R E S T R Y
Edmund Barton Building Barton ACT GPO Box 858 Canberra ACT 2601 ph +61 2 6272 3933 www.aqis.gov.au ABN 24 113 085 695
MINI TRACTORS
DISCLAIMER The information provided in this guide merely aims to assist machinery importers meeting the Import Permit Conditions (Clean as New). Importers should note that this guide is not exhaustive and AQIS makes no warranties or representations with respect to the accuracy or completeness of that information and will bear no liability with respect to that information. Importers must satisfy all quarantine concerns and comply with quarantine conditions applicable at the time of entry. The Commonwealth through AQIS is not liable for any costs arising from or associated with decisions of importers to import based on conditions presented here which are not current at the time of importation. It is the importer’s responsibility to verify the accuracy and completeness of the information at the time of importation.
Compiled by: Matt Howard
AQIS Brisbane The following cleaning/inspection guide has been segmented to facilitate the process. The segmentation is as follows:
1. Engine Block, Sump & Housing Images 2 & 3: The two sides of the mini tractor engine block. All surfaces of the block (red arrows), around all starter motors (green arrows), oil filters; fuel tanks (blue arrows) must be thoroughly cleaned and inspected.
Image 4: The topside of the engine block and tappet head cover. This area must be thoroughly cleaned and inspected.
Image 5: The rear end of the sump. All countersink holes must be free of contamination. On this model there is a small recess above the sump (green arrow) that may require flushing to verify cleanliness.
Image 6: Another example of a small recess (red arrow) behind the sump that must be free of contamination.
Image 7: This illustration shows an unusual sump design with the steering shaft dividing it through the centre. This area (red arrows) can harbour contamination and requires flushing to verify cleanliness.
Image 2
Image 3
Image 4
Image 5
Image 6
Image 7
4
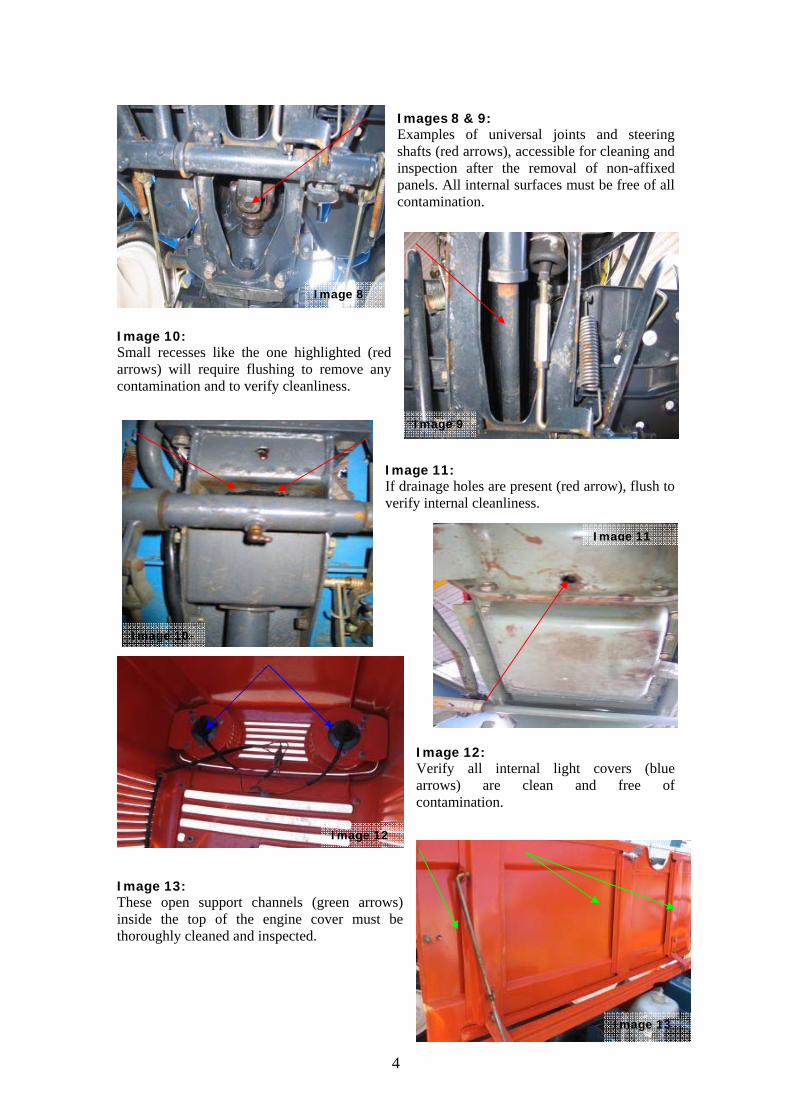
Images 8 & 9: Examples of universal joints and steering shafts (red arrows), accessible for cleaning and inspection after the removal of non-affixed panels. All internal surfaces must be free of all contamination.
Image 10: Small recesses like the one highlighted (red arrows) will require flushing to remove any contamination and to verify cleanliness.
Image 11: If drainage holes are present (red arrow), flush to verify internal cleanliness.
Image 12: Verify all internal light covers (blue arrows) are clean and free of contamination.
Image 13: These open support channels (green arrows) inside the top of the engine cover must be thoroughly cleaned and inspected.
Image 8
Image 9
Image 11
Image 10
Image 12
Image 13
5
2. Rear Wheel Arches
Images 14 & 15: The inside rear wheel arches highlighting the hollow support cavities (green arrows). These hollow channels must be flushed in the presence of the inspecting officer to verify internal cleanliness.
Image 16: On some models, numerous hollow support channels may be found under the rear wheel arches. All require flushing to remove any internal contamination.
Image 17: This illustration shows spot-welded hollow support channels under the rear arches. Due to these channels not being sealed units, contamination can enter via the small recesses (green arrows) and these require flushing to verify internal cleanliness.
Image 15
Image 16
Image 17
Image 14
6
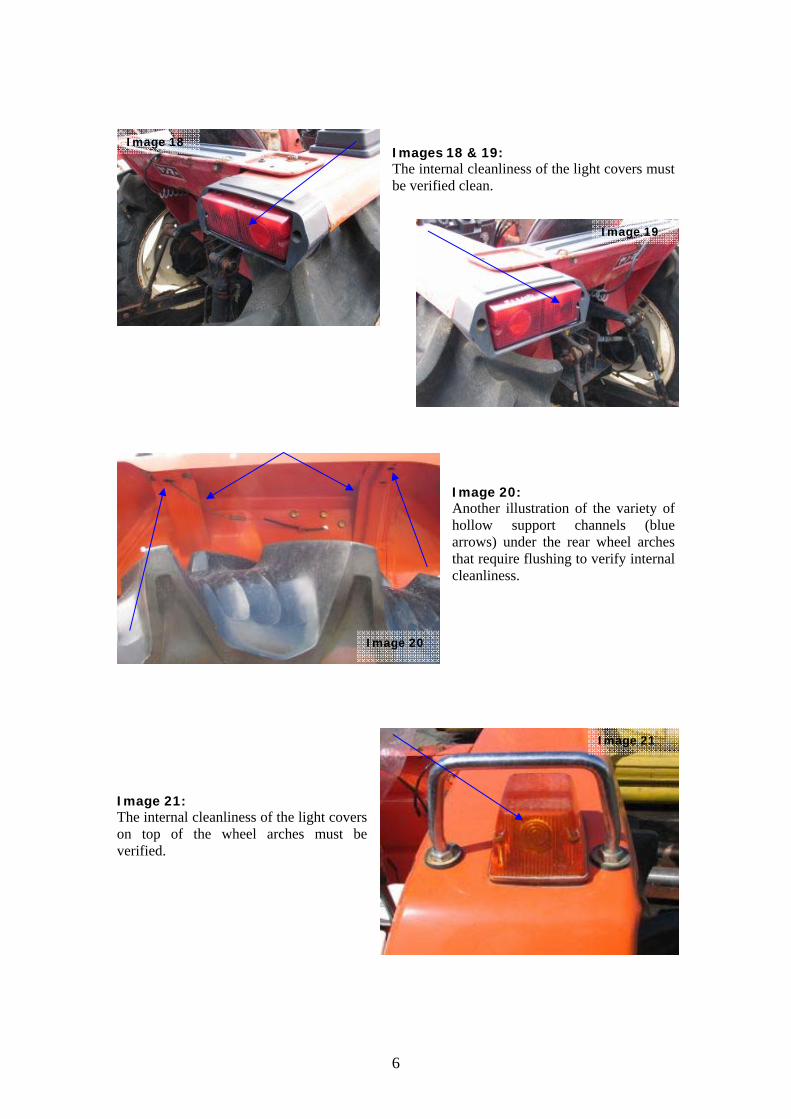
Images 18 & 19: The internal cleanliness of the light covers must be verified clean.
Image 20: Another illustration of the variety of hollow support channels (blue arrows) under the rear wheel arches that require flushing to verify internal cleanliness.
Image 21: The internal cleanliness of the light covers on top of the wheel arches must be verified.
Image 20
Image 21
Image 18
Image 19
7
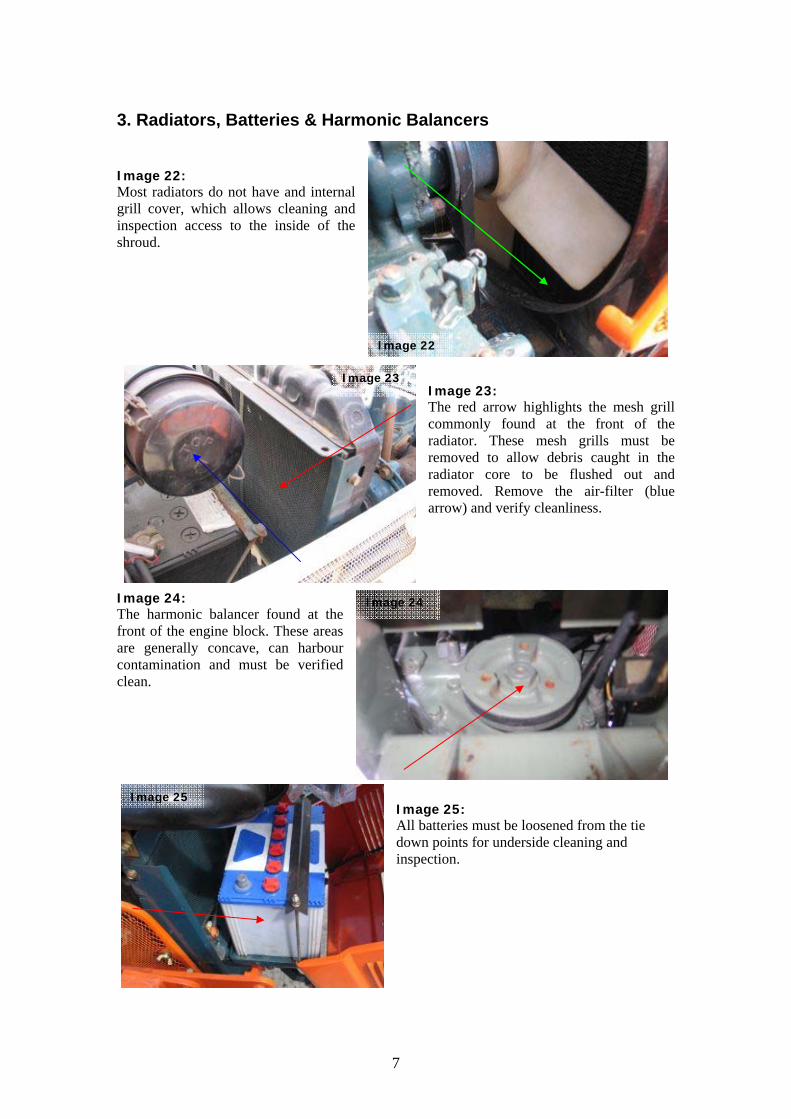
3. Radiators, Batteries & Harmonic Balancers Image 22: Most radiators do not have and internal grill cover, which allows cleaning and inspection access to the inside of the shroud.
Image 23: The red arrow highlights the mesh grill commonly found at the front of the radiator. These mesh grills must be removed to allow debris caught in the radiator core to be flushed out and removed. Remove the air-filter (blue arrow) and verify cleanliness.
Image 24: The harmonic balancer found at the front of the engine block. These areas are generally concave, can harbour contamination and must be verified clean.
Image 25: All batteries must be loosened from the tie down points for underside cleaning and inspection.
Image 22
Image 23
Image 24
Image 25
8
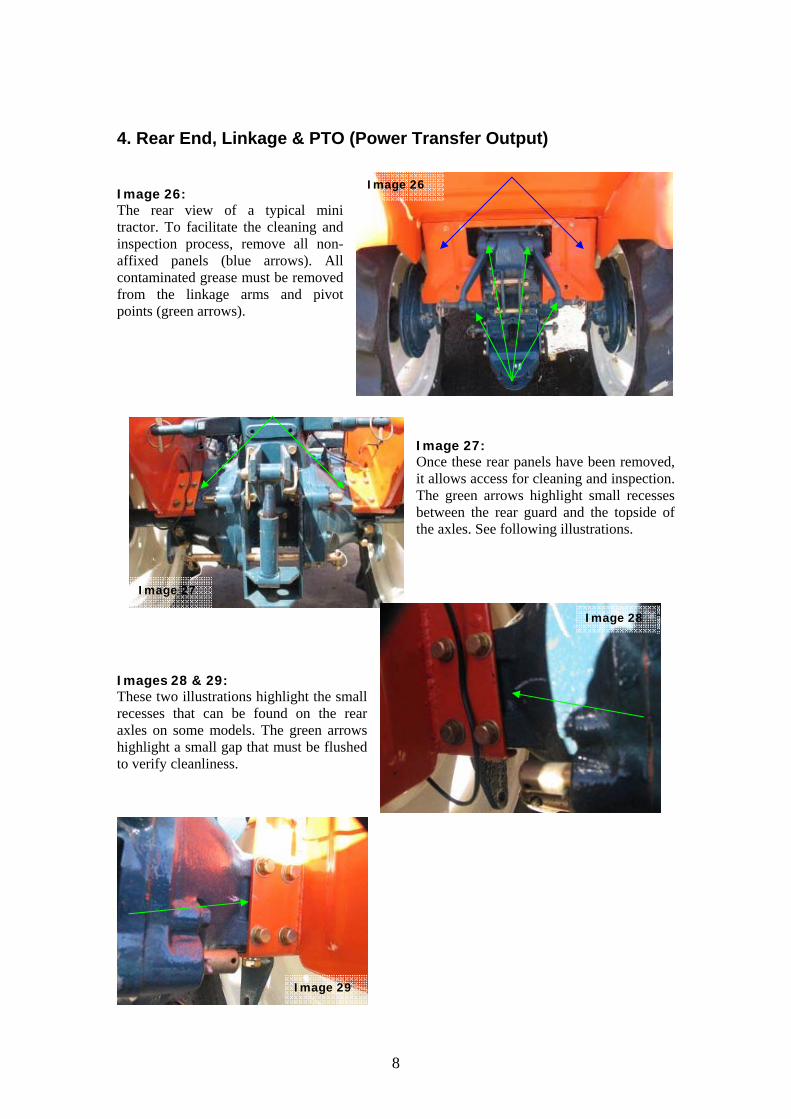
4. Rear End, Linkage & PTO (Power Transfer Output) Image 26: The rear view of a typical mini tractor. To facilitate the cleaning and inspection process, remove all non-affixed panels (blue arrows). All contaminated grease must be removed from the linkage arms and pivot points (green arrows).
Image 27: Once these rear panels have been removed, it allows access for cleaning and inspection. The green arrows highlight small recesses between the rear guard and the topside of the axles. See following illustrations.
Images 28 & 29: These two illustrations highlight the small recesses that can be found on the rear axles on some models. The green arrows highlight a small gap that must be flushed to verify cleanliness.
Image 26
Image 27
Image 28
Image 29
9
Image 30: Check for any contamination in areas where attachments are mounted to the rear of the tractor. Areas like those illustrated by the red arrows may require flushing to verify cleanliness.
Image 31: All countersunk holes (red arrows) must be free of contamination.
Image 32: In conjunction with verifying countersunk holes, on some models, other small recesses (green arrows) can be flushed to verify cleanliness.
Image 33: Another example of the rear of a mini tractor. This model has numerous ledges (red arrows) and countersunk holes (blue arrows) that must be cleaned and verified.
Image 30
Image 31
Image 32
Image 33
10
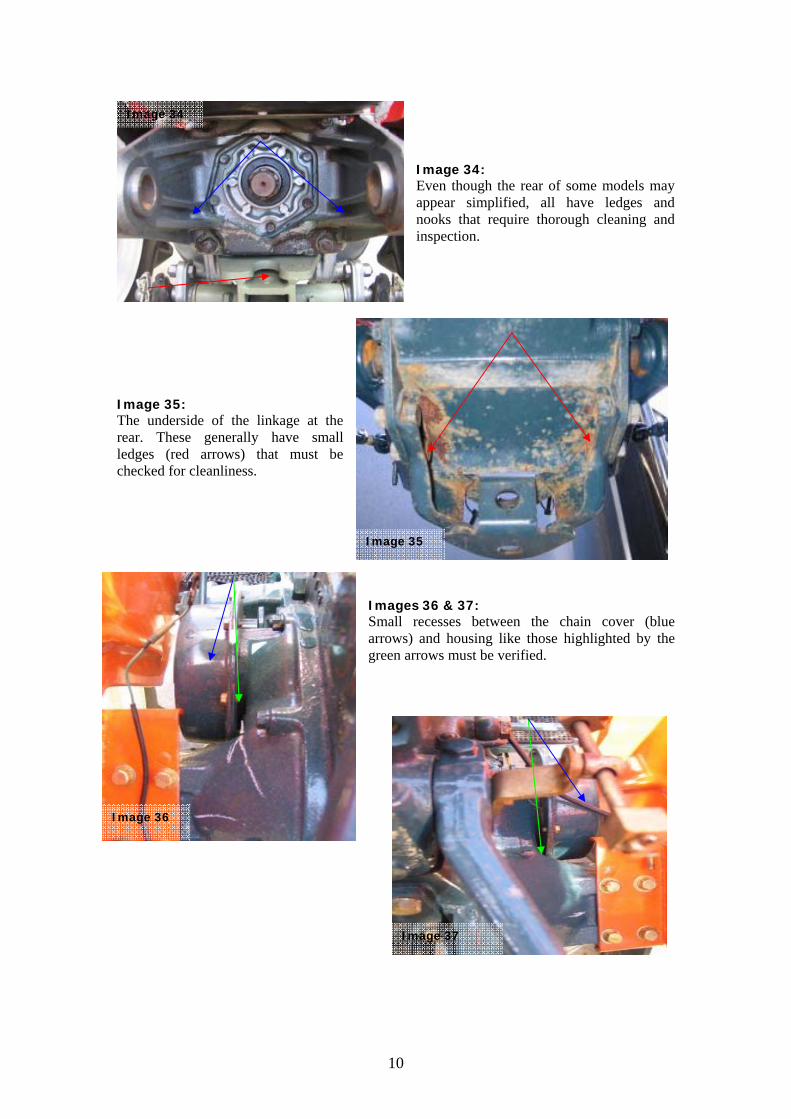
Image 34: Even though the rear of some models may appear simplified, all have ledges and nooks that require thorough cleaning and inspection.
Image 35: The underside of the linkage at the rear. These generally have small ledges (red arrows) that must be checked for cleanliness.
Images 36 & 37: Small recesses between the chain cover (blue arrows) and housing like those highlighted by the green arrows must be verified.
Image 34
Image 35
Image 36
Image 37
11
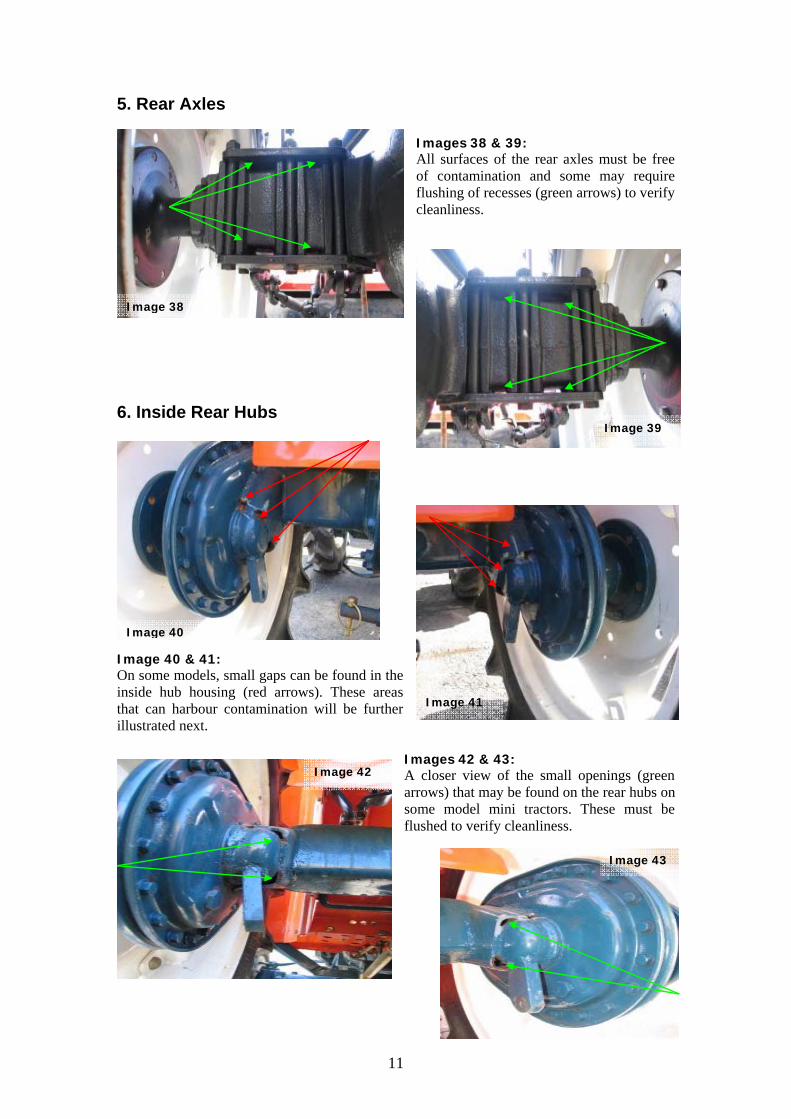
5. Rear Axles Images 38 & 39: All surfaces of the rear axles must be free of contamination and some may require flushing of recesses (green arrows) to verify cleanliness.
6. Inside Rear Hubs
Image 40 & 41: On some models, small gaps can be found in the inside hub housing (red arrows). These areas that can harbour contamination will be further illustrated next.
Images 42 & 43: A closer view of the small openings (green arrows) that may be found on the rear hubs on some model mini tractors. These must be flushed to verify cleanliness.
Image 38
Image 39
Image 40
Image 41
Image 42
Image 43
12
7. Instrument Panels, Fuel Cells & Gears
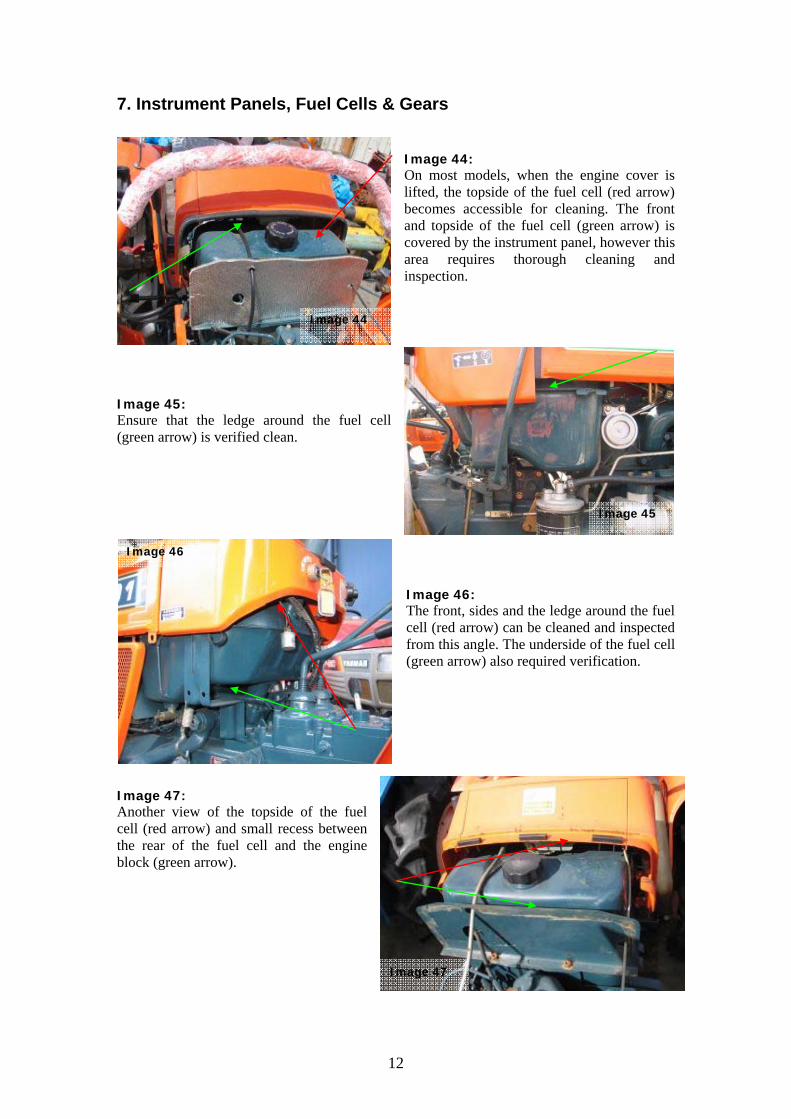
Image 44: On most models, when the engine cover is lifted, the topside of the fuel cell (red arrow) becomes accessible for cleaning. The front and topside of the fuel cell (green arrow) is covered by the instrument panel, however this area requires thorough cleaning and inspection.
Image 45: Ensure that the ledge around the fuel cell (green arrow) is verified clean.
Image 46: The front, sides and the ledge around the fuel cell (red arrow) can be cleaned and inspected from this angle. The underside of the fuel cell (green arrow) also required verification.
Image 47: Another view of the topside of the fuel cell (red arrow) and small recess between the rear of the fuel cell and the engine block (green arrow).
Image 44
Image 45
Image 46
Image 47
13
Images 48 & 49: Several illustrations of the variety of gearbox covers (green arrows) found on mini tractors. These non-affixed covers must be removed for cleaning and inspection.
Images 50 & 51: On other models the gear levers may be found under or beside the seat. These non-affixed covers (green arrows) must be removed for cleaning and inspection.
Image 48
Image 49
Image 50
Image 51
14
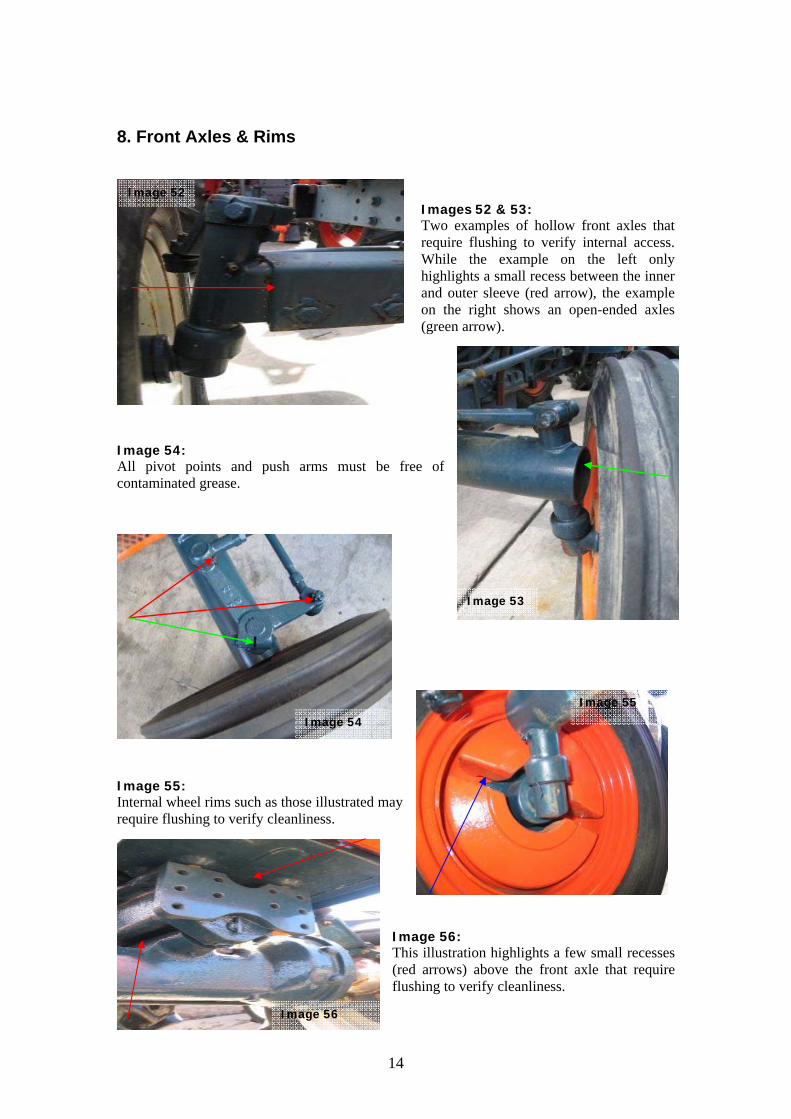
8. Front Axles & Rims
Images 52 & 53: Two examples of hollow front axles that require flushing to verify internal access. While the example on the left only highlights a small recess between the inner and outer sleeve (red arrow), the example on the right shows an open-ended axles (green arrow).
Image 54: All pivot points and push arms must be free of contaminated grease.
Image 55: Internal wheel rims such as those illustrated may require flushing to verify cleanliness.
Image 56: This illustration highlights a few small recesses (red arrows) above the front axle that require flushing to verify cleanliness.
Image 52
Image 53
Image 54
Image 55
Image 56
15
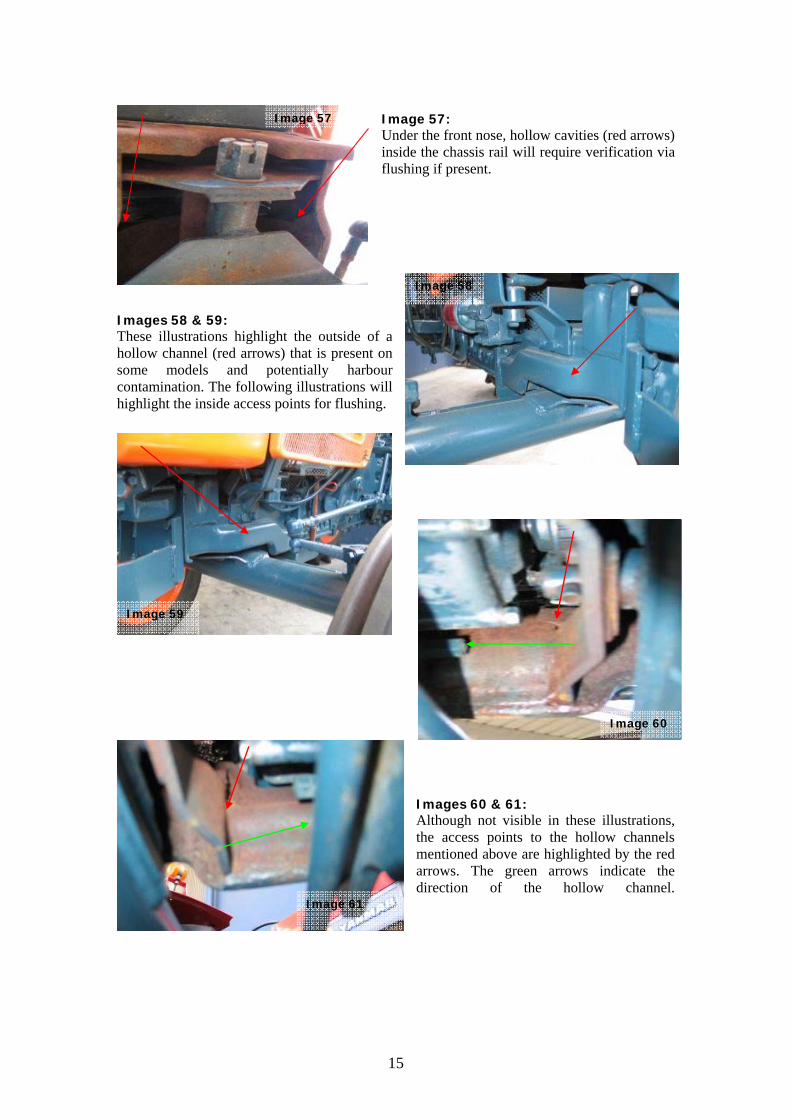
Image 57: Under the front nose, hollow cavities (red arrows) inside the chassis rail will require verification via flushing if present.
Images 58 & 59: These illustrations highlight the outside of a hollow channel (red arrows) that is present on some models and potentially harbour contamination. The following illustrations will highlight the inside access points for flushing.
Images 60 & 61: Although not visible in these illustrations, the access points to the hollow channels mentioned above are highlighted by the red arrows. The green arrows indicate the direction of the hollow channel.
Image 57
Image 59
Image 58
Image 60
Image 61
16
9. Sidesteps Image 62: The underside of all rubber mats that may be on mini tractor sidesteps must be cleaned and accessible for inspection.
Image 63: The underside of the sidestep must also be free of all contamination.
10. Underbelly
Image 64: The underside of many mini tractors has numerous countersunk holes (red arrows) which all require cleaning and inspection to verify free of contaminants.
Image 65: The shaft (red arrows) located halfway along the underbelly will require flushing to verify cleanliness.
Image 62 Image 63
Image 64
Image 65
17
11. Push Arms Image 66: The push arms (blue arrow) may be hollow structures which require internal verification. See next illustration.
Image 67: On the inside of the push arm, a hollow structure (green arrow) is illustrated and will require verification.
Image 68: At the base of where the push arms attach to the frame may have open cavities which will be illustrated next.
Above Right: The open cavity at the base of the push arms which will require verification.
Image 66
Image 67
Image 68 Image 69
18
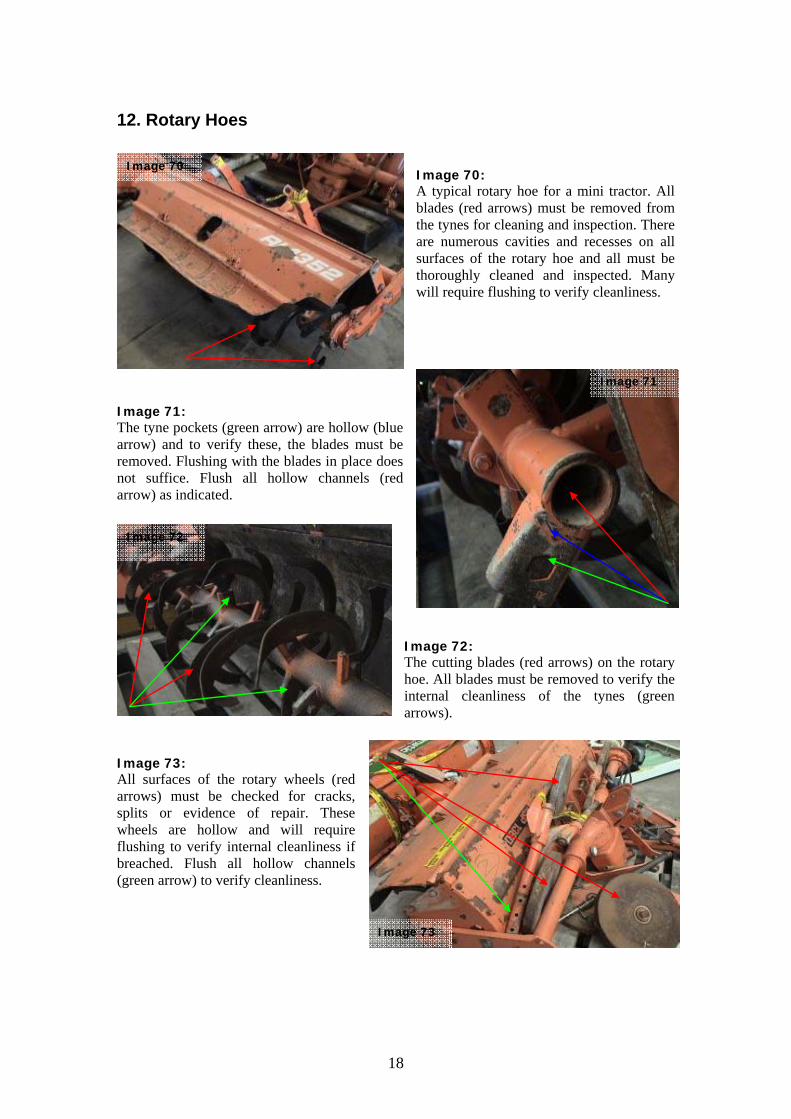
12. Rotary Hoes
Image 70: A typical rotary hoe for a mini tractor. All blades (red arrows) must be removed from the tynes for cleaning and inspection. There are numerous cavities and recesses on all surfaces of the rotary hoe and all must be thoroughly cleaned and inspected. Many will require flushing to verify cleanliness.
Image 71: The tyne pockets (green arrow) are hollow (blue arrow) and to verify these, the blades must be removed. Flushing with the blades in place does not suffice. Flush all hollow channels (red arrow) as indicated.
Image 72: The cutting blades (red arrows) on the rotary hoe. All blades must be removed to verify the internal cleanliness of the tynes (green arrows).
Image 73: All surfaces of the rotary wheels (red arrows) must be checked for cracks, splits or evidence of repair. These wheels are hollow and will require flushing to verify internal cleanliness if breached. Flush all hollow channels (green arrow) to verify cleanliness.
Image 70
Image 71
Image 73
Image 72
19
Images 74 & 75: Examples of the small cavities (green arrows) that are commonly found on rotary hoes. These areas must be cleaned and flushed to verify cleanliness.
Images 76 & 77: Examples of the small cavities (green arrows) that are commonly found on rotary hoes. These areas must be cleaned and flushed to verify cleanliness.
Image 74
Image 75
Image 76
Image 77
20
13. General Images 78 & 79: Hollow channels like those highlighted (red arrows) must be verified internally clean.
Image 80: Verify the internal cleanliness of the toolbox, located under or behind the seat.
Image 81: Check all outer rims for small gussets (red arrows) that will require verification.
Image 78
Image 79
Image 80
Image 81
21
Image 82: All non-affixed panelling (red arrow) is removed for cleaning and inspection.
Image 83: All cracks and splits in tyres must be verified that all are free of contamination.
Image 84: If a cabin is present, check for hollow open-ended framework (red arrow) and flush to verify cleanliness if present.
Image 85: The underside of the seats must be verified clean. Image 86: The underside of the axles and differential may also have small recesses (green arrows) that require verification.