56
Model 2370 High-Speed Universal Fiber Optic Modem User Manual

Model 2370 High-Speed Universal
Fiber Optic Modem User Manual


EdgeAccess® Universal Chassis System
Model 2370 Model User Manual i
CAUTION!
This product may contain a laser diode operating at a wavelength of 1300nm - 1600nm. Use of optical instruments (e.g., collimating optics) with this product may increase eye hazard. Use of controls or adjustments, or performing procedures other than those specified herein may result in hazardous radiation exposure.
Under normal conditions, the radiation levels emitted by this product are under Class 1 limits in 21 CFR Chapter 1, Subchapter J.
ATTENCION! Cet équipement peut avoir une diode laser émettant à des longueurs d'onde allant de 1300nm à 1600nm. L'utilisation d'instruments optiques (par exemple : un collimateur optique) avec cet équipement peut s'avèrer dangereuse pour les yeux. Procéder à des contrôles, des ajustements ou toute procédure autre que celles décrites ci-après peut provoquer une exposition dangereuse à des radiations.
Sous des conditions normales, le niveau des radiations émises par cet équipement est en dessous des limites prescrites dans CFR21, chapitre 1, sous chapitre J.
NOTICE!
This device contains static sensitive components. It should be handled only with proper ElectroStatic Discharge (ESD) grounding procedures.
NOTE! Cet équipement contient des composants sensibles aux décharges électro-statiques. Il doit absolument être manipulé en respectant les règles de mise à la terre afin de prévenir de telles décharges.

Model 2370 Model User Manual ii
NOTICE Canoga Perkins has prepared this users manual for use by customers and Canoga Perkins personnel as a guide for the proper installation, operation and/or maintenance of Canoga Perkins equipment. The drawings, specifications and information contained in this document are the property of Canoga Perkins and any unauthorized use or disclosure of such drawings, specifications and information is prohibited.
Canoga Perkins reserves the right to change or update the contents of this manual and to change the specifications of its products at any time without prior notification. Every effort has been made to keep the information in this document current and accurate as of the date of publication or revision. However, no guarantee is given or implied that the document is error free or that is accurate with regard to any specification.
Canoga Perkins Corporation 20600 Prairie Street
Chatsworth, California 91311-6008 Business Phone: (818) 718-6300
(Monday - Friday 7 a.m. - 5 p.m. Pacific Time) FAX: (818) 718-6312 (24hrs.) Web Site: www.canoga.com Email: [email protected]
Copyright© 2003, 2004 Canoga Perkins Corporation
All Rights Reserved EdgeAccess®
Universal Chassis System Model 2370 User Manual
Model Number 2370-UM Product Number 6913151
Rev. E 01/2008

EdgeAccess® Universal Chassis System
Model 2370 Model User Manual iii
Table of Contents Chapter 1 Overview.................................................................................................1-1 1.1 Modem Operation...................................................................................................................1-2 1.2 Fiber Optic Options ................................................................................................................1-3 1.3 Features ..................................................................................................................................1-3 Chapter 2 Installation and Setup............................................................................2-1 2.1 Installation ..............................................................................................................................2-1 2.2 Power Up and Front Panel Functions.....................................................................................2-2 Chapter 3 Electrical Data Interfaces......................................................................3-1 3.1 L130: Configurable EIA-232/423/530/P53/449/V35............................................................3-1 3.2 P53 Interface for the L130......................................................................................................3-3 3.3 L131: EIA-422, DC-37 With Control Signals.......................................................................3-5 3.4 L132: EIA-422, TwinAx .......................................................................................................3-6 3.5 L133: TTL, BNC...................................................................................................................3-6 3.6 L134, L135, L136, L137: T1 and E1.....................................................................................3-7 3.7 L138: EIA-422, DC-37 Without Control Signals..................................................................3-8 3.8 L139: T88..............................................................................................................................3-8 3.9 Operating Modes and Transmit/Receive Timing ...................................................................3-8 Chapter 4 Software Management...........................................................................4-1 4.1 VT100 Terminal Emulation ...................................................................................................4-1 4.2 PC Configuration for Terminal Operation .............................................................................4-1 4.3 Management User Interface ...................................................................................................4-2 4.3.1 General Screen Format ...........................................................................................................4-2 4.3.2 User Interface Organization ...................................................................................................4-3 4.3.3 Login Screen and DMM Main Menu .....................................................................................4-3 4.4 2370 Main Menu ....................................................................................................................4-4 4.5 System Configuration.............................................................................................................4-4 4.6 Hardware Configuration.........................................................................................................4-5 4.7 Functional Configuration .......................................................................................................4-5 4.8 Trap Configuration .................................................................................................................4-9 4.9 Alarm Output Configuration ................................................................................................4-10 4.10 SNMP Configuration............................................................................................................4-11 4.11 Host Table ............................................................................................................................4-12 4.12 Diagnostics ...........................................................................................................................4-13 4.13 Interface Status .....................................................................................................................4-14 4.14 Link Error Counters..............................................................................................................4-14 4.15 System Alarms .....................................................................................................................4-16 4.16 Utilities .................................................................................................................................4-17 4.17 PING.....................................................................................................................................4-18 4.18 Software Upgrade.................................................................................................................4-18 Chapter 5 Troubleshooting .....................................................................................5-1

Model 2370 Model User Manual iv
5.1 Loopback Tests ...................................................................................................................... 5-2 5.2 Optical Power and BERT Tests ............................................................................................. 5-2 5.3 Fiber Optic Diagnostics ......................................................................................................... 5-3 Chapter 6 Specifications ......................................................................................... 6-1 6.1 Optical.................................................................................................................................... 6-1 6.2 Electrical ................................................................................................................................ 6-1 6.3 Physical / Environmental ....................................................................................................... 6-2 6.4 Modem Configurations .......................................................................................................... 6-3 Appendix A Warranty Information...................................................................... A-1
List of Figures Figure 1. Model 2370 Modem ........................................................................................................... 1-2 Figure 2. P53 Interface for External Station Clock............................................................................ 3-3 Figure 3. P53 Interface for Internal Clock ......................................................................................... 3-4 Figure 4. P53 Interface for External Function ................................................................................... 3-4 Figure 5. External Operating Mode ................................................................................................... 3-9 Figure 6. Internal Operating Mode .................................................................................................... 3-9 Figure 7. Slave Operating Mode...................................................................................................... 3-10 Figure 8. General Screen Format ....................................................................................................... 4-2 Figure 9. 2370 Main Menu ................................................................................................................ 4-4 Figure 10. System Configuration Menu............................................................................................. 4-4 Figure 11. Hardware Configuration Screen ....................................................................................... 4-5 Figure 12. Functional Configuration Screen...................................................................................... 4-6 Figure 13. Trap Configuration Screen ............................................................................................... 4-9 Figure 14. Alarm Output Configuration Screen............................................................................... 4-10 Figure 15. SNMP Configuration Screen .......................................................................................... 4-11 Figure 16. Host Table Screen........................................................................................................... 4-12 Figure 17. Diagnostics Screen ......................................................................................................... 4-13 Figure 18. Interface Status Screen ................................................................................................... 4-14 Figure 19. Link Error Counters Screen............................................................................................ 4-15 Figure 20. System Alarms Screen.................................................................................................... 4-16 Figure 21. Utilities Menu Screen ..................................................................................................... 4-17 Figure 22. PING Generation Screen ................................................................................................ 4-18 Figure 23. Software Upgrade Screen ............................................................................................... 4-18 Figure 24. Local Loopback ................................................................................................................ 5-2 Figure 25. Remote Loopback............................................................................................................. 5-2
List of Tables Table 1. 2370 LED Functions ............................................................................................................ 2-2 Table 2. Signals and Pinouts: EIA-423/232, -530 Protocols and EIA-449/42 and V.35 Adapters... 3-2 Table 3. EIA-449 Interface DC-37 Pin Assignments......................................................................... 3-5
EdgeAccess® Universal Chassis System
Model 2370 Model User Manual v
Table 4. EIA-422 Interface TwinAx Signals......................................................................................3-6 Table 5. TTL/BNC Signals.................................................................................................................3-6 Table 6. RJ-48 Pinout .........................................................................................................................3-7 Table 7. DA-15 Pinout .......................................................................................................................3-7 Table 8. T1 and E1 ELIM Status LEDs .............................................................................................3-7 Table 9. EIA-422, Without Control Signals, DC-37 Pin Assignments ..............................................3-8 Table 10. EIA-422 Interface TwinAx Signals...................................................................................3-8 Table 11. System Configuration Option Definitions..........................................................................4-5 Table 12. Functional Configuration Option Definitions ....................................................................4-6 Table 13. Interface Configuration Parameters and Values.................................................................4-7 Table 14. Trap Definitions .................................................................................................................4-9 Table 15. Alarm Output Definitions.................................................................................................4-10 Table 16. SNMP Configuration Parameters Description .................................................................4-11 Table 17. Diagnostics Screen Definitions ........................................................................................4-13 Table 18. Link Error Counters Definitions.......................................................................................4-15 Table 19. System Alarms Definitions ..............................................................................................4-16 Table 20. Utilities Menu Options .....................................................................................................4-17 Table 21. Symptoms With Possible Causes and Actions ...................................................................5-1 Table 22. RJ-45 Pinout .......................................................................................................................6-2

Model 2370 Model User Manual vi

EdgeAccess® Universal Chassis System
Model 2370 Model User Manual 1-1
Chapter 1 Overview
The Model 2370 universal fiber optic modem provides full-duplex operation at speeds up to 20 Mbps and distances up to 120 Km, depending on the rate and mode selections.
The 2370 operates with these electrical line interface modules (ELIM):
• EIA-530 and EIA-530-A • EIA-423A and EIA-232D • EIA 449 and EIA-422 • CCITT V.35 • EIA-530/Model P53 supports:
• External station Clock • Internal Clock • External Clock
• EIA-422A/Model T22 • EIA-422A/Model D22 • TTL/BNC • T1/E1 • T88
Use the 2370 with the Universal Chassis System (UCS) in the UCS 1000, UCS 1001, or Model 1040 or 1050 Standalone Enclosure. The UCS 1000 will hold up to 15 modems, the UCS 1001 can hold up to two modems, and a standalone enclosure holds one modem. Figure 1 shows the 2370 modem.

Model 2370 Model User Manual 1-2
Figure 1. Model 2370 Modem
1.1 Modem Operation
The electrical connection between the network equipment and the 2370 differs according to the electrical line interface module (ELIM). The conversion between electrical and optical signals is similar in all applications. The modem multiplexes the clock, data, and control lead inputs from the ELIM, then adds framing and supervisory information. The optical receiver extracts the clock and data information from the optical signal, establishes the frame-bit lock, then demultiplexes the clock, data, control signals, and routes the signals to the interface circuits.
The 2370 operates asynchronously at up to 15 Mbps and synchronously at up to 20 Mbps. Operation mode options include external, internal, and slave timing. The built-in clock can generate the common clock rates, including most Nx56/Nx64K rates.

EdgeAccess® Universal Chassis System
Model 2370 Model User Manual 1-3
1.2 Fiber Optic Options
The 2370 includes one fiber-optic transmitter and receiver. Use the 2370 with multimode or single mode fiber optic cable and SC or ST connectors, depending on the transmitter option. The transmitter options include:
• Single Mode, at 1310 nm and 1550 nm • Multimode, at 1310 nm • CWDM
For descriptions of the options by model number, see Chapter 6.
1.3 Features
The 2370 supports these features:
• Status LEDs • Console port for accessing management functions through SLIP, PPP, SNMP • Redundancy: Two modems at each end of the link provide full redundancy in these modes of
operation: • Auto Switchover Monitors the link; if the active modem fails, switches automatically to the
inactive modem • Manual Primary Makes the primary modem active • Manual Secondary Makes the secondary modem active • Off Disables redundancy
• ELIM connector adapters for P53 • Local and Remote loopback for test • TRM/MDM and Reset switches

Model 2370 Model User Manual 1-4

EdgeAccess® Universal Chassis System
Model 2370 Model User Manual 2-1
Chapter 2 Installation and Setup
The 2370 can be installed in a UCS 1000, UCS 1001, or Model 1040 or 1050 enclosure. For details on the chassis, see the manual for the chassis. The process to install a 2370 is the same for all chassis options.
2.1 Installation
Follow these steps to install the 2370 and ELIM:
1. Unpack and inspect all components. Save the shipping carton and packing materials in case you need to return the equipment to the manufacturer. Appendix A provides information for Return Material Authorization (RMA).
2. Insert the 2370 into an unused slot in the chassis. Slide the 2370 into the rails and push it firmly into the backplane, then tighten the captive screws. If you encounter resistance, check that no connector pins are bent.
If you encounter more difficulty, contact Canoga Perkins at (818) 718-6300 for technical assistance.
3. Insert the ELIM into the 2370. Slide the ELIM into the rails and push it firmly into the connector, then tighten the captive screw. If you encounter resistance, check that no connector pins are bent.
Note: The 2370 and ELIM are hot-swappable and can be inserted or removed without disrupting data transfer in other modules in the chassis.
The 2370 uses electrical cables to connect to the local site and fiber optic cables to connect to the remote modem. Follow these steps to connect the electrical and optical cables:
4. If you will control the 2370 directly through the serial port, plug a DE-9 straight-through serial cable into the EIA-232 port on the DMM and the serial port on the PC or terminal; for the pinout, see Table 22 on page 6-2.
5. To connect to the local site, plug the electrical interface cables from the local equipment into the Rx and Tx connectors using Tx to Rx, and Rx to Tx orientation.
Dirty optical connectors are a common source of link loss or attenuation problems, especially for single mode fiber (SMF). Clean the connectors before plugging in a cable and whenever there is a significant or unexplained light loss. To prevent contamination, always install protective dust covers on unused fiber optic connectors.
6. Wipe the ferrule and the end-face surface of the male fiber coupler with a lint-free isopropyl alcohol pad from a fiber cleaning kit.
7. Use canned air to blow out any dust from the female fiber coupler.
Model 2370 Model User Manual 2-2
Caution: To avoid damaging the fiber end-surface or connector, use extreme care when installing or removing cables.
8. Plug in the optical cables:
• If you have a simplex optical connector, use a single strand, single mode fiber cable between a pair of 2370 modems, one at 1310 nm wavelength and the other at 1550 nm wavelength.
• If you have a duplex connector, use Tx to Rx, and Rx to Tx orientation.
9. Label each cable and connector with a signal name and direction.
10. For cable connections to other modules in the chassis, see the appropriate user manual for details.
2.2 Power Up and Front Panel Functions
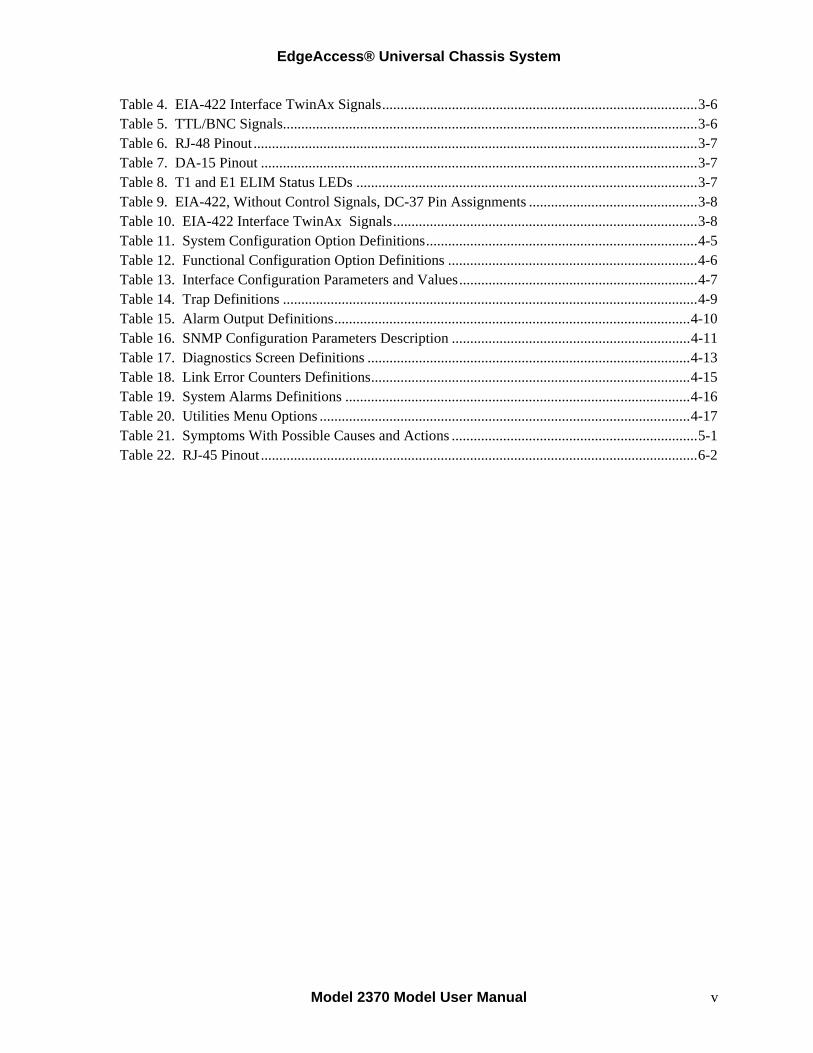
During the initial power-up sequence, all LEDs light amber. When start-up is complete, the setup and installation are correct, and data is transmitting normally across the link, the STA LED lights green and the CFG, CLS, and TST LEDs are off. During normal operation, the LED colors change according to system and port conditions. The STA, CFG, and TST LEDs show the module condition. The CLS LED shows the optical signal conditions. Table 1 shows the LED states for various conditions.
Table 1. 2370 LED Functions
LED Status Description
STA Off No power Green Normal operation Amber Inactive (redundant modem) Red Failed system self-test CFG Off Normal operation Red Software mismatch between local and remote modems, improperly
connected fiber optic cable, or setup mismatch between local and remote modems
CLS Off Normal operation Red Local loss of optical sync Red blinking Remote loss of optical sync TST Off Normal operation Amber Local loopback (optical or electrical) Amber blinking Remote loopback (optical or electrical)

EdgeAccess® Universal Chassis System
Model 2370 Model User Manual 3-1
Chapter 3 Electrical Data Interfaces
The 2370 supports these ELIMs:
• L130 Configurable EIA-232/423/530/P53/449/V35 • P53 Interface for the L130 • L131 EIA-422 DC-37 with controls • L132 EIA-422 TwinAx • L133 TTL BNC • L134 T1 RJ-45 • L135 T1 DA-15 • L136 E1 RJ-45 • L137 E1 DA-15 • L138 EIA-422 DC-37 without controls • L139 T88
In addition, this chapter describes operating and clock modes for the ELIMs.
3.1 L130: Configurable EIA-232/423/530/P53/449/V35
The L130 ELIM is electrically compatible with the EIA-423A, EIA-232D, and EIA-530 standards. Table 2 lists the EIA-423/232 and EIA-530 signals with the pinouts for the female DB-25 connector and the signals and pinouts for the adapters that support EIA 449/422 or V.35.
The control leads comply with the interface standards. RTS, CTS and DCD provide handshaking. TD and RD are data input and output. SCT is the clock output for Internal and Slave modes. SCR is always the clock for RD. SCTE is the clock input for External mode. DSR, DCD, and CTS output are selectable in software.
The EIA-423 and EIA-232 interface includes these five end-to-end control leads:
• RTS to DCD • DTR to RI • STD to SRD • SRTS to SDCD • DSRS to SCTS
DSR and TM are local status leads that follow the functions described in EIA-232D. DSR typically indicates that the modem is ready to handle transmit data. TM indicates that a loopback is active on one or both modems. LL and RL are loopback control inputs and follow the software setting, unless a 2370 in a Model 1040 is in hardware mode and the function switch on the enclosure is set for loopback, then LL and RL are ignored. For details on the software and loopback tests, see Sections 4.12 and 5.1.

Model 2370 Model User Manual 3-2
The V.35 interface signals follow the EIA-423 and EIA-232 protocols with minor changes, including these three end-to-end control leads:
• RTS to DCD • DTR to RI
DSR indicates that the modem is ready to receive data. TM is On only when loopback is active on either or both modems.
Table 2. Signals and Pinouts: EIA-423/232, -530 Protocols and EIA-449/42 and V.35 Adapters
Signal Name Path EIA-423/232 Signal
DB-25 Pin
EIA-530 Signal
DB-25 Pin
EIA-449/422 Signal
DC-37 Pin
CCITT Circuit
V.35 Pin
Frame Ground FG 1 FG 1 SHLD 1 101 A Transmit Data In TD 2 TDA 2 SD 4 103 P Receive Data Out RD 3 RDA 3 RD 6 104 R Request to Send In RTS 4 RTSA 4 RS 7 105 C Clear to Send Out CTS 5 CTSA 5 CS 9 106 D Data Set Ready Out DSR 6 DSRA/B 6/22 DM 11 107 E Signal Ground SG 7 SG 7 SG 19 102 B Data Carrier Detect Out DCD 8 DCDA 8 RR 13 109 F Secondary RC Out RXCB 9 RT 26 115 V Secondary DCD Out DCDB 10 RR 31 Secondary TT In SCTEB 11 TT 35 113 U Secondary DCD Out SDCD 12 TXCB 12 ST 23 114 Y Secondary CTS Out SCTS 13 CTSB 13 CS 27 Secondary TD In STD 14 TDB 14 SD 22 103 S Transmit Clock Out SCT 15 TXCA 15 ST 5 114 AA Secondary RD Out SRD 16 RDB 16 RD 24 104 T Receive Clock Out SCR 17 RXCA 17 RT 8 115 X Local Loopback In LL 18 LLA 18 LL 10 141 L Secondary RTS In SRTS 19 RTSB 19 RS 25 Data Terminal Ready In DTR 20 DTRA/B 23/20 TR 12 108 H Remote Loopback In RL 21 RLA 21 RL 14 140 N Ring Indicator Out RI 22 DM 29 125 J Data Signal Rate Selector In DSRS 23 TR 30 Terminal Timing In SCTE 24 SCTEA 24 TT 17 113 W Test Mode Out TMA 25 TMA 25 TM 18 142 NN
EdgeAccess® Universal Chassis System
Model 2370 Model User Manual 3-3
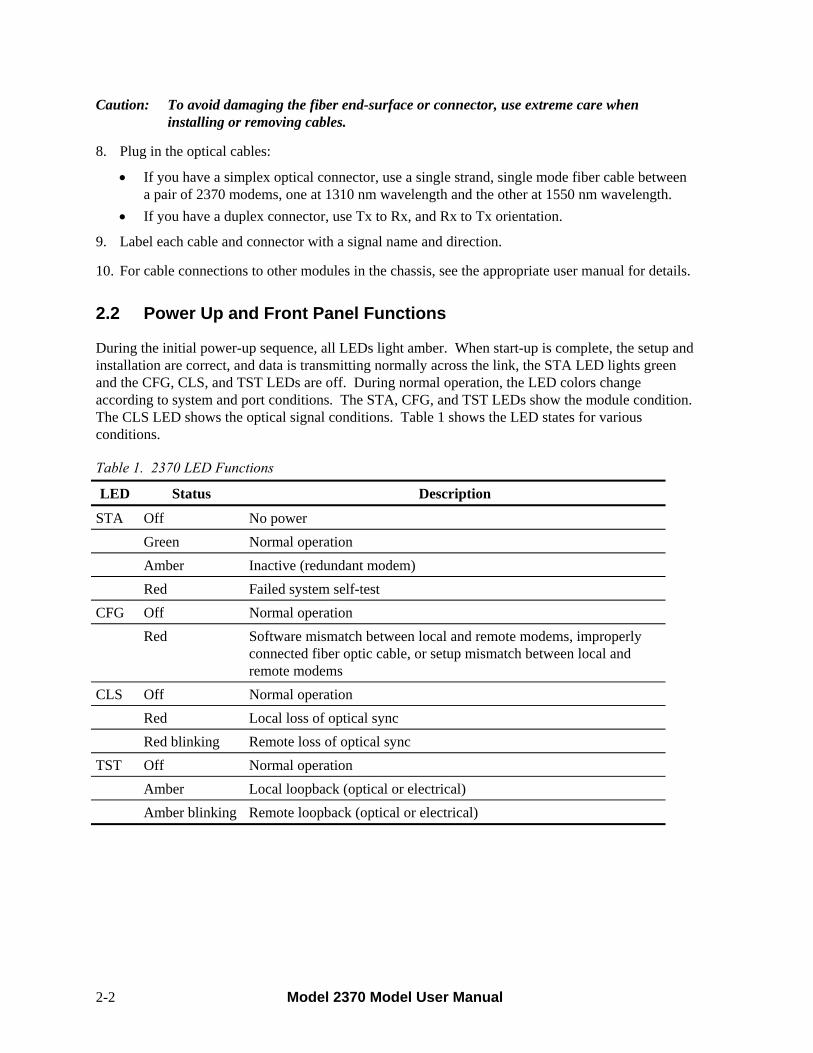
3.2 P53 Interface for the L130
The L130 ELIM supports the P53 interface and external DCE/DTE adapter that converts the interface to DTE with male DB-25 connector This interface supports FIFO buffers for received or transmitted data and a programmable delay line to fine-tune the clock and data timing. The interface supports these typical applications:
• With encryption devices on the BLACK side, where modems act as the network and supply the synchronous clock, or on the RED (clear) side of data encryption (KG) equipment as the "tail-circuit adapter" device. This allows the modem to accept two synchronous clocks, one for transmitting (external clock) and one for receiving (FIFO input clock, SCT becomes an input).
• With systems that communicate over geosynchronous satellites, the FIFO can make up for clock drift (Doppler shift) caused by the satellite's elliptical orbit around the earth.
Use the External Station configuration when an external station (slave) clock provides the timing (see Figure 2). In this application, the modems act as the network, although the timing is from an outside source. When connecting KG or KIV encryptors on the Black side with an external timing device, go to the Functional Configuration screen and set the interface configuration values: set the modem with the timing source to external; set the other modem to slave; for details, see Section 4.7.
FIFO
RX Data
RX Clock
Delay Line
InternalClock
TX Clock
TX Data
RXD
SCR
SCT
SCTE
TXD
J1, DB-25
Figure 2. P53 Interface for External Station Clock
Model 2370 Model User Manual 3-4
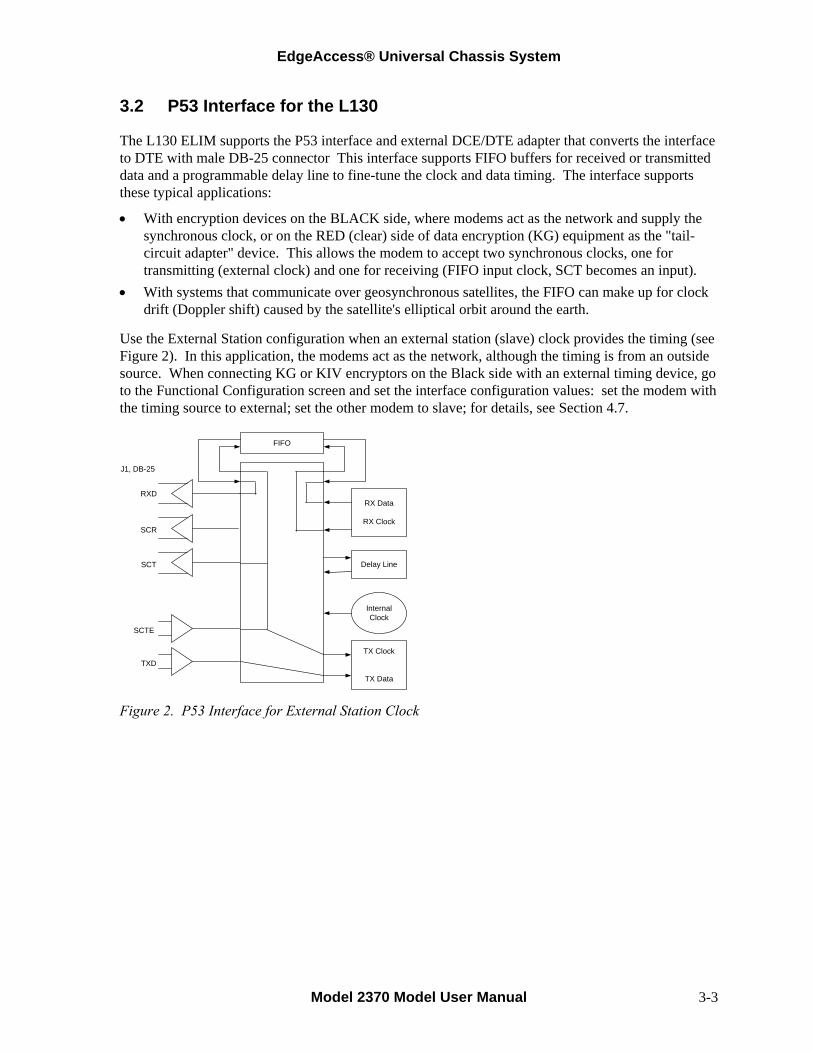
Use the Internal configuration when the network equipment is set for Internal Timing (see Figure 3). In this application, the modems act as the network timing source. When connecting KG or KIV encryptors on the Black side, go to the Functional Configuration screen and set the interface configuration parameters: set the operating mode to Internal, then set the Internal Rate, then set the delay time; for details, see Section 4.7.
FIFO
RX Data
RX Clock
Delay Line
InternalClock
TX Clock
TX Data
RXD
SCR
SCT
SCTE
TXD
J1, DB-25
Figure 3. P53 Interface for Internal Clock
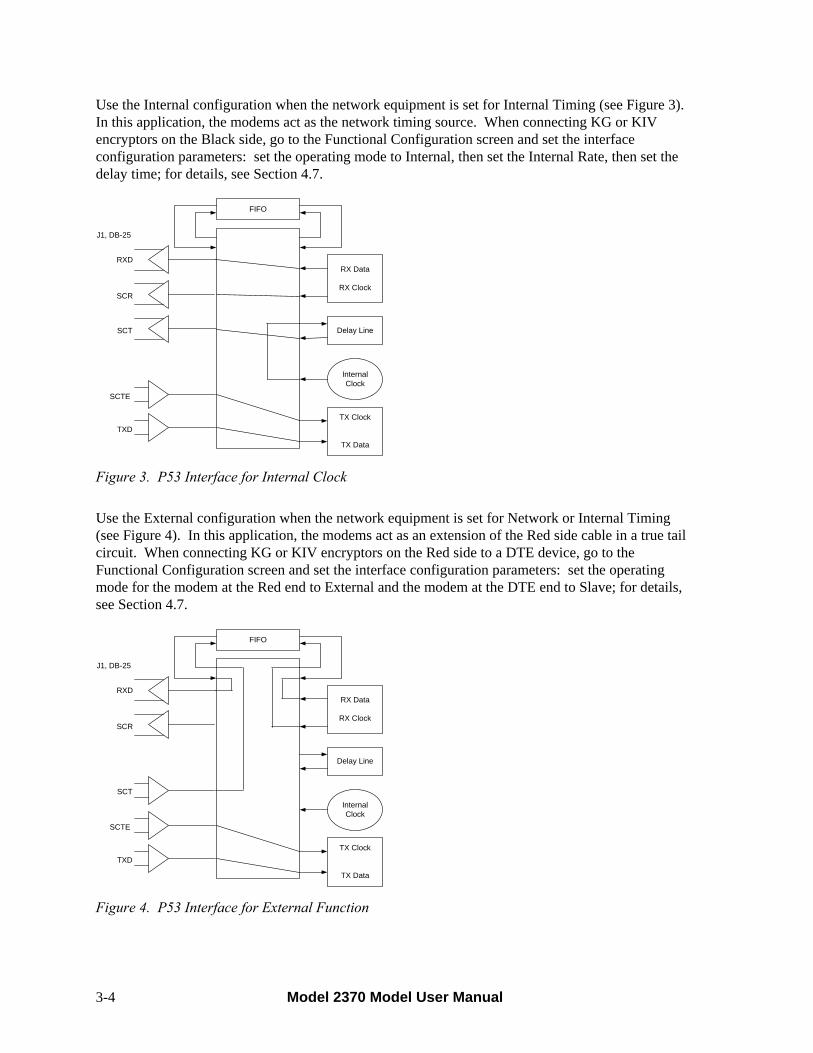
Use the External configuration when the network equipment is set for Network or Internal Timing (see Figure 4). In this application, the modems act as an extension of the Red side cable in a true tail circuit. When connecting KG or KIV encryptors on the Red side to a DTE device, go to the Functional Configuration screen and set the interface configuration parameters: set the operating mode for the modem at the Red end to External and the modem at the DTE end to Slave; for details, see Section 4.7.
FIFO
RX Data
RX Clock
Delay Line
InternalClock
TX Clock
TX Data
RXD
SCR
SCT
SCTE
TXD
J1, DB-25
Figure 4. P53 Interface for External Function

EdgeAccess® Universal Chassis System
Model 2370 Model User Manual 3-5
3.3 L131: EIA-422, DC-37 With Control Signals
The L131 ELIM for EIA-449 is electrically compatible with the EIA-422 specifications for clock and data and with EIA-423 for control signals. It uses a female DC-37 connector; Table 3 lists the pinout.
SD, RD, ST, RT and TT provide the primary data and clock signals. ST provides the transmit clock reference for Internal and Slave modes. RT provides the clock for the received data. TT provides the transmit clock for External mode.
The control signal outputs are unbalanced drivers and the B-leads of the differential control signal outputs are tied to signal ground to comply with EIA-422. None of the control leads interact with the data transmission, but they do comply with DTE interface requirements. Most of the control leads are end-to-end signal channels that can conform to EIA-449 interface standards..
The EIA-449 interface includes three end-to-end control leads; input to output:
• RS to RR • TR to IC • NS to SQ
DM and TM provide local status and follow the RS-449 functions. DM typically indicates that the modem is ready to receive data. LL and RL are loopback control inputs and follow the software setting, unless a 2370 in a Model 1040 is in hardware mode and the function switch on the enclosure is set for loopback, then LL and RL are ignored. For details on the software and loopback tests, see Sections 4.12 and 5.1.
Table 3. EIA-449 Interface DC-37 Pin Assignments
DC-37 Pin EIA-449 Signal Function Direction
1 SHLD Shield (Ground) 3/21 not used 4/22 SD Send Data In 5/23 ST Send Timing Out 6/24 RD Receive Data Out 7/25 RS Request to Send In 8/26 RT Receive Timing Out 9/27 CS Clear to Send Out 10 LL Local Loopback In 11/29 DM Data Mode Out 12/30 TR Terminal Ready In 13/31 RR Receiver Ready Out 14 RL Remote Loopback In 15 IC Incoming Call Control 17/35 TT Terminal Timing In

Model 2370 Model User Manual 3-6
DC-37 Pin EIA-449 Signal Function Direction
18 TM Test Mode Out 19 SG Signal Ground 20 RC Receive Common 33 SQ Signal Quality Control 34 NS New Signal Control 37 SC Send Common
3.4 L132: EIA-422, TwinAx
The L132 ELIM is electrically compatible with the EIA-422A specifications. It uses five TwinAx connectors. Table 4 lists the supported signals.
Table 4. EIA-422 Interface TwinAx Signals
Signal Name Direction
RXD Receive Data Out TXD Transmit Data In SCR Receive Clock Out SCT Transmit Clock Out SCTE External Transmit Clock In
3.5 L133: TTL, BNC
The L133 ELIM includes five BNC connectors to connect to a DTE device that uses unbalanced TTL signal levels; it supports only the clock and data. Use this ELIM for high speeds and long distances. Table 5 lists the supported signals.
Table 5. TTL/BNC Signals
Signal Name Direction
RXD Receive Data Out TXD Transmit Data In SCR Receive Clock Out SCT Transmit Clock Out SCTE External Transmit Clock In

EdgeAccess® Universal Chassis System
Model 2370 Model User Manual 3-7
3.6 L134, L135, L136, L137: T1 and E1
The L134, L135, L136, and L137 ELIMs are electrically compatible with T1 or E1 specifications. Tables 6 and 7 show the connector pinouts.
• L134 supports T1 and transmits AMI or B8ZS code. The ELIM includes an RJ-45 connector; use a 100 ohm twisted pair cable to connect to the local network equipment.
• L135 supports T1 and transmits AMI or B8ZS code. The ELIM includes a DA-15 connector; use a 100 ohm twisted pair cable to connect to the local network equipment.
• L136 supports E1 and transmits AMI or HDB3 code. The ELIM includes an RJ-45 connector; use a 120 ohm twisted pair cable to connect to the local network equipment.
• L137 supports E1 and transmits AMI or HDB3 code. The ELIM includes a DA-15 connector; use a 120 ohm twisted pair cable to connect to the local network equipment.
These ELIMs include two LEDs, LOS and AIS. See Table 8.
Table 6. RJ-48 Pinout
Pin Direction
1, 2 Tx (Output) 4, 5 Rx (Input)
Table 7. DA-15 Pinout
Pin Direction
1, 9 Rx (Input) 3, 11 Tx (Output)
Table 8. T1 and E1 ELIM Status LEDs
LED Color Description
LOS Off Normal Red Loss of received signal AIS Off Normal Amber Alarm; receiving all 1s

Model 2370 Model User Manual 3-8
3.7 L138: EIA-422, DC-37 Without Control Signals
The L138 ELIM is electrically compatible with the EIA-422A specifications. It includes a female DC-37 connector, but not the control signals available with the EIA-449 interface. Table 9 lists the supported clock and data signals.
Table 9. EIA-422, Without Control Signals, DC-37 Pin Assignments
Pin Signal Name Direction
15/33 RDA/B Receive Data Out 17/35 SCRA/B Receive Clock Out 9/27 TDA/B Transmit Data In 5/23 SCTEA/B Terminal Timing In 3/21 SCTA/B Transmit Clock Out 19 FG Frame Ground 1 SG Signal Ground
3.8 L139: T88
The L139 ELIM is electrically compatible with Mil-Std 188-114C; it supports only the clock and data. It includes five TwinAx connectors. Table 10 lists the supported signals.
Table 10. EIA-422 Interface TwinAx Signals
Signal Signal Name Direction
SCR Receive Clock Out RXD Receive Data Out TXD Transmitted Data In SCTE External Transmit Clock In SCT Transmit Clock Out
3.9 Operating Modes and Transmit/Receive Timing
The 2370 operates in a variety of modes that support different sources of the timing signals; you can set these on the Functional Configuration screen. For details on the Functional Configuration screen and configuring the parameters for various interfaces, see Section 4.7.
The TD Timing signal is the clock that sends data to the fiber interface. It can be either the SCT or SCTE signals. Use SCT Inverted to allow for data delays in relation to the clock and prevent bit errors. Use SCTE Sampled if the clock is gapped.
The RD Timing signal is the clock that shifts data to the electrical interface. It can be either the SCT or SCR signals.

EdgeAccess® Universal Chassis System
Model 2370 Model User Manual 3-9
• External mode: Use when the DTE provides the clock or when the 2370 is used as a tail circuit connecting to a DCE. The other device sends this clock to the modem as the TD Timing signal. Go to the Functional Configuration screen and set the interface configuration values: select External mode, then set the TD Timing source to SCTE or SCTE Sampled for a gapped clock. See Figure 5.
RX Data
RX Clock
InternalClock
TX Clock
TX Data
RXD
SCR
SCT
SCTE
TXD
INTERFACE MODEM MAIN BOARD
External Mode With SCT IgnoredSCTE Used for TD TimingSCR Used for RD Timing
RX Data
RX Clock
InternalClock
TX Clock
TX Data
RXD
SCR
SCT
SCTE
TXD
INTERFACE MODEM MAIN BOARD
External Mode With SCT InputSCTE Used for TD TimingSCT Used for RD Timing
Figure 5. External Operating Mode
• Internal mode: Use when this 2370 generates the clock and sends it to the DTE on the SCT signal. Go to the Functional Configuration screen and set the interface configuration values: set the interface type, then select Internal mode, then set the Internal data Rate; then set the TD Timing source to SCT for most applications or to SCTE or SCT Inverted for high data rates or a long cable to the DTE. See Figure 6.
PLD
RX Data
RX Clock
InternalClock
TX Clock
TX Data
RXD
SCR
SCT
SCTE
TXD
Internal Mode Without Turnaround ClockSCT Used for TD TimingSCR Used for RD Timing
INTERFACE MODEM MAIN BOARD
RX Data
RX Clock
InternalClock
TX Clock
TX Data
RXD
SCR
SCT
SCTE
TXD
INTERFACE MODEM MAIN BOARD
Internal Mode With Turnaround ClockSCTE Used for TD Timing; the DTE loops the clock from SCT toward SCTESCR Used for RD Timing
Figure 6. Internal Operating Mode

Model 2370 Model User Manual 3-10
• Slave mode: This 2370 uses the clock from the remote modem as both the TD Timing and RD Timing signals. Go to the Functional Configuration screen and set the interface configuration values: set the interface type, then select Slave mode, then set the TD Timing source to SCT for most applications or to SCTE, SCTE Sampled, or SCT Inverted for high data rates or a long cable to the DTE. See Figure 7.
RX Data
RX Clock
InternalClock
TX Clock
TX Data
RXD
SCR
SCT
SCTE
TXD
INTERFACE MODEM MAIN BOARD
Slave Mode Without Turnaround ClockSCT Used for TD TimingSCR Used for RD Timing
RX Data
RX Clock
InternalClock
TX Clock
TX Data
RXD
SCR
SCT
SCTE
TXD
Slave Mode Without Turnaround ClockSCT Inverted Used for TD TimingSCR Used for RD Timing
INTERFACE MODEM MAIN BOARD
RX Data
RX Clock
InternalClock
TX Clock
TX Data
RXD
SCR
SCT
SCTE
TXD
INTERFACE MODEM MAIN BOARD
Slave Mode With Turnaround ClockSCTE or SCTE Sampled Used for TD TimingSCR Used for RD Timing
Figure 7. Slave Operating Mode
• Asynchronous mode: Use when a data signal is present without a separate clock signal. This mode samples the data signal at 100 MHz, causing a 10 ns pulse distortion, which can affect high data transmission rates.
For details on the Functional Configuration screen and configuring the parameters for various interfaces, see Section 4.7.

EdgeAccess® Universal Chassis System
Model 2370 Model User Manual 4-1
Chapter 4 Software Management
If the 2370 is in a Model 1040 enclosure or is in a UCS 1000 chassis within a system that includes a DMM and a CIM, you can manage the 2340 through VT100 Terminal Emulation, which is accessible by a Telnet session, HyperTerminal or similar terminal emulation software, a standard SNMP network manager, and CanogaView.
4.1 VT100 Terminal Emulation
Connect the VT100 terminal emulation session to the DMM used in the UCS 1000 chassis or directly to a Model 1040 enclosure.
For details on the DMM, see the Model 1500 Domain Management Module User Manual.
Setting up the VT100 session depends on which connection, serial port or Ethernet, you have available for access to the VT100 management program. Canoga Perkins suggests that you use HyperTerminal for your first session. For details, see the User Manual for your DMM.
Note: You must set up TCP/IP for the DMM before you can use Telnet; for details, see the manual for the DMM.
4.2 PC Configuration for Terminal Operation
These steps briefly describe how to set up your PC for a terminal connection to a Model 1040 enclosure. For details on using Windows, see your Windows documentation.
1. Turn on your PC.
2. When the Windows desktop appears, click Start, then highlight Programs, Accessories, the HyperTerminal Folder, and then click HyperTerminal.
3. At the Connection Description dialog, select an icon, enter a name for the connection to the system, and click OK.
4. At the Connect To dialog, pull down the Connect using menu, select the COM port, and click OK.
5. At the COM Properties dialog, on the Port Settings tab, check for these selections:
• Bits per second: 19200 bps • Data bits: 8 • Parity: None • Stop bits: 1 • Flow control: None
6. Click OK. HyperTerminal connects to the system and the VT100 terminal emulation starts.

Model 2370 Model User Manual 4-2
4.3 Management User Interface
The Management User Interface for the 2370 provides screens for setup, monitoring, and diagnostics. You can access the screens directly by connecting to the serial port of the DMM in the chassis or by establishing a Telnet session with the DMM. These sections discuss the screens for the 2370, using a Telnet session for access; for details about the DMM screens, see the User Manual for your DMM.
4.3.1 General Screen Format
A typical screen, shown in Figure 8, includes standard descriptions and reference designations. Use this and other screens to configure the system, set operational parameters, and verify the system status. All screens use a common method for navigation.
Messages andurgent status
Screen navigationinstructions
Change options
Status reports
Model number
Chassis and slot information
Figure 8. General Screen Format
Not all screens and menus provide options that you can change. Some menu items reach screens that only report status, such as revision numbers, module type, or alarms. On other screens, you can move through and select options, and enter data.
Use these keys to navigate the screens:
• Space bar When a menu item is highlighted, press <Space> to cycle through all options for that item.
• Tab Press <Tab> to move the highlight to the next column to the right. • Enter Press <Enter> to select the highlighted option for a menu item. • Escape Press <Esc> to return to the previous screen.

EdgeAccess® Universal Chassis System
Model 2370 Model User Manual 4-3
4.3.2 User Interface Organization
The user interface consists of selectable, nested screens, available in this order:
Main Menu 1. System Configuration 1. Hardware Configuration 2. Functional Configuration 1. Configure local interface 2. Configure remote interface 3. LOS Detection 4. Redundancy setup 3. Trap Configuration 4. Alarm Output Configuration 5. SNMP Configuration Parameters 13. Host Table 2. Diagnostics 3. Interface Status 4. Link Counter Errors 5. System Alarms 6. Utilities 7. Software Upgrade
This chapter describes each of these screen in detail.
4.3.3 Login Screen and DMM Main Menu
The first screen is the Login Menu. If this is your initial setup and no password has been set, type admin, then press <Enter>, at the prompts for both the user name and the password. Otherwise, type your password and press <Enter>.
After you log in, the Main Menu for the DMM appears. This is the main management screen for the DMM. For details on all menu options, see the Model 1500 Domain Management Module User Manual. From this screen, you can access the 2370 by either of two methods.
• To reach the 2370 directly, follow these steps:
a. Type 4, "Manage or access a specific Module," and press <Enter>.
b. Type the chassis and slot numbers with a slash, such as "1/4" for chassis 1, slot 4, and then press <Enter>.
c. At the Module Menu, type 4, "Access User Interface," then press <Enter> to reach the Main Menu screen for the 2370.

Model 2370 Model User Manual 4-4
• To reach the chassis, and then select the 2370, follow these steps:
a. Type 3, "Manage or access a specific Chassis," and press <Enter>, press <Space> to cycle through the chassis in the domain, and then press <Enter> to select the chassis.
b. At the Chassis Management screen, press <Space> to cycle to the slot number for the 2370, then press <Enter> to reach the Main Menu screen for the 2370.
4.4 2370 Main Menu
The Main Menu provides access through various menus and reports to all functions for the 2370, setup, diagnostics, and reports. See Figure 9.
MAIN MENU 1) System Configuration 2) Diagnostics 3) Interface Status 4) Link Error Counters 5) System Alarms 6) Utilities 7) Software Upgrade 8) Logout
Figure 9. 2370 Main Menu
4.5 System Configuration
The System Configuration menu provides configuration options. See Figure 10 and Table 11. To access the System Configuration menu, follow this step:
1. At the Main Menu, type 1, "System Configuration," and press <Enter>. The System Configuration screen appears.
SYSTEM CONFIGURATION 1) Hardware Configuration 2) Functional Configuration 3) Trap Configuration 4) Alarm Output Configuration 5) SNMP Configuration
Figure 10. System Configuration Menu

EdgeAccess® Universal Chassis System
Model 2370 Model User Manual 4-5
Table 11. System Configuration Option Definitions
Menu Item Description
1) Hardware Configuration Reports information about the local and remote modems 2) Functional Configuration Reports modem status; set ELIM values and loopback options3) Trap Configuration Enable or disable traps 4) Alarm Output Configuration Enable or disable the alarm outputs; set alarm levels 5) SNMP Configuration Reports Ethernet information; set up SNMP parameters
4.6 Hardware Configuration
The Hardware Configuration screen reports information about the local and remote primary and secondary modems. See Figure 11. To view the Hardware Configuration report, follow these steps:
1. At the System Configuration menu type 1, "Hardware Configuration," and press <Enter>. The Hardware Configuration screen appears.
2. To return to the System Configuration menu, press <Esc>.
--------------------------HARDWARE CONFIGURATION------------------------ Local Remote Pri. Sec. Pri. Sec. Chassis/Slot 5/8 Standalone Standalone Standalone Chassis Type 5U UCS 1000 1040 1040 1040 Power Supply Pri AC 120/240 AC 120/240 AC 120/240 AC 120/240 Power Supply Sec N/A N/A N/A N/A Fan Installed N/A N/A N/A N/A Modem Model 2370-1313 2370-1313 2370-1313 2370-1313 Modem Type 1310 MM SC 10dB 1310 MM SC 10dB 1310 MM SC 10dB 1310 MM SC 10dB Modem Revision A1 A1 A1 A1 Modem Serial No. 20030694501 20021019450 20021945010 20021014945 ELIM Model L130 L130 L130 L130 ELIM Type Configurable Configurable Configurable Configurable ELIM Revision A1 A1 A1 A1 ELIM Serial No. 20030592525 20021925255 20021039252 20029252503
Figure 11. Hardware Configuration Screen
4.7 Functional Configuration
The Functional Configuration report and menu provides information about the local and remote interfaces, LOS detection, and redundancy, with options to set all values. See Figure 12 and Table 12. The Oscillator (MHz) parameter shows the frequency of the optical oscillator, or shows N/A if no oscillator is installed. Some parameters are valid for only certain interfaces and settings and show N/A in all conditions that do not apply. For information about the various electrical interfaces and the operating modes, see Chapter 3.

Model 2370 Model User Manual 4-6
-------------------------FUNCTIONAL CONFIGURATION------------------------- Local Pri. Local Sec. Remote Pri. Remote Sec. Oscillator(MHz) 6.144 6.144 6.144 6.144 Interface Type EIA-423/232 EIA-423/232 EIA-530 EIA-530 Operating Mode Internal Internal Slave Slave Int. Rate (bps) 384000 384000 384000 384000 TD Timing SCTE SCTE N/A N/A RD Timing SCR SCR SCT SCT DCD Output Far RTS Far RTS CLS CLS CTS Output Local RTS Local RTS Remote DTR Remote DTR DSR Output Far Local Test Far Local Test Any Test On Any Test On KGCTS(A)/RLSD Normal Normal +6V/GND +6V/GND Delay (ns) N/A N/A N/A N/A T1 Output N/A N/A N/A N/A LOS Detection On On On On Redundancy Auto/Active Auto/Inactive Auto/Active Auto/Inactive Select [1] to configure local interface, [2] to configure remote interface, [3] LOS Detection, [4] redundancy setup:
Figure 12. Functional Configuration Screen
Table 12. Functional Configuration Option Definitions
Menu Item Description
1) Configure local interface Enter values for the local interface parameters 2) Configure remote interface Enter values for the remote interface parameters 3) LOS Detection Set to On or Off 4) Redundancy setup Set to Auto, Manual Primary (Man Pri) or Secondary (Man Sec),
or Off; shows current activity
You can set values for various parameters for both local and remote modems. To configure an interface, see Tables 12 and 13 and follow these steps: To configure the 2370 functions, follow these steps:
1. From the Main Menu type 2, "Functional Configuration," and press <Enter>.
2. From the Functional Configuration menu type 1, "to configure local interface," or 2, "to configure remote interface," and press <Enter>.
3. At each successive prompt, press <Space> to cycle through the options and press <Enter> to select an option or type a number to select values for the parameters, according to the information in Table 13.
4. To set up LOS Detection or Redundancy, type 3 or 4 and follow the prompts on the screen.
Note: LOS detection differs by application. For a 530 or 422 (with controls) interface, LOS uses RTS. For a T22, D22, and T88 interface, LOS uses SCTE. For T1/E1, LOS tracks 175 consecutive zeros. TTL/BNC interfaces do not support LOS.
EdgeAccess® Universal Chassis System
Model 2370 Model User Manual 4-7
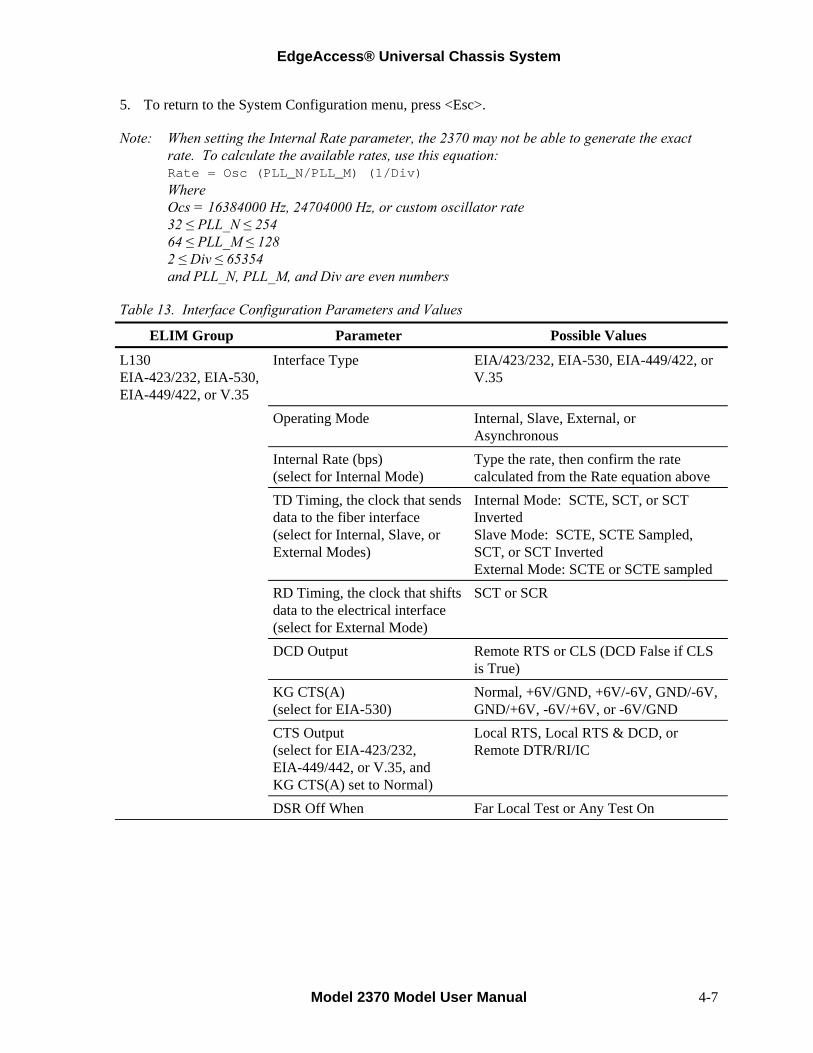
5. To return to the System Configuration menu, press <Esc>.
Note: When setting the Internal Rate parameter, the 2370 may not be able to generate the exact rate. To calculate the available rates, use this equation: Rate = Osc (PLL_N/PLL_M) (1/Div) Where Ocs = 16384000 Hz, 24704000 Hz, or custom oscillator rate 32 ≤ PLL_N ≤ 254 64 ≤ PLL_M ≤ 128 2 ≤ Div ≤ 65354 and PLL_N, PLL_M, and Div are even numbers
Table 13. Interface Configuration Parameters and Values
ELIM Group Parameter Possible Values
L130 EIA-423/232, EIA-530, EIA-449/422, or V.35
Interface Type EIA/423/232, EIA-530, EIA-449/422, or V.35
Operating Mode Internal, Slave, External, or Asynchronous
Internal Rate (bps) (select for Internal Mode)
Type the rate, then confirm the rate calculated from the Rate equation above
TD Timing, the clock that sends data to the fiber interface (select for Internal, Slave, or External Modes)
Internal Mode: SCTE, SCT, or SCT Inverted Slave Mode: SCTE, SCTE Sampled, SCT, or SCT Inverted External Mode: SCTE or SCTE sampled
RD Timing, the clock that shifts data to the electrical interface (select for External Mode)
SCT or SCR
DCD Output Remote RTS or CLS (DCD False if CLS is True)
KG CTS(A) (select for EIA-530)
Normal, +6V/GND, +6V/-6V, GND/-6V, GND/+6V, -6V/+6V, or -6V/GND
CTS Output (select for EIA-423/232, EIA-449/442, or V.35, and KG CTS(A) set to Normal)
Local RTS, Local RTS & DCD, or Remote DTR/RI/IC
DSR Off When Far Local Test or Any Test On

Model 2370 Model User Manual 4-8
ELIM Group Parameter Possible Values
L130 with P53
Interface Type P53
Operating Mode Internal, Ext. Station, or External Internal Rate (bps)
(select for Internal Mode) Type the rate, then confirm the rate calculated from the Rate equation above
Delay (ns) (select for Internal Rate)
0 to 170 in 10 ns increments
TD Timing (select for Ext. Station or External Modes)
SCTE or SCTE Sampled
DCD Output (select for External Mode)
Remote RTS or CLS (DCDFalse if CLS is True)
RLSD (select for External Mode)
Normal, +6V/GND, +6V/-6V, GND/-6V, GND/+6V, -6V/+6V, or -6V/GND
DSR Off When (select for External Mode)
Far Local Test or Any Test On
L131, L132, and L138 TwinAx 422 or DC-37 High Speed EIA-422
All values preset
L133 TTL/BNC
Operating Mode Internal, Slave, External, or Asynchronous
Internal Rate (bps) (select for Internal Mode)
Type the rate, then confirm the rate calculated from the Rate equation above
TD Timing (select for Internal, Slave, or External Modes)
Internal Mode: SCTE, SCT, or SCT Inverted Slave Mode: SCTE, SCTE Sampled, SCT, or SCT Inverted External Mode: SCTE or SCTE sampled
RD Timing (select for External Mode)
SCT or SCR
L134, L135, L136, and L137 Transparent T1/E1
E1: All values preset T1: Set only T1 Output
0-133FT, 133-266FT, 266-399FT, 399-533FT, 533-655FT, CSU part 68 opt. A, or CSU T1C1.2

EdgeAccess® Universal Chassis System
Model 2370 Model User Manual 4-9
4.8 Trap Configuration
Traps are messages that require management attention and are routed to the Network Manager, but do not trigger alarms. Use the Trap Configuration screen to view the current configuration and to enable or disable traps for the 2370. See Figure 13 and Table 14. To configure traps, follow these steps:
1. From the System Configuration menu type 3, "Trap Configuration," and press <Enter>.
2. At the Trap Configuration screen, type the number for a trap and press <Enter>.
Note: "Master Trap Control" enables or disables all traps; the default is Disabled.
2. Press <Space> to cycle to Enabled or Disabled and press <Enter>.
3. To return to the System Configuration menu, press <Esc>.
------------------------TRAP CONFIGURATION-------------------------------- 1) Master Trap Control Disabled 2) LOS/CLS Traps Enabled 3) SQL Traps Enabled 4) Redundancy Traps Enabled 5) Configuration Traps Enabled 6) Diagnostic Traps Enabled 7) Authentication Traps Enabled 8) Power/Fan Malfunction Traps Enabled 9) Cold Start Traps Enabled 10) Alarm Input Traps Enabled 11) Security Violation Traps Enabled
Figure 13. Trap Configuration Screen
Table 14. Trap Definitions
Type of Trap Definition
2) LOS/CLS Loss of Signal (electrical)/Composite Loss of Signal (optical); one or both received signals fail
3) SQL Squelch (for received signal) 4) Redundancy Monitors redundant operation activity 5) Configuration Setup errors, including mismatches with other modems 6) Diagnostic Monitors loopback 7) Authentication Checks for SNMP access and read/write community string 8) Power/Fan Malfunction Power is low or fan is off 9) Cold Start Monitors the reset function 10) Alarm Input UCS 1001 function; see the UCS 1001 User Manual 11) Security Violation Not used

Model 2370 Model User Manual 4-10
4.9 Alarm Output Configuration
Use the Alarm Output Configuration screen to set any or all alarms to Major, Minor, or Off. See Figure 14 and Table 15.
To configure alarms, follow these steps:
1. From the System Configuration menu type 4, "Alarm Output Configuration," and press <Enter>. The Alarm Output Configuration screen appears.
2. Type the number for the alarm you want to set and press <Enter>.
3. Press <Space> to cycle to Major, Minor, or Off, and press <Enter>.
4. To return to the System Configuration menu, press <Esc>.
-------------------ALARM OUTPUT CONFIGURATION---------------------------- 1) Factory Defaults 2) LOS/CLS Alarm Off 3) SQL Alarm Off 4) Configuration Alarm Off 5) Power/Fan Alarm Minor 6) Power-On Self Test Alarm Major 7) BERT Alarm Minor
Figure 14. Alarm Output Configuration Screen
Table 15. Alarm Output Definitions
Alarm Description
1) Factory Defaults Reset all alarms to factory defaults, for values, see Figure 14 2) LOS/CLS Loss of Signal (electrical)/Composite Loss of Signal (optical); one or
both received signals fail; default is Off 3) SQL Squelch (for received signal); default is Off 4) Configuration Setup errors, including mismatches with other modems; default is Off 5) Power/Fan Power is low or fan is off; default is Minor 6) Power-On Self Test Modem failed when power was turned on; default is Major 7) BERT Bit Error Rate Test (BERT) detects data errors; default is Off

EdgeAccess® Universal Chassis System
Model 2370 Model User Manual 4-11
4.10 SNMP Configuration
Use the SNMP Configuration screen to view and set up the SNMP parameters on the 2370. See Figure 15 and Table 16. To view SNMP parameters, follow these steps:
1. From the System Configuration menu type 5, "SNMP Configuration," and press <Enter>. The SNMP Configuration screen appears.
2. Type the number for the alarm you want to set and press <Enter>.
3. Type the information or value, and press <Enter>.
4. To return to the System Configuration menu, press <Esc>.
---------------------------SNMP CONFIGURATION----------------------------- Ethernet Address 00 40 2A 00 53 E7 Ethernet Link UP/Half Duplex 1) System Contact 2) System Name 3) System Location 4) Read Community public 5) Write Community public 6) SLIP/PPP IP Address 0.0.0.0 7) Ethernet IP Address 172.16.143.10 8) Subnet Mask 255.255.0.0 9) Default Gateway 172.16.1.1 10) BOOTP Enabled No 11) Serial Port Config VT100 12) Telnet Timeout Never 13) Host Table
Figure 15. SNMP Configuration Screen
Table 16. SNMP Configuration Parameters Description
Item Description
1) System Contact Who is responsible for the 2370, up to 50 characters 2) System Name What you call the 2370, up to 50 characters 3) System Location Where the 2370 is located, up to 50 characters 4) Read Community Name for the people who can view the reports, up to 10 characters;
default is public 5) Write Community Name for the people who can set values for parameters, up to 10
characters; default is public 6) SLIP/PPP IP Address Enter the IP address for access through SLIP or PPP 7) Ethernet IP Address Enter the IP address for access through the Ethernet network 8) Subnet Mask Enter the mask that sets the network ID part of the IP address 9) Default Gateway Enter the address of the network node that connects to another
network

Model 2370 Model User Manual 4-12
Item Description
10) BOOTP Enabled Enable this if the module needs to obtain its IP address from a BOOTP server; when the unit has an IP address, disable BOOTP
11) Serial Port Config Set the type of serial port connection: VT100, SLIP, or PPP 12) Telnet Timeout Set the time with no activity until a Telnet connection automatically
logs out 13) Host Table Go to the Host Table screen
4.11 Host Table
The SNMP agent allows access to up to 24 Host IP addresses listed in the Host Table. Set up the Host information for the 2370 on the Host Table screen. See Figure 16. To access the Host Table, follow these steps:
1. From the SNMP Configuration menu, type 13, Host Table, and press <Enter>. The Host Table screen appears.
2. To add a host, type 1 and press <Enter>, then follow the prompts, to enter values for these parameters:
a. IP Address for the Host
b. Access level for the host; can be 1, read; 2, read/write; 3, read/trap; or 4, read/write/trap
c. Trap community string (up to 10 characters)
3. To delete a host, type 2 and press <Enter>, then at the prompt, enter IP Address for the Host.
4. Type Y to confirm your changes and save them. The host table appears again with your changes.
5. To return to the SNMP Configuration menu, press <Esc>.
-------------------------------HOST TABLE------------------------------ Managing Access Trap Trap Managing Access Trap Trap Host Level Community Port Host Level Community Port ------------------------------------ ------------------------------------ 172.16.142.20 4 public 162 Add or Delete a host entry (1=Add, 2=Delete from table):
Figure 16. Host Table Screen

EdgeAccess® Universal Chassis System
Model 2370 Model User Manual 4-13
4.12 Diagnostics
Use the Diagnostics screen to view current loopback status and set loopback controls. See Figure 17 and Table 17. To access the Diagnostics screen, follow these steps:
1. From the Main Menu type 2, "Diagnostics," and press <Enter>.
2. Type the number for the control that you want to set and press <Enter>.
3. Press <Space> to cycle to the setting you want, and press <Enter>.
4. To return to the Main Menu, press <Esc>.
------------------------------DIAGNOSTICS-------------------------------- Local Local Remote Remote Pri. Sec. Pri. Sec. Loopback Switch Status N/A N/A N/A N/A Interface LL Signal Off Off Off Off Interface RL Signal Off Off Off Off 1) Loopback Norm Norm Norm Norm 2) Loopback Control Mode Software Software Software Software 3) Electrical Line Relay Open Closed Open Closed
Figure 17. Diagnostics Screen
Table 17. Diagnostics Screen Definitions
Item Description
Loopback Switch Status
If the 2370 is in a 1040 enclosure, shows current position of the switch on the 1040 as Normal, Local (F1), or Remote (F2); otherwise, shows N/A.
Interface LL Signal
For an L130 or L131 ELIM, shows current local loopback signal received from the DTE as On or Off; otherwise, shows N/A.
Interface RL Signal
For an L130 or L131 ELIM, shows current remote loopback signal received from the DTE as On or Off; otherwise, shows N/A.
1) Loopback In software mode, select Normal, Local, Remote, or Clear All; in hardware mode, this shows loopback status.
2) Loopback Control Mode
Set to Hardware to follow the hardware switch or RL and LL signals and ignore this menu setting; set to Software to follow the software setting and ignore the hardware switch and LL/RL signals
3) Electrical Line Relay
Normally shows the current electrical line status as Open, Closed, or N/A (when redundancy is off); during maintenance, you can select Closed to test the inactive link when the Y cable is removed and test equipment installed

Model 2370 Model User Manual 4-14
4.13 Interface Status
The Interface Status report provides information about the local and remote interface types, the current data rate, and the controls for the interface type. See Figure 18. To view the 2370 interface status, follow these steps:
1. From the Main Menu type 3, "Interface Status," and press <Enter>.
2. To return to the System Configuration menu, press <Esc>.
---------------------------INTERFACE STATUS------------------------------ Local Interface (Primary) Remote Interface (Primary) EIA-530 EIA-530 Actual Rate (bps): 384000 Actual Rate (bps): 384000 Inputs: Outputs: Inputs: Outputs: RTS: On DCD: On RTS: On DCD: On DTR: On CTS: On DTR: On CTS: On LL: Off TM: Off LL: Off TM: Off RL: Off DSR: On RL: Off DSR: On
Figure 18. Interface Status Screen
For details on the characteristics of your interface, see Chapter 3.
4.14 Link Error Counters
The Link Error Counters screen reports errors that occur on the modem link. See Figure 19 and Table 18. To view the link errors, follow these steps:
1. From the Main menu type 4, "Link Error Counters," and press <Enter>. The Link Error Counters screen appears.
2. To reset the timer and counters, press <Tab>.
3. To return to the Main Menu, press <Esc>.

EdgeAccess® Universal Chassis System
Model 2370 Model User Manual 4-15
-------------------------LINK ERROR COUNTERS---------------------------- Local Remote Pri. Sec. Pri. Sec. Timer DDDD:HH:MM:SS 0:00:06:47 0:00:06:42 Composite LOS Errors 0 0 Electrical LOS Errors 0 0 SQL Rx Errors 0 0 BERT Sync Status OK OK BERT Sync Count 0 0 BERT Bit Errors 0 0 BERT BER (1E-9) 0 0 BERT Up Time 0:00:06:47 0:00:06:42 Hit 'TAB' to reset timers and counters, 'ESC' to return to previous menu.
Figure 19. Link Error Counters Screen
Table 18. Link Error Counters Definitions
Item Definition
Timer Number of days, hours, minutes, and seconds since the last reset Composite LOS Errors Number of optical loss of signal errors Electrical LOS Errors Number of electrical loss of signal errors SQL Rx Errors Number of received squelch occurrences BERT Sync Status Reports loss if the BERT out of sync error rate exceeds 10E-9 or
OK if signal is good BERT Sync Count Number of good to faulty patterns BERT Bit Errors Number of bits with errors in the received pattern BERT BER (1E-9) Number of bit errors during this BERT up time BERT Up Time How long BERT is available and running
The Bit Error Rate Test (BERT) sends a continuous sequence to check for bit errors while the optical signal remains in sync.

Model 2370 Model User Manual 4-16
4.15 System Alarms
The System Alarms screen reports alarms and faults on the local 2370 and the remote 2370. See Figure 20 and Table 19. To view current alarm status, follow these steps:
1. From the Main Menu, type 5, Alarms, and press <Enter>. The System Alarms report appears.
2. To return to the Main Menu, press <Esc>.
------------------------------SYSTEM ALARMS------------------------------- Local Remote Modem Redundancy Status N/A N/A Configuration Errors No No Fiber Loss of Signal No No Electrical Loss of Signal No No SQL Rx OK OK Chassis Management N/A N/A Alarm Relay Inputs N/A N/A Power Supply Primary OK OK Power Supply Secondary N/A N/A Fan N/A N/A Power-On Self Test OK OK
Figure 20. System Alarms Screen
Table 19. System Alarms Definitions
Item Definition
Modem Redundancy Status
Reports if redundancy is Active, Inactive, or turned off (N/A)
Configuration Errors Check that the local and remote modems have compatible set ups, including software version
Fiber Loss of Signal Checks if optical loss of signal errors Electrical Loss of Signal When LOS detection is On, checks if electrical loss of signal occurs SQL Rx Checks if squelch occurs Chassis Management Reports OK if 2370 is in UCS 1000 with DMM or N/A if 2370 is in
1040, 1050, or UCS 1001 Alarm Relay Inputs Reports Loss if CLS occurs or OK if signal is good; UCS 1001, only Power Supply Primary Reports function of main power supply Power Supply Secondary Reports function of second power supply Fan Reports fan failure Power-On Self Test Reports OK or faulty hardware or software
EdgeAccess® Universal Chassis System
Model 2370 Model User Manual 4-17
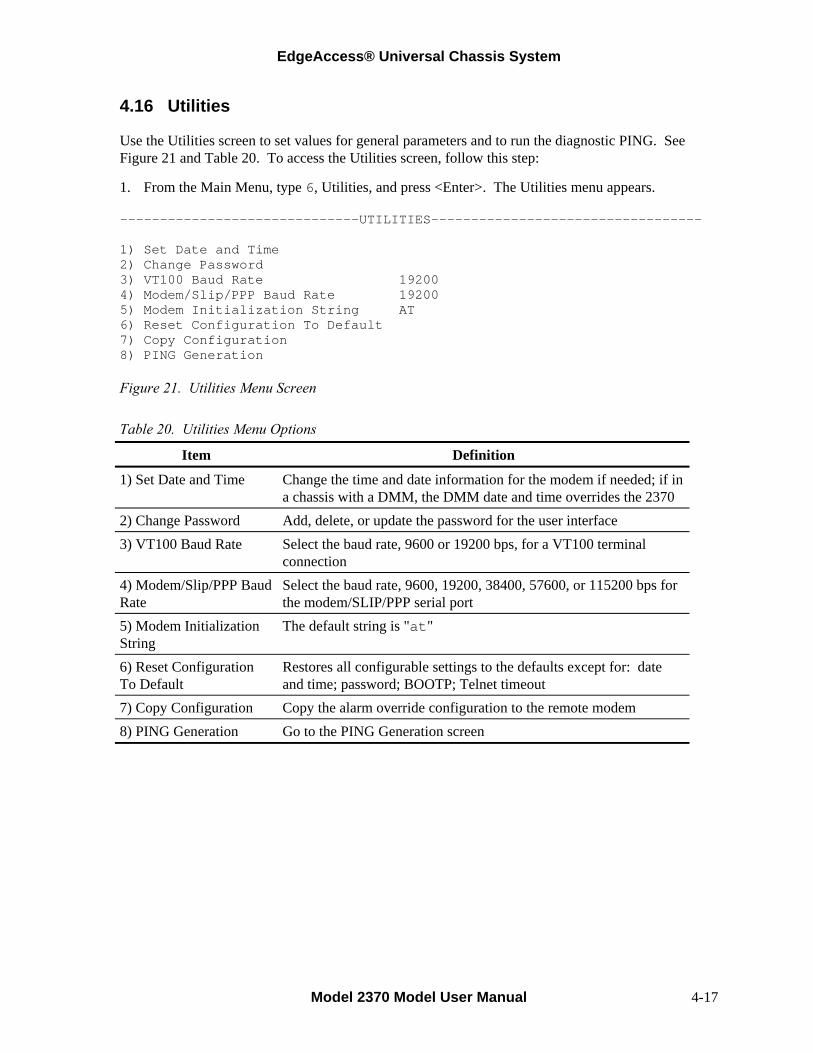
4.16 Utilities
Use the Utilities screen to set values for general parameters and to run the diagnostic PING. See Figure 21 and Table 20. To access the Utilities screen, follow this step:
1. From the Main Menu, type 6, Utilities, and press <Enter>. The Utilities menu appears.
------------------------------UTILITIES---------------------------------- 1) Set Date and Time 2) Change Password 3) VT100 Baud Rate 19200 4) Modem/Slip/PPP Baud Rate 19200 5) Modem Initialization String AT 6) Reset Configuration To Default 7) Copy Configuration 8) PING Generation
Figure 21. Utilities Menu Screen
Table 20. Utilities Menu Options
Item Definition
1) Set Date and Time Change the time and date information for the modem if needed; if in a chassis with a DMM, the DMM date and time overrides the 2370
2) Change Password Add, delete, or update the password for the user interface 3) VT100 Baud Rate Select the baud rate, 9600 or 19200 bps, for a VT100 terminal
connection 4) Modem/Slip/PPP Baud Rate
Select the baud rate, 9600, 19200, 38400, 57600, or 115200 bps for the modem/SLIP/PPP serial port
5) Modem Initialization String
The default string is "at"
6) Reset Configuration To Default
Restores all configurable settings to the defaults except for: date and time; password; BOOTP; Telnet timeout
7) Copy Configuration Copy the alarm override configuration to the remote modem 8) PING Generation Go to the PING Generation screen

Model 2370 Model User Manual 4-18
4.17 PING
Use the PING Generation screen to test the connection to a specific IP address. To use the PING option, see Figure 20 and follow these steps:
----------PING Generation---------------------------------- IP Address to PING: 0.0.0.0 PING count (1 to 255, 0 = forever): 0 Use TAB key to move to other field, and ENTER to validate.
Figure 22. PING Generation Screen
1. From the Main Menu, type 6, Utilities, and press <Enter>.
2. From the Utilities menu, type 8, PING Generation, and press <Enter>.
3. At the prompt, type the IP address to PING and press <Tab>.
4. At the prompt, type the number of times to send a PING, from 1 to 256, or type 0 to PING continuously every 3 seconds, and press <Enter>. "PING response received..." indicates a good connection; "TIMEOUT: Unable to reach [IP address]..." indicates a faulty connection.
5. To stop the PING and return to the Utilities menu, press <Esc>.
4.18 Software Upgrade
Use the Software Upgrade screen to check the current version of the firmware and upgrade it and the remote 2370, if necessary. See Figure 23. To access the Software Upgrade screen and check the software version, follow these steps:
1. From the Main Menu, type 7, Software Upgrade, and press <Enter>. The Software Upgrade screen appears.
---------------------------SOFTWARE UPGRADE------------------------------- Local Remote Pri Offline Sec. Pri Offline Sec. Last Data Last Data Last Data Active Firmware 01.00 01.00 Inactive Firmware 01.01 01.01 Bootcode 05.00 05.00 1) Software Reset Reset Reset Reset Reset 2) Swap Bank Swap Swap Swap Swap 3) Copy Software from Source modem to Destination modem 4) Get New File with TFTP
Figure 23. Software Upgrade Screen

EdgeAccess® Universal Chassis System
Model 2370 Model User Manual 4-19
2. Record the numbers for the Active and Inactive Firmware for both the local and remote modems.
3. Access the Canoga Perkins Web site, click Downloads, scroll to the 2370 file name and compare the version numbers listed there with the version numbers you recorded. The 2370 firmware file name is similar to 23x00106.zip, where 23x0 indicates the product type and 0106 indicates the version number.
Caution: To ensure compatibility when two or more units are connected, you must upgrade all connected units with the same software.
If the firmware on the 2370 is outdated, you need to upgrade it. If the 2370 is in a chassis or standalone enclosure within a domain with a DMM, go to the User Manual for the DMM and use that procedure to install the new software. If the 2370 is in a Model 1040, follow these steps:
1. Access the SNMP Configuration menu before starting the software upgrade: enter the IP address, subnet Mask, and default gateway for the SNMP agent.
2. From the Main Menu, type 7, Upgrade Software, and press <Enter>.
3. At the Software Upgrade menu, type 4, Get New File with TFTP, and press <Enter>.
4. At the prompt, type the IP address for the source of the software.
5. At the prompt, type Y to confirm the choice.
6. If the file name differs from the default, type it and press <Enter> or press <Enter> to accept the default.
7. At the prompt, type Y to start the upgrade.
To upgrade a remote unit to the same version of software, follow these steps:
1. Make sure that the remote modem is online.
2. From the Main Menu, type 7, Upgrade Software, and press <Enter>.
3. At the Software Upgrade menu, type 3, Copy Software from Source modem to Destination modem, and press <Enter>.
4. At the prompt, select the Source modem, then the Destination modem, and press <Enter>; the upgrade runs automatically.
To run the new software, swap banks, and reset the modem, follow these steps:
1. Check the version of the Inactive Firmware for the Remote modem to be sure that the upgrade is complete.
2. From the Main Menu, type 7, Upgrade Software, and press <Enter>.
3. At the Software Upgrade menu, type 2, Swap Bank, and press <Enter>.
4. At the Software Upgrade menu, type 1, Software Reset, and press <Enter>. The modem resets and starts using the new firmware.

Model 2370 Model User Manual 4-20

EdgeAccess® Universal Chassis System
Model 2370 Model User Manual 5-1
Chapter 5 Troubleshooting
Use the diagnostic procedures in this section to test and troubleshoot the 2370. Before starting the diagnostics, obtain this equipment:
• Multimeter • Fiber Optic Power Meter • Short (1 m or less) fiber optic jumper cable • Bit Error Rate Tester (BERT)
Table 21 lists troubleshooting strategies for various symptoms.
Table 21. Symptoms With Possible Causes and Actions
Symptom Possible cause(s) Corrective action
No power indicator on front panel(s)
No AC power Check AC power source
Defective modem Replace modem Local or Remote sync error Faulty modem, cable or connector. If
the modems are configured in a tail circuit (one is externally locked and the other is slave), verify that the externally locked modem has a clock on its TT (or equivalent) leads that matches its rate switch.
Run Loopback and BERT tests
Cable loss exceeds modem loss budget
Faulty fiber optic cable Replace defective cable
Faulty fiber optic connector Polish or replace connector Loopback test passes, but modems will not pass data
Modem not configured properly Check and correct switch and jumper settings on all devices
Interface cables damaged or wired incorrectly
Repair or replace cables
Modem fails BERT test when optically looped back to itself
Faulty modem or electrical interface Replace faulty modem
Modem fails BERT when looped locally
Faulty modem or electrical interface Replace faulty modem

Model 2370 Model User Manual 5-2
5.1 Loopback Tests
Use loopback to diagnose a fault on the optical link, either on a modem or with a cable. The 2370 supports both local and remote loopback. Local loopback loops the data internally; remote loopback loops the data at the remote modem. Set loopback either in software at the Diagnostics screen for a managed 2370 or, if the Loopback control Mode on the Diagnostics screen is set to Hardware, at the F1/NRM/F2 (Local/Normal/Remote loopback) switch on a Model 1040 enclosure. See Figures 24 and 25.
Figure 24. Local Loopback
Figure 25. Remote Loopback
5.2 Optical Power and BERT Tests
To optically test the modem, cables, and connectors, follow these steps:
1. Verify the optical cable loss:
a. Clean the connectors on the fiber optic test cable before plugging it in to the Tx connector on the 2370.
b. Warm up each component for at least 30 minutes.
c. Set the optical power meter to the proper wavelength.
d. Wait two or three minutes for the power reading to stabilize, and then read the output power.
e. Subtract out the test cable loss, then record the power level and compare it to the value on the performance sheet for that particular 2370. Measurement tolerance is +/- 0.5 dBm.
Note: When referencing optical power levels with numerical values less than zero, the reading closer to zero is the greater value; for example, -17 dBm is greater than -20 dBm.

EdgeAccess® Universal Chassis System
Model 2370 Model User Manual 5-3
f. If the reading is incorrect, repeat the measurement with a different test cable. If the power level is still not within range, call Technical Support.
If you know the link attenuation, subtract that value from the 2370 Tx output value to determine the power expected at the remote cable end, which is the input power at the remote receiver, and skip this section. Otherwise, continue these steps to use the 2370 to measure the link attenuation.
g. At the local site, connect the fiber link cable to Tx on the 2370.
h. At the remote site, set the optical power meter to the proper wavelength and connect it to the fiber link cable.
i. Record the optical power level and compare it with the sensitivity level listed on the data sheet for the link fiber type.
j. Subtract the remote power level from the value for the transmitter output power at the local site. The result provides the link loss, in dB. This power level must not exceed the limit for Rx sensitivity listed on the data sheet for the remote unit.
Note: If you cannot determine the Rx sensitivity, contact Canoga Perkins Technical Support Department for assistance.
k. Repeat this process at the other site.
2. If the cable loss exceeds the loss budget for the modem, either a cable or a connector is faulty. If the cable loss is within specification, follow these steps to run the loopback test; for details, see Section 4.12:
a. At the Diagnostics screen, set the near-end modem to Remote Loopback.
b. Set the BERT tester for the clocking, data rate, and format used for the circuit; use the existing interface cables if possible.
c. Connect the BERT tester in place of the near-end device and run the BERT test.
3. If the remote loopback and BERT tests pass, optically loop back each modem and repeat the BERT test. If the test fails, the modem is faulty.
4. If the optical loop back and BERT tests pass, set Local loopback on each modem and repeat the BERT test. If the test fails, the modem is faulty.
5.3 Fiber Optic Diagnostics
If the Loopback Test passes, but the modems still fail, make these checks:
• Check that the fiber optic cables are connected in the standard Tx to Rx and Rx to Tx scheme and labeled near each end with the signal direction, source, and destination.
• Check that the data rate is set correctly. • Check that the operating mode (internal/external/slave) is set for synchronous transmission or that
the circuit is set for asynchronous transmission.
If the problem persists, contact Canoga Perkins Technical Support.

Model 2370 Model User Manual 5-4

EdgeAccess® Universal Chassis System
Model 2370 Model User Manual 6-1
Chapter 6 Specifications
6.1 Optical Composite Error Rate: >10-12 Fiber Optic Cable Compatibility: 1310 nm MM
1310 nm SM 1550 nm SM
Transmitter: Laser diode (1310 or 1550 nm) Fiber Optic Connector: ST or SC Fiber Optic Receiver: 1310 nm Laser PIN (InGaAs) 1550 nm Laser PIN (InGaAs) Typical Fiber Optic Link Loss Budget: 1310 nm 10 dB SM 1310 nm 11 dB MM 1310 nm 26 dB SM 1550 nm 30 dB SM Typical Launch Power and Rx Sensitivity Optic Type Launch Power (dBm) Hi/Lo Rx Sensitivity (dBm) 1310 LP Laser -14/-20 -32 1310 LP Laser -8/-15 -32 1310 HP Laser 0/-5 -34 1550 HP Laser 0/-2 -34
6.2 Electrical Interface Connector: Interface Connector Type EIA-232C / 423 /530 DB-25 EIA-422 (422) DC-37 V.35 DB-25 with MRC-34 adapter TTL / BNC BNC T1 / E1 DA-15 or RJ-48C

Model 2370 Model User Manual 6-2
Interfaces Supported: RS-232D / RS-423 RS-449 CCITT V.35 TTL / BNC TwinAx 422 TwinAx MIL-STD-188-114C Transparent T1 / E1 RS-530 Power Requirement: Standalone 115 VAC ±10% at 0.22 Amps 115/230 VAC ± 10% switchable at
0.11 Amps ,47 to 63 Hz Rack Mount PC Card 18 VAC ±10% at 1.1 Amps per board,
50 to 64 H
Table 22. RJ-45 Pinout
Pin Signal Source Path
1 RI DTE Out 2 DCD DCE Out 3 DTR DTE In 4 SIG GND DTE In 5 RXD DCE Out 6 TXD DTE In 7 CTS DCE Out 8 RTS DTE In
6.3 Physical / Environmental Dimensions: 7.9" H x 1.0" W x 10.4" D (201 mm x 25 mm x 264 mm) Weight: 0.9 lb (0.41 kg) Operating Environment: Temperature 0 to 50° C Humidity Up to 95% (non-condensing)

EdgeAccess® Universal Chassis System
Model 2370 Model User Manual 6-3
6.4 Modem Configurations
2370 Universal Fiber Optic Modem
Model Description 2370-1213 1310 nm, MM, SC, 11 dB 2370-1313 1310 nm, SM, SC, 10 dB 2370-1333 1310 nm, SM, SC, 26 dB 2370-1543 1550 nm, SM, SC, 30 dB 2370-1211 1310 nm, MM, ST, 11 dB 2370-1311 1310 nm, SM, ST, 10 dB 2370-1331 1310 nm, SM, ST, 26 dB 2370-1541 1550 nm, SM, ST, 30 dB 2370-1354 Single Fiber, SM, SC, 1310 nm, up to 20 Km 2370-1564 Single Fiber, SM, SC, 1550 nm, up to 20 Km 2370-1374 Single Fiber, SM, SC, 1310 nm, up to 40 Km 2370-1584 Single Fiber, SM, SC, 1550 nm, up to 40 Km CWDM Ready 2370 Universal Fiber Optic Modem 2370-1070 CWDM 1470 nm, SM, SC, 30 dB 2370-1071 CWDM 1490 nm, SM, SC, 30 dB 2370-1072 CWDM 1510 nm, SM, SC, 30 dB 2370-1073 CWDM 1530 nm, SM, SC, 30 dB 2370-1074 CWDM 1550 nm, SM, SC, 30 dB 2370-1075 CWDM 1570 nm, SM, SC, 30 dB 2370-1076 CWDM 1590 nm, SM, SC, 30 dB 2370-1077 CWDM 1610 nm, SM, SC, 30 dB

Model 2370 Model User Manual 6-4
L13x ELIMs
Model Interface Description
L130 Configurable EIA232/423/530/P53/449/V35L131 EIA422 DC37 with control L132 EIA422 TwinAx L133 TTL BNC L134 T1 RJ45 L135 T1 DA15 L136 E1 RJ45 L137 E1 DA15 L138 EIA422 DC37 without controls L139 T88 TwinAx

EdgeAccess® Universal Chassis System
Model 2370 Model User Manual A-1
Appendix A Warranty Information
Current Warranty information is available on-line in the Client Login Area of the Canoga Perkins web site (www.canoga.com) or by contacting Technical Support at 800-360-6642 (voice) or [email protected] (email).


CANOGA PERKINS CORPORATION 20600 Prairie Street
Chatsworth, California 91311-6008 USA Phone: (818) 718-6300 FAX: (818) 718-6312
Web Site: www.canoga.com Email: [email protected]


