CONSULT SAFETY PRECAUTION SECTION BEFORE USING THIS PRODUCT. SOME FEATURES MAY REQUIRE
ADDITIONAL MATERIAL (NOT INCLUDED).
GOVERNMENT REGULATIONS
This device complies with the requirements of Industry Canada (IC) - Management of Radio-frequencies, as specified in document CNR-210. Its use is authorized only on a no-interference, no-protection basis; in other words, this device must not be used if it is determined that it causes harmful interference to services
authorized by IC. In addition, the user of this device must accept any radio interference that may be received, even if this interference could affect the operation of the device.
This device complies with Part 15 of the FCC rules. Operation is subject to the following two conditions:
(1) this device may not cause harmful interference and (2) this device must accept interference that may cause undesired operation.
This equipment has been tested and found to comply with the limits for a class B digital device, pursuant to Part 15 of the FCC Rules. These limits are designed to provide reasonable protection against harmful interference in a residential installation. This equipment generates uses and can radiate radio-frequency energy and, if not installed and used in accordance with the instruction manual, may cause harmful interference to radio communications. However, there is no guarantee that interference will not occur in a particular installation. If this equipment does cause harmful interference to radio or television, which can be determined by turning the equipment OFF and ON, the user is encouraged to try to correct the interference by one or more of the following measures:
Reorient or relocate the receiving antenna. Increase the separation between the equipment and receiver. Connect the equipment to an outlet on a circuit different from the one the receiver is connected to. Consult the dealer or an experienced radio / TV technician for help.
Warning: Changes or modifications not expressly approved by <manufacturer> could void the user's authority to operate the equipment.
ELECTRONICS 188 St-Francois Xavier
Delson, Qc J5B 1X9
www.astroflex.com
3
THANK YOU FOR CHOOSING AN ASTROSTART REMOTE CAR STARTER!
Like you, Astroflex is concerned with the environment. This is why we suggest using the two-minute runtime
when you remote start your vehicle to warm up engine fluids. We take this opportunity to remind you to properly defrost your windows
and remove all the snow from your vehicle before driving on public roads. Rolling igloos are extremely dangerous!
We wish you an excellent journey with your remote engine starter!
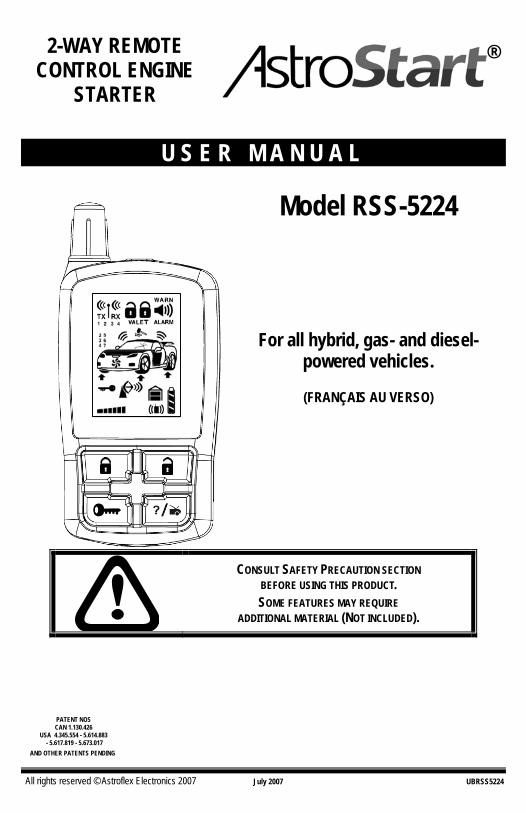
USER GUIDE FOR RSS-5224 REMOTE ENGINE STARTER. The RSS-5224 is a Bi-directional remote engine start systems. This means that it can communicate both ways and therefore return an acknowledgment to the transmitter and/or communicate the status of the vehicle. An optional alarm kit (P/N ALA-OP) can be added to the system. If this is the case, functions inherent to the alarm system described in this manual will be attributed to it. The functions relative to the safety system described in this manual apply only to remote starter to which an alarm kit has been added. The RSS-5224 offers a keyless entry feature allowing the user to operate the door locks as well as access to the trunk of the vehicle. These features are optional and may require additional material and/or wiring during installation.
Table of contents SAFETY PRECAUTIONS ____________________________________________________________________________ 4
SAFETY SEQUENCE FOR MANUAL TRANSMISSION VEHICLES ---------------------------------------------------------------------------------------4 PREPARING SYSTEM----------------------------------------------------------------------------------------------------------------------------------------5
THE REMOTE CONTROL ___________________________________________________________________________ 6 PAGER --------------------------------------------------------------------------------------------------------------------------------------------------------8
TABLE OF COMMANDS ____________________________________________________________________________ 9 START COMMANDS ---------------------------------------------------------------------------------------------------------------------------------------10 SECURITY SYSTEM ----------------------------------------------------------------------------------------------------------------------------------------13 LOCK/UNLOCK COMMANDS AND ALARM SYSTEM ARMING/DISARMING--------------------------------------------------------------------------17 OTHER COMMANDS ---------------------------------------------------------------------------------------------------------------------------------------19
HOOD SWITCH ---------------------------------------------------------------------------------------------------------------------------------------------21 GEARSHIFT CHECK APPLICABLE TO AUTOMATIC TRANSMISSION VEHICLES-------------------------------------------------------------------21 GEARSHIFT CHECK APPLICABLE TO MANUAL TRANSMISSION VEHICLES-----------------------------------------------------------------------22
REPLACING OR BOOSTING VEHICLE BATTERY_______________________________________________________ 22
4
SAFETY PRECAUTIONS Before using this product, carefully read the following safety precautions. GENERAL RULES
• Never perform a remote start when a person or animal is inside the vehicle. • Do not allow any person or animal to remain inside the vehicle when the engine is running under remote starter
control (continuous mode). • Immediately report any malfunction to the AstroStart dealer that performed the installation. • Under no circumstance can this product or its use be modified. • Always turn off the main switch when vehicle is parked in an enclosed, unventilated area or is in for servicing. • Always turn off the main switch when not using your remote starter for extended periods. • Keep remote controls away from children. • Have your engine tuned regularly to ensure optimum performance of your remote starter. • Make sure that the windshield wipers and the headlights are turned off before leaving vehicle. • Regularly check safety features that stop engine (see SAFETY CHECKS on page 20.) • Make sure you comply with all local regulations, which may prohibit leaving your engine running when vehicle is
unattended in a public place. • To ensure continued safe operation of your remote starter, ask your AstroStart dealer to periodically check
and/or tune the remote starting system. • Always advise service personnel that your vehicle is equipped with a remote starter. • We strongly recommend that you have your remote starter checked annually. Contact a dealer in your area. • All users of the vehicle should be aware of the safety precautions and operation procedures. • Make sure that the warning sticker is present on the driver's window.
SPECIFIC RULES FOR MANUAL TRANSMISSION VEHICLES • Make sure that the parking brake is operational, i.e. it can prevents the vehicle from moving. • If the shift lever is accessible without having to open a door of the vehicle (for example, by entering via the
liftgate or rear hatch) or in the case of a convertible vehicle, it is strongly recommended to have a motion detector (microwave) installed with the system. This device prevents the engine from starting should any activity be detected near the gearshift.
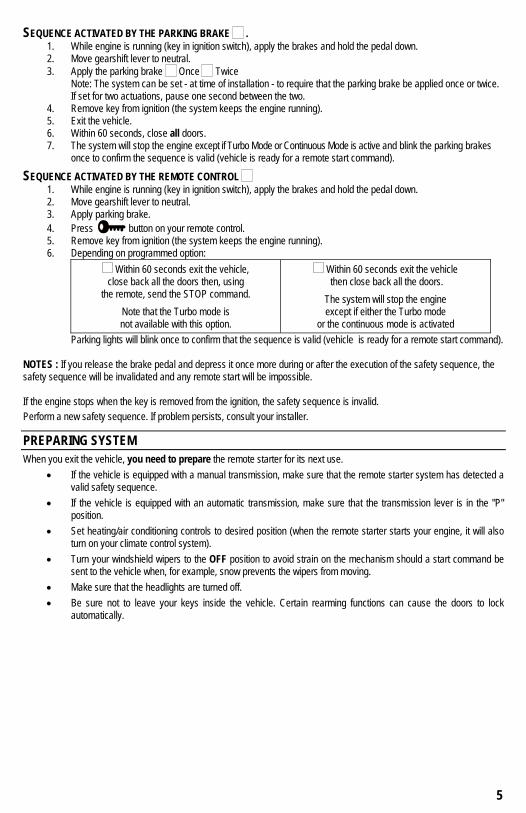
SAFETY SEQUENCE FOR MANUAL TRANSMISSION VEHICLES Your remote starter was designed to force you to perform a series of actions that will ensure that the gearshift lever is in neutral position when you exit the vehicle. This series of actions is called a "Safety sequence" and is aimed at preventing any remote start in situations where remote starting the engine would not be safe. Should the hatchback or any door be opened at any time, the intrusion will be detected and the safety sequence will be cancelled by the system, thus preventing a remote start. In such cases, the sequence must be repeated to allow for an eventual remote start. The system offers two execution modes for the sequence. These options must be set at time of installation. The first mode is initiated by the parking brake and the other by the remote control. The safety sequence must be performed as follows.
5
SEQUENCE ACTIVATED BY THE PARKING BRAKE . 1. While engine is running (key in ignition switch), apply the brakes and hold the pedal down. 2. Move gearshift lever to neutral. 3. Apply the parking brake Once Twice
Note: The system can be set - at time of installation - to require that the parking brake be applied once or twice. If set for two actuations, pause one second between the two.
4. Remove key from ignition (the system keeps the engine running). 5. Exit the vehicle. 6. Within 60 seconds, close all doors. 7. The system will stop the engine except if Turbo Mode or Continuous Mode is active and blink the parking brakes
once to confirm the sequence is valid (vehicle is ready for a remote start command).
SEQUENCE ACTIVATED BY THE REMOTE CONTROL 1. While engine is running (key in ignition switch), apply the brakes and hold the pedal down. 2. Move gearshift lever to neutral. 3. Apply parking brake. 4. Press button on your remote control. 5. Remove key from ignition (the system keeps the engine running). 6. Depending on programmed option:
Within 60 seconds exit the vehicle, close back all the doors then, using
the remote, send the STOP command. Note that the Turbo mode is not available with this option.
Within 60 seconds exit the vehicle then close back all the doors.
The system will stop the engine except if either the Turbo mode
or the continuous mode is activated Parking lights will blink once to confirm that the sequence is valid (vehicle is ready for a remote start command).
NOTES : If you release the brake pedal and depress it once more during or after the execution of the safety sequence, the safety sequence will be invalidated and any remote start will be impossible. If the engine stops when the key is removed from the ignition, the safety sequence is invalid. Perform a new safety sequence. If problem persists, consult your installer.
PREPARING SYSTEM When you exit the vehicle, you need to prepare the remote starter for its next use.
• If the vehicle is equipped with a manual transmission, make sure that the remote starter system has detected a valid safety sequence.
• If the vehicle is equipped with an automatic transmission, make sure that the transmission lever is in the "P" position.
• Set heating/air conditioning controls to desired position (when the remote starter starts your engine, it will also turn on your climate control system).
• Turn your windshield wipers to the OFF position to avoid strain on the mechanism should a start command be sent to the vehicle when, for example, snow prevents the wipers from moving.
• Make sure that the headlights are turned off. • Be sure not to leave your keys inside the vehicle. Certain rearming functions can cause the doors to lock
automatically.
6
THE REMOTE CONTROL The remote control can access four distinct remote starters. A maximum of four remote controls can be assigned to your vehicle. See your dealer for additional remote controls. NOTE: The range of your remote control can be affected by a weak battery, interference from nearby metal structures, hydro poles, or crowded parking lots.
USING YOUR REMOTE CONTROL To send a command, press for two seconds on the appropriate button. Command may not be sent if the button is not pressed long enough. The remote control beeps when a button is pressed, then emits eight short beeps during the transmission, i.e. about one second after the button was pressed. Your remote control can transmit on four different channels, allowing control of four separate vehicles. Only the “Panic” command is transmitted on both channels simultaneously. To select a different channel, press the “P” button located on the back and hold it for 2 secondes, when the button is released the transmitter passes to the next channel. The remote control shown may differ from that included in the kits. Your system may be programmed in such a way that it can distinguish between two groups of remote controls (maximum: two remotes per group). These groups let you activate predefined settings (seat, mirror and other) when unlocking certain vehicles (additional optional equipment required). As soon as a command is sent, the remote switches over to standby mode in order to receive and display confirmations sent by the command module installed in the vehicle. These confirmations are sent to all the programmed remote. These signals are transmitted only once and could be neutralized by radio or electromagnetic interferences generated by electronic devices in the vicinity. If no confirmation is received in a given location, move away from electronic devices and activate the "Status" command ( ). The start module will inform you of the status of door locks, alarm, and running of the engine. Note that the communication between the vehicle and the transmitter operates in only one direction at a time. This is why it is recommended to wait for the confirmation before sending another command. Otherwise, the vehicle and the transmitter could transmit at the same time wich would block the command as well as the returned confirmation. Out of range If the vehicle is out of range, the transmitter will emit a soft chirp after 3 seconds to indicate that the command has not been received by neither the module nor the transmitter.
REPLACING THE BATTERY The LCD of the 4-button remote has a battery icon telling you when to replace the battery. We strongly recommend keeping a replacement battery in your glove compartment. The remote controls require one AAA battery. See your dealer for spare batteries. To replace the battery, slide the latch sideways and remove the battery cover on the back of the remote control case, remove old battery and replace it with a new one. Make sure the battery is placed the right way (see pictogram inside the cover).
7
CONFIRMATIONS EMITTED BY THE REMOTE
An audible confirmation (piezo) and a visual confirmation (LCD display) are emitted each time a command is transmitted. The LCD displays the vehicule status at all time, the display is refreshed on every transmission or when the status of the vehicle changes pertaining that the “Status confirmation” function is enable. The display shows the last confirmation received. The following diagram shows the usefulness of each icon of the display. Descriptions in CAPITAL letters show confirmations pertaining to the security system’s functions.
1 Transmission 14 Battery charge indicator
2 Vehicle out of range 15 Auxiliairy outputs status
Two types of confirmations are displayed on the remote : Command confirmation: These confirmations are command acknoledgement, the icon corresponding to the command is displayed to confirm reception of the command. Status confirmations : These confirmations are displayed when the status of a zone, monitored by the system, changes. e.i. : door openning, security system alarm state, etc. Command confirmations are returned immediatly following a command transmission whereas the status confirmations may be returned up to 12 seconds after the event appened depending on the communication protocol between the hand-held unit and the vehicle. Remarks: When the remote receives a confirmation that is intended to a vehicle other that the one actually selected, most audible confirmations are made more descret, vehicle icon flashes (1-4) to warn you that the display reflect the status of that specific vehicle. When a command is transmitted, the vehicle selection gets back to the previously selected unless the confirmation was related to an alarm condition. In that case the selected vehicle is temporarely changed, to allow stopping the alarm condition without having to change the vehicle selection, then gets back to previously selected when the alarm condition is stopped. Out of range : In the event that the environement prevents the confirmation from being received by the remote control, all icons are cleared out. In this case, resend the command or send the status command to refresh the display.
8
REMOTE CONTROL SETTING Certain functions on the remote may be set to your convinience. To access the remote control programming mode, press the button located on the back of the remote and hold it for 5 seconds. The remote beeps once to endicate entering programming mode.
PAGER The system is equipped with a function called ‘Pager’. The purpose of this function is to send a general call asking those who carry them to get to the vehicle or to perform a task previously established. Paging To send a general call, the user must press the ‘Valet’ switch and hold it for 3 seconds while engine is stopped and key is not in the ignition, or while engine is remote started (see ‘Valet Mode’ on page 16)(The valet switch is a small push button hided under the dash board). Parking lights on the vehicle blink once to confirm the call was sent. All remote controls (maximum: 4) located within the radio frequency range of the vehicle will begin to chirp. To silence the remote control, press any button.
Confirmations emitted by the vehicle are sent as soon as the command is received by the start module. In most cases, your remote starter will confirm that the command has been received, either by sounding the horn, the siren, or by flashing the parking lights. The confirmations emitted by the parking lights are mandatory while those emitted by the horn and the siren are optional (programmable) and can require connexions and additionnal equipment at time of installation. many of these confirmations depend on the system’s status when the command is emitted. Refer to paragraphs relating to each command for more details on confirmations.
CONFIRMATIONS SENT BY VEHICLE SENT BY REMOTE CONTROL COMMANDS BUTTON
HORN PARKING LIGHTS SIREN * CONVENIENCE SECURITY
DÉMARRAGE / MODE CONTINU 1� 1 - �
STOP � - 1 - LOCK / ARMING * 1� 1 / 3 1 / 3 / X PANIC (BUTTON HELD FOR > 4 SEC.) OU 30 / 60 SEC. UNLOCK / DISARMING * � - 2 / 4 2 / 4 / X
ACTIVATE / CANCEL VALET MODE - 2 / 4 - / STATUS - - - �
ACTIVATE / CANCEL UTILITY 2 - 1 - /
VEHICUE SELECTION (BUTTON HELD 1.5 SEC.)
THIS BUTTON IS LOCATED
ON THE BACK OF THE REMOTE. LEGEND : DISPLAYED ICONS (BLACK) : HIDDEN ICONS (GRAY)
* COMMANDS FOLLOWED BY AN ASTERISK (*) APPLY ONLY TO COMMAND UNITS EQUIPPED WITH A SECURITY SYSTEM. � THIS COMMAND TERMINATES THE RUNTIME, PANIC MODE AND ALARM STATUS. � TEMPORARY VALET MODE IF ACTIVATED A SECOND TIME DURING REARMING DELAY. � START CONFIRMATION CAN TAKE FEW SECONDS EXCEPT IF THE ENGINE IS ALREADY RUNNING. � AVAILABLE ON SUBSEQUENT COMMANDS ONLY IF PROGRAMMED DURING INSTALLATION. � WHEN THE OPTION IS PROGRAMMED IN TRUNK MODE (OPTIONAL MATERIAL REQUIRED) AND THE TRUNK IS OPEN. THIS CONFIRMATION WILL REPEAT ITSELF EVERY 5 MINUTES UNTIL THE TRUNK IS CLOSED. � WHEN THE DOOR AND TRUNK ZONE ARE IN VIOLATION AT THE SAME TIME, THE LCD DISPLAY WILL SHOW THE DOOR ZONE (EXCEPT IF THE DOME LIGHT IS ON BY THE SYSTEM). � IF THE COMMAND CAN NOT BE EXECUTED, THE PARKING LIGHTS FLASHES ONCE, THE “TRUNK” ICON DOES NOT SHOW.
10
START COMMANDS STARTING THE ENGINE To start engine, press button. The system automatically adjusts ignition duration for your type of vehicle; parking lights flash once (duration: four seconds) then stay on all the time when the engine is running. If more than one command is sent, each successive start command resets the runtime to the beginning, parking lights flash once to confirm command has been received and horn sounds once (programmable during installation) to let you know engine is already running.
System ready for start When the start command is emitted, the system will immediately send a confirmation
that the vehicle is ready to start
Flashing fan
System not ready for start or
the following confirmation if the vehicle is not ready (ex.: the vehicle won't start if the hood is open).
In this case, the parking lights and fan icons flashes number of times that corresponds to the start fail code, see details on page 20.
Parking lights and fan flashing
Successful start If the vehicle is ready to start, the system will automatically change to the start cycle and send another confirmation only if the command was
successfully executed. The system can take a few seconds to send back the confirmation.
(constant fan)
IF ENGINE DOES NOT START If your system cannot start engine at first attempt, it will wait a few seconds then try again; it could try again twice depending on reason for failure to start. After three attempts, it will shut down automatically and wait for a new command.
UPON ENTERING YOUR VEHICLE...
DO NOT TURN IGNITION KEY TO START POSITION.
Automatic transmission vehicles Manual transmission vehicles To avoid turning the engine off when taking
place behind the steering wheel, do not apply the brakes until you have placed the key in the ignition and turned it to the RUN position.
Drive as usual.
To avoid turning the engine off when taking place behind the steering wheel, do not apply the brakes and do not remove the parking brake until you have placed the key in the ignition and turned it to the RUN position.
Drive as usual.
STATUS When this command is sent, the command module checks engine status, protection zones status and lock status, then retransmits this information to remote control, which indicates the results on the LCD display with a combination of pictograms. When remote control receives a confirmation, it flashes the relevant pictograms and vibrates twice. If vehicle is out of range, remote control will give a soft chirp after five seconds to indicate that either the control module or the remote transmitter could not receive the command.
11
ENGINE RUNTIME Your engine will stop automatically after a preset runtime: 2 min. , 4 min. , 8 min. or 18 min. depending on settings durring installation. These durations are doubled for deisel vehicles. Parking lights will stay on as long as the engine is running.
TRIGGER INPUT Your remote starter is equipped with a negative trigger (pulse) input. This input can be connected to another remote control device or to an AstroStart RST-2 timer output (optional), part number 310-903-502. If this input is connected, consult this device's manual or ask your technician which command controls the Start/Stop function. Commands received on this input are ignored while engine is running on a remote start. All Start/Stop commands triggered on the input act the same as a remote control commands.
CONTINUOUS MODE Continuous Mode function lets you remove the key from the ignition while leaving the engine running. This convenient feature allows you to leave your vehicle for short periods while climate controls remain on.
AUTOMATIC TRANSMISSION
VEHICLES
To access Continuous Mode, send Start command while engine is idling (see STARTING THE ENGINE on page 10). If Turbo Mode is active, you must press a second time on the button of the remote to set the runtime according to the preset settings. Parking lights, engine and climate controls will remain on for the duration of the programmed runtime.
MANUAL TRANSMISSION
VEHICLES
To access Continuous Mode, send Start command before removing the key from ignition when performing the safety sequence described on page 4. See “STARTING the ENGINE“ on page 10. Note: Do not send the stop command if you perform sequence activated by the remote control (Step 7). If Turbo Mode is on, it will be activated when the safety sequence is executed.
Remove the key, exit vehicle and lock all doors. All safety devices will remain active. If you return to your vehicle before runtime has elapsed, just turn the key to RUN position and press the brake pedal.
TURBO MODE (Activated at time of installation) This mode allows the engine to be left running at idle speed for a short period of time so that the turbocharger can cool down as recommended by certain car manufacturers. This mode activates the continuous mode at a reduced runtime (one or two minutes according to the programming). To activate the Turbo Mode, press on the (2 sec.) button (refer to ‘Continuous Mode’).
WHAT STOPS THE ENGINE For your safety, engine will not start or will stop if: Your key is in ignition (prevent Start cycle). Remote control sends a Stop message. Hood is open. Brakes are applied. Engine is over-revving (if programmed Enable at installation). Alarm detects intrusion. Main switch is OFF. Safety sequence not valid (manual transmission vehicle only - parking brake not applied, opening of door detected
while remote starter was not keeping engine running).
MAIN SWITCH The main switch is usually mounted under the dashboard. It is a toggle ON/OFF switch that is used to cancel start functions. It does not disable other commands, which remain active (Alarm features, Locks, etc.).
12
STOP When engine is running on a remote start, you can turn it off by performing a stop command. This command also terminates panic mode and the alarm condition without disarming the security system.
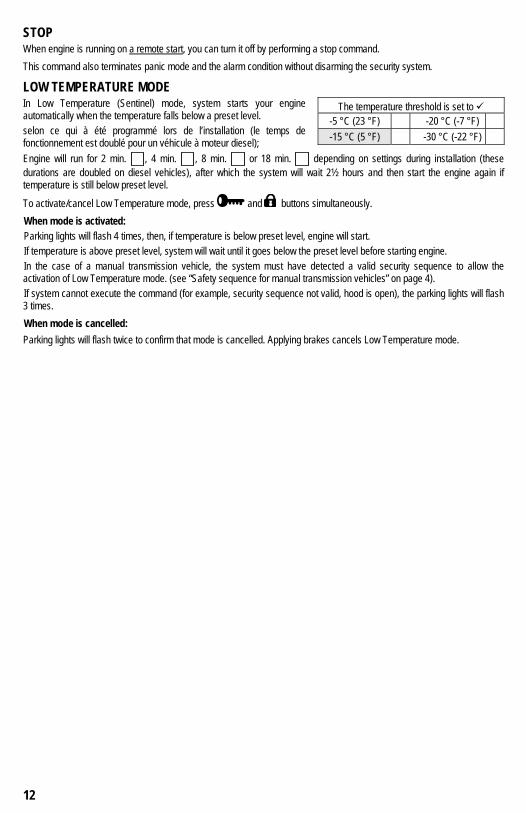
LOW TEMPERATURE MODE In Low Temperature (Sentinel) mode, system starts your engine automatically when the temperature falls below a preset level. selon ce qui à été programmé lors de l’installation (le temps de fonctionnement est doublé pour un véhicule à moteur diesel); Engine will run for 2 min. , 4 min. , 8 min. or 18 min. depending on settings during installation (these durations are doubled on diesel vehicles), after which the system will wait 2½ hours and then start the engine again if temperature is still below preset level.
To activate/cancel Low Temperature mode, press and buttons simultaneously. When mode is activated: Parking lights will flash 4 times, then, if temperature is below preset level, engine will start. If temperature is above preset level, system will wait until it goes below the preset level before starting engine. In the case of a manual transmission vehicle, the system must have detected a valid security sequence to allow the activation of Low Temperature mode. (see “Safety sequence for manual transmission vehicles” on page 4). If system cannot execute the command (for example, security sequence not valid, hood is open), the parking lights will flash 3 times. When mode is cancelled: Parking lights will flash twice to confirm that mode is cancelled. Applying brakes cancels Low Temperature mode.
The temperature threshold is set to -5 °C (23 °F) -20 °C (-7 °F) -15 °C (5 °F) -30 °C (-22 °F)
13
SECURITY SYSTEM This section applies to an AstroStart safety system (optional) and should not be mistaken for the vehicle’s original system. On such a system, the remote can only warn of an alarm status (Alarm Link) (optional connections). The bi-directional remote control is in constant communication with your vehicle. Even if you do not ask for status, it will inform you by means of icons on your remote that a door has been opened for more than 5 minutes, that the engine has stopped, etc.
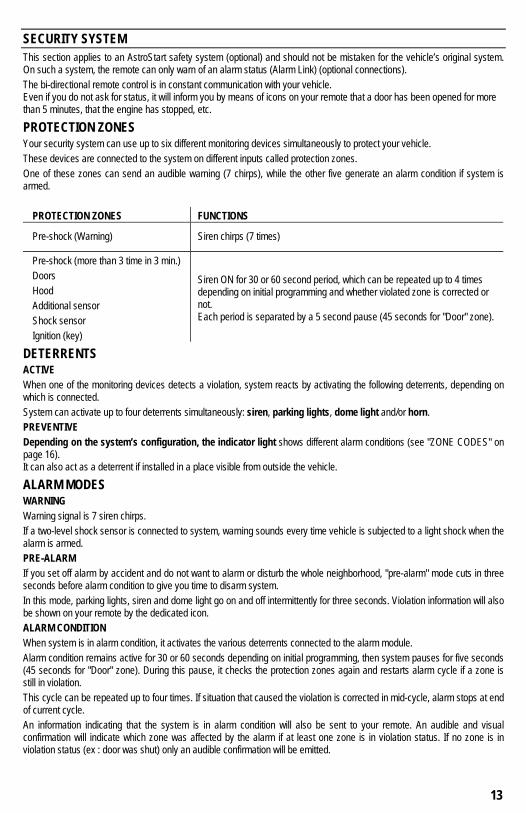
PROTECTION ZONES Your security system can use up to six different monitoring devices simultaneously to protect your vehicle. These devices are connected to the system on different inputs called protection zones. One of these zones can send an audible warning (7 chirps), while the other five generate an alarm condition if system is armed.
PROTECTION ZONES FUNCTIONS
Pre-shock (Warning) Siren chirps (7 times)
Pre-shock (more than 3 time in 3 min.) Doors Hood Additional sensor Shock sensor Ignition (key)
Siren ON for 30 or 60 second period, which can be repeated up to 4 times depending on initial programming and whether violated zone is corrected or not. Each period is separated by a 5 second pause (45 seconds for "Door" zone).
DETERRENTS ACTIVE When one of the monitoring devices detects a violation, system reacts by activating the following deterrents, depending on which is connected. System can activate up to four deterrents simultaneously: siren, parking lights, dome light and/or horn. PREVENTIVE Depending on the system’s configuration, the indicator light shows different alarm conditions (see "ZONE CODES" on page 16). It can also act as a deterrent if installed in a place visible from outside the vehicle.
ALARM MODES WARNING Warning signal is 7 siren chirps. If a two-level shock sensor is connected to system, warning sounds every time vehicle is subjected to a light shock when the alarm is armed. PRE-ALARM If you set off alarm by accident and do not want to alarm or disturb the whole neighborhood, "pre-alarm" mode cuts in three seconds before alarm condition to give you time to disarm system. In this mode, parking lights, siren and dome light go on and off intermittently for three seconds. Violation information will also be shown on your remote by the dedicated icon. ALARM CONDITION When system is in alarm condition, it activates the various deterrents connected to the alarm module. Alarm condition remains active for 30 or 60 seconds depending on initial programming, then system pauses for five seconds (45 seconds for "Door" zone). During this pause, it checks the protection zones again and restarts alarm cycle if a zone is still in violation. This cycle can be repeated up to four times. If situation that caused the violation is corrected in mid-cycle, alarm stops at end of current cycle. An information indicating that the system is in alarm condition will also be sent to your remote. An audible and visual confirmation will indicate which zone was affected by the alarm if at least one zone is in violation status. If no zone is in violation status (ex : door was shut) only an audible confirmation will be emitted.
14
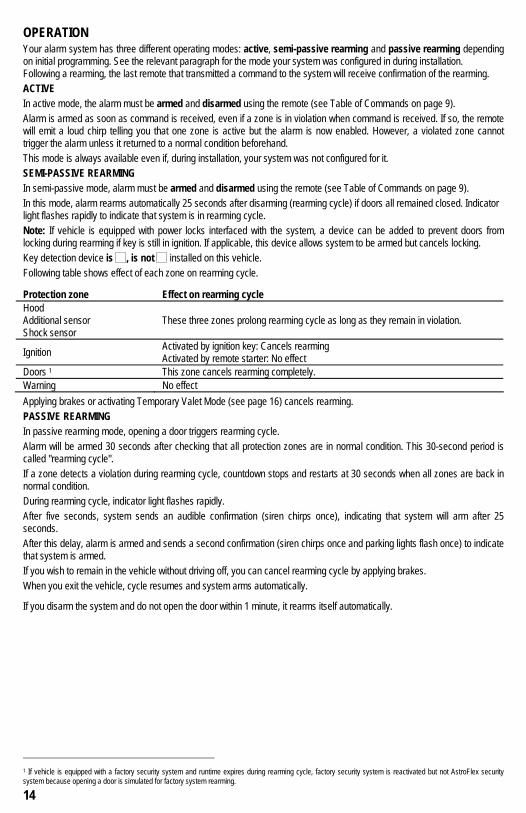
OPERATION Your alarm system has three different operating modes: active, semi-passive rearming and passive rearming depending on initial programming. See the relevant paragraph for the mode your system was configured in during installation. Following a rearming, the last remote that transmitted a command to the system will receive confirmation of the rearming. ACTIVE In active mode, the alarm must be armed and disarmed using the remote (see Table of Commands on page 9). Alarm is armed as soon as command is received, even if a zone is in violation when command is received. If so, the remote will emit a loud chirp telling you that one zone is active but the alarm is now enabled. However, a violated zone cannot trigger the alarm unless it returned to a normal condition beforehand. This mode is always available even if, during installation, your system was not configured for it. SEMI-PASSIVE REARMING In semi-passive mode, alarm must be armed and disarmed using the remote (see Table of Commands on page 9). In this mode, alarm rearms automatically 25 seconds after disarming (rearming cycle) if doors all remained closed. Indicator light flashes rapidly to indicate that system is in rearming cycle. Note: If vehicle is equipped with power locks interfaced with the system, a device can be added to prevent doors from locking during rearming if key is still in ignition. If applicable, this device allows system to be armed but cancels locking. Key detection device is
, is not
installed on this vehicle. Following table shows effect of each zone on rearming cycle.
Protection zone Effect on rearming cycle Hood Additional sensor Shock sensor
These three zones prolong rearming cycle as long as they remain in violation.
Ignition Activated by ignition key: Cancels rearming Activated by remote starter: No effect
Doors 1 This zone cancels rearming completely. Warning No effect Applying brakes or activating Temporary Valet Mode (see page 16) cancels rearming. PASSIVE REARMING In passive rearming mode, opening a door triggers rearming cycle. Alarm will be armed 30 seconds after checking that all protection zones are in normal condition. This 30-second period is called "rearming cycle". If a zone detects a violation during rearming cycle, countdown stops and restarts at 30 seconds when all zones are back in normal condition. During rearming cycle, indicator light flashes rapidly. After five seconds, system sends an audible confirmation (siren chirps once), indicating that system will arm after 25 seconds. After this delay, alarm is armed and sends a second confirmation (siren chirps once and parking lights flash once) to indicate that system is armed. If you wish to remain in the vehicle without driving off, you can cancel rearming cycle by applying brakes. When you exit the vehicle, cycle resumes and system arms automatically.
If you disarm the system and do not open the door within 1 minute, it rearms itself automatically.
1 If vehicle is equipped with a factory security system and runtime expires during rearming cycle, factory security system is reactivated but not AstroFlex security system because opening a door is simulated for factory system rearming.
15
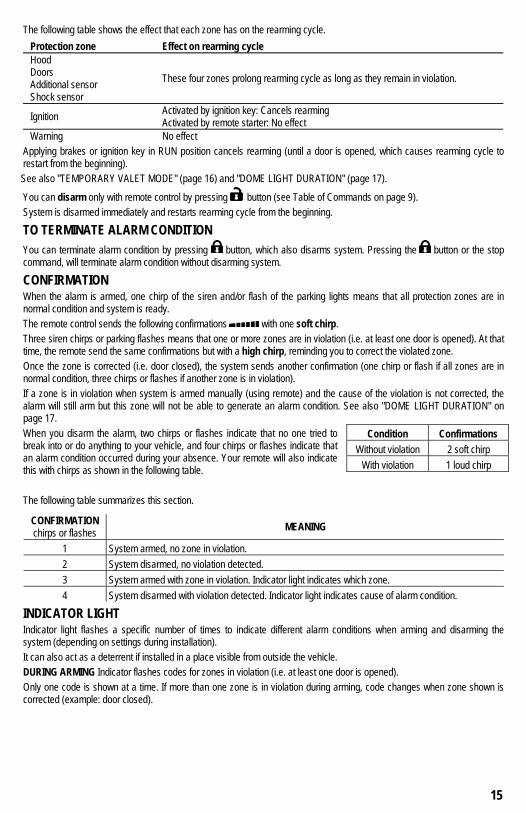
The following table shows the effect that each zone has on the rearming cycle.
Protection zone Effect on rearming cycle Hood Doors Additional sensor Shock sensor
These four zones prolong rearming cycle as long as they remain in violation.
Ignition Activated by ignition key: Cancels rearming Activated by remote starter: No effect
Warning No effect Applying brakes or ignition key in RUN position cancels rearming (until a door is opened, which causes rearming cycle to restart from the beginning). See also "TEMPORARY VALET MODE" (page 16) and "DOME LIGHT DURATION" (page 17).
You can disarm only with remote control by pressing button (see Table of Commands on page 9). System is disarmed immediately and restarts rearming cycle from the beginning.
TO TERMINATE ALARM CONDITION You can terminate alarm condition by pressing button, which also disarms system. Pressing the button or the stop command, will terminate alarm condition without disarming system.
CONFIRMATION When the alarm is armed, one chirp of the siren and/or flash of the parking lights means that all protection zones are in normal condition and system is ready. The remote control sends the following confirmations with one soft chirp. Three siren chirps or parking flashes means that one or more zones are in violation (i.e. at least one door is opened). At that time, the remote send the same confirmations but with a high chirp, reminding you to correct the violated zone. Once the zone is corrected (i.e. door closed), the system sends another confirmation (one chirp or flash if all zones are in normal condition, three chirps or flashes if another zone is in violation). If a zone is in violation when system is armed manually (using remote) and the cause of the violation is not corrected, the alarm will still arm but this zone will not be able to generate an alarm condition. See also "DOME LIGHT DURATION" on page 17. When you disarm the alarm, two chirps or flashes indicate that no one tried to break into or do anything to your vehicle, and four chirps or flashes indicate that an alarm condition occurred during your absence. Your remote will also indicate this with chirps as shown in the following table. The following table summarizes this section.
CONFIRMATION chirps or flashes MEANING
1 System armed, no zone in violation. 2 System disarmed, no violation detected. 3 System armed with zone in violation. Indicator light indicates which zone. 4 System disarmed with violation detected. Indicator light indicates cause of alarm condition.
INDICATOR LIGHT Indicator light flashes a specific number of times to indicate different alarm conditions when arming and disarming the system (depending on settings during installation). It can also act as a deterrent if installed in a place visible from outside the vehicle. DURING ARMING Indicator flashes codes for zones in violation (i.e. at least one door is opened). Only one code is shown at a time. If more than one zone is in violation during arming, code changes when zone shown is corrected (example: door closed).
Condition Confirmations Without violation 2 soft chirp
With violation 1 loud chirp
16
DURING DISARMING Indicator flashes code for last zone that generated the alarm condition.
Code is shown when you press button. This code is repeated until you apply the brakes. The following table shows the meaning of zone codes (number of flashes).
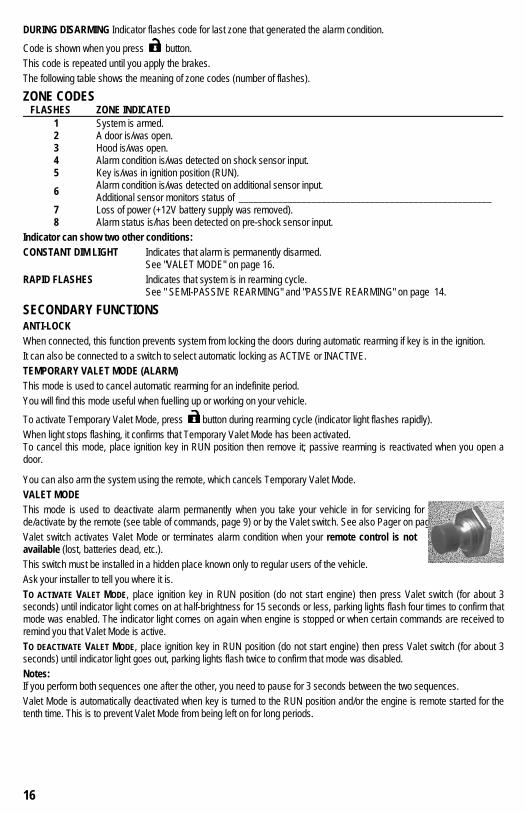
ZONE CODES FLASHES ZONE INDICATED
1 System is armed. 2 A door is/was open. 3 Hood is/was open. 4 Alarm condition is/was detected on shock sensor input. 5 Key is/was in ignition position (RUN).
6 Alarm condition is/was detected on additional sensor input. Additional sensor monitors status of ____________________________________________________
7 Loss of power (+12V battery supply was removed). 8 Alarm status is/has been detected on pre-shock sensor input.
Indicator can show two other conditions: CONSTANT DIM LIGHT Indicates that alarm is permanently disarmed. See "VALET MODE" on page 16. RAPID FLASHES Indicates that system is in rearming cycle.
See " SEMI-PASSIVE REARMING" and "PASSIVE REARMING" on page 14.
SECONDARY FUNCTIONS ANTI-LOCK When connected, this function prevents system from locking the doors during automatic rearming if key is in the ignition. It can also be connected to a switch to select automatic locking as ACTIVE or INACTIVE. TEMPORARY VALET MODE (ALARM) This mode is used to cancel automatic rearming for an indefinite period. You will find this mode useful when fuelling up or working on your vehicle.
To activate Temporary Valet Mode, press button during rearming cycle (indicator light flashes rapidly). When light stops flashing, it confirms that Temporary Valet Mode has been activated. To cancel this mode, place ignition key in RUN position then remove it; passive rearming is reactivated when you open a door.
You can also arm the system using the remote, which cancels Temporary Valet Mode. VALET MODE This mode is used to deactivate alarm permanently when you take your vehicle in for servicing for example. It can be de/activate by the remote (see table of commands, page 9) or by the Valet switch. See also Pager on page 8. Valet switch activates Valet Mode or terminates alarm condition when your remote control is not available (lost, batteries dead, etc.). This switch must be installed in a hidden place known only to regular users of the vehicle. Ask your installer to tell you where it is. TO ACTIVATE VALET MODE, place ignition key in RUN position (do not start engine) then press Valet switch (for about 3 seconds) until indicator light comes on at half-brightness for 15 seconds or less, parking lights flash four times to confirm that mode was enabled. The indicator light comes on again when engine is stopped or when certain commands are received to remind you that Valet Mode is active. TO DEACTIVATE VALET MODE, place ignition key in RUN position (do not start engine) then press Valet switch (for about 3 seconds) until indicator light goes out, parking lights flash twice to confirm that mode was disabled. Notes: If you perform both sequences one after the other, you need to pause for 3 seconds between the two sequences. Valet Mode is automatically deactivated when key is turned to the RUN position and/or the engine is remote started for the tenth time. This is to prevent Valet Mode from being left on for long periods.
17
GLOSSARY SIREN Siren has six different sounds, i.e., it chirps repeatedly and has six different melodies (only supplied with optional alarm kit). It chirps intermittently (short repeated chirps) during a pre-alarm and continuously during an alarm condition. It can confirm ARM and DISARM commands with short chirps; see table in CONFIRMATION section. This function is programmable as ACTIVE or INACTIVE during installation.
HORN Horn beeps intermittently (short repeated beeps) during an alarm condition. This function is optional and may require the installation of additional material. Ask your installer for more details.
PARKING LIGHTS Parking lights flash intermittently (repeated flashes) during a pre-alarm and alarm condition. Parking lights also confirm that commands have been received. See table in CONFIRMATION section.
VIOLATION Violation means a situation that causes a protection zone to generate an alarm condition; example: a door was opened, etc. DOME LIGHT DURATION The system may turn the vehicle dome light on for 30 seconds upon unlocking command or when engine is stopped by ignition key (depends on programming - optional connection - not applicable in "semi-passive rearming" mode). On some vehicles, dome light may remain on after all doors have been closed. If this option applies to your vehicle, rearming cycle is prolonged by the number of seconds during which dome light is kept on by vehicle's factory system.
Special condition If during dome light duration, a "Lock" command is sent while a door is opened, system arms and ignores door violation; if door is still open 45 seconds after dome light duration ends, system recognizes door violation and changes to alarm condition.
LOCK/UNLOCK COMMANDS AND ALARM SYSTEM ARMING/DISARMING If your vehicle is equipped with electric door locks, several functions can be operated by remote control. These features are optional and may require purchasing additional equipment. Consult your dealer for advice. Arming and disarming the security system also controls Lock/Unlock functions. The arming/disarming functions only apply to models equipped with a security system. The following systems can be controlled:
• Door locks • Trunk or hatchback release • Interior lights
LOCK / ARM Press the button, doors are locked and alarm system is armed, parking lights flash once and siren chirps once (if programmed during installation) to confirm command has been received and that none of the protected zones is in violation. Parking light confirmation is sent as many times as command is repeated so you are sure that system has received the command. Audible confirmation is also repeated (siren or horn depending on programming) if option "Confirmation on 2nd lock" is activated (during installation). If a zone is in violation during arming, confirmation is different (3 flashes or chirps) to warn you. See table of alarm codes to know which zone is in violation.
18
UNLOCK / DISARM Press the button, doors are unlocked and alarm is disarmed, parking lights flash and siren chirps twice to confirm command has been received and that no alarm condition was generated during your absence. If there was a violation, confirmation is different (4 flashes or chirps) to warn you. See table of alarm codes to know which zone generated alarm condition. The “Unlock“ function can be programmed and connected in such a way that the first Unlock command only unlocks the driver's door, while a following Unlock command unlocks the other door(s) (optional connection during installation). Dome light will turn on for 30 seconds every time Unlock command is sent (not applicable in semi-passive mode)(optional connection during installation). This 30-second duration is cancelled when Lock command is sent, brakes are applied or key is inserted in ignition and turned to RUN position.
TRUNK RELEASE (This feature must be enabled during installation). Press the button and hold it for 4 second, the trunk is released and parking lights flash three times to confirm command has been executed. The remote shows the trunk opening. Trunk cannot be released if ignition key is in “RUN” position. Furthermore, if alarm is armed and system is not equipped with an additional sensor capable of detecting trunk release (optional equipment not included), opening of trunk with remote control will not be possible. In this case, parking lights flash once and remote control vibrates once to confirm that command has been received but trunk could not be released. If you are not sure you have received confirmation, repeat command. System will repeat confirmation as often as you wish. If your vehicle is equipped with a factory installed security system and that this system is neutralized by the trunk release command, remember to rearm it after trunk is closed ("Lock" command).
SYSTEM EQUIPPED WITH AN ADDITIONAL SENSOR . If your system is equipped with a sensor designed to monitor status of trunk (added at time of installation), parking lights will flash three times to confirm command was received. When trunk is released, 3 chirps are emitted to warn that alarm will not take into account the status of this zone or the shock sensor's zone for the next 5 minutes. If you do not release trunk within 10 seconds, the system will rearm trunk automatically. The timer is reset each time the command is repeated, which allows a new 5-minute period to close the trunk lid. The system will sound a chirp when trunk is closed to confirm it has been rearmed. If trunk is open for more than 5 minutes, the system switches to alarm status.
AUTOMATIC LOCK/UNLOCK Programmable as Active or Inactive during installation. This function locks doors when ignition key is in ‘RUN’ position, engine is running and brakes are applied. Doors are unlocked when key is turned from ‘RUN’ to ‘OFF’ or when Continuous Mode (Including Turbo Mode) is activated or when a safety sequence is detected. If Unlock function is set to unlock only driver's door on the first command, Automatic Unlock function will unlock driver's door only. If dome light is connected to system, it comes on when an Automatic Unlock occurs. This function is: Active Inactive .
19
OTHER COMMANDS ANTITHEFT (CIRCUIT DISABLER) Programmable as Active or Inactive during installation. Your Remote Starter is equipped with an antitheft system. This system, when enabled, consists of an output that controls a relay that cuts all circuits required to operate your vehicle (optional connection). There are two types of antitheft systems.
“PASSIVE ARMING" TYPE ANTITHEFT / This type of antitheft system arms automatically when ignition key is turned from RUN to OFF and remains OFF for one minute. It can also be armed manually by sending a Lock command (unless ignition key is in RUN position). DISARMING Antitheft system is disarmed for one minute when you send an Unlock command. If ignition key is not turned to ‘RUN’ position within one minute, system automatically rearms, thus preventing an intruder from starting your vehicle, even with ignition key. The indicator light (optional) blinks rapidly during rearming, and then continuously when antitheft system is armed. It can be connected so that horn sounds if an intruder tries to start your vehicle when antitheft is armed.
“ACTIVE" TYPE ANTITHEFT / This type of antitheft system is armed by sending a ‘Lock’ command (unless ignition key is in ‘RUN’ position) and is disarmed by sending an ‘Unlock’ command. The indicator light (optional) blinks continuously when antitheft system is armed (if the AstroStart security system is not armed) .
VALET MODE (Antitheft) The Antitheft function can be deactivated for the same reasons and in the same way as the Antitheft system. See "Valet mode" details on page 16.
PARKING LIGHTS STATUS The system can advise you that the vehicle’s lights have been on for more than ten seconds after the engine was stopped (additional optional equipment required). The message is sent again after 30 seconds and then every two minutes for as long as the lights remain on. This function is only available on gas-powered and hybrid vehicles.
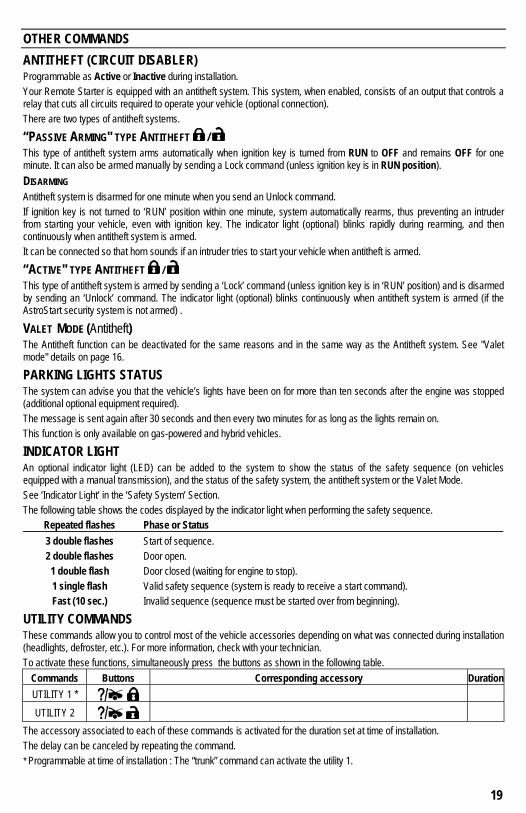
INDICATOR LIGHT An optional indicator light (LED) can be added to the system to show the status of the safety sequence (on vehicles equipped with a manual transmission), and the status of the safety system, the antitheft system or the Valet Mode. See ‘Indicator Light’ in the ‘Safety System’ Section. The following table shows the codes displayed by the indicator light when performing the safety sequence.
Repeated flashes Phase or Status 3 double flashes Start of sequence. 2 double flashes Door open.
1 double flash Door closed (waiting for engine to stop). 1 single flash Valid safety sequence (system is ready to receive a start command). Fast (10 sec.) Invalid sequence (sequence must be started over from beginning).
UTILITY COMMANDS These commands allow you to control most of the vehicle accessories depending on what was connected during installation (headlights, defroster, etc.). For more information, check with your technician. To activate these functions, simultaneously press the buttons as shown in the following table.
The accessory associated to each of these commands is activated for the duration set at time of installation. The delay can be canceled by repeating the command. * Programmable at time of installation : The “trunk” command can activate the utility 1.
20
CAR FINDER Press and buttons simultaneously. This function sounds the horn (short melody) and flashes the parking lights so you can locate your vehicle in a large parking lot.
PANICPANIC To activate the panic mode, press and hold more than 4 seconds on either the or the button. This command activates all deterrents that are connected to the system, parking lights, horn, siren and dome light for 30 sec. or 60 sec. depending on programming made during installation. Panic mode is used to attract attention if you are experiencing difficulties. If you are inside the vehicle when Panic Mode is activated, press on the brake pedal to lock doors (optional connections required) and neutralize antitheft (60 sec. if doors were already locked). As long as the cycle is not over, applying the brakes resets the sequence from the beginning every time. This command will not be executed if engine is kept running by ignition key. Use the stop command to abort panic mode.
START FAIL CODES When a remote start attempt fails, it is possible to determine what caused the failure to start. When this occurs, the remote flashes the parking lights icon the number of times that corresponds to the start fail code. The table below lists the various start fail codes. Note that this code is only displayed once.
Code Failure to start details 1 Module has received a Stop command (remote or timer). 2 Brakes were applied during or after start sequence or module overload occurred. 3 Stopped by alarm. 4 Engine does not crank when starting sequence is initiated. 5 Start command ignored because hood is open. 6 Safety sequence not valid during start sequence. 7 Start command ignored because key is in ignition (in “Run” position). 8 Remote starter main switch is OFF. 9 Runtime has elapsed.
10 Remote starter attempted to start engine three times unsuccessfully. 11 Remote starter sensed engine was already running. 12 Engine is over-revving (RPM > 3000)(programmable at time of installation). 13 Engine not cranking fast enough during start sequence. 14 Security sequence has been invalidated by status of parking brake. 15 Security sequence has been invalidated by opening of one or more doors. 16 Internal failure of module. 19 Module does not detect manual interface. 20 Consult your dealer.
If any of these start fail codes persist, consult your dealer.
21
CODE LEARNING OF ADDITIONAL TRANSMITTER(S) Four different remote controls can be programmed for a given vehicle. If a fifth remote is added, the first remote is deleted. Note: When the first code learning command is sent, all the old codes are cleared out. therefore if you want to add a new remote, all the old ones must be reprogrammed as well. One or more remote transmitters can be added. To do this, the programming is accessed as follows:
Open hood. (Hood switch must be present and operational. – See “Safety checks” on page 21 Place key in the ignition and turn to the “RUN” position Apply the brakes once You now have 10 seconds to turn the key from “RUN” to the “OFF” position 3 times. If this sequence is correctly carried out, the control module flashes parking lights (4 flashes). You may then
proceed to the next step. Press the button on the new remote control. When access code of new remote control is memorized,
the control module will confirm with flashing parking lights (1 flash). Repeat the above procedures for each remote control that has to be programmed (up to 4 remotes). Apply the brakes.
New remote(s) is (are) now added to the system. If your vehicle is equipped with a function that automatically sets driver preferences (seat, mirrors, etc.) and the system is configured to control it, the remote controls programmed in positions 1 and 2 will control the settings for the first driver and the remote controls programmed in positions 3 and 4 will control the settings for the second driver. If you only have two remote controls, program the first one twice and the second one twice to occupy the four memory locations of the system.
SAFETY CHECKS In order to maintain a high safety standard, proceed with the following checks every month.
HOOD SWITCH
• Remote start your vehicle. • Open hood.
Engine should stop as soon as hood is opened. If engine does not stop immediately, turn main switch to OFF position and leave it off until situation is rectified. Contact your service center.
GEARSHIFT CHECK APPLICABLE TO AUTOMATIC TRANSMISSION VEHICLES If key must be in ignition for gearshift to be moved out of P, your vehicle is safe as long as keys are kept away from children. If, on the other hand, gearshift can be put in gear without key being in ignition, proceed with this simple check.
• Make sure that the parking brake is applied. • Put gearshift in gear (D). • Remain in the vehicle and be ready to apply brakes. • Start vehicle with remote starter. • Repeat these steps with gearshift in every position other than Park and Neutral.
If starter reacts within 90 seconds (which is not safe), turn main switch to OFF position and leave it off until situation is rectified. Contact your service center.
• Make sure that the parking brake is applied. • With gearshift in P, start vehicle with remote starter. • Remain in vehicle and be ready to apply brakes. • Without applying brakes, move gearshift out of P.
If, without applying brakes, engine does not stop immediately (which is not safe), turn main switch to OFF position and leave it off until situation is rectified. Contact your service center.
22
GEARSHIFT CHECK APPLICABLE TO MANUAL TRANSMISSION VEHICLES Make sure the parking brake is operational, i.e. it has the capability of immobilizing the vehicle. If the parking brake cannot stop the wheels from turning, which is not safe, place the main switch in OFF position until the situation is rectified.
DETECTION OF PARKING BRAKE STATUS 1. Carry out the safety sequence, then remote start the engine to confirm the safety sequence is valid.
Make sure not to apply the brakes. 2. Release the parking brake.
The engine must stop immediately upon releasing the parking brake. If the engine does not stop, which is not safe, place the main switch in OFF position until the situation is rectified. Consult your service center.
DETECTION OF DOOR OPENING Make sure that the opening of each door (open one by one) will break safety sequence.
1. Carry out the safety sequence, then remote start the engine to confirm the safety sequence is valid. 2. Stop the engine using the remote control. Make sure you do not apply the brakes and that the parking brake
remains applied until step 4. 3. Open then close only one door once the engine has stopped. 4. Try to start the engine using the remote control.
The engine should not be able to be remote started and the system should generate error code #15. Repeat this test for every door of the vehicle (including hatchback if applicable). If the vehicle is equipped with fold-down rear seat backrests, the trunk has to be considered as a door since it is an opening that can give access to the passenger compartment. It must therefore be included in the safety sequence. If the engine starts, which is not safe, place the main switch in OFF position until the situation is rectified. Consult your service center.
REPLACING OR BOOSTING VEHICLE BATTERY If you have to replace or boost your battery for any reason, turn main switch to OFF position and leave it OFF until battery is replaced or fully charged.
Reversing polarity when boosting your battery could permanently damage your remote starter.
Note: If alarm is armed when battery is disconnected, siren will sound when battery is reconnected if a zone is in violation. To avoid this, put system in Valet Mode before disconnecting battery