41
Model SR4500 User Guide AV Surround Receiver SR4500U DFU_00_cover 04.6.25, 11:18 AM Page 9 Adobe PageMaker 6.5J/PPC
| Date post: | 31-Jul-2018 |
| Category: |
Documents |
| Upload: | phungkhuong |
| View: | 231 times |
| Download: | 0 times |

Model SR4500 User Guide
AV Surround Receiver
SR4500U DFU_00_cover 04.6.25, 11:18 AMPage 9 Adobe PageMaker 6.5J/PPC

CAUTIONRISK OF ELECTRIC SHOCK
DO NOT OPEN
CAUTION: TO REDUCE THE RISK OF ELECTRIC SHOCK,DO NOT REMOVE COVER (OR BACK)
NO USER-SERVICEABLE PARTS INSIDEREFER SERVICING TO QUALIFIED SERVICE PERSONNEL
The lightning flash with arrowhead symbol within an equilateral triangle isintended to alert the user to the presence of uninsulated “dangerous voltage”within the product’s enclosure that may be of sufficient magnitude to constitutea risk of electric shock to persons.
The exclamation point within an equilateral triangle is intended to alert the userto the presence of important operating and maintenance (servicing) instructionsin the literature accompanying the product.
WARNINGTO REDUCE THE RISK OF FIRE OR ELECTRIC SHOCK,DO NOT EXPOSE THIS PRODUCT TO RAIN OR MOISTURE.
CAUTION: TO PREVENT ELECTRIC SHOCK, MATCH WIDE BLADE OF PLUGTO WIDE SLOT, FULLY INSERT.
ATTENTION: POUR ÉVITER LES CHOC ÉLECTRIQUES, INTRODUIRE LALAME LA PLUS LARGE DE LA FICHE DANS LA BORNE CORRESPONDANTEDE LA PRISE ET POUSSER JUSQU’AU FOND.
NOTE TO CATV SYSTEM INSTALLER:This reminder is provided to call the CATV (Cable-TV) system installer’s attention to Section 820-40 of theNEC which provides guidelines for proper grounding and, in particular, specifies that the cable groundshall be connected to the grounding system of the building, as close to the point of cable entry as practical.
NOTE:This equipment has been tested and found tocomply with the limits for a Class B digital device,pursuant to Part 15 of the FCC Rules. These limitsare designed to provide reasonable protectionagainst harmful interference in a residentialinstallation. This equipment generates, uses andcan radiate radio frequency energy and, if notinstalled and used in accordance with theinstructions, may cause harmful interference toradio communications. However, there is noguarantee that interference will not occur in aparticular installation. If this equipment does causeharmful interference to radio or televisionreception, which can be determined by tuning the
equipment off and on, the user is encouraged to tryto correct the interference by one or more of thefollowing measures:- Reorient or relocate the receiving antenna.
- Increase the separation between the equipmentand receiver.
- Connect the equipment into an outlet on a circuitdifferent from that to which the receiver isconnected.
- Consult the dealer or an experienced radio/TVtechnician for help.
IMPORTANT SAFETYINSTRUCTIONSREAD BEFORE OPERATING EQUIPMENT
This product was designed and manufactured tomeet strict quality and safety standards. There are,however, some instal lat ion and operat ionprecautions which you should be particularlyaware of.
1. Read Instructions – All the safety andoperating instructions should be read beforethe product is operated.
2. Retain Instructions – The safety and operatinginstructions should be retained for futurereference.
3. Heed Warnings – All warnings on the productand in the operating instructions should beadhered to.
4. Follow Instructions – All operating and useinstructions should be followed.
5. Cleaning – Unplug this product from the walloutlet before cleaning. Do not use liquidcleaners or aerosol cleaners. Use a dampcloth for cleaning.
6. Attachments – Do not use attachments notrecommended by the product manufactureras they may cause hazards.
7. Water and Moisture – Do not use this productnear water-for example, near a bath tub, washbowl, kitchen sink, or laundry tub, in a wetbasement, or near a swimming pool, and thelike.
8. Accessories – Do not place this product on anunstable cart, stand, tripod, bracket, or table.The product may fall, causing serious injury toa child or adult, and serious damage to theproduct. Use only with a cart, stand, tripod,bracket, or table recommended by themanufacturer, or sold with the product. Anymounting of the product should follow themanufacturer’s instructions, and should use amounting accessory recommended by themanufacturer.
9. A product and cart combination should bemoved with care. Quick stops, excessiveforce, and uneven surfaces may cause theproduct and cart combination to overturn.
10. Ventilation – Slots and openings in the cabinetare provided for ventilation and to ensurereliable operation of the product and to protectit from overheating, and these openings mustnot be blocked or covered. The openingsshould never be blocked by placing theproduct on a bed, sofa, rug, or other similarsurface. This product should not be placed ina built-in installation such as a bookcase orrack unless proper ventilation is provided orthe manufacturer’s instructions have beenadhered to.
11. Power Sources – This product should beoperated only from the type of power sourceindicated on the marking label. If you are notsure of the type of power supply to your home,consult your product dealer or local powercompany. For products intended to operatefrom battery power, or other sources, refer tothe operating instructions.
SR4500U DFU_00_cover 04.6.25, 11:18 AMPage 2 Adobe PageMaker 6.5J/PPC

12. Grounding or Polarization – This product maybe equipped with a polarized alternating-current line plug (a plug having one bladewider than the other). This plug will fit into thepower outlet only one way. This is a safetyfeature. If you are unable to insert the plugfully into the outlet, try reversing the plug. If theplug should still fail to fit, contact yourelectrician to replace your obsolete outlet. Donot defeat the safety purpose of the polarizedplug.
AC POLARIZED PLUG
13. Power-Cord Protection – Power-supply cordsshould be routed so that they are not likely tobe walked on or pinched by items placed uponor against them, paying particular attention tocords at plugs, convenience receptacles, andthe point where they exit from the product.
14. Protective Attachment Plug – The product isequipped with an attachment plug havingoverload protection. This is a safety feature.See Instruction Manual for replacement orresetting of protective device. If replacementof the plug is required, be sure the servicetechnician has used a replacement plugspecified by the manufacturer that has thesame overload protection as the original plug.
15. Outdoor Antenna Grounding – If an outsideantenna or cable system is connected to theproduct, be sure the antenna or cable systemis grounded so as to provide some protectionagainst voltage surges and built-up staticcharges. Article 810 of the National ElectricalCode, ANSI/NFPA 70, provides informationwith regard to proper grounding of the mastand supporting structure, grounding of thelead-in wire to an antenna discharge unit, sizeof grounding conductors, location of antenna-discharge unit, connection to groundingelectrodes, and requirements for thegrounding electrode. See Figure 1.
16. Lightning – For added protection for thisproduct during a lightning storm, or when it isleft unattended and unused for long periods oftime, unplug it from the wall outlet anddisconnect the antenna or cable system. Thiswill prevent damage to the product due tolightning and power-line surges.
17. Power Lines – An outside antenna systemshould not be located in the vicinity ofoverhead power lines or other electric light orpower circuits, or where it can fall into suchpower lines or circuits. When installing anoutside antenna system, extreme care shouldbe taken to keep from touching such powerlines or circuits as contact with them might befatal.
18. Overloading – Do not overload wall outlets,extension cords, or integral conveniencereceptacles as this can result in a risk of fire orelectric shock.
19. Object and Liquid Entry – Never push objectsof any kind into this product through openingsas they may touch dangerous voltage pointsor short-out parts that could result in a fire orelectric shock. Never spill liquid of any kind onthe product.
20. Servicing – Do not attempt to service thisproduct yourself as opening or removingcovers may expose you to dangerous voltageor other hazards. Refer all servicing toqualified service personnel.
21. Damage Requiring Service – Unplug thisproduct from the wall outlet and refer servicingto qualified service personnel under thefollowing conditions:
a. When the power-supply cord or plug isdamaged.
b. If liquid has been spilled, or objects havefallen into the product.
c. If the product has been exposed to rain orwater.
d. If the product does not operate normally byfollowing the operating instructions. Adjustonly those controls that are covered by theoperating instructions as an improperadjustment of other controls may result indamage and will often require extensive workby a qualified technician to restore the productto its normal operation.
e. If the product has been dropped or damagedin any way, and
f. When the product exhibits a distinct change inperformance – this indicates a need forservice.
22. Replacement Parts – When replacementparts are required, be sure the servicetechnician has used replacement partsspecified by the manufacturer or have thesame characteristics as the original part.Unauthorized substitutions may result in fire,electric shock, or other hazards.
23. Safety Check – Upon completion of anyservice or repairs to this product, ask theservice technician to perform safety checks todetermine that the product is in properoperating condition.
24. Wall or Ceiling Mounting – The product shouldbe mounted to a wall or ceiling only asrecommended by the manufacturer.
25. Heat – The product should be situated awayfrom heat sources such as radiators, heatregisters, stoves, or other products (includingamplifiers) that produce heat.
FIGURE 1EXAMPLE OF ANTENNA GROUNDING AS PERNATIONAL ELECTRICAL CODE, ANSI/NFPA 70
This Class B digital apparatus complies withCanadian ICES-003.
Cet appareil numérique de la Classe B est conformeà la norme NMB-003 du Canada.
NEC - NATIONAL ELECTRICAL CODE
ANTENNALEAD IN WIRE
GROUNDCLAMP
ANTENNADISCHARGE UNIT(NEC SECTION 810-20)
GROUNDING CONDUCTORS(NEC SECTION 810-21)
ELECTRICSERVICEEQUIPMENT
GROUND CLAMPSPOWER SERVICE GROUNDINGELECTRODE SYSTEM(NEC ART 250, PART H)
SR4500U DFU_00_cover 04.6.25, 11:18 AMPage 3 Adobe PageMaker 6.5J/PPC

EN
GL
ISH
1
TABLE OF CONTENTSINTRODUCTION.................................. 2PRECAUTIONS ................................... 2DESCRIPTION..................................... 2FEATURES .......................................... 3ACCESSORIES ................................... 3FRONT PANEL .................................... 4
FL DISPLAY ................................................................... 5
REAR PANEL ...................................... 6REMOTE CONTROL OPERATION ..... 7
FUNCTION AND OPERATION ...................................... 7
PROGRAMMING THE REMOTE CONTROLLER ......... 8
OPERATION OF REMOTE CONTROL UNIT ................ 9
GENERAL INFORMATION OF RC5500SR TO SR4500 ... 9
CONNECTIONS................................. 11SPEAKER PLACEMENT ............................................. 11
CONNECTING SPEAKERS ......................................... 11
CONNECTING AUDIO COMPONENTS ...................... 12
CONNECTING VIDEO COMPONENTS ...................... 13
ADVANCED CONNECTING ........................................ 14
CONNECTING THE REMOTE CONTROL JACKS ..... 14
CONNECTING THE ANTENNA TERMINALS .............. 15
SETUP ............................................... 16SETUP MENU SYSTEM .............................................. 16
ENTER THE DESIRED MENU ITEM OF THE
SETUP MENU .............................................................. 16
SIMPLE SETUP ........................................................... 17
1. INPUT SETUP (ASSIGNABLE DIGITAL INPUT) ..... 17
2. SPEAKER SETUP ................................................... 18
3. PREFERENCE ......................................................... 21
4. SURROUND ............................................................ 21
5. PL II (DOLBY PRO LOGIC II ) MUSIC PARAMETER .. 22
6. CS II (CIRCLE SURROUND II) ............................... 22
BASIC OPERATION (PLAY BACK) .. 23SELECTING AN INPUT SOURCE ............................... 23
SELECTING THE SURROUND MODE ....................... 23
ADJUSTING THE MAIN VOLUME .............................. 23
ADJUSTING THE TONE (BASS & TREBLE) CONTROL ... 23
TEMPORARILY TURNING OFF THE SOUND ............ 23
USING THE SLEEP TIMER ......................................... 23
NIGHT MODE .............................................................. 23
SURROUND MODE........................... 24OTHER FUNCTION ........................... 27
ATTENUATION TO ANALOG INPUT SIGNAL ............. 27
LISTENING THROUGH HEADPHONES ..................... 27
VIDEO ON/OFF ........................................................... 27
DISPLAY MODE ........................................................... 27
SELECTING ANALOG AUDIO INPUT OR DIGITAL
AUDIO INPUT .............................................................. 27
RECORDING AN ANALOG SOURCE ......................... 28
HT-EQ .......................................................................... 28
7.1 CH INPUT .............................................................. 28
7.1 CH INPUT LEVEL .................................................. 29
BASIC OPERATION (TUNER) .......... 30LISTENING TO THE TUNER ....................................... 30
PRESET MEMORY ...................................................... 30
SURROUND SPEAKER B SYSTEM. 32ANOTHER ROOM PLAYBACK USING THE
S(SURROUND) SPEAKER B TERMINALS ................. 32
TROUBLESHOOTING ....................... 32TECHNICAL SPECIFICATIONS ....... 34DIMENSIONS .................................... 34
SR4500U DFU_01_ENG 1_2 04.6.25, 11:28 AMPage 1 Adobe PageMaker 6.5J/PPC
EN
GL
ISH
2
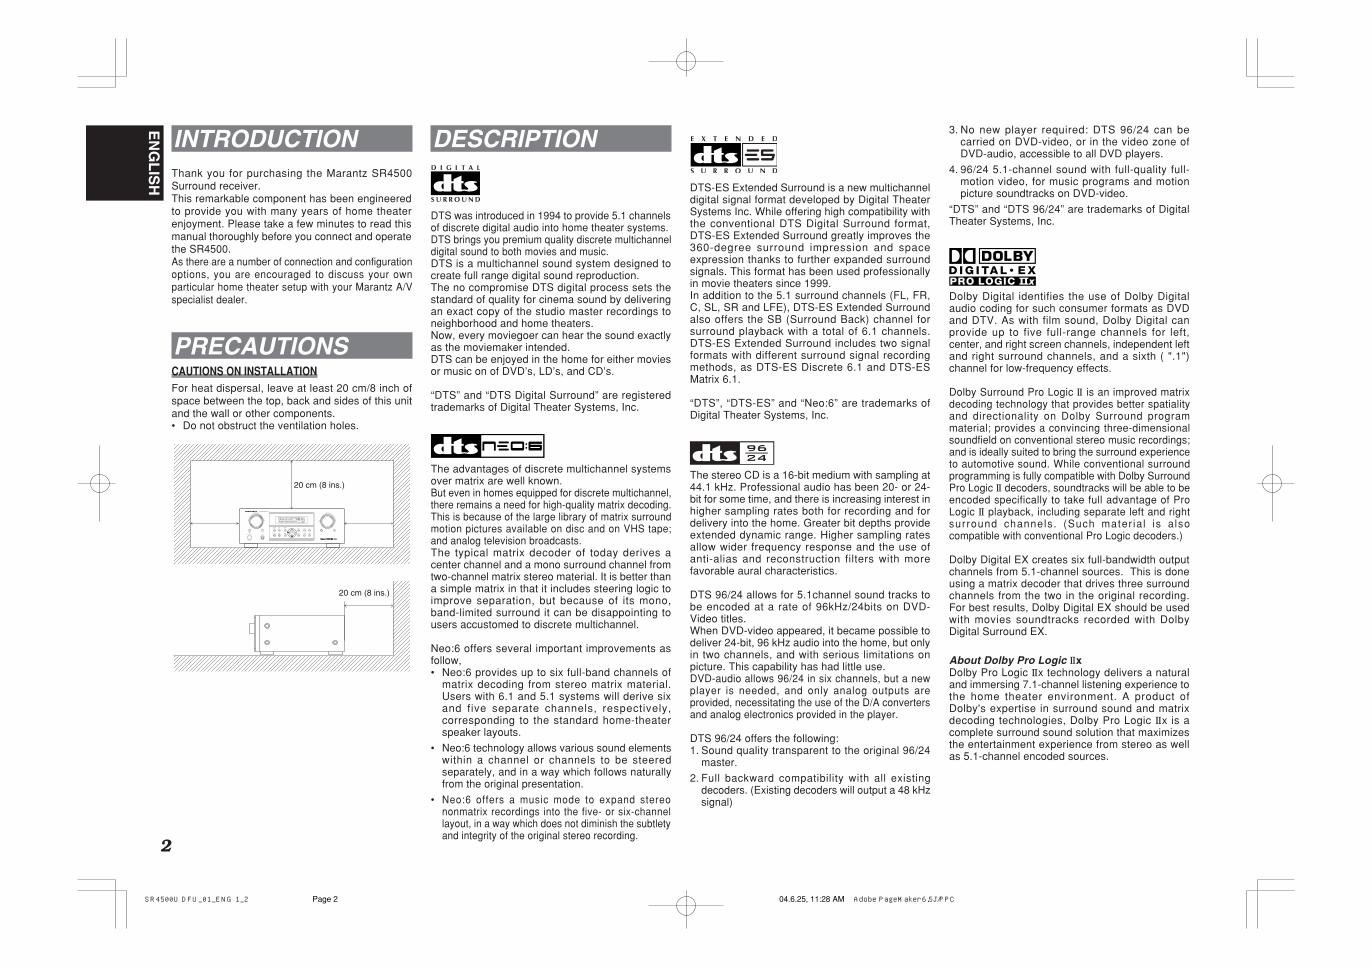
INTRODUCTIONThank you for purchasing the Marantz SR4500Surround receiver.This remarkable component has been engineeredto provide you with many years of home theaterenjoyment. Please take a few minutes to read thismanual thoroughly before you connect and operatethe SR4500.As there are a number of connection and configurationoptions, you are encouraged to discuss your ownparticular home theater setup with your Marantz A/Vspecialist dealer.
PRECAUTIONSCAUTIONS ON INSTALLATIONFor heat dispersal, leave at least 20 cm/8 inch ofspace between the top, back and sides of this unitand the wall or other components.• Do not obstruct the ventilation holes.
20 cm (8 ins.)
20 cm (8 ins.)
SURROUND
AV SURROUND RECEIVER SR4500
DOWN UP
VOLUMEINPUT SELECTOR
POWER ON/STANDBY PHONES
STANDBY
MUTE7.1CH INPUT S.SPEAKER B ATT
PURESETUPDIRECT
SIMPLE
AUTO HT-EQ MENU
ENTER
DISPLAY MEMO CLEAR
T-MODEEXIT BAND
MODE
DISP MULTI AUTO TUNED ST V – OFF NIGHT PEAK ANALOG
DIGITAL
ATT
SLEEP SURRAUTO DIRECT DISC 6.1 MTX 6.1 EQDIGITAL
SURROUND
PCM
L C R
SL S SR
LFE
DESCRIPTION
DTS was introduced in 1994 to provide 5.1 channelsof discrete digital audio into home theater systems.DTS brings you premium quality discrete multichanneldigital sound to both movies and music.DTS is a multichannel sound system designed tocreate full range digital sound reproduction.The no compromise DTS digital process sets thestandard of quality for cinema sound by deliveringan exact copy of the studio master recordings toneighborhood and home theaters.Now, every moviegoer can hear the sound exactlyas the moviemaker intended.DTS can be enjoyed in the home for either moviesor music on of DVD’s, LD’s, and CD’s.
“DTS” and “DTS Digital Surround” are registeredtrademarks of Digital Theater Systems, Inc.
The advantages of discrete multichannel systemsover matrix are well known.But even in homes equipped for discrete multichannel,there remains a need for high-quality matrix decoding.This is because of the large library of matrix surroundmotion pictures available on disc and on VHS tape;and analog television broadcasts.The typical matrix decoder of today derives acenter channel and a mono surround channel fromtwo-channel matrix stereo material. It is better thana simple matrix in that it includes steering logic toimprove separation, but because of its mono,band-limited surround it can be disappointing tousers accustomed to discrete multichannel.
Neo:6 offers several important improvements asfollow,• Neo:6 provides up to six full-band channels of
matrix decoding from stereo matrix material.Users with 6.1 and 5.1 systems will derive sixand five separate channels, respectively,corresponding to the standard home-theaterspeaker layouts.
• Neo:6 technology allows various sound elementswithin a channel or channels to be steeredseparately, and in a way which follows naturallyfrom the original presentation.
• Neo:6 offers a music mode to expand stereononmatrix recordings into the five- or six-channellayout, in a way which does not diminish the subtletyand integrity of the original stereo recording.
DTS-ES Extended Surround is a new multichanneldigital signal format developed by Digital TheaterSystems Inc. While offering high compatibility withthe conventional DTS Digital Surround format,DTS-ES Extended Surround greatly improves the360-degree surround impression and spaceexpression thanks to further expanded surroundsignals. This format has been used professionallyin movie theaters since 1999.In addition to the 5.1 surround channels (FL, FR,C, SL, SR and LFE), DTS-ES Extended Surroundalso offers the SB (Surround Back) channel forsurround playback with a total of 6.1 channels.DTS-ES Extended Surround includes two signalformats with different surround signal recordingmethods, as DTS-ES Discrete 6.1 and DTS-ESMatrix 6.1.
“DTS”, “DTS-ES” and “Neo:6” are trademarks ofDigital Theater Systems, Inc.
The stereo CD is a 16-bit medium with sampling at44.1 kHz. Professional audio has been 20- or 24-bit for some time, and there is increasing interest inhigher sampling rates both for recording and fordelivery into the home. Greater bit depths provideextended dynamic range. Higher sampling ratesallow wider frequency response and the use ofanti-alias and reconstruction filters with morefavorable aural characteristics.
DTS 96/24 allows for 5.1channel sound tracks tobe encoded at a rate of 96kHz/24bits on DVD-Video titles.When DVD-video appeared, it became possible todeliver 24-bit, 96 kHz audio into the home, but onlyin two channels, and with serious limitations onpicture. This capability has had little use.DVD-audio allows 96/24 in six channels, but a newplayer is needed, and only analog outputs areprovided, necessitating the use of the D/A convertersand analog electronics provided in the player.
DTS 96/24 offers the following:1. Sound quality transparent to the original 96/24
master.
2. Full backward compatibility with all existingdecoders. (Existing decoders will output a 48 kHzsignal)
3. No new player required: DTS 96/24 can becarried on DVD-video, or in the video zone ofDVD-audio, accessible to all DVD players.
4. 96/24 5.1-channel sound with full-quality full-motion video, for music programs and motionpicture soundtracks on DVD-video.
“DTS” and “DTS 96/24” are trademarks of DigitalTheater Systems, Inc.
Dolby Digital identifies the use of Dolby Digitalaudio coding for such consumer formats as DVDand DTV. As with film sound, Dolby Digital canprovide up to five full-range channels for left,center, and right screen channels, independent leftand right surround channels, and a sixth ( ".1")channel for low-frequency effects.
Dolby Surround Pro Logic II is an improved matrixdecoding technology that provides better spatialityand directionality on Dolby Surround programmaterial; provides a convincing three-dimensionalsoundfield on conventional stereo music recordings;and is ideally suited to bring the surround experienceto automotive sound. While conventional surroundprogramming is fully compatible with Dolby SurroundPro Logic II decoders, soundtracks will be able to beencoded specifically to take full advantage of ProLogic II playback, including separate left and rightsurround channels. (Such mater ia l is a lsocompatible with conventional Pro Logic decoders.)
Dolby Digital EX creates six full-bandwidth outputchannels from 5.1-channel sources. This is doneusing a matrix decoder that drives three surroundchannels from the two in the original recording.For best results, Dolby Digital EX should be usedwith movies soundtracks recorded with DolbyDigital Surround EX.
About Dolby Pro Logic IIxDolby Pro Logic IIx technology delivers a naturaland immersing 7.1-channel listening experience tothe home theater environment. A product ofDolby's expertise in surround sound and matrixdecoding technologies, Dolby Pro Logic IIx is acomplete surround sound solution that maximizesthe entertainment experience from stereo as wellas 5.1-channel encoded sources.
SR4500U DFU_01_ENG 1_2 04.6.25, 11:28 AMPage 2 Adobe PageMaker 6.5J/PPC

EN
GL
ISH
3
Dolby Pro Logic IIx is fully compatible with DolbySurround Pro Logic technology and can optimallydecode the thousands of commercially available DolbySurround encoded video cassettes and televisionprograms with enhanced depth and spatiality. It canalso process any high-quality stereo or AdvancedResolution 5.1-channel music content into a seamless6.1- or 7.1-channel listening experience.
Manufactured under license from Dolby Laboratories.“Dolby”, “Pro Logic”, and the double-D symbol aretrademarks of Dolby Laboratories.
Circle Surround II (CS-II) is a powerful and versatilemultichannel technology. CS-II is designed toenable up to 6.1 multichannel surround soundplayback from mono, stereo, CS encoded sourcesand other matrix encoded sources. In all cases thedecoder extends it into 6 channels of surroundaudio and a LFE/subwoofer signal. The CS-IIdecoder creates a listening environment thatplaces the listener “inside” music performancesand dramatical ly improves both hi-f i audioconventional surround-encoded video material.CS-II provides composite stereo rear channels togreatly improve separation and image positioning –adding a heightened sense of realism to both audioand A/V productions.CS-II is packed with other useful feature like dialogclarity (SRS Dialog) for movies and cinema-likebass enrichment (TruBass). CS-II can enable thedialog to become clearer and more discernable inmovies and it enables the bass frequenciescontained in the original programming to moreclosely achieve low frequencies – overcoming thelow frequency limitations of the speakers by fulloctave.
Circle Surround II, Dialog Clarity, TruBass, SRSand symbol are trademarks of SRS Labs, Inc.Circle Surround II, Dialog Clarity and TruBasstechnology are incorporated under license fromSRS Labs, Inc.
FEATURESThe SR4500 incorporates the latest generation ofdigital surround sound decoding technology suchas Dolby Digital EX, Dolby Digital, DTS ES(Discrete 6.1 and Matrix 6.1), DTS Neo:6 (Cinema,Music), Dolby Pro-Logic IIx (Movie, Music andGame), Circle Surround II (Cinema and Music).In addition, Marantz has focused on the future. Byutilizing pre-out jacks, 7.1 direct inputs the SR4500is tomorrow's technology, today!
The SR4500 features a fully discrete 7 channelamplifier section capable of delivering 80 watts ofhigh-current amplification, for continuously clean andstable power into each of the seven channels. Itemploys a massive EI power transformer incombination with oversized filter capacitors. Thisdesign configuration is capable of a clear andpowerful reproduction of the most demanding actionmovie soundtracks and full range (multichannel)music discs. Through its ability to generate very highoutput voltages, the SR4500 can easily drive themost demanding speakers with optimum results.
The SR4500 incorporates the most advancedDigital Signal Processing circuitry, along with aCrystal® 192 kHz/24 bit D/A converter in each ofthe 7 channels. Independent power supply circuitsare incorporated for the FL display, audio andvideo sections for maximum separation, clarity anddynamic range. Together with hand-selectedcustomized components, all elements work inharmony to recreate the emotion, exactly as theartist had intended.
The SR4500 is designed and engineered withextensive feedback from dealers and consumers. Itfeatures a heavy duty speaker binding posts andan extensive array of both analog and digital inputs/ outputs. With 4 assignable digital inputs, 2component inputs and SACD Multi Channel (7.1channel) direct inputs is taken to a stunning newlevel.
An easy-to-use universal remote control allows fullaccess to all of the operating functions and can beused for system operation as well.
This unit has Simple Setup function for easy setup.You can setup all speaker settings by just selectingyour room size and the number of your speakerswith Simple Setup function. You can also setupcustomized settings just like conventional AVamplifiers.
The TruSurround Headphone technology providesa surround sound listening experience overheadphones.When listening to multichannel content such as DVDmovies over headphones, the listening experience isfundamentally different than listening to speakers.Since the headphone speaker drivers are covering thepinna of the ear, the listening experience differs greatlyfrom traditional speaker playback. TruSurround utilizespatented headphone perspective curves to solve thisproblem and provides a non-fatiguing, immersive,home theater listening experience. TruSurroundHeadphone also delivers exceptional 3D audio frommono and stereo material.
• Dolby Digital EX, Dolby Digital ,DTS ES (Discrete 6.1, Matrix 6.1, Neo: 6)
• Dolby Pro Logic IIx (Movie, Music, Game)• Circle Surround II (Movie, Music, Mono)• 7 x 80 Watts (8 Ohm), Discrete Amplifiers• Massive Energy Power Supply, Huge EI
Transformer, Large ELCO's.• 192 kHz/24 bit Crystal® DAC for all 7 Channels• 32 bit Digital Surround Processing Chipsets• Video Off Mode• Large Heavy Duty Speaker Terminals for all
Channels• Auto Input Signal Detection• Improved Station Name Input Method, 50
Presets• Auto Adjust Function for Speaker Distance
Settings (Delay Time)• Universal remote control• Simple Setup Function• Simple Video Conversion (Video ↔ S-Video)
ACCESSORIESRemote Controller RC5500SR
CH.SEL
LIP.SYNC
PTY
SUB-T/ATT
AUDIO
INPUT/DISC+
F.DIRECT
RDS
TUNE/SEARCH
T-MODE
TREBLECHANNEL/SKIP
BASS A/DP.SCAN/V-OFF
7.1CH IN
STEREO
MCH-STMEMO
CLEAR
DISPLAY
NIGHT
CSII
EX/ESVIRTUAL
DTS
S-DIRECTAUTO
T.TONE
MENU OFF
SETUP/
MENU
OSD
SLEEP
MUTE
AMP
AUX1
TUNER
CD
TAPECDR/MD
DVD
POWER
VCR1DSS/VCR2
TV
SYSTEM REMOTE CONTROLLER
RC5500SR
ENTER
0
32
1
65
4
98
7
VOL.MAIN
VOL.TV
AAA-size batteries X 2
AM Loop Antenna
FM Antenna
User Guide
SR4500U DFU_01_ENG 1_2 04.6.25, 11:28 AMPage 3 Adobe PageMaker 6.5J/PPC

EN
GL
ISH
4
FRONT PANEL
t INFRARED receiving sensor windowThis window receives infrared signals for the remotecontrol.
y SURROUND MODE buttonYou can select the surround mode by pressing thisbutton.
u PURE DIRECT buttonWhen this button is pressed, the tone control circuitryis bypassed as well as Bass Management.DIRECT indicator will be illuminated in the display.
Notes:• The surround mode is automatically switched to
AUTO when the source direct function is turned on.
• Additionally, Speaker Configurations are fixedautomatically as follows.Front SPKR = Large, Center SPKR = Large,Surround SPKR = Large, Sub woofer = On
• This function is unavailable when the surroundspeaker B system is activated. While this functionis activated, this function will be canceled if the S.SPEAKER B button is pressed.
SURROUND
AV SURROUND RECEIVER SR4500
DOWN UP
VOLUMEINPUT SELECTOR
POWER ON/STANDBY PHONES
STANDBY
MUTE7.1CH INPUT S. SPEAKER B ATT
PURESETUPDIRECT
SIMPLE
AUTO HT-EQ MENU
ENTER
DISPLAY MEMORY CLEAR
T-MODEEXIT BAND
MODE
DISP MULTI AUTO TUNED ST V – OFF NIGHT PEAK ANALOG
DIGITAL
ATT
SLEEP SURRAUTO DIRECT DISC 6.1 MTX 6.1 EQDIGITAL
SURROUND
PCM
L C R
SL S SR
LFE
!5!6!7!8!9@0@1@2
q w yu !3i o !0t !2!1re
!4
q POWER switch and STANDBY indicatorWhen this switch is pressed once, the unit turns ONand the display illuminates. When pressed again,the unit turns OFF and the STANDBY indicator willbe illuminated.
w 7.1CH INPUT buttonPress this button to select the output of an externalmultichannel player.
e INPUT SELECTOR knob (AUDIO/ VIDEO)This knob is used to select the input sources.The video function selector, such as TV, DVD, VCR1and DSS, selects video and audio simultaneously.Audio function sources such as CD, TAPE, CDR/MD, and TUNER may be selected in conjunctionwith a Video source.This feature (Sound Injection) combines a soundfrom one source with a picture from another.Choose the video source first, and then choose adifferent audio source to activate this function.
r S.(Surround) SPEAKER B buttonPress this button to activate the Surround SpeakerB system . “SPKR B” indicator will be illuminated inthe display. (See page 32)
i SIMPLE SETUP buttonPress this button to enter the simple setup mode.You can setup the speaker conditions (speakersizes, number of speakers, speaker delay times)quickly by pressing the cursor buttons.
o DISPLAY buttonWhen this button is pressed, the FL display modeis changed as Surround Mode → Auto-display Off→ Display Off → Input Function and the display offindicator(DISP) lights up in condition of DISPLAYOFF.
!0 MEMORY buttonPress this button to enter the tuner preset memorynumbers or station names. (See page 30)
!1 CLEAR buttonPress this button to cancel the station-memory settingmode or preset scan tuning. (See page 31)
!2 VOLUME control knobAdjusts the overall sound level. Turning the controlclockwise increases the sound level.
!3 ATT (Attenuate) buttonIf the selected analog audio input signal is greaterthan the capable level of internal processing, thePEAK indicator will illuminate. If this happens, youshould press the ATT button. “ATT” is displayedwhen this function is activated.The signal-input level is reduced by about half.Attenuation will not work with the output signal of“REC OUT” (TAPE, CD-R/MD, VCR1 and VCR2output). This function is memorized for each inputfunction.
!4 MUTE buttonPress this button to mute the output to the speakers.Press it again to return to the previous volume level.
!5 T-MODE buttonPress this button to select the auto stereo mode ormono mode when the FM band is selected.The “AUTO” indicator lights in the auto stereo mode.(See page 30)
!6 BAND buttonPress this button to switch between FM and AM inthe TUNER mode.
!7 EXIT buttonThis button is used to exit from the SETUP MAINMENU.
!8 Cursor ( , , , ) / ENTER buttonUse these buttons when operating the SETUP MAINMENU and TUNER function.
!9 MENU buttonThis button is used to enter the SETUP MAIN MANU.
@0 HT-EQ buttonUsed to turn on or off HT(Home Theater)-EQ mode.This mode compensates for the audio portion of amovie sounding “bright”. When this button ispressed, “EQ” indicator lights up.
@1 AUTO (Auto surround) buttonPress this button to select the AUTO mode from thesurround modes. When this mode is selected, thereceiver determines the surround mode correspondingto a digital input signal automatically.
@2 HEADPHONE jack for stereo headphonesThis jack may be used to listen to the SR4500’soutput through a pair of headphones. Be certainthat the headphones have a standard 1 / 4" stereophono plug. Note that the main room speakers willautomatically be turned off when the headphonejack is in use.
Notes:• When using headphones, the surround mode will
change to STEREO and TruSurround (TS)headphones by SURROUND MODE button.
• The surround mode returns to the previous settingas soon as the headphone plug is removed from thejack.
SR4500U DFU_01_ENG 1_2 04.6.25, 11:28 AMPage 4 Adobe PageMaker 6.5J/PPC

EN
GL
ISH
5
DISP AUTO TUNED ST V – OFF NIGHT PEAK ANALOG
DIGITAL
ATT
SLEEP SURRAUTO DIRECT DISC 6.1 MTX 6.1 EQDIGITAL
SURROUND
PCM
L C R
SL S SR
LFE
SPKR B
¡7
¡6
f
s
a
¡5
g j l ¡1 ¡3d
h ¡0 ¡2 ¡4k
FL DISPLAY
a DISP (Display Off) indicatorThis indicator is illuminated when the SR4500 is inthe display off condition.
s SLEEP timer indicatorThis indicator is illuminated when the sleep timerfunction is active.
d AUTO SURR (Auto Surround mode)indicator
This indicator is illuminated to show that the AUTOSURROUND mode is in use.
f TUNER’s indicatorsAUTO : This indicator illuminates when the
tuner’s Auto mode is in use.TUNED : This indicator illuminates when a
station is being received withsufficient signal strength to provideacceptable listening quality.
ST(Stereo) : This indicator illuminates when anFM station is being tuned into stereocondition.
g DTS-ES mode indicators (DISC6.1, MTX6.1)These indicators will illuminate to show the DTS-ES decoding mode (Discrete 6.1 or Matrix 6.1).
h V (video)-OFF mode indicatorThis indicator is illuminated when the Video-OFFfunction is active.
¡4 SIGNAL FORMAT indicators2 DIGITAL, EX, 2 SURROUND, dts, ES, 96/24,PCMWhen the selected input is a digital source, someof these indicators will be illuminated to display thespecific type of signal in use.
¡5 ENCODED CHANNEL STATUSindicators
These indicators display the channels that areencoded with a digitalinput signal. If the selected digital input signal isDolby Digital 5.1ch or DTS 5.1ch, “L”, “C”, “R”,“SL”, “SR” and “LFE” will be illuminated. If thedigital input signal is 2 channel PCM-audio, “L” and“R” will be displayed.If Dolby Digital 5.1ch signal with Surround EX flagor DTS-ES signal comes in, “L”, “C”, “R”, “SL”, “S” ,“SR” and “LFE” will be illuminated.
¡6 Main Information DisplayThis display shows messages relating to thestatus, input source, surround mode, tuner,volume level or other aspects of unit’s operation.
¡7 DIRECT (Pure direct) indicatorThis indicator is illuminated when the SR4500 is inthe PURE DIRECT mode.
j NIGHT mode indicatorThis indicator is illuminated when the SR4500 is inthe Night mode, which reduces the dynamic rangeof digital program material at low volume levels.
k SPKR (Speaker) B indicatorThis indicator is illuminated when the S(Surround)speaker B system is active.
l PEAK indicatorThis indicator is a monitor for an analog audio inputsignal. If the selected analog audio input signal isgreater than the capable level of internal processing,this will illuminate. If this happens, you should pressthe ATT button on the front panel or the remote.
¡0 EQ mode indicatorThis indicator is illuminated when the HT-EQfunction is active.
¡1 ATT (Attenuation) indicatorThis indicator is illuminated when the attenuationfunction is active.
¡2 DIGITAL Input IndicatorThis indicator lights when a digital input has beenselected.
¡3 ANALOG input indicatorThis indicator is illuminated when an analog inputsource has been selected.
SR4500U DFU_01_ENG 1_2 04.6.25, 11:29 AMPage 5 Adobe PageMaker 6.5J/PPC

EN
GL
ISH
6
n DIGITAL INPUT (Dig.1 - 4) / OUTPUT(coaxial, optical)
These are the digital audio inputs and outputs.There are 2 digital inputs with coaxial jacks, 2 withoptical jacks.The inputs accept digital audio signals from acompact disc, LD, DVD, or other digital sourcecomponent.For digital output, there is 1 coaxial output and 1optical output.The digital outputs can be connected to MDrecorders, CD recorders, DAT decks, or othersimilar components.
m COMPONENT VIDEO INPUT/OUTPUTIf your DVD player or other device has componentvideo connectors, be sure to connect them to thesecomponent video connectors on the SR4500. TheSR4500 has two component video input connectorsto obtain the color information (Y, CB, CR) directlyfrom the recorded DVD signal or other videocomponent and one component video outputconnector to output it directly into the matrix decoderof the display device.By sending the pure DVD component video signaldirect ly, the DVD signal forgoes the extraprocessing that normally would degrade the image.The result is vastly increased image quality, withincredibly life like colors and crisp detail.
, Power cableConnect to an AC power outlet.SR4500 has to be powered by 120 V AC only.
. AC OUTLETSConnect the AC power cables of components such asa DVD and CD player to these outlets. SWITCHEDand UNSWITCHED outlets are provided.The one marked SWITCHED provides power onlywhen the SR4500 is turned on and is useful forcomponents which you use every time you playyour system.The one marked UNSWITCHED is always live aslong as the SR4500 is plugged into a live outlet.A component connected here may be left onpermanently, or may be switched off with via itsown power switch.
Caution:• In order to avoid potential turn-off thumps, anything
plugged into these outlets should be powered upbefore the SR4500 is turned on.
REAR PANEL
c VIDEO IN/OUT (TV, DVD, VCR1, DSS/VCR2)These are the video inputs and outputs. There are4 video inputs and 2 video outputs and each oneincludes both composite video and S-videoconfigurations. Connect VCRs, DVD players, andother video components to the video inputs.The 2 video output channels can be used to beconnected to video tape recorders for makingrecordings.The input signals of video and S-video are convertedeach other, and each of the converted video signalscan be output.
v MONITOR OUTThis is a monitor output and each one includes bothcomposite video and S-video configurations.
b REMOTE CONT. IN/OUT terminalsConnect to a Marantz component equipped withremote control (RC-5) terminals.
z AUDIO IN/OUT (CD, TAPE, CD-R/MD, TV,DVD, VCR1, DSS/VCR2)
These are the analog audio inputs and outputs.There are 7 audio inputs (4 of which are linked tovideo inputs) and 4 audio outputs (2 of which arelinked to video outputs). The audio jacks arenominally labeled for cassette tape decks,compact disc players, DVD players and etc.... Theaudio inputs and outputs require RCA-typeconnectors.
x FM antenna terminal (75 ohms)Connect an external FM antenna with a coaxialcable, or a cable network FM source.
AM antenna and ground terminalsConnect the supplied AM loop antenna. Use theterminals marked “AM” and “GND”. The suppliedAM loop antenna will provide good AM reception inmost areas. Position the loop antenna until youhear the best reception.
• The capacity of this AC outlet is 100W. Do notconnect devices that consume electricity more thanthe capacity of these AC outlets. If the total powerconsumption of the connected devices exceeds thecapacity, the protection circuit shuts down thepower supply.
⁄0 7.1 CHANNEL INPUTBy connecting a DVD Audio player, SACDmultichannel player, or other components thathas a multichannel port, you can playback theaudio with 5.1 channel or 7.1 channel outputs.
⁄1 Speaker outputs terminalsSeven terminals are provided for the front left, frontright, front center, surround left, surround right,surround back left and surround back right speakers.
Note:• You can use surround back speaker terminals as
S(Surround) SPEAKER B terminals, when youuse no surround back speaker.
⁄2 Preamp Outputs(L, R, SL, SR, SBL, SBR, C)
Jacks for L(front left), R (front right), C (Center), SL(surround left), SR (surround right), SBL (surroundback left) and SBR (surround back right).Use these jacks for connection to external poweramplifiers.
⁄3 Subwoofer OutputConnect this jack to the line level input of a poweredsubwoofer. If an external subwoofer amplifier is used,connect this jack to the subwoofer amplifier input. Ifyou are using two subwoofers, either powered or witha 2 channel subwoofer amplifier, connect a “Y”connector to the subwoofer output jack and run onecable from it to each subwoofer amplifier.
IN OUTMONITORVCR1
MONITOR
R SR
C
SW SBR
SL SBLL
R
SPEAKER SYSTEMS MINIMUM 6 OHMS
CENTER
R
FRONT SURROUND BACKS. SPEAKER B
SURROUND
L LLR
DVDOUTIN
MONITORTVDVDVCR1
OUTINDSS / VCR2
OUT
VIDEO
INY
DSS / VCR 2DVDCOAX.OUT
43OPT.OUT
217.1CH INPUT
L SL C SBL
SBRSWSRRTVDVDVCR1
OUTININ OUTDSS / VCR2
IN OUTCDR/MDTAPE
PRE OUT
OUTINCD
R
L
FM (75Ω) GND AM
CB/PB
CR/PR
AUDIO
ANTENNA
RC-5
DIGITAL
COMPONENT VIDEO
AUDIO
S-VIDEO
AC IN
AC OUTLETS120V 60HZ
1A 120W MAX
UNSWITCHED
SWITCHED
1A 120W MAX
c
.⁄3
v b n m
⁄1 ⁄0⁄2
z x ,
SR4500U DFU_01_ENG 1_2 04.6.25, 11:29 AMPage 6 Adobe PageMaker 6.5J/PPC

EN
GL
ISH
7
m Cursor ( , , , ) / OK buttons(when AMP mode is selected)Use these button when operating the SETUP MAINMENU.
, MENU OFF button(when AMP mode is selected)This button is used to exit from the SETUP MAINMENU.
. Numeric buttons 1 to 9 / Surround modebuttons
Numeric buttonsThese buttons are used to enter figures in the selec-tion of a tuner preset station and station name pre-set or to set select a CD track number, etc. The func-tions of these buttons are dependent on the functionbutton selected.
Surround mode buttons(when AMP mode is selected)These buttons are used to select the surround mode.
⁄0 P.SCAN (Preset scan) / V(Video)-OFFbutton
(when TUNER mode is selected)This button is used to start preset scan when SR4500is selected TUNER mode.
(when AMP mode is selected)This is used when switching the video signals fromthe various monitor outputs to Video-Off mode.
⁄1 0 / A/D button0 buttonThis button is used to enter the number “0”
A/D button (when AMP mode is selected)This is used to switch between the analog and digitalinputs.
⁄2 CONTROL buttonsThese buttons are used when operating the CDplayer, TAPE deck, etc.The function of these buttons are dependent on thefunction button selected.For the controllable functions of each input function,please refer to controllable function table on the page10.
⁄3 SUB-T (Title) / ATT (attenuator) buttonWhen the input signal is too high and the voice dis-torts even while adjusting the SR4500 VOLUMEcontrol, turn on this function. “ATT” is illuminatedwhen this function is activated.The input level is reduced. Attenuator is invalid forthe output signal of “REC OUT”.
Note:• This function is unavailable while the digital input
is selected.
⁄4 INPUT/DISC+ / CH.SEL buttonsThis button is used to enter the 7.1 channel inputlevel setup menu.
⁄5 TREBLE UP ( ) /DOWN ( ) buttonsThese buttons are used to adjust the tone control ofhigh frequency sound for left and right speaker.
⁄6 BASS UP ( ) /DOWN ( ) buttonsThese buttons are used to adjust the tone control oflow frequency sound for left, right and subwooferspeaker.
⁄7 MEMO buttonMemory enable button for various preset functions.
⁄8 CLEAR buttonThis button is used to cancel for certain memory orprogramming operations.
⁄9 DISPLAY buttonSelects the display mode for the front display of theSR4500.
¤0 NIGHT buttonPressing this button prevents the Dolby Digital sig-nal from playback at a loud voice. This function re-duces the voice by 1/3 to 1/4 at maximum. Thus, iteliminates the occurrence of an abruptly loud voiceat night. However, the function is valid only in thecase when the Dolby Digital signal is entered intoOPTICAL or COAXIAL and data to compress thevoice exists in the signal to be played back.When this button is pressed, the “NIGHT” indicatoris illuminated.
REMOTE CONTROLOPERATIONFUNCTION AND OPERATION
The provided remote control unit is a universal re-mote controller. The POWER button, numeric but-tons and control buttons are used in common acrossdifferent input source components.The input source controlled with the remote controlunit changes when one of the input selector but-tons is pressed.
z Transmitting indicatorLights up during a button is pressed and an infraredsignal is sending.
x (Main) POWER buttons(when AMP mode is selected)Press to switch the power of the SR4500 ON or OFFafter pressing the AMP button.
c Input selector buttons/ FUNCTIONSELECTOR buttons (AUDIO/VIDEO INPUT)
These buttons are used to select a Audio or Videosource component. Press one of these buttons onceto change the function of the remote control. Presssame button within 2 seconds, the input function ofthe SR4500 is changed.Audio function sources such as CD, TAPE, CDR/MD, and TUNER may be selected in conjunctionwith a Video source.This feature (Sound Injection) combines a soundfrom one source with a picture from another.Choose the video source first, and then choose adifferent audio source to activate this function.
Notes:• CDR/MD button is set CDR function at initial. To
switch MD function, press and hold down CDR/MD button and press 2 button.
• To return CDR function, press and hold downCDR/MD button and press 1 button.
v MAIN VOLUME UP ( ) /DOWN ( ) buttonsMain volume control of the SR4500. The front, sur-round, center and subwoofer channel volumes con-trolled by these buttons simultaneously.
b MUTE buttonMuting button of the SR4500. Press this button de-crease the sound temporarily. Press this buttonagain to return to the previous sound.When this button is pressed, “MUTE” indicator lightsup.
n MENU button(when AMP mode is selected)This button is used to enter the SETUP MAIN MENU.
ENTER
CH.SEL LIP.SYNC
PTYSUB-T/ATTAUDIOINPUT/DISC+
F.DIRECTRDS
TUNE/SEARCH
T-MODE
TREBLE
CHANNEL/SKIP
BASS
A/D P.SCAN/V-OFF
7.1CH INSTEREOMCH-ST
MEMOCLEAR
DISPLAY
NIGHT CSII EX/ES VIRTUAL
DTSPURE DIRECT AUTO
321
654
98
0
7
T.TONEMENU OFFSET UP/
MENUOSD
VOL.TV
VOL.MAIN
SLEEP MUTE
AMPAUX1
TUNER CD TAPE CDR/MD
DVD
POWER
VCR1 DSS/VCR2TV
SYSTEM REMOTE CONTROLLER
RC5500SR
,
m
nb
v
c
xz
⁄1
⁄2⁄5
¤3
¤2
¤1¤0
⁄9⁄8⁄7
⁄6
¤4
⁄4⁄3
¤5
.⁄0
SR4500U DFU_01_ENG 1_2 04.6.25, 11:29 AMPage 7 Adobe PageMaker 6.5J/PPC

EN
GL
ISH
8
RESETTING THE ALL CODE
1. Press and hold down the any FunctionSelector button and press SETUP buttonuntil the indicator blinking twice.
2. Press the code 9 - 8 - 1.The indicator will blink twice.Then, RC5500SR will return to the factorypreset code.
Note:• After this procedure, the selected function button
is set initial code and other function buttons areset initial code too.
Once you have found and the codes for your vari-ous appliances, you may want to write them downhere.
TV
VCR
DSS
DVD
CD
TAPE
CDR
MD
SCANNING THE CODE TABLE
1. Switch on the appliance which should becontrolled.
2. Press and hold down the Function Selectorbutton for appliance which should be controlledand press SETUP button until the indicatorblinking twice.
3. Press the code 9 - 9 - 1.The indicator will blink twice.
4. Aim the remote control at the appliance andslowly alternate between pressing POWERbutton and the Function Selector button forthe appliance.
5. Stop when the appliance turns off.6. Press SETUP button once to lock in the code.
CHECKING THE CODE
1. Press and hold down the Function Selectorbutton for appliance which should be controlledand press SETUP button until the indicatorblinking twice.
2. Press the code 9 - 9 - 0.The indicator will blink twice.
3. To view the code for first digit, press 1 once.Wait 3 seconds, count the indicator blinks(e.g. 3 blinks = 3) and write down the number.Note:If a code digit is “0”, the indicator will not blink.
4. Repeat step 3 three more times for remainingdigits. Use 2 for the second digit, 3 for thethird digit, and 4 for the fourth digit.
PROGRAMMING THE REMOTE CONTROLLERThe remote control ler RC5500SR must beprogrammed to use the codes for your appliancesof different brands. This is done by keying in a 4-digit code or by scanning the codes until the correctone is found. We recommend to using the 4-digitcode. This mode is faster and more reliable. Thecode scanning method should be used only if youcannot find the code for one of your appliances.The codes are listed at the end of this book.
Important:• Use the remote control buttons for programming,
not the buttons of the receiver or other appliances.
• Some codes may be not match your equipment.In this case, your equipment cannot be controlledwith this remote controller.
PROGRAMMING WITH THE 4-DIGIT CODE
1. Press and hold down the Function Selectorbutton for the appliance which should becontrolled and press SETUP button until theindicator blinks twice.
2. Press the 4-digit code for appliance (codetable at the end of this book)
3. When the procedure is successful, the indicatorwill blink twice.
Note:• If the indicator did not blink twice, then repeat
steps 1 through 2 and try entering the same codeagain.
MENUOSD
VOL.TV
VOL.MAIN
SLEEP MUTE
AMPAUX1
TUNER CD TAPE CDR/MD
DVD
POWER
VCR1 DSS/VCR2TV
1.
ENTER
PTYSUB-T/ATTAUDIOINPUT/DISC+
F.DIRECTRDS
TUNE/SEARCH
T-MODE
TREBLE
CHANNEL/SKIP
BASS
A/D P.SCAN/V-OFF
7.1CH INSTEREOMCH-ST
MEMOCLEAR
DISPLAY
NIGHT CSII EX/ES VIRTUAL
DTSPURE DIRECT AUTO
321
654
98
0
7
T.TONEMENU OFFSET UP/
1.
2.
MENUOSD
VOL.TV
VOL.MAIN
SLEEP MUTE
AMP
TUNER CD TAPE CDR/MD
DVD
POWER
VCR1 DSS/VCR2TV
AUX1
1.
ENTER
TUNE/SEARCHTREBLE
CHANNEL/SKIP
BASS
A/D P.SCAN/V-OFF
7.1CH INSTEREOMCH-ST
MEMOCLEAR
DISPLAY
NIGHT CSII EX/ES VIRTUAL
DTSPURE DIRECT AUTO
321
654
98
0
7
T.TONEMENU OFFSET UP/
MENUOSD
1.
2.MENUOSD
VOL.TV
VOL.MAIN
SLEEP MUTE
AMP
TUNER CD TAPE CDR/MD
DVD
POWER
VCR1 DSS/VCR2TV
AUX1
2.4.
4. ENTER
TUNE/SEARCHTREBLE
CHANNEL/SKIP
BASS
A/D P.SCAN/V-OFF
7.1CH INSTEREOMCH-ST
MEMOCLEAR
DISPLAY
NIGHT CSII EX/ES VIRTUAL
DTSPURE DIRECT AUTO
321
654
98
0
7
T.TONEMENU OFFSET UP/2.
6.
3.
MENUOSD
VOL.TV
VOL.MAIN
SLEEP MUTE
AMP
TUNER CD TAPE CDR/MD
DVD
POWER
VCR1 DSS/VCR2TV
AUX1
1.
ENTER
F.DIRECTRDS
TUNE/SEARCH
T-MODE
TREBLE
CHANNEL/SKIP
BASS
A/D P.SCAN/V-OFF
7.1CH INSTEREOMCH-ST
MEMOCLEAR
DISPLAY
NIGHT CSII EX/ES VIRTUAL
DTSPURE DIRECT AUTO
321
654
98
0
7
T.TONEMENU OFFSET UP/
1.3.4.
2.
¤1 PURE DIRECT buttonWhen this button is pressed, the tone control circuitis bypassed.
¤2 SETUP / T.TONE button(when AMP mode is selected)Used to enter the test tone menu.
¤3 OSD buttonNote:
• This button is unavailable for SR4500.
¤4 SLEEP (sleep timer) buttonThis button is used for setting the sleep timer. It canbe operated the same way as the button on the unit.
¤5 TV VOLUME UP ( ) /DOWN ( ) buttonsThese buttons increase or decrease TV’s volume.
SR4500U DFU_01_ENG 1_2 04.6.25, 11:29 AMPage 8 Adobe PageMaker 6.5J/PPC

EN
GL
ISH
9
OPERATION OF REMOTE CONTROL UNIT
REMOTE CONTROLThe distance between the transmitter of the remotecontrol and the IR SENSOR of the SR4500 shouldbe less than 5 meters. If the remote control is pointedin a direction other than the IR SENSOR or if there isan obstacle between them, use of the remote controlmay not be possible.
Remote-controllable range
LOADING BATTERIESThe life of the batteries used with the remote controlis about 4 months with normal use. Also be sure toreplace batteries earlier when you notice that theyare getting weak.
1. Remove the back cover.
2. Insert the new batteries (AAA type) withcorrect and polarity.
3. Close the cover until it clicks.
POWER Turns the SR4500 on and off
Function selector * Selects a particular source component
SLEEP * Sets the sleep timer function
MUTE * Decreases the sound temporarily
VOL 34 * Adjusts the over all sound level
MENU Enters the SETUP MENU
Cursor Moves the cursor for settings in the SETUP MENU
ENTER • Enters the SETUP MENU
• Confirms the settings in SETUP MENU
SETUP/T.TONE Enters the test tone mode for setting the Speaker Level Setup
MENU OFF Exits from the SETUP MENU
PURE DIRECT * Selects the Pure Direct mode
NIGHT * Turns on or off the NIGHT mode
DISPLAY * Change the front display mode
Surround mode (1-8) Selects the surround mode
7.1CH-IN (9) Selects the 7.1CH IN
A/D (0) Switches between the analog and digital inputs
BASS 34 * Adjusts the tone control of low frequency sound
TREBLE 34 * Adjusts the tone control of high frequency sound
SUB-T/ATT Reduces the input level
P.SCAN/V-OFF Turns on or off the Video output
CH. SEL Adjusts the 7.1 ch input level
* These buttons are used to control SR4500 in any function mode.
TUNER Selects a frequency band
0-9 Inputs the numeric #s
CLEAR Clears the inputting
MEMO Enters the tuner preset memory numbers
P.SCAN/V-OFF Starts preset scan
CHANNEL/SKIP • Selects a preset station
4 / ¢ • Changes a PTY type *
TUNE/SEARCH Tunes a station
5 / 6
T-MODE 1 2 Selects the auto stereo mode or mono mode
RDS ; Selects the display mode in RDS *
F.DIRECT 2 Selects the “Frequency direct input”
PTY 9 Displays the programmed information of the current station *
* : European model only
TUNER MODE
AMP MODE
GENERAL INFORMATION OF RC5500SR TO SR4500To control the SR4500 by your RC5500SR, you have to select the device AMP or TUNER by pressing thefunction selector button. Please refer below for the details in AMP and TUNER mode.
CH.SEL LIP.SYNC
PTYSUB-T/ATTAUDIOINPUT/DISC+
F.DIRECTRDS
TUNE/SEARCH
T-MODE
TREBLE
CHANNEL/SKIP
BASS
A/D P.SCAN/V-OFF
7.1CH INSTEREOMCH-ST
MEMOCLEAR
DISPLAY
NIGHT CSII EX/ES VIRTUAL
DTSPURE DIRECT AUTO
321
654
98
0
7
T.TONEMENU OFFSET UP/
MENUOSD
VOL.TV
SLEEP MUTE
AMP
TUNER CD TAPE CDR/MD
DVD
POWER
VCR1 DSS/VCR2TV
SYSTEM REMOTE CONTROLLER
RC5500SR
VOL.MAIN
ENTER
AUX1
ENTER
CH.SEL LIP.SYNC
PTYSUB-T/ATTAUDIOINPUT/DISC+
F.DIRECTRDS
TUNE/SEARCH
T-MODE
TREBLE
CHANNEL/SKIP
BASS
A/D P.SCAN/V-OFF
7.1CH INSTEREOMCH-ST
MEMOCLEAR
DISPLAY
NIGHT CSII EX/ES VIRTUAL
DTSPURE DIRECT AUTO
321
654
98
0
7
T.TONEMENU OFFSET UP/
MENUOSD
VOL.TV
VOL.MAIN
SLEEP MUTE
AMP
TUNER CD TAPE CDR/MD
DVD
POWER
VCR1 DSS/VCR2TV
SYSTEM REMOTE CONTROLLER
RC5500SR
AUX1
SURROUND
AV SURROUND RECEIVER SR4500
DOWN
UP
VOLUME
INPUT SELECTOR
POWER ON/STANDBY
PHONES
STANDBY
MUTE
7.1CH INPUT
MULTI SPEAKER
ATT
PURE
SETUP
DIRECT
SIMPLEAUTO
HT-EQ
MENU
ENTER
DISPLAY
MEMO
CLEAR
T-MODE
EXIT
BAND
MODE
Remote control unit (RC5500SR)
60°
SR4500
Approx. 5 m
SR4500U DFU_01_ENG 1_2 04.6.25, 11:29 AMPage 9 Adobe PageMaker 6.5J/PPC

EN
GL
ISH
10
CH.SEL LIP.SYNC
PTYSUB-T/ATTAUDIOINPUT/DISC+
F.DIRECTRDS
TUNE/SEARCH
T-MODE
TREBLE
CHANNEL/SKIP
BASS
A/D P.SCAN/V-OFF
7.1CH INSTEREOMCH-ST
MEMOCLEAR
DISPLAY
NIGHT CSII EX/ES VIRTUAL
DTSPURE DIRECT AUTO
321
654
98
0
7
T.TONEMENU OFFSET UP/
MENUOSD
VOL.TV
VOL.MAIN
SLEEP MUTE
AMP
TUNER CD TAPE CDR/MD
DVD
POWER
VCR1 DSS/VCR2TV
SYSTEM REMOTE CONTROLLER
RC5500SR
ENTER
AUX1
THE CONTROLLABLE FUNCTION TABLE
TV VCR DVD DSS CD TAPE CDR MD
POWER POWER POWER POWER POWER POWER POWER POWER POWER
MENUCALL UP CALL UP CALL UP CALL UP SWITCH SWITCH SWITCH SWITCH
MENU MENU MENU MENU DISPLAY DISPLAY DISPLAY DISPLAYCursor Cursor Cursor Cursor Cursor – – – –
ENTER OK OK OK OK – – – –
SETUP/T.TONE – –SETUP
– – – – –MENU
MENU OFF –CANCEL
–CANCEL
– – – –MENU MENU
0 - 9INPUT INPUT INPUT INPUT INPUT INPUT INPUT INPUT
NUMERIC NUMERIC NUMERIC NUMERIC NUMERIC NUMERIC NUMERIC NUMERIC
CLEARINPUT TAPE INPUT INPUT INPUT INPUT INPUT INPUTCLEAR SPEED CLEAR CLEAR CLEAR CLEAR CLEAR CLEAR
MEMO – –CALL
–CALL CALL CALL CALL
PROGRAM PROGRAM PROGRAM PROGRAM PROGRAMCHANNEL/SKIP 4 CH– PREV PREV CH– PREV PREV PREV PREV
CHANNEL/SKIP ¢ CH+ NEXT NEXT CH+ NEXT NEXT NEXT NEXT
TUNE/SEARCH 5 – REWIND REWIND – REWIND REWIND REWIND REWIND
TUNE/SEARCH 6 – FF FF – FF FF FF FF
0 (REC) – REC – – – REC REC REC
T-MODE 1 2 – – – – – DIRECTION – –
RDS ; – PAUSE PAUSE – PAUSE PAUSE PAUSE PAUSE
F.DIRECT 2 – PLAY PLAY – PLAY PLAY PLAY PLAY
INPUT/DISC+ INPUT SEL. TV/VCR DISC+ TV/DSS DISC+ – DISC+ –
AUDIO – AUDIO AUDIO AUDIO – – – –
PTY 9 – STOP STOP – STOP STOP STOP STOP
SUB-T/ATT – – SUBTITLE – – – – –
SR4500U DFU_01_ENG 1_2 04.6.25, 11:29 AMPage 10 Adobe PageMaker 6.5J/PPC

EN
GL
ISH
11
CONNECTIONSSPEAKER PLACEMENT
The ideal surround speaker system for this unit is 7-speaker systems, using front left and right speakers,a center speaker, surround left and right speakers,surround back left and right speakers, and asubwoofer.For best results we recommend that all front speakersbe of the same type, with identical or similar driverunits. This will deliver smooth pans across the frontsound stage as the action moves from side to side.Your center channel speaker is very important asover 80 % of the dialog from a typical motion pictureemanates from the center channel.It should possess similar sonic characteristics tothe main speakers. Surround channel speakersneed not be identical to the front channel speakers,but they should be of high quality.The surround center speaker is useful for playbackof Dolby Digital Surround EX or DTS-ES. One ofthe benefits of both Dolby Digital and DTS is thatsurround channels are discrete full range, whilethey were frequency limited in earlier “Pro Logic’type systems.Bass effects are an important part of home theater.For optimal enjoyment a subwoofer should be usedas it is optimized for low frequency reproduction. Ifyou have full range front speakers, however, theymay be used in place of a subwoofer with propersetting of the switches in the menu system.
Front left and right speakersWe recommend to set the front L and R speakerswith 45-60 degrees from the listening position.
Center speakerAlign the front line of the center speaker with thefront L/R speakers. Or place the center speaker alittle backward from the line.
Surround left and right speakersWhen the SR4500 is used in surround operation,the preferred location for surround speakers is onthe side walls of the room, at or slightly behind thelistening position.The center of the speaker should face into the room.
Surround back left and right speakersSurround back speakers are required when a full7.1-channel system is installed.Speakers should be placed on a rear wall, behindthe listening position.The center of the speaker should face into the room.
SubwooferWe recommend using a subwoofer to have maximumbass effect. Subwoofer bears only low frequencyrange so you can place it any where in the room.
HEIGHT OF THE SPEAKER UNITS
Front left and right speakers, and a center speakerAlign the tweeters and mid-range drivers on thethree front speakers at the same height, as best aspossible.
Surround left and right speakers, and surroundback speakerPlace the surround left, right and surround backspeakers higher than your ears by about 70cm – 1m.Also place the speakers at the same height, as bestas possible.
Note:• Use magnetically-shielded speakers for front left,
right and the center speakers when the speakersare installed near the TV and the TV is a monitortype.
90°110°
22°
30°135°
150°
0°
Front Right
Front Left
Front Center
Surround LeftSubwooferSurround
Back Left
Surround RightSurroundBack Right
70cm 1m
CONNECTING SPEAKERS
IN OUTMONITORVCR1
MONITOR
R SR
C
SW SBR
SL SBLL
R
SPEAKER SYSTEMS MINIMUM 6 OHMS
CENTER
R
FRONT SURROUND BACK SURROUND
L LLR
DVDOUTIN
MONITORTVDVDVCR1
OUTINDSS / VCR2
OUT
VIDEO
INY
DSS / VCR 2DVDCOAX.OUT
43OPT.OUT
217.1CH INPUT
L SL C SBL
SBRSWSRRTVDVDVCR1
OUTININ OUTDSS / VCR2
IN OUTCDR/MDTAPE
PRE OUT
OUTINCD
R
L
FM (75Ω) GND AM
CB/PB
CR/PR
AUDIO
ANTENNA
RC-5
DIGITAL
COMPONENT VIDEO
AUDIO
S-VIDEO
AC IN
AC OUTLETS120V 60HZ
1A 120W MAX
UNSWITCHED
SWITCHED
1A 120W MAX
R
SPEAKER SYSTEMS MINIMUM 6 OHMS
CENTER
R
FRONT SURROUND BACKS. SPEAKER B
SURROUND
L LLR
SW
INVERTOUTPUT
INPUTLEVEL
BTL REMOTE CONT.EXT. CONT. IN
VIDEO/+5~13V DC
SYSTEM OUT OUT
INPUT
MASTER SLAVE
MIN MAX IN
FUSE
SPEAKER SYSTEMMINIMUM 4 OHMS
POWEREDSUBWOOFER POWER
AMPLIFIERPASSIVE
SUBWOOFERFRONT
RIGHT LEFTSURROUND
SURROUNDBACK LEFT
CENTER
orRIGHT LEFT
CONNECTING SPEAKER WIRE1. Strip away approx. 10 mm of wire insulation.2. Twist the bared wire ends tight, to prevent short
circuits.3. Loosen the knob by turning it counterclockwise.4. Insert the bare part of the wire into the hole in
side of each terminal.5. Tighten the knob by turning it clockwise to
secure the wire.
1. 2.
3. 4. 5.10 mm
SURROUNDBACK RIGHT
SR4500U DFU_01_ENG 1_2 04.6.25, 11:29 AMPage 11 Adobe PageMaker 6.5J/PPC

EN
GL
ISH
12
Caution:• Be sure to use speakers with the specified impedance
as shown on the rear panel of this unit.
• To prevent damage to circuitry, do not let the barespeaker wires toucheach other and donot let them touchany metal part ofthis unit.
• Do not touch thespeaker terminalswhen the power ison. It may cause youto receive an electric shocks.
• Do not connect more than one speaker cable toone speaker terminal. Doing so may damage thisunit.
Note:• Be sure to connect the positive and negative
cables for the speaker properly. If they are miss-connected, the signal phase will be reversed andthe signal quality will be corrupted.
CONNECTING A SUBWOOFERUse the PRE OUT SUBWOOFER jack to connecta powered subwoofer (power amplifier built in ).If your subwoofer is a passive type (power amplifieris not built in), connect a monaural power amplifierto the PRE OUT SUBWOOFER jack and connectthe subwoofer to the amplifier.
CONNECTING AUDIO COMPONENTS
IN OUTMONITORVCR1
MONITOR
R SR
C
SW SBR
SL SBLL
R
SPEAKER SYSTEMS MINIMUM 6 OHMS
CENTER
R
FRONT SURROUND BACK SURROUND
L LLR
DVDOUTIN
MONITORTVDVDVCR1
OUTINDSS / VCR2
OUT
VIDEO
INY
DSS / VCR 2DVDCOAX.OUT
43OPT.OUT
217.1CH INPUT
L SL C SBL
SBRSWSRRTVDVDVCR1
OUTININ OUTDSS / VCR2
IN OUTCDR/MDTAPE
PRE OUT
OUTINCD
R
L
FM (75Ω) GND AM
CB/PB
CR/PR
AUDIO
ANTENNA
RC-5
DIGITAL
COMPONENT VIDEO
AUDIOAC IN
S-VIDEO
S. SPEAKER B
AC OUTLETS120V 60HZ
1A 120W MAX
UNSWITCHED
SWITCHED
1A 120W MAX
TAPEOUTIN
CD
R
L
INCDR/MD
4OPT.OUT
1
DIGITAL
OUT
OUT IN
L
R
L
R
OUT
L
R
L RL R L R
R L RL RL
OUT IN
L
R
L
R
DIGITALINPUT
DIGITALOUTPUT
DIGITALOUTPUT
R L
R L R L
RL
LR
The output audio signal from the TAPE OUT jackand the CD-R/MD OUT jack is the same signalwhich is currently selected.
Caution:• Do not connect this unit and other components to
mains power until all connections betweencomponents have been completed.
Notes:• Insert all plugs and connectors securely.
Incomplete connections may make noise.
• Be sure to connect the left and right channelsproperly.
Red connectors are for the R (right) channel, andwhite connectors are for the L (left) channel.
• Be sure to connect input and output properly.
• Refer to the instructions for each component thatis connected to this unit.
• Do not bind audio/video connection cables withpower cords and speaker cables this will result ingenerating a hum or other noise.
CONNECTING DIGITAL AUDIO COMPONENTS• There are 4 digital inputs, 2 coaxial jacks and 2
optical jacks, on the rear panel. You can usethese jacks to input PCM, Dolby Digital and DTSbitstream signals from a CD, DVD, or otherdigital source components.
• There is one digital output coaxial jack and oneoptical output jack on the rear panel. These jackscan be connected to a CD recorder-, or a MDdeck inputs, respectively.
• Refer to the instructions for each component. Tosetup the digital audio format of DVD player, orother digital source’s connected to digital inputjacks.
• Use fiber optical cables (optical) for DIG-1,2 inputjacks. Use 75 ohms coaxial cables (for digitalaudio or video) for DIG-3, 4 input jacks.
• You can designate the input for each digital input/output jacks according to your component. Seepage 17.
CD RECORDER / MD DECK CD PLAYERTAPE DECK
ANALOG AUDIO
DIGITAL AUDIO(COAXIAL)
DIGITAL AUDIO(OPTICAL)
Notes:• There is no Dolby Digital RF input jack. Please
use an external RF demodulator Dolby Digitaldecoder when connecting the Dolby Digital RFoutput jack of the video disc player to the digitalinput jack.
• The digital signal jacks on this unit conform to theEIA standard. If you use a cable that does notconform to this standard, this unit may notfunction properly.
• Each type of audio jack works independently.Signals input through the digital and analog jacksare output through the corresponding digital andanalog jacks, respectively.
SR4500U DFU_01_ENG 1_2 04.6.25, 11:29 AMPage 12 Adobe PageMaker 6.5J/PPC
EN
GL
ISH
13
INMONITORVCR1
R SR
C
SW SBR
SL SBLL
R
SPEAKER SYSTEMS MINIMUM 6 OHMS
CENTER
R
FRONT SURROUND BACK SURROUND
L LLR
DVDOUTIN
MONITORTVDVDVCR1
OUTINDSS / VCR2
OUT
VIDEO
IN
OPT.OUT
217.1CH INPUT
L SL C SBL
SBRSWSRRTVDVDVCR1
OUTININ OUTDSS / VCR2
IN OUTCDR/MDTAPE
PRE OUT
OUTINCD
R
L
FM (75Ω) GND AM
AUDIO
ANTENNA
DIGAUDIO
S-VIDEO
S. SPEAKER B
L R
AUDIOOUT
DIGITALOUT
VIDEOOUT
AUDIOOUT
L R
VIDEOOUT
S-VIDEOIN
VIDEOIN
L R
LR
MONITORTV
MONITORVCR1
S-VIDEO
TV2
DSS / VCR2IN
INDSS / VCR2
L R
L R
L R
IN OUTMONITORVCR1
MONITOR
R
C
SW SBR
L SBL
R
SPEAKER SYSTEMS MINIMUM 6 OHMS
CENTER
R
FRONT SURROUND BACK SURROUND
L LLR
DVDOUTIN
MONITORTVDVDVCR1
OUTINDSS / VCR2
OUT
VIDEO
INY
DSS / VCR 2DVDCOAX.OUT
43OPT.OUT
217.1CH INPUT
L SL C SBL
SBRSWSRRTVDVDVCR1
OUTININ OUTDSS / VCR2
IN OUTCDR/MD
PRE OUT
T
M
CB/PB
CR/PR
AUDIO
RC-5
DIGITAL
COMPONENT VIDEO
AUDIO
S-VIDEO
S. SPEAKER B
AC OUTLETS120V 60HZ
1A 120W MAX
UNSWITCHED
SWITCHED
1A 120W MAX
VCR1OUTIN
VCR1OUTIN
DVD
DVD
MONITORVCR1 DVDOUTIN
S-VIDEO
MONITOR
Y
DVD
CB/PB
CR/PR
COMPONENT VIDEO
3
DIGITAL
L R
AUDIOOUT
DIGITALOUT
VIDEOOUT
S-VIDEOOUT
S-VIDEOIN
L R
AUDIOOUT
AUDIOIN
L R
VIDEOOUT IN
S-VIDEOOUT IN
L R L R
Y CB / PB CR / PR
COMPONENT VIDEO OUT
Y CB / PB CR / PR
COMPONENT VIDEO IN
L R L R
L R
L R
CONNECTING VIDEO COMPONENTS
ANALOG AUDIO
VIDEO
S-VIDEO
DVD PLAYER VIDEO PROJECTORSATELLITE TUNER
DIGITAL AUDIO(COAXIAL)
VCR
TV
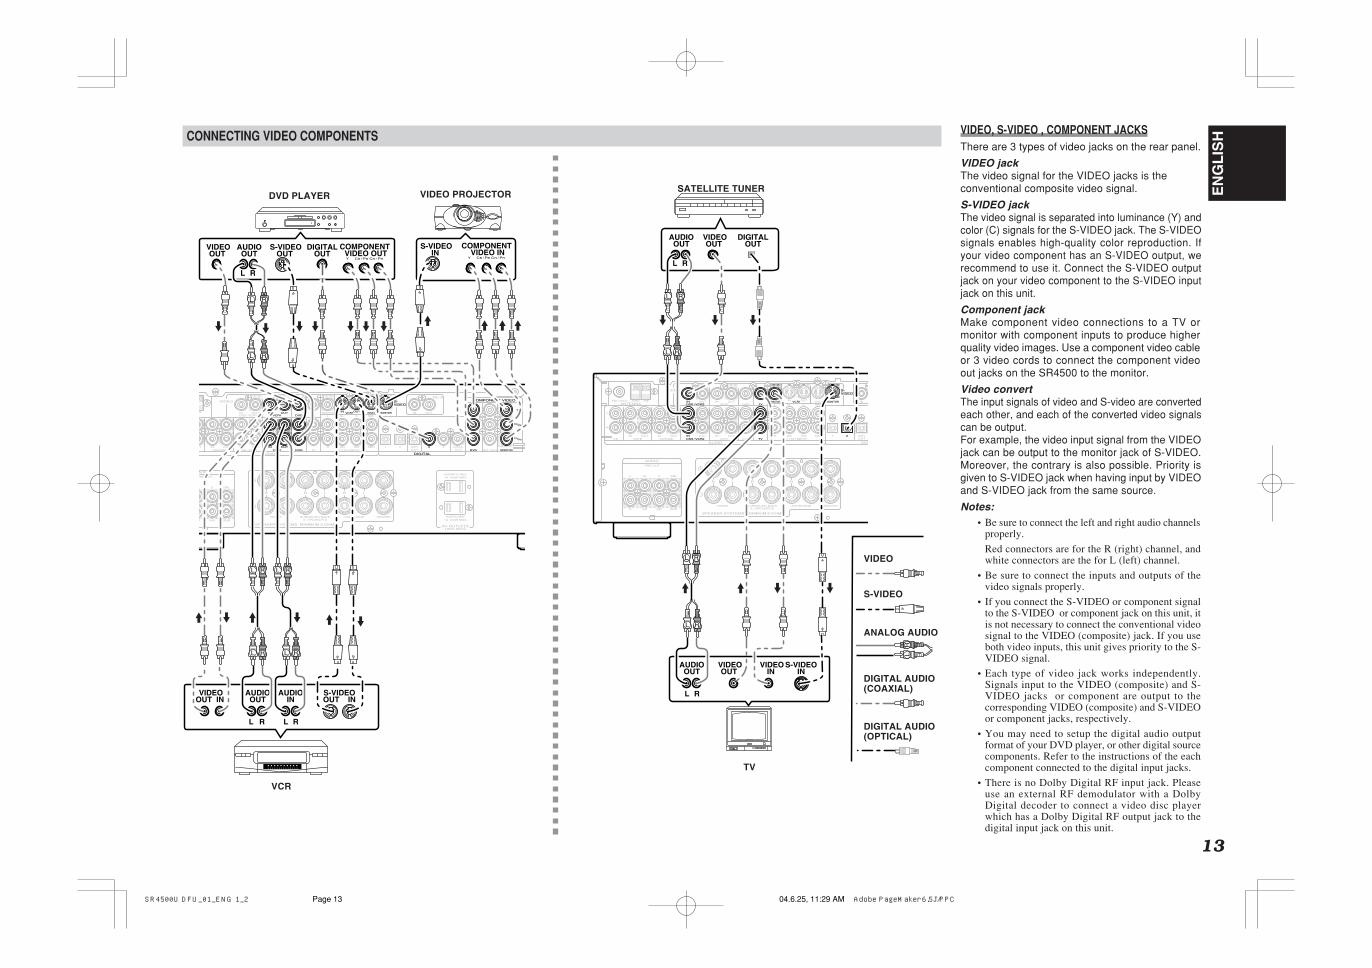
VIDEO, S-VIDEO , COMPONENT JACKSThere are 3 types of video jacks on the rear panel.
VIDEO jackThe video signal for the VIDEO jacks is theconventional composite video signal.
S-VIDEO jackThe video signal is separated into luminance (Y) andcolor (C) signals for the S-VIDEO jack. The S-VIDEOsignals enables high-quality color reproduction. Ifyour video component has an S-VIDEO output, werecommend to use it. Connect the S-VIDEO outputjack on your video component to the S-VIDEO inputjack on this unit.
Component jackMake component video connections to a TV ormonitor with component inputs to produce higherquality video images. Use a component video cableor 3 video cords to connect the component videoout jacks on the SR4500 to the monitor.
Video convertThe input signals of video and S-video are convertedeach other, and each of the converted video signalscan be output.For example, the video input signal from the VIDEOjack can be output to the monitor jack of S-VIDEO.Moreover, the contrary is also possible. Priority isgiven to S-VIDEO jack when having input by VIDEOand S-VIDEO jack from the same source.
Notes:• Be sure to connect the left and right audio channels
properly.
Red connectors are for the R (right) channel, andwhite connectors are the for L (left) channel.
• Be sure to connect the inputs and outputs of thevideo signals properly.
• If you connect the S-VIDEO or component signalto the S-VIDEO or component jack on this unit, itis not necessary to connect the conventional videosignal to the VIDEO (composite) jack. If you useboth video inputs, this unit gives priority to the S-VIDEO signal.
• Each type of video jack works independently.Signals input to the VIDEO (composite) and S-VIDEO jacks or component are output to thecorresponding VIDEO (composite) and S-VIDEOor component jacks, respectively.
• You may need to setup the digital audio outputformat of your DVD player, or other digital sourcecomponents. Refer to the instructions of the eachcomponent connected to the digital input jacks.
• There is no Dolby Digital RF input jack. Pleaseuse an external RF demodulator with a DolbyDigital decoder to connect a video disc playerwhich has a Dolby Digital RF output jack to thedigital input jack on this unit.
DIGITAL AUDIO(OPTICAL)
SR4500U DFU_01_ENG 1_2 04.6.25, 11:29 AMPage 13 Adobe PageMaker 6.5J/PPC

EN
GL
ISH
14
MONITORVCR1
R SR
C
SW SBR
SL SBLL
R
SPEAKER SYSTEMS MINIMUM 6 OHMS
CENTER
R
FRONT SURROUND BACK SURROUND
L LLR
DVDOUTIN
MONITORTVDVDVCR1
OUTINDSS / VCR2
OUT
VIDEO
IN
17.1CH INPUT
L SL C SBL
SBRSWSRRTVDVDVCR1
OUTININ OUTDSS / VCR2
IN OUTCDR/MDTAPE
PRE OUT
OUTINCD
R
L
FM (75Ω) GND AM
AUDIO
ANTENNA
AUDIO
SV
S. SPEAKER BR SR
C
SW SBR
SL SBLL
PRE OUT
AUDIO
7.1CH INPUT
L SL C SBL
SBRSWSRR
L
RFRONT SURR. SURR.
BACKSUB
WOOFER
CENTER
L
RFRONT SURR. SURR.
BACKSUB
WOOFER
CENTER
R L
L R
R L
RL R L
LR
L R L R
L RLRL R
R L
. SPEAKER B
IN OUTMONITORVCR1
MONITOR
R
NIMUM 6 OHMS
CENTERRROUND BACK SURROUND
LLR
DVDOUTIN
MONITORTV
Y
DSS / VCR 2DVDCOAX.OUT
43OPT.OUT
217.1CH INPUT
L SL C SBL
SBRSWSRRTV
CB/PB
CR/PR
RC-5
DIGITAL
COMPONENT VIDEOS-VIDEO
AC IN
AC OUTLETS120V 60HZ
1A 120W MAX
UNSWITCHED
SWITCHED
1A 120W MAX
IN OUT
RC-5
REMOTE CONTROL
REMOTE CONTROL
REMOTE CONTROL
IN
OUT
IN
OUT
IN
OUT
EXTERNAL INTERNAL EXTERNAL INTERNAL EXTERNAL INTERNAL
1
RC OUT
2
ADVANCED CONNECTING
CONNECTING MULTI CHANNEL AUDIO SOURCEThe 7.1CH INPUT jacks are for multichannel audiosource such as a SACD multichannel player, DVDaudio player or external decoder.If you use these jacks, switch on the 7.1CH INPUTand set the 7.1CH INPUT level by using the 7.1channel input level menu. See page 29.
CONNECTING AN EXTERNAL POWER AMPLIFIERThe PREOUT jacks are for connecting externalpower amplifiers.Be sure to connect each speaker to the correspondingexternal power amplifier.
POWERAMPLIFER
DVD AUDIO PLAYERor
SACD MULTI CHANNEL PLAYER
CenterFrontLeft
FrontRight
SurroundLeft
SurroundRight
Subwoofer
CONNECTING THE REMOTE CONTROL JACKS
MD DECKCD RECORDER
qYou can control other Marantz products throughthis unit with the remote control by connecting theREMOTE CONTROL terminals on each unit.The signal transmitted from the remote control isreceived by the remote sensor on this unit. Then thesignal is sent to the connected device through thisterminal. Therefore you only need to aim the remoteat one unit. Also, if a Marantz power amplifier (somemodels excluded) is connected to one of theseterminals, the power amplifier’s, power switch issynchronized with this unit’s power switch.
Set the REMOTE CONTROL SWITCH on the units,other than the main unit to EXT.(EXTERNAL) forthis feature.
CD PLAYER
OPTION
wWhenever external infrared sensors or similardevices are connected to RC-5 IN of the SR4500,be sure to always disable operation of the infraredsensor on the main unit by using the followingprocedure.
1. Hold down the 7.1CH INPUT button andMENU button on the front panel at the sametime for five seconds.
2. The setting “IR=ENABLE” is shown on the FLDISPLAY.
3. Press the or cursor button to change thisto “IR=DISABLE”.
4. Press the ENTER button. Once this setting ismade, the infrared sensor on the main unit isdisabled.
Note:Be sure to set to “IR=ENABLE” when externalinfrared sensors or similar devices are notconnected. Otherwise, the main unit will beunable to receive remote control commands.
5. To restore the original setting, perform steps 1to 4 to set to “IR=ENABLE”.
SurroundBack Left
SurroundBack Right
SR4500U DFU_01_ENG 1_2 04.6.25, 11:29 AMPage 14 Adobe PageMaker 6.5J/PPC

EN
GL
ISH
15
CONNECTING THE ANTENNA TERMINALS
IN OUTMONITORVCR1
MONITOR
R SR
C
SW SBR
SL SBLL
R
SPEAKER SYSTEMS MINIMUM 6 OHMS
CENTER
R
FRONT SURROUND BACK SURROUND
L LLR
DVDOUTIN
MONITORTVDVDVCR1
OUTINDSS / VCR2
OUT
VIDEO
INY
DSS / VCR 2DVDCOAX.OUT
43OPT.OUT
217.1CH INPUT
L SL C SBL
SBRSWSRRTVDVDVCR1
OUTININ OUTDSS / VCR2
IN OUTCDR/MDTAPE
PRE OUT
OUTINCD
R
L
FM (75Ω) GND AM
CB/PB
CR/PR
AUDIO
ANTENNA
RC-5
DIGITAL
COMPONENT VIDEO
AUDIO
S-VIDEO
S. SPEAKER B
AC IN
AC OUTLETS120V 60HZ
1A 120W MAX
UNSWITCHED
SWITCHED
1A 120W MAX
FM (75Ω) GND AMANTENNA
FMANTENNA
FM EXTERNALANTENNA
AM LOOPANTENNA
AM EXTERNALANTENNA
ASSEMBLING THE AM LOOP ANTENNA1. Release the vinyl tie and take out the connection
line.
2. Bend the base part in the reverse direction.
3. Insert the hook at the bottom of the loop partinto the slot at the base part.
CONNECTING THE SUPPLIED ANTENNAS
Connecting the supplied FM antennaThe supplied FM antenna is for indoor use only.During use, extend the antenna and move it invarious directions until the clearest signal is received.Fix it with push pins or similar implements in theposition that will cause the least amount of distortion.If you experience poor reception quality, an outdoorantenna may improve the quality.
Connecting the supplied AM loop antennaThe supplied AM loop antenna is for indoor use only.Set it in the direction and position it to where youreceive the clearest sound. Put it as far away aspossible from the unit, televisions, speaker cables,and power cords.If you experience poor reception quality, an outdoorantenna may improve the quality.
1. Press and hold down the lever of the AM antennaterminal.
2. Insert the bare wire into the antenna terminal.3. Release the lever.
CONNECTING AN FM OUTDOOR ANTENNA
Notes:• Keep the antenna away from noise sources (neon
signs, busy roads, etc.).
• Do not put the antenna close to power lines. Keepit well away from power lines, transformers, etc.
• To avoid the risk of lightning and electrical shock,grounding is necessary.
CONNECTING AN AM OUTDOOR ANTENNAAn outdoor antenna will be more effective if it isstretched horizontally above a window or outside.
Notes:• Do not remove the AM loop antenna.
• To avoid the risk of lightning and electrical shock,grounding is necessary.
4. Place the antenna on stable surface.
SR4500U DFU_01_ENG 1_2 04.6.25, 11:29 AMPage 15 Adobe PageMaker 6.5J/PPC

EN
GL
ISH
16
1. INPUT
SIMPLE SETUP
2. SPEAKER
3. PREFERENCE
5. DOLBY PLII
6. CSII
4. SURROUND
CDTAPECD-RTVDVDVCR1DSS
SUBWL&RCENTSL&SRSBSB SIZELPF/HPF
BASS
(Subwoofer)(Front Left & Right)(Center)(Surround Left & Right)(Surround Back)(Surround Back Size)(Low/High Pass Filter)
(Bass Mix)
→SMALL→LARGE→→80→100→120→
→BOTH→MIX→
SMALL100Hz
BOTH
→YES→NONE→ YES
2CH
→LARGE→SMALL→ LARGE→SMALL→LARGE→NONE→ SMALL
SMALL→SMALL→LARGE→NONE→
→LARGE→MEDIUM→SMALL→
→1CH→2CH→NONE→
→MANUAL→AUTO→ MANUAL
→NOMAL→ECONOMY→ ECONOMY
→…→AUTO→…→STEREO→… AUTO
LR
(Front L)(Front R)(Center)(Surround L)(Surround R)(Subwoofer)(Surround back L)(Surround back R)
CSLSR
T-MODELCENTRSRSBRSBLSLSUBW
(Test Tone)(Front L-ch Level)(Center-ch Level)(Front R-ch Level)(Surround R-ch Level)(Surround Back R-ch Level)(Surround Back L-ch Level)(Surround L-ch Level)(Subwoofer Level)
STBY (Standby Mode)
PARAMPANORAMA
SRHT-EQLFE
(Surround Mode)
(LFE Level)
TRUBASSSRS DIALOG
7.1-V (7.1ch Video Input)
D1 AUTO / D2 AUTO /D3 AUTO / D4 AUTO (Digital AUTO mode)DIG.1 / DIG.2 / DIG.3 / DIG.4 (Digital Fixed mode) ANALOG
SPEAKERSROOM
2-1. SPEAKERS SIZE setup
2-2. SPEAKERS DISTANCE setup
2-3. SPEAKERS LEVEL setup
3.0m(10ft)3.0m(10ft)3.0m(10ft)3.0m(10ft)3.0m(10ft)
OFF0db
→2.0(2ch)→2.1(2.1ch)→ … →7.0(7ch)→7.1(7.1ch)→
→0.3m(1ft)→…→9.0m(30ft)→0.3m(1ft)→…→9.0m(30ft)→0.3m(1ft)→…→9.0m(30ft)→0.3m(1ft)→…→9.0m(30ft)
SWSBLSBR
3.0m(10ft)3.0m(10ft)3.0m(10ft)
→0.3m(1ft)→…→9.0m(30ft)→0.3m(1ft)→…→9.0m(30ft)→0.3m(1ft)→…→9.0m(30ft)
→-10→…→0→…→+10 0db0db0db0db0db0db0db
00
LAST
→-10→…→0→…→+10 →-10→…→0→…→+10 →-10→…→0→…→+10→-10→…→0→…→+10 →-10→…→0→…→+10→-10→…→0→…→+10
0db→-15→…→0→…→+10
→0→1→2→3→4→5→6→
→LAST→TV→DVD→…→V–OFF→
→OFF→ON→(∗)→0→-10→OFF→(∗)
→DEFAULT→CUSTOM→ DEFAULT OFF →OFF→ON→
DIMENSION 3→0→1→2→3→4→5→6→C-WIDTH
(Parameter)
(Center Width) 3→0→1→2→3→4→5→6→7→
D4-AUTO
D1-AUTO
D3-AUTOANALOG
ANALOG
ANALOG
D2-AUTO
SETUP MENU
→0.3m(1ft)→…→9.0m(30ft)
→0→1→2→3→4→5→6→
SETUPAfter all components are connected, initial setupmust be performed.
SETUP MENU SYSTEMThe SR4500 incorporates an menu on the frontdisplay, which makes various operations possible byusing the cursor ( , , , ) and ENTER buttons.
ENTER THE DESIRED MENU ITEMOF THE SETUP MENU
1. Turn on the unit.2. Press the AMP button of the remote control.3. Press the MENU button or the ENTER button of
the remote control to enter the SETUP MENU.4. Press the or cursor button to select the
SETUP MENU item.5. Press the ENTER button or the MENU button
to enter the desired menu item.
After finishing all setup, press the MENU OFF buttonto exit the SETUP MENU.
MENU STRUCTURE
Initial state
EXITDTSPURE DIRECT AUTO
321
T.TONEMENU OFFSET UP/
MENUOSD
VOL.TV
VOL.MAIN
SLEEP MUTE
AMP
ENTER
AUX1
MAIN
4.
2.
3. 5.
3. 5.
SURROUND
AV SURROUND RECEIVER SR4500
INPUT SELECTOR
PHONES
STANDBY
7.1CH INPUT
PURESETUPDIRECT
SIMPLE
AUTO HT-EQ MENU
ENTER
DISPLAY MEMORY
EXIT BAND
MODE
DISP MULTI AUTO TUNED ST V – OFF NIGHT PEAK ANALOG
DIGITAL
ATT
SLEEP SURRAUTO DIRECT DISC 6.1 MTX 6.1 EQDIGITAL
SURROUND
AAC PCM
L C R
SL S SR
LFE
POWER ON/STANDBY
S. SPEAKER B
3. 5. 4. 5.
SR4500U DFU_01_ENG 2_2 04.6.25, 11:06 AMPage 16 Adobe PageMaker 6.5J/PPC

17
EN
GL
ISH1. INPUT SETUP
(ASSIGNABLE DIGITAL INPUT)Four digital inputs can be assigned as the desiredsource.Use this menu to select the digital input jack to beassigned to the input source.The Input Setup consists of 6 items, which are asbelow.
• D1AUTO to D4AUTO : Digital AUTO modeIf the input signal from the selected source is digitalsignal, this unit chooses a digital input automatically.
• DIG.1 to DIG.4 : Digital FIXED modeThe SR4500 chooses a digital input regardless ofa input signal from the selected source.
• ANA : Analog mode
Use this menu to select the digital input jack to beassigned to the input source.
1. Select “1.INPUT” in SETUP MENU with the or cursor button.
2. Press the ENTER button to enter the menu.3. Press the or cursor button to select the input
source.4. Press or cursor button to select the input
function.Select “DxAUTO”, “DIG.x” or “ANA” for inputsources.
The relation of the speakers number andconectted speaker
The relation of the room size and floor space
The relation of the room size and floor space is aroughly standard.
Front Front Surround Surround SubCHANNEL L/R Center L/R Back L/R woofer
(F) (C) (S) (SB) (SW)
7.1 ch LARGE SMALL SMALL 2ch YES
7.0 ch LARGE SMALL SMALL 2ch NONE
6.1 ch LARGE SMALL SMALL 1ch YES
6.0 ch LARGE SMALL SMALL 1ch NONE
5.1 ch LARGE SMALL SMALL NONE YES
5.0 ch LARGE SMALL SMALL NONE NONE
4.1 ch LARGE NONE SMALL NONE YES
4.0 ch LARGE NONE SMALL NONE NONE
3.1 ch LARGE SMALL NONE NONE YES
3.0 ch LARGE SMALL NONE NONE NONE
2.1 ch LARGE NONE NONE NONE YES
2.0 ch LARGE NONE NONE NONE NONE
SIMPLE SETUPYou can setup the speaker conditions quickly withSIMPLE SETUP menu. In this menu, the numberof speakers and speaker delay time can be set.These settings can be changed more detail in “2.SPEAKER” setup menu.Press the SIMPLE SETUP button on the unit toenter this menu.
1. Press the SIMPLE SETUP button on the unitto enter the “SPEAKERS” menu.
2. Press or cursor button to select the speakernumber.
3. Press the cursor button to enter the “ROOM”menu.
4. Press or cursor button to select the roomsize.
5. After finishing all setup, press the cursorbutton to exit the SIMPLE SETUP menu.
Note• All Simple Setup menu is reset when the speaker
setting is changed with Speaker Setup menu.
SIZEFloor Width Depth
Imaging Distancespace (W) (D)
Front (F) 6 ft. (1.8 m)
Center (C) 5 ft. (1.5 m)
SMALL 10 m2 2.7 m 3.6 m Surround (S) 4 ft. (1.2 m)
Surr. Back (SB) 5 ft. (1.5 m)
Sub Woofer (SW) 5 ft. (1.5 m)
Front (F) 7 ft. (2.1 m)
Center (C) 6 ft. (1.8 m)
MEDIUM 16 m2 3.6 m 4.5 m Surround (S) 5 ft. (1.5 m)
Surr. Back (SB) 7 ft. (2.1 m)
Sub Woofer (SW) 6 ft. (1.8 m)
Front (F) 9 ft. (2.7 m)
Center (C) 8 ft. (2.4 m)
LARGE 24 m2 4.5 m 5.4 m Surround (S) 7 ft. (2.1 m)
Surr. Back (SB) 8 ft. (2.4 m)
Sub Woofer (SW) 8 ft. (2.4 m)
MENU STRUCTURE of Simple Setup
3.0 (ch)
3.1 (ch)
2.0 (ch)
2.1 (ch)
4.0 (ch)
4.1 (ch)
5.0 (ch)
5.1 (ch)
6.0 (ch)
6.1 (ch)
7.0 (ch)
7.1 (ch)
LARGEROOM
MEDIUM
SMALL
SPEAKERSSIMPLE SETUP
SL
SR
C W
D
TV
SW
FR
FL
SBL
SBR (F)
(F)
(S)
(S)
(C)
(SW)
(SB)
(SB)
SURROUND
SURROUND RECEIVER SR4500
DOWN
PHONES
MUTE
PURESETUPDIRECT
SIMPLE
AUTO HT-EQ MENU
ENTER
DISPLAY MEMORY CLEAR
T-MODEEXIT BAND
MODE
DISP MULTI AUTO TUNED ST V – OFF NIGHT PEAK ANALOG
DIGITAL
ATT
SLEEP SURRAUTO DIRECT DISC 6.1 MTX 6.1 EQDIGITAL
SURROUND
AAC PCM
L C R
SL S SR
LFE
S. SPEAKER B
2. 4. 3. 5.1.
DTSPURE DIRECT AUTO
T.TONEMENU OFFSET UP/
MENUOSD
VOL.TV
VOL.MAIN
SLEEP MUTE
ENTER
4. 5.
2. 5.
1. 3. 5.
SURROUND
ND RECEIVER SR4500
D
NES
EAKER
PURESETUPDIRECT
SIMPLE
AUTO HT-EQ MENU
ENTER
DISPLAY MEMORY CLEAR
T-MODEEXIT BAND
MODE
DISP MULTI AUTO TUNED ST V – OFF NIGHT PEAK ANALOG
DIGITAL
ATT
SLEEP SURRAUTO DIRECT DISC 6.1 MTX 6.1 EQDIGITAL
SURROUND
AAC PCM
L C R
SL S SR
LFE
4. 5. 2. 5.1. 3. 5.
SR4500U DFU_01_ENG 2_2 04.6.25, 11:06 AMPage 17 Adobe PageMaker 6.5J/PPC

EN
GL
ISH
18
5. If you finish these setup, press the or cursor button to select “TO MAIN MENU” thenpress the ENTER button to return the SETUPMENU.Or press the or cursor button to select“EXIT” then press the ENTER button to exitthe SETUP MENU.
Notes:• When a DTS-LD or DTS-CD is playing, this setup
is not available. This is to avoid noise beinggenerated from the analog input.
• If “Dx-AUTO” is selected and a DVD, compactdisc or LD is fast forwarded during playback,decoded signals may produce a skipping sound. Insuch cases, change the setting to DIGITAL.
• Same digital input function cannot be set. In thiscase, the previous setting is set to ANALOG. Samedigital input number cannot be set in Digital AUTOmode and Digital Fixed mode. For example,D1AUTO and DIG.1 are not set at same time.
• The TUNER is fixed to the analog input, and cannot be selected for any digital input.
2. SPEAKER SETUPAfter you have installed the SR4500, connected allthe components, and determined the speaker layout,it is now time to perform the settings in the SpeakerSetup menu for the optimum sound acoustics foryour environment and speaker layout.Before you perform the following settings, it isimportant that you first determine the followingcharacteristics:
2-1. SPEAKERS SIZEWhen setting the speaker size in the SPEAKERSIZE sub-menu, use the guidelines given below.Large:
The complete frequency range for the channelyou are setting will be output from the speaker.
Small:Frequencies of the channel you are settinglower than approx. 100Hz will be output from thesubwoofer.If the Subwoofer is set to “NONE” and the frontspeakers are set to “Large,” then the sound maybe output from both the left and right speakers.
MENU STRUCTURE of Speakers Size setup
Speakers Size
Select when a subwoofer is connected.
Select if the front speakers are large sized.
Select if the center speaker is small sized.
Select when a subwoofer is not connected.
Select if the front speakers are small sized.
Select if the center speaker is large sized.
Select if no center speaker is connected.
Select if no surround left and right speakers are connected.
Select if the surround left and right speakers are large sized.
Select if the surround left and right speakers are small sized.
YES
NONE
LARGE
SMALL
SMALL
L & R
CENTER
LARGE
NONE
SMALL
LARGE
NONE
SL & SR
Select if no surround back speaker is connected
Select if the surround back left and right speakers are connected
Select if the surround back speaker is connected
2CH
NONE
SB
Select if the surround back speaker(s) is large sized
This menu (SB SIZE) will not be displayed, if SB is set "NONE".
Select if the surround back speaker(s) is small sizedSMALL
LARGE
***
SB SIZE
Select this when the bass speaker is about 8cm(3 3/16inches)
Select this when the bass speaker is about 10cm(3 15/16inches)
Select this when the bass speaker is about 12cm(4 3/4inches)80
100
120
LPF/HPF
SUBW2-1. SPEAKERS SIZEsetup
1CH
MAIN MENUexit SETUPMENU
Speakers Distancesetup
TO MAINMENUEXITNEXT
1. Select “2.SPEAKER” in SETUP MENU with or cursor button,
2. Press the ENTER button to enter the menu.The first sub-menu item is “2-1.Speakers Size”setup.
3. Press or cursor button to select the eachspeaker.
4. Press or cursor button to select the settingof size to each speaker.
5. If you finish these setup, press the or cursor button to select “NEXT”.
6. Press the ENTER button to enter the next “2-2. Speakers Distance” setup.Or press the or cursor button to select“EXIT” then press the ENTER button to exitthe SETUP MENU.Or press the or cursor button to select “TOMAIN MENU” then press the ENTER button toreturn the SETUP MENU.
DTSPURE DIRECT AUTO
T.TONEMENU OFFSET UP/
MENUOSD
VOL.TV
VOL.MAIN
SLEEP MUTE
ENTER
4. 5.
2. 5.
1. 3. 5.
SURROUND
ND RECEIVER SR4500
D
NES
EAKER
PURESETUPDIRECT
SIMPLE
AUTO HT-EQ MENU
ENTER
DISPLAY MEMORY CLEAR
T-MODEEXIT BAND
MODE
DISP MULTI AUTO TUNED ST V – OFF NIGHT PEAK ANALOG
DIGITAL
ATT
SLEEP SURRAUTO DIRECT DISC 6.1 MTX 6.1 EQDIGITAL
SURROUND
AAC PCM
L C R
SL S SR
LFE
4. 5. 2. 5.1. 3. 5. MENU STRUCTURE of Speakers Size setup
SR4500U DFU_01_ENG 2_2 04.6.25, 11:06 AMPage 18 Adobe PageMaker 6.5J/PPC
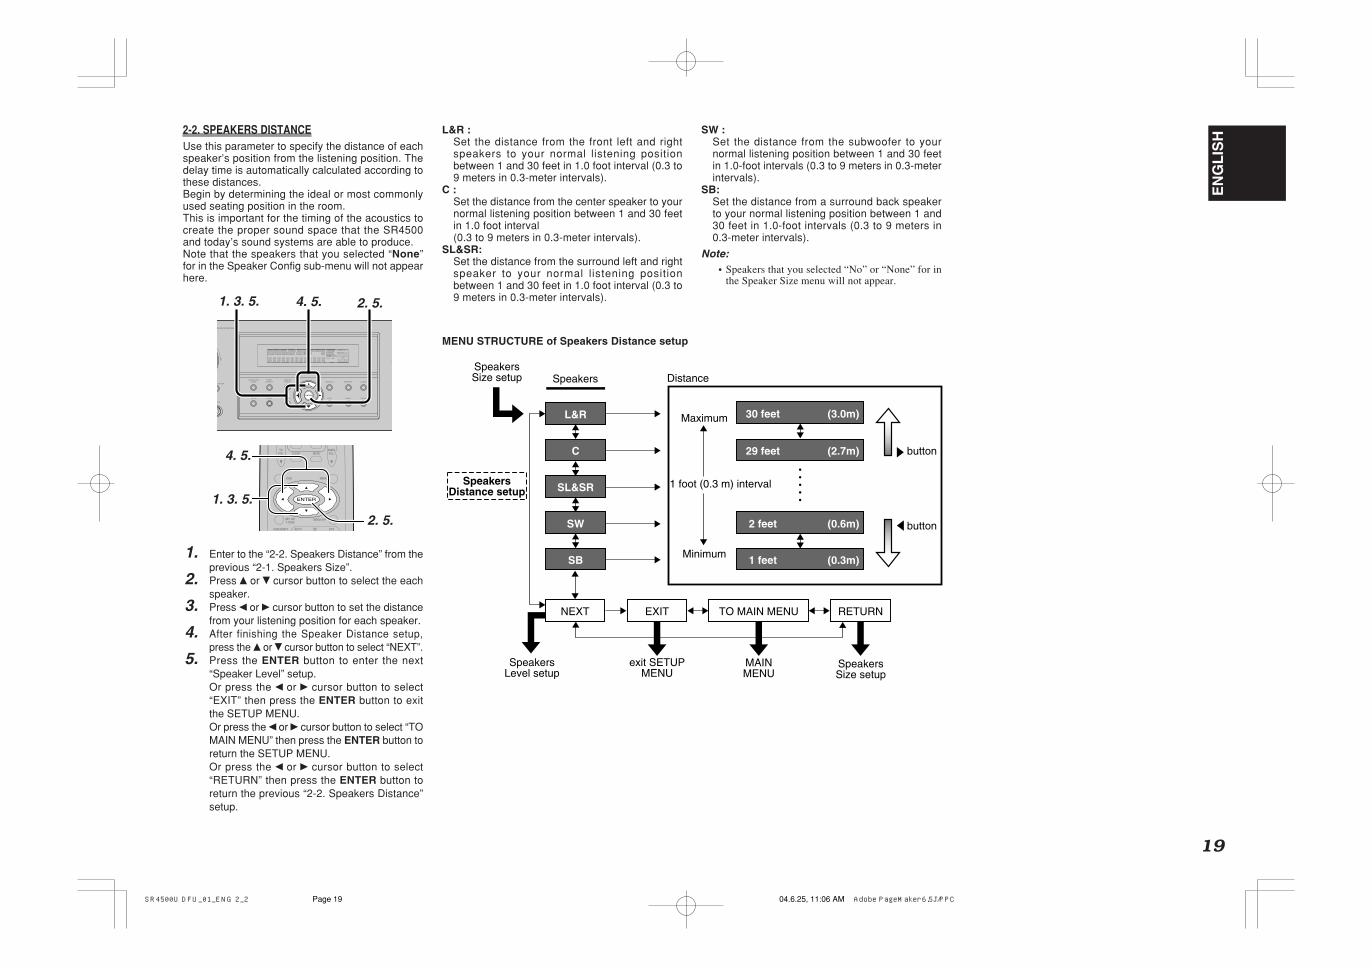
19
EN
GL
ISH2-2. SPEAKERS DISTANCE
Use this parameter to specify the distance of eachspeaker’s position from the listening position. Thedelay time is automatically calculated according tothese distances.Begin by determining the ideal or most commonlyused seating position in the room.This is important for the timing of the acoustics tocreate the proper sound space that the SR4500and today’s sound systems are able to produce.Note that the speakers that you selected “None”for in the Speaker Config sub-menu will not appearhere.
1. Enter to the “2-2. Speakers Distance” from theprevious “2-1. Speakers Size”.
2. Press or cursor button to select the eachspeaker.
3. Press or cursor button to set the distancefrom your listening position for each speaker.
4. After finishing the Speaker Distance setup,press the or cursor button to select “NEXT”.
5. Press the ENTER button to enter the next“Speaker Level” setup.Or press the or cursor button to select“EXIT” then press the ENTER button to exitthe SETUP MENU.Or press the or cursor button to select “TOMAIN MENU” then press the ENTER button toreturn the SETUP MENU.Or press the or cursor button to select“RETURN” then press the ENTER button toreturn the previous “2-2. Speakers Distance”setup.
L&R :Set the distance from the front left and rightspeakers to your normal listening positionbetween 1 and 30 feet in 1.0 foot interval (0.3 to9 meters in 0.3-meter intervals).
C :Set the distance from the center speaker to yournormal listening position between 1 and 30 feetin 1.0 foot interval(0.3 to 9 meters in 0.3-meter intervals).
SL&SR:Set the distance from the surround left and rightspeaker to your normal listening positionbetween 1 and 30 feet in 1.0 foot interval (0.3 to9 meters in 0.3-meter intervals).
MENU STRUCTURE of Speakers Distance setup
button
button
30 feet (3.0m)
29 feet (2.7m)
L&R
C
SL&SR
SW
SB
2 feet (0.6m)
EXIT
Minimum
Maximum
1 foot (0.3 m) interval
RETURNTO MAIN MENU
1 feet (0.3m)
NEXT
Distance
SpeakersSize setup
MAINMENU
exit SETUPMENU
SpeakersLevel setup
Speakers
SpeakersDistance setup
SpeakersSize setup
DTSPURE DIRECT AUTO
T.TONEMENU OFFSET UP/
MENUOSD
VOL.TV
VOL.MAIN
SLEEP MUTE
ENTER
4. 5.
2. 5.
1. 3. 5.
SURROUND
ND RECEIVER SR4500
D
NES
EAKER
PURESETUPDIRECT
SIMPLE
AUTO HT-EQ MENU
ENTER
DISPLAY MEMORY CLEAR
T-MODEEXIT BAND
MODE
DISP MULTI AUTO TUNED ST V – OFF NIGHT PEAK ANALOG
DIGITAL
ATT
SLEEP SURRAUTO DIRECT DISC 6.1 MTX 6.1 EQDIGITAL
SURROUND
AAC PCM
L C R
SL S SR
LFE
4. 5. 2. 5.1. 3. 5.
MENU STRUCTURE of Speakers Distance setup
SW :Set the distance from the subwoofer to yournormal listening position between 1 and 30 feetin 1.0-foot intervals (0.3 to 9 meters in 0.3-meterintervals).
SB:Set the distance from a surround back speakerto your normal listening position between 1 and30 feet in 1.0-foot intervals (0.3 to 9 meters in0.3-meter intervals).
Note:• Speakers that you selected “No” or “None” for in
the Speaker Size menu will not appear.
SR4500U DFU_01_ENG 2_2 04.6.25, 11:06 AMPage 19 Adobe PageMaker 6.5J/PPC

EN
GL
ISH
20
1. When you select “MANUAL” in T-MODE menuby pressing the or button, this unit will emita pink noise from the front left speaker. At thistime, adjust the desired level of the mastervolume. Remember the level of this noise andthen press the button. This unit will emit thepink noise from the center speaker.
2. Using the and cursor buttons, adjust thevolume level of the noise from the centerspeaker so that it is the same level as the frontleft speaker (Note that this can be adjusted toany level between –10 and +10 dB in 1dBintervals).
3. Press the cursor button again. This unit willnow emit the pink noise from the front rightspeaker.
4. Repeat steps 2 and 3 above for the front rightand other speakers until all speakers areadjusted to the same volume level.
5. Press the ENTER button, you can stop thetest tone mode. Or press the or cursorbutton to select “EXIT” then press the ENTERbutton to exit the SETUP MENU.Or press the or button to select “RETURN”then press the ENTER button to return theprevious “2-2. Speakers Distance” setup.
2-3. SPEAKERS LEVELHere you will set the volume for each speaker sothat they are all heard by the listener at the samelevel. Moreover, if the T.TONE button is pressed,unit can enter into this menu directly.
Note:• The speaker level settings is not available in 7.1
channel input mode and Pure Direct mode.
T(TEST) MODE :Selects “MANUAL” or “AUTO” for generatingmode of test tone or cursor button.
If you select “AUTO” by pressing the button, thetest tone will be cycled through in a circular patternwhich is L (Left) → C (Center) → R (Right) → SR(Surround Right) → SBR (Surround Back Right) →SBL (Surround Back Left) → SL (Surround Left) →SW (Subwoofer) → L →.. increments of 2 secondsfor each channel.Using the and cursor buttons, adjust thevolume level of the noise from the speaker so thatit is the same level for all speaker.Press the ENTER button, you can stop the testtone mode. Or press the or cursor button toselect “EXIT” then press the ENTER button to exitthe SETUP MENU.Or press the or cursor button to select“RETURN” then press the ENTER button to returnthe previous “2-2. Speakers Distance” setup.
If you select “MANUAL”, adjust the output level ofeach speaker as follow.
Notes:• Speakers that you selected “None” for in the
Speaker Size Setup menu will not appear.
• The setup level for each channel is memorized forreproduction in all surround mode.
• To adjust the speaker levels for 7.1-channel inputsources, you will need to use the 7.1CH LevelInput setup menu.
MENU STRUCTURE of Speakers Level setup
MANU AUTO
SW
L C
SBR
R
SL SR
EXITRETURNTO MAIN MENU
SBL
Speaker(Auto)
SpeakersDistance setup
MAINMENU
exit SETUPMENU
Test Tone mode
SpeakersLevel setup
SpeakersDistance
setup
Direct selectby remote
control
ListeningPositiom
1. 5.
5.
2. 5.
1. 3. 5.
NIGHT CSII EX/ES VIRTUAL
DTSPURE DIRECT AUTO
321
654
T.TONEMENU OFFSET UP/
MENUOSD
VOL.TV
VOL.MAIN
SLEEP MUTE
AMP
ENTER
AUX1
MAIN
MENU STRUCTURE of Speaker Level setup
+10dB
+9dB
-9dB
Minimum
Maximum
1 dB interval
Reference
1 dB interval
-10dB(SW -15 dB)
button
button
0dB
SURROUND
AV SURROUND RECEIVER SR4500
INPUT SELECTOR
PHONES
STANDBY
7.1CH INPUT
PURESETUPDIRECT
SIMPLE
AUTO HT-EQ MENU
ENTER
DISPLAY MEMORY CLEAR
T-MODEEXIT BAND
MODE
DISP MULTI AUTO TUNED ST V – OFF NIGHT PEAK ANALOG
DIGITAL
ATT
SLEEP SURRAUTO DIRECT DISC 6.1 MTX 6.1 EQDIGITAL
SURROUND
AAC PCM
L C R
SL S SR
LFE
POWER ON/STANDBY
S. SPEAKER B
1. 5. 5.1. 2. 5.1. 3. 5.
SR4500U DFU_01_ENG 2_2 04.6.25, 11:06 AMPage 20 Adobe PageMaker 6.5J/PPC

21
EN
GL
ISHHT-EQ :
Select to active the HT-EQ with the or cursorbuttons.The tonal balance of a film soundtrack will beexcessively bright and harsh when played backover audio equipment in the home. This isbecause film soundtracks were designed to beplayed back in large movie theater environments.Activating the HT-EQ feature when watching afilm made for movie theaters corrects this andrestores the correct tonal balance.The HT-EQ feature is available except in thefollowing modes.
• 7.1 CH INPUT
• PURE-DIRECT
• When VIRTUAL is set for the surround modeLFE LEVEL :
Select the output level of the LFE signal includedin the Dolby Digital signal or the DTS signal.Select 0 dB, -10 dB or OFF with the or cursorbuttons.
When you select “TO MAIN MENU” by pressingthe or button, you can return the SETUP MAINMENU by pressing the ENTER button.
4. SURROUNDThis sub menu is to adjust channel levels for eachsurround setting groups. There are three surroundsetting groups shown below. Therefore if settingsfor a surround mode are changed, settings for allother surround modes in the same group are alsochanged.
Surround setting group1 : AUTO, DOLBY, DTS, EX/ES, VIRTUAL,
STEREO2 : Multi-ch stereo3 : CS II
1. Select “4. SURROUND” in SETUP MENUwith or cursor button.
2. Press the ENTER button.3. To select a desired item, press or cursor
button.4. Using the or cursor button to select the mode
or adjust the volume level of each speaker.5. When you select “TO MAIN MENU” by pressing
the or button, you can return the SETUPMENU by pressing the ENTER button.Or press the or cursor button to select“EXIT” then press the ENTER button to exitthe SETUP MENU.
SR(SURR-MODE) :Select the desired surround mode with or cursor button.
• If one of the following modes is selected, all othermodes are also set to the same. AUTO, DOLBY,DTS, EX/ES, VIRTUAL, STEREO.
5. When you select “TO MAIN MENU” by pressingthe or button, you can return the SETUPMENU by pressing the ENTER button.Or press the or cursor button to select“EXIT” then press the ENTER button to exitthe SETUP MENU.
BASS MIX• The BASS MIX setting is only valid when
“LARGE” is set for the front speakers and “YES”is set for the subwoofer at stereo playback .
• When the “BOTH” is selected, the lowfrequency signal range of “LARGE” areproduced simultaneously from those channelsand the subwoofer channel.
When actual low frequency sound volume isweak depending on room size, use this functionto fill low frequency sound equally in the room.
• When “MIX” is selected, subwoofer output isdetermined depending on the speaker sizes foreach channels. If the front speaker size is set to“Large”, subwoofer output is only the LFE signalcontained in Dolby Digital or DTS processedsignals.
Note:• When Front speaker is set ”SMALL”, then BASS
MIX is set “MIX”. (The display appears “BASSMIX = ”.)
SURROUND MODE
HT-EQ
LFE
EXITTO MAIN MENU
exit SETUPMENU
4.SURROUND
MENU STRUCTURE of SURROUND setup
3. PREFERENCE
1. Select “3. PREFERENCE” in SETUP MENUwith or cursor button.
2. Press the ENTER button.3. Press or cursor button to select desired
item.4. Press or cursor button to set the mode.
DTSPURE DIRECT AUTO
T.TONEMENU OFFSET UP/
MENUOSD
VOL.TV
VOL.MAIN
SLEEP MUTE
ENTER
3. 4.
2. 4.
1. 4.
SURROUND
ND RECEIVER SR4500
D
NES
EAKER
PURESETUPDIRECT
SIMPLE
AUTO HT-EQ MENU
ENTER
DISPLAY MEMORY CLEAR
T-MODEEXIT BAND
MODE
DISP MULTI AUTO TUNED ST V – OFF NIGHT PEAK ANALOG
DIGITAL
ATT
SLEEP SURRAUTO DIRECT DISC 6.1 MTX 6.1 EQDIGITAL
SURROUND
AAC PCM
L C R
SL S SR
LFE
3. 4. 2. 4.1. 4
DTSPURE DIRECT AUTO
T.TONEMENU OFFSET UP/
MENUOSD
VOL.TV
VOL.MAIN
SLEEP MUTE
ENTER
4. 5.
2. 5.
1. 3. 5.
SURROUND
ND RECEIVER SR4500
D
NES
EAKER
PURESETUPDIRECT
SIMPLE
AUTO HT-EQ MENU
ENTER
DISPLAY MEMORY CLEAR
T-MODEEXIT BAND
MODE
DISP MULTI AUTO TUNED ST V – OFF NIGHT PEAK ANALOG
DIGITAL
ATT
SLEEP SURRAUTO DIRECT DISC 6.1 MTX 6.1 EQDIGITAL
SURROUND
AAC PCM
L C R
SL S SR
LFE
4. 5. 2. 5.1. 3. 5.
MENU STRUCTURE of SURROUND setup
MENU STRUCTURE of PREFERENCE setup
NOMAL
ECONOMY
STBY
TO MAIN MENU EXIT
exit SETUP MENU
3.PREFERENCESTANDBY MODE:When this function is set to "ECONOMY", you can reduce the power consumption when the unit is in the standby mode.
This menu (BASS) will not be displayed, if SUBW is set "NONE".
For L&R is "SMALL" : The low frequency signal range of front L/R are outputted to a subwoofer simultaneously with the LFE signal.
For L&R is "LARGE" : The low frequency signal range of front L/R are not output to subwoofer.
BOTH
MIX
***
BASSThe low frequency signal range of front L/R are outputted to a subwoofer simultaneously with the LFE signal.
7.1-V LAST>TV>DVD>…>V-OFF>
MENU STRUCTURE of PREFERENCE setup
SR4500U DFU_01_ENG 2_2 04.6.25, 11:07 AMPage 21 Adobe PageMaker 6.5J/PPC

EN
GL
ISH
22
TRUBASS
SRS DIALOG
EXITTO MAIN MENU
exit SETUPMENU
0 6
0 6
MENU STRUCTURE of CS II setup
6.CS II setup
6. CS II (CIRCLE SURROUND II)
1. Select “6. CS II” in SETUP MENU with or cursor button.
2. Press the ENTER button to enter this menu.3. Press or cursor button to select desired
item.4. Press or cursor button to set the level.5. When you select “TO MAIN MENU” by pressing
the or button, you can return the SETUPMENU by pressing the ENTER button.Or press the or cursor button to select“EXIT” then press the ENTER button to exitthe SETUP MENU.
TRUBASS:Set the TRUBASS level between 0 and 6 level in1 level interval with or cursor button.TRUBASS produced by the speakers to be anoctave below the actual physical capabilities ofthe speakers adding exciting, deeper basseffects.
SRS DIALOG:Set the SRS DIALOG level between 0 and 6level in 1 level interval with or cursor button.This can be popped out of the surround audioeffects allowing the listener to easily discernwhat the actors say.If “NONE” was selected for the Center speakersetting in the Speaker size, then this setting willnot appear.
DTSPURE DIRECT AUTO
T.TONEMENU OFFSET UP/
MENUOSD
VOL.TV
VOL.MAIN
SLEEP MUTE
ENTER
4. 5.
2. 5.
1. 3. 5.
SURROUND
ND RECEIVER SR4500
D
NES
EAKER
PURESETUPDIRECT
SIMPLE
AUTO HT-EQ MENU
ENTER
DISPLAY MEMORY CLEAR
T-MODEEXIT BAND
MODE
DISP MULTI AUTO TUNED ST V – OFF NIGHT PEAK ANALOG
DIGITAL
ATT
SLEEP SURRAUTO DIRECT DISC 6.1 MTX 6.1 EQDIGITAL
SURROUND
AAC PCM
L C R
SL S SR
LFE
4. 5. 2. 5.1. 3. 5.
MENU STRUCTURE of CS II setup5. PL II (DOLBY PRO LOGIC II )Pro Logic II-Music mode creates a rich andenveloping surround ambience from stereosources such as CDs.In this mode, SR4500 includes three controls tofine-tune the soundfield as follows.
1. Select “5.PLII” in SETUP MENU with or cursor button.
2. Press the ENTER button to enter the menu.3. Press or cursor button to select a desired
item.4. Press or cursor button to select the mode
or set the level.5. When you select “TO MAIN MENU” by pressing
the or button, you can return the SETUPMENU by pressing the ENTER button.Or press the or cursor button to select“EXIT” then press the ENTER button to exitthe SETUP MENU.
PANORAMA:Select the Panorama mode On or Off with or cursor button.Panorama wraps the sound of the front left and rightspeakers around you for an exciting perspective.
DIMENSION:Set the Dimension level between 0 and 6 level in1 level interval with or cursor button.Adjust the soundfield either towards the front ortowards the rear.This can be useful to help achieve a more suitablebalance from all the speakers with certain recordings.
C WIDTH:Set the Center width level between 0 and 7 levelin 1 level interval with or cursor button.Center Width allows you to gradually spread thecenter channel sound into the front left and rightspeakers.At its widest setting, all the sound from thecenter is mixed into the left and right.This control may help achieve a more spacioussound or a better blend of the front image.If “NONE” was selected for the Center speakersetting in the Speaker size, then this setting willnot appear.
DTSPURE DIRECT AUTO
T.TONEMENU OFFSET UP/
MENUOSD
VOL.TV
VOL.MAIN
SLEEP MUTE
ENTER
4. 5.
2. 5.
1. 3. 5.
SURROUND
ND RECEIVER SR4500
D
NES
EAKER
PURESETUPDIRECT
SIMPLE
AUTO HT-EQ MENU
ENTER
DISPLAY MEMORY CLEAR
T-MODEEXIT BAND
MODE
DISP MULTI AUTO TUNED ST V – OFF NIGHT PEAK ANALOG
DIGITAL
ATT
SLEEP SURRAUTO DIRECT DISC 6.1 MTX 6.1 EQDIGITAL
SURROUND
AAC PCM
L C R
SL S SR
LFE
4. 5. 2. 5.1. 3. 5.
DEFAULT
CUSTOM
PARAMETER
OFFPANORAMA
ON
DIMENSION
C-WIDTH 0 7
EXITTO MAIN MENU
exit SETUPMENU
5. PRO LOGIC II
MENU STRUCTURE of PRO LOGIC II setup
0 6
MENU STRUCTURE of PRO LOGIC II setup
SR4500U DFU_01_ENG 2_2 04.6.25, 11:07 AMPage 22 Adobe PageMaker 6.5J/PPC

23
EN
GL
ISHUSING THE SLEEP TIMER
To program the SR4500 for automatic standby,press the SLEEP button on the remote.Each press of the button will increase the timebefore shut down in the following sequence.
The sleep time will be shown for a few seconds inthe display on the front panel, and it will countdown until the time has elapsed.When the programmed sleep time has elapsed,the unit will automatically turn off.Note that the SLEEP indicator on the display willilluminate when the Sleep function is programmed.To cancel the Sleep function, press the SLEEPbutton until the display shows “SLEEP OFF” and theSLEEP indicator will disappear.
NIGHT MODE
Press the NIGHT button on the remote to turn on theNIGHT mode.Selecting the Night Mode ON is effective in DolbyDigital only, and it compresses the dynamic range.This softens loud passages such as suddenexplosions, to help prevent disturbing others late atnight.To turn off the Night mode, press the NIGHT buttonagain.
BASIC OPERATION(PLAY BACK)
SELECTING AN INPUT SOURCEBefore you can listen to any input media, you mustfirst select the input source on the SR4500.
Example : DVD
To select DVD, turn the INPUT FUNCTIONSELECTOR knob on the front panel or simplypress the DVD button on the remote.After you have selected DVD, simply turn on theDVD player and play the DVD.
• The input name will appear in the display on thefront panel.
• As the input is changed, the SR4500 willautomatically switch to the digital input, surroundmode, attenuation, and night mode status whichwere entered during the configuration processfor that source.
• When an audio source is selected, the last videoinput used remains routed to the VCR1 & DSS/VCR2 Outputs and Monitor Outputs. Thispermits simultaneous viewing and listening todifferent sources.
• When a Video source is selected, the videosignal for that input will be routed to the MonitorOutputs jacks and will be viewable on a TVmonitor connected to the SR4500.If a component video input is connected to theDVD or DSS component inputs, it will be routedto the Component Video Output. Make certainthat your TV is set to the proper input to view thesignal.
SELECTING THE SURROUND MODE
Example : AUTO SURROUND
To select the surround mode during playback, pressthe SURROUND MODE button on the front panel orthe Surround mode buttons on the remote.
ADJUSTING THE MAIN VOLUME
Adjust the volume to a comfortable level using theVOLUME control knob on the front panel or VOL / buttons on the remote.To increase the volume, turn the VOLUME knobclockwise or press VOL button on the remote, todecrease the volume, turn counterclockwise or pressVOL button on the remote.
Notes:• The volume can be adjusted within the range of – ∞
to 18 dB, in steps of 1 dB.
• However, when the channel level is set as describedon page 20, if the volume for any channel is set at+1 dB or greater, the volume cannot be adjusted upto 18 dB.
(In this case the maximum volume adjustmentrange is “18 dB - Maximum value of channel level)
ADJUSTING THE TONE (BASS &TREBLE) CONTROL
During a listening session you may wish to adjustthe Bass and Treble Control to suit your listeningtastes or room acoustics.
(Using the remote control unit)To adjust the bass effect, press BASS or BASSon the remote.To adjust the treble effect, press TREBLE orTREBLE on the remote.
Note:• The tone control function can work in the AUTO
Surround, Stereo, Dolby PLIIx, DTS, DTS-ES,and Multi Ch. Stereo mode.
TEMPORARILY TURNING OFF THESOUND
To temporarily silence all speaker outputs such aswhen interrupted by a phone call, press the MUTEbutton on the front panel or MUTE button on theremote.This will interrupt the output to all speakers and thehead-phone jack, but it will not affect any recordingor dubbing that may be in progress.When the system is muted, the display will show“MUTE” .Press the MUTE button again to return to normaloperation.
SURROUND
AV SURROUND RECEIVER SR4500
INPUT SELECTOR
PHONES
STANDBY
7.1CH INPUT
PURESETUPDIRECT
SIMPLE
AUTO HT-EQ MENU
MODE
DISP MULTI AUTO TUNED ST V –
SLEEP SURRAUTO DIRECT DISC 6.1
POWER ON/STANDBY
S. SPEAKER B
SURROUND
AV SURROUND RECEIVER SR4500
INPUT SELECTOR
PHONES
STANDBY
7.1CH INPUT
PURESETUPDIRECT
SIMPLE
AUTO HT-EQ MENU
MODE
DISP MULTI AUTO TUNED
SLEEP SURRAUTO DIRECT
POWER ON/STANDBY
S. SPEAKER B
DOWN UP
VOLUME
MUTE ATTDISPLAY MEMORY CLEAR
T-MODEEXIT BAND
AK ANALOG
DIGITAL
ATT
EQDIGITAL
SURROUND
AAC PCM
L C R
SL S SR
LFE
DOWN UP
VOLUME
MUTE ATTDISPLAY MEMORY CLEAR
T-MODEEXIT BAND
ANALOG
DIGITAL DIGITAL
SURROUND
AAC PCM
L C R
SL S SR
LFE
MENUOSD
VOL.TV
VOL.MAIN
SLEEP MUTE
AMP
TUNER CD TAPE CDR/MD
DVD
POWER
VCR1 DSS/VCR2TV
AUX1
TUNE/SEARCHTREBLE
CHANNEL/SKIP
BASS
A/D P.SCAN/V-OFF
7.1CH INSTEREOMCH-ST
MEMOCLEAR
DISPLAY
NIGHT CSII EX/ES VIRTUAL
DTSPURE DIRECT AUTO
321
654
98
0
7
T.TONEMENU OFFSET UP/
ENTER
MENUOSD
VOL.TV
VOL.MAIN
SLEEP MUTE
AMP
TUNER CD TAPE CDR/MD
DVDVCR1 DSS/VCR2TV
ENTER
AUX1
CH.SEL LIP.SYNC
PTYSUB-T/ATTAUDIOINPUT/DISC+
F.DIRECTRDS
TUNE/SEARCH
T-MODE
TREBLE
CHANNEL/SKIP
BASS
A/D P.SCAN/V-OFF
7.1CH INSTEREOMCH-ST
MEMOCLEAR
DISPLAY
NIGHT CSII EX/ES VIRTUAL
DTSPURE DIRECT AUTO
321
654
98
0
7
MENUOSD
VOL.TV
VOL.MAIN
SLEEP MUTE
AMP
TUNER CD TAPE CDR/MD
DVDVCR1 DSS/VCR2TV
ENTER
AUX1
MENUOSD
VOL.TV
VOL.MAIN
SLEEP MUTE
AMP
TUNER CD TAPE CDR/MD
DVDVCR1 DSS/VCR2TV
ENTER
AUX1
TUNE/SEARCHTREBLE
CHANNEL/SKIP
BASS
A/D P.SCAN/V-OFF
7.1CH INSTEREOMCH-ST
MEMOCLEAR
DISPLAY
NIGHT CSII EX/ES VIRTUAL
DTSPURE DIRECT AUTO
321
654
98
0
7
T.TONEMENU OFFSET UP/
MENUOSD
ENTER
OFF 10 20 30 40
90 80 70 60 50
SR4500U DFU_01_ENG 2_2 04.6.25, 11:07 AMPage 23 Adobe PageMaker 6.5J/PPC
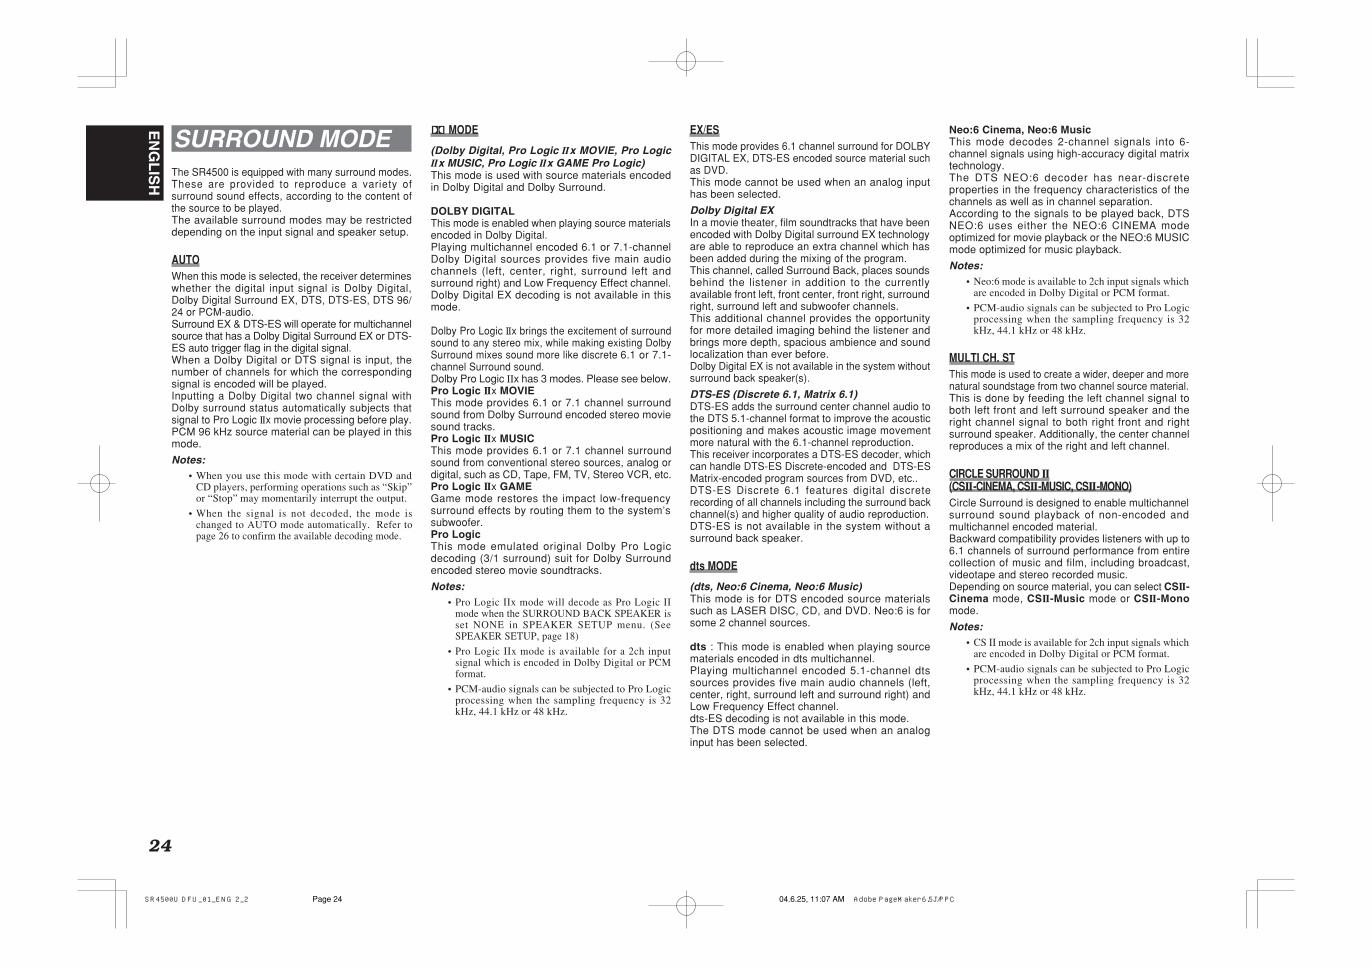
EN
GL
ISH
24
SURROUND MODEThe SR4500 is equipped with many surround modes.These are provided to reproduce a variety ofsurround sound effects, according to the content ofthe source to be played.The available surround modes may be restricteddepending on the input signal and speaker setup.
AUTOWhen this mode is selected, the receiver determineswhether the digital input signal is Dolby Digital,Dolby Digital Surround EX, DTS, DTS-ES, DTS 96/24 or PCM-audio.Surround EX & DTS-ES will operate for multichannelsource that has a Dolby Digital Surround EX or DTS-ES auto trigger flag in the digital signal.When a Dolby Digital or DTS signal is input, thenumber of channels for which the correspondingsignal is encoded will be played.Inputting a Dolby Digital two channel signal withDolby surround status automatically subjects thatsignal to Pro Logic IIx movie processing before play.PCM 96 kHz source material can be played in thismode.
Notes:• When you use this mode with certain DVD and
CD players, performing operations such as “Skip”or “Stop” may momentarily interrupt the output.
• When the signal is not decoded, the mode ischanged to AUTO mode automatically. Refer topage 26 to confirm the available decoding mode.
2 MODE
(Dolby Digital, Pro Logic IIx MOVIE, Pro LogicIIx MUSIC, Pro Logic IIx GAME Pro Logic)This mode is used with source materials encodedin Dolby Digital and Dolby Surround.
DOLBY DIGITALThis mode is enabled when playing source materialsencoded in Dolby Digital.Playing multichannel encoded 6.1 or 7.1-channelDolby Digital sources provides five main audiochannels (left, center, right, surround left andsurround right) and Low Frequency Effect channel.Dolby Digital EX decoding is not available in thismode.
Dolby Pro Logic IIx brings the excitement of surroundsound to any stereo mix, while making existing DolbySurround mixes sound more like discrete 6.1 or 7.1-channel Surround sound.Dolby Pro Logic IIx has 3 modes. Please see below.Pro Logic IIx MOVIEThis mode provides 6.1 or 7.1 channel surroundsound from Dolby Surround encoded stereo moviesound tracks.Pro Logic IIx MUSICThis mode provides 6.1 or 7.1 channel surroundsound from conventional stereo sources, analog ordigital, such as CD, Tape, FM, TV, Stereo VCR, etc.Pro Logic IIx GAMEGame mode restores the impact low-frequencysurround effects by routing them to the system’ssubwoofer.Pro LogicThis mode emulated original Dolby Pro Logicdecoding (3/1 surround) suit for Dolby Surroundencoded stereo movie soundtracks.
Notes:• Pro Logic IIx mode will decode as Pro Logic II
mode when the SURROUND BACK SPEAKER isset NONE in SPEAKER SETUP menu. (SeeSPEAKER SETUP, page 18)
• Pro Logic IIx mode is available for a 2ch inputsignal which is encoded in Dolby Digital or PCMformat.
• PCM-audio signals can be subjected to Pro Logicprocessing when the sampling frequency is 32kHz, 44.1 kHz or 48 kHz.
EX/ESThis mode provides 6.1 channel surround for DOLBYDIGITAL EX, DTS-ES encoded source material suchas DVD.This mode cannot be used when an analog inputhas been selected.
Dolby Digital EXIn a movie theater, film soundtracks that have beenencoded with Dolby Digital surround EX technologyare able to reproduce an extra channel which hasbeen added during the mixing of the program.This channel, called Surround Back, places soundsbehind the listener in addition to the currentlyavailable front left, front center, front right, surroundright, surround left and subwoofer channels.This additional channel provides the opportunityfor more detailed imaging behind the listener andbrings more depth, spacious ambience and soundlocalization than ever before.Dolby Digital EX is not available in the system withoutsurround back speaker(s).
DTS-ES (Discrete 6.1, Matrix 6.1)DTS-ES adds the surround center channel audio tothe DTS 5.1-channel format to improve the acousticpositioning and makes acoustic image movementmore natural with the 6.1-channel reproduction.This receiver incorporates a DTS-ES decoder, whichcan handle DTS-ES Discrete-encoded and DTS-ESMatrix-encoded program sources from DVD, etc..DTS-ES Discrete 6.1 features digital discreterecording of all channels including the surround backchannel(s) and higher quality of audio reproduction.DTS-ES is not available in the system without asurround back speaker.
dts MODE
(dts, Neo:6 Cinema, Neo:6 Music)This mode is for DTS encoded source materialssuch as LASER DISC, CD, and DVD. Neo:6 is forsome 2 channel sources.
dts : This mode is enabled when playing sourcematerials encoded in dts multichannel.Playing multichannel encoded 5.1-channel dtssources provides five main audio channels (left,center, right, surround left and surround right) andLow Frequency Effect channel.dts-ES decoding is not available in this mode.The DTS mode cannot be used when an analoginput has been selected.
Neo:6 Cinema, Neo:6 MusicThis mode decodes 2-channel signals into 6-channel signals using high-accuracy digital matrixtechnology.The DTS NEO:6 decoder has near-discreteproperties in the frequency characteristics of thechannels as well as in channel separation.According to the signals to be played back, DTSNEO:6 uses either the NEO:6 CINEMA modeoptimized for movie playback or the NEO:6 MUSICmode optimized for music playback.
Notes:• Neo:6 mode is available to 2ch input signals which
are encoded in Dolby Digital or PCM format.
• PCM-audio signals can be subjected to Pro Logicprocessing when the sampling frequency is 32kHz, 44.1 kHz or 48 kHz.
MULTI CH. STThis mode is used to create a wider, deeper and morenatural soundstage from two channel source material.This is done by feeding the left channel signal toboth left front and left surround speaker and theright channel signal to both right front and rightsurround speaker. Additionally, the center channelreproduces a mix of the right and left channel.
CIRCLE SURROUND II(CSII-CINEMA, CSII-MUSIC, CSII-MONO)Circle Surround is designed to enable multichannelsurround sound playback of non-encoded andmultichannel encoded material.Backward compatibility provides listeners with up to6.1 channels of surround performance from entirecollection of music and film, including broadcast,videotape and stereo recorded music.Depending on source material, you can select CSII-Cinema mode, CSII-Music mode or CSII-Monomode.
Notes:• CS II mode is available for 2ch input signals which
are encoded in Dolby Digital or PCM format.
• PCM-audio signals can be subjected to Pro Logicprocessing when the sampling frequency is 32kHz, 44.1 kHz or 48 kHz.
SR4500U DFU_01_ENG 2_2 04.6.25, 11:07 AMPage 24 Adobe PageMaker 6.5J/PPC

25
EN
GL
ISHVIRTUAL
This mode creates a virtualized surround soundexperience from a two-speaker (front L and R)playback system playing any multichannel audiosource (such as found on DVDs and digitalbroadcasts), including Dolby Digital, Dolby Pro Logicor DTS.
STEREOThis mode bypasses all surround processing.In stereo program sources, the left and right channelsplay normally when PCM-audio or analog stereo isinput.With Dolby Digital and DTS sources, the 5.1multichannels are converted to two channelstereo. 96 kHz PCM source material can be playedback in stereo mode.
PURE - DIRECTIn the source direct mode, the tone control circuitand bass management configuration are bypassedfor full range frequency response and the puristaudio reproduction.96 kHz PCM source material can be played back inthis mode.
Notes:• Internal speaker size is setup to front L/R =
LARGE, Center = LARGE, Surround L/R =LARGE and Subwoofer = YES automatically.Tone controls and additional processing are alsodefeated.
• When you use this mode with certain DVD and CDplayers, performing operations such as “Skip” or“Stop” may momentarily interrupt the output.
CAUTION
NOTE for DTS signal* Connected DVD-player, laser-disc player or CD-
player needs to support DTS-digital output. Youmay not be able to play some DTS sourcesignals from certain CD players and LD playerseven if you connect the player to the SR4500digitally. This is because the digital signal hasbeen processed (such as the output level,sampling frequency, or frequency response)and the SR4500 cannot recognize the signal asDTS data.
* Depending on the player used, DTS play mayproduce a short noise. This is not a malfunction.
* While signals from DTS-laser disc or CD areplaying in another Surround mode, you cannotswitch to digital input or from digital input toanalog input by INPUT SETUP in SETUP MAINMENU or the A/D button.
* The outputs for the VCR 1 OUT, DSS/VCR 2OUT, TAPE OUT, and CD-R OUT output analogaudio signals. Do not record from CDs or LDsthat support DTS using these outputs. If you do,the DTS-encoded signal will be recorded asnoise.
NOTE for Dolby Digital Surround EX signal* When playing Dolby Digital Surround EX-
encoded software in 6.1 channels, it is requiredto set the EX/ES mode.
* Note that some of Dolby Digital Surround EX-encoded software does not contain theidentification signal. In this case, set the EX/ES mode manually.
NOTE for 96kHz PCM audio* AUTO, Pure- DIRECT, and STEREO modes can
be used when playing PCM signals with asampling frequency of 96 kHz (such as fromDVD-Video discs that contain 24 bit, 96 kHzaudio). If such signals are input during playbackin one of the other surround modes, output fromSR4500 will be muted.
* Certain DVD player models inhibit digital output.For details, refer to the player’s operation manual.
* Some DVD formatted discs feature copy protection.When using such disc, 96 kHz PCM signal is notoutput from the DVD player. For details, refer to theplayer's operation manual.
SR4500U DFU_01_ENG 2_2 04.6.25, 11:08 AMPage 25 Adobe PageMaker 6.5J/PPC
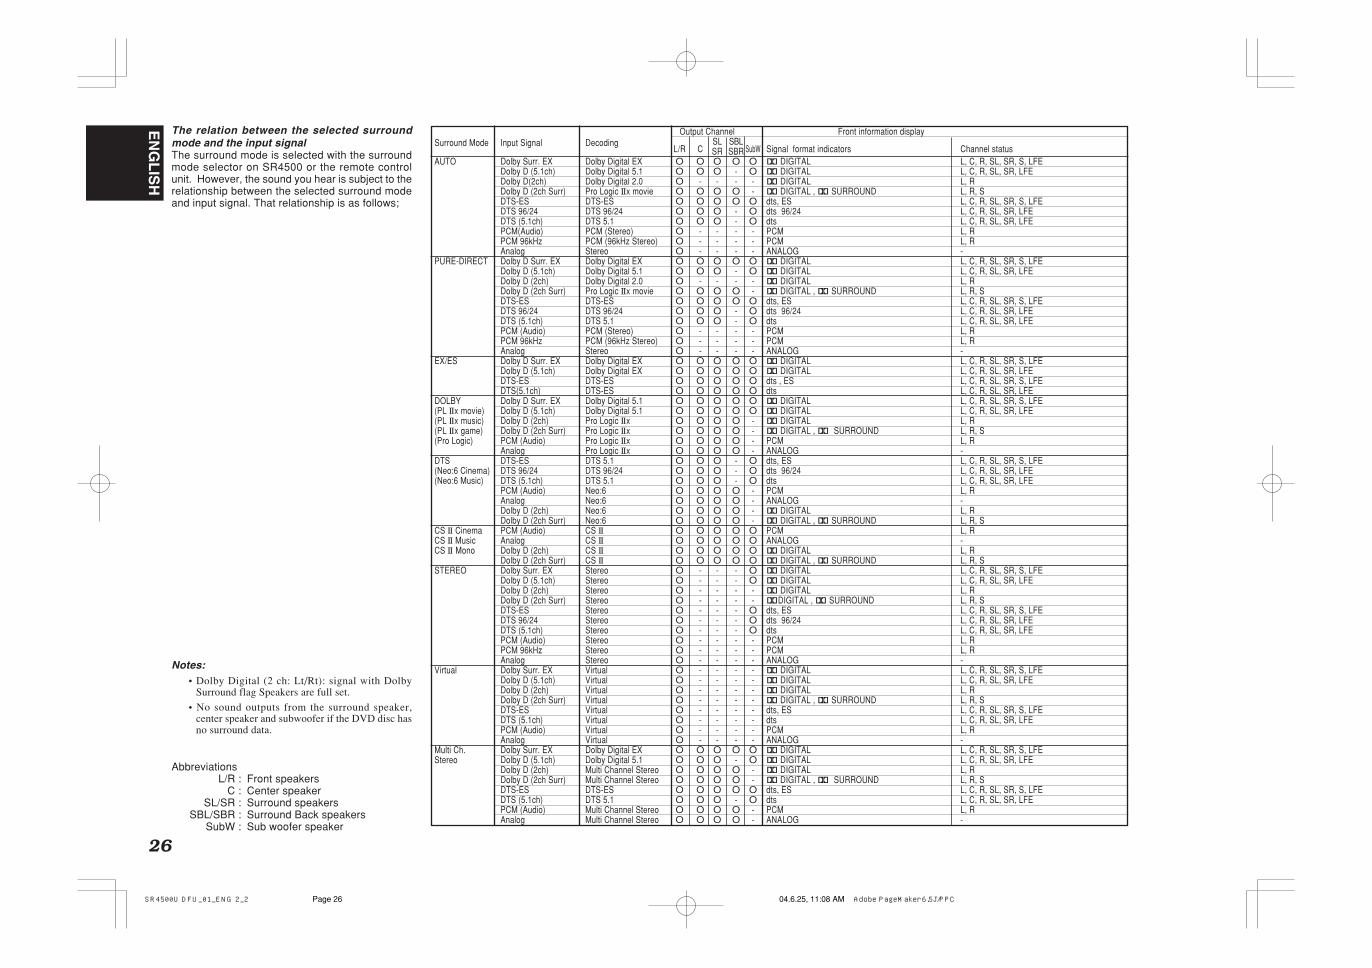
EN
GL
ISH
26
The relation between the selected surroundmode and the input signalThe surround mode is selected with the surroundmode selector on SR4500 or the remote controlunit. However, the sound you hear is subject to therelationship between the selected surround modeand input signal. That relationship is as follows;
Notes:• Dolby Digital (2 ch: Lt/Rt): signal with Dolby
Surround flag Speakers are full set.
• No sound outputs from the surround speaker,center speaker and subwoofer if the DVD disc hasno surround data.
AbbreviationsL/R : Front speakers
C : Center speakerSL/SR : Surround speakers
SBL/SBR : Surround Back speakersSubW : Sub woofer speaker
Surround Mode Input Signal DecodingOutput Channel Front information display
L/R CSL SBL
SubW Signal format indicators Channel statusSR SBRAUTO Dolby Surr. EX Dolby Digital EX O O O O O 2 DIGITAL L, C, R, SL, SR, S, LFE
Dolby D (5.1ch) Dolby Digital 5.1 O O O - O 2 DIGITAL L, C, R, SL, SR, LFEDolby D(2ch) Dolby Digital 2.0 O - - - - 2 DIGITAL L, RDolby D (2ch Surr) Pro Logic IIx movie O O O O - 2 DIGITAL , 2 SURROUND L, R, SDTS-ES DTS-ES O O O O O dts, ES L, C, R, SL, SR, S, LFEDTS 96/24 DTS 96/24 O O O - O dts 96/24 L, C, R, SL, SR, LFEDTS (5.1ch) DTS 5.1 O O O - O dts L, C, R, SL, SR, LFEPCM(Audio) PCM (Stereo) O - - - - PCM L, RPCM 96kHz PCM (96kHz Stereo) O - - - - PCM L, RAnalog Stereo O - - - - ANALOG -
PURE-DIRECT Dolby D Surr. EX Dolby Digital EX O O O O O 2 DIGITAL L, C, R, SL, SR, S, LFEDolby D (5.1ch) Dolby Digital 5.1 O O O - O 2 DIGITAL L, C, R, SL, SR, LFEDolby D (2ch) Dolby Digital 2.0 O - - - - 2 DIGITAL L, RDolby D (2ch Surr) Pro Logic IIx movie O O O O - 2 DIGITAL , 2 SURROUND L, R, SDTS-ES DTS-ES O O O O O dts, ES L, C, R, SL, SR, S, LFEDTS 96/24 DTS 96/24 O O O - O dts 96/24 L, C, R, SL, SR, LFEDTS (5.1ch) DTS 5.1 O O O - O dts L, C, R, SL, SR, LFEPCM (Audio) PCM (Stereo) O - - - - PCM L, RPCM 96kHz PCM (96kHz Stereo) O - - - - PCM L, RAnalog Stereo O - - - - ANALOG -
EX/ES Dolby D Surr. EX Dolby Digital EX O O O O O 2 DIGITAL L, C, R, SL, SR, S, LFEDolby D (5.1ch) Dolby Digital EX O O O O O 2 DIGITAL L, C, R, SL, SR, LFEDTS-ES DTS-ES O O O O O dts , ES L, C, R, SL, SR, S, LFEDTS(5.1ch) DTS-ES O O O O O dts L, C, R, SL, SR, LFE
DOLBY Dolby D Surr. EX Dolby Digital 5.1 O O O O O 2 DIGITAL L, C, R, SL, SR, S, LFE(PL IIx movie) Dolby D (5.1ch) Dolby Digital 5.1 O O O O O 2 DIGITAL L, C, R, SL, SR, LFE(PL IIx music) Dolby D (2ch) Pro Logic IIx O O O O - 2 DIGITAL L, R(PL IIx game) Dolby D (2ch Surr) Pro Logic IIx O O O O - 2 DIGITAL , 2 SURROUND L, R, S(Pro Logic) PCM (Audio) Pro Logic IIx O O O O - PCM L, R
Analog Pro Logic IIx O O O O - ANALOG -DTS DTS-ES DTS 5.1 O O O - O dts, ES L, C, R, SL, SR, S, LFE(Neo:6 Cinema) DTS 96/24 DTS 96/24 O O O - O dts 96/24 L, C, R, SL, SR, LFE(Neo:6 Music) DTS (5.1ch) DTS 5.1 O O O - O dts L, C, R, SL, SR, LFE
PCM (Audio) Neo:6 O O O O - PCM L, RAnalog Neo:6 O O O O - ANALOG -Dolby D (2ch) Neo:6 O O O O - 2 DIGITAL L, RDolby D (2ch Surr) Neo:6 O O O O - 2 DIGITAL , 2 SURROUND L, R, S
CS II Cinema PCM (Audio) CS II O O O O O PCM L, RCS II Music Analog CS II O O O O O ANALOG -CS II Mono Dolby D (2ch) CS II O O O O O 2 DIGITAL L, R
Dolby D (2ch Surr) CS II O O O O O 2 DIGITAL , 2 SURROUND L, R, SSTEREO Dolby Surr. EX Stereo O - - - O 2 DIGITAL L, C, R, SL, SR, S, LFE
Dolby D (5.1ch) Stereo O - - - O 2 DIGITAL L, C, R, SL, SR, LFEDolby D (2ch) Stereo O - - - - 2 DIGITAL L, RDolby D (2ch Surr) Stereo O - - - - 2DIGITAL , 2 SURROUND L, R, SDTS-ES Stereo O - - - O dts, ES L, C, R, SL, SR, S, LFEDTS 96/24 Stereo O - - - O dts 96/24 L, C, R, SL, SR, LFEDTS (5.1ch) Stereo O - - - O dts L, C, R, SL, SR, LFEPCM (Audio) Stereo O - - - - PCM L, RPCM 96kHz Stereo O - - - - PCM L, RAnalog Stereo O - - - - ANALOG -
Virtual Dolby Surr. EX Virtual O - - - - 2 DIGITAL L, C, R, SL, SR, S, LFEDolby D (5.1ch) Virtual O - - - - 2 DIGITAL L, C, R, SL, SR, LFEDolby D (2ch) Virtual O - - - - 2 DIGITAL L, RDolby D (2ch Surr) Virtual O - - - - 2 DIGITAL , 2 SURROUND L, R, SDTS-ES Virtual O - - - - dts, ES L, C, R, SL, SR, S, LFEDTS (5.1ch) Virtual O - - - - dts L, C, R, SL, SR, LFEPCM (Audio) Virtual O - - - - PCM L, RAnalog Virtual O - - - - ANALOG -
Multi Ch. Dolby Surr. EX Dolby Digital EX O O O O O 2 DIGITAL L, C, R, SL, SR, S, LFEStereo Dolby D (5.1ch) Dolby Digital 5.1 O O O - O 2 DIGITAL L, C, R, SL, SR, LFE
Dolby D (2ch) Multi Channel Stereo O O O O - 2 DIGITAL L, RDolby D (2ch Surr) Multi Channel Stereo O O O O - 2 DIGITAL , 2 SURROUND L, R, SDTS-ES DTS-ES O O O O O dts, ES L, C, R, SL, SR, S, LFEDTS (5.1ch) DTS 5.1 O O O - O dts L, C, R, SL, SR, LFEPCM (Audio) Multi Channel Stereo O O O O - PCM L, RAnalog Multi Channel Stereo O O O O - ANALOG -
SR4500U DFU_01_ENG 2_2 04.6.25, 11:08 AMPage 26 Adobe PageMaker 6.5J/PPC
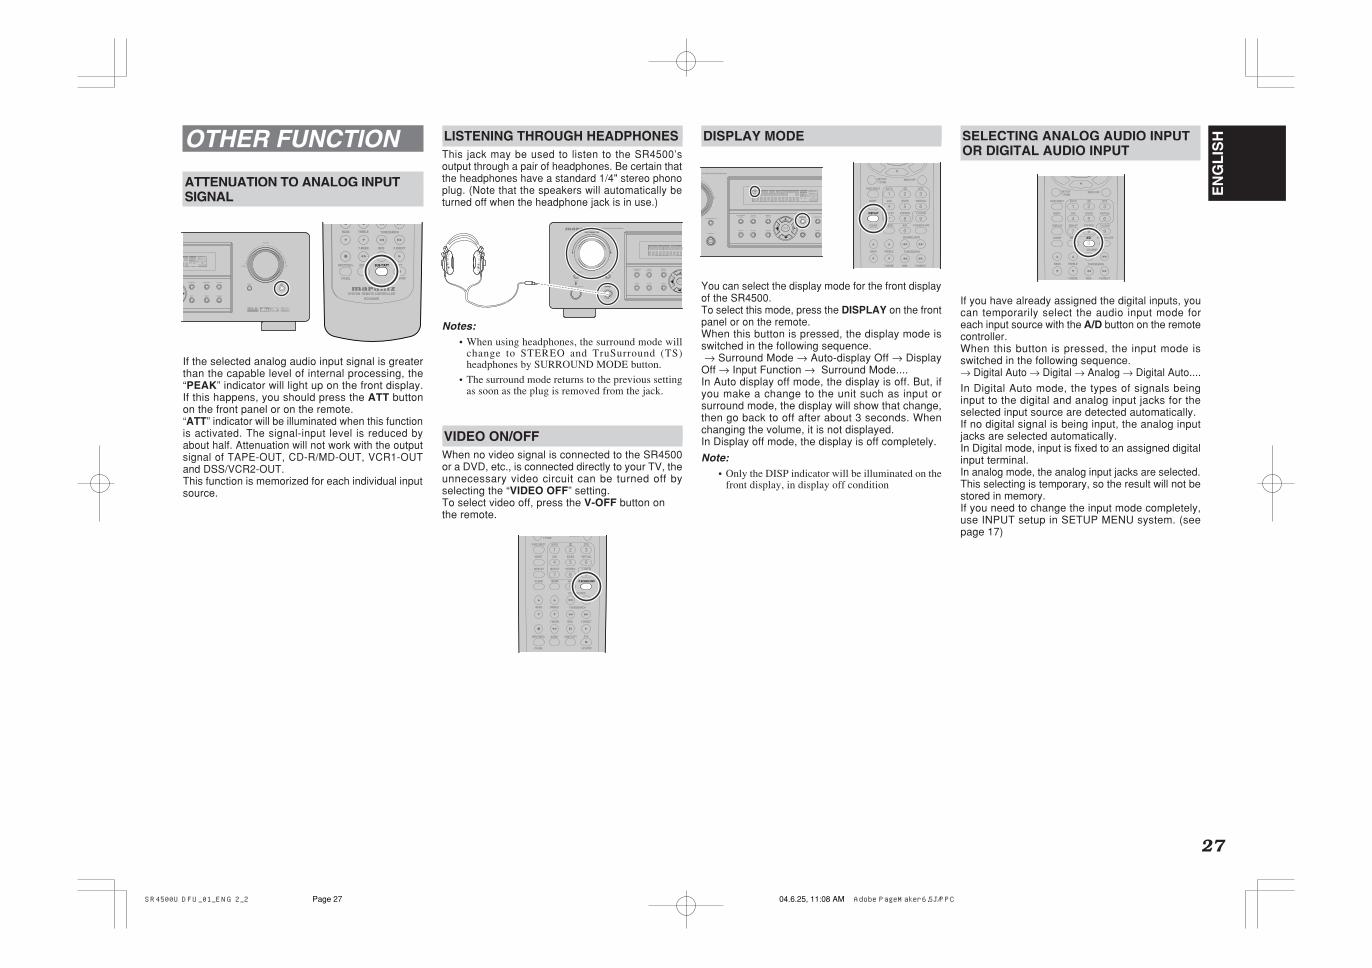
27
EN
GL
ISHDISPLAY MODE
You can select the display mode for the front displayof the SR4500.To select this mode, press the DISPLAY on the frontpanel or on the remote.When this button is pressed, the display mode isswitched in the following sequence. → Surround Mode → Auto-display Off → DisplayOff → Input Function → Surround Mode....In Auto display off mode, the display is off. But, ifyou make a change to the unit such as input orsurround mode, the display will show that change,then go back to off after about 3 seconds. Whenchanging the volume, it is not displayed.In Display off mode, the display is off completely.
Note:• Only the DISP indicator will be illuminated on the
front display, in display off condition
OTHER FUNCTION
ATTENUATION TO ANALOG INPUTSIGNAL
If the selected analog audio input signal is greaterthan the capable level of internal processing, the“PEAK” indicator will light up on the front display.If this happens, you should press the ATT buttonon the front panel or on the remote.“ATT” indicator will be illuminated when this functionis activated. The signal-input level is reduced byabout half. Attenuation will not work with the outputsignal of TAPE-OUT, CD-R/MD-OUT, VCR1-OUTand DSS/VCR2-OUT.This function is memorized for each individual inputsource.
LISTENING THROUGH HEADPHONESThis jack may be used to listen to the SR4500’soutput through a pair of headphones. Be certain thatthe headphones have a standard 1/4" stereo phonoplug. (Note that the speakers will automatically beturned off when the headphone jack is in use.)
Notes:• When using headphones, the surround mode will
change to STEREO and TruSurround (TS)headphones by SURROUND MODE button.
• The surround mode returns to the previous settingas soon as the plug is removed from the jack.
VIDEO ON/OFFWhen no video signal is connected to the SR4500or a DVD, etc., is connected directly to your TV, theunnecessary video circuit can be turned off byselecting the “VIDEO OFF” setting.To select video off, press the V-OFF button onthe remote.
SELECTING ANALOG AUDIO INPUTOR DIGITAL AUDIO INPUT
If you have already assigned the digital inputs, youcan temporarily select the audio input mode foreach input source with the A/D button on the remotecontroller.When this button is pressed, the input mode isswitched in the following sequence.→ Digital Auto → Digital → Analog → Digital Auto....
In Digital Auto mode, the types of signals beinginput to the digital and analog input jacks for theselected input source are detected automatically.If no digital signal is being input, the analog inputjacks are selected automatically.In Digital mode, input is fixed to an assigned digitalinput terminal.In analog mode, the analog input jacks are selected.This selecting is temporary, so the result will not bestored in memory.If you need to change the input mode completely,use INPUT setup in SETUP MENU system. (seepage 17)
SURROUND
AV SURROUND RECEIVER SR4500
INPUT SELECTOR
PHONES
STANDBY
7.1CH INPUT
PURESETUPDIRECT
SIMPLE
AUTO HT-EQ MENU
ENTER
MODE
DISP MULTI AUTO TUNED ST V – OFF NIG
SLEEP SURRAUTO DIRECT DISC 6.1 MTX 6.1
POWER ON/STANDBY
S. SPEAKER B
DOWN UP
VOLUME
MUTE ATTDISPLAY MEMORY CLEAR
T-MODEEXIT BAND
K ANALOG
DIGITAL
ATT
EQDIGITAL
SURROUND
AAC PCM
L C R
SL S SR
LFE
SURROUND
AV SURROUND RECEIVER SR4500
R
PHONES
PURESETUPDIRECT
SIMPLE
AUTO HT-EQ MENU
ENTER
DISPLAY MEMORY
EXIT BAND
MODE
DISP MULTI AUTO TUNED ST V – OFF NIGHT PEAK ANALOG
DIGITAL
ATT
SLEEP SURRAUTO DIRECT DISC 6.1 MTX 6.1 EQDIGITAL
SURROUND
AAC PCM
L C R
SL S SR
LFE
S. SPEAKER B
CH.SEL LIP.SYNC
PTYSUB-T/ATTAUDIOINPUT/DISC+
F.DIRECTRDS
TUNE/SEARCH
T-MODE
TREBLEBASS
SYSTEM REMOTE CONTROLLER
RC5500SR
F.DIRECTRDS
TUNE/SEARCH
T-MODE
TREBLE
CHANNEL/SKIP
BASS
A/D P.SCAN/V-OFF
7.1CH INSTEREOMCH-ST
MEMOCLEAR
DISPLAY
NIGHT CSII EX/ES VIRTUAL
DTSPURE DIRECT AUTO
321
654
98
0
7
T.TONEMENU OFFSET UP/
F.DIRECTRDS
TUNE/SEARCH
T-MODE
TREBLE
CHANNEL/SKIP
BASS
A/D P.SCAN/V-OFF
7.1CH INSTEREOMCH-ST
MEMOCLEAR
DISPLAY
NIGHT CSII EX/ES VIRTUAL
DTSPURE DIRECT AUTO
321
654
98
0
7
T.TONEMENU OFFSET UP/
CH.SEL LIP.SYNC
PTYSUB-T/ATTAUDIOINPUT/DISC+
F.DIRECTRDS
TUNE/SEARCH
T-MODE
TREBLE
CHANNEL/SKIP
BASS
A/D P.SCAN/V-OFF
7.1CH INSTEREOMCH-ST
MEMOCLEAR
DISPLAY
NIGHT CSII EX/ES VIRTUAL
DTSPURE DIRECT AUTO
321
654
98
0
7
T.TONEMENU OFF
SR4500U DFU_01_ENG 2_2 04.6.25, 11:08 AMPage 27 Adobe PageMaker 6.5J/PPC

EN
GL
ISH
28
7.1 CH INPUTThe SR4500 is equipped for future expansionthrough the use of Multi channel SACD multichannelplayer or DVD-Audio player.When this is selected, the input signals connectedto the L(front left), R (front right), CENTER, SL(surround left), SR (surround right) and SBL(surround back left) and SBR (surround back right)channels of the 7.1 CH. IN jacks are output directlyto the front (left and right), center, surround (leftand right) and surround back speaker systems aswell as the pre-out jacks without passing throughthe surround circuitry.In addition, the signal input to the SW (subwoofer)jack is output to the PRE OUT SW (subwoofer)jack.When 7.1 CH. INPUT is selected, the last video inputused remains routed to the Monitor Outputs.This permits simultaneous viewing with videosources
1. Select a desired Video source to decide therouted video signal to the Monitor Outputs .
2. Press the 7.1 CH INPUT button on the frontpanel or press 7.1 CH IN on the remote toswitch the 7.1 channel input.
Recording the video from one source and theaudio from anotherYou can add the sound from one source to thevideo of another source to make your own videorecordings.Below is an example of recording the sound from acompact disc player connected to CD IN and thevideo from a video camera connected to VCR1 tovideo cassette recorder connected to the DSS/VCR2 OUT jack.
1. Switch the video output source to VCR1 bysimply pressing the input selector buttons onthe remote.
2. Switch the audio input source to CD by simplypressing the input selector buttons on theremote.
3. Now “CD” has been selected as the audio inputsource and “VCR1” as the video input source.
Notes:• If you change the input source during recording,
you will record the signals from the newly selectedinput source.
• You cannot record the surround effects.
• Digital input signals are only output to the digitaloutputs. There is no conversion from digital toanalog .
When connecting CD players and other digitalcomponents, do not connect only the digitalterminals, but the analog ones as well.
HT-EQ
Press the HT-EQ button on the front panel to turn onthe HT-EQ mode.The tonal balance of a film soundtrack will beexcessively bright and harsh when played back overaudio equipment in the home. This is because filmsoundtracks were designed to be played back inlarge movie theater environments.Activating the HT-EQ feature when watching a filmmade for movie theaters corrects this and restoresthe correct tonal balance.The HT-EQ feature is available except in thefollowing modes.
• 7.1 CH INPUT
• PURE-DIRECT
• When VIRTUAL is set for the surround mode SURROUND
AV SURROUND RECEIVER SR4500
INPUT SELECTOR
PHONES
STANDBY
7.1CH INPUT
PUREDIRECT
AUTO HT-EQ
MODE
DISP MULTI
SLEEP AUTO
POWER ON/STANDBY
S. SPEAKER B
1.2.
MENUOSD
VOL.TV
VOL.MAIN
SLEEP MUTE
AMP
TUNER CD TAPE CDR/MD
DVDVCR1 DSS/VCR2TV
AUX1
1.2.
CHANNEL/SKIP
A/D P.SCAN/V-OFF
7.1CH INSTEREOMCH-ST
MEMOCLEAR
DISPLAY
NIGHT CSII EX/ES VIRTUAL
DTSPURE DIRECT AUTO
321
654
98
0
7
T.TONEMENU OFFSET UP/
MENUOSD
VOL.TV
VOL.MAIN
SLEEP MUTE
AMP
TUNER CD TAPE CDR/MD
DVD
POWER
VCR1 DSS/VCR2TV
ENTER
AUX1
2.
4.
1.
SURROUND
AV SURROUND RECEIVER SR4500
DOWN
INPUT SELECTOR
PHONES
STANDBY
MUTE7.1CH INPUT
PURESETUPDIRECT
SIMPLE
AUTO HT-EQ MENU
ENTER
DISPLAY MEMORY CLEAR
T-MODEEXIT BAND
MODE
DISP MULTI AUTO TUNED ST V – OFF NIGHT PEAK ANALOG
DIGITAL
ATT
SLEEP SURRAUTO DIRECT DISC 6.1 MTX 6.1 EQDIGITAL
SURROUND
AAC PCM
L C R
SL S SR
LFE
POWER ON/STANDBY
S. SPEAKER B
DOWN UP
VOLUME
MUTE ATTMEMORY CLEAR
T-MODEBAND
DIGITAL
SURROUND
L C R
SL S SR
LFE
4.
RECORDING AN ANALOG SOURCEIn normal operation, the audio or video sourceselected for listening through the SR4500 is sent tothe record outputs.This means that any program you are watching orlistening to may be recorded simply by placingmachines connected to the outputs for TAPE OUT,CD-R/MD OUT, VCR1 OUT, and DSS/VCR2 OUTin the record mode.
To record the input source signal you are currentlywatching or listening to
1. Select the input source to record by turningthe INPUT FUNCTION SELECTOR knob onthe front panel or simply press the inputselector buttons on the remote.The input source is now selected and you maywatch or listen to it as desired.
2. The currently selected input source signal isoutput to the TAPE OUT, CD-R/MD OUT,VCR1 OUT, and DSS/VCR2 OUT outputs forrecording.
3. Start recording to the recording component asdesired.
SURROUND
AV SURROUND RECEIVER SR4500
INPUT SELECTOR
PHONES
STANDBY
7.1CH INPUT
PURESETUPDIRECT
SIMPLE
AUTO HT-EQ MENU
ENTE
MODE
DISP MULTI AUTO TUNED ST V – OFF NI
SLEEP SURRAUTO DIRECT DISC 6.1 MTX 6.
POWER ON/STANDBY
S. SPEAKER B
1.
MENUOSD
VOL.TV
VOL.MAIN
SLEEP MUTE
AMP
TUNER CD TAPE CDR/MD
DVD
POWER
VCR1 DSS/VCR2TV
AUX1
1.MAIN
SR4500U DFU_01_ENG 2_2 04.6.25, 11:08 AMPage 28 Adobe PageMaker 6.5J/PPC
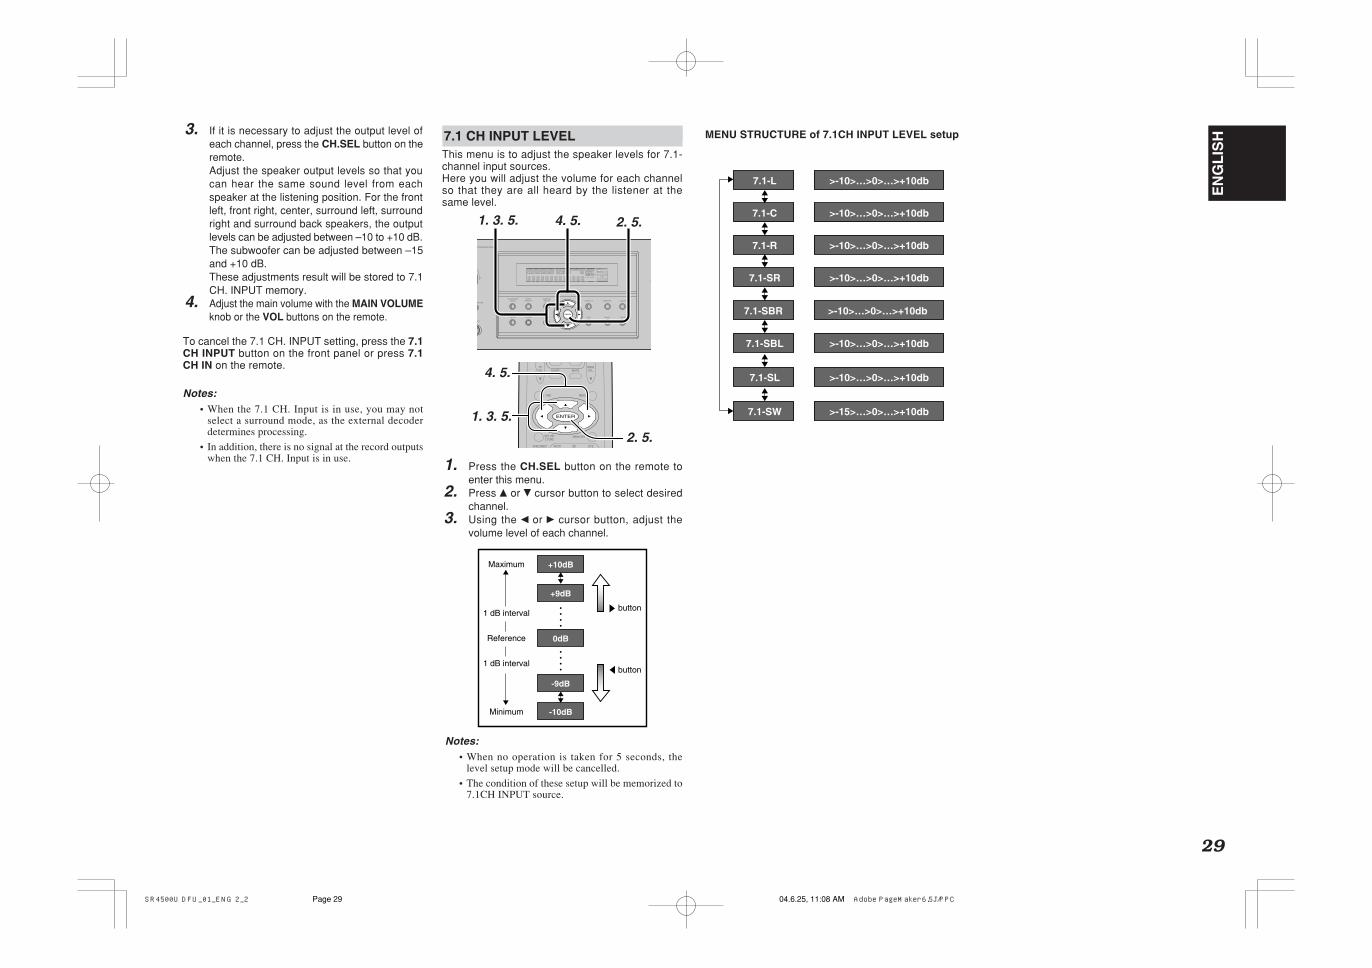
29
EN
GL
ISH7.1 CH INPUT LEVEL
This menu is to adjust the speaker levels for 7.1-channel input sources.Here you will adjust the volume for each channelso that they are all heard by the listener at thesame level.
1. Press the CH.SEL button on the remote toenter this menu.
2. Press or cursor button to select desiredchannel.
3. Using the or cursor button, adjust thevolume level of each channel.
Notes:• When no operation is taken for 5 seconds, the
level setup mode will be cancelled.
• The condition of these setup will be memorized to7.1CH INPUT source.
DTSPURE DIRECT AUTO
T.TONEMENU OFFSET UP/
MENUOSD
VOL.TV
VOL.MAIN
SLEEP MUTE
ENTER
4. 5.
2. 5.
1. 3. 5.
+10dB
+9dB
-9dB
Minimum
Maximum
1 dB interval
Reference
1 dB interval
-10dB
button
button
0dB
MENU STRUCTURE of 7.1CH IN setup
7.1-L
7.1-C
7.1-R
7.1-SR
7.1-SBR
7.1-SBL
7.1-SL
7.1-SW
>-10>…>0>…>+10db
>-10>…>0>…>+10db
>-10>…>0>…>+10db
>-10>…>0>…>+10db
>-10>…>0>…>+10db
>-10>…>0>…>+10db
>-10>…>0>…>+10db
>-15>…>0>…>+10db
MENU STRUCTURE of 7.1CH INPUT LEVEL setup3. If it is necessary to adjust the output level ofeach channel, press the CH.SEL button on theremote.Adjust the speaker output levels so that youcan hear the same sound level from eachspeaker at the listening position. For the frontleft, front right, center, surround left, surroundright and surround back speakers, the outputlevels can be adjusted between –10 to +10 dB.The subwoofer can be adjusted between –15and +10 dB.These adjustments result will be stored to 7.1CH. INPUT memory.
4. Adjust the main volume with the MAIN VOLUMEknob or the VOL buttons on the remote.
To cancel the 7.1 CH. INPUT setting, press the 7.1CH INPUT button on the front panel or press 7.1CH IN on the remote.
Notes:• When the 7.1 CH. Input is in use, you may not
select a surround mode, as the external decoderdetermines processing.
• In addition, there is no signal at the record outputswhen the 7.1 CH. Input is in use.
SURROUND
ND RECEIVER SR4500
D
NES
EAKER
PURESETUPDIRECT
SIMPLE
AUTO HT-EQ MENU
ENTER
DISPLAY MEMORY CLEAR
T-MODEEXIT BAND
MODE
DISP MULTI AUTO TUNED ST V – OFF NIGHT PEAK ANALOG
DIGITAL
ATT
SLEEP SURRAUTO DIRECT DISC 6.1 MTX 6.1 EQDIGITAL
SURROUND
AAC PCM
L C R
SL S SR
LFE
4. 5. 2. 5.1. 3. 5.
SR4500U DFU_01_ENG 2_2 04.6.25, 11:08 AMPage 29 Adobe PageMaker 6.5J/PPC

EN
GL
ISH
30
BASIC OPERATION(TUNER)
LISTENING TO THE TUNERFrequency scan step for AM is selectable.Default setup is 10 kHz step, if your country’sstandard is 9 kHz step, Press TUNER button onthe remote more than 6 seconds. Scan step willchange.
Note:• Preset memory for the tuner will clear by changing
this setup.
AUTO TUNING
(Using the SR4500)1. To select tuner and desired band (FM or AM),
press the BAND button on the front panel.2. Press the or cursor buttons on the front
panel for more than 1 second to start the autotuning function.
3. Automatic searching begins then stops whena station is tuned in.
(Using the remote control unit)1. To select tuner and desired band (FM or AM),
press the TUNER button twice within in twoseconds on the remote.
2. Press the 55555 or 66666 for more than 1 second onthe remote.
3. Automatic searching begins then stops whena station is tuned in.
If tuning does not stop at the desired station, useto the “Manual tuning” operation.
MANUAL TUNING
(Using the SR4500)1. To select tuner and desired band (FM or AM),
press the BAND button on the front panel2. Press the or cursor buttons on the front
panel to select the desired station.
(Using the remote control unit)1. To select tuner and desired band (FM or AM),
press the TUNER button twice within in twoseconds on the remote.
2. Press the 55555 or 66666 on the remote to tune in thedesired station.
DIRECT FREQUENCY CALL
1. To select tuner and desired band (FM or AM),press the TUNER button twice within twoseconds on the remote.
2. Press the F.DIRECT on the remote, display willshow “FREQ - - - -”.
3. Input your desired station’s frequency with thenumeric buttons on the remote.
4. The desired station will automatically be tuned.
(FM) TUNING MODE (AUTO STEREO OR MONO)
When in the auto stereo mode, AUTO indicator willbe illuminated on the display.The “ST” indicator is illuminated when a stereobroadcast is tuned in.At open frequencies, the noise is muted and the“TUNED” and “ST” indicators are not illuminated.If the signal is weak, it may be difficult to tune into thestation in stereo. In such a case, press the T-MODEbutton on the front panel or remote.“AUTO” indicator is not illuminated, if FM stereobroadcasts are received in monaural and the “ST”indicator is not illuminated.To return to auto stereo mode, press the T-MODEbutton or press T-MODE button on the remote again.AUTO indicator is illuminated on the display.
PRESET MEMORYWith this unit you can preset up to 50 FM/AM stationsin any order.For each station, you can memorize the frequencyand reception mode if desired.
AUTO PRESET MEMORYThis function automatically scans the FM and AMband and enters all stations with proper signalstrength into the memory.
1. To select FM , press the BAND button on thefront panel.
2. While pressing the MEMO button, press the cursor button.“AUTO PRESET” will appear on the display,and scanning starts from the lowest frequency.
3. Each time the tuner finds a station, scanningwill pause and the station will be played for fiveseconds.During this time, the following operations arepossible.The band can be changed by the BAND button.
4. If no button is pressed during this period, thecurrent station is memorized in location Preset02.If you wish to skip the current station, press the
cursor button during this period, this stationis skipped and auto presetting continues.
5. Operation stops automatically when all 50preset memory positions are filled or whenauto scanning attains the highest end of allbands. If you desire to stop the auto presetmemory at anytime, press the CLEAR button.
MANUAL PRESET MEMORY
(Using the SR4500)1. Tune into the radio station you desire (Refer to
the “MANUAL TUNING” or “AUTO TUNING”section).
2. Press the MEMO button on the front panel. “– –“(preset number) starts blinking on the display.
3. Select the preset number by pressing the or cursor buttons, while this is still blinking
(approx. 5 seconds)4. Press the MEMO button again to enter. The
display stops blinking.The station is now stored in the specifiedpreset memory location.
URROUND
DOWN
MUTE
PURESETUPDIRECT
SIMPLE
AUTO HT-EQ MENU
ENTER
DISPLAY MEMORY CLEAR
T-MODEEXIT BAND
MODE
DISP MULTI AUTO TUNED ST V – OFF NIGHT PEAK ANALOG
DIGITAL
ATT
SLEEP SURRAUTO DIRECT DISC 6.1 MTX 6.1 EQDIGITAL
SURROUND
AAC PCM
L C R
SL S SR
LFE
1.2.
DOWN UP
VOLUME
MUTE ATT
R
DISPLAY MEMORY CLEAR
T-MODEEXIT BAND
GHT PEAK ANALOG
DIGITAL
ATT
EQDIGITAL
SURROUND
AAC PCM
L C R
SL S SR
LFE
SURROUND
AV SURROUND RECEIVER SR4500
DOWN UP
VOLUMEINPUT SELECTOR
PHONES
STANDBY
MUTE7.1CH INPUT ATT
PURESETUPDIRECT
SIMPLE
AUTO HT-EQ MENU
ENTER
DISPLAY MEMORY CLEAR
T-MODEEXIT BAND
MODE
DISP MULTI AUTO TUNED ST V – OFF NIGHT PEAK ANALOG
DIGITAL
ATT
SLEEP SURRAUTO DIRECT DISC 6.1 MTX 6.1 EQDIGITAL
SURROUND
AAC PCM
L C R
SL S SR
LFE
POWER ON/STANDBY
S. SPEAKER B
2. 4. 2. 5. 1. 3.
SURROUND
RECEIVER SR4500
S
PURESETUPDIRECT
SIMPLE
AUTO HT-EQ MENU
ENTER
DISPLAY MEMORY
EXIT BAND
MODE
DISP MULTI AUTO TUNED ST V – OFF NIGHT PEAK ANALOG
DIGITAL
ATT
SLEEP SURRAUTO DIRECT DISC 6.1 MTX 6.1 EQDIGITAL
SURROUND
AAC PCM
L C R
SL S SR
LFE
R B
3. 2. 4.PTYSUB-T/ATTAUDIOINPUT/DISC+
F.DIRECTRDS
TUNE/SEARCH
T-MODE
TREBLE
CHANNEL/SKIP
BASS
A/D P.SCAN/V OFFMEMOCLEAR
0
2.
VOL.TV
VOL.MAIN
SLEEP MUTE
AMP
TUNER CD TAPE CDR/MD
DVDVCR1 DSS/VCR2TV
AUX1
1.
MENUOSD
VOL.TV
VOL.MAIN
SLEEP MUTE
AMP
TUNER CD TAPE CDR/MD
DVD
POWER
VCR1 DSS/VCR2TV
AUX1
1.
CH.SEL LIP.SYNC
PTYSUB-T/ATTAUDIOINPUT/DISC+
F.DIRECTRDS
TUNE/SEARCH
T-MODE
TREBLE
CHANNEL/SKIP
BASS
A/D P.SCAN/V-OFF
7.1CH INSTEREOMCH-ST
MEMOCLEAR
DISPLAY
NIGHT CSII EX/ES VIRTUAL
DTSPURE DIRECT AUTO
321
654
98
0
7
SYSTEM REMOTE CONTROLLER
3.
2.
CH.SEL LIP.SYNC
PTYSUB-T/ATTAUDIOINPUT/DISC+
F.DIRECTRDST-MODE
SYSTEM REMOTE CONTROLLER
RC5500SR
F.DIRECTRDS
TUNE/SEARCH
T-MODE
TREBLE
CHANNEL/SKIP
BASS
A/D P.SCAN/V-OFF
7.1CH INSTEREOMCH-ST
MEMOCLEAR
DISPLAY
NIGHT CSII EX/ES VIRTUAL
DTSPURE DIRECT AUTO
321
654
98
0
7
T.TONEMENU OFFSET UP/
ENTER
3.2.
URROUND
DOWN
MUTE
PURESETUPDIRECT
SIMPLE
AUTO HT-EQ MENU
ENTER
DISPLAY MEMORY CLEAR
T-MODEEXIT BAND
MODE
DISP MULTI AUTO TUNED ST V – OFF NIGHT PEAK ANALOG
DIGITAL
ATT
SLEEP SURRAUTO DIRECT DISC 6.1 MTX 6.1 EQDIGITAL
SURROUND
AAC PCM
L C R
SL S SR
LFE
1.2.
PTYSUB-T/ATTAUDIOINPUT/DISC+
F.DIRECTRDS
TUNE/SEARCH
T-MODE
TREBLE
CHANNEL/SKIP
BASS
A/D P.SCAN/V OFFMEMOCLEAR
0
2.
VOL.TV
VOL.MAIN
SLEEP MUTE
AMP
TUNER CD TAPE CDR/MD
DVDVCR1 DSS/VCR2TV
AUX1
1.
SR4500U DFU_01_ENG 2_2 04.6.25, 11:09 AMPage 30 Adobe PageMaker 6.5J/PPC

31
EN
GL
ISH(Using the remote control unit)
1. Tune into the radio station you desire (Refer tothe “MANUAL TUNING” or “AUTO TUNING”section).
2. Press the MEMO button on the remote. “– –“(preset number) starts blinking on the display.
3. Enter the desired preset number by pressingthe numeric buttons.
Note:• When entering a single digit number (2 for
example), either input “02” or just input “2” andwait for a few seconds.
RECALLING A PRESET STATION
(Using the SR4500)1. Select the desired preset station by pressing
the or cursor buttons on the front panel
(Using the remote control unit)1. Press the 4 or ¢ buttons to select the desired
preset station, or input your desired presetchannel with the numeric buttons on the remote.
PRESET SCAN
(Using the remote control unit)1. Press the P.SCAN on the remote.
“PRESET SCAN” appears on the display andthen the preset station with the lowest presetnumber is recalled first.
2. Preset stations are recalled in sequence (No.1→ No.2 → etc.) for 5 seconds each.No stored preset number will be skipped.
3. You can fast forward the preset stations bypressing the ¢ continuously.When the desired preset station is received,cancel the preset scan operation by pressingthe CLEAR button or P.SCAN on the remote.
CLEARING STORED PRESET STATIONSYou can remove preset stations from the memoryusing the following procedure.
1. Recall the preset number to be cleared with themethod described in “Recalling” a preset station.
2. Press the MEMO button on the front panel orpress the MEMO button on the remote.
3. The stored preset number blinks in the displayfor 5 seconds. While blinking, press theCLEAR button on the front panel or the remote.
4. “xx CLEAR” appears on the display to indicatethat the specified preset number has beencleared.
Note:• To clear all stored preset stations, press and hold
the CLEAR and the ENTER buttons for twoseconds.
SORTING PRESET STATIONS
If you have stations memorized, and there is a gapin the sequential order:I.e. the stations are stored as follows
1) 87.1 MHz 2) 93.1 MHz 3) 94.7 MHz10) 105.9 MHz
(notice there is no stations programmed for presets for 4-9), you can have pre set 10 become preset 5:To sort the numbers, press and hold the MEMO andthe cursor buttons.“PRESET SORT” will appear on the display andsorting will be done.
NAME INPUT OF THE PRESET STATION.This function allows the name of each preset channelto be entered using alphanumeric characters.Before name inputting, you need to store presetstations with the preset memory operation.
1. Recall the preset number to be inputted namewith the method described in “Recalling” apreset station.
2. Press the MEMO button on the front panel orpress the MEMO button on the remote formore than 3 seconds.
3. The left most column of the station nameindicator flashes, indicating the characterentry ready status.
4. When you press the or cursor buttons onthe front panel or the 55555 / 66666 buttons on theremote, alphabetic and numeric characters willbe displayed in the following order:A → B → C ... Z → 1 → 2 → 3 ..... 0 → – → +→ / → (Blank) → A
UP → ← DOWN
5. After selecting the first character to be entered,press the MEMO or ENTER buttons, press theMEMO button on the remote.The entry in this column is fixed and the nextcolumn starts to flash. Fill the next column thesame way.To move back and forth between the characters,press the / cursor buttons or press 4 or ¢buttons on the remote.Note:• Unused columns should be filled by enteringblanks.
6. To save the name, press the MEMO button onthe front panel or remote for more than 2seconds.
SURROUND
EIVER SR4500
D
PURESETUPDIRECT
SIMPLE
AUTO HT-EQ MENU
ENTER
DISPLAY MEMORY CLEAR
T-MODEEXIT BAND
MODE
DISP MULTI AUTO TUNED ST V – OFF NIGHT PEAK ANALOG
DIGITAL
ATT
SLEEP SURRAUTO DIRECT DISC 6.1 MTX 6.1 EQDIGITAL
SURROUND
AAC PCM
L C R
SL S SR
LFE
1.
DOWN
VOLUME
MUTE
ENTER
DISPLAY MEMORY CLEAR
T-MODEEXIT BAND
ST V – OFF NIGHT PEAK ANALOG
DIGITAL
ATT
DISC 6.1 MTX 6.1 EQDIGITAL
SURROUND
AAC PCM
L C R
SL S SR
LFE
2. 3.
SURROUND
AV SURROUND RECEIVER SR4500
DOWN UP
VOLUMEINPUT SELECTOR
PHONES
STANDBY
MUTE7.1CH INPUT ATT
PURESETUPDIRECT
SIMPLE
AUTO HT-EQ MENU
ENTER
DISPLAY MEMORY CLEAR
T-MODEEXIT BAND
MODE
DISP MULTI AUTO TUNED ST V – OFF NIGHT PEAK ANALOG
DIGITAL
ATT
SLEEP SURRAUTO DIRECT DISC 6.1 MTX 6.1 EQDIGITAL
SURROUND
AAC PCM
L C R
SL S SR
LFE
POWER ON/STANDBY
S. SPEAKER B
SURROUND
AV SURROUND RECEIVER SR4500
DOWN UP
VOLUMEINPUT SELECTOR
PHONES
STANDBY
MUTE7.1CH INPUT ATT
PURESETUPDIRECT
SIMPLE
AUTO HT-EQ MENU
ENTER
DISPLAY MEMORY CLEAR
T-MODEEXIT BAND
MODE
DISP MULTI AUTO TUNED ST V – OFF NIGHT PEAK ANALOG
DIGITAL
ATT
SLEEP SURRAUTO DIRECT DISC 6.1 MTX 6.1 EQDIGITAL
SURROUND
AAC PCM
L C R
SL S SR
LFE
POWER ON/STANDBY
S. SPEAKER B
5. 2. 5. 6.4.
F.DIRECTRDS
TUNE/SEARCH
T-MODE
TREBLE
CHANNEL/SKIP
BASS
A/D P.SCAN/V-OFF
7.1CH INSTEREOMCH-ST
MEMOCLEAR
DISPLAY
NIGHT CSII EX/ES VIRTUAL
DTSPURE DIRECT AUTO
321
654
98
0
7
T.TONEMENU OFFSET UP/
1.
1.
CH SEL LIP SYNC
PTYSUB-T/ATTAUDIOINPUT/DISC+
F.DIRECTRDS
TUNE/SEARCH
T-MODE
TREBLE
CHANNEL/SKIP
BASS
A/D P.SCAN/V-OFF
7.1CH INSTEREOMCH-ST
MEMOCLEAR
DISPLAY
NIGHT CSII EX/ES VIRTUAL
DTSPURE DIRECT AUTO
321
654
98
0
7
T.TONEMENU OFFSET UP/
3. 1.3.
3.
CH.SEL LIP.SYNC
PTYSUB-T/ATTAUDIOINPUT/DISC+
F.DIRECTRDS
TUNE/SEARCH
T-MODE
TREBLE
CHANNEL/SKIP
BASS
A/D P.SCAN/V-OFF
7.1CH INSTEREOMCH-ST
MEMOCLEAR
DISPLAY
NIGHT CSII EX/ES VIRTUAL
DTSPURE DIRECT AUTO
321
654
98
0
7
T.TONEMENU OFFSET UP/
2.
3.
CH.SEL LIP.SYNC
PTYSUB-T/ATTAUDIOINPUT/DISC+
F.DIRECTRDS
TUNE/SEARCH
T-MODE
TREBLE
CHANNEL/SKIP
BASS
A/D P.SCAN/V-OFF
7.1CH INSTEREOMCH-ST
MEMOCLEAR
DISPLAY
NIGHT CSII EX/ES VIRTUAL
DTSPURE DIRECT AUTO
321
654
98
0
7
T.TONEMENU OFFSET UP/
MENUOSD
ENTER
2. 5. 6.
5.
5.
5.
4.
Ten keypad Press, press again, press again, etc.
1 A → B → C → 1 → A2 D → E → F → 2 → D3 G → H → I → 3 → G4 J → K → L → 4 → J5 M → N → O → 5 → M6 P → Q → R → 6 → P7 S → T → U → 7 → S8 V → W → X → 8 → V9 Y → Z → space → 9 → Y0 – → + → / → 0
SR4500U DFU_01_ENG 2_2 04.6.25, 11:09 AMPage 31 Adobe PageMaker 6.5J/PPC

EN
GL
ISH
32
SURROUNDSPEAKER B SYSTEMThe Surround Speaker B system is a function whichallows you to listen to the same source in a roomother than the room in which the SR4500 is located.The operations possible with the Surround speakerfunction are explained briefly below.
ANOTHER ROOM PLAYBACK USINGTHE S(SURROUND) SPEAKER BTERMINALSThe SR4500 allows you to connect another set ofspeakers and place them in a another room orseparated area for listening to music.The SURROUND SPEAKER B system can not beoperated with the supplied remote controller.
1. Press the S(Surround) SPEAKER B button.The unit enters surround speaker B mode andthe “SPKR B” will appear on the display.
2. The volume of S. SPEAKER B is interlockedwith the main volume.
Notes for SURROUND SPEAKER B• SURROUND SPEAKER B On/ Off is available in
main room only.
• SURROUND SPEAKER B output terminals canbe used when the SURROUND BACK SPEAKERis set NONE in SPEAKER SETUP menu. (SeeSPEAKER SETUP, page 18)
• “The Surr. Back Speakers are in use” is displayedby pressing the S. SPEAKER B button when theSURROUND BACK SPEAKER is set exceptNONE in SPEAKER SETUP menu. (SeeSPEAKER SETUP, page 18)
• Surround Speaker B function is unavailable,while the unit is 7.1 CH input mode.
SURROUND
AV SURROUND RECEIVER SR4500
DOWN UP
VOLUMEINPUT SELECTOR
PHONES
STANDBY
MUTE7.1CH INPUT ATT
PURESETUPDIRECT
SIMPLE
AUTO HT-EQ MENU
ENTER
DISPLAY MEMORY CLEAR
T-MODEEXIT BAND
MODE
DISP MULTI AUTO TUNED ST V – OFF NIGHT PEAK ANALOG
DIGITAL
ATT
SLEEP SURRAUTO DIRECT DISC 6.1 MTX 6.1 EQDIGITAL
SURROUND
AAC PCM
L C R
SL S SR
LFE
POWER ON/STANDBY
S. SPEAKER B
2.1.
SR4500U DFU_01_ENG 2_2 04.6.25, 11:09 AMPage 32 Adobe PageMaker 6.5J/PPC

33
EN
GL
ISHTROUBLESHOOTING
In case of trouble, check the following before calling for service:1. Are the connections made properly ?
2. Are you operating the unit properly following the user’s guide ?
3. Are the power amplifiers and speaker working properly ?
If the unit does not operate properly, check items shown in the following table.If your trouble cannot be recovered with the remedy actions listed in the following table, malfunction of theinternal circuitry is suspected; immediately unplug the power cable and contact your dealer, nearestMarantz authorized dealer or the Marantz Service Center in your country.
CAUSE
The power plug is not connected.
Mute is on.
The input cable is not connected correctly.
The master volume control is turned allthe way down.
The function selector position is wrong.
The headphones are connected to theheadphone jack.
Input cable connected incorrectly.
Speaker cable connected incorrectly.
The center speaker cable connection isincomplete.
STEREO has been selected for Surroundmode.
Center = NONE has been selected inSETUP mode.
The surround speaker cable connectionis incomplete.
STEREO has been selected for Surroundmode.
Surround = NONE has been selected inSETUP mode.
The surround back speaker cableconnection is incomplete.
Surround mode is not EX/ES mode.
Surround back = NONE has beenselected in SPEAKERS SIZE SETUP
SYMPTOM
SR4500 cannot be turned up.
No sound and picture areoutput even when power is on.
No speaker output.
Incorrect Audio or Video forselected source.
Incorrect Audio from a channel.
No Audio output from thecenter channel speaker.
No Audio output from thesurround speakers.
No Audio output from thesurround back speakers.
REMEDY
Connect the power plug to the outlet.
Cancel mute using the remote control unit.
See the connection diagram and connect thecables correctly.
Adjust the master volume.
Select correct position.
Disconnect the headphones. (Speakers will notoutput sound when headphones are connected.)
Connect the cable correctly by referring to theconnection diagram.
Connect the cable correctly by referring to theconnection diagram.
Connect the cable correctly.
When STEREO is selected for Surround mode, nosound will be output from the center speaker. Setanother Surround mode.
Make the correct setting.
Connect the cable correctly.
When STEREO has been selected for Surroundmode, no sound will be output from the surroundspeaker. Set another Surround mode.
Make the correct setting.
Connect the cable correctly.
Set surround mode EX/ES.
Make the correct setting.
SYMPTOM
Can not select EX/ES mode.
Can not select Pro Logic IIxmode.
Can not select Neo:6 mode.
Can not select CSII mode.
No output to Sub Woofer Out.
Noise is produced during DTS-encoded CD or laser disc play.
A specific channel does notproduce output.
FM or AM reception fails.
Noise is heard during AMreception.
Noise is heard during FMreception.
Cannot get programmedstation when the PRESETbutton is pressed.
Control with the remotecontrol unit fails.
CAUSE
Surround center= NONE has beenselected in SPEAKERS SIZE SETUP
Input signal is incompatible.
Input signal is incompatible.
Input signal is incompatible.
Input signal is incompatible.
Sub-woofer = NONE has been selectedin SETUP mode.
Analog has been selected for input.
Nothing recorded on source.
Antenna connection is incomplete.
Reception is affected by other electricalfields.
The radio waves from the broadcastingstation are weak.
Preset data has been erased.
Batteries are consumed.
Remote control ler 's funct ion-keysetting is wrong.
The distance between this SR4500 andthe remote commander is too far.
Something is blocking SR4500 and theremote commander.
REMEDY
Make the correct setting.
Use 5.1channel source.
Use 2 channel Dolby Digital input signal, PCM inputsignal or analog input signal.
Use 2 channel Dolby Digital input signal, PCM inputsignal or analog input signal.
Use 2 channel Dolby Digital input signal, PCM inputsignal or analog input signal.
Select Sub-woofer = YES.
Be sure to perform digital connection, select digitalinput, then play.
Check the encoded channel on the source side.
Correctly connect the indoor FM and AM antennasto FM and AM antenna outlets.
Try changing location where the AM indoorantenna is set up.
Install an FM outdoor antenna.
Disconnecting power plug for long periods of timewill erase preset data. If that happens, input thepreset data again.
Replace all the batteries with new ones.
Select different position from which equipment willbe controlled.
Move closer to this SR4500.
Remove offending object.
SR4500U DFU_01_ENG 2_2 04.6.25, 11:10 AMPage 33 Adobe PageMaker 6.5J/PPC
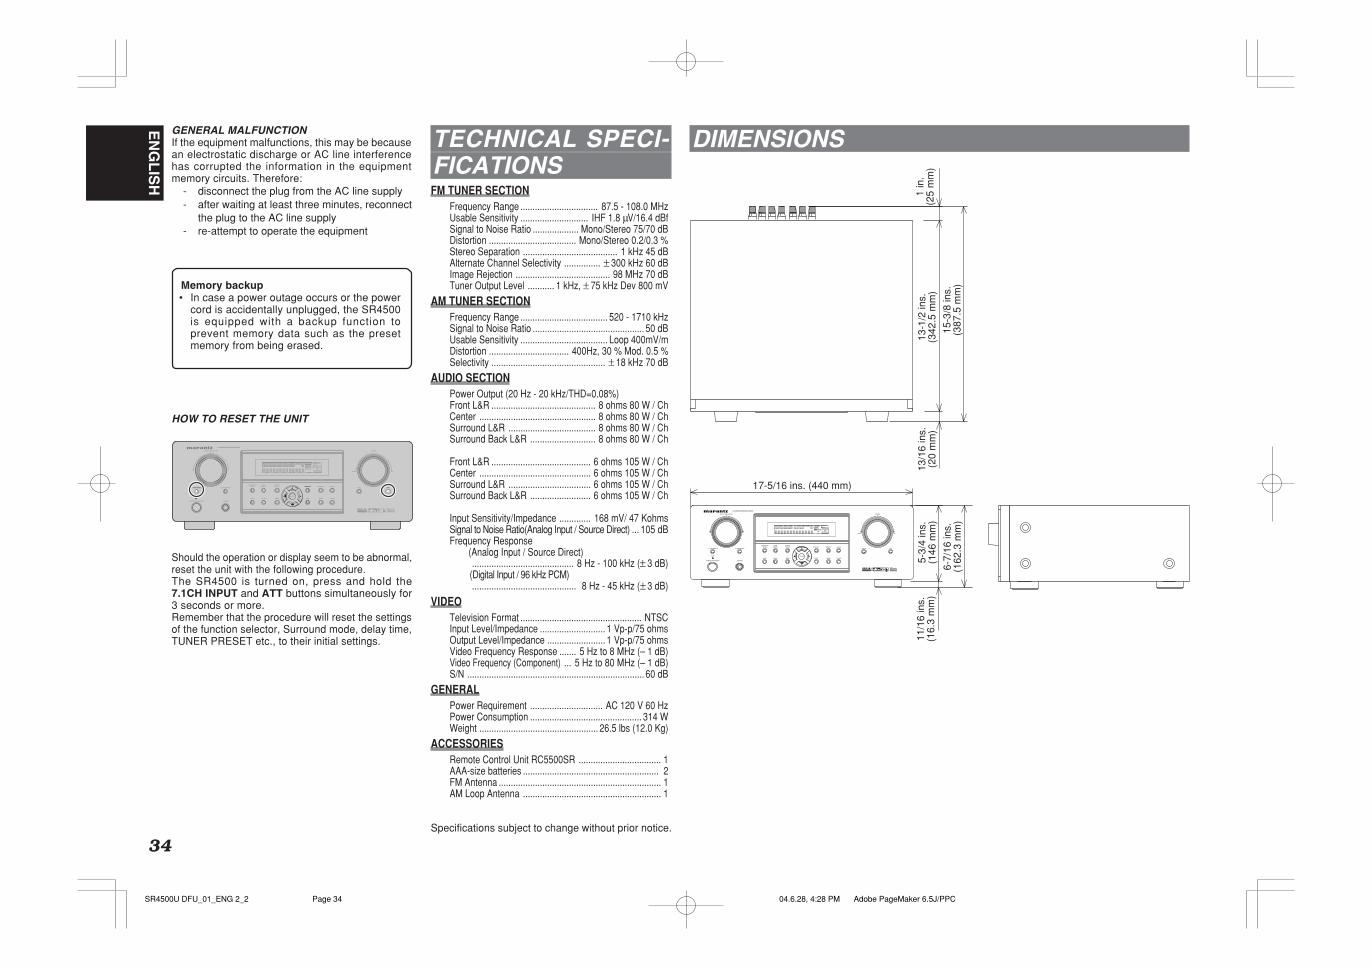
EN
GL
ISH
34
TECHNICAL SPECI-FICATIONSFM TUNER SECTION
Frequency Range ................................ 87.5 - 108.0 MHzUsable Sensitivity ............................ IHF 1.8 µV/16.4 dBfSignal to Noise Ratio ................... Mono/Stereo 75/70 dBDistortion .................................... Mono/Stereo 0.2/0.3 %Stereo Separation ....................................... 1 kHz 45 dBAlternate Channel Selectivity ............... ± 300 kHz 60 dBImage Rejection ....................................... 98 MHz 70 dBTuner Output Level ........... 1 kHz, ± 75 kHz Dev 800 mV
AM TUNER SECTIONFrequency Range .................................... 520 - 1710 kHzSignal to Noise Ratio .............................................. 50 dBUsable Sensitivity .................................... Loop 400mV/mDistortion ................................. 400Hz, 30 % Mod. 0.5 %Selectivity ............................................... ± 18 kHz 70 dB
AUDIO SECTIONPower Output (20 Hz - 20 kHz/THD=0.08%)Front L&R ........................................... 8 ohms 80 W / ChCenter ................................................ 8 ohms 80 W / ChSurround L&R .................................... 8 ohms 80 W / ChSurround Back L&R ........................... 8 ohms 80 W / Ch
Front L&R ......................................... 6 ohms 105 W / ChCenter .............................................. 6 ohms 105 W / ChSurround L&R .................................. 6 ohms 105 W / ChSurround Back L&R ......................... 6 ohms 105 W / Ch
Input Sensitivity/Impedance ............. 168 mV/ 47 KohmsSignal to Noise Ratio(Analog Input / Source Direct) ... 105 dBFrequency Response
(Analog Input / Source Direct).......................................... 8 Hz - 100 kHz (± 3 dB)
(Digital Input / 96 kHz PCM)........................................... 8 Hz - 45 kHz (± 3 dB)
VIDEOTelevision Format .................................................. NTSCInput Level/Impedance ........................... 1 Vp-p/75 ohmsOutput Level/Impedance ........................ 1 Vp-p/75 ohmsVideo Frequency Response ....... 5 Hz to 8 MHz (– 1 dB)Video Frequency (Component) ... 5 Hz to 80 MHz (– 1 dB)S/N ......................................................................... 60 dB
GENERALPower Requirement .............................. AC 120 V 60 HzPower Consumption .............................................. 314 WWeight ................................................. 26.5 lbs (12.0 Kg)
ACCESSORIESRemote Control Unit RC5500SR .................................. 1AAA-size batteries ........................................................ 2FM Antenna ................................................................... 1AM Loop Antenna ......................................................... 1
Specifications subject to change without prior notice.
HOW TO RESET THE UNIT
Should the operation or display seem to be abnormal,reset the unit with the following procedure.The SR4500 is turned on, press and hold the7.1CH INPUT and ATT buttons simultaneously for3 seconds or more.Remember that the procedure will reset the settingsof the function selector, Surround mode, delay time,TUNER PRESET etc., to their initial settings.
GENERAL MALFUNCTIONIf the equipment malfunctions, this may be becausean electrostatic discharge or AC line interferencehas corrupted the information in the equipmentmemory circuits. Therefore:
- disconnect the plug from the AC line supply- after waiting at least three minutes, reconnect
the plug to the AC line supply- re-attempt to operate the equipment
Memory backup• In case a power outage occurs or the power
cord is accidentally unplugged, the SR4500is equipped with a backup function toprevent memory data such as the presetmemory from being erased.
SURROUND
AV SURROUND RECEIVER SR4500
DOWN UP
VOLUMEINPUT SELECTOR
POWER ON/STANDBY PHONES
STANDBY
MUTE7.1CH INPUT S. SPEAKER B ATT
PURESETUPDIRECT
SIMPLE
AUTO HT-EQ MENU
ENTER
DISPLAY MEMORY CLEAR
T-MODEEXIT BAND
MODE
DISP MULTI AUTO TUNED ST V – OFF NIGHT PEAK ANALOG
DIGITAL
ATT
SLEEP SURRAUTO DIRECT DISC 6.1 MTX 6.1 EQDIGITAL
SURROUND
AAC PCM
L C R
SL S SR
LFE
6-7/
16 in
s.(1
62.3
mm
)
11/1
6 in
s.(1
6.3
mm
)5-
3/4
ins.
(146
mm
)
17-5/16 ins. (440 mm)
13/1
6 in
s.(2
0 m
m)
1 in
.(2
5 m
m)
13-1
/2 in
s.(3
42.5
mm
)
15-3
/8 in
s.(3
87.5
mm
)
SURROUND
AV SURROUND RECEIVER SR4500
DOWN UP
VOLUMEINPUT SELECTOR
POWER ON/STANDBY PHONES
STANDBY
MUTE7.1CH INPUT S. SPEAKER B ATT
PURESETUPDIRECT
SIMPLE
AUTO HT-EQ MENU
ENTER
DISPLAY MEMORY CLEAR
T-MODEEXIT BAND
MODE
DISP MULTI AUTO TUNED ST V – OFF NIGHT PEAK ANALOG
DIGITAL
ATT
SLEEP SURRAUTO DIRECT DISC 6.1 MTX 6.1 EQDIGITAL
SURROUND
PCM
L C R
SL S SR
LFE
DIMENSIONS
SR4500U DFU_01_ENG 2_2 04.6.28, 4:28 PMPage 34 Adobe PageMaker 6.5J/PPC
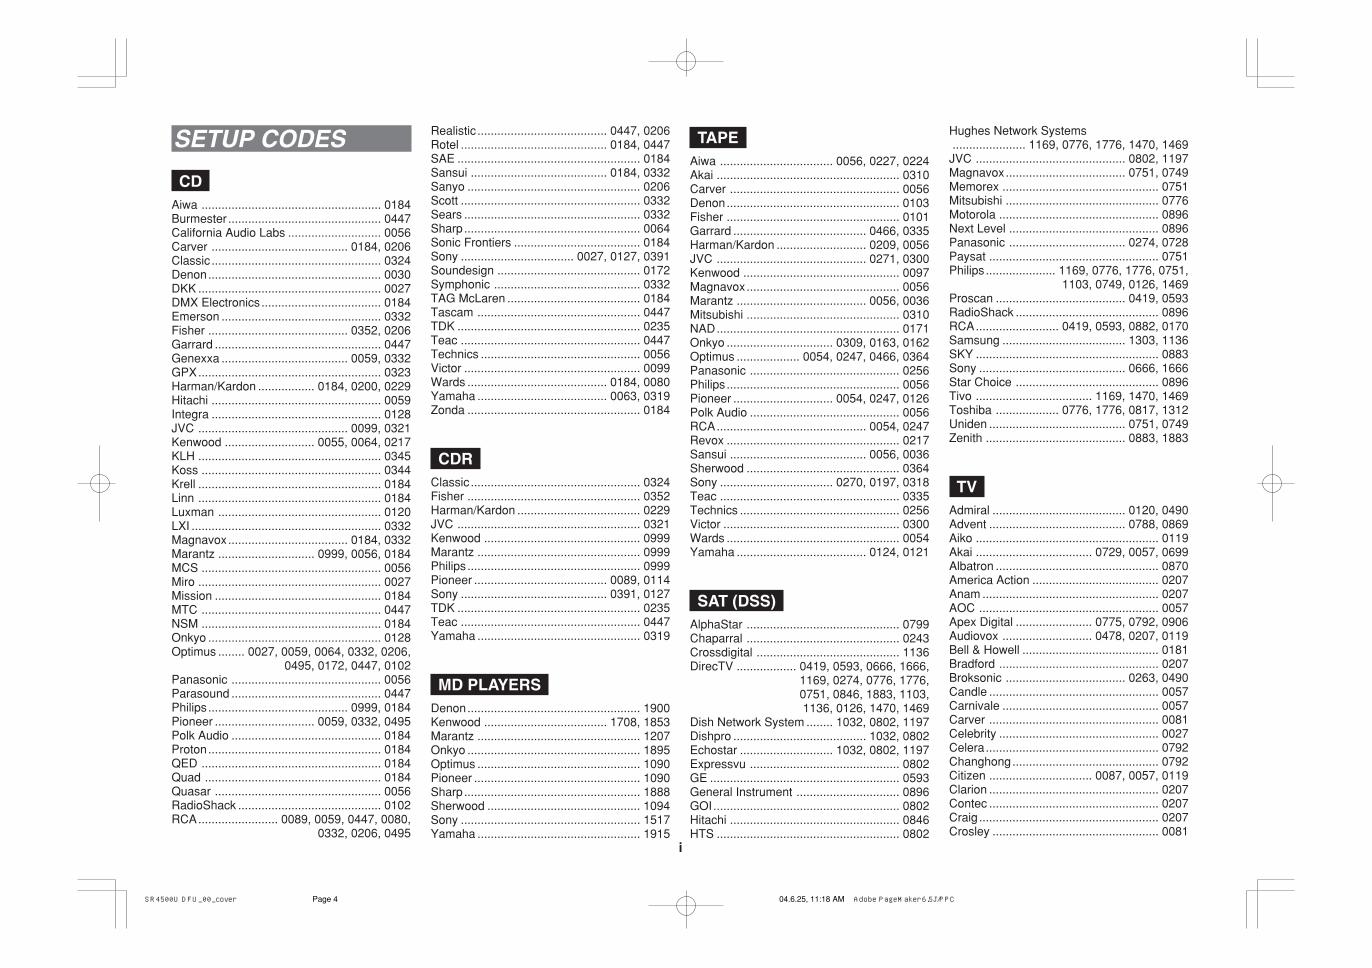
SETUP CODES
CDAiwa ...................................................... 0184Burmester .............................................. 0447California Audio Labs ............................ 0056Carver ......................................... 0184, 0206Classic ................................................... 0324Denon.................................................... 0030DKK ....................................................... 0027DMX Electronics .................................... 0184Emerson ................................................ 0332Fisher .......................................... 0352, 0206Garrard .................................................. 0447Genexxa ...................................... 0059, 0332GPX....................................................... 0323Harman/Kardon ................. 0184, 0200, 0229Hitachi ................................................... 0059Integra ................................................... 0128JVC ............................................. 0099, 0321Kenwood ........................... 0055, 0064, 0217KLH ....................................................... 0345Koss ...................................................... 0344Krell ....................................................... 0184Linn ....................................................... 0184Luxman ................................................. 0120LXI ......................................................... 0332Magnavox.................................... 0184, 0332Marantz ............................. 0999, 0056, 0184MCS ...................................................... 0056Miro ....................................................... 0027Mission .................................................. 0184MTC ...................................................... 0447NSM ...................................................... 0184Onkyo .................................................... 0128Optimus ........ 0027, 0059, 0064, 0332, 0206,
0495, 0172, 0447, 0102Panasonic ............................................. 0056Parasound ............................................. 0447Philips .......................................... 0999, 0184Pioneer .............................. 0059, 0332, 0495Polk Audio ............................................. 0184Proton.................................................... 0184QED ...................................................... 0184Quad ..................................................... 0184Quasar .................................................. 0056RadioShack ........................................... 0102RCA........................ 0089, 0059, 0447, 0080,
0332, 0206, 0495
Realistic ....................................... 0447, 0206Rotel ............................................ 0184, 0447SAE ....................................................... 0184Sansui ......................................... 0184, 0332Sanyo .................................................... 0206Scott ...................................................... 0332Sears ..................................................... 0332Sharp..................................................... 0064Sonic Frontiers ...................................... 0184Sony .................................. 0027, 0127, 0391Soundesign ........................................... 0172Symphonic ............................................ 0332TAG McLaren ........................................ 0184Tascam ................................................. 0447TDK ....................................................... 0235Teac ...................................................... 0447Technics ................................................ 0056Victor ..................................................... 0099Wards .......................................... 0184, 0080Yamaha ....................................... 0063, 0319Zonda .................................................... 0184
CDRClassic ................................................... 0324Fisher .................................................... 0352Harman/Kardon ..................................... 0229JVC ....................................................... 0321Kenwood ............................................... 0999Marantz ................................................. 0999Philips.................................................... 0999Pioneer ........................................ 0089, 0114Sony ............................................ 0391, 0127TDK ....................................................... 0235Teac ...................................................... 0447Yamaha ................................................. 0319
MD PLAYERSDenon.................................................... 1900Kenwood ..................................... 1708, 1853Marantz ................................................. 1207Onkyo .................................................... 1895Optimus ................................................. 1090Pioneer .................................................. 1090Sharp..................................................... 1888Sherwood .............................................. 1094Sony ...................................................... 1517Yamaha ................................................. 1915
TAPEAiwa .................................. 0056, 0227, 0224Akai ....................................................... 0310Carver ................................................... 0056Denon.................................................... 0103Fisher .................................................... 0101Garrard ........................................ 0466, 0335Harman/Kardon ........................... 0209, 0056JVC ............................................. 0271, 0300Kenwood ............................................... 0097Magnavox.............................................. 0056Marantz ....................................... 0056, 0036Mitsubishi .............................................. 0310NAD....................................................... 0171Onkyo ................................ 0309, 0163, 0162Optimus ................... 0054, 0247, 0466, 0364Panasonic ............................................. 0256Philips .................................................... 0056Pioneer .............................. 0054, 0247, 0126Polk Audio ............................................. 0056RCA............................................. 0054, 0247Revox .................................................... 0217Sansui ......................................... 0056, 0036Sherwood .............................................. 0364Sony .................................. 0270, 0197, 0318Teac ...................................................... 0335Technics ................................................ 0256Victor ..................................................... 0300Wards .................................................... 0054Yamaha ....................................... 0124, 0121
SAT (DSS)AlphaStar .............................................. 0799Chaparral .............................................. 0243Crossdigital ........................................... 1136DirecTV .................. 0419, 0593, 0666, 1666,
1169, 0274, 0776, 1776,0751, 0846, 1883, 1103,1136, 0126, 1470, 1469
Dish Network System ........ 1032, 0802, 1197Dishpro ........................................ 1032, 0802Echostar ............................ 1032, 0802, 1197Expressvu ............................................. 0802GE ......................................................... 0593General Instrument ............................... 0896GOI........................................................ 0802Hitachi ................................................... 0846HTS ....................................................... 0802
Hughes Network Systems...................... 1169, 0776, 1776, 1470, 1469
JVC ............................................. 0802, 1197Magnavox.................................... 0751, 0749Memorex ............................................... 0751Mitsubishi .............................................. 0776Motorola ................................................ 0896Next Level ............................................. 0896Panasonic ................................... 0274, 0728Paysat ................................................... 0751Philips ..................... 1169, 0776, 1776, 0751,
1103, 0749, 0126, 1469Proscan ....................................... 0419, 0593RadioShack ........................................... 0896RCA......................... 0419, 0593, 0882, 0170Samsung ..................................... 1303, 1136SKY ....................................................... 0883Sony ............................................ 0666, 1666Star Choice ........................................... 0896Tivo ................................... 1169, 1470, 1469Toshiba ................... 0776, 1776, 0817, 1312Uniden ......................................... 0751, 0749Zenith .......................................... 0883, 1883
TVAdmiral ........................................ 0120, 0490Advent ......................................... 0788, 0869Aiko ....................................................... 0119Akai ................................... 0729, 0057, 0699Albatron ................................................. 0870America Action ...................................... 0207Anam ..................................................... 0207AOC ...................................................... 0057Apex Digital ....................... 0775, 0792, 0906Audiovox ........................... 0478, 0207, 0119Bell & Howell ......................................... 0181Bradford ................................................ 0207Broksonic .................................... 0263, 0490Candle ................................................... 0057Carnivale ............................................... 0057Carver ................................................... 0081Celebrity ................................................ 0027Celera.................................................... 0792Changhong............................................ 0792Citizen ............................... 0087, 0057, 0119Clarion ................................................... 0207Contec ................................................... 0207Craig ...................................................... 0207Crosley .................................................. 0081
i
SR4500U DFU_00_cover 04.6.25, 11:18 AMPage 4 Adobe PageMaker 6.5J/PPC

Crown .................................................... 0207Curtis Mathes ......... 0074, 0081, 0181, 0478,
0120, 0087, 0729, 0057,0172, 0193, 1174, 1374
CXC....................................................... 0207Daewoo ................... 0478, 1688, 0119, 0699Denon.................................................... 0172Dumont .................................................. 0044Durabrand ................................... 0207, 0205Electroband ........................................... 0027Elektra ......................................... 0044, 1688Emerson ........................... 0181, 0263, 0490,
0207, 0205, 0198Envision................................................. 0057Fisher .................................................... 0181Fujitsu................................ 0710, 0880, 0836Funai ........................................... 0207, 0198Futuretech ............................................. 0207Gateway ...................................... 1782, 1783GE .......................... 0074, 0078, 0478, 0205,
1474, 1374, 1174Gibralter ...................................... 0044, 0057GoldStar ...................................... 0057, 0205Grunpy .................................................. 0207Hallmark ................................................ 0205Harman/Kardon ..................................... 0081Harvard ................................................. 0207Havermy ................................................ 0120Hello Kitty .............................................. 0478Himitsu .................................................. 0207Hisense ................................................. 0775Hitachi ......................................... 1172, 0172Infinity .................................................... 0081Inteq ...................................................... 0044JBL ........................................................ 0081JCB ....................................................... 0027Jensen................................................... 0788JVC ....................................................... 0080KEC ....................................................... 0207Kenwood ............................................... 0057KLH ....................................................... 0792KTV ............................................. 0207, 0057LG ..................................... 1205, 0883, 0469LXI ................. 0074, 0081, 0181, 0183, 0205Magnavox...... 0081, 0057, 1481, 0733, 1281Marantz ................... 0081, 0057, 1581, 0731Matsushita ................................... 0277, 0677Megatron ..................................... 0205, 0172Memorex ................. 0181, 0490, 0177, 0205MGA .................................. 0177, 0057, 0205Midland.............................. 0074, 0044, 0078
Mitsubishi ...... 0120, 0177, 1277, 0205, 0863Monivision ............................................. 0870Motorola ................................................ 0120MTC ............................................ 0087, 0057Multitech ................................................ 0207NAD............................................. 0183, 0205NEC............................................. 0057, 1731Nikko ................................. 0057, 0205, 0119Norcent ........................................ 0775, 0851NTC ....................................................... 0119Onwa ..................................................... 0207Optimus ................... 0181, 0277, 0193, 0677Optonica ................................................ 0120Orion ........................................... 0263, 0490Panasonic ......................... 0277, 0078, 0677Penney ................... 0074, 0183, 0078, 0087,
0057, 0205, 1374Philco .......................................... 0081, 0057Philips ................................ 0081, 1481, 0717Pilot ....................................................... 0057Pioneer ........................................ 0193, 0706Portland ................................................. 0119Prima ..................................................... 0788Prism ..................................................... 0078Proscan ............................. 0074, 1474, 1374Proton.................................................... 0205Pulsar .................................................... 0044Quasar .............................. 0277, 0078, 0677RadioShack ... 0074, 0181, 0207, 0057, 0205RCA........................ 0074, 1474, 1274, 1574,
0117, 1174, 1074, 1374, 0706Realistic ................... 0181, 0207, 0057, 0205Runco .......................................... 0044, 0057Sampo ......................................... 0057, 1782Samsung ................. 0087, 0729, 0057, 0205Sansui ................................................... 0490Sanyo .................................................... 0181Scotch ................................................... 0205Scott .................................. 0263, 0207, 0205Sears ... 0074, 0081, 0181, 0183, 0205, 0198Sharp..................................................... 0120Sheng Chia ........................................... 0120Sony ...................................................... 0027Soundesign ................................. 0207, 0205Squareview ........................................... 0198SSS ....................................................... 0207Starlite ................................................... 0207Studio Experience ................................. 0870Supreme................................................ 0027SVA ............................................. 0775, 0892Sylvania ............................. 0081, 0057, 0198
Symphonic .................................. 0207, 0198Tandy .................................................... 0120Tatung ................................................... 1783Technics ...................................... 0277, 0078Techwood.............................................. 0078Teknika.......... 0081, 0207, 0177, 0087, 0119Telefunken ............................................ 0729TMK....................................................... 0205TNCi ...................................................... 0044Toshiba .................. 0181, 0183, 0087, 1283,
1383, 1183, 1731, 0677TVS ....................................................... 0490Vector Research ................................... 0057Victor ..................................................... 0080Vidikron ................................................. 0081Vidtech .................................................. 0205Viewsonic .............................................. 1782Wards ...................... 0081, 0057, 0205, 1183Waycon ................................................. 0183White Westinghouse ............................. 0490Yamaha ................................................. 0057Zenith ...................... 0044, 0490, 0205, 0119
VCRAdmiral ........................................ 0075, 0236Adventura .............................................. 0027Aiwa ............................................ 0064, 0027American High....................................... 0062Asha ...................................................... 0267Audiovox ............................................... 0064Beaumark .............................................. 0267Bell & Howell ......................................... 0131Broksonic ................ 0211, 0148, 0236, 1506Calix ...................................................... 0064Canon.................................................... 0062Carver ................................................... 0108Citizen ......................................... 0064, 1305Craig .................................. 0064, 0074, 0267Curtis Mathes .......... 0087, 0062, 0189, 1062Cybernex ............................................... 0267Daewoo ....................................... 0072, 1305Denon.................................................... 0069Durabrand ............................................. 0066Dynatech ............................................... 0027Electrohome .......................................... 0064Electrophonic ........................................ 0064Emerex .................................................. 0059Emerson ................. 0064, 0211, 0027, 0148,
0070, 0236, 1305, 1506Fisher .......................................... 0074, 0131Fuji .............................................. 0062, 0060Funai ..................................................... 0027Garrard .................................................. 0027GE ....... 0087, 0062, 0267, 1087, 1062, 0834GoldStar ...................................... 0064, 1264Gradiente .............................................. 0027Harley Davidson .................................... 0027Harman/Kardon ..................................... 0108HI-Q....................................................... 0074Hitachi ......................................... 0027, 0069Hughes Network Systems ..................... 0069JVC ....................................................... 0094KEC ....................................................... 0064Kenwood ............................................... 0094Kodak .......................................... 0062, 0064Lloyd’s ................................................... 0027LXI ......................................................... 0064Magnasonic ........................................... 1305Magnavox...... 0062, 0066, 0108, 0027, 1808Magnin .................................................. 0267Marantz ............................. 0062, 0108, 1408Marta ..................................................... 0064Matsushita ................................... 0062, 0189MEI ........................................................ 0062Memorex ...... 0062, 0189, 0064, 0075, 0066,
0074, 0267, 0027, 0131, 0236, 1264MGA ............................................ 0267, 0070MGN Technology .................................. 0267Minolta ................................................... 0069Mitsubishi .......................... 0094, 0070, 0834Motorola ...................................... 0062, 0075MTC ............................................ 0267, 0027Multitech ................................................ 0027NAD....................................................... 0085NEC............................................. 0131, 0094Nikko ..................................................... 0064Noblex ................................................... 0267Olympus ................................................ 0062Optimus ............................ 1089, 0189, 0064,
0075, 0131, 0085Orion ................................. 0211, 0236, 1506Panasonic ........................ 1089, 0062, 0189,
0252, 1062, 0643Penney ............................. 0062, 0064, 0267,
0069, 1264, 1062Pentax ................................................... 0069Philco .................................................... 0062Philips ................................ 0062, 0108, 0645Pilot ....................................................... 0064
ii
SR4500U DFU_00_cover 04.6.25, 11:18 AMPage 5 Adobe PageMaker 6.5J/PPC
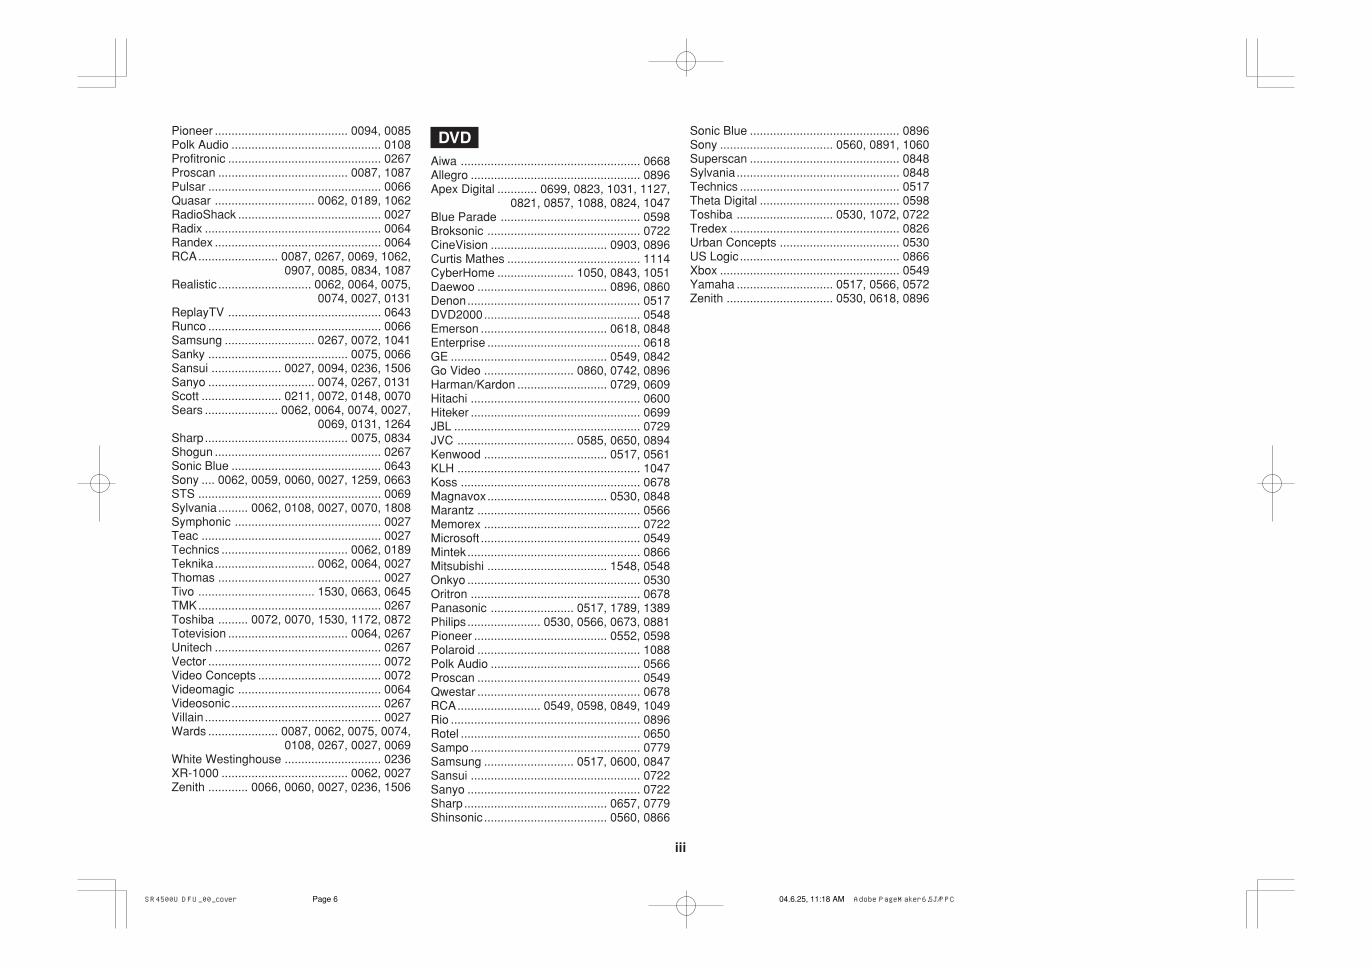
Pioneer ........................................ 0094, 0085Polk Audio ............................................. 0108Profitronic .............................................. 0267Proscan ....................................... 0087, 1087Pulsar .................................................... 0066Quasar .............................. 0062, 0189, 1062RadioShack ........................................... 0027Radix ..................................................... 0064Randex .................................................. 0064RCA........................ 0087, 0267, 0069, 1062,
0907, 0085, 0834, 1087Realistic ............................ 0062, 0064, 0075,
0074, 0027, 0131ReplayTV .............................................. 0643Runco .................................................... 0066Samsung ........................... 0267, 0072, 1041Sanky .......................................... 0075, 0066Sansui ..................... 0027, 0094, 0236, 1506Sanyo ................................ 0074, 0267, 0131Scott ........................ 0211, 0072, 0148, 0070Sears ...................... 0062, 0064, 0074, 0027,
0069, 0131, 1264Sharp........................................... 0075, 0834Shogun .................................................. 0267Sonic Blue ............................................. 0643Sony .... 0062, 0059, 0060, 0027, 1259, 0663STS ....................................................... 0069Sylvania ......... 0062, 0108, 0027, 0070, 1808Symphonic ............................................ 0027Teac ...................................................... 0027Technics ...................................... 0062, 0189Teknika.............................. 0062, 0064, 0027Thomas ................................................. 0027Tivo ................................... 1530, 0663, 0645TMK....................................................... 0267Toshiba ......... 0072, 0070, 1530, 1172, 0872Totevision .................................... 0064, 0267Unitech .................................................. 0267Vector .................................................... 0072Video Concepts ..................................... 0072Videomagic ........................................... 0064Videosonic ............................................. 0267Villain ..................................................... 0027Wards ..................... 0087, 0062, 0075, 0074,
0108, 0267, 0027, 0069White Westinghouse ............................. 0236XR-1000 ...................................... 0062, 0027Zenith ............ 0066, 0060, 0027, 0236, 1506
iii
DVDAiwa ...................................................... 0668Allegro ................................................... 0896Apex Digital ............ 0699, 0823, 1031, 1127,
0821, 0857, 1088, 0824, 1047Blue Parade .......................................... 0598Broksonic .............................................. 0722CineVision ................................... 0903, 0896Curtis Mathes ........................................ 1114CyberHome ....................... 1050, 0843, 1051Daewoo ....................................... 0896, 0860Denon.................................................... 0517DVD2000............................................... 0548Emerson ...................................... 0618, 0848Enterprise .............................................. 0618GE ............................................... 0549, 0842Go Video ........................... 0860, 0742, 0896Harman/Kardon ........................... 0729, 0609Hitachi ................................................... 0600Hiteker ................................................... 0699JBL ........................................................ 0729JVC ................................... 0585, 0650, 0894Kenwood ..................................... 0517, 0561KLH ....................................................... 1047Koss ...................................................... 0678Magnavox.................................... 0530, 0848Marantz ................................................. 0566Memorex ............................................... 0722Microsoft ................................................ 0549Mintek.................................................... 0866Mitsubishi .................................... 1548, 0548Onkyo .................................................... 0530Oritron ................................................... 0678Panasonic ......................... 0517, 1789, 1389Philips...................... 0530, 0566, 0673, 0881Pioneer ........................................ 0552, 0598Polaroid ................................................. 1088Polk Audio ............................................. 0566Proscan ................................................. 0549Qwestar ................................................. 0678RCA......................... 0549, 0598, 0849, 1049Rio ......................................................... 0896Rotel ...................................................... 0650Sampo ................................................... 0779Samsung ........................... 0517, 0600, 0847Sansui ................................................... 0722Sanyo .................................................... 0722Sharp........................................... 0657, 0779Shinsonic ..................................... 0560, 0866
Sonic Blue ............................................. 0896Sony .................................. 0560, 0891, 1060Superscan ............................................. 0848Sylvania ................................................. 0848Technics ................................................ 0517Theta Digital .......................................... 0598Toshiba ............................. 0530, 1072, 0722Tredex ................................................... 0826Urban Concepts .................................... 0530US Logic ................................................ 0866Xbox ...................................................... 0549Yamaha ............................. 0517, 0566, 0572Zenith ................................ 0530, 0618, 0896
SR4500U DFU_00_cover 04.6.25, 11:18 AMPage 6 Adobe PageMaker 6.5J/PPC

06/2004 00M07BW851250 ecmf-ePrinted in China
is a registered trademark.
www.marantz.comYou can find your nearest authorized distributor or dealer on our website.
JAPAN Marantz Japan, Inc. 35-1 Sagami Ohno 7-Chome, Sagamihara-shi, Kanagawa 228-8505, Japan
U.S.A. Marantz America, Inc. 1100 Maplewood Drive, Itasca, IL 60143, U.S.A.
EUROPE Marantz Europe B.V. P.O. Box 8744, 5605 LS Eindhoven, The Netherlands
Manufactured under license from Dolby Laboratories. “Dolby”, “Pro Logic” and the double-D symbol are trademarks of Dolby Laboratories.Confidential Unpublished Works. © 1992-1997 Dolby Laboratories, Inc. All rights reserved.
SR4500U DFU_00_cover 04.6.25, 11:18 AMPage 8 Adobe PageMaker 6.5J/PPC


