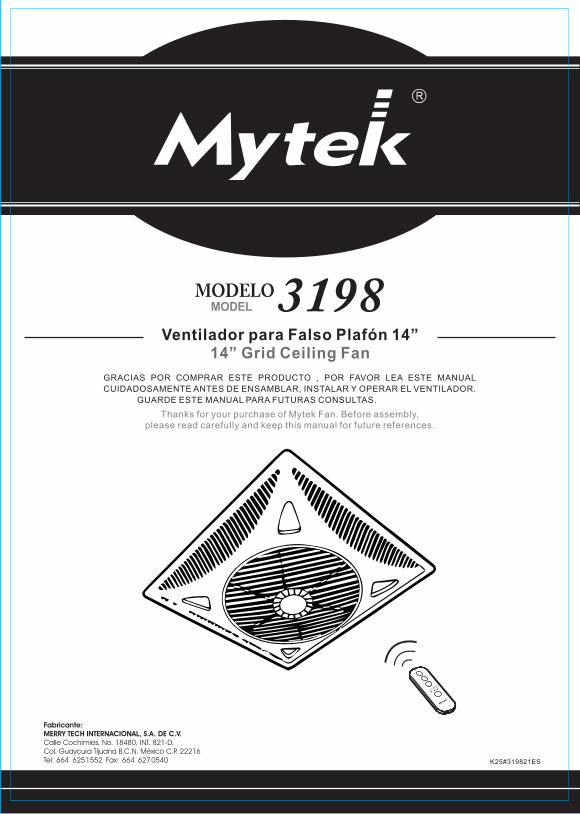
K25#319821ES 3198 MODELO MODEL Ventilador para Falso Plafón 14” 14” Grid Ceiling Fan GRACIAS POR COMPRAR ESTE PRODUCTO , POR FAVOR LEA ESTE MANUAL CUIDADOSAMENTE ANTES DE ENSAMBLAR, INSTALAR Y OPERAR EL VENTILADOR. GUARDE ESTE MANUAL PARA FUTURAS CONSULTAS. Thanks for your purchase of Mytek Fan. Before assembly, please read carefully and keep this manual for future references.
Transcript
K25#319821ES
3198MODELOMODEL
Ventilador para Falso Plafón 14”14” Grid Ceiling Fan
GRACIAS POR COMPRAR ESTE PRODUCTO , POR FAVOR LEA ESTE MANUAL
CUIDADOSAMENTE ANTES DE ENSAMBLAR, INSTALAR Y OPERAR EL VENTILADOR.
GUARDE ESTE MANUAL PARA FUTURAS CONSULTAS.
Thanks for your purchase of Mytek Fan. Before assembly, please read carefully and keep this manual for future references.
A5-w210xh148(出血3mm)
K25#319821ES ,西+英文
2
3Solución de falla
5Operación
5Observaciones
Pasos de instalación 4
5Limpieza y mantenimiento
Observaciones de instalación 4
5Especificaciones eléctricas
CONTENIDO (MANUAL EN ESPAÑOL)
CONTENTS (ENGLISH MANUAL)
7Troubleshooting
9Operation
9Notes
Installation procedure 8
9Cleaning and Maintenance
Notes for installation 8
9Technical Specifications
6Instrucciones importantes de seguridad
A5-w210xh148(出血3mm)
K25#319821ES ,西+英文
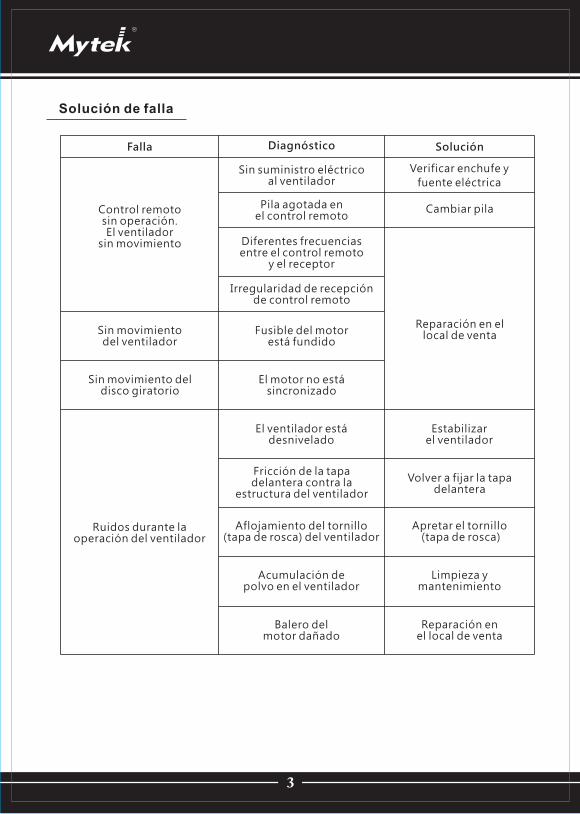
Solución de falla
Falla
Control remoto sin operación. El ventilador
sin movimiento
Sin movimiento del ventilador
Sin movimiento del disco giratorio
Ruidos durante la operación del ventilador
3
Diagnóstico Solución
Sin suministro eléctrico al ventilador
Verificar enchufe y
fuente eléctrica
Pila agotada en el control remoto
Cambiar pila
Diferentes frecuencias entre el control remoto
y el receptor
Irregularidad de recepción de control remoto
Fusible del motor está fundido
Reparación en el local de venta
El motor no está sincronizado
El ventilador está desnivelado
Fricción de la tapa delantera contra la
estructura del ventilador
Aflojamiento del tornillo(tapa de rosca) del ventilador
Estabilizar el ventilador
Volver a fijar la tapa delantera
Apretar el tornillo (tapa de rosca)
Acumulación de polvo en el ventilador
Limpieza y mantenimiento
Balero del motor dañado
Reparación en el local de venta
A5-w210xh148(出血3mm)
K25#319821ES ,西+英文
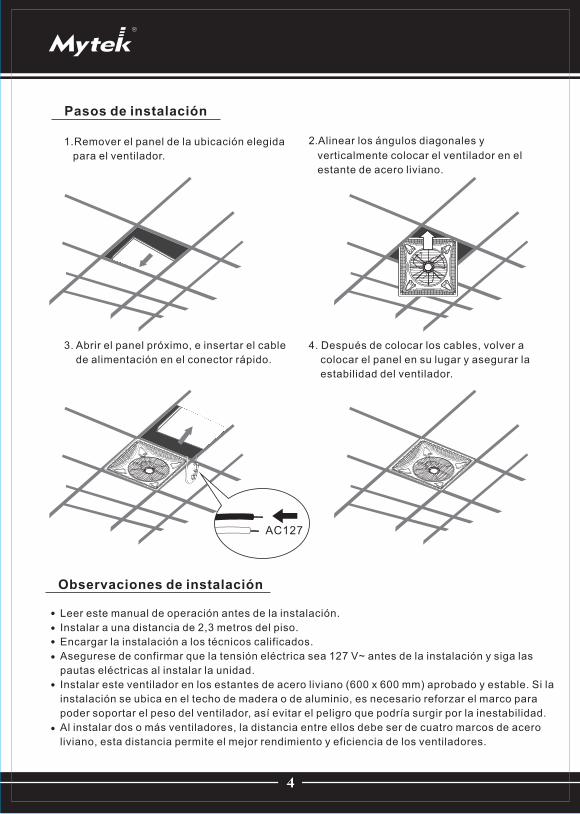
1.Remover el panel de la ubicación elegida
para el ventilador.
2.Alinear los ángulos diagonales y
verticalmente colocar el ventilador en el
estante de acero liviano.
3. Abrir el panel próximo, e insertar el cable
de alimentación en el conector rápido.
4. Después de colocar los cables, volver a
colocar el panel en su lugar y asegurar la
estabilidad del ventilador.
Pasos de instalación
AC127
4
Observaciones de instalación
Leer este manual de operación antes de la instalación.
Instalar a una distancia de 2,3 metros del piso.
Encargar la instalación a los técnicos calificados.
Asegurese de confirmar que la tensión eléctrica sea 127 V~ antes de la instalación y siga las
pautas eléctricas al instalar la unidad.
Instalar este ventilador en los estantes de acero liviano (600 x 600 mm) aprobado y estable. Si la
instalación se ubica en el techo de madera o de aluminio, es necesario reforzar el marco para
poder soportar el peso del ventilador, así evitar el peligro que podría surgir por la inestabilidad.
Al instalar dos o más ventiladores, la distancia entre ellos debe ser de cuatro marcos de acero
liviano, esta distancia permite el mejor rendimiento y eficiencia de los ventiladores.
A5-w210xh148(出血3mm)
K25#319821ES ,西+英文
5
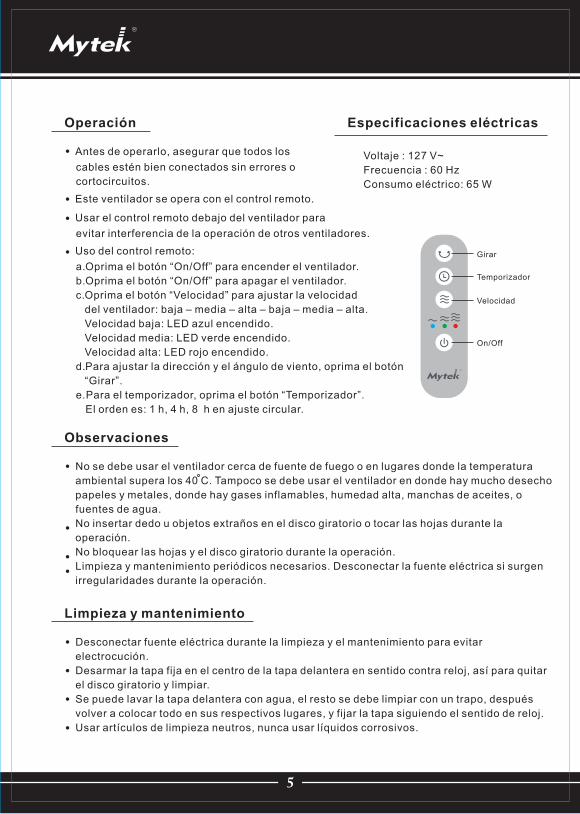
Operación
Antes de operarlo, asegurar que todos los
cables estén bien conectados sin errores o
cortocircuitos.
Este ventilador se opera con el control remoto.
Usar el control remoto debajo del ventilador para
evitar interferencia de la operación de otros ventiladores.
Uso del control remoto:
a.Oprima el botón “On/Off” para encender el ventilador.
b.Oprima el botón “On/Off” para apagar el ventilador.
c.Oprima el botón “Velocidad” para ajustar la velocidad
del ventilador: baja – media – alta – baja – media – alta.
Velocidad baja: LED azul encendido.
Velocidad media: LED verde encendido.
Velocidad alta: LED rojo encendido.
d.Para ajustar la dirección y el ángulo de viento, oprima el botón
“Girar”.
e.Para el temporizador, oprima el botón “Temporizador”.
El orden es: 1 h, 4 h, 8 h en ajuste circular.
Observaciones
No se debe usar el ventilador cerca de fuente de fuego o en lugares donde la temperatura
ambiental supera los 40 C. Tampoco se debe usar el ventilador en donde hay mucho desecho
papeles y metales, donde hay gases inflamables, humedad alta, manchas de aceites, o
fuentes de agua.
No insertar dedo u objetos extraños en el disco giratorio o tocar las hojas durante la
operación.
No bloquear las hojas y el disco giratorio durante la operación.
Limpieza y mantenimiento periódicos necesarios. Desconectar la fuente eléctrica si surgen
irregularidades durante la operación.
Limpieza y mantenimiento
Desconectar fuente eléctrica durante la limpieza y el mantenimiento para evitar
electrocución.
Desarmar la tapa fija en el centro de la tapa delantera en sentido contra reloj, así para quitar
el disco giratorio y limpiar.
Se puede lavar la tapa delantera con agua, el resto se debe limpiar con un trapo, después
volver a colocar todo en sus respectivos lugares, y fijar la tapa siguiendo el sentido de reloj.
Usar artículos de limpieza neutros, nunca usar líquidos corrosivos.
Especificaciones eléctricas
Voltaje : 127 V~
Frecuencia : 60 Hz
Consumo eléctrico: 65 W
On/Off
Velocidad
Temporizador
Girar
A5-w210xh148(出血3mm)
K25#319821ES ,西+英文
6
Instrucciones importantes de seguridad
Siempre desconecte este aparato de la corriente eléctrica antes de darle servicio do mantenimiento o
limpieza.
Este aparato no es apropiado para usarse en lugares húmedos tales como ventanas, baños y
exteriores.
Este producto deberá ser usado solo para los propósitos descritos en este instructivo.
La supervisión es requerida mientras los menores do edad esten cerca del producto.
Este aparato no se destina para utilizarse por personas (incluyendo niños) cuyas capacidades físicas,
sensoriales o mentalse sean diferentes o estén reducidas, o carezcan de experiencia o conocimiento,
a menos que dichas personas reciban una supervisión o capacitación para el funcionamiento del
aparato por una persona responsable de su seguridad.
Los niños deben supervisarse para asegurar que ellos no empleen los aparatos como juguete.
Evite el contacto con las partes móviles, no trate de introducir los dedos u otros objetos dentro del
motor, ni bloquear el aspa para evitar su movimiento.
No opere este producto en presencia de gases explosivos y/p flamables.
Mantenga el producto o cualquiera de sus partes alejado del fuego o aparatos que generen calor.
No use artículos complementarions o refacciones no autorizados.
Siempre use en lugares secos y superficies planas.
No opere sin los protectores de aspa correctamente ensamblados.
Este producto es solo para uso doméstico no para uso comercial o industrial.
Este aparato funciona con un voltaje de alimentación de 127 V~ a una frecuencia de 60 Hz con una
potencia de 80 W.
A5-w210xh148(出血3mm)
K25#319821ES ,西+英文
7
Troubleshooting
Symptom
The remote control is not responsive, and the
fan does not rotate
The remote control is functioning, but fan blades do not rotate
The remote control is functioning, but the
louver grill is not rotating
The Air Circulation Fan makes noise when it is on
Diagnostics Solution
The fan has no electrical power
Check the plug and
electrical outlet
The remote control has no power
Change the batteries
Remote control frequency is different
from the receiver's
The remote control malfunctions
Motor fuse is broken
Ask the vendor for repair
Synchronous motor malfunctions
The Air Circulation Fan is not leveled
There are frictions between the fan body and the front
cover of the fan
Fan screw (cap) is slightly loose
Re-level the fan
Re-mount the front cover
Tighten the screw (cap) again
Too much dust on the fan
Perform cleaning maintenance
Motor bearing is damaged
Ask the vendor for repair
A5-w210xh148(出血3mm)
K25#319821ES ,西+英文
8
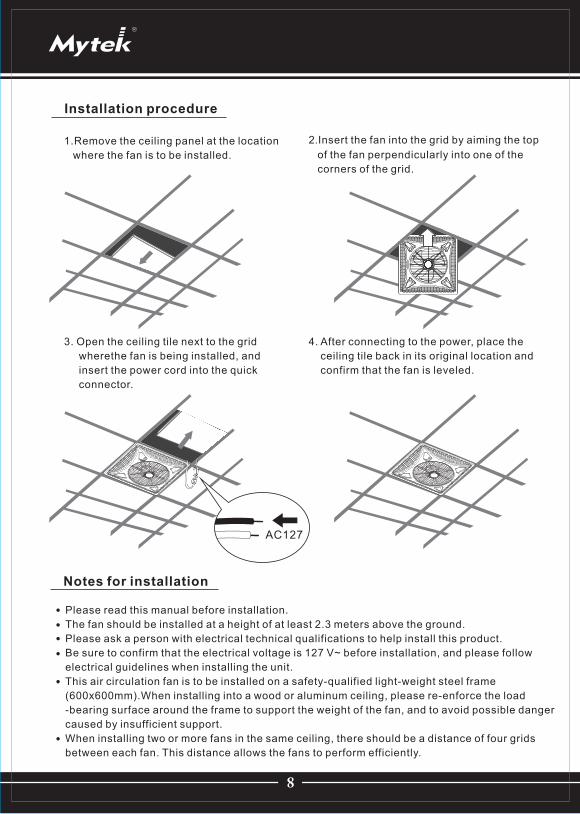
1.Remove the ceiling panel at the location
where the fan is to be installed.
2.Insert the fan into the grid by aiming the top
of the fan perpendicularly into one of the
corners of the grid.
3. Open the ceiling tile next to the grid
wherethe fan is being installed, and
insert the power cord into the quick
connector.
4. After connecting to the power, place the
ceiling tile back in its original location and
confirm that the fan is leveled.
Installation procedure
AC127
Notes for installation
Please read this manual before installation.
The fan should be installed at a height of at least 2.3 meters above the ground.
Please ask a person with electrical technical qualifications to help install this product.
Be sure to confirm that the electrical voltage is 127 V~ before installation, and please follow
electrical guidelines when installing the unit.
This air circulation fan is to be installed on a safety-qualified light-weight steel frame
(600x600mm).When installing into a wood or aluminum ceiling, please re-enforce the load
-bearing surface around the frame to support the weight of the fan, and to avoid possible danger
caused by insufficient support.
When installing two or more fans in the same ceiling, there should be a distance of four grids
between each fan. This distance allows the fans to perform efficiently.
A5-w210xh148(出血3mm)
K25#319821ES ,西+英文
9
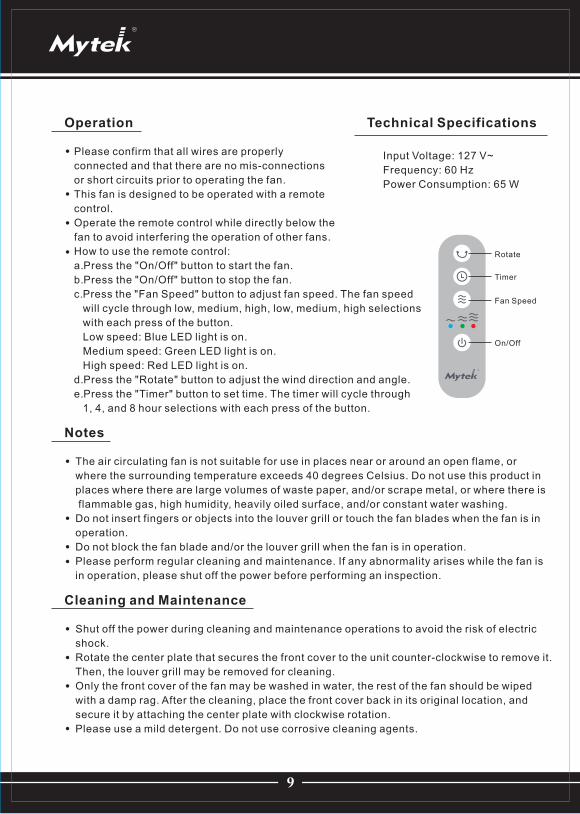
Operation
Please confirm that all wires are properly
connected and that there are no mis-connections
or short circuits prior to operating the fan.
This fan is designed to be operated with a remote
control.
Operate the remote control while directly below the
fan to avoid interfering the operation of other fans.
How to use the remote control:
a.Press the "On/Off" button to start the fan.
b.Press the "On/Off" button to stop the fan.
c.Press the "Fan Speed" button to adjust fan speed. The fan speed
will cycle through low, medium, high, low, medium, high selections
with each press of the button.
Low speed: Blue LED light is on.
Medium speed: Green LED light is on.
High speed: Red LED light is on.
d.Press the "Rotate" button to adjust the wind direction and angle.
e.Press the "Timer" button to set time. The timer will cycle through
1, 4, and 8 hour selections with each press of the button.
Notes
The air circulating fan is not suitable for use in places near or around an open flame, or
where the surrounding temperature exceeds 40 degrees Celsius. Do not use this product in
places where there are large volumes of waste paper, and/or scrape metal, or where there is
flammable gas, high humidity, heavily oiled surface, and/or constant water washing.
Do not insert fingers or objects into the louver grill or touch the fan blades when the fan is in
operation.
Do not block the fan blade and/or the louver grill when the fan is in operation.
Please perform regular cleaning and maintenance. If any abnormality arises while the fan is
in operation, please shut off the power before performing an inspection.
Cleaning and Maintenance
Shut off the power during cleaning and maintenance operations to avoid the risk of electric
shock.
Rotate the center plate that secures the front cover to the unit counter-clockwise to remove it.
Then, the louver grill may be removed for cleaning.
Only the front cover of the fan may be washed in water, the rest of the fan should be wiped
with a damp rag. After the cleaning, place the front cover back in its original location, and
secure it by attaching the center plate with clockwise rotation.
Please use a mild detergent. Do not use corrosive cleaning agents.