Developed to facilitate the hamstrings, abdominals, and upper-
back while inhibiting the low-back and hip flexors.
Starting PositionSit with feet straight out in front, hands behind the butt, toes pointed 1.
up, and shoulder blades pulled back and down.
Bend both knees to about 35 degrees and pull the toes toward the shins.2.
ProcedureUsing the hands and heels, lift the butt off the ground.1.
Lift the left foot off the ground, straighten the left leg by locking out 2.
the knee, and keep both toes pulled back.
Shift the hips back until they are under the shoulders and there is 3.
approximately a 15 degree bend in the right knee.
Pull down hard with the right heel, contract the abdominals, and keep 4.
the shoulder blades pulled back and down.
Hold for 10 seconds, go down, and repeat for the other leg.5.
Coaching PointsKeep the shoulders pulled back and down with the chest pulled •
down by bringing the belly to the spine.
Hold the head in a relaxed, neutral position, making sure to breathe •
normally throughout the entire exercise.
Avoid letting the shoulders roll forward or the toes to point during •
any part of the exercise.
Control the 10 second count for both legs.•
353535
1 x Left (10 sec)1 x Right (10 sec)
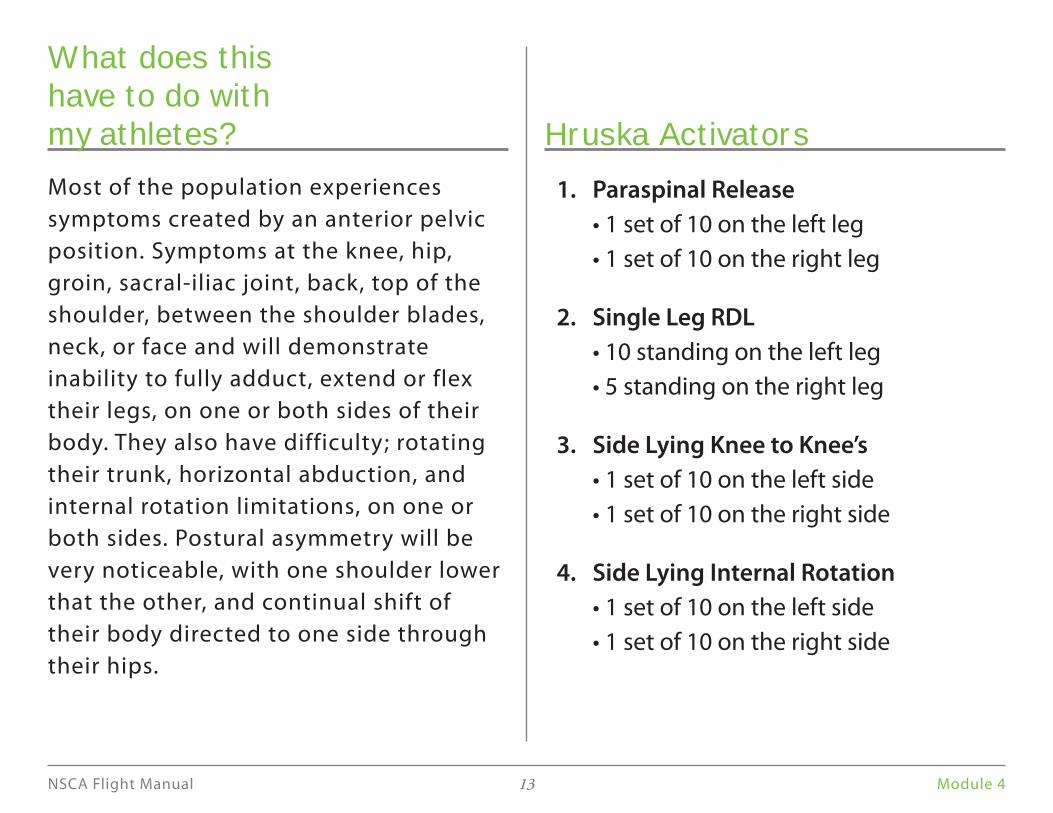
1. Paraspinal Release
Module 4NSCA Flight Manual 15
Developed to facilitate the hamstrings, glutes, and
abdominals while inhibiting the low-back and hip
flexors. Also strengthens the ankle by forcing it to
stabilize the weight of the body.
Starting PositionStand with the feet hip-width apart, knees slightly 1.
flexed, and toes slightly turned in.
Isometrically contract the abdominals and low-back 2.
by bringing the belly to the spine.
Shift body weight to the left leg and slightly into the 3.
hip; lift the right foot off the ground and raise the
right hand in the air.
ProcedureKeep the left knee slightly flexed and bend forward 1.
at the hip with the torso and right knee moving
together.
Proper range of motion has been achieved when the 2.
back becomes parallel with the ground.
Use the hamstring and glute to pull the body back up 3.
to the starting position.
Repeat for 10 repetitions standing on the left leg and 4.
5 repetitions standing on the right leg.
2. Single Leg RDL
1 x 10 Left1 x 5 Right
Module 4NSCA Flight Manual 16
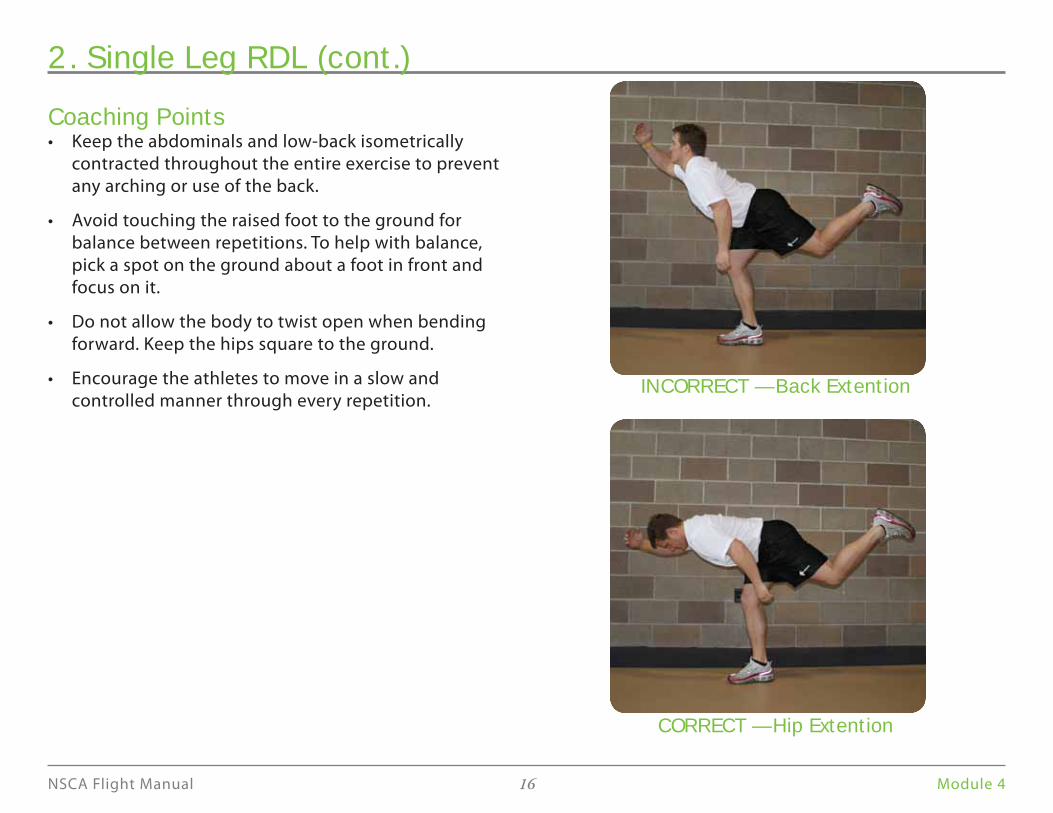
Coaching PointsKeep the abdominals and low-back isometrically •
contracted throughout the entire exercise to prevent
any arching or use of the back.
Avoid touching the raised foot to the ground for •
balance between repetitions. To help with balance,
pick a spot on the ground about a foot in front and
focus on it.
Do not allow the body to twist open when bending •
forward. Keep the hips square to the ground.
Encourage the athletes to move in a slow and •
controlled manner through every repetition.
2. Single Leg RDL (cont.)
INCORRECT — Back Extention
CORRECT — Hip Extention
Module 4NSCA Flight Manual 17
Developed to facilitate the adductors, glutes, and internal obliques.
Starting PositionLay down on the left side with the bottom arm pointed straight 1. up and the top arm reaching out front pushing into the ground.
Tuck the knees up to create a 90 degree angle at the hips and 2. knees and pull the toes toward the shins.
ProcedureKeep the feet together and slowly raise the top knee up about 1. six inches to hip height. The top knee should never leave this position throughout the entire exercise.
Raise the bottom knee up, squeezing it to the top knee as hard 2. as you can; hold for 2 seconds, and release.
Continue until 10 repetitions are complete, roll over to the right 3. side, and repeat.
Coaching PointsMaintain the raised position of the top knee throughout the • entire exercise.
Start the 2 second count when the bottom knee and top knee • are squeezed together.
Avoid letting the body rotate backward when squeezing. Stay • forward and keep pushing into the ground with the top arm.
Control the pace of the exercise. Tell the athletes when to • squeeze and when to release. Counting on your fingers helps keep track of repetitions while still allowing you to help the athletes make corrections.
3. Side Lying Knee to Knees
90
90
90
90
90
90
STARTING POSITION
1x10 Left (2sec)
1x10 Right (2sec)
Module 4NSCA Flight Manual 18
3. Side Lying Knee to Knees (cont.)
RELEASE POSITION
SQUEEZED POSITION
Module 4NSCA Flight Manual 19
Developed to facilitate the internal rotators, adductors,
abductors, glutes, and internal obliques.
Starting Position Lay down on the left side with the bottom arm 1.
pointed up and your top arm reaching out front and
pushing into the ground.
Tuck the knees up to create a 90 degree angle at the 2.
hips and knees and pull the toes toward the shins.
Straighten out the top leg reaching through the heel, 3.
locking out the knee, and pulling the toe toward the
shin. This will create a straight line form the hand to
the ankle.
Slightly raise the bottom knee off the ground keeping 4.
the foot flat on the floor.
ProcedureRotate the entire leg inside the hip socket as far as 1.
possible without bending the knee or pointing the toe.
Lower the leg down until the toe touches the ground.2.
Maintain the rotation in the leg and raise it back up to 3.
the starting position.
Then un-rotate the leg from inside the hip.4.
Continue until 10 repetitions are done, roll over to the 5.
right side and repeat.
Coaching PointsAvoid any rotation coming from the back throughout •
the entire exercise. Stay forward and keep the top
arm pushing into the ground.
Avoid bending at the knee and pointing the toe when •
rotating. All the rotation should come from inside the
hip.
Control the pace of the exercise. Tell the athletes •
when to rotate, touch, up, and unrotate. Counting on
your fingers helps keep track of repetitions while still
allowing you to help the athletes make corrections.
4. Side Lying Internal Rotation
STARTING POSITION
1x10 Left 1x10 Right
Module 4NSCA Flight Manual 20
4. Side Lying Internal Rotation (cont.)
Starting Position Rotate Touch
Up Un-rotate
Module 4NSCA Flight Manual 21
Practice Drills
Position Practice•
Catch Practice •
Exercise #1
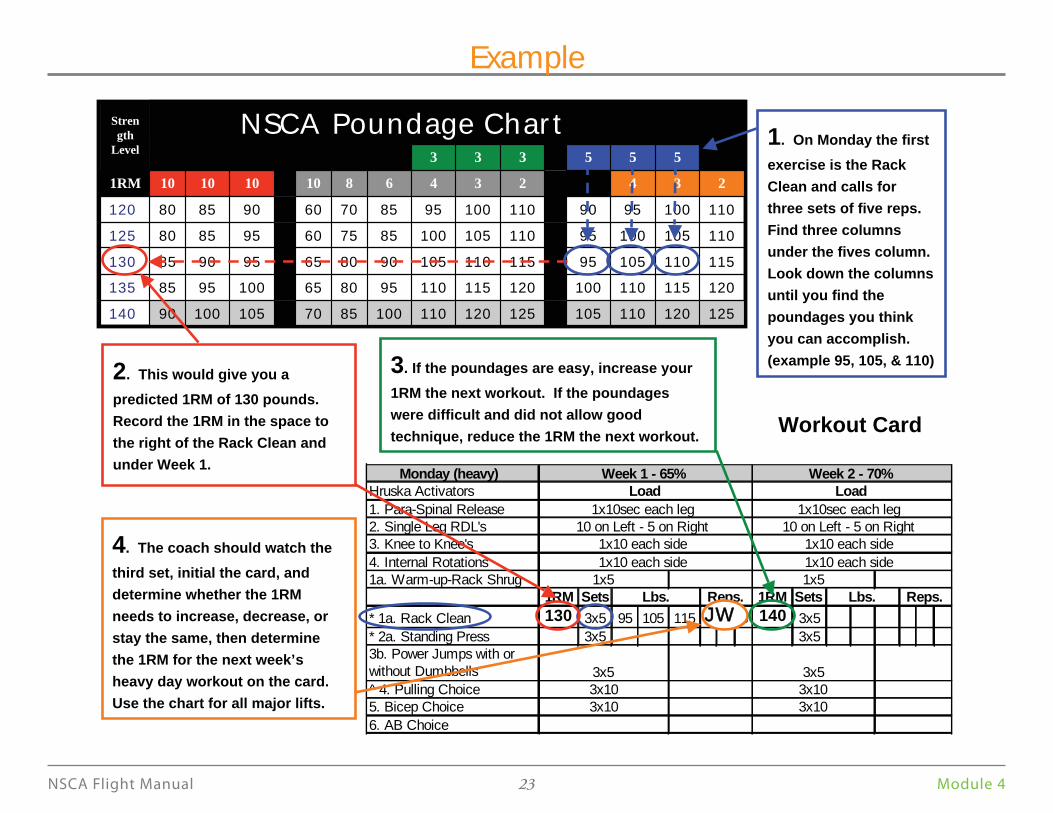
1a. Rack Clean
1b. Hang Clean
1c. Power Clean
Exercise #2
2a. Standing Press
2b. Power Press
2c. Push Jerk
Exercise #3
3a. Jammer Extension
3b. Power Jumps with
or without Dumbells
Exercise #4: Pulling Choice
4a. Pull-ups
4b. Standing Low Row
4c. Lat Pulldown
4d. Bent-over Row
Exercise #5: Bicep Choice
Exercise #6: Ab Choice
Explosive Day Exercises
Module 4NSCA Flight Manual 22
Explosive Day Base Phase Workout Card
Monday (heavy)
Hruska Activators
1. Para-Spinal Release
2. Single Leg RDL's
3. Knee to Knee's
4. Internal Rotations
1a. Warm-up-Rack Shrug
1RM Sets 1RM Sets 1RM Sets
* 1a. Rack Clean 3x5 3x5 3x5
* 2a. Standing Press 3x5 3x5 3x5
3b. Power Jumps with or
without Dumbbells
^ 4. Pulling Choice
5. Bicep Choice
6. AB Choice
Thursday (light)
Hruska Activators
1. Para-Spinal Release
2. Single Leg RDL's
3. Knee to Knee's
4. Internal Rotations
1a. Warm-up-Rack Shrug
1RM Sets 1RM Sets 1RM Sets 1RM Sets
* 1a. Rack Clean 3x5 3x5 3x5 3x5
* 2a. Standing Press 3x5 3x5 3x5 3x5
3b. Power Jumps with or
without Dumbbells
^ 4. Pulling Choice
5. Bicep Choice
6. AB Choice
Date
Name: Date: Sport/Class: Phase: Base 3x5
^ 4. Pulling Choice - a. Pull-ups, b. Standing Low Row, c. Lat Pulldown, d. Bent-over Row
Comments Supervisor
* Represents major lifts that need to be done everyday and checked off by a coach
3x10 3x103x10 3x10
3x10 3x103x10 3x10
Lbs. Reps. Lbs. Reps.Lbs. Reps. Lbs. Reps.
1x10 each side 1x10 each side 1x10 each side
1x10 each side 1x10 each side 1x10 each side 1x10 each side
1x10sec each leg 1x10sec each leg 1x10sec each leg
10 on Left - 5 on Right 10 on Left - 5 on Right 10 on Left - 5 on Right 10 on Left - 5 on Right
Week 1 Week 2 Week 3 Week 4 - 70%
3x10 3x10 3x10 Weight Reps
Weight Reps
3x10 3x10 3x10
3x5
Lbs. Reps. Warm-up and Test
Rack Clean 5 - 6 reps
1x10 each side 1x10 each side
1x10 each side 1x10 each side 1x10 each side 1x10 each side
1x10sec each leg 1x10sec each leg
10 on Left - 5 on Right 10 on Left - 5 on Right 10 on Left - 5 on Right 10 on Left - 5 on Right
^ 4. Pulling Choice - a. Pull-ups, b. Standing Low Row, c. Lat Pulldown, d. Bent-over Row
Comments Supervisor
* Represents major lifts that need to be done everyday and checked off by a coach
3x5
3x5 3x5 3x5 3x5
3x5 3x5
Lbs. Reps.
3x3 3x3 3x3 3x3
Lbs. Reps. Lbs. Reps.
1x10 each side 1x10 each side 1x10 each side
1x10 each side 1x10 each side 1x10 each side 1x10 each side
1x10 each side
1x10sec each leg 1x10sec each leg 1x10sec each leg
10 on Left - 5 on Right 10 on Left - 5 on Right 10 on Left - 5 on Right 10 on Left - 5 on Right
1x10sec each leg
Week 6 Week 7 Week 8 - 80%Week 5
Reps
3x5 Power Press 3 - 4 reps
3x5 3x5 3x5 Weight
3x5 3x5
Weight Reps
3x3 3x3 3x3
Lbs. Reps. Warm-up and Test
Hang Clean 3 - 4 reps
Lbs. Reps. Lbs. Reps.
1x10 each side 1x10 each side 1x10 each side
1x10 each side 1x10 each side 1x10 each side
1x10sec each leg 1x10sec each leg 1x10sec each leg
10 on Left - 5 on Right 10 on Left - 5 on Right 10 on Left - 5 on Right
Week 6 - 80% Week 7 - 70% Week 8 - 85%
Load Load Unload Strength Level Test Day
Lbs. Reps.
3x5
Name: Date: Sport/Class: Phase: Development 3x3
1x10 each side
10 on Left - 5 on Right
Week 5 - 75%
1x5
1x10sec each leg
1x10 each side
1x5 1x5
1x5 1x5 1x5 1x5
Module 4NSCA Flight Manual 25
Explosive Day Peak Phase Workout Card
Monday (heavy)
Hruska Activators
1. Para-Spinal Release
2. Single Leg RDL's
3. Knee to Knee's
4. Internal Rotations
1c.Warm-up-Power Shrug
1RM Sets 1RM Sets 1RM Sets 1RM Sets
* 1c. Power Clean 4,3,2 4,3,2 4,3,2 4,3,2
* 2c. Push Jerk 4,3,2 4,3,2 4,3,2 4,3,2
3b. Power Jumps with or
without Dumbbells
^ 4. Pulling Choice
5. Bicep Choice
6. AB Choice
Thursday (light)
Hruska Activators
1. Para-Spinal Release
2. Single Leg RDL's
3. Knee to Knee's
4. Internal Rotations
1c.Warm-up-Power Shrug
1RM Sets 1RM Sets 1RM Sets 1RM Sets
* 1c. Power Clean 4,3,2 4,3,2 4,3,2 4,3,2
* 2c. Push Jerk 4,3,2 4,3,2 4,3,2 4,3,2
3b. Power Jumps with or
without Dumbbells
^ 4. Pulling Choice
5. Bicep Choice
6. AB Choice
Date
3x5
3x5
^ 4. Pulling Choice - a. Pull-ups, b. Standing Low Row, c. Lat Pulldown, d. Bent-over Row
Comments Supervisor
* Represents major lifts that need to be done everyday and checked off by a coach
3x5
3x5 3x5 3x5 3x5
3x5 3x5
Lbs. Reps.
4,3,2 4,3,2 4,3,2 4,3,2
Lbs. Reps. Lbs. Reps.
1x10 each side 1x10 each side 1x10 each side
1x10 each side 1x10 each side 1x10 each side 1x10 each side
1x10 each side
1x10sec each leg 1x10sec each leg 1x10sec each leg
10 on Left - 5 on Right 10 on Left - 5 on Right 10 on Left - 5 on Right 10 on Left - 5 on Right
1x10sec each leg
Week 10 Week 11 Week 12Week 9
3x5
3x53x5 3x5
3x5 3x5
4,3,2 4,3,2 4,3,2 4,3,2
Lbs. Reps. Lbs. Reps.Lbs. Reps. Lbs. Reps.
1x10 each side 1x10 each side 1x10 each side
1x10 each side 1x10 each side 1x10 each side 1x10 each side
1x10 each side
1x10sec each leg 1x10sec each leg 1x10sec each leg
10 on Left - 5 on Right 10 on Left - 5 on Right 10 on Left - 5 on Right 10 on Left - 5 on Right
1x10sec each leg
Week 10 - 85% Week 11 - 90% Week 12 - 80%
Load Load Load Unload
Week 9 - 80%
Lbs. Reps.
3x5
Name: Date: Sport/Class: Phase: Peak 4,3,2
1x5 1x5 1x5 1x5
1x5 1x5 1x5 1x5
Module 4NSCA Flight Manual 26
Position Practice
To teach the correct body positioning and movement patterns needed to
perform the Rack Clean, Hang Clean, and Power Clean.
The three positions taught in this drill are:
Cover Position or the top of the knees 1.
(the power position of the Hang Clean)
Mid-thigh Position (starting position of the Rack Clean)2.
Mid-shin Position (the starting position of the Power Clean)3.
Module 4NSCA Flight Manual 27
Starting PositionUse a stick or bar with no weight.1.
Grasp the bar with an overhand grip slightly 2.
wider than shoulder width, pull the shoulder
blades back and down, and keep the arms
straight with the elbows pointed out.
Place the feet hip-width apart and toes pointed 3.
straight ahead.
Stand erect with the shoulders, hips, knees, and 4.
ankles in alignment and the bar held at arm’s
length touching the top part of the thighs.
(Position 1)
Position 1
Module 4NSCA Flight Manual 28
Continue the cover—pull-through, 3.
multiple times until the movement
pattern and body positioning are
engrained in the muscle memory.
PROCEDURE:Cover Position
Slowly push the hips back, letting the 1.
bar slide down the thighs, and transfer
the weight from the balls of the feet to
the heels until the bar reaches the top
of the knees. This is the cover position.
(Position 2)
In this position, the shoulders should
be in front of the bar, the back is
flat with the shoulder blades pulled
back and down, the arms are straight
with the elbows pointed out, hips
are flexed, and the knees are slightly
flexed.
Rise back to the starting position. Pull-2.
through by extending the hips and
squeezing the glutes and abs until the
body is fully erect. Position 2
Module 4NSCA Flight Manual 29
Mid-thigh PositionNext begin adding the mid-thigh position.4.
From the cover position, the bar rides up the 5.
thighs by slightly extending the hips and flexing
the knees until the shoulders are directly above
the bar and in line with the knees and ankles.
(Position 3)
Practice multiple reps going from the cover 6.
position, to mid-thigh, back to cover, back to
mid-thigh, and pulling through.
Position 3
Module 4NSCA Flight Manual 30
Mid-shin PositionTo get down to the mid-shin position; get into 7.
the cover position, squat down by pushing the
hips down and flexing the knees, and keep the
back flat with the arms straight.
The chest should be filled with air (without lifting 8.
the ribcage) with the abs and back isometrically
contracted.
Make sure the shoulders are positioned just in
front of the bar and the head is held in a neutral
position. The weight should be on the heels and
the hips should be slightly higher than the knees.
(Position 4)
Rise back up to the cover position by slowly 9.
extending the hips and knees with the shoulders,
hips, knees, and bar all moving simultaneously.
Keep the bar in contact with the legs at all times
and pull through.
Position 4
Module 4NSCA Flight Manual 31
Coaching PointsMaintain a flat back with the arm •
straight and elbows pointed out. Keep
the shoulder blades pulled back and
down with the head held in a neutral
position.
During the initial stages of each •
position, the coach should make sure
that every athlete has the correct body
positioning by having the athletes hold
each position and make any necessary
corrections before moving on.
If the athletes are able to master these •
three positions, they will have little
trouble performing most of the lifts
and drills.
Begin mixing it up and start going 10.
from the starting position to the cover
position to the mid-shin position, back
to cover, to mid-thigh, to cover to mid-
shin, to cover and pull-through. Use
various combinations of all positions.
Once the movement patterns are 11.
learned, begin adding an explosive
jump phase into the drill from either
the mid-thigh or cover position.
Module 4NSCA Flight Manual 32
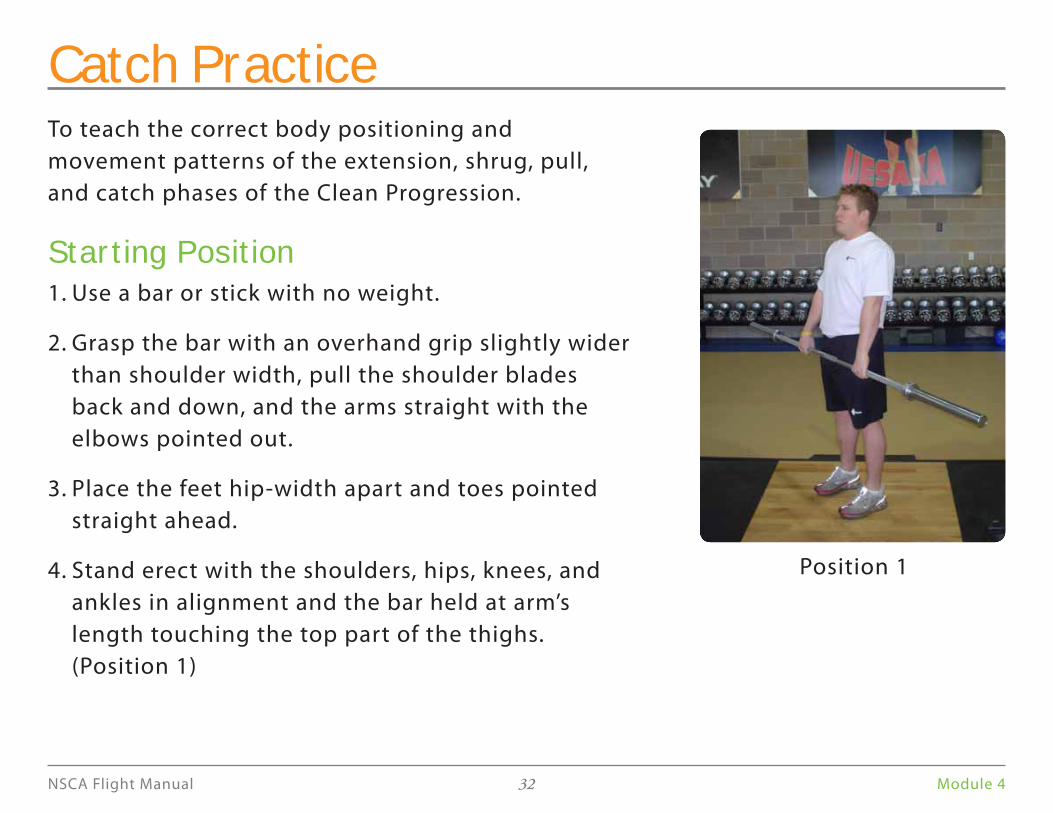
Catch PracticeTo teach the correct body positioning and
movement patterns of the extension, shrug, pull,
and catch phases of the Clean Progression.
Starting PositionUse a bar or stick with no weight.1.
Grasp the bar with an overhand grip slightly wider 2.
than shoulder width, pull the shoulder blades
back and down, and the arms straight with the
elbows pointed out.
Place the feet hip-width apart and toes pointed 3.
straight ahead.
Stand erect with the shoulders, hips, knees, and 4.
ankles in alignment and the bar held at arm’s
length touching the top part of the thighs.
(Position 1)
Position 1
Module 4NSCA Flight Manual 33
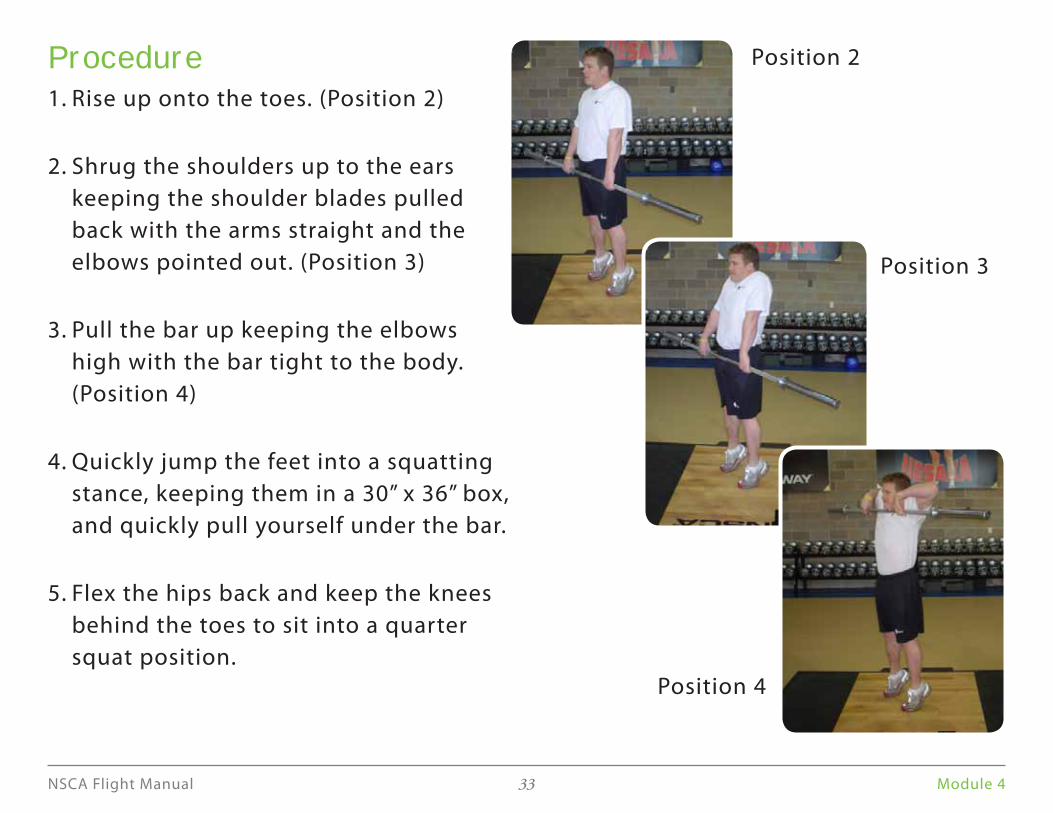
ProcedureRise up onto the toes. (Position 2)1.
Shrug the shoulders up to the ears 2.
keeping the shoulder blades pulled
back with the arms straight and the
elbows pointed out. (Position 3)
Pull the bar up keeping the elbows 3.
high with the bar tight to the body.
(Position 4)
Quickly jump the feet into a squatting 4.
stance, keeping them in a 30” x 36” box,
and quickly pull yourself under the bar.
Flex the hips back and keep the knees 5.
behind the toes to sit into a quarter
squat position.
Position 2
Position 3
Position 4
Module 4NSCA Flight Manual 34
Rotate the elbows down and then up ahead of the bar 6.
catching it on the front portion of the shoulders, keeping the
elbows high so that the bar is securely racked. (Position 5)
Stand erect with the feet flat on the ground until the 7.
shoulders, hips, knees, and ankles in alignment.
Lower the bar under control and prepare for the next 8.
repetition.
Coaching PointsThe shrug position teaches athlete to keep their arms straight through the triple •
extension of the body.
Keeping the elbows high in the pull phase teaches the athlete how to keep the bar •
close to the body.
Avoid moving so quickly through the phases of the drill that the movement is •
performed out of control; make it one fluid movement.
Perform this drill as a warm-up prior to beginning the explosive day workout.•
Good cues to use are; Toes, Shrug, Pull, Catch, respectively for each phase of the drill.•
Position 5
Module 4NSCA Flight Manual 35
1a. Rack CleanDevelops the explosive phase of the pull
and teaches the lifter how to get under
the bar quickly.
Starting PositionWith the bar resting on boxes or in a power 1.
rack, the athlete address the bar.
Place the feet hip-width apart and toes pointed 2.
straight ahead.
The knees should be flexed with the weight 3.
evenly distributed through the feet.
Thighs should be in contact with the bar 4.
approximately mid-thigh height.
The head should be held in a neutral position 5.
with the eyes looking forward.
The shoulders, elbows, knees, and ankles 6.
should all be in alignment.
Take a deep breath to fill the chest with air 7.
(without lifting the ribcage) and isometrically
contract the abs and low back.
Procedure Explosively extend the hips, knees, and ankles 1.
to achieve triple extension and accelerate the
bar upward.
Simultaneously extend onto the balls of the 2.
feet while shrugging the shoulders straight up.
• Keep the bar close to the body with the
arms straight and elbows pointed out.
Jump the feet into a squatting stance, keeping 3.
them in a 30” x 36” box, and quickly pull
yourself under the bar.
Flex the hips backward keeping the knees 4.
behind the toes and sit into a quarter squat
position absorbing the weight of the bar.
Module 4NSCA Flight Manual 36
Coaching PointsLower the bar in a slow controlled manner •
between reps by keeping the elbows slightly
flexed, sitting into a quarter squat position,
and allowing it to land on the thighs aiding in
its deceleration.
Avoid pulling with the arms (bending the •
elbows) before the hips are completely
extended.
Catch the bar with the knees behind the toes, •
hips back, elbows high, and eyes looking
forward.
Keep the elbows high in front so that the bar •
is securely racked on the front portion of the
shoulders.
Quickly rotate the elbows down and then 5.
up ahead of the bar catching it on the front
portion of the shoulders so that it is securely
racked.
Stand erect with the feet flat on the ground 6.
and shoulders directly over the balls of the
feet.
Module 4NSCA Flight Manual 37
Develops the ability to express explosive power in the
hips and legs. The mechanics used to execute the Hang
Clean are specific to many athletic movements.
Equipment and materials needed:
A platform or rubber floor with a 30” x 36” box on it.•
An Olympic bay, rubber plates, and clips.•
Starting Position
To begin, approach the bar resting on the floor or 1.
platform so the shins make contact with it.
Place the feet hip-width apart and the toes pointed 2.
straight ahead.
Keeping the back flat and shoulder blades pulled 3.
together, squat down until the hands grasp the bar.
Grasp the bar with an overhand grip slightly wider 4.
than shoulder-width with arms straight and the
elbows pointed out.
The head is held in a neutral position with the eyes 5.
looking forward throughout the entire lift. (Position 1)
Slowly extend the hips and knees, elevating the bar 6.
to just above the knees. Keep the bar in close to the
body.
As the bar passes the knees, extend the hips.7.
Stand erect with the shoulders, hips, and knees in 8.
alignment and the bar held at arm’s length touching
the top part of the thigh. (Position 2)
Position 1 Position 2
1b. Hang Clean
Module 4NSCA Flight Manual 38
Procedure:Take a deep breath to fill the chest with air and isometrically the abs and low back.1.
Keeping the back flat, shoulder blades pulled together, and trapezius relaxed; lower the 2.
bar to the top of the knees by flexing at the hips.
In this position the shoulders should be in front of the bar, the back is flat, the arms are 3.
straight with the elbows pointed out, hips are flexed, the knees are slightly bent (not
locked out), and the weight is on the heels. This will put the athlete in the power (cover)
position. (Position 3)
When the bar reaches the top of the knees there should be no hesitation as to take full 4.
advantage of the stretch-shortening cycle.
Immediately extend the hips, knees, and ankles explosively to achieve triple extension 5.
and accelerate the bar upward.
Simultaneously extend onto the balls of the feet while shrugging the shoulders straight 6.
up. (Position 4)
Keep the bar close to the body with the arms straight and elbows pointed out.7.
Jump the feet into a squatting stance, keeping them in a 30” x 36” box, and quickly pull 8.
yourself under the bar.
Flex the hips backward keeping the knees behind the toes and sit into a quarter squat 9.
position absorbing the weight of the bar. Jump the feet into a squatting stance, keeping
them in a 30” x 36” box, and quickly pull yourself under the bar.
Quickly rotate the elbows up ahead of the bar catching it on the front portion of the 10.
shoulders so that it is securely racked. (Position 5)
Stand erect with the feet flat on the ground and shoulders directly over the balls of the 11.
feet. (Position 6)
Position 3
Position 4
Position 5
Module 4NSCA Flight Manual 39
Once the bar is lifted off the platform the lift begins.•
Each athlete is allowed 1 set of 5 repetitions.•
Lower the bar in a slow controlled manner between reps by • keeping the elbows slightly flexed, sitting into a quarter squat position, and allowing it to land on the thighs aiding in its deceleration.
Stand erect before each repetition.•
If the bar is dropped to the platform the lift is over.•
The coach will determine the number of repetitions that were • successful.
Position 6
Module 4NSCA Flight Manual 40
Coaching Points:
Avoid pulling with the arms (bending the elbows) before the hips are •
completely extended.
Catch the bar with your knees behind the toes, hips back, elbows high, and •
eyes up.
The scooping action or re-bend of the legs can be compromised by bending •
the elbows before the hips can be fully extended to the triple extension
(Position 4) OR by swinging the bar away from the body.
With the younger and or less experienced athletes, have them pause and hold •
the bar at the top of the knees so the coach can make sure they are in the
correct power position before making the explosive movement.
Position 1 Position 2 Position 3 Position 4
Position 5
Position 6
Module 4NSCA Flight Manual 41
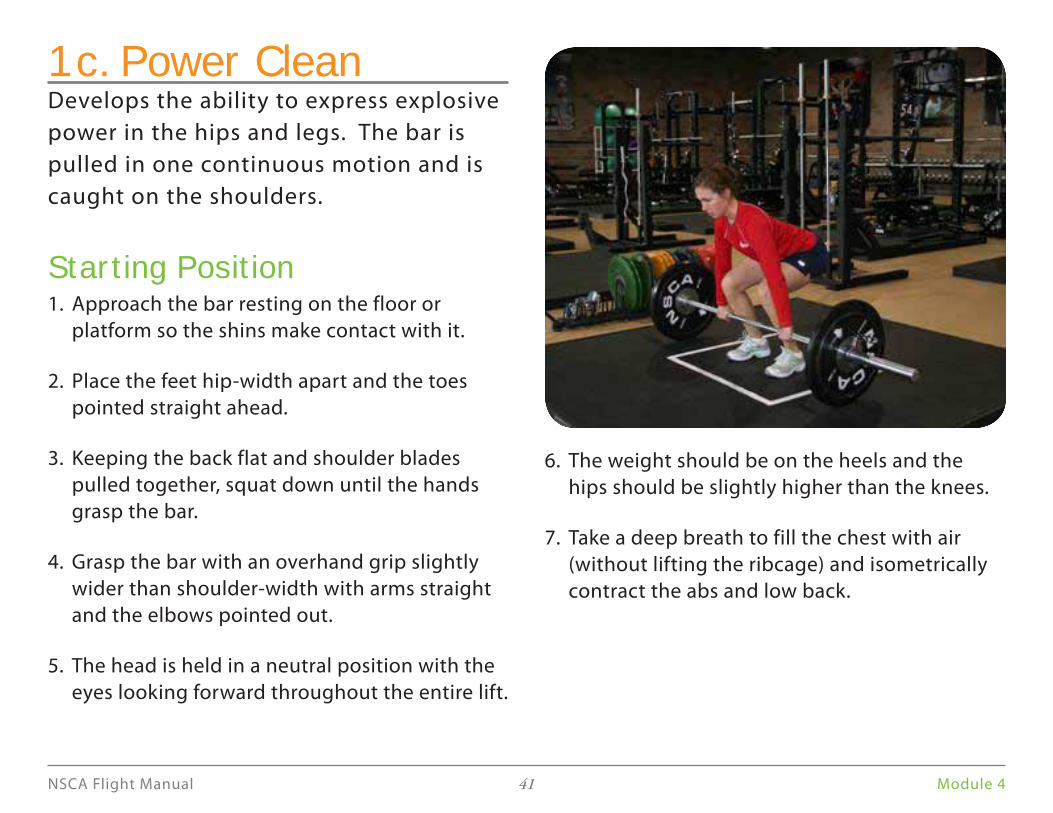
The weight should be on the heels and the 6.
hips should be slightly higher than the knees.
Take a deep breath to fill the chest with air 7.
(without lifting the ribcage) and isometrically
contract the abs and low back.
1c. Power CleanDevelops the ability to express explosive
power in the hips and legs. The bar is
pulled in one continuous motion and is
caught on the shoulders.
Starting Position Approach the bar resting on the floor or 1.
platform so the shins make contact with it.
Place the feet hip-width apart and the toes 2.
pointed straight ahead.
Keeping the back flat and shoulder blades 3.
pulled together, squat down until the hands
grasp the bar.
Grasp the bar with an overhand grip slightly 4.
wider than shoulder-width with arms straight
and the elbows pointed out.
The head is held in a neutral position with the 5.
eyes looking forward throughout the entire lift.
Module 4NSCA Flight Manual 42
The bar is accelerated upward and kept close
to the body by keeping the shoulder blades
pulled back with the arms straight and elbows
pointed out.
Jump the feet into a squatting stance, keeping 5.
them in a 30” x 36” box, and quickly pull
yourself under the bar.
Flex the hips backward keeping the knees 6.
behind the toes and sit into a quarter squat
position absorbing the weight of the bar.
Quickly rotate the elbows up ahead of the 7.
bar catching it on the front portion of the
shoulders so that it is securely racked.
Stand erect with the feet flat on the ground 8.
and shoulders directly over the balls of the
feet.
Procedure Lift the bar smoothly off the floor to just above 1.
the knees by slowly extending the hips and
knees keeping the bar in contact with the
shins.
The bar, knees, hips, and shoulders rise at the
same rate keeping the back angle constant.
As the bar passes over the knees, the shoulders 2.
remain in front of the bar, the arms are straight
with elbows pointed out, hips are flexed, and
the knees slightly bent.
Explosively extend the hips, knees, and ankles 3.
to achieve triple extension and accelerate the
bar upward.
Simultaneously extend onto the balls of the 4.
feet while shrugging the shoulders straight up.
Module 4NSCA Flight Manual 43
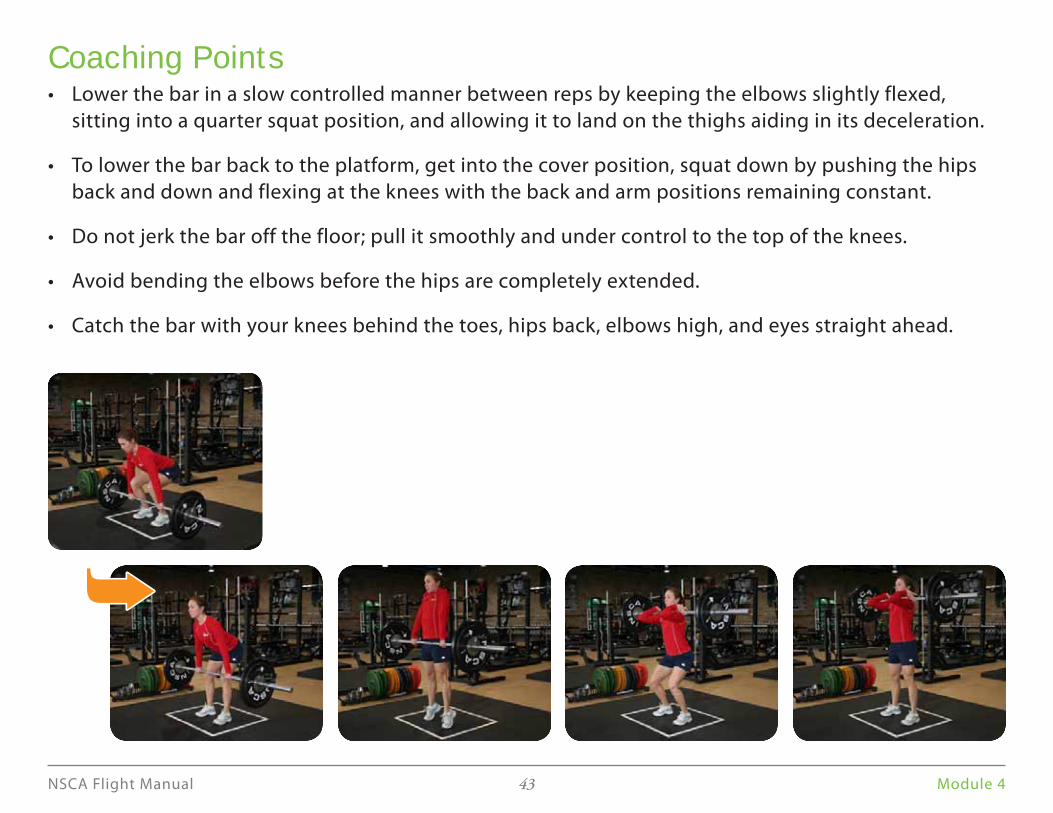
Coaching PointsLower the bar in a slow controlled manner between reps by keeping the elbows slightly flexed, •
sitting into a quarter squat position, and allowing it to land on the thighs aiding in its deceleration.
To lower the bar back to the platform, get into the cover position, squat down by pushing the hips •
back and down and flexing at the knees with the back and arm positions remaining constant.
Do not jerk the bar off the floor; pull it smoothly and under control to the top of the knees.•
Avoid bending the elbows before the hips are completely extended.•
Catch the bar with your knees behind the toes, hips back, elbows high, and eyes straight ahead.•
➥➥
Module 4NSCA Flight Manual 44
2a. Standing PressTo develop strength in the muscles of the shoulder girdle and
teach the lifter to use the whole body in the stabilizing of
weight overhead.
Starting Position The bar should be set a height where the athlete has no trouble 1.
lifting it off the rack.
Place the hands evenly on the bar, slightly wider than shoulder-2.
width, and grasping it tightly with a pronated grip.
The bar should be positioned behind the neck comfortably 3.
across the shoulders with the shoulder blades pulled back and
down and the elbows pointed down with the hands directly
above them.
Stand erect and take one or two steps back, positioning yourself 4.
in the center of the rack with the feet hip-width apart, toes
pointed straight ahead, and slightly flexing at the hips and knees
with the weight centered on the feet.
The head and eyes should be focused straight ahead in a neutral 5.
position.
This keeps the cervical spine in line with the body and helps
maintain balance.
Isometrically contract the glutes and abs to stabilize the body 6.
and prevent the back from arching.
Module 4NSCA Flight Manual 45
Coaching PointsWhen lowering the bar, the athlete should •
simultaneously flex the hips and knees as
the bar hits the shoulders to help absorb
the weight, not allowing the knees to come
forward over the toes.
Avoid using your lower body to complete the •
lift.
Keep the shoulders over the hips during the •
entire range-of-motion.
Keep the elbows directly under the hands •
throughout the entire lift.
Keep the glutes and abs isometrically •
contracted to avoid arching the back to
complete the lift.
This lift can also be done from the front of the •
shoulders.
Procedure Maintain the position of the ankles, knees, and 1.
hips, and press the bar straight overhead by
extending the arms.
The bar should end behind the ears with the 2.
elbows completely extended and inline with
the shoulders, hips, and heels.
Lower the bar to its starting position in a 3.
controlled manner.
Module 4NSCA Flight Manual 46
2b. Power PressTo develop explosive power in the hips and legs, as well as strengthen the shoulder muscles while
stabilizing the weight overhead.
Starting Position The bar should be set a height where the athlete has no trouble lifting it off the rack.1.
Place the hands evenly on the bar, slightly wider than shoulder-width, 2.
and grasping it tightly with a pronated grip.
The bar should be positioned behind the neck comfortably across the 3.
shoulders with the shoulder blades pulled back and down and the
elbows pointed down with the hands directly above them.
Stand erect and take one or two steps back, positioning yourself in the 4.
center of the rack with the feet hip-width apart, toes pointed straight
ahead, and slightly flexing at the hips and knees with the weight
centered on the feet.
The head and eyes should be focused straight ahead in a neutral 5.
position. This keeps the cervical spine in line with the body and helps
maintain balance.
Isometrically contract the abs and low back to stabilize the body and 6.
prevent the back from arching.
Module 4NSCA Flight Manual 47
Coaching PointsWhen lowering the bar, simultaneously flex the •
hips and knees as the bar hits the shoulders to
help absorb the weight, not allowing the knees
to come forward over the toes.
The dip should be controlled with NO pause at •
the bottom.
Keep the elbows directly under the hands •
throughout the entire lift.
Keep the abs isometrically contracted to avoid •
arching the back to complete the lift.
This lift can also be done from the front of the •
shoulders.
Procedure Keeping the back flat and shoulder blades 1.
pulled together; dip into a quarter squat
position by pushing the hips back, flexing the
knees, letting the torso come forward, and
transfer the weight onto the heels.
Explosively extend the hips and knees going 2.
onto the balls of the feet to accelerate the bar
upward.
Drive the bar upward by extending the arms 3.
completely, pressing it overhead. The bar
should end up behind your ears with the
elbows completely extended and inline with
the shoulders and hips.
As the bar is caught overhead, flex the hips 4.
backward keeping the knees behind the toes
and sit into a quarter squat position.
Extend the hips and knees to stand erect and 5.
complete the lift.
Lower the bar to its starting position in a 6.
controlled manner.
Module 4NSCA Flight Manual 48
2c. Push JerkTo develop explosive power in the hips and legs, as well as strengthen the
shoulder muscles while stabilizing the weight overhead.
Starting Position The bar should be set a height where the athlete has no 1.
trouble lifting it off the rack.
Place the hands evenly on the bar, slightly wider than 2.
shoulder-width, and grasping it tightly with a pronated grip.
The bar should be positioned behind the neck comfortably 3.
across the shoulders with the shoulder blades pulled back
and down and the elbows pointed down with the hands
directly above them.
Stand erect and take one or two steps back, positioning 4.
yourself in the center of the rack with the feet hip-width
apart, toes pointed straight ahead, and slightly flexing at the hips and
knees with the weight centered on the feet.
The head and eyes should be focused straight ahead in a neutral position. 5.
This keeps the cervical spine in line with the body and helps maintain
balance.
Isometrically contract the abs and low back to stabilize the body and prevent the back from arching.6.
Module 4NSCA Flight Manual 49
Coaching PointsWhen lowering the bar, simultaneously fl ex the • hips and knees as the bar hits the shoulders to help absorb the weight, not allowing the knees to come forward over the toes.
The dip should be controlled with NO pause at the • bottom.
Keep the torso vertical when making the catch • overhead. Any forward lean will make it diffi cult to complete the lift.
Drive the bar up with the shoulders to take • advantage of the power from the hips and legs.
When splitting the feet apart they should land • on the ground hip-width apart. On every other repetition, switch which foot goes forward and which foot goes back.
Keep the elbows directly under the hands • throughout the entire lift.
Keep the abs isometrically contracted to avoid • arching the back to complete the lift.
This lift can also be done from the front of the • shoulders.
Procedure Keeping the back fl at and shoulder blades pulled 1. together; dip into a quarter squat position by pushing the hips back, fl exing the knees, letting the torso come forward, and transfer the weight onto the heels.
Explosively extend the hips and knees going onto 2. the balls of the feet to accelerate the bar upward.
Split the legs apart as the feet leave the ground 3. moving one straight forward and one straight back.
Drive the bar upward with the shoulders, extending 4. the arms, and pushing the body under the bar.
Flex the front leg to about 90 degrees with the 5. knee directly over the ankle and the front foot slightly turned in.
Slightly fl ex the back knee with the foot up on the 6. toes and the heel pointed up.
The bar should end up behind the ears with the 7. elbows completely extended and inline with the shoulders and hips.
Once the catch is made and stabilized stand erect, 8. walking the feet back to parallel with the shoulders, hips, knees, and ankles in alignment.
Lower the bar to its starting position in a controlled 9. manner.
Module 4NSCA Flight Manual 50
3a. Jammer ExtensionTo develop total body power by utilizing a
ground-based, multiple-joint movement. This
exercise also develops the ability of the body
to stabilize at the ankles, knees, hips, torso,
shoulders, elbows and wrists.
Start Position Grasp the handles with hands as close as possible. 1.
Position the shoulders directly behind the hands 2.
as close as possible.
Elbows should be positioned at the side of the 3.
torso.
Position the feet hip-width apart, toes pointed 4.
straight ahead, and the body weight evenly
distributed on the feet.
Flex the hips backward keeping the knees behind 5.
the toes and sit into a quarter squat position.
Module 4NSCA Flight Manual 51
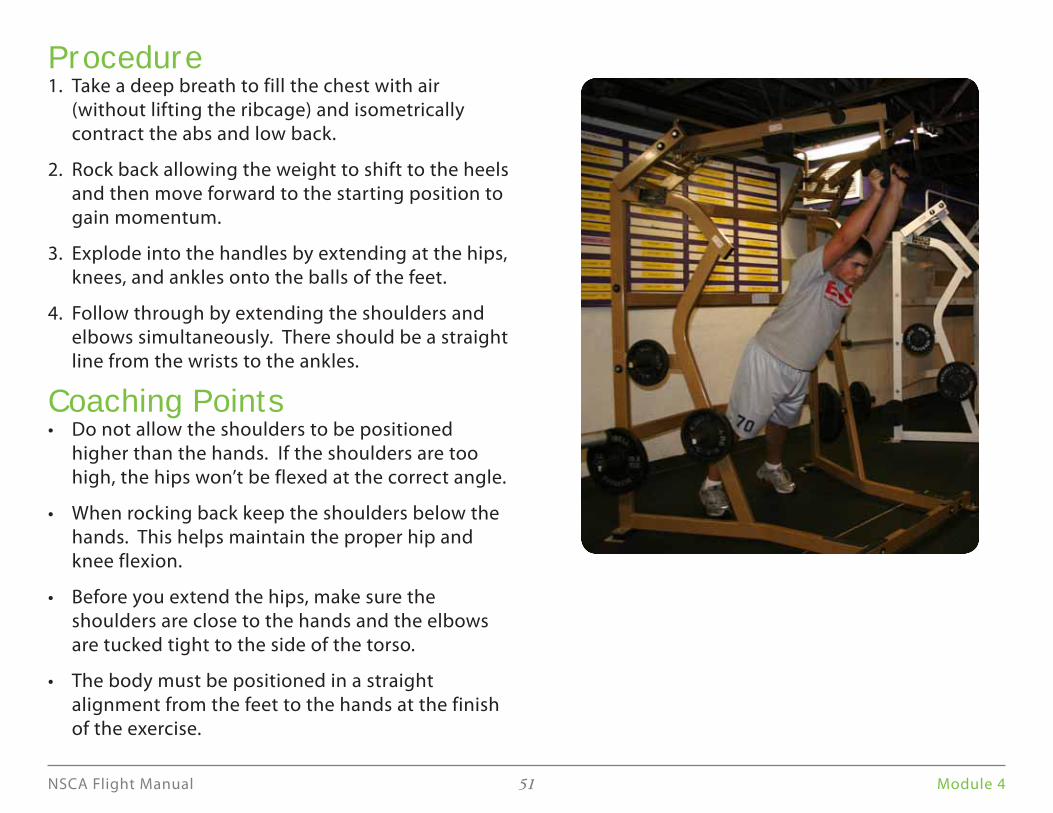
Procedure Take a deep breath to fill the chest with air 1.
(without lifting the ribcage) and isometrically
contract the abs and low back.
Rock back allowing the weight to shift to the heels 2.
and then move forward to the starting position to
gain momentum.
Explode into the handles by extending at the hips, 3.
knees, and ankles onto the balls of the feet.
Follow through by extending the shoulders and 4.
elbows simultaneously. There should be a straight
line from the wrists to the ankles.
Coaching PointsDo not allow the shoulders to be positioned •
higher than the hands. If the shoulders are too
high, the hips won’t be flexed at the correct angle.
When rocking back keep the shoulders below the •
hands. This helps maintain the proper hip and
knee flexion.
Before you extend the hips, make sure the •
shoulders are close to the hands and the elbows
are tucked tight to the side of the torso.
The body must be positioned in a straight •
alignment from the feet to the hands at the finish
of the exercise.
Module 4NSCA Flight Manual 52
As the feet leave the ground the shoulders,
hips, knees, and ankles should all be in
alignment.
At the peak of the jump, shrug the shoulders 3.
upward toward the ears, and keep the
dumbbells close to the body.
Land as soft as possible, flexing at the hips and 4.
knees to absorb the weight.
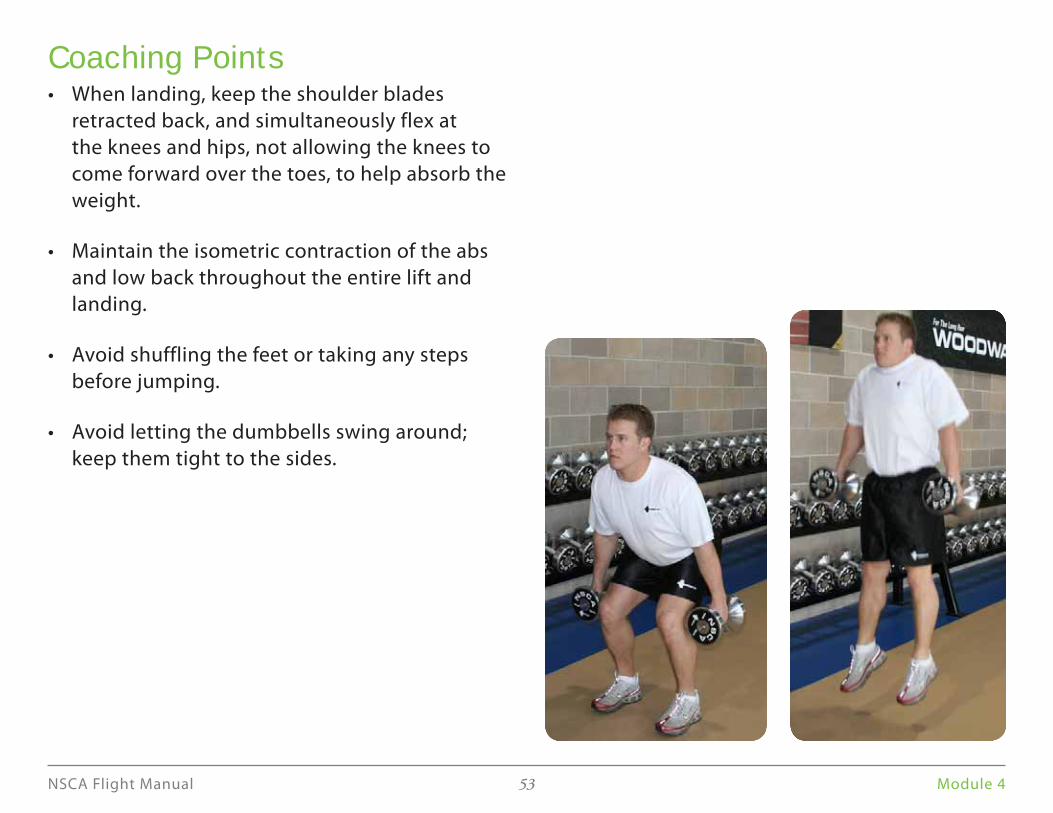
3b. Power JumpDevelops the ability to express explosive power
in the hips and legs.
Starting Position Stand in an erect position holding dumbbells 1.
at the sides with the shoulder blades pulled
back and down, arms straight, and palms
facing in.
Position the feet hip-width apart and toes 2.
pointed straight ahead.
Take a deep breath to fill the chest with air 3.
(without lifting the ribcage) and isometrically
contract the abs and low back.
Procedure Keeping the back flat and shoulder blades 1.
pulled together; dip into a quarter squat
position by pushing the hips back, flexing the
knees, letting the torso come forward, and
transfer the weight onto the heels.
Without any hesitation, explosively extend 2.
the hips, knees, and ankles to achieve triple
extension.
Module 4NSCA Flight Manual 53
Coaching PointsWhen landing, keep the shoulder blades •
retracted back, and simultaneously flex at
the knees and hips, not allowing the knees to
come forward over the toes, to help absorb the
weight.
Maintain the isometric contraction of the abs •
and low back throughout the entire lift and
landing.
Avoid shuffling the feet or taking any steps •
before jumping.
Avoid letting the dumbbells swing around; •
keep them tight to the sides.
Module 4NSCA Flight Manual 54
4a. Pull-UpsTo develop strength in the muscles of the upper back, arms, abdominals, and
stretch the upper extremities.
Starting Position Place the hands evenly on the bar slightly wider than shoulder-width with a 1.
pronated grip.
Let the body hang completely from the bar making sure the elbows and hips 2.
are fully extended with the knees slightly flexed and ankles crossed.
Isometrically contract the abs and low back to stabilize the body and prevent 3.
arching of the back.
Procedure From the fully extended position pull the body up, squeezing the shoulder 1.
blades down and together as the elbows are flexed.
Continue to pull the body upward until the chin is over the bar.2.
Lower yourself in a controlled manor back to the starting position.3.
Coaching PointsAvoid swinging the body or legs to complete the lift.•
Concentrate on squeezing the shoulder blades back and down and achieving a •
full range of motion.
Maintain the isometric contraction of the abs and low back throughout the •
entire range of motion.
Lower yourself slowly until a full stretch is experienced at the bottom of the •
motion.
Module 4NSCA Flight Manual 55
4b. Standing Low RowTo develop the muscles of the upper back as well as the stabilizers of the
legs and trunk.
Starting Position Squat down to grasp the bar, placing the hands evenly on it.1.
With the chest up, back flat, and abs contracted, take a few steps back 2.
and center yourself in the machine.
Stand with the feet hip-width apart, toes pointed strait ahead, hips 3.
and knees slightly flexed, and the weight centered on the feet.
The knees should be directly over the ankles with a slight forward 4.
lean of the torso so the shoulders are directly over the knees.
The elbows should be fully extended.5.
Isometrically contract the glutes and abs to stabilize the body and 6.
prevent the back from arching.
Module 4NSCA Flight Manual 56
Coaching PointsMaintain a flat back throughout the entire •
exercise.
Concentrate on maintaining a constant body •
position throughout the entire lift.
Avoid using momentum to complete the lift.•
Focus on achieving a full range-of-motion.•
Procedure Maintaining the starting body position, 1.
squeeze the shoulder blades back and down
while flexing the elbows.
Continue to pull the bar until it touches the 2.
upper abdomen.
Return the bar to its starting position in a slow, 3.
controlled manner.
Module 4NSCA Flight Manual 57
4c. Lat PulldownTo develop strength in the muscles of the upper back.
Starting Position Adjust the thigh pad to a height where it anchors you to the seat.1.
Place the hands evenly on the bar slightly wider than shoulder-width using 2. an overhand grip.
With the arms fully extended, sit with the chest up, back flat, and abs 3. contracted.
Procedure Maintaining a flat back, pull the shoulder blades down and together while 1. flexing the elbows.
Pull the bar down until it touches the top of the chest.2.
Return the bar to its starting position in a slow, controlled manner.3.
Coaching PointsMaintain a flat back position throughout the entire lift.•
Avoid initiating the movement of the bar downward by leaning backward • with the torso.
Concentrate on pulling the elbows straight down and squeezing the • shoulder blades together.
Focus on achieving a full range-of-motion.•
Module 4NSCA Flight Manual 58
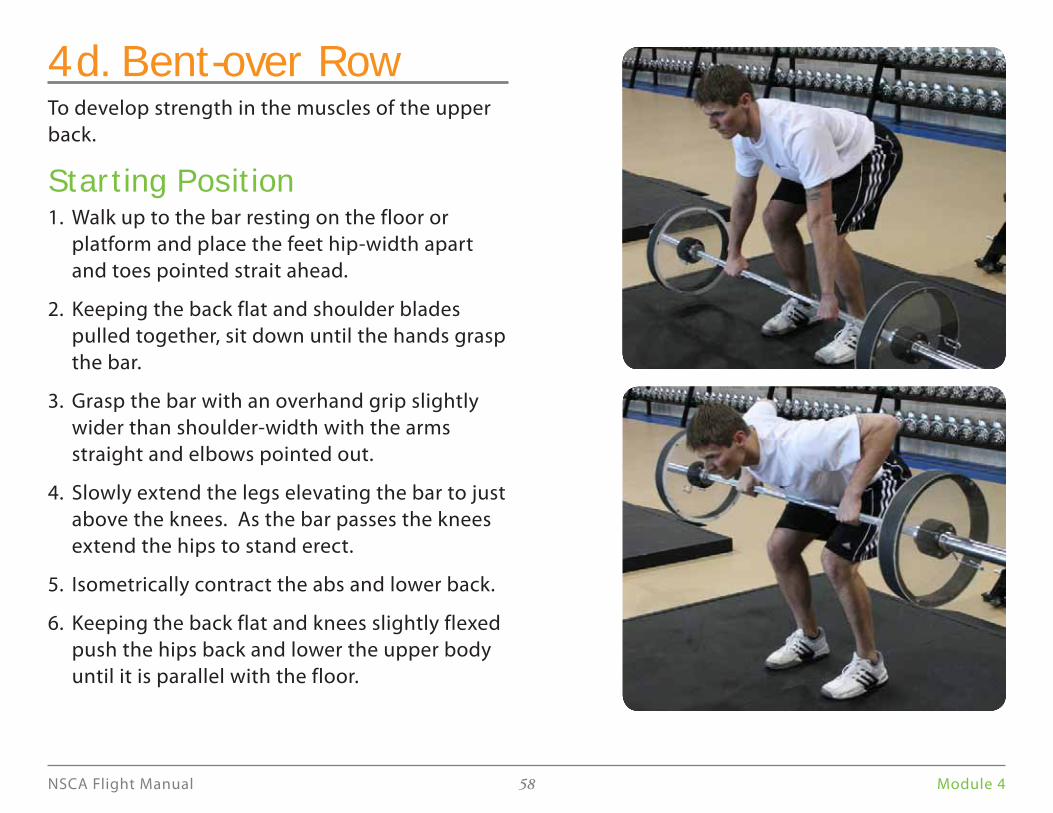
4d. Bent-over RowTo develop strength in the muscles of the upper
back.
Starting Position Walk up to the bar resting on the floor or 1.
platform and place the feet hip-width apart
and toes pointed strait ahead.
Keeping the back flat and shoulder blades 2.
pulled together, sit down until the hands grasp
the bar.
Grasp the bar with an overhand grip slightly 3.
wider than shoulder-width with the arms
straight and elbows pointed out.
Slowly extend the legs elevating the bar to just 4.
above the knees. As the bar passes the knees
extend the hips to stand erect.
Isometrically contract the abs and lower back.5.
Keeping the back flat and knees slightly flexed 6.
push the hips back and lower the upper body
until it is parallel with the floor.
Module 4NSCA Flight Manual 59
Procedure Maintaining an upper body position parallel 1.
to the floor, squeeze the shoulder blades
together while flexing the elbows, pulling
them up and slightly outward.
Continue to pull the bar upward until it 2.
touches the upper abdomen.
Return the bar to its starting position in a slow, 3.
controlled manner.
Coaching PointsThe body weight should be on the heels of the •
feet with the knees slightly flexed.
Maintain a straight back position throughout •
the entire lift.
Concentrate on squeezing the shoulder blades •
back and down and achieving a full range of
motion.
Avoid using momentum to complete the lift.•
Module 4NSCA Flight Manual 60
5. Bicep Choice: W-bar CurlTo develop strength in the muscles of the biceps.
Starting Position Grasp the bar with an underhand grip at approximately shoulder-width.1.
Stand erect with the feet hip-width apart and toes pointed straight ahead.2.
Hold the bar at arms length with the elbows completely extended and 3.
shoulder blades pulled back and down.
Isometrically contract the glutes and abs to stabilize the body and prevent 4.
rocking back and forth to complete the lift.
Procedure Maintaining an erect body position, slowly pull the bar upward by flexing 1.
the elbows.
Continue to pull the bar up to the shoulders until the elbows are 2.
completely flexed.
Return the bar to its starting position in a slow, controlled manner.3.
Coaching PointsKeep the elbows positioned at the sides throughout the entire lift.•
Avoid letting the shoulders roll forward during any part of the lift.•
Avoid using momentum to complete the lift.•
There are many different bicep exercises to choose from. Change the •
exercise every so often to add variety to the workout and prevent
staleness.
Module 4NSCA Flight Manual 61
6. Ab Choice: PlanksTo develop strength, stability, and balance in
the muscles of the pelvic, abdominal, back, and
shoulder areas.
Hand PlanksSTARTING POSITION
Start by getting on the hands and knees on a 1.
non-slip surface.
The hands should be directly under the 2.
shoulders and the knees should be directly
under the hips.
The head should be held in a neutral position. 3.
This keeps the cervical spine in line with the
body and helps maintain balance.
PROCEDURE
Walk the feet straight back until your legs are 1.
fully extended and stay on the toes.
Create a neutral pelvic and spine position by 2.
rolling the pelvis forward, contracting the
glutes, and pulling the belly button to the spine
by contracting the inner abdominal muscles.
A straight line should be created from the 3.
ankles to the ears.
Maintain this position for the designated 4.
time or until a breakdown in technique
occurs.
COACHING POINTS
Avoid letting the hips sag and arching the •
lower back.
Concentrate on breathing normally without •
releasing the abdominal contraction
throughout the entire exercise.
Try holding for 1 minute to start. As strength is •
gained and technique improves, increase the
time.
Module 4NSCA Flight Manual 62
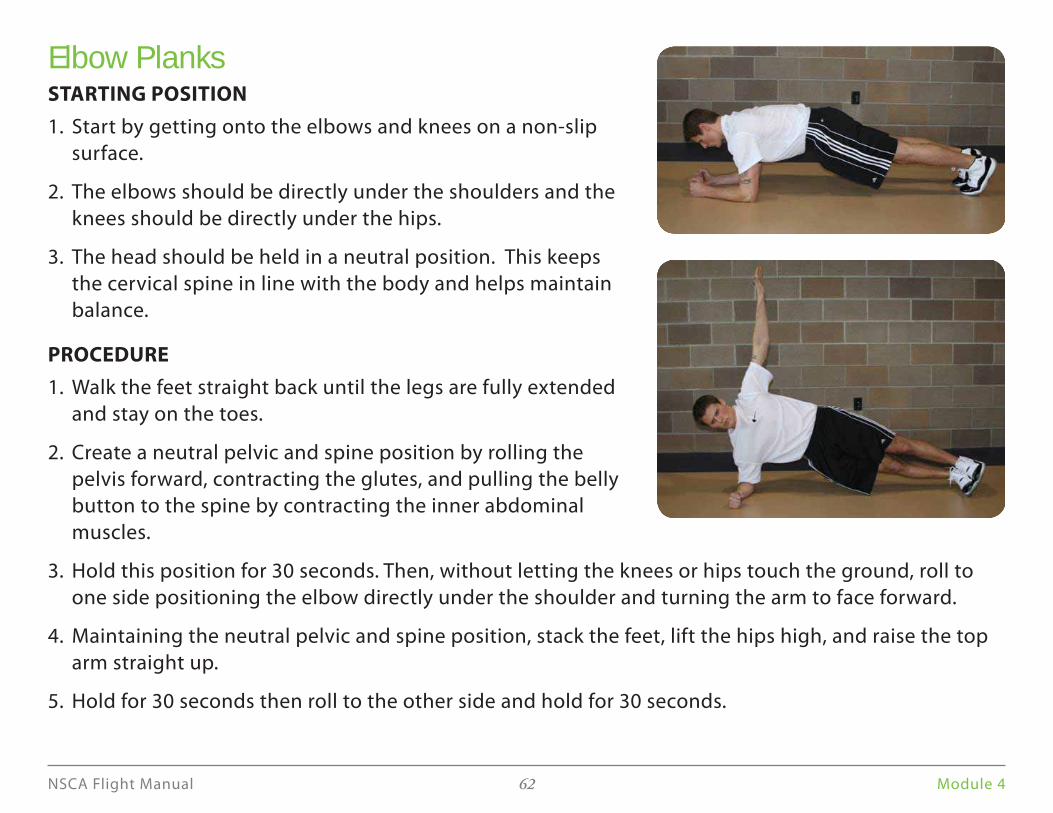
Elbow PlanksSTARTING POSITION
Start by getting onto the elbows and knees on a non-slip 1.
surface.
The elbows should be directly under the shoulders and the 2.
knees should be directly under the hips.
The head should be held in a neutral position. This keeps 3.
the cervical spine in line with the body and helps maintain
balance.
PROCEDURE
Walk the feet straight back until the legs are fully extended 1.
and stay on the toes.
Create a neutral pelvic and spine position by rolling the 2.
pelvis forward, contracting the glutes, and pulling the belly
button to the spine by contracting the inner abdominal
muscles.
Hold this position for 30 seconds. Then, without letting the knees or hips touch the ground, roll to 3.
one side positioning the elbow directly under the shoulder and turning the arm to face forward.
Maintaining the neutral pelvic and spine position, stack the feet, lift the hips high, and raise the top 4.
arm straight up.
Hold for 30 seconds then roll to the other side and hold for 30 seconds.5.
Module 4NSCA Flight Manual 63
Elbow PlanksCOACHING POINTS
Maintain body position for the designated time •
or until a breakdown in technique occurs.
Avoid letting the hips sag and arching the •
lower back.
Concentrate on breathing normally without •
releasing the abdominal contraction
throughout the entire exercise.
As strength is gained and your technique •
improves, increase the time.
Keep the elbows directly under the shoulders •
throughout the entire exercise.
When rolled to one side keep the top hip in •
front of the bottom hip and avoid letting the
body fall and rotate backward.
Module 4NSCA Flight Manual 64
Exercise #7:
Neutral Squat
Exercise #8
8a. RDL
8b. Clean Deadlift
8c. (1)Walking Lunge
or (2)Split Squat
Exercise #9
9a. Bench Press
9b. Incline Press
Exercise #10
10a. Shoulder Raises
10b. Shoulder Press
Exercise #11:
Triceps Choice
Exercise #12:
Ab Choice
Stength Day ExercisesThese traditional lifts have provided great results for thousands of programs all over the
country for many years. Athletes tend to make better gains when they first begin lifting.
Module 4NSCA Flight Manual 65
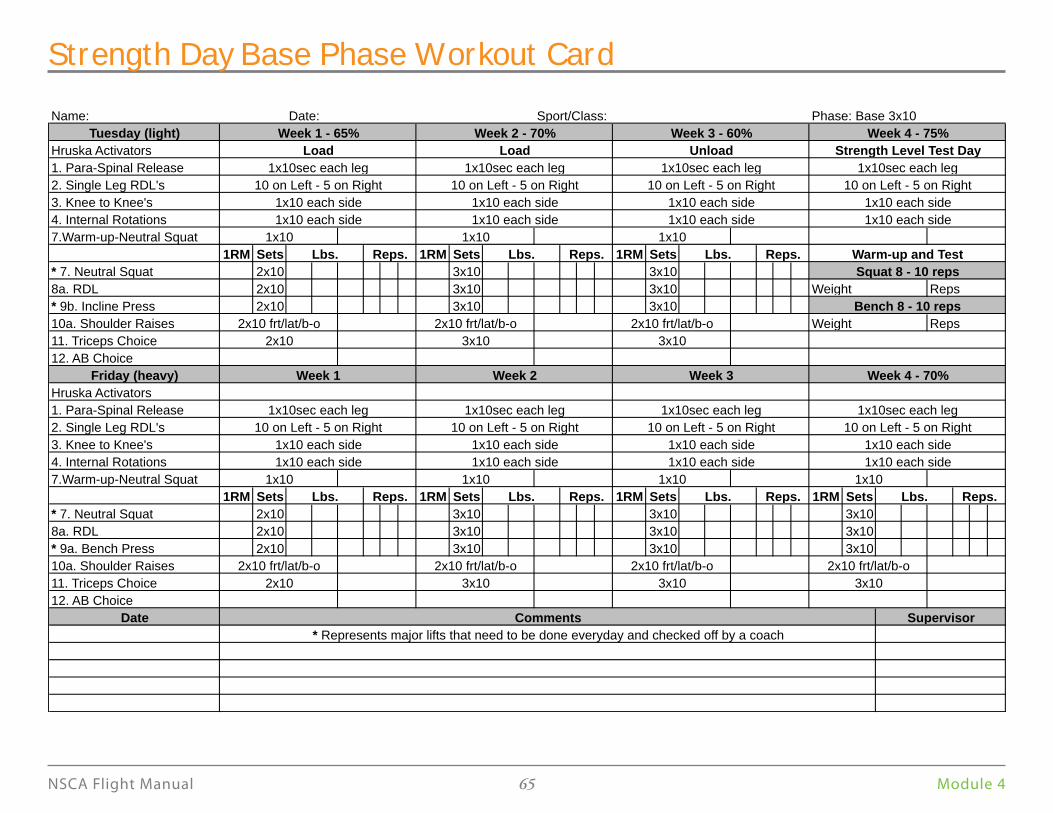
Strength Day Base Phase Workout Card
Tuesday (light)
Hruska Activators
1. Para-Spinal Release
2. Single Leg RDL's
3. Knee to Knee's
4. Internal Rotations
7.Warm-up-Neutral Squat
1RM Sets 1RM Sets 1RM Sets
* 7. Neutral Squat 2x10 3x10 3x10
8a. RDL 2x10 3x10 3x10
* 9b. Incline Press 2x10 3x10 3x10
10a. Shoulder Raises
11. Triceps Choice
12. AB Choice
Friday (heavy)
Hruska Activators
1. Para-Spinal Release
2. Single Leg RDL's
3. Knee to Knee's
4. Internal Rotations
7.Warm-up-Neutral Squat
1RM Sets 1RM Sets 1RM Sets 1RM Sets
* 7. Neutral Squat 2x10 3x10 3x10 3x10
8a. RDL 2x10 3x10 3x10 3x10
* 9a. Bench Press 2x10 3x10 3x10 3x10
10a. Shoulder Raises
11. Triceps Choice
12. AB Choice
Date Comments Supervisor
* Represents major lifts that need to be done everyday and checked off by a coach
1x10 each side 1x10 each side 1x10 each side 1x10 each side
1x10sec each leg
10 on Left - 5 on Right 10 on Left - 5 on Right 10 on Left - 5 on Right 10 on Left - 5 on Right
Week 4 - 75%
Load Load Unload Strength Level Test Day
Week 1 - 65%
Name: Date: Sport/Class:
1x10sec each leg
Week 2 - 70% Week 3 - 60%
1x10sec each leg 1x10sec each leg
Phase: Base 3x10
1x10 each side
1x10sec each leg
1x10 1x10 1x10
1x10 1x10 1x10 1x10
Lbs.
Module 4NSCA Flight Manual 66
Strength Day Development Phase Workout Card
Tuesday (light)
Hruska Activators
1. Para-Spinal Release
2. Single Leg RDL's
3. Knee to Knee's
4. Internal Rotations
7.Warm-up-Neutral Squat
1RM Sets 1RM Sets 1RM Sets
* 7. Neutral Squat 3x5 3x5 3x5
* 8b. Clean Deadlift 3x5 3x5 3x5
* 9b. Incline Press 3x5 3x5 3x5
10b. Shoulder Press 3x5 3x5 3x5
11. Triceps Choice
12. AB Choice
Friday (heavy)
Hruska Activators
1. Para-Spinal Release
2. Single Leg RDL's
3. Knee to Knee's
4. Internal Rotations
7.Warm-up-Neutral Squat
1RM Sets 1RM Sets 1RM Sets 1RM Sets
* 7. Neutral Squat 3x5 3x5 3x5 3x5
* 8b. Clean Deadlift 3x5 3x5 3x5 3x5
* 9a. Bench Press 3x5 3x5 3x5 3x5
10b. Shoulder Press 3x5 3x5 3x5 3x5
11. Triceps Choice
12. AB Choice
Date
Name: Date: Sport/Class: Phase: Development 3x5
Supervisor
* Represents major lifts that need to be done everyday and checked off by a coach
Comments
3x53x5 3x5
Lbs. Reps.Lbs. Reps. Lbs. Reps.
1x10 each side 1x10 each side 1x10 each side
1x10 each side 1x10 each side 1x10 each side 1x10 each side
1x10 each side
1x10sec each leg 1x10sec each leg 1x10sec each leg
10 on Left - 5 on Right 10 on Left - 5 on Right 10 on Left - 5 on Right 10 on Left - 5 on Right
1x10sec each leg
Week 5 Week 6 Week 7 Week 8 - 80%
Reps
3x5 3x5 3x5
Weight Reps
Bench 3 - 5 reps
Weight
Lbs. Reps. Warm-up and Test
Squat 3 - 5 reps
Lbs. Reps. Lbs. Reps.
1x10 each side 1x10 each side 1x10 each side
1x10 each side 1x10 each side 1x10 each side 1x10 each side
1x10 each side
1x10sec each leg 1x10sec each leg 1x10sec each leg
10 on Left - 5 on Right 10 on Left - 5 on Right 10 on Left - 5 on Right 10 on Left - 5 on Right
1x10sec each leg
Week 6 - 80% Week 7 - 70% Week 8 - 85%
Load Load Unload Strength Level Test Day
Week 5 - 75%
Lbs. Reps.
3x5
1x5 1x5 1x5
1x5 1x5 1x5 1x5
Module 4NSCA Flight Manual 67
Strength Day Peak Phase Workout Card
Tuesday (light)
Hruska Activators
1. Para-Spinal Release
2. Single Leg RDL's
3. Knee to Knee's
4. Internal Rotations
7.Warm-up-Neutral Squat
1RM Sets 1RM Sets 1RM Sets 1RM Sets
* 7. Neutral Squat 10,2 10,2 10,2 10,2
8c. (1) Walking Lunge
* 9b. Incline Press 10,2 10,2 10,2 10,2
10b. Shoulder Press
11. Triceps Choice
12. AB Choice
Friday (heavy)
Hruska Activators
1. Para-Spinal Release
2. Single Leg RDL's
3. Knee to Knee's
4. Internal Rotations
7.Warm-up-Neutral Squat
1RM Sets 1RM Sets 1RM Sets 1RM Sets
* 7. Neutral Squat 10,2 10,2 10,2 10,2
8c. (2) Split Squat
* 9a. Bench Press 10,2 10,2 10,2 10,2
10b. Shoulder Press
11. Triceps Choice
12. AB Choice
Date
3x5
3x5 3x5 3x5
3x5 3x5
3x5 3x5 3x5 3x5
Lbs.
3x5
Lbs. Lbs. Lbs.
Supervisor
* Represents major lifts that need to be done everyday and checked off by a coach
Comments
Name: Date: Sport/Class: Phase: Peak 10,8,6,4,3,2
3x5
1x10 each side 1x10 each side
3x5
1x10 each side
1x10 each side 1x10 each side 1x10 each side 1x10 each side
1x10 each side
1x10sec each leg 1x10sec each leg 1x10sec each leg
10 on Left - 5 on Right 10 on Left - 5 on Right 10 on Left - 5 on Right 10 on Left - 5 on Right
1x10sec each leg
Week 10 Week 11 Week 12Week 9
1x10 each side
1x10 each side 1x10 each side 1x10 each side 1x10 each side
1x10 each side 1x10 each side
1x10sec each leg 1x10sec each leg 1x10sec each leg
10 on Left - 5 on Right 10 on Left - 5 on Right 10 on Left - 5 on Right 10 on Left - 5 on Right
1x10sec each leg
Week 10 - 85% Week 11 - 90% Week 12 - 80%
Load Load Load Unload
Week 9 - 80%
Lbs.
3x5
3x5 3x5
3x5 3x5
Lbs.
1x10 each side
3x5
Lbs.
3x5
Lbs.
3x5
3x5
1x10 1x10 1x10 1x10
3x5
1x10 1x10 1x10 1x10
3x5
Module 4NSCA Flight Manual 68
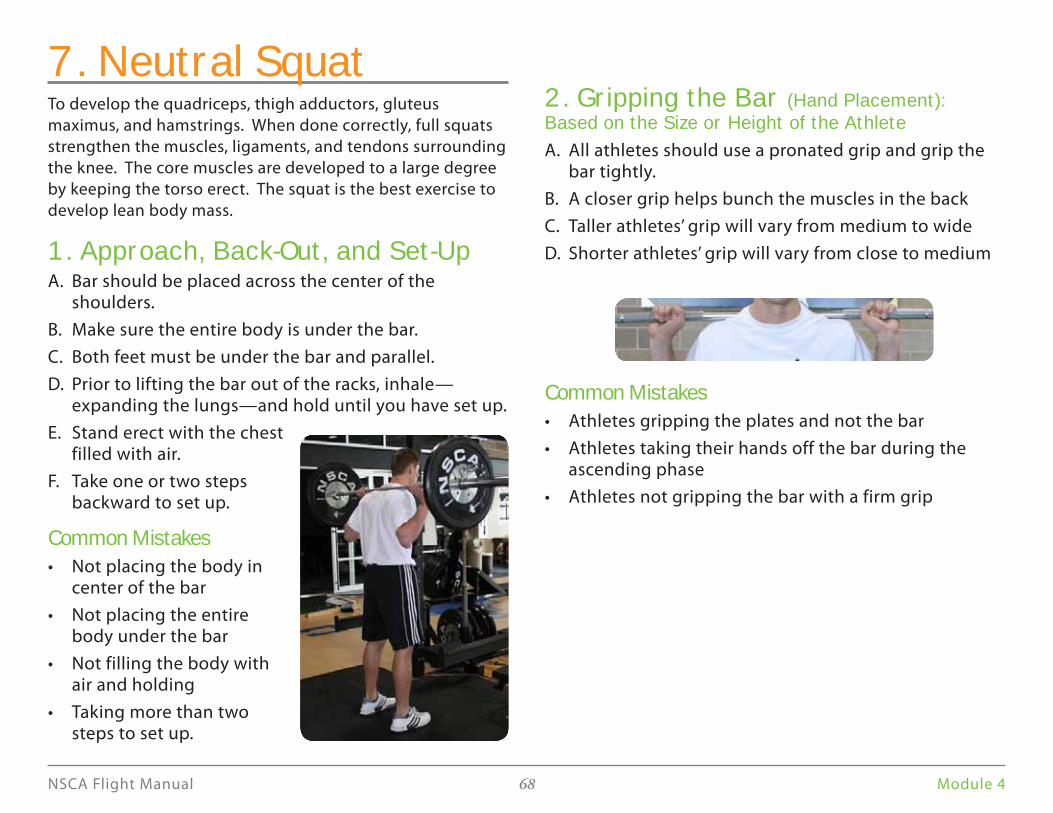
2. Gripping the Bar (Hand Placement): Based on the Size or Height of the Athlete
All athletes should use a pronated grip and grip the A. bar tightly.
A closer grip helps bunch the muscles in the backB.
Taller athletes’ grip will vary from medium to wideC.
Shorter athletes’ grip will vary from close to mediumD.
Common MistakesAthletes gripping the plates and not the bar•
Athletes taking their hands off the bar during the • ascending phase
Athletes not gripping the bar with a firm grip•
7. Neutral SquatTo develop the quadriceps, thigh adductors, gluteus
maximus, and hamstrings. When done correctly, full squats
strengthen the muscles, ligaments, and tendons surrounding
the knee. The core muscles are developed to a large degree
by keeping the torso erect. The squat is the best exercise to
develop lean body mass.
1. Approach, Back-Out, and Set-UpBar should be placed across the center of the A. shoulders.
Make sure the entire body is under the bar.B.
Both feet must be under the bar and parallel.C.
Prior to lifting the bar out of the racks, inhale—D. expanding the lungs—and hold until you have set up.
Stand erect with the chest E. filled with air.
Take one or two steps F. backward to set up.
Common MistakesNot placing the body in • center of the bar
Not placing the entire • body under the bar
Not filling the body with • air and holding
Taking more than two • steps to set up.
Module 4NSCA Flight Manual 69
4. Head and Eye PositionHead and eyes should be focused straight ahead. This is a natural position; keeping the cervical spine in line with the body helps maintain body weight distribution throughout the squat. Balance is one of the key elements of squatting. When the neck is placed in an improper or unnatural position, the back is rounded, placing unwanted stress or strain on the neck.
Common MistakesTitling the head forward (looking down), the weight • can shift to the balls of the feet, placing excess stress on the body and causing the athlete to round his/her back.
Tilting the head backward (looking upward), can • cause the weight to shift to the heel of the foot, which can cause an improper curvature of the spine and place unwanted stress on the neck and back.
3. Bar Placement: No Significant Difference in Muscle Development Between High-Bar and Low-Bar Squatting:
High Bar Squat: The bar sits on top of the trapezius A. muscle near the base of the neck. Increases force at the knees.
Low Bar Squat: The bar sits 1 to 2 inches below the B. deltoids. Increases force at the hips.
Common MistakesHigh-Bar: Leaning forward or rounding the back•
Low-Bar: Bar rolling down•
Module 4NSCA Flight Manual 70
5. Breathing Inhale Deeply to Maintain Intra-thoracic Pressure and Prevent Bending Forward, Arching the Back, and Passing Out
Helps maintain tightness throughout the squatA.
Inhale and hold prior to descending in the squatB.
Exhale once you are near or at the top of the squatC.
Inhale and exhale at the top of the squat between repetitionsD.
Common MistakesHolding your breath during repetitions•
Exhaling at the bottom of the squat•
6. Torso-TrunkStabilize your torso-trunk by isometrically contracting the abdominals and back.A.
The torso-trunk should be held between 35 and 45 degree angles.B.
Less than 35 degrees, you are too straight upward•
More than 45 degrees, you are too far forward•
The torso should be kept flat and straight (the axis C. of flexion runs through the hip thigh joint.)
Common MistakesAllowing the torso-trunk to lean forward too much•
Keeping the torso-trunk too upright•
Not squatting with a rigid torso.•
Module 4NSCA Flight Manual 71
7. DescendingPush hips backA.
Simultaneously flex at the knee and push the hips back and down.B.
Maintain torso position.C.
Distribute body weight from balls of the feet to the heelsD.
Maintain a slow and controlled manner during descent, not letting the E. knees extend past the balls of the feet.
Keep the shins as vertical as possible.F.
At the bottom, do not bounce, jerk, or stop the squatG.
Common MistakesGoing straight down in the squats.•
Allowing the knees to go past the balls of the feet.•
Shins not vertical •
Dropping down too quickly into the squat•
NOTE: To obtain optimal results in core flexibility, muscular development, and strength of the lower body, observe the following:
When performing the back squat, the proper depth has been achieved • when the mid-thigh is parallel to the floor, while still maintaining the proper back squat form.
Squatting to additional depth—while still maintaining the proper back squat form—will result in greater core • flexibility, muscular development, and strength of the lower body than the mid-thigh position.
Module 4NSCA Flight Manual 72
8. AscendingDrive the feet through the floorA.
Simultaneously raise the hips and shouldersB.
Push your shoulders slightly back into the bar so that your chest C. remains facing outward
Rotate the hips under the barD.
Maintain proper head and eye positionE.
Stand erect and tall, back into the starting position.F.
Common MistakesAttempting to bounce out of the bottom of the squat•
Allowing the hips to raise too quickly out of the bottom of the squat•
Allowing the weight to shift to the toes•
9. Foot PositionNarrow stance—works the quadriceps, some gluteusA.
Medium Stance—works the quadriceps, some adductor workB.
Wide Stance—works the adductor, gluteus, and outer quadricepsC.
Keep heels on the floorD.
Toes should be pointed out slightly from neutral to 30 degrees.E.
The angle of the foot position makes no difference as long as you are F. comfortable with the stance
Common MistakesNot finding what stance works for you•
Turning or pointing the toes inward•
Module 4NSCA Flight Manual 73
10. AbdominalsStrong abdominal muscles help maintain torso A. stability and intra-thoracic pressure throughout the squat
The obliques are an important muscle group when B. performing the squat as they help to maintain torso stability.
Common MistakesNot including abdominal work as part of the regular • strength training routine
Working only one section of the abdominal area • (either upper or lower, or just the obliques)
Not using a variety of abdominal/oblique exercises•
Too much hip flexion during abdominal exercises•
SummaryWithout question, the squat is the single most effective leg exercise. This strength training exercise involves a large part of the muscular system. As strength coaches, we must remember that athletes’ squats will vary based on differences in their body types, length of the legs, and flexibility of the ankles. Technique will vary based on differences in foot stance widths, the use of heel pieces, and the positioning of the bar—high or low—on the back.
To utilize higher weight or to help an athlete achieve proper depth in the squat, lower the bar and widen the stance. Coach and teach your athletes to stabilize their torso by isometrically contracting the abdominals and back. Never flex the spine during a squat.
Overall, the key to performing the squat is to do it correctly and carefully. Never let the weight control you. You control the weight. Squats are not “bad for your knees.” The fact is that if you have healthy knees, they are quite capable of handling even the heaviest weight that your body can tolerate.
Module 4NSCA Flight Manual 74
8a. RDLTo develop strength in the muscles of the hamstrings, glutes, and erector stabilizers.
Starting PositionGrasp the bar with a pronated grip slightly wider than shoulder-width.1.
Stand in an erect position with the feet shoulder-width apart, toes pointed straight 2. ahead, and knees slightly flexed.
The arms should be fully extended with elbows pointed out and the bar resting 3. against the thighs.
Pull the shoulder blades back and down and isometrically contract the abs and low 4. back to maintain a flat back.
ProcedureSlowly push the hips backward letting the bar slide down the thighs and transfer 1. the weight onto the heels.
Maintain a flat back and continue the decent until the bar reaches the top of the 2. knees.
Ascend back to the starting position; extending the hips forward by pulling with 3. the hamstrings, squeezing the glutes, and transfer the weight back to the center of the feet.
Coaching PointsMaintain the starting back, chest, and knee positions throughout the entire range • of motion.
Keep the shoulder blades pulled back and down throughout the entire lift.•
The bar should remain in contact with the legs throughout the entire lift.•
Module 4NSCA Flight Manual 75
8b. Clean Deadlift To learn how to lift the bar off the ground properly and to develop strength in the muscles of the legs, hips, back, and torso stabilizers.
Starting Position
Approach the bar resting on the floor or platform so the shins make 1. contact with it.
Place the feet hip-width apart and the toes pointed straight ahead.2.
Keeping the back flat and shoulder blades pulled together, squat down 3. until the hands grasp the bar.
Grasp the bar with an overhand grip slightly wider than shoulder-width 4. with arms straight and the elbows pointed out.
The head is held in a neutral position with the eyes looking forward 5. throughout the entire lift.
The body weight should be on the heels and the hips should be slightly 6. higher than the knees.
Take a deep breath to fill the chest with air (without lifting the ribcage) 7. and isometrically contract the abs and low back.
Module 4NSCA Flight Manual 76
Procedure Lift the bar smoothly off the floor to just above the knees by slowly 1. extending the hips and knees keeping the bar in contact with the shins.
The bar, knees, hips, and shoulders rise at the same rate keeping the back angle constant.
As the bar passes over the knees, the shoulders remain in front of the bar, 2. the arms are straight with elbows pointed out, hips are flexed, and the knees slightly bent.
Extend the hips forward squeezing the glutes and abs.3.
As a fully erect body position is established, the shoulders, hips, knees, 4. and ankles should be in alignment.
Return the bar to the platform in a slow, controlled manner maintaining 5. an isometric contraction in the abs and back.
The bar should ride down the thighs as you flex primarily at the hips until 6. it passes over the knees; then squat down by simultaneously pushing the hips back and flexing the knees with the body weight on the heels.
Coaching PointsMaintain a constant back angle during the initial lift off. The shoulders, • hips, knees, and bar should all move together as one unit.
Do not jerk the bar off the floor; pull it smoothly and under control.•
The bar should remain in contact with the legs throughout the entire lift.•
Module 4NSCA Flight Manual 77
8c.(1) Walking LungeTo develop strength in the muscles of the hips, legs, and trunk.
Starting PositionStand in an erect position holding dumbbells at the 1. sides with the shoulder blades pulled back and down, arms straight, and palms facing in.
Position the feet hip-width apart and toes pointed 2. straight ahead.
ProcedureTake an exaggerated step forward with one leg 1. keeping the toes pointed straight ahead.
Sit the hips and back knee down until the front thigh 2. is parallel with the floor.
The torso should come forward to a 35 – 45 degree 3. angle with the back kept flat and straight.
Maintain balance as you push off with the back leg 4. and step all the way though to the next lunge.
Coaching PointsMake sure that the hips and shoulders remain square • to the direction going throughout the entire lift.
Keep the weight on the front heel and keep the back • heel pointed to the sky to prevent it from rolling to the side.
Do not allow the front knee to go forward past the • ball of the foot.
Avoid taking a middle step for balance as you step • through to the next rep.
Module 4NSCA Flight Manual 78
8c.(2) Split SquatTo isolate a single leg and develop strength in the muscles of the hips, legs, and trunk.
Starting PositionStand in an erect position holding dumbbells at the sides with the shoulder 1. blades pulled back and down, arms straight, and palms facing in.
Position the feet hip-width apart and toes pointed straight ahead.2.
Procedure Take an exaggerated step forward keeping the feet hip-width apart with the 1. toes pointed straight ahead.
Sit the hips down until the front thigh is parallel with the floor.2.
The torso should come forward to a 35 – 45 degree angle with the back kept 3. flat and straight.
Maintain balance as you push through the heel of the front foot and toe of the 4. back foot to return to the starting position.
Repeat for the desired repetitions then switch legs and complete the same 5. number of repetitions with the other leg.
Coaching PointsMake sure that the hips and shoulders remain square to the direction facing • throughout the entire lift.
Keep the weight on the front heel and keep the back heel pointed to the sky • to prevent it from rolling to the side.
Do not allow the front knee to go forward past the ball of the foot.•
Module 4NSCA Flight Manual 79
Coaching Points The movement of the bar should be down and • slightly forward, and up and slightly back. The most common error is to let the bar come off the chest moving toward the legs. This movement takes the bar out of the groove. The bar must come straight up and back off the chest so that maximum force can be applied to the bar.
The wrists should be in line with the elbows and • thumbs must be wrapped around the bar throughout the entire lift.
The lower back should remain in contact with the • bench throughout the entire lift. Do not arch the back or raise the chest to meet the bar.
Avoid bouncing the bar off the chest.•
9a. Bench PressTo develop strength in the muscles of the pectorals, shoulders, and triceps.
Starting Position Lie flat on the bench in a five-point body contact 1. position with the eyes directly under the bar.
Grasp the bar evenly with a pronated, closed grip 2. with the hands slightly wider than shoulder-width.
Lift the bar from the hooks and position it directly 3. above the shoulders with the elbows fully extended.
Procedure Inhale, taking a deep breath to fill the chest with air 1. and isometrically contract the abs to prevent the back from arching to complete the lift.
Lower the bar slowly and under control, allowing it to 2. just touch the chest at the nipple line.
Keep the wrists rigid and directly above the elbows.3.
Drive the weight explosively off 4. the chest extending the elbows to return the bar to the starting position.
Exhale as you near the top of the 5. lift.
Module 4NSCA Flight Manual 80
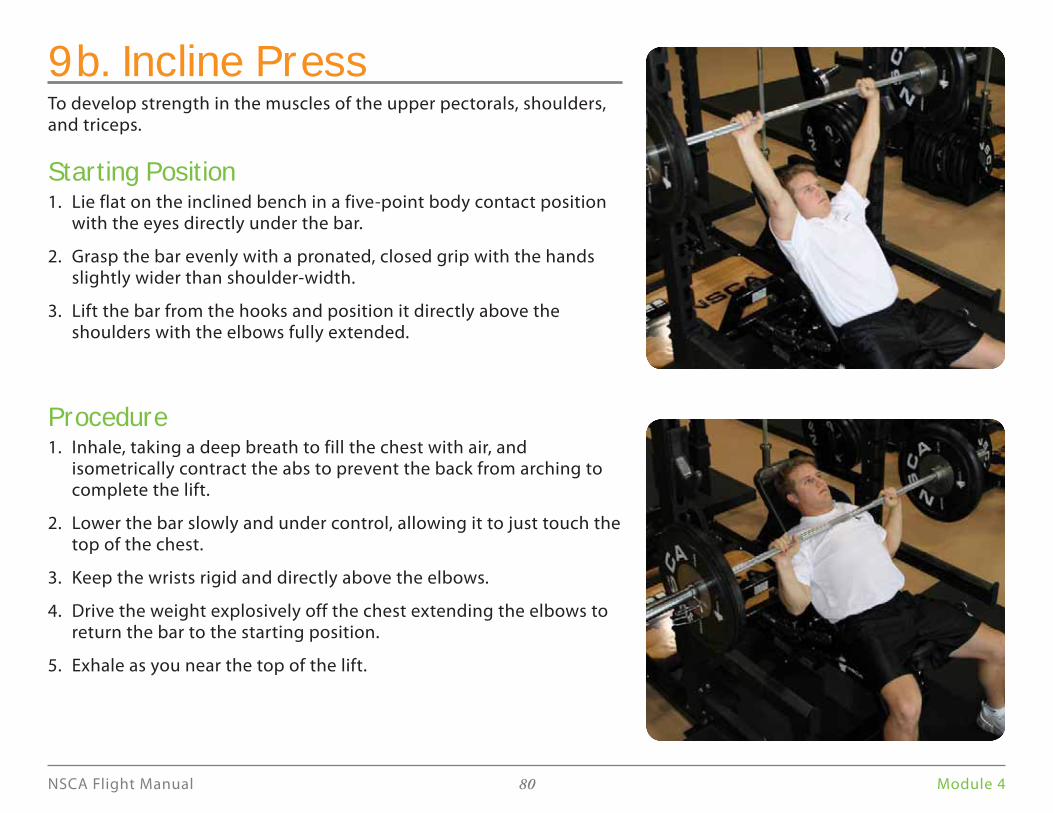
9b. Incline Press To develop strength in the muscles of the upper pectorals, shoulders, and triceps.
Starting Position Lie flat on the inclined bench in a five-point body contact position 1. with the eyes directly under the bar.
Grasp the bar evenly with a pronated, closed grip with the hands 2. slightly wider than shoulder-width.
Lift the bar from the hooks and position it directly above the 3. shoulders with the elbows fully extended.
Procedure Inhale, taking a deep breath to fill the chest with air, and 1. isometrically contract the abs to prevent the back from arching to complete the lift.
Lower the bar slowly and under control, allowing it to just touch the 2. top of the chest.
Keep the wrists rigid and directly above the elbows.3.
Drive the weight explosively off the chest extending the elbows to 4. return the bar to the starting position.
Exhale as you near the top of the lift.5.
Module 4NSCA Flight Manual 81
Coaching PointsThe movement of the bar should be down and • slightly forward, and up and slightly back. The most common error is to let the bar come off the chest moving toward the legs. This movement takes the bar out of the groove. The bar must come straight up and back off the chest so that maximum force can be applied to the bar.
The wrists should be in line with the elbows and • thumbs must be wrapped around the bar throughout the entire lift.
The lower back should remain in contact with the • bench throughout the entire lift. Do not arch the back or raise the chest to meet the bar.
Avoid bouncing the bar off the chest.•
Module 4NSCA Flight Manual 82
10a. Shoulder RaisesShoulder raises are a group a three exercises that can be done together in any combination or done separately.
1. Front RaisesTo isolate and develop strength in the muscles of the anterior deltoids.
STARTING POSITION
Stand erect with dumbbells in each hand, arms extended allowing them 1. to hang in front of the thighs, and shoulder blades pulled back and down.
Position the feet hip-width apart and toes pointed straight ahead.2.
Slightly flex the knees and isometrically contract the glutes and abs to 3. stabilize the body and prevent the back from arching and rocking back and forth to complete the lift.
PROCEDURE
Maintain a constant body position as both dumbbells are raised directly to the front until they are at shoulder level.1.
Lower the dumbbells slowly, keeping the palms facing the ground, back to the starting position and repeat.2.
COACHING POINTS
Maintain a constant head, body, and arm position throughout the entire lift.•
Avoid using momentum to complete the lift.•
Module 4NSCA Flight Manual 83
2. Lateral RaisesTo isolate and develop strength in the muscles of the lateral deltoids.
STARTING POSITION
Stand erect with dumbbells in each hand, arms 1. extended allowing them to hang at the sides of the thighs, and shoulder blades pulled back and down.
Position the feet hip-width apart and toes pointed 2. straight ahead.
Slightly flex the knees and isometrically contract the glutes and abs to stabilize the body and prevent the back from 3. arching and rocking back and forth to complete the lift.
PROCEDURE
Maintain a constant body position as both dumbbells are raised laterally until they are at shoulder level.1.
Lower the dumbbells slowly keeping the palms facing the ground back to the starting position and repeat.2.
COACHING POINTS
Maintain a constant head, body, and arm position throughout the entire lift.•
Avoid arching the back to complete the lift.•
Module 4NSCA Flight Manual 84
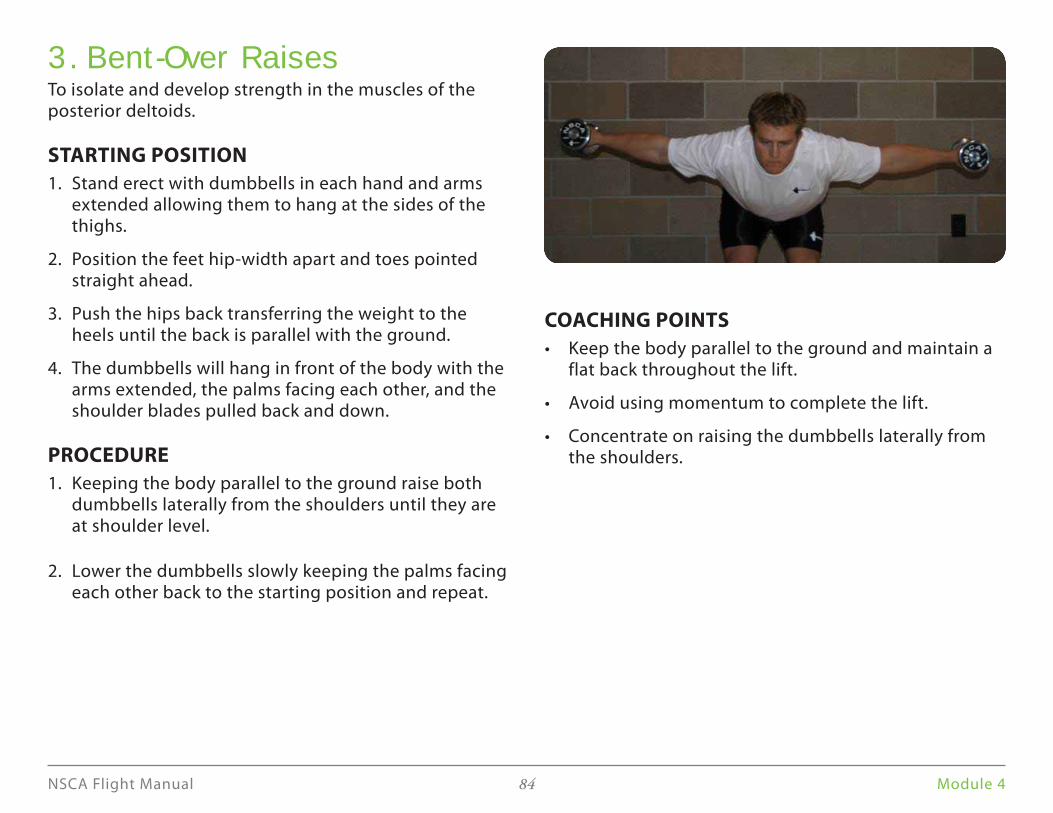
COACHING POINTS
Keep the body parallel to the ground and maintain a • flat back throughout the lift.
Avoid using momentum to complete the lift.•
Concentrate on raising the dumbbells laterally from • the shoulders.
3. Bent-Over RaisesTo isolate and develop strength in the muscles of the posterior deltoids.
STARTING POSITION
Stand erect with dumbbells in each hand and arms 1. extended allowing them to hang at the sides of the thighs.
Position the feet hip-width apart and toes pointed 2. straight ahead.
Push the hips back transferring the weight to the 3. heels until the back is parallel with the ground.
The dumbbells will hang in front of the body with the 4. arms extended, the palms facing each other, and the shoulder blades pulled back and down.
PROCEDURE
Keeping the body parallel to the ground raise both 1. dumbbells laterally from the shoulders until they are at shoulder level.
Lower the dumbbells slowly keeping the palms facing 2. each other back to the starting position and repeat.
Module 4NSCA Flight Manual 85
10b. Shoulder Press To develop strength in the muscles of the shoulder girdle and to teach the lifter to use the whole body in the stabilizing of weight overhead.
Starting PositionThe bar should be set a height where the athlete has no trouble 1. lifting it off the rack.
Place the hands evenly on the bar, slightly wider than shoulder-2. width, and grasping it tightly with a pronated grip.
The bar should be positioned behind the neck comfortably across 3. the shoulders with the shoulder blades pulled back and down and the elbows pointed down with the hands directly above them.
Stand erect and take one or two steps back, positioning yourself in 4. the center of the rack with the feet hip-width apart, toes pointed straight ahead, and slightly flexing the knees with the weight centered on the feet.
The head and eyes should be focused straight ahead in a neutral 5. position. This keeps the cervical spine in line with the body and helps maintain balance.
Isometrically contract the glutes and abs to stabilize the body and 6. prevent the back from arching to complete the lift.
Module 4NSCA Flight Manual 86
ProcedureMaintain the position of the ankles, knees, and hips, and press the 1. bar straight overhead by extending the arms.
The bar should end up behind the ears with the elbows completely 2. extended and inline with the shoulders, hips, and heels.
Lower the bar to its starting position in a controlled manner.3.
Coaching PointsAvoid using your lower body to complete the lift.•
Keep the shoulders over the hips during the entire range-of-• motion.
Keep the elbows directly under the hands throughout the entire • lift.
Keep the glutes and abs isometrically contracted to avoid arching • the back to complete the lift.
When lowering the bar, the athlete should simultaneously flex the • hips and knees as the bar hits the shoulders to help absorb the weight.
This lift can also be done from the front of the shoulders.•
Module 4NSCA Flight Manual 87
11. Triceps Choice—Triceps PushdownTo isolate and develop strength in the muscles of the triceps.
Starting PositionPosition the hands on the pull-down bar about six inches apart in an overhand grip.1.
Stand with the feet flat on the floor, hip-width apart, and toes pointed straight ahead with the knees 2. slightly flexed.
Isometrically contract the glutes and abs to stabilize the body and prevent the back from arching.3.
Pull the bar down to an extend arm position.4.
ProcedureKeeping the shoulder blades pulled back and 1. down and the elbows positioned at the sides, allow the bar to rise until there is a 90 degree angle at the elbows.
Maintain an erect body position and push the bar 2. down until the arms are completely extended.
Coaching PointsAvoid letting the shoulders roll forward during any • part of the lift.
Avoid using momentum to complete the lift.•
There are many different triceps exercises that you • can choose from. Change the exercise every so often to add variety to your workout and prevent staleness.
Module 4NSCA Flight Manual 88
Slowly return back to the starting position, and 5. then bring the left shoulder toward the left heel and slide the hand along the ground until it touches the heel. Hold for 1 second.
Slowly return back to the starting position and 6. repeat for the desired repetitions.
Coaching PointsAvoid pulling the head forward throughout the • exercise.
Avoid lifting the lower back off the ground.•
There are many different abdominal exercises • that you can choose from. Change the exercise every so often to add variety to your workout and prevent boredom.
To develop strength in the muscles of the abdominals and obliques.
Starting PositionLie on the floor face up with the arms straight, 1. placed at the sides, and palms flat.
Bend the knees keeping the feet flat on the floor, 2. pulling the heels toward the butt, and pressing the lower back into the floor.
ProcedureBring the chest toward the thighs, lifting 1. the scapula off the ground, and contract the abdominal muscles.
The hands should slide along the ground staying 2. close to the body until they make contact with the heels. Hold for 1 second.
Slowly return back to the starting position, pause, 3. and repeat for the desired repetitions.
For the obliques, bring the right shoulder toward 4. the right heel and slide the hand along the ground until it touches the heel. Hold for 1 second.
12. Ab Choice: Heel Touches
Module 4NSCA Flight Manual 89
ReferencesBenjamin H. Massey and Norman L. Chaudet, Effects of Systematic, Heavy Resistive Exercise on Range of
Joint Movement in Young Male Adults. Research Quarterly, (27)1, pp 41 – 51
Howard G. Knuttengen and William J. Kraemer, Journal of Applied Science Research 1(1): 1987
James G. Hay and J. Gavin Ried, Anatomy, Mechanics and Human Motion, pg. 10
John Garhammer, Ph.D., Free Weight Equipment for the Development of Athletic Strength and Power – Part 1, NSCA Journal, 3(6): 1981
Kramer, J., Stone, M.H., O’Bryant, H., Conley, M., Johnson, R., Nieman, D., Honeycutt, D., & Hoke, T. (1997). Effects of single vs. multiple sets of weight training: Impact of volume, intensity, and variation. Journal of Strength and Conditioning Research. 11, 143 – 147.
Kraemer, W. (1997) A series of studies: The physiological basis for strength training in American football: Fact over philosophy. Journal of Strength and Conditioning Research. 11, 31 – 142.
Randal A., Kai-Nan An, Steven G. Scott and Edmond Y.S. Chao., Kinetic Chain Exercise in Knee Rehabilitation, Sports Medicine 11(6): 1991 Philip J. Rasch and Roger K. Burke, Kinesiology and Applied Anatomy, pg. 86
Robert A. Panariello, P.T., A.T.C., C.S.C.S., The closed kinetic chain in strength training, National Strength and Conditioning Association Journal, Volume (13)1: 1991
Willoughby, D. (1993). The effects of mesocycle-length weight training programs involving periodization and partially equated volumes on upper and lower body strength. Journal of Strength and Conditioning Research. 7, 2 – 8.