18
32 | Page Module:3 How to Regain a strong foundation

32 | P a g e
Module:3
How to Regain a strong foundation
33 | P a g e
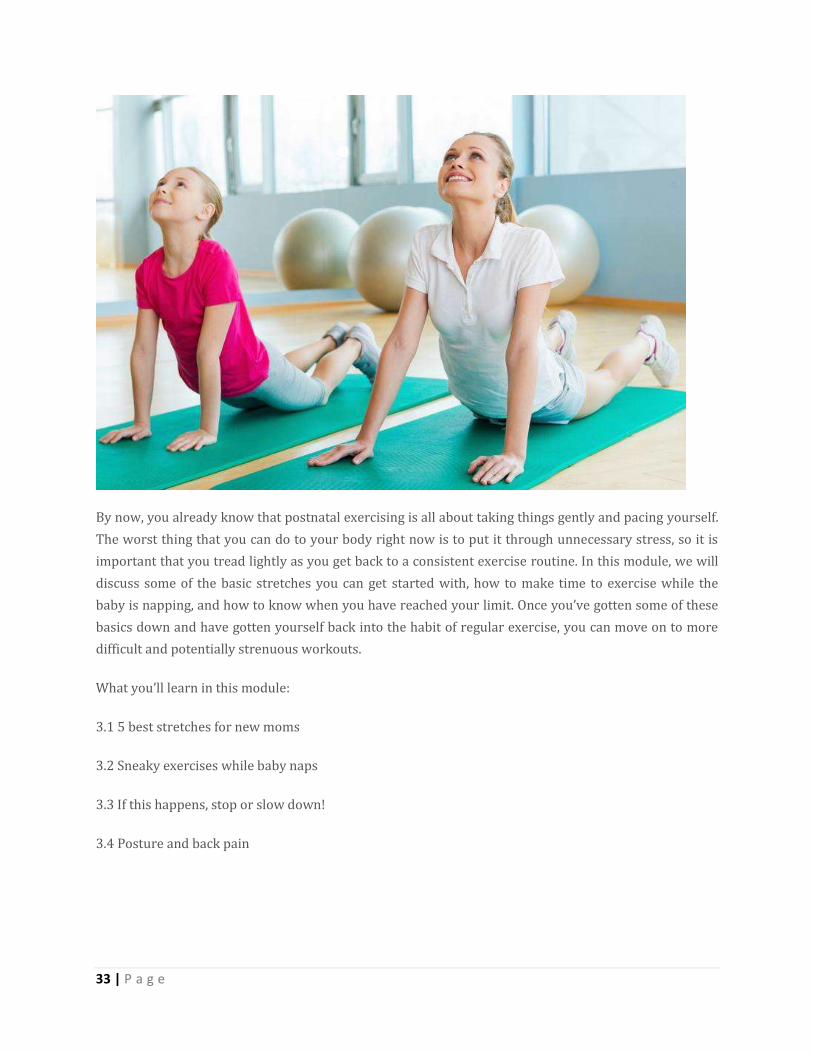
By now, you already know that postnatal exercising is all about taking things gently and pacing yourself.
The worst thing that you can do to your body right now is to put it through unnecessary stress, so it is
important that you tread lightly as you get back to a consistent exercise routine. In this module, we will
discuss some of the basic stretches you can get started with, how to make time to exercise while the
baby is napping, and how to know when you have reached your limit. Once you’ve gotten some of these
basics down and have gotten yourself back into the habit of regular exercise, you can move on to more
difficult and potentially strenuous workouts.
What you’ll learn in this module:
3.1 5 best stretches for new moms
3.2 Sneaky exercises while baby naps
3.3 If this happens, stop or slow down!
3.4 Posture and back pain

34 | P a g e
3.1 5 best stretches for new moms
The best way to start getting yourself back into the habit of exercising is to start with some simple
stretching that is going to work out the muscles you need to work out without putting too much strain
on your already straining bodies. Remember, this is mostly about getting yourself back into an
exercise routine, so make it fun. Put on some music or something that will relax you so that you look
forward to this time rather than dread it. Let’s get started with 5 very simple and effective stretches:
Pigeon pose
How to do the stretch: You are going to start this stretch on all fours on the floor or your mat. Once you
are on all fours, bring your right leg forward until it is in front of you, then position it so that your right
leg rests in front of you with your foot pointing towards your left (as pictured).Now, extend your left leg
so that it is straight out behind you. Once you have gotten your body into position, sit up tall by raising
your upper body. Then, lower your upper body, leaning forward as far as you can without causing a
strain and hold the pose for a few seconds. Then, repeat the same directions, but positioned with your
left leg forwards and your right leg back. Remember; do not force yourself into a painful or
uncomfortable position. If this stretch is not working for you, skip it until you are ready.
Reps: Do this stretch a three to five times on each leg, or until you feel overexerted or it feels painful.
Make sure you are not hurting yourself.

35 | P a g e
Purpose: This is one of the best stretches there is for opening up your hips. Open hips allow you to have
more flexibility, and will also make some of the more high intensity workouts that you will start doing
later more effective.
Hip roll
How to do the stretch: This stretch is pretty simple and starts with you lying flat on your back with
your knees bent as if you are about to do some sit ups.To do this stretch properly, you are going to need
to put weight on your heels and your lower back. Start the stretch by pressing them against the floor,
and tilting your pelvis into the air. Slowly lift your hips off of the floor or mat, raising them as high as you
can without straining yourself. Once you have raised your hips, slowly lower them back to the floor or
mat, rolling them down a little bit at a time. This stretch works best when it is done slowly so as to work
all of the proper muscles.
Reps: Repeat the stretch (lifting up your hips and then lowering them down) between five and ten
times, depending on your flexibility and stamina. Each day you stretch, try to do more reps, so you can
start with five and work your way up to ten.
Purpose: Hip rolls help you open up your lower back and hips, which are essential stretches when you
are trying to recover from giving birth. These stretches will give you flexibility and reduce your risk of
injury (while exercising or just in your everyday life).
Mermaid stretch

36 | P a g e
How to do the stretch: This stretch could be a little bit uncomfortable for some, so putting a small
pillow under your hips can make it feel better. Sit on the floor or your mat with your legs stretched in
front of you. Now, bring your right knee towards you, and drop it to the floor in a “v” shape, with the sole

37 | P a g e
of your right foot pointed towards your left knee. Then, shift your left leg behind you and tuck your left
foot under or against your butt. Now, stretch by putting your right hand on the floor behind you and
lifting your left hand up in the air above your head. As you are lifting your left arm, squeeze you gluteus
and press your hips up as you lift onto your knees. Hold this pose for a few seconds, pushing your
shoulders back, and then lower your body back to the floor. You can also finish this stretch by placing
your left hand onto the floor and raising your right arm.
Reps: You can repeat this about three times on each side to get a proper workout.
Purpose: The mermaid stretch opens up your chest, hips, and the rest of the front of your body. This
stretch also helps to minimize your risk of injury and maximize your flexibility.
Downward facing dog
How to do the stretch: It is important to first mention that this is not a recommended stretch for
anyone who has had a C section because it puts too much pressure on the abdomen, and that can cause
tearing for new mothers who have undergone a C section. If you gave birth vaginally, then this is a
classic yoga pose that can be easy to do and help you increase your flexibility. Start by going down on all
fours on the floor or on your mat, with your wrists and shoulders aligned and your hips and knees
aligned. From this position, slowly straighten your legs below you, and lift your hips into the air until
you are making a “v” shape with your body with only your hands and feet on the floor or mat. When you
are first trying this stretch, hold the pose for as long as you canvass you get more and more used to it,
however, you’ll want to try to hold this pose for between fifteen and twenty seconds.
Reps: Depending on the length of time you are able to hold the pose, you’ll want to repeat this stretch
between three and five times. Again, do not strain yourself.
Purpose: This stretch helps to lengthen your lower back, a problem area for many new mothers. This
stretch can help to reduce or alleviate lower backaches and pains.
Roll downs

38 | P a g e
How to do the stretch: This stretch is fairly simple to do, but difficult to explain. Start by standing
straight and raising our arms over your head. Keeping your torso straight, bend at the hips with your
knees slightly bent. Once you can’t bend forward any longer with your back straight, reach your arms
around behind you to open up your chest. Next, round out your back, and lean forward with your arms
dangling towards your toes. Try to keep your head and neck relaxed. Then, simply lift your body up
slowly, lifting from your hips. Your head should be the final part of you that you raise. If you want to
work your abs even more, scoop your stomach so that your abs will do some of the work in lifting up
your body.
Reps: If possible, you should repeat this stretch about five times. Be attentive to what your body is
telling you, and make sure not to strain or hurt yourself.
Purpose: This stretch is perfect for releasing tension, especially in problem areas like your back, your
neck, and your hamstrings. Once again, this stretch also increases your flexibility and lowers your risk of
injury.
These 5 stretches are an excellent way to start getting into an exercise routine. Each will help you work
and stretch a typical problem area for new mothers, without putting too much extra strain on your
already fragile body.

39 | P a g e
3.2 Sneaky exercises while baby naps
This is a tricky situation. The baby is down for a nap but, as you know, there is no telling whether he
or she is going to be napping for an hour or three minutes. So, trying to fit in some exercise during
this variable time takes quick thinking, ingenuity, and the ability to adapt to new situations. Once you
get used to your baby’s patterns (although we all know that we have to use the term “patterns” very
loosely), you can get yourself into a new set routine. Because every baby takes different kinds of
naps, we will cover several different exercises, some that require equipment and proper clothing,
and some that require nothing but a minute of free time. As always, do not do any of these exercises
if they cause you discomfort or pain. In the next few pages you’ll find some great exercises to try:
When you know you have a good amount of time before he or she wakes up
When you may only have 10-15 minutes
When the baby could wake up at any moment
When you know you have a good amount of time before he or she wakes: You have gotten your
new baby into a nap routine, and you know you have at least 30 minutes to work out. You have time to
quickly change your clothes and throw on a sports bra. With the extra time that you have, these
exercises are a little more high intensity and involved.
Back row: Grab some small weights (5 lbs. will do, but choose the weight that best works for you), and
bend forward at the waist with your knees bent a little and your arms hanging in front of you. Now, lift
your right arm (with the weight) straight up to your chest and bring it back down again. Then, do the
same with your left arm. This will exercise your back, your arms, and your legs all at the same time and
will not wake anyone up.

40 | P a g e
Climb the stairs: This one is pretty simple: climb the stairs. First of all, make sure your stairs aren’t
noisy. If they are, then use something else as a stepper (a step ladder, a milk crate, or the like).Make sure
to lift your knees high going both ways to get the best workout possible.
Burgees: These are tough, but great. Only do burgees if your body is ready. Remember to be gentle on
your postnatal body. Start in a standing position, and then crouch down. Then, kick your legs behind you
so that you are in a push up position. Complete a push up, then go back to a crouching position, and then
jump in the air and land in the standing position in which you started. Do five or ten of these, depending
on your strength level and stamina.
Kettlebell exercises: Using a kettle ball or a small weight, you can do a number of quick and quiet
exercises.
Kettlebell swing: Pick up the kettlebell or weight with both hands in a squatting position. Swing the bell
or weight up so that your arms create a 90-degree angle with your chest. Then, let the bell or weight
swing down and repeat the process.
Kettlebell row: Start in the same position as you did for the kettlebell swing, but instead of swinging the
bell, lift it straight up towards your chest and let it back down again.
Kettlebell Russian twist: Be careful with this one. Sit on the ground and lean back slightly with the
kettlebell in your hands at your stomach. Lift your legs slightly off the ground, and then twist to the left
with the bell, and then twist back to the right. Do this about 10 times (or more or less depending on how
it feels).

41 | P a g e
When you may only have 10-15 minutes: Your baby is a pretty heavy sleeper, but he or she is still
not in a normal nap routine, and so you only have between 10 and 15 minutes. This is not
necessarily enough time to change, but it is enough time to gather together some equipment,
whether it is true workout equipment or DIY.
42 | P a g e
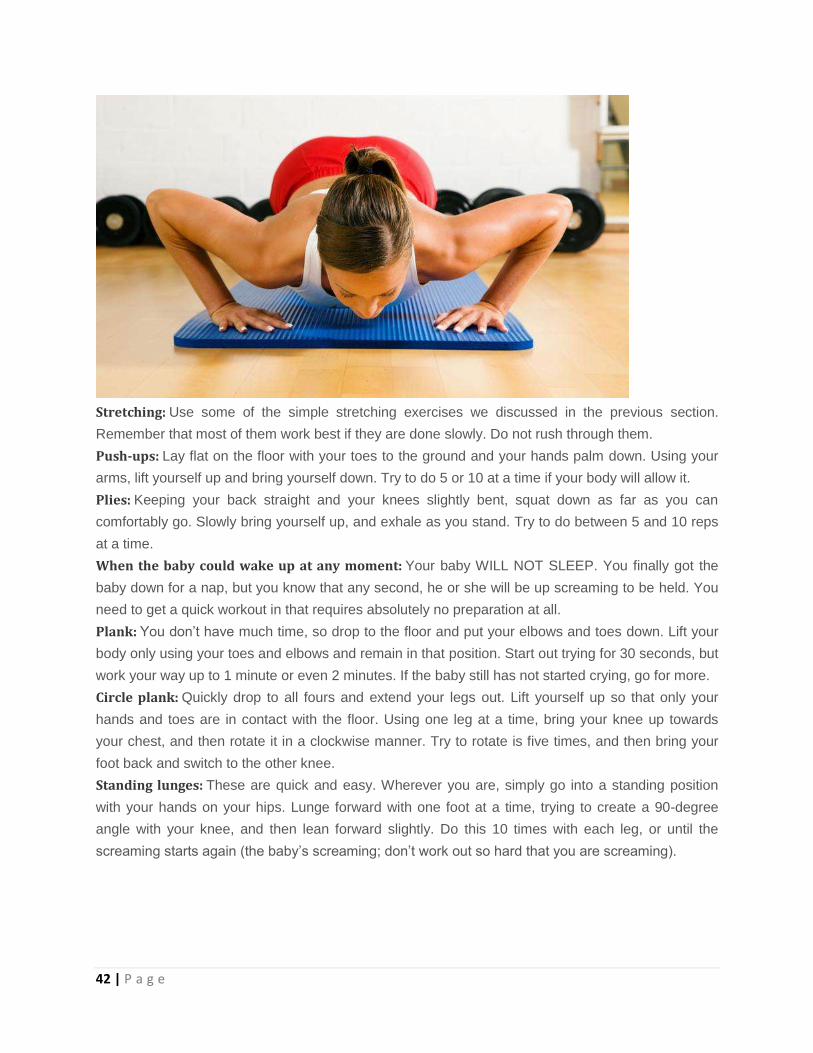
Stretching: Use some of the simple stretching exercises we discussed in the previous section.
Remember that most of them work best if they are done slowly. Do not rush through them.
Push-ups: Lay flat on the floor with your toes to the ground and your hands palm down. Using your
arms, lift yourself up and bring yourself down. Try to do 5 or 10 at a time if your body will allow it.
Plies: Keeping your back straight and your knees slightly bent, squat down as far as you can
comfortably go. Slowly bring yourself up, and exhale as you stand. Try to do between 5 and 10 reps
at a time.
When the baby could wake up at any moment: Your baby WILL NOT SLEEP. You finally got the
baby down for a nap, but you know that any second, he or she will be up screaming to be held. You
need to get a quick workout in that requires absolutely no preparation at all.
Plank: You don’t have much time, so drop to the floor and put your elbows and toes down. Lift your
body only using your toes and elbows and remain in that position. Start out trying for 30 seconds, but
work your way up to 1 minute or even 2 minutes. If the baby still has not started crying, go for more.
Circle plank: Quickly drop to all fours and extend your legs out. Lift yourself up so that only your
hands and toes are in contact with the floor. Using one leg at a time, bring your knee up towards
your chest, and then rotate it in a clockwise manner. Try to rotate is five times, and then bring your
foot back and switch to the other knee.
Standing lunges: These are quick and easy. Wherever you are, simply go into a standing position
with your hands on your hips. Lunge forward with one foot at a time, trying to create a 90-degree
angle with your knee, and then lean forward slightly. Do this 10 times with each leg, or until the
screaming starts again (the baby’s screaming; don’t work out so hard that you are screaming).

43 | P a g e
There are thousands of other exercises out there that are quick and quiet, so take a look around.
The most important thing, though, is that you have made the decision to make exercise a priority and
are willing to fit it into your schedule wherever you can.Keep up the good work; you’ll get to where
you’re trying to be.
3.3 If this happens, stop or slow down!
As you may have noticed, one of the most important things we have been stressing throughout this
course so far is that you need to pay attention to your body. Your body will tell you when something
is not right, and you need to be ready and prepared to read its signals. Postnatal exercise is
extremely important, but it is not worth hurting yourself over. Any injuries you cause yourself could
keep you from exercising further, and even impact the time you have with your new child. Therefore,
you need to make sure that you pay very close attention to the following signals that your body is
giving you. If you start to feel any of these signals, it is time for you to slow down what you are doing
or even stop altogether.
Sharp pains
If you are feeling sharp pains while you exercise, you should definitely stop immediately. Many women
who encounter sharp pains during postnatal exercises get pains in their abdomen, pelvis, or back. All of
these areas are very sensitive to a woman who has just delivered a baby, so they need to be taken
seriously. Pains such as these could mean anything from a small bruise or ache to a bad muscle or
ligament tear. Regardless of the source of the pain, it is important that you stop exercising immediately,
and put your routine on hold until you can see a doctor and get to the bottom of what is causing it. If you
continue to work out through this pain, you could end up causing permanent damage that could leave
you less mobile or unable to pick up your child. Be very careful and don’t mess with an injury like this.

44 | P a g e
Dizziness, faintness, or weak feeling
These feelings could be a sign of something very minor, like fatigue, or a sign of something major, so it is
important to take it seriously. When you first feel a slight faintness, it is smart to at least slow down your
exercise routine. If the feeling does not go away, you should stop your exercise altogether and go to see
your doctor. It may be caused by something that is easy to remedy like malnourishment or dehydration,
but it could be caused by something more serious.

45 | P a g e
Leakage
Leakage can be very embarrassing, but comes with the territory after a pregnancy. The pelvic and
abdominal muscles that help you hold in your movements have been stretched tremendously and your
bladder has been under a lot of pressure, so some incontinence is normal. However, if you are noticing a
higher than normal level of leakage, especially when you are exercising, coughing, sneezing, or laughing,
you could be causing more strain on your pelvic and abdominal muscles during exercise than is healthy.
If the problem is minor, consider revising your exercise routine to be less intensive and more relaxing. If
the problem is major, or the minor problem persists, stop your exercise routine immediately and consult
with your doctor. One of the best benefits of postnatal exercise is that it helps to cure incontinence, so
you definitely do not want to continue if the exercise you are doing is making it worse.
Unusual lochia
As you already know, a woman who has recently given birth discharges fluids, called lochia, from her
vagina during the first 4 to 6 weeks after giving birth. This lochia is usually comprised of blood, mucus,
uterine tissue, and bacteria. This is a completely normal process as your body is discharging excess fluid
that helped aid the birth of your child. Some women have been known to see a change in their lochia
after exercising, however, and it could be a sign that you are overworking your body. If the flow of your
lochia becomes noticeably heavier, or has changed to a brighter red color, then you should stop your
exercise and consult your doctor immediately. It is likely that this is only an indication that you have put
too much stress on your body, and it will go back to normal after some rest. It could be an indication of a
more serious problem, though, so it is very important to get a doctor’s opinion.

46 | P a g e
None of these signs should be taken lightly, and all of them warrant a trip to the doctor. As we
mentioned before, postnatal exercise is all about getting healthy and feeling good. If the exercise that
you are doing is causing the opposite to occur, then the exercise needs to be modified or stopped
completely. There is nothing more important than your health, especially now that you have a new child
to look after.
3.4 Posture and back pain
Back pain is incredibly common in women who have just given birth to a child. Not only were you
carrying around a child for 9 months, you now have tons of extra lifting to do, whether it is the baby,
the baby bag, or all the baby’s toys. This is also the reason why back pain is incredibly debilitating to
a new mother. A hurt or sore back can have a direct impact on your interactions with your child, and
no mother wants anything getting in between her and her new baby. That is why it is important to
always be cognizant about your posture. The right posture can relieve or prevent back pain. Here is
a quick guide to the posture for which you should strive:
When you are seated
When you are seated, try to sit in traditional chairs, so that you can rest your back firmly. If you cannot
rest your back firmly against the back of the chair in which you are sitting, use a pillow to add depth to
the chair and improve your posture. Try to place your fleet comfortably and flat on the floor, and do not
lean forward. All of these strategies will keep your spine straight and reduce the amount of pressure you
put on your lower back when you sit.
When you are standing
You will want to stand as upright as possible, but do not strain yourself. Make sure your feet are firmly
planted, but that your knees are nice and relaxed. Try to stand with your ears over your shoulders and
your chin down as often as you can. If trying to stand perfectly becomes too much of a stressor, than
simply pay attention to when you are slouching and adjust your stance. Slouching causes the spine to
curve, and puts too much pressure on too few areas of the back. Standing straight up distributes the
pressure evenly and helps prevent pain.

47 | P a g e

48 | P a g e

49 | P a g e
When you are carrying your new baby
When you are carrying your new baby, try to keep his or her weight at the center of your body. You can
do this by either holding him or her diagonally against your shoulder, or by cradling the new baby at you
stomach. Either way you are holding the new baby, try to keep your shoulders back and contract your
abdominal muscles to relieve some of the pressure on your back.
These are all great ways to posture yourself so that you can alleviate some of the stress that your
everyday life puts on your back. Now, if you are already experiencing back pain, there are a couple of
things that you can do around the house, or get professionally done, to help make you feel better.
Posture and exercise: We have already talked about these, but proper posture and exercise can
alleviate and prevent back pain.
Draw yourself a warm bath: The warmth of the water will help relax the muscles in your back and
temporarily relieve your back pain. Make sure that the water is not too hot, and that you are able to lay
comfortably in the bathtub with good posture.
Use a heating pad: Putting a heating pad on your back will have many of the same effects as a warm
bath, except that you have more freedom to do other things because you are not stuck in the tub. You
can either place the heating pad on your back as you sit back, or get one that you can wrap around to so
that you are more mobile.
Get yourself a massage: You have put your body through a lot in the last year; you deserve a massage.
Let a professional help you relive you back pains and aches while you are able to relax.
Learn relaxation techniques: Aromatherapy and meditation have been known to help reduce chronic
pain, so they could help you a lot.
If your back pain is overwhelming you, please make sure that you see your doctor. With serious back
pain, there could be an underlying issue that needs to be taken care of before real healing can begin.


