Moku Cloud Compile is an innovative new feature available on Moku:Pro. The Moku family of test and measurement tools are FPGA based instruments and Moku Cloud Compile allows users to deploy custom VHDL code to a Moku. This code can provide custom features and interact with the existing instruments to unlock new and unique instrumentation only possible due the Moku’s Instrument-on-Chip architecture.
This tutorial will guide users from the very start of creating a Cloud Compile account through to coding and deployment of some simple VHDL examples. By the end of this guide, users will have the fundamental knowledge to compile and deploy custom code to Moku:Pro.
Multi-instrument mode and Cloud Compile ............................................................................................................... 4
Setting up a Cloud Compile account ........................................................................................................................... 5
VHDL example #1 : routing inputs to outputs ............................................................................................................ 7
Enter the VHDL code ......................................................................................................................................................................... 7 Build the code ....................................................................................................................................................................................... 8 Deploy the code .................................................................................................................................................................................. 9 VHDL example #2 : subtracting/adding inputs ....................................................................................................... 12
VHDL example #3 : scaling and offset inputs / DSP slice ..................................................................................... 12
VHDL example #4a : clipping signal/output limit setting ...................................................................................... 13
Questions or comments? ............................................................................................................................................. 16
If your Moku:Pro does not have MiM or MCC, please contact Liquid Instruments at sales@liquidinstruments to enquire about evaluations and upgrades.
Overview Liquid Instruments’ Cloud Compile tool enables users to design customer code and features for implementation on the Moku:Pro platform. Compared to CPI and application specific integrated circuits (ASIC) based DSP approaches, FPGA platforms provide near ASIC-level latency and performance with being software programmable more like a traditional CPU.
While there are many software languages that can be employed to write software for CPU based designs, and these languages are widely taught and used; FPGA programming is limited to VHDL or Verilog and these have a steep learning curve and the tools are typically costly. Also, the platforms available for deploying VHDL code are limited to evaluation boards from FPGA vendors or a variety of limited functionality, open source hardware boards.
Moku:Pro combined with Moku Cloud Compile address the need for a high performance laboratory instrument with research grade hardware, combined with the ability to deploy custom VHDL without the overhead of a large suite of HDL compile, synthesize and route software. MCC compiles the users’ customer VHDL in the cloud and delivers a bitstream over the internet, ready to deploy to any MCC enabled Moku:Pro
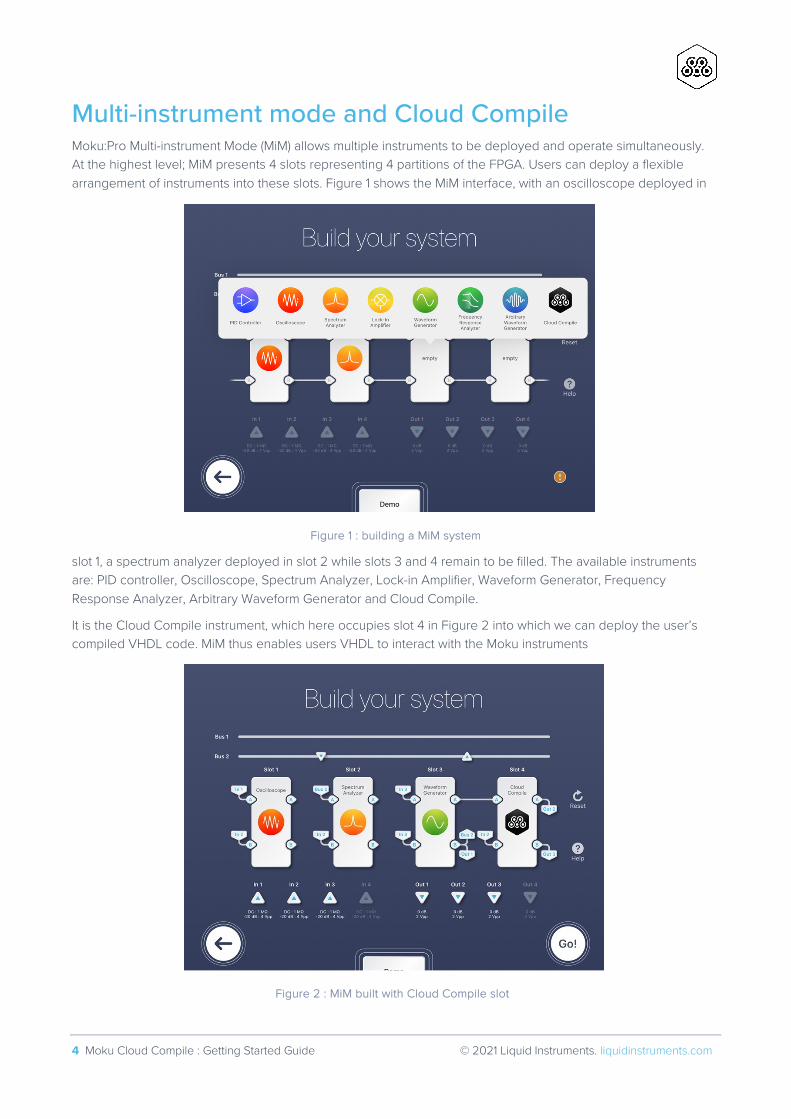
Multi-instrument mode and Cloud Compile Moku:Pro Multi-instrument Mode (MiM) allows multiple instruments to be deployed and operate simultaneously. At the highest level; MiM presents 4 slots representing 4 partitions of the FPGA. Users can deploy a flexible arrangement of instruments into these slots. Figure 1 shows the MiM interface, with an oscilloscope deployed in
slot 1, a spectrum analyzer deployed in slot 2 while slots 3 and 4 remain to be filled. The available instruments are: PID controller, Oscilloscope, Spectrum Analyzer, Lock-in Amplifier, Waveform Generator, Frequency Response Analyzer, Arbitrary Waveform Generator and Cloud Compile.
It is the Cloud Compile instrument, which here occupies slot 4 in Figure 2 into which we can deploy the user’s compiled VHDL code. MiM thus enables users VHDL to interact with the Moku instruments
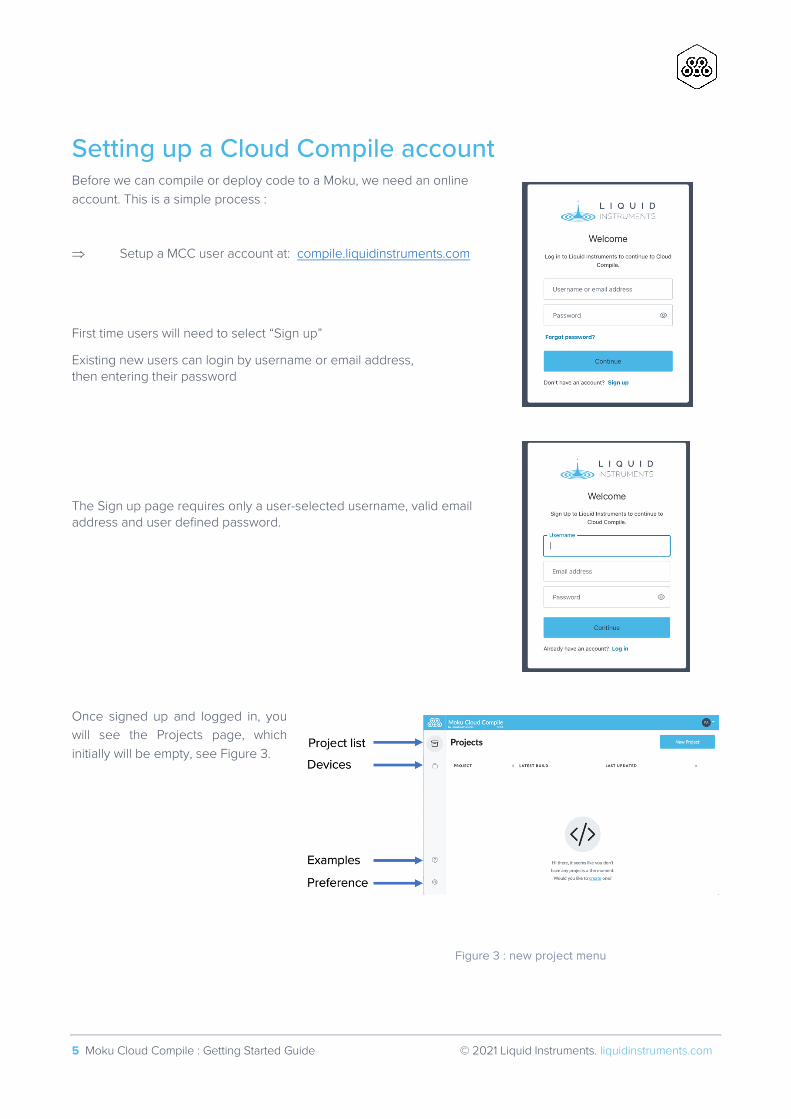
Setting up a Cloud Compile account Before we can compile or deploy code to a Moku, we need an online account. This is a simple process :
Þ Setup a MCC user account at: compile.liquidinstruments.com
First time users will need to select “Sign up”
Existing new users can login by username or email address, then entering their password The Sign up page requires only a user-selected username, valid email address and user defined password. Once signed up and logged in, you will see the Projects page, which initially will be empty, see Figure 3.
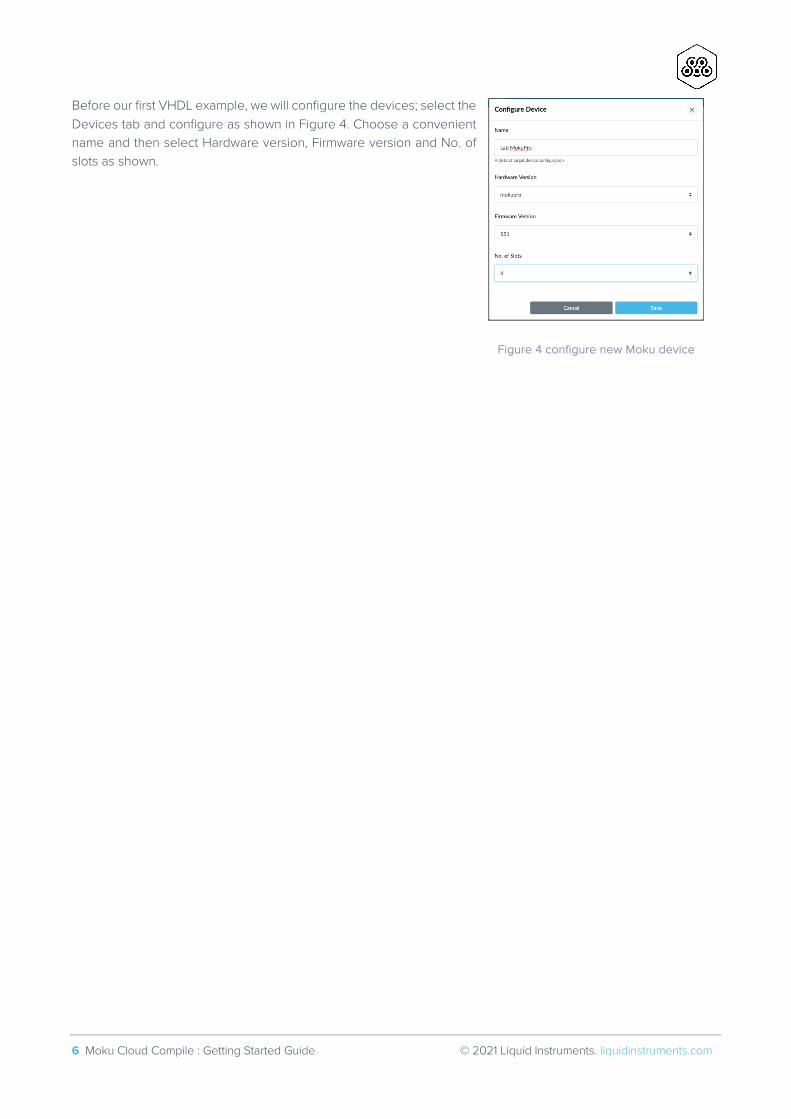
Before our first VHDL example, we will configure the devices; select the Devices tab and configure as shown in Figure 4. Choose a convenient name and then select Hardware version, Firmware version and No. of slots as shown.
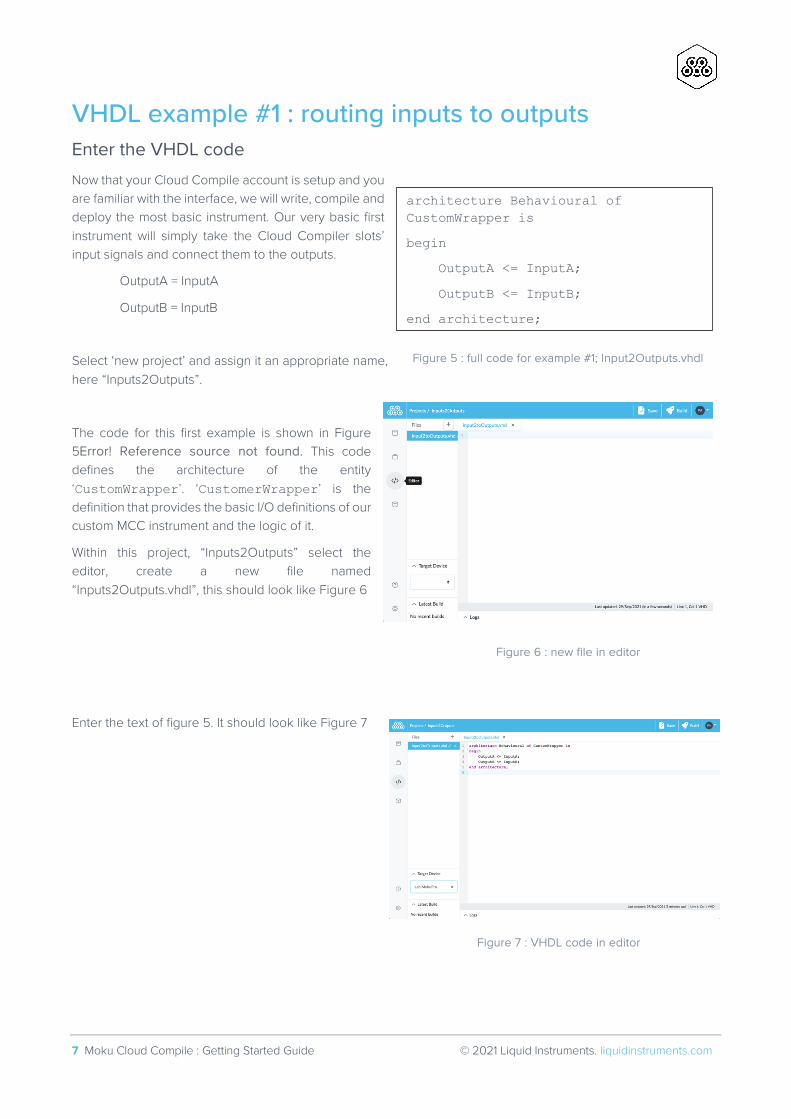
VHDL example #1 : routing inputs to outputs Enter the VHDL code
Now that your Cloud Compile account is setup and you are familiar with the interface, we will write, compile and deploy the most basic instrument. Our very basic first instrument will simply take the Cloud Compiler slots’ input signals and connect them to the outputs.
OutputA = InputA
OutputB = InputB
Select ‘new project’ and assign it an appropriate name, here “Inputs2Outputs”.
The code for this first example is shown in Figure 5Error! Reference source not found. This code defines the architecture of the entity ‘CustomWrapper’. ‘CustomerWrapper’ is the definition that provides the basic I/O definitions of our custom MCC instrument and the logic of it.
Within this project, “Inputs2Outputs” select the editor, create a new file named “Inputs2Outputs.vhdl”, this should look like Figure 6
Enter the text of figure 5. It should look like Figure 7
architecture Behavioural of CustomWrapper is
begin
OutputA <= InputA;
OutputB <= InputB;
end architecture;
Figure 5 : full code for example #1; Input2Outputs.vhdl
Build the code Select the ‘Target device’, ‘Save’ and then ‘Build’. The code will then be submitted to the Cloud Compile server
and you can select the Build tab to observe the process. This will take several minutes to complete.
Once the code compilation is complete, the “Synthesize”, “Route”, Report” and “Bitstream” should all be green. At the very bottom of this screen is the bitstream, or artifact, ‘bitstream.tar.gz’. Do not unzip or untar this bit stream.
It is likely you will see many compiler or synthesizer warnings; these can mostly be disregarded for our purpose. However, any errors would need attention, errors are likely to halt the build process.
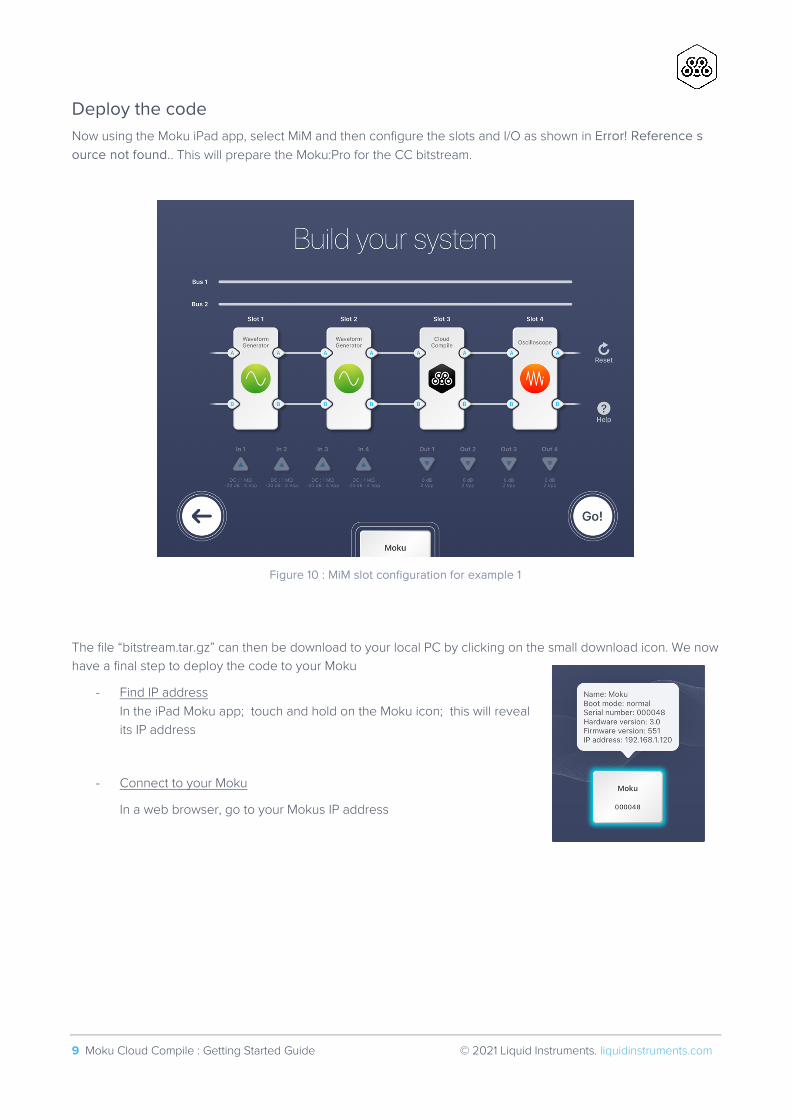
Deploy the code Now using the Moku iPad app, select MiM and then configure the slots and I/O as shown in Error! Reference source not found.. This will prepare the Moku:Pro for the CC bitstream.
The file “bitstream.tar.gz” can then be download to your local PC by clicking on the small download icon. We now have a final step to deploy the code to your Moku
- Find IP address In the iPad Moku app; touch and hold on the Moku icon; this will reveal its IP address
You should see the Moku:Pro web interface as shown in Figure 11.
Next, choose the ‘bitstream.tar.gz’ that was downloaded earlier and upload it. In this example, set slot 3 to ‘custom’, tick ‘force’ and select deploy. The custom code will be deployed to the Moku.
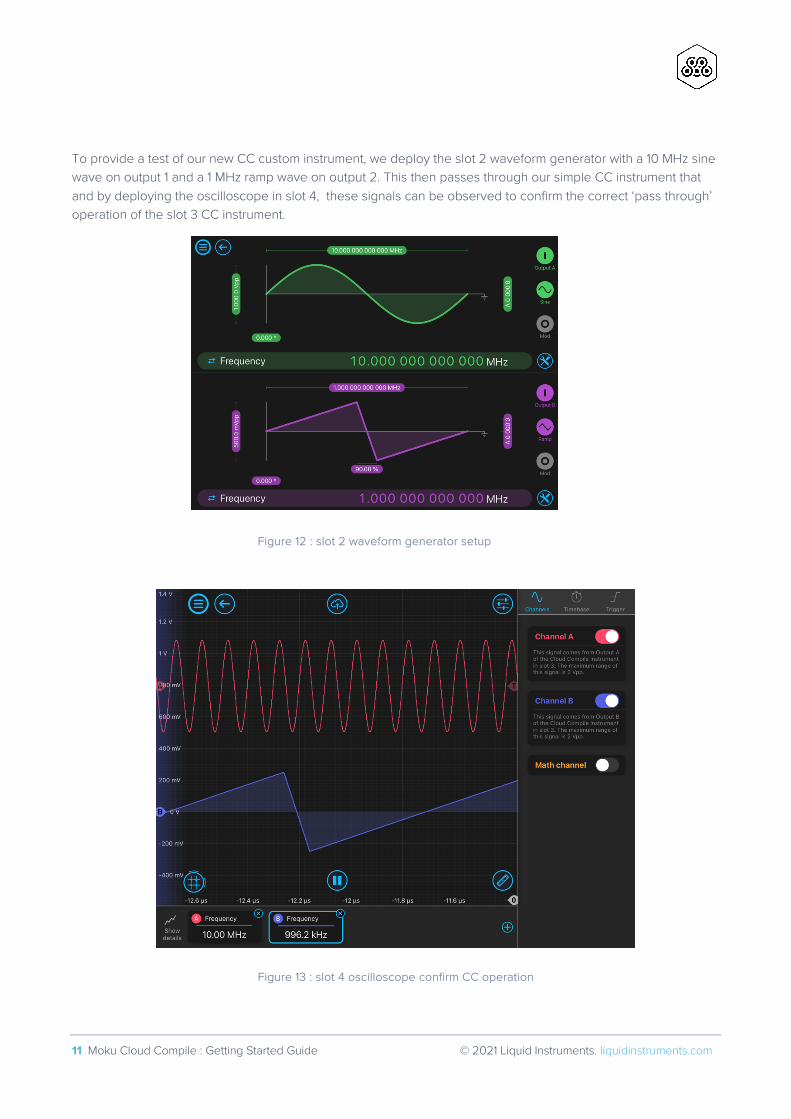
To provide a test of our new CC custom instrument, we deploy the slot 2 waveform generator with a 10 MHz sine wave on output 1 and a 1 MHz ramp wave on output 2. This then passes through our simple CC instrument that and by deploying the oscilloscope in slot 4, these signals can be observed to confirm the correct ‘pass through’ operation of the slot 3 CC instrument.
Figure 12 : slot 2 waveform generator setup
Figure 13 : slot 4 oscilloscope confirm CC operation
VHDL example #2 : subtracting/adding inputs This example shows the VHDL to add and subtract inputs. While a basic and simple example; it has many practical scenarios in the test and measurement world.
VHDL example #3 : scaling and offset inputs / DSP slice This example is slightly more complex than the first two examples.
The code references the VHDL library MercurySupport, this is a Liquid Instruments library and further information on its contents is available on the Help section of the MCC website. Specifically the entity ScaleOffset is named. This entity is an FPGA specific hardware block that is dedicated to multiply and add functions. This entity is instantiated as block ‘DSP’ and used to provide math function of :
Output = (Input * Scale) + Offset
The comments note that the output, Z, is clipped to prevent over or under flowing of the math operation.
Another new feature of this example is the use of Control1 and Control2. These control registers are accessible from the Moku web browser interface and thus provide a way to provide input parameters to the MCC instrument.
architecture Behavioural of CustomWrapper is begin OutputA <= InputA + InputB; OutputB <= InputA – InputB; end architecture;
use WORK.MercurySupport.ScaleOffset; architecture Behavioural of CustomWrapper is begin -- Z = X * Scale + Offset -- Clips Z to min/max (prevents over/underflow) -- Includes rounding -- One Clock Cycle Delay DSP: ScaleOffset port map ( Clk => Clk, Reset => Reset, X => InputA, Scale => signed(Control1.Value(15 downto 0)), Offset => signed(Control2.Value(15 downto 0)), Z => OutputA, Valid => '1', OutValid => open ); end architecture;
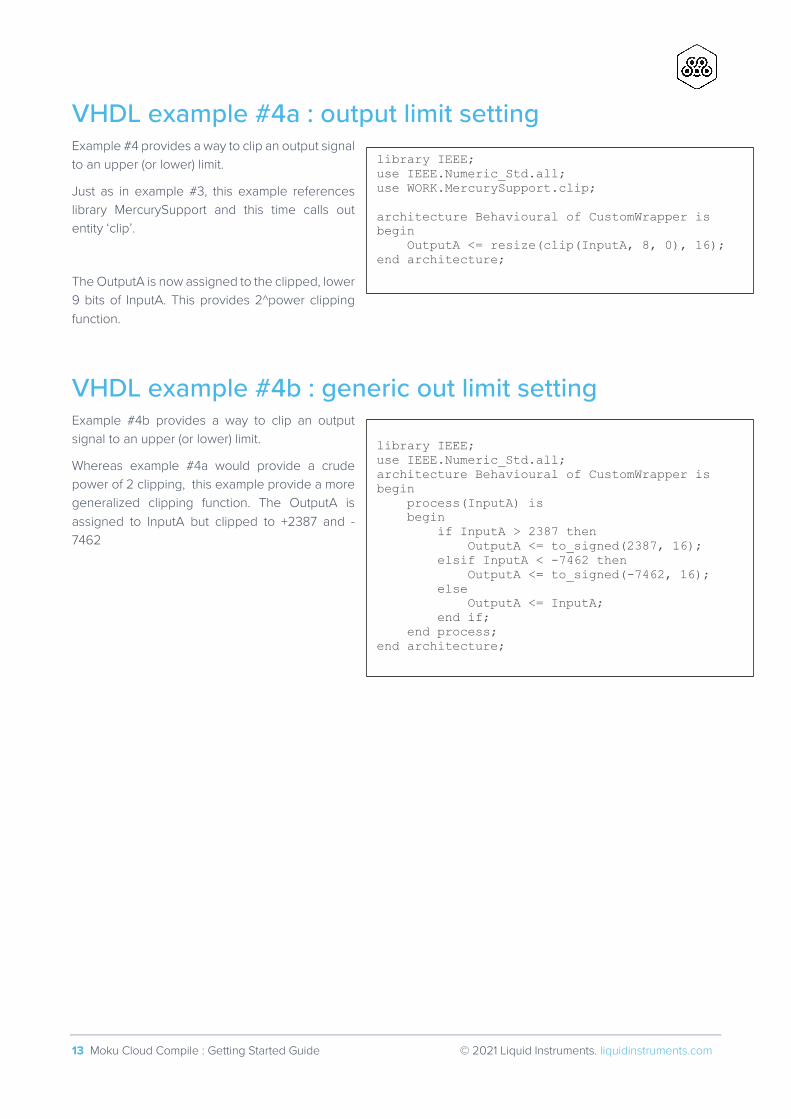
VHDL example #4a : output limit setting Example #4 provides a way to clip an output signal to an upper (or lower) limit.
Just as in example #3, this example references library MercurySupport and this time calls out entity ‘clip’.
The OutputA is now assigned to the clipped, lower 9 bits of InputA. This provides 2^power clipping function.
VHDL example #4b : generic out limit setting Example #4b provides a way to clip an output signal to an upper (or lower) limit.
Whereas example #4a would provide a crude power of 2 clipping, this example provide a more generalized clipping function. The OutputA is assigned to InputA but clipped to +2387 and -7462
library IEEE; use IEEE.Numeric_Std.all; use WORK.MercurySupport.clip; architecture Behavioural of CustomWrapper is begin OutputA <= resize(clip(InputA, 8, 0), 16); end architecture;
library IEEE; use IEEE.Numeric_Std.all; architecture Behavioural of CustomWrapper is begin process(InputA) is begin if InputA > 2387 then OutputA <= to_signed(2387, 16); elsif InputA < -7462 then OutputA <= to_signed(-7462, 16); else OutputA <= InputA; end if; end process; end architecture;
VHDL example #5 : PWM from analog input Example 5 is more lengthy. It generates a pulse width modulation (PWM) signal from the analog inputA. It comprises two files, Counter.vhdl and pwm.vhdl. These are entered as separate files in MCC file editor before building together
-- counter.vhdl library IEEE; use IEEE.Std_logic_1164.all; use IEEE.Numeric_Std.all; --Output Strobe every 2^EXPONENT / INCREMENT Input Strobes --Will quantize to round integers but maintains overflow, so --will average out over time, but will have a +-1 cycle jitter. entity Counter is generic ( EXPONENT : positive := 8; PHASE90 : boolean := false ); port ( Clk : in std_logic; Reset : in std_logic; Enable : in std_logic; Increment : in unsigned; Strobe : out std_logic ); end entity; architecture Behavioural of Counter is signal Count : unsigned(EXPONENT downto 0); begin assert Increment'length <= Count'length severity FAILURE; process(Clk) is begin if rising_edge(Clk) then if Reset = '1' then Count <= (others => '0'); if PHASE90 then Count(EXPONENT - 1) <= '1'; end if; elsif Enable = '1' then --Trim the MSB but allow overflow into it. This gives a single Clk cycle --output pulse on Strobe. Count <= resize(Count(Count'left-1 downto 0), Count'length) + Increment; else Count(Count'left) <= '0'; end if; end if; end process; Strobe <= Count(Count'left); end architecture;
Summary In this application note we have explained some of the advantages and benefits of Moku Cloud Compile when operating as part of Multi Instrument Mode on Moku:Pro. The entire process from entering the simplest VHDL case of example #1 was covered from the point of entering the HDL code, through building deploying and confirming expected operation.
Further example code was presented and briefly explained; inviting the user to experiment with the possibilities opened up by MCC.
Further CC examples of more complex math operations, custom trigger modes and other applications can be developed from these basics.
Moku:Pro Demo mode You can download the Moku app for iPadOS for free at the Apple app store. The demo mode operates without need for any hardware and provides a great overview of using Moku:Pro and its interface.


![Getting Started in RobotC // Comment task main() motor[] {} wait1Msec() ; = Header Code Compile Download Run Take out your notes.](https://static.documents.pub/doc/80x56/5697bfc91a28abf838ca8ca7/getting-started-in-robotc-comment-task-main-motor-wait1msec-.jpg)


