59
Vasco da Gama User Manual version 1
Vasco da Gama
User Manual version 1
CopyrightCopyright © 2004 MotionStudios, Osterholzer Dorfstrasse 73a, 28307 Bremen, Germany
The duplication, translation or other re-use of this manual in whole or in part is prohibited withoutthe prior written permission of MotionStudios, or unless agreed by the copyright holder orauthorised under the copyright law.
Website: http://www.motionstudios.deEmail: [email protected]
Concept and development: Ingo KleefeldUser interface and design: Ingo Kleefeld
3D engine: Axel Deising3D objects: Ivan and Predrag Pesic
User manual: Stefan Kost
Exclusion of liabilityAlthough the information contained in this manual was compiled with the greatest of care, it maynot have been possible to eliminate all errors.
MotionStudios accepts no liability for direct, indirect, incidental or other damage or consequentialdamage resulting from the use of the information contained in this manual.
MotionStudios reserves the right to change the information contained in this manual without priornotice.
MotionStudios shall not be liable to render the program error-free and accepts no liability for theaccuracy or correctness of the information given. In particular, MotionStudios makes no guaranteethat the program will meet the requirements or purposes of the purchaser or that it will work withother programs he or she may choose to use.
MotionStudios accepts no liability for consequential damage. This applies even to cases where thelicenser is informed of the risk of such damage. In all cases, the liability is limited to the amountpaid by the licensee for the program. Liability for gross negligence with regard to traders isexcluded. Claims based on mandatory legal provisions for product liability remain unaffected.
Trademarks usedWindows is a trademark of Microsoft Inc. USA.
Other product names and brand names may be brands or registered brands of the respective owners.
3D objects usedThis product contains 3D models licensed by DoschDesign GmbH in Marktheidenfeld 97828.
Software components usedThis product uses the DevIL library distributed under the LGPL. Information and resources can befound on the project website at http://openil.sourceforge.net.

Table of Contents1 Foreword............................................................................................................................................12 Introduction and Installation..............................................................................................................2
2.1 What exactly is Vasco da Gama?...............................................................................................22.2 Installation der Software auf Ihrem Computer.......................................................................... 22.3 Starting the software.................................................................................................................. 4
3 Vasco da Gama in detail....................................................................................................................53.1 The main display screen.............................................................................................................5
3.1.1 The map area...................................................................................................................... 63.1.2 The timeline....................................................................................................................... 83.1.3 The main menu...................................................................................................................9
3.1.3.1 Points..........................................................................................................................93.1.3.2 Objects......................................................................................................................173.1.3.3 Route........................................................................................................................ 20
3.1.4 The project bar................................................................................................................. 253.2 Object selection........................................................................................................................273.3 Colour selection....................................................................................................................... 293.4 Video preview..........................................................................................................................303.5 Project settings.........................................................................................................................313.6 Program settings...................................................................................................................... 33
4 Tutorial............................................................................................................................................ 364.1 Example 1................................................................................................................................ 364.2 Example 2................................................................................................................................ 40
5 Troubleshooting...............................................................................................................................456 Support............................................................................................................................................ 467 Glossary........................................................................................................................................... 478 Tastaturkürzel.................................................................................................................................. 499 3D Objekt Galerie............................................................................................................................50


1 Foreword
1 ForewordDear Customer,
Thank you for choosing Vasco da Gama software. Vasco da Gama offers you a range of new functions that you can use on your PC toenhance your video productions.
This user manual will introduce you to the extensive capabilities of the software andgive you practical tips on how to use it effectively. The manual is divided into thefollowing main sections: “Introduction and installation”, “Vasco da Gama in detail” and“tutorial”. At the end of the manual, you will also find a small glossary in whichtechnical terms are explained. So if you come across a term in the text that you do notrecognise, you can look it up in the glossary. You can also look up terms on the Internet,e.g. in the free English language encyclopaedia at http://en.wikipedia.org. At this point, we would like to point out some conventions used in this manual.
This symbol is used to indicate a tip. In a section marked with this symbol, you willfind useful information and suggestions related to the program.
In contrast, this symbol is used to highlight important sections. Please make sure toobserve the information in these boxes at all times.
We hope you enjoy using your new Vasco da Gama software.
Your MotionStudios team
1

MotionStudios : Vasco da Gama
2 Introduction and Installation2.1 What exactly is Vasco da Gama?Vasco da Gama is software that offers new functions in the area of PC video editing.
Vasco da Gama is mainly used to create attractive graphical representations of travelroutes on world, country and city maps. To enable you to do this, Vasco da Gama offers you multiple video sequence designoptions. With the videos you create, you can enhance your travel and your holidayvideos in a way that you’ve only ever seen before in TV productions.
The Vasco da Gama software package contains various different types of maps and avariety of 3D objects, for example cars, aeroplanes, ships and trains.
In addition to these extensive features, Vasco da Gama offers a design that is sophisti-cated and simple to use, allowing you to give free rein to your creativity. We havedesigned the software so that a project needs no preparatory work at all. You can justjump in and get started immediately – all settings can be changed at any time. You willalso notice that any changes to settings are usually immediately visible. This shouldencourage you to “play” with the settings and see what happens.
2.2 Installation of the software to your ComputerIncluded in your Vasco da Gama software package is this manual, a registration cardwith serial number and a CD. Before you can use the software, it must be set up on yourcomputer.
Please note that the minimum requirements to use Vasco da Gama are a PC equippedwith an 800 MHz processor, 256 MB main memory (RAM), a 3D capable graphicscard and Windows 98SE/2000/XP operating system.
Your desktop should be running at a resolution of 1024x768 pixels and true-colourcolour depth (24/32bit colour depth).
Vasco da Gama also requires DirectX 9.0. If necessary, please install this first. Youwill find a recent version of DirectX on the CD.
To install, please insert the Vasco da Gama CD into your CD or DVD drive. Theinstallation wizard will soon appear. If the autoplay function is not activated on your PCor if for some other reason the installation wizard does not appear, double click on theMy Computer symbol on your desktop and then on the symbol for your CD-ROM drivewhere the Vasco da Gama CD is inserted. Double click on the file setup.exe in the listof files to start the installation wizard.
The installation wizard appears and starts preparing theinstallation. Please be patient as this can take a few seconds.
2
2.2 Installation of the software to your Computer
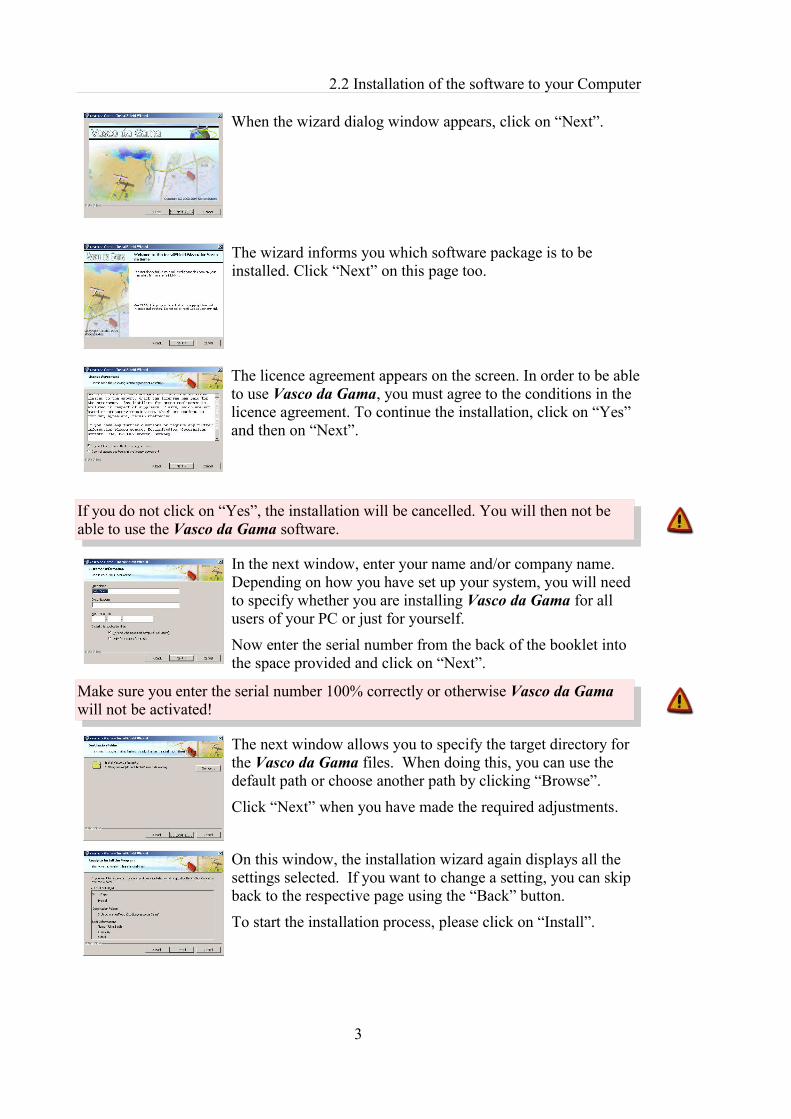
When the wizard dialog window appears, click on “Next”.
The wizard informs you which software package is to beinstalled. Click “Next” on this page too.
The licence agreement appears on the screen. In order to be ableto use Vasco da Gama, you must agree to the conditions in thelicence agreement. To continue the installation, click on “Yes”and then on “Next”.
If you do not click on “Yes”, the installation will be cancelled. You will then not beable to use the Vasco da Gama software.
In the next window, enter your name and/or company name.Depending on how you have set up your system, you will needto specify whether you are installing Vasco da Gama for allusers of your PC or just for yourself.
Now enter the serial number from the back of the booklet intothe space provided and click on “Next”.
Make sure you enter the serial number 100% correctly or otherwise Vasco da Gamawill not be activated!
The next window allows you to specify the target directory forthe Vasco da Gama files. When doing this, you can use thedefault path or choose another path by clicking “Browse”.
Click “Next” when you have made the required adjustments.
On this window, the installation wizard again displays all thesettings selected. If you want to change a setting, you can skipback to the respective page using the “Back” button.
To start the installation process, please click on “Install”.
3
MotionStudios : Vasco da Gama
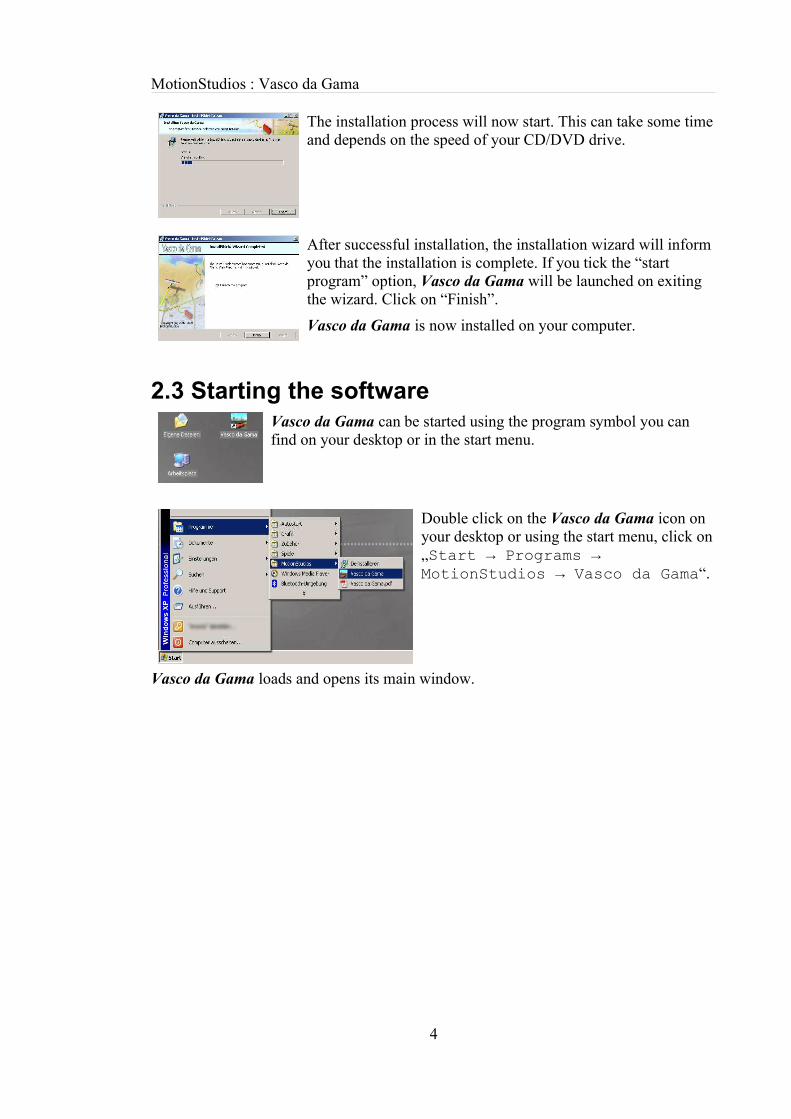
The installation process will now start. This can take some timeand depends on the speed of your CD/DVD drive.
After successful installation, the installation wizard will informyou that the installation is complete. If you tick the “startprogram” option, Vasco da Gama will be launched on exitingthe wizard. Click on “Finish”.
Vasco da Gama is now installed on your computer.
2.3 Starting the softwareVasco da Gama can be started using the program symbol you canfind on your desktop or in the start menu.
Double click on the Vasco da Gama icon onyour desktop or using the start menu, click on„Start → Programs →MotionStudios → Vasco da Gama“.
Vasco da Gama loads and opens its main window.
4

3 Vasco da Gama in detail
3 Vasco da Gama in detailCreating a route in Vasco da Gama usually begins with choosing a suitable map. Youthen specify points to show the stopovers on your tour. You can add 3D objects e.g.houses, castles or sports stadiums to these stopover points. These objects are calledstopover objects. It is also possible to add text objects to label these stopovers. You canalso select 3D objects that symbolise the means of transport used for the differentsections of the route. These objects are called header objects as they mark the mostadvanced point of the route during the video animation. Throughout the whole tour, youcan use the Vasco da Gama camera to fly over the map and zoom in on different points.The completed video can be output as a whole or as individual video sequences and thenloaded into a video-editing program of your choice.
The following sections explain all the application display controls in detail. In chapter 4from page 36 of the tutorial, we use examples to illustrate the use of the functionsdescribed in the following section.
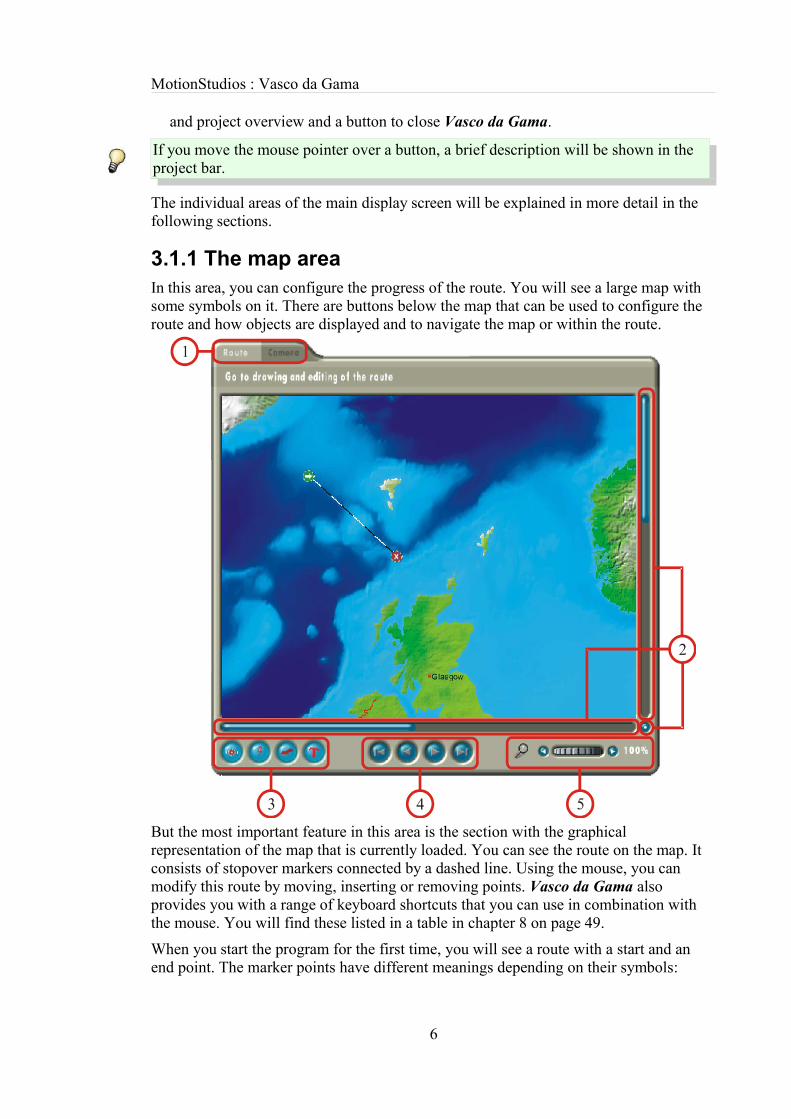
3.1 The main display screenWhen you start Vasco da Gama, you will see the following screen. The window isdivided into 4 main areas. Each area contains numerous user controls. Some areas havetabs at the top with which you can switch between different pages.
1. The map area shows the map and the route. You can change the route here using themouse.
2. The timeline is used to control the chronological progress of the video.3. The main menu offers settings and options for the stopovers, the 3D objects
displayed and the route.4. The project bar contains buttons for loading and saving projects, for project settings
5
MotionStudios : Vasco da Gama
and project overview and a button to close Vasco da Gama.
If you move the mouse pointer over a button, a brief description will be shown in theproject bar.
The individual areas of the main display screen will be explained in more detail in thefollowing sections.
3.1.1 The map areaIn this area, you can configure the progress of the route. You will see a large map withsome symbols on it. There are buttons below the map that can be used to configure theroute and how objects are displayed and to navigate the map or within the route.
But the most important feature in this area is the section with the graphicalrepresentation of the map that is currently loaded. You can see the route on the map. Itconsists of stopover markers connected by a dashed line. Using the mouse, you canmodify this route by moving, inserting or removing points. Vasco da Gama alsoprovides you with a range of keyboard shortcuts that you can use in combination withthe mouse. You will find these listed in a table in chapter 8 on page 49.
When you start the program for the first time, you will see a route with a start and anend point. The marker points have different meanings depending on their symbols:
6

3.1.1 The map area
Name Symbol MeaningStartingpoint
This marks the beginning of the route.
Stopoverpoint
This type of point can be used to indicate any point at whichyou made a stop. Vasco da Gama can then automatically cutthe resulting video at this point. You will find the settingsnecessary for this in section 3.1.3.1 on page 9.
Supportingpoint
Supporting points allow you to control the progress of theroute.
End point This type of point specifies the end of the route.
Weiterhin unterscheiden sich die Punkte in ihrer Farbe. Die Farbgebung kennzeichnetden Modus eines Punktes:
Colour MeaningGreen signalises that the point is active. For example, you can activate apoint by selecting it with the mouse. If a point is active, its settings (e.g.whether it displays a 3D stopover object) are always applied.
Only one point can be active at any one time.
When a point is active, you can move it. To do this, click on the pointusing the left mouse button and move the mouse while keeping the leftmouse button pressed down. Right click to stop moving the point.If a point is red, this means it is not active and is therefore not beingedited at the current time.
To add new points to the route, just left click between two existing points on the linerepresenting the route. A new supporting point will then be added and activated at theposition clicked. You can now move this to the required position using the mouse oryou can convert it into a stopover point. (see section 3.1.3.1 on page 9).
To remove a point, first activate it so that it turns green. Then right click on the point.Start points and end points cannot be deleted.
You can add, delete or move points at any time during your work on the project. It istherefore up to you whether you want to create all the points first and set them up orwhether you want to take each point at a time.
We now come to the user controls in the map area.
1. Switching between the route editor and the camera editor:You can switch between the two editors using the tabs. In the route editor, you canspecify the main stopovers on your tour. These will be visible as a dashed line withstopover markers. The camera view shows you the route as you will see it in thefinished video. You can also define how the camera travels and zooms.
2. Adjusting the visible part of the map:You can change which part of the map is visible using the vertical and horizontalbars. Alternatively you can change the section of the map displayed by clicking onthe round button at the bottom right and moving the mouse while holding the mousebutton down. The section of the map displayed then changes according to the
7

MotionStudios : Vasco da Gama
movement of the mouse.In camera view, you can only move around the map if the option “manual cameracontrol” is activated (see chapter 3.1.3.3, page 23) and the camera setting for thecurrent point is on “manual positioning” (see chapter 3.1.3.1, page 9).
3. Display options for objects on the maps:With these switches, you can activate or deactivate the display of objects on the map.When the objects are active, the switches are marked with a red symbol and light up.Otherwise the symbol is black and the buttons are not lit up. From left to right, theobjects controlled by the switches are: the route, the objects at stopover points,
the objects at the head of the route and text label objects.
4. Browsing through marker points:At a minimum, a route consists of a start point and an end point. Between these, therecan be supporting points and stopover points. All these points are connected by thedashed line representing the route. To edit a point, you must select it. You can usethese buttons to do this.In camera view, a camera is displayed to the left of these buttons if the markerpoint is a supporting point for the camera. This is preset for start points, end pointsand stopover points but not for supporting points. Section 3.1.3.3 on page 23describes how to change this setting.
5. Enlarging the map area:The two buttons and the wheel beside the magnifying glass are used to zoom in andout on the visible map area. With these buttons, you can shrink or enlarge the maparea in small steps. To use the wheel, click on it and move the mouse to the left toshrink and to the right to enlarge. Left click to apply the setting and right click torestore the original setting. The current enlargement is shown on the left hand side.In camera mode, the enlargement can only be set up for marker points to the left ofthe scan buttons that are marked with a camera .
3.1.2 The timelineYour work in Vasco da Gama produces a video or a series of video sequences showingthe animated travel route. You can go to specific points in time using the timeline.
The blue bar in the timeline tells you the time progressed at the point at which you arecurrently working. To the right of the timeline, the time is displayed again in the form'Minuten:Sekunden.Videobilder'.To go back and forward in time, left click on the blue bar and move the mouse to theright or left while keeping the mouse button pressed down. When you do this in cameraview, you will immediately see the camera moving on the map.
8
3.1.3 The main menu
3.1.3 The main menuThis section contains all the functions used to edit the waypoints, the 3D objects and theroute. You can switch between the individual areas using the tabs at the top.
There is a submenu bar under each tab. Each submenu is made up of sections withdifferent titles.
Simply browse through all the tabs and submenus belonging to them and take a look atthe settings. This will help you get to know your way around the software for later.
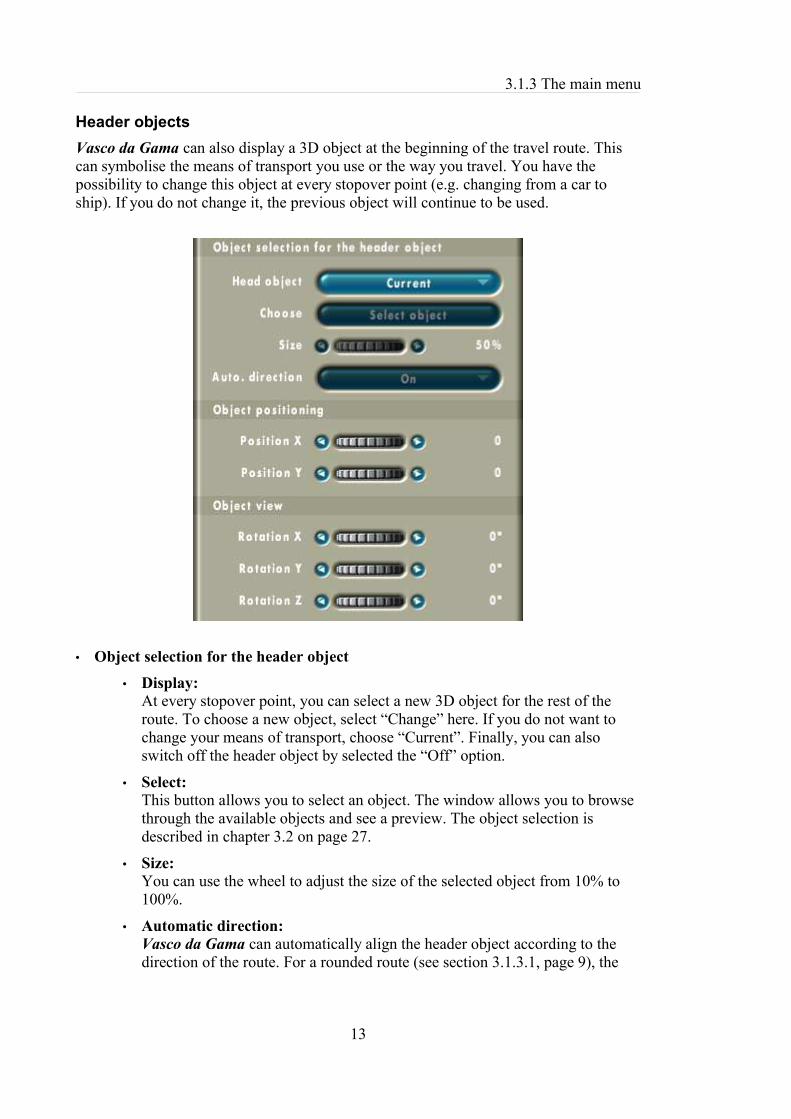
3.1.3.1 PointsThis menu provides you with a range of design options for the stopovers on the route.They range from adjusting the appearance of the header object to selecting the stopoverobjects and adding text objects.
Only the first menu point is available for supporting points.
Supporting points and stopover pointsHere you will find all configuration options for the marker point currently selected. It ismarked in green on the map.
• Points• Type:
If you activate a stopover or a supporting point, you can use this setting tochange its type. Reminder: You use stopover points for the stopovers on yourroute. Supporting points are used to form the course of the route.
• Line:You can use these options to change the shape of the curve. A smooth curvedline is set as default. If you change to “Angular”, a straight line is drawn toand away from the object. If “Angular” is selected for two neighbouringpoints, these points will be connected by a straight line. You can see the
9

MotionStudios : Vasco da Gama
difference in the following two pictures:
smooth line angular line
• Stop time:Whenever the route reaches a stopover point, the header object pauses for amoment before the route is continued further. The pause duration isdetermined by the stop time. If the stop time is set to zero, the movementcontinues immediately.The stop time has another function. Instead of one long video, Vasco daGama can produce several short sequences. Whenever a stop time is longerthan 2 frames, then Vasco da Gama on request can place a cut at this point inthe middle of the stop time. This makes it easier to integrate into your videoediting program. You can switch automatic cutting on and off in the projectsettings (see chapter 3.5, page 31).
• Camera settings• Positionierung:
The camera positioning can only be changed if the option “manual cameralcontrol” is activated. This is explained in chapter 3.1.3.3 on page 23. Thesimplest mode is “centred” as this ensures that the stopover point is in themiddle of the picture. In contrast, “manual” allows you to freely position thecamera using the controls in the map area (see chapter 3.1.1, page 6). Thethird option that can be selected is “Off”. If this is selected, the camera movesfrom the previous stopover point to the next without making a separate stop atthe current point.
10

3.1.3 The main menu
Objects at stopover pointsYou can add 3D objects to every stopover point. In this submenu, you will find optionsto individually design each stopover point.
• Object selection for stopover point• Object:
Vasco da Gama can display a global object (see section 3.1.3.2 on page 17), aspecial (local) object or no object at this stopover point. If you decide to use alocal stopover object, you can select it using the following controls.
• Stopover object:This button allows you to select the object. The window allows you to browsethrough the available objects and see a preview. The object selection isdescribed in chapter 3.2 on page 27.
• Size:You can use the wheel to adjust the size of the selected object from 10% to100%.
• Object positioningObjects are displayed relative to the respective stopover point. If you subsequentlymove a stopover point, the object belonging to it moves with it.
• Position:If “Global” is selected here, the positioning details from the global object
11

MotionStudios : Vasco da Gama
settings (see section 3.1.3.2, page 17) are applied. If these settings are not verysuitable for a particular point, for example because the object is covering adetail on the map, you can change this option to “local” and then choose adifferent position with the following controls.
• Horizontal:Moves the object to the left or the right relative to the stopover point.
• Vertical:Moves the object up or down.
• Object view• View:
If “Global” is selected here, the view details from the global object settings(see section 3.1.3.2, page 17) are applied. If these settings are not verysuitable for a particular point, they can also be adjusted by switching to“local”.
• X angle : Rotates the object around the horizontal axis by the angle specified.
• Y angle: Rotates the object around the vertical axis by the angle specified.
• Z angle: Rotates the object around the z axes (depth) by the angle specified.
12
3.1.3 The main menu
Header objectsVasco da Gama can also display a 3D object at the beginning of the travel route. Thiscan symbolise the means of transport you use or the way you travel. You have thepossibility to change this object at every stopover point (e.g. changing from a car toship). If you do not change it, the previous object will continue to be used.
• Object selection for the header object• Display:
At every stopover point, you can select a new 3D object for the rest of theroute. To choose a new object, select “Change” here. If you do not want tochange your means of transport, choose “Current”. Finally, you can alsoswitch off the header object by selected the “Off” option.
• Select:This button allows you to select an object. The window allows you to browsethrough the available objects and see a preview. The object selection isdescribed in chapter 3.2 on page 27.
• Size:You can use the wheel to adjust the size of the selected object from 10% to100%.
• Automatic direction:Vasco da Gama can automatically align the header object according to thedirection of the route. For a rounded route (see section 3.1.3.1, page 9), the
13
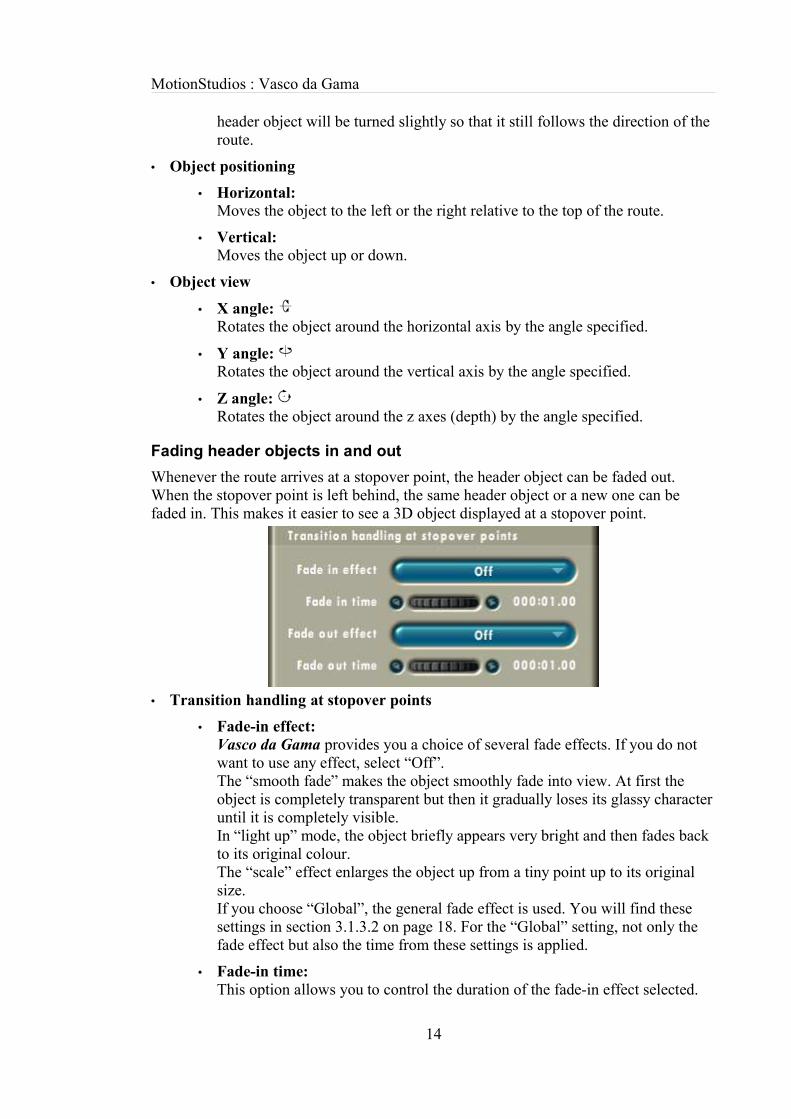
MotionStudios : Vasco da Gama
header object will be turned slightly so that it still follows the direction of theroute.
• Object positioning• Horizontal:
Moves the object to the left or the right relative to the top of the route.
• Vertical:Moves the object up or down.
• Object view
• X angle: Rotates the object around the horizontal axis by the angle specified.
• Y angle: Rotates the object around the vertical axis by the angle specified.
• Z angle: Rotates the object around the z axes (depth) by the angle specified.
Fading header objects in and outWhenever the route arrives at a stopover point, the header object can be faded out.When the stopover point is left behind, the same header object or a new one can befaded in. This makes it easier to see a 3D object displayed at a stopover point.
• Transition handling at stopover points• Fade-in effect:
Vasco da Gama provides you a choice of several fade effects. If you do notwant to use any effect, select “Off”.The “smooth fade” makes the object smoothly fade into view. At first theobject is completely transparent but then it gradually loses its glassy characteruntil it is completely visible.In “light up” mode, the object briefly appears very bright and then fades backto its original colour.The “scale” effect enlarges the object up from a tiny point up to its originalsize.If you choose “Global”, the general fade effect is used. You will find thesesettings in section 3.1.3.2 on page 18. For the “Global” setting, not only thefade effect but also the time from these settings is applied.
• Fade-in time:This option allows you to control the duration of the fade-in effect selected.
14

3.1.3 The main menu
The time details are displayed as 'minutes: seconds.videoframes'. You can select values from 1 frame up to 12 seconds.
However if the time is too short, you will hardly see the effect. We recommenda minimum fade time of one second.
• Fade-out effect:Here you can select the desired fade-out effect. These are the same as thefade-in effects but have the opposite effect.
• Fade-out time:This option allows you to control the duration of the fade-out effect selected.This function is also the same as that for the fade-in time.
Text at stopover pointsEvery stopover point can be labelled with a text object. You can use these to identifystopovers that have not yet been assigned a name in the map.The design settings for text objects, such as font and size and borders and shadow areexplained in chapter 3.1.3.3 on page 22.
• Text details for stopover point• Show text:
Select this if you would like to add a text object to the current stopover point.
• Text:You can enter the text to be displayed into this box using the keyboard. Thetext can only be one line long.
Try to use the shortest description possible, so that not too much of the mapand the route are covered up.
• Position:The text is displayed relative to the stopover point. If you move the stopoverpoint, the text moves with it. Using this option, you can choose whereaboutsthe text will be placed.
• Abstand:The higher you set the distance, the farther away the text object will be placedfrom its stopover point.
15
MotionStudios : Vasco da Gama
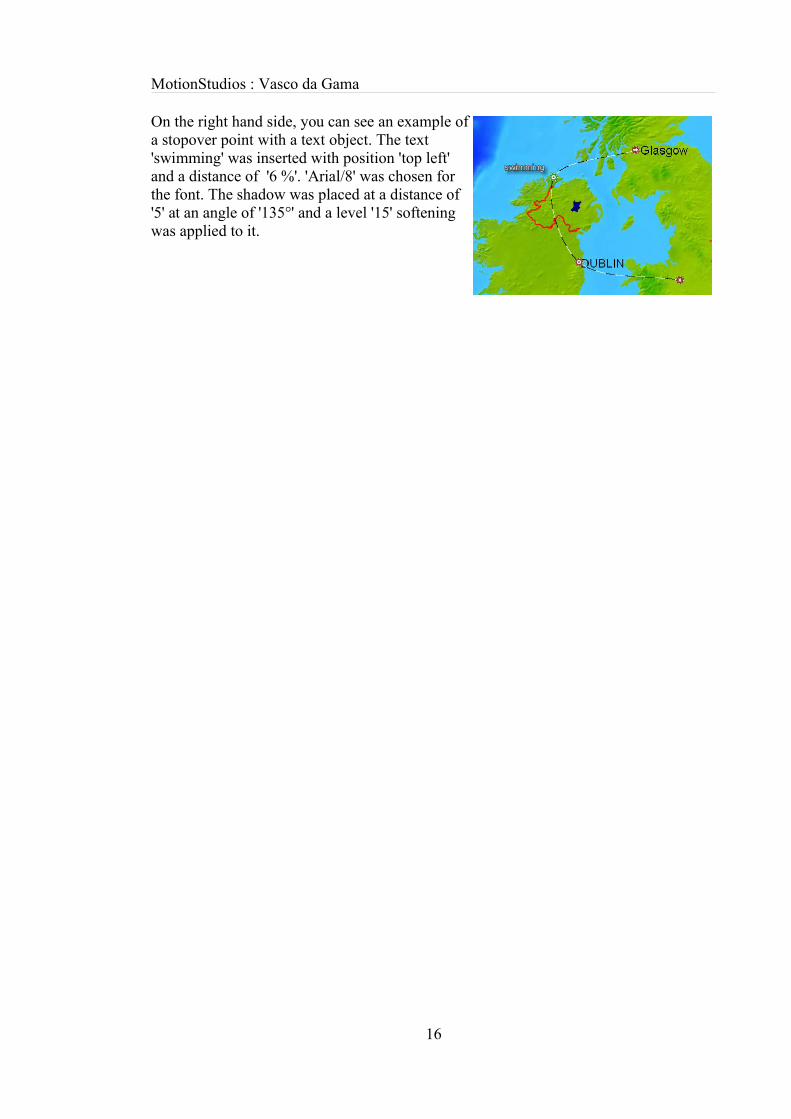
On the right hand side, you can see an example ofa stopover point with a text object. The text'swimming' was inserted with position 'top left'and a distance of '6 %'. 'Arial/8' was chosen forthe font. The shadow was placed at a distance of'5' at an angle of '135°' and a level '15' softeningwas applied to it.
16

3.1.3 The main menu
3.1.3.2 ObjectsIn this menu you will find a variety of settings with which you can change the display ofheader and stopover objects. This includes fade and lighting settings.
Global stopover objectDefining various stopover objects can take a lot of time. Therefore Vasco da Gamagives you the possibility to select a global object for all stopover points. You can replacethis object with another for specific stopover points. You can read up on how this isdone in section 3.1.3.1 on page 11.
• Object selection for stopover point• Display:
Select “On” here if you would like to use a global stopover object.
• Stopover object: This button allows you to select an object. The window allows you to browsethrough the available objects and see a preview. The object selection isdescribed in chapter 3.2 on page 27.
• Size:You can use the wheel to adjust the size of the selected object from 10% to100%.
• Object positioning• Horizontal:
Moves the object to the left or the right relative to the top of the route.
17
MotionStudios : Vasco da Gama
• Vertical:Moves the object up or down.
• Object view
• X angle: Rotates the object around the horizontal axis by the angle specified.
• Y angle: Rotates the object around the vertical axis by the angle specified.
• Z angle: Rotates the object around the z axes (depth) by the angle specified.
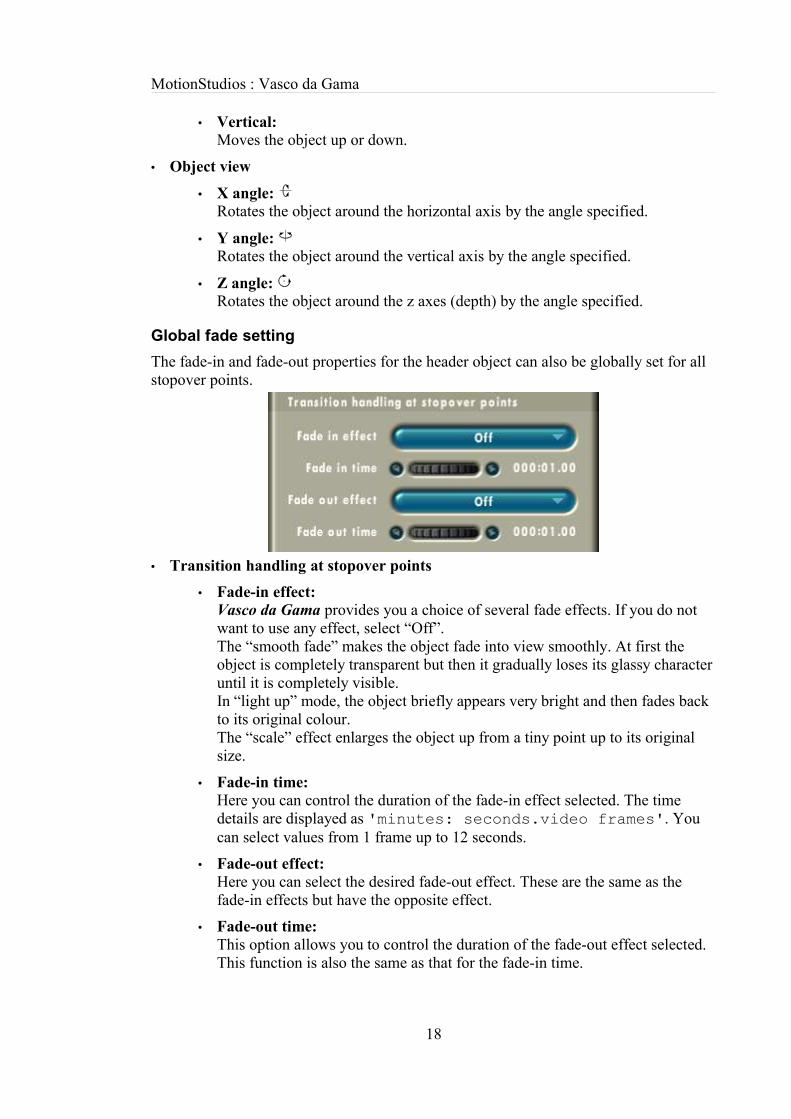
Global fade settingThe fade-in and fade-out properties for the header object can also be globally set for allstopover points.
• Transition handling at stopover points• Fade-in effect:
Vasco da Gama provides you a choice of several fade effects. If you do notwant to use any effect, select “Off”.The “smooth fade” makes the object fade into view smoothly. At first theobject is completely transparent but then it gradually loses its glassy characteruntil it is completely visible.In “light up” mode, the object briefly appears very bright and then fades backto its original colour.The “scale” effect enlarges the object up from a tiny point up to its originalsize.
• Fade-in time:Here you can control the duration of the fade-in effect selected. The timedetails are displayed as 'minutes: seconds.video frames'. Youcan select values from 1 frame up to 12 seconds.
• Fade-out effect:Here you can select the desired fade-out effect. These are the same as thefade-in effects but have the opposite effect.
• Fade-out time:This option allows you to control the duration of the fade-out effect selected.This function is also the same as that for the fade-in time.
18

3.1.3 The main menu
Object light settingsThe 3D objects displayed are illuminated by a virtual light source. This contributessignificantly to a realistic 3D representation. If you are only using 2D objects, you canswitch off the light. The flat objects will then appear to have a more uniform colour.When the light source is activated, you can use this menu to set the direction and colourof the light.
• Light settings• Use light:
Choose whether a light source is to be used or not.
• Direction:You can use this menu selection to specify which way the light source isdirected.
• Colour:This shows you the current colour of the light. The “select colour” button willbring you to the colour selection, which is displayed in a separate window.This is described in chapter 3.3 on page 29.
19
MotionStudios : Vasco da Gama
3.1.3.3 RouteThis submenu contains settings for the route. Among other things, you can change howthe line of the route is displayed, you can edit the appearance of text objects and the typeof camera control and you can set the total time for the video.
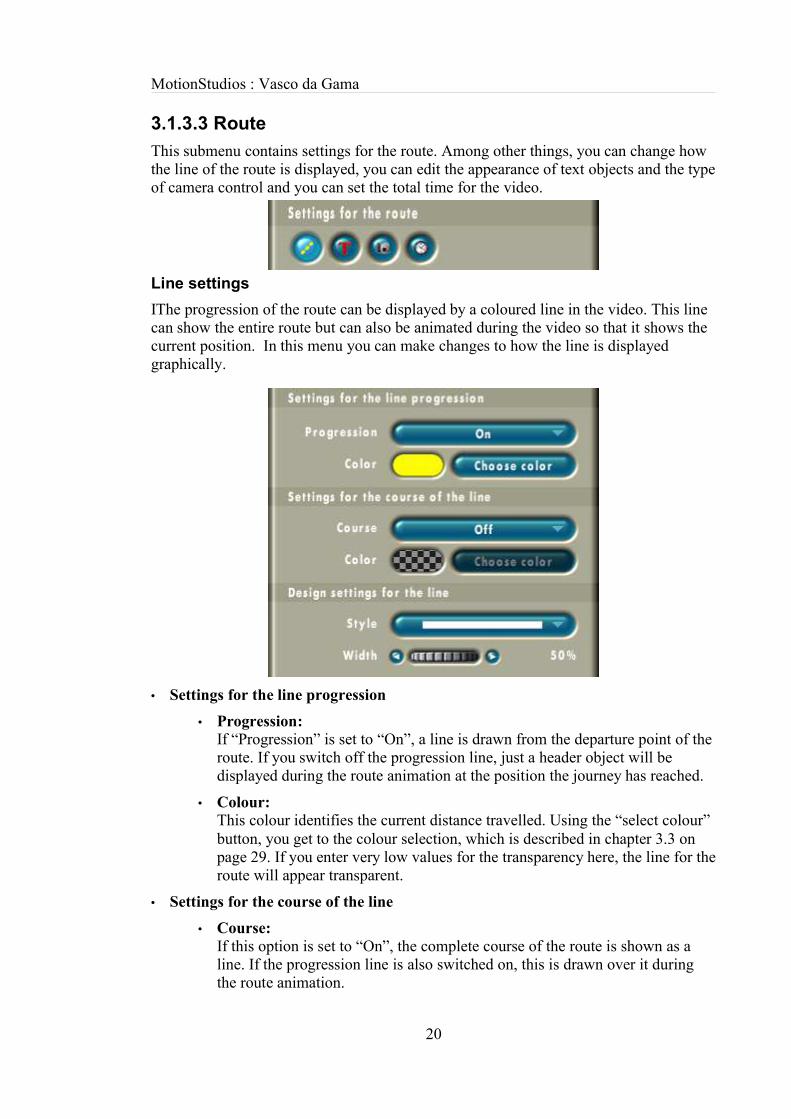
Line settingsIThe progression of the route can be displayed by a coloured line in the video. This linecan show the entire route but can also be animated during the video so that it shows thecurrent position. In this menu you can make changes to how the line is displayedgraphically.
• Settings for the line progression• Progression:
If “Progression” is set to “On”, a line is drawn from the departure point of theroute. If you switch off the progression line, just a header object will bedisplayed during the route animation at the position the journey has reached.
• Colour:This colour identifies the current distance travelled. Using the “select colour”button, you get to the colour selection, which is described in chapter 3.3 onpage 29. If you enter very low values for the transparency here, the line for theroute will appear transparent.
• Settings for the course of the line• Course:
If this option is set to “On”, the complete course of the route is shown as aline. If the progression line is also switched on, this is drawn over it duringthe route animation.
20

3.1.3 The main menu
• Colour:This colour is used to draw the complete course of the route. Again, you canalso use the “select colour” button to select a colour. And again, you cancreate a transparent line by selecting a low value for the transparency.
Both lines “Off” Progression is “On”
Course is “On” Both lines are “On”• Design settings for the line
• Style:Vasco da Gama offers you four different line styles, such as solid, dashed anddotted.
• Width:You can use this to select the width of the coloured route line.
21
MotionStudios : Vasco da Gama
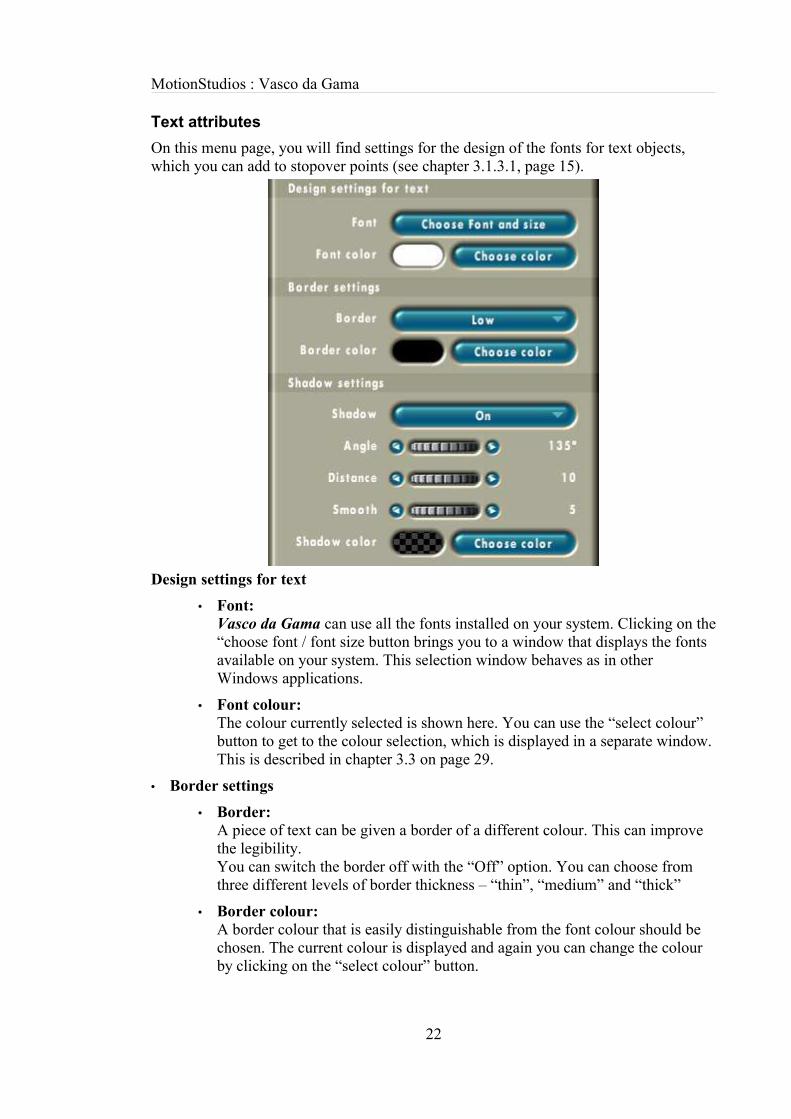
Text attributesOn this menu page, you will find settings for the design of the fonts for text objects,which you can add to stopover points (see chapter 3.1.3.1, page 15).
Design settings for text• Font:
Vasco da Gama can use all the fonts installed on your system. Clicking on the“choose font / font size button brings you to a window that displays the fontsavailable on your system. This selection window behaves as in otherWindows applications.
• Font colour:The colour currently selected is shown here. You can use the “select colour”button to get to the colour selection, which is displayed in a separate window.This is described in chapter 3.3 on page 29.
• Border settings• Border:
A piece of text can be given a border of a different colour. This can improvethe legibility.You can switch the border off with the “Off” option. You can choose fromthree different levels of border thickness – “thin”, “medium” and “thick”
• Border colour:A border colour that is easily distinguishable from the font colour should bechosen. The current colour is displayed and again you can change the colourby clicking on the “select colour” button.
22
3.1.3 The main menu
• Shadow settings• Shadow:
Vasco da Gama can also add a shadow to the font. This makes the font looklike it is floating lightly above the map.
• Angle:You can use this option to choose the direction in which the shadow falls.This can be an angle between 0° and 360°.
If you are using a light source, you should make sure that the light directionand the shadow direction agree with each other.
• Distance:You can use the “distance” control to set the distance between the shadow andthe font. The higher the distance you choose, the higher the font seems tofloat above the map.
• Softening:The shadow can be sharp or “blurred”. The higher the value for “setsoftening” you set, the more blurred the shadow will appear.
• Shadow colour:You can select a colour for the shadow too.
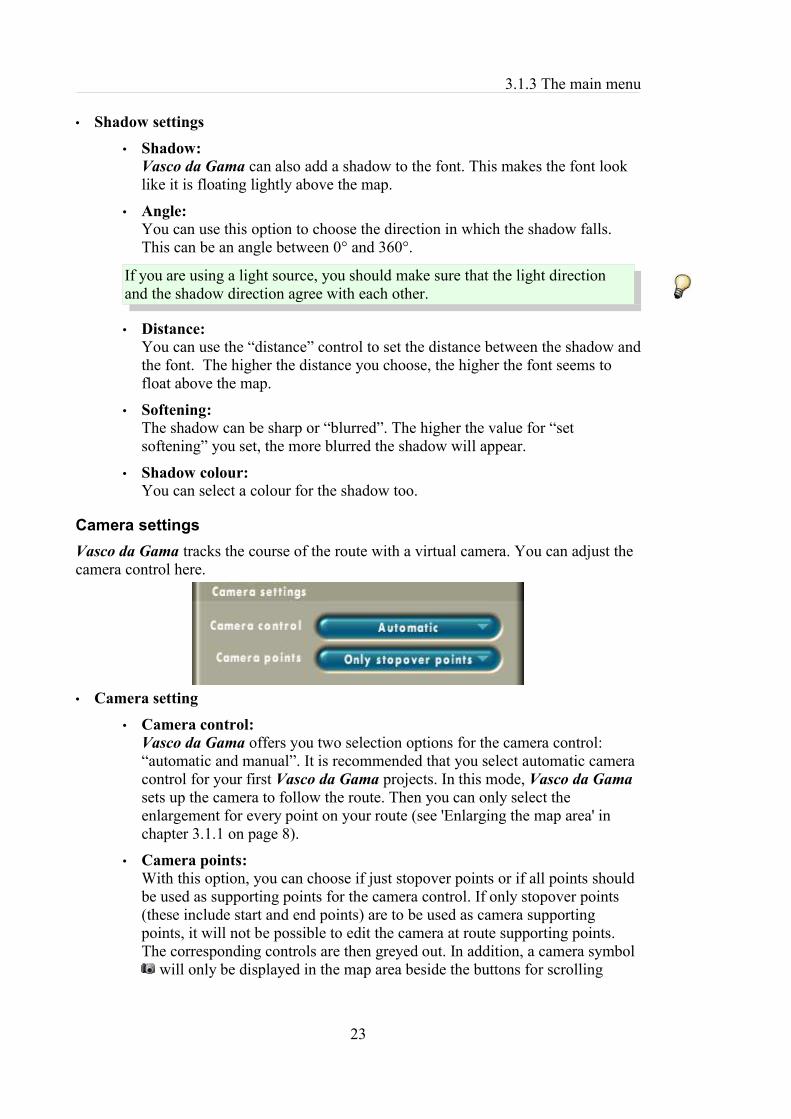
Camera settingsVasco da Gama tracks the course of the route with a virtual camera. You can adjust thecamera control here.
• Camera setting• Camera control:
Vasco da Gama offers you two selection options for the camera control:“automatic and manual”. It is recommended that you select automatic cameracontrol for your first Vasco da Gama projects. In this mode, Vasco da Gamasets up the camera to follow the route. Then you can only select theenlargement for every point on your route (see 'Enlarging the map area' inchapter 3.1.1 on page 8).
• Camera points:With this option, you can choose if just stopover points or if all points shouldbe used as supporting points for the camera control. If only stopover points(these include start and end points) are to be used as camera supportingpoints, it will not be possible to edit the camera at route supporting points.The corresponding controls are then greyed out. In addition, a camera symbol
will only be displayed in the map area beside the buttons for scrolling
23

MotionStudios : Vasco da Gama
through the supporting points, if the current point on the route is a camerasupporting point.
Time overview for the routeThe time taken for the route can be specified on this page. The pause times at stopoverpoints, the total fade times and the total time for the entire video are also displayed here.
• Calculation of the time taken for the entire route• Route:
Enter the total time for the entire route here. Vasco da Gama distributes thetime evenly over the whole route.
• Stop time:As described in chapter 3.1.3.1 on page 9, you can set a stop time for stopoverpoints. Here you can see the sum of the stop times for all stopover points.
• Fading:The times for the fading in and fading out of header objects are also includedin the time (see chapter 3.1.3.1, page 14). The sum of these is displayed here.
• Total time:The running time for the completed video is made up of the times describedabove.
24
3.1.4 The project bar
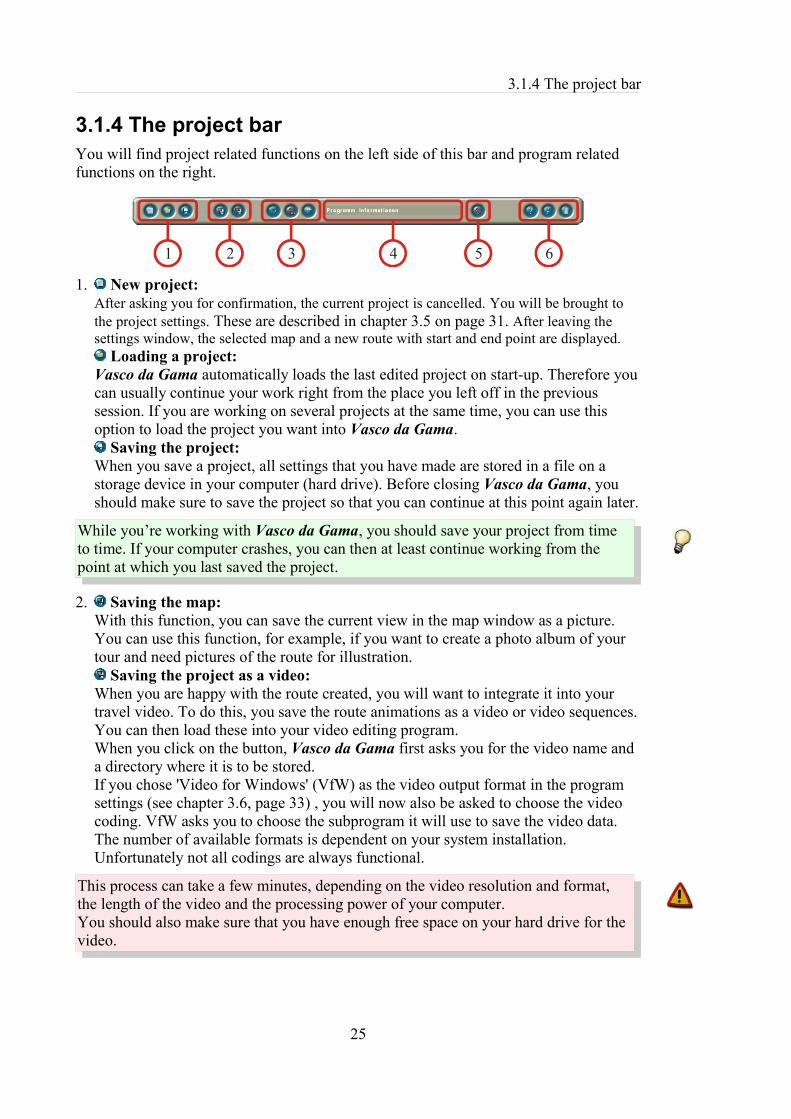
3.1.4 The project barYou will find project related functions on the left side of this bar and program relatedfunctions on the right.
1. New project:After asking you for confirmation, the current project is cancelled. You will be brought tothe project settings. These are described in chapter 3.5 on page 31. After leaving thesettings window, the selected map and a new route with start and end point are displayed.
Loading a project:Vasco da Gama automatically loads the last edited project on start-up. Therefore youcan usually continue your work right from the place you left off in the previoussession. If you are working on several projects at the same time, you can use thisoption to load the project you want into Vasco da Gama.
Saving the project:When you save a project, all settings that you have made are stored in a file on astorage device in your computer (hard drive). Before closing Vasco da Gama, youshould make sure to save the project so that you can continue at this point again later.
While you’re working with Vasco da Gama, you should save your project from timeto time. If your computer crashes, you can then at least continue working from thepoint at which you last saved the project.
2. Saving the map:With this function, you can save the current view in the map window as a picture.You can use this function, for example, if you want to create a photo album of yourtour and need pictures of the route for illustration.
Saving the project as a video:When you are happy with the route created, you will want to integrate it into yourtravel video. To do this, you save the route animations as a video or video sequences.You can then load these into your video editing program.When you click on the button, Vasco da Gama first asks you for the video name anda directory where it is to be stored.If you chose 'Video for Windows' (VfW) as the video output format in the programsettings (see chapter 3.6, page 33) , you will now also be asked to choose the videocoding. VfW asks you to choose the subprogram it will use to save the video data.The number of available formats is dependent on your system installation.Unfortunately not all codings are always functional.
This process can take a few minutes, depending on the video resolution and format,the length of the video and the processing power of your computer.You should also make sure that you have enough free space on your hard drive for thevideo.
25
1 3 62 54

MotionStudios : Vasco da Gama
3. Video preview:Clicking on this button opens a new window in which you can see a preview of thevideo. The controls in this window are described in chapter 3.4 on page 30.
Project settings:You can use this button to open the settings for the current project. These range fromvideo parameters to selecting the map you would like to use for the route. You willfind a more detailed description of this window in chapter 3.5 on page 31.
Resetting the project:This function is similar to creating a new project. However in contrast to a newproject, it keeps the current map. So if a route is not going very well for you, you canuse this function to start again from the beginning.
4. Quick help:In this area, Vasco da Gama shows you a short description of the buttons at whichthe mouse pointer is pointing.
5. Program settings:This button opens a window with options for program settings (e.g. to set thegraphics quality). These settings are independent of the projects you are working on.The individual options are explained in chapter 3.6 on page 33.
6. Opening Help:This button brings you to the Vasco da Gama Help. A separate window opens, whichyou can keep open while working. The document in the Help view corresponds asmuch as possible to this manual.
Display information on Vasco da Gama:This displays a window with information on the program. In addition to otherinformation, you find the address for the Vasco da Gama website on the Internet andthe email address to use for help with problems.
Closing Vasco da Gama:This closes your Vasco da Gama session. After clicking on this button, the programwill ask you if you would like to save your project before closing, if you have notalready done so.
If you do not save your project before closing, you will lose any changes made sincethe last save.
26
3.2 Object selection
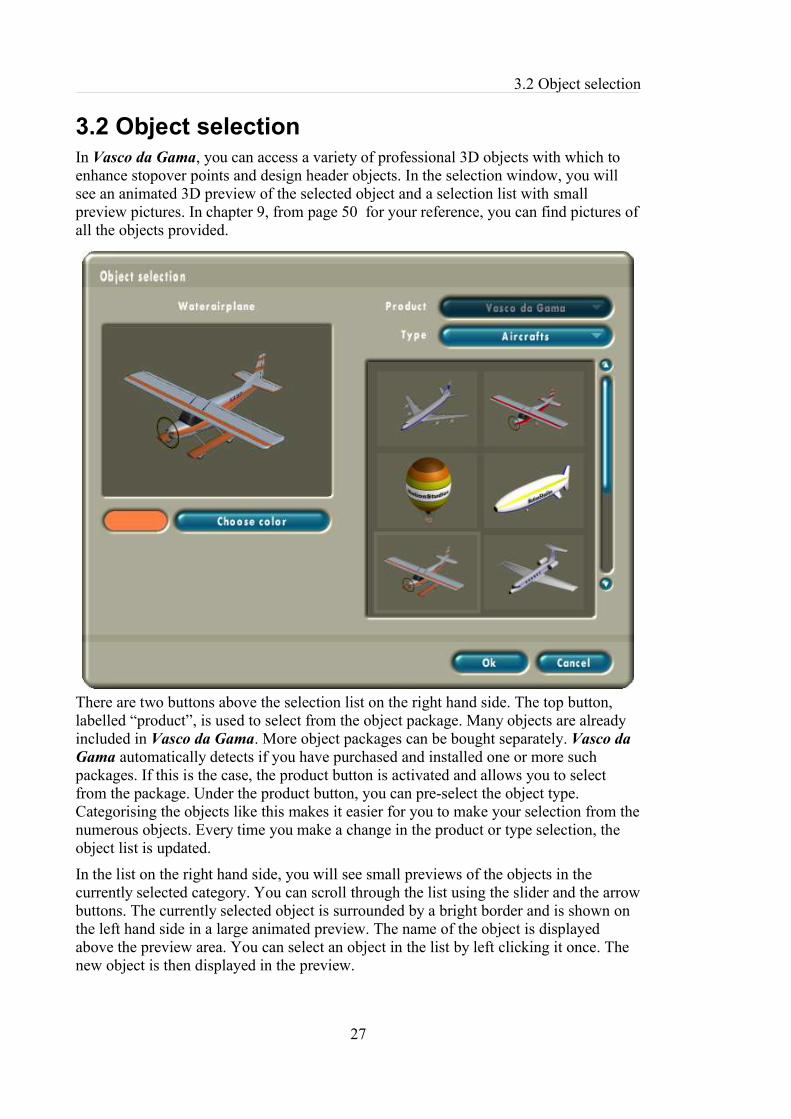
3.2 Object selectionIn Vasco da Gama, you can access a variety of professional 3D objects with which toenhance stopover points and design header objects. In the selection window, you willsee an animated 3D preview of the selected object and a selection list with smallpreview pictures. In chapter 9, from page 50 for your reference, you can find pictures ofall the objects provided.
There are two buttons above the selection list on the right hand side. The top button,labelled “product”, is used to select from the object package. Many objects are alreadyincluded in Vasco da Gama. More object packages can be bought separately. Vasco daGama automatically detects if you have purchased and installed one or more suchpackages. If this is the case, the product button is activated and allows you to selectfrom the package. Under the product button, you can pre-select the object type.Categorising the objects like this makes it easier for you to make your selection from thenumerous objects. Every time you make a change in the product or type selection, theobject list is updated.
In the list on the right hand side, you will see small previews of the objects in thecurrently selected category. You can scroll through the list using the slider and the arrowbuttons. The currently selected object is surrounded by a bright border and is shown onthe left hand side in a large animated preview. The name of the object is displayedabove the preview area. You can select an object in the list by left clicking it once. Thenew object is then displayed in the preview.
27

MotionStudios : Vasco da Gama
It is possible to change the colour of many objects. Depending on the object selected,additional controls will then be displayed below the preview.
Control DescriptionIn the selection list, you will find several presets tochoose from. These offer you various patterns withwhich the object can be decorated.
In this case, you can also choose any colour you like.Depending on the object, this colour will be used forlarger areas of the object or for decoration. Using the'select colour' button, you get to the colour selection,which is described in chapter 3.3, on page 29.
28

3.3 Colour selection
3.3 Colour selectionColours are important at many stages in Vasco da Gama, whether you are designing theline representing the route or colouring objects. Every time you click “select colour”,you will get to one of these windows.
Without transparency With transparencyYou can see the colour wheel on the left side of both windows. All the colours aredisplayed on the outer circle. The small black circle marks the currently selected colour.The inner square can be used to choose the saturation and brightness of the colour. Thecurrent value is also marked by a small black circle. Both circles can be moved using themouse. The current colour is always displayed at the bottom left.
There are two groups of sliders on the right hand side. One for the RGB colour modeland one for the HSV colour model. In the RGB model, a colour is specified based on itsred, green and blue components. Setting all 3 sliders to 0 results in black and setting allsliders to 255 results in white. If you select the colour using the colour wheel, you willsee the sliders change according to your selection. Similarly, the two black circles in thecolour wheel will also “move” when you move the wheels.
29
H
V
S
MotionStudios : Vasco da Gama
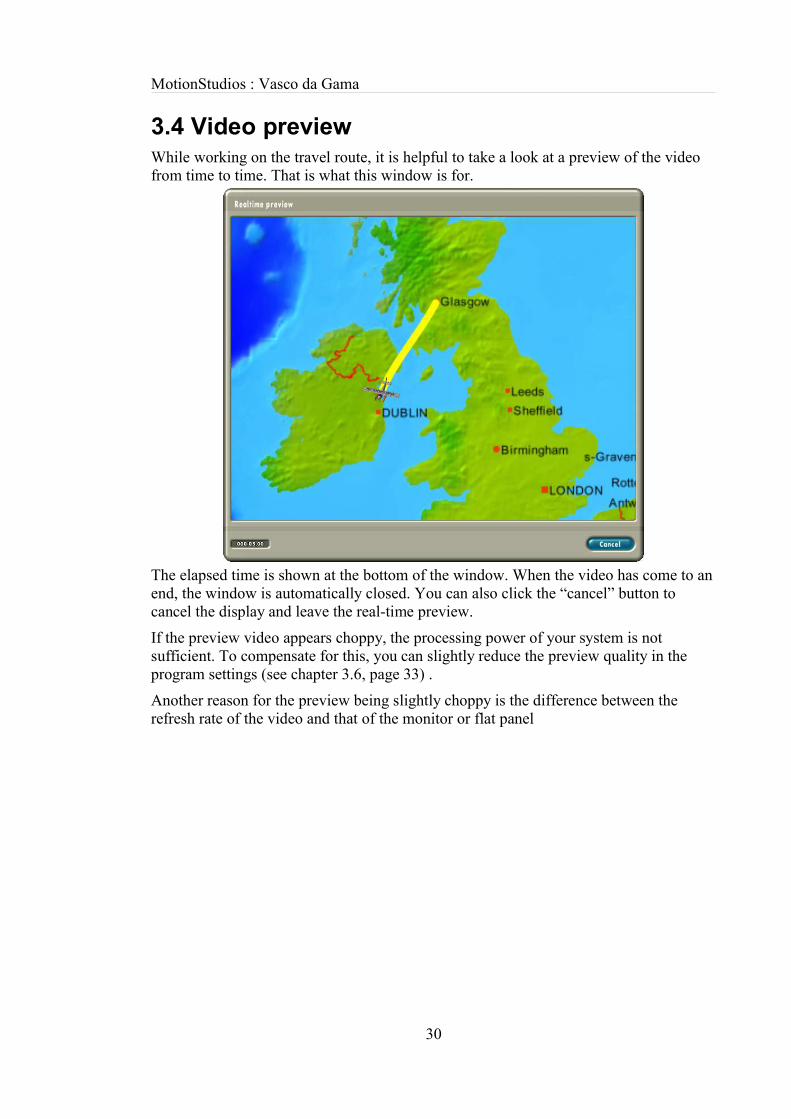
3.4 Video previewWhile working on the travel route, it is helpful to take a look at a preview of the videofrom time to time. That is what this window is for.
The elapsed time is shown at the bottom of the window. When the video has come to anend, the window is automatically closed. You can also click the “cancel” button tocancel the display and leave the real-time preview.
If the preview video appears choppy, the processing power of your system is notsufficient. To compensate for this, you can slightly reduce the preview quality in theprogram settings (see chapter 3.6, page 33) .
Another reason for the preview being slightly choppy is the difference between therefresh rate of the video and that of the monitor or flat panel
30
3.5 Project settings
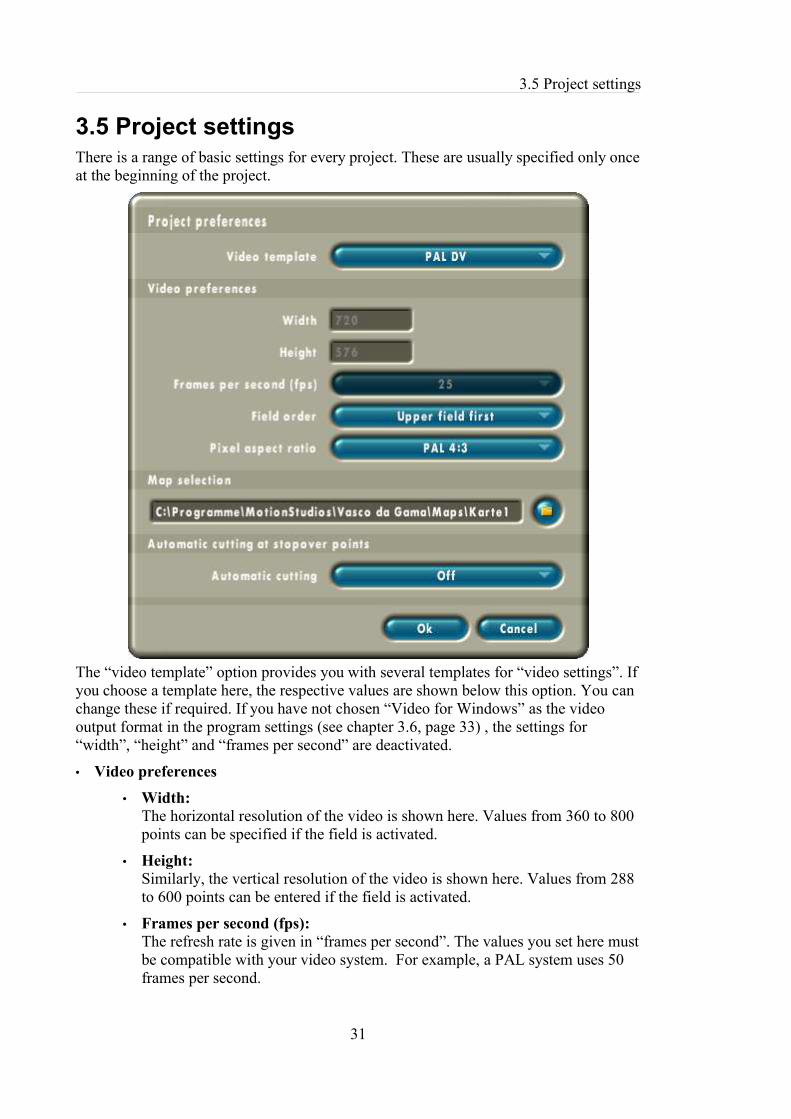
3.5 Project settingsThere is a range of basic settings for every project. These are usually specified only onceat the beginning of the project.
The “video template” option provides you with several templates for “video settings”. Ifyou choose a template here, the respective values are shown below this option. You canchange these if required. If you have not chosen “Video for Windows” as the videooutput format in the program settings (see chapter 3.6, page 33) , the settings for“width”, “height” and “frames per second” are deactivated.
• Video preferences• Width:
The horizontal resolution of the video is shown here. Values from 360 to 800points can be specified if the field is activated.
• Height:Similarly, the vertical resolution of the video is shown here. Values from 288to 600 points can be entered if the field is activated.
• Frames per second (fps):The refresh rate is given in “frames per second”. The values you set here mustbe compatible with your video system. For example, a PAL system uses 50frames per second.
31

MotionStudios : Vasco da Gama
• Field order:With this option, you can change the way the video is displayed. Normalvideo frames are stored in “interlaced” mode. In interlaced mode, a frame isdivided into two fields – one with all the even lines and one with all the oddlines. These fields are alternated so quickly during playback that the eye doesnot notice any difference.If your travel video is to be subsequently played on a TV, please select “topfield first” here. For a modern DVD production, the choice of the “non-interlaced (progressive scan)” option is recommended.
• Pixel aspect ratio:You can choose between different aspect ratios using this option. StandardTV sets use the aspect ratio 4:3. New wide screen devices use the 16:9 formatas used in the cinema.
If you create a video in 16:9 wide screen format and view it on a modern TVset (4:3), the video will be displayed with black stripes at the top and bottomborders of the screen. On old TV sets, it is possible that the video picture willbe distorted (stretched in height).
• Map selectionHere you will see the path to the currently selected map. To the right of the path isthe file selection button, which will open a window where you can select the file. Inthis window, you can choose a different map for this project. You can load your ownmaps in addition to those included in Vasco da Gama. Many holiday brochures printmaps that you can scan into your computer using a scanner.
The maps must be in one of the following image formats. The following formats aresupported: bmp (windows bitmap), png (portable network graphics), targa or tga(truevision), jpeg (joint photographic expert group) and tiff (tagged image file format).The maximum map size may not exceed 8000 x 8000 pixels. But the resolution of themap should at least equal the video resolution. Many scanning programs display thepixel resolution and the picture file size expected.
• Automatic cutting at stopover pointsWhile creating the video, Vasco da Gama will automatically cut the film at allstopover points with a stop time greater than 2 frames if you activate this function.Several files are created as a result. Vasco da Gama attaches the section number tothe file name you have specified (e.g. 'My_Route_3.avi' for the 3rd section).Automatically creating the video sequences makes integration into your video editingprogram easier. Section 3.1.3.1 on page 9 explained how to set up the stop time.
32
3.6 Program settings
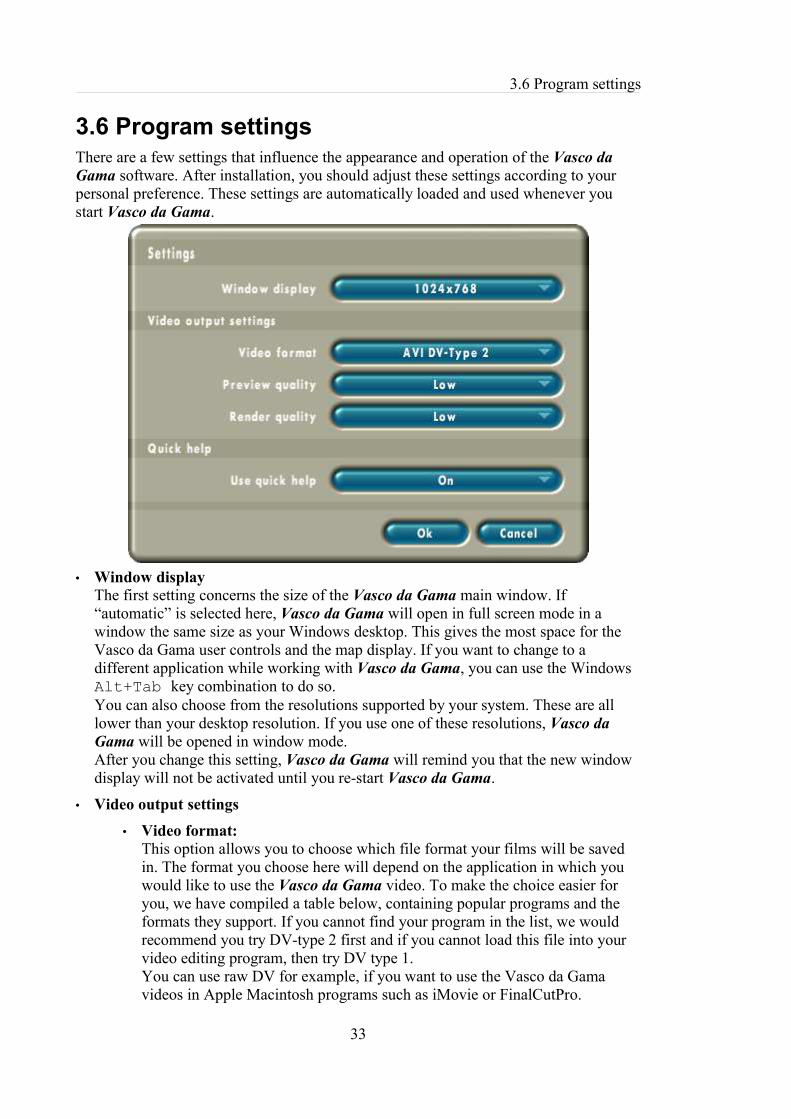
3.6 Program settingsThere are a few settings that influence the appearance and operation of the Vasco daGama software. After installation, you should adjust these settings according to yourpersonal preference. These settings are automatically loaded and used whenever youstart Vasco da Gama.
• Window displayThe first setting concerns the size of the Vasco da Gama main window. If“automatic” is selected here, Vasco da Gama will open in full screen mode in awindow the same size as your Windows desktop. This gives the most space for theVasco da Gama user controls and the map display. If you want to change to adifferent application while working with Vasco da Gama, you can use the WindowsAlt+Tab key combination to do so.You can also choose from the resolutions supported by your system. These are alllower than your desktop resolution. If you use one of these resolutions, Vasco daGama will be opened in window mode.After you change this setting, Vasco da Gama will remind you that the new windowdisplay will not be activated until you re-start Vasco da Gama.
• Video output settings• Video format:
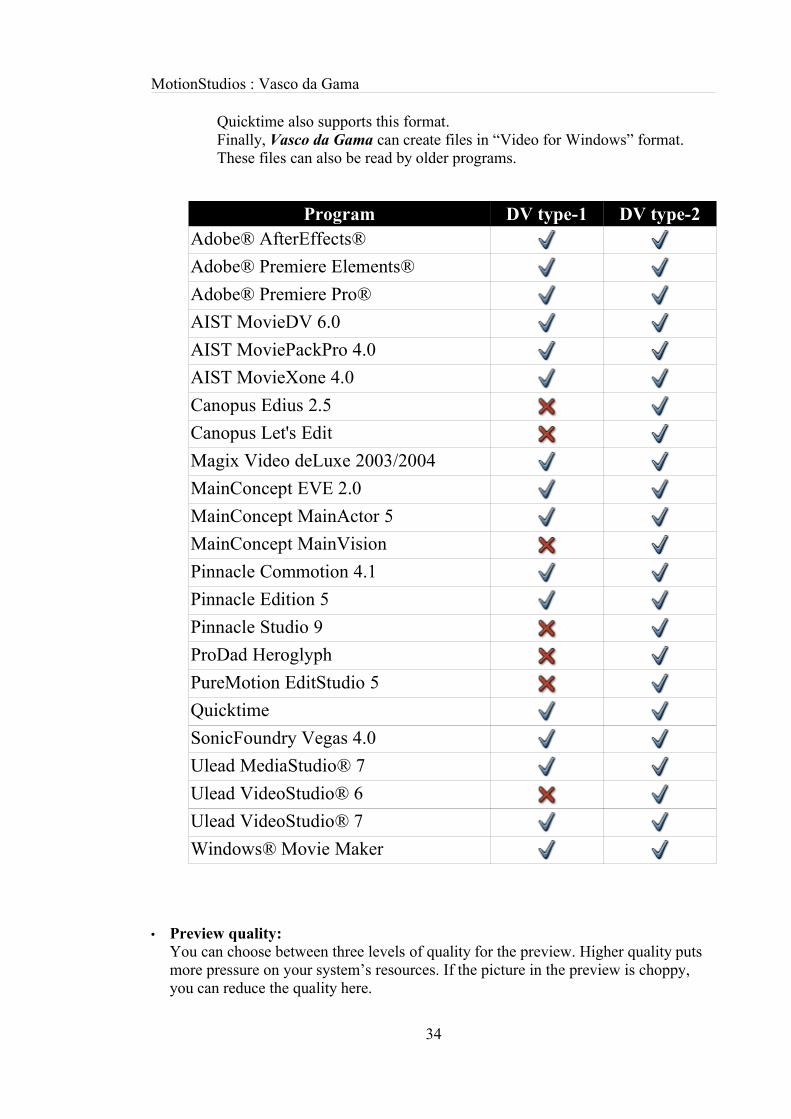
This option allows you to choose which file format your films will be savedin. The format you choose here will depend on the application in which youwould like to use the Vasco da Gama video. To make the choice easier foryou, we have compiled a table below, containing popular programs and theformats they support. If you cannot find your program in the list, we wouldrecommend you try DV-type 2 first and if you cannot load this file into yourvideo editing program, then try DV type 1.You can use raw DV for example, if you want to use the Vasco da Gamavideos in Apple Macintosh programs such as iMovie or FinalCutPro.
33
MotionStudios : Vasco da Gama
Quicktime also supports this format.Finally, Vasco da Gama can create files in “Video for Windows” format.These files can also be read by older programs.
Program DV type-1 DV type-2Adobe® AfterEffects®Adobe® Premiere Elements®Adobe® Premiere Pro®AIST MovieDV 6.0AIST MoviePackPro 4.0AIST MovieXone 4.0Canopus Edius 2.5Canopus Let's EditMagix Video deLuxe 2003/2004MainConcept EVE 2.0MainConcept MainActor 5MainConcept MainVisionPinnacle Commotion 4.1Pinnacle Edition 5Pinnacle Studio 9ProDad HeroglyphPureMotion EditStudio 5QuicktimeSonicFoundry Vegas 4.0Ulead MediaStudio® 7Ulead VideoStudio® 6Ulead VideoStudio® 7Windows® Movie Maker
• Preview quality:You can choose between three levels of quality for the preview. Higher quality putsmore pressure on your system’s resources. If the picture in the preview is choppy,you can reduce the quality here.
34
3.6 Program settings
• Rendering quality:You can make a similar selection for the creation of the video. The higher the qualityis set, the longer Vasco da Gama needs to create the video.
• Quick HelpIf the “Quick Help” is active, you will see a short description about the buttons in theproject bar when you move the mouse over them.
35

MotionStudios : Vasco da Gama
4 TutorialIn this chapter, we would like to use examples to introduce you to using Vasco daGama. We will begin with a very simple route and develop this considerably in thesecond part so that we will get to know all the functions of Vasco da Gama.
For the tutorial, we set the Vasco da Gama screen resolution in the program settings to1024x768 pixels (see chapter 3.6, page 33). If you use a higher resolution, you will havea larger map display. The values that we give in the tutorial for the enlargement of themap will then be different from your values.
4.1 Example 1Start Vasco da Gama and click on on the project bar. This will display the projectsettings for the new project. Leave all the settings on the default values and click on“Next”.
For the first route, we want to travel within Germany from Hamburg, through Berlin andFrankfurt (Main) to Munich. Germany may not yet be visible in the new project (forexample if you are working with a screen resolution of 1024x768 pixels). Use thewheel under the map to reduce the size of the map until you see Germany (approx.61%). Now we have to move the start and end points already created to Germany. To dothis, left click on the active start point and keep the mouse button pressed down.Move the point to Germany and let go of the point by releasing the left mouse button.Now we just need the end point . Click on the end point to activate it and againkeep the left mouse button pressed down. Move this point to Germany as well andrelease it. You can stop moving a point by clicking the right mouse button while movingthe point. The point will be returned to its position before it was moved and you canrelease the left mouse button.
Now adjust the map area so you can seeas much as possible of Germany. To dothis, use the sliders to the right andunderneath the map and use the wheelto enlarge the map.
We will now create the route. To do this, first move the start point to Hamburg andthe end point to Munich. The best position to place the points is on the red circles tothe left of the city names. We still need points for the intermediate stops in Berlin and
36

4.1 Example 1
Frankfurt. To insert a new point, simply click once on the line showing the route. Thiscreates a new supporting point . However we also made a stop in Berlin and recordedsome nice videos of the city.
So we have to convert the supporting point into a stopoverpoint. You will find the setting required to do this in themenu on the right hand side of the window. Change the field“type” from “supporting point” to “stopover point”. Thepicture of the point now also changes from to . Move thenew stopover point to Berlin. Now we need another stopoverpoint to include Frankfurt in the route as well. Create a newsupporting point by clicking on the route line between Berlinand Munich. Change this point into a stopover point too and move it to Frankfurt.
At this point, you should save your work. Click on the button in the project bar. Namethe project “tutorial1”. Vasco da Gama automatically adds the “.prj” file name extensionto the name.
Now we can have our first look at the preview video of the route. To do this, click on .in the project bar. The video of the route will be shown in the preview window. Nearlyall of Europe can be seen in the video. Since our journey is only in Germany, we do notneed all of Europe displayed. Therefore we must adjust the zoom for the camera. To dothis, use the tabs above the map to change to camera view. Only the map is visible.Activate the route display by clicking on the button underneath the map. This willdisplay the route as it is shown in the route view. Now activate the first point on theroute (Hamburg) by clicking on the point or the button. Using the wheel under themap, now adjust the enlargement to 200%. Then activate the next point (Berlin). To dothis, click on the button. We will adjust the zoom here to 150%. We do exactly thesame with the next point (Frankfurt). And finally, for Munich, we set it back to 200%.We also want to insert a short pause at each point. Let’s start in Munich. Use the wheelin the menu on the right hand side to set the value for the stop time to about 2 seconds(000:02.00). Now scroll backwards through the stopover points using the button. Setthe stop time to about 2 seconds for every point.
Save the project and have a look at the current preview. Nowwe can see much more of the course of the route. We alsohave short pauses at the stops on our journey. But theanimation still looks somewhat basic. Therefore we will nowintroduce 3D objects. Using the tabs in the menu on the righthand side, go into the object settings (middle tab) and enablethe display of objects at the stopover point. The “selectobject” button will then be activated. Click on this button toget into the object selection.
37

MotionStudios : Vasco da Gama
In this menu, select the object type “miscellaneous” and then select the yellow pin.Confirm your selection with “Next”. To make the object easier to see, set its size to 70%using the wheel in the menu.
After we have highlighted our marker points in this way, wenow just need a 3D object for the start of the route. Thisobject will be displayed at the top of the yellow linerepresenting the route. Select the start of our route again byclicking on the button. Change back to the “Points” tab inthe menu and this time we will go into the submenu here forthe header object. In this submenu, change the setting for theheader object from “keep” to “change”. It is now possible touse a new header object at this point on the route.
38

4.1 Example 1
Now click on the object selection option and this time select the “Cars” object type.Here we will choose the silver limousine. Confirm your selection with “Next”. We cankeep the settings for object size and automatic alignment.
You should now save the project again. You can then use the video preview to haveanother look at the result of our first tutorial.
In the final stage of your work in Vasco da Gama, we will create the video file. To dothis, click on the button in the project bar. In the file selection window that follows,enter “tutorial1” for the name. Vasco da Gama will again add the correct extension tothe name you enter. In this case, the extension is “.avi”. Depending on the processingpower of your computer, it can take a while for the film to be created. You can now loadthe completed film into your video editing program.
39
MotionStudios : Vasco da Gama
4.2 Example 2We already created a complete travel video in the previous chapter. But there are many more functions and details to get to know in Vasco da Gama. In thistutorial, we will further develop the project in order to get to know these functions.Vasco da Gama provides good pre-set values in many areas, which in the last tutorialmeant you did not have to adjust many of the settings yourself. In this chapter, we willalso examine these settings.
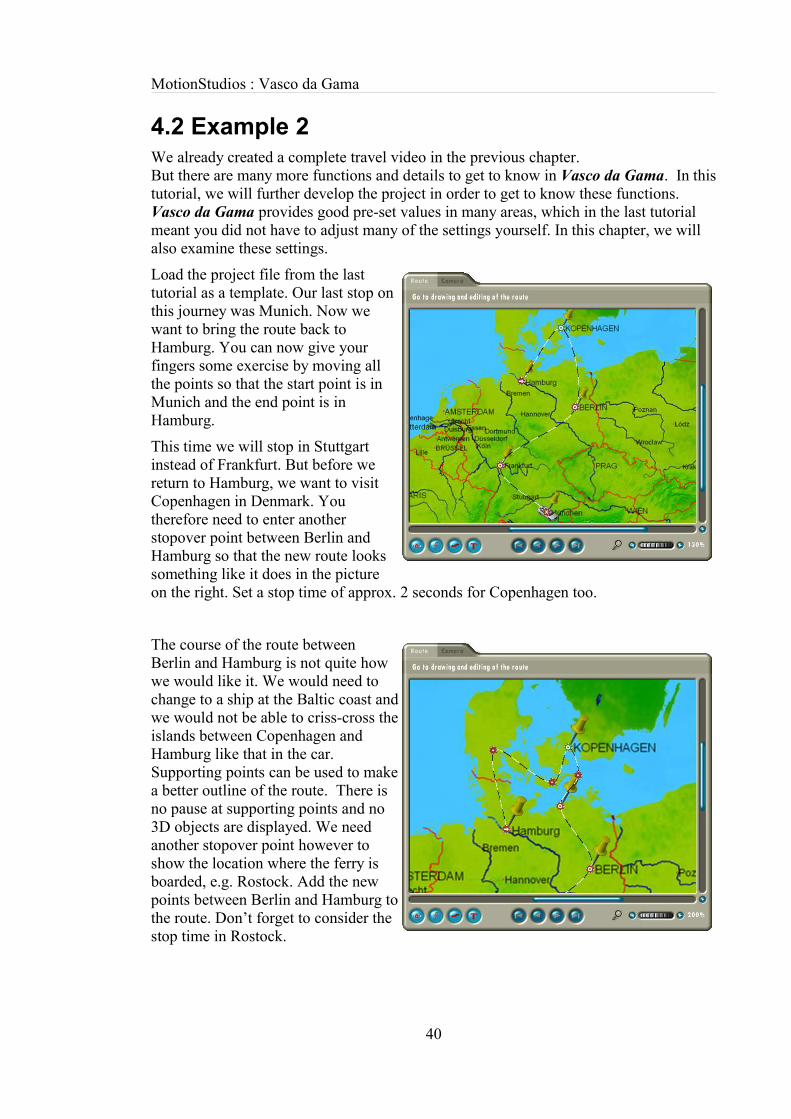
Load the project file from the lasttutorial as a template. Our last stop onthis journey was Munich. Now wewant to bring the route back toHamburg. You can now give yourfingers some exercise by moving allthe points so that the start point is inMunich and the end point is inHamburg.
This time we will stop in Stuttgartinstead of Frankfurt. But before wereturn to Hamburg, we want to visitCopenhagen in Denmark. Youtherefore need to enter anotherstopover point between Berlin andHamburg so that the new route lookssomething like it does in the pictureon the right. Set a stop time of approx. 2 seconds for Copenhagen too.
The course of the route betweenBerlin and Hamburg is not quite howwe would like it. We would need tochange to a ship at the Baltic coast andwe would not be able to criss-cross theislands between Copenhagen andHamburg like that in the car.Supporting points can be used to makea better outline of the route. There isno pause at supporting points and no3D objects are displayed. We needanother stopover point however toshow the location where the ferry isboarded, e.g. Rostock. Add the newpoints between Berlin and Hamburg tothe route. Don’t forget to consider thestop time in Rostock.
40
4.2 Example 2
Here’s another tip for editing the route. It is advisable to work in the route view inorder to be able to more accurately position the points. You can edit the points incamera view, but in the route view you can enlarge the map without moving thecamera.
Now it’s time to save our project. This time, save the project as “tutorial 2”. If we havea look at the preview of the video, we can see that the camera has not yet been set up forthe new points. Do this now and set the enlargement in Rostock to 180% and inCopenhagen to 200%. Instead of opening the preview to check our work, this time wewill move through the animation ourselves. To do this, click on the blue bar in thetimeline and drag it slowly to the right using the mouse. As you travel through thetimeline, the car moves from the start to the target point.
Let us know turn our attention to changing the vehicle (the header object). To do this,activate the stopover point in Rostock and click on the “Points” tab in the menu and goto the middle submenu . The current selection for the header object is “keep”. Set thisto “change” and select the first boat from the “watercraft” category. Then activate ourstopover point in Copenhagen and change the header object here back to a car.
Save the project and go into the video preview. As planned, the header object changes inRostock and Copenhagen. However this happens very suddenly. But Vasco da Gamahas a solution for this too. The header object can be faded in and out using severaleffects. To use these effects, click on the “Objects” tab and on the submenu “Fade-inand fade-out properties at stopover point”. Both fade effects are currently deactivated.Choose “smooth fade” for both effects and leave the time on the default setting of 1second. Now we must activate the global fade effect for the stopover points required.To do this, change to the “Points” tab and go to the fade effects submenu here. On themap, activate the stopover point for Rostock and set the fade-in and fade-out effect to“Global”. Do the same for the stopover point for Copenhagen. For the stopover point inMunich, set only the fade-in effect to “Global” and the fade-out effect to “Off”. For thestopover point in Hamburg, do the reverse (fade-in effect = “Off” and fade-out effect =“On”). This makes a smoother start and finish at the start and end point of our journey.We have listed the settings again in the following table.
Stopover point Fade-in effect Fade-out effectMunich Global OffRostock Global GlobalCopenhagen Global GlobalHamburg Off Global
Save your project and open the preview. After the initial stopover in Munich, our carfades smoothly into view and starts to move. In Rostock and Copenhagen we see itchange from a car to a ship and vice versa. The fade effect looks very nice.Unfortunately we cannot see the location at which we board the ferry, as Rostock is noton the map. But that’s not a problem. We’ll simply add in the city ourselves.
Activate the stopover point for Rostock. Change to the “Points” tab and go to thesubmenu “Text details at stopover point”. Switch the display text option from “Off”to “On” In the input box below this option, enter the word “Rostock”. We set the
41

MotionStudios : Vasco da Gama
position to “Z“ and the distance to 5%. We can already see the text objectin the map. But it looks very differentfrom the other text on the map.However you can also change the waytext objects appear in Vasco da Gama.Since these settings are applied to alltext objects on the route, you will findthe settings under the “Route” tab.Change to this tab and go to thesubmenu “Design settings for text”.Click first of all on “choose font / fontsize” and change the settings to“Arial/Standard/8”. We set the fontcolour to a dark grey (R=G=B=50) inthe colour selection. We deactivate theborders and shadow, so that the new text object looks the same as the others. The word“Rostock” should now look something like it does in the picture on the right.
In the first tutorial, we selected the yellow pin as the stopover object for all stopoverpoints. In this tutorial, we want to select different objects for the start and end of theroute. Activate the stopover point for “Hamburg” and change back to the “Points” taband to the submenu for the stopover objects . The “Object” control is currently set to“Global”. Change this to “Local”. Now you can use a different 3D object for this point.Click “Select object” and choose an object (e.g. the lighthouse from the “Buildings”category). Repeat these steps for the start point of our route. For example, a suitable 3Dobject for Munich would be the church from the buildings category. However, ashappened previously with the pin, the 3D objects are simply placed over the centre ofthe city. Because of this, they often cover the city name and are also “run over” by theheader object. To correct this problem, we will position the objects manually.
42
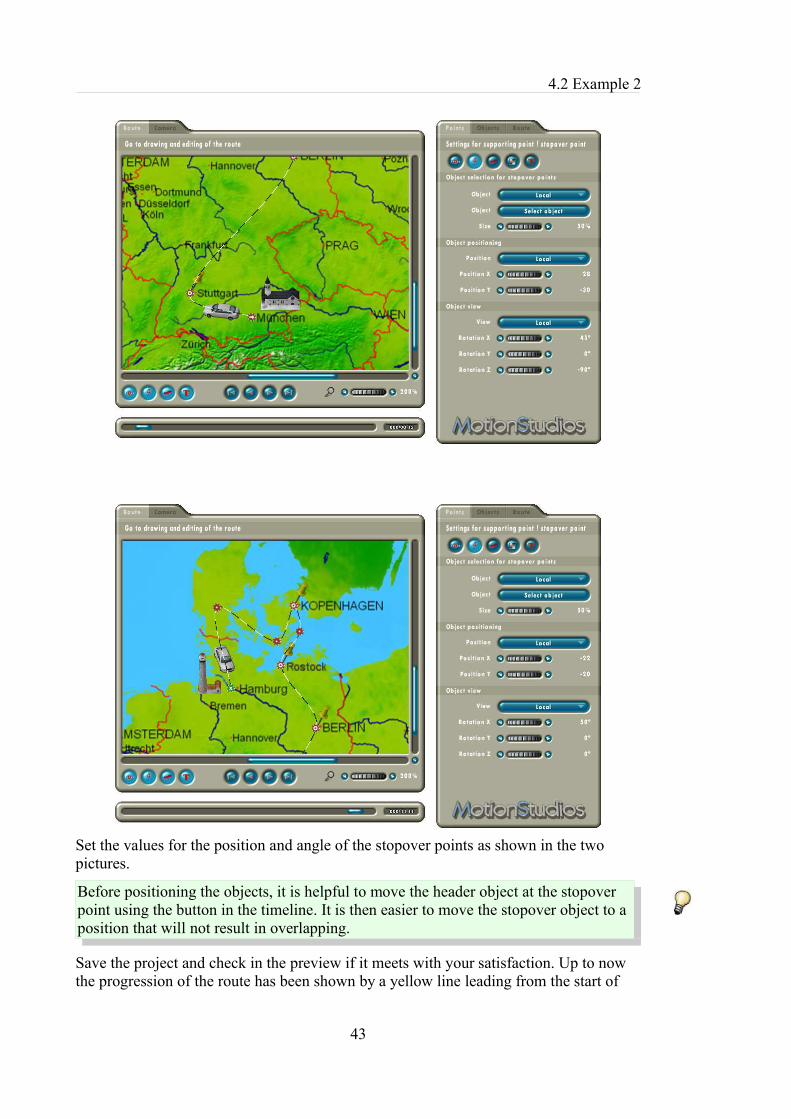
4.2 Example 2
Set the values for the position and angle of the stopover points as shown in the twopictures.
Before positioning the objects, it is helpful to move the header object at the stopoverpoint using the button in the timeline. It is then easier to move the stopover object to aposition that will not result in overlapping.
Save the project and check in the preview if it meets with your satisfaction. Up to nowthe progression of the route has been shown by a yellow line leading from the start of
43
MotionStudios : Vasco da Gama
the tour to the current position of the header object. Again, Vasco da Gama offers you arange of design options in this regard. Change to the “Route” tab and go to the submenu
“Settings for the line progression”. The option to draw the complete route is currentlyinactive. Activate the option to draw the complete course of the route. The colourselection will now become active. Now click on “select colour”. In the colour selection,please select an orange colour (R=255, G=200, B=0) and set the transparency to approx.60.
Now if you look at the video in the preview, you will see a thin orange line, which isoverlaid with a thick yellow line as the journey progresses.
We have now almost completed the second tutorial. Before we create the video, youshould save your work again. This time we don’t want to create the video as one longfilm. Instead, we want Vasco da Gama to insert cuts at the stopover points and save thevideo in parts. Now open the project settings using the project bar. Set the“Automatic partitioning” option to “On” and click on “Next”. Now we can create thevideo using the button. Enter “Tutorial2” as the filename. Vasco da Gama will nowcreate several files called “tutorial2_1.avi”, “tutorial2_2.avi” and so on. You can nowload the individual video sequences into your video editing program.
44
5 Troubleshooting
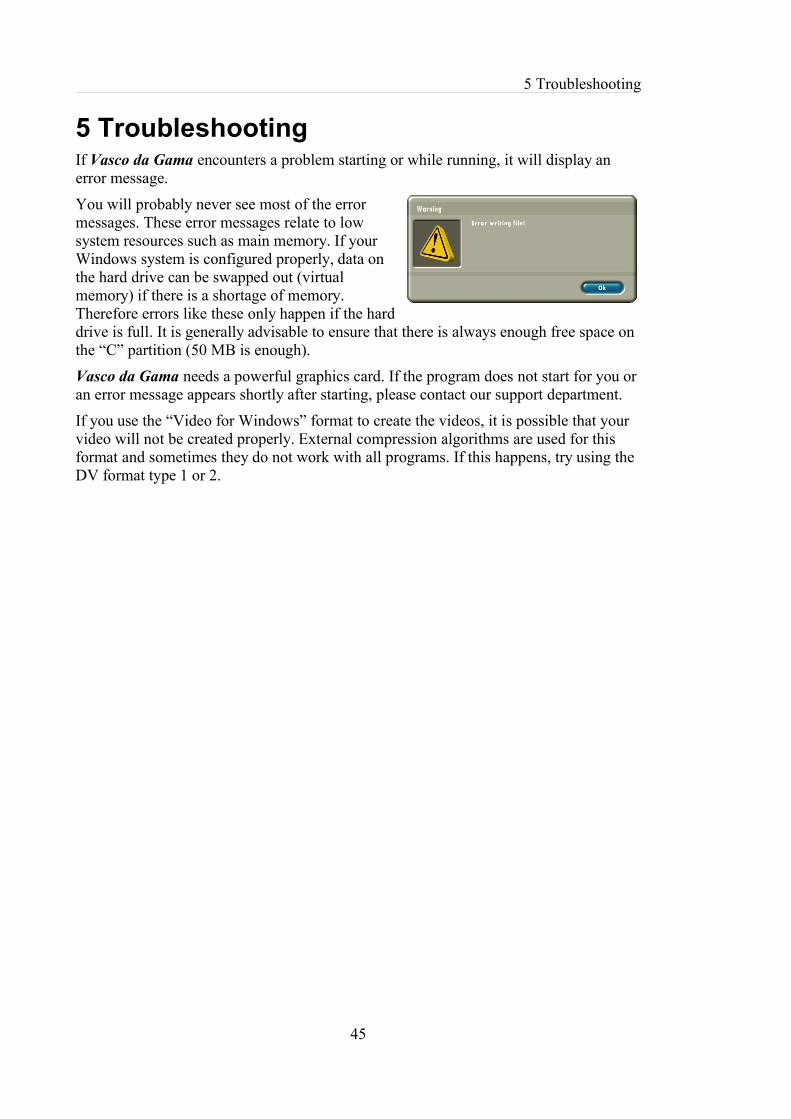
5 TroubleshootingIf Vasco da Gama encounters a problem starting or while running, it will display anerror message.
You will probably never see most of the errormessages. These error messages relate to lowsystem resources such as main memory. If yourWindows system is configured properly, data onthe hard drive can be swapped out (virtualmemory) if there is a shortage of memory.Therefore errors like these only happen if the harddrive is full. It is generally advisable to ensure that there is always enough free space onthe “C” partition (50 MB is enough).
Vasco da Gama needs a powerful graphics card. If the program does not start for you oran error message appears shortly after starting, please contact our support department.
If you use the “Video for Windows” format to create the videos, it is possible that yourvideo will not be created properly. External compression algorithms are used for thisformat and sometimes they do not work with all programs. If this happens, try using theDV format type 1 or 2.
45

MotionStudios : Vasco da Gama
6 SupportYou can get more help on problems with Vasco da Gama and information on the latestsoftware updates at our website or by email:
Website: http://www.motionstudios.deEmail: [email protected]
Please note that to avail of support, you must be a registered customer of the Vasco daGama software. To allow us to make a speedy response to your email request, pleaseinclude the following information:
• The version number of your Vasco da Gama software:You will find this in the information window, which you can open using the buttonin the project bar.
• The serial number of your product:This number is printed on the registration card and on the back of the booklet andalso displayed in the information window.
• Your address:Please also make sure to let us know your address so that we can check this againstthe registered details.
46

7 Glossary
7 Glossary16:9Widescreen format that is also used in the cinema. Many TV sets now also use thewidescreen format.
4:3Aspect ratio of most TV sets. The picture is only slightly greater in width than height.
AVIThe standard file format for videos on Windows systems. The AVI format describes thestructure of the file and can contain various video formats. Therefore AVI format is alsocalled a container format.
DVDigital Video, standard for digital video recording using camcorders.
FPS“Frames Per Second”. The refresh rate is given in “frames per second” i.e. how manyframes are shown in every second of video.
HSVColour model consisting of the Hue, Saturation and Value components.
InterlaceInterlaced mode in video technology, in which a frame is divided into two fields (halfframes) with even and odd scan lines. These fields are then played in quick successionand the only noticeable effect is a slight flicker.
NTSCVideo standard used primarily in the USA but also in other countries such as Japan e.g.720x480 pixels at a refresh rate of 60 Hz.
PALThis video standard is used primarily in European countries, e.g. 720x576 pixels at arefresh rate of 50 Hz.
RAW-DVThis is not actually a file format. A file with RAW DV video data contains only the barevideo data and no file header recording additional data such as the video resolution.
47
MotionStudios : Vasco da Gama
RGBAdditive colour model consisting of the components Red, Green and Blue. When allthree components are at zero, the colour black is produced. When all three componentsare at their highest level, white is produced. This is why it is called “additive” – white isobtained from adding the colour components.
Video for WindowsStandard video format for Microsoft Windows systems. Files in this format usually havethe ending “.avi”. Different methods can be used to store video data in these files.
Widescreen (2,35:1)lso known as Cinemascope and Panavision. This format is a little wider than the 16:9widescreen format of modern TV sets.
ZoomEnlarges (more details) or reduces (better overview) a section of an image.
48

8 Keyboard shortcuts
8 Keyboard shortcutsExcept for text input, Vasco da Gama is operated using the mouse. Apart from this,there are also keyboard commands. This makes it easier to use for the advanced user,since some actions can be carried out more quickly.
Vasco da Gama contains the following keyboard commands:
Keyboard shortcut MeaningCtrl – C Copy: Copies the data from the active supporting point
into a buffer memory.Ctrl – S Swap: Supporting point ↔ Stopover point. A supporting
point is turned into a stopover point and vice versa.Ctrl – V Paste: Copies the data from the buffer memory into the
active supporting point.Ctrl - I Insert: Inserts a supporting point.Page Up to the previous pointPage Down to the next pointHome to the first pointEnd To the last pointInsert to the last pointDelete Removes pointEnter key Activates pointEsc Deactivates point
49

MotionStudios : Vasco da Gama
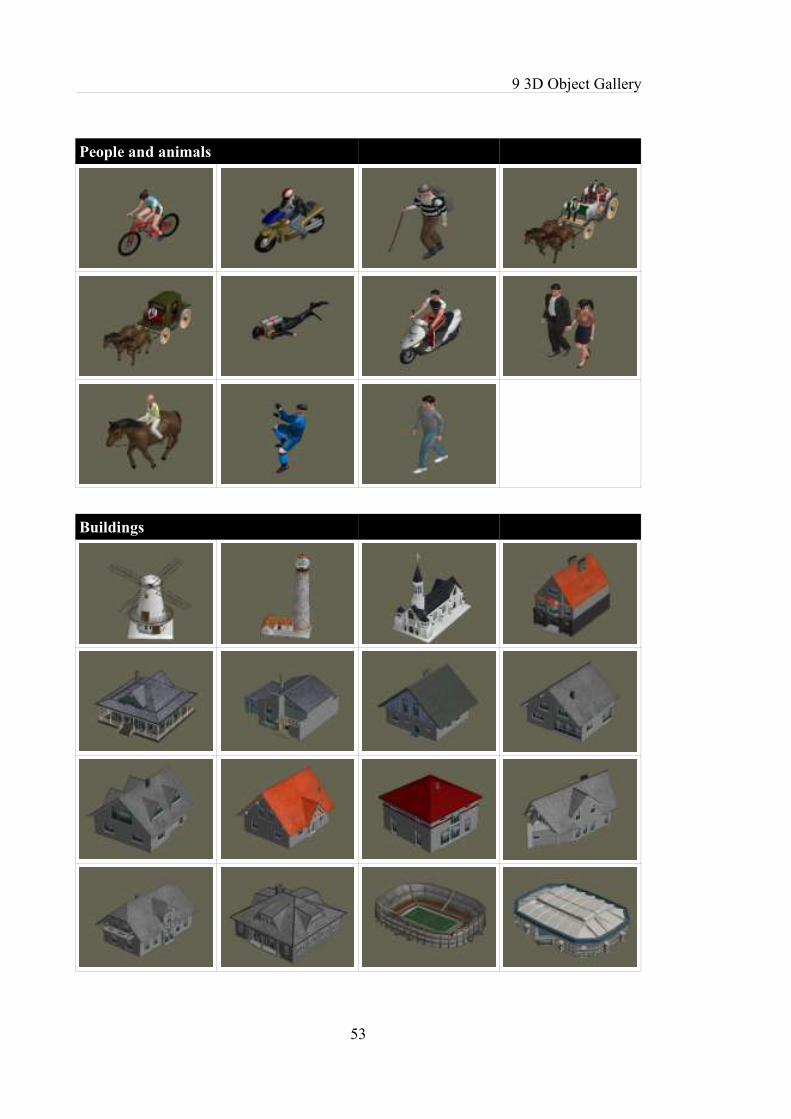
9 3D Object GalleryThe following pages depict small pictures of all the 3D objects included in Vasco daGama.
2D objects
Cars
50

9 3D Object Gallery
Cars
Buses and vans
Aircraft
51

MotionStudios : Vasco da Gama
Aircraft
Watercraft
Rail vehicles
52
9 3D Object Gallery
People and animals
Buildings
53

MotionStudios : Vasco da Gama
Buildings
Miscellaneous
54
Index3D objects 11
AAdd new points 7As a video 25Aspect ratio 32
BBrief description 6Browsing 8
CCamera editor 7Camera settings 10Camera view 7p., 37, 41Configuration options 9Create the video 44
EEnd point 7p.Enlargement 8Error messages 45
FFile format 33Freely position 10Full screen 33
GGenerating the video 25
HHeader object 9, 13Help 26, 35, 46
IInstallation 2
KKeyboard commands 49
LLoading 25
MMain menu 5, 9Map area 5pp.Marker points 6
PPreview 30, 34Program 26Project 25p.Project bar 5p., 25
RRefresh rate 31Remove a point 7Rendering 35Resetting 26Route editor 7
SSaving 25Serial number 2p., 46Start point 8Starting point 7Stop time 10, 24Stopover objects 9Stopover point 7p., 10Stopover points 9, 23p.Supporting point 7p.Supporting points 8p., 23Symbol 6
TText object 15p.Text objects 9Time taken 24Timeline 5, 8, 41, 43
VVideo settings 31
WWindow mode 33


