76
Multi-Robot Systems with ROS Lesson 2 Teaching Assistant: Roi Yehoshua [email protected] Summer 2015

(C)2015 Roi Yehoshua
Agenda• Simulating multiple robots in Stage• Collision avoidance• Robots synchronization• Creating custom messages

(C)2015 Roi Yehoshua
ROS Stage Simulator• Stage simulates a population of mobile robots,
sensors and objects in a 2D bitmapped environment • Stage is designed to support research of multi-agent
autonomous systems, so it provides fairly simple, computationally cheap models of lots of devices rather than attempting to emulate any device with great fidelity
• Multi-Robot Patrolling Task - Simulation in Stage/ROS
(C)2015 Roi Yehoshua
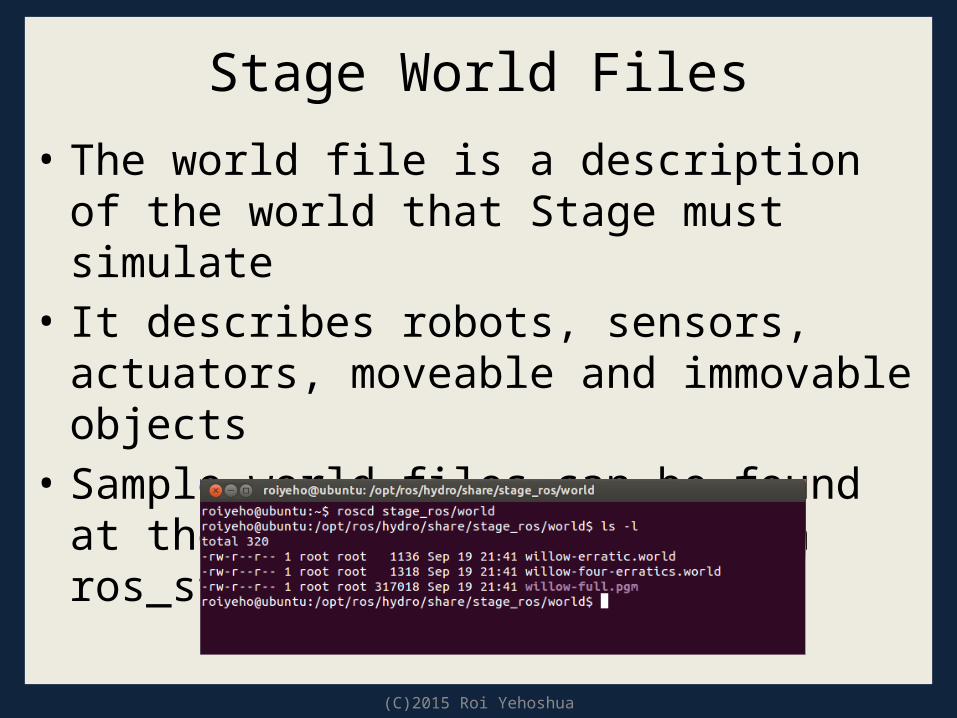
Stage World Files• The world file is a description of the world that
Stage must simulate• It describes robots, sensors, actuators, moveable
and immovable objects • Sample world files can be found at the /world
subdirectory in ros_stage package

(C)2015 Roi Yehoshua
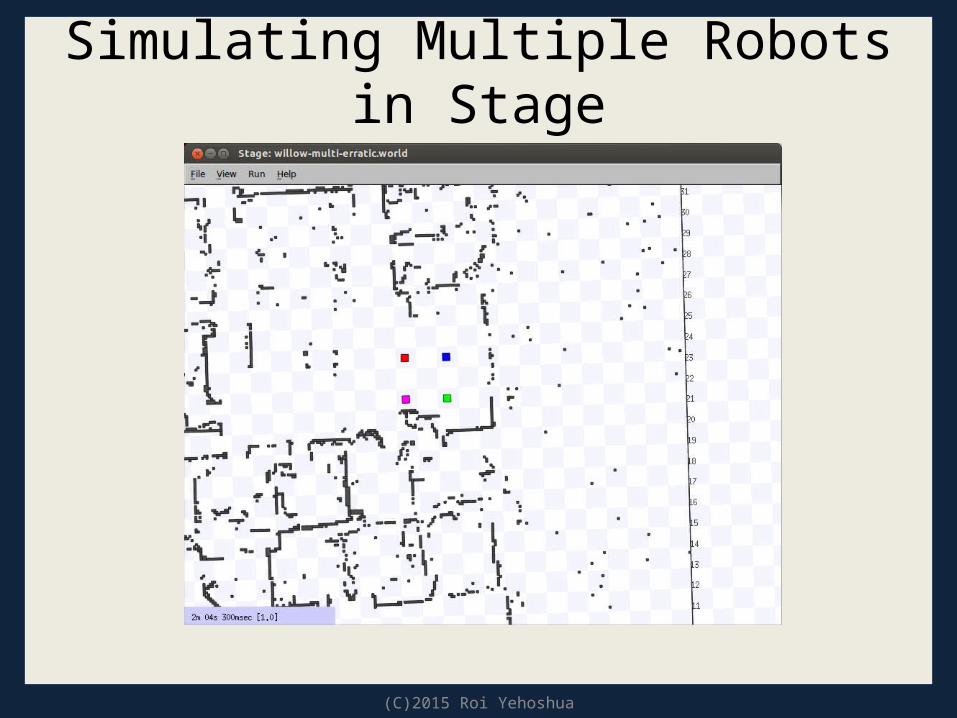
Simulating Multiple Robots in Stage• First, you need to build a model of every robot
you need in the world file• For example, let’s add 3 more robots to willow-
erratic.world• First we will copy it to the home directory and
change its name to willow_multi_erratic.world– Notice that you also need to copy willow-full.pgm
$ cd ~$ cp /opt/ros/indigo/share/stage_ros/world/willow-erratic.world willow-multi-erratic.world$ cp /opt/ros/indigo/share/stage_ros/world/willow-full.pgm .

(C)2015 Roi Yehoshua
Simulating Multiple Robots in Stage• Now add the following lines at the end of the file
willow-multi-erratic.world
• Then run again the stage simulator
# robotserratic( pose [ -11.5 23.5 0 0 ] name "robot0" color "blue")erratic( pose [ -13.5 23.5 0 0 ] name "robot1" color "red")erratic( pose [ -11.5 21.5 0 0 ] name "robot2" color "green")erratic( pose [ -13.5 21.5 0 0 ] name "robot3" color "magenta")
# block( pose [ -13.924 25.020 0 180.000 ] color "red")
rosrun stage_ros stageros willow-multi-erratic.world
(C)2015 Roi Yehoshua
Simulating Multiple Robots in Stage

(C)2015 Roi Yehoshua
Simulating Multiple Robots in Stage• Each robot subscribes and publishes its own
topics

(C)2015 Roi Yehoshua
Simulating Multiple Robots in Stage• You can move one of the robots by publishing
to /robot_X/cmd_vel topic• For example, to make robot 2 move forward
type:rostopic pub /robot_2/cmd_vel -r 10 geometry_msgs/Twist '{linear: {x: 0.2}}'

(C)2015 Roi Yehoshua
Simulating Multiple Robots in Stage

(C)2015 Roi Yehoshua
Creating a ROS Package• Now we will create a ROS node that will make
one of the robots move forward• The ID of the robot will be given as a command-
line argument to the node

(C)2015 Roi Yehoshua
catkin Workspace• Make sure you have a catkin workspace ready• If you don’t have, run the following commands:
• And add the following line to your bashrc
$ mkdir catkin_ws catkin_ws/src$ cd catkin_ws/src$ catkin_init_workspace$ cd ..$ catkin_make
source ~/catkin_ws/devel/setup.bash

(C)2015 Roi Yehoshua
Creating a ROS Package• Create a new ROS package called stage_multi
• Create a world subdirectory in the package and copy the world files into it
$ cd ~/catkin_ws/src$ catkin_create_pkg stage_multi std_msgs rospy roscpp
$ mkdir ~/catkin_ws/src/stage_multi/world$ cp ~/willow-multi-erratic.world ~/catkin_ws/src/stage_multi/world$ cp ~/willow-full.pgm ~/catkin_ws/src/stage_multi/world

(C)2015 Roi Yehoshua
Creating a ROS Package• Now compile the package and create an Eclipse
project file for it:$ cd ~/catkin_ws$ catkin_make --force-cmake -G"Eclipse CDT4 - Unix Makefiles"

(C)2015 Roi Yehoshua
Directory Structure

(C)2015 Roi Yehoshua
Import the Project into Eclipse• Now start Eclipse• Choose catkin_ws folder as the workspace folder

(C)2015 Roi Yehoshua
Import the Project into Eclipse• Choose File --> Import --> General --> Existing
Projects into Workspace

(C)2015 Roi Yehoshua
Import the Project into Eclipse• Now choose the ~/catkin_ws/build folder

(C)2015 Roi Yehoshua
Project Structure• Open the "Source directory" within the project
so that you can edit the source code

(C)2015 Roi Yehoshua
Add New Source File• Right click on src and select New –> Source File,
and create a file named move_robot.cpp

(C)2015 Roi Yehoshua
ROS Init• A version of ros::init() must be called before using
any of the rest of the ROS system• Typical call in the main() function:
• Node names must be unique in a running system• We will make the node names unique by
concatenating the robot’s number to the end of the node name
• For that purpose we will need to supply the robot’s number as a command-line argument
ros::init(argc, argv, "Node name");

(C)2015 Roi Yehoshua
move_robot.cpp (1)#include "ros/ros.h"#include "geometry_msgs/Twist.h" #include <string>using namespace std; #define MAX_ROBOTS_NUM 20#define FORWARD_SPEED 0.2 int robot_id;ros::Publisher cmd_vel_pub; // publisher for movement commands void move_forward();
(C)2015 Roi Yehoshua
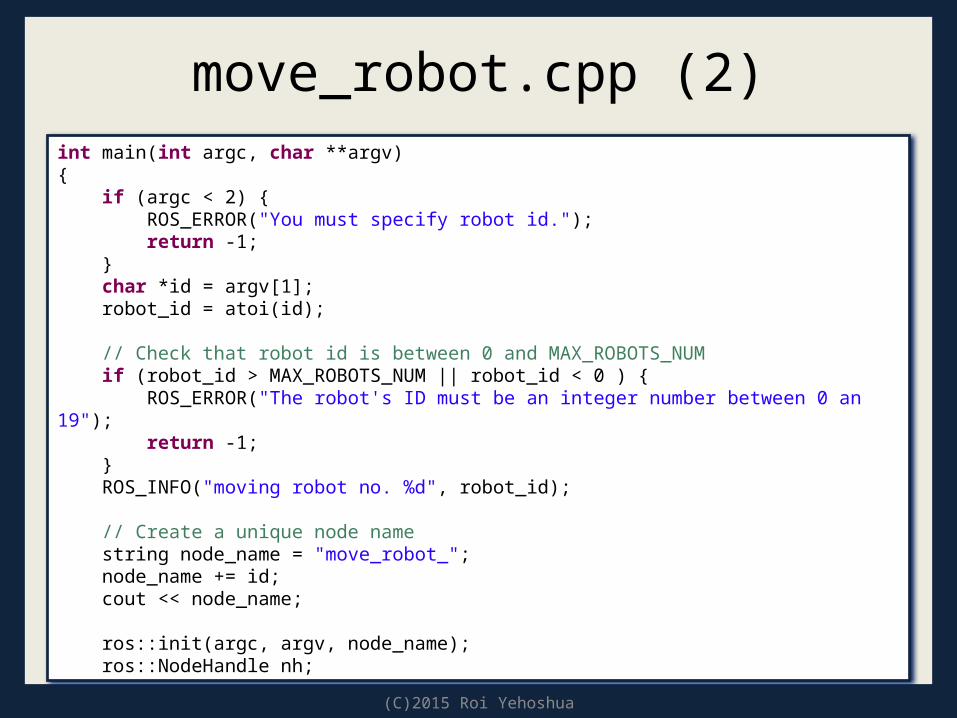
move_robot.cpp (2)int main(int argc, char **argv){ if (argc < 2) { ROS_ERROR("You must specify robot id."); return -1; } char *id = argv[1]; robot_id = atoi(id); // Check that robot id is between 0 and MAX_ROBOTS_NUM if (robot_id > MAX_ROBOTS_NUM || robot_id < 0 ) { ROS_ERROR("The robot's ID must be an integer number between 0 an 19"); return -1; } ROS_INFO("moving robot no. %d", robot_id); // Create a unique node name string node_name = "move_robot_"; node_name += id; cout << node_name; ros::init(argc, argv, node_name); ros::NodeHandle nh;

(C)2015 Roi Yehoshua
move_robot.cpp (3) // cmd_vel_topic = "robot_X/cmd_vel" string cmd_vel_topic_name = "robot_"; cmd_vel_topic_name += id; cmd_vel_topic_name += "/cmd_vel"; cmd_vel_pub = nh.advertise<geometry_msgs::Twist>(cmd_vel_topic_name, 10); move_forward(); return 0;}

(C)2015 Roi Yehoshua
move_forward functionvoid move_forward(){ // Drive forward at a given speed. geometry_msgs::Twist cmd_vel; cmd_vel.linear.x = FORWARD_SPEED; cmd_vel.angular.z = 0.0; // Loop at 10Hz, publishing movement commands until we shut down ros::Rate rate(10); while (ros::ok()) // Keep spinning loop until user presses Ctrl+C { cmd_vel_pub.publish(cmd_vel); rate.sleep(); } // Stop the robot geometry_msgs::Twist stop_cmd_vel; stop_cmd_vel.linear.x = 0.0; stop_cmd_vel.angular.z = 0.0; cmd_vel_pub.publish(stop_cmd_vel); ROS_INFO("robot no. %d stopped", robot_id);}

(C)2015 Roi Yehoshua
Compiling the Node• Before building your node, you should modify
the generated CMakeLists.txt in the package• Change the lines marked in red:
• After changing the file call catkin_make
cmake_minimum_required(VERSION 2.8.3)project(stage_multi)…## Declare a cpp executableadd_executable(multi_sync src/SyncRobots.cpp)
## Add cmake target dependencies of the executable/library## as an example, message headers may need to be generated before nodes# add_dependencies(stage_multi_node stage_multi_generate_messages_cpp)
## Specify libraries to link a library or executable target againsttarget_link_libraries(move_robot ${catkin_LIBRARIES})

(C)2015 Roi Yehoshua
Running the Node Inside Eclipse• Create a new launch configuration, by clicking on
Run --> Run configurations... --> C/C++ Application (double click or click on New).
• Select the correct binary on the main tab (use the Browse… button)~/catkin_ws/devel/lib/stage_multi/move_robot
• Make sure roscore and stage are running• Click Run

(C)2015 Roi Yehoshua
Running the Node Inside Eclipse

(C)2015 Roi Yehoshua
Setting Command Line Arguments

(C)2015 Roi Yehoshua
Running the Node Inside Eclipse

(C)2015 Roi Yehoshua
Running the Node Inside Eclipse

(C)2015 Roi Yehoshua
Running the Node Inside Eclipse
(C)2015 Roi Yehoshua
Launch File• Now we will create a launch file that will make all
the 4 robots move forward • We will use the args attribute in the <node> tag
to specify the command line arguments• Create a launch subdirectory in stage_multi
package• Add stage_multi.launch file to this directory and
copy the following code

(C)2015 Roi Yehoshua
Launch File<launch> <node name="stage" pkg="stage_ros" type="stageros" args="$(find stage_multi)/world/willow-multi-erratic.world"/> <node name="move_robot_0" pkg="stage_multi" type="move_robot" args="0" output="screen"/> <node name="move_robot_1" pkg="stage_multi" type="move_robot" args="1" output="screen"/> <node name="move_robot_2" pkg="stage_multi" type="move_robot" args="2" output="screen"/> <node name="move_robot_3" pkg="stage_multi" type="move_robot" args="3" output="screen"/></launch>
• Note that the node names must be unique
(C)2015 Roi Yehoshua
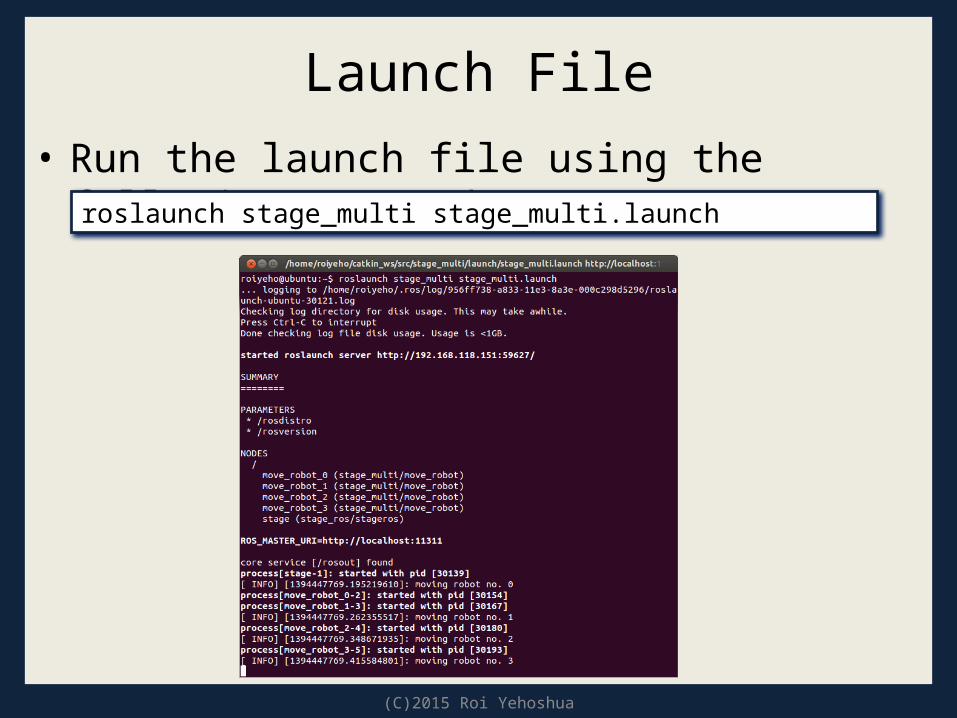
Launch File• Run the launch file using the following command:
roslaunch stage_multi stage_multi.launch

(C)2015 Roi Yehoshua
Launch File

(C)2015 Roi Yehoshua
Launch File• The robots will eventually bump into the obstacles:

(C)2015 Roi Yehoshua
Reading Sensors• Now we will make the robots move until they
sense an obstacle– Will they be able to sense each other as obstacles?
• For that purpose we will use the laser data published on the topic /base_scan
• The message type used to send information of the laser is sensor_msgs/LaserScan

(C)2015 Roi Yehoshua
move_robot.cpp (1)#include "ros/ros.h"#include "geometry_msgs/Twist.h"#include "sensor_msgs/LaserScan.h" #include <string>using namespace std; #define MAX_ROBOTS_NUM 20#define FORWARD_SPEED 0.2#define MIN_SCAN_ANGLE -60.0/180*M_PI#define MAX_SCAN_ANGLE +60.0/180*M_PI#define MIN_PROXIMITY_RANGE 0.5 int robot_id;ros::Publisher cmd_vel_pub; // publisher for movement commandsros::Subscriber laser_scan_sub; // subscriber to the robot's laser scan topicbool keepMoving = true; void move_forward();void scanCallback(const sensor_msgs::LaserScan::ConstPtr& scan);

(C)2015 Roi Yehoshua
move_robot.cpp (2)int main(int argc, char **argv){ if (argc < 2) { ROS_ERROR("You must specify robot id."); return -1; } char *id = argv[1]; robot_id = atoi(id); ... // subscribe to robot's laser scan topic "robot_X/base_scan" string laser_scan_topic_name = "robot_"; laser_scan_topic_name += id; laser_scan_topic_name += "/base_scan"; laser_scan_sub = nh.subscribe(laser_scan_topic_name, 1, &scanCallback); move_forward(); return 0;}

(C)2015 Roi Yehoshua
move_robot.cpp (2)void move_forward(){ // Drive forward at a given speed. geometry_msgs::Twist cmd_vel; cmd_vel.linear.x = FORWARD_SPEED; cmd_vel.angular.z = 0.0; // Loop at 10Hz, publishing movement commands until we shut down ros::Rate rate(10); while (ros::ok() && keepMoving) // Keep spinning loop until user presses Ctrl+C { cmd_vel_pub.publish(cmd_vel); ros::spinOnce(); // Need to call this function often to allow ROS to process incoming messages rate.sleep(); } ... }

(C)2015 Roi Yehoshua
scanCallback// Process the incoming laser scan messagevoid scanCallback(const sensor_msgs::LaserScan::ConstPtr& scan){ // Find the closest range between the defined minimum and maximum angles int minIndex = ceil((MIN_SCAN_ANGLE - scan->angle_min) / scan->angle_increment); int maxIndex = floor((MAX_SCAN_ANGLE - scan->angle_min) / scan->angle_increment); float closestRange = scan->ranges[minIndex]; for (int currIndex = minIndex + 1; currIndex <= maxIndex; currIndex++) { if (scan->ranges[currIndex] < closestRange) { closestRange = scan->ranges[currIndex]; } } //ROS_INFO_STREAM("Closest range: " << closestRange); if (closestRange < MIN_PROXIMITY_RANGE) { keepMoving = false; }}

(C)2015 Roi Yehoshua
Reading Sensors

(C)2015 Roi Yehoshua
Collision Avoidance• All models in Stage (including lasers and robot bases)
have heights • A sensor will only "see" other models at the same
height • In Stage .world examples, the robots have lasers mounted on
their tops in such a way that a robot's laser only sees other robots' lasers, not their bases
• This is the correct result for such a robot configuration, since in the real world, the laser planes don't intersect the robot bases.
• If you want to simulate a different (perhaps less realistic) kind of robot, you can adjust the laser heights

(C)2015 Roi Yehoshua
Collision Avoidancedefine erratic position( #size [0.415 0.392 0.25] size [0.35 0.35 0.25] origin [-0.05 0 0 0] gui_nose 1 drive "diff" topurg(pose [ 0.050 0.000 -0.1 0.000 ]) )

(C)2015 Roi Yehoshua
Collision Avoidance

(C)2015 Roi Yehoshua
Collision Avoidance• A more difficult problem related to collision
avoidance is that when two lasers see each other directly, they often get "dazzled", and the data are discarded.
• Laser-based obstacle avoidance among a group of homogeneous robots is difficult
• Can you think of a solution to this problem?

(C)2015 Roi Yehoshua
Robots Synchronization• One important aspect of multi-robot systems is
the need of coordination and synchronization of behavior between robots in the team
• We will now make our robots wait for each other before they start moving

(C)2015 Roi Yehoshua
Robots Synchronization• First we will create a shared topic called team_status• Each robot when ready – will publish a ready status
message to the shared topic• In addition, we will create a monitor node that will
listen for the ready messages• When all ready messages arrive, the monitor node
will publish a broadcast message that will let the robots know that the team is ready and they can start moving

(C)2015 Roi Yehoshua
RobotStatus Message• We will start by creating a new ROS message
type for the ready messages called RobotStatus• The structure of the message will be:
• The header contains a timestamp and coordinate frame information that are commonly used in ROS
Header headerint32 robot_idbool is_ready

(C)2015 Roi Yehoshua
Message Header
• stamp specifies the publishing time• frame_id specifies the point of reference for data
contained in that message

(C)2015 Roi Yehoshua
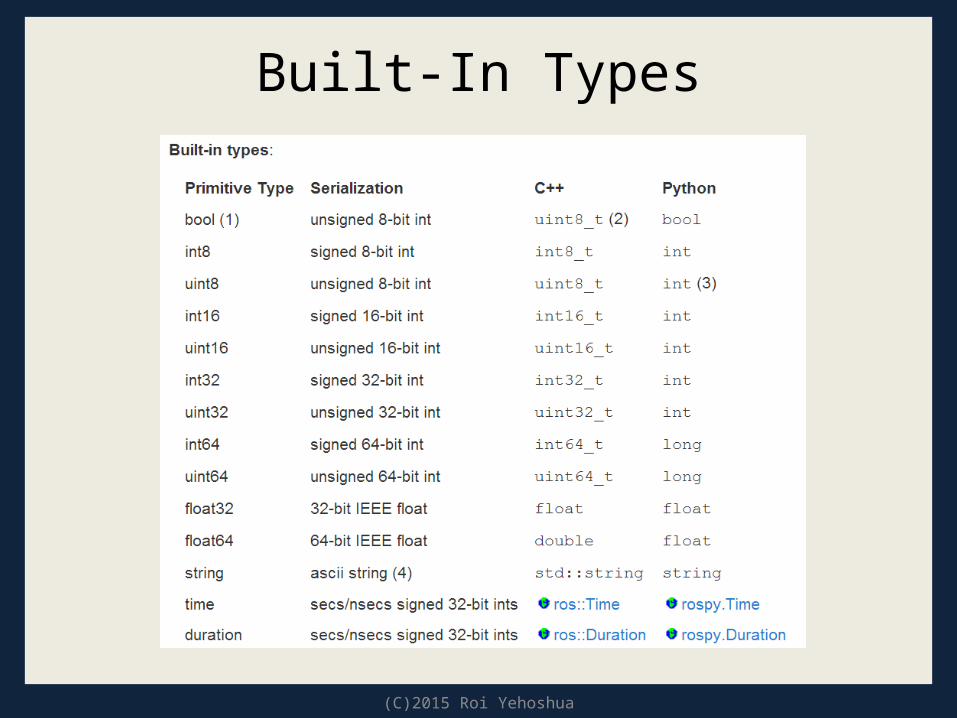
Message Field TypesField types can be:• a built-in type, such as "float32 pan" or "string
name"• names of Message descriptions defined on their
own, such as "geometry_msgs/PoseStamped"• fixed- or variable-length arrays (lists) of the above,
such as "float32[] ranges" or "Point32[10] points“• the special Header type, which maps to
std_msgs/Header
(C)2015 Roi Yehoshua
Built-In Types

(C)2015 Roi Yehoshua
msg Files• msg files are simple text files that describe the
fields of a ROS message • They are used to generate source code for
messages in different languages• Stored in the msg directory of your package

(C)2015 Roi Yehoshua
Create a Message• First create a new package called multi_sync
• Copy the world subdirectory from the stage_multi package we created in the last lesson to the new package
• Now create a subdirectory msg and the file RobotStatus.msg within it
$ cd ~/catkin_ws/src$ catkin_create_pkg multi_sync std_msgs rospy roscpp
$ cd ~/catkin_ws/src/multi_sync$ mkdir msg$ gedit msg/RobotStatus.msg

(C)2015 Roi Yehoshua
Create a Message Type• Add the following lines to RobotStatus.msg:
• Now we need to make sure that the msg files are turned into source code for C++, Python, and other languages
Header headerint32 robot_idbool is_ready

(C)2015 Roi Yehoshua
package.xml• Open package.xml, and add the following two lines to it
• Note that at build time, we need "message_generation", while at runtime, we need "message_runtime"
<build_depend>roscpp</build_depend><build_depend>rospy</build_depend><build_depend>std_msgs</build_depend><build_depend>message_generation</build_depend><run_depend>roscpp</run_depend><run_depend>rospy</run_depend><run_depend>std_msgs</run_depend><run_depend>message_runtime</run_depend>

(C)2015 Roi Yehoshua
CMakeLists• Add the message_generation dependency to the find
package call so that you can generate messages:
• Also make sure you export the message runtime dependency:
find_package(catkin REQUIRED COMPONENTS roscpp rospy std_msgs message_generation)
catkin_package(# INCLUDE_DIRS include# LIBRARIES multi_sync CATKIN_DEPENDS roscpp rospy std_msgs message_runtime# DEPENDS system_lib)

(C)2015 Roi Yehoshua
CMakeLists• Find the following block of code:
• Uncomment it by removing the # symbols and then replace the stand in Message*.msg files with your .msg file, such that it looks like this:
## Generate messages in the 'msg' folder# add_message_files(# FILES# Message1.msg# Message2.msg# )
add_message_files( FILES RobotStatus.msg )

(C)2015 Roi Yehoshua
CMakeLists• Now we must ensure the generate_messages() function is
called• Uncomment these lines:
• So it looks like:
# generate_messages(# DEPENDENCIES# std_msgs# )
generate_messages( DEPENDENCIES std_msgs)

(C)2015 Roi Yehoshua
Compiling a package with custom messages
• If you need to compile nodes that depend on custom messages in the same package, you need to run catkin_make with the following argument:
• Otherwise catkin_make tries to compile the library without waiting for all the message headers to be generated
catkin_make -j4

(C)2015 Roi Yehoshua
Using rosmsg• That's all you need to do to create a msg • Let's make sure that ROS can see it using
the rosmsg show command:$ rosmsg show [message type]

(C)2015 Roi Yehoshua
Create a Message• Now we need to make our package:
• During the build, source files will be created from the .msg file:
$ cd ~/catkin_ws$ catkin_make

(C)2015 Roi Yehoshua
Create a Message• Any .msg file in the msg directory will generate
code for use in all supported languages.• The C++ message header file will be generated
in ~/catkin_ws/devel/include/multi_sync/

(C)2015 Roi Yehoshua
RobotStatus.h#include <std_msgs/Header.h> namespace multi_sync{template <class ContainerAllocator>struct RobotStatus_{ typedef RobotStatus_<ContainerAllocator> Type; RobotStatus_() : header() , robot_id(0) , is_ready(false) { } typedef ::std_msgs::Header_<ContainerAllocator> _header_type; _header_type header; typedef uint32_t _robot_id_type; _robot_id_type robot_id; typedef uint8_t _is_ready_type; _is_ready_type is_ready; typedef boost::shared_ptr< ::multi_sync::RobotStatus_<ContainerAllocator> > Ptr; typedef boost::shared_ptr< ::multi_sync::RobotStatus_<ContainerAllocator> const> ConstPtr; boost::shared_ptr<std::map<std::string, std::string> > __connection_header; }; // struct RobotStatus_typedef ::multi_sync::RobotStatus_<std::allocator<void> > RobotStatus;

(C)2015 Roi Yehoshua
Importing Messages• Copy move_robot.cpp from the last lesson to the
package• Now import the RobotStatus header file by
adding the following line:
• Note that messages are put into a namespace that matches the name of the package
#include <multi_sync/RobotStatus.h>

(C)2015 Roi Yehoshua
Team Status Messages• We will use a shared topic called team_status to
receive status messages from other team members
• Each robot will have both a publisher and a listener object to this topic
• Add the following global (class) variables:ros::Subscriber team_status_sub;ros::Publisher team_status_pub;

(C)2015 Roi Yehoshua
Team Status Messages• In the main() function initialize the publisher and
the listener:
• Then call a function that will publish a ready status message (before calling move_forward):
• After that call a function that will wait for all the other team members to become ready:
team_status_pub = nh.advertise<multi_sync::RobotStatus>("team_status", 10);team_status_sub = nh.subscribe("team_status", 1, &teamStatusCallback);
publishReadyStatus();
waitForTeam();

(C)2015 Roi Yehoshua
Publishing Ready Status Message• Add the following function that will publish a status message
when the robot is ready:
• Note that the publisher needs some time to connect to the subscribers, thus you need to wait between creating the publisher and sending the first message
void publishReadyStatus() { multi_sync::RobotStatus status_msg; status_msg.header.stamp = ros::Time::now(); status_msg.robot_id = robot_id; status_msg.is_ready = true; // Wait for the publisher to connect to subscribers sleep(1.0); team_status_pub.publish(status_msg); ROS_INFO("Robot %d published ready status", robot_id);}

(C)2015 Roi Yehoshua
Waiting for Team• First add a global (class) boolean variable that will
indicate that all robots are ready:
• Now add the following function:
– ros::spinOnce() will call all the team status callbacks waiting to be called at that point in time.
void waitForTeam() { ros::Rate loopRate(1);
// Wait until all robots are ready... while (!teamReady) { ROS_INFO("Robot %d: waiting for team", robot_id); ros::spinOnce(); loopRate.sleep(); }}
bool teamReady = false;

(C)2015 Roi Yehoshua
Receiving Team Ready Status• Add the following callback function to
move_robot.cpp that will receive a team ready message from the monitor node:void teamStatusCallback(const multi_sync::RobotStatus::ConstPtr& status_msg){ // Check if message came from monitor if (status_msg->header.frame_id == "monitor") { ROS_INFO("Robot %d: Team is ready. Let's move!", robot_id); teamReady = true; }}

(C)2015 Roi Yehoshua
Compiling the Node• Uncomment the following lines in CMakeLists.txt:
• Then call catkin_make
cmake_minimum_required(VERSION 2.8.3)project(multi_sync)…## Declare a cpp executableadd_executable(move_robot_sync src/move_robot.cpp)
## Specify libraries to link a library or executable target againsttarget_link_libraries(move_robot_sync ${catkin_LIBRARIES})

(C)2015 Roi Yehoshua
Launch File• Create a launch file named multi_sync.launch in
/launch subdirectory and add the following lines:<launch> <node name="stage" pkg="stage_ros" type="stageros" args="$(find multi_sync)/world/willow-multi-erratic.world"/> <node name="move_robot_0" pkg="multi_sync" type="move_robot" args="0" output="screen"/> <node name="move_robot_1" pkg="multi_sync" type="move_robot" args="1" output="screen"/> <node name="move_robot_2" pkg="multi_sync" type="move_robot" args="2" output="screen"/> <node name="move_robot_3" pkg="multi_sync" type="move_robot" args="3" output="screen"/></launch>

(C)2015 Roi Yehoshua
Running the move_robot nodes

(C)2015 Roi Yehoshua
Ready status messages• Type rostopic echo /team_status to watch the
ready messages:

(C)2015 Roi Yehoshua
Homework (not for submission)• Create a monitor node that will listen for the ready
messages and announce when all robots are ready


