instructables Multi Tool by Pricklysauce What every pocket needs...a Multi Tool Follow along and make this easy to make multi tool... M4 to M12 spanner Hex screwdriver holder socket Flat screwdriver bit Compass Set square Tin opener Bottle opener...for that well earned beer at the end of a hard working day... https://youtu.be/L2p3IR1abgc Multi Tool: Page 1
Transcript
instructables
Multi Tool
by Pricklysauce
What every pocket needs...a Multi Tool
Follow along and make this easy to make multi tool...
M4 to M12 spanner
Hex screwdriver holder socket
Flat screwdriver bit
Compass
Set square
Tin opener
Bottle opener...for that well earned beer at the end of a hard working day...
https://youtu.be/L2p3IR1abgc
Multi Tool: Page 1
Step 1: Get your bits together
Only a few materials1.5mm mild steel sheet 100x150mm piece will maketwo multi tools, a spare or a present?
Stencils - Sticky backed plastic or paper + glue
Spray paint - optional
ToolsGeneral metal working tools -
Hammer
Files
Metal vice
Metal cutting - I used a woodworking fret saw with ametal junior hacksaw blade
Rotary tool with cutting disc, grinding disc, sanderbobbin
Drill + drill bits
Scalpel knife to cut out stencils or Silhouette CameoCNC cutter
Etching tool - Optional see my video on metaletching to make your own one - easy to make
Step 2: Get it sized up
Such a little sized tool that can do so much...
...only 75mm long by 40mm wide...
Multi Tool: Page 2
Step 3: Fold the edge
Clamp 10mm of the metal in the vice...
...and fold over to 90 degrees...use a hammer to make the bend nice and clean
Step 4: Stencil
Print out the PDF file for the outline shapes...
Carefully cut out the shapes...or cut out on a CNC paper cutter for best accuracy if you have use of one.
I like to cut out my stencils on sticky backed plastic, though paper and some glue will work just as well.
Stick the first stencil along the folded edge of the metal.
I then spray painted the metal with white paint...
...and removed the stencils so the stencil wouldn't ruck up when cutting.
In truth probably over kill and cutting to the stencil should be fine.
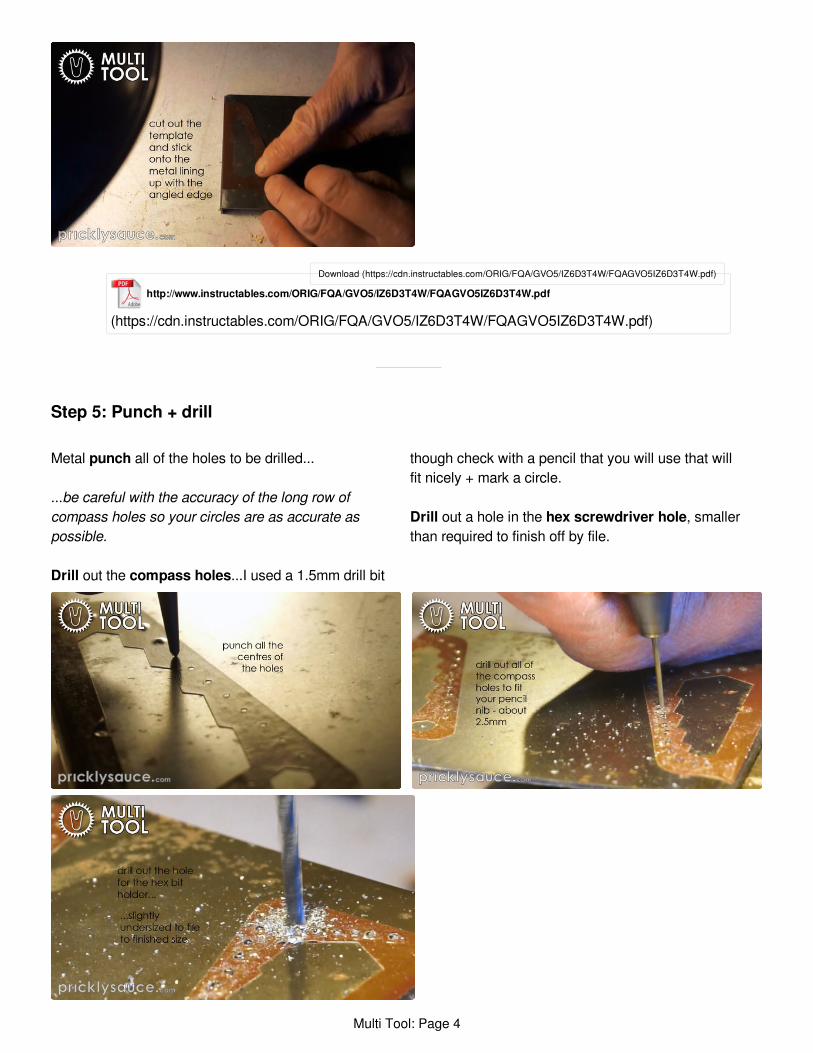
Step 7: Cut out the inner
To cut out the inner of the multi tool I used a woodworking fret saw that I can fix a junior hacksaw metal bladeinto...it worked suprisingly well.
Due to the metal downturn, cut a piece of MDF to act as spacer while cutting
Drill a large enough hole for the blade through both the metal + MDF block...and attach the blade to the fretsaw.
Cut out the shape
Multi Tool: Page 5
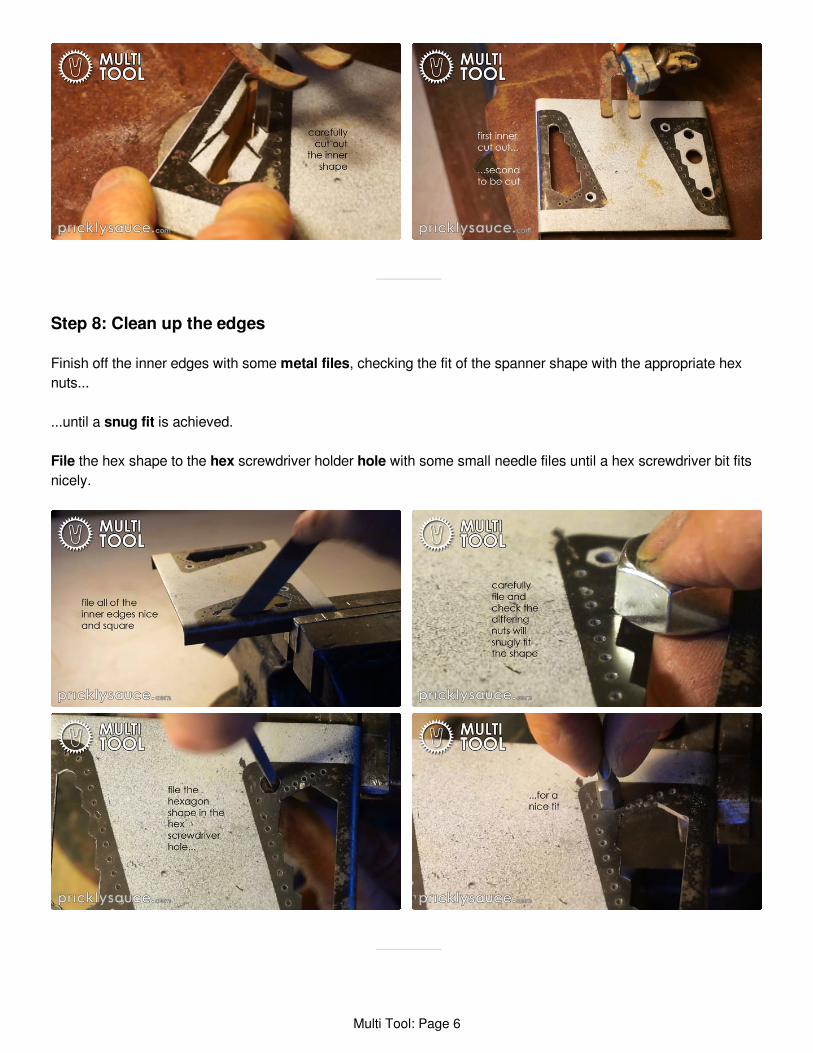
Step 8: Clean up the edges
Finish off the inner edges with some metal files, checking the fit of the spanner shape with the appropriate hexnuts...
...until a snug fit is achieved.
File the hex shape to the hex screwdriver holder hole with some small needle files until a hex screwdriver bit fitsnicely.
Multi Tool: Page 6
Step 9: Cut out the outside
Back to the fretsaw and cut out the outer shape...
...remember to add the slotted screwdriver poky bit to the top of the multi tool
Step 10: Clean up
Clean the outer edges with some hand files...
...file the flat screwdriver bit end to the required thickness for a screw
Take care that the end is square to the folded over side...
...this will be the set square
Multi Tool: Page 7
Step 11: Etching
I wanted to add the bolt sizes to the spanner and thepricklysaucelogo to my multi tool...
...If you are interested in doing similar then check outmy metal etching video to learn how to make yourown etcher and how to make some cool etches.
A very steady hand is required to cut out the little 'M'numbers or a Silhouette Cameo CNC paper cutterdoes it with no effort. Find the stencil on the PDF file.
I won't go into the details of the etching process asthe video will explain it all, though happy to make anInstructable in the future if people would beinterested, just leave a comment below.
I wanted my etches to be red, so I spray painted themall over red!...before...
https://youtu.be/t2D7DICS070
Multi Tool: Page 8
Step 12: Cleaning up
...clean up all the faces of the multi tool...
I used a combination of bench sander and rotary tool with differing sanding polishing attachments...
...I ended up leaving a slightly burnished finish from the rotary tool with a sanding drum attachment...
...catches the light nicely
Step 13: Looking good!
Multi Tool: Page 9
Step 14: Compass
The compass works by hammering a pin through oneof the holes...
...each of the holes is in a multiple of 5mm...
...the last 5 holes along the short end are at 1mmintervals...
...giving a range of 1mm to 55mm...
...circles below 5mm are a little difficult to draw inreality.
Place your sharpened pencil in the desired hole andspin around.
Step 15: Hex screwdriver
A hex screwdriver bit holder slots into the hex hole you filed...
...and the multi tool turns into a fist grip screwdriver.
Multi Tool: Page 10
Step 16: Slotted screwdriver
The slotted screwdriver bit screws in slotted screws!...
Step 17: Tin opener
...and pops open tin lids.
Step 18: Set square
Your nicely squared off end is an accurate set square
Multi Tool: Page 11
Step 19: Spanner
The big central cut out nicely fits hex nuts from M4 to M12 [in x2M steps sizes]
Step 20: Crack open a beer
...and after all that work...
...crack open a beer...
...your worth it!
CHEERS
Multi Tool: Page 12
Step 21: So useful
...Use + Enjoy!
This is a surprisingly easy project that makes such auseful little multi tool...
...I hope you enjoyed it and will make your very ownmulti tool...
...I am entering this project into the Build a ToolCompetition. If you have enjoyed this project, I wouldreally appreciate your vote. Many thanks.
This project is part of my YouTube series where I try
to make cool and interesting projects.
Please check out my channel if you want to see moreof the projects, if not there will be more coming toInstructables soon.
Why not check out what I am up to withpricklysauce.com