Network Supported ❏ Wired LAN Refer to the Owner's Manuals below for details about network function. ❏ Network Set-up and Operation ❏ PJ Network Manager Multimedia Projector MODEL LC-XBL21 LC-XBL26 Owner’s Manual
Features and DesignThisMultimediaProjectorisdesignedwiththemostadvancedtechnologyforportability,durability,andeaseofuse.Thisprojectorutilizesbuilt-inmultimediafeatures,apaletteof16.77millioncolors,andmatrixliquidcrystaldisplay(LCD)technology.
♦ Security Function The Security function helps you to ensure security
of the projector. With the Key lock function, you canlocktheoperationonthetopcontrolorremotecontrol(p.54).PIN code lock function preventsunauthorizeduseoftheprojector(pp.19,54–55).
CAUTION: TO REDUCE THE RISK OF ELECTRIC SHOCK, DO NOT REMOVE COVER (OR BACK) . NO USER-SERVICEABLE PARTS INSIDE EXCEPT LAMP REPLACEMENT . REFER SERVICING TO QUALIFIED SERVICE PERSONNEL .
CAUTIONDO NOT SET THE PROjECTOR IN GREASy, wET, OR SMOKy CONDITIONS SUCH AS IN A KITCHEN TO PREVENT A BREAKDOwN OR A DISASTER . IF THE PROjECTOR COMES IN CONTACT wITH OIL OR CHEMICALS, IT MAy BECOME DETERIORATED .
READ AND KEEP THIS OwNER'S MANUAL FOR LATER USE .
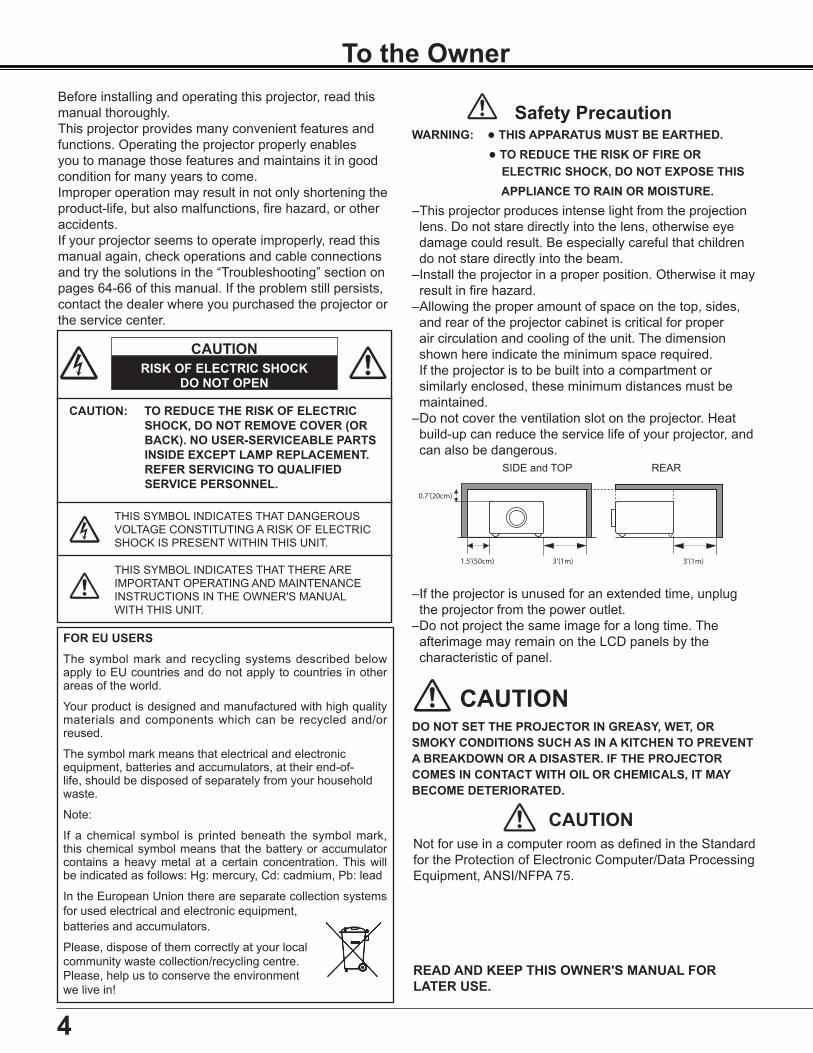
wARNING: ● THIS APPARATUS MUST BE EARTHED . ● TO REDUCE THE RISK OF FIRE OR ELECTRIC SHOCK, DO NOT EXPOSE THIS APPLIANCE TO RAIN OR MOISTURE .–Thisprojectorproducesintenselightfromtheprojectionlens.Donotstaredirectlyintothelens,otherwiseeyedamagecouldresult.Beespeciallycarefulthatchildrendonotstaredirectlyintothebeam.–Installtheprojectorinaproperposition.Otherwiseitmayresultinfirehazard.–Allowingtheproperamountofspaceonthetop,sides,andrearoftheprojectorcabinetiscriticalforproperaircirculationandcoolingoftheunit.Thedimensionshownhereindicatetheminimumspacerequired.Iftheprojectoristobebuiltintoacompartmentorsimilarlyenclosed,theseminimumdistancesmustbemaintained.–Donotcovertheventilationslotontheprojector.Heatbuild-upcanreducetheservicelifeofyourprojector,andcanalsobedangerous.
If a chemical symbol is printed beneath the symbol mark,thischemicalsymbolmeansthatthebatteryoraccumulatorcontainsaheavymetal at a certain concentration.Thiswillbeindicatedasfollows:Hg:mercury,Cd:cadmium,Pb:lead
Safety InstructionsAll the safetyand operating instructions shouldbe readbeforetheproductisoperated.
Readall of the instructionsgivenhereand retain themfor lateruse.UnplugthisprojectorfromACpowersupplybefore cleaning.Do not use liquidor aerosol cleaners.Useadampclothforcleaning.
Follow all warnings and instructions marked on theprojector.
For added protection to the projector during a lightningstorm, orwhen it is left unattendedandunused for longperiodsof time, unplug it from the wall outlet.Thiswillpreventdamageduetolightningandpowerlinesurges.
Donot expose this unit to rain or use near water... forexample,inawetbasement,nearaswimmingpool,etc...
Do not use attachments not recommended by themanufacturerastheymaycausehazards.
Do not place this projector on an unstable cart, stand,or table.The projector may fall, causing serious injuryto a child or adult, and serious damage to the projector.Use only with a cart or stand recommended by themanufacturer, or sold with the projector.Wall or shelfmounting should follow the manufacturer’s instructions,and should use a mount ing k i t approved by themanufacturers.
An appliance and cart combinationshould be moved with care. Quickstops, excessive force, and unevensurfaces may cause the applianceandcartcombinationtooverturn.
Theopeningsshouldneverbecoveredwithclothorothermaterials,andthebottomopeningshouldnotbeblockedby placing the projector on a bed, sofa, rug, or othersimilar surface.This projector should never be placednearoroveraradiatororheatregister.
Neverpushobjectsofanykindintothisprojectorthroughcabinetslotsastheymaytouchdangerousvoltagepointsor short out parts that could result in a fire or electricshock.Neverspillliquidofanykindontheprojector.
Do not install the projector near the ventilation duct ofair-conditioningequipment.
This projector should be operatedonly from the typeof power source indicated on the marking label. If youarenotsureofthetypeofpowersupplied,consultyourauthorizeddealerorlocalpowercompany.
Donotoverloadwalloutletsandextensioncordsasthiscanresultinfireorelectricshock.Donotallowanythingto rest on the power cord.Do not locate this projectorwherethecordmaybedamagedbypersonswalkingonit.
Do not attempt to service this projector yourself asopening or removing Covers may expose you todangerousvoltageorotherhazards.Referallservicingtoqualifiedservicepersonnel.
Unplugthisprojectorfromwalloutletandreferservicingto qualified service personnel under the followingconditions:a.Whenthepowercordorplugisdamagedorfrayed.b.Ifliquidhasbeenspilledintotheprojector.c.Iftheprojectorhasbeenexposedtorainorwater.d.Iftheprojectordoesnotoperatenormallybyfollowing
theoperating instructions.Adjust only thosecontrolsthat are covered by the operating instructions asimproperadjustment of other controlsmay result indamage and will often require extensive work by aqualifiedtechniciantorestoretheprojectortonormaloperation.
f. When the projector exhibits a distinct change inperformance-thisindicatesaneedforservice.
When replacement parts are required, be sure theservicetechnicianhasusedreplacementpartsspecifiedbythemanufacturer thathavethesamecharacteristicsas theoriginal part. Unauthorized substitutionsmayresultinfire,electricshock,orinjurytopersons.
Upon completion of any service or repairs to thisprojector, ask the service technician to perform routinesafetychecks todetermine that theprojector is insafeoperatingcondition.
NOTE FOR CUSTOMERS IN THE USHgLAMP(S)INSIDETHISPRODUCTCONTAINMERCURYANDMUSTBERECYCLEDORDISPOSEDOFACCORDINGTOLOCAL,STATEORFEDERALLAWS.
6
Safety Instructions
Openings in thecabinetareprovided forventilation.Toensurereliableoperationoftheproductandtoprotectitfromoverheating, theseopeningsmust not beblockedorcovered.
CAUTION
Hotairisexhaustedfromtheexhaustvent.Whenusingor installing the projector, the following precautionsshouldbetaken.–Donotputanyflammableobjectorspraycannearthe
Cooling fans are provided to cool down the projector.The fans’ running speed is changed according to thetemperatureinsidetheprojector.
Moving the ProjectorWhenmovingtheprojector,replacethelenscapandretractadjustablefoottopreventdamagetothelensandcabinet.Whentheprojectorisnotinuseforanextendedperiod,putitintoasuitablecase.
Federal Communications Commission NoticeNote:ThisequipmenthasbeentestedandfoundtocomplywiththelimitsforaClassBdigitaldevice,pursuantto Part 15 of the FCC Rules.These limits are designed to provide reasonable protection against harmfulinterference in a residential installation.This equipmentgenerates, uses, and can radiate radio frequencyenergy, and if not installed and used in accordance with the instructions, may cause harmful interferenceto radio communications. However, there is no guarantee that interference will not occur in a particularinstallation. If thisequipmentdoescauseharmful interference to radioor television reception,whichcanbedeterminedbyturningtheequipmentoffandon, theuser isencouragedtotry tocorrect the interferencebyoneormoreofthefollowingmeasures: –Reorientorrelocatethereceivingantenna. –Increasetheseparationbetweentheequipmentandreceiver. –Connecttheequipmentintoanoutletonacircuitdifferentfromthattowhichthereceiverisconnected. –Consultthedealeroranexperiencedradio/TVtechnicianforhelp.UseofshieldedcableisrequiredtocomplywithclassBlimitsinSubpartBofPart15ofFCCRules.Donotmakeanychangesormodificationstotheequipmentunlessotherwisespecifiedintheinstructions.Ifsuchchangesormodificationsshouldbemade,youcouldberequiredtostopoperationoftheequipment.ModelNumber :LC-XBL21,LC-XBL26TradeName :EIKIResponsibleparty :EIKIInternational,Inc.Address :30251EsperanzaRanchoSantaMargaritaCA92688-2132TelephoneNo. :800-242-3454(949-457-0200)
TheACPowerCordsuppliedwiththisprojectormeetstherequirementforuseinthecountryyoupurchasedit.AC Power Cord for the United States and Canada:
AC Power Cord used in the United States and Canada is listed by the UnderwritersLaboratories(UL)andcertifiedbytheCanadianStandardAssociation(CSA).ACPowerCordhasagrounding-typeAClineplug.Thisisasafetyfeaturetobesurethattheplugwillfitintothepoweroutlet.Donottrytodefeatthissafetyfeature.Shouldyoubeunabletoinserttheplugintotheoutlet,contactyourelectrician.
GROUND
AC Power Cord Requirement
AC Power Cord for the United Kingdom:Thiscordisalreadyfittedwithamouldedplugincorporatingafuse,thevalueofwhichisindicatedonthepinfaceoftheplug.Shouldthefuseneedtobereplaced,anASTAapprovedBS1362fusemustbeusedofthesamerating,markedthus ASA . If thefusecoverisdetachable,neverusetheplugwiththecoveromitted.Ifareplacementfusecoverisrequired,ensureitisofthesamecolourasthatvisibleonthepinfaceoftheplug(i.e.redororange).FusecoversareavailablefromthePartsDepartmentindicatedinyourUserInstructions.Iftheplugsuppliedisnotsuitableforyoursocketoutlet,itshouldbecutoffanddestroyed.Theendoftheflexiblecordshouldbesuitablypreparedandthecorrectplugfitted.wARNING : A PLUG wITH BARED FLEXIBLE CORD IS HAZARDOUS IF ENGAGED IN A LIVE SOCKET OUTLET .TheWiresinthismainsleadarecolouredinaccordancewiththefollowingcode: Green-and-yellowEarth Blue . . . . . . . . . . . Neutral Brown . . . . . . . . . LiveAsthecoloursofthewiresinthemainsleadofthisapparatusmaynotcorrespondwiththecolouredmarkingsidentifyingtheterminalsinyourplugproceedasfollows:Thewirewhichiscolouredgreen-and-yellowmustbeconnectedtotheterminalintheplugwhichismarkedbytheletterEorbythesafetyearthsymbol orcolouredgreenorgreen-and-yellow.The wire which is colouredbluemust be connected to the terminalwhich ismarked with the letterN orcolouredblack.The wire which is coloured brown must be connected to the terminal which is marked with the letter L orcolouredred.wARNING: THIS APPARATUS MUST BE EARTHED .
THE SOCKET-OUTLET SHOULD BE INSTALLED NEAR THE EQUIPMENT AND EASILy ACCESSIBLE .
8
Part Names and Functions
Back
①Top controls and Indicators②Zoom Ring③Focus Ring④Speaker⑤ Infrared Remote Receiver⑥Projection Lens⑦Lens Cap (Seepage61forattaching.)
⑧Air Intake Vent
⑨Lamp Cover⑩Terminals and Connectors⑪LAN Connection Terminal⑫ Power Cord Connector⑬ Exhaust Vents
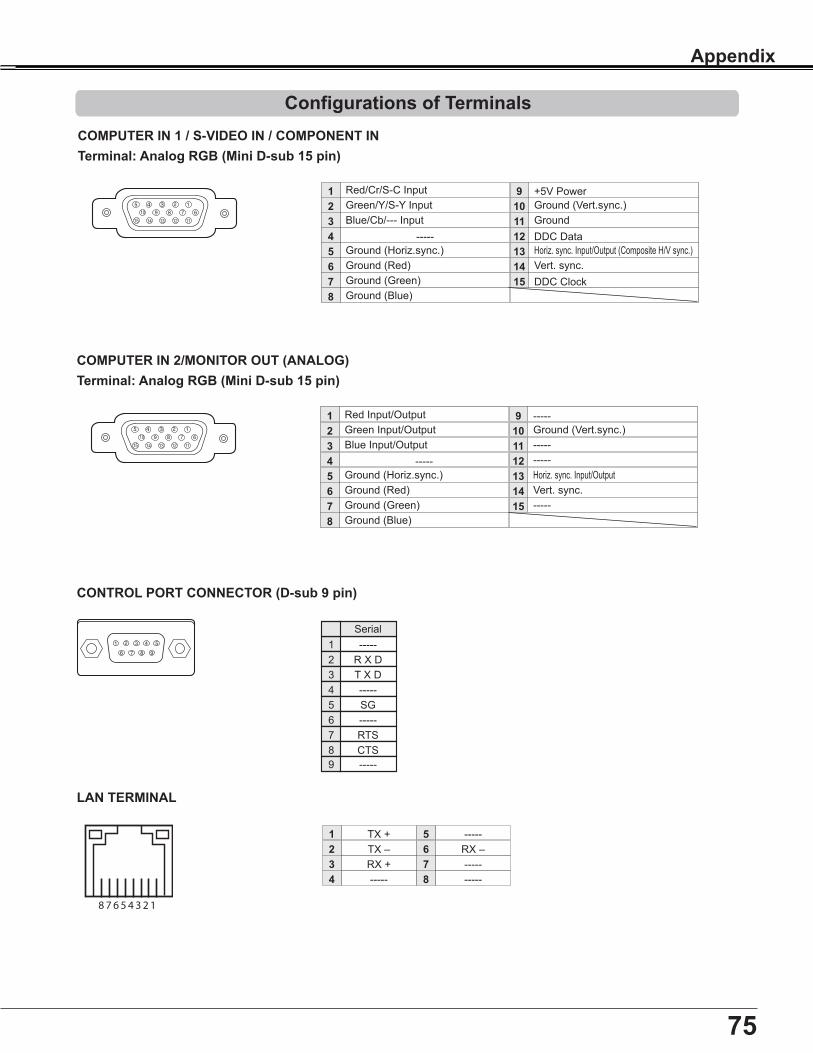
③ COMPUTER IN 2 / MONITOR OUT –ConnectanalogRGBoutputsignalfroma computertothisterminal(p.14). –Thisterminalcanbeusedtooutputtheincoming analogRGBandComponentsignalfrom COMPUTERIN1/S-VIDEOIN/COMPONENTIN terminaltotheothermonitor(pp.14,16).
⑧
⑧ AUDIO IN (PC) Connecttheaudiooutputsignalfromcomputer
Two AAA size batteriesForcorrectpolarity(+and–),besurebatteryterminalsareincontactwithpinsincompartment.
1 2 �
Point the remote control toward the projector (InfraredRemote Receiver) when pressing the buttons. Maximumoperating range for the remote control is about 16.4'(5 m)and60degreesinfrontoftheprojector.
Remote Control Operating Range
Remote Control Battery Installation
16.4'(5m)
30° Remotecontrol
30°
The2different remotecontrolcodes (Code1–Code2)areassignedtothisprojector.Switchingtheremotecontrol codes prevents interference from other remotecontrolswhenseveralprojectorsorvideoequipmentnext toeachotherareoperatedat thesametime.Changetheremotecontrolcodefortheprojectorfirstbeforechanging that for theremotecontrol.See"Remotecontrol"intheSettingMenuonpage53.
Cables used for connection •VideoCable•S-VideoCable•S-Video-VGACable•AudioCables(These cables are not supplied with the projector.Pleaseusecommerciallyavailablecables.)
Cables used for connection•AudioCables•Scart-VGACable•ComponentCable•Component-VGACable(These cables are not supplied with the projector.Pleaseusecommerciallyavailablecables.)
Connecting the AC Power CordThisprojectorusesnominalinputvoltagesof100-240VACand it automatically selects the correct input voltage. It isdesignedtoworkwithsingle-phasepowersystemshavingagroundedneutral conductor.To reduce the riskof electricalshock,donotplugintoanyothertypeofpowersystem.If you are not sure of the type of power being supplied,consultyourauthorizeddealerorservicecenter.Connect the projector with all peripheral equipment beforeturningtheprojectoron.
Connect theAC power cord (supplied) to theprojector.
TotheACoutlet.(200 - 240 V AC)
NOTE ON THE POwER CORDACpowercordmustmeetrequirementofthecountrywhereyouusetheprojector.ConfirmtheACplugtypewiththechartbelowandproperACpowercordmustbeused.IfsuppliedACpowercorddoesnotmatchyourACoutlet,contactyoursalesdealer.
Is signal processed correctly?Is cable connected properly?
Nosignal
CurrentInputsetting:RGB
Is signal processed correctly?
Is cable connected properly?
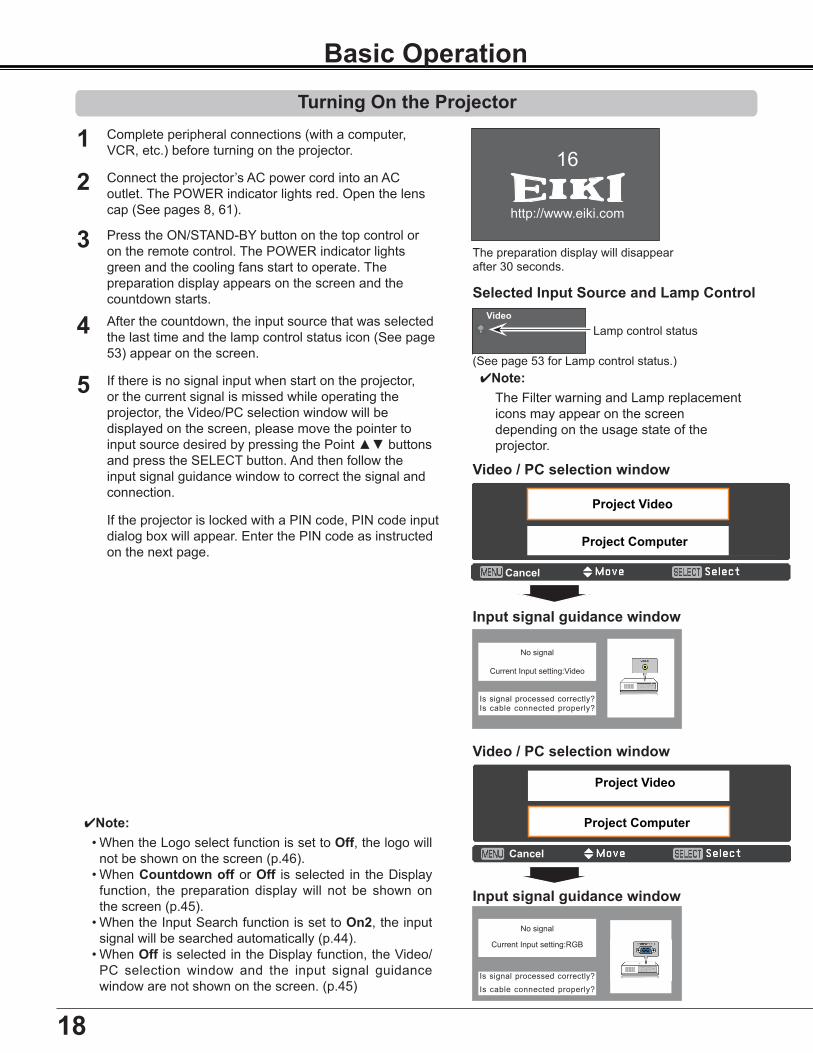
16
http://www.eiki.com
19
what is PIN code?PIN(PersonalIdentificationNumber)codeisasecuritycodethatallowsthepersonwhoknowsittooperatetheprojector.SettingaPINcodepreventsunauthorizeduseoftheprojector.
Enter a PIN codeUsethePoint▲▼buttonstoenteranumber.PressthePoint◄►buttonstofixthenumberandmovetheredframepointertothenextbox.Thenumberchangesto“✳”.Ifyoufixedanincorrectnumber,usethePoint◄►buttonstomovethepointertothenumberyouwanttocorrect,andthenenterthecorrectnumber.
CAUTION ON HANDLING PIN CODEIfyouforgetyourPINcode,theprojectorcannolongerbestarted.TakeaspecialcareinsettinganewPINcode,writedownthenumberinacolumnonpage76ofthismanualandkeepitonhand.ShouldthePINcodebemissingorforgotten,consultyourdealerorservicecenter.
Turning Off the ProjectorPress theON/STAND-BYbuttonon the topcontrolorontheremotecontrol,andPower off? appearsonthescreen.
Press the ON/STAND-BY button again to turn off theprojector.ThePOWERindicatorstartstoblinkred,andthecoolingfanskeeprunning.(Youcanselectthelevelof fans’quietnessandspeed.See“Fan”onpage56.)Atthistime,youcanunplugtheACpowercordevenifthefansarestillrunning.
1
2
� When the projector has cooled down enough, thePOWER indicator stops blinking and you can turn ontheprojector.
✔Note: •When theDirecton function isset toOn, theprojector
will be turned on automatically by connecting theACpowercordtoanACoutlet(p.50).
•WhilethePOWERindicatorisblinking,thelampisbeingcooleddownandtheprojectorcannotbeturnedon.Waituntil thePOWERindicatorstopsblinking to turnon theprojectoragain.
•The fan rotation will terminate directly if theAC powercord is unplugged immediately after the projector isturnedoff.
•The projector can be turned on after the POWERindicator turns red.The waiting time to restart will beshortenedwhenthenormalpower-offprocessingforfan
cooling is completed, compared with the time theACpower cord is immediately unplugged after the power-off.
cannot restart the projector immediatelyafter the power is disconnected. If theexternal power supply is suddenly cutoff, the fans stop immediately.The lampremains high temperature and needs tobecooled.
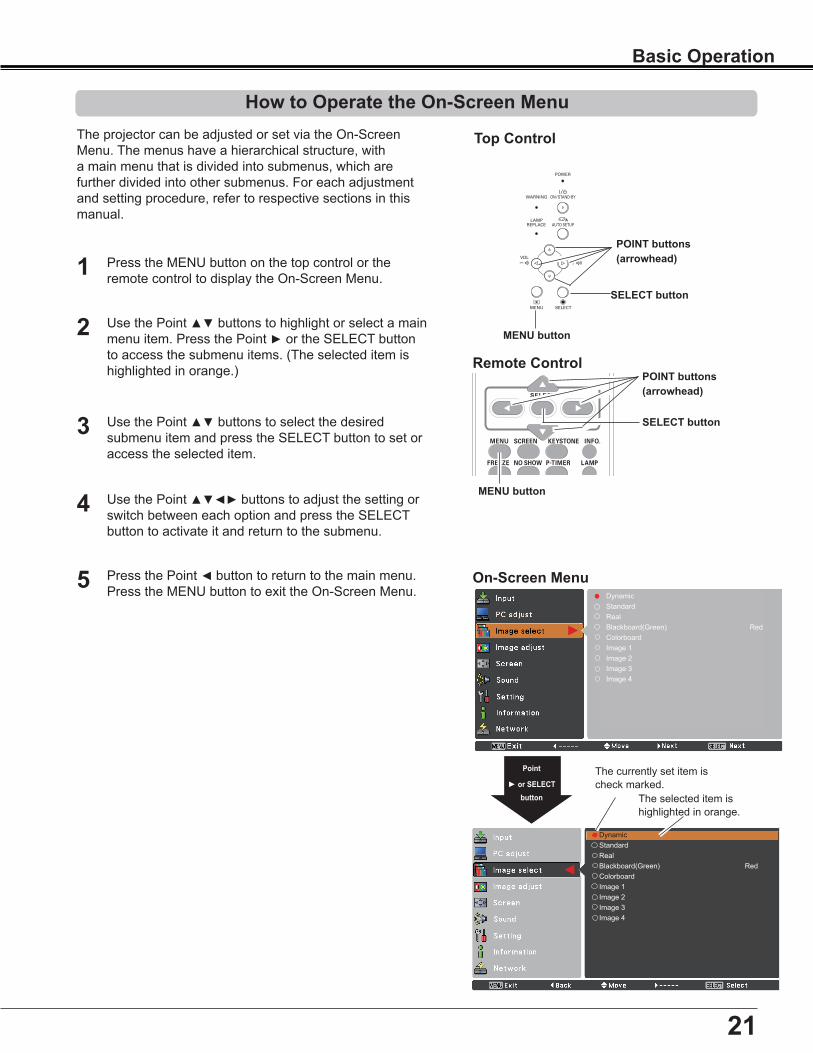
How to Operate the On-Screen MenuTheprojectorcanbeadjustedorsetviatheOn-ScreenMenu.Themenushaveahierarchicalstructure,withamainmenuthatisdividedintosubmenus,whicharefurtherdividedintoothersubmenus.Foreachadjustmentandsettingprocedure,refertorespectivesectionsinthismanual.
PresstheMUTEbuttonontheremotecontrol toselectOnto temporarily turn off the sound.To turn the sound backon,presstheMUTEbuttonagaintoselectOfforpresstheVOLUME+/–buttons.TheMutefunctionisalsoeffectivefortheAUDIOOUTjack.
Remote Control OperationUsingtheremotecontrolforsomefrequentlyusedoperationsisadvisable.JustpressingoneofthebuttonsenablesyoutomakethedesiredoperationquicklywithoutcallinguptheOn-ScreenMenu.
ChooseeitherComputer 1(RGB) orComputer 2(RGB)bypressingtheCOMPUTER1orCOMPUTER2buttonontheremotecontrol.Before using these buttons, correct input source should be selected through Menu operation as describedbelow.
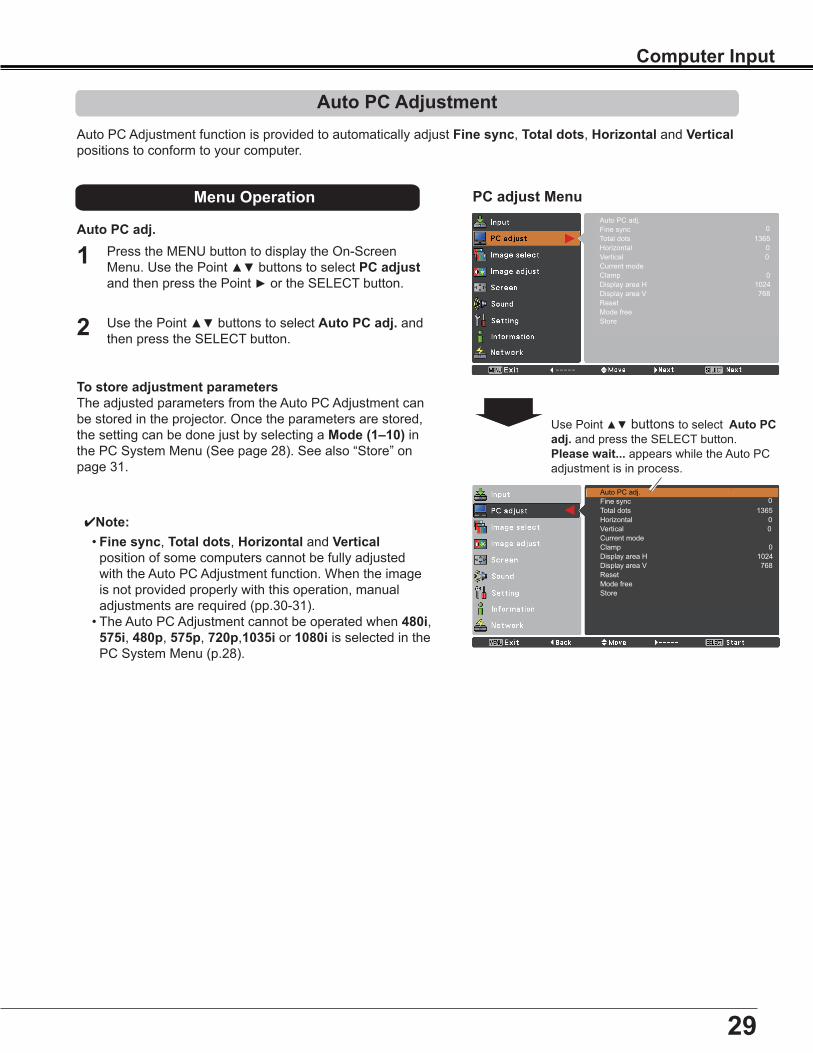
Computer System SelectionThisprojectorautomaticallytunestovarioustypesofcomputerswithitsMulti-scansystemandAutoPCAdjustment.Ifacomputerisselectedasasignalsource,thisprojectorautomaticallydetectsthesignalformatandtunestoprojectaproperimagewithoutanyadditionalsettings.(Signalformatsprovidedinthisprojectorareshownonpage71.)
To store adjustment parametersTheadjustedparametersfromtheAutoPCAdjustmentcanbestoredintheprojector.Oncetheparametersarestored,thesettingcanbedonejustbyselectingaMode (1–10)inthePCSystemMenu(Seepage28).Seealso“Store”onpage31.
2 UsethePoint▲▼buttonstoselectAuto PC adj .andthenpresstheSELECTbutton.
Auto PC adj .
Menu OperationAuto PC adj.Fine syncTotal dots 1365Horizontal 0Vertical 0Current modeClamp 0Display area H 1024Display area V 768ResetMode freeStore
0
►
UsePoint▲▼buttonstoselect Auto PC adj . andpresstheSELECTbutton.Please wait . . .appearswhiletheAutoPCadjustmentisinprocess.
Auto PC adj.Fine syncTotal dots 1365Horizontal 0Vertical 0Current modeClamp 0Display area H 1024Display area V 768ResetMode freeStore
0►
�0
Computer Input
PC adjust Menu
Manual PC AdjustmentSomecomputersemployspecialsignalformatswhichmaynotbetunedbyMulti-scansystemofthisprojector.ManualPCAdjustmentenablesyoutopreciselyadjustseveralparameterstomatchthosesignalformats.Theprojector has five independent memory areas to store those parameters manually adjusted. It allows you torecallthesettingforaspecificcomputer.
StoreTostoretheadjusteddata,select Store andthenpressthePoint►ortheSELECTbutton.MovethehighlighttooneoftheModes1to10inwhichyouwanttostore,andthenpresstheSELECTbutton.
✔Note: •Display area (H/V) cannotbeselectedwhen480i,575i,480p,575p,720p,10�5ior1080i isselectedinthe
PCSystemMenu(p.28). •Wheninputcomputersignaltotheprojector, PC adjust willbecomeavailable.
ResetTo reset the adjusted data, select Reset and press theSELECTbutton.Aconfirmationboxappearsandthenselectyes.Alladjustmentswillreturntotheirpreviousfigures.
ThisModehasstoredparameters.
Auto PC adj.Fine syncTotal dots 1365Horiznotal 0Vertical 0Current modeClamp 0Display area H 1024Display area V 768ResetMode freeStore
To reset the adjusted data, select Reset and press theSELECTbutton.Aconfirmationboxappearsandthenselectyes.Alladjustmentswillreturntotheirpreviousfigures.
higherthanit,resettheresolutiontothelowerbeforeconnectingtotheprojector. •Theimagedatainotherthan1024x768ismodifiedtofitthescreensizeininitialmode. •True,Full,andDigital zoom +/–aredisabledandcannotbedisplayedwhen480i,575i,480por575p is
selectedinthePCSystemMenu(p.28).
1
2
Tostoretheadjusteddata,selectStoreandpressthePoint►or the SELECT button. Use the Point ▲▼buttonstoselectonefromImage 1to4andpresstheSELECTbutton.Aconfirmationboxappearsandthenselectyes.StoreddatacanbecalledupbyselectinganImage (1–4)intheImageModeSelectiononpage32.
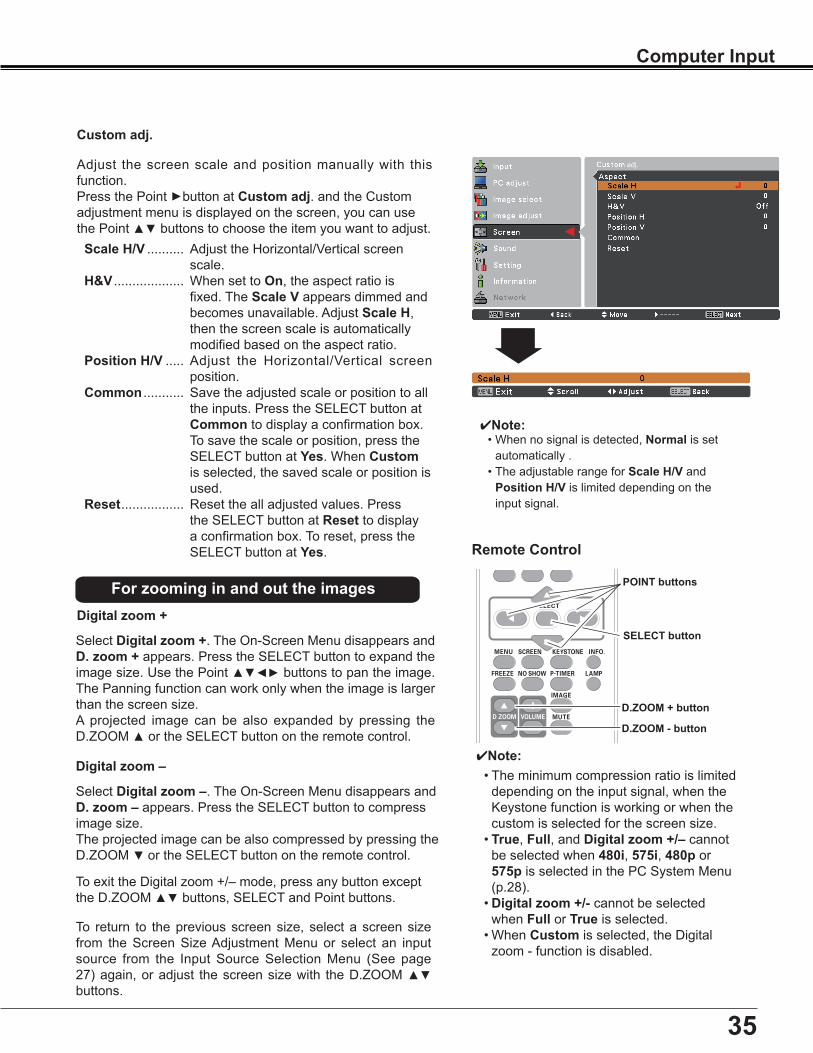
SelectDigital zoom +.TheOn-ScreenMenudisappearsandD . zoom +appears.PresstheSELECTbuttontoexpandtheimagesize.UsethePoint▲▼◄►buttonstopantheimage.ThePanningfunctioncanworkonlywhentheimageislargerthanthescreensize.A projected image can be also expanded by pressing theD.ZOOM▲ortheSELECTbuttonontheremotecontrol.
To return to thepreviousscreensize, selectascreensizefrom the Screen SizeAdjustment Menu or select an inputsource from the Input Source Selection Menu (See page27)again,oradjust thescreensizewith theD.ZOOM▲▼ buttons.
Adjust the screen scale and positionmanually with thisfunction.PressthePoint►buttonatCustomadj.andtheCustomadjustmentmenuisdisplayedonthescreen,youcanusethePoint▲▼buttonstochoosetheitemyouwanttoadjust. Scale H/V.......... AdjusttheHorizontal/Verticalscreen
The projector automatically detects an incoming videosystem, and adjusts itself to optimize its performance.WhenVideoSystemisPAL-MorPAL-N,selectthesystemmanually.
Noise interference on the screen can be reduced. Selectoneofthefollowingoptionstogetsmootherimages. Off......... Disabled. L1.......... Lowerreduction L2.......... Higherreduction
To reset the adjusted data, select Reset and press theSELECTbutton.Aconfirmationboxappearsandthenselectyes.Alladjustmentswillreturntotheirpreviousfigures.
Adjust the screen scale and positionmanually with thisfunction.PressthePoint► buttonatCustomadj .andtheCustomadjustmentmenuisdisplayedonthescreen,youcanusethePoint▲▼buttonstochoosetheitemyouwanttoadjust. Scale H/V.......... AdjusttheHorizontal/Verticalscreen
Thisfunctionisusedtoadjustkeystonedistortionoftheprojectedimage.UsethePoint▲▼buttonstochoosetheitemyouwanttoadjust. KeystoneTocorrectkeystonedistortion,presstheSELECTbutton.Keystone appears on the screen. Use the Point ▲▼ buttonstocorrectkeystonedistortion(p.23). Store Store.....KeepthekeystonecorrectionevenwhentheACpowercordisunplugged. Reset.....ReleasethekeystonecorrectionwhentheACpowercordisunplugged.
Countdown Off....... Show the input image instead ofthe countdown when turning on theprojector.Usethisfunctionwhenyouwanttoprojecttheimageasearlyaspossible even when the lamp is notbrightenough.
After capturing the projected image, go to the Logo selectfunctionandsetittoUser.Thenthecapturedimagewillbedisplayed the next time you turn on the projector or whenyoupresstheNOSHOWbutton.(Seepage26)
✔Note: •Before capturing an image, select Standard in the
Image select Menu to capture a proper image (pp.32,39).
•A signal from a computer can be captured up to XGA(1024 x 768).A signal from video equipment can becapturedexceptfor720p,1035i,and1080i.
•When capturing the image that has been adjusted bytheKeystonefunction,theadjusteddataisautomaticallyreset and the projector captures an image withoutkeystonecorrection.
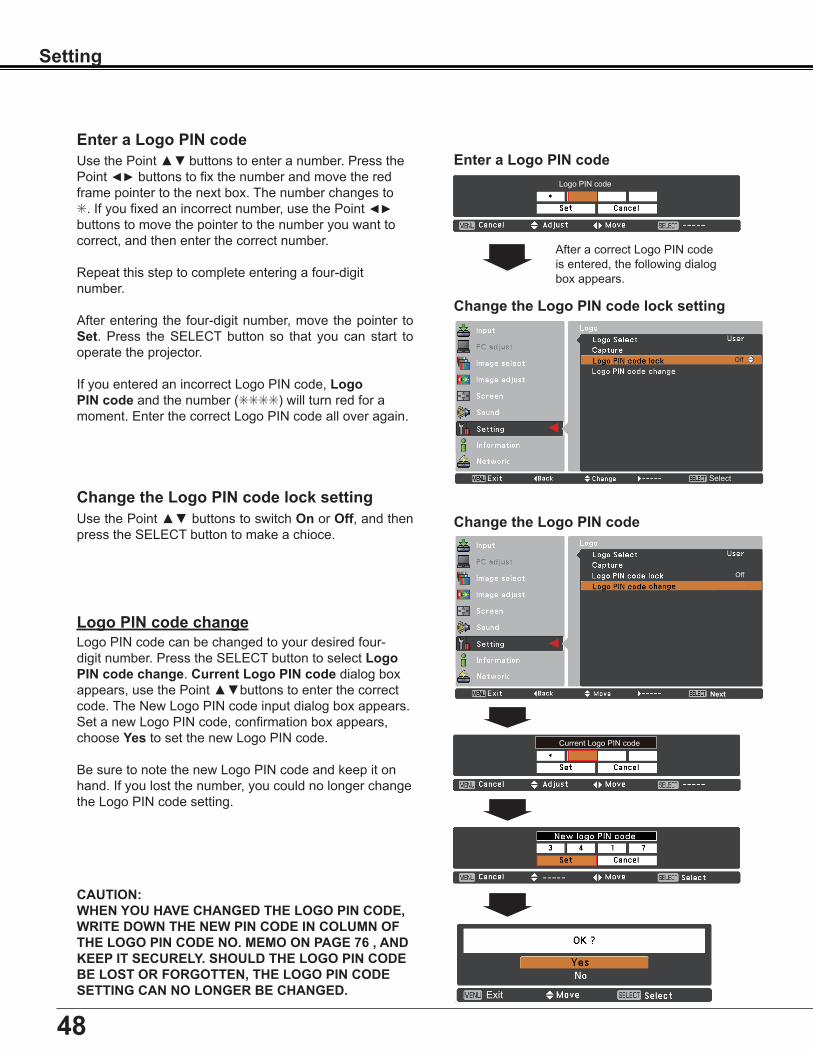
Enter a Logo PIN codeUsethePoint▲▼buttonstoenteranumber.PressthePoint◄►buttonstofixthenumberandmovetheredframepointertothenextbox.Thenumberchangesto✳.Ifyoufixedanincorrectnumber,usethePoint◄►buttonstomovethepointertothenumberyouwanttocorrect,andthenenterthecorrectnumber.
CAUTION:wHEN yOU HAVE CHANGED THE LOGO PIN CODE, wRITE DOwN THE NEw PIN CODE IN COLUMN OF THE LOGO PIN CODE NO . MEMO ON PAGE 76 , AND KEEP IT SECURELy . SHOULD THE LOGO PIN CODE BE LOST OR FORGOTTEN, THE LOGO PIN CODE SETTING CAN NO LONGER BE CHANGED .
Change the Logo PIN code lock setting
Change the Logo PIN code
Logo PIN code
Next
►
Off
----Exit
►
Off
Select
Current Logo PIN code
49
Setting
Ceiling
Rear
CeilingWhen this function is set to On, the picture will be top/bottom and left/right reversed. This function is used toprojecttheimagefromaceiling-mountedprojector.
Rear
WhenthisfunctionissettoOn, thepicturewillbe left/rightreversed.This function is used to project the image fromrearofthescreen.
Computer 2 . . computerinput Monitor Out . . monitorout
TerminalfunctionisnotavailablewhenselectingComputer 2totheinputsource.Changetheinputsourcetotheothers(Computer 1, andsoon)so that theTerminal functionwillbeavailable.(p.25,36,37)
50
Setting
TimeleftbeforeLampisoff.
Power managementForreducingpowerconsumptionaswellasmaintainingthelamplife,thePowermanagementfunctionturnsofftheprojectionlampwhentheprojectorisnotoperatedforacertainperiod.
after turningoff theprojectorbypressing theON/STAND-BYbuttonon the remote control.Youcanturnon/off theprojectorvianetwork,modify network environment, and receivean e-mail about projector status while theprojectorispoweredoff.
Eco............ SelectEcowhenyoudonotusetheprojectorvia network.The projector’s network functionwill stop when turning off the projector, youcannotturnontheprojectorvianetwork.
To change the code for the projector:SelecteitherCode 1orCode 2inthisSettingMenu.
To change the code for the remote control:PressandholdboththeMENUandIMAGEbuttonstogetherfor5secondsormore.Afterchangingthecode,makesuretheremotecontroloperatesproperly.
Enter a PIN codeUsethePoint▲▼buttonstoenteranumber.PressthePoint◄►buttonstofixthenumberandmovetheredframepointertothenextbox.Thenumberchangesto✳.Ifyoufixedanincorrectnumber,usethePoint◄► buttonstomovethepointertothenumberyouwanttocorrect,andthenenterthecorrectnumber.
CAUTION:wHEN yOU HAVE CHANGED THE PIN CODE, wRITE DOwN THE NEw PIN CODE IN COLUMN OF THE PIN CODE NO . MEMO ON PAGE 76, AND KEEP IT SECURELy . IF yOU FORGET yOUR PIN CODE, THE PROjECTOR CAN NO LONGER BE STARTED .
This function provides the following options in the coolingfans’operationwhentheprojectoristurnedoff(p.20). L1......Normaloperation L2......Slowerandlower-soundthanthenormaloperation
(L1), but it takes more time to cool the projectordown.
Be sure to reset the Lamp replacement counter after thelampisreplaced.(p.62)Press the Point ▲▼ buttons to choose the Lamp counterfunctionandthenpressthePoint►ortheSELECTbuttontoaccessthesubmenuitems.Lamp counter................Thisitemshowsthetotalaccumulatedtimeofthelampusage.Lamp counter reset.......PresstheSELECT buttonto
Whenyouwanttomakeadigitalprocessingofaprojectedimagefaster,setthisfunction.Use the Point ▲▼ buttons�� select an item o� Off orOn.✔Note: Noise reductionandProgressivecannotbeselected
The projector is shut down and the wARNING indicator is blinking red .Whenthetemperatureinsidetheprojectorreachesacertainlevel,theprojectorwillbeautomaticallyshutdowntoprotecttheinsideoftheprojector.ThePOWERindicatorisblinkingwhiletheprojectorisbeingcooleddown.Whentheprojectorhascooleddownenough(toitsnormaloperatingtemperature),itcanbeturnedonagainbypressingtheON/STAND-BYbutton.
The projector is shut down and the wARNING indicator lights red .Whentheprojectordetectsanabnormalcondition,itisautomaticallyshutdowntoprotecttheinsideoftheprojectorandtheWARNINGindicatorlightsred.Inthiscase,unplugtheACpowercordandreconnectit,andthenturntheprojectorononceagaintoverifyoperation.IftheprojectorcannotbeturnedonandtheWARNINGindicatorstilllightsred,unplugtheACpowercordandcontacttheservicecenter.
Cleaning the Projection LensUnplugtheACpowercordbeforecleaning.
Gently wipe the projection lens with a cleaning cloth thatcontains a small amount of non-abrasive camera lenscleaner, or use a lens cleaning paper or commerciallyavailableairblowertocleanthelens.
Avoid using an excessive amount of cleaner.Abrasivecleaners, solvents, or other harsh chemicalsmight scratchthesurfaceofthelens.
UnplugtheACpowercordbeforecleaning.
Gentlywipetheprojectorbodywithasoftdrycleaningcloth.When thecabinet isheavily soiled,usea small amountofmilddetergentandfinishwithasoftdrycleaningcloth.Avoidusingan excessiveamount of cleaner.Abrasive cleaners,solvents,orotherharshchemicalsmightscratchthesurfaceofthecabinet.
When the projector is not in use, put the projector inan appropriate carrying case to protect it from dust andscratches.
When moving this projector or while not using it over anextendedperiodoftime,replacethelenscap.
Donotuseanyflammablesolventsorairspraysontheprojector and in its vicinity.The explosion or fire hazardmay occur even after theAC power cord is unpluggedbecausethetemperatureinsidetheprojectorisextremelyhighduetothelamps.Inaddition,thereisariskthattheinternalpartsmaybedamagednotonlybytheflammableairspraybutalsobythecoldair.
CAUTIONWhenreplacingthe lampbecause ithasstopped illuminating, there isapossibility that the lampmaybebroken.Ifreplacingthelampofaprojectorwhichhasbeeninstalledontheceiling,youshouldalwaysassumethatthe lamp isbroken,andyoushouldstand to thesideof the lampcover,notunderneath it.Remove thelampcovergently.Smallpiecesofglassmayfalloutwhenthelampcoverisopened.Ifpiecesofglassgetintoyoureyesormouth,seekmedicaladviceimmediately.
● Lamp li�e ma�� di��er �rom lamp to lamp and according to the en�ironment o� use. There is no guaranteeLamplifemaydifferfromlamptolampandaccordingtotheenvironmentofuse.Thereisnoguaranteeofthesamelifeforeachlamp.Somelampsmayfailorterminatetheir life inashorterperiodoftimethanothersimilarlamps.
● �� the pro�ector indicates that the lamp should be replaced�� i.e.�� i� the L��P �EPL�CE indicator lightsIftheprojectorindicatesthatthelampshouldbereplaced,i.e., iftheLAMPREPLACEindicatorlightsup,replacethelampwithanewoneIMMEDIATELYaftertheprojectorhascooleddown.
● � Lamp ma�� e�plode as a result o� �ibration�� shock or degradation as a result o� hours o� use as itsALampmayexplodeasa resultofvibration,shockordegradationasa resultofhoursofuseas itslifetime draws toan end. Risk of explosion may differ according to the environment or conditions inwhichtheprojectorandlamparebeingused.
IF A LAMP EXPLODES, THE FOLLOwING SAFETy PRECAUTIONS SHOULD BE TAKEN .If a lamp explodes, disconnect the projector’sAC plug from theAC outlet immediately. Contact anauthorized service center for a checkup of the unit and replacement of the lamp.Additionally, checkcarefullytoensurethattherearenobrokenshardsorpiecesofglassaroundtheprojectororcomingoutfrom thecoolingaircirculationholes.Anybrokenshards foundshouldbecleanedupcarefully.Nooneshould check the inside of the projector except those who are authorized trained technicians and whoarefamiliarwithprojectorservice.Inappropriateattemptstoservicetheunitbyanyone,especiallythosewhoarenotappropriatelytrainedtodoso,mayresultinanaccidentorinjurycausedbypiecesofbrokenglass.
LAMP HANDLING PRECAUTIONS
ORDER REPLACEMENT LAMPReplacementlampcanbeorderedthroughyourdealer.Whenorderingaprojectionlamp,givethefollowinginformationtothedealer.
● Model No . of your projector : LC-XBL21, LC-XBL26 ● Replacement Lamp Type No . : POA-LMP142 (ServicePartsNo.6103497518)
64
Problem: –Solutions
No power –PlugthepowercordoftheprojectorintotheACoutlet. –SeeifthePOWERindicatorlightsred. –WaituntilthePOWERindicatorstopsblinkingtoturnontheprojector
The initial display is not shown . –MakesureOfforCountdown offarenotchosenatdisplay function.Seepage45.
The initial display is not same –MakesureUserorOffarenotchosenatLogo(select)as the default set . function.Seepage46.
Input signal switches automatically . –MakesureInputsearchfunctionisadjustedproperly.Seepage44.(or does not switch automatically)
when the projector is on and you –ThatistheFilterwarningicon.Seepage57.press the input source buttons, an icon other than the Lamp mode icon appears.
An icon other than Input mode or –ThatistheLampreplacementiconortheFilterwarningicon.SeeLamp mode icon appears . pages57or62.
Image is out of focus . –Adjustfocusoftheprojector.Seepage23. –Provideproperdistancebetweentheprojectorandtheprojection screen.Seepage13. –Checktheprojectionlenstoseeifitneedscleaning.Seepage61. –Movingtheprojectorfromacooltowarmplacemayresultin moisturecondensationontheprojectionlens.Insuchcases,leave theprojectoroffandwaituntilcondensationevaporates.
Image is Left/Right reversed . –ChecktheCeiling/Rearfunction.Seepage49.Image is Top/Bottom reversed . –ChecktheCeilingfunction.Seepage49.Picture is not bright enough . –CheckiftheContrastorBrightnessisadjustedproperly.See pages33,40. –CheckifImage modeisselectedproperly.Seepages32,39. –Checkthelampcontrolfunction.Seepages25,53. –ChecktheLAMPREPLACEindicator.Ifitlights,theendoflamplife isapproaching.Replacethelampwithanewonepromptly.Seepage 62.
No sound –Checktheaudiocableconnectionfromaudioinputsource. –Adjusttheaudiosource. –PresstheVolume+button.Seepage24. –PresstheMutebutton.Seepage24. –WhentheAUDIOOUTisplugged-in,theprojector'sbuilt-inspeaker isnotavailable. –Istheimageprojected?Youwillhearthesoundonlywhentheimage isprojected.
The color is strange . –ChecktheInputsignal,colorsystem,videosystemorcomputer systemmode. –MakesuretheBlackboardisnotselectedonImageselect menu.Seepages32,39.
Some displays are not seen –ChecktheDisplayfunction.Seepage45. during the operation .
Auto PC adjustment function –ChecktheInputsignal.AutoPCadjustmentfunctioncannotwork does not work . when480p,575p.720p,480i,575i,10�5ior1080iisselected.See page29.
The setting does not remain –MakesureyouselectedStoreafteradjustingsetting.Somesettings after turning off power . cannotbestoredifnotregisteredwithStore.Seepages34,41.
Power management does not –PowermanagementfunctioncannotworkwhileFreezeorNo work . Showfunctionisrunning.Seepage50.
Capture function does not work . –Checktheconnectionandtheinputsignaltoseeifthereissignal.
Auto setup does not work properly . –MakesureOffisnotselectedatanyfunctionof Auto setup.Seepage 44. –MakesureOnisnotselectedattheCeilingfunction.Seepage49.
Auto keystone function does not –MakesuretheAutokeystonefunctionisnotsettoManual.Press work even when the projector is theAUTOSETUPbuttononthetopcontrol.Seepages23,44. tipped .
66
Appendix
The image is distorted or runs off . –CheckPC adjustmenuorScreenmenuandadjustthem. Seepages30-31,34-35.
PIN code dialog box appears –PINcodelockisbeingset.EnteraPINcode(the“1234”ornumbers at start-up . youhaveset).Seepages19,54-55.
The Remote Control does –Checkthebatteries. not work . –Makesurenoobstructionisbetweentheprojectorandremote control. –Makesureyouarenottoofarfromtheprojectorwhenusingthe remotecontrol.Maximumoperatingrangeis16.4'(5m). –Makesurethecodeoftheremotecontrolisconformedtothe projector’scode.Seepage53. –UnlocktheKeylockfunctionfortheremotecontrolfunction.See page54.
Indicator blinks or lights . –Checkthestatusoftheprojectorwithreferringto"Indicatorsand projectorCondition".Seepage70.
The exclamation mark appears –Youroperationisinvalid.Operatecorrectly. on the screen .
Top control does not work . –ThetopcontrolisnotavailableifthetopcontrolislockedatKey lock underSecurityofSETTINGsection.Seepage54.
Unable to unlock the Logo PIN –Contactthedealerwhereyoupurchasedtheprojectorortheservice code lock, Security key lock center. or Security PIN code lock .
67
wARNING :High voltages are used to operate this projector . Do not attempt to open the cabinet .
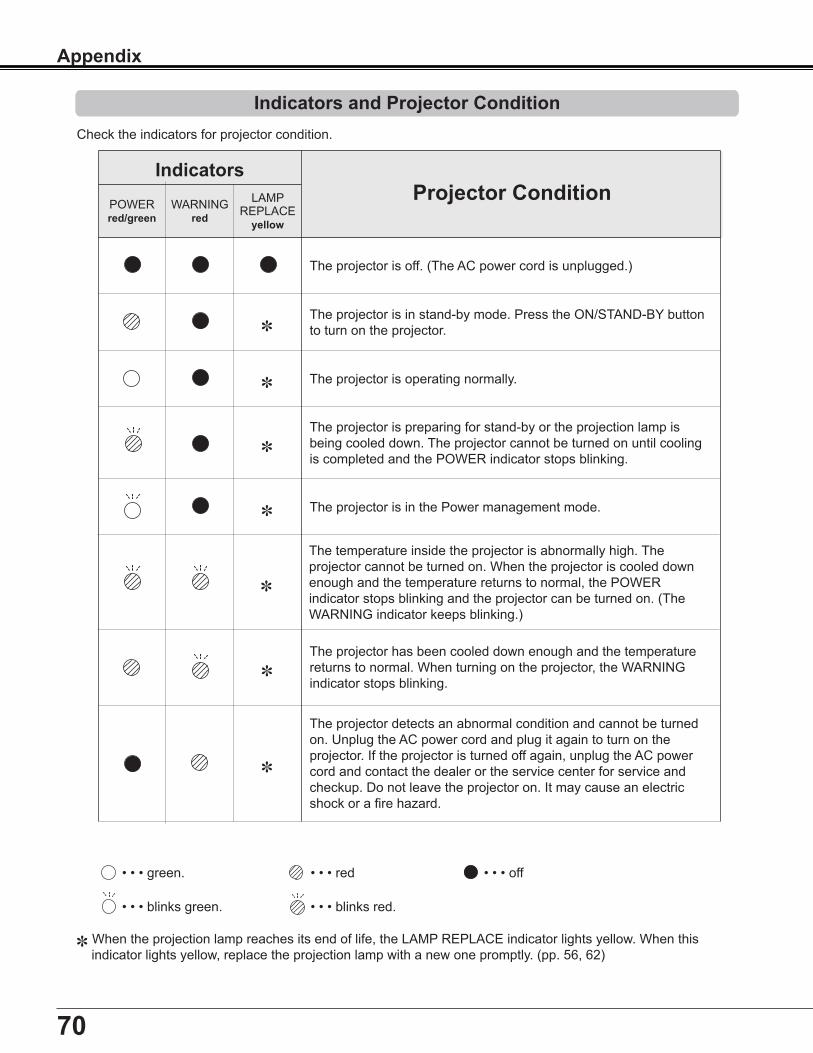
✽ When the projection lamp reaches its end of life, the LAMP REPLACE indicator lights yellow. When this indicator lights yellow, replace the projection lamp with a new one promptly. (pp. 56, 62)
The projector is off. (The AC power cord is unplugged.)
The projector is in stand-by mode. Press the ON/STAND-BY button to turn on the projector.
Projector ConditionPOWERred/green
IndicatorsLAMP
REPLACEyellow
WARNING red
✽
The projector is preparing for stand-by or the projection lamp is being cooled down. The projector cannot be turned on until cooling is completed and the POWER indicator stops blinking.
✽
The temperature inside the projector is abnormally high. The projector cannot be turned on. When the projector is cooled down enough and the temperature returns to normal, the POWER indicator stops blinking and the projector can be turned on. (The WARNING indicator keeps blinking.)
✽
The projector detects an abnormal condition and cannot be turned on. Unplug the AC power cord and plug it again to turn on the projector. If the projector is turned off again, unplug the AC power cord and contact the dealer or the service center for service and checkup. Do not leave the projector on. It may cause an electric shock or a fire hazard.
✽
The projector is operating normally. ✽
The projector is in the Power management mode. ✽
✽
The projector has been cooled down enough and the temperature returns to normal. When turning on the projector, the WARNING indicator stops blinking.
U.S.A.EIKI International, Inc. 30251 Esperanza Rancho Santa Margarita CA 92688-2132 U.S.A.Tel : 800-242-3454 (949)-457-0200 Fax : 800-457-3454 (949)-457-7878 E-Mail : [email protected]
Deutschland & Österreich EIKI Deutschland GmbH Am Frauwald 12 65510 Idstein Deutschland Tel : 06126-9371-0 Fax : 06126-9371-14 E-Mail : [email protected]
ChinaEIKI (Shanghai) Co., Ltd. Lakeside Oasis Middle Ring Business Centre Block 10. #16-07, 1628, Jin Sha Jiang Road, Shanghai, 200333. China Main Line : 86-21-3251-3993 Service Hot Line : 86-21-3251-3995 Fax : 86-21-3251-3997 E-mail : [email protected]
CanadaEIKI CANADA - Eiki International, Inc. P.O. Box 156, 310 First St. - Unit 2, Midland, ON, L4R 4K8, Canada Tel : 800-563-3454 (705)-527-4084 Fax : 800-567-4069 (705)-527-4087 E-Mail : [email protected]
Eastern Europe EIKI CZECH SPOL. s.r.o. Nad Cementárnou 1163/4a Praha 4, Podolí 147 00 Czech Republic Tel : +420 241 410 928 +420 241 403 095 Fax: +420 241 409 435 E-Mail : [email protected]
South East Asia EIKI Industrial (M) Sdn Bhd No. 3A-2C, 4th Floor, Jalan PJU 8/3A, Perdana Business Centre, Bandar Damansara Perdana, 47820 Petaling Jaya, Selangor Malaysia Tel : +603-7722-4362 Fax : +603-7722-4392 E-Mail : [email protected]
Japan & Worldwide EIKI Industrial Company Limited. 4-12 Banzai-Cho, Kita-Ku, Osaka, 530-0028 Japan Tel : +81-6-6311-9479 Fax : +81-6-6311-8486