24
User Manual 1.01 MXK10 For Kawasaki Ninja ZX-10R

User Manual 1.01
MXK10 For Kawasaki Ninja ZX-10R
User Manual 1.00
MXK10 For Kawasaki Ninja ZX-10R
1 – MXK10in a few words 2 – What is in the kit? 3 – Installation 4 – MXK10 Main features 4.1 – Lap Times 4.2 – Icons 4.3 – LEDs 4.4 – The bike keyboard 4.5 – Parameters setting at start up or while riding 4.6 – Data recording 5 – Menu 5.1 – Vehicle settings 5.1.1 – Power Mode setting 5.1.2 – KQS UP (Quick shift) 5.1.3 – KLCM (Launch Control Level) 5.1.4 – KIBS (Intelligent braking system) 5.1.5 – KECS (electronic suspensions) 5.1.6 – KECS settings 5.1.7 – S-KTRC (Traction Control) Settings 5.2 – Preferences 5.2.1 – Riding Mode 5.2.2 – Lap switch 5.2.3 – Backlight 5.2.4 – Wi-Fi 5.3 – Odometers 5.4 – Tracks 5.5 – System Info 6 – On track application 6.1 – Connection to the PC 6.2 – Configuration of the Expansions 6.3 – Managing a track on MXK10 with Race Studio 3 7 – Data recall 8 – Data download and analysis 9 – Wi-Fi configuration 9.1 – Configuring MXK10 dash logger as an access point (AP) 9.2 – Adding MXK10 logger to an existing network 9.3 – Wi-Fi network settings 9.4 – The Internet connectivity 9.5 – Connection issues 9.6 – Working on MacTM with virtualized WindowsTM 9.7 – Connected device visualization issues 10 – New firmware upgrade
020607081011121314141516161717171818181919192020212122222223273031323336383939404243
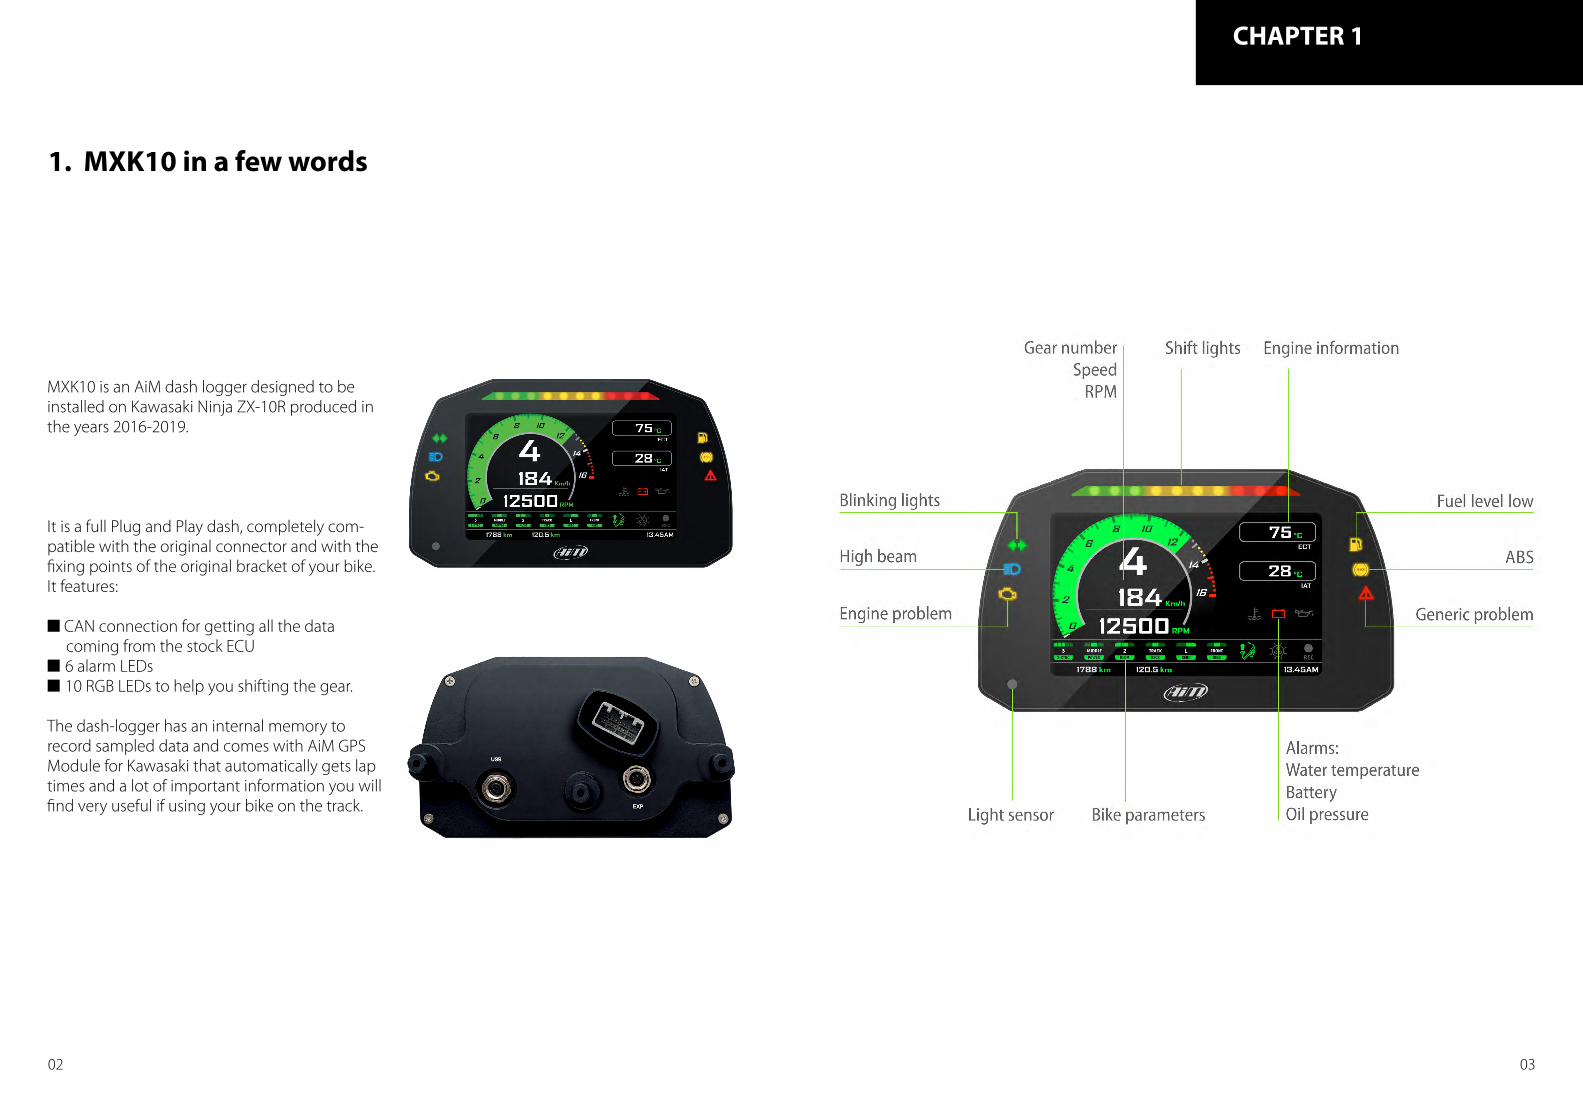
MXK10 is an AiM dash logger designed to be installed on Kawasaki Ninja ZX-10R produced in the years 2016-2019.
It is a full Plug and Play dash, completely com-patible with the original connector and with the fixing points of the original bracket of your bike.It features:
n CAN connection for getting all the data coming from the stock ECUn 6 alarm LEDsn 10 RGB LEDs to help you shifting the gear.
The dash-logger has an internal memory to record sampled data and comes with AiM GPS Module for Kawasaki that automatically gets lap times and a lot of important information you will find very useful if using your bike on the track.
1. MXK10 in a few words
CHAPTER 1
02 03

CHAPTER 1

SmartyCam GP HD kit includes:
- SmartyCam GP HD 2.2- External CAN Cable or External powercable- 110/220v Battery Charger with AC power adapter - Software Race Studio 3 CD- Bullet
2. What is in the kit?
MXK10 kit (part number: XA2MXS12A05R0KN) includes:
n MXK10 dash logger (1)n Washers and screws to fix MXK10 (2)n GPS Module (3)n GPS bracket with screws (4)
3. Installation
MXK10 installation is extremely simple. You only need the tools shown here below:n pin punch (1)n Ratchet (2)n 10 and 13 Wrench (3)n Screwdriver (4)n Universal pliers (5)n 3, 4, 5 and 6 Allen keys (6)
At this link https://www.youtube.com/watch?v=TmP4SQzS2n8&feature=youtu.be a tutorial video that shows how to remove Kawasaki Ninja stock dash and install MXK10 dash logger is available.
CHAPTER 2-3
06 07

CHAPTER 4
08 09
4. MXK10 Main features
First of all, we have to say that MXK10 has two different working modes: Road Mode and Track Mode. You may swap between the two modes entering the proper voice of “Preferences” Menu (paragraph 5.2.1).
Track Mode is intended to be used when you are riding on a track. The GPS Module is enabled, in order to automatically get Lap Times; data are automatically recorded, TFT page is swapped in Track Mode and Lap pushbutton may be disabled in order to avoid confusion between the GPS Signal and the pushbutton one.
In Road Mode, TFT page is swapped in Road Mode, the data are by default not recorded, GPS Module is disabled and Lap Pushbutton is enabled.
The dash offers different pages, freely selectable by the handlebar pushbutton shown here below.
Two pages are intended for road usage.
Two pages are intended for track usage
In road pages ECT or Engine Coolant Temperature (Water Temperature) and IAT or intake air temperature (Air Tempera-ture) are shown while in track pages Lap Time and Lap number are shown.

4.1 Lap Times
CHAPTER 4
10 11
MXK10 calculates and shows lap times. This can be made in two ways:
n Manually pushing “Lap” on the bike left keyboard
n Automatically using GPS Module you find in the kit; the Module includes most of the world tracks.
n When you switch the bike on near a track the Module automatically recognizes it, loads the start/finish coordi-nates and calculates lap times when these coordinates are crossed. If your track is not in the database you may always create and load it in the database using Race Studio 3 software, freely downloadable from AiM website at:https://www.aim-sportline.com/en/sw-fw-download.htm
As said MXK10 features two working modes: road and track. In track mode the lap pushbutton can be disabled (see paragraphs 5.2.1and 5.2.2) to avoid confusion between GPS signal and Lap button one while in road mode Lap button is always enabled and GPS Module is always disabled.
4.2 Icons
Thanks to the wide number of icons available on its display, the dash logger shows a good amount of information. Here follow explanation of their meaning and working mode.
Water TemperatureIt turns on when water temperature gets to 110°C
BatteryIt turns on when:n battery voltage < 10Vn battery voltage > 16V
Oil pressureIt turns on when the bike engine detects a problem with oil pressure.
Traction control (S-KTRC)Working range: 0 (OFF)-5 (Max)
Power ModeWorking range: Low-Middle-Full
Launch Control LevelWorking range: from 1-(min) to 3 (max)
Electronic suspensions (KECS)Working modes: Manual, Road and Track
Engine Brake (KEBC)Available options: Low, OFF
Intelligent Braking System (KIBS)Levels: ON, FRONT/REAR, OFF
Quick ShiftAvailable levels: Up (shown here on the left), Down, Up&Down, OFF
EconomyIt turns ON when: RPM is lower than 6500 and throttle position is <5%
RECIt turns on when the dash logger is recording.

4.3 LEDs
With reference to the image here below MXK10 features 6 solid LEDs that gives you these information.
n Blinking Lights (2)n High beam (3)n Engine problem (4)n Fuel level low (5)n ABS off/problems (6)n Generic problem (7)
4.4 The bike keyboard
Kawasaki Ninja features five buttons: four on the left handlebar and one on the right one, used to manage MXK10 dash logger:
n UP (1)n SEL (2)n DOWN (3)n LAP (4)n START/STOP (5)
Differently pushed they perform different actions on MXK10 display pages. With reference to the following table: S stays for short (less than half of a second) pressure, L for long pressure (from half of a second to a second).
CHAPTER 4
12 13
In the upper part of the dash are 10 LED shift lights (1): when all lights are on it is suggested to shift gear.
1
2 3
4
5
Function
Scroll riding pages
Access Menu
Access Data Recall
Change S-KTRC (traction control) settings
Activate Launch control
Laptime
Up
S
L
Down
S
L
Sel
S
L
Lap
S
L
Start/Stop
L
Notes
Full power ModeRecording

4.5 Parameters setting at start up or while riding
Traction Control (S-KTRC) is the only parameter that can be set while riding: press (using a long pressure) UP and DOWN buttons.If you power the bike off with Traction Control disabled it will be automatically enabled and set on Level 1 at the following power on.
4.6 Data Recording
Push SEL to enter MXK10 settings “Menu” and set some parameters.
Please note: this is possible only if the bike is not moving.
CHAPTER 5
14 15
Launch Control Level allows to depart from a standstill with the power completely open. It can be set only at start up with the bike in FULL POWER mode (see paragraph 5.1.1). To activate it press START/STOP and SEL at one time. A message with blue background appears bottom of the display and remains until one of the following conditions occurs:
n the bike reaches 150 km/hn the third gear is engagedn the bike is turned off
In Road Mode data recording is disabled. To enable it push START/STOP for 2 seconds and push it again for 2 seconds to disable it.
In Track Mode data recording is automatically enabled and activates when RPM reaches 2000 and speed is higher than 20 km/h. When MXK10 is recording the related icon appears ( )
5. Menu
Use “UP” and “DOWN” buttons to scroll option and “SEL” to select the desired option. The icons stays for.
Vehicle settings Preferences Odometers Track Maps
ExitSystem Information

CHAPTER 5
16 17
To configure the functionalities of the bike navigate through the icons with “UP” and ”DOWN” buttons, select the icon and press “SEL” to change the selected parameters.
5.1 Vehicle settings
The parameters you may set are:n Power Mode: Full, Middle or Lown KEBC (Engine Brake): Low or OFFn KQS UP (Quick shift UP): Enabled or Disabledn KLCM (Launch Control Mode): from 1 (min) to 3 (max)n KIBS (Intelligent Braking System): R OFF or F+R OFFn KECS Settings (Electronic suspensions): Manual, Road or Track
Power Mode can be Full, Middle or Low. As explained in paragraph 4.5 this feature is mandatory to set Launch Control Mode. Power Mode is to be Full as shown here on the right.
5.1.1 Power Mode setting
5.1.2 KQS UP (Quick shift)
Quick shift parameters are related to Up and Down shift. It is possible to enable/disable UP and Down modes.The selected setting is shown by an icon in MXK10 bottom row.
5.1.3 KLCM (Launch Control Level)
Once the bike in Full power mode (see paragraph 5.1.1) press START/STOP and SEL buttons at one time to activate Launch Control Level. Its working range is from 1 (min) to 3 (max)A message with blue background appears bottom of the display and remains until one of the following conditions occurs:
n the bike reaches 150 km/hn the third gear is engagedn the bike is turned off
5.1.4 KIBS (Intelligent braking system)ABS Management; available options aren F+R OFF: both offn R OFF: front on, rear off
Up Down Up&Down Off
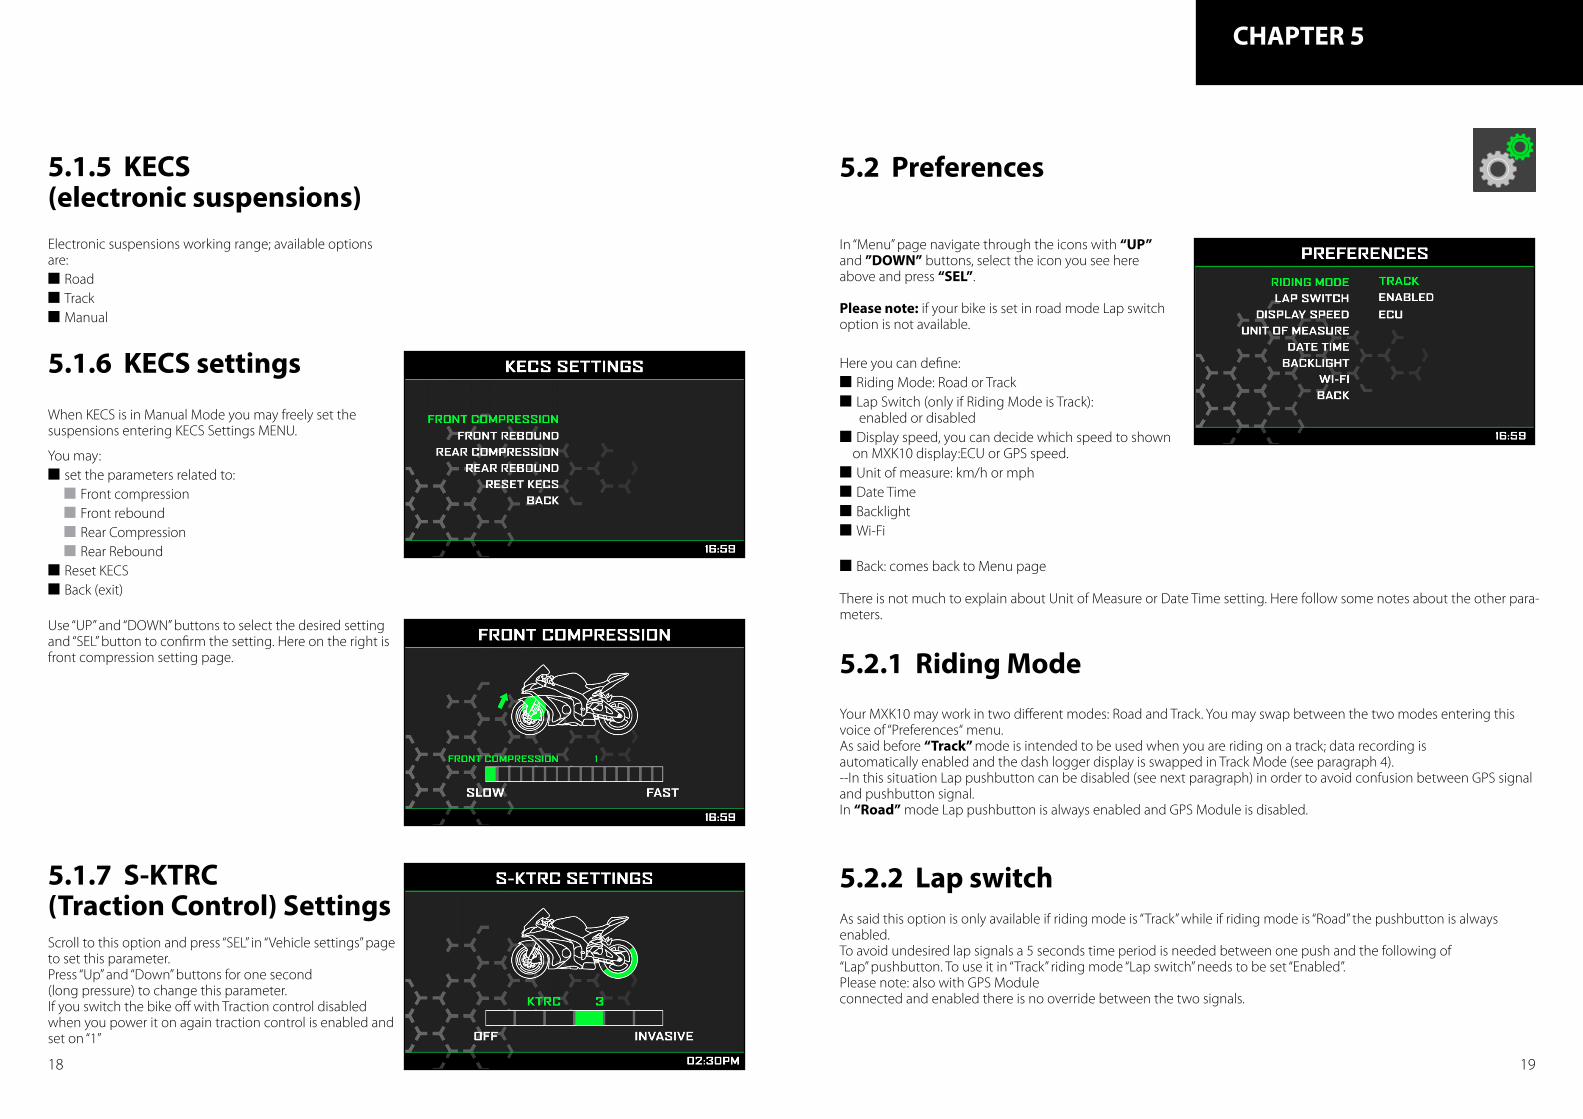
Electronic suspensions working range; available options are:n Roadn Trackn Manual
5.1.5 KECS (electronic suspensions)
In “Menu” page navigate through the icons with “UP” and ”DOWN” buttons, select the icon you see here above and press “SEL”.
Please note: if your bike is set in road mode Lap switch option is not available.
5.2 Preferences
CHAPTER 5
18 19
5.1.6 KECS settings
When KECS is in Manual Mode you may freely set the suspensions entering KECS Settings MENU. You may: n set the parameters related to: n Front compression n Front rebound n Rear Compression n Rear Reboundn Reset KECSn Back (exit)
Use “UP” and “DOWN” buttons to select the desired setting and “SEL” button to confirm the setting. Here on the right is front compression setting page.
5.1.7 S-KTRC (Traction Control) SettingsScroll to this option and press “SEL” in “Vehicle settings” page to set this parameter.Press “Up” and “Down” buttons for one second (long pressure) to change this parameter.If you switch the bike off with Traction control disabled when you power it on again traction control is enabled and set on “1”
Here you can define:n Riding Mode: Road or Trackn Lap Switch (only if Riding Mode is Track): enabled or disabledn Display speed, you can decide which speed to shown on MXK10 display:ECU or GPS speed.n Unit of measure: km/h or mphn Date Timen Backlightn Wi-Fi
n Back: comes back to Menu page
There is not much to explain about Unit of Measure or Date Time setting. Here follow some notes about the other para-meters.
5.2.1 Riding Mode
Your MXK10 may work in two different modes: Road and Track. You may swap between the two modes entering this voice of “Preferences“ menu.As said before “Track” mode is intended to be used when you are riding on a track; data recording is automatically enabled and the dash logger display is swapped in Track Mode (see paragraph 4). --In this situation Lap pushbutton can be disabled (see next paragraph) in order to avoid confusion between GPS signal and pushbutton signal.In “Road” mode Lap pushbutton is always enabled and GPS Module is disabled.
5.2.2 Lap switchAs said this option is only available if riding mode is “Track” while if riding mode is “Road” the pushbutton is always enabled.To avoid undesired lap signals a 5 seconds time period is needed between one push and the following of “Lap” pushbutton. To use it in “Track” riding mode “Lap switch” needs to be set “Enabled”. Please note: also with GPS Module connected and enabled there is no override between the two signals.

In Menu page navigate through the icons with “UP” and ”DOWN” buttons and select the icon pushing “SEL”.MXK10 offers five different odometers. One of them is not resettable while the others are. The first two odometers are used to show total and partial mileage. The others are mainly used in races.
5.3 Odometers
CHAPTER 5
MXK10 has two levels of brightness for day and night usage. A light sensor (shown below on the right) in the lower left side of the dash logger may help setting the desired brightness.Available options are: Auto and Manual.
5.2.3 Backlight
20 21
In Auto Mode you may:n Set the Light Sensor Threshold. At the desired threshold the dash logger commutes the display brightness.n set the Day Brightness Level: when the Light Sensor reads a brightness level higher than the threshold, the display is enlightened at the level defined in this parameter.n set the Night brightness Level: at the desired threshold the dash logger commutes the display brightness;
In Manual Mode you simply set one level of brightness and this level is maintained independently from the external light conditions.
5.2.4 Wi-FiMXK10 features a Wi-Fi module to communicate with the PC. It is mainly used for race or track in order to:n receive from the PC the configuration of the expansion modulesn transmit data to the PCn calibrate sensorsn download sampled data to the PC after the test
All these functionalities are explained in chapters 6 and 8
Wi-Fi available Modes are:n Auto: Wi-Fi is ON when the bike is stopped and OFF when the bike is movingn ON: Wi-Fi is always onn OFF: Wi-Fi is always OFF
5.4 Tracks
Navigate through the icons using the pushbuttons “UP” and “DOWN” and select the Tracks Icon pushing “SEL”.Track Management is intended for the driver that uses his bike on a track, both for races and track days. In order to take advantage from Track management, you have to install the GPS08 module, included in the kit. This is used for:
n Lap time calculationn Speed calculationn Predictive lap time calculation
To calculate these data the system needs to know the start/finish line coordinates of the racetrack you are racing on: MXK10 comes with a long list of the world main tracks, constantly updated by our technicians and automatically loaded to your PC when you run Race Studio 3 software and a Wi-Fi connection is available.MXK10 provides two track selection modes:
n automaticn manual
Automatic:MXK10 automatically recognizes the track you are running on, loads the start/finish line and the possible splits coordinates and calculates lap and split times. This is the best mode in most cases.
Manual:In this mode you may select the track from the internal database. This mode is to prefer when multiple track configurations are available nearby. In this case MXK10 would anyway recognize the track but would need at least one complete track lap.
You can scroll the list of available tracks choosing among these options:n nearest: shows only tracks in a 10 km distancen all: shows all tracks stored in the system in alphabetical ordern custom: shows only the tracks you have previously created (learning mode)
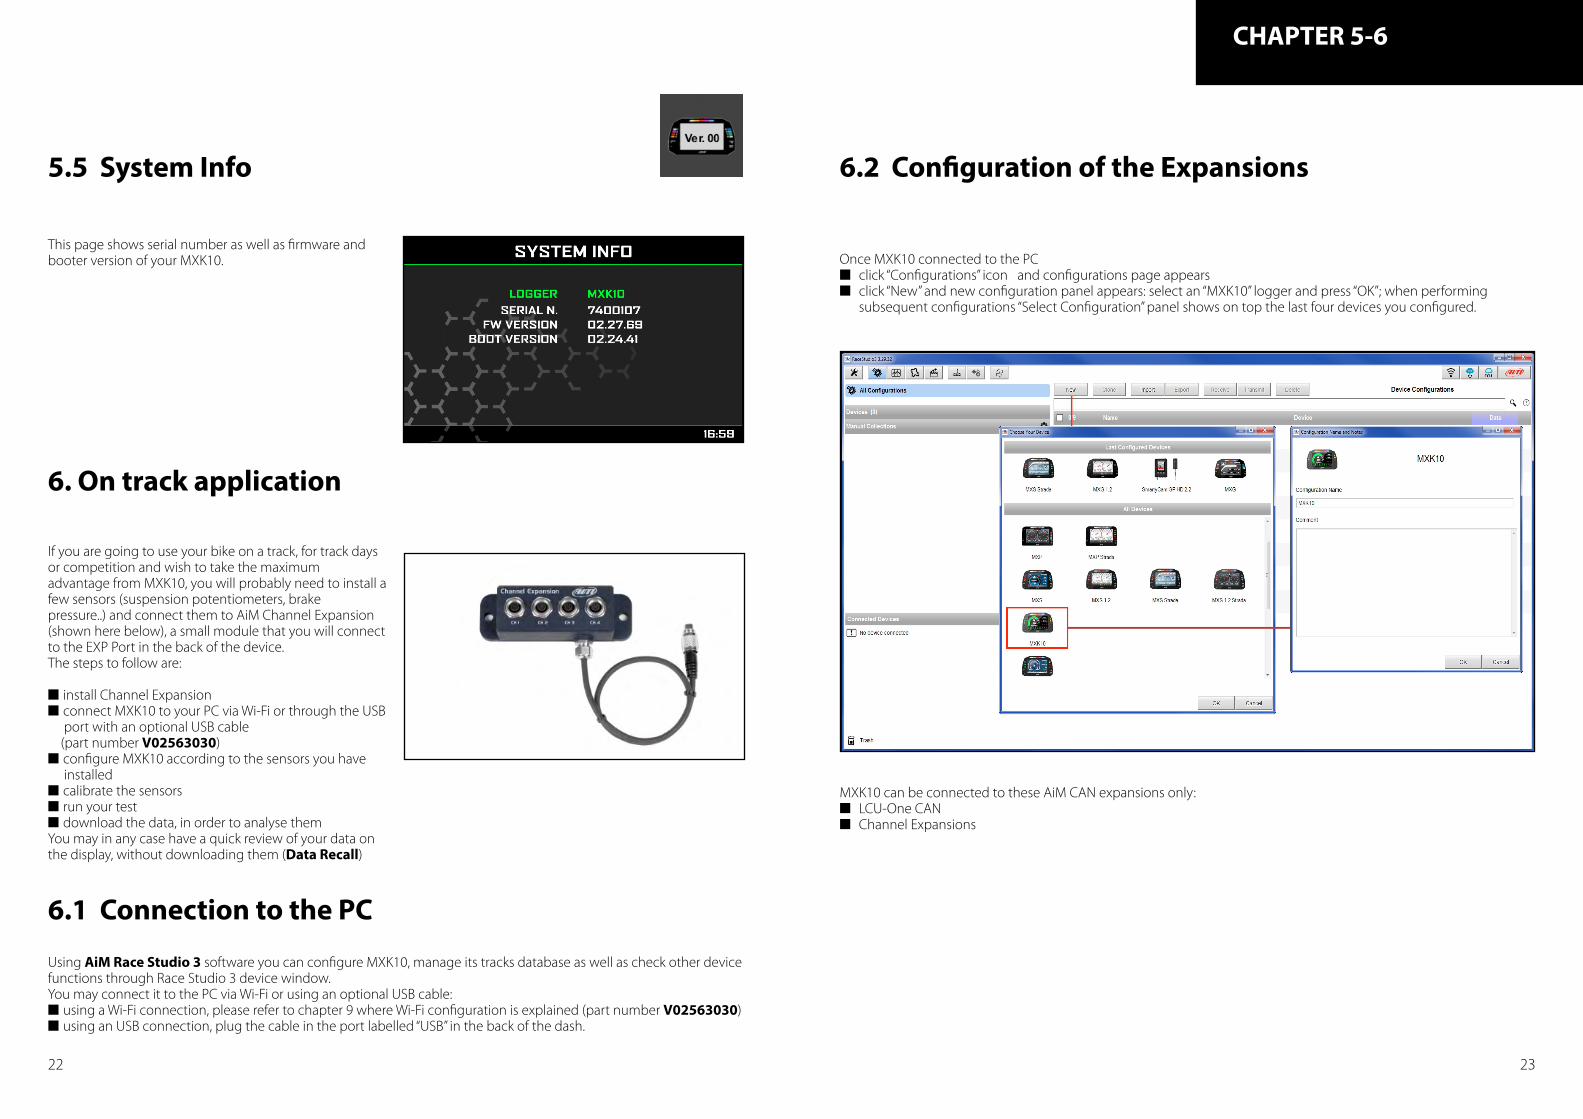
This page shows serial number as well as firmware and booter version of your MXK10.
CHAPTER 5-6
5.5 System Info
22 23
If you are going to use your bike on a track, for track days or competition and wish to take the maximum advantage from MXK10, you will probably need to install a few sensors (suspension potentiometers, brake pressure..) and connect them to AiM Channel Expansion (shown here below), a small module that you will connect to the EXP Port in the back of the device.The steps to follow are:
n install Channel Expansionn connect MXK10 to your PC via Wi-Fi or through the USB port with an optional USB cable (part number V02563030)n configure MXK10 according to the sensors you have installedn calibrate the sensorsn run your testn download the data, in order to analyse themYou may in any case have a quick review of your data on the display, without downloading them (Data Recall)
6. On track application
6.1 Connection to the PC
Using AiM Race Studio 3 software you can configure MXK10, manage its tracks database as well as check other device functions through Race Studio 3 device window. You may connect it to the PC via Wi-Fi or using an optional USB cable: n using a Wi-Fi connection, please refer to chapter 9 where Wi-Fi configuration is explained (part number V02563030)n using an USB connection, plug the cable in the port labelled “USB” in the back of the dash.
Once MXK10 connected to the PCn click “Configurations” icon and configurations page appearsn click “New” and new configuration panel appears: select an “MXK10” logger and press “OK”; when performing subsequent configurations “Select Configuration” panel shows on top the last four devices you configured.
6.2 Configuration of the Expansions
MXK10 can be connected to these AiM CAN expansions only:n LCU-One CANn Channel Expansions

CHAPTER 6
At the very first MXK10 connection this page shows up: Setting LCU-One CAN
To set an LCU-One CAN:n press “New Expansion” button;n select “LCU-One CAN” and press OKn name the LCU One and fill in its serial number or press “Get SN from a connected expansion” to receive the serial number from the connected LCU-Onen select the multiplier to calculate AFR from lambda (in the example “14.57 Gasoline”) or add a custom value pressing “Add Custom Value” (the related panel shows up)n set the LCU One channels double clicking on each channel and setting the panel that shows upn press “Close” to save and exit
24 25
Select the CAN expansion to set and press “OK”. Each expansion needs to be set filling in the related panel.

CHAPTER 6
26 27
With Track Manager function of Race Studio 3 tracks can be created, deleted and modified, transmitted and received to/from MXK10. Press “Tracks” icon.
6.3 Managing a track on MXK10 with Race Studio 3Setting Channel Expansion
To set a Channel Expansion:n press “New Expansion” button; if you have already set an LCU-One CAN Channel Expansion layer appears and no more expansions can be loaded.n select “Channel Expansion” and press OKn name the Channel expansion and fill in its serial number or press “Get SN from a connected expansion” to receive the serial number from the connected Channel Expansionn set each channel double clicking on each channel and setting the panel that shows up n press “Close” to save and exit
Please note: for any further information about AiM can Expansions refer to the related user manuals you can download from AiM website www.aim-sportline.com documentation area, products section.
When the configuration is finished:n press “Save” on the page top keyboardn press “Transmit” to transmit the configuration to MXK10
The main page is divided in three columns; on the left:n on top, the filters that allow to collect many tracks following customized criteria; by default, all tracks are shown (light blue “All Tracks” filter in the image below).n bottom left, the connected devices (in the image, “MXK10 ID 7400107”)
The column in the middle shows:n on top a fast search bar that allows to select the tracks which satisfy personal research criteria; pressing “?” a pop-up window explains research criteria (highlighted in red below), to say: n long name is the name in bold in each track box n short name is the track name shown on the display of your MXK10 and is the name shown top right of each track box n track city is the name of the city the track is located inn all the tracks listed in Race Studio 3 database. It automatically updates at start up if a connection to the Internet is available.The column on the Right shows:n the data sheet of the track you are mousing over.

CHAPTER 6
28 29
When MXK10 is connected it is shown on the left bottom part of the page as said before. Clicking on it all the tracks it contains are shown in the right column of the page.
Tracks created by the user are labelled “User” and if the track stored in MXK10 logger is different from the one stored in AiM database this is notified as shown here above.
The page keyboards are used to manage the tracks.
The keyboard above the central column allows to:
n New: create a new trackn Import: import one or more tracks stored in the device or in another external devicen Export: export one or more tracks to a specific PC folder or to another peripheral devicen Receive: receive from the connected device tracks user created (if no device is connected the button is disabled)n Transmit: transmit one or more tracks from the PC to the connected device (if no device is connected the button is disabled)n Delete: delete one or more tracks from Race Studio 3 database
The keyboard above the right column allows to:
n Refresh: refresh the track list stored in the connected devicen Delete: delete one or more tracks from the device memoryn Delete All: delete all tracks stored in the device memoryn Save all: save all the tracks stored in the connected device; it creates a zip file that can be loaded to another AiM devicen Load Saved: load the tracks previously saved in the device memory
Since the software is constantly updated, may be other information or features will be available soon. Please check our website www.aim-sportline.com, documentation area, software section “Track Manager” manual.

CHAPTERS 7-8
8 Data download and analysis
Once the test session is over it is possible to download data sampled on a PC. Connect MXK10 dash logger to a PC and click on it bottom left of the software page. Once reached the device page activate “Download”. layer It shows all the in-formation concerning the file stored in the logger: number of laps, best lap, date/time, file dimensions. Select the file(s) to download and press “Download” button.
30 31
At the end of the test sampled data can be recalled pressing “LAP”.
7. Data recall
First is “Today” page.Press “SEL”.
Second is “Summary” page that shows all the last tests with date and place. Select the day you see and press “SEL”.
Third is “Day Summary” page that shows all tests in a box with time of the test, number of laps and best lap of the test.Select the test to see and press “SEL”.
This page is a histogram test summary. Moving the cursor left and right all laps and their lap time are shown.
After download press Analysis Icon ( ) and Race Studio Analysis software starts showing all the files available for analysis. Double clicking on the desired one it is possible to start analysing your performance.
CHAPTER 9
32 33
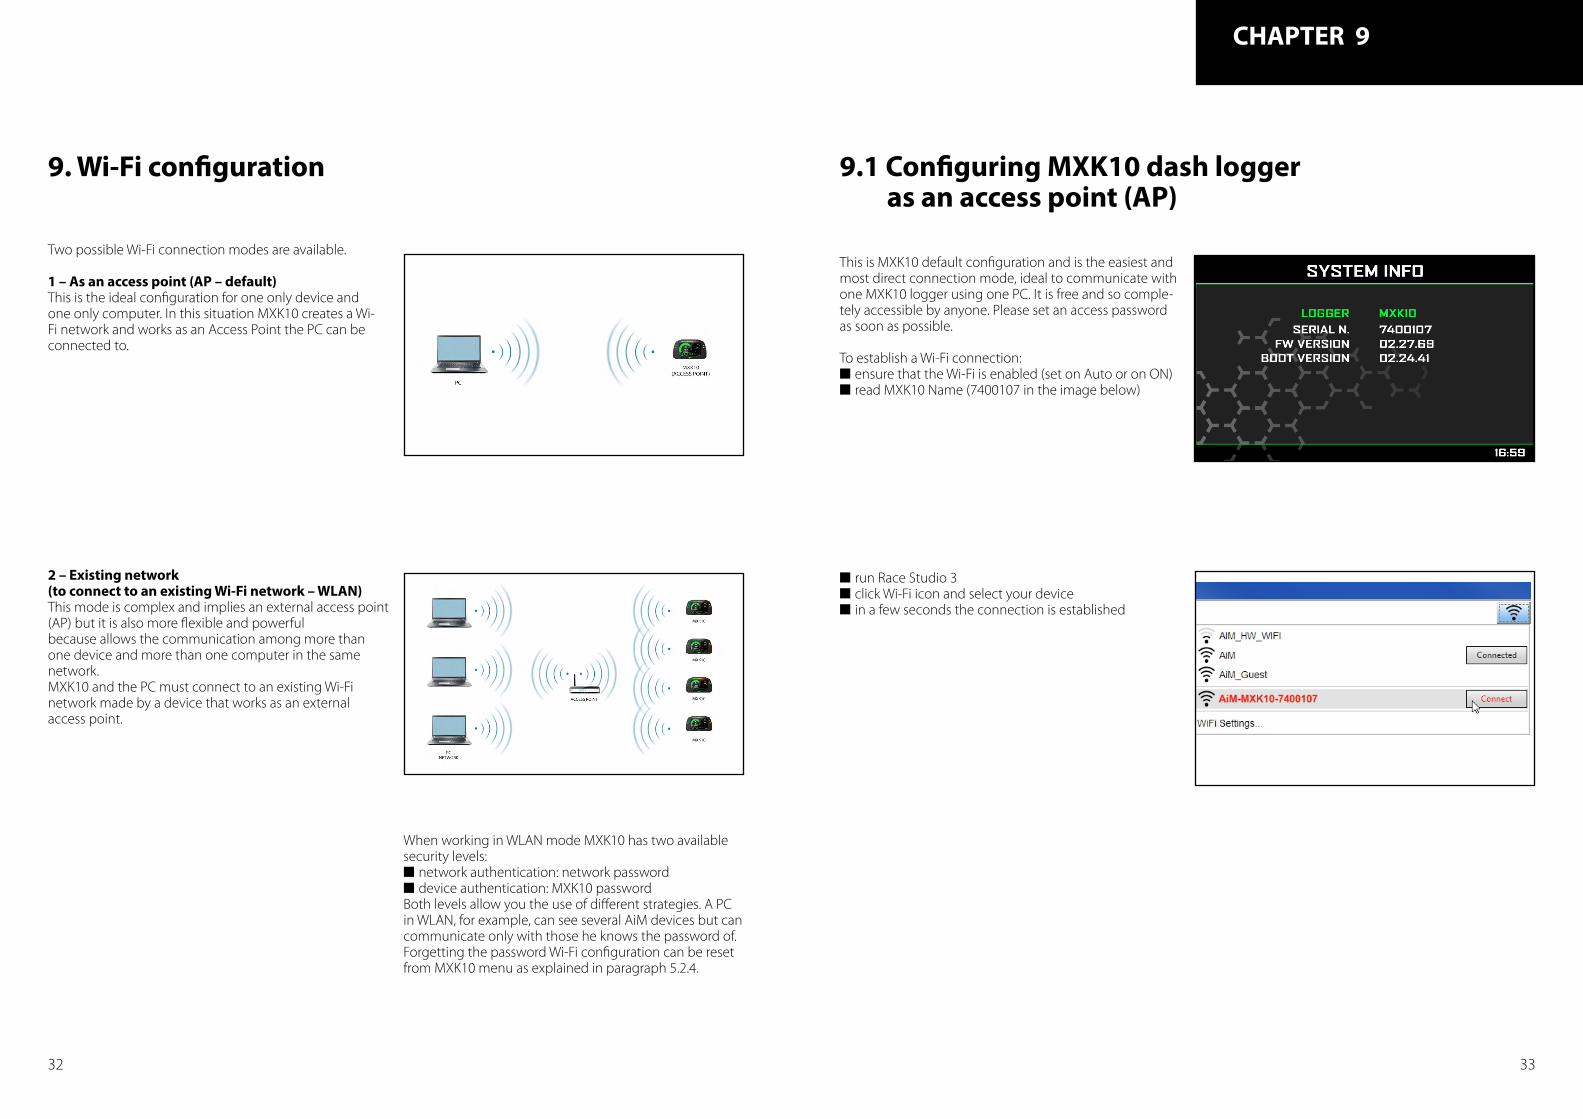
Two possible Wi-Fi connection modes are available.
1 – As an access point (AP – default)This is the ideal configuration for one only device and one only computer. In this situation MXK10 creates a Wi-Fi network and works as an Access Point the PC can be connected to.
9. Wi-Fi configuration
2 – Existing network (to connect to an existing Wi-Fi network – WLAN)This mode is complex and implies an external access point (AP) but it is also more flexible and powerful because allows the communication among more than one device and more than one computer in the same network. MXK10 and the PC must connect to an existing Wi-Fi network made by a device that works as an external access point.
When working in WLAN mode MXK10 has two available security levels:n network authentication: network passwordn device authentication: MXK10 passwordBoth levels allow you the use of different strategies. A PC in WLAN, for example, can see several AiM devices but can communicate only with those he knows the password of.Forgetting the password Wi-Fi configuration can be reset from MXK10 menu as explained in paragraph 5.2.4.
9.1 Configuring MXK10 dash logger as an access point (AP)
This is MXK10 default configuration and is the easiest and most direct connection mode, ideal to communicate with one MXK10 logger using one PC. It is free and so comple-tely accessible by anyone. Please set an access password as soon as possible.
To establish a Wi-Fi connection:n ensure that the Wi-Fi is enabled (set on Auto or on ON)n read MXK10 Name (7400107 in the image below)
n run Race Studio 3n click Wi-Fi icon and select your devicen in a few seconds the connection is established

CHAPTER 9
34 35
To set other parameters create a unique password to protect the device/ network. With a password the communication is safe and encrypted using WPA2-PSK standard.Characters allowed in the password are all letters, also capital, all digits and these characters: ‘+-_()[]{}$£!?^#@*\\\”=~.:;/%”“Space” type can be used if it is not the first one because this could cause incomprehension in some WindowsTM versions.
This AP or SSID name is unique for the device. An example of name is:” AiM-MXK10-7400107” where:n “AiM” is the prefix of all AiM devicesn “MXK10” is the device identifiern “0107” is device serial number assigned by the factory.
To make a device more recognizable a name can be added to the SSID. With the limit of eight characters. Allowed cha-racters are all letters, capital too, all digits and these characters: ‘+ - _ () [] {}!.“Space” type can be used provided that it is not the first one because it can cause incomprehension in some WindowsTM versions.Adding, for example, the driver’s name, Tom Wolf, the network name (SSID) becomes:”AiM-MXK10-0107-TomWolf”Once all parameters set click “Transmit”. MXK10 logger reboots and is configured with the new parameters. If MXK10 logger is protected by a password, as recommended, Race Studio 3 will ask that password to authenticate.
Please Note: the same Wi-Fi connection can be created with the operative system tool.Once the device has been authenticated in the Wi-Fi network it can communicate using Race Studio 3.

CHAPTER 9
To obtain connectivity on the device the PC has to be authenticated to the same network as shown here below.
36 37
This situation is ideal for a team with multiple drivers and staff members and is desired to communicate with one or more AiM devices using the same PC network. Each MXK10 logger can have its password that adds another security and privacy level to the network.Race Studio 3 will show all MXK10 loggers connected to the same network under “Connected devices” label, bottom left of the software page: click the device.Enter “Wi-Fi and properties” tab and set it on “Existing Network”; fill in network name, network password and device password.Transmit the network settings to the device clicking “Transmit”: it reboots and joins that network.Please note: the only admitted password are those following WPA2-PSK standard.
9.2 Adding MXK10 loggers to an existing network
To complete this procedure use Race Studio 3 software as here explained.
Here above is shown a device “MXK10 ID 74000107” that switched from AP to WLAN mode (Existing Network).Network name is “network_2” and does not work with free access because is protected by a password.
When the PC is authenticated to the network called “network_2” it can see all devices you configured to access the same network. In the image below three AiM devices are connected to the same “network_2” WLAN.
CHAPTER 9
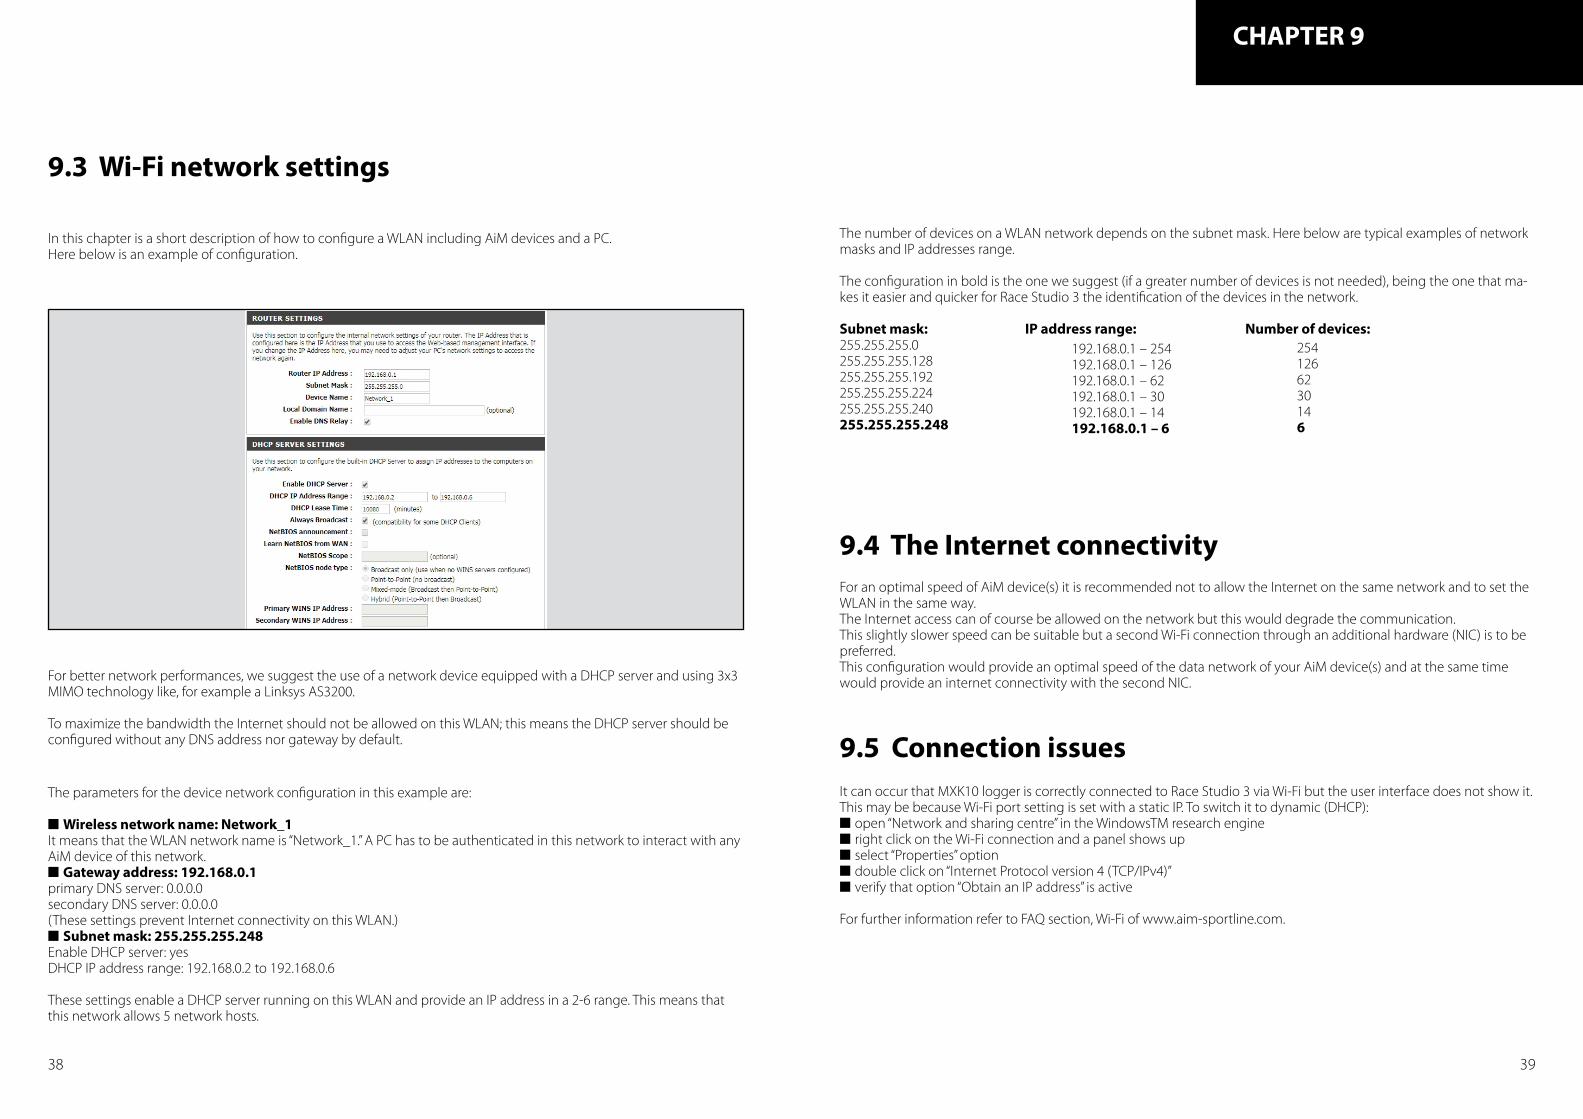
The number of devices on a WLAN network depends on the subnet mask. Here below are typical examples of network masks and IP addresses range.
The configuration in bold is the one we suggest (if a greater number of devices is not needed), being the one that ma-kes it easier and quicker for Race Studio 3 the identification of the devices in the network.
Subnet mask: IP address range: Number of devices:255.255.255.0255.255.255.128255.255.255.192255.255.255.224255.255.255.240255.255.255.248
38 39
In this chapter is a short description of how to configure a WLAN including AiM devices and a PC.Here below is an example of configuration.
9.3 Wi-Fi network settings
For better network performances, we suggest the use of a network device equipped with a DHCP server and using 3x3 MIMO technology like, for example a Linksys AS3200.
To maximize the bandwidth the Internet should not be allowed on this WLAN; this means the DHCP server should be configured without any DNS address nor gateway by default.
9.4 The Internet connectivityFor an optimal speed of AiM device(s) it is recommended not to allow the Internet on the same network and to set the WLAN in the same way.The Internet access can of course be allowed on the network but this would degrade the communication.This slightly slower speed can be suitable but a second Wi-Fi connection through an additional hardware (NIC) is to be preferred.This configuration would provide an optimal speed of the data network of your AiM device(s) and at the same time would provide an internet connectivity with the second NIC.
9.5 Connection issuesIt can occur that MXK10 logger is correctly connected to Race Studio 3 via Wi-Fi but the user interface does not show it. This may be because Wi-Fi port setting is set with a static IP. To switch it to dynamic (DHCP):n open “Network and sharing centre” in the WindowsTM research engine n right click on the Wi-Fi connection and a panel shows upn select “Properties” optionn double click on “Internet Protocol version 4 (TCP/IPv4)”n verify that option “Obtain an IP address” is active
For further information refer to FAQ section, Wi-Fi of www.aim-sportline.com.
The parameters for the device network configuration in this example are:
n Wireless network name: Network_1It means that the WLAN network name is “Network_1.” A PC has to be authenticated in this network to interact with any AiM device of this network.n Gateway address: 192.168.0.1primary DNS server: 0.0.0.0secondary DNS server: 0.0.0.0(These settings prevent Internet connectivity on this WLAN.)n Subnet mask: 255.255.255.248Enable DHCP server: yesDHCP IP address range: 192.168.0.2 to 192.168.0.6
These settings enable a DHCP server running on this WLAN and provide an IP address in a 2-6 range. This means that this network allows 5 network hosts.
192.168.0.1 – 254192.168.0.1 – 126192.168.0.1 – 62192.168.0.1 – 30192.168.0.1 – 14192.168.0.1 – 6
2541266230146

Race Studio 3 only works on WindowsTM operative systems; Mac users can use a virtualized WindowsTM machine.The main problem is that the host OS (Mac) must share its Wi-Fi interface with the virtualized operative system (Win-dows) as Ethernet interface and not as Wi-Fi interface.
9.6 Working on MacTM with virtualized WindowsTM
Verify that the status in the window that shows up is “Connected” and that the IP address associated is, for example, 10.0.0.10 (could be 10.0.0.11, 10.0.0.12, or generically 10.0.0.x).
CHAPTER 9
40
Configuring Parallels(™)Select “Menu –> Configure…” in Parallels.
Press “Hardware” – top on the page that shows up – and select “Network” in the drop-down menu on the left.Right on the configuration panel set “Type” field on “Wi-Fi”.Then select the device to communicate with.
To enable Race Studio 3 correctly working on a Mac with virtualized WindowsTM.n press Wi-Fi icon n select “Wi-Fi Settings” option
To ensure that the communication works select “Open Network preferences…” menu.
MXK10 “AiM-MXK10-00107”
41

It may occur that using Race Studio 3 on an iMac with virtualized Windows the device connected via Wi-Fi takes some time to be shown in the network or is not shown at all. This is why we always suggest using an Wi-Fi (WLAN) router.This router work as an Access Point allowing more external devices to connect to its network. MXK10 logger Wi-Fi confi-guration is to be set on Existing Network as explained before.
CHAPTERS 9-10
42
9.7. Connected device visualization issues
10. New firmware upgradeOur technicians and engineers are constantly working to improve both the firmware (the application that manages the device) and the software (the application installed on the PC).Each time a new firmware and/or software version is available the icon here above appears with an arrow indicating that something is available for download (otherwise the icon only shows the cloud).Click it and freely download the new applications.
Once the new firmware has been downloaded connect the device to the PC using the OPTIONAL USB cable or via Wi-Fi to perform a firmware upgrade. In a few seconds the device is ready.
n enable the checkbox shown here below.
43

AiM Tech srl.Via Cavalcanti, 820063 Cernusco S/N (MI)ItaliaTel.(+39) 02.9290571
www.aim-sportline.com


